#Cricut heat press guide
Text
How to Upload Fonts to Cricut? [Easy Ways]

The use of the right font is essential in creating crafts projects. Each font you select gives your project a different feeling and emotional effect. Fonts are an important element in the process for a crafter using Cricut. The good news is they can learn how to upload fonts to Cricut and use them for their project.
Here is a useful tutorial that you can read and learn how. It will teach you quick ways of uploading fonts to the Cricut Design Space software and using them on Windows and Mac. After that, you can use them to give a personalized touch to your project. But to upload a font, you first need to download it. Before starting the uploading process, let's first know where you can find fonts to download.
Where to Find Eye-catching Fonts to Download?
There are several places where crafters can discover both free and paid fonts to download for their projects. They can select from beautiful and high-quality font collections and include them in the Design Space to begin with their project. Most often, their free font downloads option includes a personal use license. It makes them use those fonts for free in their projects. Thus, if you want to sell items with certain fonts, include only the one for commercial use.
Easy Steps to Access Fonts in Cricut Design Space
You can access Fonts in the Cricut Design Space with some basic steps. Here are some of the steps you need to execute for the purpose.
First, download the font you want.
After that, unzip your font file folder.
Double-click on the individual font file.
Follow the prompts to install the font file on your computer.
Now, open Cricut Design Space.
Start to create a New Project.
In the next step, add a new text box to your canvas.
Click on the font drop-down menu to change the font.
How to Upload Fonts to Cricut Design Space on Windows/Mac?
You can access the font on several devices. You only need to download and install the font onto each device you want to use. Here are some easy steps that can help you add fonts to this Cricut's software on Windows and Mac computers.
For Windows
Follow these instructions if you use Windows to access the Cricut Design Space. Once you learn how to upload fonts to Cricut on Windows, you can include those fonts in your project.
First of all, download the font file you want to have in your project.
Next, navigate to your Downloads folder.
Find the downloaded font file and right-click on it.
Choose the Extract option to extract those files.
In the following step, right-click on the font file and choose Install.
Once you perform these steps, the fonts will get installed on your windows. You can find them in the Design Space to access.
For Mac
Do you want to add fonts on your Mac device? Here are a few of the directions that you need to follow.
First, download the font you prefer.
Double-click on the downloaded zip folder.
Once unzipped, select the fonts and use ctrl+click to launch the menu.
Now, select Open with > Font Book option.
Now, you will see a pop-up to install fonts.
Tap on the Install tab to begin the installation process.
It will make your fonts appear in the FontBook. From there, you can use it in the Design Space.
Conclusion
The text gives an emotional touch to the project. Thus, every craft lover should know how to upload fonts to Cricut. The process is also quick and straightforward. Moreover, Design Space makes it effortless and time-saving too. First, download the font from a specific site and then add it on a device - windows or Mac to use it in your project. Keep experimenting with crafts and fonts for attractive projects.
Frequently Asked Questions
How Can I Add Fonts to Design Space on My iPhone?
For this purpose, you first need to install Fonts, a free font manager app. Below are some instructions to make your fonts available in the Design Space app.
Begin to download and install the Fonts app.
Unzip the file after downloading.
Now, open the iFont and choose Font Finder.
After selecting Open Files, move to the font file and select the file you want to install.
Next, select the Installer tab and click on Install to continue.
Now, close the app and open Settings.
Tap on the tab Profile Downloads.
In the end, press install.
Why are My Downloaded Fonts Not Showing Up in Cricut?
Have you downloaded your favorite font, but it's not showing? It can be because of several reasons, which include the following:
After downloading, you still need to install the fonts.
There was no successful installation.
Your font file format was not .ttf or .otf.
You still need to restart the app after installation.
How Can I Unzip the Downloaded Fonts File?
Make sure to execute these easy steps to unzip your downloaded font file. Here they are.
Right-click on the .zip folder with font files.
Next, click on Extract.
Select the TrueType or OpenType font files.
Subsequently, right-click on them and then install them.
At last, click Yes to allow the program to change your device.
Source: How to Upload Fonts to Cricut
Visit: design.cricut.com/setup
Cricut.com/setup
Cricut EasyPress 3 Setup
Cricut heat press guide
Cricut Design Space Login
#Cricut.com/setup#Cricut EasyPress 3 Setup#design.cricut.com/setup#cricut design space#install cricut design space app#cricut design space for mac#Cricut heat press guide#how to upload fonts to cricut
2 notes
·
View notes
Text
Cricut EasyPress
Cricut EasyPress 2 Heat Press Machine (9 in x 9 in), Ideal for T-Shirts, Tote Bags, Pillows, Aprons & More, Precise Temperature Control, Features Insulated Safety Base & Auto-Off, Raspberry
For More Details /Order on Amazon Link
#cricut easypress#🚀 Keyword Tool Pro#Do you need this information?#Keyword Tool Pro provides search volume data for English keywords.#cricut easypress mini#cricut easypress 2 vs 3#cricut easypress mini how to use#cricut easypress 3 tutorial#cricut easypress 2 12x10#cricut easypress 2 temperature guide#cricut easypress vs heat press#cricut easypress 2 unboxing#cricut easypress 2 9x9#cricut easypress mini t shirt#cricut easypress app
1 note
·
View note
Text
0 notes
Text
How to Use Cricut Infusible Ink Pens: Beginner’s Guide
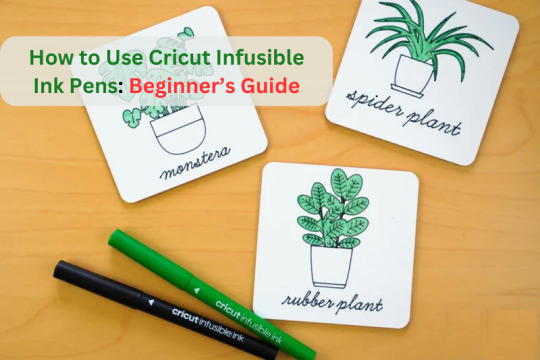
Hey crafters! Excited to create something new? I will show you how to use Cricut infusible ink pens in this post. Even if you’re a beginner or a pro-level crafter, I would say read this guide once and learn how you can use the Cricut infusible ink pens incredibly. This blog covers a step-by-step guide to creating a project using your Cricut machine and its infusible ink pens.
Now, the big question in your mind is, how do these Cricut pens work? These pens work on the principle of sublimation process where the ink turns into gas form while heated and then again comes back into solid form. Thus, these infusible products from Cricut work best to deliver great results. Explore my blog to learn everything in detail.
What Do You Need to Get Started?
When you’re creating a project, you’ll need some necessary Cricut accessories to get started with it and get exceptional results. Have a look at the checklist below.
Cricut cutting machine
Cricut Design Space
Infusible ink pens
Cricut Heat Press
Transfer paper
Lint roller
Sublimation blank
Parchment paper
Using all these accessories, you’ll design the best-looking sublimation design using your Cricut. So, here we go!
How to Use Cricut Infusible Ink Pens to Make a Keychain?
If you want to create something personal that you can always keep with you, a keychain is a good option. Also, it is a bit easier than other projects. Let’s move on to its steps and learn something more.
Step 1: Select a Design From Cricut Design Space
To start, you need to use your Cricut Design Space software to select a design for your keychain. Here, you have all the options to edit your design. I’m using text as my design. You can choose yours. If you want to use a pre-made design, you have the option to upload a design from the Design Space library. To modify it, click on the Edit option on the screen. Also, you can resize your design to fit the blank.
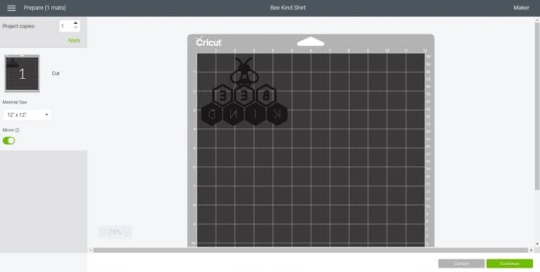
Once you are ready with the design, click the Lock option to fix it. Now, go to the Operation option, change it to pen, and select the size. For instance, I’m using a fine point 0.4 pen. After that, you’ll see the option for infusible ink with its color.
After everything, hit the Make It option and send the design to your machine.
Step 2: Set the Settings for Cricut Infusible Ink Pens
Before you go forward with the next steps, you have to mirror your design before putting it on the mat. Next, choose the size for your Cricut mat and hit the Next button to enter the material settings option.
Then, click on the All Materials option and write “copy.” Now, select your copy paper and hit the Close option. In case you don’t get the desired material, you can use the nearest number.
Afterward, your Design Space software will tell you which color infusible pen you should use first and then. Also, you can go with the on-screen steps and insert your Cricut mat with the paper on it. Next, you can put your first infusible ink pen into the pen carriage and hit the “C” button.
Once your design is drawn on the paper, take it off from the mat carefully. Then, move ahead to learn how to use Cricut infusible ink pens on your blank.
Step 3: Use the Heat Press to Fix Your Design
Take a blank for the keychain. And then, use a lint roller to brush off the leftovers and debris. Now, place the design paper on the keychain blank and cover it using heat-resistant tape. Finally, your design is secured.
In order to prevent your blank from the heat, you need to take 2-3 pieces of copy paper to use them around the blank. When you have covered your blank with the paper pieces, you need to cover it with parchment paper. It will look exactly like this image.
Step 4: Apply the Heat Press
After covering your blank with the parchment paper, you have to place it in the center of your heat press in the center. Next, you’ll have to set the time, heat, and pressure as mentioned in the heat guide.
Apply the heat for about 90 seconds, and then let the design cool before removing the paper. After you do this, use pliers to attach the rings to your blank, and finally, your keychain is ready.
Conclusion
I assume you know how to use Cricut infusible ink pens on your blank to create a perfect keychain project. Ensure that you arrange all the necessary materials to avoid any mistakes. As this was an iron-on project, you must have a heat press. Moreover, the project is sensitive as it includes heat pressing. Hence, it’s always wise to use the Cricut Heat Guide.
FAQs
Can You Use Infusible Ink Pens Directly on Fabric?
No, the infusible ink pens are not meant to be directly used on fabric. As the heating process requires different polyester-based materials, the fabric is not an ideal material for getting the sublimation ink directly. You can rather use vinyl to design anything and then transfer it to any fabric you want.
What Kind of Paper Do You Use for Infusible Ink Pens?
While using infusible ink pens or markers, you need laser copy paper to place on your blank. However, you don’t need to place it directly onto your blank. In fact, it can be used as a carrier to transfer your design to your blank.
Can I Use a Household Iron for Cricut Infusible Ink?
Yes, you can use a regular iron to experiment with iron-on projects. However, it’ll only work for some light materials. But, if your project type is complex and you have to apply heat on a hard surface, you’ll have to use a heat press.
For more information visit: Cricut.com setup mac
design.cricut.com
Cricut design space download
Cricut setup on computer
Source: How to Use Cricut Infusible Ink Pens
#How to Use Cricut Infusible Ink Pens#cricut design space download#cricut.com/setup#Cricut Design Space login#cricut software app#Cricut setup on computer#cricut machine setup#cricut explore air 2 setup
2 notes
·
View notes
Text
How To Use Cricut Transfer Paper On Vinyl? [Step By Step Guide]
If you usually make Cricut or Silhouette projects, you will have to use transfer paper once in a while. Cricut transfer paper eases the process of getting the design from backing paper and transfer it to final project. If you don’t know how to use Cricut transfer paper on vinyl, this guide is for you. The cut vinyl appears as a big sticker that you need to remove from the backing paper and attach to your project. However, the vinyl is very thin and difficult to transfer using your hands. Plus, it gets more difficult with complicated designs.
Hence, if you are starting to make vinyl craft stickers, transfer paper will be useful for you. We will reveal the use of transfer paper with vinyl. The process is simple- cutting and weeding the vinyl, transferring the vinyl to the transfer paper, and then transferring the design onto the final project.
There are many vinyl projects to create. You can increase your business with a Cricut machine, permanent vinyl, and good-quality transfer tape. If you haven’t used transfer paper on vinyl, read this blog that describes a step-by-step guide.
What Is A Cricut Transfer Paper?
Cricut transfer paper looks like a paper roll or A4 sheet pack. You can also say transfer paper as transfer tape. You can print on transfer paper via an inkjet printer. For instance, printing a design onto a shirt. Transfer paper is sticky and transfers vinyl to the final material and can work on various materials such as mugs, glasses, cups, etc. It is a good tool to transfer the vinyl decal to the material you need to personalize.
Cricut transfer tape has two sides. The bottom side is the paper backing that you need to remove, and the sticky upper side is composed of a plastic film. The top sticky side is attached to the top of the vinyl. Crafters use mugs, cups, and tumblers using adhesive vinyl. However, if you are working with heat transfer vinyl, you won’t need transfer paper. For the vinyl projects that have to be frequently washed, such as cups and mugs, you should use permanent adhesive vinyl.
What Are The Types Of Transfer Tape?
Transfer paper is available as a regular and strong grip. The standard transfer paper is used for most projects and has a strong grip on glitter vinyl, as you need extra strength to grip the surface. If you have an issue lifting the vinyl from the backing sheet, use a strong grip transfer tape.
How To Use Cricut Transfer Paper On Vinyl?
First, cut the design from adhesive vinyl with your Cricut machine. After that, weed the excess vinyl in and around the design. When you only have the design you need to transfer, you need to peel off the transfer tape.
Follow the steps to use transfer tape on vinyl:
First, cut the transfer tape a little larger than your design. Before you get rid of transfer tape you should use it several times. Hence, take a little larger transfer tape for your project for proper adhesiveness.

Then, peel back the backing paper. Keep the paper backing to use later to stick to the transfer tape.
Place the transfer paper on your design and burn it down. You can use a scraper or an old gift card or a credit card.

You can either turn the piece, take off the backing paper, or lift the transfer tape. You need to fix the design on the tape.

Now your design is on the tape, and you can move it to your project.

Then, press the vinyl down and burnish it once again.
After that, peel back the transfer tape. Make sure that your project surface is stuck properly to vinyl. Remove the tape and burnish it a little more if it is still lifting.

What Kinds Of Projects Can You Make With Permanent Vinyl?
You can make many projects using permanent vinyl and transfer paper. You can put the design prints on glass, plastic, ceramic, or acrylic surfaces. It means that you can transfer designs on wine glasses, notebooks, flower vases, and many more.
FAQs
Why Use Cricut Transfer Paper For Vinyl?
Cricut transfer paper or tape is generally used to transfer the vinyl with designs to materials such as water bottles, mugs, and tumblers.
Do I Need To Mirror Vinyl While Using Transfer Paper?
In the case of permanent vinyl, there is no need to mirror the design on the Cricut Design Space. The design mirroring is necessary in the case of heat transfer vinyl.
Can I Use Any Type Of Vinyl With Transfer Tape?
The answer is no; you cannot use any type of vinyl with transfer tape. For heavy vinyl, such as glitter, you must use a high-tack transfer tape. But for standard vinyl like holographic, you should use a medium tack transfer tape.
Is Cricut Transfer Tape Reusable?
Yes, Cricut transfer tape is reusable. Once you finish the project, put a Teflon sheet or parchment paper on the transfer tape and save it to use later. Next time you can use it if it has enough adhesion for the transfer.
Which Side Of The Vinyl Should I Put On Transfer Tape?
The shiniest or top side of the vinyl should be put on the transfer tape. On the other hand, the sticky side of the transfer tape should stick to the top of the vinyl.
design cricut.com download
design.cricut.com/setup
#cricut.com design space#cricut.com setup mac#cricut.com setup download#design.cricut.com/setup#design cricut.com download#cricut setup#Cricut.com/setup#www.cricut.com/setup
1 note
·
View note
Text
Cricut Ideas: Get Inspired To Make Best Craft Projects
Looking for inspiration to start your projects using the Cricut cutting machines and devices? Then look no further; you are at the right place. This blog is hand-crafted to give you the best money-making Cricut Ideas. Every Cricut cutting machine and device can give you the best professional-looking results in no time.
Here, we have provided the steps to get started with the Cricut Ideas. Then you get to know what you can create with various Cricut machines, presses, and tools. So, keep reading to find out everything about Cricut ideas and much more.
Cricut Ideas: How To Get Started?
Before you look into all the Cricut Ideas, I have broken down the whole process of creation into a few simple steps. These steps are basic and will act as a mini guide before you embark on your journey of creating and selling crafts using your Cricut machines.
Step One:
If you have not yet purchased your Cricut cutting machine, then the first thing you need to do is get one. You can either buy it from famous stores like Walmart, or you can get it from famous online websites, including Amazon and Cricut’s very own online shop. I would recommend you do thorough research on the features that are offered by the machine you are opting for. Make sure that it matches your requirements. You can also buy important tools and add-on devices like a knife blade, heat press, scoring tools, and rotary blades.
Step Two:
Download the Cricut Design Space application on your system or mobile device. It has a library with many pre-designed projects, images, graphics, and fonts. It will not only inspire you to create beyond any limits but also save your time. Once you have your own Cricut ID and login credentials, you can join various Cricut communities on the app that will help you further.
Step Three:
Start creating your projects for yourself and selling your craftsmanship to earn some extra cash. You can host a sale in your backyard and really create a small business overnight. The Cricut machines are user-friendly and quick machines that can help you personalize stuff for your clients. Make sure to take as many pictures as possible to post your work online to gain popularity and a good client base.
Cricut Ideas: For Beginners
Here are some interesting Cricut ideas that you can get inspired from:
Make Greeting Cards/Invitation Cards/Drawn Cards/ Welcome Cards etc.
To make cards, be they real-life-looking drawn cards, invitation cards, adhesive vinyl cards, welcome cards, birthday cards, customized cards, or cards for any occasion, you will either need a Cricut Maker, Explore, or Joy machine. You can sell it to people who are looking for personalized gifts cards options. By adding a scoring stylus or wheel, you can customize the envelopes to go along with the cards. Cricut also has its own range of colorful pens that can be used to add beautiful aesthetics to your cards.
Create A Personalised Vase
Flowers are everyone’s favorite; people gift them to each other normally as well as on special occasions. A great companion of flowers is a beautiful vase. You can actually brighten up any corner of your home or workplace with a customized vase. You can use fonts, graphics, and designs that are already pre-made in your Cricut Design Space Application. Then cut them out using Cricut cutting machines. You will need adhesive vinyl as a base material to cut out designs that can easily stick to the surface of the vase.
Personalize Storage And Boxes To Organize
One of the best among all Cricut ideas is using your Cricut cutting machine to declutter and organize your home, craft room, workspace, or kitchen. You can organize many areas of your home by making stylish labels from adhesive vinyl. All you will have to do is cut the labels and, with the help of a tool, transfer them to your carts, boxes, bags, etc. For creating small labels, I would highly recommend the Cricut Joy machine. You can get many beautiful fonts on the Cricut Design Space application.
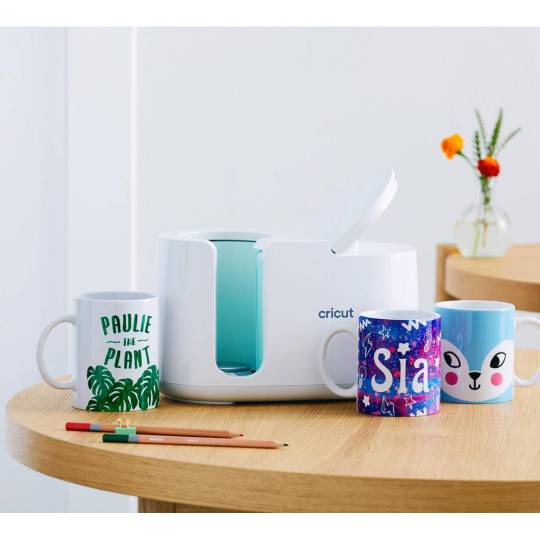
Make Customized Mugs
The best way to create customized mugs is by combining the technologies of your Cricut cutting machine, Cricut Mug Press, and Cricut Design Space. You can create a beautiful collection of mugs or sell customized mugs. The mug making is one of the best among all the Cricut ideas, as they are high-in-demand products. You can work with infusible inks or heat transfer vinyl.
Visit: cricut.com/setup
learn cricut.com/setup
cricut setup
www.cricut.com learn
Source: https://learn-cricut.com/cricut-ideas/
3 notes
·
View notes
Text
How to Use Cricut Infusible Ink: A Comprehensive Guide
Eager to learn about infusible ink and create a project with it? Here, you’ll get it all in detail. I’ve been using Cricut machines for the last five years, and there is nothing left that I haven’t used to date. I also started as a beginner, but soon, I experimented with many Cricut accessories. Today, you’ll learn how to use Cricut infusible ink to make a personalized T-shirt. You’ll get a step-by-step guide to learning how to use infusible ink.
Before I move on to the final steps, I would like to share with you something that you need to know about Cricut infusible ink, like what it is, how it works, and how you can best utilize it to create your projects. Let’s get started!
What You Need to Know about Cricut Infusible Ink?
I know creating a new project seems exciting, but at the same time, the chances of silly mistakes increase, too. It’s always better to learn before you start. Infusible ink is a different type of ink used for creating professional-looking projects using a range of materials. You might have used iron-on vinyl or HTV, which are usually applied over the surface or your material and then peeled off, leaving the design.
However, there is a different case with infusible ink. This ink works on the sublimation principle and fuses with your material without leaving any residue. Thus, it gives you a typical printing look but with ink. To make an infusible ink project, you’ll need to use infusible ink sheets and infusible ink pens.
How to Use Cricut Infusible Ink to Make a Shirt?
You know what infusible ink is and how it works. It’s way better than the vinyl projects and leaves a permanent design on your material. Get ready to learn how to use infusible ink transfer sheets on shirts and create customized T-shirts.
Step 1: Select an Infusible Ink Material and Apparel
You have two options: Either you can cut your designs onto an infusible ink transfer sheet or draw the designs using your infusible ink pens and markers. In this guide, you’ll learn to cut and apply your infusible ink transfer materials to your final project. Note that I’m not teaching you how to use the infusible ink and markers here. So, if your main focus is on them, I’ll recommend you move on to another tutorial. Here, we go with the other steps to learn how to use Cricut infusible ink.
Step 2: Draw a Design in Cricut Design Space
This step includes making a desirable design using special software from Cricut. I’m mentioning a few steps here that you can go through to understand how you can use this software.
Step 3: Cut Your Infusible Ink Transfer Sheets
It’s time to use an infusible ink transfer sheet to cut it. To proceed, use these steps:
That’s how you’ll finish the cutting process. Let’s continue learning how to use Cricut infusible ink transfer sheets.
Step 4: Get Ready With Your Materials
In this step, you’ll have to use a Cricut EasyPress to transfer the design onto your shirt. Follow the steps below to learn how to apply the transfer sheet.
Step 5: Preheat Your Blank
The first step to transfer your project to your blank is to preheat it as per the instructions in the Cricut Heat Guide. This process will remove the wrinkles and moisture from the blank and won’t interfere with the design transfer.
After that, take off your heat press from the apparel and also remove the butcher paper. Allow your blank to cool. Don’t be in a rush, and let your blank space fully cool down.
Step 6: Transfer the Infusible Ink
In this step, you need to put your cut design on the apparel. Make sure that the shiny side is facing down. Then, follow the steps mentioned here.
Finally, your customized shirt is ready. One more thing I want to suggest to you is that you can also use a pair of tweezers to lift the transfer sheet from your apparel. It will safely remove the material.
Conclusion
Hopefully, you’ve learned how to use Cricut infusible ink to create a customized shirt. The whole process is easy, and even beginners can perform it very well. Moreover, there are some tips and tricks that are useful while creating your project with the Cricut machine. For instance, always remember to mirror your design. Plus, always preheat your blank before applying the heat properly. The most important part is not to forget to weed off your cut design before using it for the final project.
Visit: install cricut design space app
www.cricut.com setup login
cricut create connect to computer
cricut setup create account
Source: https://desincricut.wordpress.com/2024/04/30/how-to-use-cricut-infusible-ink-a-comprehensive-guide/
#install cricut design space#install cricut design space app#install cricut explore air 2#cricut install setup#cricut.com/setup#www.cricut.com setup login#cricut setup create account#cricut create connect to computer#cricut setup on computer#cricut setup#cricut setup maker#cricut setup log in#cricut.com setup mac
0 notes
Text
Cricut Easy Press 2 Setup: Quick and Easy Instructions
In my previous blog, one of my readers left a comment asking me to teach about the Cricut EasyPress 2 setup. It will be a little tricky for me because it’s been a while since I have used this machine. With this Cricut product, you can create amazing iron-on projects such as tote bags, pillows, aprons, and so much more. In addition, this Cricut machine comes with the speed of a heat press and the convenience of a household iron.
Before using this Cricut product to make DIY projects, you must set it up on a computer. Plus, you will register this Cricut Easy Press model through Cricut Design Space. If you don’t want to miss the golden chance to grab the content about the machine setup and registration procedure, then read this blog.
Cricut Easy Press 2 Setup on Your Computer
If you want to learn the Cricut machine setup process on PCs, this blog section benefits you. It will share all the details that will make it easy to set up the devices. To execute the process in a proper format, take a look at the steps given below:
In the opening step of the process, download and install Cricut Design Space on your computer.
Next, you must sign in or create your Cricut ID to use the app.

Then, go back to the Cricut app main page and select the Menu bar on the left-hand side.
After that, click the New Product Setup button under the Canvas dropbox.
Following this, tap the Cricut Heat Press and then Cricut EasyPress 2.
In this step of the Cricut EasyPress 2 setup, plug the power cable into the wall socket.

Also, ensure the socket is working and not too far from the Heat Press.
At this point, plug the cord’s small end into the EasyPress 2 USB port and the large end into the computer USB port.

Now, finish the rest of the process by following the instructions displayed on your system screen.
After successfully setting up both devices, you need to register your Cricut Heat Press by following the instructions below.
How Do I Register My Cricut EasyPress 2 Machine?
In addition to the Cricut EasyPress 2 setup guide, let’s study in depth the method for setting up this product through the Cricut Design app.
First, switch on your desktop or mobile devices and open Cricut Design Space.
Second, download the Cricut app and follow the instructions present on your screen.

Third, choose New Product Setup by opening the app on your device.
Now, go through the on-screen guidelines to complete the remaining setup process.
Finally, your Cricut EasyPress 2 will instantly register when the setup is concluded.
You can create different heat-transfer projects after successfully registering this Cricut Heat Press model.
How to Adjust Cricut EasyPress 2 Temperature?
In case there comes the point where you want to change the product heating temperature, then take the help of the info given below:
Commence the process by powering on this Cricut EasyPress version.
Now, click the temperature button for a few seconds to turn it on.
Afterward, adjust the Cricut product temperature using the (+) or (-) button.

Then, change the temperature from *C to *F by holding the temperature button for a few seconds.
At this time, set your machine’s time by clicking the clock icon and setting the time using the (+ or -) sign.

Now, the orange light will display that your Cricut EasyPress 2 is heating up.
Also, the green light will display that the press has reached the set temperature.
If you see a red light, it clearly indicates that an error was made while adjusting the temperature.
Finally, your Cricut EasyPress 2 is all set to be used for crafting numerous personalized projects.
Overall, this Cricut product is one of a kind among its series. Undoubtedly, if you are a beginner, you might face difficulty in the beginning, but once the Cricut EasyPress 2 setup is done, everything will instantly get sorted out.
Frequently Asked Questions
Question: How to Update Cricut EasyPress 2 Firmware?
Answer: To update your Cricut EasyPress 2 firmware, check out the following steps:
Open the Cricut New Product Setup page.
On the page, select Cricut Heat Press and then Cricut EasyPress 2.
Now, sign in to your Cricut account and follow the on-screen instructions.
Afterward, hit the Update option, and the press will update the firmware.
Finally, tick the Done option and start crafting various projects.
Question: How to Access Cricut EasyPress 2 Heat Guide?
Answer: To get access to your Cricut EasyPress 2 Heat Guide, read this method:
The procedure will start by opening the official site of Cricut Design Space.
Now, start looking for the Heat Guide and then open it.
Afterward, choose the Heat Transfer material & Base material from the section.
Also, choose the Cricut cutting mat and then click the Apply button.
At last, select the temperature & timing depending on the material.
Question: Does Cricut EasyPress 2 Support the Cricut Heat App?
Answer: No, Cricut Easy Press 2 doesn’t support the Cricut Heat app for any reason. This model doesn’t have built-in Bluetooth connectivity, which is why it doesn’t scan the Heat app. On the other hand, you can easily connect the app with Cricut Easy Press 3, which has Bluetooth and various other features.
read more: cricut.com/setup mac
install cricut design space app
Cricut Design Space
Cricut New Machine Setup
Source: cricut easy press 2 setup
0 notes
Text
How to Set Up Cricut Mug Press: A Complete Guide
All users who intend to create designs need to get the Cricut Design Space app on their devices. Besides that, users must buy this Cricut Mug Press and bundle before making any mugs. Give me a golden chance to inspire you to set up Cricut Mug Press on your device.
How to Set Up Cricut Mug Press on a Computer?
Before getting a personalized mug, all the users must set up their respective Mug Press successfully. For a successful setup, you need to follow the steps given below:
First, turn on your computer and open the web browser (Google Chrome, Safari, or other).
Second, visit the Cricut setup official page and download the Design Space app for your system.
Third, sign in by entering your Cricut ID and password, or create your Cricut ID by entering your first name, last name, personal email address, or country.
After creating your account, go to the Cricut setup page, choose Heat Press, and then select the Cricut Mug Press option.
Next, switch on your machine and plug it into the nearby wall outlet.
Afterward, unwrap the USB cable and put it inside both devices properly.
Following this, go through the Terms & Conditions and press the Activate option.
Lastly, select the Get Started option, and you are all set to create your first project on this Cricut Heat Press model.
Users can quickly learn how to set up Cricut Mug Press using the above steps. After the successful setup, they will be able to make a variety of mugs for various purposes.
How to Use Cricut Mug Press for the First Time?
With the help of the below steps, users can make various mugs with the snap of their fingers. Get to know about the steps needed to be taken while using this press for making do-it-yourself mugs:
Begin by opening Cricut Design Space and creating a design using the mug template.
After making the design, cover your Cricut cutting mat with an infusible ink sheet.
While placing the sheet, don’t forget to keep the shiny side downward and the color side upward.
Next, take your Cricut transfer tape and cover your entire mug with the tape to avoid any wrinkles or bubbles.
Following this, switch on your machine and pre-heat it by pressing the power button.
When your machine is completely pre-heated, the power button will turn green, indicating that you should load the mug.
Now, place the mug inside the empty area and close it with the handle on the right side of the press.
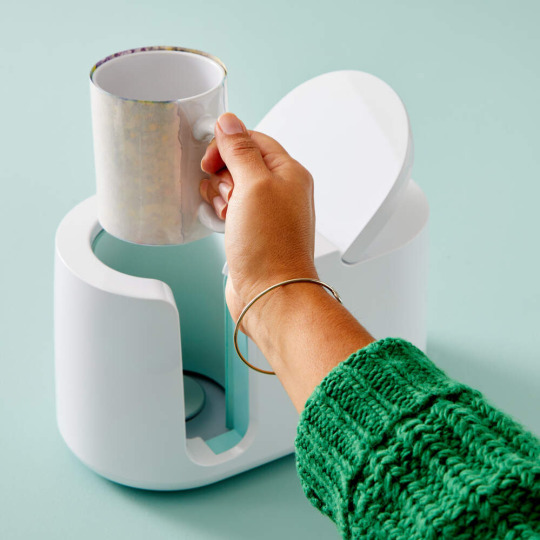
At this point, you need to wait till the machine is transferring the design to the mug.
When the mug has cooled, carefully peel off the design, ensuring that it doesn’t get spoiled.
Finally, your first-ever customized mug is ready to be given as a gift to someone special.
Since we’ve collected the majority of details regarding how to set up Cricut Mug Press and how to utilize it, it’s time to learn a little bit more about this Cricut Heat Press extra feature.
How to Change My Cricut Mug Press Temperature?
In case you want to change the temperature settings of your Cricut Mug Press while making any mug, then have a look at the steps given below:
Initiate the process by entering the Temperature Setting mode, whether your machine is switched on or off.
After doing that, hold on to the power button for 10 seconds, and you will hear the chimes sound with all the LEDs flashing continuously.
Following this, you will notice that the power button will turn orange during the Temperature Settings mode.
Now, you will get to see three different LED rows showing the current setting.
Next, you need to push the power button to select the setting that you want during the process.
At this point, you will hear a chime sound, and the LED display and power button will start flashing together.
After a few minutes, your press will automatically turn off, and new settings will activate when the Cricut Mug Press turns on.
In conclusion, with the how to set up Cricut Mug Press blog, you can now make tons of personalized mugs on your own.
#HOW TO SET UP CRICUT MUG PRESS#HOW TO SET UP CRICUT MACHINE#HOW TO SET UP CRICUT#CRICUT MUG PRESS SETUP#CRICUT MUG PRESS LOGIN#CRICUT MUG PRESS
0 notes
Text
How to Use Cricut EasyPress 3: Mastering Iron-on Projects

If you are here to learn how to use Cricut EasyPress 3, you are at the right place! My husband is a huge wine fan and has a dedicated space called a bar section. In this section, he loves to collect different types of beverages or wines. Since my husband likes to have a collection of liquor or beverages, one day, he came to me and asked if I could make something unique that would get more attention.
On his request I decided to make wine bags. I showed him an idea about a design I had created in Design Space. After several trials, he finally agreed to a design that I will show you later in this tutorial. Also, there are some essential supplies required to make this project, which I have included in this blog. Despite that, you will also learn how to activate your press machine using the Cricut Heat app. Let’s take a look at this blog to know the proper usage of EasyPress 3.
How to Setup Cricut EasyPress 3 on Your Device?
Here, I am going to show you how to set up the EasyPress using the Cricut Heat app. This step is essential if you want to know how to use Cricut EasyPress 3. Besides, this press uses Bluetooth Lite technology to pair the Android or iOS device. Plus, the app is used to communicate with the heat press. So, follow the instructions below to set up the press.
Here are the steps to follow for EasyPress setup:
First of all, you will need to download a Cricut Heat app. This app is essential to set up your EasyPress.
Then, plug your machine into the power source and press the power button to turn it on.
After that, you will see the APP flashing on the screen, meaning it is ready to connect with the Cricut Heat app. This step is a must for activating and registering the machine.
Pair the device via Bluetooth, and ensure a minimum of 7 feet of distance between the machine and the mobile device.
Go to the app, and hit the option Set Up to begin the activation.
Afterward, you have to choose the unit from available presses and hit the Connect button.
Now, you will see “Connecting to EasyPress 3-0163” as shown in the picture below.
Then, select the check box to accept the Terms of Use and Privacy Policy and finally tap the Activate.
Lastly, you will see a “Success!” message on the screen, confirming the setup is done. During this time, your Cricut EasyPress 3 will start to heat up and be ready to use.
Here, I have explained the easy steps to set up your EasyPress 3 machine. However, you will need to ensure some essential supplies are needed for making a wine bag. So, let’s proceed further to know.
What Materials Do I Need to Make a Custom Wine Bag?
So, are you ready to collect the supplies needed to make a beautiful wine bag? For this project, I will use Infusible Ink materials. Here’s the list of supplies required for the wine bag:
Cricut cutting machines such as Maker, Explore, and Joy.
Cricut EasyPress 3
EasyPress mat
Cricut Infusible Ink wine bag
Brayer
Green StandardGrip mat
Cricut Infusible Ink Transfer Sheets, along with a butcher paper
Heat resistant tape
White cardstock
How to Use Cricut EasyPress 3 for Creating a DIY Project?
Finally, I am excited to share the complete tutorial on the usage of this machine. But the heat press alone can’t do everything. Hence, you will also need some other supplies that I have already mentioned above.
Step 1: Create Your Design
I have made a very simple design for a wine bag. If you want, you can also try different font styles and sizes to enhance the designs. Add extra elements to make it as beautiful as possible.
Step 2: Choose the Load Type
When you go for cutting your design, you will get a pop up screen. This pop-up screen will be visible to those who are using anyone from Cricut Maker 3, Explore 3, and Joy. Since I am working with Infusible Ink, I opted for the On Mat option.
Note: Older Cricut machine users will not get the pop-up screen to select the load type.
Step 3: Set Your Image on a Cricut Mat
On the mat in the Prepare screen, your image will be displayed. To ensure it transfers onto the wine bag correctly, click on the Mirror option located in the left panel.
Step 4: Cut & Weed Out the Design
Now, I have placed the infusible ink sheet on the mat, and I used a brayer to flatten the transfer sheet. After that, cut the design and weed it using the weeding tools.
Step 5: Apply Your Image
Finally, it’s time to transfer the design onto the blank wine bag. Here, you will be guided through your Cricut Heat app. Put your wine bag on the EasyPress mat and then place the design over the blank bag. On top of that, you have to place the butcher paper.
Step 6: Use the Cricut EasyPress 3
In the last step, you have to carefully preheat the blank as per the instructions given in the Cricut Heat app. Afterward, place your design on the blank and then heat up according to the Heat app. Once done, peel the design away, and your bag is ready. Here’s what it looks like. Finally, this easy guide on how to use Cricut EasyPress 3 ends here.
FAQs
What is the difference between Cricut EasyPress 3 and 2?
The EasyPress 3 is the latest version, which supports all the features that you can find in the EasyPress 2. In addition, the latest one comes with Bluetooth connectivity. There is a dedicated app called Cricut Heat app, which you can use to send the temperatures and times to your EasyPress 3. In EasyPress 3, you get a lot of benefits, such as it can heat up quickly, is easy to program, has a safety base, and two sizes are available, i.e., Cricut EasyPress 3 12×10 and 9×9. Whereas EasyPress 2 comes in 3 different sizes.
What projects can I make with Cricut EasyPress 3?
There are endless projects you can make using your press machine. Below, you can find the project list that you can make on your machine.
Baby Clothing and Blanket Set
Personalized Dog Bandana
Flower Coasters
Bird and Branch Pillow
Enjoy Wine Bag
Venice Infusible Ink Shirt
Rainbow Tote Bag
Amour Sweatshirt
Sprinkle Apron
Do I need to use Cricut EasyPress 3 with Cricut Heat app?
Yes, you will need a Cricut Heat app to set up or activate the EasyPress 3. But once it is complete, there is no need to use this app again and again. You just set up a device, and you are ready to use EasyPress on its own.
Final Words
The Cricut EasyPress 3 is an advanced device for crafters with many capabilities, such as making baby clothing, wine bags, and pillow covers. To use it, follow the setup instructions and gather the necessary supplies before following the tutorial. Before proceeding further, you will need to set up the device, which I have easily explained in this blog. So, follow the guide step-by-step tutorial on how to use Cricut EasyPress 3 and transform your projects to the next level.
For more information visit: Cricut.com setup
Cricut machine setup
cricut explore one software
Cricut heat press guide
Source: How to Use Cricut EasyPress 3
#Cricut EasyPress 3 12x10#how to use cricut EasyPress 3#cricut heat app#Cricut heat press guide#Cricut EasyPress 3 Setup#Cricut design space download#design.cricut.com
0 notes
Text
7 Cricut Machine Projects: Get Inspired & Start Crafting
I know you are looking for Cricut machine projects, and you have landed in the right place. I'm excited to share some unique project ideas you must try. Each idea is created for beginners, keeping it simple, fun as well as inspiration.
In this guide, I won't bore you with unnecessary details. Instead, I will mention the crafting tools needed for each project & their main purpose and sometimes guide you on how to use them. You don't have to tackle anything complicated; just follow the ideas outlined in the blog. Regardless of your Cricut machine, I have covered all the projects you can create. Let's dive into our first project.
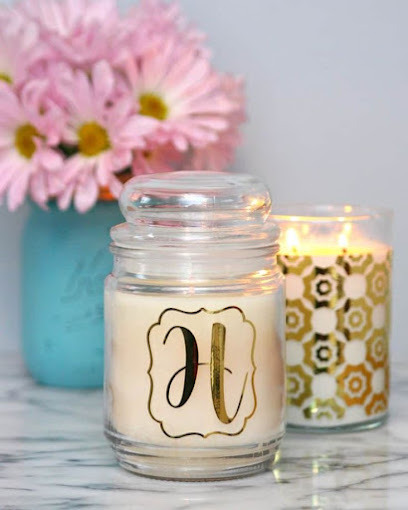
1. Customize Candle Jar
I love decorating my room, and I'm sure you do too. For cozy night time vibes, candles are a must. Why not customize your own candle jar with your Cricut machine? All you need is colored vinyl, a weeding tool, a clean jar, transfer tape, and of course, your Cricut cutting machine. Design in the Cricut software, cut, and apply to the jar!
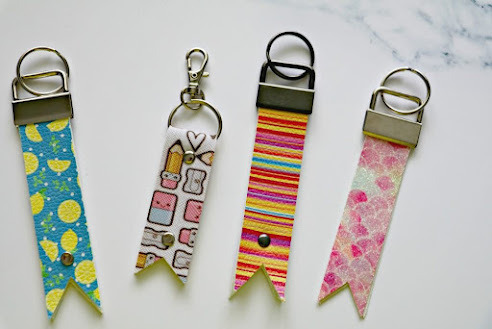
2. Leather Keychains
Keychains are often overlooked, but they are a great way to add personality to your daily items. I make keychains for my car, room, and locker, and people notice! If you are exploring Cricut machine projects, try creating faux leather keychains. You will need a Cricut machine, faux leather, iron-on vinyl, a Cricut Heat Press, and Design Space to get started.
3. Banners
Recently, I celebrated my daughter's birthday. I handled all the decorations with my Cricut machine. One Cricut machine project that stood out was creating a birthday banner. Planning a party becomes more enjoyable with Cricut crafts. With a Cricut cutting machine, cardstock, weeding tools, and designs from the Cricut app, you're all set!

4. Labels
Let's move on to other Cricut machine projects. Turn on your Cricut machine and start cutting out personalized text for your pantry items. You can also add designs with text on chalkboard vinyl if you want. This project will undoubtedly prove to be very useful as it allows you to easily label and identify your items.
5. Decals
If scratches on your laptop are causing trouble, it's time to solve this common issue. Create a custom design with Cricut software, cut it onto printable vinyl in your preferred color, and apply it to your laptop. This DIY solution is not only cost-effective but also allows you to personalize your device exactly how you want it.

6. T-shirts
I can't overlook the excitement of t-shirt projects with a Cricut machine. It's not just any DIY project; it's an adventure filled with fun. For this, you will need a Cricut cutting machine and a Cricut Heat Press. Once you learn to make T-shirts with Cricut, you'll feel confident with iron-on and infusible ink projects, too.
7. Mug & Tumblers
Well, who doesn't love personalized tumblers or mugs? They add such an attractive and personal touch. The good news is you can make them yourself with the help of a Cricut Mug Press and a Cricut cutting machine. Simply cut the infusible ink and press it into the tumbler or mug using the Mug Press machine.
Final Thoughts
Whether it's the weekend or just a casual occasion, crafting with a Cricut machine is always a lot of fun, isn't it? However, sometimes, finding the right Cricut machine projects can be overwhelming. To address this, I have mentioned 7 creative and unique projects in the blog above, ranging from candle jars to t-shirts and banners. Once you have completed these DIY projects, you will be even more enthusiastic about Cricut crafting.
Frequently Asked Questions
How to get a free Cricut project?
The best and easiest way to make crafts with Cricut is by finding and creating your desired project for free.
First, open the Cricut app and select New Project.
Next, navigate to the design panel and choose images.
Click on Free under the highlighted categories and type in your desired project.
What is the easiest thing to make with a Cricut?
If you are a beginner in Cricut crafting, here are some easy Cricut machine projects you can start with.
Flowers
Shirt
Gift tags
Decals
Tumblers
Mugs
Stickers
Keychains
What can a Cricut machine do?
A Cricut machine is an electronic cutting machine that can cut symbols, designs, and images on a variety of materials with precision. In addition to cutting, the Cricut machine can also write, deboss, foil, and engrave with a variety of tools and blades. Some Cricut machines also have a print-then-cut sensor so you can cut out the printed design.
Source Url :- Cricut machine projects
Visit here for more Information :- cricut design space
Cricut cutting machine
#Cricut machine projects#cricut.com/setup#design.cricut.com/setup#cricut.com#cricut design space#cricut design space download#cricut design space login#design.cricut.com/setup explore air 2#cricut.com/setup maker 3#cricut.com/setup app#cricut.com/create#cricut.com/register
0 notes
Text
How to Use Cricut Hat Press
Crafting is something that brings peace to my soul. Whether it’s Halloween, Cyber Monday, or Christmas, I love making unique crafts with the Cricut machine. Last week, I tried some handmade hats with the Cricut Hat Press machine. And I can’t explain how exciting my crafting journey was. It was all about how to use Cricut Hat Press and the Cricut Heat app to bring a good piece of a project to life. One of the exciting things I found during this crafting process is its easy-to-use features.
Are you excited to learn more about this Cricut machine? All right! Here, I will share everything you need to get started with this smart machine. Since I own a crafting business and have immense knowledge of the crafting field, I can help you with every detail of crafting using this machine. So, let’s start a thorough journey with Cricut’s new product, the Cricut Hat Press.
Cricut Hat Press: An Overview
Cricut has introduced the Cricut Hat Press as a new compact and user-friendly machine. This machine enables crafters to create custom hats in the comfort of their homes. It uses heat transfer technology to include text, logos, intricate designs, etc, on hats. Moreover, the machine’s size is small, and thus, you can easily apply heat even to the hat’s brim. It just required precise temperatures and time for excellent craft results. The machine includes the press, a stand, and a hat form to help you with the time-saving crafting process. Plus, you will need a Cricut Hat Press app for better crafting.
What Do You Need to Use the Cricut Hat Press?
Before you start crafting with your machine, you will need to gather all the essentials. Do you have yet to decide what to prepare beforehand? Here is the list of things you will need to use the Cricut Hat Press.
Cricut Hat Press
Cricut Hat Press stand and hat form
Compatible Hats
Weeding tools to ward off excess material.
Cricut Design Space to create/upload a design.
Cricut machine, plus cutting mats.
Cricut Iron-on or Heat transfer vinyl (HTV).
How to Use Cricut Hat Press for Making a Custom Hat?
Are you ready with the supplies and other essentials? Now, the time has come to begin your crafting process. Below, I am explaining the whole process step-by-step.
Step 1: Create & Weed Out a Design
The first step to start using the Hat Press machine is to create a design. For this, you can use a design in the Cricut Design Space, or you can use any of the SVGs. After you create the design, please send it to your Cricut machine and start cutting. Also, make sure to mirror your design before you cut it onto the HTV Iron-on.
Advertisement
Furthermore, ensure to follow all the on-screen instructions carefully to cut on the software. After that, use weeding tools to weed the design. Now, the design is ready to apply to the hat.
Step 2: Download the Cricut Heat App
Are you curious about the next step of how to use Cricut Hat Press? In this step, you will need to download the Cricut Heat app.
First of all, open the Cricut Heat app.
Now, follow all the prompts to set up your press machine.
Later, use the app to determine the temperature and time.
Then, enter the type of vinyl and the material you use.
After that, allow Bluetooth to connect your machine and the app.
Step 3: Preparing the Hat
Look at your hat and find if it has a sweatband. If it has, flip it down. Also, ensure to put your hat on the hat form that comes with the machine. Then, proceed with the instructions below.
Start by turning on the Cricut Hat Press machine.
After that, when you see that the lights are green, it means that the machine is ready.
Further, preheat the hat by looking at the directions on the application.
Next, tap on the green triangle and start the time.
Finally, press till you get to hear the beep.
For precise temperature and time, you can refer to the Cricut Hat Press temperature guide. It will help you with the correct temperature settings and more.
Step 4: Attach the Design to Your Hat
After you prepare the hat, the next step is to use Cricut heat tape to fix the design of the hat. To get a perfect ensure that the design is flat against the hat with no bubbles or creases. Additionally, it should be your job to make sure that the design is not too close to the brim of the hat. If it’s too close, you can find it difficult to tape. Also, it will become challenging to get enough heat and pressure to stick to the hat.
Step 5: Use Your Machine for Applying the Design to a Hat
Once the design is adhered with the tape, press the triangle once again. Now, press the Hat Press over the design. The app will help you with the pressure firmness pressure to use. In this step of how to use Cricut Hat Press, continue to press the hat until your machine beeps. Also, confirm that the heat and pressure is applied to all the parts of the design. Finally, when the press starts to beep, put the press on the stand. Then, peel off the transfer sheet as per the app directions.
Advertisement
Woah! This way your cust hat is ready to go.
Conclusion
Cricut Hat Press is a wonderful Cricut machine that you can use to make custom hats at home. These hats can make a perfect gift on Christmas and other special occasions. So, bring out the machine and learn how to use Cricut Hat Press with the Cricut Heat app. Once you register your press successfully, you can get started with an extensive range of hats. Moreover, you can create them and sell them online, too.
Frequently Asked Questions
Q.1 What Comes With the Cricut Hat Press Box?
Do you have yet to learn what is included with the Hat Press machine? It is obvious to get curious about opening the box. Look at the list of certain things that come with this smart machine.
● Cricut Hat Press
● User guide
● Safety Base
● Cricut Hat pressing form
● Strong Heat Resistant Tape
● Iron-on Design to practice.
Q.2 How to Set Custom Time and Temp Settings in Cricut Heat App?
Custom time and temperature settings are essential to use the Cricut Heat app. So, follow these instructions to set them up correctly.
First, open the Cricut Heat app.
Now, select the Cricut Hat Press Under My Heat Press.
After that, scroll to set Custom Time and Temp.
Next, change the Temperature and Press Time.
Finally, select Send Settings to Hat Press.
Q.3 How to Activate Cricut Hat Press?
Are you new to the Cricut Hat Press machine? Perform these steps to activate the machine.
First of all, plug in your machine.
Next, download the Cricut Heat app.
After that, pair the device through Bluetooth settings.
Then, select the Set Up option in the app.
Thereafter, accept Cricut’s Terms of Use and Privacy Policy.
Lastly, click on Activate.
Sourec :- https://designaccessoriesmart.com/how-to-use-cricut-hat-press-tips-tricks-for-perfect-results
0 notes
Text
How to Use Heat Transfer Vinyl with Cricut: Full Guide
How’re you doing, crafters? I am passionate about DIY crafts, and I love making stuff for myself and my husband. Well, he is not into crafting, but whenever I create something for him, he gets super excited. Recently, I designed a shirt for him, and now he wears it everywhere. You can do the same with your Cricut machine. In this blog, I will tell you my way of using HTV. Be with me till the end to learn how to use heat transfer vinyl with Cricut.
I’ll show the exact steps that I use while making interesting DIY projects. I am confident you will understand through my words and all the photos that I am going to share with you here. Get ready with your Cricut machine – you can simply use any of your machines that can do the process cutting. I am using a Cricut Maker, which I really like and use in all my crafts. Here, we are going to create something interesting.
What Tools and Supplies Will You Need to Get Started?
As you know, you will need some materials and tools to get started with your project; I am giving you a list of a few of them to understand what exactly you need to arrange to make a fun project.
HTV
Apparel (I am using a blank T-shirt, you can use tote bags, onesies, etc.)
Cricut machine (I am using a Cricut Maker)
Cricut Easy Press 2 (You can use a household iron, too)
Weeding tool
Standard Grip mat
Easy Press mat
With all these tools and materials, you can create a beautiful project. I will explain the whole process in a step-by-step guide.
How to Use Heat Transfer Vinyl with Cricut Machine?
If you are wondering how I use Cricut heat transfer vinyl for Cricut, here comes the final part of the blog, where you will learn how you can use HTV to create a unique project. Look at the steps and learn my way of using HTV.
Step 1: Use Cricut Design Space
As the first step includes creating a design, you will have to use Cricut Design Space to make a unique shirt design. I am using a cute design which is in an SVG file format. You can choose the design for your craft.
To keep my design simple, I will go for a monochrome design. If you want, you can use multiple colors too. To use your own designs, you can simply upload them to the Cricut software.
Step 2: Modify Your Design for Cutting
When you upload your design or the SVG file on the Design Space canvas, there are a few things you need to modify, such as the colors, layers, and size, to make the design ready for cutting. If you want to check that the image is ready to be cut, click the Make It button in green. It will show you the preview screen.
The Cricut app can automatically adjust your graphics and the text size on the mat to take out the best cutting of the material. Once you are ready with the design, you can allow the machine to cut, and if not, you should hit the Cancel button to move back and modify your design a little more before taking the final design.
To keep your text in one place, you need to attach your shapes in Design Space. In order to change the color of the Layer, you need to select the image or select Layer on the Layers Panel and click on the Square below the Linotype menu on the top to choose a new color.
Step 3: Load the Material and Blades in Cricut
If you want to learn how to use heat transfer vinyl with Cricut, you need to follow all the steps carefully. Before ordering your machine to cut the design, you need to ensure that you mirror your design on the left side of your mat. While cutting the heat transfer vinyl, you will always need to mirror your designs. Once you are all set, hit the Continue button in green.

I prefer using Cricut iron-on vinyl for my projects; you can use any other brand, too. When the machine asks you to select the material, you should select the right one. After that, you will have to load all the blades and your cutting mat into your Cricut machine.
Before placing your mat into the machine, you need to place the HTV on the Standard Grip mat and slightly press down your vinyl to ensure that it sticks well to the mat without wrinkles.
Now, you need to load the fine point blades in Clamp B, and you won’t need any tool in Clamp A while cutting the HTV. After that, you can load your mat into the Cricut machine, align it on the guides, and hit the Load button.
When done, hit the Go button on the Cricut machine to start cutting the HTV material. Now, you are ready to finish up your project and learn how to use heat transfer vinyl with Cricut.
Step 4: Unload the Cricut Cutting Mat
When your cut is finished, hit the Load/Unload button to take your mat off the machine. You can flip your mat and then peel away the HTV while holding the vinyl against the surface to avoid curling the vinyl. Next, weed off the excess of HTV from the design to remove the baby pieces from the design.

Step 5: Preheat Your Shirt
When your design is ready, you will need to preheat your apparel to make a wrinkle-free and lint-free project. A preheat prepares your apparel for the final heating. In the case of regular iron, just move the iron for 15 seconds.
If you are using Easy Press, you can consider the Cricut Heat app to get the right heat pressure and pressure settings for your project. So, I preheat my T-shirt with my Easy Press for about five seconds, and then I apply the HTV design onto the shirt apparel.
Also, the transfer sheet backing of the HTV is usually sticky and can hold your design while you are pressing it. However, if you want to make your design more stable while heating, you can apply heat-resistant tape before pressing it.
Step 6: Apply Heat to Your Shirt
When your design is finished, you can apply the Easy Press onto your blank apparel with light pressure for just 30 seconds. Then, let it stand for a few seconds until it cools down. When the shirt is cooled down, just slowly peel off the transfer sheet from the HTV.
Now, you have your final design on the shirt. It’s an awesome experience for everybody who wants to make something unique with their Cricut machine. Here is my guide on how to use heat transfer vinyl with Cricut ends, and I am pretty sure that you will try making anything simple and amazing with HTV and Cricut machines.
#Cricut iron-on vinyl#How to Use Heat Transfer Vinyl with Cricut#Cricut Design Space#cricut design space login#cricut design space download#cricut design space app#cricut design space for mac#cricut design space setup#cricut.com/setup#cricut explore 3#cricut accessories#cricut.com/setup mac#cricut.com/setup pc#cricut.com/setup windows#cricut explore air 2#cricut software app#cricut new machine setup
0 notes
Text
Cricut Iron On Vinyl Instructions: Quick & Easy Guide
If you’re new to the world of Cricut and want to upgrade your crafting with iron-on vinyl, then this quick and easy tutorial is for you. Cricut iron on vinyl is a thin, flexible pre-cut sheet or roll of vinyl with an adhesive backing that is activated after heat and pressure. You can create beautiful personalized T-shirts, makeup bags, pillowcases, wine bags, and more from iron-on vinyl.
In this guide, I am going to show you detailed Cricut iron-on vinyl instructions to help you explore other possibilities for the Cricut machine. Don’t worry; I have written this tutorial for beginners in mind — I will walk you through the entire process in depth from start to finish. Plus, I will discuss the essential supplies, how to make a design, how to cut iron on vinyl, and so much more. So, let’s get started.
Essential Tools and Materials for Designing a T-shirt
Gathering enough supplies is the most important instruction for making any Cricut iron-on vinyl project.
A Cricut cutting machine
Weeding tool
Cricut Easy Press
Everyday iron-on vinyl
Base material (T-shirt, tote bag, etc)
Cricut cutting mat
Heat Press mat
Cricut Design Space
Cricut Guide
Butcher paper
Step 1: Create or Upload a Design in the Cricut App
The first thing you need to keep in mind for any Cricut iron-on project is a digital design that allows you to cut iron on vinyl. You use the design and apply it to the desired surface.
First, download a design in SVG format from the internet and make sure it is compatible with Cricut Design Space.
Unzip the SVG file, open the Cricut app, and click on New Project.
Also, hit the Upload button on the left sidebar and upload the file to the canvas.
Next, drag and resize the design to fit the surface. I chose a shirt as the surface to demonstrate the Cricut iron on vinyl instructions.
When the design is ready for iron on vinyl, click the Make It option.
Step 2: Select Your Materials
Now is the right moment to choose the materials and configure the settings one by one in the Design Space.
On the prepare screen, toggle the “Mirror” option and press the Continue button.
Click Browse All Material on the next make-screen and search for iron on vinyl. Note: If you have Cricut Explore Air 2, turn the wheel to custom.
Step 3: Cut & Weed Out Iron On Vinyl
As soon as you select iron as the material, it’s time to cut out the design.
First, place the vinyl on the Cricut cutting mat and insert the mat into the machine.
You have to press the flashing Go button to start cutting your design on the vinyl.
Once the machine stops cutting, remove the mat and the negative parts from the design using the weeding tool.
Step 4: Preparation for Applying Heat
Once your design is ready, it is time to learn Cricut iron-on vinyl instructions and prepare everything to apply the heat.
Initially, visit the Cricut Heat Guide and get accurate timing & temperature info.
Set up the workspace, place the Easy Press mat on a clean surface, and preheat it.
Now, lay down the shirt on the heat press mat and preheat it for 5 seconds to remove the wrinkles.
Step 5: Place the Vinyl on Your Shirt
These are the final Cricut iron on vinyl instructions that need to be followed to complete the process.
First, center the vinyl design on the shirt you just cut out, and be sure to place the shiny vinyl side up.
Now, place butcher paper over the design and apply heat to the vinyl following the Cricut heat transfer guide. I use light pressure at 315F for 30 seconds.
Finally, leave the surface (shirt) until it cools, then peel off the plastic transfer sheet.
Frequently Asked Questions
Question 1: How do I use a Cricut iron on vinyl?
The following are brief step-by-step instructions for using the Cricut vinyl.
Create or upload a design in Cricut Design Space.
Select vinyl as the material and other cut settings.
Cut and weed out the design.
Place the heat press on your design.
Question 2: How long should you leave the Cricut iron on vinyl?
Once you apply heat to the Cricut iron on vinyl, it penetrates the surface, and the time and temperature depend entirely on the Cricut Heat Guide instructions. For better results, apply moderate pressure with the iron for 25 to 30 seconds. As for how long to leave the iron on vinyl, the answer is simple: until the surface has cooled.
Question 3: What materials should you avoid while using Cricut iron on vinyl?
Before deciding how to use Cricut iron on vinyl, it is important to know its compatibility with various materials. Iron on vinyl is suitable for use on cotton, polyester, blends, and burlap canvas. But, it is not compatible with fabrics like nylon and spandex. Therefore, refrain from using iron on vinyl on such fabric surfaces.
Final Words
Crafting with a Cricut machine is both adventurous and challenging, offering many opportunities. One such difficult task is cutting and applying heat iron on vinyl with Cricut to create popular DIY projects like T-shirts, tote bags, cards, banners, keychains, and makeup bags. If you are here, you’ve already navigated through the step-by-step Cricut iron-on vinyl instructions necessary to achieve the desired output.
Source: Cricut iron on vinyl
Cricut iron on vinyl instructions
Visit here for more Information: Cricut.com/setup
Cricut explore 3
#Cricut iron on vinyl#Cricut iron on vinyl instructions#cricut.com/setup#cricut explore 3#design space cricut#cricut maker 3 vs explore 3#2024
1 note
·
View note
Text
Which Is the Top Rated Cricut Machine of 2024?
Ready to bring your crafting ideas to life with Cricut? If you have been looking for the top rated Cricut machine that is beloved worldwide for its exceptional crafting capabilities, look no further. Welcome to my ultimate guide, where I will not only introduce you to one or two top machines but also provide detailed coverage of more than five models.
For the past six years, I have dedicated myself to crafting full-time and discovered every Cricut model along the way. With this wealth of experience, I am confident that I can provide you with the right tips based on my journey. Also, I will include expert recommendations for each machine. Let's not delay any longer and dive deep into the Cricut machine lineup, starting from the top down.
1. Cricut Maker 3
Many of you are looking to upgrade from your old Cricut machine, while others are beginners starting their crafting journey. For both groups, the top rated Cricut machine I highly recommend is the Cricut Maker 3. This versatile machine meets the needs of both experienced crafters and newcomers.
The Cricut Maker 3 has cutting-edge technology and many features. It is the fastest cutting machine in the Cricut lineup, capable of cutting over 300 materials ranging from thin paper to thick wood and 2.4mm fabric. While it comes with a price tag of around $399, the investment is well worth it in the long run.
Features:
2. Cricut Explore 3
This Explore 3 is a top rated Cricut machine that offers great value and plenty of advanced features. It is a more affordable alternative to the Cricut Maker 3. This updated version of the Explore Air 2 can cut over 100+ materials and works with Smart Materials, allowing cuts up to 12 feet in length without a mat. At just $279, it's a compelling option.
Features:
3. Cricut EasyPress 3
Once you start making projects with the Cricut machine, you'll get to work with HTV and iron on vinyl to create different items like t-shirts, tote bags, coasters, blankets, and more. To use this, you will need a Cricut Heat Press machine. The ideal choice for beginners is the Cricut EasyPress 3, available in two sizes: 12X10 inches and 9 x 9 inches. Prices vary according to size, starting at $149.
Features:
4. Cricut Joy Xtra
The latest top rated Cricut machine, the Cricut Joy Xtra, was launched on September 7, 2023, and has gained popularity due to its advanced features. It is an upgraded version of the Cricut Joy that offers a larger size for DIY projects, up to 8.5 x 11 inches, and compatibility with Smart Materials up to 4 feet long. Priced at $199, it offers additional features like the Print Then Cut feature, making it perfect for sticker making compared to the $149 Cricut Joy.
Features:
5. Cricut Mug Press
Whether you're planning to start a Cricut business or simply enjoy making mugs or tumblers for your loved ones, a Cricut Mug Press is essential. This machine enables you to easily create unique and memorable designs that offer a niche for your business endeavors. Also, it connects to the Cricut Heat app to ensure the accurate transfer of infusible ink designs onto mugs.
Features:
Final Words
If you are committed to making your dream DIY projects at home, investing in a Cricut machine is worthwhile. I have guided you through the top rated Cricut machine, including three cutting machines, one heat press, and one mug press. Choose the one that fits your style and needs best.
Visit: cricut.com/setup
www.cricut.com setup login
cricut.com setup mac
Source: https://cricutdesig.wordpress.com/2024/03/13/which-is-the-top-rated-cricut-machine-of-2024/
#cricut.com sign in#cricut.com/setup#cricut.com/create#cricut.com design space#cricut design space#cricut.com/register#cricut design space download#design.cricut.com/setup#cricut design space login#www.cricut.com/setup login#install cricut design space app#install cricut design space#cricut setup#cricut.com setup mac#cricut.com setup download
1 note
·
View note
Text
How to Activate Cricut Easy Press 3: A Comprehensive Guide
Do you want to make heat-transfer projects but don’t know how to activate Cricut Easy Press 3? Don’t panic—I will be your guardian for this guide. In addition to developing crafting machines, Cricut has introduced various heat press models to its customers. My favorite is Cricut EasyPress 3, which is designed to achieve next-level heat transfer results long after multiple washes.
Also, this Cricut model has press speed, an iron feature, and built-in Bluetooth technology. Cricut EasyPress 3 is compatible with iOS and Android devices and needs to be set up by crafters to create various projects. Moreover, you can connect this machine to your smartphone wirelessly. From now on, this blog will teach you how to activate and pair devices to help you make DIY projects.
How to Pair Cricut Easy Press 3 to Smartphones?
Subsequently, this Cricut heat press has Bluetooth Low Energy technology (BLE), allowing mobile devices to pair while using the Cricut Heat app. Take a look at the below steps to learn about the wireless pairing process between this Cricut machine and smartphones:
First, you must check that your device’s Bluetooth is on to make it discoverable.
If the Bluetooth is off, turn it on and pair it with your machine.
Now, open the Cricut Heat app and sign in by following the on-screen guidelines.
If you have activated your machine, it will appear in the My Presses section.
Also, if you have numerous presses activated, then choose one to connect.
Afterward, if you still need to activate this machine, tap the Set up New Press.
Here, your app will display your device as connected, and the machine is listed in your device’s Bluetooth section.
Finally, when you turn off the press, the Bluetooth automatically disconnects.
Wasn’t considering this method for wirelessly pairing this Cricut machine with mobile devices easy? This method allows you to operate EasyPress 3 as your choice and transfer the design to the chosen blank.
How to Activate Cricut EasyPress 3?
This section of the blog outlines the steps needed to activate this Cricut product on smartphones. This Cricut heat press uses Bluetooth Lite technology to activate with other devices. With the help of these steps, you will get the answers to activate Cricut EasyPress 3 on mobile devices:
Begin the process by opening the App Store or Google Play Store and installing the Cricut Design app.

Now, sign in or create your Cricut account by entering the required details.

Afterward, start unpacking your Cricut machine and remove other items.
Following this, plug the press into a nearby wall socket and turn it on.
At this time, you will notice the word APP appearing on your device screen.
Equally important, pair your device wirelessly and check that both devices are within 7 feet of each other.
Next, open the Cricut Heat app and tick the Set Up option.
Equally important, choose the model from the list on your screen and click the Continue option.
Now, you are supposed to wait till the connection between the devices is going on.
After a few minutes, tap the Terms & Conditions checkbox and click Activate.
In the end, you will see a message sharing that your wireless activation process has been done.
Wasn’t this segment on how to activate Cricut Easy Press 3 helpful for you? By utilizing these steps, you will be able to activate this Cricut product in the future while creating any HTV projects on the blanks.
How to Adjust Cricut EasyPress 3 Settings Using Cricut Heat App?
With the help of the installed Cricut Heat app on your phone, you can easily modify this Cricut product time & temp settings. Below are the steps you need to take to adjust the Cricut EasyPress 3 settings:
Let’s begin by plugging the machine wire into the wall socket.
Afterward, hold the power button for a few seconds and switch on your Cricut EasyPress 3.
Launch the Cricut Heat app and open the My Heat Presses dropbox.
Under the dropbox, choose Cricut EasyPress 3 and then Start New Project.
Now, choose the Transfer Material > Base Material and the surface you will use.

Following this, click the Next button at the bottom of the app.
Once you have selected it, tap Send Settings to EasyPress, which isvisible inside the blue box.

Now, you must stay calm until the press reaches the decided temperature.
Final Words
Consequently, this how to activate Cricut Easy Press 3 guide assists you with the content you need to take while performing the activation and pairing process. You must activate your EasyPress 3 and pair it with your iOS and Android devices. Moreover, you need to be very cautious throughout the entire method. Afterward, you will be able to create several projects, such as tote bags, aprons, wine bags, and more.
Frequently Asked Questions
Question: How Can I Adjust My Cricut EasyPress 3 Temperature Manually?
Answer: Check out the below steps to manually adjust your Cricut machine’s temperature:
First, switch on your Cricut machine and use the + or – button to increase or decrease the temperature.
Second, change the temp to Celcius by holding the Temperature button for a few seconds.
Click the Time button and adjust the timing depending on the material type.
Question: How to Update Cricut EasyPress 3 Firmware?
Answer: You can update your Cricut EasyPress 3 firmware through the Cricut Heat app available on your mobile devices. Take a look at the pointers given below to learn about the process:
Start by plugging your Cricut heat into the nearby wall pocket.
Now, tick the power button and turn it on.
Afterward, check that your Cricut EasyPress 3 is connected to your mobile devices.
Then, you need to sign in and select your model from the My Presses section.
Lastly, the Cricut product firmware will start updating automatically.
Question: How Can I Activate My Cricut EasyPress 3 on Phone?
Answer: Check out the below steps for wirelessly activating Cricut EasyPress 3 on smartphones:
First, you are supposed to install the Cricut app on your device and sign in.
Second, plug the machine into the wall socket and turn it on.
After that, open the app on your mobile device and tick the Set Up option.
Now, choose the model from the list and wait a few minutes.
At last, click the Activate option, and the activation will come to an end.
Read more: cricut.com/setup mac
install cricut design space app
Cricut Design Space
Source: how to activate cricut easy press 3
#how to activate cricut easy press 3#Cricut Design Space#install cricut design space app#install cricut explore air 2#cricut explore 3#cricut.com/setup#cricut new machine setup#cricut.com/setup mac
0 notes
Last Seen Blogs

srpisces
Untitled

thabet88co
Thabet88

chaos3910
Chaos

atd-sportscars-blog
ATD-Sportscars

fizagetworld
Untitled