#how to upload fonts to cricut
Text
How to Upload Fonts to Cricut? [Easy Ways]

The use of the right font is essential in creating crafts projects. Each font you select gives your project a different feeling and emotional effect. Fonts are an important element in the process for a crafter using Cricut. The good news is they can learn how to upload fonts to Cricut and use them for their project.
Here is a useful tutorial that you can read and learn how. It will teach you quick ways of uploading fonts to the Cricut Design Space software and using them on Windows and Mac. After that, you can use them to give a personalized touch to your project. But to upload a font, you first need to download it. Before starting the uploading process, let's first know where you can find fonts to download.
Where to Find Eye-catching Fonts to Download?
There are several places where crafters can discover both free and paid fonts to download for their projects. They can select from beautiful and high-quality font collections and include them in the Design Space to begin with their project. Most often, their free font downloads option includes a personal use license. It makes them use those fonts for free in their projects. Thus, if you want to sell items with certain fonts, include only the one for commercial use.
Easy Steps to Access Fonts in Cricut Design Space
You can access Fonts in the Cricut Design Space with some basic steps. Here are some of the steps you need to execute for the purpose.
First, download the font you want.
After that, unzip your font file folder.
Double-click on the individual font file.
Follow the prompts to install the font file on your computer.
Now, open Cricut Design Space.
Start to create a New Project.
In the next step, add a new text box to your canvas.
Click on the font drop-down menu to change the font.
How to Upload Fonts to Cricut Design Space on Windows/Mac?
You can access the font on several devices. You only need to download and install the font onto each device you want to use. Here are some easy steps that can help you add fonts to this Cricut's software on Windows and Mac computers.
For Windows
Follow these instructions if you use Windows to access the Cricut Design Space. Once you learn how to upload fonts to Cricut on Windows, you can include those fonts in your project.
First of all, download the font file you want to have in your project.
Next, navigate to your Downloads folder.
Find the downloaded font file and right-click on it.
Choose the Extract option to extract those files.
In the following step, right-click on the font file and choose Install.
Once you perform these steps, the fonts will get installed on your windows. You can find them in the Design Space to access.
For Mac
Do you want to add fonts on your Mac device? Here are a few of the directions that you need to follow.
First, download the font you prefer.
Double-click on the downloaded zip folder.
Once unzipped, select the fonts and use ctrl+click to launch the menu.
Now, select Open with > Font Book option.
Now, you will see a pop-up to install fonts.
Tap on the Install tab to begin the installation process.
It will make your fonts appear in the FontBook. From there, you can use it in the Design Space.
Conclusion
The text gives an emotional touch to the project. Thus, every craft lover should know how to upload fonts to Cricut. The process is also quick and straightforward. Moreover, Design Space makes it effortless and time-saving too. First, download the font from a specific site and then add it on a device - windows or Mac to use it in your project. Keep experimenting with crafts and fonts for attractive projects.
Frequently Asked Questions
How Can I Add Fonts to Design Space on My iPhone?
For this purpose, you first need to install Fonts, a free font manager app. Below are some instructions to make your fonts available in the Design Space app.
Begin to download and install the Fonts app.
Unzip the file after downloading.
Now, open the iFont and choose Font Finder.
After selecting Open Files, move to the font file and select the file you want to install.
Next, select the Installer tab and click on Install to continue.
Now, close the app and open Settings.
Tap on the tab Profile Downloads.
In the end, press install.
Why are My Downloaded Fonts Not Showing Up in Cricut?
Have you downloaded your favorite font, but it's not showing? It can be because of several reasons, which include the following:
After downloading, you still need to install the fonts.
There was no successful installation.
Your font file format was not .ttf or .otf.
You still need to restart the app after installation.
How Can I Unzip the Downloaded Fonts File?
Make sure to execute these easy steps to unzip your downloaded font file. Here they are.
Right-click on the .zip folder with font files.
Next, click on Extract.
Select the TrueType or OpenType font files.
Subsequently, right-click on them and then install them.
At last, click Yes to allow the program to change your device.
Source: How to Upload Fonts to Cricut
Visit: design.cricut.com/setup
Cricut.com/setup
Cricut EasyPress 3 Setup
Cricut heat press guide
Cricut Design Space Login
#Cricut.com/setup#Cricut EasyPress 3 Setup#design.cricut.com/setup#cricut design space#install cricut design space app#cricut design space for mac#Cricut heat press guide#how to upload fonts to cricut
2 notes
·
View notes
Text
How to Upload Fonts to Cricut Design Space: Stepwise Guide
What’s up, crafters? I am sure you are thinking of something creative, am I right? Well, making crafts is nothing new to you, but there are multiple ways to upgrade yourself. Are you thinking about uploading a new font to your Design Space? Sure, you can do that and create your own font. The best part is that this process is going to be easy for you. So, follow me to learn how to upload fonts to Cricut software.
You don’t need to spend hours finding the right font in Cricut Design Space — rather, you can find it somewhere else, which is what I’m going to tell you about. Adding fonts to the Cricut app is an extremely easy process. So, let’s get started with that.
How to Find a Perfect Font to Upload?
Options for perfect fonts are never-ending. There are many places to find Cricut fonts, and some of my favorite ones are fonts.google.com and Creative Fabrica. On these websites, you will surely find some cool fonts. Apart from them, there are also some sources like
Creative Market and dafont.com are where you can get some high-quality fonts completely free.
Isn’t it great? However, not all fonts will be free on them, and to get some specific fonts, you may need to pay some money. So, if your purpose is to sell items you make, you can go for the paid fonts that often have a commercial use license.
How to Download a New Font to Cricut Design Space?
If you have finally selected your perfect font and you are all set to download it, go ahead with my simplest steps here.
Download your font from a site and check where it gets downloaded to your folder.
Then, unzip your font folder and then double-click on that file. Usually, you will get the font files in .ttf or .otf type. But, I will .otf file.
Now, continue with all the on-screen prompts on your desktop to get the font file.
When your font is installed, launch your the Cricut software.
After that, you need to create a new project.
Next, add the new text layer and choose the text box to add the text to Design Space.
That’s how you will add the font easily to your Design Space canvas. When you download fonts, your guesswork will become zero as you will know which font to use.
How to Upload Fonts to Cricut on a Windows PC?
Are you a Windows user? Perfect. Most of my work is PC-based, so I can tell you well how to upload fonts correctly to your Design Space. Look at the steps below.
In the first step, download your font file, move it to your Downloads folder, and get the downloaded file.
Then, right-click on the file if it’s compressed and choose Extract to get the files.
Now, your font will be added to your PC and the software.
You have understood the download procedure. You can move it to the Cricut Design app canvas by using the steps I have shared at the start.
How to Upload Fonts to Cricut on Your Mac Computer?
Well, if you are a Mac user, I have different steps for you. I don’t use Mac often, but for all of you, I tried adding a font to my friend’s Macbook. So, the steps are easy; let’s check them below.
Similarly, download a font file to your Mac.
After that, unzip your file if it is compressed in the .zip format.
Double-click on the font in your Finder window and let the font install.
You will get your fonts in just three simple steps. Now, you can do anything with your fonts and make great projects.
How to Upload Fonts to Cricut on Smartphones (Android/iPhone)?
If you prefer a mobile phone to use Cricut Design Space, don’t worry. You can also get the latest fonts on your device. Follow my steps below.
For Android
First of all, install an app to manage fonts. I prefer iFont.
Then, download your font and navigate to it under the Downloads folder.
Now, if your file is compressed into .zip format, get the file.
Launch your iFont app and then head to the My Font option.
Next, open that option to see the preview of your font and then install it on your device.
At last, hit the Set option to finish the installation.
These are the final steps for adding fonts to Cricut on an Android smartphone. Now, create your favorite designs with your unique fonts.
For iPhone
iPhone users don’t need to worry; I have a separate section for them. You will also need to install an app to manage fonts. iFont is a perfect app for you, too. Let’s look at the steps.
First of all, install the iFont app to manage your fonts.
Then, download your font and unzip it from the Downloads folder.
Now, launch your iFont and choose the Font Finder.
After that, choose the Open Files window and search for your font file to install.
Next, choose the Installer tab and hit the Install button with the font to allow the installation.
Then, hit the Continue button and then click the Allow option.
Next, launch your Settings app and close the iFont app.
Now, click on the Profile Downloaded option.
Finally, you will get the option to Install your favorite font.
Finally, the font is installed on our iPhone, and you are all set to use it. Now, you have learned the uploading process on almost all the devices.
Conclusion
If you are thinking about how to upload fonts to Cricut Design Space, this blog can be helpful to you. Fonts are so creative and can add spark to your lovely projects. Also, if you are someone who likes to sell your creative items, the addition of a great font will level up your projects and will make you grow as a crafter. I have shared all my favorite sources with you, like dafont.com and Creative Fabrica; if you have better sources than mine, go for it.
#Setup Cricut Machine#Cricut Machine Stepwise Guide#How to Upload Fonts on Cricut Design Space#Stepwise Guide#How to Upload Fonts#cricut explore air 2#cricut setup#cricut new machine setup#cricut crafts
0 notes
Text
How to Download Cricut Design Space on Laptop: Easy Tutorial
Cricut Design Space is an official software program. It helps you use your cutting and heat press machines. You create or upload a design to the app and make your beautiful projects. To start working on it, you need to download it on your computer or laptop. Here, you will learn how to download Cricut Design Space on laptop. So, read the blog until the end, and then you can easily download and install the app on your operating system.
Although it is a free app, you can also purchase the premium Cricut Access. It gives you much more designs, images, and fonts for your crafts. However, the software will be good enough if you are a beginner. Now, let’s start with the minimum system requirements for using the software on your laptop.
Minimum System Requirements for Cricut Application
Before you get the app tutorial, you need to know your laptop’s system requirements. The laptop needs to have certain features to work with the software and run its features smoothly. Design Space works great with Windows and Mac laptops. However, it does not support Chromebook computers.
For Windows: If you have a Windows laptop, make sure it’s running Windows 10 or a newer version. The CPU needs to be an Intel dual-core processor or its equivalent.
For Mac: If you are using a Mac, it must run on macOS 11 or later and have a CPU of 1.83.
RAM: It has to be 4GB, and it should have 2GB of free disk space.
Bluetooth or USB: The machine must have either a Bluetooth or USB port or both to connect to your devices.
Display: 1024 x 768 px screen resolution is the minimum requirement for the screen.
Internet connection: The laptop should have a good and stable internet connection to download and upload SVG files. The speed for downloading should be 2-3 Mbps, and for uploading, it should be 1-2 Mbps.
Memory: The memory requirements of the laptop depend on your craft projects.
How to Download Cricut Design Space on Laptop (Windows)
Once you have checked the system requirements on your laptop, you can start to download the software program. If you have a Windows laptop, this is the process you should follow to download and install the app:
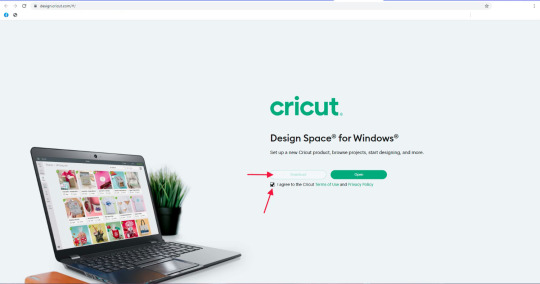
To initiate the app downloading process, open your windows laptop and go to cricut.com/setup.
Then, you will see a link on the app that says Download. You have to click on it to start downloading the app. But before that, you will have to agree on Cricut terms, and for that, you will need to tick the checkbox.
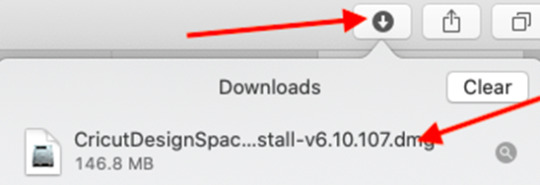
When you click on Download, the app will start to download. When the downloading is done, you should go to the Downloads folder on the device and open the file by clicking on it.
After that, a new window will open on the computer screen, which means that the app has started to install.
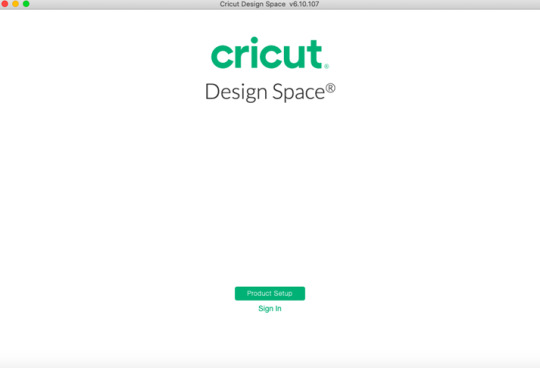
Once the app is installed, open it and either log in or create an account. Then, you can start using the software on your device.

You can choose to add the app icon to the taskbar on your laptop.
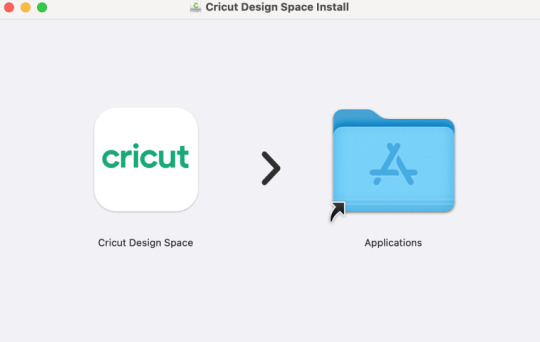
How to Download Cricut Design Space on Laptop (Mac)
Just like a Windows laptop, you can download the program on a Mac system. The MacBook is compatible with the app, and you can install it from the official website. These easy steps will help you download the app.
First, open your Mac laptop and connect it to a stable wireless network.
Then, navigate through cricut.com/setup and look for the Design Space app.
Next, agree to the terms and conditions and click on Download.

Now, choose a folder on the device screen to download the app. You can leave the option if you don’t want it; the app will be saved in the default folder - Downloads folder.
After downloading the file, go to the folder and double-click on the file.
Now, you will see a window on your device with two icons. You will have to drag the app icon into the Applications icon.
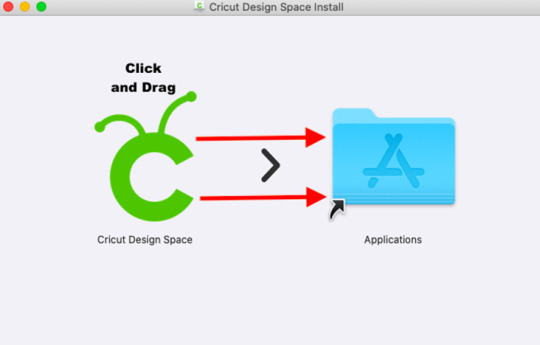
After that, open the Applications icon by clicking twice to launch the application.
Finally, you have to open the app and log in with a Cricut ID.
Conclusion
Here, you read how to download Cricut Design Space on laptop (Windows and Mac). The app is essential for Cricut machine users, especially when you are a beginner. As a beginner, you can learn how to use the software program and all its features for free. Following the instructions, you can install the app on your laptop and log in with your account. After that, you will be able to use the app to work on your projects.
FAQs
How Can I Download Cricut Design Space on My Laptop?
To download the app on your laptop, you have to follow the steps below:
First, open your laptop and visit cricut.com/setup.
Then, find Design Space and click on Download.
Next, open the file from the Downloads folder and click on it twice.
After that, the app will start to install.
After the app is downloaded, log in to use the app for your projects.
Why Am I Unable to Open Cricut App on My Laptop?
If you are unable to open the software, there are a few reasons for that. You should check these things, and the problem will be solved. First, you have to make sure that you are using a laptop that is compatible with the app. After you make sure that you are using a compatible laptop, you must check that the app is up to date and that you are not using an old version. After that, you will be able to open the software on your laptop.
How Can I Setup Cricut on My Laptop?
If you want to set up a machine on your laptop, you should follow these steps:
First, you should turn on the machine after plugging into a wall socket.
Then, connect the machine to your laptop using Bluetooth.
Next, download the software app to your laptop.
Now, log in with a Cricut ID or create one if you are new.
After you log in, the machine setup is done.
0 notes
Text
Cricut Joy Xtra: A Versatile and Easy-to-Use Crafting Machine
Are you looking for a crafting machine that is space-friendly? Do you find other tools taking too much of your room space? It’s frustrating! Isn’t it? With Cricut Joy Xtra, you don’t have to worry at all about spaces.
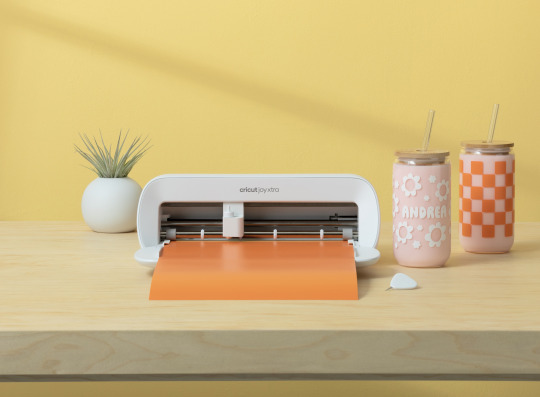
Not only is this wonderful machine small, but it is also highly feasible for small to medium-sized projects. Most importantly, you can create as many crafts as you want. There is no limit to the possibilities. There is something for everyone, be it custom cards, iron-on designs, or stickers. So, let’s start with this machine and see what it entails!
What Can Cricut Joy Xtra Do?
This is an amazing tool for cutting, writing, drawing, and foiling to make popular projects like stickers, custom cards, T-shirts, decals, and more. It is compatible with over 50+ materials, including paper, vinyl, iron-on, and cardstock. One useful plus point for using this machine is that it can sync with your home inkjet printer as well. You can also print and cut designs. With its fine-point blade, it can create intricate designs with almost perfection and precision. In addition, it can write, draw, and foil too.

This tool is also compatible with varying material sizes, like US letter and A4 free. To use the machine, you have to use the Design Space app, which can be connected to it via Bluetooth. You can upload and cut your own designs or choose from the Design Space library.
What Are the Main Features of Cricut Joy Xtra?
The most important aspect of using this machine is that it is beginner-friendly. With the help of the Design Space software, even someone new to Cricut machines can easily create amazing DIY projects. One does not need to be a pro to use this machine.
The app comes with around 3,000 pre-installed “Make It Now” projects. These are in-built projects that are complementary to the software. You will have to connect the machine to your device to use them. First, you need to connect your machine and choose a project. Next, you have to click on “Make It,” and you are good to go. These projects are suitable for various materials and for every skill level, be it a beginner or professional crafter. With the Design Space app and its library of hundreds of fonts, images, and lines, customization isn’t a problem for any art and craft person.
How to Setup Cricut Joy Xtra?
The first step is to download the free Design Space app on your laptop, desktop, tablet, or mobile device. If you don’t already have one, create your Cricut ID.
If you already have one, log into your account, select Machine Setup, and tap on your machine model from the list to begin the setup process.
When prompted, connect your device and machine via Bluetooth. The name of the machine can be found on the bottom of your machine.

Your machine will then begin updating before you can use the Cricut Joy Xtra. Ensure that you have at least 30 cm of space behind your machine, as your designs will roll through the back and might get damaged if hindered. So, have an ideal space of at least 30 cm in front and behind the machine.
In the included welcome pack, you will get some practice materials. To use them, follow the steps on your device to carry out your test cut and insert the vinyl into the machine under the two white tabs. Once setup and activation are done, you can perform the on-screen steps to begin cutting. Once the cut is complete, an unload button will appear on your Design Space screen. Tap this button, and the smart vinyl will unload from the machine.
It can also be used to draw and foil. Simply insert the pen or swap over the blade when prompted to do so in the app. It can cut materials up to 21.6 cm wide and 1.2 m long. When using smart materials, the print and cut function can also be used to create stickers for notebooks, jars, tumblers, and more.
Summing Up
With all these major features, crafting is much easier with the Cricut Joy Xtra. It is a perfect tool for beginners who want to venture into DIY projects for mugs, shirts, cards, stickers, etc. It is perfect for every space with cutting compatibility of over 50 different materials, compact design, and lightweight. We hope that reading this blog will help readers to make informed decisions on their buying journey. Enjoy extra with Cricut!
FAQs
What can I do with a Cricut Joy Xtra?
With this machine, one can do many DIY projects. These include stickers, T-shirts, decals, labels, cards, mugs, and even hats! One only needs a compatible device and a high-speed internet connection to get started on this crafting machine.
What are the dimensions of Cricut Joy Xtra?
The machine’s dimensions are (Width x Length x Height) 12.48 in x 4.46 in x 5.87 in (31.71 cm x 11.32 cm x 14.91 cm), and it weighs 6.03 lbs (2.73 kg). Its sleek design makes it the lightest among its competitors, making it comfortable and portable.
Does Cricut Joy Xtra require a PIN code to connect with Bluetooth?
No, you can follow the basic instructions to pair your machine with your Windows/Mac computer or iOS/Android mobile device, and you’re good to go.
Visit here to Know More: Cricut Explore Software
Twitter
Pinterest
0 notes
Text
How to Use a Pen on Cricut: A Beginner’s Guide
If you are a Cricut user, then you know that Cricut is a brand that offers crafting machines capable of making a variety of projects using different materials. But did you know that you can now create DIY projects using Cricut pens without cutting any design? Yes, it is possible! Cricut provides many pens and markers in different colors for beautiful crafts. To make projects involving pens, you must know how to use a pen on Cricut.
If you do not know what a Cricut pen is or how to use it, don’t worry. This blog will explain everything related to a pen. To learn all about these pens and how to use them, just read the blog!
What Is a Cricut Pen?
Before we find out how to use a pen on Cricut, we should know what a Cricut pen is. Cricut pens are specially designed to work with Cricut machines to write on various materials. Using this pen, you can make banners, greeting cards, bookmarks, labels, notes, and more.
With Cricut models like Maker, Venture, and Explore, you can use special-sized pens that you can fit into the machine’s pen holder. However, if you want to use a pen with Cricut Joy, you will need to buy a separate pen, which will not work with other Cricut machines. The Cricut Joy is a small machine, so any regular pen will not work with it. You will have to get a pen that is specially made for Cricut Joy.
Types of Cricut Pens
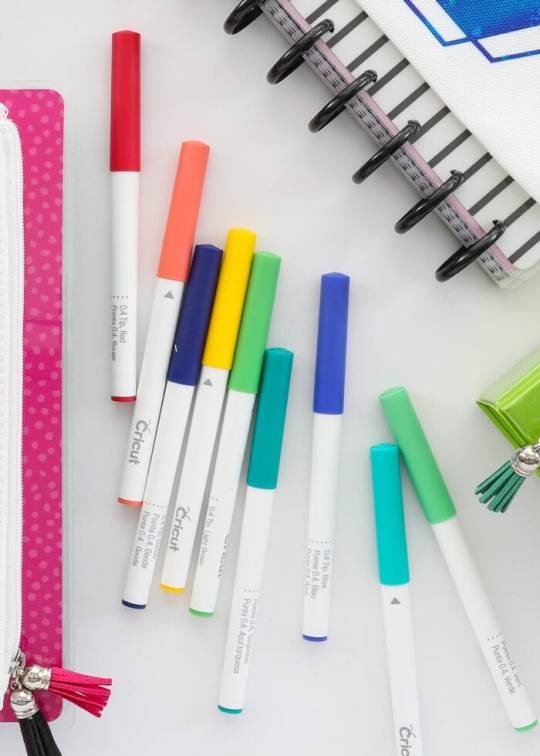
Cricut has a variety of pens, and you can use one of them depending on the project you are making. I am writing about all of them. Here, you will learn about these pens and which one is suitable for your project. It is important to know about pens before learning how to use a pen on Cricut.
Pens
Most Cricut writing projects are made with Cricut pens. You can insert the pen into the machine clamp, which is good for writing. These pens come in a wide variety of thicknesses, colors, sheens, and weights. They have fun color combinations. These pens include fine-point pens, extra fine-point pens, and normal pens. Their thickness ranges from 0.3 to 0.8 mm.
Markers
When you need to write on projects that require thick writing, you can use markers instead of pens. Its thickness ranges from 0.6 mm to 1.0 mm.
Fabric Pens
This pen is specially created to draw on clothes. You can fit the pen into clamp A just like any other pen and start drawing. You can use the Cricut Maker/Explore machines to draw.
Infusible Ink Pens
If you want to draw on your sublimation projects, you can use infusible ink pens. It will draw on the infusible ink sheet, and you can transfer it to a mug or coaster project using a heat press machine. Remember, do not use this ink with non-sublimation projects.
Free Hand Markers
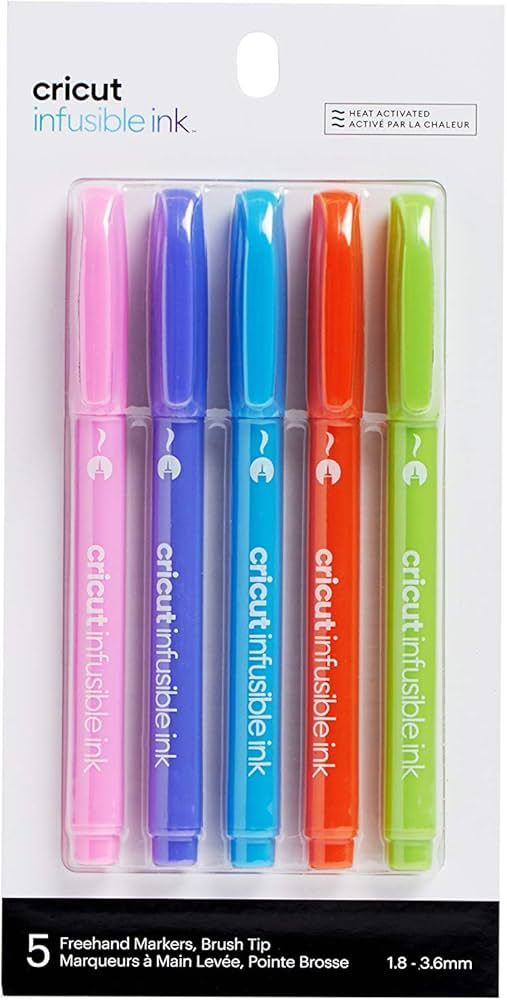
These are markers that do not fit in a Cricut machine. If you want to use it, color the design by hand.
How to Use a Pen on Cricut: 3 Easy Instructions
Now you know all you need to know before you go on to learn how to use a Criuct pen. Let’s learn how you can actually use a pen on your project.
Step 1: Insert a Pen into Your Cricut Machine
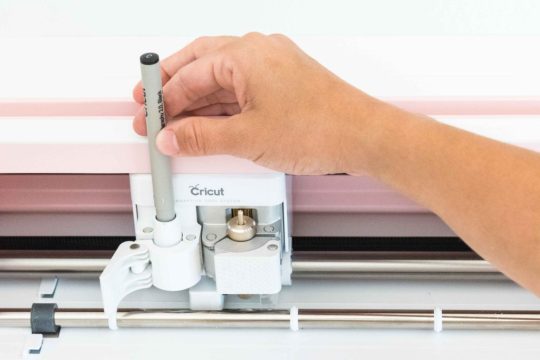
To install the pen, you have to turn the machine on and then open clamp A of your Cricut cutting machine, which is located on the left side. Once the clamp opens, you have to remove the pen cap and press it into the camp. When it reaches its limit, you will hear or feel a click. It means that the pen is well installed. Now, you close the camp.
Step 2: Choose a Design or Font
Before using a pen on your Cricut machine, you should first choose or create a design using the Design Space software. Cricut has thousands of ready-made designs, fonts, and images. You can select any one of them and draw on your machine. If you want, you can also create a design on your own. You also have an option to upload an image from the internet.
Step 3: Draw Your Design
After that, you can draw the design using your material. You must put the material inside the Cricut Maker, Explore, or Venture machine. Once the material is loaded, you can start drawing the design on it, and when it is done, you can unload the material. Your project is now ready.
Conclusion
In conclusion, you have to know that you have learned here how to use a pen on Cricut, and now you can easily create projects with the help of pens. Cricut has various pens, and you can use any that fit the needs of your project. To use a pen on your Cricut machine, you should choose a design that you will draw using your material. Once the design is ready, you can install the pen into the machine and draw the design on it.
Frequently Asked Questions
How Can I Install Cricut Pen?
To draw any image or font on a Cricut machine, you will need to install a pen. You can install it in a few steps. Here is how you can do it.
First, pick a pen suitable for your project.
Then, open the clamp A of your machine.
Next, insert the pen inside the clamp and close the camp
Now, the pen is installed. You can start crafting.
What Can I Make from a Cricut Pen?
A Cricut pen is a tool that can be used for multiple projects. You can create beautiful bookmarks, cards, invitations, coasters, t-shirts, and so much more. If it is someone’s birthday and you want to make banners, you can use a Cricut machine for it. Apart from these, you can make cute doodles, stickers, and labels using these pens. You can use these projects for your home decor, or you can also give them to someone you love.
Can I Write on Fabric with a Cricut Pen?
Yes definitely! Cricut has a fabric pen specifically designed for fabrics. You can use the pen with the Cricut machine and draw any design on the fabric. To use the fabric pen, you must first select a design on the Cricut Design Space app and then install the pen on your cutting machine. After that, load the fabric onto the machine and draw your design on it.
0 notes
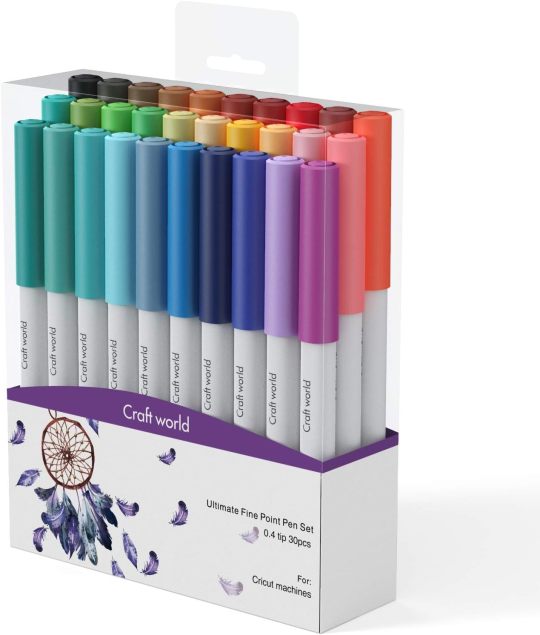
Photo

Cricut Freebies | Tutorials for Your Cricut Projects on Frugal Coupon Living. Take a look a how to upload your own images, how to monogram, how to save all your new (and old fonts), how to transfer vinyl and more. #cricut #freebies #cricuttutorials #cricutfreebies #svg #svgfreebies
0 notes
Text
Cricut Setup on Computer: A Guide for Windows and Mac
A few days back, my friend called me who had just bought a new Cricut machine. Her name is Ria, and she was a little anxious about setting up her new Cricut machine for the first time. Since I’m a Cricut user and a professional DIYer, I helped her with the Cricut setup on computer. Just like my friend, there are many users out there who are conscious about their Cricut setup. Hence, I’m writing this blog to tell you everything that I told my friend to help her.
I share my best crafts with my readers, and it makes me happy. When I get queries on my social media accounts, I get excited to answer each one of them. And the best type of answer is writing a blog. Here, you will get to know everything about a Cricut machine setup on a Windows and Mac computer. So, let’s start here!
Minimum System Requirements for Cricut Machine Setup
The first thing you all keep in mind is that your Cricut machine runs with a special software called Cricut Design Space. You’ll have to install this software on your computer in order to use your Cricut and design anything you want.
Moreover, when you’re installing the Cricut software, you have to ensure that your system is compatible with it. Below, I’m mentioning some minimum system requirements that your system should have. Only you can proceed with the Cricut setup on computer.
For Windows
For Mac
When you know about the minimum system requirements, the Cricut setup on a PC becomes easier.
Download & Install Cricut Design Space on a Computer
Before getting ahead with the Cricut setup on computer, let’s learn to download and install the Cricut app. Check out the procedures below.
Windows
Explore the steps below to download and install the Cricut software on your Windows computer. Check them out here.
Finally, your Windows PC has the Cricut Design software to start designing with your machine.
Mac
Check the steps below to learn how to download the Cricut Design Space on a Mac computer. Then, you can proceed with the Cricut setup on computer.
Now, you can enjoy the Cricut Design Space software to start creating your unique designs and beautiful projects.
Cricut Setup on Computer (Windows and Mac)
Here is the final part: Cricut setup for beginners. Check the steps below to setup your Cricut machine on your computer.
Windows
After checking the minimum system requirements for Windows PC, you can finally move ahead to setup your Cricut on Windows. I’m using the Bluetooth connection to connect the devices together. Check the steps below.
That’s it for your Cricut setup on a Windows computer. Now, let’s explore the steps for a Mac computer.
Mac
After looking at the Cricut setup on Windows, it’s time to check the steps involved in setup on a Mac computer. Check the steps below.
These are the simplified steps for the Cricut setup on a computer. Now, you’re good to go with your Cricut machine and create anything you want.
FAQs
How Do I Setup My Cricut on Mobile Devices?
Connecting Cricut to mobile devices is a simple process; check here:
Is Cricut Machine Compatible With Windows 10?
Yes, the Cricut machine is compatible with Windows 10 and all the latest versions. You can get the Cricut app on a Windows 10 PC and go ahead with the designing process such as uploading the designs or creating unique projects and much more.
Do I Have to Pay for Cricut Design Space?
Absolutely not. This software is from Cricut, which is completely free for beginners as well as existing users. You can get this software from Cricut’s official website for free. In the free version, you’ll get unlimited things to explore, such as a design library, free templates, texts, fonts, and many more. However, there is a subscription plan known as Cricut Access that you can consider if you want premium features for professional crafting.
Visit: install cricut design space app
cricut create connect to computer
Source: https://desincricut.wordpress.com/2024/04/24/cricut-setup-on-computer-a-guide-for-windows-and-mac/
#install cricut design space app#cricut create connect to computer#cricut.com setup download#cricut.com/setup#cricut.com sign in#cricut.com/create#cricut.com/register#cricut.com design space#www.cricut.com/setup#www.cricut.com/setup login#cricut.com setup mac#design.cricut.com/setup#install cricut design space#cricut new product setup#cricut new product device
0 notes
Text
How to Download Cricut Design Space on HP Laptop: Full Guide
Gratitude to all my beloved readers! I know you have missed me a lot since I haven’t been able to post a blog for the past few weeks. These days, most of my readers ask how to download Cricut Design Space on HP laptop. If you have any creative ideas and are willing to give them a proper shape, then you needa Cricut machine and its designing software. Also, the app runs smoothly with all Cricut models and supports PCs and smartphones.
Design Space is Cricut-registered software that operates with the Cricut machine. This easy-to-use app unlocks doors to new opportunities, encouraging you to step out of your cocoon and show the world what you’re capable of. Besides, Design Space comes with a library containing a different set of images, fonts, and customized projects.
Follow this blog post, as it will guide you through the system requirements, getting the app, and creating the Cricut account.
What Are Cricut App System Requirements for Laptops?
Cricut Design Space is free software that works with the Cricut machine. This design software runs smoothly with Windows, Mac, iOS, and Android devices. Before beginning with how to download Cricut Design Space on HP laptop, you need to ensure that your devices are fulfilling the basic system requirements. Below are the system requirements that your HP laptop must have to make the app run on the system:
Your device must come with Windows 10 or an upgraded version with Intel Dual-Core or a similar processor. Apart from that, it must have 4GB RAM with 2GB free disk space with the availability of a USB port and built-in Bluetooth. Furthermore, your screen resolution should be a minimum of 1024px x 768px. In addition, the device must have 2-3Mbps speed while downloading and 1-2 Mbps for uploading the file on the app. Also, the Cricut Design app runs smoothly without an internet connection.
After encountering the basic requirements, it’s time to make progress and take the app download process on board.
How to Download Cricut Design Space on HP Laptop?
HP laptop supports the Windows operating system, meaning you must follow the steps below to get this Cricut app. By referring to these pointers, you will find starting and finishing the download process a lot easier. Pay special towards the details given below:
First, turn on your HP laptop and open the search engine (Chrome, Firefox, or other).
After finalizing the search engine, move to the Cricut Design Space setup page (design.cricut.com).
Next, agree to the Cricut Terms of Use and Privacy Policy by ticking the box.
Following this, click the Download button and wait until the download process progresses.
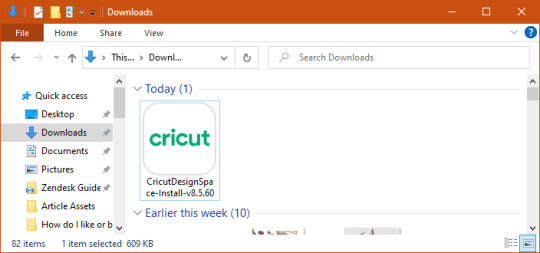
After downloading, open the browser or go to your device’s Downloads folder.
Now, double-click the downloaded, and a small pop-up window will suddenly appear on your screen.
At this point, choose I trust the application option, and a window will display the installation status.
Equally important, open the installed app, and the Cricut sign-in official page will open.
If you are a new Cricut user, you must create an account using your login details.
Now, right-click the icon > select Pin to Taskbar, and the shortcut will be within easy reach.
Finally, you can enjoy using the Cricut Design app and make uncountable designs.
By referring to the above-said steps, you can quickly finish how to download Cricut Design Space on HP laptop without having any serious errors.
How to Create a Cricut Account on a Laptop?
After getting this Cricut software on your respective system, you need to create a separate account. With the account, you will be able to give physical form to your ideas as you choose. Have a look at the total number of steps you need to take while creating an account:
Start the process by opening the Cricut Design app and then click the Create a Cricut ID option.
After that, you will get connected to the new web page.
Now, enter your email address, password, first name, last name, and country.
Next, cross-check the details and hit the box on the left side of the Terms & Conditions.
At this point, your Cricut account will be created by clicking the Create Cricut ID.
Conclude the process by opening the Cricut app and creating new canvas projects.
This tutorial has made it clear that Cricut software plays a crucial role for all DIYers. A user with incomplete information about how to download Cricut Design Space on HP laptop might need help to create their favorite designs. Also, they will need more time to connect their cutting machine model with the app before the cutting process.
Frequently Asked Questions
Question: How Can I Install Cricut Design Space on My Mac?
Answer: Get to know about the steps that need to be taken while getting the app on a Mac system are:
First, open the Safari search engine and visit the Cricut app’s official portal.
Next, press the Download option and choose the folder where you want to get the app.
At this point, when the download is complete, double-click the downloaded file.
Afterward, move the Cricut software to the Applications folder and launch it.
Finish the process by installing the app, creating your account, or signing in.
Question: How Do I Purchase Items From Cricut Design Space?
Answer: The Cricut Design Space app permits the DIYer to buy images, fonts, and pre-customized projects from the library. The user can get these items by subscribing to Cricut Access and choosing the monthly or yearly plan. Moreover, they will also enjoy a 30-day free trial and learn about the benefits of this subscription.
Question: How to Download Cricut Design Space on Android?
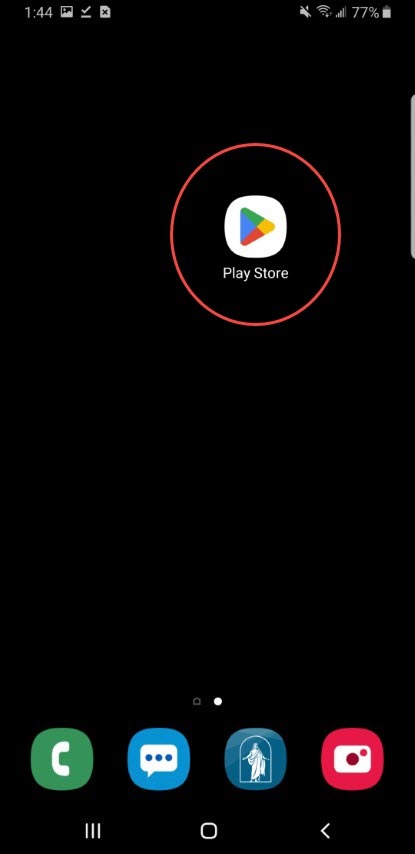
Answer: With the help of the below steps, you can easily install the Cricut Design app on Android devices:
First, open the Google Play Store and start looking for the Design Space app.
Next, press the Install button inside the green box on the right-hand side of the page.
With the installation of the app, sign in or create your Cricut ID with the login details.
Source :- https://designaccessoriesmart.wordpress.com/2024/04/24/how-to-download-cricut-design-space-on-hp-laptop-full-guide/
design.cricut.com/setup
cricut maker 3 accessories
cricut explore air 2 accessories
cricut new machine setup
0 notes
Text
How to Download Cricut Design Space on Mac: A Stepwise Guide
If you’re a Cricut user, you must be aware of the Cricut Design Space software. It is the Cricut app that crafters use to design and create DIY projects. This amazing software works excellently for all types of designs. If you don’t know how to download Cricut Design Space on Mac, I will tell you everything about it. Many Mac users often find it difficult to set up their Cricut machines on it. If you learn it, then you will surely not face any difficulty.
Without further ado, let’s jump into the steps for the Cricut Design Space download. Although this blog is specific for Mac computers, you can use it on any device of your choice except for Chromebooks. Now, let’s learn more about the Cricut software.
What is a Cricut Design Space?
Cricut Design Space is a specific design software created by Cricut. To set up a Cricut machine, users have to download and install this software on their devices. This software has many interesting features like creative designs, fonts, images, texts, templates, and everything else you need to create a design for crafting. Moreover, this software tool is
completely free, so you can create tons of beautiful projects without spending any money.
Well, if you want additional features and want to take your journey to another level, you should purchase the Cricut Access subscription, which offers loads of premium features for your everyday design.
How to Download Cricut Design Space on Mac?
When you know what the Cricut Design app is, you’re ready to download and install it on your Mac computer. So, let’s have a look at the steps to get Design Space for desktop.
Open an internet browser on your Mac computer.
Then, navigate to cricut.com/setup (Criuct’s official website).

After that, agree to the terms and conditions of Cricut and also its privacy policy.
Next, hit the Download option to get the latest version of the Cricut app.
Also, your Cricut Design app will move to the Downloads location.
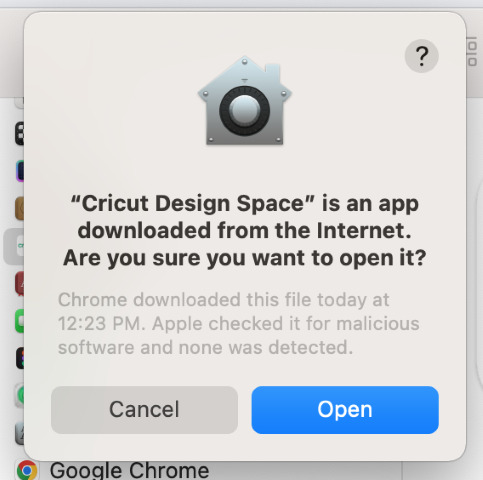
When your file is downloaded, drag its icon to the Applications folder.
In the following step, go to the Applications folder and click on the app.

Afterward, hit the Open option to start the Cricut software installation.
Now, log in with your Cricut ID and password. If new, create a new account.
https://cricutappforpc.wordpress.com/wp-content/uploads/2024/04/image-45.png
Finally, your Cricut machine will be set up on your Mac computer.
That’s how to download Cricut Design Space on Mac. When you know about the download process, you can set it up with any device and start your crafting journey.
How to Create a New Cricut Account?
As you know, you’ll need to perform a Cricut Design Space login or sign in during the Cricut machine’s setup on a device. Below are the easiest steps to create a Cricut account as a new user. Have a look at them.
To start, visit Cricut’s official website at cricut.com/setup on your internet browser.
Then, get the Cricut Design Space through the steps I have provided above.
After that, continue with the Sign in/Create a Cricut ID process.
Moreover, hit the Create a new ID option.
Fill in all the necessary fields, like your full name, country, email address, and password.
https://cricutappforpc.wordpress.com/wp-content/uploads/2024/04/image-46.png
Once everything is filled, submit the form.
Now, your account is created successfully on your Mac.
At last, your Cricut machine will prompt you to do a test cut.
Once you get a message for a test cut, it means your Cricut ID has been created, and you can use that account every time you sign in to your Cricut account.
Conclusion
Finally, you know how to download Cricut Design Space on Mac. It’s an easy process that anyone can perform. You must ensure that you have a strong internet connection to get the Cricut software hassle-free. Once you get this software, your path of creativity is clear, and you’re open to creating different designs you want. Please remember that you’ll need to create a new Cricut ID if you’re a new user.
FAQs
How Do I Change My Cricut ID?
If you want to change your Cricut Design Space account, follow these steps:
First of all, visit cricut.com and log in to your Cricut account.
Then, click on the welcome prompt to get the details of your account.
After that, select the Profile option from the left menu.
Now, hit the “here” option to do editing of your account.
Select the Edit option, provide your email address, and hit the Save option.
How to Get Cricut Design Space on My Phone?
Getting Cricut software on your phone is easy; check the steps below:
First, head to the Play Store or App Store on the phone.
Then, search for the Cricut Design Space app in the search bar.
After that, click on the Install/Get option to get the software.
Next, sign in to your account using your username and password.
If you’re a beginner, create a new Cricut ID.
How Do I Open My Cricut Design Space on My Windows PC?
To open your Cricut Design Space on a Windows PC, follow these steps:
Ensure that the Cricut app is installed on your PC.
Then, go to the Search bar on the Windows.
Now, type the Cricut Design Space option and hit enter.
Then, hit the Install option and open the app on your desktop.
Read more: Cricut New Machine Setup
install cricut design space app
cricut.com/setup
cricut.com/setup mac
Source: cricut design space login
#cricut design space login#cricut.com/setup mac#cricut.com/setup#cricut explore air 2#cricut explore 3#install cricut design space app#Cricut New Machine Setup
0 notes
Text
How to Connect Cricut to iPad: Two Methods Explained!
As you know, Cricut machines are amazing. You can use them to create thousands of creative stuff like tote bags, keychains, cards, stickers, decals, etc. If I tell you about my crafting journey, it's too long. I started when I was a teenager just for a hobby, but I didn't realize when it would become my business. Well, if I share my story, this blog isn't enough. So, let's discuss the matter we are here for. I know you want a little clarity on how to connect Cricut to iPad. Don't worry; I'll share everything with you to make your work easier.
My blog is dedicated to iPad users who are struggling with their Cricut machines and want to learn how to connect them to an iPad. Let me walk you through this guide and teach you the process.
Introduction to Cricut Design Space
Before we move forward to learn how to connect Cricut to iPad, let's learn about its special software and its excellent features. This application or software is designed for Cricut users to create creative designs. Also, you get multiple features in this software, including different fonts, texts, templates, and designs; you'll be able to design anything you want. To get this software or application, you need to install it from Cricut's official website.
How to Download Cricut Design Space on iPad?
If you want to download and install the Cricut Design app on your iPad device, follow the steps below.
That's it for the Cricut Design Space download on an iPad. Now, let's check its connection process.
How to Connect Cricut to iPad via Bluetooth and USB?
Here comes the final step, which is to connect your Cricut to an iPad. To do this, you'll need to use the Bluetooth pairing option. Go through the steps below to learn the connection process.
Method 1: Using a USB Cable
If you want to connect your Cricut to a wired connection like USB, you need to follow the steps below. A wired connection is helpful in many ways and can be set up hassle-free.
That's how to connect Cricut to iPad with USB. After this, you can utilize your Cricut to create anything.
Method 2: With Bluetooth
Check the steps below to learn Cricut setup on iPad via Bluetooth. This wireless connection is amazing and will work best for you.
That's how to connect Cricut to iPad via Bluetooth. If you want, you can go for a wired connection such as USB.
FAQs
Why Does My iPad Need to Download the Cricut App?
There are certain minimum system requirements you need to check before you download the Cricut app on your iPad. For instance, your iPad version should be 11 or the latest. Also, your internet connection should be strong and within 2-3 Mbps to download and upload. If everything meets, you can connect Cricut to iPad.
How Do I Connect Cricut to My Computer?
To connect your Cricut machine to a computer, follow these steps:
What to Do When My Cricut Is Not Connecting to My iPad?
When your Cricut is not connecting to your iPad it can happen when your Cricut or iPad device is not connected to the power supply. If you're using a USB cable, your cable may be loose, and if you're using a Bluetooth connection, maybe your device's Bluetooth option is not ON.
Visit: www.cricut.com/setup login
install cricut design space app
Source: https://setupcricutoncomputer.wordpress.com/2024/04/06/how-to-connect-cricut-to-ipad-two-methods-explained/
#www.cricut.com/setup login#www.cricut.com/setup#install cricut design space app#install cricut explore air 2#cricut design space#cricut maker bundle#cricut new machine setup#cricut.com/setup#cricut explore 3#cricut.com/setup login#cricut create connect to computer#cricut new product setup#cricut new product device#cricut install setup#connecting cricut maker to computer#cricut setup create account#cricut cutting machine setup#cricut setup on computer#setting up new cricut maker#cricut setup log in#cricut account setup#cricut printer setup#www.cricut.com setup login
0 notes
Text
How to Get Free Cricut Design Space: A Complete Guide
If you want to unleash your creativity, the Cricut cutting machine will help you on this crafting journey. During each turn of the path, the free Cricut Design Space will be the best passenger. It is the company’s registered designing software that assists in creating and personalizing projects. Besides, the Design Space app supports all Cricut machines and is compatible with Windows, Mac, Android, and iOS devices.
This easy-to-use app helps users simplify complex designs with its tools and other features. Plus, it has unlimited images, fonts, and pre-made projects to turn ideas into reality. The Cricut software is undoubtedly available, but it also offers a subscription plan called Cricut Access. This monthly or yearly plan allows users to use thousands of images and text fonts.
This blog will give you full details about the app system requirements and installation process on your respective device (computer or mobile phone).
System Requirements for Downloading Cricut Design Space
You must fulfill the system requirements if you look forward to getting free Cricut Design Space on your desktop computer or mobile device. The reason why it is essential to know about the requirements is that you will get to understand whether your device is going to support this software or not. Go through the details and come across with the minimum system requirements:
For Windows
Operating System
Windows 10 or later
Intel Dual Core or similar AMD processor
4GB RAM with 2GB free disk space
Available USB port or wireless Bluetooth connectivity
Display: Min 1024px x 768px screen resolution
Internet Connectivity
Download: Min 2-3Mbps
Upload: 1-2Mbps
For Android
Operating System
Android 10 or an upgraded version
Mobile devices or tablets that don’t support Chromebooks
Performance entirely depends upon chipset, processor speed, and manufacturer
Internet Connectivity
Download: At least 2-3Mbps
Upload: At least 1-2Mbps
How to Download Free Cricut Design Space on Windows?
After collecting details about the Cricut software system requirements, it is time to learn how to get it on the Windows system. Have a look at the steps that you need to take to get the software on your computer system:
Initiate the process by opening the web browser of your choice and then go to Cricut Design Space’s official portal.
Next, tick the box given next to Terms & Conditions and click the Download option.
After the download ends, double-click the file available in your device download folder.
A small window will open, sharing your PC’s free Cricut Design Space installation status.
Next, go to your computer’s home screen and open the installed app.
Then, create your account by entering your first name, last name, email address, and country.
Now, tick the Sign-In button to enjoy the app on your Desktop.
How to Install the Cricut App on Android Devices?
If you are an Android device user and want to get this easy-to-use app on your mobile, then install it by reading the details below:
First, switch on your mobile device and go to the Google Play Store app.
Afterward, enter Cricut Design Space inside the search box, and the app will appear at the center of your mobile screen.
Now, tick the Install option to start the app installation process.
Next, you will see the free Cricut Design Space app next to other installed apps.
Finally, open the app, sign in, and create your canvas design.
Since you’ve become aware of the Cricut app system requirements and the installation process, it is time for you to dive in and create your DIY projects. If you are a beginner, you should make paper cards, stickers, decals, cake toppers, banners, and so much more. I wish you luck while making your first project on the software.
Frequently Asked Questions
Question: Can I Download Cricut App on My Device for Free?
Answer: You can download the Cricut app for free on your respective computers and smartphones. Craft lovers can get the Design Space for their PCs from Cricut’s official website and install it on their smartphones via the App Store or Play Store. But this designing software comes with a subscription plan called Cricut Access.
Question: What Projects Can I Make With Cricut App?
Answer: Since the Cricut app has various tools, it can easily make different projects from different materials. The names of the crafts are written here:
Greeting cards
T-shirts
Tumblers
Wall decals
Custom-made mugs
Tote bags
Question: How Do I Install Cricut App on My iOS Device?
Answer: Follow the below steps to get the Cricut designing software on your iOS devices:
You need to start the process by opening the App Store on your mobile phone and searching for Cricut Design Space.
After getting the app, click the downward arrow and double-click your power button.
When the app is installed on your device, open it and create your Cricut ID.
Finally, you can start making new projects anywhere and anytime on the app.
Source: free Cricut Design Space
#design space signin#free Cricut Design Space#install cricut design space app#cricut new product setup#cricut.com sign in#cricut.com/create#setting up your cricut maker#cricut explore air 2
0 notes
Text
How to Make Cricut Thank You Cards: Easy and Simple Steps
Welcome back, guys! Look what I made today: Personalized Cricut Thank You cards. I am creating this craft to appreciate my grandfather, as he has done many things for my family. Adding a personal touch to the card will make it look like it was made out of love and respect. Beyond the shadow of a doubt, greeting someone verbally is nice, but expressing it with words directly touches the heart.
I am a little of an introverted person and don't share my feelings with anyone easily, but this time, I have made up my mind and will value his sacrifice to satisfy our unnecessary demands. After making the final decision, it's clear that I will need some crafting items and a complete process to complete the craft.
Stay with this blog until the end and collect full-fledged info about making this custom project with the cut-die machine.
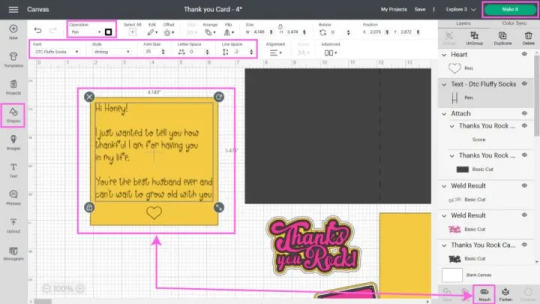
Step 1: Draw a Thank You Card on Cricut Design Space
Commence the method of designing this do-it-yourself project by going to the Cricut sign-in page and creating your account. Now, open the app and press the New Project on the left side of the page. After a few seconds, you will connect to the canvas, press Upload and your image from the Recent Uploads, and tick Add to Canvas.

Before taking a step towards cutting the card:
Decrease your card size and ensure that the details are visible.
Select the card and click Ungroup to edit each layer of this DIY project.
Choose Thanks You Rock, press the Weld button, and repeat the same with the white layers inside the cassette.

In the middle of the card, you will see a straight dotted line; that's where you will score to make the card easily foldable. After observing that, select the line given under the Layers area, tick Operation, and choose Score from the list. Then, select both layers to connect your Cricut Thank You cards with the score line and press the Attach option.

At this time, write the message of your wish, change its color, font, and size, and add a heart at the end. Next, return to operation dropbox, tick the Pen from the list, and press the Attach option. After selecting the option, press the Make It and share the card with the Cricut machine.
Step 2: Choose Your Material and Start Cutting
After finishing your design, choose On Mat, followed by the Continue option, and start selecting material for your craft. In order to design this project properly, your machine will perform four different kinds of cuts. For this project, choose Medium Cardstock (80lb) and load the tools and materials depending on the cut you will do.

Remove the plastic sheet from your Cricut material and place it on the cutting mat using the brayer tool to remove the bubbles and spaces. Please turn on your craft plotter and insert the mat inside it. After finishing the cutting process, bend your mat and release the design. Follow the same steps with the rest of the mats until you get all the pieces of your Cricut Thank You cards.

Step 3: Stick All the Pieces Together
Give a pat on your shoulder as you have smoothly completed the most crucial steps of designing this custom-made project. It's time to connect all the pieces and make this personalized project from a craft plotter. Start sticking the pieces by taking the Thank You Rock word.

Next, stick the square inside your card and the cassette design. If you need clarification, go to Design Space and check the sequence. Now, give rest to your Cricut Thank You cards and let all the pieces stick together. There you go! Keep your head up and shine like a star in the community after sharing it.

Conclusion
There are many other ways to give perfect form to this custom-made project elegantly. But this is my favorite as it gets complete using fewer crafting supplies and is easily understandable. Apart from that, any fresher or expert can make it out of any Cricut cutting machine within a few minutes. Also, you can start your own business by making and selling Cricut Thank You cards in your society.
Frequently Asked Questions
Question: How Do I Make a Card With Cricut Joy?
Answer: If you have Cricut Joy and want to design any card, then go through the steps given below:
First, select the Thank You created from the Design Space application.
Second, peel off the protective sheet of the card and stick its front part on it.
Third, load the mat into the Joy machine and let the cutting process begin.
At last, remove the extra material with the scraper tool, and your card is ready.
Question: On What Occasion Can I Create Cards With My Cricut?
Answer: Cricut is such a fantastic craft plotter so you can make different cards from it. The ideas include:
Valentine's Day
Birthday
Graduation ceremony
Mother & Father's Day
Halloween party
Thanksgiving party
Christmas
Question: Is It Compulsory to Make a Card in Cricut Design Space?
Answer: Since the Cricut cutting machine is compatible with the Design Space app, all DIYers must create card designs. You will find multiple images, fonts, templates, and ready-to-make projects. Also, you will enjoy the Cricut Access plan, where you will get to use an ever-growing library offering multiple images, fonts, and customized projects.
#Cricut Thank You Cards#cricut explore air 2 software#How to setup cricut maker#cricut explore air 2#cricut setup
0 notes
Text
How to Make Cricut Graduation Cards: Full Tutorial
Eighteen years of laughter, tears, birthday parties, prom nights, and dates. It will be a big day for every high school student to bid farewell to their high school and start a new chapter of their journey. Being the senior craft teacher of the school, the principal has given me the duty of making invitations for each of them. I feel lucky that she trusted me, and I would give her the best Cricut graduation cards for this event.
Creating attractive and simple invitations is undoubtedly a difficult task, thanks to my Cricut machine, as it will help me finish the craft on time. I can make several easy-to-make projects from Cricut products for this occasion, but my favorite is customized slider cards. In this tutorial, I've shared step-by-step instructions for making this project.
Step 1: First, Open the Cricut App and Create a Design
Start by opening the Cricut app and pressing the New Project button. Next, tick the Upload option and press the Upload Image box. Now, press the Browse icon, select the image from your system library, and save it. Afterward, go to Recent Upload Images, choose your image, and hit the Insert Image button. Following this, separate the layers by pressing Ungroup under the Layers panel.
Then, find the card base in the Layers section and change the fold line to score lines by selecting Score from the Operation section. At the same time, attach the scoreline and card base by selecting the Attach option in the lower right-hand corner. After that, repeat the same steps for the slider piece and four rosette pieces.
Select the Text tool and enter the text into your Cricut graduation cards. After finishing the text, select the whole text and apply a new font, color, size, and style. Now, you must change the line by returning to the Operation section and pressing the PEN option. Besides you can also change the color of your pen depending on your choice.
Next, cross-check that the design has been made correctly; if there are any mistakes, then instantly change it. Following this, tap the Make It, which appears blank on the top right-hand side of your canvas.
Step 2: Now, Choose the Material for Your Craft
You will see the mat on the mat preview page and press the Continue option. Also, select your material from the list of your choice and load the tools into the respective Clamps. Use a brayer or scraper tool to stick the material on the cutting mat properly. Then, you must prepare for the final writing and cutting process.
Step 3: Next, Insert the Mat Into Your Cricut Machine
Equally important, tap the Double Arrows button to ensure your cutting mat is in the correct position. When your craft machine starts flashing the C button, it indicates that it's time to cut the material. Please press the button and let it make the Cricut graduation cards without any disturbances. You must repeat the same steps until all the layers have been cut.
Step 4: Lastly, Assemble All the Layers
Following this, weed out all the materials from the Cricut mat with your weeding tool or tweezer. Ensure that you are accurately using the tool without causing any damage to the mat or design. It's time to assemble all the layers and give it the shape of a proper invitation.
Start assembling the card by sticking the diploma and Cricut graduation cards with strong adhesive glue. Keep both pieces aside for a few minutes, and let the glue dry completely. Afterward, fold the rosette pieces from the score lines back and forth or as you wish. Now, add a tiny bit of glue to one of the rosettes and stick the second piece of the same color. Then, add glue to the other end and attach both, making a continuous piece.
Just take your time and start folding the rosette flat while gathering all the pleats. Ensure that all the pleats are folded correctly, and it will instantly begin to take its shape. Next, put a small portion of glue in the center and put a diploma or graduation cap on it. Also, set aside the mat and messaging panel. After that, place the yellow mat on the blue base and the sentiment layer on the yellow mat.
Following this, fold the slider piece with the pull tab cutout at first, start with valley fold, mountain fold, and then again valley fold. After doing that, flip the slider and add glue at the bottom of the tab. Flip the pull tab and stick it correctly with the slider, ensuring the edges line up.
Now, you need to add glue on all sides of the slider and attach it to the top of the sentiment layer. Simultaneously, pull up the pull tab and add the rosettes to the raised portion. Once it is done, fold the card base and add the messaging panel on the base. Lastly, complete your Cricut graduation cards by adding the slide to the front of the card base.
That's it! Making this customized project from your cut-die machine will take a few minutes. Moreover, you can also create different crafts for this event, such as dorm moving bags, window signs, cake toppers, car decals, and many more.
Source Url:- cricut graduation cards
Visit here for more Information:- Cricut Design Space,
Cricut Design Space app,
Cricut design space login
#cricut graduation cards#Cricut Design Space#cricut.com/setup#Cricut Design Space app#cricut.com#cricut design space download#cricut design space login#design.cricut.com/setup explore air 2#cricut.com/setup maker 3#cricut.com/setup app#cricut.com/create
0 notes
Text
How to Make Labels With Cricut: A Step-by-Step Guide
Have you ever faced the issue of putting a lot of similar things in one place and finding it difficult to pick the one you need? You sure would have! Everyone faces that problem now and then. To avoid this issue, you can put labels on your boxes. These labels are most useful in a pantry. You can create these labels easily. To learn how to make labels with Cricut, read this blog as I am writing down the procedure for creating these labels.
You can use two methods to make the labels. The first method is by using vinyl. After cutting the material, you transfer it to the boxes. The second method is to use a Cricut pen to print on the material. Once made, you can apply it to the boxes. In this write-up, I will be showing the vinyl method. So, let’s start with the supplies and tools you will require for Cricut labels.
What Materials Do I Need to Make Labels?
To learn how to make labels with Cricut, you must first know the materials and tools you are going to need. These items will be required to create labels using Cricut vinyl.
Cricut cutting machine: To make labels, you can use Cricut Maker, Explore, or Joy machine. You need the machine to cut your design.
Cutting mat: A mat is very important as you need it to put the material on before you place it inside the Cricut machine.
Premium Cricut vinyl: Itis the material to cut the designed font and then place it on your boxes.
Weeding tools: You need this tool to peel your design from the material.
Transfer tape: A transfer tape is used to transfer the design to the boxes or its destined place.
How to Make Labels With Cricut: 4 Easy Steps
Once you have collected all the required items to make labels, you can proceed to make them. There are four simple steps to crafting these labels, which I will describe in simple but detailed terms.
Step 1: Create a Design in Cricut Design Space

To write on labels, the first thing you need to do is pick a font in the Cricut Design Space app. Next, you can customize the shape and size of the font, edit it however you like, and then cut it with the machine. Not only can you choose a font from the Cricut software, but you can also upload any design or font to the app. For example, you can create a design on your computer or phone and then upload it to the app.
One thing to keep in mind while making a design is to choose a simple font that you can easily weed after cutting. Also, consider the size of the label in relation to the size of the box. It should neither be too small nor too large to ensure it looks good.
Step 2: Cut the Labels on Your Cricut Machine

Once the design is ready and you are learning how to make labels with Cricut, click on “Make It” in the Design Space app. After that, the software will arrange all the words in the best possible way to minimize material waste. To start cutting, put the Cricut vinyl on the cutting mat and then load it into your machine. When everything is set, press the “Load” button on the machine. After the cutting procedure, you have to unload your machine and then take off the mat.
Step 3: Weed Out Your Design
After the cutting is done, peel off the labels from the material. Use the Cricut weeding tool to ensure precise peeling without damaging the label material. This tool is designed for accurate weeding.
Step 4: Transfer the Labels to the Surface
Once the weeding is complete, apply transfer tape to the top of the label sheet. Use a scraper tool on the transfer tape to make sure the vinyl letters stick well. Now, cut the labels, and they will be ready for transfer to your surface.

Conclusion
In short, learning how to make labels with Cricut is not that difficult. If you have the required tools and know the process, you can do it in less than 30 minutes. Labels are very important in a household, especially when it comes to your pantry. They help you find the right box at the moment and prevent confusion. To make a label, you pick the text on the Design Space app and cut it on your Cricut machine. And then, you place the design wherever you want.
Frequently Asked Questions
Is Cricut Good for Making Labels?
Yes, it is. A Cricut machine is great for making labels at home. It offers a variety of designs and fonts to choose from that enable you to create stunning labels to suit your needs. There are two main methods to make labels with Cricut: using vinyl material or a pen on other materials.
How to Make Labels Using Cricut Pen?
Making labels with a Cricut pen is easy. You will need just three things: a Cricut machine, smart paper, and a pen or marker. Start by selecting and designing your label on the Design Space app. After that, use your machine to print the design onto smart paper using a pen. Once you print the design, cut it into your desired size and shape and apply it wherever you want to place the label.
How Can I Design Labels for a Cricut Machine Myself?
Designing labels on the Cricut Design Space app is equally easy. Just download the software on your operating system and log in with your Cricut username and password. Once logged in, you can choose fonts and designs from the app, customize their shapes and sizes, and even upload your own designs. Once your design is ready, you can continue to cut or print it using your Cricut cutting machine.
Visit here For More Infomation: how to make labels with Cricut
Cricut Easy press
Pinterest
0 notes
Text
How to Make Card on Cricut: A Stepwise Tutorial
With Mother's Day around the corner, I am getting really confused about how to make her feel on top of the world on that day. Right now, thousands of handmade ideas are running in my mind, but I always end up choosing a custom card as the final choice. Whether you are already an expert or just a newbie, making this project is the best decision as it is easy to make and can be formed within a few minutes.
If you just added a new Cricut machine to your art room, then get started with how to make card on Cricut. Without a doubt, the Cricut machine can craft various types of cards from any material within a few minutes. With the help of this blog, you will be able to design this project with ease.
Step 1: Sign in to Cricut Software & Make a Design
With your PCs or smartphones, log in to your Cricut Design app or create your account. After doing that, connect your devices and go to the Uploads button. Now, tick the Upload Image > choose your image from the Downloads folder and then hit the Insert Images option.

Also, select the whole card and click the ungroup option present under the Layers panel. Next, select the entire text and then click the Weld option visible at the bottom of the panel. At this stage on how to make card on Cricut method, you will notice that all the card materials will be divided into four different layers.

At this point, you will see a line inside the blue card and change the Operation from Basic Cut to Score. To be on the safe side while scoring the lines, pick both lines and tick the Duplicate option. Then, change the line alignment to Center from the drop-box.

Step 2: Write Text on Your Card
Now, tick the Text toolbox and start writing your text inside the box. After completing the text, move it inside the particular card portion and make the necessary changes. Next, change the operation to Draw-Pen and instruct the machine to start writing by selecting the Attach box.
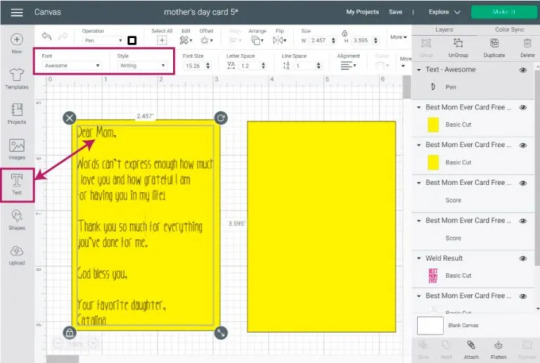
Carry forward the how to make card on Cricut process by flattening the text and then moving it to the card portion. After that, select all the layers and change the size of the card if you want. At this time, tap the Make It on the top-right corner of the canvas.
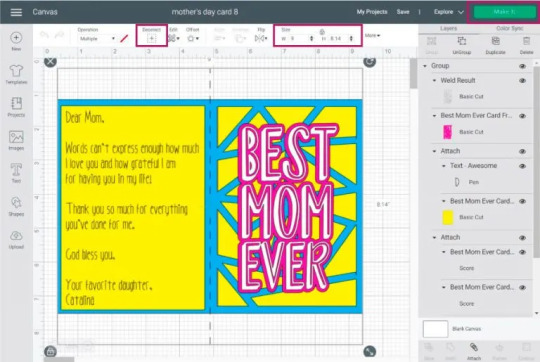
Step 3: Set Your Material on the Mat
Tick the Mirror icon on the left-hand side to ensure that the text has been placed properly on the mat. Then, click the Continue option and choose the material you will use for the project.
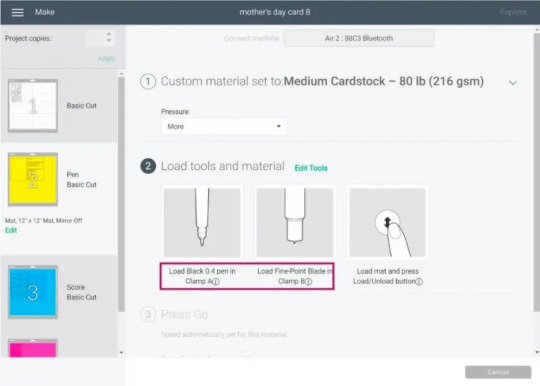
In addition, hit the C button and let Cricut products do the rest of their work without making any changes in the middle of the process. When the machine is done with cutting, carry on with the next step of how to make card on Cricut.

Step 4: Show off Your Cricut Card
At this stage of creating a custom card on a craft plotter, assemble the text using a household iron and the remaining material using a Cricut Glue gun. And then, keep it aside and let the glue settle down. Once the glue has dried, surprise your mom by giving her this handmade card with breakfast on her bed.

Compliments to you! You've now learned how to make card on Cricut,with all the steps that are part of the process. Apart from this style, you can also try some new styles of cards that you can design out of your Cricut machine.
FAQs
Question: What Are Cricut Card-Making Tips for Beginners?
Answer: To make the best Cricut card by yourself, you need to follow certain tips shared below:
Use the correct cutting machine and tools while making a card
Choose bold fonts with color, style & size
Write heart-warming text that will express your feelings
Create a background and design from the Cricut Design app.
Question: What Different Card Styles Can I Make With My Cricut?
Answer: The various card styles that you can easily make out of your machine are as follows:
Pop-up card
Handbag card idea
3d style
Layered style
Shaker card
Shaped card
Shadowbox style
P.S. I Love You style card
Question: Which Cricut Machine Is Best for Making Cards?
Answer: Several Cricut models are known for creating every project, especially cards. Cricut Joy is a compact cutting machine for creating DIY cards as it supports the Cricut card mat, which can make four cards at the same time. It is highly preferred for making last-minute crafts, especially cards.
0 notes
Text
How to Make a Monogram on Cricut: A Step-by-Step Guide
Isn’t it amazing to always be eager to learn how to make a monogram on Cricut? Then, you will be a part of the journey where you will get all the information, from basics to the end. I have done thousands of DIY projects over the past few months, but designing custom-made monograms is close to my heart. From wine glasses to hats, you can combine them, making them look more casual and trendier.
There are many models of Cricut machines that you can customize to your liking. Besides the cutting machine, essential supplies will make this project more manageable. Apart from that, you can also create and sell your respective monograms in the market and start your own business.
To get the best results out of the Cricut machine, keep reading this blog until the end and avoid jumping into any section while going through it.
Step 1: Start By Designing a Monogram Design
Begin by choosing the Text toolbar and entering your initial inside. Afterward, go to the Fonts section, press System, and type monogram inside the Search box. Now, click the monogram system you want to choose, and it will directly appear on your canvas.
Following this, increase your monogram size and select the Ungroup option. Afterward, tick the Shapes tool and choose anyone from the list. Next, put the shape on top of your monogram design, select both, and then tap the Slice option at the bottom side of your screen. Then, repeat those steps and slice down the remaining monogram designs.
Once the first step of your how to make a monogram on Cricut is finished, tick the Make It button present at the top right side of your canvas. After a few seconds, you will connect to the preview page and check that the design and the alignment are perfect on the mat. Now, choose the compatible material and tools for the cutting process and tick the Continue button.
Step 2: Cut Your Monogram Design
At this point of the process, unbox your Cricut products and then turn on your cut-die machine. After that, remove the plastic sheet from your material and place it on the Cricut cut mat with the scraper or brayer tool. Following this, start loading your cutting material into your craft plotter.
Step 3: Weed Out the Monogram Design
After the cutting process, in this section on how to make a monogram on Cricut ends, unload your mat from the cut-die machine. Now, remove your weeding tool and remove the extra material from the design. However, you need to be very careful while using the tool because small mistakes can damage your design.
Step 4: Transfer the Design to Your Glass
At completing this step, clean your glass with baby wipes in a circular motion. After adequately clearing the design, shift it to the glass and cover it with the transfer tape. To properly change the design on the glass, use a scraper tool to remove any space between the glass and the design.
Step 5: Cover Your Design With Etch Cream
In this step, while performing how to make a monogram on Cricut, remove the tape from your design and cover it correctly with the etching cream. Now, you must wait at least 05 minutes and clean it with baby wipes or keep it under the cold water. You must ensure the water isn’t too hard; otherwise, it might inappropriately clean the cream.
Step 6: Show Your DIY Monogram
Finish making this do-it-yourself monogram by removing the remaining pieces of the cream with tweezers, baby wipes, or an alcohol-free wipe. Next, you need to wait for a few minutes, and your monogram is all set to be used for various purposes. Moreover, you can also upload your project images on an online platform and share your creativity with people worldwide.
Frequently Asked Questions
Question: What Are the Different Types of Monograms That Can Be Made With Cricut?
Answer: Since Cricut is a multi-tasking cutting machine, the various monogram projects are as follows:
Question: What Are Some Styles of Monograms Available in Cricut Design Space?
Answer: While using the Cricut Design Space app, you will come across various monogram styles that will be available for DIYers. The names of the styles are as follows:
Question: How to Make a Monogram on Cricut Design Space?
Answer: Read the below steps to know about the steps of making monograms with Design Space:
Visit: cricut.com/setup
www.cricut.com/setup login
install cricut design space app
cricut.com setup mac
design.cricut.com/setup
Source: https://cutting-setup.com/how-to-make-a-monogram-on-cricut-a-step-by-step-guide/
#cricut.com/setup#cricut.com/register#cricut.com design space#cricut.com sign in#cricut.com/create#cricut.com setup mac#cricut.com setup download#install cricut design space app#install cricut explore air 2#cricut design space app#cricut explore air 2 setup#cricut create connect to computer#cricut new product setup#setting up your cricut maker#cricut explore air 2
0 notes
Last Seen Blogs

venomchicago
VENOM 🕷 CHICAGO

garp19-sophialea-blog
Why is Frida Khalo famous?

beprofree-blog
Sans titre

dcntrlzdd
DCNTRLZD
dcntrlzdd
DCNTRLZD