#Document Bulk Uploader
Explore tagged Tumblr posts


Text
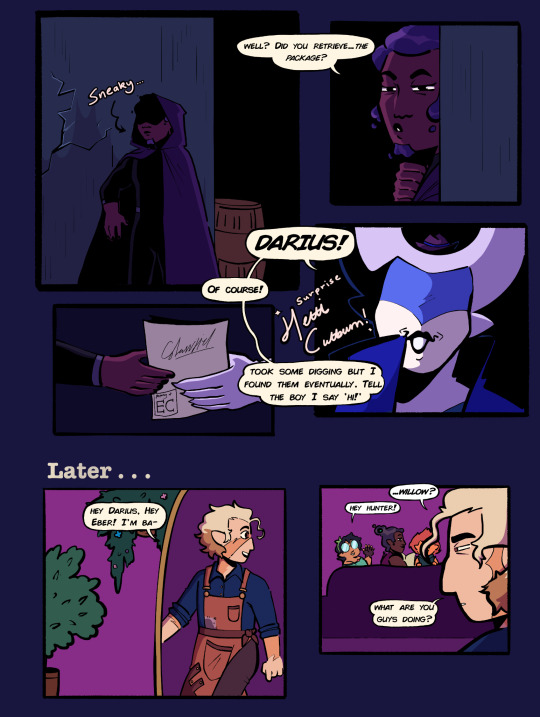
[ID: an 11 panel comic featuring characters from the owl house. Panel 1- a cloaked Darius sneaking around a wall. panel 2 he peaks around the corner, saying "well? Did you retrieve...the package?". Panel 3 Hettie Cutburn (who has old Hollywood style text announcing "surprise Hettie Cutburn!" next to her) says "Darius! Of course! Took some digging but I found them eventually. Tell the boy I say 'hi!'". Panel four- she hands documents labeled "classified" to Darius. Later, Hunter (post timeskip) walks through a door in Darius' home, saying "hey Darius, hey Eber, I'm ba-". Next panel- Darius, Willow, and Eberwolf on the couch. Hunter says "...willow?", She replies "hey hunter!", he asks "what are you guys doing?
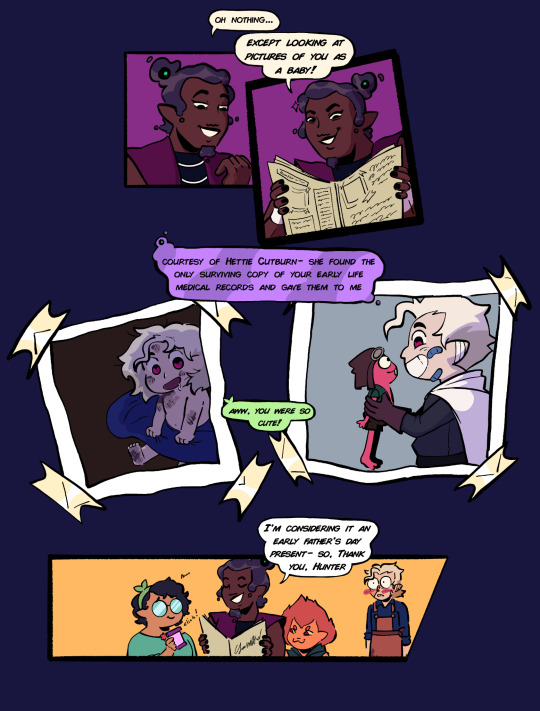
Darius says "oh nothing...except looking at pictures of you as a baby!" Holding up the documents from earlier. We see two pictures of a younger hunter framed like panels- the first is of hunter as a baby/toddler aged hunter freshly sprouted out of the ground with a blanket around him, covered in dirt, while the second one shows a young scout Hunter covered in bandages receiving his sprig plushie. Darius' narration reads "courtesy of Hettie Cutburn- she found the only surviving copy of your early life medical records and gave them to me". Willow says "aww, you were so cute!". The final panel shows Hunter looking embarrassed/stunned as Willow takes a photo of the documents, and Darius says "I'm considering it an early father's day present- so, thank you, Hunter". End ID]
MERRY DADRIUS WEEK!!! Thank you to @sergeantsporks for hosting! There's other prompts I wanna do but they'll probably be late (maybe I'll do them in bulk and upload them on the final day). Til then here's a silly comic!
#the owl house#toh#dadrius week#hunter toh#hunter deamonne#darius deamonne#won't tag eber and willow cause they're barely there#also i realize that op isn't really a fan of hubtlow i. literally forgot while making this the brainrot was so strong#it's not explicitly romantic though so hopefully it's not obtrusive. i know ships are allowed but i don't wanna annoy anyone yknow?#anyway this was 90% an excuse to draw baby hunter even though it was 90% me practicing drawing Darius#he's fun to draw! i just struggle w drawing him consistently but like. i do that w/ most characters from illustration to illustration#i finished this right under the wire. executive dysfunction and exams really got my ass#but it's finished now! not perfect but i haven't really made a proper comic since my final piece this year#on account of that one took me like 6 months#i needed comic recovery time 😭#also hope the ID isn't an issue for anyone since it's a bit spartan. i was trying to trim down it's length since a) it's long as fuck#and b) this fandom is- respectfully- whimpy as hell abt image IDs#but anyway yeah! happy dadrius week#and also happy fathers day if you celebrate!#i got my dad 'do androids dream of electric sheep' and he was really happy w/ that :]
754 notes
·
View notes
Text
The Ellipsus Experience*
From someone who’s been using Google Docs for over a decade and LibreOffice for. Idk a year, probably.
*I don’t have a collaborator helping me out with this, so this is a solo-writer’s experience: please keep that in mind
Ellipsus is a writing website (not an app) that can be considered a collaborative alternative to Google Docs. They are [anti-AI] and don't plan on going back on this "barring significant regulatory changes." It has been compared both to Google Docs and LibreOffice. As stated above, I've used both of these other products (heavily) for a while and feel I'm properly familiar enough with both of them to say this one is... well deserving of the comparisons.
TL;DR
Ellipsus is essentially a GDocs/LibreOffice lovechild that is currently in open beta, works well, and I do recommend it as a Google Docs alternative for any collaborative needs just because it’s free and anti-AI, though it is only on par with LibreOffice so far as I can tell for solo work.
I was made aware of Ellipsus through a Blazed post here on Tumblr, though I haven't actually heard of it anywhere else, but I could just have completely and utterly forgotten if I'd ever seen them elsewhere. They also have a presence here on Tumblr, @ellipsus-writes, if you would like to have a browse for yourself.
All hyperlinks will be underlined and associated words will be between these [ ] brackets.
Getting Started
Ellipsus does not use a password system. You sign up/log in with your email, which will then send you a one-time code to get in. While signing up, the site asks a few questions while setting up, such as if you write with others (options boil down to yes, no, and not yet) and where you heard about Ellipsus from. You also initially choose your light mode/dark mode preference here. It can also use your system setting.
Once you’ve gotten through that, you’re taken to a document to introduce you to the features and capabilities of Ellipsus, though it doesn’t appear to really be… properly up-to-date… but it isn’t too badly divergent as to be too confusing (notably, there isn’t a “merge this draft” button to click like the doc tells you). It also offers several links to useful posts they’ve made to help you get started.
You will then be brought to the dashboard and unleashed.
Their layout is very simple, clean, and minimalist. There aren’t a thousand features, but sometimes you don’t need a thousand features. The site itself is easy to navigate and none of the toolbars or pages even look a little bit crowded, which is nice. Unfortunately, this does mean your settings are also very barebones. You can’t delete your account directly from the settings, but you can change your display name and email from the account settings page. Here, you can also download your logs or stored data. Unfortunately, though you can have an avatar/icon, you have to use Gravatar for it, with no exceptions. Other than that it displays the first two letters of the email associated with your account. This may be visible when collaborating with others.
On Desktop (and basics)
The dashboard (home page) shows your works, with a separate tab/page/button to show anything shared with you. Here is where you make new documents or manage existing ones, or make and manage folders.
Folders are named, and can have descriptions of their contents. They can be repeatedly nested for your highly-organized needs. (Or for organizing parts/arcs/chapters/etc. for your stories.) They can be bulk deleted by deleting the parent folder (the very first folder they’re all in).
When making a new document, you can either make a completely blank one or import a markdown (.md) file. Documents can be named here and renamed later. If you’re coming from Google Docs, you’ll have to use a desktop to download your documents as a markdown (.md) file in order to reupload it directly to Ellipsus. This is currently the only way to upload a file from elsewhere.
While writing, Ellipsus offers a focus mode (the cup icon) that will automatically hide all other panels/icons except for the outline (table of contents) and the icon to leave focus mode.
The other panels available are on the left- and right-hand sides of the screen. Both panels can be collapsed to increase screen space for the document. The right panel can be collapsed directly from within its additional menus through the arrow icon on the top left of the panel or returned to the expanded panel menu through the squares-in-a-square icon on the top right of the panel. It also has a keyboard icon (which the welcome doc calls a controller) to check available keyboard shortcuts, as well as a gear icon, both on the top right. (Will expand on the gear menu later.) The right panel also contains the “create a new draft” button, which becomes “compare changes” within drafts (expanded on later).
Formatting can be done through the bar on the bottom (basic* only) or through the formatting icon on the right panel. The default font is Literata and the default font size is 16pt. The default font color will change depending on your choice of light/dark mode, but you can pick from ten colors (nine, plus the default that changes per light/dark mode). If you don’t want to use the formatting bar/menu, markdown (like Discord) is also available for use while writing, and can be set to apply automatically.
Outline is simply a table of contents that allows you to jump between headers in your document. This makes it much easier to navigate a document, particularly if it’s long and you want to get from Point A to Point T but they’re a few tens of thousands of words apart (or more. Idk how much you write).
Find and replace is exactly that. It also has “match case,” “whole words only,” and “use regular expressions” toggles to better finess the find and replace experience.
Spellcheck will be elaborated on in the writing section.
Version history will open either the main document or the specific draft you’re on in a new page, where you can go between versions and pick on to overwrite with, if that’s what you want. I don’t fully understand how this works, but you can go through each day the document has been edited and pick a time you would like to replace the document with. These versions are saved at what appear to be every ten minutes of the clock, as every version of my stuff has shown only //:/0 am/pm as available within the version history.
Comments, chat, and collaborators will be expanded on in the collaborating section later.
Share and export is expanded on in the export section.
Document info becomes draft info when on a draft. This just gives you information like when it was made and last edited, as well as who edited it last and owns it (I think?). It also shows the word count, character count, and the estimated reading time.

The last option is “get support” and just opens to show you buttons to where to share feedback, find overviews/guides, or contact support from the team.
The left panel is where the main document and all associated drafts are kept. Remember to name your drafts appropriately so you don’t lose them; these can be duplicated, deleted, or renamed at any point.
*Basic formatting includes bold, italic, underline, and undo/redo. Ellipsus’s floating bar has these as well as a shortcut to the formatting menu, indent and unindent, and search. This is “basic formatting” for this review.
On Mobile
Since I first logged in on desktop, I’m not sure if this pops up when you do an initial login on mobile, but there was a pop-up that offered extra guidance in using the site on mobile, though I declined it. This is still a good feature, and not something you stumble on all the time. The site does look and work identically across devices, and the icons used are all identical. This is also a good thing.
On mobile, the basic formatting bar is moved to the top of the screen to account for pop-up keyboards, and side panels are hidden away. Thankfully, across screen sizes, the buttons for basic formatting aren’t absolutely tiny, though this does mean you may have to scroll to access parts of the basic formatting bar depending on the size of your display. The left panel has a “papers” icon on the top left, to the left of the cloud icon, and the right panel is within a “hamburger menu” (the three lines stacked on each other) on the top right, to the right of the bell icon (notifications for collaboration reasons).
Actually typing and working on mobile tends to be a bit buggy, but this is a beta so I’m not going to hold it against them. I’ll likely be using mobile as desktop through landscape full-screen on my iPad instead of vertically. The screen tends not to follow as you write, disappearing behind the basic formatting bar and/or the keyboard, which is a bit annoying. It says it will default to device settings with the double-spacing (expanded below) but doesn’t appear to always work on mobile.
Additionally
There are a few more settings on the right panel in the gear menu on the top right. These include features regarding smart formatting, collaboration, and display. This is the “editor settings” menu.
Smart formatting has quotes (from " to “ when typing quotation marks), ellipses (changing the three periods to one symbol …), markdown shortcuts (*and* such, like Discord), double-space period (tapping space twice will insert a period; unchecked will do as your device does), and en and em dashes (– and — from -; there is an option of “- - for —” or “- - for – as well as - - - for —”).
Collaboration has toggles for live cursors and collaborator avatars for when collaborators are viewing alongside you.
Display allows you to turn off the floating basic formatting bar (desktop/landscape only), turn on “invisible characters” (like paragraph symbols, spaces, etc.) or the word count, and is also where you can change from light/dark/system.
These additional settings (aside from light/dark/system) apply across your account, so you don’t have to do it per device as with other settings.
Actually Writing* With Ellipsus
*I used pre-written things for this review
Ellipsus synchronizes practically immediately. I don’t have anyone else to do this with, but between my own account on different devices, there’s a negligible amount of lag, which is notable considering my laptop is currently trying to die on me.* Different users** (or yourself on another device) are flagged with a colorful live cursor with their display name attached, which moves accordingly and swiftly to wherever they are in the doc, including if they’re navigating through the text using the arrows on their keyboard (for mobile hiding the keyboard might not remove your cursor, and for desktop opening a different window will not remove your cursor). When the other user** (or, again, yourself) highlights something, it is replicated in yellow for the other. The highlighting is surprisingly reactive and can follow per-letter (again, between me, myself, and I).
Spellcheck can add languages, has “accept” or “ignore all” options, offers multiple suggestions for (detected) misspellings, remembers what was “ignored” after leaving the document and returning. This has to be run through for every device you open the document on, which is a pain when you have fifty characters who have names the dictionary has beef with. The English dictionary appears to be on par with LibreOffice (disappointing) (the “se” in “per se” gets marked) (fanfiction will be painted in red). Detected misspellings (whether they are or aren’t) are both underlined and highlighted in red; the “first” detected misspelling with have both a highlight and an underline, but subsequent instances (“inactive” instances that you do not have selected) will only be underlined.
Additional languages currently available (Jan 2025) consist of: English (US, AUS, GB, CA), German, Spanish, French, Italian, Korean, Dutch, Russian, Polish, Portuguese, and Ukrainian.
If you want to change the font or text size, it currently (Jan 2025) applies across the entire document or draft’s corresponding paragraph style. This means the only way to have differently-sized portions in your document at this time is to have an individual paragraph with a different paragraph style (headings 1 through 4, paragraph/body, caption) applied, as they all have different font sizes associated with them.
There is also an optional word count displayed at the top of the screen next to the focus mode icon/notifications (depending on long or tall screen). It does display the word count with commas where appropriate.
My most favorite feature is that you can tab indent the start of your paragraphs. I’m not even kidding I love that so much. I don’t actually like the double-spacing (hitting the enter key twice for a new paragraph) format I do for fanfiction even though it looks better on AO3 that way, but having the ability to insert a tab indent just once and have it automatically carry through to each following paragraph…….. that’s so tasty. I’ve always hated writing on mobile because there’s usually no tab!!! It’s just there on Ellipsus!
Drafts are like a copy of the main document at the time of the draft’s creation. These are stored on the left panel menu and can be accessed simply by clicking them. This is useful more so for collaboration or when you’re struggling to pick an idea you like more. You can create these at any point, and merge them into the main document in order to make the content of the main document match that of the draft chosen.
Drafts can be compared to the main document through the “compare changes” page, accessible either from the “…” menu attached to the draft card on the left panel, or through the button on the right panel when you’re already in the draft. This “compare changes” page is where you’ll be able to do just that; additions are highlighted in green and anything removed is highlighted in red. On mobile you have to swap between the draft and the main document with the highlighted changes, but it’s laid out side-by-side on desktop. You can merge a draft with the main document from here.
You can also just make an empty draft and use it for things like notes and outlines and all that good stuff. They don’t have to be merged at any point. If you want a blank draft, though, you’ll either have to delete the whole doc within the draft or make a base blank draft at the start of your doc’s lifespan to later duplicate to edit when you need/want a blank draft.
*The responsiveness between me, myself, and I is notable because Google Docs lags so much for no reason, even if it’s just yourself on different devices in the same room. I’m doing this across three different browsers (Firefox, Safari, and DuckDuckGo) and three different devices (actively dying Windows laptop, iPhone, and iPad) it’s reactive and barely stutters, as opposed to how Google Docs needs to think about it across… itself (mobile app and Chrome browser, even!). Yes, I tested it to be sure.
**Disclaimer, again, I do not have friends to collaborate with to test otherwise.
Available Fonts
Here are all the currently available fonts (defaulted to 16pt when using the paragraph/body style). Photos* of just a few included because I’m doing this on mobile Tumblr and I can only use a few images so I’m picky. Also, this is all on dark mode, and the text color would be black if I were on light mode.
Baskerville
Caveat (#1)
Comic Neue
Courier Prime
EB Garamond
Inter
Literata (default font)
Merryweather
Monteserrat
Open Dyslexic
Raleway
Whatever this is? Doctor handwriting? Cursive Russian? (#2)
Roboto Mono
Sylexiad Serif (#3)
Ubuntu Mono


*Excerpt used is from the original concept Maddox and Li Hua, my ex-military dragon dad and his dragon daughter, were used in. It was originally in outside POV before I got bored with Darren. Sorry, Darren. (He’s still present later, just not as the POV character anymore.)
Importing
If you have a markdown (.md) file on hand, then go ahead.* Everything else you’re going to have to copy/paste in. Copy/paste will not automatically tab indent paragraphs like I extolled above even if there was a tab indent in the original text copied. The font will likely change to fit whatever you’re using on Ellipsus (it did for me between Liberation Serif -> Literata and Helvetica -> Literata) but it also won’t remove every single bit of formatting, so it’s not a completely exasperating exercise to copy/paste your works over. It won’t copy over things like headings properly, either, though that’s much less of a hassle than having to go back through and add all your italics back in.
For the sake of this review I did make my very first markdown (.md) file and... I honestly don't know what happened but about half of it was stuck in the "code" mode in the formatting section, which I couldn't figure out how to undo, outside of just copying the text (triple-clicking/tapping would select everything within the code block) and pasting it as plain text (ctrl/cmd+shift+v). I'm not sure you can paste as plain text on mobile (couldn't figure it out myself) so I, personally, am not going to be doing a whole lot of uploading previous stuff to Ellipsus. Other than this, importing a single-spaced (hitting the enter key once for a new paragraph) document will merge everything into a "single" paragraph, so I had to go through and separate all my paragraphs again so I could properly indent/unindent/apply other formatting as needed. I'll just completely re-type or batch copy/paste everything else in the future so I can have a better grip on the formatting.
*As stated way up at the start, you can upload a text file to Google Drive, open it in Docs (which makes into a .docx file, which they're working on allowing you to import as well), and then download that file as a .md file. This requires a desktop you can download/upload from. If you've never done this before, you can download as .md (and other file types) through the "File -> Download" section on an open document.
Exporting
This is accessed through the document directly instead of on the dashboard. It’s under “share and export” on the default right-hand panel menu.
You can “share” through two different methods. You can share a link to a document (logged-in users only or anyone with the link), which only allows for viewing the doc with zero editing abilities, and the entire document will be visible. The other option is a “snippet,” which is primarily what you’ll see pictures of when browsing the Ellipsus tag here; it’s a .png of a selected section of text* to create a slightly more interesting excerpt of what you’re working on. This helps your excerpt stand out without having to make it yourself. Example of a snippet with the default white background color:

(Snippets will export in only this font, but you can choose to keep any colored text.)
Exporting the entirety of the main document can be done by downloading as a PDF or markdown (.md) file. You can also copy it as HTML, markdown (.md), or rich text (.rtf). Most notable is a direct export to AO3 button! Ellipsus might tell you your blorbo’s name is spelled wrong, but it’ll let you upload your fic straight from the draft. ([Here’s] the official post about it.)
*You MUST make a selection of text in order to make a snippet; it won’t work if you don’t highlight anything for it to process. It also might be a bit slow, but a bit of patience will get you your .png to share.
Collaborating
… aha. I don’t know anyone currently using Ellipsus to review this with. Here’s paraphrased info off this [link].
Collaborating is done through email: your collaborator(s) have to have an Ellipsus account in order to actually work on the document. Inviting collaborators is done through entering their email, which will send them a link, which will bring them to the site where they will either make an account or log in to access the document. The owner of the document therefore knows the email of any and all collaborators, though other collaborators will only be able to see everyone’s display names. Collaborators can be given one of two roles with different permission levels: “can merge” means they can merge drafts into the main document, edit the main document, create drafts, as well as everything the next level can do; “can edit” can create drafts, edit existing drafts, and use the chat/comments features. Collaborators cannot invite or manage collaborators. Document owners can remove collaborators or change their role/access level at any time.
Information from Discord says this might be laggy and buggy, but the staff is looking into it.
Comments can be left through highlighting parts of the doc/drafts. Chat is a live chat to use while working together, or something, because I can’t test that.
Extras!
Their Discord server consists mostly of adults (age 18 or over) and offers opportunities to find collaborators of all stripes that also use Ellipsus. It has nearly 1600 members at the time of writing, though not everyone has chosen their roles, but of the approximately 500 reactions on the bot’s age role message, only nearly 40 chose the “under 18” role. It is a fairly active social space for the size, and doesn’t have an absolute hoard of channels. There’s even an art channel, with the description reading “original, human-powered art or credited or linked to the respective artist.”
They have a [blog] with resources/templates you can use to get started. You have to scroll through to find them since you can’t sort by the resource tag, but they’re pretty good templates for worldbuilding, story planning, and character information. I would recommend saving these as individual docs on their own and then copy/pasting the templates into the drafts of your stories to keep the information connected to the main doc you’re using it for. (Don’t forget to appropriately name all your drafts so you don’t lose anything.)
They have been in open beta since May 2024. There were apparently nine months of closed beta before this. They are also a former sponsor of NaNoWri(teNo)Mo(re) but [dropped them] when they made the stupid announcement about AI (2024).
Yes, you can use emojis on Ellipsus. Yes, you can have your leads text 🥴 to each other.
They are ellipsus_writes on Twitter/X and TikTok, ellipsuswrites on Instagram, and ellipsus-writes here on Tumblr (as mentioned way back at the start).
#ellipsus#BOUNCY. REVIEW.#if you wanna help me test ellipsus's collaborative abilities hmu asks and dms are open#review#site review#writers on tumblr#writeblr#queer writers#writer stuff#original writing#writing#writers#fanfic#fanfic writing#writing community#writerscommunity#writers community
6 notes
·
View notes
Text
Silverman, along with authors Christopher Golden and Richard Kadrey, allege that OpenAI and Meta’s respective artificial intelligence-backed language models were trained on illegally-acquired datasets containing the authors’ works, according to the suit.
The complaints state that ChatGPT and Meta’s LLaMA honed their skills using “shadow library” websites like Bibliotik, Library Genesis and Z-Library, among others, which are illegal given that most of the material uploaded on these sites is protected by authors’ rights to the intellectual property over their works.
When asked to create a dataset, ChatGPT reportedly produced a list of titles from these illegal online libraries.
“The books aggregated by these websites have also been available in bulk via torrent systems,” says the proposed class-action suit against OpenAI, which was filed in San Francisco federal court on Friday along with another suit against Facebook parent Meta Platforms.
Exhibits included with the suit show ChatGPT’s response when asked to summarize books by Silverman, Golden and Kadrey.
The first example shows the AI bot’s summary of Silverman’s memoir, The Bedwetter; then Golden’s award-winning novel Ararat; and finally Kadrey’s Sandman Slim.
The suit says ChatGPT’s synopses of the titles fails to “reproduce any of the copyright management information Plaintiffs included with their published works” despite generating “very accurate summaries.”
This “means that ChatGPT retains knowledge of particular works in the training dataset and is able to output similar textual content,” it added.
The authors’ suit against Meta also points to the allegedly illicit sites used to train LLaMA, the ChatGPT competitor the Mark Zuckerberg-owned company launched in February.
AI models are all trained using large sets of data and algorithms. One of the datasets LLaMA uses to get smarter is called The Pile, and was assembled by nonprofit AI research group EleutherAI.
Silverman, Goldman and Kadrey’s suit points to a paper published by EleutherAI that details how one of its datasets, called Books3, was “derived from a copy of the contents of the Bibliotik private tracker.”
Bibliotik — one of the handful of “shadow libraries” named in the lawsuit — are “flagrantly illegal,” the court documents said.
The authors say in both claims that they “did not consent to the use of their copyrighted books as training material” for either of the AI models, claiming OpenAI and Meta therefore violated six counts of copyright laws, including negligence, unjust enrichment and unfair competition.
Although the suit says that the damage “cannot be fully compensated or measured in money,” the plaintiffs are looking for statutory damages, restitution of profits and more.
The authors’ legal counsel did not immediately respond to The Post’s request for comment.
The Post has also reached out to OpenAI and Meta for comment.
The lawyers representing the three authors — Joseph Saveri and Matthew Butterick — are involved in multiple suits involving authors and AI models, according to their LLMlitigation website.
In 2022, they filed a suit against OpenAI’s GitHub Copilot — which turns natural language into code and was acquired by Microsoft for $7.5 billion in 2018 — claiming that it violates privacy, unjust enrichment and unfair competition laws, and also commits fraud, among other things.
Saveri and Butterick also filed a complaint earlier this year challenging AI image generator Stable Diffusion, and have represented a slew of other book authors in class-action litigation against AI tech.
15 notes
·
View notes
Note
Can you tell me more about this doc youre working on? Are you planning on making it public? Im new to wrestling and like the best friends stable a lot but the backlog of matches (including before aew) to watch is insane and im overwhelmed. Thanks for your answer in advance <3 hope you have a good day!
yeah to both questions!! it was a document of the timeline for the best friends + orange cassidy vs miro/kip/penelope feud, i put it together back in jan 2022. i want to post it here after im done cleaning it up-- it was really just notes and links to facilitate me giving a video presentation to my friends, and wasn't really meant to be legible for anyone else. i also did a bulk of the work before i got a sub to fite/triller, and I want to go in and add direct links to the episodes there because i know digging around the site for episodes is a pain.
i dunno how long that process is gonna take because im notoriously slow, so if you want a preview you can check it out here: https://wrestlezon.tumblr.com/BFOCvsMiroKipPenelope2020
(i dont want to post it early because changes/edits dont apply to people's reblogs)
all the dates are on there so you can go and track down the episodes via whatever way you can use to watch aew. they sometimes post clips/segments separately on youtube or twitter and i tried to provide those legit alternatives if i found them. the 12-character codes on there that usually start with BV1 are for bilibili.
im also relatively new to wrestling (i started this blog in jan 2022...) and around that time i saw a gifset of butler chuck taylor and went huh. what. how did this happen. why did this happen. and then tracked down what episode it was from and then worked my way looking forwards and backwards on show recap articles*. lots of CTRL+F-ing their names (lol) on the week-to-week recaps until I reached the beginning of the angle and the end. then i snooped around on, like, twitter by searching date ranges to see if they uploaded any "online exclusives" or supplementary material there. it kinda sucks having to do research homework for anything that isnt happening in the moment but i dunno how else youre supposed to go about it without asking someone directly or finding some giant effortpost someone made about it. cagematch is great for matches, but not for finding any segments in between. anyway i was "goin thru it" in 2022 so this was a valid use of my time and effort
*aew has recaps on their official site, the wrestling observer has recaps on their site (f4wonline), and theres cagesideseats also. only cagesideseats has an archive page, everyone else wants me to suffer through infinite-scroll and die!!!!
#askzon#honestly the worst part is that THIS FEUD ISNT EVEN THAT GOOD!!!!!!!! IT DRAGS!!!!!!!!!#<- wailing from someone who has only gotten through revising the incredibly boring first half of this#before this? orange's jericho feud. after this? orange's adam cole feud. then they were in the jeff jarrett zone. UGH!!!!!#the yuta departure arc was pretty good actually. when did that start. may 2022??#though i feel like getting the full impact of that requires knowledge of the miscellaneous bte bullying segments#and yutas notesapp tweet before he fought chuck at beyond#and the fact chuck and orange trained him wahhh and let him live on their couch for a while WAHHHHHH
4 notes
·
View notes
Text
April 2024 Patreon Announcements! Changes Ahoy!
Okay oof, April is here. I'm tracking the days until i get some of my outstanding bills paid. Just gotta hang on for a few more months!
Some notable announcements in terms of commissions and restructuring! (This is a long one, so please bare with me!) EDIT: I forgot its April 1st, so as to some assurance so people don't think I'm pulling legs, the updates are forreal.
=====
Firstly, Patreon-specific announcements. Monthly Fills starting this month will be free to view! The Feedback form (which is still open! Feel free to leave some if you haven't) points to people being fine with, and still willing to support me if patreon content was free, so I'm going to see how this goes! Voting will still be Patron only, and higher tiers will for now focus on voter benefits. This may change in the future pending on support and feedback! Fills and Doodles will NOT be directly posted to Patreon. I will be creating google drive folders that will have all the fills from now on. They will be posted to my medias too (discord, tumblr, pixiv, previews on twitter/X, pixiv), but spicier ones will not be posted where they wouldn't be allowed.
April 2024's Poll will be up shortly! and this month's Theme is Prank/April Fool's with the top 3 winners getting single stage fills! I know that we're supposed to be getting a sequence this month, but I want to more immediately address the fact that people are often displeased with the sequence winners due to kink and character tastes (understandably!). See below! I will still be doing Sequences, but they will be longer form projects separated from monthly content and having no deadlines so I can work on them at my leisure. They will also have their own polls which will only be repeated once the previous sequence is finished. =====
Commission Repricing Has Been Decided! Due to feedback, I've decided to implement a more moderate increase to commission pricing. Essentially, Waist up and Full body figures will be getting a 25% increase (to $50 and $75 respectively). Busts will remain the same price, as it's not a popular option, and some Extras will be receiving slight price increases. The form has yet to be updated, and the new prices won't come into effect until I announce that its done. I will also be offering an additional option that is less expensive than the normal figure prices, but pricier than the YCHs, where they'd be done similarly to the weekly stream doodles (ie. Very Quick one-session-and-done style pieces).
=====
Now the usual announcements! Due to fills becoming free, no new pieces will be going to the higher tiers. I'll still release the older fills slowly, but eventually, everything will be free to view! As such...
April 2022 and 2023's fills will be released and free to view! As per usual, I'll bulk upload them onto my drive and pixiv, and spread them out over the course of the week on tumblr and discord (twitter/X site getting previews). I'll also be putting up an April New Uploads Folder in my drive so people can keep up with what goes up this month, while deleting the February Uploads folder.
A new Reward Request Post will be going up, too! Patrons are free to leave one in there even if you already have one from last month's! February's requests will have expired though! So if those haven't been drawn, you will need to re-suggest them. March's will expire when May rolls around. See this document to see whats on the list, what expired, and what has been done!
=====
As always, thanks for the support! I'm hoping these changes will be favorably received by many of you! (and please bare with me as I updated all the stuff that needs updating 😅
2 notes
·
View notes
Text
AvatoAI Review: Unleashing the Power of AI in One Dashboard

Here's what Avato Ai can do for you
Data Analysis:
Analyze CV, Excel, or JSON files using Python and libraries like pandas or matplotlib.
Clean data, calculate statistical information and visualize data through charts or plots.
Document Processing:
Extract and manipulate text from text files or PDFs.
Perform tasks such as searching for specific strings, replacing content, and converting text to different formats.
Image Processing:
Upload image files for manipulation using libraries like OpenCV.
Perform operations like converting images to grayscale, resizing, and detecting shapes or
Machine Learning:
Utilize Python's machine learning libraries for predictions, clustering, natural language processing, and image recognition by uploading
Versatile & Broad Use Cases:
An incredibly diverse range of applications. From creating inspirational art to modeling scientific scenarios, to designing novel game elements, and more.
User-Friendly API Interface:
Access and control the power of this advanced Al technology through a user-friendly API.
Even if you're not a machine learning expert, using the API is easy and quick.
Customizable Outputs:
Lets you create custom visual content by inputting a simple text prompt.
The Al will generate an image based on your provided description, enhancing the creativity and efficiency of your work.
Stable Diffusion API:
Enrich Your Image Generation to Unprecedented Heights.
Stable diffusion API provides a fine balance of quality and speed for the diffusion process, ensuring faster and more reliable results.
Multi-Lingual Support:
Generate captivating visuals based on prompts in multiple languages.
Set the panorama parameter to 'yes' and watch as our API stitches together images to create breathtaking wide-angle views.
Variation for Creative Freedom:
Embrace creative diversity with the Variation parameter. Introduce controlled randomness to your generated images, allowing for a spectrum of unique outputs.
Efficient Image Analysis:
Save time and resources with automated image analysis. The feature allows the Al to sift through bulk volumes of images and sort out vital details or tags that are valuable to your context.
Advance Recognition:
The Vision API integration recognizes prominent elements in images - objects, faces, text, and even emotions or actions.
Interactive "Image within Chat' Feature:
Say goodbye to going back and forth between screens and focus only on productive tasks.
Here's what you can do with it:
Visualize Data:
Create colorful, informative, and accessible graphs and charts from your data right within the chat.
Interpret complex data with visual aids, making data analysis a breeze!
Manipulate Images:
Want to demonstrate the raw power of image manipulation? Upload an image, and watch as our Al performs transformations, like resizing, filtering, rotating, and much more, live in the chat.
Generate Visual Content:
Creating and viewing visual content has never been easier. Generate images, simple or complex, right within your conversation
Preview Data Transformation:
If you're working with image data, you can demonstrate live how certain transformations or operations will change your images.
This can be particularly useful for fields like data augmentation in machine learning or image editing in digital graphics.
Effortless Communication:
Say goodbye to static text as our innovative technology crafts natural-sounding voices. Choose from a variety of male and female voice types to tailor the auditory experience, adding a dynamic layer to your content and making communication more effortless and enjoyable.
Enhanced Accessibility:
Break barriers and reach a wider audience. Our Text-to-Speech feature enhances accessibility by converting written content into audio, ensuring inclusivity and understanding for all users.
Customization Options:
Tailor the audio output to suit your brand or project needs.
From tone and pitch to language preferences, our Text-to-Speech feature offers customizable options for the truest personalized experience.
>>>Get More Info<<<
#digital marketing#Avato AI Review#Avato AI#AvatoAI#ChatGPT#Bing AI#AI Video Creation#Make Money Online#Affiliate Marketing
3 notes
·
View notes
Text
How to Merge PDFs and Adjust Margins for Uniform Layout
When combining multiple PDF files into a single document, you may encounter inconsistent margins—especially if the files come from different sources or have been formatted differently. Uneven margins can make your final PDF look unprofessional and difficult to read. To create a clean, cohesive document, it's important to adjust margins for a uniform layout either before or after merging.
This guide explains how to merge PDFs and standardize margins across all pages for a polished result.
Why Margin Consistency Matters
Margins affect both visual balance and readability. Inconsistent margins can result in:
· Misaligned content or text running too close to the edge
· Uneven page spacing, especially when printed
· Awkward layout transitions between merged sections
Standardizing margins ensures:
· A professional and uniform appearance
· Better user experience, especially for printing
· Compatibility with binding or booklet layouts
Step 1: Merge the PDFs
Start by combining your documents into a single file. Use a browser-based tool like PDFingo.com to:
· Upload and reorder multiple PDF files
· Merge them into one unified document
· Download the final file securely in your browser
Once merged, you can begin adjusting margins across all pages.
Step 2: Adjust Margins Using a PDF Editor
Most PDF editors don’t allow direct margin editing like a word processor, but you can achieve similar results by:
A. Using Page Cropping Tools
Use software like Adobe Acrobat Pro or PDF-XChange Editor:
1. Open the merged PDF
2. Select the Crop Tool or Set Page Boxes
3. Define a consistent margin area by adjusting trim boxes or crop values
4. Apply the settings to all pages or selected ranges
This method trims content edges to simulate margin uniformity.
B. Adding White Margins with Background or Canvas Resize
Some tools allow you to expand the page canvas:
· Increase the page size slightly
· Position the original content centrally
· Add white space around as artificial margins
Tools like Sejda Desktop or Infix PDF Editor support this feature.
Step 3: Apply Changes and Save
Once your margins are adjusted:
· Preview the document to ensure alignment looks correct
· Save the updated file with a new name
· Test print a few pages if the PDF is intended for physical use
Tips for Margin Adjustment
· Use consistent units (e.g., inches or millimeters)
· Apply changes in bulk to avoid manual errors
· Keep content centered after resizing to preserve layout
· Check page numbering and footers—they may shift during cropping
Final Thoughts
Merging PDFs with consistent margins results in a document that looks clean and professional, whether viewed on-screen or in print. Although adjusting margins in PDFs requires a few extra steps, the improved layout and readability are worth the effort.
Use a simple online tool like PDFingo.com to merge your PDFs first, then use a PDF editor to refine the margins for a polished, unified appearance. With the right tools and approach, your final PDF will be both functional and visually consistent.
0 notes
Text
📲 Go Paperless with Ekychub: The Future of KYC is Digital
In today’s digital-first economy, businesses need to onboard users quickly, securely, and without unnecessary paperwork. Manual KYC (Know Your Customer) methods are not only time-consuming but also prone to delays and errors.
Ekychub’s Paperless KYC API service is the perfect solution for businesses looking to verify customer identities instantly—without printing, scanning, or uploading physical documents.

🔍 What is Paperless KYC?
Paperless KYC refers to the process of verifying a customer’s identity using digital methods, without any need for physical paperwork. It’s faster, more secure, and fully compliant with Indian regulatory standards.
Using Aadhaar-based OTP eKYC, PAN validation, and bank account verification, businesses can now complete onboarding processes in less than a minute—all from within their app or website.
⚙️ Ekychub's Paperless KYC API Features
✅ Real-Time Verification
Verify Aadhaar, PAN, UPI, and more instantly using secure and fast APIs.
🔐 Secure & Compliant
Fully encrypted and aligned with UIDAI and regulatory compliance standards.
🧾 No Paperwork Required
No more document uploads or manual checks—go fully digital.
💼 Designed for Businesses
Built for fintech, lending apps, insurance firms, payment gateways, and any business that requires identity verification.
🔄 Bulk KYC Options
Need to verify multiple users at once? Ekychub supports bulk verification for large onboarding campaigns.
🚀 How Does It Work?
User submits Aadhaar or PAN
Ekychub verifies through secure API calls
Response with verified details is returned in seconds
You onboard the user instantly, with confidence
It’s that simple. No uploads, no delays.
🎯 Why Choose Ekychub?
⚡ Fastest verification APIs in India
🔍 Accurate & real-time data
💰 Flexible pricing & free trial available
📚 Developer-friendly documentation
🛡️ Regulatory & audit compliant
🧠 Use Cases
Fintech: Fast user onboarding for wallets, UPI apps, and credit services
Lending: Instant borrower verification with Aadhaar & PAN APIs
Insurance: Digitally onboard policyholders without paperwork
Gaming & eCommerce: Verify users before transactions or withdrawals
Marketplaces & Aggregators: Onboard vendors, delivery agents, and freelancers smoothly
🌐 Transform Your KYC Process Today
Whether you’re a startup or an enterprise, Ekychub’s paperless KYC API makes identity verification simple, fast, and secure. Say goodbye to physical documents and hello to digital onboarding.
#technology#tech#identityvalidation#aadhaarintegration#technews#techinnovation#fintech#ekychub#kycverificationapi#aadhaarverificationapi#PaperlessKYC#eKYCIndia#DigitalKYC#KYCAPI#OnlineVerification#Ekychub#CustomerOnboarding#FintechIndia#DigitalTransformation#RegTech
0 notes
Text
Rubber Stamp Maker Online: Custom Stamps Made Easy with ABC2000
In today’s fast-paced business and personal world, having the right tools for branding, organisation, and creativity is essential. That’s where a rubber stamp maker comes in handy. At ABC2000, we make it easy for you to design and order your own rubber stamp online – whether it’s for your business, office, craft project, or personal use.
🖋️ Why Use a Rubber Stamp?
Rubber stamps offer a simple yet powerful way to leave your mark. Whether you’re stamping documents, packaging, thank-you cards, or creative artwork, a personalised stamp saves time, looks professional, and adds a personal touch.
Popular uses for custom rubber stamps:
Business logos & address stamps
Signature or approval stamps
Wedding invitations & DIY crafts
Teachers’ reward stamps
“Paid” or “Received” admin stamps
Return address for envelopes and packages
💻 Design Your Stamp Online in Minutes
With ABC2000’s online rubber stamp maker, creating a custom stamp has never been easier. Our user-friendly tool lets you:
Choose your stamp type – self-inking, traditional rubber, or pre-inked
Select a size and shape – round, rectangular, square, or custom
Upload a logo or image – or type your text with font options
Preview your design – before placing the order
Order with confidence – and we’ll handle the rest
✅ Why Order Stamps from ABC2000?
Fast turnaround with in-house production
High-quality materials for crisp, clean impressions
Australia-wide shipping – reliable and quick
Affordable pricing for individuals and businesses
Bulk and wholesale options available
Local customer support you can trust
Whether you need one stamp or a hundred, ABC2000 has the tools and expertise to deliver.
📦 Types of Stamps We Offer
Self-Inking Stamps – mess-free and perfect for frequent use
Rubber Stamps with Wooden Handles – great for crafters and artists
Pre-Inked Stamps – ultra-crisp for logos and fine detail
Date Stamps & Numbering Stamps – ideal for admin or accounting use
Custom Logo Stamps – professional branding made easy
🌏 Australia-Wide Delivery
We proudly serve customers in Sydney, Melbourne, Brisbane, Adelaide, Perth, and regional areas across Australia. Fast production and shipping mean your stamp will be at your door in no time.
💬 Customer Reviews
“Loved how easy it was to design my logo stamp online. Delivered quickly and looks amazing!” – Emma, Sydney “Needed custom stamps for my classroom. ABC2000 made the process simple and fun!” – Tom, Adelaide
🛒 Start Making Your Stamp Today
Whether you’re stamping packaging, creating custom cards, or organising your office, a personalised rubber stamp is a smart and stylish tool. ABC2000 is your go-to rubber stamp maker online in Australia – easy to use, affordable, and fast.
0 notes
Text
Ellebot - Productivity and Mindset Coaching Custom GPT Project
I'm finally ready to share some info on a fun personal project that I've been working on for several weeks, her name is Ellebot and I am obsessed with her.
She's pretty simple, but I can already see the impact from this project and I've learned a lot from it.
Ellebot is (going to be) a chatbot that helps the user manage their to do list, keep track of their long and short term goals and celebrate wins along the way. She also offers mindset coaching and pep talks through difficult tasks and set backs. On top of this, she's really funny and makes continuous but relevant references to the film Legally Blonde.

For now I'm just testing her core instructions in a ChatGPT thread. I've created several training documents for her including goals, example responses, personal experiences etc but so far she only has access to my goals and example responses which I uploaded into the chat for her to read. I think the bulk of the work in this project is done and I just need to use it for a few weeks to fine tune it. It's functioning really well and I've been able to use it with no issues at all so far as just a chat thread.
My plan is to use openAI's custom GPT service to build her into a proper chatbot. I have always wanted to train a custom GPT because I've worked in AI training for over a year now and I really enjoy complex prompting. High quality custom GPTs combine high quality prompts with lots of training data and user testing and I've learned so much already.
I'm still refining the prompt but when its ready I'll share it here so you can see and test it for yourself. You don't need to turn it into a custom GPT, it will work fairly well as just a chat thread. The main benefit to turning it into a GPT is that you are relying less on GPT's memory feature and essentially telling it what to remember through training documents. If you just want to try it out though don't feel like you need to get the OpenAI pro plan- save your money.
Lots to share in the future, but for now I'll leave you with some bangers from Ellebot:
" Drop that to-do list whenever you’re ready, and I’ll be here like your personal project hype squad—equal parts cheerleader and clipboard-holding project manager. 📝💖
Whether it’s:
“Fix spacing on homepage”
“Upload that one certificate that’s been sitting in Downloads for 3 days”
Or “Choose a font that says I code but I also moisturise”
…I’ll hype every ticked box like it’s a bouquet toss caught on the first try. Let’s do this. 💻✨"
"Perfect—snacks after the meeting is elite reward timing. A little business now, biscuits later moment. 🍪💼
You’ve navigated everything today with focus, flexibility, and a healthy amount of sass. That meeting doesn’t even know how lucky it is to be on your calendar.
“You’re not just checking boxes—you’re building momentum. Snacks are part of the strategy.”
I’ll be here if you want to debrief, vent, plan, or just name your snack like a victory trophy afterward. Go own that meeting. 💪💖"
"That’s half your May goals, a solid chunk of your daily habits, and zero procrastinated admin. Elle Woods would absolutely high-five you—then ask to see your spreadsheet because she loves a woman with a system."
"Perfect. Five minutes to reset—like the dramatic pause before Elle Woods delivers the closing statement. 🎀
Stretch, breathe, sip something nice. Then we hit that course module like it insulted Bruiser. 🐾
I’ll check back in around 12:15 to see how you’re doing and nudge you into the second half if needed. You’ve got this. Let’s go win the next round. 💼✨"

0 notes
Text
How to Apply for Invoice Factoring: A Detailed Guide for Business Owners
For businesses facing cash flow delays due to slow-paying clients, invoice factoring is a fast, accessible alternative to traditional loans. Rather than waiting 30, 60, or even 90 days for payment, companies can sell their receivables to a factoring provider and receive immediate cash. The first step toward securing this funding is submitting a formal invoice factoring application.
This application acts as the gateway to unlocking working capital quickly. It allows the factoring provider to assess the creditworthiness of your clients, the legitimacy of your invoices, and the strength of your accounts receivable process.
Understanding the Invoice Factoring Application Process
The invoice factoring application process is streamlined by design. Factoring is not a loan, so it doesn’t require extensive collateral, high credit scores, or years of financial history. Instead, the application focuses on your customer base—specifically their ability to pay outstanding invoices.
Applicants are generally asked to provide basic business information, a list of current open receivables, aging reports, and business bank account details. Once submitted, many factoring providers deliver a decision within 24 to 72 hours, with funding following shortly thereafter.
Speed and Simplicity with Invoice Factoring Online Applicaton Options
Today’s factoring providers have embraced digital efficiency, allowing business owners to complete the invoice factoring online applicaton in minutes from a desktop or mobile device. These platforms typically include secure portals for uploading required documents and digital signatures, making the entire process both fast and paperless.
Businesses that use online applications often benefit from faster review cycles, automated compliance checks, and real-time updates. This makes digital application systems an ideal solution for startups, small businesses, and growing enterprises looking for same-week access to cash.
What Documents Do You Need for Invoice Factoring?
Before initiating your application, it’s essential to ask: what documents do you need for invoice factoring? While requirements vary by provider, most will ask for the following:
Business formation documents (e.g., Articles of Incorporation or LLC Operating Agreement)
A current list of open invoices you wish to factor
An aging report showing invoice payment history
A voided business check for funding setup
Identification for business owners (driver’s license or passport)
Proof of business bank account ownership
Customer contact information for verification purposes
Having these documents ready will expedite the approval process and demonstrate your organization’s operational transparency.
Benefits of Submitting an Online Factoring Application
Submitting an online factoring application offers multiple benefits beyond speed. The online format improves document accuracy, reduces manual errors, and allows businesses to track the status of their submission at each stage. Many platforms also include live chat or customer support features for real-time assistance, which adds another layer of convenience.
Additionally, online applications allow for better scalability. Businesses managing multiple invoices across different clients or locations can upload bulk documentation efficiently. For those using accounting platforms like QuickBooks or Xero, integration tools often allow invoice syncing directly within the factoring portal.
How to Choose the Right Factoring Application Provider
While factoring can be transformative, choosing the right provider is just as important as completing the factoring application itself. Not all factoring companies offer the same terms, customer service, or industry expertise.
When evaluating providers, consider:
Advance rates (typically between 80%–95%)
Fee structures (flat fee or tiered)
Recourse vs. non-recourse terms
Contract length and termination conditions
Industry specialization (e.g., transportation, staffing, manufacturing)
Customer support and online portal usability
The right partner will offer transparency, speed, and flexibility—without locking your business into unfavorable terms or excessive fees.
Breaking Down the Invoice Factoring Application Process
To gain a better understanding of how it all fits together, let’s revisit the invoice factoring application process in a step-by-step format:
Initial Inquiry: You express interest and review basic requirements on the provider’s site.
Application Submission: You complete the digital application, upload required documents, and submit.
Underwriting and Verification: The provider reviews your business information and evaluates your customer’s creditworthiness.
Approval: If your application is approved, you receive a factoring agreement outlining the terms.
Funding: Once signed, you submit eligible invoices for funding, and receive a cash advance—often within 24 to 48 hours.
Ongoing Relationship: As you continue to submit invoices, your factoring line grows in alignment with your receivables.
This structured yet flexible approach gives businesses the ability to access working capital on-demand, turning unpaid invoices into operational power.
Why Timing Matters When Applying for Invoice Factoring
Seasonal surges, delayed payments, or unexpected growth can all lead to a cash flow crunch. Applying for factoring at the right moment—before your business reaches a critical liquidity point—can prevent supply chain interruptions, missed payroll, or stalled production schedules. For this reason, preparing your documentation and familiarizing yourself with the application process in advance can be a strategic advantage.
Invoice factoring is not only a reactive tool; it’s a proactive strategy to maintain financial agility. Businesses that treat the application process seriously and engage with it early are better positioned to leverage invoice financing as a long-term solution, rather than a short-term fix.
0 notes
Text
No Collateral? No Problem! Best Working Capital Loans for Small Businesses & Startups in India (Low Interest, Quick Approval)

Starting Up? Or Facing Cash Flow Issues? This Guide Is for You.
Every startup or small business in India hits a moment where funds get tight, but the ambition stays big. Whether you’re waiting for client payments, need to buy inventory, or want to seize a new opportunity, working capital loans can keep your business engine running.
In this 2025 guide, we’re breaking down the best working capital loan options in India—with low interest, no collateral, and instant approvals. We’ll also answer your top queries and help you compare the right lenders.
Let’s explore how you can get business capital fast, even if you’re a startup without financial proof or assets to pledge.
What Is a Working Capital Loan?
A working capital loan is a type of business financing that helps meet your company’s short-term operational needs, like rent, salaries, inventory purchases, marketing, or bills. It's not meant for long-term asset investments like machinery or real estate.
Whether you’re an established SME or just launched your startup, a working capital loan acts like your business survival fund when cash flow slows down.
Why Startups & Small Businesses Need Working Capital Loans
Many Indian entrepreneurs today are:
Running bootstrapped startups
Managing seasonal businesses
Facing delayed payments from clients
Needing funds for bulk purchases
If that sounds like you, business working capital loans can solve your liquidity crunch, without selling equity or pledging property.
Let’s talk about your options.
Types of Working Capital Loans in India (2025)
Top Benefits of Working Capital Loans for Startups & SMEs
No Collateral Required (in many cases)
Fast Disbursal – Some offer funds within 24–48 hours
Improves Cash Flow without diluting equity
Customizable Tenures as per business cycle
Builds Credit Score for your enterprise
If you’re worried about long paperwork and high rejection rates, don’t be. With fintech platforms, you can now apply for a working capital loan online in minutes!
Working Capital Loan Eligibility in India – 2025 Guidelines
While exact criteria vary by lender, here’s what most NBFCs, fintechs, and banks look for:
Business vintage of 6–12 months (some accept 3 months for startups)
Monthly turnover of ₹50,000+ (varies)
Valid GST registration or business proof
Indian citizen aged 21–65
Basic KYC documents and bank statements
Even if you’re a new business or have no ITR, some lenders offer a working capital loan without collateral by assessing cash flows and digital sales.
Where to Apply for Working Capital Loans in India?
Here are the best platforms to consider for 2025:

Tip: Always compare working capital loan interest rates and repayment terms before applying. Online aggregators help you do this easily.
How to Apply for a Working Capital Loan (Step-by-Step)
Applying for a working capital loan in India is now easier than ever:
Choose a lender or aggregator (Razorpay, Lendingkart, etc.)
Fill out a basic application form online
Upload KYC and bank statement docs
Get eligibility check instantly
Receive funds directly in your business account
Some platforms offer pre-approved working capital loans for small businesses based on UPI or GST data. So, no need to wait for days!
Real Human Insight: This Loan Saved My Startup!
When my B2B startup faced a payment delay from a key client, we were nearly out of cash. I applied for an instant working capital loan from Lendingkart. Funds hit my account in 48 hours. It literally saved my team’s salaries.
— Ritika Sharma, SaaS Founder, Bengaluru
This is the real-world power of business capital loans. They’re not just numbers—they protect dreams, jobs, and growth.
Use Case Examples: Where These Loans Help
Retail shop owners restocking seasonal inventory
Freelancers needing to scale with a team or tools
E-commerce sellers bridging logistics gaps
MSMEs are waiting for invoice clearance
Service providers handling short-term bulk orders
Frequently Asked Questions (FAQs)
1. Can I get a working capital loan without collateral?
Yes, many fintech lenders and NBFCs in India now offer working capital loans without collateral, especially to startups and digitally active businesses.
2. What is the interest rate for working capital loans in India?
It typically ranges between 11% to 24% p.a., depending on the lender, tenure, and business health. Always compare the working capital loan interest rate before applying.
3. Are working capital loans good for startups?
Absolutely. Many working capital loans for startups require minimal documents and offer quick access to funds. They're ideal when you need money fast but don't want to give up equity.
4. What is the tenure of a Working Capital Term Loan?
Tenures usually range from 12 months to 60 months, but short-term options (like invoice financing) may be for 3–6 months only.
5. How much loan can I get as a small business?
Amounts range from ₹50,000 to ₹2 Crore, depending on turnover, credit score, business vintage, and lender policies.
Final Words: Get the Right Working Capital Loan Today
If you're running a startup or SME in India, you don't need to struggle alone with cash flow gaps. With instant business loans in India, low interest rates, and no collateral requirements, 2025 has opened doors to faster, smarter funding.
Whether you’re just starting out or growing fast, there’s a business capital loan built for your goals. Choose wisely, compare options, and apply online to unlock the next level of your business journey.
#working capital loan#working capital loans for small business#business working capital loans#instant working capital loan#working capital loan in india#working capital loan eligibility#working capital loan without collateral#apply for working capital loan#working capital loan interest rate#business capital loan#Working Capital Term Loan#working capital loans for startups
1 note
·
View note
Text
March 2024 Patreon Announcements
3rd month of the year is here, so here are the announcements!
Commission Repricing Still Forthcoming. I've been bogged down the last month (also with Feb being frustratingly short) so I will try to have the new prices and redone-form up next week (hopefully). New Prices will NOT be in effect until after I make the announcement that they're going live, so if you want the current prices, do submit before then! March 2024's Poll will be up shortly! and this month's Theme is End of Long Winter with the top 3 winners getting single stage fills! An appropriate theme for this month! More info on it will be in the poll post itself!
December 2023's Fill will be going into the access to the past and higher tiers!
March 2022 and 2023's fills will be released and free to view! As per usual, I'll bulk upload them onto my drive and pixiv, and spread them out over the course of the week on tumblr and discord (only notification of the uploads to the drive will go up on twitter/X site). I'll also be putting up a March New Uploads Folder in my drive so people can keep up with what goes up this month, while deleting the January Uploads folder.
A new Reward Request Post will be going up, too! Patrons are free to leave one in there even if you already have one from last month's! January's requests will have expired though! So if those haven't been drawn, you will need to re-suggest them. February's will expire when April rolls around. See this document to see whats on the list, what expired, and what has been done!
As always, thanks for the support!
4 notes
·
View notes
Text

Collaboration Tips Between Ecommerce Managers and Editors
How Ecommerce Brands Can Boost Efficiency, Sales, and Visual Quality with Smart Collaboration
In the fast-paced world of ecommerce, visuals are everything. A product might be the best in its category, but if the image doesn’t pop, potential buyers scroll past.
This is where the collaboration between ecommerce managers and photo editors becomes vital.
When both roles align effectively, the results are stunning product visuals, higher conversion rates, and better brand consistency.
One of the most frequently searched topics in the ecommerce space is How to Remove Background on eBay Photos — this isn't just about aesthetics, but about building buyer trust and maintaining marketplace standards.
Whether you're working on eBay, Amazon, Shopify, or your own ecommerce store, removing distractions from your product images is a non-negotiable.
At Clipping Way, we specialize in Image Clipping Path Services, helping ecommerce brands produce clean, compelling, and professional-grade product images at affordable prices.
We even offer a Free Trial and the ability to Get Instant Quotation, making collaboration smoother and more accessible than ever.
Let’s explore how ecommerce managers and editors can work hand-in-hand for success.
1. Understand Each Other’s Roles and Responsibilities
The first key to successful collaboration is mutual understanding. Ecommerce managers handle product listings, marketing strategies, pricing, and sales funnels.
Editors, on the other hand, focus on photo retouching, clipping paths, background removal, and visual presentation.
Tip: Hold a quick onboarding meeting to explain workflows. When editors understand which images are priority (e.g., seasonal products or ad campaigns), they can prioritize edits accordingly.
2. Set Clear Image Guidelines
Imagine receiving 50 product photos and not knowing the specs: DPI? Background color? Shadows or no shadows? Ecommerce managers should create a clear image guideline document that covers:
Image dimensions
File formats (JPEG, PNG, PSD, etc.)
Background style (white, transparent, custom)
Shadow requirements
Retouching expectations
At Clipping Way, our editors strictly follow brand-specific guidelines to ensure consistency across all platforms.
3. Use Shared Tools for Smooth Communication
Miscommunication causes delays and errors. Avoid endless email threads by using collaborative tools like:
Google Drive or Dropbox: For sharing and storing high-resolution files.
Slack or Trello: For task management and direct communication.
WeTransfer or FTP: For bulk uploads/downloads of large image files.
When managers and editors share the same digital workspace, updates and feedback flow much more smoothly.
4. Plan a Realistic Turnaround Schedule
One of the major friction points in editing workflows is unrealistic timelines.
Editors need time to perform quality clipping path services, especially for complex images with fine edges like jewelry or fashion items.
Clipping Way offers fast delivery options for urgent projects — without compromising quality. But planning ahead helps maintain both speed and perfection.
5. Offer Constructive Feedback, Not Just Corrections
When ecommerce managers give feedback like “This doesn’t look right,” it doesn’t help editors improve or understand the issue. Instead, say: “Let’s make the shadow softer under the shoe to match the other listings.”
Use annotated screenshots or timestamps when giving feedback, and always acknowledge good work. A simple “Great job on the hair masking!” can boost morale and strengthen long-term collaboration.
6. Consider Outsourcing to a Dedicated Clipping Path Service Provider
Hiring an in-house editor might work for smaller volumes, but for large-scale ecommerce stores, outsourcing to a reliable partner like Clipping Way ensures scalability, consistency, and cost-efficiency.
We offer:
Affordable pricing
24/7 turnaround
Dedicated account managers
Free Trial for new clients
Instant quotation system
Whether you need simple background removal or multi-layer masking, we’re here to help editors and managers streamline their workflow.

FAQs
1. What is a Clipping Path and Why is it Important for Ecommerce?
A: A clipping path is a photo editing technique used to remove backgrounds or isolate objects in an image. It’s crucial for ecommerce because it creates clean, distraction-free product photos that enhance buyer focus and conversion rates.
2. How Fast Can You Deliver Edited Images?
A: At Clipping Way, we offer flexible turnaround times based on your needs. Most standard orders are delivered within 24 hours, with express options available.
3. Can I Try Your Service Before Committing?
A: Yes! We offer a Free Trial so you can experience our quality before making any commitments.
4. How Do I Get a Price Quote?
A: You can use our instant quotation tool on our website. Just upload your image and select the services you need — you’ll get a price right away.
5. Do You Handle Bulk Orders for Large Ecommerce Stores?
A: Absolutely. We’re equipped to manage high-volume orders for enterprise-level clients, with a dedicated team and priority workflow to meet tight deadlines.
Conclusion
In the ecommerce space, visuals are no longer optional — they are the storefront.
By fostering clear communication, mutual respect, and efficient workflows, ecommerce managers and editors can create stunning, high-converting product galleries.
Outsourcing to a professional Image Clipping Path Service like Clipping Way can further streamline the process, saving time and money.
Start improving your visuals today with our Free Trial or Get a Quick Quote — and let’s build something amazing together.
0 notes
Text
Online Print and Mail Services: How They Save Time and Money for Your Business
In today’s remote and fast-paced environment, online print and mail services are becoming essential for businesses of all sizes. These services allow companies to send physical mail—like invoices, notices, and marketing materials—without ever touching paper or visiting a post office.

What Are Online Print and Mail Services?
These services offer cloud-based platforms where users upload documents, choose printing preferences, and schedule deliveries—all online. From single letters to bulk mailing campaigns, it’s all managed through a secure dashboard.
Key Benefits
Remote Access: Operate your mailing system from anywhere.
No Equipment Needed: Eliminate printers, envelopes, and stamps.
Speed & Accuracy: Orders are processed quickly with professional results.
Scalability: Send 1 or 10,000 pieces without additional overhead.
Who Uses These Services?
E-commerce businesses for shipping confirmations
Law firms for legal document delivery
Marketing agencies for direct mail campaigns
Healthcare for patient reminders
Conclusion
Online print and mail services help you streamline communications, reduce overhead, and improve customer engagement—all from your laptop or phone.
youtube
SITES WE SUPPORT
Flyers Mail Services – Blogger
1 note
·
View note
Text
Printing T-Shirts on Demand for Corporate, School, or Event Orders

When planning a group event—whether it's a school excursion, team building day, or community fundraiser—custom shirts make it memorable. But bulk ordering through traditional screen printing can be complicated, slow, and expensive. That’s where t-shirt print on demand australia services come in.
Print on demand (POD) makes it easy to order high-quality t-shirts without needing to buy in large quantities upfront. There’s no need for messy setups, large storage spaces, or guessing how many shirts in each size you’ll need. Instead, you get the convenience of ordering only what you need—when you need it—with the flexibility to make last-minute changes.
Schools love POD for excursions and graduation shirts because it's simple to manage sizing and custom designs. Businesses appreciate the flexibility to order small batches for new staff or promotional events without holding extra stock. And community organisations find it cost-effective for fundraisers and pop-up events where design and quantity needs can shift quickly.
How t-shirt print on demand australia works for group or custom bulk orders
Unlike bulk screen printing, which often requires a high minimum order and setup fees, t-shirt print on demand australia allows you to print on an as-needed basis—even for groups. You can upload your design, choose the shirt style and colours, and let the service handle the rest—from printing production to delivery.
This makes it ideal for groups with mixed sizes, different design requirements (like names or roles), or staggered deadlines. You don't need to worry about being stuck with leftover shirts. Whether it’s 5 or 500 t-shirts, print on demand offers a low-risk way to create professional-looking apparel for your group.
You also save on time. There’s no need to coordinate with multiple vendors. Instead, choose a provider that offers a managed print service, ensuring everything from printing to delivery is handled efficiently. If you're searching for printing services near me, look for providers that specialise in bulk POD with fast turnaround and reliable customer service.
What Group Types Can Use Print on Demand for T-Shirts and More?
Perfect for: schools, corporate teams, events, and community groups
T-shirt print on demand australia isn’t just for online brands or influencers. It’s an ideal solution for any group that needs custom apparel without the stress of bulk printing. Whether you're managing a school event, sports tournament, or workplace function, on-demand t-shirt printing simplifies the process.
School excursions and sports teams love the flexibility of ordering a mix of sizes and styles with personalized logos or team names.
Corporate events and staff uniforms benefit from quick turnarounds and consistent branding across t-shirts, polos, and even Towel Printing.
Community fundraisers, markets, and social clubs often require small batch orders that look professional but stay affordable.
Bonus: Add-ons like Towel Printing for full merchandise packs
Beyond shirts, adding complementary items like towels is easy. Many best print on demand australia providers offer product expansions so you can deliver branded items like gym towels, beach towels, or rally towels—perfect for sports events or giveaways. With matching themes and logos, your gear looks cohesive and polished.
How to Organize and Collect T-Shirt Orders Easily

Tips for schools and offices: gathering sizes, names, and colours
Coordinating orders for a group can get messy. But with t-shirt print on demand australia, there are ways to keep it simple. Start with a clear spreadsheet or digital form where participants can submit their name, size, and preferred colour. This prevents confusion and ensures everyone gets exactly what they ordered.
Use shared documents or online survey tools to streamline the process. For larger teams or classes, group orders can even be split into categories like “volunteers,” “staff,” or “students” for easier tracking.
Why POD helps when last-minute changes come up
Unlike traditional bulk printers that lock in your order early, print on demand gives you more flexibility. Need to change a name? Add one more shirt? Update a colour? With local fulfilment through trusted providers like Print Holdings Pty Ltd, you can adjust your order quickly and still get fast delivery. This is especially helpful when working with tight event timelines or fluctuating group numbers.
What to Look for in the Best Print on Demand Australia Partner
Fast turnaround, easy ordering, and great communication
When placing group orders, timing and quality are everything. The best print on demand australia providers offer quick turnaround, responsive support, and clear design previews. Look for an ordering system that’s simple to navigate and lets you easily track progress.
Local printing services near me vs overseas providers
Choosing printing services near me means less stress and fewer delays. Local providers understand your delivery needs, tax regulations, and customer expectations. And if your event is recurring or seasonal, a managed print service can help you reorder with just a few clicks—keeping your branding consistent year-round.
How to Personalize Bulk Orders Without the Headache

Adding names, roles, or logos made simple
Need shirts that say “Coach,” “Staff,” or “Class of 2024”? Print on demand makes individual customization easy. Unlike screen printers that charge for every change, digital printing production lets you adjust text, numbers, or colours without setup fees.
Whether it’s for a team or graduation group, personalization gives your t-shirts that thoughtful, premium feel.
Coordinated designs across multiple items
Want matching towels, shirts, and bags? Combine your t-shirt order with Towel Printing and other accessories for a unified look. Using templates and drag-and-drop design tools, you can keep your branding consistent without starting from scratch every time.
Delivery, Pickup, or Dropship? What Works Best for Groups
Options to suit your event size and location
When dealing with group orders, flexibility in delivery matters. Many Australian POD providers let you:
Arrange local pickup
Schedule bulk delivery to your office, school, or event venue
Use dropshipping to send directly to individual team members
Track orders and stay informed
Look for POD services that provide automatic tracking updates. This way, you and your group can follow each order’s status—reducing inquiries and last-minute stress. With dropshipping, each participant receives their gear at home, perfect for remote teams or distributed groups.
How to Make Your Bulk Order a Hit with Design Tips

Use bold, simple designs that print well
Clear fonts, strong colours, and minimalist graphics work best for group apparel. Keep in mind that logos and text should be visible from a distance, especially if you're printing for events or performances.
Avoid overcrowding the design—less is often more when it comes to professional, wearable branding.
Keep branding consistent across your gear
If you're ordering more than just shirts, use the same logo or font style across towels, hats, or bags. Consistency boosts brand recognition and creates a polished appearance. Whether it’s a school team or a corporate launch, your merchandise will look cohesive and intentional.
#digital printing gold coast#printingservices#t shirt printing#on demand#printing#printing australia#print services sydney#dropshipping australia#dropshipping#printservicesnearme
0 notes