#Easy boondi raita recipe
Text
Boondi Ka Raita
❤️ About Boondi Ka Raita
Boondi ka raita is a North Indian dish with yoghurt (curd) and boondi. We season the yoghurt with spices like roasted cumin powder, salt, and sometimes red chilli powder or black salt for added flavour. its creamy textured, tangy flavoured, and crunchy boondi, making it a refreshing accompaniment to Indian dishes. It serves as a cooling counterbalance to spicy curries,…

View On WordPress
#boond#boondi#Boondi ka raita ingredients#Boondi ka Raita recipe#Boondi Raita ingredients#Boondi raita recipe#Boondi Raita serving suggestions#Boondi Raita side dish#Boondi raita variations#boondi recipes#Boondi yogurt dip#Easy boondi raita recipe#How to make boondi raita#Indian boondi raita#Quick Boondi Raita#Raita#Ready boondi raita#Savory boondi yogurt sauce#Spiced yogurt with boondi#Spicy Boondi Raita#spicy veg recipe#spicy veg recipes#Sweet Boondi Raita#Traditional boondi raita
0 notes
Photo

My all time favorite raita is Boondi Raita. I love it with puris, kachoris and even with dry sabjis (stir-fries). This is the perfect cool yogurt dip for your Indian fried breads. Click on the below link to read more about it or go to the 'Chutneys, Condiments and Dips' section of my blog Life Without Alu? https://lifewithoutalu.blogspot.com/2018/01/boondi-raita.html Like this recipe? Share it on your Facebook, Twitter, Pinterest and Instagram. . . #lifewithoutalu #foodloverravi #sharphome #maryberry #BBCFood #glassofwineforme #thekolkatabuzz #boondi #curd #raita #yoghurt #paratha #recipe #easy #easyrecipes #quickrecipes #healthyfood #healthyrecipes #foodporn #foodie #myfood #lovefood #foodpics #foodcoma #foodlove #foodtruck #foodbeast #foodstylist #foodstagram #instadaily https://www.instagram.com/p/B0QvLDLBxnw/?igshid=oeh4jrlhcjqt
#lifewithoutalu#foodloverravi#sharphome#maryberry#bbcfood#glassofwineforme#thekolkatabuzz#boondi#curd#raita#yoghurt#paratha#recipe#easy#easyrecipes#quickrecipes#healthyfood#healthyrecipes#foodporn#foodie#myfood#lovefood#foodpics#foodcoma#foodlove#foodtruck#foodbeast#foodstylist#foodstagram#instadaily
0 notes
Link
Hello Friends, Today's recipe is a Boondi Raita in Salty and Sweet Form. Boondi Raita is very simple to prepare and easy to serve. Boondi Raita brings amazing flavor in daily meals.
4 notes
·
View notes
Link
Dabha Style Cauliflower Mix Veg.

Hey everyone, I hope you are having an amazing day today. Today, I will show you a way to prepare a special dish, dabha style cauliflower mix veg. It is one of my favorites. This time, I will make it a bit tasty. This is gonna smell and look delicious.
Dabha Style Cauliflower Mix Veg is one of the most popular of recent trending foods on earth. It is easy, it's fast, it tastes yummy. It's enjoyed by millions daily. Dabha Style Cauliflower Mix Veg is something that I have loved my entire life. They're fine and they look fantastic.
To begin with this particular recipe, we must first prepare a few ingredients. You can have dabha style cauliflower mix veg using 21 ingredients and 11 steps. Here is how you can achieve it.
The ingredients needed to make Dabha Style Cauliflower Mix Veg:
{Take 2-3 tsp of oil (preferably mustard oil).
{Prepare 2 of potatoes.
{Get 1 of carrot.
{Get 1 of small cauliflower.
{Make ready 10-12 of french beans.
{Take Handful of peas.
{Take 1 of small capsicum.
{Make ready 1 tsp of jeera/cumin seeds.
{Take 3-4 of garlic clove.
{Take 1 inch of ginger nicely chopped.
{Get Handful of coriander leaves chopped.
{Take 1/2 tsp of Red chilli powder.
{Prepare 1 tsp of kashmiri lal mirch( red chilli) powder.
{Get 1 tsp of coriander powder.
{Take 1/2 tsp of garam masala.
{Make ready 2-4 of tomatoes (depending on size).
{Get 2-3 of dry red chilli (optional).
{Make ready 1/2 cup of curd.
{Get 1-2 tsp of kasuri methi.
{Take 1 of papad roasted this is the top secret ingredient.
{Prepare to taste of Salt.
Steps to make Dabha Style Cauliflower Mix Veg:
Heat oil in pan add chopped potato and carrot. And cook for 2-3 minute. Add lil salt..
Now add cauliflower and french beans and cover and cook for 2 minutes. Add salt as per taste and veggies quantity..
Now add peas and capsicum. (I used boiled peas, if you are using fresh peas then add with cauliflower itself), cook for 2 minutes..
Make space in center by shifting veggies to the corner now add jeera. Adding jeera or cumin seeds at this point will enhance the flavor. Now add ginger and garlic and cook it for sometime..
Now add masala like red chilli powder, kashmiri lal mirch, coriander powder, jeera powder and garam masala..
Now add coriander leaves and now mix everything..
Again make space in center by shifting veggies..
Grind tomato and dry red chilli. (Dry red chilli is optional if you like spicy then add it) now add tomato paste and cook for 1-2 minutes. Now add 1/2 cup water (if you want semi-gravy) Then mix everything..
Add curd and kasuri methi. Mix it well and cook for 2-3 minutes..
At last crush roasted papad and mix in veggies. Trust me this will enhance the taste to next level. Now just cook for 1 minute. And mix veg is ready..
Enjoy dabha style mix veg with hot fulka and boondi raita!!!.
So that's going to wrap it up with this exceptional food dabha style cauliflower mix veg recipe. Thank you very much for reading. I'm confident that you will make this at home. There is gonna be interesting food in home recipes coming up. Remember to bookmark this page on your browser, and share it to your loved ones, friends and colleague. Thank you for reading. Go on get cooking!
0 notes
Link
Hyderabadi Vegetable Dum Biryani. Authentic Vegetable biryani recipe that tastes awesome and so good. One of my most popular recipes on the blog is this perfectly made Vegetarian Biryani recipe from the Hyderabadi One of our favorite rice based dish is this Hyderabadi dum biryani made with mix veggies, spices, yogurt and a lot of love. This article is part of the series on.

Making a vegetable biryani can be as simple This vegetable dum biryani recipe is roughly adapted from the hyderabadi vahchef's video and is one of the best veg biryani that I can ever make. Vegetables marinated with special spices and cooked. Give the Hyderabadi vegetable biryani a taste, to make sure the overall salt and spice levels are good to go.
Hey everyone, hope you're having an incredible day today. Today, I'm gonna show you how to prepare a special dish, hyderabadi vegetable dum biryani. It is one of my favorites food recipes. For mine, I will make it a little bit unique. This will be really delicious.
Authentic Vegetable biryani recipe that tastes awesome and so good. One of my most popular recipes on the blog is this perfectly made Vegetarian Biryani recipe from the Hyderabadi One of our favorite rice based dish is this Hyderabadi dum biryani made with mix veggies, spices, yogurt and a lot of love. This article is part of the series on.
Hyderabadi Vegetable Dum Biryani is one of the most popular of recent trending meals on earth. It's easy, it's quick, it tastes yummy. It's enjoyed by millions every day. They're nice and they look fantastic. Hyderabadi Vegetable Dum Biryani is something that I have loved my entire life.
To get started with this particular recipe, we have to first prepare a few components. You can cook hyderabadi vegetable dum biryani using 47 ingredients and 32 steps. Here is how you can achieve it.
The ingredients needed to make Hyderabadi Vegetable Dum Biryani:
{Prepare of Basmati Rice.
{Make ready of Green Peas.
{Prepare of French Beans …… Chopped lengthwise.
{Prepare of Carrots …… Chopped lengthwise.
{Get of Mixed Bell Peppers (Green, Red, Yellow).... Cubed.
{Get of Cauliflower Florets.
{Make ready of Small Potatoes ……. Cut into wedges.
{Prepare of large Onions ……. Chopped finely.
{Prepare of large Tomato..... Chopped finely.
{Get of Fresh Curds …… Whisked.
{Make ready of Large Garlic Cloves.
{Prepare of Ginger.
{Make ready of Fresh Mint Leaves.
{Make ready of Turmeric Powder.
{Make ready of Bedgi Red Chilli Powder.
{Prepare of Kashmiri Red Chilli Powder.
{Get of Coriander Powder.
{Prepare of Garam Masala Powder.
{Prepare of Milk.
{Prepare of Saffron.
{Prepare of Kewra Water.
{Prepare of Homemade Ghee (Clarified Butter).
{Take of Salt.
{Prepare of Chopped Coriander Leaves.
{Take of For Making Birista :.
{Get of Oil For Frying.
{Take of Medium Onions ……. Finely sliced.
{Make ready of Salt.
{Get of Whole spices and other ingredients for cooking with the rice :.
{Prepare of Cloves.
{Make ready of Cinnamon (1″ inch each).
{Make ready of Green Cardamoms.
{Get of Black Peppercorns.
{Get of Cumin seeds.
{Prepare of Lemon Juice.
{Get of Salt.
{Take of Whole Spices For Tempering :.
{Make ready of Oil.
{Take of Cloves.
{Make ready of Cinnamon (1″ each).
{Prepare of Green Cardamoms.
{Make ready of Black Cardamom.
{Get of Black Peppercorns.
{Take of Bay Leaves.
{Get of Star Anise.
{Take of Mace.
{Get of Cumin Seeds.
Hyderabadi dum biryani is special, I think we can all agree with that. When living in Hyderabad, one of the favourite food topics among friends was where Hyderabadi vegetable dum biryani - a medley of rice, spices, vegetables, and herbs slow cooked to perfection. This authentic recipe of traditional Hyderabadi vegetable Biryani explains the step by step procedure to cook on stove top and oven both. I loved this Veg Biryani, I really did.
Steps to make Hyderabadi Vegetable Dum Biryani:
To make Hyderabadi Vegetable Dum Biryani, first wash the rice twice and soak the rice in sufficient water for half an hour..
For cooking the rice boil water, atleast four times the quantity of the rice. Add the above mentioned whole spices and salt to it..
When the water comes to a boil, drain the soaked rice and add to the boiling water and give it a good stir..
Add the lemon juice and stir..
When the rice is almost cooked, i.e. just one grain is remaining to be cooked, switch off the flame..
Drain all the rice in a sieve and set aside..
In the meantime, wash and chop the vegetables as mentioned above. Keep aside till use..
Heat the milk and add the saffron to it. Keep aside till use..
At the same time, heat the oil for the birista in a kadhai and start frying the sliced onions. Add a pinch of salt to each batch to hasten the browning and to get crisp fried onions..
When done, in the same oil fry the potato wedges too and set aside..
Heat some water for boiling the vegetables..
Boil the carrots, french beans and the cauliflower florets separately, in the boiling water and drain. Set aside till use..
In a heavy bottomed pan, heat the oil for tempering..
First saute the chopped bell peppers in the hot oil and set aside..
Now add the whole spices mentioned for tempering to the hot oil..
As soon as they splutter, add the chopped onions and a little salt. Saute till onions turn a little brown.
Grind the ginger and garlic to a fine paste and add it to the browned onions. Saute for a while..
Add the chopped tomatoes and cook covered till they turn mushy. Add salt to taste..
Add the whisked curds to this mixture and saute continuously on high flame till the mixture becomes a little thick..
Add all the vegetables and give it a good stir. Cover and give it one steam. The biryani masala is now ready..
Place a thick griddle on the gas stove and start heating it..
To layer the biryani, spread some homemade ghee at the bottom of a heavy bottomed pan..
Spread some prepared vegetable masala over it. Spread half the cooked rice over the masala..
Roughly tear the mint leaves and spread them over the rice. Spread half of the birista too..
Spread the remaining biryani masala over it and again cover with a layer of the remaining rice. Spread the birista over this layer. Drizzle some homemade ghee over it..
Make four vertical holes in the biryani in the four mid corners with the handle of a spoon..
Pour the saffron milk equally in these holes. Seal with the cooked rice and drizzle the kewra water over it..
Cover the pan with a foil and place a lid tightly over it..
Place the pan on the hot griddle on high flame for the first 5 minutes and then on low flame for 8-10 minutes..
Switch off the heat and set aside for about 15 minutes..
Uncover and transfer the biryani to a serving bowl and garnish with chopped coriander leaves..
Serve this delicious Hyderabadi Vegetable Dum Biryani with some salad and a cooling boondi raita!.
Although I still have to develop the taste the strong and pungent whole spices in rice, since they tend to put me off sometimes. Vegetable Biryani prepared in a traditional Hyderabadi Dum Biryani style is a Vegetarian's dream come true for enjoying the famous dum biryani. This slimming friendly healthy Hyderabadi dum biryani is going to change your perception about biryani, coz it is the healthiest version of restaurant-style dum biryani. The South Indian Vegetable Hyderabadi Biryani is not an easy dish - as in, not something you would make on a typical work day. But it is just perfect for a lazy Sunday or a This is not a regular rice dish, but a dum biryani, which is cooked in a closed handi sealed with chapati dough to seal in the flavour.
So that is going to wrap this up with this exceptional food hyderabadi vegetable dum biryani recipe. Thank you very much for reading. I'm sure that you will make this at home. There is gonna be interesting food in home recipes coming up. Don't forget to save this page on your browser, and share it to your loved ones, friends and colleague. Thank you for reading. Go on get cooking!
0 notes
Photo

Today's Special - The Mint Raita (The Minty Yogurt Condiment from India) Hello Savourian's.... Today I am gonna share a very easy recipe to cherish the moments and add taste to your food... Very easy to prepare...tasty to savour. The Mint Raita 🍀 To make mint raita take some Yogurt and beat it as much as possible. (Dun hurt your hands in doing so. 😆) Take Some water and add to beaten yogurt as per the consistency you need. Now sprinkle some black pepper powder and some mint powder. Add some salt to taste.🧂 At last add some salted Boondi into the preparation. (Boondi is small pearl like preparation made from gram flour and can be bought from any general store, ready to use.) Give everything a good mix. And refrigerate the raita for 1 hour. Now serve in small porcelain or glass bowls. Garnish with mint leaf 🌿 to give aesthetic appeal. Enjoy the condiment and savour your food stories. See you around Savourian's... #instagood #indianfood #raita #mint #indiancondiments #instagram #love #cookingathome #savourystoryindia #increddio #quickfood #impressionism #aestheticfood #foodphotography #foodislovefoodislife #cookingwithlove #india #cookyourownfood (at Delhi, India) https://www.instagram.com/p/CJWvjjoJLVL/?igshid=5rhiehn70n31
#instagood#indianfood#raita#mint#indiancondiments#instagram#love#cookingathome#savourystoryindia#increddio#quickfood#impressionism#aestheticfood#foodphotography#foodislovefoodislife#cookingwithlove#india#cookyourownfood
0 notes
Photo
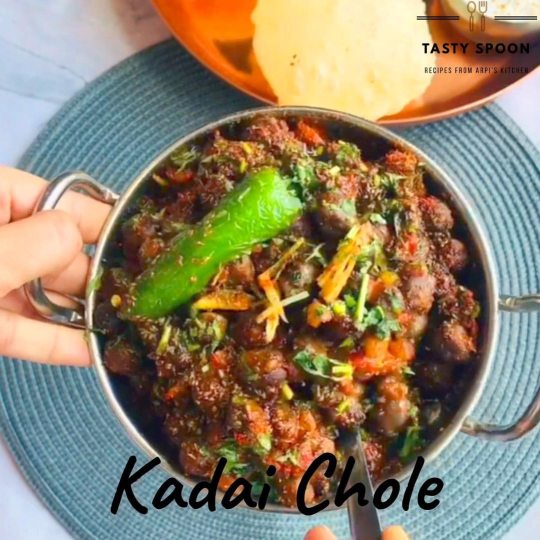
Kadai Chole Masala | North Indian Recipe | NO ONION GARLIC | Quick & Easy | Arpi's Kitchen Typical North Indian Lunch Kadai Chole Masala, Poori and Boondi Raita. Kadai Chole may be very simple and quick to make and crucial factor is that there isn’t any gravy in it. Cherry on top is Ghee Ajwain ka Tadka and Fried Chilli. Since No use of Onion Garlic make this my one of the favorite dish for Pooja or Festival . https://youtu.be/eHtDYM3L4l8 Please Subscribe, Like, Comment and Share. Thanks for Watching. (at India) https://www.instagram.com/p/CFjG2MAFVh1/?igshid=1hbmxx080yx5f
0 notes
Text
Sookhi Urad Dal, dry preparation of Split Bengal Gram Lentils in Indian Spices | Learn how to make Sookhi Urad Dal
Sookhi Urad Dal is a one of the popular lentil preparation from the Northern States of India.. Punjab, Uttar Pradesh and Haryana. Usually lentils are prepared in curry or stew style. This dal is just the opposite from the regular lentil preparation.In many states of India, Urad Dal is widely used to make idlis like these idlis, savoury crepes and dumpling(like dal ke pakore or medu vada), used in filling for Kachoris(Dal Ki Kachori, Khasta Kachoris), Papads/Poppadoms etc.. In Northern states, it is also prepared in curry style or dry form and paired with rice or chapatis.
In western Uttar Pradesh(U.P) especially in the interiors, it is served on special occasions with rice, a side veggie, boondi raita and boora(a form of sugar). Imarti, an Indian Mitahi/sweet just like Jalebi is also prepared with Urad dal.
Other recipes with Urad Dal.. Bedmi Poori another popular fried puffed flat bread, Dahi Vade(lentil dumplings served in sweet yogurt with chutneys).
What goes best with Sookhi Urad dal
This dal best pairs up with Missi Roti/Besani Roti, Masala Parantha( Tikadia) or Tandoori Roti. Fresh Dal tempered with onions and ghee also makes a wonderful combination with Naan(try with my Whole Wheat Tawa Naan). If I make these for weekdays for lunchbox, then I pack it with whole wheat chapatis.
Serve it for dinner or at your get-togethers, as a side with any curry like Matar Mushroom, Matar Paneer , Rasewale Aloo, Papad Boondi Ki Subzi and raita(like Mix Veg. Raita, Spinach and Pomegranate Raita or Boondi Raita) for a wholesome meal experience.
How to prepare Sookhi Urad Dal
A no fuss recipe that take just a few minutes to prepare, but it is a bit tricky too. One has to be very careful, if it overcooks , lentils sticks together and dish looses it’s texture. Cook Dal al-dente.
The real flavour of this dal comes with whole spices likes bayleaf, cloves, black cardamom.So don’t skip these.
To cook perfect Urad Dal, with separate lentil grains, soak dal for 15-20 minutes.
Cook in Pressure cooker, to one whistle with turmeric and salt. Release the pressure immediately.You can also cook in an open pan, it will take 10-15 minutes.
For one cup of Dal add 1 cup water. Strain water from cooked dal.
You can use onion and garlic in tempering or skip it. It tastes good both ways.
To cook with whole spices,finely chopped onion and ginger and garlic, saute, onions and garlic in oil, add spices like red chili powder, garam masala and mix dal very lightly.
For no onion -no garlic version, skip onion and garlic and temper only with spices and ginger.
Sookhi Urad Dal

Sookhi Urad Dal, dry preparation of Split Bengal Gram Lentils in Indian Spices| Learn how to make Sookhi Urad Dal
1 Cup Dhuli Urad Dal/Skinned Split Bengal Gram
1 Onion(small Chopped) (optional)
1-2 Garlic Cloves
Fresh Ginger(small piece)
1-1 tsp Garam Masala Powder
1/2 tsp Red Chilli Powder or as per taste
1/4 tsp Amchur/Dry Mango Powder (optional)
2 tbsp Vegetable Oil
Salt to taste
1 Bay Leaf
3-4 Cloves
1 Dry Whole Red Chilli
Wash dal and soak in water fro 15-20 minutes.
Drain Water,add dal in a pressure cooker. Add around 1 Cup water.
Let it boil, once the froth accumulates at top, discard it, add turmeric powder and salt as per taste.
Close the lid and cook Dal for 1 whistle. Release pressure manually.
If there is water, strain it and keep dal aside.
In a pan or kadhai. add oil, once it is warm add whole spices, cumin seeds.
Once seeds splutter, add onions and garlic and saute for 2-3 minutes, till onions are light brown in color.
Add garam masala powder, red chilli powder(if using), mix then add dal.
Mix it very lightly. Take care, don't mash dal.
Serve hot with chapatis or parantha.
Adding a spoonful of ghee, enhance the taste of dal. You can make tempering of desi ghee, cumin seeds and red chilli powder and add to dal before serving.
Add a tsp of dried fenugreek leaves while sauteing onions. It enhances taste.
For no onion-no garlic version skip both from the recipe.
To cook dal al dente in open pot , add 1.5 cups of water instead of 1 Cup.
Instead of Split Bengal Gram Lentils you can use Split Skinned Moong Lentils(Dhuli/Yellow Moong Dal)
Do make this simple and easy lentil recipe, do give me your feedback whenever you make it.
Say Hello!!and visit my social media accounts.. FB, Pinterest and Instagram. Whenever you make this, do post on my FB page or tag me on Instagram. Pin the recipes for later use.
If you like my work, then do hit the follow button and subscribe to the blog to get notifications on new posts and share the blog with your loved ones. I promise won’t spam your mailbox 🙂.
Thanks for stopping by and keep coming back!!
Sookhi Urad Dal(Dry Split Balck Lentils) Sookhi Urad Dal, dry preparation of Split Bengal Gram Lentils in Indian Spices | Learn how to make Sookhi Urad Dal…
0 notes
Text
HYDERABADI BIRYANI – CUISINE OF EDIGEST FOODS
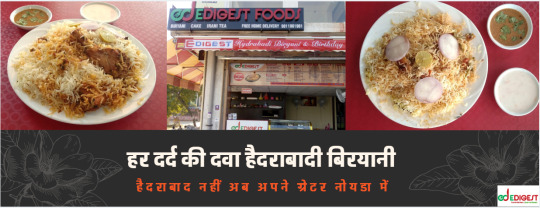
Hey How are you all , It has been a long time since I have not written about my food experiences due to my project work in Greater Noida . Greater Noida is a modern city with all modernized civilization . It’s a student area and street foods are in common. But here are many restaurants which are good. Though according to me the best restaurant in greater noida is EDigest Foods which serves hyderabadi biryani in greater noida .
After having my dinner at EDigest Foods . I went to the chef and how he makes the best biryani in greater noida .He said that Hyderabadi Chicken Biryani boasts of a beautiful cacophony of flavours that is known the world over. A delicious medley of fine long grain rice spices and chicken pieces, this Hyderabad style dum biryani is very easy to make and a delight to eat. Here is how to make Chicken Biryani Recipe at home.
What’s great about Hyderabadi biryani is its unique taste and influences from different parts of the world, especially from the Mughals. It’s one dish that’s really close to everyone’s heart and the perfect definition of soul food.
Hyderabadi Chicken Biryani boasts of a beautiful cacophony of flavours that is known the world over. A delicious medley of fine long grain rice spices and chicken pieces, this Hyderabad style dum biryani is very easy to make and a delight to eat. Here is how to make Chicken Biryani Recipe at home.
Hyderabadi Chicken biryani served in a bowl.
What’s great about Hyderabadi biryani is its unique taste and influences from different parts of the world, especially from the Mughals. It’s one dish that’s really close to everyone’s heart and the perfect definition of soul food.
This delectable dish is made with tender, juicy pieces of chicken cooked to perfection with Indian Spices and caramelized onions, each rice grain bearing the flavors of this royal treat.
When I started to cook, I never thought that Biryani can be made at home. It was always a special dish we went out to eat.
Then one day, a friend of our’s invited us over a biryani dinner and that day changed everything for me.
The biryani he made was out of the world and was made at home from scratch. I became his fan immediately and we had many biryani meals at his place later.
This man gave me the confidence to try out biryani at home and with a little hand holding by him, it took me no time to become a Biryani champion myself. I made many variations later apart from chicken biryani and posted the recipes here.
Some of the other biryani recipes I’ve posted are: Mutton Biryani, Hyderabadi Vegetable Dum Biryani, Kathal Ki Biryani, Hariyali Jheenga Biryani, Egg Dum Biryani and a seafood special Fish Dum Biryani.
What is Hyderabadi Chicken Biryani?
Biryani is basically rice cooked with meat in layers and on very slow heat or dum. There are many ways in a which a biryani is prepared and each method is unique and have it’s own significance.
There is Hyderabadi Style Biryani, Lucknowi Biryani, Ambur Biryani, Donne Biryani etc to name a few.
Hyderabadi Biryani is prepared in two ways – Kacchi or Pakki Biryani. Kacchi Biryani is where the meat is not cooked separately but gets cooked along with the rice while in the pakki biryani, the meat is cooked prior to layering it with rice.
The method I have mentioned below is Kacchi Biryani method and I will soon be posting the Pakki Biryani method too.
How to make Chicken Biryani?
This royal treat is prepared by cooking the rice first, and then layering it with chicken. Long grain basmati rice is to be soaked and added into a bowl of boiling water with khada garam masala, salt and shahi jeera. The rice is allowed to infuse the flavours of the masala and jeera and cook in it.
The chicken pieces are marinated with ginger paste, garlic paste, garam masala powder, red chilli powder, turmeric powder, salt, vegetable oil, green chilli and lemon juice, it’s allowed to sit for a few hours so that it soaks in all the flavours of the marinate and become tender.
You must make sure to marinate the chicken well in advance for it to get tender and cook under dum to perfection.
Once marinated, this delicious Hyderabadi biryani is assembled by putting in the chicken first and topping it with partially cooked rice.
As the rice starts to cook, the biryani is topped with milk, soaked saffron, browned onions and ghee. Then the pan is covered and the biryani is allowed to cook on dum beautifully with the flavours of the spices and toppings.
At this point in time, the aromas in your kitchen are going to be simply divine. It’s important to slow cook the biryani so that all the flavours seep right through and the chicken gets cooked thoroughly. Once it’s cooked completely, the biryani is mixed and served hot.
It’s very important to see to it that the rice is cooked to perfection; you don’t want it to be too mushy. The flavours of this dish speak for itself, chicken is to be marinated well and the final touch of saffron give this whole biryani a royal touch.
People from all over the world flock to Hyderabad to get a taste of this delicious Hyderabadi Chicken biryani, but what most don’t realise is that you can bring the taste and flavours of Hyderabad to your home. In Hyderabad, the taste of the biryani differs from region to region, but the method of cooking the biryani continues to be the same.
So for your next party, do try this delicious Hyderabadi Chicken Biryani and you won’t be disappointed. This recipe continues to be one of my all-time favourite biryani recipes.
Tips to make best Chicken Dum Biryani
Use best quality rice to make biryani. Long grain basmati rice which is atleast 2 years old is considered best to make a good biryani. I use Fortune basmati Rice to make my biryani.
The chicken must be marinated before hand. Since we are not cooking it separately, marinating it beforehand will make it tender and easy to cook.
Use a heavy bottom pan to assemble the biryani. The biryani needs to be cooked for 35-40 minutes on low heat and if the pan is not heavy, it might burn.
The traditional potli masala used to make biryani recipe has many unusual ingredients, but since it is not easy to source them, I have a mix which is easy to find and not compromise on taste.
Making Birista at home is the best way to go. I always make a large batch and freeze it for later use. You can check the recipe to make golden fried onion or Birista here.
Be very attentive while cooking the rice. Do not stir the rice much while cooking otherwise it will break the grains.
Choose a pan with a tight fitting lid. This biryani cooks on dum or steam and we want to retain as much steam that is formed inside. Traditionally, a sealing of dough used to be put around the pan and the lid but I don’t think that it is required if the lid fits tightly.
How to choose rice to make best Chicken Dum Biryani Recipe?
Both the taste and visual appeal of Biryani should stand out in its preparation. Now while this recipe takes care of the taste, the visual appeal comes only through rice grains. Longer the grain, better would be the biryani. I always choose the rice which is extra long and stands out as individual grains.
This gives the visual appeal of a blooming flower and makes eating biryani an enjoyable experience. Hence Basmati rice is the best choice to make Biryani, it stands out individually, without forming lumps while cooking.
In the market, you now even get specially selected long grain Basmati Rice, which is perfect for this Biryani.
The age of the rice is also very crucial to make good biryani. Choose the rice grain which is at least 2 year old. The older the rice, the better it is.
What to serve with Chicken Biryani?
Chicken Biryani can be served with any raita of your choice like Onion Tomato Raita, Boondi Raita or Pineapple Raita.
You can serve Mirchi ka Salan with it too.
So If you are in Greater Noida and you are a biryani lover then go to the EDigest Foods because it’s the best biryani restaurant in greater noida.
0 notes
Link
Dabha Style Cauliflower Mix Veg.

Hello everybody, it's Brad, welcome to our recipe page. Today, I'm gonna show you how to make a distinctive dish, dabha style cauliflower mix veg. It is one of my favorites. For mine, I'm gonna make it a little bit tasty. This will be really delicious.
Dabha Style Cauliflower Mix Veg is one of the most favored of recent trending foods in the world. It is easy, it's fast, it tastes delicious. It's enjoyed by millions every day. Dabha Style Cauliflower Mix Veg is something which I've loved my whole life. They're nice and they look fantastic.
To begin with this particular recipe, we have to first prepare a few components. You can cook dabha style cauliflower mix veg using 21 ingredients and 11 steps. Here is how you cook that.
The ingredients needed to make Dabha Style Cauliflower Mix Veg:
{Get of oil (preferably mustard oil).
{Get of potatoes.
{Prepare of carrot.
{Take of small cauliflower.
{Prepare of french beans.
{Prepare of peas.
{Prepare of small capsicum.
{Get of jeera/cumin seeds.
{Get of garlic clove.
{Make ready of ginger nicely chopped.
{Prepare of coriander leaves chopped.
{Make ready of Red chilli powder.
{Make ready of kashmiri lal mirch( red chilli) powder.
{Take of coriander powder.
{Make ready of garam masala.
{Make ready of tomatoes (depending on size).
{Make ready of dry red chilli (optional).
{Make ready of curd.
{Make ready of kasuri methi.
{Prepare of papad roasted this is the top secret ingredient.
{Take of Salt.
Steps to make Dabha Style Cauliflower Mix Veg:
Heat oil in pan add chopped potato and carrot. And cook for 2-3 minute. Add lil salt..
Now add cauliflower and french beans and cover and cook for 2 minutes. Add salt as per taste and veggies quantity..
Now add peas and capsicum. (I used boiled peas, if you are using fresh peas then add with cauliflower itself), cook for 2 minutes..
Make space in center by shifting veggies to the corner now add jeera. Adding jeera or cumin seeds at this point will enhance the flavor. Now add ginger and garlic and cook it for sometime..
Now add masala like red chilli powder, kashmiri lal mirch, coriander powder, jeera powder and garam masala..
Now add coriander leaves and now mix everything..
Again make space in center by shifting veggies..
Grind tomato and dry red chilli. (Dry red chilli is optional if you like spicy then add it) now add tomato paste and cook for 1-2 minutes. Now add 1/2 cup water (if you want semi-gravy) Then mix everything..
Add curd and kasuri methi. Mix it well and cook for 2-3 minutes..
At last crush roasted papad and mix in veggies. Trust me this will enhance the taste to next level. Now just cook for 1 minute. And mix veg is ready..
Enjoy dabha style mix veg with hot fulka and boondi raita!!!.
So that's going to wrap it up for this exceptional food dabha style cauliflower mix veg recipe. Thanks so much for reading. I'm confident you can make this at home. There's gonna be more interesting food in home recipes coming up. Don't forget to save this page in your browser, and share it to your loved ones, colleague and friends. Thank you for reading. Go on get cooking!
0 notes
Link
Hyderabadi Vegetable Dum Biryani.

Hey everyone, it's Louise, welcome to our recipe site. Today, I'm gonna show you how to prepare a distinctive dish, hyderabadi vegetable dum biryani. It is one of my favorites food recipes. This time, I will make it a little bit unique. This is gonna smell and look delicious.
Hyderabadi Vegetable Dum Biryani is one of the most favored of current trending meals in the world. It's enjoyed by millions daily. It's easy, it is fast, it tastes yummy. They're fine and they look wonderful. Hyderabadi Vegetable Dum Biryani is something that I have loved my whole life.
To begin with this particular recipe, we must prepare a few components. You can have hyderabadi vegetable dum biryani using 27 ingredients and 9 steps. Here is how you can achieve it.
The ingredients needed to make Hyderabadi Vegetable Dum Biryani:
{Make ready 2 cup of long grain basmati rice, soaked for 30 minutes.
{Prepare 1 tsp of salt.
{Take 2 tbsp of cooking oil.
{Prepare 2 tbsp of ghee.
{Prepare 2 of bay leaves.
{Make ready 4 of cloves.
{Make ready 2 of green cardamon.
{Take 1 inch of cinnamon stick.
{Prepare 1 tsp of cumin seeds.
{Take 1 of yellow onion, thinly sliced.
{Prepare 4 of green chilies, slit into halves.
{Make ready 1 tbsp of ginger- garlic paste.
{Take 1/4 cup of coriander leaves, finely chopped.
{Get 1/4 cup of mint, finely chopped.
{Make ready 1/2 of cauliflower florets.
{Take 1/4 of carrots, diced.
{Make ready 1/4 of beans, chopped.
{Take 1/4 of green peas, fresh or frozen.
{Get 1 of large potato, peeled and diced.
{Get of salt as required.
{Prepare 1/2 tsp of turmeric powder.
{Take 1 tsp of kashmiri red chilli powder.
{Prepare 1/2 tsp of garam masala.
{Prepare 1 tsp of Biryani masala.
{Take 3 tbsp of hung curd.
{Make ready 1/4 cup of fried onions.
{Make ready pinch of saffron,soaked in milk.
Instructions to make Hyderabadi Vegetable Dum Biryani:
Wash and soak the basmati rice for 30 minutes. Bring 5 cups of water to boil and then add soaked rice with salt. Cover and cook until 70% done.Drain the cooked rice in a colander and keep aside..
Heat the oil and ghee in a heavy bottom pan, then add all whole spices and cumin seeds.Allow the spices to infused their flavors in oil..
Then add the green chillies, onion and ginger-garlic paste, saute until raw smell goes off and onion becomes soft and translucent..
Add half of the chopped cilantro and mint and saute for a minute.Then add all the veggies with salt and pan fry the veggies for 2- 3 minutes this gives nice texture to the veggies..
Then add turmeric and red chilli powder and mix well.Cover and cook the veggies by adding 1/2 cup of water until veggies are almost cooked..
Once veggies are cooked add the garam masala,Biryani masala and hung curd, allow to cook until oil separates.Check and adjust the seasoning by this time if needed..
Reduce the flame to medium-low add start layering the dum biryani. Add remaining cilantro, mint, fried onion and then cooked rice, top it with saffron milk and ghee..
Cover the pan with aluminium foil and then lid for 10 mins in medium-low flame..
Mix well and serve hot with Onion Tomato Raita or Boondi Raita.
So that's going to wrap it up with this special food hyderabadi vegetable dum biryani recipe. Thanks so much for your time. I am confident you will make this at home. There's gonna be more interesting food at home recipes coming up. Don't forget to save this page in your browser, and share it to your loved ones, friends and colleague. Thank you for reading. Go on get cooking!
0 notes
Photo

New Post has been published on https://toldnews.com/health/heres-how-you-can-make-lauki-bottle-gourd-interesting-for-your-kids/
Here's How You Can Make Lauki (Bottle Gourd) Interesting For Your Kids

Highlights
Most kids have a habit of discarding veggies from their meals
Lauki is quite infamous for its distinct taste and flavour
With just a handful of masalas and condiments, lauki can taste delicious
If you have picky eaters at home, you must have faced problems while preparing meals for them. Most kids have a habit of discarding veggies from their meals, which are loaded with health-benefiting properties. Out of all the green vegetables, there is one veggie, which is quite infamous for its distinct taste and flavour – lauki. Lauki (ghiya or bottle gourd) is replete with nutrition. Many health experts stress on the importance of drinking lauki juice; this is because lauki has the potential to keep you hydrated from within. With just a handful of masalas and condiments, you can do wonders with this green vegetable. If you wish to make your kids eat this wonder veggie without them knowing, all you need to do is transform it in spectacular dishes.
Here Is A List Of Three Lauki Dishes That Are A Perfect Combination Of Taste And Health:
Stuffed Lauki
Blanched bottle gourd when marinated in lime and stuffed with cottage cheese gives rise to this appetising dish called stuffed lauki. If you have had a certain disliking for lauki and were hesitant all this while to eat this healthy green vegetable, then try eating it in the form of this dish. You can prepare this delight for lunch or dinner and pair with some chapatis to get wholesome nutrition.
(Also Read: 11 Best Bottle Gourd Recipes | Easy Lauki Recipes)
You can prepare this delight for lunch or dinner
Doodhi Ka Halwa
This one’s for all the sweet lovers out there. If you happen to have a sweet tooth and wish to indulge in something sweet yet healthy, bring this dessert to your rescue. Made using doodhi (or lauki) along with soy milk, this halwa preparation is a common festive preparation. You may adjust the amount of jaggery that goes in making of this halwa as per your palate. Oh, and your kids are going to love this dessert.
Lauki Raita
If you are bored of having the same regular boondi raita and wish to experiment with your palate, try making lauki raita instead. This raita is a perfect accompaniment to pair with lunch or dinner menu spread. You may add spices of your choice to take the flavour game a level up.
So, the next time if your kids say no to lauki, try one of these recipes and we are sure that they will never say no lauki. Happy Cooking!
Disclaimer: This content including advice provides generic information only. It is in no way a substitute for qualified medical opinion. Always consult a specialist or your own doctor for more information. NDTV does not claim responsibility for this information.
#bottle gourd#ghiya#health news magazine#health news on eggs#health news sources#health news today 2019#health news who#lauki#the health news
0 notes
Video
youtube
boondi raita recipe | Raita Recipe | Easy and Quick Raita Recipes | Rait...
0 notes
Text
Easy Kadai Chicken Recipe
Kadai Chicken recipe is a very common Chicken Dry dish made from rich tomato gravy and sauteed along with capsicum chunks and onions. Serve it for your weekday dinner with Tawa Paratha, and a Boondi Raita.

Kadai Chicken Recipe is a very well known dish brought down from Pakistan and North India. The dish is known for its complexity and spiciness combined with meat. There are also chunks of onions and capsicum fried along with the food. The bowl is made semi-dry and the gravy is kept warm. Kadai chicken recipe can be made in just 30 minutes and even prepared for later use. The simplicity in this dish is the simple use of Indian Masala as garam masala powder and red chili.
Ingredients you need to make Kadai chicken recipe:
Ingredients
300 grams Chicken breasts, cut into chunks
1 Onion, sliced
1 Onion, diced
1 Green Bell Pepper (Capsicum), diced
1 teaspoon Cumin seeds (Jeera)
2 Dry Red Chilli
1 inch Ginger, chopped
4 cloves Garlic, chopped
1 cup Homemade tomato puree
2 teaspoons Red Chilli powder
1/4 teaspoon Turmeric powder (Haldi)
2 teaspoon Garam masala powder
1 tablespoon Fresh cream
Salt , to taste
2 sprig Coriander (Dhania) Leaves , chopped
Sunflower Oil
How to make Kadai Chicken Recipe:
Heat a heavy-bottomed pan/wok with oil to begin making the Kadai Chicken Recipe. If it gets hot, add the cumin seeds and let it splutter.
Remove dried red chilies and saute until they crisp. Add ginger, garlic, and make smooth.
Attach the onions sliced and diced, then saute until they melt then caramelize.
Add bell peppers and cook until a little soft. When done, add a cup of tomato puree and keep cooking until well-cooked tomatoes. This will take about four to five minutes.
Add red chili powder, garam masala powder, turmeric powder, salt, and boil for another 3 minutes after 4 to 5 minutes.
Attach pieces of chicken and saute well, until the masala is uniformly spread over the meat.
The chicken can cook for about 15 to 20 minutes. Apply a spoonful of cream at the end and blend properly. Garnish it with coriander leaves to serve sweet.
For a weekday dinner, eat the Kadai Chicken Recipe along with Tawa Paratha, Boondi Raita, and a Kachumber Salad.
0 notes
Text
Papad ki Subzi,a spicy and tangy Rajasthani curry made with yogurt and papad/poppadoms and chickpea flour.
A simple and fuss free curry from the royal state of Rajasthan. If you follow me, by now you must have known my love for Rajasthani Cuisine. I spent 3 years of my college life in Rajasthan and fall in love with the food. It is very much similar to the cuisine of from where I come from Western U. P but still many dishes like Dal Baati, Gatte Ki Subzi, Gatte Ka Pulao, Rajasthani Kabuli/Jodhpuri Pulao are native to the state.
Rajasthan is basically is a dry state and people have adapted there cuisine vegetarians especially to the local available ingredients. Due to scarcity of water, the state does not enjoy a wide range of fresh vegetables. Now a days almost everything is available in big cities but few decades back and still, people in small towns relied on local ingredients. Yogurt, spices and chickpea flour and millets like bajara are widely used in making dishes.
Other Rajasthani Recipes on the blog.. Rajasthani Pyaz ki Kachori, Mawa Ki Kachori, Choorma , Rajasthani Lehsun Ki Chutney
Papad Ki Subzi/Dahi Papad Shak
One such curry rich in flavors and very quick and easy to make is Papad Ki Subzi or Dahi Papad Shak as known in local language. I first tasted this curry from one of my classmates lunchbox, who used bring homemade food for us(those living in college hostel) . We loved this simple curry used to gorge on it with ajwain paranthas.
The curry is very simple and we just need sour yogurt, chickpea flour and papads. It is a very good way to use leftover papads/papadums from the last nite’s party or when we run out of vegetables for making lunch or dinner. Did this ever happened with you that you are about to prepare dinner or wake up early morning to find no veggies, no tomatoes not even onion and potatoes in pantry to cook!!?? I am sure sometimes it happens with all of us, especially towards the weekend..
Khali Fridge/Empty Refrigerator
I am right na?? What you do when you have practically no veggies in pantry/refrigerator. This specially happens when we come back from a long vacation or cleaning the pantry and refrigerator when gong on long vacations. Or sometimes it just you don’t want to go grocery shopping 😉 !!
There are many recipes that one can think of making with veggies, onion and tomatoes.Lentils or frozen veggies are on thing usually that come to our rescue.Dishes like khichdi like Yellow Moong Dal Khichdi, Hari Moong Dal Khichdi or simple dal preparations like (Dhuli Moong Dal/Red Lentils, Dal Tadka)with steamed rice, crepes made with various flours like Chickpea flour(Besan Chilla), Instant Ragi Dosa, Dal Parantha or Pooris(Bedmi Poori) can be prepared in jiffy for such times.
#KhaliFridge is the theme for this week’s Foodie Monday Bloghop group for this Monday.This wonderful theme was suggested by Renu who blog’s at Cook with Renu. Renu’s blog has a wonderful collection of recipes where she uses gluten-free flours like coconut, millets and healthy ingredients which suit the taste buds of both the grown ups and kids. Do check out here blog..
What to have with Papad Ki Subzi
I make Papad ki Subzi many times especially when I want something quick, easy and different for dinner. Kids love this curry as I top it more crunchy papads and they like to have it with chapatis/rice. You can serve it your guests too, along with other main course dishes like Aloo Matar or Matar Paneer, Rassewale Aloo Tamatar, Palak Paneer,Chautneywale Aloo, Besanwali Bhindi. This curry goes well with chapatis, paranthas and even with pooris(Methi Dal Poori).
For a quick, wholesome meal, pair it with Sookhi Urad dal(Dry Split Black Gram Lentil). Another recipe that you can make when there are no veggies.(updating next),
Let’s see now how I make this super simple Papad Ki Subzi/Dahi Papad Ki Subzi
All the ingredients(papad,boondi, spices) are available at Indian Grocery stores
Papads or better known as Poppadoms, use preferably Moong Papads or Urad Dal Papads.
To make Dahi Papad ki Subzi, we need Curd/Yogurt. Old or sour yogurt should be preferably used used for the authentic taste.
Chickpea flour/besan to bind the curry, spices like bay leaf, cinnamon, cloves and black pepper for flavour.
You can also add boondi to it. Boondi are fried chickpea balls that are used for making boondi raita or used in chaat recipes. I am adding it here.
I am also using dried feugreek leaves(kasuri methi) in the recipe, as it gives a nice flavour and aroma to curry. This is optional and not used in traditional preparation.
Traditionally fried papads are added to this curry, but I usually add roasted papads. You can roast papads on stovetop or in microwave.
#gallery-0-10 { margin: auto; } #gallery-0-10 .gallery-item { float: left; margin-top: 10px; text-align: center; width: 33%; } #gallery-0-10 img { border: 2px solid #cfcfcf; } #gallery-0-10 .gallery-caption { margin-left: 0; } /* see gallery_shortcode() in wp-includes/media.php */
Method..
Roast papads and keep aside. Crush it to the size as you like it in curry. Soaked papads increase in size after sometime, you
In a mixing bowl, add yogurt, chickpea flour/besan , salt and other powdered spices like coriander powder, red chilli powder, turmeric powder.
Add about 1 cup of water and mix well.
#gallery-0-11 { margin: auto; } #gallery-0-11 .gallery-item { float: left; margin-top: 10px; text-align: center; width: 25%; } #gallery-0-11 img { border: 2px solid #cfcfcf; } #gallery-0-11 .gallery-caption { margin-left: 0; } /* see gallery_shortcode() in wp-includes/media.php */
Heat oil/ghee in a kadhai, add hing(asafeotida), cumin seeds/jeera and other whole spices.
Add ginger green chilli paste saute for few seconds.Then, add dried fenugreek leaves/kasuri methi and saute for another 1-2 seconds.
Add yogurt and chickpea mixture and stir it well. Take care it should not curdle.Once the mix comes to roaring boil, add salt.
Cook the mixture for 2-3 minutes and then add crushed papads and boondi to it. Many recipes tell about soaking papads and boondi in hot water before adding to curry, but I add it directly. It get’s cooked and soaked in curry. I like it that way.
#gallery-0-12 { margin: auto; } #gallery-0-12 .gallery-item { float: left; margin-top: 10px; text-align: center; width: 33%; } #gallery-0-12 img { border: 2px solid #cfcfcf; } #gallery-0-12 .gallery-caption { margin-left: 0; } /* see gallery_shortcode() in wp-includes/media.php */
Top with finely chopped cilantro/coriander(optional). Top it more crushed papads and boondi while serving for the crunch if you like.
Serve hot with Chapati/Parantha or Poori.
Other Yogurt based curries from the blog that you will like… Chatpatte Kale Chane, Kadi Pakodi,
Papad Ki Subzi

1 Cup Yogurt/Dahi
1-2 tbsp Chickpea Flour/Besan
½ Cup Crushed Papad/Popadums
¼ Cup Boondi
Spices used
1 Bay Leaf
1-2 Whole Red Chillies
4-5 Cloves
1 tsp Cumin Seeds/Jeera
1 tsp Red Chilli Powder
1" Ginger
1-2 Green Chillies (optional)
1 tsp Coriander Powder
1/4 tsp Turmeric Powder
Salt to taste
1-2 tbsp Oil/Desi Ghee
Roast papads and keep aside. Crush it to the size as you like it in curry.
Crush Ginger and green chilli in motor pestle or finely chop.
In a mixing bowl, add yogurt, chickpea flour/besan , salt and other powdered spices like coriander powder, red chilli powder, turmeric powder.Add about 1 cup of water and mix well.
Heat oil/ghee in a kadhai, add hing(asafeotida), cumin seeds/jeera and other whole spices.
Add ginger green chilli paste and saute for few seconds. Add dried fenugreek leaves/kasuri methi and saute for another few seconds.
Add yogurt and chickpea mixture and stir it well. Take care it should not curdle.Once the mix comes to raring boil, add salt.
Cook the mixture for 2-3 minutes and then add crushed papads and boondi to it. You can also soak papad and boondi in hot water(separately) before adding to curry, but I add it directly. It get's cooked and soaked in curry.
Top with finely chopped cilantro/coriander(optional). Top it more crushed papads and boondi while serving for the crunch if you like.
Serve hot with Chapati/Parantha or Poori.
Variations for Curry
Add one pureed tomato for a different texture and flavour.
You can add boiled potatoes and peas to it.
For the drier version add more papad, reduce water to half cup and add green capsicum to it along with chopped tomatoes.
Variations for Papad Ki Subzi
Add one pureed tomato for a different texture and flavour.
You can add boiled potatoes and peas to it.
For the drier version add more papad, reduce water to half cup and add green capsicum to it along with chopped tomatoes.You will love this simple and yumm version with hot chapatis!!
Do try this yogurt based curry for loved ones not only when you run out of vegetables, but also for festive meal menu..
Do give me your feedback whenever you make it.. tag me on my social media handles..
Say Hello!!and visit my social media accounts.. FB, Pinterest and Instagram. Whenever you make this, do post on my FB page or tag me on Instagram. Pin the recipes for later use.
If you like my work, then do hit the follow button and subscribe to the blog to get notifications on new posts and share the blog with your loved ones. I promise won’t spam your mailbox 🙂.
Thanks for stopping by and keep coming back!!
Papad Boondi ki Subzi Papad ki Subzi,a spicy and tangy Rajasthani curry made with yogurt and papad/poppadoms and chickpea flour.
0 notes
Link
Raita, the yogurt-based salsa, is one of the most popular recipes in India and neighbouring nations. Yogurt is the principle ingredient that is utilized in making of raita recipe. Other ingredients that could be mixed with yogurt to make this recipe are, leafy foods powders, onions, tomatoes, cucumber, to make raita recipe more scrumptious and tastier. Because of its cold effect in the body, Raita is usually made in summer season. Raita could be made sweet as well as salty, depends upon the taste you like. People love to eat Raita along with Pulao, Biryani or Parathas. In India, you can discover numerous assortments of raita. One of the best and popular type of raita is, boondi raita. And, other raita recipes that you can try at home could be dry fruit raita, onion raita, cucumber raita and makhana raitas. This Living Foodz raita recipe is very tasty and easy to make at home. It is called boondi raita, and you can get the entire details of this recipe by visiting Living Foodz site.
0 notes
Last Seen Blogs

iceprincessrose17
AA Health Choice

kvssidhu
Kvs Sidhu

jubhoi-ng-blog
Jubhoi

chenfordsource
you know me so well

forgemotorsport
The Best For The Aftermarket