#Free Video Production Software
Text
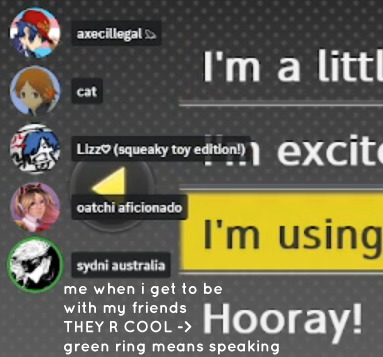
Is this stupid? Yes. Do I need people to see it? Also yes.
#abomy talks#as ceo of Ted Spankoffski lesbianism you’re so welcome#someone take the free editing software away from me#I’m too lazy to make the bead drop transition smoothly you get the point#ted spankoffski#theodore spankoffski#paul matthews#bill woodward#starkid#team starkid#starkid productions#starkid musicals#tgwdlm#starkid tgwdlm#tgwdlm starkid#the guy who didn’t like musicals#hatchetfield#hatchetverse#hatchetfield universe#shitpost#chappell roan#super graphic ultra modern girl#video
306 notes
·
View notes
Text
The must haves tools and software which makes you rich, its market value over $1000 now 87% off...
Over time, technology continues to advance, causing us to integrate old things and traditional methods with new technology. In the field of digital marketing, these changes happen very quickly. Consequently, the skills we acquire either become obsolete, or their productivity diminishes if not adapted to new technologies. In today's era, Artificial Intelligence is predominant, and we are gradually entering the AI era. Due to this, many jobs, especially in digital marketing, are at risk. Some creators even fear that AI might replace their work.
In such situations, there are tools and software that act as a foundation, with their utility existing both before and after the advent of AI. Without these tools and software, we cannot effectively utilize AI. Our team thoroughly analyzed this matter, conducted market research, and developed a bundle of tools and software that will remain essential. If you use these software and implement them effectively, no one can stop your success in digital marketing. These digital products are designed for every platform.

For instance, if you are a YouTuber, there are video editing and audio editing software, after-effects tools, and copyright-free background music. If you own an agency or work as a freelancer, there are numerous audio-video templates that you can use for running your ads. If you sell digital products on Etsy or any online platform, there are graphics bundles, after-effects tools, face tools, neon kit bundles, eBooks, AI-generated t-shirt bundles, logo designs, Corel Draw, and many other products available.
Whether you are a content creator, SEO expert, or web designer, there is something for everyone in this bundle. The best part is that you can use it for your creativity and resell it. We provide resale rights for all these products to ensure you face no problems in the future. Additionally, we offer other services alongside, with customer support being the most crucial. Our team is active 24 hours a day to promptly address any inquiries or issues because, in the end, trust builds a brand, and our main goal is to stand by our customers' trust.
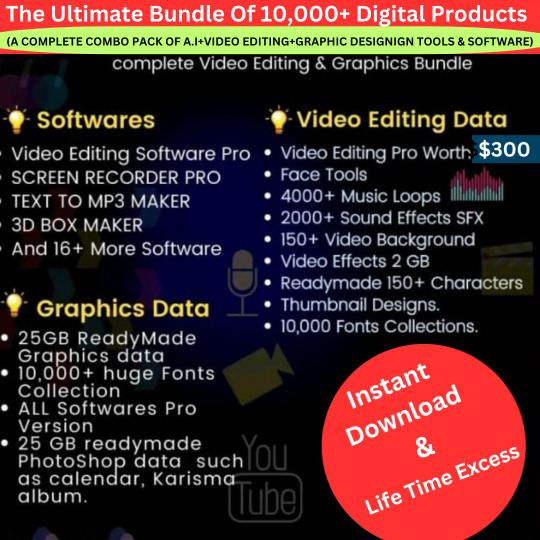
The market value of this entire bundle is over $1000, but today we are offering it at a significantly reduced price. We are providing an 87% discount on this product, along with a $500 bonus, but this bonus is exclusive to the first 50 buyers. So, don't delay; click on the link provided now, visit our product page for complete details, and who knows, you might not get such a golden opportunity again.
Click link below to know more
https://multystuff-reviews.com/
#digital marketing#digital products#digital illustration#graphic art#graphic design#plr content#software#plr ebooks#print on demand#reselling#video editing#youtube video#music video#graphic designing#graphic designer#logo design#poster design#logo#ebooks#free books#creators on tumblr#support content creators#creativity#youtubers#web design#passive income#work from your phone#work from home#work from anywhere#work from office
5 notes
·
View notes
Text
0 notes
Text
Sell Smarter, Not Harder: Unleashing the Power of AI in Sales
In today's fast-paced, hyper-competitive business landscape, sales teams are under immense pressure to deliver results. Traditional sales methods, while effective in the past, may no longer suffice in the age of digital transformation. This is where artificial intelligence (AI) can make a significant difference. By leveraging AI-powered tools, sales teams can streamline their processes, improve customer engagement, and ultimately drive revenue growth.
Understanding AI in Sales
AI refers to the development of intelligent systems that can learn, reason, and act autonomously. In the context of sales, AI can be applied in various ways to enhance performance. Some of the key applications include:
Lead Generation and Scoring: AI algorithms can analyze vast datasets to identify potential customers and score them based on their likelihood to convert. This helps sales teams prioritize their efforts and focus on leads with the highest probability of closing deals.
Personalized Sales Outreach: AI enables personalized communication by tailoring messages and offers to individual prospects. This improves customer engagement and increases the chances of conversion.
Sales Forecasting and Analytics: AI-powered analytics tools can provide valuable insights into sales trends, performance metrics, and customer behavior. This information can be used to optimize sales strategies and make data-driven decisions.
Customer Relationship Management (CRM) Automation: AI can automate routine CRM tasks, such as data entry and lead nurturing, freeing up sales reps to focus on building relationships with customers.
Benefits of AI in Sales
Implementing AI in sales can offer numerous benefits, including:
Increased Efficiency: AI can automate time-consuming tasks, allowing sales teams to focus on more strategic activities.
Improved Lead Quality: AI can help identify high-quality leads, reducing wasted time and resources.
Enhanced Customer Experience: Personalized communication and targeted offers can lead to a better customer experience.
Data-Driven Decision Making: AI provides valuable insights into sales performance, enabling data-driven decision making.
Boosted Revenue: By improving efficiency, lead quality, and customer engagement, AI can ultimately drive revenue growth.
Implementing AI in Your Sales Strategy
Here are some steps to consider when implementing AI in your sales strategy:
Identify Your Needs: Assess your current sales processes and identify areas where AI can add value.
Choose the Right Tools: Select AI-powered tools that align with your specific needs and budget.
Train Your Team: Provide your sales team with the necessary training to effectively use AI tools.
Start Small and Scale: Begin with a pilot project to test the benefits of AI and gradually expand its use as you see results.
Conclusion
AI is no longer a futuristic concept; it is a reality that sales teams can leverage to gain a competitive advantage. By embracing AI-powered tools, sales teams can sell smarter, not harder, and achieve sustainable growth in today's challenging market.
#ai tools#best ai tools#free ai tools#new ai tools#ai#ai powered tools#top ai tools#ai tools for creators#ai productivity tools#new ai tools 2023#6 crazy ai powered tools#10 ai tools#ai tools new#how to use ai tools#2023 ai tools#crazy free ai tools#mind blowing ai tools#list of ai tools#top ai tools 2023#ai powered tools to land your next software#ai tools for video editing#ai tools for business
0 notes
Link
🎥 Exciting news for small creators, educators, and hobbyists! Dubbing your YouTube videos for free can now be done without breaking the bank. By using free tools and software, you can localize your content, boost engagement, and grow your channel with zero financial investment. Check out the latest post from Mosaico Productions to learn more! #YouTube #Dubbing #FreeTools #ContentLocalization 🌟
#🎥 Exciting news for small creators#educators#and hobbyists! Dubbing your YouTube videos for free can now be done without breaking the bank. By using free tools and software#you can localize your content#boost engagement#and grow your channel with zero financial investment. Check out the latest post from Mosaico Productions to learn more! YouTube Dubbing
0 notes
Text
Google is going to start scraping all of their platforms to use for AI training. So, here are some alternatives for common Google tools!
Google Chrome -> Firefox
If you’re on tumblr, you’ve probably already been told this a thousand times. But FireFox is an open-source browser which is safe, fast and secure. Basically all other browsers are Chrome reskins. Try Firefox Profilemaker, Arkenfox and Librewolf! Alternatively, vanilla Firefox is alright, but get Ublock Origin, turn off pocket, and get Tabliss.
Google Search -> DuckDuckGo
DuckDuckGo very rarely tracks or stores your browsing data (though they have only been known to sell this info to Microsoft). Don’t use their browser; only their search engine. Domain visits in their browser get shared. Alternatively, you can also use Ecosia, which is a safe search engine that uses its income to plant trees! 🌲
Google Reverse Image Search -> Tineye
Tineye uses image identification tech rather than keywords, metadata or watermarks to find you the source of your image!
Gmail -> ProtonMail
All data stored on ProtonMail is encrypted, and it boasts self-destructing emails, text search, and a commitment to user privacy. Tutanota is also a good alternative!
Google Docs -> LibreOffice
LibreOffice is free and open-source software, which includes functions like writing, spreadsheets, presentations, graphics, formula editing and more.
Google Translate -> DeepL
DeepL is notable for its accuracy of translation, and is much better that Google Translate in this regard. It does cost money for unlimited usage, but it will let you translate 500,000 characters per month for free. If this is a dealbreaker, consider checking out the iTranslate app.
Google Forms -> ClickUp
ClickUp comes with a built-in form view, and also has a documents feature, which could make it a good option to take out two birds with one stone.
Google Drive -> Mega
Mega offers a better encryption method than Google Drive, which means it’s more secure.
YouTube -> PeerTube
YouTube is the most difficult to account for, because it has a functional monopoly on long-form video-sharing. That being said, PeerTube is open-source and decentralized. The Internet Archive also has a video section!
However, if you still want access to YouTube’s library, check out NewPipe and LibreTube! NewPipe scrapes YouTube’s API so you can watch YouTube videos without Google collecting your info. LibreTube does the same thing, but instead of using YouTube servers, it uses piped servers, so Google doesn’t even get your IP address. Both of these are free, don’t require sign-ins, and are open source!
Please feel free to drop your favorite alternatives to Google-owned products, too! And, if this topic interests you, consider checking out Glaze as well! It alters your artwork and photos so that it’s more difficult to use to train AI with! ⭐️
#anti ai#anti ai art#anti ai music#anti ai writing#anti google#google#political#current events#azure does a thing
31K notes
·
View notes
Text
How do you write a AV project proposal for classroom??
In the modern educational landscape, audiovisual (AV) technology plays a crucial role in enhancing the learning experience. From interactive displays and sound systems to collaboration tools and smart classroom av solutions layout, AV integration has become essential for creating engaging and effective educational environments. As an AV design and proposal software company, XTEN-AV understands the significance of a well-crafted AV project proposal for classroom installations. In this blog post, we will guide you through the process of writing an effective AV project proposal that impresses clients and increases your chances of winning projects.

Understand the Client's Needs:
Before starting to write an AV project proposal for a classroom, it's crucial to have a clear understanding of the client's requirements and objectives. Schedule a meeting or conduct a thorough needs assessment to gather information about the educational goals, budget constraints, technical requirements, and any specific challenges the client may be facing. This knowledge will allow you to tailor your proposal to meet their unique needs and demonstrate your expertise.
Executive Summary:
Begin your AV project proposal with an executive summary that provides an overview of the project and highlights its key aspects. Summarize the client's needs, outline your proposed solution, and mention the expected outcomes. Keep this section concise and impactful, as it serves as a snapshot of your proposal and can influence the reader's initial impression.
Scope of Work:
Define the scope of work for the AV project in clear and specific terms. Outline the tasks, activities, and deliverables that will be involved in the installation process. Specify the equipment to be installed, such as projectors, displays, audio systems, control systems, and any other relevant AV components. Be detailed and include any additional services you will provide, such as training, ongoing support, or maintenance.
Technical Specifications:
In this section, provide detailed technical specifications for the AV equipment you are recommending. Include information such as brand, model, quantity, and any special features or capabilities. Ensure that the equipment aligns with the client's needs, supports their educational objectives, and meets industry standards. If applicable, mention any integration with existing infrastructure and compatibility considerations.
Room Design Layout:
A crucial aspect of an AV project proposal for a classroom is the room design layout. Use XTEN-AV's software to create visual representations of the proposed setup. Include diagrams, floor plans, and 3D renderings to showcase the placement of equipment, cabling, and control interfaces within the classroom. This visual representation will help the client understand the proposed design and its impact on the learning environment.
#audio visual#software#design#saas#video production#proposal#proposal software#proposal templates#proposal layout#classroom design template#classroom layout template#classroom layout template free#classroom management plan template#classroom setup template#classroom template#classroom proposal#classroom template layout
0 notes
Text
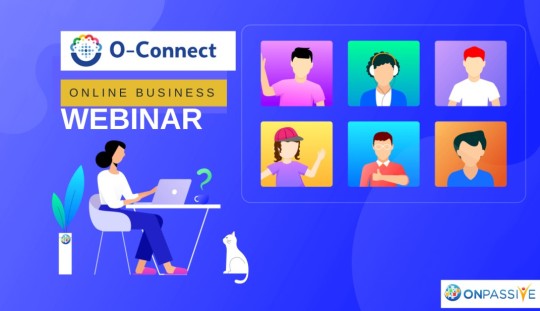
Utilize Onpassive Products To Get The Best Online Webinar platform Experience With O-Connect
Utilize Onpassive Products To Get The Best Online Webinar platform Experience With O-Connect
Are you looking for the best online webinar platform to host your next meeting? With O-Connect, you can get the best online meeting experience without any hassle. O-Connect is an AI-powered platform created by Onpassive Products, to make all your online meetings stress-free and secure. With features such as video conferencing, screen sharing, live chatting, and file management, O-Connect has…
View On WordPress
#ai online meeting software#ai webinar online#alternative to zoom#best ai online meeting services#best free online meeting platform#best free online video conference#best online meeting app than zoom#best online meeting platforms free#best online webinar platform#free online meeting apps#o-connect app#o-connect onpassive peoducts#o-conneect#online meeting app#onpassive oconnect#onpassive products#zoom#zoom app
0 notes
Text
Komodo Decks: An HD Video Demo and Walkthrough Creation Tool - Best Appsumo Deal
Komodo Decks: An HD Video Demo and Walkthrough Creation Tool – Best Appsumo Deal
Komodo Decks is a user-friendly screencasting software that allows you to create and share HD video tours walkthrough. It’s easy to use and perfect for creating high-quality video content for your audience. With Komodo Decks, you can quickly create engaging and informative videos to help your audience learn more about your product or service.
Meet with Komodo Decks
Note: Most AppSumo deals are…

View On WordPress
#appsumo#Appsumo Deal#Appsumo Komodo Decks#appsumo lifetime deals free#appsumo lifetime deals premium#appsumo lifetime deals review#appsumo lifetime deals unlimited appsumo#best apps for screen mirroring#Best Appsumo#Best Appsumo Deal#Best Appsumo deals#creating demo videos#Decks#demo video software#how to create training videos#how to make product demo videos#Komodo#Komodo Decks#Komodo Decks Appsumo#Komodo Decks price#making a training video
0 notes
Text
We Learned About, Downloaded, Used & Loved OBS Studio Made by the OBS Project & It Works Great to Remux MKV to MP4 on macOS
We Learned About, Downloaded, Used & Loved OBS Studio Made by the OBS Project & It Works Great to Remux MKV to MP4 on macOS

View On WordPress
#Cisdem Video Converter#free software#Matroska#MKV#MP4#OBS#OBS Project#OBS Studio#open source software#remixing#Robert Krasker#Robert Krasker Day#The Robert Krasker Project#video production applications#video production software
0 notes
Text
I am not a professional video editor or filmmaker and I treat video essays as a hobby because I know that if I turn it into a job, I'll hate it. And I'd rather love doing it.
I would also love to see more Native American / First Nations / Indigenous people making content on Youtube, tiktok, etc and any help or advice that I can provide, I will.
If you like to analyze and talk about media and would need footage, OBS is free to use and REALLY useful. https://obsproject.com/
If you need video editing software, Da Vinci Resolve is free to use and tutorials exist online: https://www.blackmagicdesign.com/products/davinciresolve
If you want a simpler and easy to use free video editor, Clip Champ suffices nicely: https://clipchamp.com/en/
You can get a decent microphone for like $20 on Amazon. I use this one:

You can find ring lights and the usual "video content creating kits" in pretty much any electronics department in grocery stores, department stores, Best Buy, etc.
And while you ---CAN--- save up some money for a camera, more often than not your phone will suffice.
Most important of all, your early works may be rough and choppy, but the important thing is to just BEGIN. Start making things. Watch your work evolve as you keep creating, keep talking, and putting yourself and your work out there.
Go forth and be glorious. Colonizers don't want us at the table. Bring your chair and sit there anyways. Take up space. DEMAND your voice be heard. Do it for yourself, do it because you love your people and your community.
300 notes
·
View notes
Text
Here's a list of Free tools and resources for your daily work!🎨
2D
• Piskelapp Pixel art + animation
• Krita general digital painting + animation
• Gimp image manipulation + painting
• MapEditor Level builder (orthogonal, isometric, hexagonal)
• Terawell manipulate 3D mannequin as a figure drawing aid (the free version has everything)
• Storyboarder Storyboard
3D
• Blender general 3D software (modeling, sculpting, painting, SFX , animation…).
• BlockBench low-poly 3D + animation.
• Dust3D low-poly 3D (similar to Zbrush Zsphere)
Sound Design
• Audacity Audio editor (recording, editing, mixing)
• LMMS digital audio workstation (music production, composition, beat-making).
• plugins4free audio plugins (work with both audacity and lmms)
• Beepcomp chiptune/8-bit/16-bit music synthesizer
Video
• davinciresolve video editing (the free version has everything)
• OBS Studio video recording + live streaming.
2D Animation
• Synfig Vector and puppet animation, frame by frame. Easy.
• OpenToon Vector and puppet animation, frame by frame. Hard.
↳ You can import your own drawings.
For learning and inspiration
• models-resource 3D models from retro games (mostly)
• spriters-resource 2D sprites (same)
• textures-resource 2D textures (same)
• TheCoverProject video game covers
• Setteidreams archive of animation production materials
• Livlily collection of animated lines
433 notes
·
View notes
Note
If the Commodore 64 is great, where is the Commodore 65?
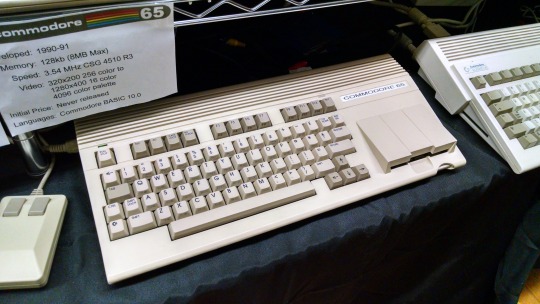
It sits in the pile with the rest of history's pre-production computers that never made it. It's been awhile since I went on a Commodore 65 rant...
The successor to the C64 is the C128, arguably the pinnacle of 8-bit computers. It has 3 modes: native C128 mode with 2MHz 8502, backwards compatible C64 mode, and CP/M mode using a 4MHz Z80. Dual video output in 40-column mode with sprites plus a second output in 80-column mode. Feature-rich BASIC, built in ROM monitor, numpad, 128K of RAM, and of course a SID chip. For 1985, it was one of the last hurrahs of 8-bit computing that wasn't meant to be a budget/bargain bin option.
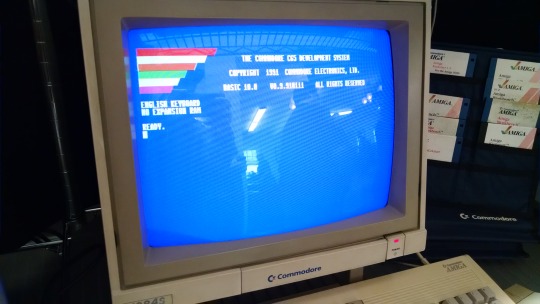
For the Amiga was taking center stage at Commodore -- the 16-bit age is here! And its initial market performance wasn't great, they were having a hard time selling its advanced capabilities. The Amiga platform took time to really build up momentum square in the face of the rising dominance of the IBM PC compatible. And the Amiga lost (don't tell the hardcore Amiga fanboys, they're still in denial).
However, before Commodore went bankrupt in '94, someone planned and designed another successor to the C64. It was supposed to be backwards compatible with C64, while also evolving on that lineage, moving to a CSG 4510 R3 at 3.54MHz (a fancy CMOS 6502 variant based on a subprocessor out of an Amiga serial port card). 128K of RAM (again) supposedly expandable to 1MB, 256X more colors, higher resolution, integrated 3½" floppy not unlike the 1581. Bitplane modes, DAT modes, Blitter modes -- all stuff that at one time was a big deal for rapid graphics operations, but nothing that an Amiga couldn't already do (if you're a C65 expert who isn't mad at me yet, feel free to correct me here).
The problem is that nobody wanted this.
Sure, Apple had released the IIgs in 1986, but that had both the backwards compatibility of an Apple II and a 16-bit 65C816 processor -- not some half-baked 6502 on gas station pills. Plus, by the time the C65 was in heavy development it was 1991. Way too late for the rapidly evolving landscape of the consumer computer market. It would be cancelled later that same year.
I realize that Commodore was also still selling the C64 well into 1994 when they closed up shop, but that was more of a desperation measure to keep cash flowing, even if it was way behind the curve by that point (remember, when the C64 was new it was a powerful, affordable machine for 1982). It was free money on an established product that was cheap to make, whereas the C65 would have been this new and expensive machine to produce and sell that would have been obsolete from the first day it hit store shelves. Never mind the dismal state of Commodore's marketing team post-Tramiel.
Internally, the guy working on the C65 was someone off in the corner who didn't work well with others while 3rd generation Amiga development was underway. The other engineers didn't have much faith in the idea.
The C65 has acquired a hype of "the machine that totally would have saved Commodore, guise!!!!1!11!!!111" -- saved nothing. If you want better what-if's from Commodore, you need to look to the C900 series UNIX machine, or the CLCD. Unlike those machines which only have a handful of surviving examples (like 3 or 4 CLCDs?), the C65 had several hundred, possibly as many as 2000 pre-production units made and sent out to software development houses. However many got out there, no software appears to have surfaced, and only a handful of complete examples of a C65 have entered the hands of collectors. Meaning if you have one, it's probably buggy and you have no software to run on it. Thus, what experience are you recapturing? Vaporware?
The myth of the C65 and what could have been persists nonetheless. I'm aware of 3 modern projects that have tried to take the throne from the Commodore 64, doing many things that sound similar to the Commodore 65.
The Foenix Retro Systems F256K:
The 8-Bit Guy's Commander X16
The MEGA65 (not my picture)
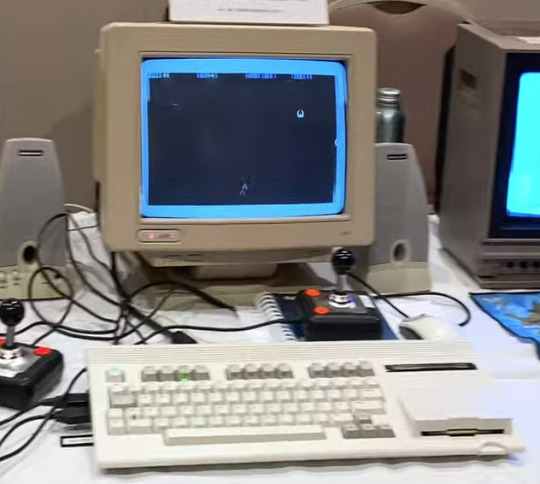
The last of which is an incredibly faithful open-source visual copy of the C65, where as the other projects are one-off's by dedicated individuals (and when referring to the X16, I don't mean David Murray as he's not the one doing the major design work).
I don't mean to belittle the effort people have put forth into such complicated projects, it's just not what I would have built. In 2019, I had the opportunity to meet the 8-Bit Guy and see the early X16 prototype. I didn't really see the appeal, and neither did David see the appeal of my homebrew, the Cactus.
Build your own computer, build a replica computer. I encourage you to build what you want, it can be a rewarding experience. Just remember that the C65 was probably never going to dig Commodore out of the financial hole they had dug for themselves.
252 notes
·
View notes
Text
The Unreasonable Effectiveness of Linux Workstations, a fantastic video on productive computing by No Boilerplate.
Creatives, gamers, and casual computer users alike: take a peek!
youtube
Full transcript available on GitHub.
Cute anecdote time: I switched my (somewhat tech savvy) 70-year-old grandparents over to Ubuntu Linux after the battery in their Windows 10 laptop died on them.
It’s been two years since the switch. I have received zero calls from them about software updates, strange behavior, or frustrating driver issues. They love it!
It took less than 45 minutes to back up their data, install Ubuntu on a new machine, and restore their files and applications. Add another 15 minutes of teaching them how to access settings and update software and… it’s done!
I believe most people could benefit from switching to Linux in noticeable, appreciable ways on a daily basis—not just in terms of performance, but productivity, ease of use, and peace of mind.
Gotta love free software!
87 notes
·
View notes
Text
so you want to use OBS
hello! i’ve decided to compile information on my OBS setup and some resources that have helped me along the way. this is mostly for personal reference, but maybe others can make use of this information!
some notes before i get into it:
i use OBS for both offline recording and (twitch) streaming. any footage i record is edited using DaVinci Resolve 18, which is free.
most of my OBS captures are of video games (through a USB capture card, specifically elgato), and the occasional screen/application capture (like clip studio paint, and sometimes PC games).
as such, the information here is reflective of these experiences. this post is not comprehensive to all of OBS’s features- this is just an overview of the settings and configurations that are most relevant to me.
with that out of the way, all the information will be under the cut!
Basic Setup
file format:
how to change: settings -> output -> recording -> recording format -> press “apply” once finished!
I save most of my recordings as .mkv files- it supports multi-track audio! i prefer .mkv over .mp4 because if your power goes out, you still have a recording to work with.
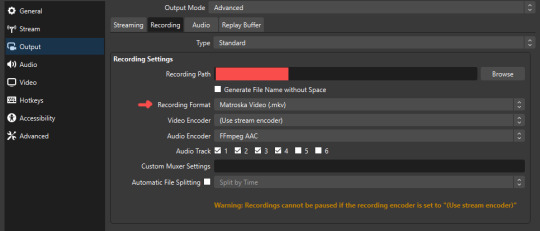
.mkv files can be read by DaVinci Resolve without an issue- but for Adobe software, they'll need to be remuxed to .mp4 within OBS! (file -> remux recordings -> press the … to select a file -> press the “remux” button)
video resolution and framerate:
how to change: settings -> video -> output (scaled) resolution
my obs canvas is @ 1920 x 1080p (16:9)
i switch between 720p and 1080p as needed! if you're concerned about space, you can probably just go for 720p. i also record at 30 fps, simply because that’s what my capture card supports.
video bitrate:
how to change: settings -> output -> encoder settings (located in both the streaming and recording tab) -> press “apply” once finished!
bitrate is a bit of a doozy to explain, but the most important thing to know is that bitrate affects your video’s quality. lower numbers = lower quality, while higher numbers = higher quality.
generally speaking, you'll want higher bitrate when you're recording things with high depth of information (e.g. you’d want a higher bitrate for something fast-paced like splatoon, compared to a slower-paced game like animal crossing).
my video bitrate is either set to 3000 or 4000 kbps! and here's some of my other (related) settings while i'm at it:
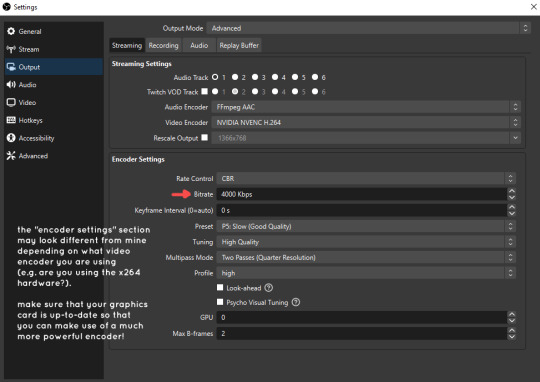
you can put your bitrate at much higher values than me if you're a stickler for quality- but keep in mind that a higher bitrate means:
bigger file size
more information to upload (when streaming)
your computer will need to encode more
i’d recommend reading twitch’s guidelines on encoding, bitrate, resolution, and framerate to get an idea of what values to pick. for people who are doing offline recording or streaming on a different platform, i suggest googling the appropriate resources!
multi-track audio:
this is mostly applicable to anyone looking to do video editing!
multi-track audio basically allows you to separate your audio sources (e.g. discord, game audio, and your own microphone) into different tracks.
this is an immensely helpful tool because it lets you adjust audio levels in post-production (editing). some examples of how this can be used:
increasing someones microphone volume if they speak too softly
increasing/decreasing game audio
muting swear words/sensitive information
completely muting voice call + microphone if you want to upload a no commentary video
and more!
to set this up, take a look at your audio mixer panel, and press the ⚙ icon. this will bring up advanced audio properties.
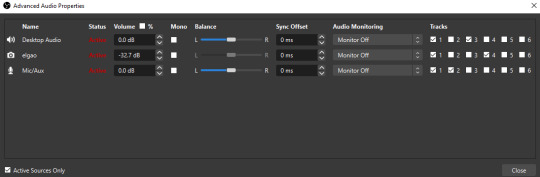
by checkmarking a track box, it puts the audio on that track. to make the above screenshot easier to digest:
track 1 consists of ALL three audio sources- desktop, elgato, and microphone.
track 2 only has the microphone audio.
track 3 only has desktop audio (i use this for voice calls)
track 4 only has the elgato capture card audio (game audio). the volume has also been lowered so that any speaking voices can be heard clearly.
tracks 5 and 6 are unused.
you might be wondering, “why do all three of these have 1 checked off?” this is what i call the universal audio track. i recommend having a universal audio track for a few reasons:
when you stream from OBS onto twitch/youtube- you have to select ONE audio track.
it’s also a nice backup in case you didn’t separate your audio correctly.
if for whatever reason you need to move around your individual audio tracks in editing, the universal track acts as a nice reference point.
mark off your audio tracks for each audio source as you see fit! once you’re finished with the advanced audio properties, go to settings > output.
for the streaming tab, you’ll want to have the number of your universal audio track selected. in my case, that will be audio track 1.
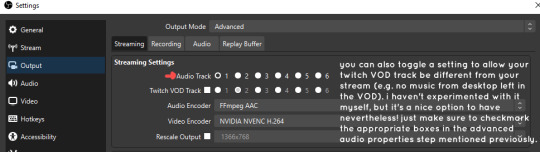
for the recording tab, checkmark all the audio tracks that are applicable to you (in my case, audio tracks 1, 2, 3, and 4). by default, only audio track 1 is selected.
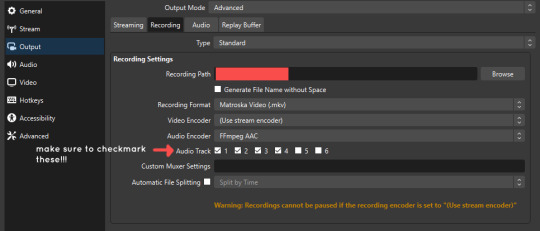
if you don’t check off the additional audio tracks in the output > recordings section, you will not have access to those audio tracks in editing, and you won’t be able to edit your audio tracks independently of each other. so don’t forget to do this! 👍
custom browser docks
custom browser docks are a great tool for when you’re streaming and want to have access to your twitch chat and/or activity feed! (or if you wanted to have some other web browser on OBS).
to create one, go to docks -> custom browser docks.
you’ll be given a table interface that asks you to put the dock name and URL. for streamers who want to have chat and alerts available, do the following:
on twitch’s homepage, go to the upper right and click your icon
then, click creator dashboard
once you’re on your dashboard, go to stream manager
click the vertical “...” on my chat OR activity feed.
press “pop-out chat” OR “pop-out activity feed”
copy and paste the link into the table back into OBS
press apply once you’re done
click and drag the docks around at your leisure to put them where you like!
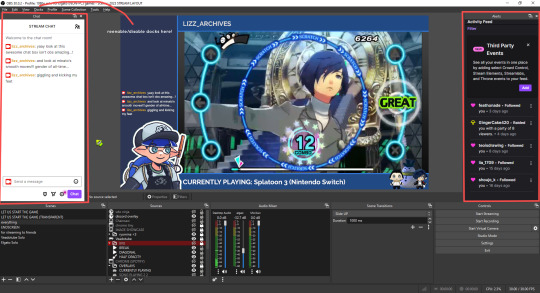
if you ever decide you don’t want to have something on your OBS dock (or want to bring something back), go to the toolbar, click “docks,” and click the appropriate dock!
third party things
a section of optional things that you may enjoy having.
streamlabs alerts
this is basically for anyone who streams and wants to have their chat and/or follower notifications visualized on screen!
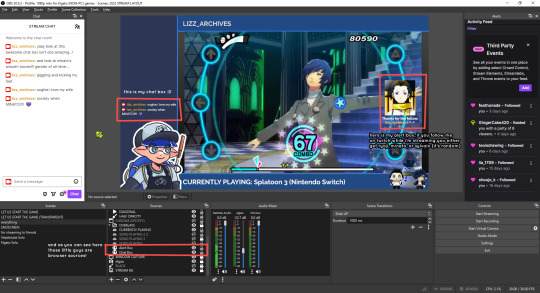
streamlab alerts can be added to OBS by adding a browser source into your scene, and the specifics can be customized on streamlabs itself. it’s pretty self-explanatory, so i’ll just leave a link to streamlabs website, where you can log in using the streaming platform of your choice: https://streamlabs.com/
discord overlay
this is a browser source that can be set up to show people who are in a server's voice chat and who speaks. i recommend this to people who make multiplayer content- it can help viewers distinguish who is who but also it can be helpful in editing.
to set this up, go to https://streamkit.discord.com/overlay, click “install for OBS,” and after logging in with discord, go to “voice widget” and click the server and voice channel you want.
you are able to apply CSS if you'd like more control over the visuals, but the standard layout tends to work fine for me! a search of “discord overlay css” on youtube can help you get more information.
veadotube mini
this is a pngtuber software that a friend recommended to me! no webcam is required- mouth opening and closing is based on your microphone input!
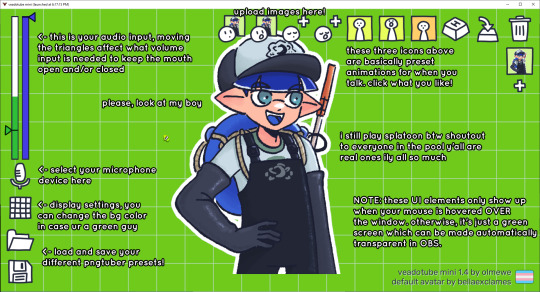
you can download it here (it’s pay what you want!): https://olmewe.itch.io/veadotube-mini
for a proper tutorial on how to use it, i recommend checking out the app's documentation, which you can read here: https://veado.tube/help/
source record
have you ever wanted to stream something with a chat overlay/layout, but wanted your recording to ONLY be the gameplay? or maybe you wanted to record BOTH your gameplay AND your webcam so that you can have a crisp zoom-in on your webcam!
source record is a third party plugin that can help you with that!
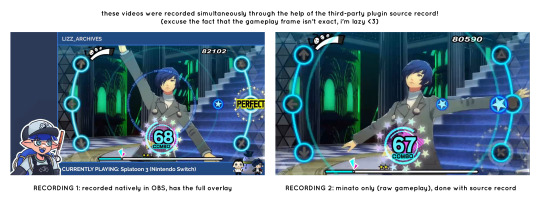
the general gist of source record involves applying the “source record” filter on either a scene or source, and customizing the encoding settings accordingly. the exact details of how to set it up is beyond the scope of this post, so I'll just direct people to this video instead (it was very helpful to me):
youtube
⚠ a quick note about source record: this plugin can be intense for your computer. be sure to do test recordings and the like to see what your computer can handle (and see if the recordings come out the way you like). it took me a few tests before i settled onto something i liked!
you can download and install source record here: https://obsproject.com/forum/resources/source-record.1285/
vdo.ninja
have you ever wanted to do a collaborative video or stream where you feature someone else’s video on your stream? or maybe you’re doing a multi-person streaming event! vdo.ninja is the perfect tool for you!
vdo.ninja turns your OBS virtual camera into a browser source link- which your collaborator can add on their stream! this is a new tool that i’ve added to my arsenal recently- since my friend and i are planning to stream a side order challenge together! i’ve still got to iron it out a bit more, but i like what i’ve used of it so far.
try it out for yourself at their website here (with documentation and demos available on the homepage!): https://vdo.ninja/ (no downloads required!)
ok! i’m set up! what now?
and with that, that’s all of the settings and tools that i thought would be worth mentioning! while most of my setup was written with video games in mind, some of these plugins and setups may be applicable to other types of videos (e.g. tabletop gaming with a physical camera)!
now that i’ve outlined all these settings, i have one more thing i have to say: regardless of what you're using OBS for, do a test recording before doing anything “official” with it. this recording can be as short as 30 seconds. it’s a good habit to develop that can make sure your streams/recordings turn out the way you want them to!
here are the kinds of things i like to check! it’s not an exhaustive list, but this can be a starting point:
video:
does my video look the way i want it to (and can my computer handle that)?
can my computer handle the load of encoding? - OBS will note in the bottom if the encoding is overloaded. if it can’t handle it, turn down your bitrate or adjust other encoding settings (e.g. i had to toggle psycho visual tuning OFF because it was causing lag)
this is especially the case if you're recording PC games- you don’t want to have slowdown on either your game or the recording!
audio:
are my audio sources (e.g. desktop audio and microphone) correct? - if you plug/unplug devices a lot, be sure to check this (settings -> audio).
are any of my audio sources muted? - make sure you don’t have anything on 🔇 if you don’t want it to be muted! otherwise the audio will be lost forever… (i lost my friend’s VC audio once… it was sad)
are my audio tracks separated properly? - requires you to boot up your editing software, but it's worth doing! for the test recording, just have something from all your sources playing at once, and see if your editor has things separated into tracks.
can i hear the voices clearly? or does the music and/or game overpower them?
if for whatever reason your OBS crashes, or you want more information on anything “critical” or “warning” worthy in your set-up, you can go to help > log files > upload current log file > analyze. crash logs currently can’t be analyzed by the log analyzer- but they’re a valuable tool when asking for help on the OBS forums!
and that’s all! for real, this time. i hope that some of these tools and settings can help anyone wanting to get more out of OBS. there’s definitely other things i didn’t touch upon (e.g. audio filters for noise compression, suppression, etc.), so i suggest doing your own research and trying things out!
happy recording/streaming, and thanks for reading! ✨
#lizzy speaks#this was a fun little write up!! i've been slowly getting some of my friends into video making teehee and its SO FUN!!!#(digital) video is like one of my other passions next to art. everyone say thank you splatoon for getting me back into it again <3#i've been using obs since like 2018 so i wanted to share some of the things i learned for funsies... i really love video...#but also i like having reference posts like this in the case people have questions they want to ask me...#because i don't always remember what video tutorials i watched and it's nice to document that somewhere...#warning to anyone who reads it this is like 2.1k words. i do want to stress that this isn't comprehensive but there's still a lot of info#that i wanted to put for this post...! that said topics like designing your own stream layout + assets for it are NOT in the scope of this#post and nor is this a beginner's guide to obs (i wrote this with the assumption that you know how to record and/or stream and that-#people already have an idea of how to use scenes and the different types of sources obs can use).#i hope everyone's had a lovely march 5th! i would love to look at the fanart but im still not done with reload...#but im hoping to finish it by the end of the month!!! yipee!!!#Youtube
47 notes
·
View notes
Text
as for how i get my patches; i made/make (havent made any in a while) all of them myself using a 6 needle embroidery machine. more needles = more concurrent colors the machine can easily swap through during the patch production. i bought special embroidery software that came with video guides after attending a workshop with the software developer and trying to use free open source embroidery software. the process is essentially the same as making vector art but with more attention paid to layering and then tooling around with things like fabric, thread, and types of stitches. i had experience with hand embroidery and also with hand sewing / using sewing machines and my partner at the time and i were very interested in the idea of making elaborate embroidery. it is in many ways similar in concept / process to screen printing which i have ample experience in, so it did not take me long to pick up and i had all the tools / access i needed to do lots of easy and fun designs. i was able to buy the machine by splitting the cost with someone else and using money i had gotten from my printing business/savings. i honestly recommend not buying a machine (even a small one) and instead out sourcing any embroidery you would want to local digitizers/embroidery companies if you want to do any machine embroidery slightly more complicated than one color directly onto a garment. it takes a long time, it’s very loud, the software required is expensive and nearly impossible to pirate (low demand), and the cost / time investment is very steep. however, i am a freak, and i also consider this my job (or part of it), so i have enjoyed it. there are a lot of people in your town or city, no matter where u are, who are already much more capable and set up to make patches for you than you would be. and they also would love to do it and it’s probably way cheaper than u think. (this also goes for screen printing). the one singular advantage to my set up is that i can make a lot of extremely singular one off patches at my own pace and at my own justified labor/time/monetary investment without having to communicate with anybody else. which is why i primarily think of myself as a artist and not necessarily a clothing embellisher/manufacturer; everything i do takes a lot of fucking time and research.
21 notes
·
View notes
Last Seen Blogs

osokaraddict
OsoKara!

elsasqueen
QUEEN ELSA

abigfatboi-bhm
abigfatboi

blaxa
Orichinals

nossasdialeticas
Algumas Dialéticas