#Free file editor for windows
Explore tagged Tumblr posts
Visit Tumblr Blog
Explore Tumblr blogs with no restrictions, modern design and the best experience.
Last Seen Tumblr Blogs


Fun Fact
28.6 is the average number of monthly visits per US mobile user.
Text
Yet Another Package Editor

Download the latest version here
YaPe is a modern package editor for DBPF (.package) files
Features:
Edit any package - FAST
List and edit resources in a package
Filter resources by type
Easy editors for several resource types
Supports opening ANY DBPF-coded .package, .dat, or .sc4 file
Easily reduce texture size, add/remove/recreate mipmaps, change texture format
Import textures by dragging, export DDS
Native on Windows and Linux
Why make yet another package editor?
Simply said, because SimPe can be kind of cumbersome especially on Linux, and package editors other than SimPe (s3pe, s4pe, iLive's Reader etc.) do not support Sims 2 resources.
To illustrate, I timed someone shrinking a texture (convert RawARGB32 -> DXT1, shrink 2x) in both SimPe and YaPe:
SimPe + GIMP: 1m 30s
YaPe: 10s
Originally this started as just a way to easily test if my DBPF library was doing the correct thing, but over time it has grown to become a half-decent editor suitable for more general use.
Tutorial / usage tips
Here I will explain how to shrink and convert textures in YaPe because that's what I imagine most people will use this program for right now, but of course you can use it for other things as well.
Let's get started by getting the program to look the way you want to: use the options in the top left to change the scale of the interface and switch between dark and light mode.
Now drag a package file into the program (don't worry about closing the sims except when you save the package), a list of resources in the package will be visible. You can find out what the abbreviations mean by hovering your mouse over them; in general I try to add tooltips like this to buttons or options that are unclear.
Don't be afraid to mess around and make changes! The changes you make are never saved unless you press the save button, so if you simply drag your package file into YaPe again without saving you will get your original package back (there is currently no undo function, but it is a planned feature).

All these resources are great, but we're only interested in the textures for this tutorial so let's set a filter. Right click on a texture (TXTR) and select "Filter on type".

Great! Now you can only see the textures we're interested in. You can disable this filter by unticking the "filter" option at the top.

Now click on the "TXTR" to open the texture, it will open a new tab in the lower half of the window by default. If your window is not very big (like mine is for this tutorial) you might have trouble seeing the texture and all the options. You can drag the tab around and put it somewhere else in the program, I'm going to put it on the right and make it a little bigger so we can see what's going on.

Okay, now we can see all the options, and well... there's a bunch of them. We'll go over some of the options that you'll likely want to use but feel free to experiment of course.

First, let's have a look at the texture viewer at the bottom: you can zoom in on the texture by holding control and scrolling, and you can change which mipmap is displayed by clicking the radio buttons above the texture.

But wait, this texture does not have enough mipmaps to show up in game! (post by @pforestsims) Let's fix that right this instant by clicking the "Add missing mipmaps" button in the middle.

Okay, now the mipmaps will show up in game, which is good... except that this mipmap is really blurry. (post by me) Luckily we can fix this really easily, just click the "Recalculate all mipmaps" button.

Much better!... except that we've created a new hidden problem: the leaves will disappear when zooming out in game (blog by lisyarus) but even this problem can be fixed. We can actually preview what the texture will look like when zoomed out by switching the format to DXT1 since DXT1 has binary transparency, just like alpha tested textures like leaves and grass.

Right, so the leaves have a bunch of holes that don't look right when zooming out, let's change that. Above the "Add missing mipmaps" button there is the "Preserve transparency" slider: try changing it to something like 120-170 and click "Recalculate all mipmaps", you can see that the transparency changes, if it's still too thin/transparent set the value higher and recalculate again and so on.

Have a look at all the mipmaps (zoom levels) and once you're satisfied with the transparency change the format back to DXT5.

This texture will now look great in game! But it is also quite large, so we can reduce the size 2x smaller without sacrificing very much in terms of looks (sorry to all the cc authors who love their large textures). Click the "Remove largest texture" button, which will make it so that the first mipmap becomes the largest texture effectively reducing the size by 2x. Like mentioned it does use the first mipmap so make sure to fix any blurry mipmaps first.
You can repeat the same process for the other textures in the package, and then we're done. Save the package by clicking the save button in the top bar, and have a look in game at your beautiful textures.
Another option is to drag images/textures you've made somewhere else into the program (with special support for dds files), for a full lists of supported image formats you can look here. (image-rs documentation) The image/texture will currently go into the firsts open texture resource tab because of UI framework limitations.
Here's a look at some of the other editor currently implemented:


Enjoy :)
195 notes
·
View notes
Text
Giving your Rook a custom name for the subtitles in 5 minutes - A modding tutorial
The tutorial is also available on Nexusmods as a PDF-file, and as a Google Doc.

Hidden under the read more for length, but it's actually super easy! Anyone can do it following instructions, I promise!
The guide assumes you’ve already installed Frosty Mod Editor, so I won’t be covering its basic set-up. If it’s your first time using the Editor, please refer to this guide by Gabbet. Gabbet's guide may look somewhat intimidating, but to prepare for my tutorial, you’ll only need its “Frosty Editor Download & Installation” section.
Open the Mod Editor and navigate to View >> Localized String Editor

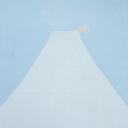
2. Once you open the Localized String Editor, click on the leftmost column inside it, input the following string ID: "0002F709" (without the "") and press Enter. It should display one search result that says “Rook”.
3. Click on the line in the search results to make it appear in the column to the right. There, erase “Rook” and type in your custom name using your keyboard. In this tutorial, I’m using “Ghilasara” as an example.

4. Once you finish typing your custom name, click “Update” to save the result.

That will refresh the line’s contents in the search results.
You’ve made all the necessary edits, and your mod is now ready to be exported :)
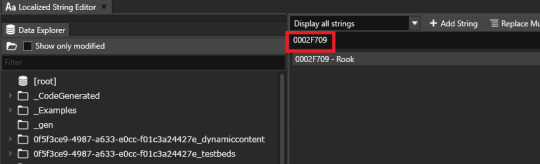
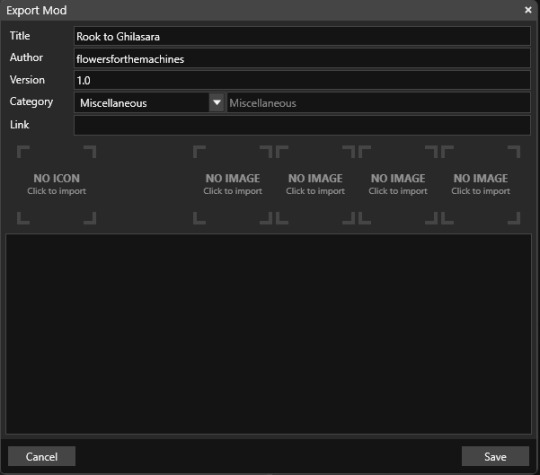
5. In the Editor’s main window, click on File > Export to Mod
Feel free to fill in the contents of the pop-up window as you see fit. Note that the first line, “Title” will be the name under which your mod displays in the Mod Manager. I named mine “Rook to Ghilsara” to make it easy to find in case I need to remove it or turn it off.
And, that’s that! All you have left to do is to import your mod into the Mod Manager.
#how the hell do I tag this#Dragon Age#Dragon Age Veilguard#Dragon Age The Veilguard#DAV Modding#DAV Tutorial#flowers mods#dragon age#dragon age the veilguard#datv modding#veilguard modding#rook datv#rook#dragon age rook#flowers.txt
211 notes
·
View notes
Text

Relics of the Sanguine Rose - A vampire-gothic themed cursor Windows, made with pixel art.
I wanted to make my own cursor with a vampire or goth theme in mind. So here we go, these cursors are finally made. It's a complete set (except for the uncustomizable stuff like zoom and grabbing hands), includes that fully animated moving "busy" hourglass and left-handed versions for those who are using left hand.
I made them specifically for windows but feel free to convert the cursors that work for MacOS or Linux.
About the size:
Windows automatically make cursors become 32x32 in size (thats the default size), and if you try to resize the cursor in the Windows 11/10 mouse settings (in "Settings" not from the control panel). It would revert to one of Windows' default cursor look if you try using the resizing sliders. The cursors are originally made 128x128 (like large size cursor), but Windows automatically put it to 32x32 (or other sizes if you adjust the scale from setting)

Yep... that's moving hourglass alright, good to look at while your program waits.
Softwares used:
Clip Studio Paint (drawing them)
GIMP 3.0 (making the png's become .cur files)
RealWorld Cursor Editor (adjustments and such)
Download links (its free, like free beer... or blood for vampires):
Google Drive |
#hydrangea shelter cursors#web resources#resources#webcore#custom cursor#pixel art#pixel graphics#vampire aesthetic#gothic#free to use#f2u#f2u graphics#cursor#cursors#web graphics#cursor pack
195 notes
·
View notes
Text
For everyone who asked: a dialogue parser for BG3 alongside with the parsed dialogue for the newest patch. The parser is not mine, but its creator a) is amazing, b) wished to stay anonymous, and c) uploaded the parser to github - any future versions will be uploaded there first!
UPD: The parser was updated!! Now all the lines are parsed, AND there are new features like audio and dialogue tree visualisation. See below!
Patch 7 dialogue is uploaded!
If you don't want to touch the parser and just want the dialogues, make sure to download the whole "BG3 ... (1.6)" folder and keep the "styles" folder within: it is needed for the html files functionality (hide/show certain types of information as per the menu at the top, jumps when you click on [jump], color for better readability, etc). See the image below for what it should look like. The formatting was borrowed from TORcommunity with their blessing.

If you want to run the parser yourself instead of downloading my parsed files, it's easy:
run bg3dialogreader.exe, OPEN any .pak file inside of your game's '\steamapps\common\Baldurs Gate 3\Data' folder,
select your language
press ‘LOAD’, it'll create a database file with all the tags, flags, etc.
Once that is done, press ‘EXPORT all dialogs to html’, and give it a minute or two to finish.
Find the parser dialogue in ‘Dialogs’ folder. If you move the folder elsewhere, move the ‘styles’ folder as well! It contains the styles you need for the color coding and functionality to keep working!
New features:
Once you've created the database (after step three above), you can also preview the dialogue trees inside of the parser and extract only what you need:

You can also listen to the correspinding audio files by clicking the line in the right window. But to do that, as the parser tells you, you need to download and put the filed from vgmstream-win64.zip inside of the parser's main folder (restart the parser after).
You can CONVERT the bg3 dialogue to the format that the Divinity Original Sin 2's Editor understands. That way, you can view the dialogues as trees! Unlike the html files, the trees don't show ALL the relevant information, but it's much easier to orient yourself in.


To get that, you DO need to have bought and installed Larian's previous game, Divinity Original Sin 2. It comes with a tool called 'The Divinity Engine 2'. Here you can read about how to unstall and lauch it. Once you have it, you need to load/create a project. We're trying to get to the point where the tool allows you to open the Dialog Editor. Then you can Open any bg3 dialogue file you want. And in case you want it, here's an in-depth Dialog Editor tutorial. But if you simply want to know how to open the Editor, here's the gist:
Update: In order to see the names of the speakers (up to ten), you can put the _merged.lsf file inside of the "\Divinity Original Sin 2\DefEd\Data\Public\[your project's name here]\RootTemplates\_merged.lsf" file path.
Feel free to ask if you have any questions! Please let me know if you modify the parser, I'd be curious to know what you added, and will possibly add it to the google drive.
2K notes
·
View notes
Text
How to convert Sims 4 3D CAS Rooms to Sims 3

Disclaimer: If you’re not familiar with Blender/TSRW/UVs then this tutorial may not be for you. If you don’t have Sims 4 Studio which needs the Sims 4 base game (or don’t know how to extract the meshes without it) this tutorial may not be for you. Honestly it’s pretty straight forward, but there’s a lot of trial and error and going in game and out of game checking placement, etc. I use Blender 4.1 for this, but you should still be able to do the same things in the older versions. I'm trying to make this as easy as possible. I’m here to answer any questions though 💕 Tutorial below
Things you’ll need:
Blender (whatever version you prefer)
Sims 4 Studio
TSRW ( I use version 2.0.86)
My Christmas CAS Room here
My TSRW work file here
Tutorial:
Find a Sims 4 CAS room that you like and open it up in Sims4Studio. This is the one I'll be using for the tutorial.

In the Texture tab, export the textures. The only textures that matter are the first 3 diffuse. Go to the Meshes tab and export the mesh, it will save as a .blend file. After that you can close out of Sims4Studio.


Open my Christmas CAS Room in TSRW. You'll get this message. Hit ignore and don't send. We only need this file as a reference to resize the SIms 4 CAS room. Export the mesh as an obj, name it whatever you like. You can close TSRW for now.

Open Blender and open the .blend file you exported from Sims4Studio. Make sure to delete studio_mesh_0 as it's just the shadow map and we don't need that. This is what mine looks like after fixing the textures.

Then import the wavefront obj you just exported from TSRW. Again we're just using this as a size reference.
This is what it looks like after I added the obj. I scaled, moved, and rotated the room to match up as close as I could with my reference mesh. When you have it lined up to your liking you can delete the reference mesh. I usually import the sims 3 body to see where my sim would be in CAS as well so feel free to do that too.

Now we have to separate the objects that use transparency in the scene to their own group. The transparent objects will always be located on studio_mesh_1. I usually do this in UV mode. Make sure UV Sync Selection is on. Where the red arrow is, that's the UV Selection button. It's blue so that means its on.

Tip: If you're using the same Blender version I am (I'm not sure if the older versions below Blender 3.0 do this) you can disconnect the alpha in shader editor and then you can easily see what uses transparency because it has a black background like the plants. Don't worry about the one outside the window as that's on the backdrop image and doesn't show in CAS.
Important: Also, make sure you delete the back of the mirror frame or it will show through the mirror in game. I usually select it in the UV editor as well and delete it.

After selecting all the objects that use transparency, I go to the 3D viewport window and press P, then selection. Now they're on their own layer as you can see. That's a very important step so please don't miss it.

Sims 4 CAS Rooms don't have a closed room like ts3 and if you don't add walls/ceiling with planes you'll be able to see that it in CAS. You can do this in any way you're comfortable with. If you don't understand how to do it feel free to ask me. For this tutorial I will not be doing this perfectly lol I've done enough rooms and I'm just trying to teach here 😩

Okay now last is renaming groups to import into TSRW. Make sure it's in this exact order and uses the exact group numbers.
Group 0 - Mirror
Group 1 - Windows/Curtains
Group 2 - View outside the window
Group 3 - Walls
Group 4 - Objects with transparency
Depending on the CAS Room you convert, yours may not have a mirror you know. You can delete groups in TSRW, experiment, feel free to ask me questions as well.
After renaming the groups, select only the groups you renamed and export as an obj. Make sure that object groups is checked so that they can stay in groups.

Open TSRW and open the testroom_cas.wrk file.
After opening the file you'll see this exact room in this tutorial lol because I had to test some things first 😅

Import the CAS room you converted from ts4. You'll get these two messages. Click yes on the first and no on the second.
Disclaimer: Make sure you reduce polygon sizes or it won't import and give you an error


Import your textures (yours may be different than mine depends on the converter) but most have been the same that I've seen. Group 0 is the mirror it doesn't require a texture. Group 1 and Group 4 usually have the same texture.
Disclaimer: TSRW an be finnicky with textures sizes, I havent gotten any issues since using the 4GB patch, but just in case. Texture sizes from ts4 can run pretty big 4096x2048 even 8196x4096. I would resize to no bigger than 2048x1024 in my opinion, but whatever works for you.
After export to sims3pack or export as package file. Make sure you compress your files and you should be good to test your CAS room in game.

This is the finished product. Should look something like this or better lol considering this was quick 😅
If you would like to make your own from the original ts3 cas room, I would suggest watching this Youtube video (it's for TS4 but it still applies and is helpful) and the link to the original ts3 cas room is here. Since we can convert ts4 to ours you could probably just build your own and go from there as well.
Thanks to @mookymilksims for testing things for me and converting her own. If you would like to try this tutorial out and experiment with room placements using @boringbones Ultra wide CAS mod which changes the field of view in cas so that you can see the whole cas room, it is here. I didn't use it for mine, but that's only because I found out about it after from Mooky lol and I'm tired of converting them 😅 but feel free to ask me any questions if you need help 😊
#ts3#tutorial#sims3#I hope this helped#been procrastinating finishing this 🙃#cas room tutorial#sorry if it's long#tried to be thorough and make sure everything was correct#my tutorials
172 notes
·
View notes
Text

Create Your Own Main Menu for The Sims 4 - Tutorial
Hey folks!
This tutorial will walk you through creating your own main menu override for The Sims 4 based on my custom repository.
_________
What is required:
JPEXS Free Flash Decompiler
Sims 4 Studio
Raster graphics editor (e.g. Photoshop, Gimp, Photopea)
Your Own Main Menu repository
_________
Step 1: Download and unzip the Your Own Main Menu repository
It's available on my Patreon page for free.
_________
Step 2: Prepare your custom images
There are two images that you need to customize:
SimMattically_YourOwnMainMenu_MainBG.pngThis is the main background image, where you want to put the desired graphic.Size: 1440px x 1200px
SimMattically_YourOwnMainMenu_BarBG.pngThis is the second background for the navigation bar on the right.Size: 480px x 1200px
Prepare your own images based on these templates. Do not change the size of the images.
Tips: If you're using a more complex background, such as a screenshot from your game, I recommend blurring the Bar_BG with a Gaussian Blur (~60px). Additionally, I suggest adding a white overlay with ~50% opacity and a 5-pixel wide white bar on the left edge with ~10% opacity. This helps improve the readability of the navigation bar buttons and adds an extra layer of detail to your menu design.

The repository also contains the optional file "SimMattically_RefreshedMainMenu_ScenarioButton.package" from my other mod, which replaces the Scenario button icon with a semi-transparent white version. It's up to you whether you want to use it.
_________
Step 3: Import the images to the .GFX file
Firstly, open JPEXS Free Flash Decompiler and then open my SimMattically_YourOwnMainMenu_Template.gfx with it.


Select "No to all" when prompted.

On the left, choose "images" and scroll to the bottom where you will see the images you just edited in their original form. Right-click on each and select "Replace." Select the custom images you prepared in step 2.


Save the file.
_________
Step 4: Import the .GFX file into the .package file.
Open Sims 4 Studio, then click on "My Projects" and open SimMattically_YourOwnMainMenu.package. Select "Scale Form GFX" (the one with the "gameentrylauncher" description) and click on "Import." Select the modified .GFX file and import it. On Windows OS, you need to switch from .binary to all file types to see the file.


Save the .package file via File -> Save As... Give it a custom name and place it in The Sims 4/Mods folder.
That's it! Enjoy!
_________
IMPORTANT INFORMATION/TERMS OF USE:
Main menu overrides can become outdated with some game updates, causing them to break the game. You will have to remake your custom main menu with a new, updated template in this case. Always make sure you are using the latest available template and that it's not outdated.
Since these mods can break the game, I do not advise sharing your custom main menus with other players. You are free to do so, but be aware that since you're relying on this repository to create your own version, you most likely won't be able to update the mod and resolve issues for other players on your own, so you take responsibility for breaking their game.
If you decide to share your version with other players, please credit my repository and link to my Patreon post.
Do not put your custom main menu based on this repository behind any paywall or early access. I made this repository and tutorial free for everyone, so keep it fair.
I do not take responsibility for people misusing this repository or breaking your game with incorrectly modified files. I do not provide support for custom main menu overrides created by other creators using this repository.
_________
#sims#thesims#thesims4#sims4#sims 4 mods#sims 4 custom content#simblr#s4cc#ts4#main menu override#sims tutorial
314 notes
·
View notes
Text
on the topic of writing software
I want to ramble at you about some writing software options. 98% of the time I'm perfectly content with LibreOffice Writer (and previously I used Word, back when Microsoft products were less shitty). But every now and then when I have a new project (like now - more on that later) I start looking for something shiny and new to try. And I fell down into another research rabbit hole lol
I usually don't talk a lot about this bc my needs are very simple, and not sure how useful my opinion is to others, but I enjoy the topic. It's an intersection of creative writing and tech nerdiness and I like both of those things. Also what writing software you prefer really depends on the type of writer that you are, and everyone has a slightly different writing process and I find that fascinating.
Now, as I said, I'm coming at it from a slightly tech-nerd angle. I don't care if the installation is clunky, I'm happy to see the words open-source, and the need to create an account will already mildly piss me off (:
Don't worry, I'm not as intense as the guy writing his novel in Vim. Though fucking respect. And I can't say I'm not tempted to try it even with the steep learning curve lmao (Seriously, if you don't know Vim is notorious among software developers.)
Anyway, things I've tried so far:
Manuskript: this was listed as an open-source Scrivener alternative (though I haven't tried Scrivener. so.). I gave it a go when I was writing heart worth the trouble and it was pretty nice. It helped me when I had to move scenes and chapters around. But overall I think it was made with plotters in mind bc it wants you to enter a lot of information upfront. I'm not a planner/architect type of writer so this type of software is a bit overwhelming for me. Still, the fact that it's open source and works on Linux gets kudos from me.
Wavemaker: I recently played around with this, and I actually surprisingly like the features it has. You can put multiple books in a project, which is very nice if you like to work on different things, like fanfic, novels, etc. The mindmap is a feature I liked, though it's a bit clunky bc it collapses the text fields when you exit, and once I added an image field by accident that I could never remove lol I do like a bit of a snowflake method, so that feature is cool, and the cards are pretty straightforward too. Usually, my problem with these apps is that I don't even want to touch half of the features so they are pointless to me, but the features of Wavemaker were kind of nice. It's a web app that you can download and use offline but it's still working from your browser if that makes sense. That was what I didn't really appreciate. Also, it doesn't give you a lot of options to back it up. You either save the wavemaker file, export it into a document (which is fine, but it adds an extra step to the backup process) or you sync with Google Drive *shudders*
Things I want to try out:
Calmly Writer: now this is just purely a text editor that focuses on being very zen, streamlined, distraction-free, etc. It's pretty and it has typewriter sounds. (Yeah, I'm not immune to a pretty UI and harmless fun features alright? I can contain multitudes :P) It has an online version, but you can also download it, and works on Windows, Mac, and Linux. On paper, the desktop app requires a license, but the way they put it is that you can evaluate it for free and the evaluation doesn't have an enforced time limit... So. As good as free. (Though if I really like it, I would totally consider buying a license for 20usd that I can use on 3 computers, that seems fair. I appreciate a license over a subscription model for sure.) Honestly, I think this is the one I'm going to try next bc it just integrates perfectly into my writing process. That being: a multitude of messy, hand-written notes and notebooks + a document editor + backups on hard drive and GitHub (yes, really) ^^"
Shaxpir: This is on the opposite end of the spectrum basically, but out of the "fancy" ones, I kind of like the look of this the most. I like the statistics part in particular. But honestly, I probably won't try it bc it doesn't have a Linux version which would be a pain in the ass for me, and is cloud-based. I kind of don't really trust them, which is my biggest issue with these companies. (Although the creator's heart seems to be in the right place when it comes to AI. Basically, some of their features are based on machine learning and language models. For example, it will recognize passive voice, if it's an adverb with "-ly" or the emotion of a word. Which I think is all cool and fine and shouldn't be lumped in with generative AI. But he also had a website that did this analysis for already published works, and when people pointed out that it was sketchy, he took that down and I can respect that. I'm not sure how much it influenced the actual features of the app, maybe I'll just take a peek out of curiosity. The whole thing does make me have trust issues though lmao) If anyone has experience with it though, I'm interested to hear about it.
Obsidian: not a dedicated writing software, but rather an elaborate note-taking app. I heard good things about it from smart people lol If I really wanted to access my writing on my phone, I would probably use this bc it works on every platform and has end-to-end encrypted sync with version control. I heard you can also integrate it with GitHub which is always music to my ears lol But the setup probably takes a bit of time and I'm not particularly motivated to do that right now.
So yeah, those are the options that appeal to me right now. If anyone used these and has opinions, I'm all ears :D
137 notes
·
View notes
Text
I've been tagged by @moyazaika to share some of the WIPs from the underground chambers. I asked my Gen Z editor (me) to write my script.
Rules: Make a new post with the names of all the files in your WIP folder, regardless of how non-descriptive or ridiculous. Let people send you an ask with the title that most intrigues them, and then post a little snippet or tell them something about it! Then tag as many people as you have WIPS.

Yandere!Zombie x Grave Robber!Reader: This one's for my hustlers out there who gotta do what it takes to succeed. Check out this undead rizz.
Yandere School Q&A: Some of these questions would send a Victorian child into a coma.
Asylum Spider Part 2: This story will make you cry, scream, throw up and fall to your knees in the asylum parking lot.
Yandere!Swordsman: This awkward, horny man will live rent free in your head. Slay (literally)
Abandoned Town Monster: His beige flag is following you around a communist wreck in freezing weather.

Tagging @dragonsholygrail, @suiana (I'm afraid), @madwomansapologist, @yandereunsolved and @/everyone who is confident enough to share their secret stash. As usual, nothing mandatory, just my way of discreetly peeking through your window at night. Heh.
200 notes
·
View notes
Note
Hello, this is not a request it's question because I really want to learn how to make graphics with gifs and idk how to do it 😭😭😭
Like your agar agar cookie layouts, I really like your work and would like to learn how you make it
Thank you for reading this, if you don't want reply it's okay, have a very nice day

Haiii!! It's no problem!! Unfortunately, I'm VERY bad at explaining stuff LOL, so here's the best I can do!! (Also, have a sneak-peak to another post :3)
How to make a gif edit.
How I decorate my edits.
How I make my PSDs.
VERY LONG POST BELOW. MASU LOVES TO HEAR HIMSELF TALK.
Okay so step one is to use photopea. I used to be an avid ibispaintx user until I realized that photopea can make gif edits and suddenly I'm photopea's #1 fan (and hater). Photopea is a website, BTW, here's the link!
First, open up a project. Good job! We're 1/4 of the way there! You can import a PSD if you want (Here's a different tutorial for that), but let's just say you DON'T have a PSD, for the simplicity of this tutorial.

Next, find the animation you want! For this example, we'll be using the Wind Archer sprite below (I took this from the CRK wiki). It can be anything - but preferably nothing too big, because Tumblr for SOME REASON HATES high quality gifs. Siiiigh...

From here, you want to go to FILE > OPEN & PLACE. It'll show a window of all your downloaded items. Click on the animation we just downloaded.


Wam-bam! We're almost there!! Okay, if your image is a WEBP file, it will not animate if you export as a GIF. But! That's okay! Because with trial and error, I found out how to fix this!
On the downloaded layer, double click on the layer. After this, go to SMART OBJECT > CONVERT TO LAYERS...

Now, if your photopea tries to explode and pretend it don't know nobody, that's okay! Just let it load a bit. The file is very. very big. It should turn into a folder! You have nothing else to do from this.

After this, you can do, well, whatever ya need!! Slap a stroke on, put a gradient map on this bad boy, anything else! Once you're finished, go to FILE > EXPORT AS... > GIF. Your photopea might try to explode again, for like, a few minutes. Just give it some time. It's a lot of trial and error!! Don't feel bad if you didn't get it the first time!!
Now, before I talk about my edits, I want to make it clear that you should FIND YOUR OWN STYLE! Don't try to copy off of someone else, or try to replicate another style. Every editor is different!! While I overuse overlays and gradient maps like I won't see tomorrow, you may like a more simple style, or something less over and out there ~ ! That's alright! Don't be afraid to branch out.
Now, as we said - we love to use overlays + gradient maps. I am an artist, so a LOT of what I do correlates to that as well (having an interesting silhouette, making a focal point, color theory, color contrast, composition). It'll be WAY, WAY too much to explain in one single post, so I'd just say to go with the flow! If something looks off, try something else! There's no shame in scrapping an entire project - especially if you're unsatisfied with the result. Do what you need to do!! It's your edits.
For making PSDs, our process is actually pretty simple. We just use a gradient map and adjusts it till it works LOL. We add a few others things too - but that's mostly what I do. If you want to learn how to make your own, my word of advice is to dissect from others. Take inspiration!! If you don't feel like doing that, there's no harm in just using a F2U PSD floating out there. Feel free to look at our Squid Ink post and use that as an example of our PSDs! (If you don't feel like going to go get it, yeah I understand, here it is right here.)
All in all, my biggest tip (besides to have fun), is to edit until you like it. Don't try to compare yourself to big editors - they've had TONS, AND TONS, of experience and editing. Experiment with your style, put yourself out there, edit some new media you've never edited before, find resources to help you out, find tutorials, ETC. It takes time to learn, so make sure to take that time!! You got this, don't feel discouraged by other people's work!!!
That's all from us folks!! Peace out!! ^_^


#໒꒰ྀི ․ ․⸝⸝⸝ ꒱აㅤ﹑﹫ㅤtalks.#໒꒰ྀི 𖦹 ˕ × ꒱ྀིაㅤ﹑﹫ㅤasks.#editblr#edit tutorial#editing#edit blog#psds#photopea tutorial#tutorial
36 notes
·
View notes
Text
well well well... happy birthday to me 🥳
to celebrate, here's a lil LUT pack that you can use as a ✨base✨ for your colourings, whether you're a gifmaker, gfx artist or video editor!
thank you to all my moots for always being there for me and for blessing my dash with all your amazing works!! 💖 thank you for keeping this hellsite running; i hope this gift could be a small help to you if you're ever in a pinch 🥰
(also, moots! could i trouble you to help me fill in this form please? 💖 the form is open to all moots even if we haven't interacted 🥺)
to everyone else who supports me, my biggest heartfelt thanks to you all!! 😁😁 i wouldn't be where i am without you, so thank you so so much!!! 💕
🚨 [DOWNLOAD]
this LUT pack is open to everyone, so feel free to download and use as a lil stepping stone for your content! 😁 it'll be long, so everything will be under the cut!

Here’s how to use LUTs in your colouring:
✨ FOR ONE-TIME USE:
Make your gif as usual until the colouring process
In Photoshop, go to Adjustments > Colour Lookup
Make sure ‘3DLUT File’ is selected
In the dropdown menu beside ‘3DLUT File’, click ‘Load 3D LUT…’
Navigate to where you saved the downloaded LUTs
Click on the selected LUT to load it. It will be automatically applied to all your frames
Done! Now you can export the gif, or continue refining the colouring
✨ FOR PERMANENT USE:
Find your Photoshop folder (under Applications for Mac; under Documents for Windows)
Go to Presets > 3DLUTs
Drag in the .3DL / .CUBE LUTs that you downloaded into this folder
Close the Finder / File Explorer
Open Photoshop
Make your gif as usual until the colouring process
In Photoshop, go to Adjustments > Colour Lookup
Make sure ‘3DLUT File’ is selected
In the dropdown menu beside ‘3DLUT File’, click ‘Load 3D LUT…’
Navigate to where you saved the downloaded LUTs
Click on the selected LUT to load it. It will be automatically applied to all your frames
Done! Now you can export the gif, or continue refining the colouring

✨ LEFT GIF: ORIGINAL
- no colouring (used as a control test)
✨ RIGHT GIF: BASE MATTE
- adds a matte texture
- red-toned to target cyans
- best used at 30% - 50% opacity
- used in this set: dokyeom "kidult" perfomance


✨ LEFT GIF: BASE 1
- good for overly bright videos
- more blue-toned
- used in this set: seonghwa visual cam
✨ RIGHT GIF: BASE 2
- good for overly bright videos
- best used at 50% opacity
- used in this set: jennie "solo" perfomance


✨ LEFT GIF: BASE 3
- red-toned to target cyans
- best for green/yellow-toned videos
- used in this set: hoshi 'code:graphy' photoshoot behind
✨ RIGHT GIF: BASE 4
- good for overly bright videos
- best for green/yellow-toned videos
- used in this set: mingi "guerilla" 8K cam


✨ LEFT GIF: BASE 5
- aims to balance skin tone
- best for yellow-toned videos
- used in this set: yeonjun essence of dance
✨ RIGHT GIF: BASE 6
- red-toned to target cyans
- increases contrast
- used in this set: jeonghan caratland 2024

✨ LEFT GIF: BASE 7
- best for blue-toned videos
- increases contrast
- used in this set: wonwoo odg video
✨ RIGHT GIF: BASE 8
- balances out yellow-toned videos
- increases contrast drastically
- used in this set: seungkwan "hot" facecam


✨ LEFT GIF: MUBANK 1
- ideal for music bank interviews
- aims to balance skin tone
- used in this set: yeosang mubank interview
✨ RIGHT GIF: MUBANK 2
- ideal for music bank interviews
- more red-toned
- increases contrast
- used in this set: jeonghan mubank interview


✨ LEFT GIF: SPOTIFY
- ideal for spotify on! videos
- aims to balance skin tone
- slight matte texture
- used in this set: wooyoung spotify cat aegyo
✨ RIGHT GIF: WIRED
- ideal for (most) wired interviews
- aims to balance skin tone
- increases contrast slightly
- used in this set: jennie wired autocomplete interview

🚨 [DOWNLOAD]
to reiterate again, this is a ✨base✨ for colourings, not to replace your actual colouring! one base does NOT fit all 😇 experiment and see what works best for you!
and that's the end! if you scrolled all the way here, thank you for taking the time to do that 😄💖 i appreciate you so much!!
#igm.talk#igm.ref#useranusia#usertheos#useryeonbins#fordaniseyes#userchoi#useryenas#heysol#userzaynab#hanaablr#useroro#lucieblr#tuserflora#usersemily#chwedoutbox#vacantlook#forparker#tuserrowan#melontrack#forbelleseyes#useregoisthye#userkngld#userresa#anniehae#lunanuggets#moots please help to fill in the form at the top of the post 💖💖#it's 12am kst so it's my bday in korea teehee#im also going to bed now so sorry if i dont see anyones messages :(
85 notes
·
View notes
Text
SRWE or AI? Best Ways to Upscale Sims 4 Screenshots
Are you also tired of seeing social media mercilessly crush your The Sims 4 screenshots? We’ve tried every trick in the book to keep our pics crisp – SRWE, AI upscalers, you name it – and now we’re ready to break down how to save your favorite sim’s photos from pixelation, quick and easy. In this article, we’ll explain (no tech jargon, promise!) what actually works, plus share our hands-on experience and top tips.
Your upscaling method depends heavily on the source image and the look you’re going for. We all have different ideas of what makes a sims beautiful – some love natural textures, even slight skin imperfections, while others prefer flawlessly smooth, hyper-sharp results.
We’ve tested different upscaling tools to help boost your screenshot quality. But to find your perfect match – the one that makes your shots look just right (by your standards!) – we recommend trying a few yourself.
You can enhance screenshots both before and after saving them! We’ve covered both approaches, so pick whichever suits you best.
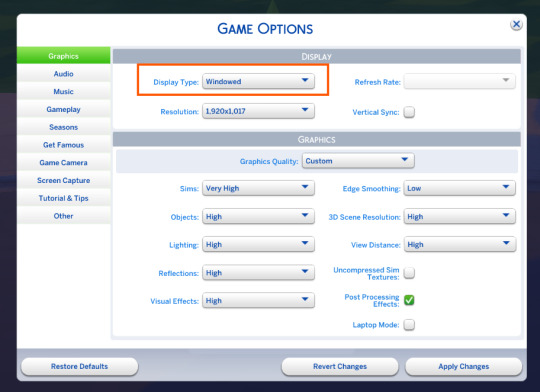
Before Saving the Screenshot: SRWE (Simple Runtime Window Editor)
This tool is well-known in The Sims 4 community – there are tons of YouTube tutorials covering it. When it comes to improving image quality before taking a screenshot, SRWE is one of the first solutions that comes to mind.
It works by bypassing Windows' DPI scaling, allowing you to capture screenshots at a higher resolution without blurring.
Pros:
— A fantastic tool: it delivers the exact same image but in much better quality.
— No conflicts with GShade/ReShade: your presets will look exactly as intended.
— Free and easy to install, no hidden costs or complicated setup.
— No post-processing needed, preserves original texture and UI quality.
— No extra plugins or presets required, works right out of the box.
— Great performance even on low-end PCs. If your computer can run GShade, SRWE will work just fine.
Cons:
— Limited functionality.
— Some users find SRWE a bit tricky to set up (though we personally disagree).
Now, let’s break down how to use it and what results to expect.
If you prefer a video guide, check out this link for a detailed walkthrough by Chii.
Step 1
First things first – you'll need to download the program itself. It's available for free on GitHub – you can grab it here.
There's no real benefit to getting the version with pre-configured profiles, so just download the standard version without profiles.
Step 2
Extract the files from the archive.
It doesn’t matter where you store them on your computer – it won’t affect how the program works.
Step 3
Now it’s time to launch the game and switch from fullscreen to windowed mode in the settings. You can also do this with the Alt+Enter shortcut.
Step 4
Set up your shot exactly how you want it. Open the location, pose your sims, apply any presets if needed. At this point, you can take a regular screenshot (for comparison) using your usual method.
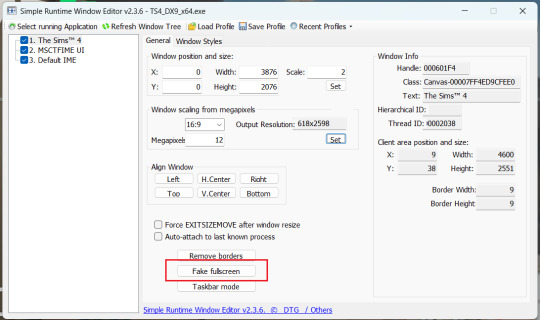
Step 5
1. Go back to the SRWE folder.
There are only two files inside – one of them launches the program (no installation needed).

2. In the window that opens, select The Sims 4 from the list.
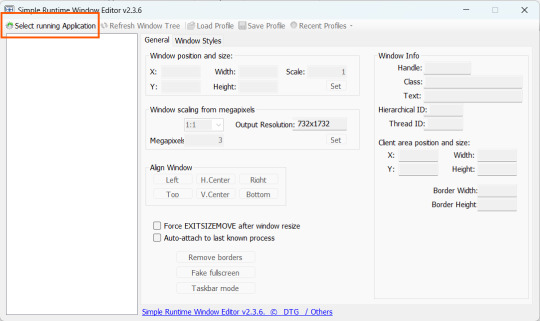
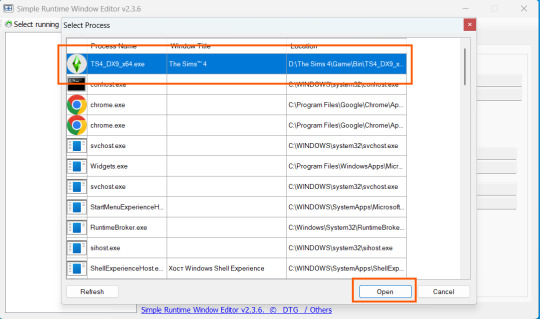
3. Check all the boxes.
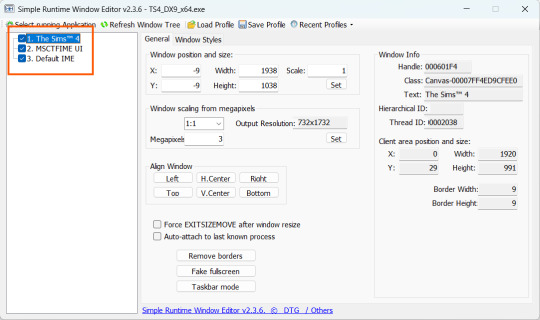
4. Image Size
You can set your screenshot size in a few different ways:
— The easiest method: Multiply your current resolution by the desired factor. For example, to upscale 1080p to 4K, multiply by 2. Tap Set.
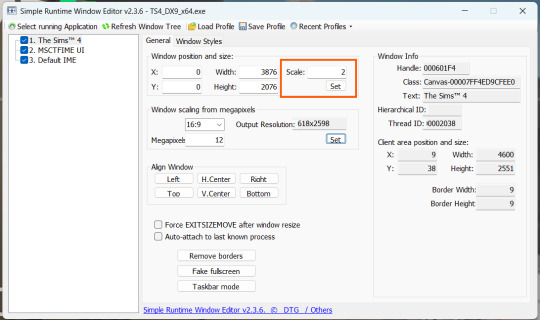
— Manual input: Enter your preferred pixel dimensions. Tap Set.
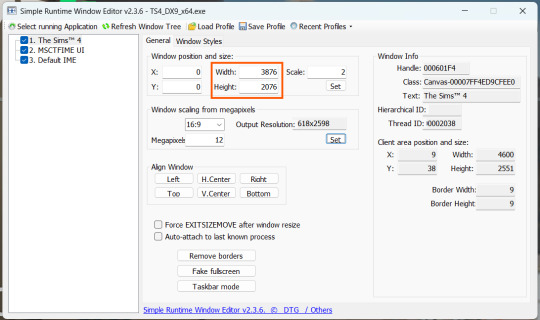
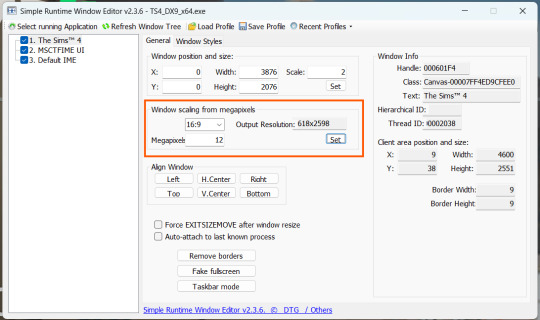
— Aspect ratio mode: Choose a format (1:1, 16:9, 4:3, etc.) and set your target megapixels. The program will automatically calculate the dimensions. Tap Set.
Honestly, you can experiment with any size. During our tests, even a weak PC handled an 8K screenshot without issues – though realistically, 4K is more than enough for most purposes.
Plus, if you're capturing in-game scenes (not just CAS), your screenshots will already be pretty large in file size. You probably won’t want them taking up even more space unnecessarily.
Step 6
Now when you return to the game, you'll notice the image has become significantly larger and no longer fits your screen resolution – you're only seeing a part of it.
Don't panic! Just wait for your preset to fully load (if you're using one), then take your screenshot as you normally would.
Step 7
Once you've captured your planned screenshot, head back to SRWE and click "Fake Fullscreen" to return to the original resolution.
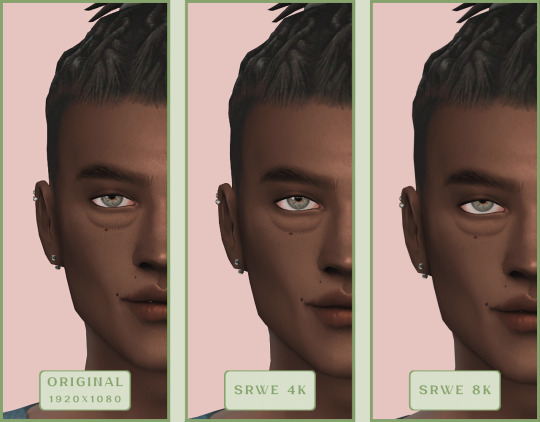
Now let's compare our results.
Gameplay Scenes
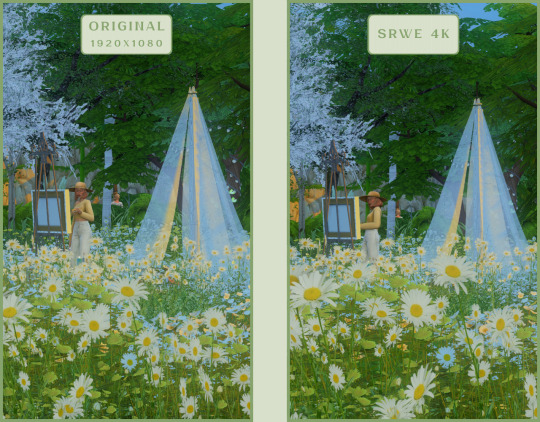
CAS
For in-game screenshots, this method works much better if you have at least a moderately powerful PC. After upscaling, navigation can become tricky due to lag. That said, it's still completely doable since we've prepared our scene in advance.
Post-Processing Screenshots
We've tested several post-processing programs: two paid options and several free ones.
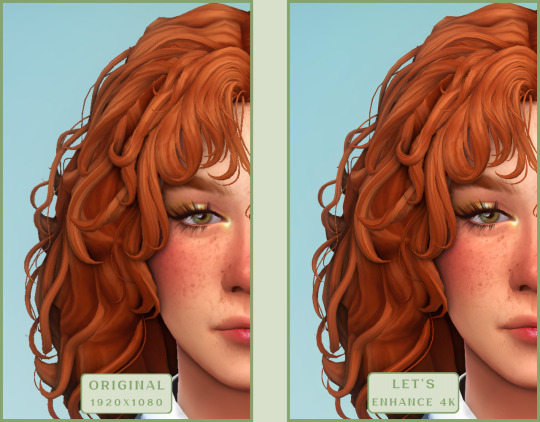
Let's start with the paid options – Topaz Gigapixel AI and Let's Enhance.
Topaz Gigapixel AI
A specialized tool from Topaz Labs designed specifically for AI-powered image upscaling.
It doesn’t include extra features like noise reduction or face correction, but it delivers more precise upscaling, which is especially useful for The Sims 4 screenshots.
Pros:
— Upscale up to 600% (6x) without losing detail.
— Preserves texture clarity (hair, clothing, patterns).
— Automatically restores lost details (e.g., small decor items).
— Supports batch processing (multiple screenshots at once).
Cons:
— $99 price tag.
— Requires a powerful PC for 4K upscaling.
— Limited functionality (just upscaling, no additional edits).
— Trial version doesn’t allow exports.
Example:

Let's Enhance
A convenient online AI-powered tool for enhancing screenshots. No downloads required – just head to https://letsenhance.io/boost and you're good to go.
Pros:
— Automatic upscaling up to 16K, boosts resolution without losing detail (hair and clothing textures become sharper).
— Dead simple to use: just upload your screenshot, pick a model, and download the result.
— AI doesn't just upscale, it subtly "beautifies" images too (though this is subjective, of course).
Cons:
— Free version limits you to 10 images/month (watermarked downloads; subscription starts at $9/month).
— Internet connection required (no offline mode).
We found these settings work best for Sims screenshots:
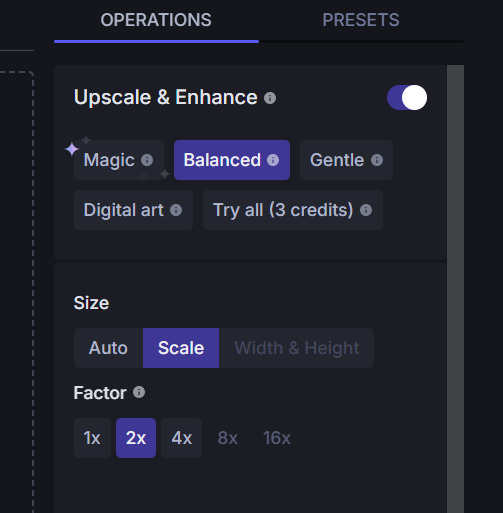
Now, let's see the results:
Free Upscaling Tools: Upscayl (with detailed usage guide), Bigjpg, and Waifu2x.
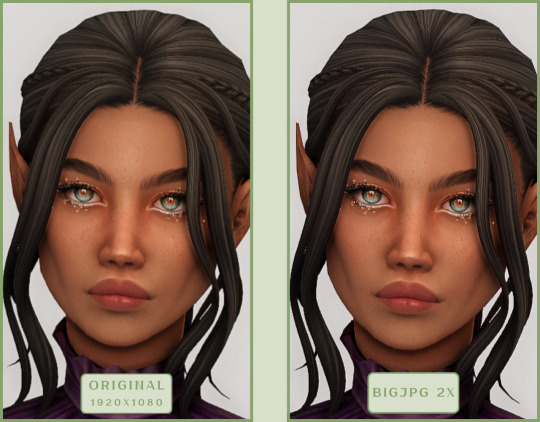
Bigjpg
A handy tool for basic image upscaling tasks, though the free version has limitations on processing speed and number of images.
Pros:
— Solid baseline results: boosts resolution effectively, making images noticeably sharper with genuine quality improvement.
— Free 2x/4x upscaling with watermark-free downloads.
Cons:
— Free version restricts image quantity, size, and processing speed.
— Lacks advanced parameter fine-tuning.
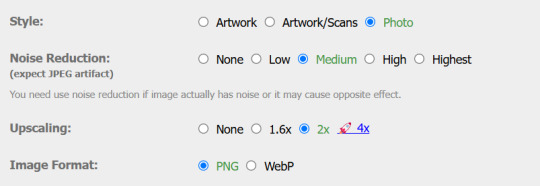
Our recommended settings combo:

The 4x upscale delivers noticeably weaker results.
Sample Bigjpg output:
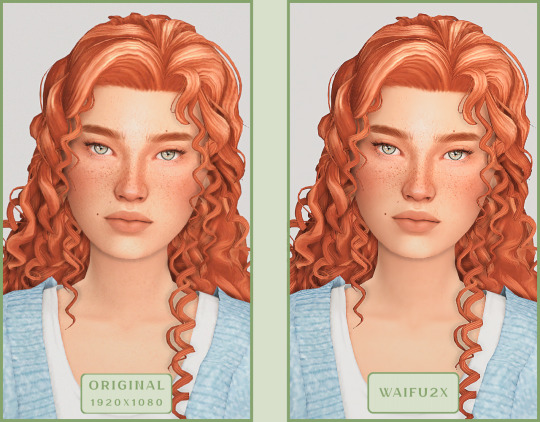
Waifu2x
A free neural network-based tool. Originally created for upscaling anime images, but works perfectly for The Sims 4 as well.
Pros:
— Upscales images 1.5x–2x without noticeable distortion.
— Preserves art style, doesn't turn pixel art into a "blurry mess" (unlike some other upscalers).
— Available in both online and offline versions.
— Offline version supports batch processing of screenshots.
— Free 2x upscaling with no watermarks.
— No powerful PC required.
Cons:
— Free online version has a 5MB file size limit.
— Maximum 2x scale (no higher options).
— Lacks advanced parameter tuning.
Our recommended settings:
Waifu2x results:
Upscayl
A free, open-source program that uses neural networks to upscale images without quality loss.
Pros:
— Upscales images without distortion.
— Enhances fine details.
— Supports multiple AI models for different screenshot styles.
— Offline version handles batch processing.
— Free 4x upscaling with no watermarks.
— Doesn't require a powerful PC for 2x upscaling.
— Works offline, no internet needed after installation.
Cons:
— Requires a powerful PC for 4x upscaling.
— Minimalist interface – fewer beginner-friendly guides.
— Lacks advanced parameter tuning.
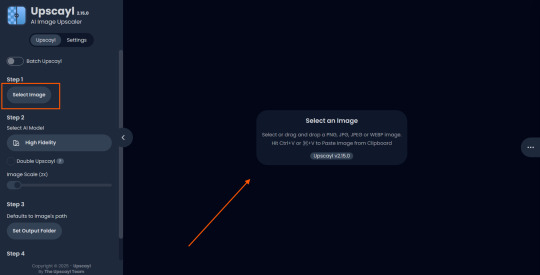
Given Upscayl's minimalist interface and lack of detailed tutorials, we decided to provide a more thorough walkthrough.
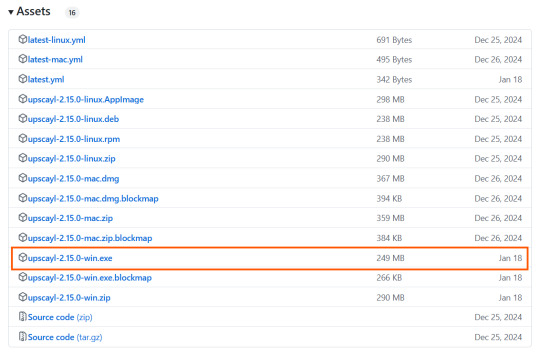
Step 1
First, download the program from its GitHub page. It's completely free and open-source.
Multiple versions are available – choose the one matching your system. For standard Windows, download the file highlighted in the screenshot below.
Step 2
Run the installer as administrator.
Install location doesn't matter – it won't affect performance. Select the destination folder. Click "Install".
Step 3
Upscayl includes several built-in AI models (good for testing), but we strongly recommend downloading custom models for better results:
1. Download the custom models pack here (also accessible via Settings → Add Custom Models in-app).
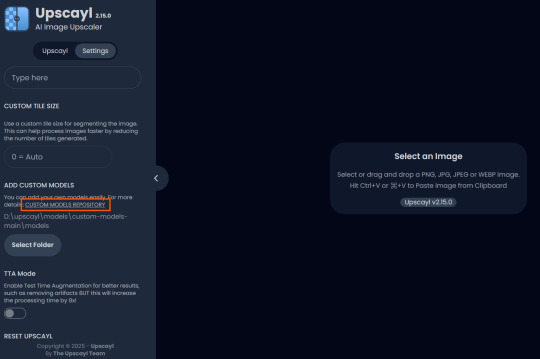
2. Extract the archive.
3. Navigate to custom-models-main → custom-models-main.
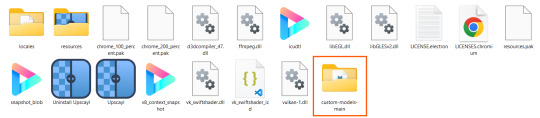
Move this folder to your Upscayl installation directory (optional: rename it).
Your Upscayl folder should now look like this:
4. Add Custom Models:
— Launch Upscayl.
— Go to Settings and click Select Folder.
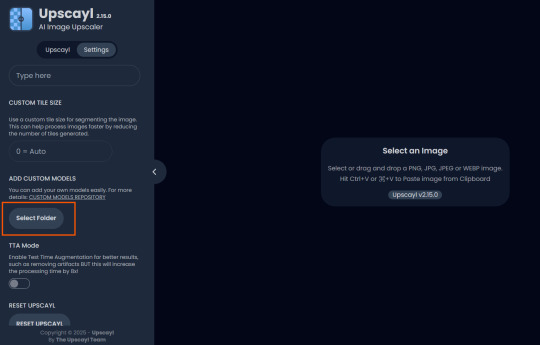
— Navigate to Upscayl → custom-models-main → models
Critical: The folder must be named "models" – don't rename it.
Step 4
Now that you have both the default and custom models loaded, it's time to start enhancing your screenshots.
1. Click Select Image or simply drag and drop your file into the processing area.
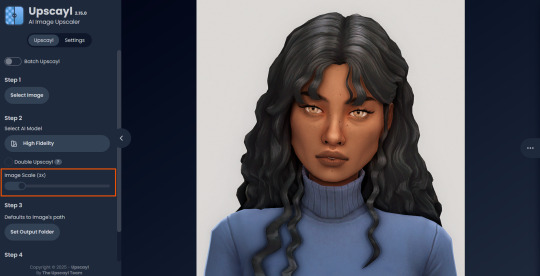
2. Choose Upscale Factor.
While Upscayl supports up to 16x magnification, it warns that anything above 5x may severely strain your system.
For optimal results, stick with 2x to 4x.
3. Select AI Model.
Click the Select AI Model dropdown: default models show before/after previews, custom models appear as a text list.
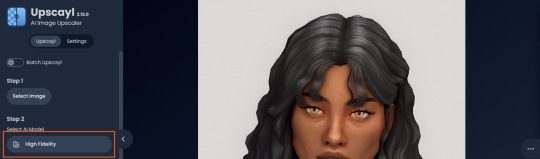
4. Experiment! Try different models on the same screenshot. Test various scales (2x, 3x, 4x) – sometimes better results come from modest scaling, while 4x might degrade quality.
For this demo, we'll use the first default model.
5. Click to begin enhancement.
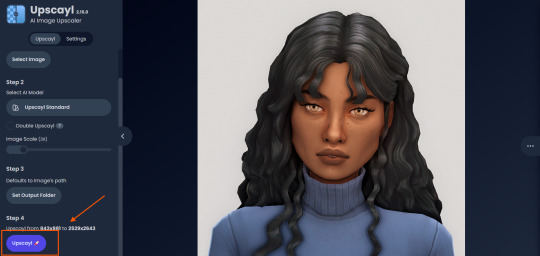
6. Processing time duration depends on original image quality, selected parameters and your PC's power (may complete quickly or take several minutes).
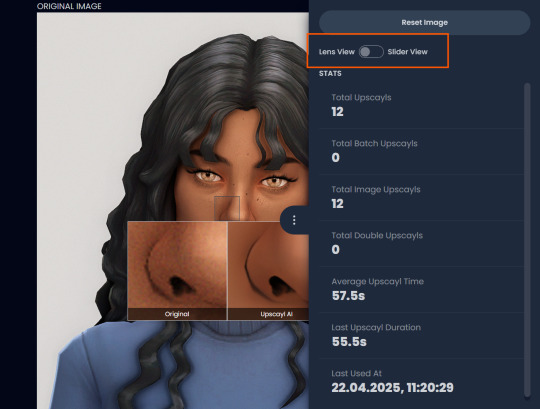
After processing, you'll see a clear side-by-side comparison of the changes.
7. Click the three-dot menu (⋮) for advanced viewing options.
Magnifying lens compares original vs. enhanced versions side-by-side.
Also you may reset to original and revert all changes instantly.
8. Save your image.
By default, Upscayl saves to the source image's folder. To change this click Set Output Folder.

9. After this, use the Ctrl+S keyboard shortcut, and the new image will be saved. The original filename will be appended with the name of the AI model used and the upscaling scale applied.
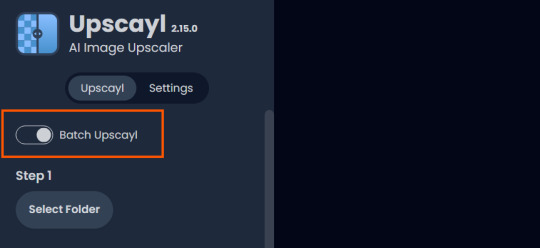
You can also use batch processing. Before loading images, you simply need to enable batch loading.
In the settings, there are different format options for saving processed images: PNG, JPG, WEBP. To preserve the best quality, we recommend choosing PNG.
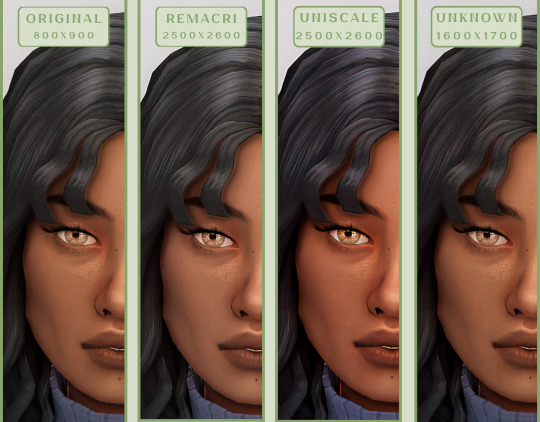
Finally, we're sharing the AI model options we liked best for processing Sims screenshots:
— Remacri (default model)
— Uniscale Restore (custom model)
— Unknown-2.0.1 (custom model)
🌱 Create your family tree with TheSimsTree
❓ Support 🌸 Our Blog
#TheSimsTree#simslegacy#legacychallenge#sims4#sims2#sims3#simsfamily#simstree#sims#sims4legacy#sims4roleplay#sims4stories#sims4couple#thesims4#ts4#ts4cc#plumtreeapp#simsta#simstagram#sims proposal#sims ideas#inzoi
38 notes
·
View notes
Text
YouTube Downloads through VLC: Step by Step
[EDIT: I've been receiving reports for some time now that this method no longer works. I suspect something about the switch to YouTube Music as a separate app, and/or YouTube's ongoing attempts to force Chrome use, broke the compatibility with the Github version of youtube.luac -- I haven't managed to look into whether there's an updated working version out there yet. Sorry!]
So this guide to easily downloading off YouTube is super helpful, but there's enough important information hidden in the reblogs that (with the permission of OP @queriesntheories ) I'm doing a more step-by-step version.
Please note: these downloads will be in YouTube quality. My test video download is coming through at 360p, even though the video I'm starting from is set to 720p. They're legible, but they won't look great on a TV. For high visual quality, you'll want to seek out other methods.
This guide is written for Windows 10, since that's what I can test on. It's been tested on Firefox, Chrome, and Edge (which is a Chromium browser, so the method should work in other Chromium browsers too). So far, I haven't tracked down a way to use this download method on mobile.
BASIC KNOWLEDGE:
I'll try to make this pretty beginner-friendly, but I am going to assume that you know how to right-click, double-click, navigate right-click menus, click-and-drag, use keyboard shortcuts that are given to you (for example, how to use Ctrl+A), and get the URL for any YouTube video you want to download.
You'll also need to download and install one or more programs off the internet using .exe files, if you don't have these programs already. Please make sure you know how to use your firewall and antivirus to keep your computer safe, and google any names you don't recognize before allowing permission for each file. You can also hover your mouse over each link in this post to make sure it goes where I'm saying it will go.
YOU WILL NEED:
A computer where you have admin permissions. This is usually a computer you own or have the main login on. Sadly, a shared computer like the ones at universities and libraries will not work for this.
Enough space on your computer to install the programs listed below, if you don't have them already, and some space to save your downloaded files to. The files are pretty small because of the low video quality.
A simple text editing program. Notepad is the one that usually comes with Windows. If it lets you change fonts, it's too fancy. A notepad designed specifically to edit program code without messing it up is Notepad++, which you can download here.
A web browser. I use Firefox, which you can get here. Chrome or other Chrome-based browsers should also work. I haven't tested in Safari.
An Internet connection fast enough to load YouTube. A little buffering is fine. The downloads will happen much faster than streaming the entire video, unless your internet is very slow.
VLC Media Player, which you can get here. It's a free player for music and videos, available on Windows, Android, and iOS, and it can play almost any format of video or audio file that exists. We'll be using it for one of the central steps in this process.
If you want just the audio from a YouTube video, you'll need to download the video and then use a different program to copy the audio into its own file. At the end of this post, I'll have instructions for that, using a free sound editor called Audacity.
SETUP TO DOWNLOAD:
The first time you do this, you'll need to set VLC up so it can do what you want. This is where we need Notepad and admin permissions. You shouldn't need to repeat this process unless you're reinstalling VLC.
If VLC is open, close it.
In your computer's file system (File Explorer on Windows), go to C:\Program Files\VideoLAN\VLC\lua\playlist
If you're not familiar with File Explorer, you'll start by clicking where the left side shows (C:). Then in the big main window, you'll double-click each folder that you see in the file path, in order - so in this case, when you're in C: you need to look for Program Files. (There will be two of them. You want the one without the x86 at the end.) Then inside Program Files you're looking for VideoLAN, and so forth through the whole path.
Once you're inside the "playlist" folder, you'll see a lot of files ending in .luac - they're in alphabetical order. The one you want to edit is youtube.luac which is probably at the bottom.
You can't edit youtube.luac while it's in this folder. Click and drag it out of the playlist folder to somewhere else you can find it - your desktop, for instance. Your computer will ask for admin permission to move the file. Click the "Continue" button with the blue and yellow shield.
Now that the file is moved, double-click on it. The Microsoft Store will want you to search for a program to open the .luac file type with. Don't go to the Microsoft Store, just click on the blue "More apps" below that option, and you'll get a list that should include your notepad program. Click on it and click OK.
The file that opens up will be absolutely full of gibberish-looking code. That's fine. Use Ctrl+A to select everything inside the file, then Backspace or Delete to delete it. Don't close the file yet.
In your web browser, go to https://github.com/videolan/vlc/blob/master/share/lua/playlist/youtube.lua
Click in the part of the Github page that has a bunch of mostly blue code in it. Use Ctrl+A to select all of that code, Ctrl+C to copy it, then come back into your empty youtube.luac file and use Ctrl+P to paste the whole chunk of code into the file.
Save the youtube.luac file (Ctrl+S or File > Save in the upper left corner of the notepad program), then close the notepad program.
Drag youtube.luac back into the folder it came from. The computer will ask for admin permission again. Give it permission.
Now you can close Github and Notepad. You're ready to start downloading!
HOW TO DOWNLOAD:
First, get your YouTube link. It should look something like this: https://www.youtube.com/watch?v=abc123DEF45 If it's longer, you can delete any extra stuff after that first set of letters and numbers, but you don't have to.
Now open VLC. Go to Media > Open Network Stream and paste your YouTube link into the box that comes up. Click Play. Wait until the video starts to play, then you can pause it if you want so it's not distracting you during the next part.
(If nothing happens, you probably forgot to put youtube.luac back. coughs)
In VLC, go to Tools > Codec Information. At the bottom of the pop-up box you'll see a long string of gibberish in a box labeled Location. Click in the Location box. It won't look like it clicked properly, but when you press Ctrl+A, it should select all. Use Ctrl+C to copy it.
In your web browser, paste the entire string of gibberish and hit Enter. Your same YouTube video should come up, but without any of the YouTube interface around it. This is where the video actually lives on YouTube's servers. YouTube really, really doesn't like to show this address to humans, which is why we needed VLC to be like "hi I'm just a little video player" and get it for us.
Because, if you're looking at the place where the video actually lives, you can just right-click-download it, and YouTube can't stop you.
Right-click on your video. Choose "Save Video As". Choose where to save it to - I use my computer's built-in Music or Videos folders.
Give it a name other than "videoplayback" so you can tell it apart from your other downloads.
The "Save As Type" dropdown under the Name field will probably default to MP4. This is a good versatile video format that most video players can read. If you need a different format, you can convert the download later. (That's a whole other post topic.)
Click Save, and your video will start downloading! It may take a few minutes to fully download, depending on your video length and internet speed. Once the download finishes, congratulations! You have successfully downloaded a YouTube video!
If you'd like to convert your video into a (usually smaller) audio file, so you can put it on a music player, it's time to install and set up Audacity.
INSTALLING AUDACITY (first time setup for audio file conversion):
You can get Audacity here. If you're following along on Windows 10, choose the "64-bit installer (recommended)". Run the installer, but don't open Audacity at the end, or if it does open, close it again.
On that same Audacity download page, scroll down past the installers to the "Additional resources". You'll see a box with a "Link to FFmpeg library". This is where you'll get the add-on program that will let Audacity open your downloaded YouTube video, so you can tell it to make an audio-only file. The link will take you to this page on the Audacity support wiki, which will always have the most up-to-date information on how to install the file you need here.
From that wiki page, follow the link to the actual FFmpeg library. If you're not using an adblocker, be careful not to click on any of the ads showing you download buttons. The link you want is bold blue text under "FFmpeg Installer for Audacity 3.2 and later", and looks something like this: "FFmpeg_5.0.0_for_Audacity_on_Windows_x86.exe". Download and install it. Without this, Audacity won't be able to open MP4 files downloaded from YouTube.
CONVERTING TO AUDIO:
Make sure you know where to find your downloaded MP4 video file. This file won't go away when you "convert" it - you'll just be copying the audio into a different file.
Open up Audacity.
Go to File > Open and choose your video file.
You'll get one of those soundwave file displays you see in recording booths and so forth. Audacity is a good solid choice if you want to teach yourself to edit soundwave files, but that's not what we're here for right now.
Go to File > Export Audio. The File Name will populate to match the video's filename, but you can edit it if you want.
Click the Browse button next to the Folder box, and choose where to save your new audio file to. I use my computer's Music folder.
You can click on the Format dropdown and choose an audio file type. If you're not sure which one you want, MP3 is the most common and versatile.
If you'd like your music player to know the artist, album, and so forth for your audio track, you can edit that later in File Manager, or you can put the information in with the Edit Metadata button here. You can leave any of the slots blank, for instance if you don't have a track number because it's a YouTube video.
Once everything is set up, click Export, and your new audio file will be created. Go forth and listen!
#reference#vlc media player#youtube downloader#youtube#uh what other tags should i use idk#how to internet#long post
230 notes
·
View notes
Text
Yuhh get into it!!!
I made a BEN mmd model! Here's how to use it and or make your own model ヽ(´▽`)ノ
Here's the vroid file! Both of the files are the same, so pick whichever you prefer. I added two in case one file doesn't work. If there's an issue please let me know!
https://www.mediafire.com/file/g188jtmismsnf01/Behavioral+Event+Network.vroid/file
https://www.mediafire.com/file/vifmafoanscfw36/Behavioral+Event+Network+vroid+model.zip/file
You can do whatever you want with the model, have fun! For those interested in making their own models, Vroid is free! It's used for vtubing and stuff, so the uses are endless! You can also use blender (yes, it's free) to make MMD models as well.
I compiled a list of both the written and video tutorials I used for MMD. This also includes motion files and other things for animating.
How to download mmd:
https://learnmmd.com/downloads/
https://www.youtube.com/watch?v=boFDkuqMLDI
How to convert a Vroid file (vrm) to pmx:
https://learnmmd.com/http:/learnmmd.com/convert-vroid-studio-to-mmd-with-one-click/
https://bowlroll.net/file/267190
https://www.youtube.com/watch?v=VnQXq3EAmYI (don't worry about the pmx editor unless you want to do more specific edits to the model. If you're interested here is the link: https://www.deviantart.com/inochi-pm/art/PmxEditor-vr-0254f-English-Version-v2-0-766313588)
The Happy Hands:
https://www.youtube.com/watch?v=Yf-wZ21zmOo
Extra - MMD sample animation:
https://www.youtube.com/watch?v=CKccnq2aD3A
The Disappearance of Hatsune Miku:
https://www.youtube.com/watch?v=93bnn3aZwxc
https://www.youtube.com/watch?v=8b_J0WfX_2U
https://www.youtube.com/watch?v=93bnn3aZwxc
https://www.deviantart.com/merodythann/art/World-Snow-download-488177446
Get down/geddan meme:
https://www.youtube.com/watch?v=r48-cyVII_k
https://www.youtube.com/watch?v=lKHAQPVeIsE
How to export mmd videos:
https://www.youtube.com/watch?v=vBVL2sLWxIE
I used this site to convert the avi files to mp4. You can also use windows movie maker 7 and I'm sure there are apps for this too.
https://cloudconvert.com/avi-to-mp4
When it comes to learning MMD the most important thing is to be patient and read the instructions throughly!
#DO THE RP10 DANCE😝😝#the way all the video files i wanted to attach are too big💀💀ill just post em separately#behavioral event network#ben drowned#ben drowned arg#mmd
41 notes
·
View notes
Text
Those of you who switched or are thinking of switching to Linux, here's a neat summary of all KDE programs in case you are looking for alternatives to Windows programs such as Adobe PDF reader, Notepad++ or Bulk Rename Utility.
All of them are free and open-source and you can use most of them on Windows as well.
Personally, I recommend Okular as a PDF editor (I used this to organize my literature for my master's thesis!) and Kate as a text editor (Fedora comes with KWrite, but I replaced it with Kate as it has more features). KDE Connect is also fantastic for quickly exchanging files between your PC and your phone.
21 notes
·
View notes
Note
RENTRY GIF TUTTT😭😭

YOU GOT IT !!! Since I don't which one you're referring to either the crossfade one or the ones with the GIF in the frames, I'll give you a two in one special ! [ Crossfade tut will be another post ]
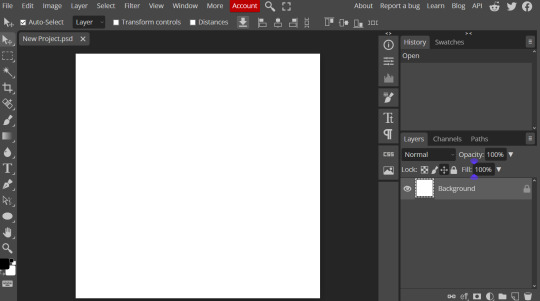
First off, you will need an advanced photo editor, I highly recommend Photopea with how much similar it is to Photoshop, but free !
Now, heads up, I prefer to use Photopea on PC as it's easier to navigate. But, if you can use it on your chosen device, then that's great!

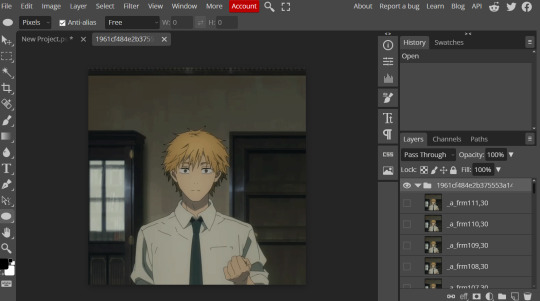
This is easy, start off with a blank canvas of any size !
Then create a folder for the mask [ aka. the shape ]
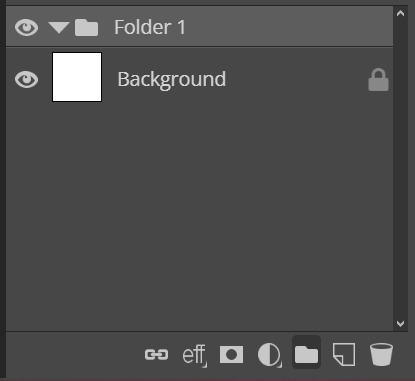
While the folder layer is highlighted, create a clipping mask

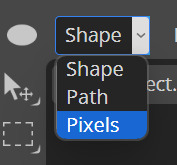
If you're making a simple mask like the example, please remember to make sure the shape is a pixel so it doesn't become another layer
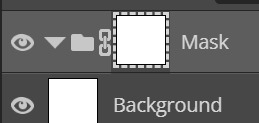
This is near the top ! Now go make that mask ! ^^

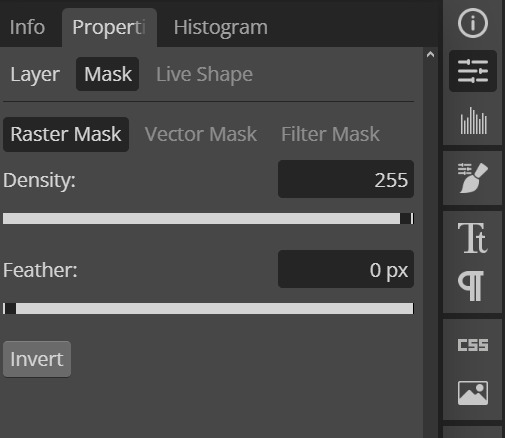
On the side click on the sliders icon and then properties, here we have to invert it, so the shape will show the gif. To quote my tutors " Black conceals, white reveals "
Now it's time for the GIF part ! Open your gif as a new project, say hi to Denji :D
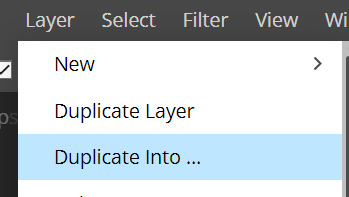
At the top, click on Layer and ' Duplicate into '
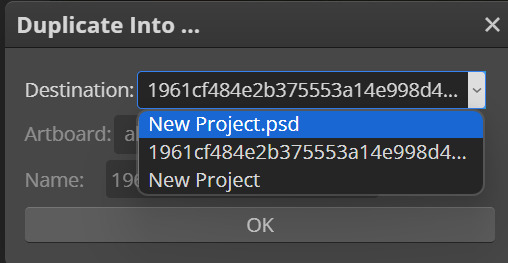
This window will pop up and make sure the destination is on the canvas where your shape is [ for me it's the file that ends in .psd ]
Boom ! There's Denji on the canvas with the mask ! :3

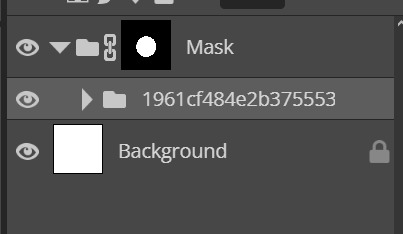
Drag the folder that has all the frames of the GIF into the mask folder
[ I collapsed the GIF folder so the layers are neater ]
Wowww, look at that ! Pat yourself on the back [ Adjust if needed, e.g. size and position ]

To save it, go to the top and click 'File', 'Export as' and then 'GIF'
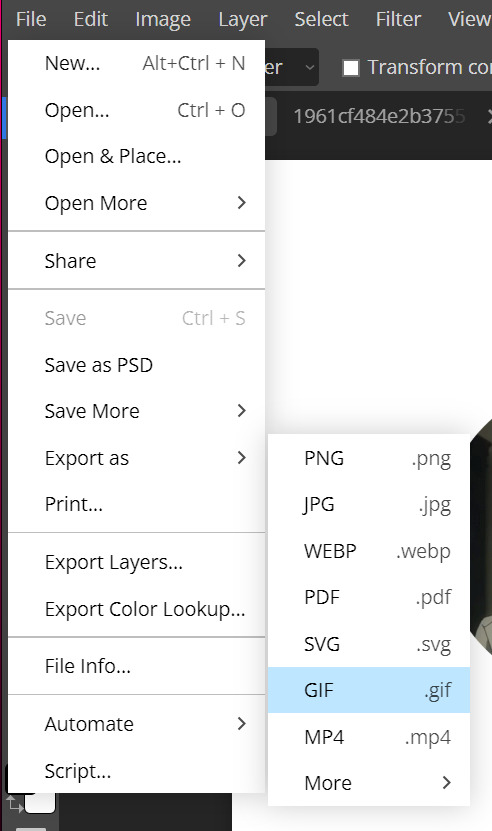
Another window will pop up and it will give you a preview of what your work is gonna be and the GIF should be moving !
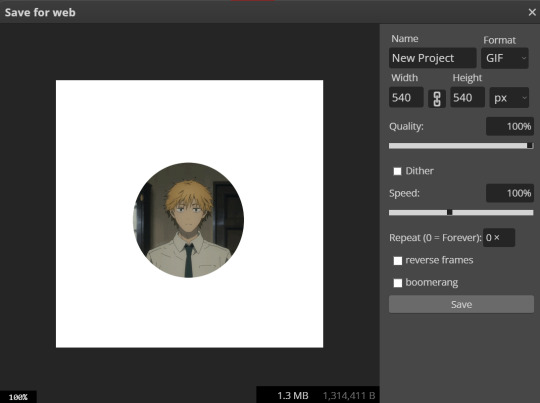
If you have any questions, feel free to ask me ! I am happy to help <3
#( 🍓 ) request . . .#I hope this helps !!!#Go crazy anon#tutorial#rentry#rentry gif#sentry#sentry graphics#rentry resources
65 notes
·
View notes
Text
Flag Making Tutorial
This will be a more technical step-by-step tutorial on how I make my flags (also a long post because I wanted to be thorough, plus I love flags lol).
The program I use is Inkscape, a free vector (.svg) editor program for pc.
I have templates set up, so the actual flag making process is pretty easy/quick.

Hotkeys/Locations/Other Reference
I'll be mentioning these options, so I thought to put them here all in one list. (They list the keyboard shortcuts first)
Snapping: magnet symbol (top right of screen), or under the adjacent arrow ◀️ symbol.
Document properties: shift+ctrl+D, or under the file menu (top left corner of screen). Display (1st tab) Guides (2nd tab) Grids (3rd tab)
Fill and Stroke: shift+ctrl+F, or under object (top of screen).
Layers and Objects: ctrl+shift+L, or under object (top of screen).
Align and Distribute: ctrl+shift+A, or under object (top of screen).
Import (Images): ctrl+i, under the file menu, or by dragging into the Inkscape window.
Save As: ctrl+shift+S, or under the file menu.
Export: shift+ctrl+E, or under the file menu.
Selector Tool: S, or cursor symbol (left side of screen). Click, or click and drag around the objects, to select them.
Locking a selection: lock symbol between the width and height boxes at the top of the screen.
Transform Selections: the width/height and x y position can be changed by typing in the X,Y,W,H boxes (near top middle of screen), or by dragging the corners/edges (resize) and inside the object (move).
Duplicate: ctrl+D.
Delete: delete key, or right click on the object.
Node Tool: N, or below the selector tool (left side of screen).
Rectangle Tool: R, or square symbol (left side of screen).
Pen Tool: B, or pen symbol (left side of screen).
Gradient Tool: G, gradient square symbol (left side of screen).
Mesh Tool: swirly square symbol (left side of screen).
Dropper Tool: D, or dropper symbol (left side of screen).
Undo: ctrl+Z.
Redo: ctrl+Y.
Creating the Template
Download Inkscape and open it, under the Time to Draw tab, click New Document.
First, snapping needs to be enabled, and under advanced mode enable grids and guide lines snapping. (This is crucial for making the stripes equally sized, spaced, and the overall flag in the right ratio.)
I'll be making a template with a 2:3 flag ratio.
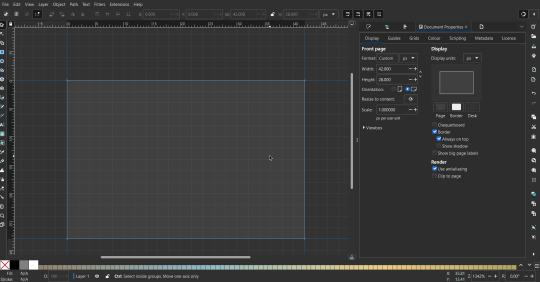
Open document properties. (I like to move these types of windows to the right side.)
Under display, set the width to 42px and height to 28px.
Under guides, just click create guides around the current page.
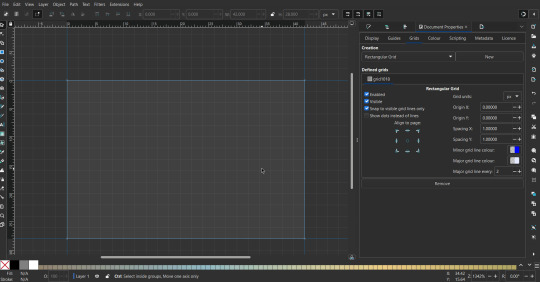
Under grids, make sure rectangular grid is selected, and click new. (Grid units should be in px.) For the major grid line every option, change it to 2. (I also prefer to change the minor grid line color to be transparent.)
That's pretty much it, your template is done :D ! Just save it wherever you want. I like putting it in an easy-to-access flag folder, as it is needed to open it every time to make new flags.

You can use a different width / height / grid size / flag ratio if you want, these are just the numbers I'm comfortable with / used to.
Also, since this is a vector, the image can be infinitely big or small without any quality loss, so the small dimensions above don't actually translate to a low res image.
Creating the Flag
(I'll be using the rainbow flag to demonstrate.)
Start by having the template open.
You can import images (like .png/.jpg files) to color pick / reference if you want. Said images can be transformed (resized/moved) by selecting and transforming them using the options mentioned in reference. (This is optional, they should just be off to the side so they don't get in the way.)
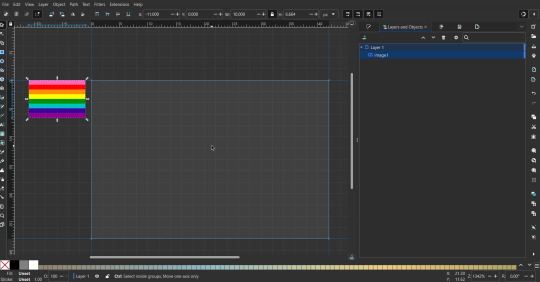
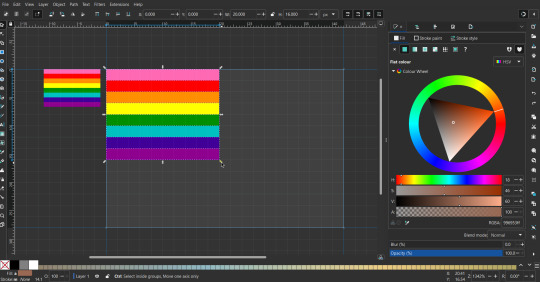
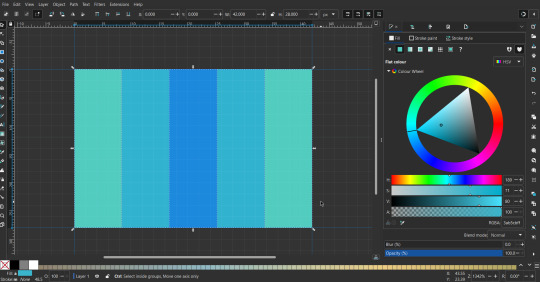
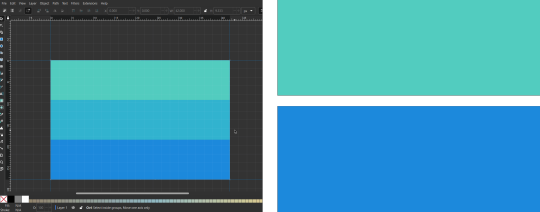
To create the stripes, use the rectangle tool. Click and drag from one grid corner, to a lower grid corner.

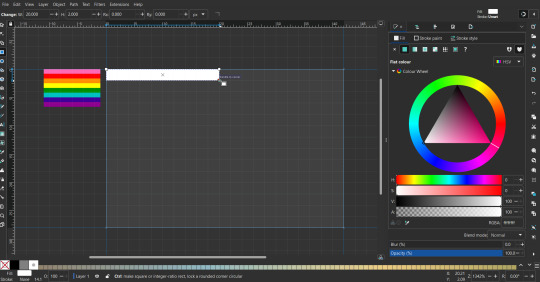
While the rectangle is selected, use the dropper tool to pick a color from a imported image. You can also use the fill and stroke (shown on right) tab to create your own colors / edit colors / etc.
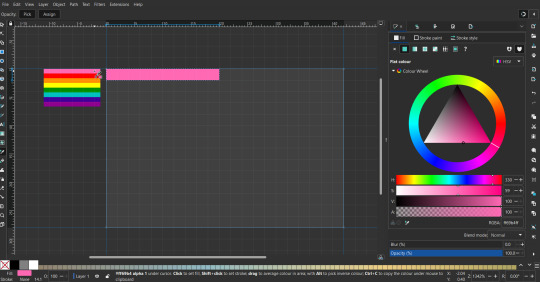
You can make these stripes however you want, they just need to all be equally sized. (They don't have to all have the same height, if you intentionally want that (like the demisexual flag for example).)
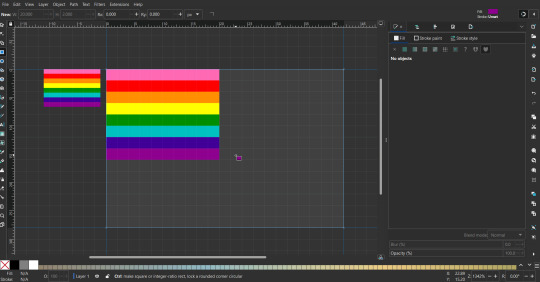
Then select all the stripes and transform them so that they fit the page.
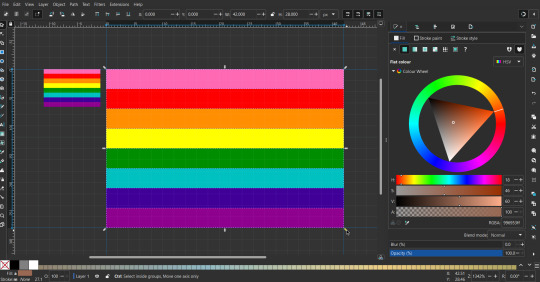
All that's left is to save/export it.
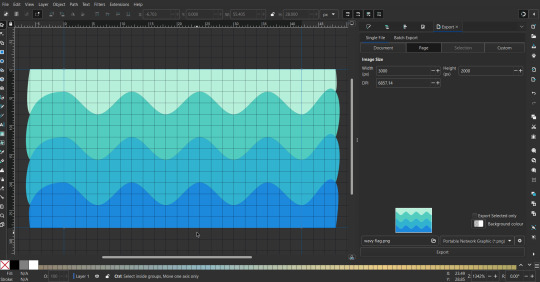
To export it, use the export tab, under single file, page, adjust the width and height (in px) to however high res you want your image to be. (I usually do 3000 by 2000.)
Type in the desired file name in the box next to the folder symbol, use the folder symbol to choose its export location (which can also be used to determine the file name and save/export it), the adjacent drop-down-menu to select what to save it as (,png, .jpg, .svg, etc.), and the gear symbol to adjust other settings (I leave it as default, with antialias turned off (set to 0)).
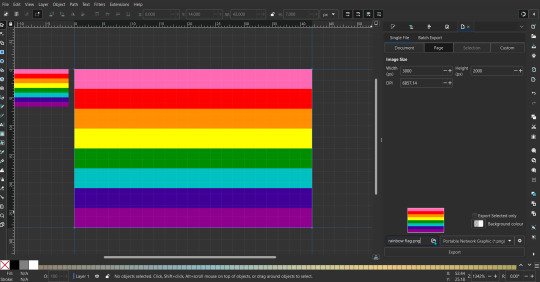
And done, you've made a flag :D 🏳️🌈
Extra Notes
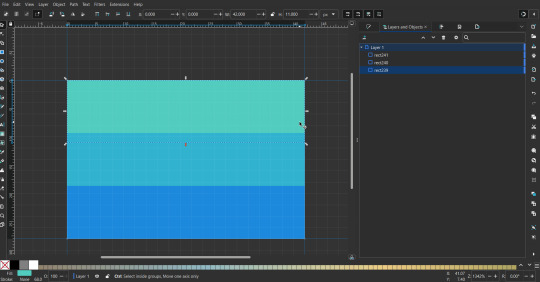
Layers and Objects: a menu that can be used to manage objects. Like their layering position (whether they are above or below another object), and other options can also be done here instead of with keyboard shortcuts.
Vertically striped flags: it's very similar to above. You would just make the rectangles taller rather than wider.
Wavy stripes: first use the pen tool to create zigzags. (The pen tool works like a outline, so just click along the grid corners, and join the line at the end. The fill and stroke menu can be used to make it a solid colored shape, and remove/add outlines). The steepness/frequency of the zigzags is up to personal preference, they just need to extend off the page a bit. To create equally sized wavy stripes, have the all side lengths (highlighted in red) be equal except (depending on how you draw your zigzags) the first or last wave, which should have half the side length of the others.

Select everything, and with the node tool, select all the zigzag nodes (the corners don't need to be selected), and click make selected nodes smooth (half circle with point in middle symbol, at top of screen). (It'll likely look like it has weird lines in-between the waves, see glitch section at the end for how to fix that.)
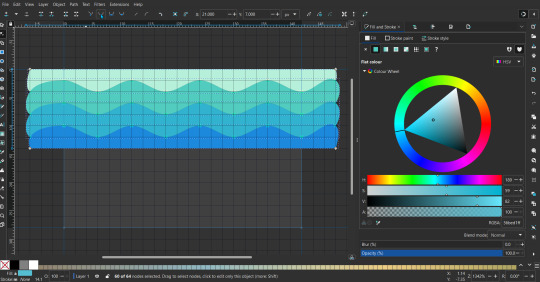
Then resize it all to the height of the canvas. And done :)
This can of course be vertical too.
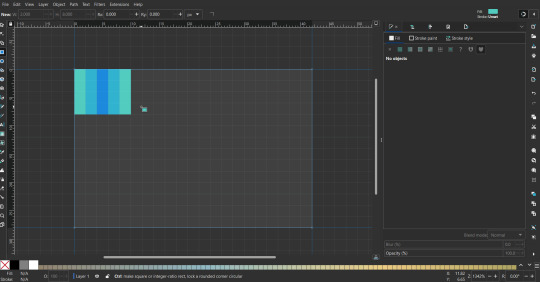
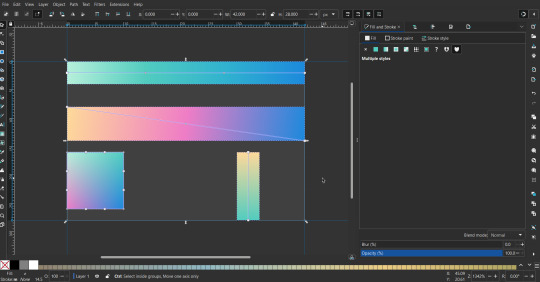
Gradients: You can use the fill and stroke dialogue, gradient tool, or mesh tool to do this.
To create the gradient, select the object, click the linear gradient symbol (gradient box) under fill and stroke. Or dragging / double clicking with the gradient/mesh tools. (The mesh tool is what I used to create the square gradient.)
To change the colors, click on the arrows or circles under fill and stroke, or by clicking the points on the shape, to select the nodes. Then use fill and stroke to change the colors.
To create new colors/stops, click on the plus+ symbol under stops (under fill and stroke), or double click on the gradient. Edit the new colors in fill and stroke again.
To change the location of stops, use stop offset under fill and stroke, or drag the nodes on the gradient. You can also move the end points on the object to make the gradient slanted or vertical.

Symbols: I make my own when I can (like the demi- triangle can be drawn with the pen tool, and resized to the correct proportions). When the symbol is too complicated, I import a .svg of it. Wikimedia commons is a great resource, and the popular twemoji comes in .svg format too. You could also edit it on over the .png in a rastor program if need be.
The align and distribute tab can be used to center symbols (or any other selected object). Select page for the relative to option, and use the symbols underneath to center/align it however you want. (You can also use different relative to options, like last selected, if you want to align it to an object instead.)
Deleting imported reference images: you can do this before saving it as a .svg, if you don't want to keep them / want to clean up the .svg file.
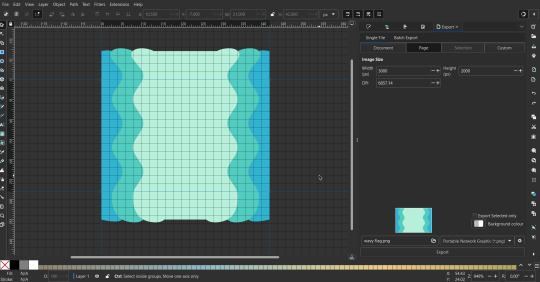
Antialiasing: an option that blurs things basically. A image with antialiasing off will be sharp pixels, while a image with antialiasing on will have transition colors between the main colors.
Below is an example. The left side is without antialiasing, and the right side is with antialiasing.

I can see why it might be preferable to have it on (like for diagonal shapes), but antialiasing can make recoloring .png (not .svg) files hard. The extra different colors messes with fill tools. I also think it looks cleaner without, so I prefer it off.
Exporting glitch: sometimes an exported image will have a thin line between the stripes, despite the fact the stripes are perfectly next to each other. (This seems to not just be a problem with Inkscape, but with vectors in general.)
Below is a zoomed in example of what it'd look like. The left side shows the stripes are all next to each other, but the right image has a transparent line in-between the stripes.
This can be fixed a number of ways.
You could select all the objects, and duplicate them twice.

Or overlap them. The stripes will still be the same size when overlapped, but they will technically be behind each other, so there will be no gap.
With all the different stuff mentioned, you can basically think of them as building blocks with the grid as reference. They can all be mixed and matched together.
I didn't mention all the options, just because there's that many different things you can do in Inkscape. I'd encourage you to play around with all the different options/tools yourself.
There's also some great Inkscape guides on YouTube, it's where I learned how to do a lot of this from (even if they're not for flags specifically, the concepts in those videos can be applied to flags).
Here's an overly elaborate flag I made, just to demonstrate some (but not all) of the things that can be done.

Anyways what a long post haha. But maybe this will be helpful for anyone interested in making (pride) flags.
218 notes
·
View notes