#Get davinci resolve studio for free
Explore tagged Tumblr posts
Visit Tumblr Blog
Explore Tumblr blogs with no restrictions, modern design and the best experience.
Last Seen Tumblr Blogs


Fun Fact
Users from the US are the majority of Tumblr visitors.
Note
How are you screen recording clips for the new episode? 👀
I was fortunate enough to get my paws on a copy of the episode before it premiered on crunchyroll, sparing me 20 odd minutes of bouncing up and down in my chair waiting for it to record sans subtitles :D For screen recording I use Open Broadcaster Software and for all my editing I use Davinci Resolve Studio (but the free version is still goated).
Some completely and totally unrelated information for you - my dms are open, my fibers are optic, and I have a google drive just sitting around gathering dust. Just in case you or anyone else was wondering :)
12 notes
·
View notes
Note
Haii, Sosaaa! Okay, so i wanna get into animation BUT I'm really new. Lucky for me I know someone who's awesome at animating (that's you btw) so I need your expertise. What program do you use, and also do you have any tips for a newbie?
Aww Jay, you flatter me~✨but before answering I must put the disclaimer that I'm just a hobbyst animator with no formal training, that during quarintine thought "Oh woah, these Multiple Animation Projects that people do in YT are so cool! I want to join them!" and started learning by herself. Take everything I say with a grain of salt.
First things first: I mainly use TV Paint. However I'm not letting you spent money on paid stuff you don't even know you'll like, so here are some free alternatives that I've used as well:
Krita is mostly a drawing program, but it also has a animation interface. The red and black parts of the Helena AMV were made with this.
Flipaclip is kinda neat phone/tablet app for when you want to animate on the go, but it can also feel more limiting since various features have to be unlocked by watching ads or getting the premuim version (in typical app fashion, I guess...)
Blender, while mainly meant for 3D animation, also has been developing Grease Pencil, that allows 2d animation in both 2D or 3D spaces. And the lines are vectors, so you can edit them after drawing them and such.
You can even use normal drawing programs. I've animated with Paint Tool Sai and Medibang by drawing all the frames, saving each frame as a image in sequence (001, 002, 003...) and putting them together in some editing program or gif maker. It's possible, but it's more work.
There's also OpenToonz, which is an open source version of the software used by Studio Ghibli in some movies?? I haven't used this one, but I'll leave it here in case you want to give it a try.
For editing (In the rare scenarios where I do fancy editing) I use After Effects. I can't personally recommend any free substitute, but as far as I've read, DaVinci Resolve seems like a good replacement.
Now, regarding actual animation advise, I won't explain the principles or terminology because:
It's very overwhelming since it's A LOT of information, specially for a beginner
I work mostly by vibes, so there are concepts I don't undertand well enough to explain to others
Instead I'll foward you this whole book that goes in detail about all that technical stuff.
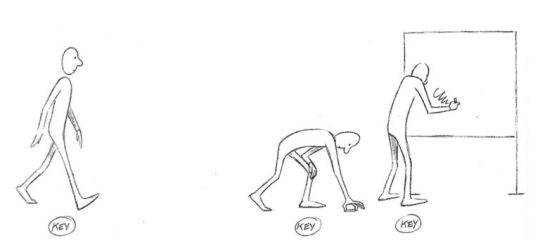
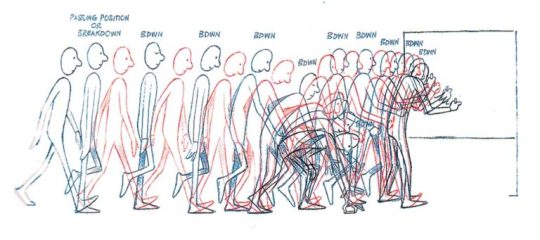
That being said, at the end of the day, hand-drawn animation is drawing main poses (aka key poses) and then drawing a bunch of more drawings in between until the drawings together look like they move.
So yeah, it's a lot of work,
....but it doesn't have to be tedious work~ 👀✨
As a hobbyst I live for the philosophy of vibing during the process instead of chasing perfect results, and I'm assuming that you just want to try for funsies and not that you're trying to become a pro industry animator anyways. Here are my personal tips to make the animation process more bearable:
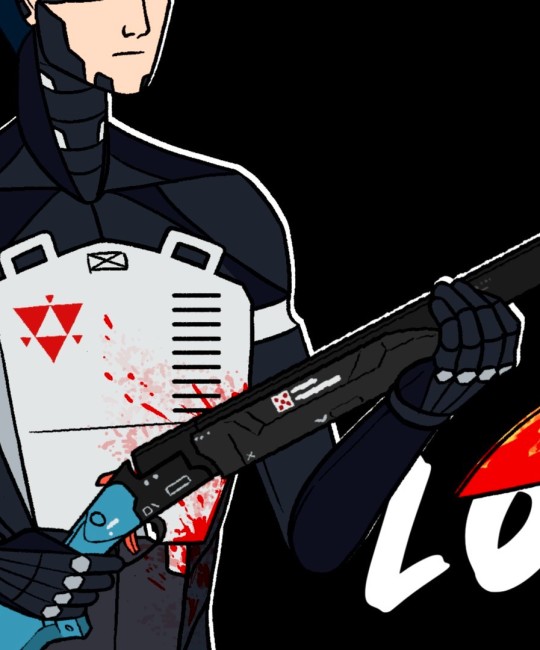
1- Pick something you love! Seriously, any long task becomes more bearable when it's about a theme or character you enjoy. There's a reason why most of my animations have been about HnK or Signalis,
2- SIMPLIFY THAT DESIGN! Before you even pick the pencil, I want you to really look at the design of whatever you're going to animate and ask yourself "Are all the details in this design really necessary?" Every extra detail really starts to add when you have to draw the same thing multiple times for a single second of animation. You don't need to add all the robotic details on replika bodies, or draw every single stripe a tiger has, to put an example.
3- Keep it simple! At some point you might have a cool idea of an anime style epic battle with looks of cool explosions, camera angles, awesome fighting choreograpies and whatnot; but you first have to start small or else you'll get overwhelmed and not finish anything (been there, done that). Start with something simple like a bouncing ball, or if you're feeling brave, a walk cycle or a character turning their head. In that same sense, remember the book I linked? Don't try to learn all of it at once, go one step at a time.
4-Use references! On google images there are multiples breakdowns of things like run, flight or walk cycles, for example, and you can even use youtube videos! (tip: pause the video and use "," and "." to move back and forth between frames). In case you need help with a very specific pose or movement, you can use yourself or a friend recreating the pose irl (yes, the process is very embarrasing, and yes, the results are worth it)
4- You don't have to animate/redraw everything everytime. We aren't going for Oscar winning levels of animation here anyways. It's ok to copy and paste across different frames, only animate certain parts of the body and leave the rest static, panning the camera to simulate movement... Listen, if actual standars profesionals cut corners, why can't we? We aren't even getting paid for this!
6- It's ok to suck at first. My first animation was this kitty back in 2016,

and here's this Elster from last year doing similar movements.

It's not perfect by any means, but I feel like both art and animation-wise there has been some improvement. And I guess that right now I could remake it and make it even better, but that's because I got more experience and a better eye at finding mistakes and how to solve them, and you get that with practice.
...So yeah, there's that, have fun in your animation endeavors 👍✨
#OH MY GOD THIS IS A TESTAMENT#I'm so sorry Jay for making you read all of this#I know less that you think#but the little I know I try to share to the best of my habilities#animation#ask#the yappening
13 notes
·
View notes
Note
How did you get started with video editing? Its a subject that interests me but i dont really know how to practice/learn
Oh gosh, I started wayyyy back in the day with Windows Movie Maker and then on Sony Vegas Movie Studio and just sort of fucking around on those for projects and little short vids. Then I went to school and did several editing classes.
I recommend downloading Davinci Resolve since it’s basically free and messing around with that. Try editing around with stock footage or stuff from your favorite anime or shows or whatever just to get a feel for how things work. Watch SuperButterBuns video on how to edit, because that helped me learn Premiere and Key Frames. And just have fun with it!
72 notes
·
View notes
Text
so you want to use OBS
hello! i’ve decided to compile information on my OBS setup and some resources that have helped me along the way. this is mostly for personal reference, but maybe others can make use of this information!
some notes before i get into it:
i use OBS for both offline recording and (twitch) streaming. any footage i record is edited using DaVinci Resolve 18, which is free.
most of my OBS captures are of video games (through a USB capture card, specifically elgato), and the occasional screen/application capture (like clip studio paint, and sometimes PC games).
as such, the information here is reflective of these experiences. this post is not comprehensive to all of OBS’s features- this is just an overview of the settings and configurations that are most relevant to me.
with that out of the way, all the information will be under the cut!
Basic Setup
file format:
how to change: settings -> output -> recording -> recording format -> press “apply” once finished!
I save most of my recordings as .mkv files- it supports multi-track audio! i prefer .mkv over .mp4 because if your power goes out, you still have a recording to work with.
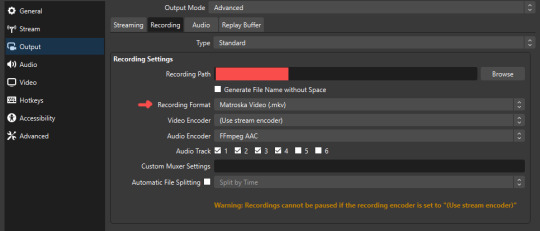
.mkv files can be read by DaVinci Resolve without an issue- but for Adobe software, they'll need to be remuxed to .mp4 within OBS! (file -> remux recordings -> press the … to select a file -> press the “remux” button)
video resolution and framerate:
how to change: settings -> video -> output (scaled) resolution
my obs canvas is @ 1920 x 1080p (16:9)
i switch between 720p and 1080p as needed! if you're concerned about space, you can probably just go for 720p. i also record at 30 fps, simply because that’s what my capture card supports.
video bitrate:
how to change: settings -> output -> encoder settings (located in both the streaming and recording tab) -> press “apply” once finished!
bitrate is a bit of a doozy to explain, but the most important thing to know is that bitrate affects your video’s quality. lower numbers = lower quality, while higher numbers = higher quality.
generally speaking, you'll want higher bitrate when you're recording things with high depth of information (e.g. you’d want a higher bitrate for something fast-paced like splatoon, compared to a slower-paced game like animal crossing).
my video bitrate is either set to 3000 or 4000 kbps! and here's some of my other (related) settings while i'm at it:
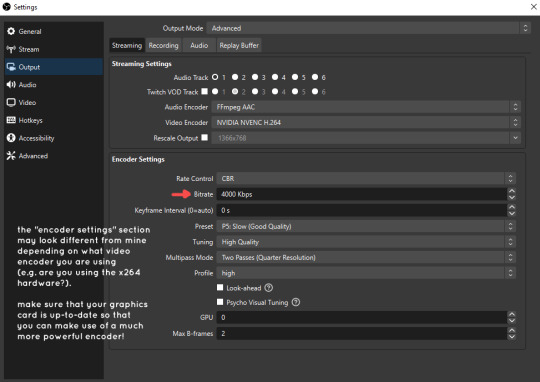
you can put your bitrate at much higher values than me if you're a stickler for quality- but keep in mind that a higher bitrate means:
bigger file size
more information to upload (when streaming)
your computer will need to encode more
i’d recommend reading twitch’s guidelines on encoding, bitrate, resolution, and framerate to get an idea of what values to pick. for people who are doing offline recording or streaming on a different platform, i suggest googling the appropriate resources!
multi-track audio:
this is mostly applicable to anyone looking to do video editing!
multi-track audio basically allows you to separate your audio sources (e.g. discord, game audio, and your own microphone) into different tracks.
this is an immensely helpful tool because it lets you adjust audio levels in post-production (editing). some examples of how this can be used:
increasing someones microphone volume if they speak too softly
increasing/decreasing game audio
muting swear words/sensitive information
completely muting voice call + microphone if you want to upload a no commentary video
and more!
to set this up, take a look at your audio mixer panel, and press the ⚙ icon. this will bring up advanced audio properties.
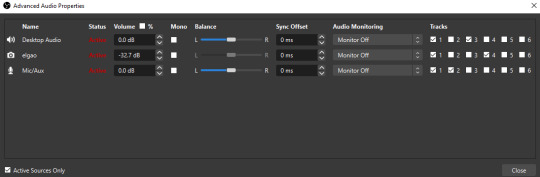
by checkmarking a track box, it puts the audio on that track. to make the above screenshot easier to digest:
track 1 consists of ALL three audio sources- desktop, elgato, and microphone.
track 2 only has the microphone audio.
track 3 only has desktop audio (i use this for voice calls)
track 4 only has the elgato capture card audio (game audio). the volume has also been lowered so that any speaking voices can be heard clearly.
tracks 5 and 6 are unused.
you might be wondering, “why do all three of these have 1 checked off?” this is what i call the universal audio track. i recommend having a universal audio track for a few reasons:
when you stream from OBS onto twitch/youtube- you have to select ONE audio track.
it’s also a nice backup in case you didn’t separate your audio correctly.
if for whatever reason you need to move around your individual audio tracks in editing, the universal track acts as a nice reference point.
mark off your audio tracks for each audio source as you see fit! once you’re finished with the advanced audio properties, go to settings > output.
for the streaming tab, you’ll want to have the number of your universal audio track selected. in my case, that will be audio track 1.
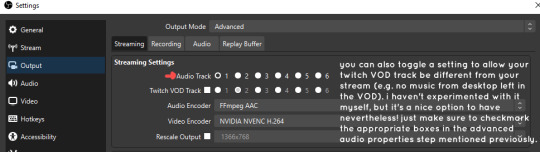
for the recording tab, checkmark all the audio tracks that are applicable to you (in my case, audio tracks 1, 2, 3, and 4). by default, only audio track 1 is selected.
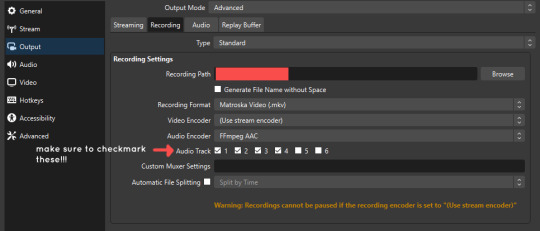
if you don’t check off the additional audio tracks in the output > recordings section, you will not have access to those audio tracks in editing, and you won’t be able to edit your audio tracks independently of each other. so don’t forget to do this! 👍
custom browser docks
custom browser docks are a great tool for when you’re streaming and want to have access to your twitch chat and/or activity feed! (or if you wanted to have some other web browser on OBS).
to create one, go to docks -> custom browser docks.
you’ll be given a table interface that asks you to put the dock name and URL. for streamers who want to have chat and alerts available, do the following:
on twitch’s homepage, go to the upper right and click your icon
then, click creator dashboard
once you’re on your dashboard, go to stream manager
click the vertical “...” on my chat OR activity feed.
press “pop-out chat” OR “pop-out activity feed”
copy and paste the link into the table back into OBS
press apply once you’re done
click and drag the docks around at your leisure to put them where you like!
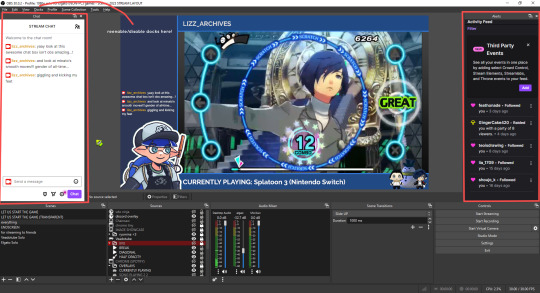
if you ever decide you don’t want to have something on your OBS dock (or want to bring something back), go to the toolbar, click “docks,” and click the appropriate dock!
third party things
a section of optional things that you may enjoy having.
streamlabs alerts
this is basically for anyone who streams and wants to have their chat and/or follower notifications visualized on screen!
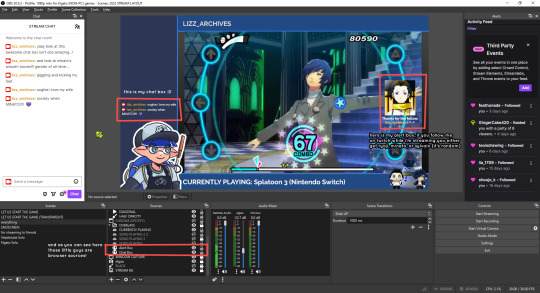
streamlab alerts can be added to OBS by adding a browser source into your scene, and the specifics can be customized on streamlabs itself. it’s pretty self-explanatory, so i’ll just leave a link to streamlabs website, where you can log in using the streaming platform of your choice: https://streamlabs.com/
discord overlay
this is a browser source that can be set up to show people who are in a server's voice chat and who speaks. i recommend this to people who make multiplayer content- it can help viewers distinguish who is who but also it can be helpful in editing.
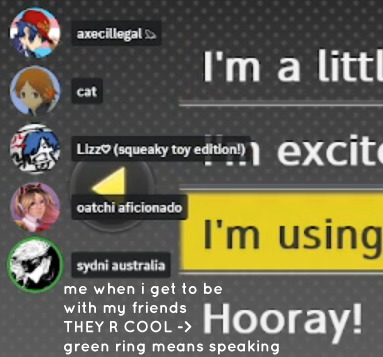
to set this up, go to https://streamkit.discord.com/overlay, click “install for OBS,” and after logging in with discord, go to “voice widget” and click the server and voice channel you want.
you are able to apply CSS if you'd like more control over the visuals, but the standard layout tends to work fine for me! a search of “discord overlay css” on youtube can help you get more information.
veadotube mini
this is a pngtuber software that a friend recommended to me! no webcam is required- mouth opening and closing is based on your microphone input!
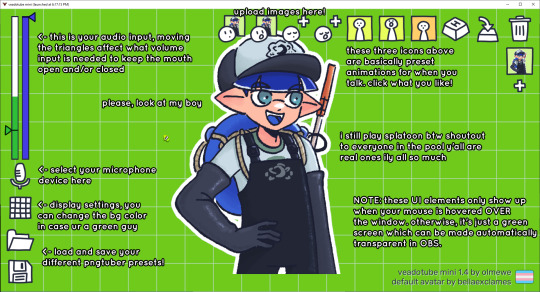
you can download it here (it’s pay what you want!): https://olmewe.itch.io/veadotube-mini
for a proper tutorial on how to use it, i recommend checking out the app's documentation, which you can read here: https://veado.tube/help/
source record
have you ever wanted to stream something with a chat overlay/layout, but wanted your recording to ONLY be the gameplay? or maybe you wanted to record BOTH your gameplay AND your webcam so that you can have a crisp zoom-in on your webcam!
source record is a third party plugin that can help you with that!
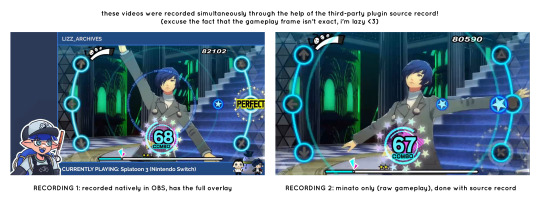
the general gist of source record involves applying the “source record” filter on either a scene or source, and customizing the encoding settings accordingly. the exact details of how to set it up is beyond the scope of this post, so I'll just direct people to this video instead (it was very helpful to me):
youtube
⚠ a quick note about source record: this plugin can be intense for your computer. be sure to do test recordings and the like to see what your computer can handle (and see if the recordings come out the way you like). it took me a few tests before i settled onto something i liked!
you can download and install source record here: https://obsproject.com/forum/resources/source-record.1285/
vdo.ninja
have you ever wanted to do a collaborative video or stream where you feature someone else’s video on your stream? or maybe you’re doing a multi-person streaming event! vdo.ninja is the perfect tool for you!
vdo.ninja turns your OBS virtual camera into a browser source link- which your collaborator can add on their stream! this is a new tool that i’ve added to my arsenal recently- since my friend and i are planning to stream a side order challenge together! i’ve still got to iron it out a bit more, but i like what i’ve used of it so far.
try it out for yourself at their website here (with documentation and demos available on the homepage!): https://vdo.ninja/ (no downloads required!)
ok! i’m set up! what now?
and with that, that’s all of the settings and tools that i thought would be worth mentioning! while most of my setup was written with video games in mind, some of these plugins and setups may be applicable to other types of videos (e.g. tabletop gaming with a physical camera)!
now that i’ve outlined all these settings, i have one more thing i have to say: regardless of what you're using OBS for, do a test recording before doing anything “official” with it. this recording can be as short as 30 seconds. it’s a good habit to develop that can make sure your streams/recordings turn out the way you want them to!
here are the kinds of things i like to check! it’s not an exhaustive list, but this can be a starting point:
video:
does my video look the way i want it to (and can my computer handle that)?
can my computer handle the load of encoding? - OBS will note in the bottom if the encoding is overloaded. if it can’t handle it, turn down your bitrate or adjust other encoding settings (e.g. i had to toggle psycho visual tuning OFF because it was causing lag)
this is especially the case if you're recording PC games- you don’t want to have slowdown on either your game or the recording!
audio:
are my audio sources (e.g. desktop audio and microphone) correct? - if you plug/unplug devices a lot, be sure to check this (settings -> audio).
are any of my audio sources muted? - make sure you don’t have anything on 🔇 if you don’t want it to be muted! otherwise the audio will be lost forever… (i lost my friend’s VC audio once… it was sad)
are my audio tracks separated properly? - requires you to boot up your editing software, but it's worth doing! for the test recording, just have something from all your sources playing at once, and see if your editor has things separated into tracks.
can i hear the voices clearly? or does the music and/or game overpower them?
if for whatever reason your OBS crashes, or you want more information on anything “critical” or “warning” worthy in your set-up, you can go to help > log files > upload current log file > analyze. crash logs currently can’t be analyzed by the log analyzer- but they’re a valuable tool when asking for help on the OBS forums!
and that’s all! for real, this time. i hope that some of these tools and settings can help anyone wanting to get more out of OBS. there’s definitely other things i didn’t touch upon (e.g. audio filters for noise compression, suppression, etc.), so i suggest doing your own research and trying things out!
happy recording/streaming, and thanks for reading! ✨
#lizzy speaks#this was a fun little write up!! i've been slowly getting some of my friends into video making teehee and its SO FUN!!!#(digital) video is like one of my other passions next to art. everyone say thank you splatoon for getting me back into it again <3#i've been using obs since like 2018 so i wanted to share some of the things i learned for funsies... i really love video...#but also i like having reference posts like this in the case people have questions they want to ask me...#because i don't always remember what video tutorials i watched and it's nice to document that somewhere...#warning to anyone who reads it this is like 2.1k words. i do want to stress that this isn't comprehensive but there's still a lot of info#that i wanted to put for this post...! that said topics like designing your own stream layout + assets for it are NOT in the scope of this#post and nor is this a beginner's guide to obs (i wrote this with the assumption that you know how to record and/or stream and that-#people already have an idea of how to use scenes and the different types of sources obs can use).#i hope everyone's had a lovely march 5th! i would love to look at the fanart but im still not done with reload...#but im hoping to finish it by the end of the month!!! yipee!!!#Youtube
50 notes
·
View notes
Note
What do you use to edit your videos together? also where did you get the high quality footage from? (I wanna do it like you, but goodness knows I have to be an amateur first lol)
Hii, thank you so much for asking. This is probably gonna be a very long answer so buckle up.
Personally, I use Capcut and Adobe Premiere Pro to edit my videos. CapCut is a free editing tool (however, they have been removing almost all features from their free version to get people to pay) and is probably the best app to start out with. Adobe is extremely expensive unfortunately.
Other editing tools you can use are Sony Vegas Pro and Davinci Resolve. Both are not cheap but at least they come outside of a subscription model. Also I think there is a free version of Davinci Resolve.
Now, regarding the footage. I used to torrent my shows. The thing with torrenting is - it's highkey illegal and I got sued by Warner Bros. So I am not doing that anymore. And I haven't really found a proper alternative yet. (If you are reading this this Warner Bros, my words are obvioulsy not binding the only TV show I have ever torrented is Dead Boy Detectives. That was a one time thing. :)))))
My go to site besides torrenting is called "Logoless Desires" on Twitter. They have a bunch of older shows, but lack newer ones. But it's worth checking them out.
I recently found a website called "Bratflix" that let's you download TV shows. But they don't have the best quality. But I think they offer a good solution to my current problem.
If you do choose to torrent, which a lot of people do, then make sure to use a VPN and immedietaly delete whatever you have downloaded from your server. Then you should be safe. In case you don't use a VPN yet, I recommend you the one by Mozilla Forefox.
I used Pirate Bay for find the shows and utorrent to download them. I do advise you to research before torrenting because a) it can be confusing at first and b) did I mention I got sued because I didn't do my research? Yeah. Don't be like me.
You can also always screenrecord. I hate that option because it's a pain in the ass but many people do it, especially those who want to get their video out their before people have made it available to download. I personally use OBS studio as a screen recording tool.
Now regarding the quality of your videos: You do want to make sure you're videos are at least in 720. 1080 is best but often hard to find. (Except on torrenting websites)
That's basically it.
Everyone starts somewhere when it comes to video editing and I am def not the end all be all. Especially due to TikTok video editing has changed a lot. And the quality has kind of ... shifted? I can't really explain it. But let's just say that you don't have to be a pro to make good edits. :) You just have to start somewhere.
If you have any other question, my DM's are always open.
4 notes
·
View notes
Text
A Beginner’s Journey: Learning Animation with Zero Background

Breaking into the world of animation with absolutely no prior experience may seem daunting—but it’s entirely possible, and more achievable today than ever before. Whether you're drawn to the magic of 2D storytelling or fascinated by hyper-realistic 3D worlds, starting from scratch doesn’t mean you’re at a disadvantage. In fact, the animation industry now thrives on fresh perspectives, and many studios actively welcome talent from non-traditional backgrounds.
If you’ve ever wondered where to begin your animation journey, this guide breaks down every step to get you started—without overwhelming jargon or unnecessary pressure.
Why Now Is the Best Time to Begin
Animation is no longer limited to major film studios or big-budget productions. Thanks to affordable tools and a surge in demand across industries—advertising, social media, education, gaming, and even virtual reality—animation has become more accessible and versatile than ever.
In 2025, the animation industry continues to boom globally, with record-breaking revenues reported in streaming-based animation content. Platforms like Netflix, Amazon Prime Video, and Crunchyroll are consistently investing in original animated shows and films. The recent success of titles like Arcane, Nimona, and Blue Eye Samurai has shown that audiences are craving animated content with rich visuals and deeper narratives.
This surge has led to more online resources, community-led initiatives, and educational platforms focused on beginners, creating an ideal environment for aspiring animators.
Step 1: Understand What Animation Actually Involves
Animation is far more than drawing. It combines storytelling, timing, physics, character development, sound design, and even a bit of acting. There are various styles and disciplines under the umbrella of animation:
2D Animation (hand-drawn or digital)
3D Animation (used in movies, games, VR)
Stop Motion
Motion Graphics
Visual Effects (VFX)
It’s important to understand these areas to figure out what excites you most. Don’t worry about mastering everything at once—most animators specialize over time.
Step 2: Begin with Free or Affordable Tools
Starting with free software can help you dip your toes in the water without a big financial commitment. Here are some excellent tools for beginners:
Krita or Pencil2D for 2D animation
Blender for 3D animation (open-source and industry-relevant)
Synfig Studio for vector-based 2D animation
DaVinci Resolve (free version) for editing and basic VFX
These tools are beginner-friendly and come with vast online communities where learners share tutorials and feedback.
Step 3: Learn the Fundamentals First
Before diving into software mastery, it’s critical to build a foundation in animation principles. The 12 principles of animation—introduced by Disney legends Frank Thomas and Ollie Johnston—remain the gold standard. These include squash and stretch, anticipation, timing, and more.
There are countless YouTube channels, MOOCs, and blogs dedicated to teaching these fundamentals, such as:
Alan Becker Tutorials
Bloop Animation
Animation Mentor Blog
Additionally, books like The Animator’s Survival Kit by Richard Williams can become your personal animation bible.
Step 4: Practice Through Mini Projects
Animation can be overwhelming when you try to create full scenes right away. Instead, focus on tiny exercises: bouncing balls, walk cycles, facial expressions, or lip-sync practice. These bite-sized projects build your muscle memory and help you apply theoretical concepts practically.
Even looping GIFs or social media reels are great formats to begin experimenting with. Remember, every animator starts with imperfect lines and awkward timing—it’s the persistence that transforms you.
Step 5: Join Animation Communities and Forums
Learning in isolation can be challenging. Join beginner-friendly animation communities where you can get feedback, participate in contests, and stay motivated. Platforms like:
r/animation on Reddit
The Animation Guild (TAG)
ArtStation & Behance
Discord channels for Blender, Krita, and VFX artists
You’ll also find many professionals and instructors giving live critiques, free sessions, and project walk-throughs.
Step 6: Consider Structured Learning for Deeper Growth
Once you’ve dipped your feet and know this path excites you, consider enrolling in a structured course. These programs offer mentorship, project reviews, and a roadmap—something self-learning can’t always provide.
For example, an 3D animation course bengaluru offers a guided curriculum that combines hands-on software training with deep dives into narrative design, character building, and even collaborative team projects. What’s exciting is that some of these programs now include real-world studio briefs, helping learners experience professional animation scenarios early on.
In growing creative hubs, institutes are becoming more holistic in approach—blending creativity with storytelling, software with emotional intelligence. This structured training, paired with a city’s expanding animation ecosystem, allows learners to build both skills and networks.
Step 7: Keep a Portfolio, Not Just Practice
As you gain confidence, start compiling your work into a digital portfolio. This doesn’t need to be elaborate—a simple showreel or a Behance page is enough. Make sure to include:
Short clips or looping animations
Before/after shots to show progress
Rough sketches or process breakdowns
A brief description for context
Employers and collaborators don’t look for perfection—they look for storytelling, style, and potential.
Step 8: Stay Updated With Industry Trends
Animation is an ever-evolving industry. Keeping up with trends ensures your skills stay relevant. Some current trends you should watch:
Real-time animation with Unreal Engine
AI-assisted animation tools like Cascadeur and RunwayML
Stylized 3D with 2D aesthetics (e.g., Spider-Verse influence)
Hybrid roles—animators now often know sound design, editing, or VFX basics
Follow events like Annecy International Animation Festival, Lightbox Expo, and SIGGRAPH to stay informed.
In 2025, several studios in India and abroad are embracing AI-enhanced workflows, but the human touch—storytelling, character nuance, emotion—is still the irreplaceable core. That’s where beginners can truly shine.
Step 9: Don’t Fear Mistakes—They’re Your Learning Tools
Animation is a long game. You’ll make clunky animations. You’ll get feedback that stings. But each mistake is a blueprint for improvement.
Many professional animators started in their 20s, 30s, even 40s. What got them ahead wasn’t talent—it was resilience and a genuine love for the medium. So don’t obsess over getting it “right” at the beginning. Focus on growing.
Conclusion: Your Zero-to-One Journey Begins Now
Starting animation with zero experience is not only doable—it’s incredibly rewarding. With persistence, smart resources, and a commitment to storytelling, you can turn blank frames into meaningful motion.
Cities like Bengaluru are seeing a rapid rise in animation and VFX studios catering to OTT, gaming, and advertising industries. Many educational hubs are adapting to this shift, providing hands-on learning in visual storytelling, motion graphics, and effects. If you're interested in mastering these advanced techniques, enrolling in a 2D animation course bengaluru could help you bridge the gap between passion and profession—especially in a city quickly becoming a hotspot for creative tech.
Remember, every great animator once knew nothing. Your journey starts with one frame—and that’s all it takes to begin.
0 notes
Text
Bibliography
Beato, Rick. 2021. "The Modern Guitar Discussion w/ Tosin Abasi, Tim Henson & Misha Mansoor." https://youtu.be/6wb4AcfXSyo.
Davinci Resolve 19.1.4 (Video Editor ). BlackMagic Design.https://www.blackmagicdesign.com/au/products/davinciresolve
Busque, Maria. 2021. "Perfection and Wabi-Sabi in music." [Blog]. Accessed 11/04/2025. https://www.mariabusque.net/en/blog/wabi-sabi.
Carpenter, Nicole. 2019. "Gamers with godlike reflexes are racing to break world records in this rhythm game." PC Gamer, 2019. Accessed 23/05/2025. https://www.pcgamer.com/two-teens-are-on-a-crazy-world-record-race-in-extremely-challenging-rhythm-game-osu/.
Casiopea. 1985. Galactic Funk. In Casiopea Live. Japan: ALFA.
Clone Hero. 2023. "CH esports: CSC:CS3 and Birdman Drum Tournament." [Website]. Accessed 23/05/2025. https://clonehero.net/2023/01/07/csccs3-birdman.html.
Serum 1.351 (VST Plugin ). Duda, Steve.https://xferrecords.com/products/serum-2
Serum v2 (VST Plugin ). ---.https://xferrecords.com/products/serum-2
Frightbox Recording. 2022. "You Think Modern Metal Production Sounds Too Robotic? GET OVER IT." https://youtu.be/zA4bx1dISQQ.
Dexed 0.9.8 (VST Plugin). Gauthier, Pascal.https://github.com/asb2m10/dexed
FL Studio 24.1.1 (Digital Audio Workstation). Image-Line.https://www.image-line.com/fl-studio/
KoiFishu. 2021. "RANKING EVERY OSU! TABLET." YouTube. https://www.youtube.com/watch?v=mUaZxp4Uj6Q.
McCormick, Scott. 2022. "The major mediant chord can add an unexpected surprise." 2022. Accessed 06/04/2025. https://blog.discmakers.com/2022/04/major-mediant-chord-adds-surprise/#:~:text=And%20it's%20not%20a%20powerful,17%25%20of%20popular%20songs.).
Mcglynn, Declan. 2025. "Xfer Records launches long-awaited Serum 2." DJ Mag, 2025. Accessed 11/04/2025. https://djmag.com/tech/xfer-records-launches-long-awaited-serum-2.
Murray, Ron. 2022. "I made Shimmer Reverb in FL Studio without spending a ton." YouTube. https://youtu.be/cdY05AM5vGE.
Musgrave, Jon, and Si Truss. 2023. "15 essential synth patches every producer should know." musicradar, 2023. Accessed 11/04/2025. https://www.musicradar.com/news/15-essential-synth-patches.
Flowframes 1.36.0 (AI Upscaler ). N00MKRAD.https://github.com/n00mkrad/flowframes
Naircol. 2022. "Glitchy WATER FX with Serum!" YouTube. https://youtu.be/cftgSTQfq1g.
Reich, Steve. 2002. Writings on Music In 1965-2000, ed Paul Hillier. England: Oxford University Press. http://www.bussigel.com/systemsforplay/wp-content/uploads/2014/02/Reich_Gradual-Process.pdf (accessed 07/03/2025).
Sam The Camera Man. 2019. "Low Pass Filter in DaVinci Resolve 16 | Get Muffled Audio." YouTube. https://youtu.be/uIYVja0jv9s.
The Complete Sound Effects Platform 01.42 (Sound Library). Soundly.https://getsoundly.com/
Crystallizer 5.0.1 (VST Plugin). Soundtoys.https://www.soundtoys.com/product/crystallizer/
Synth Anatomy. 2022. Xynth Audio Rezonator, new resonator plugin for creating rich harmonies. Accessed 21/03/2025.
Walker 2 FX 1.0.1. UVI.https://www.uvi.net/en/soundfx/walker-2.html
Versai, Anna. 2025. "A Serum 2 FAQ: Xfer’s Latest Release Is Free For Existing Users." Technowize, 2025. Accessed 11/04/2025. https://www.technowize.com/a-serum-2-faq-xfers-latest-release-is-free-for-existing-users/.
Wacom. 2024. "Wacom pen tablets – preferred by osu! players worldwide." Accessed 23/05/2025. https://estore.wacom.com/en-us/osu.
Rezonator 2.7.0.4239 (VST Plugin). Xynth Audio.https://www.xynth.audio/plugins/rezonator
0 notes
Text
Buy TourBox NEO Creative Software Controller in UAE

If you’re a creative professional in the UAE looking to streamline your workflow and boost productivity, the TourBox Upgraded NEO Creative Software Controller now available at AWPRO is a game-changer you shouldn’t miss.
What is the TourBox NEO?
The TourBox NEO is a compact, ergonomically designed controller built specifically for creators working in photo editing, video production, animation, audio, and digital art. It’s the upgraded second-generation model, featuring an improved left-side dial and center knob for smoother, more precise adjustments—ideal for intricate creative tasks.
Key Features
Universal Compatibility: Works seamlessly with industry-standard software such as Adobe Photoshop, Lightroom, Premiere Pro, DaVinci Resolve, Illustrator, After Effects, Final Cut Pro X, Capture One, Clip Studio Paint, and many more.
Customizable Controls: Offers up to 42 customizable operations with uniquely shaped buttons, dials, scroll wheels, and knobs for intuitive tactile navigation.
Ergonomic Design: Designed for comfort and efficiency, allowing you to use the controller with one hand while operating a mouse, keyboard, or graphics tablet with the other.
Seamless Integration: Connects via USB Type-C to both Mac and Windows computers, ensuring fast and reliable performance.
Preset Management: The free TourBox software lets you manage and switch between multiple configurations, with official and user-made presets for popular creative apps.
Enhanced Workflow: Features like brush control, all-in-one dial for sliders and frame stepping, seamless navigation (zoom, rotate, timeline adjust), and quick tool switching with HUD support put everything you need at your fingertips.
Why Creatives Love the TourBox NEO
Speed and Efficiency: The tactile controls allow for rapid adjustments, making editing, color grading, and retouching much faster than using keyboard shortcuts alone.
Intuitive Customization: Easily map your most-used shortcuts and functions to the controller, adapting it to your unique workflow.
Build Quality: Premium construction ensures durability and a satisfying user experience, even during long editing sessions.
Beginner-Friendly: Whether you’re a novice or a seasoned pro, the TourBox NEO is easy to set up and master, thanks to its thoughtful design and comprehensive software support.
Why Buy from AWPRO?
AWPRO is the authorized dealer for TourBox in Dubai and across the UAE, offering the best prices and free shipping on orders over AED 300. With a reputation for serving the professional audio, video, and photo community, AWPRO ensures you get genuine products and excellent after-sales support.
Who Should Get the TourBox NEO?
Photographers seeking faster retouching and editing in Lightroom or Photoshop
Video editors wanting precise timeline and frame control in Premiere Pro or DaVinci Resolve
Digital artists and illustrators looking for smooth brush adjustments and tool switching
Audio producers and animators who need quick access to complex software functions
Conclusion
The TourBox Upgraded NEO Creative Software Controller is more than just a gadget. It's an essential tool for modern creators who value efficiency, precision, and comfort. Available now at AWPRO, it’s your ticket to a smoother, more enjoyable creative process in the UAE.
0 notes
Text
Newsroom to Newsfeed: Must-Have Journalism Tools Every Indian Reporter Swears By

In the fast-paced world of modern journalism, tools can make or break a story. From capturing raw footage in chaotic field conditions to editing crisp news segments for digital platforms, today’s journalists wear many hats—reporter, videographer, graphic designer, and even sound engineer.
Whether you're a rookie reporter or a student enrolled at one of the Top Mass Communication institutes in Delhi, understanding the essential software stack is a necessity. Journalism is no longer just about notepads and voice recorders—it’s about mastering tech that tells the story best.
Let’s explore the best journalism tools and software used by professionals across India—and how mass communication students can get a head start.
🎥 Video Editing Tools: From Field to Feed
1. Adobe Premiere Pro
Used widely by media giants like NDTV and India Today, Adobe Premiere Pro is the gold standard in video editing. Journalists love its flexibility—editing clips on-the-go, adjusting audio levels, or adding subtitles is seamless.
Case Study: A digital reporter from Scroll.in used Premiere Pro to compile a quick-turnaround documentary on the Delhi floods, merging mobile footage with studio interviews within hours.
2. DaVinci Resolve
For budding broadcast journalists learning the craft at schools like IAAN School of Mass Communication, DaVinci Resolve is a powerful (and free!) option. Known for its professional-grade color correction and audio mastering tools, it’s a favorite among student journalists producing documentaries and news bulletins.
🖼️ Graphic Design Tools: Visuals That Talk
3. Canva Pro
Indian newsrooms are increasingly going visual. Canva Pro is a go-to design tool for reporters needing to create infographics, thumbnails, and social media visuals—especially when designers aren't available.
Real Example: Political journalist @RajdeepSARDESAI tweeted custom infographic explainers created using Canva during the 2024 general elections. It helped simplify voter data visually for the masses.
Mass communication students are now trained in tools like Canva from day one, especially in Top Mass Communication institutes in Delhi where digital storytelling is part of the curriculum.
4. Adobe Illustrator
For more advanced graphic design—especially for print publications and data-driven visuals—Illustrator remains unmatched. It’s taught in professional journalism institutes like IAAN, where students use it to create layouts for newsletters, magazine covers, and campaign posters.
🎧 Sound Editing & Podcasting: Crafting the Sonic Story
5. Audacity
Free and open-source, Audacity is widely used for editing radio shows, interviews, and podcasts. It's particularly useful for community radio projects, which are growing in India’s rural journalism hubs.
On Campus: At IAAN’s audio labs, students record and edit mock interviews and podcasts using Audacity as part of their audio journalism module.
6. Adobe Audition
For journalists working in TV or national digital outlets, Adobe Audition is preferred for its detailed sound cleaning and mixing capabilities. It helps eliminate background noise, adjust levels, and export in broadcast-ready formats.
Real Use: A reporter at The Quint used Adobe Audition to polish voiceovers for their mini-series on environmental activism in Uttarakhand, improving clarity in windy outdoor interviews.
📰 Tools for News Gathering & Publishing
7. InShot (Mobile Video Editing)
In the age of mobile journalism (MoJo), many Indian reporters rely on InShot to trim and polish clips for Instagram, Twitter, and YouTube. It’s simple, fast, and efficient—especially for on-ground coverage during rallies, protests, or election updates.
8. Trello + Google Docs
Journalism is collaborative. Tools like Trello help manage story pipelines, while Google Docs is essential for real-time editing, especially during live news breaks.
Example: Digital desks at Times Internet use Trello boards to assign stories, attach briefs, and monitor deadlines, even across states.
📚 How Institutes Like IAAN Are Preparing Students
Among the Top Mass Communication institutes in Delhi, IAAN School of Mass Communication stands out for actively incorporating these tools into its curriculum. Students don’t just learn about these platforms theoretically—they apply them in lab settings, newsroom simulations, and internship projects.
IAAN’s practical modules cover:
Premiere Pro and Audacity in its Broadcast Journalism Lab
Canva, Illustrator, and Photoshop in its Visual Design & Photography Studio
Podcast recording and editing as part of Radio Production classes
Real-world publishing workflows using Google Workspace and WordPress
Moreover, IAAN’s industry connections allow students to intern at top media houses where these tools are used daily, ensuring graduates are newsroom-ready from Day 1.
🧠 Bonus Tools Every Journalist in India Should Know
Tool
Use Case
Otter.ai
Auto-transcribe interviews quickly
Google Lens
Translate street signs and posters during reporting
Telegram/Signal
Safe communication with whistleblowers or sources
Lightroom Mobile
Edit DSLR-quality photos on your phone
🎯 Conclusion: Tools Don’t Replace Journalists—They Empower Them
Technology is only as powerful as the hands that use it. For Indian journalists, mastering these tools has become essential for storytelling in a competitive digital-first ecosystem.
The Top Mass Communication institutes in Delhi like IAAN know this—and that’s why they don’t just teach journalism, they train multimedia storytellers. Whether you dream of anchoring a news hour, producing a true-crime podcast, or reporting live from election grounds, your toolbox matters as much as your pen.
0 notes
Text
Mastering the Art of Video Editing: A Beginner’s Guide
We’ve all been there—scrolling through YouTube or TikTok, amazed by those smooth transitions, crisp cuts, and cinematic effects. You might think, “There’s no way I could ever do that.” But here’s the truth: great video editors weren’t born with magical skills—they just started. And so can you.Video editing is more than just trimming clips or slapping on music; it’s storytelling. Whether you're making vlogs, gaming videos, short films, or promos, editing helps you shape how your message is seen and felt. The good news? You don’t need a Hollywood studio setup to get started—just a little patience, creativity, and the right tools.Start With the Right SoftwareIf you’re a total newbie, don’t overwhelm yourself. Free tools like CapCut, iMovie, or DaVinci Resolve are perfect to begin with. They’re user-friendly and packed with powerful features. Want something a bit more advanced? Adobe Premiere Pro and Final Cut Pro are industry favorites.Get to Know the BasicsBefore diving into flashy effects, nail the basics:Cutting & trimming: Remove what you don’t need. Clean edits make your video flow.Transitions: Use them sparingly. A simple crossfade or swipe can do wonders when used intentionally.Sound design: Music sets the mood, but syncing your audio with visuals (like a beat drop with a scene change) adds magic.Color correction: A little brightness, contrast, or saturation tweak can breathe life into dull footage.Tell a Story, Even in a 30-Second ClipWhat makes people stay and watch isn’t always how polished your video looks—but how it feels. Every video should have a beginning, middle, and end. Ask yourself: What am I trying to say? How do I want viewers to feel?Practice, Rewatch, RepeatYour first few edits might look choppy or feel off. That’s okay! Editing is a craft—each video you work on sharpens your eye. Don’t be afraid to mimic your favorite creators, experiment with styles, or follow YouTube tutorials.Join the CommunityYou’re not alone in this journey. Join editing groups on Reddit, Discord, or Facebook. Share your work, ask questions, and watch how others create magic with the same tools you have.In the End…Mastering video editing doesn’t happen overnight. But with every cut you make and every clip you piece together, you’re getting better. So, roll up your sleeves, open that editing software, and start telling your story—frame by frame
Get started now for has low as $2.5
1 note
·
View note
Text
DaVinci Resolve tech problems
My system is currently not fast enough for Studio. More specifically, the FX that I'd want to use in Studio. The audio mixing in the free version crashed my Davinci. I found out I need at the very least a faster CPU (going to order that) but for proper use of the Studio version, I need a new motherboard, CPU and Graphics card. I'll save up for that for next year.
Audio (and now video) issue: I seem to have messed up a piece that was working before, by trying to use FX in the audio fairlight part of it. It's just a short sequence, but now I get no audio, even though the equalizer shows audio being played when I play it. It's also crashed Davinci in total. I have removed all attributes off the piece. Still no sound. I am trying to replace it with a clean version from the source, but the entire source (converted to MP4 for just this reason) gives no sound. I'm throwing up my hands. Maybe I need to import a previous render and just use that? It will be messy with the transitions, but I can't think of anything else to do.
[...next day...]
Half the mp4s (episodes) now don't have any audio anymore. I updated DaVinci Resolve to the latest version due to a massive problem I was having, and I had to uninstall and reinstall. Last time I updated to the most recent version, I lost audio on all MKV and most AVI files. I converted everything to MP4 to solve the issue. Now I don't have audio on half the MP4 files that I made. So what do I convert it to now? And why only half? And is it consistent? How many conversions are in the future?
I looked if STUDIO would solve everything, but there are many complaints about no audio in the Studio version, so that's not a likely solution. And also - I can't update to Studio until I have more CPU and probably I need a whole new computer for it. That's not happening this year.
[...sometime later...]
I've come to the conclusion that it's not that the episodes don't have sound anymore. There are too many moments where something will play, and then stop for it to be the absence of sound. So it's not a codec thing. It's more likely that my computer isn't fast/robust enough for what I'm doing. A new CPU is the next action for me.
If that doesn't work, I'll have to save up for a new computer.
If it does work, I'll have to save up for a new computer but not be frustrated about it.
This is probably one of the most expensive hobbies I've ever had. (Apart from going to conventions in foreign countries.)
0 notes
Text
i cant speak for the photo editing software, but i can for the painting and illustration ones ive used!
when i first got a tablet it came with photoshop elements, and as an illustrator i found it quite complicated (which is fair enough its made for photo editing)
i mostly used a pirated version of painttool sai, but i did recently pay for it cuz like, even tho i dont draw as much, sai was developed by one dude in japan so i might as well toss some money his way for all the years i used his program. also when i bought it, i believe the yen was pretty weak, so what i thought would cost $50USD ended up being like $35.
clip studio paint is the one that allll the artists are using nowadays, i had a pirated version on my old laptop and might buy the single purchase when im able to draw again :') it does have a subscription service to use on ipad, as well as paint pro vs ex which, idk all the different features cuz i didnt spend enough time with it before my laptop died. i think its like $50 for the single purchase BUT it goes on sale pretty often and my friend got it for like $25
procreate my fucking beloved forever and everrrrr its $10 forever, its really simple to use but also robust in features, i think theyre coming out with an animation version? and you can get a ton of brushes online for free or customize them all you want yourself. basically everything ive drawn on this blog has been thru procreate, it was a lifesaver when i couldnt afford a pc and its still my most used app.
before i knew how to pirate sai, i used firealpaca, completely free and very simple, GREAT for beginners to digital art, but personally i found it a little limiting. medibang is basically the same as firealpaca but its also on ios and android and features a cloud server so you can easily move between devices. it is littered with ads tho :\ but the free version works well enough for beginners
i know a lot of ppl rep for krita, but it just didnt work for me, i think cuz i was using it on my dads old macbook but im willing to try it out again, completely free and i think open source but dont quote me on that lol
other stuff on here ive used:
audacity, to make really shitty nightcore and chopped up edits of songs lol
garageband.... a lot of just messing around in garageband..... obv not for professional use but its fun to mess around in
opentoonz for like 5 minutes but i was very confused w it, but supposedly its been used by ppl working at studio ghibli
inkscape but im just generally shit at vector art
stuff ive heard good stuff abt but havent used myself:
gimp
affinity suite
davinci resolve
blender
ableton and flstudio for music
corel
tv paint and toonboom for animation
anyway just pirate photoshop you can prob find a tutorial somewhere
or use alternatives! heard good things about photopea, gimp is a classic

431 notes
·
View notes
Text
How to Create a YouTube Channel for Beginners (Step-by-Step Tutorial)
Creating a YouTube channel is a straightforward process, and this step-by-step guide will walk you through everything you need to do to get started.
Step 1: Set Up a Google Account
Go to Google Account:
If you already have a Google account, skip to Step 2.
If not, create one by entering your details (name, email, password, etc.).
Verify your account using the instructions provided.
Step 2: Create Your YouTube Channel
Go to YouTube:
Log in using your Google account.
Access Channel Settings:
Click on your profile picture in the top-right corner.
Select "Create a Channel".
Choose a Name:
You can use your real name or create a custom name for a brand account.
Follow the prompts to set it up.
Upload a Profile Picture:
Choose an image that represents you or your brand.
Step 3: Customize Your Channel
Go to "Customize Channel":
Click on your profile picture and select "YouTube Studio".
Navigate to the Customization tab.
Add a Channel Banner:
Design a banner image (2560 x 1440 pixels recommended). Tools like Canva or Adobe Express can help.
Write a Channel Description:
Introduce yourself and describe the type of content you'll create.
Add Links:
You can add links to your website or social media in the About section.
Step 4: Plan Your Content
Define Your Niche:
Decide what type of videos you’ll create (e.g., tutorials, vlogs, reviews).
Create a Content Schedule:
Plan a consistent posting schedule to engage your audience.
Step 5: Create Your First Video
Plan Your Video:
Write a script or outline to stay organized.
Record Your Video:
Use a camera, smartphone, or webcam. Ensure good lighting and clear audio.
Edit Your Video:
Use editing software like iMovie, Adobe Premiere Pro, or free tools like DaVinci Resolve.
Export in HD:
Aim for 1080p resolution for professional quality.
Step 6: Upload Your Video
Go to YouTube Studio:
Click "Create" > "Upload Videos".
Add Details:
Title: Write a catchy, keyword-rich title.
Description: Include relevant information and links.
Tags: Add relevant tags to help users find your video.
Choose a Thumbnail:
Create a custom thumbnail (1280 x 720 pixels recommended).
Set Privacy Settings:
Public: Anyone can view.
Unlisted: Only people with the link can view.
Private: Only you can view.
Step 7: Promote Your Channel
Share on Social Media:
Post your videos on platforms like Instagram, Twitter, and Facebook.
Engage with Your Audience:
Respond to comments and interact with viewers.
Collaborate:
Partner with other creators to grow your audience.
Step 8: Optimize for Growth
Learn About Analytics:
Use YouTube Studio Analytics to track your performance.
Use SEO:
Research keywords and include them in your titles, descriptions, and tags.
Experiment and Improve:
Test different content types and formats to see what works best.
Tips for Success
Consistency: Stick to your upload schedule.
Quality over Quantity: Focus on creating valuable content.
Patience: Building a channel takes time. Stay persistent!
#how to create youtube channel#create youtube channel login#youtube studio#youtube dashboard#create youtube account#youtube account settings
0 notes
Text
Top Tools to Help You Release Your Song on YouTube Easily
Releasing your music on YouTube has never been more accessible, thanks to the array of tools available to simplify the process. Whether you're an emerging artist or an established musician, leveraging the right technology can enhance your video's quality, increase your reach, and help you connect with your audience. In this article, we’ll explore the best tools to help you release your song on YouTube easily and ensure it makes a lasting impression.
High-Quality Audio Recording and Editing Software
The foundation of any great song is its sound quality. To make your music stand out on YouTube, invest in top-tier audio recording and editing tools. Software like Pro Tools, Logic Pro X, or FL Studio is widely used in the industry for producing professional-grade tracks. If you’re looking for free alternatives, Audacity and GarageBand are excellent choices for beginners. These tools allow you to polish your music, remove unwanted noise, and master your sound, ensuring it resonates with listeners.
For editing vocals, auto-tuning, or layering effects, consider specialized plugins like iZotope Nectar or Waves Vocal Rider. A well-mixed and mastered track enhances your credibility and keeps viewers engaged. High-quality audio is non-negotiable if you want to release your song on YouTube easily and stand out from the competition.
Video Editing Software for Eye-Catching Visuals
A visually appealing video is essential to capture attention on YouTube. Video editing software helps you craft engaging visuals, whether you’re creating a full-fledged music video, a lyric video, or a simple static image with your song playing in the background.
Adobe Premiere Pro is a top choice for professionals, offering extensive editing tools to enhance video quality. For those on a budget, tools like DaVinci Resolve or iMovie provide excellent functionality for free. Canva’s video editor is another beginner-friendly option, especially for creating lyric videos or promotional snippets.
To add special effects or animation, After Effects and Blender are fantastic tools. They help make your content visually dynamic, encouraging viewers to stay longer on your video. These tools are instrumental in ensuring that your music video not only gets views but also leaves a lasting impression.
YouTube Optimization Tools
Creating a video is only part of the process; ensuring it reaches your target audience is equally important. YouTube optimization tools like TubeBuddy and VidIQ are essential for maximizing visibility. These platforms provide insights into trending keywords, optimal tags, and ideal video lengths.
For your music release, use these tools to find relevant keywords such as “music video,” “official song release,” or release your song on YouTube easily. Optimize your video title, description, and tags to improve its discoverability. Additionally, these tools offer suggestions for crafting engaging thumbnails that draw viewers in. A well-optimized video has a higher chance of appearing in YouTube search results and recommendations.
Platforms for Creating Custom Thumbnails
A compelling thumbnail is often the first thing viewers notice about your video. Tools like Canva, Snappa, and Adobe Spark allow you to design custom thumbnails with ease. These platforms provide templates specifically designed for YouTube, enabling you to create professional-looking thumbnails even if you have no prior design experience.
Use bold colors, clear text, and high-quality images that reflect your song’s theme. Adding your photo or a recognizable logo can also strengthen your branding. With a strong thumbnail, you increase your chances of attracting clicks, ensuring that your effort to release your song on YouTube easily pays off.
Social Media and Marketing Tools
Promoting your song effectively is key to driving traffic to your YouTube channel. Social media scheduling tools like Buffer, Hootsuite, and Later help you plan and post promotional content across platforms like Instagram, Twitter, and Facebook. Sharing snippets of your song, behind-the-scenes footage, or teasers can build excitement and anticipation for your release.
Email marketing platforms such as Mailchimp or ConvertKit are also valuable. They allow you to send personalized messages to your fans, letting them know about your new release and encouraging them to check it out. Social media ads on platforms like Facebook or Instagram can further amplify your reach, targeting specific demographics interested in your music genre.
Analytics Tools for Measuring Success
Once your video is live, tracking its performance is crucial. YouTube Analytics provides detailed insights into views, watch time, and audience demographics. Complement this with third-party tools like Social Blade or Google Analytics for a deeper understanding of your audience and traffic sources.
By analyzing this data, you can identify what works and refine your strategy for future releases. Monitoring metrics like viewer retention and click-through rates helps you fine-tune your content, ensuring each release outperforms the last.
Conclusion
Releasing your song on YouTube doesn’t have to be overwhelming. By using tools like professional audio and video editing software, optimization platforms, and marketing resources, you can streamline the process and increase your chances of success. These tools not only simplify the technical aspects but also help you connect with your audience more effectively.
Start exploring these resources today, and take the next step to release your song on YouTube easily. With the right tools and strategy, your music can reach a global audience and make a lasting impact.
Related Articles:
For further reading, explore these related articles:
Release your song on YouTube without a distributor
Release your song on YouTube in 2025
Release your song on YouTube and earn money
Release your song on YouTube as an independent artist
For additional resources on music marketing and distribution, visit DMT RECORDS PRIVATE LIMITED.
1 note
·
View note
Text
Best Vlog Editing Software for 2025: Top Tools for Professional Video Creation
The choice of the best vlog editing software determines the quality of your videos and whether they are exceptional. Since there are numerous choices, choosing the right tool that suits your needs can be quite overwhelming. From a beginner looking for something simple to a professional who requires more advanced features, here’s a breakdown of the top vlog editing software in 2025.

1. Final Cut Pro
Key Features:
Color grading tools
Multi-camera editing
HDR and 360-degree video
Smooth Integration with macOS
Pros:
It is professional grade for the editing of high quality
Rendering very fast since optimized for Mac performance
Magnetic Timeline makes the editing process quite intuitive
Cons:
Expensive compared to other tools
Available only on Mac OS, reducing compatibility.
Best for: Advanced users or professional vloggers who need powerful, feature-rich software.
Final Cut Pro is still one of the top picks for creators who demand their ideal picture as they produce video content. This software is suitable for vloggers who require high-quality output and efficient editorial tools with its high-end capabilities.
2. iMovie
Key Features:
Drag-and-drop interface
Pre-designed templates and themes
Preinstalled sound effects and music
Basic color correction and video trim features
Pros:
Free to use for users of macOS and iOS
For newbies, perfect
The interface is pretty simple and user-friendly
Cons:
Less advanced features
Doesn’t support as many file formats as other software
Best for: Novice and occasional vloggers looking to begin with little fuss.
iMovie is best for the novice or vlogger that is simply interested in making quick simple videos. The software offers a friendly user interface, ease of use, and minimal distraction for content-creation over mastery of the application.
3. Adobe Premiere Pro
Key Features:
Multitrack video editing
High advanced color grading and audio control
Shared access with other Adobe Creative Cloud apps (After Effects, Photoshop, etc.)
Works seamlessly with many file formats and devices
Pros:
Industry-standard tool used by professionals
Constant updates and new features
All the effects, transitions, and plugins available
Cons:
Steep learning curve for beginners
Subscription-based pricing model; can get pretty pricey
Best for: Vloggers who need advance features and editing flexibility.
Adobe Premiere Pro is always the best tool for professionals and vloggers, as it comes with advanced tools for editing with maximum creativity and good video production quality.
4. DaVinci Resolve
Key Features:
Color Correction and Grading Tools: Professional-grade
Professional Audio Postproduction Features
Multi User Collaboration
Free Version
Pros:
High-quality grading tools to level with top-of-the-line studios
Free Version: A range of features can be found for free
Details-rich color correction as well as color finishing
Cons:
Has high system requirements; may demand powerful hardware to run smoothly
Steep learning curve for novices
Best for: Vloggers looking for visuals quality and color grading.
DaVinci Resolve is a professional-grade software that’s infamous for powerful color grading. The ideal application for vloggers who want to raise the bar on their visual appeal with delicate and advanced color correction features.
5. Adobe Premiere Rush
Key Features:
It has a simple, easy-to-use interface.
Motion graphic templates and predetermined transitions are available.
Cloud syncing is possible across PC, Mac, iOS, and Android devices.
Additional video trimming, color correction, and audio editing tools
Pros:
Easy edits and simple interface
Affordable, subscription-only
Ideal for mobile content creators
Cons:
Lacks some advanced features of Premiere Pro
Limited for complex video projects
Best for: Beginners and vloggers, who need something fast and very mobile-friendly.
Adobe Premiere Rush is for making quick edits while using mobile – a great feature for vloggers that need content quickly. However, it has less functionality in comparison to Adobe Premiere Pro; therefore, its usability is perfect for basic to mid-level editing activities.
6. Pinnacle Studio
Key Features:
Multi-track video editing
Motion tracking, 360-degree video editing
Tools for color correction and audio mixing
Video effects and transitions options
Pros:
Affordable for a one-time payment
Touts advanced feature without the burden of a subscription model
Suitable for use by semi-professionals.
Cons:
Slower performance with complex projects.
Lacks some advanced features of Premiere Pro or Final Cut Pro.
Best for: Semi-professional vloggers and hobbyists wanting advanced features but not the hefty price tag.
Pinnacle Studio is a software that balances advanced professional features at an affordable cost. It would be ideal for vloggers who want features beyond basic tools but do not require the scope of professional apps like Adobe Premiere Pro.
7. Clipchamp
Key Features:
Cloud-based editor using drag-and-drop interface
Pre-made stock video clips, audio, and other effects
Intuitive timeline
Cloud-based for projects
Pros:
Has a free edition with core functionality
Accessible both on PC and Mac through any browser
Simple, fast editing, perfect for speed
Cons:
Lacks some advanced features and tools in the free version
This might be slow for larger, more complex projects.
Best for: Vloggers who need an easy, no-frills web-based editor.
Clipchamp is a great solution for creators seeking fast, web-based editing that doesn’t involve complicated software. It’s best suited for fast videos or quick social media content creation with minimal set-up.
Conclusion
The right software you’ll use will depend on your needs and experience. You can either go for simple choices such as iMovie, which is best for beginners, or Clipchamp or be an experienced one ready to use advanced features and be in line with Final Cut Pro or Adobe Premiere, among many others. There’s always the right tool awaiting you for your journey of vlogging in 2025. Raybit Technologies offers the most innovative software you need for your vlog editing solutions to ensure professionalism every time.
0 notes
Video
Real Paper Transitions Motion Design from Antony Parker on Vimeo.
✔️ Download here: templatesbravo.com/vh/item/real-paper-transitions/54753650
Elevate your video editing with our Realistic Paper Transitions for DaVinci Resolve that simulate the look of crumpled paper and stop motion effect. Perfect for giving your videos a handcrafted, textured feel that stands out.
Animation Options: Choose between folding or unfolding animations and randomize movements with a few clicks. Customization: Choose a light or dark paper texture, or change the color to your liking. User Friendly: Follow our step-by-step video tutorial and get started in no time. Seamless Compatibility: Works with both free and studio versions of DaVinci Resolve 18 (or newer) Resolution Flexibility: Supports any resolution, including vertical formats for TikTok and Instagram.
0 notes