#Hardware and software installation services
Explore tagged Tumblr posts
Visit Tumblr Blog
Explore Tumblr blogs with no restrictions, modern design and the best experience.
Last Seen Tumblr Blogs


Fun Fact
Tumblr’s reach among the 26-to-35-year-olds in the US is 11%.
Text
Yes. For people saying this is just regarding Nintendo Online Accounts, here is what is written under that agreement:
Without limitation, you agree that you may not (a) publish, copy, modify, reverse engineer, lease, rent, decompile, disassemble, distribute, offer for sale, or create derivative works of any portion of the Nintendo Account Services; (b) bypass, modify, decrypt, defeat, tamper with, or otherwise circumvent any of the functions or protections of the Nintendo Account Services, including through the use of any hardware or software that would cause the Nintendo Account Services to operate other than in accordance with its documentation and intended use; (c) obtain, install or use any unauthorized copies of Nintendo Account Services; or (d) exploit the Nintendo Account Services in any manner other than to use them in accordance with the applicable documentation and intended use, in each case, without Nintendo’s written consent or express authorization, or unless otherwise expressly permitted by applicable law. You acknowledge that if you fail to comply with the foregoing restrictions Nintendo may render the Nintendo Account Services and/or the applicable Nintendo device permanently unusable in whole or in part.
If you don’t use the device and services in the way they want you to, they are saying they can brick your console.
Is this likely to happen? Probably not! But they’re saying they can.
I get online accounts are a shared space and should have terms and conditions. I get this has been the standard for a while. But I just think it’s wild that they want to throw a blanket “we can brick your console” into their terms regardless of where it is in their agreements. Anyone else saying xyz industry already does this: yes. They should also not do that.
Ban people from the online account for modding. Okay. But I don’t think these people should be saying if they catch you doing something they don’t want they can render your account and your device permanently unusable should they feel like it.
it should be illegal for a company to be able to brick any console that you legally own I am so serious about this
10K notes
·
View notes
Text
fucking client emailed in requesting a license last night at 10, called today before nine asking for the license and if I could hurry this along because it was urgent; being the person that I am I went to go find some more information and discovered that the customer wants to do an in-place upgrade on a nine-year-old free license to a recent server license which is.
A) not possible with the service pack they have installed B) probably not compatible with the two kinds of software they have talking to the database C) probably not compatible with their actual server, which blew up spectacularly in January.
(all of which is to say nothing about the wide variety of possible ways to purchase and install the license, but probably standard is what they want even if they're technically too big for it)
I talk to my team, most of whom do not have much experience with upgrades/migrations for this software and we all agree that more research into their environment is needed, including possibly calls with their other software vendors and also possibly maybe replacing their twelve year old server.
Call the client at 2pm and let him know that this project is going to be more rigorous than just ordering a license, let them know that this isn't being dropped or ignored, but we need more information and will be in contact when more of the team knows what's going on.
5:14 PM, my coworker messages me "hey, do we have a tenant for this client?"
I message my coworker: "fucking lol, this is about their license, isn't it?"
It is about their license. They have sent in an emergency after hours ticket describing the issue as urgent: they have purchased the license on their own from a consumer vendor unaware of the fact that they need admin access to a tenant to download the software.
I create a tenant for the client and document the information, then provide the tenant ID.
And then since it's urgent, it's an emergency, I begin gathering data and composing an email.
The license won't populate to the tenant for hours at least and probably not for a full day.
They didn't actually tell us what license they've got, but if they plan to use it with one flavor of software they've got they probably need a secondary license they were totally unaware of.
I have found no evidence whatsoever that this license is compatible with their other software.
I hop into an after hours meeting with one of our tier three consultants to get the exact version number of the software and confirm that there is not a straightforward upgrade path between the license they have and the license they want.
I send an email advising that if their developer wants to make an upgrade they MUST back up the database because we have emergency backups, not database backups, let them know in writing "per our conversation this afternoon, this is why we don't think this will work" and thank them cheerfully, letting them know to reach out if they have questions about licensing.
hit send at half past eight.
Combined after hours work on this "emergency" "critical" "urgent" ticket is now probably about half the hardware cost of a better server.
I get that emergencies happen, but buddy if I tell you "hey, I know you are in a rush with this but we have to take our time to do this correctly" and you ignore me and make me stay late to handle your "critical" ticket, you and I both are not going to have a good time.
2K notes
·
View notes
Text
SSTech Networking Solution : Best IT service provider company in India
We are best IT service provider and software development company with a focus on website, app, and software development. We provide a wide range of CUSTOM software development services.
We are providing both software and hardware services so contact us for all updates.

#IT service provider#Top IT services companies in India#IT software development company#Cloud computing#Computer cleaning#Computer Customization#Computer upgrades#Custom Computer Building#Software development#Web design#Hardware & software installation
1 note
·
View note
Text
How I ditched streaming services and learned to love Linux: A step-by-step guide to building your very own personal media streaming server (V2.0: REVISED AND EXPANDED EDITION)
This is a revised, corrected and expanded version of my tutorial on setting up a personal media server that previously appeared on my old blog (donjuan-auxenfers). I expect that that post is still making the rounds (hopefully with my addendum on modifying group share permissions in Ubuntu to circumvent 0x8007003B "Unexpected Network Error" messages in Windows 10/11 when transferring files) but I have no way of checking. Anyway this new revised version of the tutorial corrects one or two small errors I discovered when rereading what I wrote, adds links to all products mentioned and is just more polished generally. I also expanded it a bit, pointing more adventurous users toward programs such as Sonarr/Radarr/Lidarr and Overseerr which can be used for automating user requests and media collection.
So then, what is this tutorial? This is a tutorial on how to build and set up your own personal media server using Ubuntu as an operating system and Plex (or Jellyfin) to not only manage your media, but to also stream that media to your devices both at home and abroad anywhere in the world where you have an internet connection. Its intent is to show you how building a personal media server and stuffing it full of films, TV, and music that you acquired through indiscriminate and voracious media piracy various legal methods will free you to completely ditch paid streaming services. No more will you have to pay for Disney+, Netflix, HBOMAX, Hulu, Amazon Prime, Peacock, CBS All Access, Paramount+, Crave or any other streaming service that is not named Criterion Channel. Instead whenever you want to watch your favourite films and television shows, you’ll have your own personal service that only features things that you want to see, with files that you have control over. And for music fans out there, both Jellyfin and Plex support music streaming, meaning you can even ditch music streaming services. Goodbye Spotify, Youtube Music, Tidal and Apple Music, welcome back unreasonably large MP3 (or FLAC) collections.
On the hardware front, I’m going to offer a few options catered towards different budgets and media library sizes. The cost of getting a media server up and running using this guide will cost you anywhere from $450 CAD/$325 USD at the low end to $1500 CAD/$1100 USD at the high end (it could go higher). My server was priced closer to the higher figure, but I went and got a lot more storage than most people need. If that seems like a little much, consider for a moment, do you have a roommate, a close friend, or a family member who would be willing to chip in a few bucks towards your little project provided they get access? Well that's how I funded my server. It might also be worth thinking about the cost over time, i.e. how much you spend yearly on subscriptions vs. a one time cost of setting up a server. Additionally there's just the joy of being able to scream "fuck you" at all those show cancelling, library deleting, hedge fund vampire CEOs who run the studios through denying them your money. Drive a stake through David Zaslav's heart.
On the software side I will walk you step-by-step through installing Ubuntu as your server's operating system, configuring your storage as a RAIDz array with ZFS, sharing your zpool to Windows with Samba, running a remote connection between your server and your Windows PC, and then a little about started with Plex/Jellyfin. Every terminal command you will need to input will be provided, and I even share a custom #bash script that will make used vs. available drive space on your server display correctly in Windows.
If you have a different preferred flavour of Linux (Arch, Manjaro, Redhat, Fedora, Mint, OpenSUSE, CentOS, Slackware etc. et. al.) and are aching to tell me off for being basic and using Ubuntu, this tutorial is not for you. The sort of person with a preferred Linux distro is the sort of person who can do this sort of thing in their sleep. Also I don't care. This tutorial is intended for the average home computer user. This is also why we’re not using a more exotic home server solution like running everything through Docker Containers and managing it through a dashboard like Homarr or Heimdall. While such solutions are fantastic and can be very easy to maintain once you have it all set up, wrapping your brain around Docker is a whole thing in and of itself. If you do follow this tutorial and had fun putting everything together, then I would encourage you to return in a year’s time, do your research and set up everything with Docker Containers.
Lastly, this is a tutorial aimed at Windows users. Although I was a daily user of OS X for many years (roughly 2008-2023) and I've dabbled quite a bit with various Linux distributions (mostly Ubuntu and Manjaro), my primary OS these days is Windows 11. Many things in this tutorial will still be applicable to Mac users, but others (e.g. setting up shares) you will have to look up for yourself. I doubt it would be difficult to do so.
Nothing in this tutorial will require feats of computing expertise. All you will need is a basic computer literacy (i.e. an understanding of what a filesystem and directory are, and a degree of comfort in the settings menu) and a willingness to learn a thing or two. While this guide may look overwhelming at first glance, it is only because I want to be as thorough as possible. I want you to understand exactly what it is you're doing, I don't want you to just blindly follow steps. If you half-way know what you’re doing, you will be much better prepared if you ever need to troubleshoot.
Honestly, once you have all the hardware ready it shouldn't take more than an afternoon or two to get everything up and running.
(This tutorial is just shy of seven thousand words long so the rest is under the cut.)
Step One: Choosing Your Hardware
Linux is a light weight operating system, depending on the distribution there's close to no bloat. There are recent distributions available at this very moment that will run perfectly fine on a fourteen year old i3 with 4GB of RAM. Moreover, running Plex or Jellyfin isn’t resource intensive in 90% of use cases. All this is to say, we don’t require an expensive or powerful computer. This means that there are several options available: 1) use an old computer you already have sitting around but aren't using 2) buy a used workstation from eBay, or what I believe to be the best option, 3) order an N100 Mini-PC from AliExpress or Amazon.
Note: If you already have an old PC sitting around that you’ve decided to use, fantastic, move on to the next step.
When weighing your options, keep a few things in mind: the number of people you expect to be streaming simultaneously at any one time, the resolution and bitrate of your media library (4k video takes a lot more processing power than 1080p) and most importantly, how many of those clients are going to be transcoding at any one time. Transcoding is what happens when the playback device does not natively support direct playback of the source file. This can happen for a number of reasons, such as the playback device's native resolution being lower than the file's internal resolution, or because the source file was encoded in a video codec unsupported by the playback device.
Ideally we want any transcoding to be performed by hardware. This means we should be looking for a computer with an Intel processor with Quick Sync. Quick Sync is a dedicated core on the CPU die designed specifically for video encoding and decoding. This specialized hardware makes for highly efficient transcoding both in terms of processing overhead and power draw. Without these Quick Sync cores, transcoding must be brute forced through software. This takes up much more of a CPU’s processing power and requires much more energy. But not all Quick Sync cores are created equal and you need to keep this in mind if you've decided either to use an old computer or to shop for a used workstation on eBay
Any Intel processor from second generation Core (Sandy Bridge circa 2011) onward has Quick Sync cores. It's not until 6th gen (Skylake), however, that the cores support the H.265 HEVC codec. Intel’s 10th gen (Comet Lake) processors introduce support for 10bit HEVC and HDR tone mapping. And the recent 12th gen (Alder Lake) processors brought with them hardware AV1 decoding. As an example, while an 8th gen (Kaby Lake) i5-8500 will be able to hardware transcode a H.265 encoded file, it will fall back to software transcoding if given a 10bit H.265 file. If you’ve decided to use that old PC or to look on eBay for an old Dell Optiplex keep this in mind.
Note 1: The price of old workstations varies wildly and fluctuates frequently. If you get lucky and go shopping shortly after a workplace has liquidated a large number of their workstations you can find deals for as low as $100 on a barebones system, but generally an i5-8500 workstation with 16gb RAM will cost you somewhere in the area of $260 CAD/$200 USD.
Note 2: The AMD equivalent to Quick Sync is called Video Core Next, and while it's fine, it's not as efficient and not as mature a technology. It was only introduced with the first generation Ryzen CPUs and it only got decent with their newest CPUs, we want something cheap.
Alternatively you could forgo having to keep track of what generation of CPU is equipped with Quick Sync cores that feature support for which codecs, and just buy an N100 mini-PC. For around the same price or less of a used workstation you can pick up a mini-PC with an Intel N100 processor. The N100 is a four-core processor based on the 12th gen Alder Lake architecture and comes equipped with the latest revision of the Quick Sync cores. These little processors offer astounding hardware transcoding capabilities for their size and power draw. Otherwise they perform equivalent to an i5-6500, which isn't a terrible CPU. A friend of mine uses an N100 machine as a dedicated retro emulation gaming system and it does everything up to 6th generation consoles just fine. The N100 is also a remarkably efficient chip, it sips power. In fact, the difference between running one of these and an old workstation could work out to hundreds of dollars a year in energy bills depending on where you live.
You can find these Mini-PCs all over Amazon or for a little cheaper on AliExpress. They range in price from $170 CAD/$125 USD for a no name N100 with 8GB RAM to $280 CAD/$200 USD for a Beelink S12 Pro with 16GB RAM. The brand doesn't really matter, they're all coming from the same three factories in Shenzen, go for whichever one fits your budget or has features you want. 8GB RAM should be enough, Linux is lightweight and Plex only calls for 2GB RAM. 16GB RAM might result in a slightly snappier experience, especially with ZFS. A 256GB SSD is more than enough for what we need as a boot drive, but going for a bigger drive might allow you to get away with things like creating preview thumbnails for Plex, but it’s up to you and your budget.
The Mini-PC I wound up buying was a Firebat AK2 Plus with 8GB RAM and a 256GB SSD. It looks like this:

Note: Be forewarned that if you decide to order a Mini-PC from AliExpress, note the type of power adapter it ships with. The mini-PC I bought came with an EU power adapter and I had to supply my own North American power supply. Thankfully this is a minor issue as barrel plug 30W/12V/2.5A power adapters are easy to find and can be had for $10.
Step Two: Choosing Your Storage
Storage is the most important part of our build. It is also the most expensive. Thankfully it’s also the most easily upgrade-able down the line.
For people with a smaller media collection (4TB to 8TB), a more limited budget, or who will only ever have two simultaneous streams running, I would say that the most economical course of action would be to buy a USB 3.0 8TB external HDD. Something like this one from Western Digital or this one from Seagate. One of these external drives will cost you in the area of $200 CAD/$140 USD. Down the line you could add a second external drive or replace it with a multi-drive RAIDz set up such as detailed below.
If a single external drive the path for you, move on to step three.
For people with larger media libraries (12TB+), who prefer media in 4k, or care who about data redundancy, the answer is a RAID array featuring multiple HDDs in an enclosure.
Note: If you are using an old PC or used workstatiom as your server and have the room for at least three 3.5" drives, and as many open SATA ports on your mother board you won't need an enclosure, just install the drives into the case. If your old computer is a laptop or doesn’t have room for more internal drives, then I would suggest an enclosure.
The minimum number of drives needed to run a RAIDz array is three, and seeing as RAIDz is what we will be using, you should be looking for an enclosure with three to five bays. I think that four disks makes for a good compromise for a home server. Regardless of whether you go for a three, four, or five bay enclosure, do be aware that in a RAIDz array the space equivalent of one of the drives will be dedicated to parity at a ratio expressed by the equation 1 − 1/n i.e. in a four bay enclosure equipped with four 12TB drives, if we configured our drives in a RAIDz1 array we would be left with a total of 36TB of usable space (48TB raw size). The reason for why we might sacrifice storage space in such a manner will be explained in the next section.
A four bay enclosure will cost somewhere in the area of $200 CDN/$140 USD. You don't need anything fancy, we don't need anything with hardware RAID controls (RAIDz is done entirely in software) or even USB-C. An enclosure with USB 3.0 will perform perfectly fine. Don’t worry too much about USB speed bottlenecks. A mechanical HDD will be limited by the speed of its mechanism long before before it will be limited by the speed of a USB connection. I've seen decent looking enclosures from TerraMaster, Yottamaster, Mediasonic and Sabrent.
When it comes to selecting the drives, as of this writing, the best value (dollar per gigabyte) are those in the range of 12TB to 20TB. I settled on 12TB drives myself. If 12TB to 20TB drives are out of your budget, go with what you can afford, or look into refurbished drives. I'm not sold on the idea of refurbished drives but many people swear by them.
When shopping for harddrives, search for drives designed specifically for NAS use. Drives designed for NAS use typically have better vibration dampening and are designed to be active 24/7. They will also often make use of CMR (conventional magnetic recording) as opposed to SMR (shingled magnetic recording). This nets them a sizable read/write performance bump over typical desktop drives. Seagate Ironwolf and Toshiba NAS are both well regarded brands when it comes to NAS drives. I would avoid Western Digital Red drives at this time. WD Reds were a go to recommendation up until earlier this year when it was revealed that they feature firmware that will throw up false SMART warnings telling you to replace the drive at the three year mark quite often when there is nothing at all wrong with that drive. It will likely even be good for another six, seven, or more years.

Step Three: Installing Linux
For this step you will need a USB thumbdrive of at least 6GB in capacity, an .ISO of Ubuntu, and a way to make that thumbdrive bootable media.
First download a copy of Ubuntu desktop (for best performance we could download the Server release, but for new Linux users I would recommend against the server release. The server release is strictly command line interface only, and having a GUI is very helpful for most people. Not many people are wholly comfortable doing everything through the command line, I'm certainly not one of them, and I grew up with DOS 6.0. 22.04.3 Jammy Jellyfish is the current Long Term Service release, this is the one to get.
Download the .ISO and then download and install balenaEtcher on your Windows PC. BalenaEtcher is an easy to use program for creating bootable media, you simply insert your thumbdrive, select the .ISO you just downloaded, and it will create a bootable installation media for you.
Once you've made a bootable media and you've got your Mini-PC (or you old PC/used workstation) in front of you, hook it directly into your router with an ethernet cable, and then plug in the HDD enclosure, a monitor, a mouse and a keyboard. Now turn that sucker on and hit whatever key gets you into the BIOS (typically ESC, DEL or F2). If you’re using a Mini-PC check to make sure that the P1 and P2 power limits are set correctly, my N100's P1 limit was set at 10W, a full 20W under the chip's power limit. Also make sure that the RAM is running at the advertised speed. My Mini-PC’s RAM was set at 2333Mhz out of the box when it should have been 3200Mhz. Once you’ve done that, key over to the boot order and place the USB drive first in the boot order. Then save the BIOS settings and restart.
After you restart you’ll be greeted by Ubuntu's installation screen. Installing Ubuntu is really straight forward, select the "minimal" installation option, as we won't need anything on this computer except for a browser (Ubuntu comes preinstalled with Firefox) and Plex Media Server/Jellyfin Media Server. Also remember to delete and reformat that Windows partition! We don't need it.
Step Four: Installing ZFS and Setting Up the RAIDz Array
Note: If you opted for just a single external HDD skip this step and move onto setting up a Samba share.
Once Ubuntu is installed it's time to configure our storage by installing ZFS to build our RAIDz array. ZFS is a "next-gen" file system that is both massively flexible and massively complex. It's capable of snapshot backup, self healing error correction, ZFS pools can be configured with drives operating in a supplemental manner alongside the storage vdev (e.g. fast cache, dedicated secondary intent log, hot swap spares etc.). It's also a file system very amenable to fine tuning. Block and sector size are adjustable to use case and you're afforded the option of different methods of inline compression. If you'd like a very detailed overview and explanation of its various features and tips on tuning a ZFS array check out these articles from Ars Technica. For now we're going to ignore all these features and keep it simple, we're going to pull our drives together into a single vdev running in RAIDz which will be the entirety of our zpool, no fancy cache drive or SLOG.
Open up the terminal and type the following commands:
sudo apt update
then
sudo apt install zfsutils-linux
This will install the ZFS utility. Verify that it's installed with the following command:
zfs --version
Now, it's time to check that the HDDs we have in the enclosure are healthy, running, and recognized. We also want to find out their device IDs and take note of them:
sudo fdisk -1
Note: You might be wondering why some of these commands require "sudo" in front of them while others don't. "Sudo" is short for "super user do”. When and where "sudo" is used has to do with the way permissions are set up in Linux. Only the "root" user has the access level to perform certain tasks in Linux. As a matter of security and safety regular user accounts are kept separate from the "root" user. It's not advised (or even possible) to boot into Linux as "root" with most modern distributions. Instead by using "sudo" our regular user account is temporarily given the power to do otherwise forbidden things. Don't worry about it too much at this stage, but if you want to know more check out this introduction.
If everything is working you should get a list of the various drives detected along with their device IDs which will look like this: /dev/sdc. You can also check the device IDs of the drives by opening the disk utility app. Jot these IDs down as we'll need them for our next step, creating our RAIDz array.
RAIDz is similar to RAID-5 in that instead of striping your data over multiple disks, exchanging redundancy for speed and available space (RAID-0), or mirroring your data writing by two copies of every piece (RAID-1), it instead writes parity blocks across the disks in addition to striping, this provides a balance of speed, redundancy and available space. If a single drive fails, the parity blocks on the working drives can be used to reconstruct the entire array as soon as a replacement drive is added.
Additionally, RAIDz improves over some of the common RAID-5 flaws. It's more resilient and capable of self healing, as it is capable of automatically checking for errors against a checksum. It's more forgiving in this way, and it's likely that you'll be able to detect when a drive is dying well before it fails. A RAIDz array can survive the loss of any one drive.
Note: While RAIDz is indeed resilient, if a second drive fails during the rebuild, you're fucked. Always keep backups of things you can't afford to lose. This tutorial, however, is not about proper data safety.
To create the pool, use the following command:
sudo zpool create "zpoolnamehere" raidz "device IDs of drives we're putting in the pool"
For example, let's creatively name our zpool "mypool". This poil will consist of four drives which have the device IDs: sdb, sdc, sdd, and sde. The resulting command will look like this:
sudo zpool create mypool raidz /dev/sdb /dev/sdc /dev/sdd /dev/sde
If as an example you bought five HDDs and decided you wanted more redundancy dedicating two drive to this purpose, we would modify the command to "raidz2" and the command would look something like the following:
sudo zpool create mypool raidz2 /dev/sdb /dev/sdc /dev/sdd /dev/sde /dev/sdf
An array configured like this is known as RAIDz2 and is able to survive two disk failures.
Once the zpool has been created, we can check its status with the command:
zpool status
Or more concisely with:
zpool list
The nice thing about ZFS as a file system is that a pool is ready to go immediately after creation. If we were to set up a traditional RAID-5 array using mbam, we'd have to sit through a potentially hours long process of reformatting and partitioning the drives. Instead we're ready to go right out the gates.
The zpool should be automatically mounted to the filesystem after creation, check on that with the following:
df -hT | grep zfs
Note: If your computer ever loses power suddenly, say in event of a power outage, you may have to re-import your pool. In most cases, ZFS will automatically import and mount your pool, but if it doesn’t and you can't see your array, simply open the terminal and type sudo zpool import -a.
By default a zpool is mounted at /"zpoolname". The pool should be under our ownership but let's make sure with the following command:
sudo chown -R "yourlinuxusername" /"zpoolname"
Note: Changing file and folder ownership with "chown" and file and folder permissions with "chmod" are essential commands for much of the admin work in Linux, but we won't be dealing with them extensively in this guide. If you'd like a deeper tutorial and explanation you can check out these two guides: chown and chmod.

You can access the zpool file system through the GUI by opening the file manager (the Ubuntu default file manager is called Nautilus) and clicking on "Other Locations" on the sidebar, then entering the Ubuntu file system and looking for a folder with your pool's name. Bookmark the folder on the sidebar for easy access.

Your storage pool is now ready to go. Assuming that we already have some files on our Windows PC we want to copy to over, we're going to need to install and configure Samba to make the pool accessible in Windows.
Step Five: Setting Up Samba/Sharing
Samba is what's going to let us share the zpool with Windows and allow us to write to it from our Windows machine. First let's install Samba with the following commands:
sudo apt-get update
then
sudo apt-get install samba
Next create a password for Samba.
sudo smbpswd -a "yourlinuxusername"
It will then prompt you to create a password. Just reuse your Ubuntu user password for simplicity's sake.
Note: if you're using just a single external drive replace the zpool location in the following commands with wherever it is your external drive is mounted, for more information see this guide on mounting an external drive in Ubuntu.
After you've created a password we're going to create a shareable folder in our pool with this command
mkdir /"zpoolname"/"foldername"
Now we're going to open the smb.conf file and make that folder shareable. Enter the following command.
sudo nano /etc/samba/smb.conf
This will open the .conf file in nano, the terminal text editor program. Now at the end of smb.conf add the following entry:
["foldername"]
path = /"zpoolname"/"foldername"
available = yes
valid users = "yourlinuxusername"
read only = no
writable = yes
browseable = yes
guest ok = no
Ensure that there are no line breaks between the lines and that there's a space on both sides of the equals sign. Our next step is to allow Samba traffic through the firewall:
sudo ufw allow samba
Finally restart the Samba service:
sudo systemctl restart smbd
At this point we'll be able to access to the pool, browse its contents, and read and write to it from Windows. But there's one more thing left to do, Windows doesn't natively support the ZFS file systems and will read the used/available/total space in the pool incorrectly. Windows will read available space as total drive space, and all used space as null. This leads to Windows only displaying a dwindling amount of "available" space as the drives are filled. We can fix this! Functionally this doesn't actually matter, we can still write and read to and from the disk, it just makes it difficult to tell at a glance the proportion of used/available space, so this is an optional step but one I recommend (this step is also unnecessary if you're just using a single external drive). What we're going to do is write a little shell script in #bash. Open nano with the terminal with the command:
nano
Now insert the following code:
#!/bin/bash CUR_PATH=`pwd` ZFS_CHECK_OUTPUT=$(zfs get type $CUR_PATH 2>&1 > /dev/null) > /dev/null if [[ $ZFS_CHECK_OUTPUT == *not\ a\ ZFS* ]] then IS_ZFS=false else IS_ZFS=true fi if [[ $IS_ZFS = false ]] then df $CUR_PATH | tail -1 | awk '{print $2" "$4}' else USED=$((`zfs get -o value -Hp used $CUR_PATH` / 1024)) > /dev/null AVAIL=$((`zfs get -o value -Hp available $CUR_PATH` / 1024)) > /dev/null TOTAL=$(($USED+$AVAIL)) > /dev/null echo $TOTAL $AVAIL fi
Save the script as "dfree.sh" to /home/"yourlinuxusername" then change the ownership of the file to make it executable with this command:
sudo chmod 774 dfree.sh
Now open smb.conf with sudo again:
sudo nano /etc/samba/smb.conf
Now add this entry to the top of the configuration file to direct Samba to use the results of our script when Windows asks for a reading on the pool's used/available/total drive space:
[global]
dfree command = /home/"yourlinuxusername"/dfree.sh
Save the changes to smb.conf and then restart Samba again with the terminal:
sudo systemctl restart smbd
Now there’s one more thing we need to do to fully set up the Samba share, and that’s to modify a hidden group permission. In the terminal window type the following command:
usermod -a -G sambashare “yourlinuxusername”
Then restart samba again:
sudo systemctl restart smbd
If we don’t do this last step, everything will appear to work fine, and you will even be able to see and map the drive from Windows and even begin transferring files, but you'd soon run into a lot of frustration. As every ten minutes or so a file would fail to transfer and you would get a window announcing “0x8007003B Unexpected Network Error”. This window would require your manual input to continue the transfer with the file next in the queue. And at the end it would reattempt to transfer whichever files failed the first time around. 99% of the time they’ll go through that second try, but this is still all a major pain in the ass. Especially if you’ve got a lot of data to transfer or you want to step away from the computer for a while.
It turns out samba can act a little weirdly with the higher read/write speeds of RAIDz arrays and transfers from Windows, and will intermittently crash and restart itself if this group option isn’t changed. Inputting the above command will prevent you from ever seeing that window.
The last thing we're going to do before switching over to our Windows PC is grab the IP address of our Linux machine. Enter the following command:
hostname -I
This will spit out this computer's IP address on the local network (it will look something like 192.168.0.x), write it down. It might be a good idea once you're done here to go into your router settings and reserving that IP for your Linux system in the DHCP settings. Check the manual for your specific model router on how to access its settings, typically it can be accessed by opening a browser and typing http:\\192.168.0.1 in the address bar, but your router may be different.
Okay we’re done with our Linux computer for now. Get on over to your Windows PC, open File Explorer, right click on Network and click "Map network drive". Select Z: as the drive letter (you don't want to map the network drive to a letter you could conceivably be using for other purposes) and enter the IP of your Linux machine and location of the share like so: \\"LINUXCOMPUTERLOCALIPADDRESSGOESHERE"\"zpoolnamegoeshere"\. Windows will then ask you for your username and password, enter the ones you set earlier in Samba and you're good. If you've done everything right it should look something like this:

You can now start moving media over from Windows to the share folder. It's a good idea to have a hard line running to all machines. Moving files over Wi-Fi is going to be tortuously slow, the only thing that’s going to make the transfer time tolerable (hours instead of days) is a solid wired connection between both machines and your router.
Step Six: Setting Up Remote Desktop Access to Your Server
After the server is up and going, you’ll want to be able to access it remotely from Windows. Barring serious maintenance/updates, this is how you'll access it most of the time. On your Linux system open the terminal and enter:
sudo apt install xrdp
Then:
sudo systemctl enable xrdp
Once it's finished installing, open “Settings” on the sidebar and turn off "automatic login" in the User category. Then log out of your account. Attempting to remotely connect to your Linux computer while you’re logged in will result in a black screen!
Now get back on your Windows PC, open search and look for "RDP". A program called "Remote Desktop Connection" should pop up, open this program as an administrator by right-clicking and selecting “run as an administrator”. You’ll be greeted with a window. In the field marked “Computer” type in the IP address of your Linux computer. Press connect and you'll be greeted with a new window and prompt asking for your username and password. Enter your Ubuntu username and password here.

If everything went right, you’ll be logged into your Linux computer. If the performance is sluggish, adjust the display options. Lowering the resolution and colour depth do a lot to make the interface feel snappier.

Remote access is how we're going to be using our Linux system from now, barring edge cases like needing to get into the BIOS or upgrading to a new version of Ubuntu. Everything else from performing maintenance like a monthly zpool scrub to checking zpool status and updating software can all be done remotely.

This is how my server lives its life now, happily humming and chirping away on the floor next to the couch in a corner of the living room.
Step Seven: Plex Media Server/Jellyfin
Okay we’ve got all the ground work finished and our server is almost up and running. We’ve got Ubuntu up and running, our storage array is primed, we’ve set up remote connections and sharing, and maybe we’ve moved over some of favourite movies and TV shows.
Now we need to decide on the media server software to use which will stream our media to us and organize our library. For most people I’d recommend Plex. It just works 99% of the time. That said, Jellyfin has a lot to recommend it by too, even if it is rougher around the edges. Some people run both simultaneously, it’s not that big of an extra strain. I do recommend doing a little bit of your own research into the features each platform offers, but as a quick run down, consider some of the following points:
Plex is closed source and is funded through PlexPass purchases while Jellyfin is open source and entirely user driven. This means a number of things: for one, Plex requires you to purchase a “PlexPass” (purchased as a one time lifetime fee $159.99 CDN/$120 USD or paid for on a monthly or yearly subscription basis) in order to access to certain features, like hardware transcoding (and we want hardware transcoding) or automated intro/credits detection and skipping, Jellyfin offers some of these features for free through plugins. Plex supports a lot more devices than Jellyfin and updates more frequently. That said, Jellyfin's Android and iOS apps are completely free, while the Plex Android and iOS apps must be activated for a one time cost of $6 CDN/$5 USD. But that $6 fee gets you a mobile app that is much more functional and features a unified UI across platforms, the Plex mobile apps are simply a more polished experience. The Jellyfin apps are a bit of a mess and the iOS and Android versions are very different from each other.
Jellyfin’s actual media player is more fully featured than Plex's, but on the other hand Jellyfin's UI, library customization and automatic media tagging really pale in comparison to Plex. Streaming your music library is free through both Jellyfin and Plex, but Plex offers the PlexAmp app for dedicated music streaming which boasts a number of fantastic features, unfortunately some of those fantastic features require a PlexPass. If your internet is down, Jellyfin can still do local streaming, while Plex can fail to play files unless you've got it set up a certain way. Jellyfin has a slew of neat niche features like support for Comic Book libraries with the .cbz/.cbt file types, but then Plex offers some free ad-supported TV and films, they even have a free channel that plays nothing but Classic Doctor Who.
Ultimately it's up to you, I settled on Plex because although some features are pay-walled, it just works. It's more reliable and easier to use, and a one-time fee is much easier to swallow than a subscription. I had a pretty easy time getting my boomer parents and tech illiterate brother introduced to and using Plex and I don't know if I would've had as easy a time doing that with Jellyfin. I do also need to mention that Jellyfin does take a little extra bit of tinkering to get going in Ubuntu, you’ll have to set up process permissions, so if you're more tolerant to tinkering, Jellyfin might be up your alley and I’ll trust that you can follow their installation and configuration guide. For everyone else, I recommend Plex.
So pick your poison: Plex or Jellyfin.
Note: The easiest way to download and install either of these packages in Ubuntu is through Snap Store.
After you've installed one (or both), opening either app will launch a browser window into the browser version of the app allowing you to set all the options server side.
The process of adding creating media libraries is essentially the same in both Plex and Jellyfin. You create a separate libraries for Television, Movies, and Music and add the folders which contain the respective types of media to their respective libraries. The only difficult or time consuming aspect is ensuring that your files and folders follow the appropriate naming conventions:
Plex naming guide for Movies
Plex naming guide for Television
Jellyfin follows the same naming rules but I find their media scanner to be a lot less accurate and forgiving than Plex. Once you've selected the folders to be scanned the service will scan your files, tagging everything and adding metadata. Although I find do find Plex more accurate, it can still erroneously tag some things and you might have to manually clean up some tags in a large library. (When I initially created my library it tagged the 1963-1989 Doctor Who as some Korean soap opera and I needed to manually select the correct match after which everything was tagged normally.) It can also be a bit testy with anime (especially OVAs) be sure to check TVDB to ensure that you have your files and folders structured and named correctly. If something is not showing up at all, double check the name.
Once that's done, organizing and customizing your library is easy. You can set up collections, grouping items together to fit a theme or collect together all the entries in a franchise. You can make playlists, and add custom artwork to entries. It's fun setting up collections with posters to match, there are even several websites dedicated to help you do this like PosterDB. As an example, below are two collections in my library, one collecting all the entries in a franchise, the other follows a theme.

My Star Trek collection, featuring all eleven television series, and thirteen films.

My Best of the Worst collection, featuring sixty-nine films previously showcased on RedLetterMedia’s Best of the Worst. They’re all absolutely terrible and I love them.
As for settings, ensure you've got Remote Access going, it should work automatically and be sure to set your upload speed after running a speed test. In the library settings set the database cache to 2000MB to ensure a snappier and more responsive browsing experience, and then check that playback quality is set to original/maximum. If you’re severely bandwidth limited on your upload and have remote users, you might want to limit the remote stream bitrate to something more reasonable, just as a note of comparison Netflix’s 1080p bitrate is approximately 5Mbps, although almost anyone watching through a chromium based browser is streaming at 720p and 3mbps. Other than that you should be good to go. For actually playing your files, there's a Plex app for just about every platform imaginable. I mostly watch television and films on my laptop using the Windows Plex app, but I also use the Android app which can broadcast to the chromecast connected to the TV in the office and the Android TV app for our smart TV. Both are fully functional and easy to navigate, and I can also attest to the OS X version being equally functional.
Part Eight: Finding Media
Now, this is not really a piracy tutorial, there are plenty of those out there. But if you’re unaware, BitTorrent is free and pretty easy to use, just pick a client (qBittorrent is the best) and go find some public trackers to peruse. Just know now that all the best trackers are private and invite only, and that they can be exceptionally difficult to get into. I’m already on a few, and even then, some of the best ones are wholly out of my reach.
If you decide to take the left hand path and turn to Usenet you’ll have to pay. First you’ll need to sign up with a provider like Newshosting or EasyNews for access to Usenet itself, and then to actually find anything you’re going to need to sign up with an indexer like NZBGeek or NZBFinder. There are dozens of indexers, and many people cross post between them, but for more obscure media it’s worth checking multiple. You’ll also need a binary downloader like SABnzbd. That caveat aside, Usenet is faster, bigger, older, less traceable than BitTorrent, and altogether slicker. I honestly prefer it, and I'm kicking myself for taking this long to start using it because I was scared off by the price. I’ve found so many things on Usenet that I had sought in vain elsewhere for years, like a 2010 Italian film about a massacre perpetrated by the SS that played the festival circuit but never received a home media release; some absolute hero uploaded a rip of a festival screener DVD to Usenet. Anyway, figure out the rest of this shit on your own and remember to use protection, get yourself behind a VPN, use a SOCKS5 proxy with your BitTorrent client, etc.
On the legal side of things, if you’re around my age, you (or your family) probably have a big pile of DVDs and Blu-Rays sitting around unwatched and half forgotten. Why not do a bit of amateur media preservation, rip them and upload them to your server for easier access? (Your tools for this are going to be Handbrake to do the ripping and AnyDVD to break any encryption.) I went to the trouble of ripping all my SCTV DVDs (five box sets worth) because none of it is on streaming nor could it be found on any pirate source I tried. I’m glad I did, forty years on it’s still one of the funniest shows to ever be on TV.
Part Nine/Epilogue: Sonarr/Radarr/Lidarr and Overseerr
There are a lot of ways to automate your server for better functionality or to add features you and other users might find useful. Sonarr, Radarr, and Lidarr are a part of a suite of “Servarr” services (there’s also Readarr for books and Whisparr for adult content) that allow you to automate the collection of new episodes of TV shows (Sonarr), new movie releases (Radarr) and music releases (Lidarr). They hook in to your BitTorrent client or Usenet binary newsgroup downloader and crawl your preferred Torrent trackers and Usenet indexers, alerting you to new releases and automatically grabbing them. You can also use these services to manually search for new media, and even replace/upgrade your existing media with better quality uploads. They’re really a little tricky to set up on a bare metal Ubuntu install (ideally you should be running them in Docker Containers), and I won’t be providing a step by step on installing and running them, I’m simply making you aware of their existence.
The other bit of kit I want to make you aware of is Overseerr which is a program that scans your Plex media library and will serve recommendations based on what you like. It also allows you and your users to request specific media. It can even be integrated with Sonarr/Radarr/Lidarr so that fulfilling those requests is fully automated.
And you're done. It really wasn't all that hard. Enjoy your media. Enjoy the control you have over that media. And be safe in the knowledge that no hedgefund CEO motherfucker who hates the movies but who is somehow in control of a major studio will be able to disappear anything in your library as a tax write-off.
1K notes
·
View notes
Text
On Personal InfoSec
Been awhile since I've had one of these posts but I figure with all that's going on in the world it's time to make another one of these posts and get some stuff out there for people. A lot of the information I'm going to go over you can find here:
So if you'd like to just click the link and ignore the rest of the post that's fine, I strongly recommend checking out the Privacy Guides.
Browsers:
There's a number to go with but for this post going forward I'm going to recommend Firefox. I know that the Privacy Guides lists Brave and Safari as possible options but Brave is Chrome based now and Safari has ties to Apple. Mullvad is also an option but that's for your more experienced users so I'll leave that up to them to work out.
Browser Extensions:
uBlock Origin: content blocker that blocks ads, trackers, and fingerprinting scripts. Notable for being the only ad blocker that still works on Youtube.
Privacy Badger: Content blocker that specifically blocks trackers and fingerprinting scripts. This one will catch things that uBlock doesn't catch but does not work for ads.
Facebook Container: "but I don't have facebook" you might say. Doesn't matter, Meta/Facebook still has trackers out there in EVERYTHING and this containerizes them off away from everything else.
Bitwarden: Password vaulting software, don't trust the password saving features of your browsers, this has multiple layers of security to prevent your passwords from being stolen.
ClearURLs: Allows you to copy and paste URL's without any trackers attached to them.
VPN:
Note: VPN software doesn't make you anonymous, no matter what your favorite youtuber tells you, but it does make it harder for your data to be tracked and it makes it less open for whatever network you're presently connected to.
Mozilla VPN: If you get the annual subscription it's ~$60/year and it comes with an extension that you can install into Firefox.
Proton VPN: Has easily the most amount of countries serviced, can take cash payments, and does offer port forwarding.
Email Provider:
Note: By now you've probably realized that Gmail, Outlook, and basically all of the major "free" e-mail service providers are scraping your e-mail data to use for ad data. There are more secure services that can get you away from that but if you'd like the same storage levels you have on Gmail/Outlook.com you'll need to pay.
Proton Mail: Secure, end-to-end encrypted, and fairly easy to setup and use. Offers a free option up to 1gb
Tuta: Secure, end-to-end encrypted, been around a very long time, and offers a free option up to 1gb.
Email Client:
Thunderbird if you're on Windows or Linux
Apple Mail if you're on macOS
Cloud Storage:
Proton Drive: Encrypted cloud storage from the same people as Proton Mail.
Tresorit: Encrypted cloud storage owned by the national postal service of Switzerland. Received MULTIPLE awards for their security stats.
Peergos: decentralized and open-source, allows for you to set up your own cloud storage, but will require a certain level of expertise.
Microsoft Office Replacements:
LibreOffice: free and open-source, updates regularly, and has the majority of the same functions as base level Microsoft Office.
OnlyOffice: cloud-based, free, and open source.
Chat Clients:
Note: As you've heard SMS and even WhatsApp and some other popular chat clients are basically open season right now. These are a couple of options to replace those.
Signal: Provides IM and calling securely and encrypted, has multiple layers of data hardening to prevent intrusion and exfil of data.
Molly (Android OS only): Alternative client to Signal. Routes communications through the TOR Network.
Briar: Encrypted IM client that connects to other clients through the TOR Network, can also chat via wifi or bluetooth.
Now for the last bit, I know that the majority of people are on Windows or macOS, but if you can get on Linux I would strongly recommend it. pop_OS, Ubuntu, and Mint are super easy distros to use and install. They all have very easy to follow instructions on how to install them on your PC and if you'd like to just test them out all you need is a thumb drive to boot off of to run in demo mode.
If you game through Steam their Proton emulator in compatibility mode works wonders, I'm presently playing a major studio game that released in 2024 with no Linux support on it and once I got my drivers installed it's looked great. There are some learning curves to get around, but the benefit of the Linux community is that there's always people out there willing to help.
I hope some of this information helps you and look out for yourself, it's starting to look scarier than normal out there.

#information security#infosec#computer security#computer infosec#personal infosec#browsers#internet browser#email#instant messaging#cloud storage#linux#pop os#linux mint#ubuntu#firefox#firefox extensions#long post
67 notes
·
View notes
Note
After seeing your weatherbugapp reblog i installed duckduckgo and tried it.

I don't know much about technology tbh but i downloaded this app less than 30 mins ago and in that time google tried to track me 112 times?? And they tried to collect finger prints? And my first and last name? And my gender? And my country, state and city? My gps coordinates? My postal code? My network carrier? My fricking battery level for whatever reason? Can you please tell me if this is normal at all, because i'm freaking out right now. I just turned 18 and started using mobile banking and stuff and this shit scares me
Why tf does it need to know my screen density???my system volume????my charging status????? What tf are they cooking
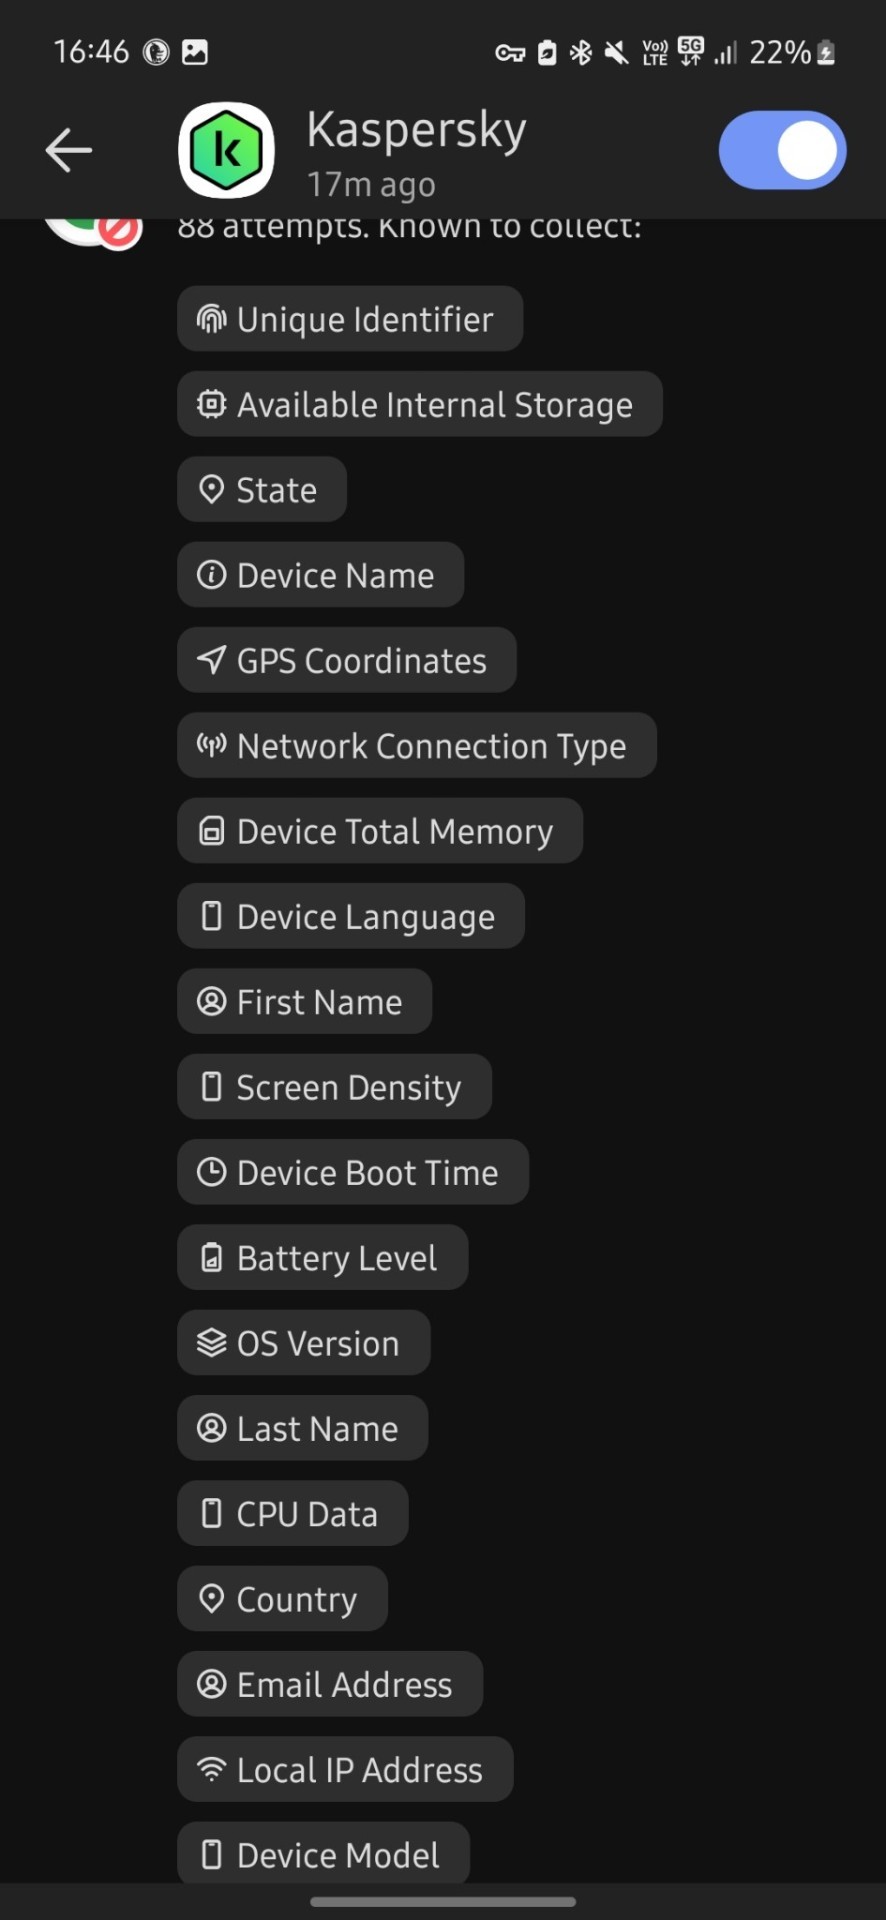
Now it's at 476 tracking attempts bro???? barely 5 mins passed.....
I condensed your three asks into one for readability!
And yeah, I'm very far from an expert about any of this, but as far as I know that's just. Normal. That's the normal amount of spying they're doing on your phone. I assume the numbers we see are to some extent because having been foiled, a lot of these scripts try repeatedly, since I can't imagine what use thousands of trackers per phone would be even to the great aggregators.
Tracking the phone stuff like screen resolution and battery level is because (apart from that definitely not being considered remotely 'private' so it's Free Real Estate) in aggregate that data can be used to track what phone use patterns are like on a demographic scale and therefore. Where the smart money is.
Almost all of this is getting sold in bulk for ad targeting and market analysis. This does presumably make it very hard to notice when like. Actually important stuff is being spied on, which is why I feel better about Having Apps with the duckduckgo app blocker thing.
My bank's app reportedly sells data to a couple aggregators including Google. Not like, my banking info, but it's still so offensive on principle that I avoid using the app unless I have to, and force stop it afterward.
The patterns that show up on the weekly duckduckgo blocker report are interesting. Hoopla attempts about two orders of magnitude more tracking than Libby, which makes sense because they're a commercial streaming service libraries pay by the unit for access, while Libby is a content management software run by a corporation that values its certification as a 'B' company--that is, one invested in the public good that can be trusted. The cleanness of their brand is a great deal of its value, so they have to care about their image and be a little more scrupulous.
Which doesn't mean not being a little bit spyware, because everything is spyware now. Something else I've noticed is that in terms of free game apps, the polished professional stuff is now much more invasive than the random kinda janky thing someone just threw together.
Back in the day you tended to expect the opposite, because spyware was a marginal shifty profit-margin with too narrow a revenue stream to be worth more to an established brand than their reputation, but now that everyone does it there's not a lot of reputation cost and refraining would be sacrificing a potential revenue stream, which is Irresponsible Conduct for a corporation.
While meanwhile 'developing a free game app to put on the game store' is something a person can do for free with the hardware they already have for home use, as a hobby or practice or to put on their coding resume. So while such apps absolutely can be malicious and more dangerous when they are than The Big Brand, they can also be neutral in a way commercial stuff no longer is. Wild world.
But yeah for the most part as far as I can make out, these are just The Commercial Panopticon, operating as intended. It's gross but it probably doesn't indicate anything dangerous on an individual level.
56 notes
·
View notes
Text
Text lurking in scenes in the first two Hazbin Hotel episodes: (I was bored and when seeing text I need to pause to read so I decided I’d do a service for anyone who needs it)
Spoilers below:
Episode 1:
21:45

News Ticker: SHIT!! THE EXTERMINATION IS HAPPENING IN SIX MONTHS. THIS IS NOT A DRILL! CONFIRMED! LEGIT! FUCK! CFVGBHNJM WE ALL DEAD SOON!! WHY DOES THIS ALWAYS HAPPEN TO ME!
Episode 2:
:56

So I’m thinkin, you and three huge guys are getting it on and it’s really hot and oily and then it’s revealed your on a boat and it’s sinking so you all have to cum as fast as you can. (I hate everything I'm writing but I've already committed so... plus nobody else should have to pause their screens to read this.)
Have you seen temperature play vids? Lol cause there is gonna be ice!!!!!!!
So get that flat honey ass to the studio baby~ as you can see the ideas are F L O W I N G
Haha sooooooo its been thirty seconds……
don’t be like this baby
This isn’t cute Angel. Legit I’m so bored of this little cat and mouse chase.
FR over it!
Fuckibng bitch!! (Yes, I spelt that as said on screen)
Babe.
Angel.
Where the fuck are you??????
3:41

VOXTEK ASSIST (top right)
“Hi Vox”
VoxTek: Can I assist you today?
VOXTECH (under Voxtek Assist)
Vox: You can be just like me!
V- Watch!
Trust Us*
Vox: It's great! I'd buy it!
*With what? That’s none of your business
9:42

News Ticker: SO THE RADIO GUY’S BACK. I DON’T THINK YOU NOTICED. I DIDN’T AT FIRST— I WAS TOO BUSY BEING A MUCH MORE INTERESTING AND IMPORTANT PERSON, BUT FUCK IT, NEWS IS SLOW TODAY I GUESS. I’M TOTALLY NOT WORRIED ABOUT THIS GUY AND NEITHER SHOULD YOU BE. I TOTALLY WRECKED HIS SHIT LAST TIME.
9:49

FUCK ALASTOR
11:02

Vox screen
A PROBLEM HAS BEEN DETECTED AND VOX HAS BEEN SHUT DOWN TO PREVENT DAMAGE TO HIS SYSTEMS.
THIS PROBLEM SEEMS TO BE CAUSES BY THE FOLLOWING FILE: ALASTOR.EXE
VOX.EXE_CRASH_ERROR_EAT_SHIT_ALASTOR
CHECK TO MAKE SURE ALL ((FUCKING 1930S LOOKING ASS)) HARDWARE AND SOFTWARE IS UP TO DATE AND PROPERLY INSTALLED. ASK VOX FOR ANY VOXTEK UPDATES YOU MIGHT NEED.
IF PROBLEMS CONTINUE, ((FUCK YOU ALASTOR)) DISABLE OR REMOVE ANY ALASTOR(S) FROM THE GENERAL VICINITY. IF YOU NEED TO USE ‘UNSAFE MODE’ RESET YOUR VOXTEK DEVICE PRESS F5 AND SELECT ‘ADVANCED STARTUP OPTIONS’ THEN SELECT ‘UNSAFE MODE’
TECHNICAL INFORMATION:
******STOP: ALASTOR.EXE ((OLD TIMY PRICK.RADIO))***
#hazbin hotel#hazbin hotel season 1#Hazbin hotel screengrabs#just little details for anyone who doesn't want to spend time pausing it#katie killjoy#hazbin hotel vox#hazbin hotel valentino#hazbin hotel angel dust#vox hazbin hotel#valentino hazbin hotel#alastor and vox hatemance#AV hatemance#hellaverse
382 notes
·
View notes
Text
SQL Server 2022 Edition and License instructions
SQL Server 2022 Editions:
• Enterprise Edition is ideal for applications requiring mission critical in-memory performance, security, and high availability
• Standard Edition delivers fully featured database capabilities for mid-tier applications and data marts
SQL Server 2022 is also available in free Developer and Express editions. Web Edition is offered in the Services Provider License Agreement (SPLA) program only.
And the Online Store Keyingo Provides the SQL Server 2017/2019/2022 Standard Edition.
SQL Server 2022 licensing models
SQL Server 2022 offers customers a variety of licensing options aligned with how customers typically purchase specific workloads. There are two main licensing models that apply to SQL Server: PER CORE: Gives customers a more precise measure of computing power and a more consistent licensing metric, regardless of whether solutions are deployed on physical servers on-premises, or in virtual or cloud environments.
• Core based licensing is appropriate when customers are unable to count users/devices, have Internet/Extranet workloads or systems that integrate with external facing workloads.
• Under the Per Core model, customers license either by physical server (based on the full physical core count) or by virtual machine (based on virtual cores allocated), as further explained below.
SERVER + CAL: Provides the option to license users and/or devices, with low-cost access to incremental SQL Server deployments.
• Each server running SQL Server software requires a server license.
• Each user and/or device accessing a licensed SQL Server requires a SQL Server CAL that is the same version or newer – for example, to access a SQL Server 2019 Standard Edition server, a user would need a SQL Server 2019 or 2022 CAL.
Each SQL Server CAL allows access to multiple licensed SQL Servers, including Standard Edition and legacy Business Intelligence and Enterprise Edition Servers.SQL Server 2022 Editions availability by licensing model:
Physical core licensing – Enterprise Edition
• Customers can deploy an unlimited number of VMs or containers on the server and utilize the full capacity of the licensed hardware, by fully licensing the server (or server farm) with Enterprise Edition core subscription licenses or licenses with SA coverage based on the total number of physical cores on the servers.
• Subscription licenses or SA provide(s) the option to run an unlimited number of virtual machines or containers to handle dynamic workloads and fully utilize the hardware’s computing power.
Virtual core licensing – Standard/Enterprise Edition
When licensing by virtual core on a virtual OSE with subscription licenses or SA coverage on all virtual cores (including hyperthreaded cores) on the virtual OSE, customers may run any number of containers in that virtual OSE. This benefit applies both to Standard and Enterprise Edition.
Licensing for non-production use
SQL Server 2022 Developer Edition provides a fully featured version of SQL Server software—including all the features and capabilities of Enterprise Edition—licensed for development, test and demonstration purposes only. Customers may install and run the SQL Server Developer Edition software on any number of devices. This is significant because it allows customers to run the software on multiple devices (for testing purposes, for example) without having to license each non-production server system for SQL Server.
A production environment is defined as an environment that is accessed by end-users of an application (such as an Internet website) and that is used for more than gathering feedback or acceptance testing of that application.
SQL Server 2022 Developer Edition is a free product !
#SQL Server 2022 Editions#SQL Server 2022 Standard license#SQL Server 2019 Standard License#SQL Server 2017 Standard Liense
7 notes
·
View notes
Text
For more than three weeks, Gaza has faced an almost total internet blackout. The cables, cell towers, and infrastructure needed to keep people online have been damaged or destroyed as Israel launched thousands of missiles in response to Hamas attacking Israel and taking hundreds of hostages on October 7. Then, this evening, amid reports of heavy bombing in Gaza, some of the last remaining connectivity disappeared.
In the days after October 7, people living in Gaza have been unable to communicate with family or friends, leaving them unsure whether loved ones are alive. Finding reliable news about events has become harder. Rescue workers have not been able to connect to mobile networks, hampering recovery efforts. And information flowing out of Gaza, showing the conditions on the ground, has been stymied.
As the Israel Defense Forces said it was expanding its ground operations in Gaza this evening, internet connectivity fell further. Paltel, the main Palestinian communications company, has been able to keep some of its services online during Israel’s military response to Hamas’ attack. However, at around 7:30 pm local time today, internet monitoring firm NetBlocks confirmed a “collapse” in connectivity in the Gaza Strip, mostly impacting remaining Paltel services.
“We regret to announce a complete interruption of all communications and internet services within the Gaza Strip,” Paltel posted in a post on its Facebook page. The company claimed that bombing had “caused the destruction of all remaining international routes.” An identical post was made on the Facebook page of Jawwal, the region’s biggest mobile provider, which is owned by Paltel. Separately, Palestinian Red Crescent, a humanitarian organization, said on X (formerly Twitter) that it had lost contact with its operation room in Gaza and is “deeply concerned” about its ability to keep caring for people, with landline, cell, and internet connections being inaccessible.
“This is a terrifying development,” Marwa Fatafta, a policy manager focusing on the Middle East and North Africa at the digital rights group Access Now, tells WIRED. “Taking Gaza completely off the grid while launching an unprecedented bombardment campaign only means something atrocious is about to happen.”
A WIRED review of internet analysis data, social media posts, and Palestinian internet and telecom company statements shows how connectivity in the Gaza Strip drastically plummeted after October 7 and how some buildings linked to internet firms have been damaged in attacks. Photos and videos show sites that house various internet and telecom firms have been damaged, while reports from official organizations, including the United Nations, describe the impact of people being offline.
Damaged Lines
Around the world, the internet and telecoms networks that typically give web users access to international video calls, online banking, and endless social media are a complicated, sprawling mix of hardware and software. Networks of networks, combining data centers, servers, switches, and reams of cables, communicate with each other and send data globally. Local internet access is provided by a mix of companies with no clear public documentation of their infrastructure, making it difficult to monitor the overall status of the system as a whole. In Gaza, experts say, internet connectivity is heavily reliant on Israeli infrastructure to connect to the outside world.
Amid Israel’s intense bombing of Gaza, physical systems powering the internet have been destroyed. On October 10, the United Nations’ Office for the Coordination of Humanitarian Affairs (OCHA), which oversees emergency responses, said air strikes “targeted several telecommunication installations” and had destroyed two of the three main lines of communications going into Gaza.
Prior to tonight’s blackout, internet connectivity remained but was “extremely slow and limited,” Access Now’s Fatafta says. People she has spoken to from Gaza say it could take a day to upload and send a few photos. “They have to send like 20 messages in order for one to go through,” Fatafta says. “They are desperately—especially for Gazans that live outside—trying to get through to their families.”
“Every time I try to call someone from family or friends, I try to call between seven to 10 times,” says Ramadan Al-Agha, a digital marketer who lives in Khan Yunis, a city in the south of the Gaza Strip. “The call may be cut off two or three times,” he told WIRED in a WhatsApp message before the latest outages. “We cannot access news quickly and clearly.” People in the region have simultaneously faced electricity blackouts, dwindling supplies of fuel used to power generators, and a lack of clean water, food, and medical supplies. “It is a humanitarian disaster,” Al-Agha says.
Connectivity in Gaza started to drop not long after Israel responded to the October 7 Hamas attack. Rene Wilhelm, a senior R&D engineer at the nonprofit internet infrastructure organization Ripe Network Coordination Center, says based on an analysis of internet routing data it collects that 11 Palestinian networks, which may operate both in the West Bank and Gaza Strip, began to experience disruption after October 7. Eight of the networks were no longer visible to the global internet as of October 23, Wilhelm says. Ahead of this evening’s blackout, there was around 15 percent of normal connectivity, according to data from Georgia Tech’s Internet Outage Detection and Analysis project. That dropped to around 7 percent as reports of the blackout circulated.
One office belonging to Paltel in the Al Rimal neighborhood of Gaza City has been destroyed in the attacks, photos and videos show. Floors have been destroyed and windows blown away in the multistory building, and piles of rubble surround the entrances. (It is unclear what equipment the building housed or how many floors Paltel occupied.) Another internet provider, AlfaNet, is listed as being based in the Al-Watan Tower. The company posted to its Facebook page on October 8 that the tower had been destroyed and its services have stopped, with other online posts also saying the tower has been destroyed.
Multiple Palestinian internet and telecoms firms have said their services have been disrupted during the war, mostly posting to social media. Internet provider Fusion initially said its engineers were trying to repair its infrastructure, although it has since said this is not continuing. “The network was destroyed, and the cables and poles were badly damaged by the bombing,” it wrote on Facebook. JetNet said there had been a “sudden disruption” to access points. SpeedClick posted that the situation was out of its control. And HiNet posted that it has “no more to offer to ensure” people could stay online following “the attacks and destruction our internet servers have suffered.”
Across Paltel’s network on October 19, according to an update shared by the Office for the Coordination of Humanitarian Affairs, 83 percent of fixed line users had been disconnected, with 53 percent of sites providing fixed line connections also being offline. Half of the company’s fiber optic internet lines in Gaza weren’t operational, the update says. The connectivity disappeared this evening, according to Paltel’s Facebook post, which says there has been a “complete interruption” of all its services. Paltel, AlfaNet, Fusion, and SpeedClick could not be reached or did not respond to requests for comment.
Lost Connections
In recent years, governments and authoritarian regimes have frequently turned to shutting down the internet for millions of people in attempts to suppress protests and curtail free speech. Targeting the communications networks is common during conflicts. During Russia's war in Ukraine, its forces have decimated communications networks, tried to take over the internet, and set up new mobile companies to control information flows. When Hamas first attacked Israel on October 7, it used drones to bomb communications equipment at surveillance posts along the borders of the Gaza Strip.
Monika Gehner, the head of corporate communications at the International Telecommunication Union, says the body is always “alarmed” by damage inflicted on any telecommunications infrastructure during conflicts. The ITU, the United Nations’ primary internet governance body, believes “efficient telecommunication services” are crucial to peace and international cooperation, and its secretary-general has called for respecting infrastructure in the Middle East, Gehner says.
Officials in Israel have consistently claimed they are targeting Hamas militants within Gaza, not civilians, while responding to the Hamas attacks, which killed more than 1,400 people in Israel. The Hamas-run Health Ministry within Gaza has said more than 7,000 people have been killed there and released a list of names. A spokesperson for the Israel Defense Forces did not respond to WIRED’s questions about internet disruptions within Gaza.
Hanna Kreitem, a senior adviser for internet technology and development in the Middle East and North Africa at the Internet Society, an open internet advocacy nonprofit, says Palestinian firms have a “big reliance” on Israeli internet firms. “Palestinians are not controlling any of the ICT infrastructure,” says Mona Shtaya, a non-resident fellow at the Tahrir Institute for Middle East Policy. Mobile networks in the Gaza Strip rely on 2G technologies. Al-Agha, the digital marketer, shared a screenshot showing mobile internet speeds of 7.18 kilobytes per second; average mobile speeds in the US in 2022 were 24 megabits per second, according to mobile analytics firm Statista.
“The internet is vital in times of war in crises,” says Fatafta, the Access Now policy manager, who adds that there can be “terrible consequences” linked to connectivity blackouts. The UN’s OCHA said rescue workers have had a harder time “carrying out their mission” partly due to the “limited or no connection to mobile networks.” Al-Agha says he has lost some clients due to the disruptions. The lack of connectivity can obscure events that are happening on the ground, Fatafta says. News crews have told WIRED they have footage from the ground but are “losing the story because of the internet.”
Kreitem says that a lack of electricity and access to the equipment will have made an impact on top of any physical damage to communications networks. “We don't know how many of the people that actually operate these networks are still alive,” Kreitem says. “The network operators are part of the world there, there's no place for them to run. They are as affected as any other person.”
90 notes
·
View notes
Text
What types of issues does technical support handle?
Technical Support Services

Technical Supporting services serve a vital role and prospect, by keeping businesses and organizations running efficiently & active by resolving their IT-related problems and issues. From minor glitches to major disruptions errors, technical support teams and professional experts help to ensure that systems remain up and running while in use, allowing the users to stay productive and alert. But what exactly do they handle? Let's take a closer look at what to look for and they assist with.
Hardware and Device Issues:
Technical supporting teams and professional experts assist with problems related to desktops, laptops, printers, scanners, and other hardware. As this includes and consists of deliverables fixing hardware failures, replacing parts, configuring devices, and troubleshooting connectivity or performance issues. Whether it's a malfunctioning keyboard or a slow-loading workstation, Technical Support is there to help.
Software Installation and Troubleshooting:
From installing and implementing the applications to resolving and assisting the software errors and glitches, technical Support guides various software-related and applications concerns and points at a time. They help and assist with updating programs, fixing bugs, assuring the overall compatibility within the operating systems, and restoring the performance if an app crashes or freezes.
Network and Connectivity Problems:
A strong network and support is the backbone of modern businesses and companies. Technical Supporting officials handle and maintain the internet issues, router configuration, VPN access, slow connection speeds, and network outages. Whether it's a minor or impactful Wi-Fi issue or a more significant server connectivity problem, the support team works to restore communication quickly.
Email and Communication Tools:
Email downtime can affect the business continuity and its proceedings. The technical supporting team manages email configuration, syncing errors, spam filters, and login issues and errors across multiple devices and platforms, including Outlook and Gmail. They also handle collaboration tools like Teams, Slack, or Zoom when they don't function as expected.
Security & Access Management:
Working professionals play an essential role in managing the IT security measures and operating parameters. While they also assist to reset passwords settings, also help to manage the user accounts, set up two-factor authentication, and address down the ongoing suspicious activity.
Personalized Help and Guidance:
From onboarding and completing setup for the new users to answering tech-related questions, technical Support assures that employees use systems efficiently. Their goal is to minimize downtime and boost productivity. Companies like Suma Soft, IBM, Cyntexa, and Cignex offer dependable technical support services tailored to your specific business needs. Their expertise helps resolve issues faster and keeps your systems up and running at all times.
#it services#technology#saas#software#saas development company#saas technology#digital transformation
3 notes
·
View notes
Text
An Okay-ish guide on How to find a good laptop for creating digital art on -2025
This is my first time making a post like this, but as someone who went from having very sparse technical knowledge to working helpdesk, I wanted to give my advice on drawing tablets/drawing workflows for comfort.
Something I ran into when trying to figure out a comfortable way for me to draw was the sea of like confusion when it came to drawing tablets. Initially, I was advised by a friend that a tablet like the Surface would be good for drawing and I really stuck to that closely- as it seemed like the alternative was to be stuck at a desk with a drawing tablet. This is not very comfy and also not very practical or easy for me to casually draw digitally. After becoming more technically literate, I realized that a 2in1 laptop serves practically the same function as a surface, is about half the price, and has a lot more power as a drawing "tablet" to also multitask things like music applications/ youtube in the background/ having a ton of tabs / ect...
So- here's a little guide on how to figure out what to look for in a laptop as of 2025!
Why 2in1? 2in1 laptops have a touch screen, can fold all the way back to a 'tablet mode' in case you like that sort of set up & come with a keyboard attached that's easy to use. Otherwise, a laptop with a touch screen should work just fine- but most likely might not be as physically flexible. What should I look for in a drawing laptop? There's some basic things I can advise as well as more nuanced things, I've also included links to some laptops that seem good: OS or Operating System: -ARM processor vs not (Windows 11 VS Windows11 ARM): I would personally avoid any sort of ARM processors, as it acts like a weaker version of+ lacks a lot of the functionality of windows 11. I had a surface laptop that I exchanged back because it did not have touch gestures. A way to see if the laptop you want has an ARM processor vs not is to check the OS or Operating System, if it has a arm processor it will likely say something like "Windows 11 ARM" or you can CTRL + F to find the word ARM in the description in your web browser.
-Linux VS MACOS VS Windows: Unfortunately I have less EXP with MAC devices, but as the price point is very high and they are not built to last AS LONG (No devices last unfortunately) I can't recommend them. -If you have an older device with touch screen capabilities that you would like to use, and would like to try to dive into Linux- I'd say go for it! Be aware that changing your OS will wipe your entire drive, so please back up your files first! If you end up not (Depending on how you go about installing it) I've been enjoying a new-er version of Kubuntu as our home media set-up! Generally, a lot of Linux distributions aren't as 'hard' on your hardware. When choosing what version of Linux to go with- as there are a lot of different types or distributions of Linux, it has been advised to choose a more stable download release version rather then the new-est version- to be able to know this, it may say if the download version is supported long term or not. I'm not a Linux expert and have generally followed guides on how to use this OS, to install a OS you will need some sort of flash media- like a flash drive/usb drive! If you end up not liking Linux, Windows has ISO files you can put on your flash drive to put it back, again this will wipe your data! It's a good idea to try and check to see if your software of choice works on the version of Linux you would like to install, there seems to generally be workarounds however, it's up to your comfort level when seeking these out.
-Windows is familiar! However, Windows 11 has this thing where it wants to back up all your files/data to OneDrive. I, Personally have been enjoying this service, as it makes backing up my files easy-cheesy. However, with the current political climate, this opens you/us up to having our privacy stripped/or our files erased without our consent as Microsoft sees fit. To combat this, I back up my files to a physical hard drive(S) as it is safer to have multiple back-ups rather then just 1.
-AVOID ChromeOS or chromebooks- is my advice GPU or Graphics Card: https://www.videocardbenchmark.net/ -Using this link, you can compare how the GPU of your device compares to the standard/other devices/ect... -Honestly, if you are not doing heavy-duty gaming or 3D sculpting, or video editing, you're probably just fine with a mid-tier GPU!
Where the files are stored / the Disk Drive: -As long as you avoid a HDD you're probably good to go! HDD drives use a physical disk that spins to save your data- this is more prone to failing and this is a lot of the reason why older laptops seem "slow"
-One of the ways to to check this- or a weird way I check this, is I click the Windows button/Windows search and type "Defrag" & You should see something that says something "Defragment and Optimize Drives" In this window, under 'Media Type' it should say something like Solid State Drive, and not 'Hard Disk Drive' or HDD -How much storage is important depending on if you store your all data on your device or not- I'd recommend at LEAST 500+GB to be safe, any more does not hurt!
RAM: For doing just art, you're probably good to go at just 8-16GB of RAM! Any more does not hurt.
Processors: I have less knowledge in this domain, however, if you are going for a intel processor, something like i5, 1255u is communicating that: i(NUMBER), the higher number = more processing power. I would recommend anything i5 and above, and the 1255u- a number I am using in this example, the 12 = 12th generation. 12 gen and up Is what I would personally recommend.
Do I need a separate stylus pen? Yes, however, there's a lot of good knock off brand pens that are cheaper if not better then official brand pens. I'd take into account how they charge, I like rechargeable pens that use Type C ports- like new-er phones!
Link Examples of 2in1 laptops that should be good for digital art- again, if the price has changed for the worse, you can use these as a guide: This is the laptop I have, I got it on sale (I exchanged my surface for this) for around 500$: https://www.bestbuy.com/site/hp-envy-2-in-1-16-2k-touch-screen-laptop-intel-core-ultra-7-16gb-memory-1tb-ssd-glacier-silver/6571084.p?skuId=6571084 Upon a glance this looks good due to the processor being i7 & the 12th generation- a new-ish one: https://www.newegg.com/lenovo-ideapad-flex-5-16iau7-82r80000us-16-0-intel-core-i7-1255u-1-tb-pcie-ssd-16gb-memory/p/N82E16834840489
Finishing notes: This is not a like solid template, more of a loose advising guide- I hope this is helpful to some folx! Feel free to ask questions!
#digitalart#artists on tumblr#digital drawing#digital painting#art#artwork#surface#2in1#stylus pen#drawing tablet#disabled artist#disability#disabled#disability art#mental illness#mental health#art ergonomics#ergonomicsupport#adhd artist#adhd problems#neurodiverse stuff#neurodiverse artist#2025 art#gpu#help desk#queer artist#queer artwork#buying a laptop#laptop#digital art supplies
5 notes
·
View notes
Text

For a digital-only, cloud-based PlayStation 7, here’s an updated schematic focusing on next-gen cloud gaming, AI-driven performance, and minimalistic hardware:
1. Hardware Architecture (Cloud-Optimized, Minimalist Design)
Processing Power:
Cloud-Based AI Compute Servers with Custom Sony Neural Processing Units (NPUs)
Local Ultra-Low Latency Streaming Box (PS7 Cloud Hub) with AI-Assisted Lag Reduction
Storage:
No Internal Game Storage (Everything Runs via PlayStation ZeroCloud)
4TB Cloud-Synced SSD for System & Personal Data

Connectivity:
WiFi 7 & 6G Mobile Support for High-Speed Streaming
Quantum Encrypted Bluetooth 6.0 for Peripherals
Direct-to-Server Ethernet Optimization (AI-Managed Ping Reduction)
Form Factor:
Minimalist Digital Console Hub (Size of a Small Router)
No Disc Drive – Fully Digital & Cloud-Dependent
2. UI/UX Design (AI-Powered Cloud Interface)
NexusOS 1.0 (Cloud-Based AI UI): Personalized Dashboard Adapting to Player Preferences

ZeroNexus AI Assistant:
Predictive Game Recommendations
Smart Latency Optimization for Cloud Gaming
In-Game AI Strategy Coach
Instant Play Anywhere:
Seamless Cloud Save Syncing Across Devices
Playable on Console, PC, Tablet, or NexusPad Companion Device
Holographic UI Options (for AR Integration with Future PlayStation VR)
3. Concept Art & Industrial Design (Minimalist, Streaming-Focused)
Compact, Vertical-Standing Console (PS7 Cloud Hub)
Sleek, Heatless Design (No Heavy Internal Processing)
DualSense 2X Controller:
Cloud-Connected Haptics (Real-Time Adaptive Feedback)
AI-Touchscreen Interface for Quick Actions & Cloud Navigation
Self-Charging Dock (Wireless Power Transfer)
4. Software & Ecosystem (Full Cloud Gaming Integration)
PlayStation ZeroCloud (Sony’s Ultimate Cloud Gaming Service)
No Downloads, No Installs – Instant Play on Any Device
AI-Based 8K Upscaling & Adaptive Frame Rate
Cloud-Powered VR & AR Experiences
Cross-Platform Compatibility: PlayStation 7 Games Playable on PC, TV, & Mobile
Subscription-Based Ownership (Game Library Access Model with NFT Licensing for Exclusive Titles)
Eco-Friendly AI Resource Scaling: Low Power Consumption for Cloud Streaming
This design ensures ultra-fast, high-quality, cloud-first gaming while eliminating hardware limitations. Let me know if you want refinements or additional features!
#chanel#playstation7#deardearestbrands x chanel#deardearestbrands sony playstation7 controller#ps7#PS7#playstation7 controller#deardearestbrands#Chanel x Playstation#playtation7Chanel#chanel textiles
3 notes
·
View notes
Text
Leveraging XML Data Interface for IPTV EPG
This blog explores the significance of optimizing the XML Data Interface and XMLTV schedule EPG for IPTV. It emphasizes the importance of EPG in IPTV, preparation steps, installation, configuration, file updates, customization, error handling, and advanced tips.
The focus is on enhancing user experience, content delivery, and securing IPTV setups. The comprehensive guide aims to empower IPTV providers and tech enthusiasts to leverage the full potential of XMLTV and EPG technologies.
1. Overview of the Context:
The context focuses on the significance of optimizing the XML Data Interface and leveraging the latest XMLTV schedule EPG (Electronic Program Guide) for IPTV (Internet Protocol Television) providers. L&E Solutions emphasizes the importance of enhancing user experience and content delivery by effectively managing and distributing EPG information.
This guide delves into detailed steps on installing and configuring XMLTV to work with IPTV, automating XMLTV file updates, customizing EPG data, resolving common errors, and deploying advanced tips and tricks to maximize the utility of the system.
2. Key Themes and Details:
The Importance of EPG in IPTV: The EPG plays a vital role in enhancing viewer experience by providing a comprehensive overview of available content and facilitating easy navigation through channels and programs. It allows users to plan their viewing by showing detailed schedules of upcoming shows, episode descriptions, and broadcasting times.
Preparation: Gathering Necessary Resources: The article highlights the importance of gathering required software and hardware, such as XMLTV software, EPG management tools, reliable computer, internet connection, and additional utilities to ensure smooth setup and operation of XMLTV for IPTV.
Installing XMLTV: Detailed step-by-step instructions are provided for installing XMLTV on different operating systems, including Windows, Mac OS X, and Linux (Debian-based systems), ensuring efficient management and utilization of TV listings for IPTV setups.
Configuring XMLTV to Work with IPTV: The article emphasizes the correct configuration of M3U links and EPG URLs to seamlessly integrate XMLTV with IPTV systems, providing accurate and timely broadcasting information.
3. Customization and Automation:
Automating XMLTV File Updates: The importance of automating XMLTV file updates for maintaining an updated EPG is highlighted, with detailed instructions on using cron jobs and scheduled tasks.
Customizing Your EPG Data: The article explores advanced XMLTV configuration options and leveraging third-party services for enhanced EPG data to improve the viewer's experience.
Handling and Resolving Errors: Common issues related to XMLTV and IPTV systems are discussed, along with their solutions, and methods for debugging XMLTV output are outlined.
Advanced Tips and Tricks: The article provides advanced tips and tricks for optimizing EPG performance and securing IPTV setups, such as leveraging caching mechanisms, utilizing efficient data parsing tools, and securing authentication methods.
The conclusion emphasizes the pivotal enhancement of IPTV services through the synergy between the XML Data Interface and XMLTV Guide EPG, offering a robust framework for delivering engaging and easily accessible content. It also encourages continual enrichment of knowledge and utilization of innovative tools to stay at the forefront of IPTV technology.
3. Language and Structure:
The article is written in English and follows a structured approach, providing detailed explanations, step-by-step instructions, and actionable insights to guide IPTV providers, developers, and tech enthusiasts in leveraging the full potential of XMLTV and EPG technologies.
The conclusion emphasizes the pivotal role of the XML Data Interface and XMLTV Guide EPG in enhancing IPTV services to find more information and innovative tools. It serves as a call to action for IPTV providers, developers, and enthusiasts to explore the sophisticated capabilities of XMLTV and EPG technologies for delivering unparalleled content viewing experiences.
youtube
7 notes
·
View notes
Text
Cost of Setting Up an Electric Vehicle Charging Station in India (2025 Guide)

With India accelerating its transition to electric mobility, the demand for EV charging stations is growing rapidly. Whether you're a business owner, real estate developer, or green tech enthusiast, setting up an electric vehicle (EV) charging station is a promising investment. But how much does it really cost to build one? Let's break it down.
Before diving into the costs, it's important to understand the types of EV chargers and the scope of services provided by modern EV charging solution providers like Tobor, a rising name in the EV infrastructure space offering smart, scalable, and efficient EV charging solutions across India.
Types of EV Charging Stations
Understanding the charger types is essential, as this heavily influences the overall cost:
1. AC Charging Stations
AC (Alternating Current) chargers are typically used for slower charging applications, ideal for residential societies, office complexes, and commercial locations with longer dwell times.
Level 1 Chargers: 3.3 kW output, suitable for two- and three-wheelers.
Level 2 Chargers: 7.2 kW to 22 kW, suitable for four-wheelers (e.g., home or workplace).
2. DC Fast Charging Stations
DC (Direct Current) chargers are used where quick charging is required, such as highways, malls, or public parking zones.
DC Fast Chargers: Start from 30 kW and go up to 350 kW.
They can charge an electric car from 0 to 80% in under an hour, depending on the vehicle.
Cost Breakdown for EV Charging Station Setup
The total cost to set up an electric car charging station in India can vary depending on the type of charger, infrastructure, and location. Here is a detailed breakdown:
1. EV Charging Equipment Cost
The cost of the electric car charger itself is one of the biggest components:
AC Chargers: ₹50,000 to ₹1.5 lakh
DC Fast Chargers: ₹5 lakh to ₹40 lakh (depending on capacity and standards like CCS, CHAdeMO, Bharat DC-001)
Tobor offers a range of chargers including TOBOR Lite (3.3 kW), TOBOR 7.2 kW, and TOBOR 11 kW – suitable for home and commercial use.
2. Infrastructure Costs
You’ll also need to invest in site preparation and power infrastructure:
Land Lease or Purchase: Costs vary widely by city and location.
Electrical Upgrades: Transformer, cabling, and power grid integration can cost ₹5 to ₹10 lakh.
Civil Work: Parking bays, shelter, lighting, signage, and accessibility features – ₹2 to ₹5 lakh.
Installation: Depending on charger type and electrical capacity, installation can range from ₹50,000 to ₹3 lakh.
3. Software & Networking Costs
Smart EV charging stations are often connected to networks for billing, load management, and user access:
EVSE Management Software: ₹50,000 to ₹2 lakh depending on features (Tobor integrates smart software as part of its offering).
Mobile App Integration: Enables users to find, reserve, and pay at your station.
OCPP Protocols: Ensures interoperability and scalability of your station.
4. Operational & Maintenance Costs
Running an EV charging station includes recurring costs:
Electricity Bills: ₹5–₹15 per kWh, depending on the state and provider.
Internet Connectivity: ₹1,000–₹2,000 per month for online monitoring.
Station Maintenance: ₹50,000 to ₹1 lakh annually.
Staff Salaries: If you have on-site attendants, this could range ₹1 to ₹3 lakh annually.
Marketing: ₹50,000 or more for signage, promotions, and digital visibility.
Total Investment Required
Here’s an estimate of the total cost based on the scale of your EV charging station:
Type
Estimated Range
Level 1 (Basic AC)
₹1 lakh – ₹3 lakh
Level 2 (Commercial AC)
₹3 lakh – ₹6 lakh
DC Fast Charging Station
₹10 lakh – ₹40 lakh
These costs can vary based on customization, location, and electricity load availability. Tobor offers tailored solutions to help you choose the right hardware and software based on your needs.
Government Support and Subsidies
To promote EV adoption and reduce the cost of EV infrastructure:
FAME II Scheme: Offers capital subsidies for charging stations.
State Incentives: States like Delhi, Maharashtra, Kerala, and Gujarat offer reduced electricity tariffs, subsidies up to 25%, and faster approvals.
Ease of Licensing: As per Ministry of Power guidelines, EV charging is a de-licensed activity, making it easier to start.
Return on Investment (ROI)
An EV charging station in a good location with growing EV traffic can break even in 3 to 5 years. Revenue comes from:
Charging fees (per kWh or per session)
Advertisement and partnerships
Value-added services (e.g., parking, cafés, shopping zones nearby)
Final Thoughts
With India's electric mobility market booming, setting up an EV charging station is not only a sustainable choice but also a profitable long-term investment. Whether you're a fleet operator, business owner, or infrastructure developer, now is the perfect time to invest.
For reliable equipment, integrated software, and end-to-end EV charging solutions, Tobor is one of the leading EV charging solution providers in India. From residential setups to large-scale commercial EVSE projects, Tobor supports every step of your journey toward green mobility.
2 notes
·
View notes
Text
i cannot believe pewdiepie taught me about systemd-analyze
for whoever is interested: you can type "systemd-analyze" in the terminal in linux and it will tell you exactly how long your PC takes to boot. You can then enter "systemd-analyze blame" and it will break the boot time down to specific services and their installation path which you can then hypothetically go improve if you have the knowledge, which potentially saves you money bc you don't necessarily need newer hardware, just optimized software
3 notes
·
View notes
Text
i tried launching Civilization 6 and a window popped up. There are new privacy policies I read and i discover that to play i have to accept the following:
* Identifiers / Contact Information: Name, user name, gamertag, postal and email address, phone number, unique IDs, mobile device ID, platform ID, gaming service ID, advertising ID (IDFA, Android ID) and IP address
* Protected Characteristics: Age and gender
* Commercial Information:Purchase and usage history and preferences, including gameplay information
* Billing Information: Payment information (credit / debit card information) and shipping address
* Internet / Electronic Activity: Web / app browsing and gameplay information related to the Services; information about your online interaction(s) with the Services or our advertising; and details about the games and platforms you use and other information related to installed applications
* Device and Usage Data: Device type, software and hardware details, language settings, browser type and version, operating system, and information about how users use and interact with the Services (e.g., content viewed, pages visited, clicks, scrolls)
* Profile Inferences: Inferences made from your information and web activity to help create a personalized profile so we can identify goods and services that may be of interest
* Audio / Visual Information: Account photos, images, and avatars, audio information via chat features and functionality, and gameplay recordings and video footage (such as when you participate in playtesting)
* Sensitive Information: Precise location information (if you allow the Services to collect your location), account credentials (user name and password), and contents of communications via chat features and functionality."

11 notes
·
View notes