#How to Add Fonts to Cricut
Explore tagged Tumblr posts
Visit Tumblr Blog
Explore Tumblr blogs with no restrictions, modern design and the best experience.
Last Seen Tumblr Blogs


Fun Fact
Tumblr posted its first advertisements in May 2012 and subsequently earned $13M in revenue.
Text
How to Add Fonts to Cricut for Your Crafting: Stepwise Guide
Fonts are a great way to create designs with your Cricut. But, have you ever wondered How to Add Fonts to Cricut? All the old fonts are overrated and sometimes even boring. Luckily, some websites offer some good fonts for your everyday needs. So, you can add these fonts to your Cricut to create various projects such as shirts, coffee mugs, etc.
I will show you all those websites where you can get newer fonts and download them for Cricut. Therefore, this guide will help you understand the download process for all the newer fonts you are looking for. Let’s get started!
What Are the Top Websites to Get the Latest Fonts for Cricut?
When you are looking for the best Cricut font online, you might come across several websites. But how do you know which is best? Basically, there are many top websites you can directly search for on your browser.
For instance, you can search for Creative Fabrica, Dafont, Fontspace, Font Freak, Creative Market Font Bundles and many more such websites. All these are top sites for getting the latest fonts for Cricut. Hopefully, you will get your desired fonts on these sites easily.
How to Add Fonts to Cricut on Windows 10?
If you have a desktop computer like Windows, you can easily access the newer fonts on your Cricut. There are some easy steps you need to go through to download and install them correctly. Have a look at them.
Go to your browser, search for the website, Cricut.com/setup and download its file.
Then, find the downloaded file in the Downloads section.
Now, navigate to your downloaded file and open it by right-clicking on it.
After that, select the Extract option to open the file you downloaded.
At last, right-click on your file and hit the Install button.
That’s how you’ll get the new fonts for Cricut.
How to Add Fonts to Cricut on Mac?
When you are using a Mac computer, you can follow these steps to access your new fonts for Cricut. Learn the steps from here.
In the first step, download a font file on your desktop.
Then, head to the downloaded folder and double-click on the file to extract it.
Now, choose your fonts and open the Menu.
After that, choose Open with and then hit the Font Book option.
Next, a pop-up option will appear to install the latest fonts.
At last, hit the Install button to begin the installation process.
Finally, you got the Cricut fonts on your Mac device. Let’s learn the steps for smartphones.
How to Add Fonts to Cricut on Android/iPhone?
If you don’t have a desktop computer and you want to download the latest Cricut fonts on Android, use these steps to do it correctly.
For Android
First of all, you need to install a font manager app through the Play Store.
Then, download the desired fonts from it.
Now, move to the Downloads section where these files are stored.
After that, extract that file and unzip it.
Next, open the font app and head to the My Font option.
Then, click on the My Font option.
At last, click on the Set option to complete the installation.
Now, you can use your new fonts in the Design Space.
For iPhone
You can easily download fonts for Cricut on your iPhone or iPad. Use the steps below to get it.
Firstly, head to the App Store and install a font manager app.
Then, download that font on your system.
Now, your file will be downloaded in .zip format.
After that, unzip your file and open your font manager app.
In the following step, hit the Font Finder option.
Next, choose the Open Files option and move to the font file you like to install.
Click on the Installer tab and hit the Install button.
Hit the Continue button and select the Allow option.
Then, you can close the app and head to your Settings.
Afterward, tap on the Profile Downloaded.
Also, hit the Install button.
You will receive a message saying Profile Installed.
In the last step, click on the Done button.
Now, you can freely use your new fonts in the Design Space.
Conclusion
I have shared the process of how to add fonts to Cricut?. If you are bored of using old fonts every time, it’s time to give yourself a new start with the latest Cricut fonts that you can download from the best websites on the internet. I am sure you’ll get some of the best fonts for everyday use. All you need to do is browse a website to download your desired fonts, and then you’re all ready to access them on your Design Space software.
FAQs
How to Add Fonts to Cricut Online?
If you want to add new fonts to Cricut online, you can do it easily in a few simple steps. You need to select a top website that offers all the latest Cricut fonts like Dafont, Fontspace, Creative Fabrica or any website and download the font from them. Once you have the downloaded file, you can extract it and add it to your Design Space.
How to Upload New Fonts to Cricut?
If you have to use a new font in your Design Space, you can use these steps.
In the first step, download a font you like from any top website.
Then, extract your downloaded file and unzip it.
After that, double-click on your file.
Continue with the on-screen prompts to install the font file on your desktop.
Next, launch your Cricut Design Space software.
Then, select the New Project option.
Now, you need to add a new text box.
At the end, you can hit the drop-down menu to select a font.
How to Unzip My Downloaded Font File?
To unzip your downloaded font file, use these steps.
First, right-click on the .zip file.
Then, hit the Extract option.
After that, choose the TrueType or OpenType file.
Next, right-click on the file and click to install it.
Finally, tap on the Yes option to allow changes.
Source: How to Add Fonts to Cricut
Visit here for more Information: Cricut.com/setup
Cricut explore 3
Cricut Design Space
#How to Add Fonts to Cricut#cricut.com/setup#cricut explore 3#cricut maker bundle#design space cricut#Cricut Design Space
0 notes
Text
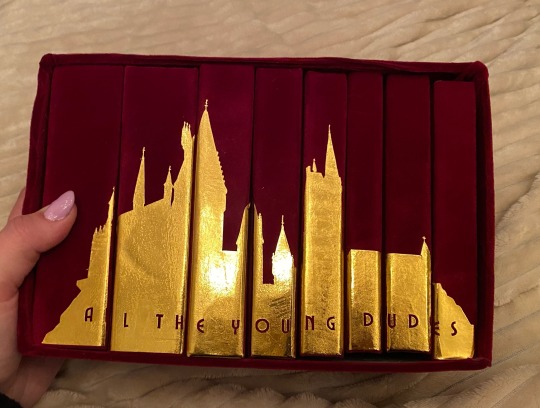
this is the one. the most popular fic in the harry potter fandom. the fic that got me into fanfiction. the fic that i sobbed to for months after reading it.
i tried to bind this three separate times over the last two years and bro the first two sucked ASS. it was legit the very first fic i tried to typeset which is like, not the greatest thing to start off with LMAO. it looked funky, i hadn’t fixed any of the spacing, my footers didn’t match the text font or size. it was very much a baby binding.
the second one was my first time using a cricut and there is a very steep learning curve w the cricut, especially in creating designs that aren’t too complex or too plain. i tried to copy one of the popular printable book jackets and omg i spent weeks modifying my designs and printing and reprinting on my cricut and it looked like trash when i was done.
so finally, we have come to this.


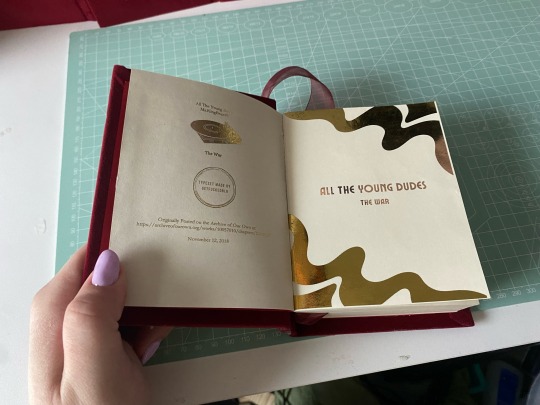
i got really into quartos during the winter and was like omg the editing process for this would be so much more manageable if i broke it down into years! so then i did lol. it allowed me to customize each chapter into sections so i could add the chapter title to the footers, and break down graphics into separate years so i didn’t have 100 pages in one canva file. it was just a lot easier to feel accomplished having broken it down bc this fic is a MONSTER.
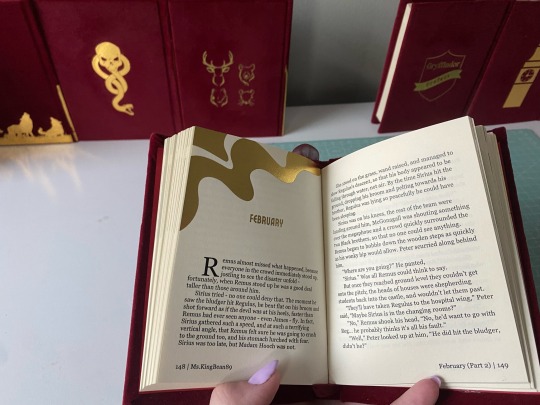
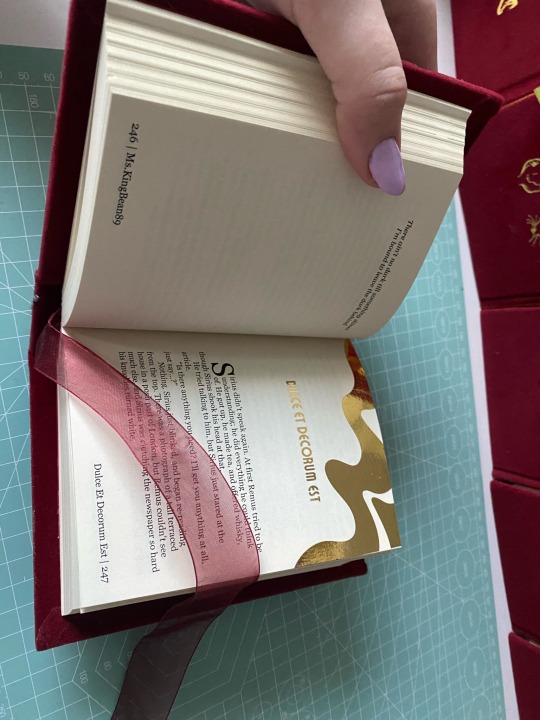
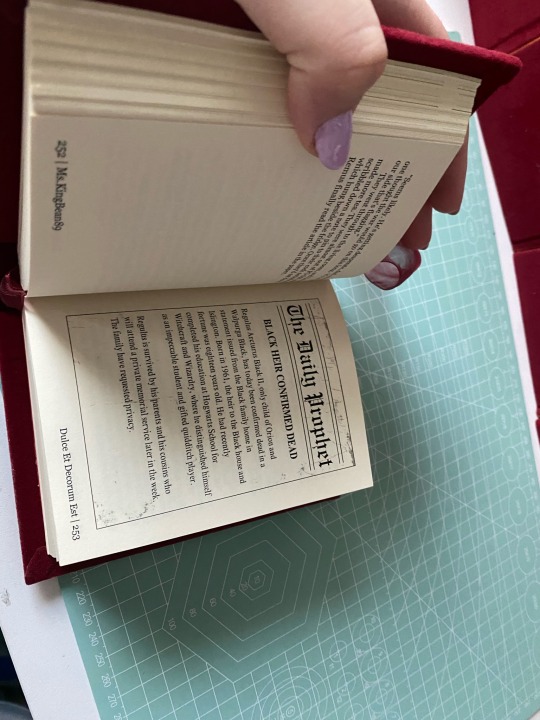
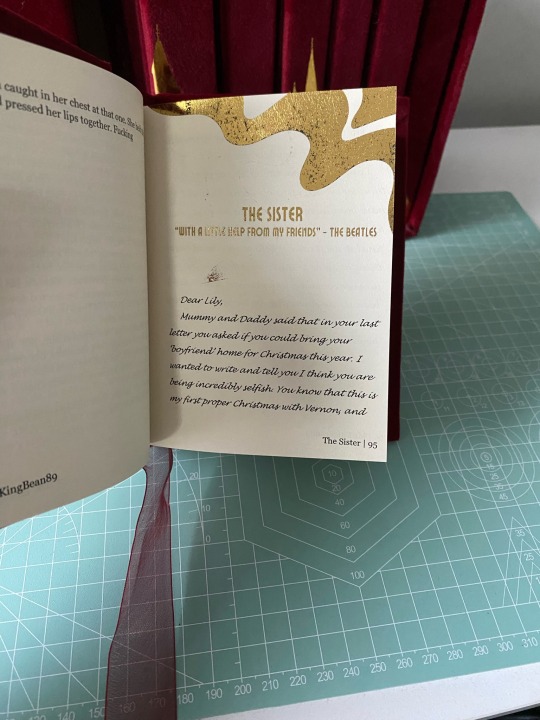
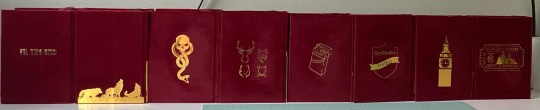
every chapter heading is the same - just the swirl. i gilded all the chapter titles using toner reactive foil and my laminator (she broke in the middle of this project. i ended up having to buy another laminator, and about 3 packs of foil from icraft. this is my most expensive fic binding to date🫠). i included the songs ms.kingbean put at the top of every chapter, and the bootleg tapes and christmas special.
i am seriously so proud of how this turned out, and can’t believe it’s actually done. sorry this is super long, but this really was a labor of love. they’re not perfect, i’m still really bad at measuring and cutting straight lines, but i’m satisfied. really satisfied.
#fanfiction#harry potter#harry potter fanfiction#bookbinding#ao3 fanfic#fanbinding#wolfstar#atyd#atyd marauders#atyd fanart#atyd fandom#remus lupin#sirius black#grant chapman#bound in peel and stick velvet flocking#chipboard#and gold htv#fucking hell it’s DONE!!#typesets in my drive#free for personal use#don’t sell fics!!
184 notes
·
View notes
Text
@bropunzeling tagged me for the sentences thing except I haven't written in one hundred years and probably never will again... here's some wip stickers tho. I'm havin a great time with the mere concept of cricut

Pride Henry beloved...making me work so hard to cover up a) the adidas logo, b) the fact that he was cropped weird in the first place on the ig story. Looking at this on the small screen i think i need to adjust how dark his face is.


One in sunshine colors, one in the barracuda's old colorway as is normal, mostly I need to print out and see if the font is readable from afar before i do anything else. These are bumper stickers but I am thinking of bags too 😭 guys there really was a situation on the cricut site.
And finally for fun: Demers yaoi courtesy of a screen shot by i think Neon that I need to watch more videos to see if a cut around them aould hold up with that much space between their heads, or if I need to add a border of some kind.

In conclusion I am very stupid. But i am having fun. I think bc there is zero percent chance of me making more $2.5k on this stuff, the tax implications are minimal so maybe I will set up a lil shop to go through these materials.
#fresno oilers.create#it's not even a side gig i feel like i'd do runs of like 3-5 items per#i just bought. so much stuff lmao#nutrionist appointment was really good i am hoping therapy tomorrow is also good#when my therapist has a project it tends to go better 😑
17 notes
·
View notes
Text
Arsenal 2024-2025 Home Kit Font – Customize Your Jersey with the Official Champions League Design
The Arsenal 2024/25 Home Kit has arrived, paying homage to the club's rich history. Created by Adidas , it features the Canon crest for the first time since 1989-1990. It also comes with a special Champions League edition , making it a must-have for Gunners

Now, you can bring the Arsenal 2025 look to your home. Our Arsenal 2025 Font Pack lets you customize your jersey with your name or favorite player's number.
👉 Get the Arsenal 2025 Font on Etsy Here
🔥 Kit Design: Modern Edge Meets Classic Spirit
The Arsenal 24-25 home shirt boasts a deep red base with white Adidas logos and dark blue side detailing . The return of the Canon crest adds a touch of nostalgia, blending retro charm with modern style.

This kit is available in authentic and replica versions. Its UEFA Champions League edition adds an extra layer of exclusivity.
⭐UEFA Champions League Edition
This year's Champions League version of the Arsenal jersey keeps the iconic red. It features slight design tweaks and official UCL player fonts . It's perfect for fans who want to bring European magic to their homes.
🏆 What Is the UEFA Champions League?
The UEFA Champions League (UCL) is Europe's top football tournament. It brings together the best clubs from across the continent. Teams must wear official fonts and badges during UCL matches. With this font pack, you can replicate that exact design on your own jersey.
🖨️ How to Use the Arsenal Font on Your Jersey
Our font lets you create personalized names and numbers that look like the pros. It's perfect for Cricut, Adobe, and other platforms. This digital download gives you all the tools you need.
youtube
✅ What's Included:
OTF + TTF font files (for installation)
Vector formats: AI, SVG, EPS (for Cricut, Silhouette, and more)
Editable numbers and letters
Compatible with printing methods like DTF or Heat Transfer Vinyl
🧵 How to Use:
Download the font after purchase
Install it on your computer (double-click OTF/TTF files)
Design your custom jersey using tools like Canva or Cricut
Print your design using DTF paper or HTV
Apply the print to your shirt with a heat press
Wear or gift your personalized football jersey!
��Top 5 Design Tools to Use with Football Fonts
Canva – Great for beginners and mockups
Cricut Design Space – Ideal for custom cutting
Adobe Illustrator – Best for vector editing
CorelDRAW – Strong alternative for pros
Inkscape – Free and powerful for advanced users
🛍️ Why Buy from Etsy?
Etsy is a trusted place for digital and handmade items. Buying from our official Etsy shop means you're supporting an independent designer who loves football. You get instant, secure downloads in high-quality formats for printing or digital use.
Plus, you're protected by Etsy's buyer protection . This gives you peace of mind with every purchase.
👉 Get the Arsenal 2025 Font on Etsy Now
❓ FAQ – Arsenal Jersey Font
Can I customize with my name or favorite player? Yes! The font is editable, so you can add any name or number.
Can I use this font with Cricut or Silhouette? Absolutely. The pack includes SVG and AI files for vinyl cutting.
Is this an official font? It's a high-quality fan version inspired by the Arsenal 2024/25 UCL kit font .
Can I sell jerseys with this font? It's for personal use only , not for selling printed goods.
What's the best way to print the design? We recommend using DTF (Direct to Film) or Heat Transfer Vinyl for the best results.
#Arsenal#Arsenal 24-25 font#Champions League#Font Football#font#font design#fonts#fonts & typography#football#football jerseys#football numbers#jersey#premier league#ucl#ucl 24/25#uefa champions league#Youtube
4 notes
·
View notes
Text
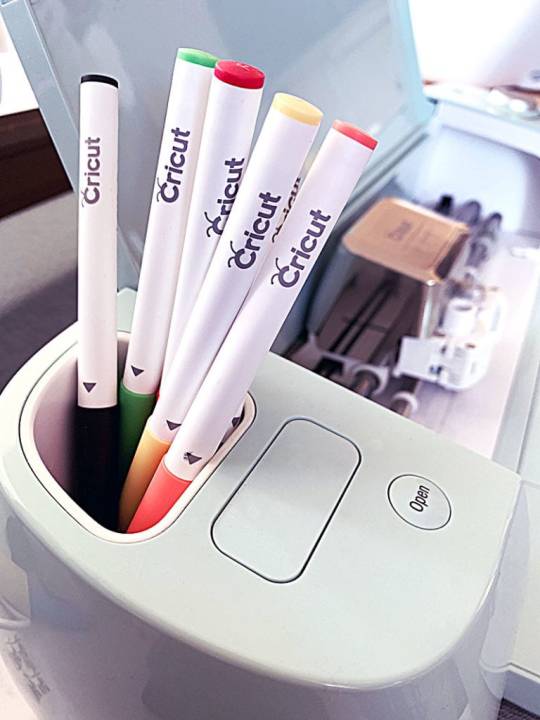
How to Use Cricut Pens? (Easy Steps!)
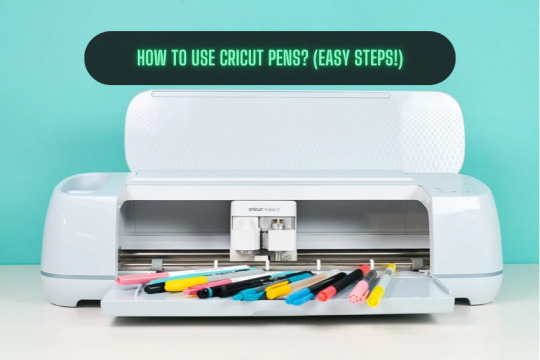
If you are a Cricut user, then surely you know that this brand makes some smart tools and machines. You know about its capabilities and how useful it is. But did you know that apart from cutting materials, you can use pens to simplify the crafting process significantly? But how to use Cricut pens? Cricut machines are not only used for cutting different shapes out of paper or vinyl. These machines use pens to create doodles, illustrations, and intricate designs. However, you need to know some basic steps you need to perform when you are designing your projects to make them better.
Using the pens is easy and straightforward, but the important thing is that you know the process. Read this blog to discover all about Cricut pens and what projects you can make with them.
What Types of Cricut Pens Are Available?
All of the current Cricut machines can use a pen, whether Maker, Explore, or Joy. The Maker and Explore machines have interchangeable pens, and Joy has a lineup of small pens. Joy pens are incompatible with other machines due to their unique, smaller size. Before you proceed with how to use Cricut pens, here is the list of pens that you can use with the machine:
Fine Point Pens
This has an F stamped on it for fine, has a 0.4mm tip, and comes in multiple colors.
Extra Fine Point Pens
These are finer, and the pens are just 0.3mm thick.
1.0 Pens and Markers
They have a thickness of 1.0mm and can be called markers, too.
Gel Pens
Gel Pens have a roller ball instead of a tip and are 0.8 mm in size.
Glitter Gel Pens
It has a roller ball and is 0.8 mm in size.
Calligraphy Pens
These pens have a gray barrel and have C stamped to denote calligraphy.
Infusible Ink Pens
It has a 1.0mm tip, and it is used for sublimation and infusing the ink on the surfaces.
How to Use Cricut Pens: Easy and Simple Steps
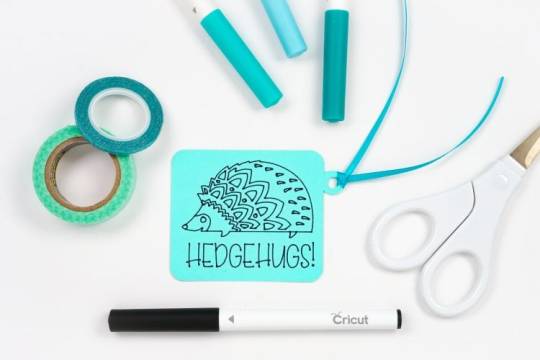
Placing or installing pens is easy, but if you are a beginner, then it will be a new thing for you. Always use the pens carefully, and pens should always be fitted to the clamp A of the cutting machine. Here, I am going to show you something different about using Cricut pens to create a simple gift tag. Now, let’s look at the below process to understand how to use it:
First, go to the Design Space and click on a new project to create a design.
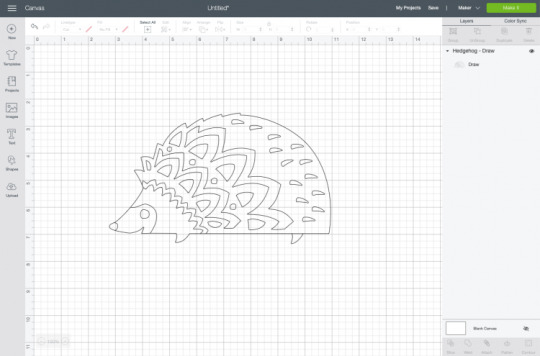
Then, create a design, or you can choose a text that you want to use with your pen. Cricut Design Space has its own vast library of images for your DIY projects.
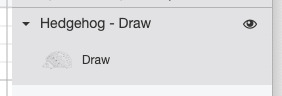
Now, remember you have to draw, not cut the image. So, go to the Edit toolbar, and from there, select the Draw option in the Layers panel.
When you click the colored square box next to the line type dropdown, you can select the type of pen and choose the Fine Point pen.

After you have completed drawing your design, it is time to add text. In the Font menu, you can filter by Cricut Writing fonts. Choose the writing style font.
You can insert a shape into your Canvas. Then, using the Align tool, you can change its size and color and move it to the back of your Canvas.
Next, select your drawing and text layer and click Attach on the right-hand side of the Layers panel.
On the preview screen, your image will appear on the mat. Click Continue, and in the Make screen option, select the material you are using. Here, I am using cardstock. The Cricut Design Space app will prompt you to insert your pen, and you can use a fine-point blade.
In the last step, you have to insert your mat into the machine, and your machine will draw and cut the tag.
Conclusion
Now you know how simple it was to learn ‘how to use Cricut pens‘.? In this post, I have explained the types of pens and how you can craft your project with the pen. After reading this blog, you can choose a pen for your project, load it into the machine, and start crafting. Start crafting with your pen and unlock the full potential of the machine.
FAQs
How Do You Load the Pen Into Cricut Machine?
When you open the machine, you will see two clamps: Clamp A and Clamp B. To load the pen into your cutting machine, open Clamp A and insert the pen into it. Gently press the pen into the clamp until it fits properly, and you hear a click sound. Then, close the cover, and you are ready to use the machine.
What Are Cricut Pens?
Cricut makes different types of pens, which are great ways to add drawn or handwritten details to your projects. Cricut pens come in different sizes and can be easily loaded into the machine. This can be used for various creative projects, such as writing on gift tag cards or adding doodles.
What Is the Difference Between Cricut Pens and Markers?
A Cricut pen usually has a fine tip, which allows it to create a thinner line, compared to a marker, which has a thick tip and creates a thicker line. Pens are ideal for writing detailed text, signatures, or fine lines within a design, whereas markers are better for filling large areas with color.
Source: How to Use Cricut Pens
#how to use Cricut pens#cricut design space download#cricut design space app#cricut maker#cricut joy#cricut pens
4 notes
·
View notes
Text
Word Play: Crafts That Come Alive with Fonts & Lettering
Today’s lesson is a love letter to letters. Whether you're printing out bold block text for a home sign or hand-lettering a dreamy quote on a canvas, fonts aren't just visual tools—they’re personality with punctuation.
Fonts make crafts speak—literally. So, let's explore fun, beginner-friendly projects where choosing the right typeface is part of the magic.
Why Fonts Are a Crafty Game-Changer
Instant emotion. Serif says classy, sans-serif says modern, script says “I own scented candles.”
Customizable text. Names, quotes, phrases—you’re in charge.
Perfect for gifts. Nothing says “I care” like your friend’s name in glitter vinyl.
Lettering is meditative. Seriously, ask any calligrapher—they vibe hard.
Your Typo-Toolbox (aka Crafting with Fonts Starter Kit)
Whether digital or analog, you’ll want:
Printable letter stencils or font templates
Transfer paper or carbon paper (for tracing)
Paint pens, brush markers, acrylic paint + fine brushes
Cricut or Silhouette (if you're fancy)
X-Acto knife (for DIY stencils)
Ruler, pencil, and eraser
Your favorite fonts downloaded and ready to roll!
And of course—a surface to letter on! Think canvas, wood, paper, jars, fabric banners, even plant pots. (Yes, your ficus wants a name tag.)
Project 1: Custom Canvas Quote Art
Perfect for wall décor or gifts, this is modern-day embroidery for your brain.
What You’ll Need:
Blank canvas or thick paper
Chosen quote or word
Printer + font (or hand-lettering skills)
Transfer paper or lightbox
Paint pen or brush
Steps:
Choose your favorite short quote.
Select a font (script + serif combos are trendy).
Print it out, place it over your canvas with transfer paper underneath.
Trace lightly with pencil.
Go over it with a paint pen or brush.
Add background color, doodles, or washi tape flair.
Font suggestion:
Bold & Friendly? Try Fredoka One
Elegant Script? Try Great Vibes
Rustic Modern? Go Playfair Display + Raleway combo
Project 2: Personalized Wooden Name Signs
These are great for doors, desks, weddings, or bedroom walls. Level-up points if you’re making them as gifts!
Materials:
Wooden board or plaque
Chosen name or word
Cricut (or print-and-trace method)
Acrylic paint or vinyl
Sandpaper (for prep)
Optional: embellishments like flowers, rope borders, mini lights
How-To:
Sand the board for a smooth base.
Either cut the word out with a Cricut or print and trace it using transfer paper.
Paint the letters or apply vinyl.
Add decorations to match your theme.
Font Mood Tip: Want something whimsical? Try Pacifico. Want sleek modern? Use Montserrat Extra Bold.
Project 3: Hand-Lettered Glass Jar Labels
Cute and functional? Now you’re talking.
You’ll Need:
Empty glass jars (mason jars work great)
Paint pens (oil-based for glass)
Rubbing alcohol (clean the surface first!)
Printed font or handwritten labels
Steps:
Clean jar surface thoroughly.
Use printed font as a guide (trace on paper and tape inside the jar for guidance).
Letter your labels on the outside.
Let dry fully and cure if needed.
Now your pantry screams “organized adult” instead of “where’s the sugar?”
Crafting Mindset: Fonts Are Feelings
Don’t overthink your font choice—but do consider the vibe.
Balance readability with personality.
If you make a typo, well… now it’s an abstract art piece.
Mixing fonts = spice of life, just don’t use 5 at once unless you’re going full chaos goblin (in which case, I respect it).
Unique Fact of the Day:
Comic Sans was designed to mimic comic book lettering— but get this: it was originally meant for a Microsoft dog assistant program in the '90s. So the next time you see it in a serious memo, just remember—it was never supposed to be serious in the first place.
https://letterhanna.com/word-play-crafts-that-come-alive-with-fonts-lettering/
0 notes
Text
How to Make Car Decals with Cricut? (Easy Steps!)
Wants to Know about “how to make car decals with Cricut“? If you are a car owner, you might have considered making car decals. Having a Cricut machine opens up endless possibilities for creating custom car decals with vinyl. There are different Cricut machines that you can use to make card decals. Therefore, learning how to make a car decal with Cricut.
To create a car decal, you should use permanent vinyl, which is known for being dust-proof and durable. You can choose the Design Space software or upload your design. Vinyl car decals are a fun way to customize your car and show creativity. And with this easy guide, it is more fun and easier than you think.
Before you learn to make a car decal with the help of your machine, you should know what a decal is. A car decal is like a decorative sticker applied to a car for various reasons. This can add a touch of style to your car. Car decals are made from vinyl and are designed to be transferred from one surface to another.
What Supplies Do You Need for Car Decals?
Before moving on to how to make car decals with the crafting machine, it is important to know you have to gather all the supplies. So, follow the below list of materials:
How to Make Car Decals with Cricut: 6 Easy Steps
Now, you are ready to learn ‘how to make a car decal with Cricut‘. You have to follow the instructions below to learn it:
Step 1: Upload a Design
First, open your Cricut Design Space and create a design for your car decal. You can also choose a design from the Cricut library. However, you will use an SVG file here to design this project. You can upload it on the app from your computer.
To upload a design, you should first go for a new project in the Cricut Design Space and then click the Upload option.
Step 2: Add Text and Click Font
After uploading the design, you need to edit it. You can edit the color, size, and shape of the design. Now, git on the Text button and type the words that you want to put on your decal. Next, go to System and choose the Font option that is suitable for your project.
Step 3: Adjust and Attach the Size of Design
Change the design and, if needed, adjust it to make it a little smaller. Select all, click the Unlock button at the top, and change the width and height. When you finish the design, you can start cutting it on the crafting machine. After that, hit the Attach button so that everything cuts together, and you are not left struggling with single letters.
Step 4: Cut Your Design
Now, you have to cut the design on the Cricut machine. You should start by putting the vinyl on a mat and inserting it into the machine. Depending on the size of your design, you can choose any Cricut machine.
When the material and design are ready, click on the Make It button in the screen’s upper right corner. You will see the design on the computer screen when the machine is cutting it. Once the cutting is complete, you need to unload the mat.
Step 5: Weed Out the Design
Once you have weeded out the project design, apply transfer paper to the top of your decal and use the scraper tool to ensure everything is sticking properly. Now, you have to apply your decal to your vehicle.
Step 6: Transfer Design to Your Car
Afterward, transfer the design to your car. To transfer the design to the car, you should use transfer paper. Cover the entire design with tape and use a scarper so that the design sticks to the tape well. Next, you have to place the design on the car and use the roller or scarper to apply it well on the car. Carefully remove the tape and apply your car decal to it.
Summary
With the easy steps above, you understand how to make a car decal with Cricut. You need to choose a design and gather all the required art supplies and tools, and you can get started with your decal. Make sure you are using permanent vinyl and follow the above steps. You can easily personalize and enhance your car’s appearance with this permanent vinyl decal. Take advantage of your crafting machine to transform your car today.
Frequently Asked Questions (FAQs)
What Supplies Do You Need to Make Car Decals?
To make car decals on a Cricut machine, you need other supplies. However, the most important thing would be permanent vinyl. Apart from that, you need a cutting machine to cut the design for the car decals. You will also need a standard grip mat to help the material cut the design. A standard grip transfer tape will be required to transfer the design to the car. And, of course, you need a crafting machine to cut the design.
Which Machine Do You Need to Make Car Decals?
You can use any cutting machine to make car decals. But if you have to make a specific decal, you can use a specific Cricut machine. For example, if you make a relatively small design, you can use a smaller machine like Cricut Joy. But if you are making a bigger design, then you will not be able to cut it on a smaller machine. You will have to use a machine that can cut big designs like Cricut Maker, Maker 3, and explore.
What Kind of Vinyl Is Required for Car Decals?
The best vinyl for making car decals on a Cricut machine is permanent vinyl. The best thing about it is that it lasts long. The reason for using this vinyl is that it has a long-lasting life and is a durable, permanent outdoor vinyl with a strong adhesive. It can withstand extreme weather conditions.
Visit: cricut.com/setup
Source: https://cricutsetjoy.com/how-to-make-car-decals-with-cricut-easy-steps/
#cricutcomsetup#cricutdesignspace#wwwcricutcomsetuplogin#cricutexploreair2setup#designcricutcomsetup#installcricutexploreair2#cricutsetup#cricutsetupforpc#cricutdesignspacesetup#designcricutcomdownload#cricutdesignspacedownload#cricutdesignspaceonline#cricutdesignspaceapp#cricutdesignspacedesktop#cricutaccountsubscription#cricutaccess#Cricutexploreair2setuppdf#cricutexploreair2download#supportcricutcom#cricutnewmachinesetup#cricutaccountlogin#cricutdesignspacelogin#cricutsoftwareapp#cricutdesignspacefree#cricutsetupforwindowsandmac#cricutcomregister#cricutmachinesetup#cricutlogindesignspace
1 note
·
View note
Text
How to Download Images From Cricut Design Space: Full Guide

If you are new to the Design Space app and want to know how to download images from Cricut Design Space, then you are in the right place. Most beginners and crafters wish to learn how to download and upload images to the Cricut app. But let’s know a bit about the Design Space app. It is a free digital design app that allows you to cut and draw for the Cricut machine and is compatible with desktop and mobile devices. And to cut with it, you need to use Cricut cutting machines.
Suppose you intend to learn the full download process of the image. Read this blog.
Functions of the Cricut Design Space App
This app allows you to create your designs online and offline. We have compiled the software’s functions and then read them to learn.
It lets you make your designs, cut, and edit your craft projects with the help of easy tools.
You can use pre-designed images and fonts for your crafts.
You can edit the pre-made projects if required.
You can connect to Cricut Explore and Cricut Maker machines using Bluetooth.
It has a feature to auto-save projects.
How to Download Images From the Cricut Design Space App
Follow the below steps to learn the process of the Cricut Design Space app:
Step 1: Search and Download an Image
First, switch on your device and search for the image you want to download in the search engine. When you are done searching and choosing the picture, right-click on it and click the Save as Image to Downloads option. The image will be successfully downloaded to your downloads folder.
Step 2: Upload the Image to the App
Now, open your Cricut Design Space app and sign in with your Cricut ID and password. Next, a new web page will appear. Click on the New Project at the top right-hand corner of the page.
On the left side of the page, under the Menu bar, click on the Upload tool to upload the image, and then browse to open the downloaded pictures in your folder.
Step 3: Remove Background From the Image
To remove the background, use the background remover tool and select the background of the downloaded image. Then, click on the places you want to make the changes and click the Apply and Continue button on the bottom right side of the page. Another method to remove the background image is to choose the Cut Image and remove the background of your downloaded image.
Step 4: Upload the SVG File to the Design Space App
After following the above steps, tap the Upload button at the bottom right side of the page. Navigate to Recently viewed images, and you can locate your edited photos. Then, choose the image and click on the Add to Canvas button to add it. Then, resize and select the Make It option. Select the image on the cutting mat and proceed towards the cutting process.
Methods to upload images
Here are the steps you need to follow to upload basic and vector images on Design Space app:
Method 1: Uploading Basic Image
Choose the basic JPG, GIF, or PNG images and drag them to your Design Space app Upload window. Then, choose the image type and click on the Continue option. Next, select the Crop tool to remove, erase, or restore unwanted background. If you wish to preview the edited image, look at the preview button on your screen and modify it according to the project’s needs. Afterwards, select the Continue option.
Method 2: Uploading the Vector Image
On the contrary, if you use vector and complex images, .svg or .dxf file to the file selector and select the Open option. Then, drop the file in the image upload window, give it a name, and click on the Upload box. Then, search for your vector file by inserting its name inside the search bar.
Then, choose the file. It will be directly moved to your Cricut app canvas. Finally, the images designed with layers will appear as grouped images. After ungrouping the photos, you can move and change their size separately according to your project.
Conclusion
After reading this guide, you will know how to download images from the Cricut Design Space app. It opens the possibility of making your projects with the Design Space app, and you can do endless projects with it. Keep designing and using the cutting machine to unleash your creativity and make new projects.
FAQs
Where can we find uploaded images in Cricut Design Space?
Follow the steps below to learn how to find the uploaded images in Cricut Design Space.
First, open your Cricut Design Space app.
Then, under the Menu panel, click on the given Images option.
Now, from the list, you can find all the downloaded and uploaded images by name.
Also, you can find the image in the Upload section.
Can you search for the project without an internet connection?
No, you cannot search or browse through the projects or images without an internet connection. However, you can use the offline features if you have saved the downloaded file to your computer. You can find your saved projects on the home screen, or you can also click View All to see all your saved projects.
How do you download free images from the Cricut Design Space app?
There are some quick and easy steps by which you can download free images:
Open the Design Space app in your system.
Create a new project.
Then, click on the images from the bottom navigation.
Now, select free under Highlighted Categories.
All the free images will be displayed.
#how to download images from cricut design space#cricut design space app#cricut design space download#cricut design space software#install cricut design space app#cricut software app#cricut new product setup
1 note
·
View note
Text
How to Download Cricut Design Space on Laptop: Easy Tutorial
Cricut Design Space is an official software program. It helps you use your cutting and heat press machines. You create or upload a design to the app and make your beautiful projects. To start working on it, you need to download it on your computer or laptop. Here, you will learn how to download Cricut Design Space on laptop. So, read the blog until the end, and then you can easily download and install the app on your operating system.
Although it is a free app, you can also purchase the premium Cricut Access. It gives you much more designs, images, and fonts for your crafts. However, the software will be good enough if you are a beginner. Now, let’s start with the minimum system requirements for using the software on your laptop.
Minimum System Requirements for Cricut Application
Before you get the app tutorial, you need to know your laptop’s system requirements. The laptop needs to have certain features to work with the software and run its features smoothly. Design Space works great with Windows and Mac laptops. However, it does not support Chromebook computers.
For Windows: If you have a Windows laptop, make sure it’s running Windows 10 or a newer version. The CPU needs to be an Intel dual-core processor or its equivalent.
For Mac: If you are using a Mac, it must run on macOS 11 or later and have a CPU of 1.83.
RAM: It has to be 4GB, and it should have 2GB of free disk space.
Bluetooth or USB: The machine must have either a Bluetooth or USB port or both to connect to your devices.
Display: 1024 x 768 px screen resolution is the minimum requirement for the screen.
Internet connection: The laptop should have a good and stable internet connection to download and upload SVG files. The speed for downloading should be 2-3 Mbps, and for uploading, it should be 1-2 Mbps.
Memory: The memory requirements of the laptop depend on your craft projects.
How to Download Cricut Design Space on Laptop (Windows)
Once you have checked the system requirements on your laptop, you can start to download the software program. If you have a Windows laptop, this is the process you should follow to download and install the app:
To initiate the app downloading process, open your windows laptop and go to cricut.com/setup.
Then, you will see a link on the app that says Download. You have to click on it to start downloading the app. But before that, you will have to agree on Cricut terms, and for that, you will need to tick the checkbox.
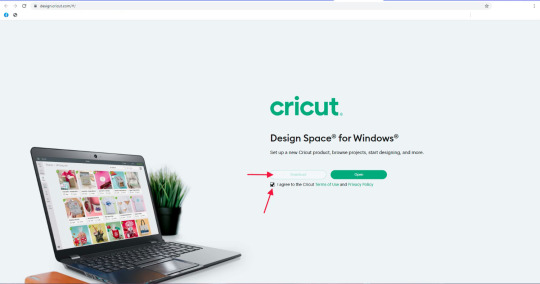
When you click on Download, the app will start to download. When the downloading is done, you should go to the Downloads folder on the device and open the file by clicking on it.
After that, a new window will open on the computer screen, which means that the app has started to install.
Once the app is installed, open it and either log in or create an account. Then, you can start using the software on your device.

You can choose to add the app icon to the taskbar on your laptop.
How to Download Cricut Design Space on Laptop (Mac)
Just like a Windows laptop, you can download the program on a Mac system. The MacBook is compatible with the app, and you can install it from the official website. These easy steps will help you download the app.
First, open your Mac laptop and connect it to a stable wireless network.
Then, navigate through cricut.com/setup and look for the Design Space app.
Next, agree to the terms and conditions and click on Download.

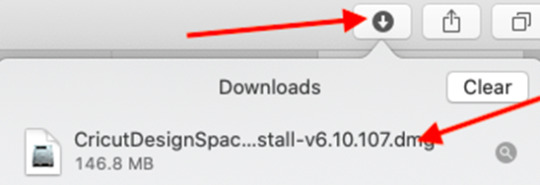
Now, choose a folder on the device screen to download the app. You can leave the option if you don’t want it; the app will be saved in the default folder - Downloads folder.
After downloading the file, go to the folder and double-click on the file.
Now, you will see a window on your device with two icons. You will have to drag the app icon into the Applications icon.
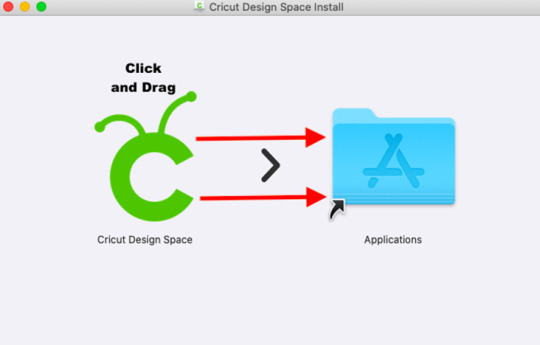
After that, open the Applications icon by clicking twice to launch the application.
Finally, you have to open the app and log in with a Cricut ID.
Conclusion
Here, you read how to download Cricut Design Space on laptop (Windows and Mac). The app is essential for Cricut machine users, especially when you are a beginner. As a beginner, you can learn how to use the software program and all its features for free. Following the instructions, you can install the app on your laptop and log in with your account. After that, you will be able to use the app to work on your projects.
FAQs
How Can I Download Cricut Design Space on My Laptop?
To download the app on your laptop, you have to follow the steps below:
First, open your laptop and visit cricut.com/setup.
Then, find Design Space and click on Download.
Next, open the file from the Downloads folder and click on it twice.
After that, the app will start to install.
After the app is downloaded, log in to use the app for your projects.
Why Am I Unable to Open Cricut App on My Laptop?
If you are unable to open the software, there are a few reasons for that. You should check these things, and the problem will be solved. First, you have to make sure that you are using a laptop that is compatible with the app. After you make sure that you are using a compatible laptop, you must check that the app is up to date and that you are not using an old version. After that, you will be able to open the software on your laptop.
How Can I Setup Cricut on My Laptop?
If you want to set up a machine on your laptop, you should follow these steps:
First, you should turn on the machine after plugging into a wall socket.
Then, connect the machine to your laptop using Bluetooth.
Next, download the software app to your laptop.
Now, log in with a Cricut ID or create one if you are new.
After you log in, the machine setup is done.
0 notes
Text
Cricut You and Me Forever and Always Love Sticker for My Wife
Celebrate your eternal love with our exquisite Cricut You and Me Forever and Always love sticker for your wife. This beautifully designed love sticker for my wife captures the essence of your unwavering affection, making it the perfect gift to express your feelings. Whether it's for an anniversary, a special occasion, or just to remind her how much she means to you, this love sticker for wife is a heartfelt gesture that will surely bring a smile to her face.
Crafted with precision using high-quality materials, this love sticker kiss design features elegant fonts and delicate details that add a touch of sophistication to any surface. Ideal for laptops, water bottles, journals, or scrapbooks, this versatile sticker is easy to apply and durable, ensuring your message of love remains intact.
Show your wife how much she means to you with this unique love sticker. Perfect for everyday reminders of your bond, the Cricut You and Me Forever and Always love sticker is a beautiful way to keep your love story alive.
#loveandkissstickers#loveandromanticstickers#lovecoupleromanticstickers#lovecouplesticker#lovecutecouplestickers#lovecutesticker#loveeveryonesticker#loveisintheairsticker#lovekisshotsticker#lovekisssticker#lovelinesticker#lovemessagesticker#loveshapestickers#lovestickerforher#lovestickerformywife#lovestickerforwife#lovestickerkiss#lovestickerline#lovestickerlogo#lovestickersprintable
0 notes
Text
How to Use Pens on Cricut: A Complete Guide for Beginners
If you are a Cricut user, then you are likely familiar with its capabilities and versatility. It is well-known that Cricut is a leading brand of crafting machines, but did you know you can also write and draw with them? Yes, Cricut machines can create beautiful designs! Here, I will explain how to use pens on Cricut.
Using a Cricut pen is straightforward, but knowing the process is essential. You just need to understand which pen is suitable for your DIY project and how to use it on your Cricut machine. So, let’s get started with the different types of Cricut pens and markers they provide!
Different Types of Cricut Pens
Before we delve into the process of learning how to use pens on Cricut, it is crucial to understand the variety available and which pen suits your crafting project best. Here are the types of pens compatible with a Cricut machine:
Fine Point Pens: These have a 0.4mm tip and come in multiple colors.
Extra Fine Point Pens: It is an even sharper pen with a 0.3mm tip.
Pens/Markers: They have a 1.0mm thickness and can be used interchangeably.
Gel Pens: No tip, with a 0.8mm roller ball, suitable for glossy or textured materials.
Glitter Gel Pens: They are similar to Gel Pens but with glittering ink.
Calligraphy Pens: These are marked with a “C” and angled at 45 degrees for calligraphy.
Fabric Markers: They are made specifically for writing on fabric.
Infusible Ink Pens: For sublimation ink onto poly-coated surfaces, with a 0.4mm tip.
Infusible Ink Marker: A thicker version of the infusible ink pen with a 1.0mm tip.
Now that you know about all of the Cricut pens available in the market, you can select the right pen for your writing and printing needs.
How to Load a Pen on a Cricut Machine?
Before you start working on how to use pens on Cricut, it is important to know how to load the pen onto your machine. Cricut pens work only with newer models like Maker 3, Explore 3, or Joy. Older Cricut machines are not made to fit in pens, and trying to use them on such models, like Maker or Explore Air 2, may damage your materials.

When you open the machine, you will see two clamps: Clamp A and Clamp B. Clamp B is always created for the pen. Just open Clamp A, gently insert the pen until it clicks into place, and then close the clamp properly. After that, you are ready to continue your crafts using the Cricut pen.
How to Use Pens on Cricut in 3 Easy Steps?
Once you have loaded the pen into your machine, it will be ready to start. To begin your DIY projects, perform the steps in the section below:
Step 1: Create a Design on the Cricut App

These are the things you have to do to make a design:
In the beginning, open the Cricut Design Space app on your device and pick a canvas size for your design.
Then, choose the Writing option. Here, you can select your desired font.
Optionally, you can add images for a unique look to your design.
Type in your text using the chosen font, and it will automatically appear in the design.
After that, select the color you want for the font.
Finally, your design is now ready for writing.
Step 2: Choose the Material
Now, you should load the material on your Cricut machine.
Choose the material onto which you want to print your design.
Then, put the material onto the mat and insert it into your machine for printing.
Your material is ready for printing now.
Step 3: Cut the Material on Your Cricut Machine
Once you load the material into your machine, you can start the cutting process.
To start printing, press the Load button on the machine, which will start printing your design on the material.
Once the printing is done, unload the material, and your design is ready on your material.
Now, you can continue to cut it into your shape and place it wherever needed.
Conclusion
Now you know how simple and easy it is to learn the procedure of how to use pens on Cricut. This post covers all the essential things for using a Cricut pen. After reading this blog, you can select a pen based on your needs, load it into your Cricut machine, create a design, choose the material, and write or draw your design using the pen.
FAQs
What Is a Cricut Pen Used For?
A Cricut pen can be used for multiple purposes. Here are some of the things you can create with them:
Coloring pages
Sweet gift notes
Greeting cards
Kitchen pantry labels
Labels for your study-related items
Adding doodles
Birthday banners
Apart from these, you can create many more things.
How Can I Write on My Cricut Instead of Cutting?
If you prefer writing with a Cricut machine instead of cutting, it is possible. However, not all Cricut machines support the writing feature. Only the latest Cricut models like Maker 3, Explore 3, and Joy can write with a Cricut pen. In order to write in your machine, open clamp A, then insert the pen and close the clamp. After that, choose a design, load the material, and start writing.
Can I Write on a Fabric with a Cricut Pen?
Yes, you can write on any of the fabrics with a Cricut machine. But for that, you have to make sure you use the right tool—a special Cricut fabric marker. With this marker, you can create beautiful quotes and designs on t-shirts, tote bags, pillowcases, and various other fabrics.
0 notes
Text
7 Best Cricut Fonts for Wedding Signs to Elevate Your Decor
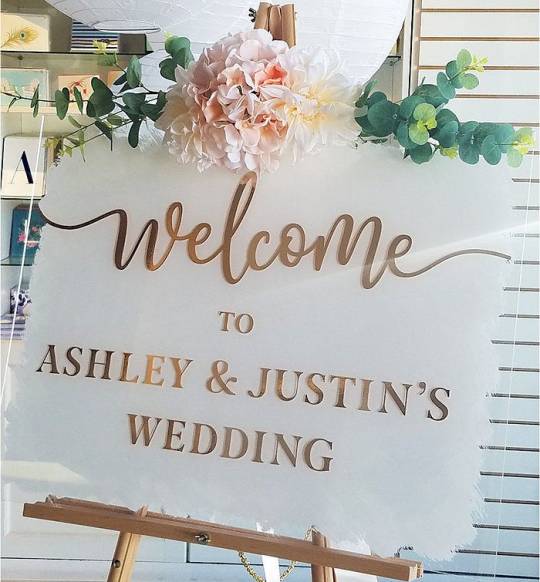
Recently, my brother Kevin got married, and I was responsible for the decorations, including invitation cards. As a pro crafter, I made all those cards and needed many different fonts to add text to them. Although many fonts were available on Cricut Design Space for free, I preferred to find some from the internet, too.
To my surprise, I had a collection of fonts that could be used for weddings if you are curious and want to know about the best Cricut fonts for your or your loved one’s wedding ceremony.
1. Always Loving
Choosing the best Cricut fonts for wedding signs is the most important part of creating an invitation card, and it is a big deal for everyone. Crafters familiar with the Cricut machine know that the fonts must be cuttable so they can be cut smoothly. Also, if you want stunning text that attracts people’s eyes, you need something like the Always Loving font.
Those crafters looking for a sure winner and who love this type of font must give it a shot!
2. Hello Honey
‘Hello Honey’ is the most beautiful font I crave. The heart swashes and tails-like features are very impressive and eye-catching. It looks stunning and luxurious, too, giving it a pure premium look. This font is easily compatible with your Cricut Design Space and is cut easily on a Cricut cutting machine.
So, if you are into adding a playful touch to wedding crafts and cards, this is the right choice!
3. Dear Agatha
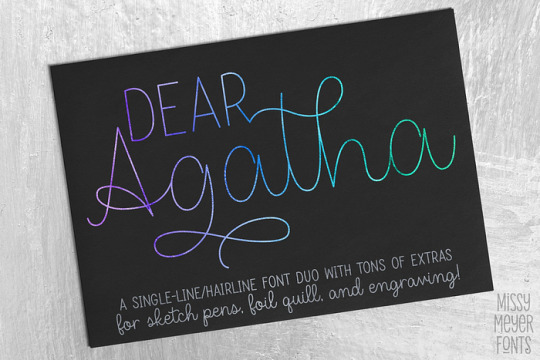
Want the perfect font for your wedding invitations and envelopes? In addition to making cards, you can also use them as gift cards. The name of the font is Dear Agatha, which I got from a well-known website called Creative Fabrica.
The font style combines script and serif, and it is super readable with all caps and serif font. This fancy font can be used to write names, and it adds some flair. Also, the clean Sans will be the perfect fit for addresses.
Madelyn Heart
Are you looking for the best Cricut fonts for wedding signs that combine hearty shapes? This font looks full of art to me. The adorable heart accent gives it a unique look that everyone wants to see. Don’t you think it is more like a piece of art? Besides, the font has many glyphs and swashes, giving you endless customization for every wedding ceremony.
5. Randy Sofia

If you asked me what my favorite Cricut fonts are for wedding cards, my answer would be Randy Sofia. I really love simple fonts and don’t like fonts that are too fancy. This was one of the best Cricut fonts for wedding signs I used on my brother’s wedding cards.
However, this was not only the font I used on my card; I also used it with a combination of others. For different texts, I used different fonts. Rather, it is your choice. Overall, the Randy Sofia font is my first choice.
6. Little Love
This is one of the modern calligraphy fonts for Cricut users. It will add a graceful touch to your wedding gifts and invitation cards. This gorgeous font, with artistic-style letters, makes it look elegant.
It is not very thought-provoking, but it is a smooth and clean font suitable for cutting or writing on a Cricut machine. Using this font, combine the bride’s and groom’s initials to make a unique monogram.
7. Creative Vintage

Want a more stylish font? Here is Creative Vintage, a stylish serif font that will add charm to your wedding crafts. Whatever you use it for, it will make it stand out. Add some flourishes to your letters and personalize any names that you want to make it look unique.
This bold font looks really elegant, doesn’t it? And it is available in two versions — grunge and clean. A clean version will look very smooth, making it easier for your Cricut to cut the vinyl quickly. However, if you want a rough look, you will want a grunge version.
Final Thoughts
Elevate your wedding celebrations with these 7 best Cricut fonts for wedding signs. There are all types of fonts, from smooth to rugged. Also, many fonts have an artistic style that is best for making the bride’s and groom’s initials. Besides, I found all those fonts from Creative Fabrica, and they are cuttable and Cricut machine-friendly fonts. So, explore the fonts I mentioned in this blog and use them to make wedding signs.
FAQs
Question 1: How to add fonts to Cricut Design Space?
Answer: In order to add the fonts to Cricut Design Space, you have to follow the steps below:
First of all, you have to download the font file.
Afterward, you will need to install the font on your device.
Then, open the Cricut Design Space.
After that, move to the New Canvas.
Next, you will have to select the Text tool from the left toolbar.
Now, add the Text box to the canvas.
Here, click the font drop-down menu.
Finally, select the new font from the list.
Question 2: How to download font to Cricut?
Answer: Downloading a Cricut Design Space is no longer tedious. In other words, many online platforms offer free or paid fonts to meet all your needs. Hence, you only need to know the platform that offers the best free fonts for Cricut users. The website that offers the free Cricut fonts are as follows:
Dafont
Fontget
Creative Fabrica
Font Squirrel
Honey Florist
Question 3: How to upload a font to Cricut?
Answer: To upload a font to Cricut, you have to follow the steps below:
First of all, download the font and find the place where you have downloaded it.
Then, you need to unzip the file folder.
After that, double-click on the downloaded font file and follow the prompts to install it on your system.
Next, open Design Space and create a new project.
Then, add the next layer and select the text tool.
Finally, choose the font from the drop-down menu.
Source: best Cricut fonts for wedding signs
Visit here for more Information: cricut.com/setup
cricut explore 3
You tube
#best Cricut fonts for wedding signs#How to download font to Cricut#How to add fonts to Cricut Design Space#cricut.com/setup#cricut explore 3#design space cricut#Cricut Design Space
1 note
·
View note
Text
Flourishing in Calligraphy: Add Flair to Your Fonts

Flourishing in Calligraphy: Techniques for Adding Elegance to Your Fonts
Are you ready to take your calligraphy skills to the next level? Discover the art of flourishing, a technique that allows you to add charm and elegance to your lettering designs. Whether you're a beginner or an experienced calligrapher, flourishing techniques can enhance the beauty and impact of your work. In this article, we will explore the world of flourishing in calligraphy, from modern techniques to advanced strategies. You'll learn how to use flourishes to connect letters, extend ascenders and descenders, and enhance crossbars. Discover how to choose the right flourishes that complement your lettering style and create harmony in your designs. To inspire your flourishing journey, we'll showcase the work of renowned calligraphy artists like Ryan Hamrick, Colin Teirney, and Seb Lester. You'll also find inspiration on Instagram, where these talented artists frequently share their flourishing masterpieces. Key Takeaways: - Flourishes and swashes add charm and elegance to calligraphy designs. - Choose flourishes that complement your lettering style and create harmony. - Instagram is an excellent source of inspiration for flourishing in calligraphy. - Open Type Fonts offer a wide range of options for exploring and experimenting with flourishes. - Adding swashes and flourishes in software like Photoshop and Cricut Design Space allows for customization and exploration of different techniques.
The Art of Flourishing: Tips for Good Flourishes

Flourishes are a beautiful and decorative addition to calligraphy, but it's important to use them wisely. When incorporating flourishes into your designs, consider the size and flow of the flourish in relation to the style of lettering. Good flourishes should enhance the overall piece without overpowering it. Start by focusing on the overall word or layout before adding flourishes. This ensures that the flourish complements the lettering and creates a harmonious design. It's also essential to use flourishes sparingly to avoid distracting from the readability of the text. A well-placed and well-executed flourish can truly elevate the aesthetic of your calligraphy. Remember, the goal is to enhance the overall design, not overshadow it. Flourishes should enhance the readability and visual appeal of the lettering, adding a touch of elegance and charm. By practicing restraint and thoughtful placement, you can achieve stunning calligraphy with well-executed flourishes. Examples: "Flourishes are like the delicate lace trim on a beautiful dress. They add that extra touch of elegance and sophistication to calligraphy." - Calligraphy Artist Table: Tips for Good Flourishes Tips Description 1. Consider the size and flow of the flourish in relation to the lettering style. 2. Start with the overall word or layout before adding flourishes. 3. Use flourishes sparingly to maintain readability. 4. Ensure that flourishes enhance the overall design without overpowering it. Flourishing in calligraphy is an art that takes practice and a keen eye for design. By following these tips, you can create calligraphy pieces that are beautifully enhanced by well-executed flourishes.
Finding Inspiration: Flourishes on Instagram

If you're looking for inspiration to take your calligraphy skills to the next level, Instagram is the place to be. With its vast community of talented artists, you'll find a treasure trove of flourishing techniques and artistic penmanship to fuel your creativity. Instagram is home to renowned calligraphy artists like Ryan Hamrick, Colin Teirney, and Seb Lester, who frequently incorporate flourishes into their work. Their intricate designs showcase the beauty and versatility of flourishes, inspiring calligraphers worldwide. One must-follow artist on Instagram is Laura Worthington, a Typeface and Lettering Designer who specializes in flourishes. Her Flourishes with Brush Lettering class on Creative Live offers in-depth guidance and downloadable practice guides, making it easier for you to master the art of flourishes. Table: Instagram Artists to Follow Artist Instagram Handle Ryan Hamrick @ryanhamrick Colin Teirney @colin_tierney Seb Lester @seblester Laura Worthington @lauraworthingtontype Browsing through their stunning creations will give you a wealth of ideas and techniques to incorporate into your own flourishing designs. So go ahead, immerse yourself in the world of flourishing on Instagram and elevate your calligraphy skills to new heights.
Unlocking Potential: Open Type Fonts

When it comes to modern calligraphy, Open Type Fonts offer a world of possibilities for exploring and experimenting with flourishing. These fonts come equipped with hidden glyphs, providing additional options for creating beautiful swashes and flourishes in your lettering. By accessing the extra characters in an Open Type Font, you can unlock new ideas and incorporate them into your own work. Open Type Fonts are particularly useful for testing different layouts and gaining inspiration. Many of these fonts showcase the additional characters and swashes available on their websites, making it easier for you to choose the perfect typeface for your flourishing needs. If you're looking to add a touch of elegance to your calligraphy, Open Type Fonts are a valuable resource to consider. They offer a wide range of options that can take your lettering to the next level. Whether you're a beginner or an experienced calligrapher, exploring Open Type Fonts will open up a whole new world of creativity and possibilities. Table: Popular Open Type Fonts for Calligraphy Font Name Style Features Alex Brush Script Swashes, Ligatures Bickham Script Pro Formal Flourishes, Alternates Burgues Script Ornamental Flourishes, Swashes Edwardian Script Elegant Swashes, Ligatures Montague Script Handwritten Swashes, Alternates "Open Type Fonts offer a wealth of options for calligraphers. With their hidden glyphs and additional characters, you can truly unlock the potential of your lettering and create stunning flourishes that will impress and inspire." - Explore different Open Type Fonts to discover unique swashes and flourishes. - Visit the websites of popular font designers to see showcase their additional characters. - Experiment with various styles and features to find the perfect typeface for your calligraphy projects. - Try combining different Open Type Fonts to create a truly personalized and one-of-a-kind lettering style.
Flourishes in Cricut Design Space
If you're looking to take your calligraphy to the next level, Cricut Design Space is a fantastic tool that allows you to add beautiful flourishes to your text. Whether you're creating custom invitations, personalized gifts, or decorative home decor, adding flourishes in Cricut Design Space can elevate the overall look of your projects. One way to add flourishes is by using glyphs and special characters. These unique elements can enhance the appearance of your text and make it look extra special. To access these characters, you can use the Windows Character Map or Microsoft Symbols. This feature enables you to easily incorporate swashes and flourishes into your designs, giving them a unique and personalized touch. For those who prefer a more hands-on approach, you can create custom swashes manually in Photoshop Creative Suite versions 1 through 6. By using the software's tools and features, such as the pen tool or custom shapes, you can design and incorporate your own unique flourishes. This allows you to have complete control over the style and appearance of your calligraphy. Adding Swashes and Flourishes in Cricut Design Space Cricut Design Space offers a range of options for adding swashes and flourishes to your text. Here's how you can do it: - Select the text you want to add swashes or flourishes to. - Click on the "Edit" tab and then select the "Style" option. - Under the "Style" menu, you'll find the "Decoration" feature. - Click on the "Decoration" dropdown menu and choose the swash or flourish style you want to apply. - Adjust the size and position of the swash or flourish to your liking. - Repeat the steps for any other text you want to add swashes or flourishes to. By following these steps, you can easily add swashes and flourishes to your text in Cricut Design Space. Remember to experiment with different styles and designs to create unique and visually stunning calligraphy projects. Pros Cons Easy to use interface Requires a compatible Cricut machine Wide range of swash and flourish styles to choose from May require additional purchase of special characters or fonts Ability to customize size and position of swashes and flourishes Limited to the capabilities of the Cricut machine
Adding Swashes and Flourishes in Photoshop

When it comes to adding swashes and flourishes to your calligraphy designs, Photoshop provides a range of tools and techniques to help you achieve stunning results. Whether you're using the latest version of Photoshop Creative Cloud or an older version like Creative Suite 1 through 6, there are various ways to incorporate decorative elements into your text. In Photoshop CC, you can take advantage of the Glyphs feature, which allows you to access and use special characters easily. Simply select the text layer, open the Glyphs panel, and choose the desired swash or flourish to apply to your letters. This feature provides a convenient way to enhance your calligraphy with unique and personalized touches. If you're using an older version of Photoshop, you can still access swashes from the Character window. Simply select the desired text layer, open the Character panel, and click on the arrow next to "OpenType" to reveal the available swashes. From there, you can experiment with different options and choose the ones that best complement your calligraphy. For those who prefer a more hands-on approach, creating custom swashes in Photoshop is also possible. You can draw swashes freehand using the Brush tool or the Pen tool. By connecting the letters with graceful strokes, you can add unique flourishes to your calligraphy designs. Another option is to slice swashes from other fonts and attach them to your text, combining different styles and creating a truly custom look. Additionally, the Custom Shape tool in Photoshop offers a wide range of pre-designed swashes and flourishes that you can easily incorporate into your calligraphy. Adding Swashes in Photoshop CC: Step Action 1 Select the text layer in Photoshop CC. 2 Go to the Glyphs panel. 3 Choose the desired swash or flourish from the available options. 4 Apply the selected swash to your calligraphy text. Creating Custom Swashes in Photoshop: Step Action 1 Select the Brush tool or the Pen tool in Photoshop. 2 Draw freehand swashes or use the Pen tool to create precise curves. 3 Connect the swashes to the letters in your calligraphy. 4 Rasterize the text layer and merge the swashes with the letters.
Selecting the Right Fonts for Swashes and Flourishes
https://www.youtube.com/watch?v=Mtk-s1npeRg When it comes to incorporating swashes and flourishes into your calligraphy designs, choosing the right fonts is essential. Not all typefaces are created equal when it comes to decorative lettering. Some fonts may be too ornate or difficult to read when used for full words or phrases, especially if they have extensive swashes and flourishes. It's important to strike a balance between aesthetics and readability. Script fonts and calligraphic styles often offer the best options for incorporating swashes and flourishes. These fonts are specifically designed to include decorative elements and can be a great starting point for your calligraphy projects. However, it's crucial to use them sparingly and for specific purposes, such as adding emphasis to a single letter or a word. Overusing decorative fonts can make the overall design busy and hinder readability. Considerations for Selecting Fonts with Swashes and Flourishes When selecting fonts with swashes and flourishes, keep the following considerations in mind: - Readability: Ensure that the font remains legible even with the added decorative elements. Avoid fonts that compromise readability for the sake of elaborate swashes. - Appropriateness: Consider the context and purpose of your design. Fonts with extravagant flourishes may not be suitable for all projects. Choose fonts that align with the overall tone and aesthetics you wish to achieve. - Balance: Strive for harmony between the lettering and the swashes. The size, flow, and complexity of the swashes should complement the style of the lettering and enhance the overall design. By carefully selecting fonts that strike the right balance between decorative elements and readability, you can ensure that your calligraphy designs are both visually appealing and effectively convey their intended message.
Creating Custom Swashes in Photoshop
In Photoshop Creative Cloud, you have the flexibility to create custom swashes that add a personalized touch to your calligraphy designs. There are several techniques you can use to achieve this: - Freehand Drawing: This method allows you to create unique and organic swashes that perfectly complement your lettering. You can use the Pen tool or a digital drawing tablet to draw fluid strokes that emanate from the letters, giving your design a natural and artistic feel. - Slicing Swashes from Other Fonts: If you're looking for ready-made swashes with different styles and designs, you can slice them from existing fonts and attach them to your calligraphy. This technique allows you to combine different fonts and create a one-of-a-kind look. - Custom Shape Library: Photoshop provides a range of pre-designed swashes and flourishes in the Custom Shape Library. You can easily select and incorporate these shapes into your calligraphy designs, saving you time and effort. By utilizing these techniques, you can elevate your calligraphy designs with elegant and eye-catching swashes that reflect your personal style. Experiment with different methods and explore various options to create visually stunning and unique calligraphy pieces. Technique Description Freehand Drawing Create custom swashes by drawing them freehand using the Pen tool or a digital drawing tablet. Slicing Swashes from Other Fonts Slice swashes from existing fonts and attach them to your calligraphy to combine different styles and designs. Custom Shape Library Access the pre-designed swashes and flourishes in Photoshop's Custom Shape Library to easily incorporate them into your calligraphy designs.
Exploring Different Swash Techniques
When it comes to calligraphy, the art of adding swashes and flourishes is an essential skill that can take your designs to the next level. By exploring different techniques, you can create unique and visually stunning lettering that truly stands out. There are multiple ways to achieve beautiful swashes and flourishes, and in this section, we will delve into some of the most popular techniques. Freehand Drawing One of the most personalized approaches to creating swashes is freehand drawing. This technique allows you to let your creativity flow and create organic designs that are tailored to your specific lettering. By using a brush pen or a pointed pen, you can add elegant curves and loops to your calligraphy, enhancing the overall aesthetic. Freehand drawing gives you complete control over the shape and size of your swashes, allowing for endless possibilities. Slicing Swashes from Other Fonts If you're looking for ready-made options, slicing swashes from other fonts can be a great solution. Many calligraphy and decorative fonts come with built-in swashes and flourishes that you can incorporate into your own designs. By combining different fonts and styles, you can create unique arrangements that suit your specific needs. Just be sure to check the licensing terms of the fonts you are using to ensure that you have the right to modify and incorporate swashes from them. Custom Shapes and Downloads Expanding your range of available swashes is easy with the use of custom shapes and downloads. Whether you're looking for ornate curls, decorative loops, or intricate patterns, there are countless resources available online where you can find and download additional swashes. These resources often come in the form of vector files that can be easily imported into design software like Adobe Illustrator or Photoshop. By using these pre-designed shapes, you can quickly add intricate details to your calligraphy without the need for extensive drawing skills. Experimenting with different swash techniques is an exciting journey that allows you to discover your own unique style and create captivating calligraphy designs. Whether you prefer the freedom of freehand drawing, the convenience of slicing swashes from other fonts, or the versatility of custom shapes, each approach offers its own distinct charm. Take the time to explore these techniques, and don't be afraid to mix and match to create truly breathtaking lettering.
Conclusion
As you conclude your journey in flourishing calligraphy, remember that adding swashes and flourishes to your lettering designs can truly elevate their flair and elegance. By following the tips for good flourishes and seeking inspiration from talented artists, you can enhance your calligraphy skills and unlock your creative potential in advanced calligraphy. Don't forget to make the most of the various calligraphy tutorials available to you. Whether it's through online classes or downloadable practice guides, these resources can enhance your understanding of different techniques and refine your flourishing skills. Exploring the tools and features offered by software like Photoshop and Cricut Design Space is another way to take your flourishes to the next level. With these powerful tools at your disposal, you can customize your calligraphy designs, experiment with different swash techniques, and create truly unique and visually stunning works of art. So, embrace the art of flourishing in calligraphy and let your creativity flourish. With dedication, practice, and a touch of your own personal style, your calligraphy designs will captivate and inspire. Now, go forth and create calligraphy that truly speaks to your heart and soul.
FAQ
What are flourishes and swashes in calligraphy? Flourishes and swashes are decorative elements that add charm and elegance to lettering, often used to connect letters, extend ascenders or descenders, and enhance crossbars. How should I choose flourishes that complement my calligraphy style? It's important to choose flourishes that harmonize with the style of your lettering. Start by considering the overall word or layout before adding flourishes to ensure balance and avoid overuse. Where can I find inspiration for flourishes in calligraphy? Instagram is a great platform to find inspiration, with artists like Ryan Hamrick, Colin Teirney, and Seb Lester showcasing their work. Read the full article
0 notes
Text
8 Incredible Beginner Cricut Projects for New Crafters
Hey there! Are you in search of beginner Cricut projects? There was a time when I was at your place😁, looking for the answer to the same questions. Then, I hardly used to get an easy design I could start with. So, I used to get references from the blog but never copied the same. Using the Cricut Design Space app, I made some simple designs by adding my creative touch.
One of the biggest takeaways from creating these easier designs was that I learned almost all the features of the Cricut app, like which tools are used for what purpose. This gave me confidence and made me an expert in crafting. Today, you will explore the top 8 Cricut projects for beginners. So, what are you waiting for? Let’s get started without any further delay!
Heart Print Hoodie

I recently came up with an interesting idea: I would create a T-shirt with geometric graphics. Yes, adding a simple kind of design is boring now! So, I first found the design on the internet and did some modifications to it. Yes, modifications like resize and color are needed depending on your choice of color and the size of the T-shirt you are going to work on. Rest, Cricut has your back, and this is going to be one of the best beginner Cricut projects!
Phone Case

I love personalized phone cases. Besides, I also prefer some kind of unique pattern. If you love personalized phone cases, you can do so with Cricut. Yes, the Cricut machine can help you create or cut vinyl designs that you can place on your phone case. It will literally look great when you use your own handmade design on the case. Must give it a shot!
Leather Keychains

If you want something like beginner Cricut projects, you have an endless option for easy projects you can create even if you just got your new Cricut for the first time. Yes, Cricut has designed its machine and software to be easy to use so everyone can use them hassle-free. Now, you need to simply cut the leather into simple strips and add the text or anything that you want.
Paper Card

Want to make your loved one feel special? Try making this simple card that says everything that you want to say. I really love the font style that I selected for the word LOVE. Just imagine if you write your loved one’s name in contrast. Isn’t that going to impress your partner? Now, use Cricut to make your love life more robust than before.
Wooden Sign

Want to make your home more welcoming? Try this wooden home sign. Don’t worry about the material; Cricut can cut and engrave wood without hassle. All you need to do is get ready with your text design on your Cricut Design app. Modify according to the size of the blank that you have chosen. Once done, you can get started with your beginner Cricut projects in one go!
Pillow Cover
Why not create a pillow with a catchy quote? That one is my favorite: HOME IS WHEREVER I’M WITH YOU. It sounds romantic, doesn’t it? Add such a quote and select any font that you like. Cricut Design Space can offer you many such fonts without any issues. So, what’s the issue — you are not required to waste hours creating those intricate designs. Just type, and you are done! 😃
Jar Labels
If you are looking for easy-to-make beginner Cricut projects, try jar labels. Yes, that can be one of the easiest and most valuable projects. I made this for my kitchen jar as I was finding it difficult to figure out the whereabouts of the ingredients. Also, I created this using a simple paper, and you know how to create texts — it’s your Cricut Design Space. This software has an intuitive interface, making it user-friendly. So what are you waiting for? Get started today!
Custom Water Bottle

I love Customized bottles. Do you? If so, you should give it a try once! These types of beginner Cricut projects are always at the top of the list. If you want to work on Cricut projects for beginners, consider this. I used vinyl materials and worked on the design myself. Anyone interested in creating such a design can take a reference and try it once!
FAQs
Question 1: How to make a DIY home sign using Cricut?
Answer: In order to make your DIY home sign using Cricut, you have to follow the steps described below:
Gather your important supplies.
Create a design or add text you like.
Choose the material and place it on a cutting mat.
Cut the design using your Cricut cutting machine.
Weed out the design.
Transfer the design to your blank.
Question 2: What supplies do I need to make beginner Cricut projects?
Answer: It generally depends on what sorts of projects you are working on. However, I can tell you about some standard supplies used for almost every type of project. To know what those supplies are, have a look at the list below:
Cricut cutting machine
Cricut mat
Cricut basic tool set
Scissors
Cricut software installed on your device
Question 3: What to use for making a personalized water bottle with Cricut?
Answer: Creating a personalized water bottle with Cricut is always fun. However, you will need the following items in order to create a customized water bottle:
Cricut smart cutting machine
Cricut Scraper
Cricut Smart Vinyl Permanent (Choose colors like Purple & Champagne)
Hand towel
Cutting mat
Cricut Weeding Tool
Cricut Transfer Tape
Water bottle (Black)
Scissors
Question 3: Which Cricut machine is the best for beginner crafters?
Answer: Cricut Explore 3 is your answer! Yes, you heard that right. This machine is a mid-range model available in Cricut’s lineup. Anyone who is a beginner can start with Cricut Explore 3, as it is the latest in the Explore family and offers almost all the features that beginner crafters need in their projects.
Source: beginner Cricut projects
Visit here For More Information: Cricut.com/setup
Twitter
0 notes
Text
Barcelona 2024-2025 Home Kit and Custom Jersey Design with the Official Font

The FC Barcelona 2024-2025 home kit honors the club's history with a mix of old and new. It takes inspiration from the original 1899 design . The kit has a striking half-and-half blue and maroon pattern with gold accents for a premium look. Fans can design their own custom jerseys with the Barcelona 2024/25 Font , designed to match this iconic kit.
👉 Download on Etsy the Barcelona Font Here
🌟 Design Inspiration: A Tribute to Heritage
The 2024-25 home kit is inspired by the club's original 1899 jersey . It features a bold half-and-half design of Deep Royal Blue and Noble Red . The kit also includes a rich Midnight Navy tone for depth. The Nike Swoosh and Spotify sponsorship logos are in Club Gold for a touch of prestige.
The kit celebrates Barcelona's historic milestones. It has a 125th-anniversary logo on the inside collar. This is a subtle but meaningful tribute to the club's legacy. The design's clean lines remind fans of the centenary shirt from Barcelona's 100th anniversary, making it a fan favorite.
🎨 Customize Your Own Barcelona Jersey with the 24/25 Font
Want to bring the official Barcelona jersey design to life on your own creations? Now, you can do it with ease. Our Barcelona 2024/25 Font is the perfect match for this kit's design.
Whether you're making a personalized football font jersey for yourself, a gift for a loved one, or a fan merchandise line, this font allows you to design custom names and numbers, just like the official Barcelona kit.
🧰How to Use the Barcelona Font:
Download the Font Get the OTF/TTF and Vector files instantly upon purchase.
Customize Your Jersey Use software like Canva , Illustrator , or Cricut Design Space to add your favorite name and number, whether it's Lewandowski 9 , Pedri 8 , or even a custom name for your own jersey.
Print Your Design Once you've created your design, you can print it using DTF (Direct To Film) or Heat Transfer Vinyl (HTV) . Make sure you're using the right materials for a professional finish!
⚙️ La Liga Font – The Official Football Font for Spain's Top Clubs
The Barcelona 24/25 jersey font is part of the official La Liga font family . It's known for its bold and modern design. This font is optimized for readability and team branding. It's the perfect complement to Barcelona's prestigious kit, ensuring that every name and number stands out clearly on the pitch or in your own designs.
✨ Perfect for Your Custom Barcelona Kit
With the official Barcelona 2024/25 Font pack, you can make a design that looks just like the real kit. It's easy to use, so you can design for yourself or as a gift for a Barça fan. Your design will look professional and spot-on.
👉 Get Your Barcelona Font Now!
🔥 Why Choose Our Barcelona Font Pack?
✅ Versatile and Easy to Use : Works with Canva, Cricut Design Space, Illustrator, and more. ✅ Editable : You can change it for any name or number. ✅ High-Quality Vector Files : Great for printing on any jersey material. ✅ Perfect for Gifts : Personalize jerseys for birthdays, special occasions, or for yourself.
🏆 Get Ready for Matchday – Customize Your Barcelona Jersey Today!
The Barcelona 2024-25 Home Kit takes inspiration from the club's history. It's perfect to complete the look with an official, customizable Barcelona jersey . The Barcelona 24/25 Font lets you make a statement on the pitch or in the stands.
Don't wait — download your Barcelona 24/25 font here and start creating your custom jersey today!
❓ FAQ
Can I use the Barcelona font for commercial projects? Yes! Our font is good for personal use and small commercial projects. For bigger projects, please contact us.
How do I print my custom jersey? Print your design with DTF paper or Heat Transfer Vinyl (HTV) for a top-notch finish.
What software do I need to use this font? Use free tools like Canva or professional software like Illustrator and Cricut Design Space .
2 notes
·
View notes
Text
How to Use Cricut Without a Subscription for DIY Projects
Cricut machines are popular among hobbyists and professional crafters, offering a perfect blend of reliability and versatility. These qualities make them indispensable companions for a variety of DIY projects. To unlock their full potential, Cricut machines rely on an application called Design Space, which serves as a platform for making craft projects. This free software provides access to various fonts, images, and project templates, enabling users to bring their ideas to life. Also, with a Cricut Access plan, users can explore premium features, expanding their creative possibilities even further.
In this blog, we’ll show you how to make the most of your Cricut machine without needing a subscription. So, let’s dive in and explore the possibilities!
Do You Need a Subscription to Use a Cricut?
Not necessarily. Whether you need a subscription depends on your usage and crafting needs. If you are a professional who is great at designing and requires various features at hand to create cutting designs, then a Cricut subscription will work for you. However, if you’re a beginner, you don’t need a Cricut Access plan.
Cricut Access Subscription Features
In this section, we mentioned the main features you’ll receive with the Cricut Access plan. Exploring these will help you understand whether you’ll need a Cricut subscription or not.
Subscription Design Perks:
Unlimited access to over 1,000,000 images
Unlimited access to over 1,000 fonts
10% discount on licensed images
Over 100,000 ready-to-use projects
Unlimited collections
Savings Benefits:
Cricut.com every three months (includes free shipping).
Get 10% off on purchases from cricut.com, with savings of up to $100 per machine.
20% off all Cricut materials
FREE shipping on $50+ orders
Plus:
Priority Member Care
How to Use Cricut Without a Subscription
In this section, we’ll explore how you can use Cricut without a subscription by accessing exclusive features for images and fonts.
Create Your Own Images

If you’re wondering whether you can create your own image with Cricut, the answer is yes! Users can upload original art to Cricut Design Space. It doesn’t matter whether it’s hand-drawn or digitally created. Just save the file in any format: JPG, PNG, or SVG. Upload it to Design Space, and the rest is easy; use your creative mind to start customizing the design. Design Space allows you complete flexibility to create or edit your image as needed.
Upload Images to Design Space

Once you’ve done selecting the image for designing, the next step will be uploading the image to the Design Space software.
Start by launching the Cricut Design Space app on your computer, tablet, or mobile device.
Next, click on the “New Project” button to start creating a new design on the canvas.
Select the “Upload” button in the bottom left corner of the screen.
After that, select the “Upload Image” button on the screen.
Then, select the image file that you want to upload (File format: JPG, PNG, or SVG).
Next, click on Continue and remove the background from the image. To do so in Manual, select Apply & Continue.
Now, convert the image into multiple layers, then select Continue.
Next, choose “Cut Image” if you want to cut the design or “Print Then Cut Image” for printed designs before cutting.
Lastly, click on the “Upload” button, and then your image will appear in the “Recent Uploads” folder.
Note: To insert the uploaded image into your new canvas, select the image and then click on “Add to Canvas” in the bottom right corner of the screen.
Upload Fonts to Design Space

Once you have learned “how to upload and insert an image into the Cricut Design Space app“, the next step is to work with fonts. In this section, we’ll be covering this:
First, download the font you desire to your system.
Next, install the font on your system.
Now, open the Cricut Design Space application and click on the “New Project” button on the top right of the display.
After that, click on the text tool on the left-hand side of the screen.
At this point, start writing the text or phrase that you wanted on your design.
Later, click on the “Font” menu at the upper-left side of the screen.
Click on “System” fonts. A menu will open on your screen, displaying all the fonts on your system (device). Lastly, click on the desired font for your design. That’s how you can use any font you like on Cricut Design Space.
Conclusion
Cricut is a leading brand that is famous for providing excellent crafting tools that are suitable for hobbyists and pro crafters. These machines offer cutting-edge features and extensive customization options, which empower you to elevate your designs to the next level. To enhance the crafting experience further, Cricut offers a subscription plan (Cricut Access), which unlocks exclusive features and provides unlimited access to various text fonts, pictures, and ready-to-make projects. However, if you are not ready to invest in a plan, you can still take advantage of the free features available on the Cricut Design Space app to create unique and beautiful designs. By following the steps mentioned above, you can explore your creativity without limitations. If you have any questions or need help, our team of experts is always here to help you get the crafting experience.
Frequently Asked Questions (FAQs)
How to Crop an Image in Cricut App?
To crop an image in Cricut Design Space, follow these steps:
Insert the image into the canvas.
Add a shape over the area you want to keep.
Select both and click Slice.
Delete the extras and use only the cropped piece.
Note: If your file isn’t an SVG, flatten it before slicing to ensure the system doesn’t treat it as a single object.
How to Downloaded fonts to Cricut on iPhone?
First, download the third-party font app like iFont, then follow the instructions listed below:
Download the font file to your iPhone’s Files app.
Select and install the downloaded font file (usually a zip file).
Open the Cricut Design Space App and click on the Text tool.
Go to the “Font” tab in the Edit panel.
Your newly installed font should be listed under “System Font.” Enjoy it!
How to offload Cricut Design Space?
Uninstalling the iOS app may be mandatory to resolve some issues. However, if you haven’t saved your projects to the Cricut Cloud, do that right away, as uninstalling the app will also delete those projects and any images or fonts you have downloaded to the device.
To offload Cricut Design Space:
Go to the Settings app and select General.
Scroll down and find iPhone/iPad storage.
Find the Cricut Design Space app and click on it.
Select the Offload App and confirm the selection.
After that, click on Reinstall App.
Open the app and attempt your project again.
Source: How to Use Cricut Without a Subscription for DIY Projects
#cricut design space app#cricut design space setup#Cricut.com/setup#Cricut Setup#cricut machine setup#design.cricut.com
0 notes