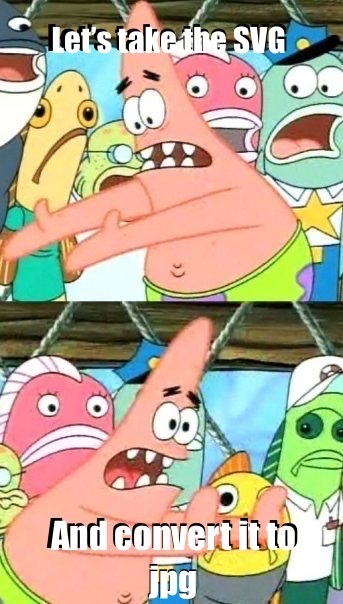
#Image converter to svg
Text
Image converter to svg

#IMAGE CONVERTER TO SVG UPDATE#
#IMAGE CONVERTER TO SVG SOFTWARE#
#IMAGE CONVERTER TO SVG SERIES#
Read the entire article here - it's very informative.
#IMAGE CONVERTER TO SVG SERIES#
Since these formulas are far more dynamic than a series of static boxes, vector formats (like SVG) offer many more benefits, like being fully editable with vector graphics software, and having the ability to enlarge them infinitely without quality loss." Vector graphics (unlike raster graphics) are not made of pixels they’re made of mathematical formulas that dictate all of the properties of a graphic on an X and Y axis. The more you zoom in on them or try to enlarge them, the more visible the individual pixels become. Graphics made of pixels are static and set at a specific size. png are raster graphics, meaning they’re made entirely of individual colored boxes known as pixels.
#IMAGE CONVERTER TO SVG SOFTWARE#
When you upload an svg, each color is it's own layer, and the software knows to cut each layer separately. When you tell it to cut, it only knows to cut around the outside. If you upload a jpg or png to design space, it will upload as a one layer image. It will come with each color as it's own "layer", and it can be made very large, or very small, without distorting. That's it for this tutorial, we hope you enjoyed it and that the information will help you in your future projects.SVG stands for Scalable Vector Graphic. This is especially great for purchased items that only have a JPG file attached. Here we tested our SVG in Silhouette Studio.Īs quick as that you can convert a JPG into a SVG in Inkscape. You can now open your SVG in the software used for your cutting machine. For the Save as type option, click the drop down menu and choose Optimized SVG then click Save. In the window called Select File to Save to, choose a location and give the file a name. Once you are satisfied with your traced image, go to File > Save As. The final step is to save the traced image as a SVG. You can choose to remove the other designs if you only want the design itself. Luckily, the design trace was nice and clean, ready for use. This will also allow you to see if anything needs to be cleaned up. In the image below, we have separated all of the elements, or in this case, the colors. Right click the traced image and select Ungroup. You can delete the original JPG image as we no longer need it. Now that we have traced the image we want to ungroup all of the elements. The original JPG is on the left while the traced result is on the right. The image below is the result of the Trace Bitmap scan settings. Once you are happy with the settings, click Apply.
#IMAGE CONVERTER TO SVG UPDATE#
We left the rest of the settings as is and clicked on Update to get a preview of the scan. Stacking will separate the colors into stacked layers, which are easier to handle. Smooth, Stack and Remove Background were all ticked. We left the Scans at 8, just a little more than the amount of colors in the image. Click on the image to select then click on the drop down menu under Multiple Scans. As our image is in color, we will use the Multiple Scans option. Singles Scans is generally used for black and white images. Make sure to select Trace Bitmap, the first option and then Multiple Scans. The Trace Bitmap panel will open on the right hand side. This tool can be found by going to Path > Trace Bitmap. We will be using the Trace Bitmap feature to turn our JPG into a SVG. This is more a feature that requires you to experiment until you find the result you want. Results will vary from image to image and some options available will have no effect. It is not a perfect tool that will give you consistent results. Something to note regarding the Trace Bitmap option. When you open an image in Inkscape a window called PNG Bitmap Image Import will appear. Once you have opened Inkscape, import your JPG file by going to File > Open.
0 notes
Text
If Tumblr was a good website it would natively support vector-based images
#not a poll#It's like cool. i get why you're compressing my image. i get it man. you want to save space on your servers.#but you want to know a GREAT way to compress the image????? let me post the svg! don't make me have to convert it to a png first!#the svg is like 1/10th the size!
52 notes
·
View notes
Text
I'm currently working pretty hard on trying to get all of the raw/original high-quality files of the flags and symbols I've made so far up on my Deviantart (same username: isobug) for those who would like to use anything in their own projects so please bear with me!
#iso.bug#I have so many files and none of them have comprehensible names. one was just “you know im done with this” no spaces all caps and keysmash#I also think I have a few symbols I need to convert to vector images/.SVGs so yaaay (<- tired and inflicted with the curse)
4 notes
·
View notes
Text
typesetting the handwritten camp rules at work bc black text on blue butcher paper is just Not It, and like.
1. i miss my font collection please god let me use city money to buy those eight fonts for $500 so that i can just steal them from the work computers
2. hot diggity shit i do not know how to graphic design Anything but text lmao
#(but hot diggity shit do i know how to do nice typography!!)#i spent an hour tracing the image in our city logo in an online svg editor so that i could have it in the .pub file i was editing#to typeset the camp rules n stuff but then!!! microsoft publisher wouldn't even accept an svg img!! and it wouldn't fucking convert either!!#so i had to export it as a giant png so i could shrink it down without fucking Artifacts bc JPGS ARE MY ARCHENEMY I HATE YOU JPGS#the worm speaks
2 notes
·
View notes
Text
AI ethics vs AI "safety"
They are hemorrhaging a river of cash, but that river’s source is an ocean-sized reservoir of even more cash.
To keep that reservoir full, the AI industry needs to convince fresh rounds of “investors” to give them hundreds of billions of dollars on the promise of a multi-trillion-dollar payoff.
That’s where the “AI Safety” story comes in. You know, the tech bros who run around with flashlights under their chins, intoning “ayyyyyy eyeeeee,” and warning us that their plausible sentence generators are only days away from becoming conscious and converting us all into paperclips.
It’s pure criti-hype: “Our technology is so powerful that it endangers the human race, which is why you should both invest in it and use it to replace all of your workers.”
This form of criticism is entirely distinct from the legitimate realm of “AI ethics,” whose emphasis is on how bad AI is at the things that will supposedly generate those promised trillions. Things like bias, low-quality training data, training data attacks, data ordering attacks, adversarial examples, the endless stream of confident lies, and the high degree of supervision they necessitate.
Add to that the exploitative labor pipeline, the environmental damage, and the public safety risks and a very different critique emerges —one that’s grounded in AI’s shortcomings, not the supposed risks arising from its incredible power.
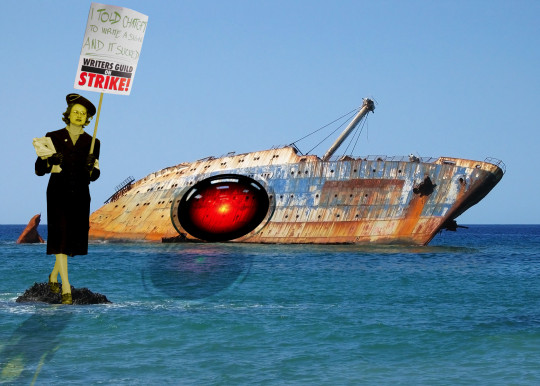
-How the Writers Guild sunk AI's ship: No one's gonna buy enterprise AI licenses if they can't fire their workers

Image:
Cryteria (modified)
https://commons.wikimedia.org/wiki/File:HAL9000.svg
CC BY 3.0
https://creativecommons.org/licenses/by/3.0/deed.en
#labor#unions#ai#tescreal#ai hype#critihype#automation#luddism#writers strike#writers guild#union strong#class war
911 notes
·
View notes
Text
Friends, Romans, countrymen, lend me your ears; I am fuckign coding again
Anyways I made this meme cause I found this awesome supply of old windows 98 aesthetic stuff but all the images are svg files and I Simply Do Not have the knowledge to work with those 🥲
I uploaded the css to neocities and the original file is like:
background-image: svg-load(“./icon/minimize.svg”);
And I can’t figure out a way to make neocities parse that 🥺 so I’m just converting each svg file I need and uploading the teeny tiny icons thusly:
background-image: url(“minimize.jpg”);
And it worked!!! Which was so cool :D I had to download a whole entire program just to make that conversion so if anyone knows a simple way to make svgs into jpgs please let me know 😭 All of that work just to put the teeny tiny minimize icon in the minimize button. A button which I have no intention of making usable, btw 😅😅😅 it’s just for the ~aesthetic~ of it all
(Also if anyone is interested, I’m using the css from 98.css on GitHub by jdan. I’m gonna make mine like hot pink and cute though. I’ll keep y’all updated💃)
37 notes
·
View notes
Text


My most requested set is here!
All Ascians with glyphs visible at some point in the game are available! The remaining images will be added as soon as I finish vectorizing them.
Each glyph has been carefully drawn from reference, vectorized, and then converted into a stitch file format. Stitched in bright red thread onto black recycled felt, they come with iron-on backing by default! The patches are hand-cut with no stitched border. As such, please understand that there may be some variation. Sizes are a little bit variable since they don’t have the same dimensions, but they’re on average about 4”-5” in either direction.
I can do custom colors or sizes as requested, so don't be afraid to send me a message!
“The end of your tale is but the beginning of another. The tale of the Crystal's demise.” - Lahabrea
“Imagine it! Bound no more by the shackles of moldering memories—of damnable duty! Free at last to live for the moment!” -Fandaniel
“Do not squander it. The legacy I leave you.” -Emet-Selch
Vectors drawn by me. If you would like to request to use them, feel free to email me and we can work somethin out! I can export them as .svg files pretty easily.
#final fantasy 14#ffxiv#emet-selch#lahabrea#fandaniel#hermes#hades#ascian#emet selch#endwalker#a realm reborn#stormblood#shadowbringers#heavensward#ff14#warrior of light#warrior of darkness
123 notes
·
View notes
Text
Day three of building Mehrak from Genshin Impact!
Omg hi guys, sorry for literally just not posting about this for months! I just got super busy with work and my summer classes (Math in Society keeps me so busy 💔) and couldn’t really work on personal projects. Turns out that work, school, life balance is hard with a full time job schedule lol!
Anyways, I’m back with an update because I finished the creating the designs to cut out using the laser cutter at my job for the front and back of Mehrak! I separated out all of the pieces into separate pngs so I can upload them to the really funky program that we use to convert things into SVGs so the laser can process them.
The full image/design is below and I will post the individual parts I am printing separately as updates 3.1 and. 3.2 if you want to see those!
Thank you so much for showing so much support on the last two updates and I look forward to sharing more with you once my designs are cut or I finish the sides!

#genshin impact#genshin#kaveh#mehrak#kaveh genshin#genshin kaveh#mehrak project#cosplay#prop design#cosplay prop#cosplay design#kaveh genshin impact#genshin impact kaveh#prop#props#gi
7 notes
·
View notes
Note
Hi! I know that post you made about the Fate dice files is like a year old now but would you be interested in selling a copy of the files? I would love to print my own set, those are the coolest fate dice I've ever seen!
very coincidentally i Finally got around to casting dice from those haha!

i think if i made the files available id want to make updated versions first - for ex. the + and - symbols arent deep enough on the d6s 🤔
that said they were v easy to make in blender3d with the first yt tutorial i saw, by converting image files to .svg files (via online converter) and seating them in the faces!
#cleo talks#inarticulateflailing#my master plan of getting ppl to play fate is by making good dice for it lol#trust me i get it.. rolling 4 regular d6s is BORING#and hardly anyone makes interesting fate dice too
48 notes
·
View notes
Text

my theme / graphics / design F.A.Q.
@ my anons and a few others who've been asking some questions + some help, i just compiled every question into one post 👍
disclaimer: i am very much an amateur in making graphics so i still don't know everything there is to know, but i think it's good to make graphic design and editing seem more accessible and less intimidating! so like don't go to me for actual professional advice
.001 | header templates
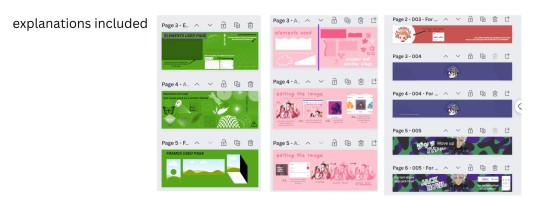
if you don't really feel like reading and just want to experience everything for yourself, here's a bunch of templates i made today. play around with them if u want :> i used canva since it's available both on mobile and pc but if you prefer to use a different app you can just check the specs/see if your app has similar functions
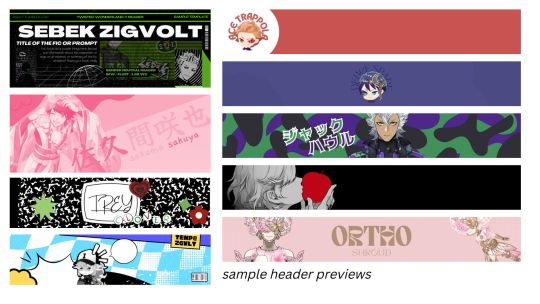
TEMPLATE LINKS (I won't know who's made copies of the templates so it's fine if you're worried about being exposed): [1: SEBEK] [2: SAKUYA (PINK)] [3: FIRST YEARS] [4: TREY AND IDIA]
if someone is interested in using any of these as inspo or as a base i don't mind, and i don't need credit either 👍 but if you wanna let me know bc i'm a bit nosy go ahead
.002 | what apps would you recommend for editing? (mobile and desktop)
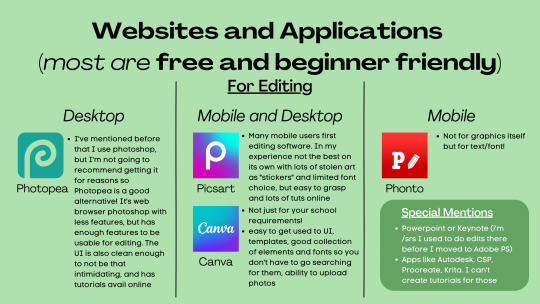
Desktop:
photopea , if you want a browser alternative to PS. i tried it out for maybe twenty minutes and a bunch of the basic features i need in PS are present there, it's definitely good if you want to experiment more as opposed to other apps. here's a tutorial for it
Mobile and Desktop:
picsart [desktop] [google play] [apple app store]: i think a lot of people start out with picsart and i totally get it! it's very easy to use, there's also a lot of tutorials for it on YouTube :>
> list of tutorials from their blog
> this playlist of tutorials by tutorial edits
canva [desktop] [google play] [apple app store]: so so elite i love canva. there are times where i do prefer the freedom that powerpoint gives me but canva is just convenient. anyway she's good both for ur powerpoints in class and pretty decent for editing. the templates i made above are my first time doing edits (not for school) with canva and i think they turned out alright!
> official canva tutorials
> this pinterest user's short-form canva tuts
> canva search keywords lists: [one] [two] [three] [four]
Mobile Only:
phonto [google play] [apple app store]: ily phonto, here's a tutorial
apps like krita or autodesk or csp or medibang or procreate are likely usable as well, i just don't exactly have advice for them since i don't use them
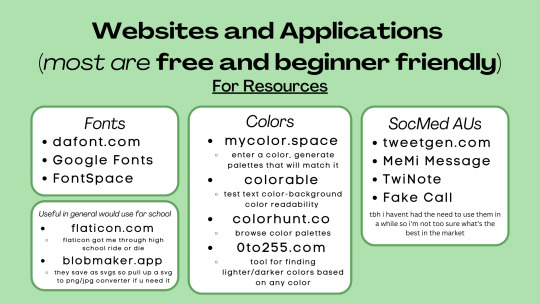
Websites for Fonts:
dafont.com
Google Fonts
FontSpace
freejapanesefont.com
font identifiers
[whatthefont]
[fontsquirrel]
Websites for images/elements:
flaticon
blobmaker.app (saves as svg, use a svg to png/jpg converter if you don't use an app that allows svgs)
getwaves.io (saves as svg, use a svg to png/jpg converter if you don't use an app that allows svgs)
haikei.app (basically a combination of blobmaker, getwaves, and a few other apps)
Colors:
mycolor.space
colorable
colorhunt.co
0to255.com
colormind.io
color tool
css drive (upload image, generate palette)
SocMed AU purposes:
tweetgen
MeMi Message (google play and apple appstore)
TwiNote (google play and apple appstore)
Fake Call
i used to use social maker and social dummy but i can't find them anymore lol
.003 | squiggly?
refer to blobmaker, getwaves, and haikei for squiggly :>
.004 | pretty themes for tumblr desktop
you can search the following tumblr blogs
theme-hunter
magnusthemes
ricecodes
kosmique
.005 | how can i make my theme prettier?
decorating your text posts:
coolsymbol.com
kaomoji
copy paste dividers
post dividers [making your own, tutorial using photopea] [masterlist of dividers by firefly-graphics]
how to get gradient text on tumblr posts + gradient recs
theme banners/headers:
specs of the tumblr header: 640 x 360 pixels on mobile, 3000 x 1055 pixels on desktop
premade headers:
[headers by spidaerman]
[headers by ridleey] [alt link]
[headers by villanaelle]
.006 | how to add *that* thing to the tumblr header theme
for this part let's use canva again. the mobile theme header is 640x360px but you can totally adjust it to be bigger (but maintaining the same width to height ratio)
so let's say this is the picture you want as your header, how do we add the details at the bottom? you can pretty much get any shape you want, whether it be from canva elements or one of the sites i mentioned or any other source you have. for this tutorial let's just use the ones on canva
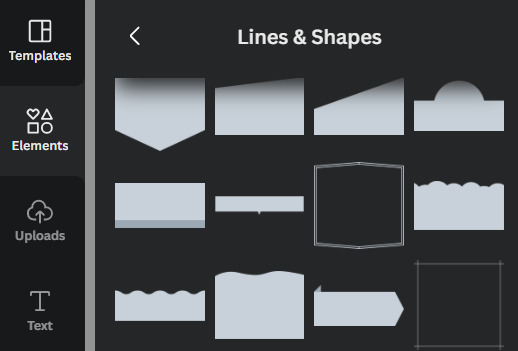
by scrolling through the elements portion, in this instance the lines & shapes portion, you can find a few that would work well
when you choose what you want, adjust it both size and color wise, and make sure there's a substantial enough amount of space for other details of your blog to fit (icon if you're not hiding it, blog name)
remember to save the color of the element! copy paste that hex code! or just have it somewhere where you can look back at it easily
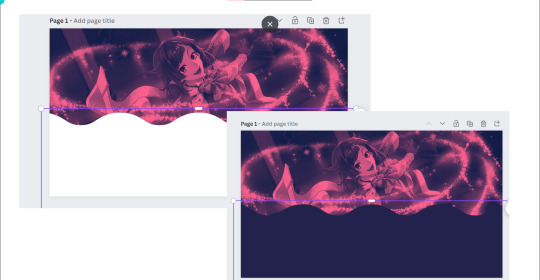
when you're satisfied, save it! then go on tumblr -> settings -> select the blog that you want to edit
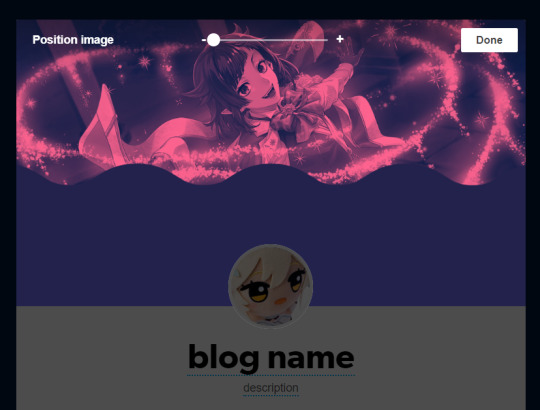
place the banner, and if you did it right it should be a perfect fit, but you can zoom in if you want! :> but wait we're not yet done! the colors don't create *that* effect yet
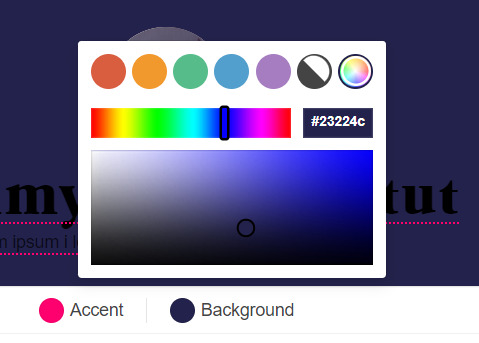
change the background color to match the bottom color of the header! (and the accent as and text colors as well, if you want!)
and we're done!
i think these are all the questions i've gotten so far? hopefully it helps!
167 notes
·
View notes
Text
im going to blow uuupppppppp cananybody here help me with blender? details of what im trying to accomplish below the cut vv
I have pixel art that I want to extrude/make 3d, and make it rotate in a circle, maybe bob up and down a bit if im getting fancy with it. like when you drop an item in minecraft, and the sprite rotates in 3d, like this

every tutorial ive watched says i need a .svg (scalable vector graphic) file, and then you can just extrude from the premade vertices/faces/edges whatever theyre called. im not very well versed in 3d modelling jargon. but every single one that ive tried doesnt work very well for pixel art, it blurs/rounds the sharp edges and makes it look like this:

and this happens when i try to convert both the original 52x52 png AND the 352x352 png to an svg.
the only one that I can find that DOESNT fuck with the pixels/reduce the sharpness leaves me with an incredibly jumbled mess of vertices.
so basically what i was wondering is - can anyone tell me how to do this? how to make the pixel art turn 3d? i've already imported the image as a plane, but it comes as a square and not the outline of the image. if anyone knows how to like, snap vertices/edges to the outline of the pixel art and then solidify/thicken it from there, i would really really appreciate the advice.
EDIT:

i have made it this far by importing the svg, removing all of the overlapping/clipping textures/materials, and slapping a png on the cover of it. however, this leaves the sides "unpainted" -- does anyone know how on earth to fix this? can i just like, paint directly on the model?
EDIT #2
I think i did it better than blender could using another program (magicvoxel)
im still going to try to animate the rotation of it in blender, but i think i'll use this to make the models !
#i was originally going to just animate the rotation in aseprite but i thought that animating 24 individual frames would take longer than#just thickening an image in blender. but i think i might be wrong this shit is hard blender is so daunting#blender
8 notes
·
View notes
Text

Aroaceflux symbol
I noticed the Aroaceflux symbol was currently missing from the LGBTA wiki, so I'm posting the clean version I have here for archival reasons ( I previously used it on this Alloaroaceflux flag ).
It's a combination of the Aroflux and Aceflux symbols by wiki user WiiFyneLM.
The post source link leads to a vector image / .SVG file for the symbol. ( If anyone wants me too I can also convert the Aroflux and Aceflux symbols. ) I'll also try to put it up on my Deviantart ( isobug )
Taglist - @radiomogai ( for archival purposes )
25 notes
·
View notes
Text
learn to digitizing your embroidey designs
From Sketch to Stitch: A Comprehensive Guide to Digitizing Your Embroidery Designs
The world of embroidery has embraced the digital age, allowing you to transform your own unique designs into stunning stitched masterpieces. But how do you bridge the gap between a simple vector graphic and a complex stitching pattern? This comprehensive guide, crafted with 2500 words, will teach you the art of digitizing your embroidery designs, from software choices to stitch considerations and finishing touches.
Before We Embark: Understanding SVGs and Embroidery Files
Scalable Vector Graphics (SVGs): These text-based descriptions of images offer infinite scalability, making them perfect for digital design.
Embroidery files: These contain specific instructions for your machine, including stitch types, colors, and placement (DST, EXP, JEF, PES formats are common).
Step 1: Choosing the Right Software
Consider these factors when selecting your digitizing software:
Skill Level: Are you a beginner or an experienced digitizer? Some programs cater to novice users, while others offer advanced features.
Budget: Free and paid options exist, each with varying capabilities and functionalities.
Compatibility: Ensure the software outputs files compatible with your embroidery machine.
Here are some popular choices:
Free:
Inkscape: A free vector graphics editor with the Ink/Stitch plugin for basic digitizing.
Sewing & Embroidery Software (SERF): Free software with limited but beginner-friendly digitizing features.
Paid:
Wilcom Embroidery Studio: Offers powerful tools for advanced digitizing and editing.
Embrilliance Enthusiast: User-friendly software with various features at a good price point.
Brother PE Design: Ideal for beginners with Brother embroidery machines.
Step 2: Preparing Your SVG
Simplify the design: Remove unnecessary details or intricate lines that might not translate well to embroidery.
Optimize colors: Limit your color palette to what your machine can handle (usually 6-12 colors).
Convert to paths: Ensure all elements in your SVG are outlines (paths) for proper stitching.
Step 3: Importing and Converting
Import your cleaned-up SVG into your chosen software.
Follow the software's specific instructions for converting to an embroidery file. This typically involves:
Choosing stitch types: Select appropriate stitches for different parts of your design (satin stitch for filling, backstitch for outlines, etc.).
Setting stitch parameters: Adjust stitch density, length, and direction for desired effects.
Color mapping: Assign thread colors to different parts of your design.
Step 4: Digitizing Tweaks and Adjustments
Preview and test: Most software allows you to preview your design on a virtual embroidery machine. Check for stitching issues and adjust paths or settings if needed.
Refine stitch types and parameters: Experiment with different stitch combinations to achieve the desired look and texture.
Consider thread types and colors: Choose thread that complements your fabric and design aesthetic.
Step 5: Export and Embroider!
Once you're happy with your design, export it in a file format compatible with your embroidery machine.
Transfer the file to your machine and prepare your fabric and thread.
It's finally time to see your creation come to life! Embroider your design, following your machine's instructions.
Bonus Tips for Success:
Start simple: Begin with basic shapes and designs to get comfortable with the conversion process.
Practice digitizing: The more you experiment, the better you'll understand how different stitches and settings affect your final outcome.
Join online communities: Connect with other embroidery enthusiasts for tips, advice, and inspiration.
Don't be afraid to ask for help: If you get stuck, consult software manuals, online tutorials, or seek assistance from experienced digitizers.
Remember, with a little practice and this guide as your compass, you'll be well on your way to transforming your SVG dreams into beautiful embroidered realities!
Further Resources:
Websites: Needlework Tips and Techniques: https://www.needlework-tips-and-techniques.com/
Books: "The Complete Book of Digitizing" by Jeannette Douglas, "Digitizing Designs" by Laura Ashley
YouTube Tutorials: CreativeBug Cutwork Embroidery Masterclass, Bluestone Creations Cutwork Basics
Online Forums: Embroidery Forum
With these additional resources and the knowledge you've gained, you
Read the full article
2 notes
·
View notes
Note
was wanting to rebind my paper-back books as hardback, leather with golden or silver filigree
Need to learn book binding, leatherwork, graphic design, converting images to SVG, making stencils
Also need to find out where I can get leather, golden/silver vinyl, a vinyl cutting printer thing
Really annoying though, a series I have has 8 paper-backs the same size, and then a hardback with entirely different dimensions
Omg that sounds soooooo cool tho!!!!! Maybe a cricut machine would work??
2 notes
·
View notes
Text
Free Image Converter
Luletools is the best image converter tool online for free. We support PNG, JPG, SVG, TIFF, WEBP and others. Try our tool and convert image to other format with luletools.
Free Image Converter
0 notes
Text
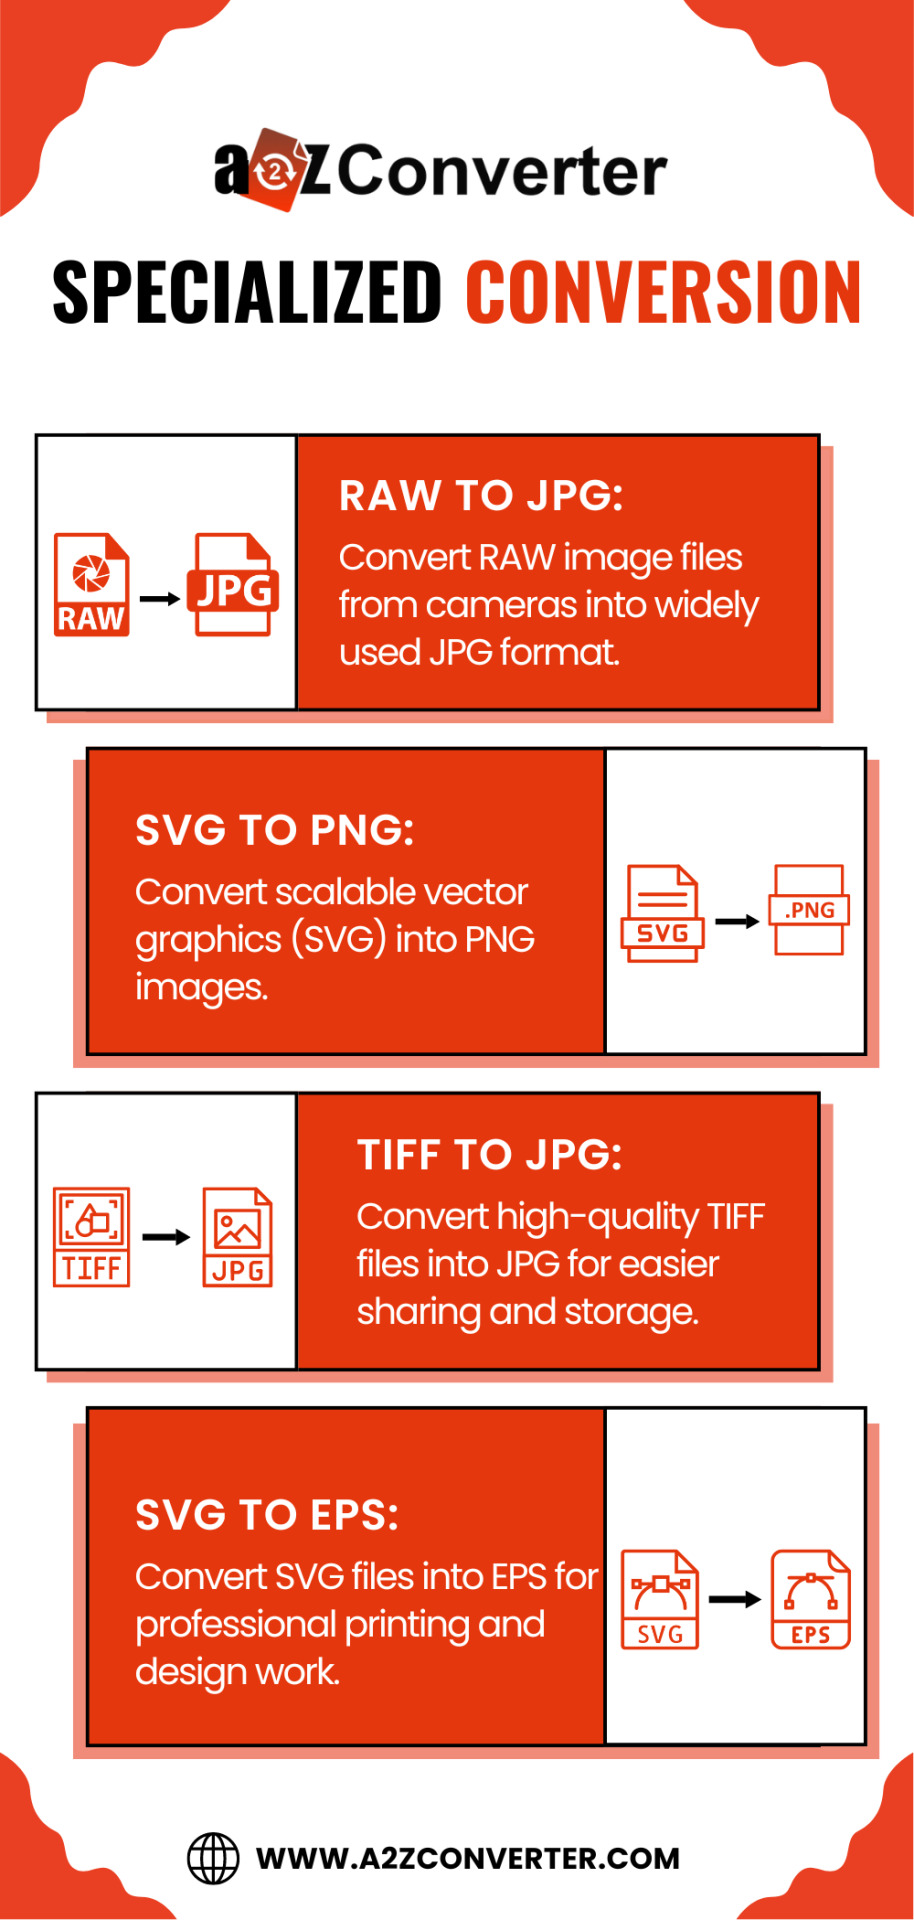
🎨 Specialized Image Conversion at Your Fingertips! 🖼️
Looking to convert your images for different purposes? A2Z Converter has got you covered with our specialized conversion tools:
📷 RAW to JPG: Easily convert RAW files from your camera into widely supported JPG formats.
🖼️ SVG to PNG: Transform scalable vector graphics (SVG) into PNG for high-quality web images.
🎨 TIFF to JPG: Compress and convert high-quality TIFF images to JPG for easier sharing and storage.
🖨️ SVG to EPS: Ready for professional printing? Convert SVG files into EPS for all your design needs!
No matter the format, A2Z Converter makes it quick and effortless.
🌐 Start converting today at www.a2zconverter.com
#ImageConversion #GraphicDesign #FileFormats #RAWtoJPG #TIFFtoJPG #SVGtoPNG #A2ZConverter #ProfessionalPrinting
0 notes
Last Seen Blogs

trentnlipton
Trent NLipton

morganchase8686
Untitled

noisymusiccherryblossom
Untitled
kyletogaz
44168155

ethanlee-94
Its Not Easy Having A Good Time