#JavaScript Development Companies
Explore tagged Tumblr posts
Visit Tumblr Blog
Explore Tumblr blogs with no restrictions, modern design and the best experience.
Last Seen Tumblr Blogs


Fun Fact
The total number of visits Tumblr.com received during January 2021 is 327 million.
Text
Essentials You Need to Become a Web Developer
HTML, CSS, and JavaScript Mastery
Text Editor/Integrated Development Environment (IDE): Popular choices include Visual Studio Code, Sublime Text.
Version Control/Git: Platforms like GitHub, GitLab, and Bitbucket allow you to track changes, collaborate with others, and contribute to open-source projects.
Responsive Web Design Skills: Learn CSS frameworks like Bootstrap or Flexbox and master media queries
Understanding of Web Browsers: Familiarize yourself with browser developer tools for debugging and testing your code.
Front-End Frameworks: for example : React, Angular, or Vue.js are powerful tools for building dynamic and interactive web applications.
Back-End Development Skills: Understanding server-side programming languages (e.g., Node.js, Python, Ruby , php) and databases (e.g., MySQL, MongoDB)
Web Hosting and Deployment Knowledge: Platforms like Heroku, Vercel , Netlify, or AWS can help simplify this process.
Basic DevOps and CI/CD Understanding
Soft Skills and Problem-Solving: Effective communication, teamwork, and problem-solving skills
Confidence in Yourself: Confidence is a powerful asset. Believe in your abilities, and don't be afraid to take on challenging projects. The more you trust yourself, the more you'll be able to tackle complex coding tasks and overcome obstacles with determination.
#code#codeblr#css#html#javascript#java development company#python#studyblr#progblr#programming#comp sci#web design#web developers#web development#website design#webdev#website#tech#html css#learn to code
2K notes
·
View notes
Text
☆ Day in the life of a software engineering student☆

Side note : I have 8 hours of classes every single day
Morning routine (5-30 -> 7.30)
Wake up at 5.30
Take a little shower and do morning skincare
Drink water
Read affirmations /listen to them
Check Notion to see what I have planned for the day
Make daily green juice and drink it
Prepare lunch box and back pack
Get ready for the day
Eat breakfast
Head out to the bus station at 7.30
Morning classes (8.30 -> 12am)
Get the most possible out of each class
Be active
Lunch break (12 -> 2.30pm)
Eat lunch and relax for a bit
Re-apply sunscreen , makeup , brush teeths , ...
Do chin tucks
Go to the library and study
Evening classes (2.30pm -> 6pm)
Same thing as morning classes , be active and focused
Night routine (7pm -> ...)
My night routine starts at 7pm when I'm finally back home
Brush my hair
Do my night skincare
Do chin tucks
Eat and chill for a bit
Post the daily diaries post on tumblr
Update Notion
Study everything done during the day and more - basically study untill I have to sleep
If I get a post idea from what I study for @codingquill , make it right away
#studyblr#study motivation#studyspo#study blog#study aesthetic#studying#university#student#code#codeblr#css#html#javascript#java development company#python#exams#student life#girlblogging#it girl#tumblr girls#studyabroad#studyinspo#studyspiration#studystudystudy#studyvisa#study#art study#study notes#study tag#study techniques
65 notes
·
View notes
Text
youtube
#online courses#coding#graphic designing#web design#ict skills#india#hindi#gujarati#english#www.ictskills.in#online training#live training#full stack course#digital marketing#ui ux design#backend#online#live courses#courses#education#computer science#engineering#java#python#php#dot net development company#spring mvc#javascript#Youtube
2 notes
·
View notes
Text
NodeJS excels in web development with its event-driven, non-blocking I/O model, making it ideal for handling concurrent connections and real-time applications like chat apps and live streaming. Its single-threaded architecture and use of JavaScript, both on the server and client side, allow for seamless development across the entire stack. NodeJS is especially suitable for startups and projects that require fast, scalable, and high-performance solutions.
Java, on the other hand, is renowned for its robustness, security, and platform independence. It is a mature technology with a vast ecosystem and a wealth of libraries and frameworks, such as Spring and Hibernate, which facilitate the development of large-scale, enterprise-grade applications. Java's multithreading capabilities and strong memory management make it well-suited for complex, resource-intensive applications where stability and reliability are paramount.
Choosing between NodeJS and Java ultimately depends on the specific needs of your project. For real-time, scalable applications with a need for rapid development, NodeJS is a compelling choice. For enterprise-level applications requiring high stability, security, and comprehensive tool support, Java is often the preferred technology.
#nodejs#javascript#web development#framework#best web development company in usa#software#node js development company#javaprogramming#programming
3 notes
·
View notes
Text
#digital aptech#reactjs#javaprogramming#javascript#coding#react.js#next.js#next js#reactjs development company#reactjs development services#reactjs developers#web development#app development#mobile app development#next.js development company
2 notes
·
View notes
Text
youtube
#html#nextjs#reactjs#coding#artificial intelligence#machine learning#programming#javascript#web development#web developers#web developing company#Youtube
2 notes
·
View notes
Text
Making a compiler
Every programmer out there, new or experienced longs for a chance to create their own programming language and compiler. I am no exception. Months ago I decided to fork an old project on github and develop it in my image. The project was a golang-like unfinished compiler, so I dug in and made changes. I changed the language to resemble a subset of rust, go and ocaml. I plan to add a LLVM backend inspired by the tre golang compiler. I will continue working on it until it kinda works. I still have a lot to do. check out the project on the link below. If you want to contribute submit a pull request.
#golang#programming#rustlang#compiler#programming languages#c++#typescript#java#javascript#javaris x#java development company#javatpoint#software#developer#sql#open source#python
11 notes
·
View notes
Text
How to install bootstrap in React.js? Installing Bootstrap in React.js: A Step-by-Step Guide.
Bootstrap is a popular CSS framework that provides a plethora of pre-designed components and styles to help developers create responsive and visually appealing web applications. Integrating Bootstrap with React.js can enhance your project's user interface and save you valuable development time. In this tutorial, we'll walk you through the process of installing Bootstrap in a React.js application.
#reactjs#bootstrap#javascript#developer#web development#web developers#web design#website#html#code#codeblr#coding#pythor p chumsworth#responsivedesign#tumblr ui#ui ux design#java development company#developers#software#python#sql
2 notes
·
View notes
Text

Website Revamp Services
Transform your online presence with our affordable website revamp services. We specialize in modernizing and optimizing websites across multiple platforms. More info: https://www.xhtmlchop.com/
skype: xhtmlchop
#wordpresswebsite#shopify#magento#web design#digital agency#html5#html css#htmlcoding#psd to html#figma to html#web graphics#webdesign#webdevelopment#web#html#htmltemplate#javascript#css#figma to wordpress#psd to wordpress#web development#shopify ecommerce development#shopify development company#shopify experts#dropshipping
0 notes
Text

Welcome back, coding enthusiasts! Today we'll talk about Git & Github , the must-know duo for any modern developer. Whether you're just starting out or need a refresher, this guide will walk you through everything from setup to intermediate-level use. Let’s jump in!
What is Git?
Git is a version control system. It helps you as a developer:
Track changes in your codebase, so if anything breaks, you can go back to a previous version. (Trust me, this happens more often than you’d think!)
Collaborate with others : whether you're working on a team project or contributing to an open-source repo, Git helps manage multiple versions of a project.
In short, Git allows you to work smarter, not harder. Developers who aren't familiar with the basics of Git? Let’s just say they’re missing a key tool in their toolkit.
What is Github ?
GitHub is a web-based platform that uses Git for version control and collaboration. It provides an interface to manage your repositories, track bugs, request new features, and much more. Think of it as a place where your Git repositories live, and where real teamwork happens. You can collaborate, share your code, and contribute to other projects, all while keeping everything well-organized.
Git & Github : not the same thing !
Git is the tool you use to create repositories and manage code on your local machine while GitHub is the platform where you host those repositories and collaborate with others. You can also host Git repositories on other platforms like GitLab and BitBucket, but GitHub is the most popular.
Installing Git (Windows, Linux, and macOS Users)
You can go ahead and download Git for your platform from (git-scm.com)
Using Git
You can use Git either through the command line (Terminal) or through a GUI. However, as a developer, it’s highly recommended to learn the terminal approach. Why? Because it’s more efficient, and understanding the commands will give you a better grasp of how Git works under the hood.
GitWorkflow
Git operates in several key areas:
Working directory (on your local machine)
Staging area (where changes are prepared to be committed)
Local repository (stored in the hidden .git directory in your project)
Remote repository (the version of the project stored on GitHub or other hosting platforms)
Let’s look at the basic commands that move code between these areas:
git init: Initializes a Git repository in your project directory, creating the .git folder.
git add: Adds your files to the staging area, where they’re prepared for committing.
git commit: Commits your staged files to your local repository.
git log: Shows the history of commits.
git push: Pushes your changes to the remote repository (like GitHub).
git pull: Pulls changes from the remote repository into your working directory.
git clone: Clones a remote repository to your local machine, maintaining the connection to the remote repo.
Branching and merging
When working in a team, it’s important to never mess up the main branch (often called master or main). This is the core of your project, and it's essential to keep it stable.
To do this, we branch out for new features or bug fixes. This way, you can make changes without affecting the main project until you’re ready to merge. Only merge your work back into the main branch once you're confident that it’s ready to go.
Getting Started: From Installation to Intermediate
Now, let’s go step-by-step through the process of using Git and GitHub from installation to pushing your first project.
Configuring Git
After installing Git, you’ll need to tell Git your name and email. This helps Git keep track of who made each change. To do this, run:

Master vs. Main Branch
By default, Git used to name the default branch master, but GitHub switched it to main for inclusivity reasons. To avoid confusion, check your default branch:

Pushing Changes to GitHub
Let’s go through an example of pushing your changes to GitHub.
First, initialize Git in your project directory:

Then to get the ‘untracked files’ , the files that we haven’t added yet to our staging area , we run the command

Now that you’ve guessed it we’re gonna run the git add command , you can add your files individually by running git add name or all at once like I did here

And finally it's time to commit our file to the local repository

Now, create a new repository on GitHub (it’s easy , just follow these instructions along with me)
Assuming you already created your github account you’ll go to this link and change username by your actual username : https://github.com/username?tab=repositories , then follow these instructions :


You can add a name and choose wether you repo can be public or private for now and forget about everything else for now.

Once your repository created on github , you’ll get this :

As you might’ve noticed, we’ve already run all these commands , all what’s left for us to do is to push our files from our local repository to our remote repository , so let’s go ahead and do that

And just like this we have successfully pushed our files to the remote repository
Here, you can see the default branch main, the total number of branches, your latest commit message along with how long ago it was made, and the number of commits you've made on that branch.

Now what is a Readme file ?
A README file is a markdown file where you can add any relevant information about your code or the specific functionality in a particular branch—since each branch can have its own README.
It also serves as a guide for anyone who clones your repository, showing them exactly how to use it.
You can add a README from this button:

Or, you can create it using a command and push it manually:

But for the sake of demonstrating how to pull content from a remote repository, we’re going with the first option:

Once that’s done, it gets added to the repository just like any other file—with a commit message and timestamp.
However, the README file isn’t on my local machine yet, so I’ll run the git pull command:

Now everything is up to date. And this is just the tiniest example of how you can pull content from your remote repository.
What is .gitignore file ?
Sometimes, you don’t want to push everything to GitHub—especially sensitive files like environment variables or API keys. These shouldn’t be shared publicly. In fact, GitHub might even send you a warning email if you do:

To avoid this, you should create a .gitignore file, like this:

Any file listed in .gitignore will not be pushed to GitHub. So you’re all set!
Cloning
When you want to copy a GitHub repository to your local machine (aka "clone" it), you have two main options:
Clone using HTTPS: This is the most straightforward method. You just copy the HTTPS link from GitHub and run:

It's simple, doesn’t require extra setup, and works well for most users. But each time you push or pull, GitHub may ask for your username and password (or personal access token if you've enabled 2FA).
But if you wanna clone using ssh , you’ll need to know a bit more about ssh keys , so let’s talk about that.
Clone using SSH (Secure Shell): This method uses SSH keys for authentication. Once set up, it’s more secure and doesn't prompt you for credentials every time. Here's how it works:
So what is an SSH key, actually?
Think of SSH keys as a digital handshake between your computer and GitHub.
Your computer generates a key pair:
A private key (stored safely on your machine)
A public key (shared with GitHub)
When you try to access GitHub via SSH, GitHub checks if the public key you've registered matches the private key on your machine.
If they match, you're in — no password prompts needed.
Steps to set up SSH with GitHub:
Generate your SSH key:

2. Start the SSH agent and add your key:

3. Copy your public key:

Then copy the output to your clipboard.
Add it to your GitHub account:
Go to GitHub → Settings → SSH and GPG keys
Click New SSH key
Paste your public key and save.
5. Now you'll be able to clone using SSH like this:

From now on, any interaction with GitHub over SSH will just work — no password typing, just smooth encrypted magic.
And there you have it ! Until next time — happy coding, and may your merges always be conflict-free! ✨👩💻👨💻
#code#codeblr#css#html#javascript#java development company#python#studyblr#progblr#programming#comp sci#web design#web developers#web development#website design#webdev#website#tech#html css#learn to code#github
93 notes
·
View notes
Text
☆ 16-22 October weekly goals ☆
Do the get a better skin challenge daily
Study everything done during the day once back home
Be consistent on posting here and on @codingquill
I'll keep adding more goals to my list, week after week - one step at a time!
#studyblr#study motivation#studyspo#study blog#study aesthetic#studying#university#student#code#codeblr#css#html#javascript#java development company#python#exams#student life#girlblogging#it girl#tumblr girls#studyabroad#studyinspo#studyspiration#studystudystudy#studyvisa#study#art study#study notes#study tag#study techniques
20 notes
·
View notes
Text

Future-Ready IT Hiring Solutions – Job24by7
Whether you're a developer, analyst, or IT recruiter, we streamline the hiring process with expertise, speed, and precision. Get matched with the right opportunities today.
#it recruitment#it recruitment agency#recruitment#recruitment process outsourcing#recruiters#it recruitment services#it recruiting agency#it jobs#it consulting#recruitment services#recruitment agencies#jobsearch#opportunities#jobseekers#devops#digitaltransformation#software engineering#developer#software#javascript#coding#opensource#computing#hiring and recruiting#resume#it recruitment company#it recruitment consultant
1 note
·
View note
Text
Top JavaScript Frameworks to Learn in 2025
In this blog, we shares about What are JavaScript Frameworks & the name of top JavaScript frameworks to help you find the most suitable framework for your development project. We are the top web development company in Rajkot. For best digital marketing services, Contact Aphonic Solutions, now!

#web development company in Rajkot#best digital marketing services#best web development services in India#Top JavaScript Frameworks#What are JavaScript Frameworks
0 notes
Text
A mobile-friendly website enhances user experience, improves SEO rankings, and boosts conversions. To build a high-performing, mobile-optimized website, consider working with 2Digit Innovations for expert mobile app and web development services.
#ui ux company#web developing company#web developers#app development#software development#mobile app development#software#app developers#app developing company#software design#coding#webdev#software engineering#javascript#engineering
0 notes
Text
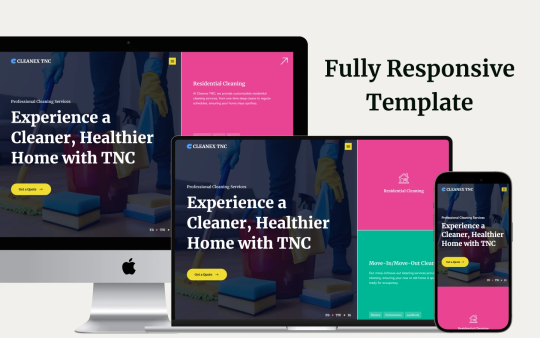
Revolutionizing Cleaning Business Webflow Websites with Cleanex TNC
In today's digital era, having an optimized and professional website is crucial for every business, especially in the cleaning service industry. Whether you are running a home cleaning service, commercial cleaning, or janitorial business, your website plays a vital role in attracting customers and establishing credibility. This is where Cleanex TNC comes in—a modern, highly customizable Webflow template designed specifically for cleaning businesses.

Why Choose Cleanex TNC?
A well-designed website should not only look aesthetically pleasing but also offer functionality, responsiveness, and seamless user experience. Cleanex TNC is a premium Webflow template that helps cleaning service providers establish a strong online presence without the need for extensive coding knowledge.
1. User-Friendly Design & Navigation
A clutter-free, easy-to-navigate website can make a significant difference in user retention and conversion rates. Cleanex TNC comes with a sleek, intuitive interface that ensures visitors can find the information they need with ease. The template is structured to guide potential clients through your services, pricing, and contact details effortlessly.
2. SEO-Optimized & Fast-Loading Pages
Speed and SEO play a crucial role in search engine rankings. Cleanex TNC is built with SEO best practices, ensuring that your site ranks higher on Google and attracts organic traffic. The optimized code and fast-loading pages enhance user experience and reduce bounce rates, which directly impacts conversions.
3. Mobile-Responsive & Cross-Browser Compatibility
In a mobile-first world, having a fully responsive website is non-negotiable. Cleanex TNC ensures a seamless browsing experience across all devices—whether it’s a smartphone, tablet, or desktop. Additionally, the template is compatible with all major browsers, ensuring consistent performance across different platforms.
4. Engaging & Customizable Sections
One of the key advantages of Cleanex TNC is its flexibility. The template offers various sections that can be easily customized to reflect your brand identity. You can modify:
Service Pages: Clearly outline your cleaning services, packages, and pricing.
Testimonial Sections: Showcase client feedback to build trust and credibility.
Call-to-Action (CTA) Buttons: Encourage visitors to request a quote or book a service instantly.
Gallery & Portfolio: Display before-and-after images to highlight the effectiveness of your services.
5. Built-in Contact & Booking Forms
Having an easy-to-use contact form is essential for customer engagement. Cleanex TNC includes an integrated booking system, allowing clients to schedule services directly from your website. This feature improves convenience and streamlines the booking process, enhancing customer satisfaction.
6. Blog & Content Marketing Ready
A blog section can help you engage your audience and improve your website’s SEO. With Cleanex TNC, you can share cleaning tips, industry news, and business updates to keep visitors informed and encourage repeat visits. Content marketing is a powerful tool for establishing your brand as an authority in the cleaning industry.
7. Conversion-Driven Design
From strategically placed CTA buttons to well-structured service pages, Cleanex TNC is designed to drive conversions. The professional layout and engaging visuals help build trust, ultimately increasing inquiries and bookings.
How to Get Started with Webflow Cleanex TNC?
Setting up your cleaning business website with Cleanex TNC is simple and hassle-free. Just follow these steps:
Purchase & Download: Get access to the template from the official Webflow marketplace.
Customize the Design: Modify colors, fonts, images, and content to align with your brand.
Add Your Services & Pricing: Clearly outline what you offer and at what cost.
Optimize for SEO: Ensure your site is optimized with relevant keywords and meta descriptions.
Launch & Promote: Publish your site and start marketing your services online.
Final Thoughts
A professional website is no longer a luxury but a necessity for cleaning businesses. Cleanex TNC simplifies the process of building a high-performing website that not only looks great but also drives customer engagement and conversions. If you’re looking for a ready-to-use Webflow template that meets all the industry standards, Cleanex TNC is the perfect choice. Get started today and elevate your cleaning business to new heights!
#web ui#uidesign#ui ux design#ui ux development services#web development#website#wordpress development#web developers#websitedevelopment#webflow#webflowtemplate#webflow development services#webflowdesign#coding#html#html css#javascript#reactjs#web developing company#cleaning services#cleaning business#house cleaning#home cleaning#cleaning tips#organization#cleaning technology#ui ux company#website design#website desing bd#website development
1 note
·
View note
Text
“Any application that can be written in JavaScript, will eventually be written in JavaScript.” - Jeff Atwood
#c++#c++ language#c++ programming#golang#typescript#programming#java#javascript#javatpoint#java development company#software#developer
4 notes
·
View notes