#Linux based hosting
Explore tagged Tumblr posts
Visit Tumblr Blog
Explore Tumblr blogs with no restrictions, modern design and the best experience.
Last Seen Tumblr Blogs


Fun Fact
Tumblr was the first site to host the blog for President Barack Obama in 2011.
Text
i think apple is also evil and linux can be frustrating to the novice user but they are both functional operating systems. everything about windows is hostile to human life. it is only "usable" in so far as its effective monopoly over the consumer base continues to hold software developers hostage. no major windows update has ever elicited anything but widespread disgust upon release by those nose-blind to the stench of the version to which they have become accustomed. it is malicious software. it is a tapeworm fattened and swollen to an affectation of the intestinal tract. a parasitic organ constantly sickening its host with its poisonous excrement having thoroughly overwhelmed the body's rational defenses, resigning it to a wretching and bleeding homeostasis interrupted only by crypto stocks on the desktop and other pioneering forays into microsoft's depraved frontier of weeping and moaning and gnashing of teeth
246 notes
·
View notes
Text

Welcome back, coding enthusiasts! Today we'll talk about Git & Github , the must-know duo for any modern developer. Whether you're just starting out or need a refresher, this guide will walk you through everything from setup to intermediate-level use. Let’s jump in!
What is Git?
Git is a version control system. It helps you as a developer:
Track changes in your codebase, so if anything breaks, you can go back to a previous version. (Trust me, this happens more often than you’d think!)
Collaborate with others : whether you're working on a team project or contributing to an open-source repo, Git helps manage multiple versions of a project.
In short, Git allows you to work smarter, not harder. Developers who aren't familiar with the basics of Git? Let’s just say they’re missing a key tool in their toolkit.
What is Github ?
GitHub is a web-based platform that uses Git for version control and collaboration. It provides an interface to manage your repositories, track bugs, request new features, and much more. Think of it as a place where your Git repositories live, and where real teamwork happens. You can collaborate, share your code, and contribute to other projects, all while keeping everything well-organized.
Git & Github : not the same thing !
Git is the tool you use to create repositories and manage code on your local machine while GitHub is the platform where you host those repositories and collaborate with others. You can also host Git repositories on other platforms like GitLab and BitBucket, but GitHub is the most popular.
Installing Git (Windows, Linux, and macOS Users)
You can go ahead and download Git for your platform from (git-scm.com)
Using Git
You can use Git either through the command line (Terminal) or through a GUI. However, as a developer, it’s highly recommended to learn the terminal approach. Why? Because it’s more efficient, and understanding the commands will give you a better grasp of how Git works under the hood.
GitWorkflow
Git operates in several key areas:
Working directory (on your local machine)
Staging area (where changes are prepared to be committed)
Local repository (stored in the hidden .git directory in your project)
Remote repository (the version of the project stored on GitHub or other hosting platforms)
Let’s look at the basic commands that move code between these areas:
git init: Initializes a Git repository in your project directory, creating the .git folder.
git add: Adds your files to the staging area, where they’re prepared for committing.
git commit: Commits your staged files to your local repository.
git log: Shows the history of commits.
git push: Pushes your changes to the remote repository (like GitHub).
git pull: Pulls changes from the remote repository into your working directory.
git clone: Clones a remote repository to your local machine, maintaining the connection to the remote repo.
Branching and merging
When working in a team, it’s important to never mess up the main branch (often called master or main). This is the core of your project, and it's essential to keep it stable.
To do this, we branch out for new features or bug fixes. This way, you can make changes without affecting the main project until you’re ready to merge. Only merge your work back into the main branch once you're confident that it’s ready to go.
Getting Started: From Installation to Intermediate
Now, let’s go step-by-step through the process of using Git and GitHub from installation to pushing your first project.
Configuring Git
After installing Git, you’ll need to tell Git your name and email. This helps Git keep track of who made each change. To do this, run:

Master vs. Main Branch
By default, Git used to name the default branch master, but GitHub switched it to main for inclusivity reasons. To avoid confusion, check your default branch:

Pushing Changes to GitHub
Let’s go through an example of pushing your changes to GitHub.
First, initialize Git in your project directory:

Then to get the ‘untracked files’ , the files that we haven’t added yet to our staging area , we run the command

Now that you’ve guessed it we’re gonna run the git add command , you can add your files individually by running git add name or all at once like I did here

And finally it's time to commit our file to the local repository

Now, create a new repository on GitHub (it’s easy , just follow these instructions along with me)
Assuming you already created your github account you’ll go to this link and change username by your actual username : https://github.com/username?tab=repositories , then follow these instructions :


You can add a name and choose wether you repo can be public or private for now and forget about everything else for now.

Once your repository created on github , you’ll get this :

As you might’ve noticed, we’ve already run all these commands , all what’s left for us to do is to push our files from our local repository to our remote repository , so let’s go ahead and do that

And just like this we have successfully pushed our files to the remote repository
Here, you can see the default branch main, the total number of branches, your latest commit message along with how long ago it was made, and the number of commits you've made on that branch.

Now what is a Readme file ?
A README file is a markdown file where you can add any relevant information about your code or the specific functionality in a particular branch—since each branch can have its own README.
It also serves as a guide for anyone who clones your repository, showing them exactly how to use it.
You can add a README from this button:

Or, you can create it using a command and push it manually:

But for the sake of demonstrating how to pull content from a remote repository, we’re going with the first option:

Once that’s done, it gets added to the repository just like any other file—with a commit message and timestamp.
However, the README file isn’t on my local machine yet, so I’ll run the git pull command:

Now everything is up to date. And this is just the tiniest example of how you can pull content from your remote repository.
What is .gitignore file ?
Sometimes, you don’t want to push everything to GitHub—especially sensitive files like environment variables or API keys. These shouldn’t be shared publicly. In fact, GitHub might even send you a warning email if you do:

To avoid this, you should create a .gitignore file, like this:

Any file listed in .gitignore will not be pushed to GitHub. So you’re all set!
Cloning
When you want to copy a GitHub repository to your local machine (aka "clone" it), you have two main options:
Clone using HTTPS: This is the most straightforward method. You just copy the HTTPS link from GitHub and run:

It's simple, doesn’t require extra setup, and works well for most users. But each time you push or pull, GitHub may ask for your username and password (or personal access token if you've enabled 2FA).
But if you wanna clone using ssh , you’ll need to know a bit more about ssh keys , so let’s talk about that.
Clone using SSH (Secure Shell): This method uses SSH keys for authentication. Once set up, it’s more secure and doesn't prompt you for credentials every time. Here's how it works:
So what is an SSH key, actually?
Think of SSH keys as a digital handshake between your computer and GitHub.
Your computer generates a key pair:
A private key (stored safely on your machine)
A public key (shared with GitHub)
When you try to access GitHub via SSH, GitHub checks if the public key you've registered matches the private key on your machine.
If they match, you're in — no password prompts needed.
Steps to set up SSH with GitHub:
Generate your SSH key:

2. Start the SSH agent and add your key:

3. Copy your public key:

Then copy the output to your clipboard.
Add it to your GitHub account:
Go to GitHub → Settings → SSH and GPG keys
Click New SSH key
Paste your public key and save.
5. Now you'll be able to clone using SSH like this:

From now on, any interaction with GitHub over SSH will just work — no password typing, just smooth encrypted magic.
And there you have it ! Until next time — happy coding, and may your merges always be conflict-free! ✨👩💻👨💻
#code#codeblr#css#html#javascript#java development company#python#studyblr#progblr#programming#comp sci#web design#web developers#web development#website design#webdev#website#tech#html css#learn to code#github
95 notes
·
View notes
Note
got a question I was hoping you could answer!
why do all apps have to go through an app store? why doesn't anywhere have their app downloadable from the internet or something?
was wondering this because lots of issues with apps seem to stem from having to comply with app store guidelines and whatnot. So why not avoid that problem and make the app available off the appstore? And if part of it is because they're easier to find in the appstore, why not do both? why not also offer the download on a website or something?
there's gotta be some reason why there's afaik no one who offers a download for their app without the appstore right?
There are absolutely other ways to get apps, and the one that springs immediately to mind is the F-Droid App Repository.
Sideloading is the process of loading an app that doesn't come from your phone's OS-approved app store. It's really easy on Android (basically just a couple of clicks) but requires jailbreaking on an iphone.
The reason more USERS don't sideload apps is risk: app stores put apps through at least nominal security checks to ensure that they aren't hosting malware. If you get an app from the app store that is malware, you can report it and it will get taken down, but nobody is forcing some random developer who developed his own app to remove it from his site if it installs malware on your phone unless you get law enforcement involved.
The reason more developers don't go outside of the app store or don't WANT to go outside of the app store is money. The number of users who are going to sideload apps is *tiny* compared to the number of users who will go through the app store; that makes a HUGE difference in terms of income, so most developers try to keep it app-store friendly. Like, if tumblr were to say "fuck the app store" and just release their own app that you could download from the sidebar a few things would happen:
Downloads would drop to a fraction of their prior numbers instantly
iOS users would largely be locked out of using tumblr unless they fuck with their phones in a way that violates Apple's TOS and could get them booted out of their iOS ecosystem if they piss off the wrong people.
Ad revenue would collapse because not a lot of advertisers want to work with companies that are app-store unfriendly
They'd be kicked off of the main app marketplaces
So most people who develop apps don't want to put the time and effort and money into developing an app that people might not pay for that then also can't carry ads.
Which leads into another issue: the kind of people who generally make and use sideloaded app aren't the kind of people who generally like profit-driven models. Indie apps are often slow to update and have minimal support because you're usually dealing with a tiny team of creators with a userbase of people who can almost certainly name ten flavors of Linux and are thus expected to troubleshoot and solve their own problems.
If this is the kind of thing you want to try, have at it. I'd recommend sticking to apps from the F-Droid Repository linked up above and being judicious about what you install. If you're using apple and would have to jailbreak your phone to get a non-approved app on it, I'd recommend switching to another type of phone.
(For the record, you also aren't limited to android or ios as the operating system of your phone; there are linux-based OSs out there and weird mutations of android and such - I am not really a phone person so I can't tell you much about them, but they are out there!)
197 notes
·
View notes
Text
"how do I keep my art from being scraped for AI from now on?"
if you post images online, there's no 100% guaranteed way to prevent this, and you can probably assume that there's no need to remove/edit existing content. you might contest this as a matter of data privacy and workers' rights, but you might also be looking for smaller, more immediate actions to take.
...so I made this list! I can't vouch for the effectiveness of all of these, but I wanted to compile as many options as possible so you can decide what's best for you.
Discouraging data scraping and "opting out"
robots.txt - This is a file placed in a website's home directory to "ask" web crawlers not to access certain parts of a site. If you have your own website, you can edit this yourself, or you can check which crawlers a site disallows by adding /robots.txt at the end of the URL. This article has instructions for blocking some bots that scrape data for AI.
HTML metadata - DeviantArt (i know) has proposed the "noai" and "noimageai" meta tags for opting images out of machine learning datasets, while Mojeek proposed "noml". To use all three, you'd put the following in your webpages' headers:
<meta name="robots" content="noai, noimageai, noml">
Have I Been Trained? - A tool by Spawning to search for images in the LAION-5B and LAION-400M datasets and opt your images and web domain out of future model training. Spawning claims that Stability AI and Hugging Face have agreed to respect these opt-outs. Try searching for usernames!
Kudurru - A tool by Spawning (currently a Wordpress plugin) in closed beta that purportedly blocks/redirects AI scrapers from your website. I don't know much about how this one works.
ai.txt - Similar to robots.txt. A new type of permissions file for AI training proposed by Spawning.
ArtShield Watermarker - Web-based tool to add Stable Diffusion's "invisible watermark" to images, which may cause an image to be recognized as AI-generated and excluded from data scraping and/or model training. Source available on GitHub. Doesn't seem to have updated/posted on social media since last year.
Image processing... things
these are popular now, but there seems to be some confusion regarding the goal of these tools; these aren't meant to "kill" AI art, and they won't affect existing models. they won't magically guarantee full protection, so you probably shouldn't loudly announce that you're using them to try to bait AI users into responding
Glaze - UChicago's tool to add "adversarial noise" to art to disrupt style mimicry. Devs recommend glazing pictures last. Runs on Windows and Mac (Nvidia GPU required)
WebGlaze - Free browser-based Glaze service for those who can't run Glaze locally. Request an invite by following their instructions.
Mist - Another adversarial noise tool, by Psyker Group. Runs on Windows and Linux (Nvidia GPU required) or on web with a Google Colab Notebook.
Nightshade - UChicago's tool to distort AI's recognition of features and "poison" datasets, with the goal of making it inconvenient to use images scraped without consent. The guide recommends that you do not disclose whether your art is nightshaded. Nightshade chooses a tag that's relevant to your image. You should use this word in the image's caption/alt text when you post the image online. This means the alt text will accurately describe what's in the image-- there is no reason to ever write false/mismatched alt text!!! Runs on Windows and Mac (Nvidia GPU required)
Sanative AI - Web-based "anti-AI watermark"-- maybe comparable to Glaze and Mist. I can't find much about this one except that they won a "Responsible AI Challenge" hosted by Mozilla last year.
Just Add A Regular Watermark - It doesn't take a lot of processing power to add a watermark, so why not? Try adding complexities like warping, changes in color/opacity, and blurring to make it more annoying for an AI (or human) to remove. You could even try testing your watermark against an AI watermark remover. (the privacy policy claims that they don't keep or otherwise use your images, but use your own judgment)
given that energy consumption was the focus of some AI art criticism, I'm not sure if the benefits of these GPU-intensive tools outweigh the cost, and I'd like to know more about that. in any case, I thought that people writing alt text/image descriptions more often would've been a neat side effect of Nightshade being used, so I hope to see more of that in the future, at least!
246 notes
·
View notes
Text

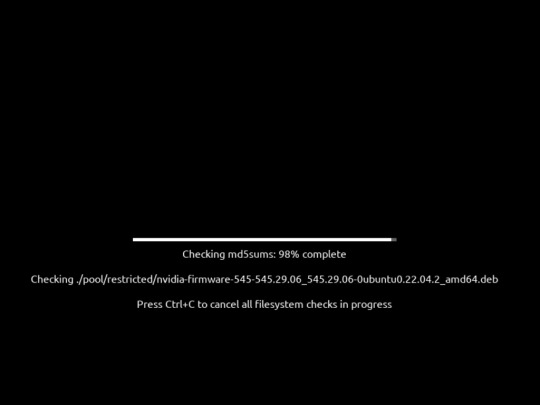
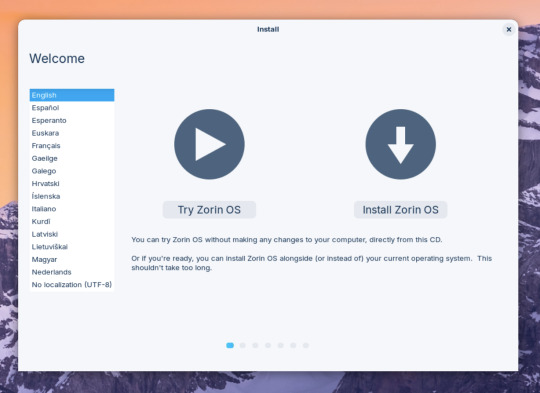


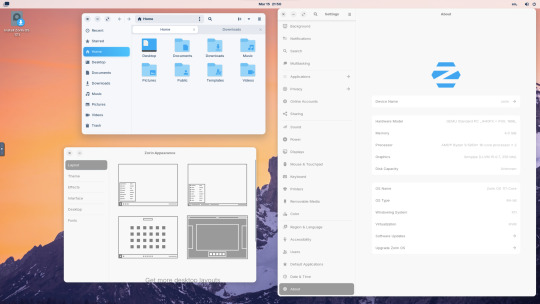


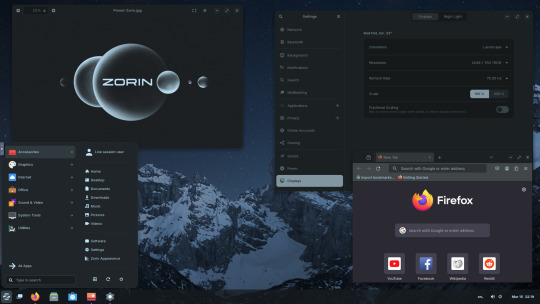
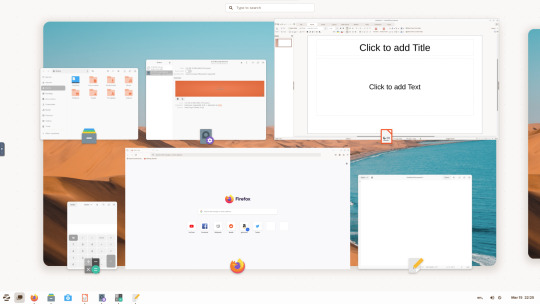


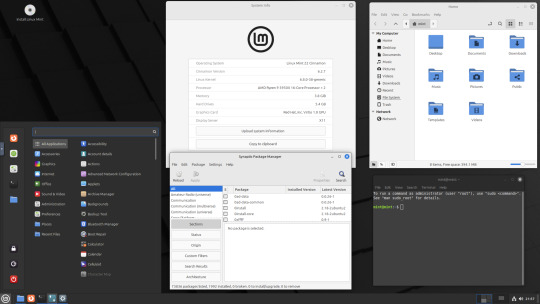
15.03.25
I tried out Zorin OS Linux on Distrosea.
https://distrosea.com/
Zorin OS started its development in 2008 by co-founders Artyom and Kyrill Zorin. The company is based in Dublin, Ireland.
Main site:
https://zorin.com/os/
Wiki link:
https://en.wikipedia.org/wiki/Zorin_OS
Like Linux Mint, it is based on Ubuntu, which in turn is based on Debian and uses the current Ubuntu 24.04.2 LTS base release.
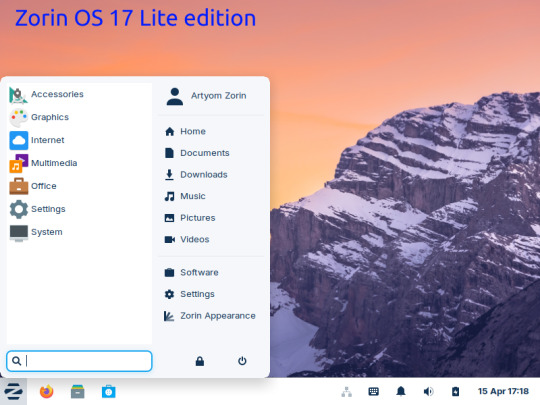
It features the GNOME 3 and XFCE desktop environments and is available in Lite, Education and Core editions.
Due to enhanced performance optimizations in the Core, Pro, and Education editions of Zorin OS, the Lite version is being discontinued.
However the XFCE desktop packages will still be available through the official software repositories:
https://help.zorin.com/docs/getting-started/getting-zorin-os-lite/
I chose version 17 and selected the 'Core' edition.
This version (Core64) features the GNOME desktop and a few more apps. I clicked 'Try' when the Linux distro booted up to the install wizard. The distro performs a md5 sum check before boot-up to check the security of the .iso file.
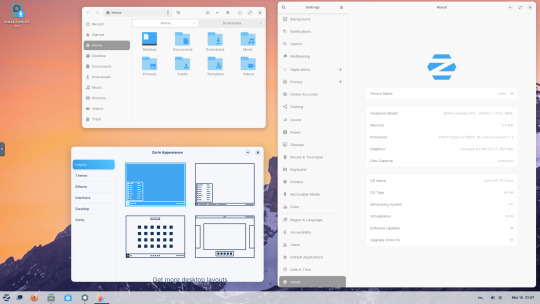
The distro can be easily customised to echo Windows or MAC-OS, as well as being tweaked to the users preferred layout.
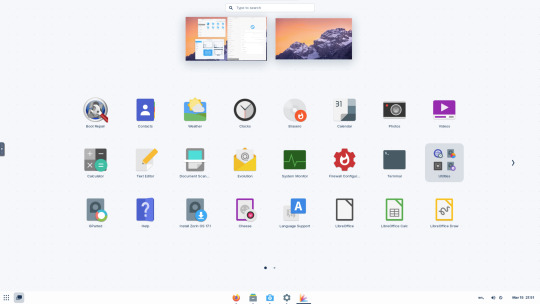
Software can be installed through Zorin's Software Store. applications are available to install in APT, dpkg, Snap and flatpak.
Windows software can be ran using Wine, a compatibly layer for running Windows only programs on Linux, MAC OS and BSD systems.
Zorin OS 17 also comes with various menu layouts from a Windows Classic/7 layout, Windows 11 style layout, GNOME menu and full screen menus. Some of the menu layouts are only available in the paid for Pro edition.
For more about the various layouts and a review see:
https://www.zdnet.com/article/zorin-os-demonstrates-exactly-what-a-desktop-operating-system-should-be/
The panel (referred to as a taskbar) is also highly configurable in size and appearance and can be changed to match the desktop layouts.
Various window management set-ups are featured for tiling windows to the sides of the screen.
I like the operating system as it is both familiar to me as a Windows user, but also is very configurable, features a polished user interface and is easy to navigate. Also Zorin comes with some very striking desktop backgrounds and colours!
However, I couldn't get the VM to connect to the internet, so I couldn't browse Firefox or try out any additional software.
This is just the way that it has been set-up on Distrosea. For test purposes though, it works very well.
It also feels very speedy, even in a virtual machine over the host internet!
6 notes
·
View notes
Text
What is an open source platform used for?
Open Source Development
An open source platform is a type of software whose source code or the base code is freely available to the public and open in segments. This means anyone can view, use, modify, and share the code. Open source platforms are widely used across industries because they offer flexibility, cost savings, and community-driven innovation. Open source development has become an initial go-to approach and one of the ideal options for building scalable and secure digital solutions.
Common Uses of Open Source Platforms -
1. Web and App Development
Open source platforms like WordPress, Drupal, and Joomla are widely used for building websites. The coders working in open source development department can customize and personalize these platforms to meet specific and unique business needs. Similarly, common frameworks such as React, Angular, and Laravel facilitate the development of dynamic and feature-rich web applications with their implementation and usage.
2. Operating Systems and Servers
Linux is one of the most well-known open-source operating systems. Many companies use Linux-based servers for hosting websites and applications because they are secure, fast, and cost-effective. These platforms are maintained by communities that constantly improve performance and patch vulnerabilities.
3. Cloud Computing
While the additional tools like OpenStack and Kubernetes are open source platforms and mediums that support the cloud infrastructure. They help businesses to manage their storage, networking, and computing resources efficiently while keeping operating costs low through open-source development.
4. Software Testing and DevOps
Open source tool and the common resources such as Selenium (for test automation) and Jenkins (for continuous integration) are essential and most considered in DevOps environments and stiff settings. These tools support the automated testing process, faster deployments, and seamless collaboration.
5. Data Management and Analytics
Platforms like Hadoop, Apache Spark, and PostgreSQL facilitate the processing and management of large datasets. These open-source solutions are widely used and leveraged in industrial sectors such as healthcare, finance with e-commerce for better understanding.
Why Do Businesses Prefer Open Source?
Open source platforms are cost-effective, highly customizable, and backed by active communities. They reduce and lower down the dependency on single vendors and parties and offer a general transparency in security and performance with its adaptation into the system or the infrastructure. Trusted providers and professional experts like Suma Soft, IBM, and Cyntexa specialize in delivering tailored and custom solutions through open source development, helping businesses to stay flexible, secure, and future-ready in this digital age and competitive market.
#it services#technology#saas#software#saas development company#saas technology#digital transformation
2 notes
·
View notes
Note
1, 3, 19!
1. base distro
my main desktop is artix linux; my laptop is void linux; my server is alpine linux (plus some VMs i use for development)
i am not actually the biggest systemd hater i just happen to not use it lol. i actually tried to use debian on my server at first but i couldn't get it to work with my hosting service's network for some reason, but with alpine if i did manual network setup during install it would Just Work. perhaps i can blame systemd for this
3. listening to music
i run a local mpd server and use ncmpcpp as a client, with my music library synced with syncthing. however i'm thinking i should move my music library to my server and stream from there bc my music library is taking up a shit ton of space on my phone and laptop both of which have limited storage (laptop storage is soldered on i think, and i don't think my phone storage is upgradeable either, but tbf i should double check those—in any case even if it were upgradeable that would cost Money and i shrimply don't think a massive music library synced between 3 devices is the wisest use of limited storage). so i may need to look into self-hosted music streaming solutions. although it is nice to be able to listen to music without using mobile data when i'm out and about.
19. file sync/sharing
a bit all over the place. as i said above i use syncthing for a few things but i'm increasingly moving away from that towards my nextcloud just bc if i'm syncing eg a 10GB file, there's no need for it to take up 30GB between 3 devices when i can just have it take up 10GB once on a remote server that i can access from any device only when it's needed. i am still sticking with syncthing for some things that are more sensitive so i want to reduce the number of devices it goes through: ie my keepass db, and some luks headers i have stored. also currently using a bit of a mess between syncthing and git hosting for my dotfiles but i'm trying to migrate to one chezmoi git repo since that can handle differences between devices and is much more elegant than my current glued-together scripts and git repos lol
for file sharing it's a bit all over the place. onionshare or bittorrent for some things, my own nextcloud for personal file sharing with people who can't wrap their heads around onionshare or bittorrent and just want a web browser link. i also use disroot's nextcloud instance for when i need to do the latter but not have it tied to me in any way. also sometimes i just send attachments in whatever platform we're using to communicate like just a signal attachment or something.
ask game
#asks#software ask game#ill tag them that way?#idk why this is so long didnt realise i was such a yapper#i coulda probably used 1 sentence per prompt...
5 notes
·
View notes
Text
Last Monday of the Week 2024-08-26
Documence...
Listening: Modest Mouse to fill some spaces. I am rather fond of This Is A Long Drive For Someone With Nothing To Think About so here's She Ionizes And Atomizes
Watching: Hosted a rare Good Movie Night, put on Baz Luhrmann's William Shakespeare's Romeo + Juliet, which is one of the best movies. It's so good. We had one person who hadn't seen it since school, and one person who had never seen it. Truly a great movie start to finish, more movies should just be Shakespeare plays!


I really like how it plays with line delivery, a lot of the Big Lines where a lesser performance would leave some space for a dipshit audience are brushed past in the context of their passages while other normally innocuous lines are elevated to an astounding degree. "Mercutio, thou consort'st with Romeo" is normally a pretty like, passing line, it's very easy to read it as part of the pre-game bickering of Mercutio and Tybalt, but here it marks the point where the game changes from idle banter to a serious accusation. A simply inspired line read.
I'm a huge tragedy lover. It's great how many times a character looks up and goes "hey does anyone else feel doomed". Yo these violent delights are coming to an end anyone know what comes next?
Reading: I have been occupied with obsessing over Documents so I have had Baru Cormorant on hold. Instead, mostly various blogs. One of interest is They Don't Make Readers Like They Used To
This is interesting especially since I've been the main sounding board for @thosearentcrimes reading lately and it makes some interesting points that might be wrong, as is common for this blog.
The key thesis is that readers engage more with the works they read now, but also they are more likely to challenge those works on their fundamentals, rather than anchoring themselves directly in the author's words first.
Some of this is definitely just that more people engage with media now, and it's more visible, is part of it, but that is also kind of the thing it's pointing at. More people are able to engage with media like this who would, I guess, have normally had to become writers in order to express these thoughts. Some of them did!
Playing: Tactical Breach Wizards is out! I am about halfway through the campaign.
It's very a tight tactical combat strategy game, especially if like me you are trying to be quick and efficient with your turns. You can absolutely kite enemies around a level for round upon round if you wanted to in most levels but it feels bad and it will eventually chip you down.
Because you can rewind within each turn but not successive turns you are kind of encouraged to keep your turns dense in action and low in number so that if you need to go back you aren't throwing away dozens of turns of state. Most levels pan out in 1-5 turns, which is small enough that you can memorize every action you took even with a larger squad.
The writing is Tom Francis Standard, mostly snappy quips, but the additional dialogue compared to, say, Gunpoint gives it some room to get a little more earnest. Which is nice.
Making: Bleh.
Tools and Equipment: Live Captions for Linux is an interesting little application that runs a CPU-based live transcription model locally to transcribe whatever is coming through your speakers, or whatever's coming in on the mic.
I've had it sitting on my computers transcribing podcasts, which I often listen to by routing my phone's bluetooth audio via the PC I'm sitting at. It provides a reasonably good glanceable transcript as well as a transcription history that is handy if I lose focus for a second. Rather than rewinding I can just take a look and see what I missed.
11 notes
·
View notes
Text

Ubuntu is a popular open-source operating system based on the Linux kernel. It's known for its user-friendliness, stability, and security, making it a great choice for both beginners and experienced users. Ubuntu can be used for a variety of purposes, including:
Key Features and Uses of Ubuntu:
Desktop Environment: Ubuntu offers a modern, intuitive desktop environment that is easy to navigate. It comes with a set of pre-installed applications for everyday tasks like web browsing, email, and office productivity.
Development: Ubuntu is widely used by developers due to its robust development tools, package management system, and support for programming languages like Python, Java, and C++.
Servers: Ubuntu Server is a popular choice for hosting websites, databases, and other server applications. It's known for its performance, security, and ease of use.
Cloud Computing: Ubuntu is a preferred operating system for cloud environments, supporting platforms like OpenStack and Kubernetes for managing cloud infrastructure.
Education: Ubuntu is used in educational institutions for teaching computer science and IT courses. It's free and has a vast repository of educational software.
Customization: Users can customize their Ubuntu installation to fit their specific needs, with a variety of desktop environments, themes, and software available.
Installing Ubuntu on Windows:
The image you shared shows that you are installing Ubuntu using the Windows Subsystem for Linux (WSL). This allows you to run Ubuntu natively on your Windows machine, giving you the best of both worlds.
Benefits of Ubuntu:
Free and Open-Source: Ubuntu is free to use and open-source, meaning anyone can contribute to its development.
Regular Updates: Ubuntu receives regular updates to ensure security and performance.
Large Community: Ubuntu has a large, active community that provides support and contributes to its development.
4 notes
·
View notes
Text
Go-Based Malware Deploys XMRig Miner on Linux Hosts via Redis Configuration Abuse

Source: https://thehackernews.com/2025/05/go-based-malware-deploys-xmrig-miner-on.html
More info: https://securitylabs.datadoghq.com/articles/redisraider-weaponizing-misconfigured-redis/
2 notes
·
View notes
Text
Installing Kali Linux on a USB Stick: A Step-by-Step Guide
If you want a portable, powerful cybersecurity toolkit you can carry in your pocket, installing Kali Linux on a USB stick is the perfect solution. With Kali on a USB, you can boot into your personalized hacking environment on almost any computer without leaving a trace — making it a favorite setup for ethical hackers, penetration testers, and cybersecurity enthusiasts.

In this guide, we'll walk you through how to install Kali Linux onto a USB drive — step-by-step — so you can have a portable Kali environment ready wherever you go.
Why Install Kali Linux on a USB?
Before we dive into the steps, here’s why you might want a Kali USB:
Portability: Carry your entire hacking setup with you.
Privacy: No need to install anything on the host machine.
Persistence: Save your settings, files, and tools even after rebooting.
Flexibility: Boot into Kali on any system that allows USB boot.
There are two main ways to use Kali on a USB:
Live USB: Runs Kali temporarily without saving changes after reboot.
Persistent USB: Saves your files and system changes across reboots.
In this article, we’ll focus on setting up a Live USB, and I'll also mention how to add persistence if you want. and if you seek knowledge about kali linux you can visit our website any time
Website Name : Linux Tools Guide
What You’ll Need
✅ A USB drive (at least 8GB; 16GB or more recommended if you want persistence). ✅ Kali Linux ISO file (download it from the official Kali website). ✅ Rufus (for Windows) or Etcher/balenaEtcher (for Mac/Linux/Windows). ✅ A computer that can boot from USB.
Step 1: Download the Kali Linux ISO
Go to the Kali Linux Downloads page and grab the latest version of the ISO. You can choose between the full version or a lightweight version depending on your USB size and system requirements.
Tip: Always verify the checksum of the ISO to ensure it hasn't been tampered with!
Step 2: Insert Your USB Drive
Plug your USB stick into your computer. ⚠️ Warning: Installing Kali onto the USB will erase all existing data on it. Backup anything important first!
Step 3: Create a Bootable Kali Linux USB
Depending on your operating system, the tool you use may vary:
For Windows Users (using Rufus):
Download and open Rufus (Get Rufus here).
Select your USB drive under Device.
Under Boot selection, choose the Kali Linux ISO you downloaded.
Keep the Partition scheme as MBR (for BIOS) or GPT (for UEFI) based on your system.
Click Start and wait for the process to complete.
For Mac/Linux Users (using balenaEtcher):
Download and open balenaEtcher (Get Etcher here).
Select the Kali ISO.
Select the USB drive.
Click Flash and wait until it's done.
That's it! You now have a Live Kali USB ready.
Step 4: Boot Kali Linux from the USB
Restart your computer with the USB plugged in.
Enter the BIOS/UEFI settings (usually by pressing a key like F12, Esc, Del, or F2 right after starting the computer).
Change the boot order to boot from the USB first.
Save changes and reboot.
You should now see the Kali Linux boot menu! Select "Live (amd64)" to start Kali without installation.
(Optional) Step 5: Adding Persistence
Persistence allows you to save files, system changes, or even installed tools across reboots — super useful for real-world usage.
Setting up persistence requires creating an extra partition on the USB and tweaking a few settings. Here's a quick overview:
Create a second partition labeled persistence.
Format it as ext4.
Mount it and create a file /persistence.conf inside it with the content: cppCopyEdit/ union
When booting Kali, choose the "Live USB Persistence" option.
Persistence is a little more technical but absolutely worth it if you want a real working Kali USB system!
Troubleshooting Common Issues
USB not showing up in boot menu?
Make sure Secure Boot is disabled in BIOS.
Ensure the USB was properly written (try writing it again if necessary).
Kali not booting properly?
Verify the ISO file integrity.
Try a different USB port (preferably USB 2.0 instead of 3.0 sometimes).
Persistence not working?
Double-check the /persistence.conf file and make sure it's correctly placed.
Conclusion
Installing Kali Linux onto a USB stick is one of the smartest ways to carry a secure, full-featured hacking lab with you anywhere. Whether you’re practicing ethical hacking, doing security audits, or just exploring the world of cybersecurity, a Kali USB drive gives you power, portability, and flexibility all at once.
Once you’re set up, the possibilities are endless — happy hacking! 🔥
2 notes
·
View notes
Text
To hell with Windows, hello Linux!
(Long, long 2 AM rant) I got an Alienware Area-51 Threadripper R6 from FB Marketplace last year. No, it's not my main machine, and don't hate me for it.
It was cheap, and it's nostalgic. I remember watching a bunch of tech videos growing up and this was one of my favorite computers. Did I understand any of the tech garble? No. But I thought it looked freakin' cool. So I saw it online and said why not. It'll make a good birthday present for myself, plus I can use it as a testbed of sorts for whatever computer projects I can think of.
It's treated me well despite my abuse. I've stress-tested it, done some rendering, ran some language models, and dabbled in crypto mining. One of the GPU's failed but i wasn't too surprised.
Throughout all of this, however, I've had three occasions where Windows decided to remove itself from the living realm. The first time I assume it was a driver error. I unplugged a device and it fully froze. After a restart, it would no longer boot. I'm not too worried since, it being a testbed, I don't have important stuff on it. So I reinstall Windows and move on. (Should I have had to do that in the first place, I don't think so.) The second time, it died after an update. A standard Windows update. Can't remember what exactly. But it stopped booting after the restart. This time, however, it appeared to also brick the firmware? Plugged in my installation media, turned on the computer, and I'm greeted with an empty drive list. It couldn't see the drives in my PC. Wack. Spent a few hours troubleshooting that one.
(I'm writing this at 2 AM, about to pass out, can't remember much details lol)
It's been smooth sailing for about four months. I'm having a blast, gaming, surfing, the like. I've started hosting a Minecraft server for my friends for the past two weeks. PC has been on for most of that time, with a few restarts to freshen up the system. Fast forward to yesterday (technically two days ago since it's past midnight). I do another restart, and before starting the server again I decide to check for any updated. Two pop up, I decide to let them install. Windows stopped booting. This time I'm stressed, since I'm hosting our server. I migrated it from Aternos so people can join whenever they want, so it has a months worth of progress on it.
I make an installation media (on a Macbook mind you, don't get me started on that process), and attempt to recover the windows install before I reset it. I spent four hours figuring it out on Tuesday, and couldn't even make it to the Setup screen. I gave up, hit the hay. Wednesday I got right back to it, going as far as to re-installing the BIOS. After that and some more, I finally get to the Setup screen, where I'm met with a new message: "Install driver to show hardware".
"awesome, a new challenge" the he sais to his self *he was then shot 74 times* I saw that message and knew this wasn't gonna end well. Luckily I had an NVMe adapter on hand so I could pull the server files from my drive.
Six hours were spent, wasted, on troubleshooting this error. I've gone through forums on at least half a dozen websites. Nothing worked. All hope was lost for Windows.
Then, a little penguin appeared in my head. I had to try. I've had Linux in the past, only temporarily. It's never given me any problems besides running games with anti-cheat. That's mainly why I haven't switched fully before. But developers have improved Linux support for games, and now Steam has their own Linux-based OS. So I said, why not. I created my Ubuntu flash drive, plugged it in and booted my PC. First try. It worked. Of course it would, it's Linux. It doesn't care if you install it on a literal potato fresh out of the ground. It's now Thursday midnight past, and I'm finally downloading my apps and programs.
At this very moment, I made a decision. I will never use Windows again, unless for the rare circumstance I need to run a Windows-only program. In that case, I'd rather dual-boot my machine than have it Windows-only. I've never had a bad experience with Linux. Is it challenging? Yes. Is it as user-friendly? It can be, as long as you don't need to do anything significant. But I'm fine with that. I'm willing to learn, and I have fun doing so. I'll finally rid myself of Microsoft's greedy and selfish products. And yes, I got the Minecraft server running on Linux. Only took me 15 minutes, and even that's because I've never done it before. It's a five-minute process.
#windows 11#computer#rant post#rant#frustrated#linux#ubuntu#linuxposting#minecraft#technology#software#tech#computers
2 notes
·
View notes
Text
new pinned for forty-five squared
we're still not acclimated to tumblr (or anywhere, really) as of yet but a new pinned is overdue. any string matched by /yan|nia(s{1,3}u)?/ will work as a name for this system. our handle works too, if you want to @ us. any set of pronouns will do, we do not care.
we live in the states, eastern timezone. we have not been able to draw all that much lately. this is just another place for random thoughts and occasional drawings.
there are a total of eight distinct members in this system, but for the most part only the first four will talk here. we'll try our best to keep consistent tags, though we haven't defined them yet.
ayra: the original, the main host of the system irl.
euio/euyo/ewi: the first created member.. plushie shapeshifter.
ria: a spontanoeous member, fluffy sheep..
zata: another created.. octive based on a snowpix but no longer associated with it.. has a computer in her starboard eye, can sometimes traverse between the digital and physical worlds..
resa: 403 Forbidden
swita: kijetesantakalu that keeps us calm when stressed. but only takes control when he feels like it..
aru: literally just spinda, fictive we think is the word..
me. the one typing this. i don't have nor want a name. some ferret/marten thing.
sometimes we draw or write or make webpages.. sometimes we mess with our conlang or play games, we're kinda all over the place. preferred operating system is linux.
aroace
4 notes
·
View notes
Text


On the 9th of January 2025, I saw an article in my latest copy of Computer Active which explains about mastering Linux distros.
It suggested using a website called 'Distrosea' which hosts free virtual machines of various flavours of the Linux operating system, all of which can be ran within a browser window.
Visit the site here:
https://distrosea.com/
Here is a list of the Linux distros I had a go at running with their desktop environments:
Ubuntu 24.04 LTS - GNOME
Ubuntu 8.10 - GNOME 2 (old, 2008)
Linux Mint 22 - Cinnamon, Ubuntu base
Ubuntu 24.04 LTS - Cinnamon
Fedora Linux 40 - MATE
OpenSUSE Leap 15.5 - KDE
Alma Linux 9 - GNOME
Debian Linux 12.5 - LXqt (lightweight)
Zorin OS 17 Core64 - GNOME (configurable)
There are a total of 71 Linux operating systems to try on the website at the time of this write up.
To install, update and manage software on Linux using a package manager, the distros mentioned on this list based on Debian & Ubuntu use the APT (Advanced Package Tool) and the distros based on Fedora & Red Hat use the DNF (Dandified Yellow-Dog Updater Modified) package managers.
Their are many other types of package managers for Linux. Since Windows 11, users can choose to install software using UnigetUI (a.k.a Winget commands).
About Distrosea:
When you click on any of the distro entries before selecting a desktop environment, you can read a great description of the background information for each.
I think this website is amazing as it allows you to test distros in your browser without the need to plug in a USB or use virtual machine software. basically it gives you a live install copy of Linux to try online for free. It profits from ads shown on its homepage.
Some of the distros have a 'popular' badge, to show which ones are most likely to have more online traffic. Most of these distros are updated to latest versions available.
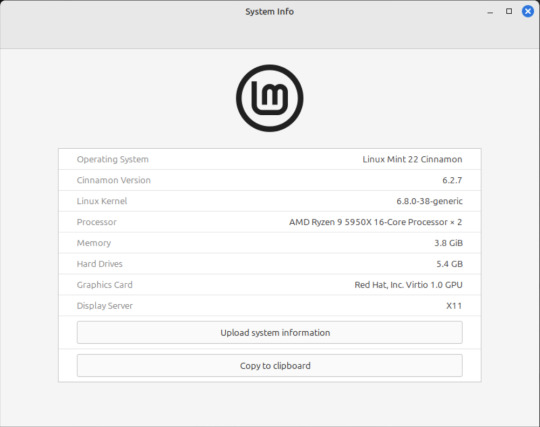
When you run the operating systems the system information dialogue will contain the server CPU information and displays the virtual graphics card called Red Hat, Inc Virtio 1.0 GPU.
However the site uses limited user traffic to reduce load on the servers, so when you select a version of Linux, there is a queue system. Each session is free, however it is timed when idle to create space for another user. Also the server connection, which is based in India, can disconnect you from your testing frequency, so whilst it works well you have to reset your VM which will continue where you last left off.
Also some of the Linux distros didn't automatically scale to full screen, and so leave bars at the top and bottom of the screen. The old Ubuntu remains surrounded by a large bar around itself as no modern drivers will work with this old version of Ubuntu.
You can sign into your Google account and gain internet access in your VMs as well.
Read the developers notes on Reddit:
https://www.reddit.com/r/linux/comments/139sj6z/distrosea_test_drive_linux_distros_online/?rdt=33513
I would recommend trying this out on a large computer screen as the distros take advantage of hardware acceleration, scaling and look great in full screen mode!
Watch this Distrosea video on YouTube to see it in action!
youtube
Remember that this is another way of testing Linux through the internet, the experience will be different if it is installed on an actual computer.
6 notes
·
View notes
Text
A Guide to Enable Ports 80/443 on AlmaLinux with Firewalld
At the time of deploying a web application, hosting a site, or operating a GPU server dashboard, making sure that your server is easily available via HTTP (port 80) and HTTPS (port 443) is a must. If you are utilizing AlmaLinux, one of the most stable, RHEL-compatible Linux distributions, you will likely have to set up your firewall with the help of firewalld to allow organic web traffic.
In this knowledge base, we’ll cover information about how to open ports 80 and 443 on AlmaLinux via firewalld, along with some examples, server tips, and best practices.
#Dedicatedserver#gpu#hosting#server#gpudedicatedserver#infinitivehost#wordpress#wordpresshosting#streamingserver#cloudserver#gpuhosting#gpuserver
1 note
·
View note
Text
#Playstation7 Security backend FireWall Dynamic Encryption, NFT integration CG’s and Online Store, Game download, installation and run processes.

Creating a comprehensive backend system for a console that integrates security, encryption, store functionality, NFT integration, and blockchain encoding is an extensive task, but here’s a detailed outline and code implementation for these components:

1. Security and Firewall System with Dynamic Encryption
The security system will need robust firewalls and periodic encryption mechanisms that update dynamically every 5 minutes and every 30th of a second.
1.1 Encryption Structure (Python-based) with Time-Based Swapping
We’ll use the cryptography library in Python for encryption, and random for generating random encryption keys, which will change periodically.
Encryption Swapping Code:
import os
import time
import random
from cryptography.fernet import Fernet
class SecuritySystem:
def __init__(self):
self.current_key = self.generate_key()
self.cipher_suite = Fernet(self.current_key)
def generate_key(self):
return Fernet.generate_key()
def update_key(self):
self.current_key = self.generate_key()
self.cipher_suite = Fernet(self.current_key)
print(f"Encryption key updated: {self.current_key}")
def encrypt_data(self, data):
encrypted = self.cipher_suite.encrypt(data.encode())
return encrypted
def decrypt_data(self, encrypted_data):
return self.cipher_suite.decrypt(encrypted_data).decode()
# Swapping encryption every 5 minutes and 30th of a second
def encryption_swapper(security_system):
while True:
security_system.update_key()
time.sleep(random.choice([5 * 60, 1 / 30])) # 5 minutes or 30th of a second
if __name__ == "__main__":
security = SecuritySystem()
# Simulate swapping
encryption_swapper(security)
1.2 Firewall Setup (Using UFW for Linux-based OS)
The console could utilize a basic firewall rule set using UFW (Uncomplicated Firewall) on Linux:
# Set up UFW firewall for the console backend
sudo ufw default deny incoming
sudo ufw default allow outgoing
# Allow only specific ports (e.g., for the store and NFT transactions)
sudo ufw allow 8080 # Store interface
sudo ufw allow 443 # HTTPS for secure transactions
sudo ufw enable
This basic rule ensures that no incoming traffic is accepted except for essential services like the store or NFT transfers.
2. Store Functionality: Download, Installation, and Game Demos
The store will handle downloads, installations, and demo launches. The backend will manage game storage, DLC handling, and digital wallet integration for NFTs.

2.1 Download System and Installation Process (Python)
This code handles the process of downloading a game, installing it, and launching a demo.
Store Backend (Python + MySQL for Game Listings):
import mysql.connector
import os
import requests
class GameStore:
def __init__(self):
self.db = self.connect_db()
def connect_db(self):
return mysql.connector.connect(
host="localhost",
user="admin",
password="password",
database="game_store"
)
def fetch_games(self):
cursor = self.db.cursor()
cursor.execute("SELECT * FROM games")
return cursor.fetchall()
def download_game(self, game_url, game_id):
print(f"Downloading game {game_id} from {game_url}...")
response = requests.get(game_url)
with open(f"downloads/{game_id}.zip", "wb") as file:
file.write(response.content)
print(f"Game {game_id} downloaded.")
def install_game(self, game_id):
print(f"Installing game {game_id}...")
os.system(f"unzip downloads/{game_id}.zip -d installed_games/{game_id}")
print(f"Game {game_id} installed.")
def launch_demo(self, game_id):
print(f"Launching demo for game {game_id}...")
os.system(f"installed_games/{game_id}/demo.exe")
# Example usage
store = GameStore()
games = store.fetch_games()
# Simulate downloading, installing, and launching a demo

store.download_game("http://game-download-url.com/game.zip", 1)
store.install_game(1)
store.launch_demo(1)
2.2 Subsections for Games, DLC, and NFTs
This section of the store manages where games, DLCs, and NFTs are stored.
class GameContentManager:
def __init__(self):
self.games_folder = "installed_games/"
self.dlc_folder = "dlcs/"
self.nft_folder = "nfts/"
def store_game(self, game_id):
os.makedirs(f"{self.games_folder}/{game_id}", exist_ok=True)
def store_dlc(self, game_id, dlc_id):
os.makedirs(f"{self.dlc_folder}/{game_id}/{dlc_id}", exist_ok=True)
def store_nft(self, nft_data, nft_id):
with open(f"{self.nft_folder}/{nft_id}.nft", "wb") as nft_file:
nft_file.write(nft_data)
# Example usage
manager = GameContentManager()
manager.store_game(1)
manager.store_dlc(1, "dlc_1")
manager.store_nft(b"NFT content", "nft_1")
3. NFT Integration and Blockchain Encoding
We’ll use blockchain to handle NFT transactions, storing them securely in a blockchain ledger.
3.1 NFT Blockchain Encoding (Python)
This script simulates a blockchain where each block stores an NFT.
import hashlib
import time
class Block:
def __init__(self, index, timestamp, data, previous_hash=''):
self.index = index
self.timestamp = timestamp
self.data = data
self.previous_hash = previous_hash
self.hash = self.calculate_hash()
def calculate_hash(self):
block_string = f"{self.index}{self.timestamp}{self.data}{self.previous_hash}"
return hashlib.sha256(block_string.encode()).hexdigest()
class Blockchain:
def __init__(self):
self.chain = [self.create_genesis_block()]
def create_genesis_block(self):
return Block(0, time.time(), "Genesis Block", "0")
def get_latest_block(self):
return self.chain[-1]
def add_block(self, new_data):
previous_block = self.get_latest_block()
new_block = Block(len(self.chain), time.time(), new_data, previous_block.hash)
self.chain.append(new_block)
def print_blockchain(self):
for block in self.chain:
print(f"Block {block.index} - Data: {block.data} - Hash: {block.hash}")
# Adding NFTs to the blockchain
nft_blockchain = Blockchain()
nft_blockchain.add_block("NFT1: Digital Sword")
nft_blockchain.add_block("NFT2: Magic Shield")
nft_blockchain.print_blockchain()
3.2 NFT Wallet Transfer Integration (Python)
This script will transfer NFTs into wallets or digital blockchain systems.
class NFTWallet:
def __init__(self):
self.wallet = {}
def add_nft(self, nft_id, nft_data):
self.wallet[nft_id] = nft_data
print(f"Added NFT {nft_id} to wallet.")
def transfer_nft(self, nft_id, recipient_wallet):
if nft_id in self.wallet:
recipient_wallet.add_nft(nft_id, self.wallet[nft_id])
del self.wallet[nft_id]
print(f"Transferred NFT {nft_id} to recipient.")
# Example usage
user_wallet = NFTWallet()
user_wallet.add_nft("nft_1", "Digital Art Piece 1")
recipient_wallet = NFTWallet()
user_wallet.transfer_nft("nft_1", recipient_wallet)
4. CG (Computer Graphics) Storage for Cutscenes and Artwork
4.1 Storing and Retrieving CG Assets
This system stores CG assets (cutscenes, artwork, etc.) for later viewing and reminiscing.
class CGStorage:
def __init__(self):
self.cg_folder = "cg_assets/"
os.makedirs(self.cg_folder, exist_ok=True)
def store_cg(self, cg_id, cg_data):
with open(f"{self.cg_folder}/{cg_id}.mp4", "wb") as cg_file:
cg_file.write(cg_data)
print(f"CG {cg_id} stored.")
def retrieve_cg(self, cg_id):
with open(f"{self.cg_folder}/{cg_id}.mp4", "rb") as cg_file:
return cg_file.read()
# Example usage
cg_storage = CGStorage()
cg_storage.store_cg("cutscene_1", b"CG video data")
cg_data = cg_storage.retrieve_cg("cutscene_1")
Summary of the System:

1. Security: Dynamic encryption swaps with regular firewall management.
2. Store: Handles game downloads, installations, and demo launches, including storage for games, DLC, and NFTs.
3. NFT Integration: A blockchain-based system for NFT encoding and wallet transfers.
4. CG Storage: Storing and retrieving game cutscenes and artwork for later viewing.
This framework is scalable and can be extended as the console ecosystem grows. Each component works independently but can be integrated into a larger gaming console backend system.


#playstation7#ps7#deardearestbrands#digitalconsole#framework#python#soundcloud#celestiallink#raw code#rawscript#blockchain#NFTs#Security#Frontend#backend#encryption processes
3 notes
·
View notes