#MacBook Pro 12
Explore tagged Tumblr posts
Visit Tumblr Blog
Explore Tumblr blogs with no restrictions, modern design and the best experience.
Last Seen Tumblr Blogs


Fun Fact
Tumblr posted its first advertisements in May 2012 and subsequently earned $13M in revenue.
Text
MacBook Pro 2017 : suddenly became very cheap
MacBook Pro 2017 is a PC version launched by Apple. Which has now been made cheaper by Apple, let us tell you about some of the key features and capabilities of MacBook Pro 2017 today Read More
#MacBook pro 17#MacBook pro 17 pro#MacBook pro#macbook air#macbook repair#MacBook#MacBook pro 12#Laptop
3 notes
·
View notes
Text
Welcome to Jaadu Se : Shop the Latest, Mobile Phones, Smartphones, Apple Products, iPhone , iPad , Watch & Premium Accessories
Jaadu Se, a proud division of iZone Digital India Private Limited, is where magic meets technology! 🎩✨ We're here to sprinkle enchantment into your shopping experience and turn every wish into a reality! 💫
At Jaadu Se, we believe in our tagline, Jaadu SE - ab hogi sabki wish puri, which means "Magic Happens - now everyone's wish will come true". 💫
Step into our mystical realm, where we offer an enchanting array of mobile phones, tablets, smartwatches, and earbuds from top brands like Apple, Samsung, VIVO, Realme, Nokia, Google Pixel, Xiaomi, and OnePlus. From the latest gadgets & Low Budgets to trendy accessories and tech-savvy solutions, we've got everything you need and more!
Explore our curated collection and discover hot deals on your favorite brands. Don't miss out on our Weekly offers and best deals, where you can score amazing discounts on must-have products! 🛍️✨
In addition, we have some original Apple accessories & Apple care & Apple care Plus available at the best and lowest prices, along with a selection of open box deals for those looking for even greater savings.
Embark on a magical journey with us as we bring your dreams to life. Let the magic of Jaadu Se transform your shopping adventure into an unforgettable experience!
Don't miss out on updates, special offers, and a touch of magic! Follow us to stay enchanted! 🌟
Keywords: Jaadu Se - Shop the Latest, Mobile Phones, Smartphones, Apple Products, iPhone , iPad , Watch and Accessories
Online Shopping, Electronics, Gadgets, Tech Accessories, Wearable Tech, Smart Devices, Mobile Accessories, Smartphone Deals, Tablet Accessories, Smartwatch Accessories, Bluetooth Earphones, Wireless Chargers, Power Banks, Tech Gifts, Latest Technology, Cutting-edge Gadgets, Exclusive Offers, Limited Time Deals, Flash Sales, Discounted Prices, Tech Enthusiasts, Tech Savvy, Must-Have Gadgets, Trending Tech, Innovative Products, Premium Quality, Reliable Brands, Trusted Products, Fast Shipping, Hassle-Free Returns, Cutting-edge Technology, Digital Devices, High-Performance Gadgets, Sleek Design, Next-Generation Products, Smart Home Devices, Virtual Reality (VR), Augmented Reality (AR), Gaming Accessories, Gaming Consoles, PC Components, Computer Accessories, Laptop Deals, Monitor Deals, Camera Accessories, Photography Gear, Home Entertainment, Audio Equipment, Sound Systems, Wireless Speakers, Home Automation, Wearable Gadgets, Fitness Trackers, Health Monitors, Smart Appliances, Home Security Systems, Environmental Friendly Tech, Sustainable Products, Eco-friendly Gadgets, Innovative Solutions, Top Brands, Apple, Samsung, VIVO, Realme, Nokia, Google Pixel, Xiaomi, OnePlus, Sony, LG, Huawei, Lenovo, ASUS, Oppo, Motorola, TCL, Honor, Acer, JBL, Bose, Logitech, Anker, Razer, Corsair, Western Digital, Seagate, SanDisk, Kingston, TP-Link, Netgear, D-Link, Microsoft, Adobe, Autodesk, Dell, HP, Alienware, Lenovo, Acer, Asus, Microsoft Surface, Google Home, Amazon Echo, Smart Lighting, Smart Thermostats, Smart Plugs, Wireless Cameras, 4K TVs, OLED TVs, QLED TVs, Curved Monitors, UltraWide Monitors, Gaming Keyboards, Gaming Mice, Gaming Headsets, VR Headsets, AR Glasses, Wireless Earbuds, Noise-Canceling Headphones, Jaadu, Jadu, Jadoo , jaadoo
#startup#appleiphone#ecommerce#sales#entrepreneur#smartphone#smartwatch#brands#iphone#ipad#mobile.#iphone 15#iphone 14#iphone 11#iphone 12#iphone 13 pro max#apple white#apple watch#apple wallet#apple music#applejack#macbook
2 notes
·
View notes
Text

Orbyt Studio / Supply.Family / MacBook Pro (12) / Mockup / 2023
Download
0 notes
Text

Elegancia en Portátiles: Apple MacBook Air
El Apple MacBook Air es sinónimo de elegancia y rendimiento. Con su diseño ultraligero y potencia sorprendente, se ha ganado un lugar especial en el corazón de los usuarios chilenos. La imagen muestra el MacBook Air en todo su esplendor, destacando su delgado perfil y su icónico logotipo de Apple iluminado. Este portátil es ideal para aquellos que valoran la portabilidad sin sacrificar el rendimiento. Ya sea que estés trabajando en proyectos creativos o disfrutando de contenido multimedia, el MacBook Air es un compañero confiable.
#Apple MacBook Air#macbook pro 2016#Samsung Galaxy#Smartphone Samsung#celulares samsung#apple iphone 12 mini tiendas#Apple iPhone 12#iphone 11 pro max#iphone 11 64gb
0 notes
Text
In my defense, I didn't pay for any of the HP laptops (and again -- work owns one of them) and the Raspberry Pi was less than $100.
So, really, my two Apple Silicon Macs are the only ones I count as spending money on.
Y'ever just think... wow... that's too many computers?
I have seven, not including my tablets.
Five of them are laptops.
Two of those laptops are Macs -- my current Mac laptop (an M2 Macbook Air) which I use every day, and my old laptop (a late-2011 13" MacBook Pro) which after some upgrades (and the removal of its spicy pillow battery years ago) currently runs as a backup server, print server, and network drive.
Then there are the three HP laptops.
One of them I technically don't own, as it's my work machine. It's just running Windows 10 -- nothing special -- and it works. Then I have my two fuckaround machines -- a 15 year old 17" 'desktop replacement' that originally ran Vista but currently runs Linux Mint (and we used for years as the registration computer at No Brand Con). Then I have a 14" laptop that's "current" (in the sense that you can buy it right now for less than $200 at Walmart) that I got for free -- which dual boots into Linux Mint and Windows 11.
And then there are the non-laptops -- my M1 Mac Mini (my primary production workstation for art and podcasts) and my non-laptop fuckaround machine -- a Raspberry Pi 400 running Raspberry Pi OS.
And I was realizing today... is that too many? That might be too many.
29 notes
·
View notes
Text
Have you got an old Mac that is no longer supported by Apple? It's time to give it a new life.
How to install the latest MacOS on Mac hardware that is no longer officially supported using OpenCore Legacy Patcher.
I recently discovered this and it has been a game changer. Recently my partner needed a Mac for her music course, so we bought a 2012 Macbook Pro as it was cheap and on paper still had decent hardware for working with music. We were then disappointed to find out that it is no longer supported by Apple, and therefore can't run the latest version of Logic, which she needed to inter-op with the school comptuers. Just as we thought we had bought a less than useful computer, I found this video about OpenCore Legacy Patcher from Youtuber Action Retro.
It's a community made piece of software that allows you to install the latest version of MacOS on any Intel Mac, from the late 2000s onwards. All you need to do is download the application on a mac, it will then allow you to make a bootable USB drive for any version of MacOS you want, and you just need to choose the specific mac you are targeting from a list, and it "blesses" the bootable drive, allowing you to install it on your unsupported mac using the normal install process.
I tried it and it it worked perfectly on the 2012 Macbook Pro, and the latest version of MacOS Sonoma is running perfectly well on the 12 year old hardware. It also allowed us to install the latest version of Logic, so it's working great.
Props to the team for making this and allowing hardware that would otherwise be e-waste to continue to be usable with the modern internet and software. If you end up using it, please consider donating to the team as apparently they had to jump through some serious technical hoops to get this working. Here is the link again if you need it: https://dortania.github.io/OpenCore-Legacy-Patcher/
#mac#MacOS#Computers#OpenCore Legacy#OpenCore Legacy Patcher#Software#hardware#Apple#computer recycling#Action Retro
3K notes
·
View notes
Text


[narni] Pose pack - Bro Bonding Time
♢ 12 group poses (12 couple + 8 single poses) ♢You need: Teleport Any Sim & Pose Player or WW ACC: - iPhone 12 Pro Max [Right] by MURPHY (hat) - Ball (ACC) by BETO (bracelets) - MXIMS Apple MacBook ACC by simsxen (hat) - Hoodie for the pose 5 by gorillax3
every sim have different height
DOWNLOAD: simfileshare ALT: mediafire
patreon | boosty
@ts4-poses @alwaysfreecc @sssvitlanz
If you have any questions or problems with using these poses, please text me!


#ts4cc#the sims 4#ts4#thesims4#ts4 poses#the sims#sims 4#sims 4 cc#sims 4 poses#narni-sims#narnisims#sims 4 pose pack#the sims 4 poses#the sims 4 cc
229 notes
·
View notes
Text


Neural Filters Tutorial for Gifmakers by @antoniosvivaldi
Hi everyone! In light of my blog’s 10th birthday, I’m delighted to reveal my highly anticipated gifmaking tutorial using Neural Filters - a very powerful collection of filters that really broadened my scope in gifmaking over the past 12 months.
Before I get into this tutorial, I want to thank @laurabenanti, @maines , @cobbbvanth, and @cal-kestis for their unconditional support over the course of my journey of investigating the Neural Filters & their valuable inputs on the rendering performance!
In this tutorial, I will outline what the Photoshop Neural Filters do and how I use them in my workflow - multiple examples will be provided for better clarity. Finally, I will talk about some known performance issues with the filters & some feasible workarounds.
Tutorial Structure:
Meet the Neural Filters: What they are and what they do
Why I use Neural Filters? How I use Neural Filters in my giffing workflow
Getting started: The giffing workflow in a nutshell and installing the Neural Filters
Applying Neural Filters onto your gif: Making use of the Neural Filters settings; with multiple examples
Testing your system: recommended if you’re using Neural Filters for the first time
Rendering performance: Common Neural Filters performance issues & workarounds
For quick reference, here are the examples that I will show in this tutorial:
Example 1: Image Enhancement | improving the image quality of gifs prepared from highly compressed video files
Example 2: Facial Enhancement | enhancing an individual's facial features
Example 3: Colour Manipulation | colourising B&W gifs for a colourful gifset
Example 4: Artistic effects | transforming landscapes & adding artistic effects onto your gifs
Example 5: Putting it all together | my usual giffing workflow using Neural Filters
What you need & need to know:
Software: Photoshop 2021 or later (recommended: 2023 or later)*
Hardware: 8GB of RAM; having a supported GPU is highly recommended*
Difficulty: Advanced (requires a lot of patience); knowledge in gifmaking and using video timeline assumed
Key concepts: Smart Layer / Smart Filters
Benchmarking your system: Neural Filters test files**
Supplementary materials: Tutorial Resources / Detailed findings on rendering gifs with Neural Filters + known issues***
*I primarily gif on an M2 Max MacBook Pro that's running Photoshop 2024, but I also have experiences gifmaking on few other Mac models from 2012 ~ 2023.
**Using Neural Filters can be resource intensive, so it’s helpful to run the test files yourself. I’ll outline some known performance issues with Neural Filters and workarounds later in the tutorial.
***This supplementary page contains additional Neural Filters benchmark tests and instructions, as well as more information on the rendering performance (for Apple Silicon-based devices) when subject to heavy Neural Filters gifmaking workflows
Tutorial under the cut. Like / Reblog this post if you find this tutorial helpful. Linking this post as an inspo link will also be greatly appreciated!
1. Meet the Neural Filters!
Neural Filters are powered by Adobe's machine learning engine known as Adobe Sensei. It is a non-destructive method to help streamline workflows that would've been difficult and/or tedious to do manually.
Here are the Neural Filters available in Photoshop 2024:


Skin Smoothing: Removes blemishes on the skin
Smart Portrait: This a cloud-based filter that allows you to change the mood, facial age, hair, etc using the sliders+
Makeup Transfer: Applies the makeup (from a reference image) to the eyes & mouth area of your image
Landscape Mixer: Transforms the landscape of your image (e.g. seasons & time of the day, etc), based on the landscape features of a reference image
Style Transfer: Applies artistic styles e.g. texturings (from a reference image) onto your image
Harmonisation: Applies the colour balance of your image based on the lighting of the background image+
Colour Transfer: Applies the colour scheme (of a reference image) onto your image
Colourise: Adds colours onto a B&W image
Super Zoom: Zoom / crop an image without losing resolution+
Depth Blur: Blurs the background of the image
JPEG Artefacts Removal: Removes artefacts caused by JPEG compression
Photo Restoration: Enhances image quality & facial details
+These three filters aren't used in my giffing workflow. The cloud-based nature of Smart Portrait leads to disjointed looking frames. For Harmonisation, applying this on a gif causes Neural Filter timeout error. Finally, Super Zoom does not currently support output as a Smart Filter
If you're running Photoshop 2021 or earlier version of Photoshop 2022, you will see a smaller selection of Neural Filters:


Things to be aware of:
You can apply up to six Neural Filters at the same time
Filters where you can use your own reference images: Makeup Transfer (portraits only), Landscape Mixer, Style Transfer (not available in Photoshop 2021), and Colour Transfer
Later iterations of Photoshop 2023 & newer: The first three default presets for Landscape Mixer and Colour Transfer are currently broken.
2. Why I use Neural Filters?
Here are my four main Neural Filters use cases in my gifmaking process. In each use case I'll list out the filters that I use:

Enhancing Image Quality:
Common wisdom is to find the highest quality video to gif from for a media release & avoid YouTube whenever possible. However for smaller / niche media (e.g. new & upcoming musical artists), prepping gifs from highly compressed YouTube videos is inevitable.
So how do I get around with this? I have found Neural Filters pretty handy when it comes to both correcting issues from video compression & enhancing details in gifs prepared from these highly compressed video files.
Filters used: JPEG Artefacts Removal / Photo Restoration
Facial Enhancement:
When I prepare gifs from highly compressed videos, something I like to do is to enhance the facial features. This is again useful when I make gifsets from compressed videos & want to fill up my final panel with a close-up shot.
Filters used: Skin Smoothing / Makeup Transfer / Photo Restoration (Facial Enhancement slider)
Colour Manipulation:
Neural Filters is a powerful way to do advanced colour manipulation - whether I want to quickly transform the colour scheme of a gif or transform a B&W clip into something colourful.
Filters used: Colourise / Colour Transfer
Artistic Effects:
This is one of my favourite things to do with Neural Filters! I enjoy using the filters to create artistic effects by feeding textures that I've downloaded as reference images. I also enjoy using these filters to transform the overall the atmosphere of my composite gifs. The gifsets where I've leveraged Neural Filters for artistic effects could be found under this tag on usergif.
Filters used: Landscape Mixer / Style Transfer / Depth Blur
How I use Neural Filters over different stages of my gifmaking workflow:
I want to outline how I use different Neural Filters throughout my gifmaking process. This can be roughly divided into two stages:
Stage I: Enhancement and/or Colourising | Takes place early in my gifmaking process. I process a large amount of component gifs by applying Neural Filters for enhancement purposes and adding some base colourings.++
Stage II: Artistic Effects & more Colour Manipulation | Takes place when I'm assembling my component gifs in the big PSD / PSB composition file that will be my final gif panel.
I will walk through this in more detail later in the tutorial.
++I personally like to keep the size of the component gifs in their original resolution (a mixture of 1080p & 4K), to get best possible results from the Neural Filters and have more flexibility later on in my workflow. I resize & sharpen these gifs after they're placed into my final PSD composition files in Tumblr dimensions.
3. Getting started
The essence is to output Neural Filters as a Smart Filter on the smart object when working with the Video Timeline interface. Your workflow will contain the following steps:
Prepare your gif
In the frame animation interface, set the frame delay to 0.03s and convert your gif to the Video Timeline
In the Video Timeline interface, go to Filter > Neural Filters and output to a Smart Filter
Flatten or render your gif (either approach is fine). To flatten your gif, play the "flatten" action from the gif prep action pack. To render your gif as a .mov file, go to File > Export > Render Video & use the following settings.

Setting up:
o.) To get started, prepare your gifs the usual way - whether you screencap or clip videos. You should see your prepared gif in the frame animation interface as follows:

Note: As mentioned earlier, I keep the gifs in their original resolution right now because working with a larger dimension document allows more flexibility later on in my workflow. I have also found that I get higher quality results working with more pixels. I eventually do my final sharpening & resizing when I fit all of my component gifs to a main PSD composition file (that's of Tumblr dimension).
i.) To use Smart Filters, convert your gif to a Smart Video Layer.
As an aside, I like to work with everything in 0.03s until I finish everything (then correct the frame delay to 0.05s when I upload my panels onto Tumblr).
For convenience, I use my own action pack to first set the frame delay to 0.03s (highlighted in yellow) and then convert to timeline (highlighted in red) to access the Video Timeline interface. To play an action, press the play button highlighted in green.

Once you've converted this gif to a Smart Video Layer, you'll see the Video Timeline interface as follows:

ii.) Select your gif (now as a Smart Layer) and go to Filter > Neural Filters

Installing Neural Filters:
Install the individual Neural Filters that you want to use. If the filter isn't installed, it will show a cloud symbol (highlighted in yellow). If the filter is already installed, it will show a toggle button (highlighted in green)

When you toggle this button, the Neural Filters preview window will look like this (where the toggle button next to the filter that you use turns blue)

4. Using Neural Filters
Once you have installed the Neural Filters that you want to use in your gif, you can toggle on a filter and play around with the sliders until you're satisfied. Here I'll walkthrough multiple concrete examples of how I use Neural Filters in my giffing process.
Example 1: Image enhancement | sample gifset
This is my typical Stage I Neural Filters gifmaking workflow. When giffing older or more niche media releases, my main concern is the video compression that leads to a lot of artefacts in the screencapped / video clipped gifs.
To fix the artefacts from compression, I go to Filter > Neural Filters, and toggle JPEG Artefacts Removal filter. Then I choose the strength of the filter (boxed in green), output this as a Smart Filter (boxed in yellow), and press OK (boxed in red).
Note: The filter has to be fully processed before you could press the OK button!

After applying the Neural Filters, you'll see "Neural Filters" under the Smart Filters property of the smart layer

Flatten / render your gif
Example 2: Facial enhancement | sample gifset
This is my routine use case during my Stage I Neural Filters gifmaking workflow. For musical artists (e.g. Maisie Peters), YouTube is often the only place where I'm able to find some videos to prepare gifs from. However even the highest resolution video available on YouTube is highly compressed.
Go to Filter > Neural Filters and toggle on Photo Restoration. If Photoshop recognises faces in the image, there will be a "Facial Enhancement" slider under the filter settings.

Play around with the Photo Enhancement & Facial Enhancement sliders. You can also expand the "Adjustment" menu make additional adjustments e.g. remove noises and reducing different types of artefacts.

Once you're happy with the results, press OK and then flatten / render your gif.
Example 3: Colour Manipulation | sample gifset
Want to make a colourful gifset but the source video is in B&W? This is where Colourise from Neural Filters comes in handy! This same colourising approach is also very helpful for colouring poor-lit scenes as detailed in this tutorial.
Here's a B&W gif that we want to colourise:

Highly recommended: add some adjustment layers onto the B&W gif to improve the contrast & depth. This will give you higher quality results when you colourise your gif.
Go to Filter > Neural Filters and toggle on Colourise.

Make sure "Auto colour image" is enabled.
Play around with further adjustments e.g. colour balance, until you're satisfied then press OK.
Important: When you colourise a gif, you need to double check that the resulting skin tone is accurate to real life. I personally go to Google Images and search up photoshoots of the individual / character that I'm giffing for quick reference.
Add additional adjustment layers until you're happy with the colouring of the skin tone.

Once you're happy with the additional adjustments, flatten / render your gif. And voila!

Note: For Colour Manipulation, I use Colourise in my Stage I workflow and Colour Transfer in my Stage II workflow to do other types of colour manipulations (e.g. transforming the colour scheme of the component gifs)
Example 4: Artistic Effects | sample gifset
This is where I use Neural Filters for the bulk of my Stage II workflow: the most enjoyable stage in my editing process!
Normally I would be working with my big composition files with multiple component gifs inside it. To begin the fun, drag a component gif (in PSD file) to the main PSD composition file.
Resize this gif in the composition file until you're happy with the placement

Duplicate this gif. Sharpen the bottom layer (highlighted in yellow), and then select the top layer (highlighted in green) & go to Filter > Neural Filters

I like to use Style Transfer and Landscape Mixer to create artistic effects from Neural Filters. In this particular example, I've chosen Landscape Mixer
Select a preset or feed a custom image to the filter (here I chose a texture that I've on my computer)

Play around with the different sliders e.g. time of the day / seasons
Important: uncheck "Harmonise Subject" & "Preserve Subject" - these two settings are known to cause performance issues when you render a multiframe smart object (e.g. for a gif)

Once you're happy with the artistic effect, press OK
To ensure you preserve the actual subject you want to gif (bc Preserve Subject is unchecked), add a layer mask onto the top layer (with Neural Filters) and mask out the facial region. You might need to play around with the Layer Mask Position keyframes or Rotoscope your subject in the process.
After you're happy with the masking, flatten / render this composition file and voila!

Example 5: Putting it all together | sample gifset
Let's recap on the Neural Filters gifmaking workflow and where Stage I and Stage II fit in my gifmaking process:
i. Preparing & enhancing the component gifs
Prepare all component gifs and convert them to smart layers
Stage I: Add base colourings & apply Photo Restoration / JPEG Artefacts Removal to enhance the gif's image quality
Flatten all of these component gifs and convert them back to Smart Video Layers (this process can take a lot of time)
Some of these enhanced gifs will be Rotoscoped so this is done before adding the gifs to the big PSD composition file
ii. Setting up the big PSD composition file
Make a separate PSD composition file (Ctrl / Cmmd + N) that's of Tumblr dimension (e.g. 540px in width)
Drag all of the component gifs used into this PSD composition file
Enable Video Timeline and trim the work area
In the composition file, resize / move the component gifs until you're happy with the placement & sharpen these gifs if you haven't already done so
Duplicate the layers that you want to use Neural Filters on
iii. Working with Neural Filters in the PSD composition file
Stage II: Neural Filters to create artistic effects / more colour manipulations!
Mask the smart layers with Neural Filters to both preserve the subject and avoid colouring issues from the filters
Flatten / render the PSD composition file: the more component gifs in your composition file, the longer the exporting will take. (I prefer to render the composition file into a .mov clip to prevent overriding a file that I've spent effort putting together.)
Note: In some of my layout gifsets (where I've heavily used Neural Filters in Stage II), the rendering time for the panel took more than 20 minutes. This is one of the rare instances where I was maxing out my computer's memory.
Useful things to take note of:
Important: If you're using Neural Filters for Colour Manipulation or Artistic Effects, you need to take a lot of care ensuring that the skin tone of nonwhite characters / individuals is accurately coloured
Use the Facial Enhancement slider from Photo Restoration in moderation, if you max out the slider value you risk oversharpening your gif later on in your gifmaking workflow
You will get higher quality results from Neural Filters by working with larger image dimensions: This gives Neural Filters more pixels to work with. You also get better quality results by feeding higher resolution reference images to the Neural Filters.
Makeup Transfer is more stable when the person / character has minimal motion in your gif
You might get unexpected results from Landscape Mixer if you feed a reference image that don't feature a distinctive landscape. This is not always a bad thing: for instance, I have used this texture as a reference image for Landscape Mixer, to create the shimmery effects as seen in this gifset
5. Testing your system
If this is the first time you're applying Neural Filters directly onto a gif, it will be helpful to test out your system yourself. This will help:
Gauge the expected rendering time that you'll need to wait for your gif to export, given specific Neural Filters that you've used
Identify potential performance issues when you render the gif: this is important and will determine whether you will need to fully playback your gif before flattening / rendering the file.
Understand how your system's resources are being utilised: Inputs from Windows PC users & Mac users alike are welcome!
About the Neural Filters test files:
Contains six distinct files, each using different Neural Filters
Two sizes of test files: one copy in full HD (1080p) and another copy downsized to 540px
One folder containing the flattened / rendered test files
How to use the Neural Filters test files:
What you need:
Photoshop 2022 or newer (recommended: 2023 or later)
Install the following Neural Filters: Landscape Mixer / Style Transfer / Colour Transfer / Colourise / Photo Restoration / Depth Blur
Recommended for some Apple Silicon-based MacBook Pro models: Enable High Power Mode
How to use the test files:
For optimal performance, close all background apps
Open a test file
Flatten the test file into frames (load this action pack & play the “flatten” action)
Take note of the time it takes until you’re directed to the frame animation interface
Compare the rendered frames to the expected results in this folder: check that all of the frames look the same. If they don't, you will need to fully playback the test file in full before flattening the file.†
Re-run the test file without the Neural Filters and take note of how long it takes before you're directed to the frame animation interface
Recommended: Take note of how your system is utilised during the rendering process (more info here for MacOS users)
†This is a performance issue known as flickering that I will discuss in the next section. If you come across this, you'll have to playback a gif where you've used Neural Filters (on the video timeline) in full, prior to flattening / rendering it.
Factors that could affect the rendering performance / time (more info):
The number of frames, dimension, and colour bit depth of your gif
If you use Neural Filters with facial recognition features, the rendering time will be affected by the number of characters / individuals in your gif
Most resource intensive filters (powered by largest machine learning models): Landscape Mixer / Photo Restoration (with Facial Enhancement) / and JPEG Artefacts Removal
Least resource intensive filters (smallest machine learning models): Colour Transfer / Colourise
The number of Neural Filters that you apply at once / The number of component gifs with Neural Filters in your PSD file
Your system: system memory, the GPU, and the architecture of the system's CPU+++
+++ Rendering a gif with Neural Filters demands a lot of system memory & GPU horsepower. Rendering will be faster & more reliable on newer computers, as these systems have CPU & GPU with more modern instruction sets that are geared towards machine learning-based tasks.
Additionally, the unified memory architecture of Apple Silicon M-series chips are found to be quite efficient at processing Neural Filters.
6. Performance issues & workarounds
Common Performance issues:
I will discuss several common issues related to rendering or exporting a multi-frame smart object (e.g. your composite gif) that uses Neural Filters below. This is commonly caused by insufficient system memory and/or the GPU.
Flickering frames: in the flattened / rendered file, Neural Filters aren't applied to some of the frames+-+
Scrambled frames: the frames in the flattened / rendered file isn't in order
Neural Filters exceeded the timeout limit error: this is normally a software related issue
Long export / rendering time: long rendering time is expected in heavy workflows
Laggy Photoshop / system interface: having to wait quite a long time to preview the next frame on the timeline
Issues with Landscape Mixer: Using the filter gives ill-defined defined results (Common in older systems)--
Workarounds:
Workarounds that could reduce unreliable rendering performance & long rendering time:
Close other apps running in the background
Work with smaller colour bit depth (i.e. 8-bit rather than 16-bit)
Downsize your gif before converting to the video timeline-+-
Try to keep the number of frames as low as possible
Avoid stacking multiple Neural Filters at once. Try applying & rendering the filters that you want one by one
Specific workarounds for specific issues:
How to resolve flickering frames: If you come across flickering, you will need to playback your gif on the video timeline in full to find the frames where the filter isn't applied. You will need to select all of the frames to allow Photoshop to reprocess these, before you render your gif.+-+
What to do if you come across Neural Filters timeout error? This is caused by several incompatible Neural Filters e.g. Harmonisation (both the filter itself and as a setting in Landscape Mixer), Scratch Reduction in Photo Restoration, and trying to stack multiple Neural Filters with facial recognition features.
If the timeout error is caused by stacking multiple filters, a feasible workaround is to apply the Neural Filters that you want to use one by one over multiple rendering sessions, rather all of them in one go.
+-+This is a very common issue for Apple Silicon-based Macs. Flickering happens when a gif with Neural Filters is rendered without being previously played back in the timeline.
This issue is likely related to the memory bandwidth & the GPU cores of the chips, because not all Apple Silicon-based Macs exhibit this behaviour (i.e. devices equipped with Max / Ultra M-series chips are mostly unaffected).
-- As mentioned in the supplementary page, Landscape Mixer requires a lot of GPU horsepower to be fully rendered. For older systems (pre-2017 builds), there are no workarounds other than to avoid using this filter.
-+- For smaller dimensions, the size of the machine learning models powering the filters play an outsized role in the rendering time (i.e. marginal reduction in rendering time when downsizing 1080p file to Tumblr dimensions). If you use filters powered by larger models e.g. Landscape Mixer and Photo Restoration, you will need to be very patient when exporting your gif.
7. More useful resources on using Neural Filters
Creating animations with Neural Filters effects | Max Novak
Using Neural Filters to colour correct by @edteachs
I hope this is helpful! If you have any questions or need any help related to the tutorial, feel free to send me an ask 💖
#photoshop tutorial#gif tutorial#dearindies#usernik#useryoshi#usershreyu#userisaiah#userroza#userrobin#userraffa#usercats#userriel#useralien#userjoeys#usertj#alielook#swearphil#*#my resources#my tutorials
536 notes
·
View notes
Text

Two Vals, Two Years of Fem V Friday
107 weeks ago, which is just over two years, I made the first Fem V Friday post. I didn't expect it to take off. As a fic smut writer in rarepair hell, I ran a tiny blog. I had barely started taking VP, if you could call it that. I've talked before about bootcamping my MacBook Pro; I did unspeakable things to that poor machine.
I'm """old""". I know I'm older than some of your parents, a fact which inflicts serious psychic anguish at times. I didn't grow up with women as playable characters in video games, or with women as video game characters at all, really. I never got into Lara Croft because I believed she was created for the male gaze, something I could never get past, though I absolutely understand why so many women love her! A woman as the playable hero of the story! At last, someone on the screen who looks like me! Kinda! (Side note: I recently learned from a huge Lara fan that the creator was unhappy with how she became sexualized, and that makes me feel better. Maybe I'll finally give it a try.)
It wasn't until Bioware that I finally got to play the badass women of young Wash's dreams. Given the option, I haven't played a male character since. This past Pride I wrote about my complicated relationship with gender, and having the ability to play as a female character — especially ones that allowed me to express my butch side — is key to my journey.
107 weeks ago, the week that Masc v Monday began, I made a comment or tagged something about being sad there wasn't such a thing for fem Vs. At the time, my dash was full of masc Vs because of who I followed: people who posted male OCs. I was still new to tumblr and hadn't met all of my friends whose Vs wives you see me regularly reblog. So many of the fem Vs who crossed my dash looked like more of the same sexualized characters created for the male gaze. I wanted the ones out there who looked like my own Val; fem Vs who looked like real women.
That following Friday, August 12, I started the tag at someone else's suggestion. I thanked him genuinely for it whenever he commented on the post or reblogged it or however the interaction occurred.
107 weeks ago, I posted Val, and many people responded. Many people reblogged and added on their fem Vs, while others posted separately. I was overwhelmed. I never expected the response I received.
107 weeks later, I still love Fridays. I love seeing all of your fem Vs in all shapes and forms, because I will never get over seeing this representation. I will never tire of seeing all the different female characters that people make.
This is why I made the first Fem V Friday post. I love Fridays, y'all.
#cyberpunk 2077#cyberpunk 2077 photomode#cyberpunk photomode#videogame photography#fem v friday#female v friday#valerie vermilion#fem v#female v#female oc#streetkid!val#corpo!val#corpo v#streetkid v#my screens#two vals one shot#corpo!npval by glory my beloved#yeah ofc i have seen “the post” about why i started fvf#first... people who are not passengers in my brain don't get to state my motivations as fact#also you're forgetting the whole “moving on” part of the thing#about cbp77 fandom
91 notes
·
View notes
Text
I’m at a point in my life where my only escape from computer stress is my 12-year-old MacBook Pro running Linux. It’s truly the only stable, reliable piece of technology in my artillery, and when my iMac and phone turn their backs on me, I know it has my back for a stress-free browsing session.
#shitpost#shit post#computer#computers#stress#stressed out#imac#mac#macos#macbook pro#linux#ubuntu#zorin#zorin os
36 notes
·
View notes
Text
41 napja nincs telefonom - olvasd el a valósággá vált rémálmom
Szeretek vigyázni Apple eszközeimre, de tudom, hogy az ördög sosem alszik, ezért mindig kötök rájuk AppleCare+ biztosítást, hogy ha mégis bekövetkezne egy baleset, akkor nyugodt lehessek.
Augusztus 28-án leejtettem az iPhone 12 minimet és akkor még azt hittem, hogy az a tragédia, hogy összetört, de sajnos a valódi tragédia az az, hogy azóta sincs telefonom. Hogy történhetett ez?
Annak ellenére, hogy a kijelző és a hátlap is sérült, MacBook Pro-mra dugva tudtam még készíteni róla egy biztonsági mentést, majd bevittem egy hivatalos szervizpartnerhez, hogy leadjam javításra. A szervizben megnyugtattak, hogy ha minden jól megy, akkor augusztus 30-án szerdán már mehetek is érte.
Az Apple szabályai tiszták: ha a telefon elő és hátlapja is törött, akkor általában az AppleCare+ biztosítás keretein belül készülékcserét állapítanak meg. Ezt a cég csehországi központi szervizében állapítják meg, ezért a szerviz kiküldte oda a készüléket.
Az esetemben azonban az Apple úgy döntött, hogy még megmenthető a készülék, ezért az elő- és hátlapot, készülékházat, kamerát és akkumulátort cserélték, majd feladták postára szeptember 1-én számomra.
Az Apple támogatási oldalán továbbra is ez a telefonom státusza:
Szeptember 5-én hívott a szerviz, hogy sajnálatos módon a visszaküldött és javított telefonom elveszett a UPS vecsési logisztikai központjában és most megpróbálják felvenni a kapcsolatot az Apple-lel, hogy intézzék el a UPS-szel a problémát.
Szeptember 6-án újra hívott a szerviz és tudatták, hogy a UPS elismerte az elveszett telefont és az Apple ezért küldött egy új telefont, az enyémmel megegyező modellt, ami napokon belül meg fog érkezni. Itt már több mint egy hete nem volt telefonom, de legalább örültem, hogy hamarosan vége lesz ennek az egész helyzetnek és nem sokkal később csak egy vicces történet lesz, amit majd esti sörözések során mesélek a haveroknak.
Ezután csak teltek és múltak a napok, a szerviz próbálta felvenni a kapcsolatot az Apple központi szervizével, de semmi értelmezhető választ nem kaptak tőlük.
Szeptember 12-én az Apple központi szervize adott egy követési számot a feladott új telefonhoz, de a UPS ellenőrzőoldala szerint az egy nem létező csomagazonosító. Ennek ellenére a szerviztől megnyugtatást kaptam, hogy azon a héten már minden bizonnyal rendeződni fog az ügy.
Szeptember 28-án elfogyott a türelmem és felhívtam az Apple támogatási telefonszámát, hogy érdeklődjek a telefonom helyzetéről. Az ügyintéző hölgy megnyugtatott, hogy mindent meg fog tenni az elveszett telefon felkutatásában és hamarosan kapni fogok tőle egy emailt, ahova el kell küldenem a szervizbe adást igazoló papírom és kérte még a telefon vásárlását igazoló számlát is. Utóbbit kicsit furcsának éreztem, de elfogadtam.
Ezt követően nem kaptam semmilyen emailt az Apple támogatástól egészen október 2-ig, amikor is azt kaptam tőlük, hogy többszöri alkalommal is próbáltak keresni telefonon, de nem sikerült elérniük.
Ma több alkalommal keresetem Önt telefonon, sajnos sikertelenül. Felvettem a kapcsolatot az [szerviz neve] szervizével, erről szerettem volna tájékoztatni. Kérem jelezze, ha továbbra is segítségre van szüksége.
Természetesen nem volt nem fogadott hívásom sem a privát számomon, ami az iPhone 12 minimhez volt rendelve, sem pedig a céges számomon, amiről az Apple támogatást hívtam korábban. A legjobban persze az utolsó mondat fájt, hiszen az Apple támogatás rendszerében is látszik a telefonom utolsó státusza, vagyis hogy szeptember 1-én postára lett adva és nem érkezett meg. Ezt figyelembe véve természetesen szükségem van továbbra is segítségre.
Az Apple támogatástól kapott emailre válaszoltam és megírtam benne mindkét élő telefonszámomat és másnap fel is hívott az Apple támogatás egy ír telefonszámról.
Itt már október 3 volt, vagyis 37 napja voltam telefon nélkül. Az ügyintéző hölgy elmondta, hogy semmiben sem tud segíteni, ugyanis nem az Apple támogatáson keresztül adtam le a készülékemet, hanem egy szervizen keresztül és így nem tudja felvenni a kapcsolatot az Apple központi szervizével.
Megkérdeztem, hogy ebben az esetben mit tudok tenni és azt tanácsolta, hogy adjak fel egy panaszt, ami majd be fog kerülni az Apple virtuális panaszkönyvébe. Ezt meg is tettem és panaszt tettem az Apple központi szervize ellen. Ezután azt az információt kaptam, hogy el fogja küldeni emailben a panasz szövegét. Ez sem történt meg, egy sablon üzenetet kaptam csak, amiben ez szerepelt:
Köszönjük, hogy felkeresett minket. Válaszolhat erre az e-mailre. A következő munkanapomon válaszolok Önnek.
Most október 7 van és szombat, vagyis már 41 napja nincs meg az iPhone 12 minim és nem érzem úgy, hogy az ügy közelebb lenne a megoldáshoz, mint bármikor az elmúlt közel másfél hónapban.
Hiába kötöttem meg az Apple legjobb biztosítását, az AppleCare+-t a telefonomra 2021-ben és azóta is fizetem folyamatosan, hiába adtam le egy hivatalos Apple szervizben a telefonom javításra, hiába vettem fel a kapcsolatot az Apple támogatással… senki sem tud vagy akar nekem segíteni.
A szerviz az első csúszásoknál említette szeptember elején, hogy ez nagyon ritka, de előfordult már a múltban is, hogy a vecsési UPS központban elveszett egy készülék, de pánikra semmi ok, az Apple mindig pótolja a készüléket.
Később azonban már a szerviz is elismerte, hogy az esetem teljesen egyedi és még sosem történt ilyesmi. Gondolom mondani se kell, hogy ez a legkevésbé sem vigasz számomra. Jobban örülnék, ha a munkámban, párkapcsolatomban vagy az életem bármely területén lennék egyedi és nem abban, hogy az én telefonomat veszítette el a legjobban az Apple.
Hogy mi a tanulság? Az sajnos nem igazán van, de azt tudom tanácsolni, hogy nagyon vigyázz eszközeidre és imádkozz, hogy semmi probléma ne legyen velük, ugyanis ha mégis így lesz, akkor elképzelhető, hogy soha többet nem látod majd.
Ha pedig szeretnéd, hogy az Apple támogatás egy kicsit is segítőkész legyen, akkor rajtuk keresztül add le a készüléked javításra, más esetben nem támaszkodhatsz rájuk.
Az Apple nincs jelen Magyarországon saját üzlettel vagy saját szervizzel, csak hivatalosnak hívott viszonteladók és szervizek vannak, de el kell fogadnunk, hogy ebben a balkáni országban nem olyan támogatást nyújt a cupertino-i cég, mint amit a külföldi oldalakon olvasott beszámolók alapján várnánk.
És hogy mi lesz velem? Nyeljem le, hogy az Apple megkárosított egy közel 200 ezres telefonnal és sétáljak be a legközelebbi Apple Premium Resellerbe és vegyek egy újat? Aztán majd arra is kössek AppleCare+ biztosítást?
Vagy esetleg vegyek egy androidos telefont és engedjem el azt az eszközök közötti integrációt, ami miatt az Apple-be szerettem egykoron?
Őszintén tanácstalan vagyok.
Te mit tennél a helyemben?
48 notes
·
View notes
Text
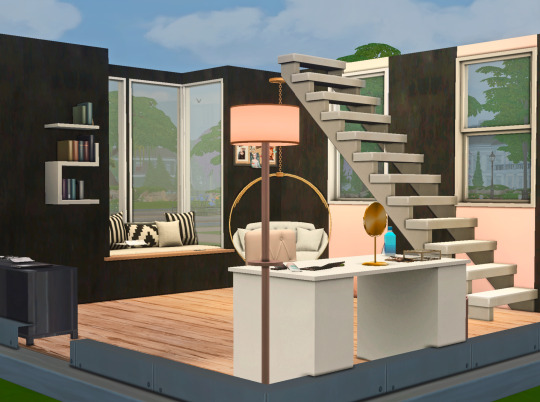
Pink Teen Loft Bedroom
This is my first build so please be kind. Gallery ID: @simtinee


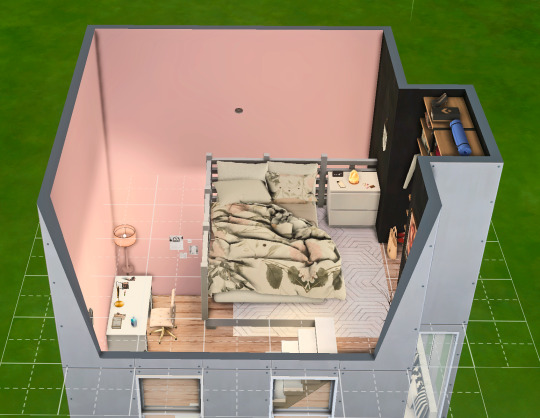
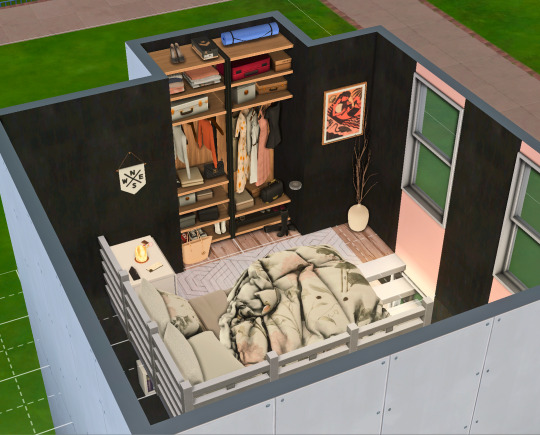

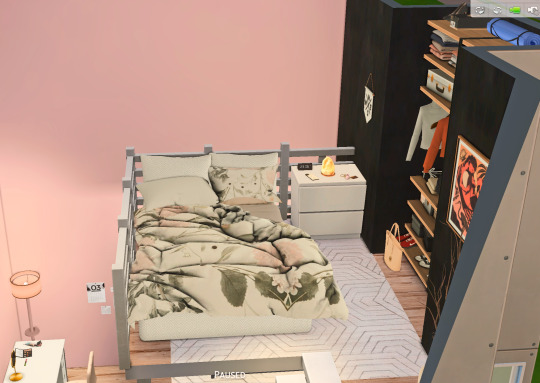
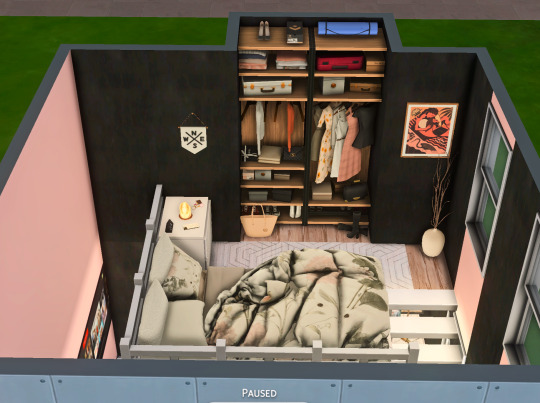
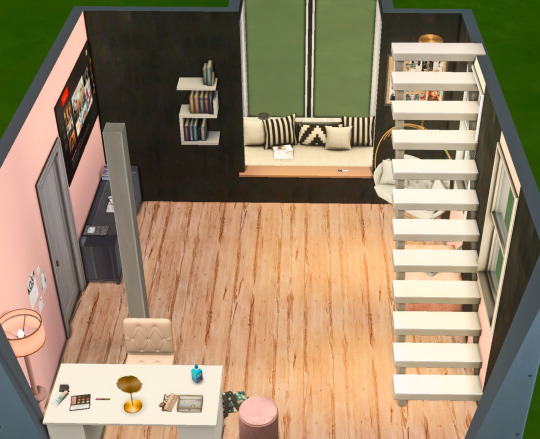


CC List:
@symphonysim Symphony Hair Accesories V2 & V3
(Symphony) Pearly set - EARLY ACCESS | Patreon
Official Post from Symphony Sims
PATREON
Mel Bennett's Composition Book, Book Stack & Mel Bennett EyeShadow Palette (I have the whole kit, it's useful)
COLLEGE TIME COLLECTION | Mel Bennett on Patreon
Official Post from Mel Bennett
PATREON
TIME TO MAKEUP COLLECTION | Mel Bennett on Patreon
Official Post from Mel Bennett
PATREON
@mlsim Mellouwsim's Modern Clock
Shire Living Set
Shire Couch (10x Swatches) Modern Clock (5x Swatches) Samsung TV (1x Swatches) Samsung TV Decor (31x Swatches) Samsung Remote (1x Swatches)
MELLOUWSIM
Novvvas Kalehouse Bedding, Pillows & Magazines
Kalehouse Bedding Recolours Download HERE {ad-free SFS} Meshes by Novvvas not included! Get them HERE
Comes with 2 blankets and pillows, in my 21 colour swatches (plus 6 bonus patterns!) @novvvas xx Requested by @trish-ccfinds See Novvvas’s
DK-SIMS.TUMBLR.COM
NOVVVAS: LOFT LIFE SET
data:blog.metaDescription
NOVVVAS
@Platinumluxesims Desk Chair, Luxe Box (on the ground), Vanity Stool
CurseForge - the home for modding communities
CurseForge is one of the biggest mod repositories in the world, serving communities like Minecraft, WoW, The Sims 4, and more. With over 800
CURSEFORGE
CurseForge - the home for modding communities
CurseForge is one of the biggest mod repositories in the world, serving communities like Minecraft, WoW, The Sims 4, and more. With over 800
CURSEFORGE
CurseForge - the home for modding communities
CurseForge is one of the biggest mod repositories in the world, serving communities like Minecraft, WoW, The Sims 4, and more. With over 800
CURSEFORGE
@qicc Sleek Hallway Boots, Urban Bedroom Kit's Closet (feminine formal & empty-ish)
Sleek Hallway Set
15 brand-new items for a sleek and modern hallway. DOWNLOAD 15 items Ottoman with Storage - 7 swatches - §125 Shoe Cabinet - 12 swatches - §
QICC.TUMBLR.COM
Quirky Introvert CC
The beds are now updated for the latest patch, enjoy!
QICC.TUMBLR.COM
@severinka Constance Bedroom Chair, Laura Nursery Lamp
Severinka_'s Constance bedroom - living chair SW
Hanging living chair (SHORT WALLS) Found in TSR Category 'Sims 4 Living Chairs'
THE SIMS RESOURCE
Severinka_'s [Laura nursery] - floor lamp
Floor lamp Found in TSR Category 'Sims 4 Floor Lamps'
THE SIMS RESOURCE
Veranka's Shades of Orange (8th horizontal shade)
Veranka's TS4 Downloads
Shades of Orange Walls 60 plain walls. Can be found in paint for §1. DOWNLOAD
VERANKA-S4CC.TUMBLR.COM
Wondymoon's Barium Loveseat
wondymoon's Barium Loveseat
- Barium Outdoor Living - Loveseat Found in TSR Category 'Sims 4 Sofas & Recliners'
THE SIMS RESOURCE
Around the Sims 4 Maybelline Mascara
Around the Sims 3 | Custom Content Downloads| Objects | Decorative | Misc.| Bathroom Accessories
AROUNDTHESIMS3.COM
Charly Pancakes' Lavish Set
lavish - stuff pack: download | Charly Pancakes on Patreon
Official Post from Charly Pancakes
PATREON
@coatisims Fiji Water (I can't find the link)
@leosims4cc bb cream, blush, shoe boxes, decor shoes v1 (website link is not working for me to check)
Patreon
Patreon is empowering a new generation of creators. Support and engage with artists and creators as they live out their passions!
PATREON
MXIMS (Retired but can still find all of their creations)
Wall Decor 1, Wall Banner Flag, Triangle Red Alarm Clock, LG 84LM960 V Decor (TV), Sirius Side Table, Alex-Linnmon Desk, Apple Remote & Macbook Pro 13"
MXIMS
MXIMS
MXIMS CC • Sims 4 Downloads
SIMS 4 DOWNLOADS
Slox's living magazines, Aiza Yogamat Lying & Folded Clothes
Patreon
Patreon is empowering a new generation of creators. Support and engage with artists and creators as they live out their passions!
PATREON
Sims 4 Slox downloads » Sims 4 Updates
SIMS 4 UPDATES
@syboubou Aurore set windows, nike shoes, dry branches, Agnes high heels, Converse shoebox & Adrienne jewellery box.
Agnes Bedroom cc sims 4 – Syboulette Custom Content for The Sims 4
S4CC.SYBOULETTE.FR
Arnaud bedroom cc sims 4 – Syboulette Custom Content for The Sims 4
S4CC.SYBOULETTE.FR
Syboubou's Agnes - High heels shoes
Those are some high heels shoes with multiple color swatches. Found in TSR Category 'Sims 4 Miscellaneous Decor'
THE SIMS RESOURCE
This is tiring. I'm done.
Cheats i used:
bb.moveobjects on; bb.enablefreebuild
Shift + [ Shift + ] Ctrl + 9 Ctrl + 0 Alt (for free movement)
Non-CC Items from the Base Game:
Simple Single-Panel Door
The Super Subtle Scaucer Light
Intellectual Illusion Wall-Mounted Bookshelves
White Stairs
Simplicity Nightstand
Wooden Horizontal Fencing
#sims 4 cc#sims 4#sims 4 gameplay#sims 4 build#sims 4 buy mode#sims 4 room#Simtinee#sim 4 screenshots#ts4 screenshots#room inspo#MXIMS
57 notes
·
View notes
Text
Help me pick my laptop!
Option 1 - Framework 13 - https://frame.work/laptop13?slug=laptop13-diy-amd-ai300&tab=specs
Option 2 - Macbook Pro 14in https://www.apple.com/shop/buy-mac/macbook-pro/14-inch-space-black-standard-display-apple-m4-pro-chip-with-12-core-cpu-16-core-gpu-24gb-memory-512gb
I've used my ipad as my "laptop" for years now and I finally want to replace it but I can't decide which one I want to go with so I'm putting it to the masses. I've been saving up for one so cost isn't a factor more just what I will finally go with. I'm leaning towards macbook, but I LOVE the concept of the framework laptop.
3 notes
·
View notes
Text
Spacetop G1, World’s first Laptop that uses AR Glasses instead of a Display

A laptop that employs augmented reality glasses as a display was called the Spacetop G1 system, and it was shown to a thousand productivity pioneers by the tech firm Sightful last year.
The upgraded Gen 1 device removes the requirement for the user to stoop over a tiny screen when working remotely on a laptop by placing a 100-inch virtual display directly in their eyes.
In this blog, The TechRobot will showcase the World’s first AR laptop: Spacetop G1. So let us begin.
What is Spacetop G1?
Sightful’s Screenless Laptop, the Spacetop G1, combines a computer with comfortable, lightweight augmented reality glasses. Running on the device is SpaceOS, a spatial operating system with an emphasis on online operations intended for productivity.
The weight of the AR glasses is 85 grams, but the Vision Pro, depending on the Light Seal, weighs between 600 and 650 grams. The keyboard is bulkier compared to a MacBook Air or iPad Pro, measuring less than 12 inches in width and weighing three pounds.
Cost of AR Laptop
The Screenless Laptop, Spacetop G1 charges $1,700 and is just a keyboard with spectacles attached.
Spacetop G1 Specs
Spacetop G1, features a Qualcomm Snapdragon QCS8550 CPU, Kryo GPU, Adreno 740 AI, dual eNPU V3, 48 INT8, 12 FP16 TOPs, 16 GB LPDDR5, 128 GB UFS3.1 storage, and 8-hour battery life.
They have two OLED display screens, a 50° field of vision, a 90Hz refresh rate, and very crisp text rendering.
The glasses enable Wi-Fi, Bluetooth, 5G, and a 5MP camera. They also contain a microphone for use in online meetings.
Benefits of AR Laptops
1. Endless View
With Spacetop’s Virtual Desktop, you may get amusement and information without having to navigate around, making it a convenient substitute for real screen space. Although it’s not the only solution with this functionality, this one could be the easiest to use.
A standard keyboard and touchpad, Spacetop’s AR glasses, and a perhaps lower price tag might allow customers to enjoy endless screen areas without sacrificing functionality. For individuals who would rather have a more ordered workstation, this would be a time-saving alternative.
2. Absolute privacy
Multi-monitor laptop attachments should not be used in public areas due to the increased danger of uninvited eyes peeping at private information caused by an excessive number of physical displays. Although privacy screens are available on certain computers and monitors, they are limited to one monitor.
To solve this, Spacetop is a Screenless Laptop, letting the user see their screen alone until it is shared with others. But it also means that those standing close to the user can’t see the screen without their glasses.
3. Improved posture
Laptops’ screens are firmly attached to the keyboard, making them portable yet uncomfortable. Some people find relief from this neck pain by attaching a desktop monitor.
The screenless laptop, Spacetop, provides a more comfortable height and does away with the need for arms or ergonomic monitor supports. Due to this, laptops are a better choice for use at home or in the workplace.
4. Laser Focus
Spacetop G1 is an Augmented Reality (AR) device that reduces visual distractions so users can work productively and enjoy their free time. The apps it may utilize, including Windows or macOS-based software and limited gaming, are restricted by its Android-based operating system and mobile hardware.
Notwithstanding these drawbacks, Spacetop provides a more practical experience than a typical computer since it places all of the necessary components in front of and surrounding users. Instead of letting others decide for them, users may choose whether to allow virtual distractions to affect them.
Highlight – Introducing Travel Mode For Meta Quest Headsets
Best AR Glasses for Laptops
1. Apple AR Glasses
Apple plans to develop AR glasses that look like conventional spectacles with a built-in display. A prototype of the glasses has a thick, attractive frame and resembles high-end luxury sunglasses. With references to Project Starboard and reports of a glassOS, the prototype is anticipated to function on iOS 14.
Though it could take a few more years for a public release, rumors indicate that Apple has already started the second phase of development. The glasses will have the ability to add prescription lenses, gesture-controlled instructions that connect with the Apple Watch, and a true vision display on both lenses.
Possible capabilities include the ability to use virtual things in real-world settings, do activities without using a phone, and enable immersive phone conversations and remote collaboration software.
2. Meta Glasses
Rebranding Facebook to Meta, Mark Zuckerberg is concentrating on augmented reality glasses and headsets. The business plans to deliver Meta spectacles, a prototype of their augmented reality spectacles, in late 2024. The Project Nazare and Project Aria prototypes provide a fully functional augmented reality experience, with 3D visuals and an elegant design. It is anticipated that the Meta Glasses will include an immersive experience with radio, speakers, and cameras, a holographic display with built-in projectors, batteries, and sensors, and a broad field of vision. In 2024, the prototype is anticipated to be released.
3. Xreal Air 2 Ultra
The Air 2 Ultra glasses from Xreal are an improvement over the Air 2 model and are aimed at competing with Apple’s Vision Pro and Meta’s Quest 3 headsets. Complete positional tracking, a form factor akin to eyeglasses, and compatibility for immersive AR apps, TV viewing, and flat-screen gaming are all features of the Air 2 Ultra.
It has a 52-degree field of vision, 500 nits of brightness, two cameras for environmental mapping, hand tracking, and compatibility with Xreal’s Nebula AR environment.
Is AR safe for your eyes?
Prolonged use of AR might result in headaches, nausea, and straining of the eyes. This is a result of our eyes continually focusing on objects at different distances when using AR. This can cause pain and eye tiredness.
Conclusion
The future of laptops with AR like the Spacetop G1 marks a breakthrough in laptop technology by utilizing augmented reality to provide a 100-inch virtual display that improves user posture, productivity, and privacy.
The Spacetop G1 presents a new option for remote work by addressing typical ergonomic concerns associated with standard laptops by mixing AR glasses with a powerful computing machine and the SpaceOS operating system.
Despite several drawbacks associated with its Android-based operating system and the possibility of eye discomfort after extended usage, the Spacetop G1 breaks new ground in augmented reality technology by offering consumers a more useful and engaging experience.
#spacetop1#ar#vr#ar glasses#laptop#virtual reality#augmented reality#mark zuckerberg#elon musk#meta ai#facebook
6 notes
·
View notes
Text
Discover High-Quality Apple Products at Exact Solutions Poland
Looking for premium Apple devices at competitive prices? Exact Solutions Electronics is your go-to destination for new, pre-owned, and refurbished Apple products in Poland. Whether you need a MacBook Pro, MacBook Air, iPad, or accessories, this online store offers a wide selection of top-tier devices, including outlet and exhibition models, all tested and verified for performance.
Why Choose Exact Solutions?
✅ High-Quality Apple Products – Find MacBooks, iPads, and accessories at unbeatable prices. ✅ Certified Refurbished & Exhibition Models – Get fully functional, warranty-backed devices for less. ✅ Extensive Product Range – From new & pre-owned laptops to accessories like keyboards, headphones, and chargers. ✅ 12-Month Warranty – Enjoy peace of mind with a minimum 1-year warranty on most products. ✅ Fast & Secure Delivery – Shop online with confidence and receive your device quickly across Poland.
Whether you're a student, professional, or tech enthusiast, Exact Solutions ensures you get top Apple devices at affordable prices. Browse the latest deals and upgrade your tech today!
👉 Visit Now: Exact Solutions
#Apple#MacBook#MacBookPro#iPad#ApplePoland#AppleDevices#RefurbishedMacBook#CertifiedPreOwned#AffordableTech#BudgetMacBook#TechDeals#OnlineShopping#TechStore#GadgetDeals#PolandShopping#Ecommerce#WorkFromAnywhere#CreativeTools#TechForBusiness#PowerfulPerformance#GoGreen#SustainableTech#RefurbishedElectronics#EcoFriendlyTech
2 notes
·
View notes
Text
MY CURRENT WISHLIST <3

D98 straight leg vintage effect jeans
beauty balm serum boosted skin tint [ 12, 13 ]
chanel earrings
chanel necklace
chanel lip balm
dior lip balm
fashion nova cart
dior necklace
new macbook pro
new Apple Watch
2 notes
·
View notes