#MySQL backend
Explore tagged Tumblr posts
Visit Tumblr Blog
Explore Tumblr blogs with no restrictions, modern design and the best experience.
Last Seen Tumblr Blogs


Fun Fact
Average visit duration of Tumblr.com is 10 mins and 25 secs.
Text

Master full-stack development with Sunbeam’s Live Online MERN Stack Course led by Mr. Amit Kulkarni (Certified Docker & Kubernetes Expert). Learn React JS, Node.js, Express, and MySQL with hands-on coding, real-world projects, and live Q&A. 📅 Start Date: 2nd June 2025 🕘 Time: 9:00 PM – 11:00 PM (Mon–Thu) 💰 Fees: ₹9100 (Inclusive of GST) 🎓 Includes Certification + Project + Group Discount 🔗 Register now: www.sunbeaminfo.in 📞 Call: 82 82 82 9806
✅ Group Discount Offer:
👨👩👧👦 Team of Five – Time to Thrive! 🎉 Enroll with a group of 5 and get 20% OFF on your learning journey!
✅ Course Highlights:
Frontend: ReactJS, Hooks, Axios, Routing
Backend: Node.js, Express.js, APIs
Database: MySQL CRUD operations
JWT Authentication, CORS, Middleware
RESTful Integration & Full-Stack Deployment
✅ Ideal for:
IT Students & Graduates
Working Developers
Anyone with knowledge of OOP, HTML, CSS, JS & SQL
✅ What You’ll Gain:
Full-stack development confidence
Real-world project exposure
Live instructor-led classes & doubt-clearing
Course material & Sunbeam certification
#MERN stack course#online MERN training#React JS classes#Node JS course#Express JS training#MySQL backend#Full Stack Developer course#Live coding classes#Sunbeam MERN#web development course
0 notes
Text
Backend update
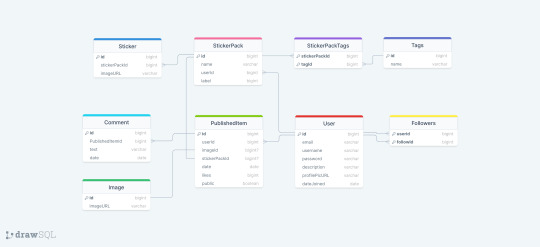
Had the most horrible time working with Sequelize today! As I usually do whenever I work with Sequelize! Sequelize is an SQL ORM - instead of writing raw SQL, ORM gives you an option to code it in a way that looks much more like an OOP, which is arguably simpler if you are used to programming that way. So to explain my project a little bit, it's a full stack web app - an online photo editor for dragging and dropping stickers onto canvas/picture. Here is the diagram.
I'm doing it with Next which I've never used before, I only did vanilla js, React and a lil bit of Angular before. The architecture of a next project immediately messed me up so much, it's way different from the ones I've used before and I often got lost in the folders and where to put stuff properly (this is a huge thing to me because I always want it to be organized by the industry standard and I had no reference Next projects from any previous jobs/college so it got really overwhelming really soon :/) . The next problem was setting up my MySQL database with Sequelize because I know from my past experience that Sequelize is very sensitive to where you position certain files/functions and in which order are they. I made all the models (Sequelize equivalent of tables) and when it was time to sync, it would sync only two models out of nine. I figured it was because the other ones weren't called anywhere. Btw a fun fact
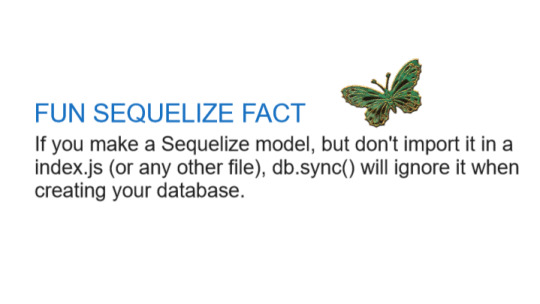
So I imported them to my index.js file I made in my database folder. It was reporting an db.define() is not a function error now. That was weird because it didn't report that for the first two tables that went through. To make a really long story short - because I was used to an server/client architecture, I didn't properly run the index.js file, but just did an "npm run dev" and was counting on all of the files to run in an order I am used to, that was not the case tho. After about an hour, I figured I just needed to run index.js solo first. The only reasons those first two tables went through in the beginning is because of the test api calls I made to them in a separate file :I I cannot wait to finish this project, it is for my bachelors thesis or whatever it's called...wish me luck to finish this by 1.9. XD
Also if you have any questions about any of the technologies I used here, feel free to message me c: <3 Bye!
#codeblr#code#programming#webdevelopment#mysql#nextjs#sequelize#full stack web development#fullstackdeveloper#student#computer science#women in stem#backend#studyblr
15 notes
·
View notes
Text
How to Hire the Right MySQL Engineer: Skills to Look For

For any business that handles structured data a solid database foundation serves as the key. MySQL continues to dominate the market as one of the most reliable and widely utilized relational database systems. Whether it’s managing e-commerce transactions, user profiles, or analytics, having the right talent can have a significant impact on performance and scalability.
That’s why several tech companies are considering hiring database engineers with MySQL proficiency. This helps to manage the growing database needs. But how do you know that you are hiring the right fit for the job? In this article we will breakdown what you need to look for when you set out to hire these experts.
Key Technical and Practical Skills Every Business Should Prioritize
Strong knowledge of SQL and database design
Fundamental SQL expertise is a must when hiring MySQL engineers. Your ideal applicant ought to:
Create secure and optimized SQL queries.
Recognize data modelling and normalization.
Understand performance indexing techniques.
Have the ability to create triggers and stored procedures.
These abilities allow a MySQL engineer to increase speed and storage efficiency, which is essential for rapidly expanding tech companies.
Experience in performance tuning and troubleshooting
Performance issues arise as your data grows. A proficient MySQL developer ought to be able to:
Find and fix slow queries.
Keep an eye on and maximize database load.
Make use of programs such as MySQLTuner, EXPLAIN, and performance schema.
Set up the server's parameters for best performance.
In SaaS setups or real-time applications where latency is a concern, this becomes even more crucial.
Data backup, security, and recovery skills
A business can be destroyed by data breaches or loss. A trustworthy MySQL developer will:
Configure automated backup plans.
Put user roles and permissions into practice.
Secure connections and encrypt data.
Create scenarios for catastrophe recovery.
These abilities guarantee data security and regulatory compliance, which is particularly important for the high-security, healthcare, and financial sectors.
Integration and collaboration capabilities
MySQL engineers don't work alone. They frequently work along with software developers and backend teams. You might also have to:
Fill positions like hiring backend developers to assist with application-side logic.
Employ database engineers for distributed or more complicated settings.
Hire software developers to create data-driven, scalable products.
A MySQL engineer with cross-departmental collaboration skills guarantees more efficient operations and agile delivery.
Familiarity with modern tools and frameworks
Present-day MySQL programmers must to be knowledgeable about:
ORMs such as Eloquent, Sequelize, or Hibernate.
Cloud-based solutions like Google Cloud SQL and AWS RDS.
Tools for monitoring such as Prometheus or Datadog.
Pipelines for CI/CD database updates.
For the majority of tech businesses that use cloud-native solutions, this demonstrates adaptability in contemporary development settings.
Closing Remarks
If you are serious about your data infrastructure, you should hire MySQL developers. Seek applicants that have excellent technical proficiency together with teamwork and problem-solving abilities. Results can be increased by matching your MySQL specialist with the appropriate team, such as hiring software engineers, regardless of whether you're managing a legacy system or scaling a SaaS platform. Choosing the proper database hiring is a commercial choice for tech firms, not just a backend one.
0 notes
Text

🚀 Master Python Full Stack Development! 💻 Are you ready to master the skills that make you a Full Stack Developer? 💻 From Frontend to Backend, and everything in between, this is your ultimate guide to becoming a tech pro! ✅ Frontend: React, HTML, CSS, JS ✅ Backend: Python, Django/Flask ✅ Database: MySQL, MongoDB ✅ APIs: REST, GraphQL ✅ DevOps: CI/CD, GitHub 📞 Enroll Now: +91 9885118899 🌐 Visit: https://pythonfullstackmasters.in/
#PythonFullStack#Coding#WebDev#TechSkills#LearnToCode#Programming#FullStackDeveloper#PythonProgramming#WebDevelopment#CodeLife#DevOps#Frontend#Backend#ReactJS#Django#Flask#MongoDB#MySQL#RESTAPI#GraphQL#GitHub
0 notes
Text
Crea un carrito de compras con PHP, MySQL y Bootstrap

Cómo crear una tienda en línea paso a paso: guía completa para estudiantes (Frontend y Backend) En esta guía detallada, te explico cómo construir una tienda en línea paso a paso utilizando PHP, MySQL y Bootstrap. Incluye tanto la interfaz de usuario (frontend) como la interfaz de administración (backend). Es importante seguir cada paso cuidadosamente y mantener la estructura de archivos organizada. PHP es un lenguaje de programación del lado del servidor ampliamente utilizado para desarrollar aplicaciones web dinámicas e interactivas. Es conocido por su facilidad de uso, integración con bases de datos y flexibilidad, lo que lo hace ideal para gestionar formularios, sesiones de usuarios y otros elementos de sitios web. MySQL es un sistema de gestión de bases de datos relacional que permite almacenar, organizar y recuperar grandes cantidades de datos de forma eficiente. Se utiliza en conjunto con lenguajes como PHP para crear aplicaciones web que requieren almacenamiento y manejo de datos, como tiendas en línea, foros y sistemas de gestión de contenido. Bootstrap es un framework de código abierto para el desarrollo de interfaces de usuario responsivas y móviles en la web. Facilita la creación de páginas y aplicaciones con un diseño atractivo, gracias a su conjunto de componentes prediseñados y sus sistemas de grillas flexibles, haciendo que el desarrollo sea más rápido y uniforme. Requisitos previos: - Conocimientos básicos de PHP y MySQL. - Servidor local como XAMPP o WAMP. Paso 1: Crear la estructura de carpetas y archivos Crea la siguiente estructura de carpetas y archivos en tu proyecto. Nota: No es necesario incluir carpetas de CSS ni JS ya que se utilizan archivos en línea. tienda-en-linea/ │ ├── incluir/ │ ├── conexion.php │ ├── encabezado.php │ ��── pie.php │ ├── recursos/ │ └── imagenes/ │ ├── admi │ ├── inicio_sesion.php . . . (backend) │ ├── panel_control.php . . . (backend) │ ├── gestion_productos.php . . . (backend) │ ├── agregar_producto.php . . . (backend) │ └── editar_producto.php . . . (backend) │ └── cerrar_sesion.php . . . (backend) │ ├── index.php . . . (frontend) ├── carrito.php . . . (frontend) ├── pago.php . . . (frontend) └── pago_exitoso.php . . . (frontend) Paso 2: Configurar la base de datos - Crea la base de datos en MySQL llamada comercio_electronico e inserta un usuario de ejemplo: CREATE DATABASE comercio_electronico; USE comercio_electronico; CREATE TABLE productos ( id_producto INT AUTO_INCREMENT PRIMARY KEY, nombre VARCHAR(100) NOT NULL, descripcion TEXT, precio DECIMAL(10, 2) NOT NULL, imagen VARCHAR(255), stock INT NOT NULL DEFAULT 0 ); CREATE TABLE usuarios ( id_usuario INT AUTO_INCREMENT PRIMARY KEY, usuario VARCHAR(50) UNIQUE NOT NULL, password VARCHAR(255) NOT NULL ); -- Insertar un usuario de ejemplo INSERT INTO usuarios (usuario, password) VALUES ('administrador', '12345'); Paso 3: Crear la conexión a la base de datos Crea el archivo incluir/conexion.php: Paso 4: Crear el encabezado y pie de página

En esta sección se diseñó el logotipo, el nombre de la tienda y el menú con el siguiente código: Archivo incluir/encabezado.php Tienda en Línea Tienda en Línea Inicio Carrito Pagar Este código es una estructura básica de una página web en HTML con Bootstrap para darle estilo y funcionalidad: - Estructura HTML: - Define la estructura básica de la página con elementos como , , , y . - Meta y Título: El define la codificación de caracteres como UTF-8 para acentos y el lenguaje español. - asegura que el sitio se vea bien en dispositivos móviles. - define el título de la página. - Enlaces a CSS: Se incluyen un archivo de estilos CSS de Bootstrap para usar componentes prediseñados. - Barra de navegación: - : Contiene la barra de navegación. - Logo y enlace: Un logo de Bootstrap es mostrado con . - Botón de menú colapsable: Permite que el menú se colapse en dispositivos móviles. - Enlaces de navegación: con - que dirigen a diferentes páginas (inicio.php, carrito.php, pago.php). El uso de Bootstrap proporciona un diseño responsivo y una presentación uniforme. Archivo incluir/pie.php

Al visualizar este archivo de manera individual, no se ver+an los estilos, ya que están siendo llamados desde el archivo index.php © Tienda en Línea. Todos los derechos reservados.

Creación del Frontend para la tienda en linea
Paso 5: Crear la interfaz de usuario Archivo index.php (Página de inicio): Inicio - Tienda en Línea
Bienvenido a nuestra tienda en línea
Hasta este punto, tu tienda deberá tener la siguiente apariencia:

Nota: no debe mostrar ningun tipo de error, ya que el mensaje de "No hay productos disponibles en este momento" hace una conexión a la base de datos y verifica si hay registros en la tabla productos Archivo carrito.php (Carrito de compras): Este archivo es un script PHP para gestionar un carrito de compras de la tienda en línea. - Conexión a la base de datos: Incluye un archivo externo (incluir/conexion.php) que establece la conexión con la base de datos. - Gestión de la sesión: Inicia la sesión con session_start() y verifica si existe un carrito en la sesión, creando uno vacío si no existe. - Lógica de carrito: - Agregar producto: Incrementa la cantidad del producto si ya está en el carrito; si no, lo agrega con cantidad 1. - Eliminar producto: Elimina un producto específico del carrito y reindexa el array. - HTML y Bootstrap: - Muestra la interfaz del carrito de compras con una tabla que detalla los productos, sus cantidades, precios unitarios, subtotales y opciones de acción (eliminar). - Calcula y muestra el total del carrito. - Enlaces y navegación: - Un botón para proceder al pago (pago.php). - Scripts y estilos: - Incluye estilos CSS y enlaces a las bibliotecas de Bootstrap y jQuery para un diseño y funcionalidad responsivos. El archivo combina lógica de servidor (PHP) y estructura de presentación (HTML/CSS) para gestionar y mostrar un carrito de compras interactivo en una página web.

Carrito de Compras
Carrito de Compras
Producto Cantidad Precio Unitario Subtotal Acciones Total: $ Proceder al Pago Archivo pago.php (Proceso de pago): Este código es un script PHP que gestiona un proceso de pago simulado de la tienda en línea, verificando que haya productos en el carrito y calculando el total. Se incluye el archivo conexion.php para establecer la conexión con la base de datos y se inicia una sesión con session_start() para gestionar el carrito de compras. Si el carrito está vacío (empty($_SESSION)), el script redirige al usuario a carrito.php y finaliza la ejecución (exit()), impidiendo que se acceda al proceso de pago sin productos en el carrito. Cuando el formulario es enviado ($_SERVER === 'POST'), se ejecuta un bucle que recorre los productos en el carrito. Se consulta cada producto en la base de datos usando su id_producto para verificar que existe y obtener su precio, y se calcula el subtotal multiplicando el precio por la cantidad de cada producto y sumándolo al total. La página muestra un encabezado y un formulario con un botón que simula la confirmación de compra y utiliza estilos CSS propios y los de Bootstrap para un diseño responsivo y atractivo. Se incluyen scripts de Bootstrap y jQuery para proporcionar funcionalidad y estilo a la página. Nota: Si el carrito está vacío, el script no realiza ninguna acción relacionada con el procesamiento de pago. En lugar de eso, verifica si el carrito está vacío y, de ser así, redirige al usuario a carrito.php y termina la ejecución del script con exit(). Esto evita que se procese un pago o se muestre la interfaz de pago si no hay productos en el carrito.

Pago
Proceso de Pago
Este es un proceso de pago simulado. Haz clic en "Completar Compra" para finalizar tu compra. Completar Compra Archivo pago_exitoso.php (Confirmación de compra):

Este archivo es una página HTML que muestra un mensaje de confirmación de compra exitosa al usuario. Incluye un encabezado (incluir/encabezado.php) y un pie de página (incluir/pie.php). El cuerpo de la página contiene un contenedor con una alerta de Bootstrap que muestra un mensaje de agradecimiento por la compra y notifica que el pedido ha sido procesado con éxito. También se proporciona un enlace con un botón que redirige al usuario de vuelta a la página de inicio (index.php). La página utiliza estilos CSS personalizados y de Bootstrap para un diseño atractivo y responsivo, y se complementa con scripts de jQuery y Bootstrap para funcionalidad adicional. Compra Exitosa
¡Gracias por tu compra!
Tu pedido ha sido procesado exitosamente. Pronto recibirás un correo con los detalles de tu pedido. Volver al Inicio Nota para los estudiantes

Hasta este punto, ya hemos creado la parte frontend de la tienda en línea. Con los archivos desarrollados, deberían poder probar la tienda y comprobar que todo funcione sin errores. Esto incluye la visualización de productos, el carrito de compras, y el proceso de pago simulado. Cómo probar la tienda antes de completar el backend Para probar las funcionalidades de la tienda, deberán ingresar un registro de producto directamente en phpMyAdmin: - Accede a phpMyAdmin y selecciona la base de datos comercio_electronico. - Selecciona la tabla productos. - Haz clic en la pestaña "Insertar" y añade un nuevo producto con la siguiente información de ejemplo: - nombre: Sudadera - descripcion: Sudadera de algodón unisex - precio: 250.00 - imagen: sudadera.png (asegúrate de que la imagen esté en la carpeta recursos/imagenes/) - stock: 10 - Guarda el registro y vuelve a tu navegador para probar la tienda en línea. Tienes que ver algo así:

Qué puedes hacer ahora: - Navegar por la página de inicio (index.php), verificar que los productos se muestren correctamente. - Agregar productos al carrito (carrito.php) y simular una compra completa (pago.php y pago_exitoso.php).

Creación del Backend para la tienda en linea
En esta sección, desarrollaremos la interfaz de administración (backend) de la tienda en línea. Esto permitirá gestionar productos de manera sencilla a través de un panel de control. La administración incluirá funcionalidades para iniciar sesión, agregar, editar y eliminar productos. Estructura de archivos del backend La estructura del backend estará contenida dentro de la carpeta admin/: tienda-en-linea/ │ ├── admin/ (backend) │ ├── inicio_sesion.php │ ├── panel_control.php │ ├── gestion_productos.php │ ├── agregar_producto.php │ └── editar_producto.php │ └── cerrar_sesion.php Paso 1: Crear el archivo de inicio de sesión (admin/inicio_sesion.php) Este archivo permitirá a los administradores acceder al panel de control.

Recuerda que los datos para acceder se insertaron al inicio al crear la base de datos: Usuario: administrador Password: 12345

Código para inicio_sesion.php: Usuario: Contraseña: Iniciar Sesión Paso 2: Crear el archivo del panel de control (admin/panel_control.php) Este archivo será el punto de acceso principal después de iniciar sesión.

Código para panel_control.php: Panel de Control - Administración
Panel de Control - Administración
Cerrar Sesión Gestionar Productos Agregar, editar y eliminar productos de la tienda. Ir a Gestión de Productos Paso 3: Crear el archivo para gestionar productos (admin/gestion_productos.php) Este archivo mostrará una lista de productos y permitirá editarlos o eliminarlos.

Código para gestion_productos.php: Gestión de Productos
Gestión de Productos
Agregar Producto Cerrar Sesión ID Nombre Descripción Precio Stock Acciones Paso 4: Crear el archivo para agregar productos (admin/agregar_producto.php) Este archivo permitirá al administrador agregar nuevos productos.

Código para agregar_producto.php Read the full article
#agregarproducto#aplicaciónweb#backend#Bootstrap#Carritodecompras#códigoPHP#conexiónabasededatos#CRUD#desarrolloweb#e-commerce#editarproducto#ejemplosdeprogramación#eliminarproducto#frontend#gestióndeproductos#gestióndetienda#iniciodesesión#interfazdeadministrador#interfazdeusuario#MySQL#paneldecontrol#PHP#procesodepago#programaciónweb#proyectodee-commerce#proyectoeducativo#seguridadenPHP#sistemadeadministración#subirimágenes#tecnologíaweb
0 notes
Text

Online Freedemo On Fullstack Development
Join Now: https://bit.ly/3V6p367
Attend Online #Freedemo On #Fullstackdevelopment with #ReactJs by Mr. Keshav.
Demo on: 5th June @ 8:00 AM (IST).
Contact us: +91 97044 55959.
WhatsApp: https://www.whatsapp.com/catalog/917032290546/
Blog link: https://visualpathblogs.com/
Visit: https://www.visualpath.in/full-stack-mern-online.html
#javascript #FullStack #webdevelopment #developer #html #css #frontend #backend #mobileapp #webapp #software #education #onlinetraining #Visualpath #TechEducation #students #ITCourses #reactjs #nodejs #bootstrap #git #expressjs #MySQL #MongoDB #postman
#javascript#FullStack#webdevelopment#developer#html#css#frontend#backend#mobileapp#webapp#software#education#onlinetraining#Visualpath#TechEducation#students#ITCourses#reactjs#nodejs#bootstrap#git#expressjs#MySQL#MongoDB#postman
0 notes
Text

Time is running out! Enroll now and ignite your coding journey with our comprehensive PHP course. Let's turn those goals into reality together!
Contact Now: 090434 94941
For More Details: https://www.n-school.com/php-course/
#php#mysql#jquery#ajax#CSS3#HTML5#javascript#bootstrap#laravel#codeigniter#database#github#programming#coding#backend#developer#frontend#phpdeveloper#webdevelopment#programmer#coder#webdeveloper#softwaredeveloper#frontenddeveloper#code#backenddeveloper
0 notes
Text
SysNotes devlog 1
Hiya! We're a web developer by trade and we wanted to build ourselves a web-app to manage our system and to get to know each other better. We thought it would be fun to make a sort of a devlog on this blog to show off the development! The working title of this project is SysNotes (but better ideas are welcome!)

What SysNotes is✅:
A place to store profiles of all of our parts
A tool to figure out who is in front
A way to explore our inner world
A private chat similar to PluralKit
A way to combine info about our system with info about our OCs etc as an all-encompassing "brain-world" management system
A personal and tailor-made tool made for our needs
What SysNotes is not❌:
A fronting tracker (we see no need for it in our system)
A social media where users can interact (but we're open to make it so if people are interested)
A public platform that can be used by others (we don't have much experience actually hosting web-apps, but will consider it if there is enough interest!)
An offline app
So if this sounds interesting to you, you can find the first devlog below the cut (it's a long one!):
(I have used word highlighting and emojis as it helps me read large chunks of text, I hope it's alright with y'all!)
Tech stack & setup (feel free to skip if you don't care!)
The project is set up using:
Database: MySQL 8.4.3
Language: PHP 8.3
Framework: Laravel 10 with Breeze (authentication and user accounts) and Livewire 3 (front end integration)
Styling: Tailwind v4
I tried to set up Laragon to easily run the backend, but I ran into issues so I'm just running "php artisan serve" for now and using Laragon to run the DB. Also I'm compiling styles in real time with "npm run dev". Speaking of the DB, I just migrated the default auth tables for now. I will be making app-related DB tables in the next devlog. The awesome thing about Laravel is its Breeze starter kit, which gives you fully functioning authentication and basic account management out of the box, as well as optional Livewire to integrate server-side processing into HTML in the sexiest way. This means that I could get all the boring stuff out of the way with one terminal command. Win!
Styling and layout (for the UI nerds - you can skip this too!)
I changed the default accent color from purple to orange (personal preference) and used an emoji as a placeholder for the logo. I actually kinda like the emoji AS a logo so I might keep it.
Laravel Breeze came with a basic dashboard page, which I expanded with a few containers for the different sections of the page. I made use of the components that come with Breeze to reuse code for buttons etc throughout the code, and made new components as the need arose. Man, I love clean code 😌
I liked the dotted default Laravel page background, so I added it to the dashboard to create the look of a bullet journal. I like the journal-type visuals for this project as it goes with the theme of a notebook/file. I found the code for it here.
I also added some placeholder menu items for the pages that I would like to have in the app - Profile, (Inner) World, Front Decider, and Chat.

i ran into an issue dynamically building Tailwind classes such as class="bg-{{$activeStatus['color']}}-400" - turns out dynamically-created classes aren't supported, even if they're constructed in the component rather than the blade file. You learn something new every day huh…

Also, coming from Tailwind v3, "ps-*" and "pe-*" were confusing to get used to since my muscle memory is "pl-*" and "pr-*" 😂
Feature 1: Profiles page - proof of concept
This is a page where each alter's profiles will be displayed. You can switch between the profiles by clicking on each person's name. The current profile is highlighted in the list using a pale orange colour.

The logic for the profiles functionality uses a Livewire component called Profiles, which loads profile data and passes it into the blade view to be displayed. It also handles logic such as switching between the profiles and formatting data. Currently, the data is hardcoded into the component using an associative array, but I will be converting it to use the database in the next devlog.

New profile (TBC)
You will be able to create new profiles on the same page (this is yet to be implemented). My vision is that the New Alter form will unfold under the button, and fold back up again once the form has been submitted.
Alter name, pronouns, status
The most interesting component here is the status, which is currently set to a hardcoded list of "active", "dormant", and "unknown". However, I envision this to be a customisable list where I can add new statuses to the list from a settings menu (yet to be implemented).


Alter image
I wanted the folder that contained alter images and other assets to be outside of my Laravel project, in the Pictures folder of my operating system. I wanted to do this so that I can back up the assets folder whenever I back up my Pictures folder lol (not for adding/deleting the files - this all happens through the app to maintain data integrity!). However, I learned that Laravel does not support that and it will not be able to see my files because they are external. I found a workaround by using symbolic links (symlinks) 🔗. Basically, they allow to have one folder of identical contents in more than one place. I ran "mklink /D [external path] [internal path]" to create the symlink between my Pictures folder and Laravel's internal assets folder, so that any files that I add to my Pictures folder automatically copy over to Laravel's folder. I changed a couple lines in filesystems.php to point to the symlinked folder:

And I was also getting a "404 file not found" error - I think the issue was because the port wasn't originally specified. I changed the base app URL to the localhost IP address in .env:

…And after all this messing around, it works!
(My Pictures folder)

(My Laravel storage)

(And here is Alice's photo displayed - dw I DO know Ibuki's actual name)

Alter description and history
The description and history fields support HTML, so I can format these fields however I like, and add custom features like tables and bullet point lists.

This is done by using blade's HTML preservation tags "{!! !!}" as opposed to the plain text tags "{{ }}".
(Here I define Alice's description contents)


(And here I insert them into the template)

Traits, likes, dislikes, front triggers
These are saved as separate lists and rendered as fun badges. These will be used in the Front Decider (anyone has a better name for it?? 🤔) tool to help me identify which alter "I" am as it's a big struggle for us. Front Decider will work similar to FlowCharty.

What next?
There's lots more things I want to do with SysNotes! But I will take it one step at a time - here is the plan for the next devlog:
Setting up database tables for the profile data
Adding the "New Profile" form so I can create alters from within the app
Adding ability to edit each field on the profile
I tried my best to explain my work process in a way that wold somewhat make sense to non-coders - if you have any feedback for the future format of these devlogs, let me know!
~~~~~~~~~~~~~~~~~~
Disclaimers:
I have not used AI in the making of this app and I do NOT support the Vibe Coding mind virus that is currently on the loose. Programming is a form of art, and I will defend manual coding until the day I die.
Any alter data found in the screenshots is dummy data that does not represent our actual system.
I will not be making the code publicly available until it is a bit more fleshed out, this so far is just a trial for a concept I had bouncing around my head over the weekend.
We are SYSCOURSE NEUTRAL! Please don't start fights under this post
#sysnotes devlog#plurality#plural system#did#osdd#programming#whoever is fronting is typing like a millenial i am so sorry#also when i say “i” its because i'm not sure who fronted this entire time!#our syskid came up with the idea but i can't feel them so who knows who actually coded it#this is why we need the front decider tool lol
23 notes
·
View notes
Text
Crafting Web Applications For Businesses Which are Responsive,Secure and Scalable.
Hello, Readers!
I’m Nehal Patil, a passionate freelance web developer dedicated to building powerful web applications that solve real-world problems. With a strong command over Spring Boot, React.js, Bootstrap, and MySQL, I specialize in crafting web apps that are not only responsive but also secure, scalable, and production-ready.
Why I Started Freelancing
After gaining experience in full-stack development and completing several personal and academic projects, I realized that I enjoy building things that people actually use. Freelancing allows me to work closely with clients, understand their unique challenges, and deliver custom web solutions that drive impact.
What I Do
I build full-fledged web applications from the ground up. Whether it's a startup MVP, a business dashboard, or an e-commerce platform, I ensure every project meets the following standards:
Responsive: Works seamlessly on mobile, tablet, and desktop.
Secure: Built with best practices to prevent common vulnerabilities.
Scalable: Designed to handle growth—be it users, data, or features.
Maintainable: Clean, modular code that’s easy to understand and extend.
My Tech Stack
I work with a powerful tech stack that ensures modern performance and flexibility:
Frontend: React.js + Bootstrap for sleek, dynamic, and responsive UI
Backend: Spring Boot for robust, production-level REST APIs
Database: MySQL for reliable and structured data management
Bonus: Integration, deployment support, and future-proof architecture
What’s Next?
This blog marks the start of my journey to share insights, tutorials, and case studies from my freelance experiences. Whether you're a business owner looking for a web solution or a fellow developer curious about my workflow—I invite you to follow along!
If you're looking for a developer who can turn your idea into a scalable, secure, and responsive web app, feel free to connect with me.
Thanks for reading, and stay tuned!
2 notes
·
View notes
Text
Web Designer vs Web Developer : Quelle carrière choisir ?

Avec l’évolution rapide du numérique, les carrières en conception et développement web restent très demandées. Bien que ces deux professions jouent un rôle clé dans la création de sites modernes, elles impliquent des compétences, des responsabilités et des perspectives différentes. Si vous hésitez entre ces deux parcours, ce guide vous aidera à comprendre les différences en termes de rôles, de potentiel de rémunération et d’opportunités à long terme afin de choisir la carrière qui vous convient le mieux.
Que fait un Web Designer ?

Responsabilités principales
Un web designer se concentre sur l’apparence, l’ergonomie et l’expérience utilisateur (UX) d’un site web. Ses tâches incluent :
• Créer des mises en page visuellement attrayantes et des wireframes.
• Sélectionner la typographie, les palettes de couleurs et les éléments de branding.
• Concevoir des sites responsifs et adaptés aux mobiles.
• Utiliser des outils comme Adobe XD, Figma et Sketch.
• Collaborer avec les développeurs pour assurer une bonne transition entre le design et le code.
Compétences clés pour un Web Designer
• Connaissance des principes UI/UX et des meilleures pratiques en ergonomie.
• Maîtrise des logiciels de design graphique (Photoshop, Illustrator, Figma).
• Notions de base en HTML & CSS pour le prototypage.
• Compréhension du branding et de la psychologie des couleurs.
Avantages d’être Web Designer
✔️ Travail très créatif avec une grande liberté artistique.
✔️ Moins de programmation que dans le développement web.
✔️ Forte demande pour l’expertise UI/UX.
✔️ Nombreuses opportunités en freelance, notamment sur des plateformes comme Upwork.
Défis du métier de Web Designer
❌ Rémunération souvent inférieure à celle des développeurs.
❌ Nécessité de suivre en permanence les tendances du design.
❌ Certains clients sous-estiment la valeur du design par rapport au développement.
Que fait un Web Developer ?
Responsabilités principales
Un développeur web est chargé de concevoir et maintenir des sites fonctionnels en utilisant des langages de programmation et des frameworks. Ses missions incluent :
• Écrire et corriger du code pour implémenter des fonctionnalités web.
• Optimiser la vitesse, la sécurité et la scalabilité des sites.
• Gérer les systèmes backend, les bases de données et les API.
• Corriger les bugs et améliorer l’expérience utilisateur.
• Travailler aussi bien sur les technologies front-end que back-end.
Les différents types de développeurs web
• Développeur Front-End : Se concentre sur les aspects visuels et interactifs du site (HTML, CSS, JavaScript).
• Développeur Back-End : Gère la programmation côté serveur, les bases de données et les API.
• Développeur Full-Stack : Maîtrise à la fois le front-end et le back-end.
Compétences clés pour un Web Developer
• Maîtrise de HTML, CSS et JavaScript.
• Connaissance de langages de programmation comme PHP, Python, Ruby.
• Familiarité avec des frameworks comme React, Angular, Vue.js.
• Gestion des bases de données (MySQL, MongoDB).
• Compétences en débogage, tests et gestion de versions.
Avantages d’être Web Developer
✔️ Forte rémunération, en particulier pour les développeurs full-stack et back-end.
✔️ Demande croissante avec de nombreuses opportunités d’évolution.
✔️ Possibilité de travailler sur des projets complexes et de grande envergure.
✔️ Opportunités de travail à distance et en freelance.
Défis du métier de Web Developer
❌ Apprentissage continu indispensable en raison des évolutions technologiques rapides.
❌ Travail très technique avec peu d’aspects créatifs.
❌ Peut impliquer de longues heures de débogage et de résolution de problèmes.
Conclusion
En résumé, si vous aimez la créativité et le design, le métier de web designer pourrait vous convenir. Si vous préférez la programmation et la résolution de problèmes techniques, le développement web est une meilleure option. Quelle que soit votre décision, les deux carrières offrent de nombreuses opportunités dans l’univers du numérique !
Je suis hermane junior Nguessan developpeur web &mobile
Liens linkedIn 👉 : https://www.linkedin.com/in/hermane-junior-nguessan-2a9a05324?utm_source=share&utm_campaign=share_via&utm_content=profile&utm_medium=ios_app
https://www.linkedin.com/in/hermane-junior-nguessan-2a9a05324?utm_source=share&utm_campaign=share_via&utm_content=profile&utm_medium=ios_app
2 notes
·
View notes
Text
Binance clone script — Overview by BlockchainX
A Binance Clone Script is a pre-built, customizable software solution that replicates Binance's features, connect with BlockchainX

What is Binance Clone Script
A Binance clone script refers to the ready-made solution of the Binance platform that deals with core functions parallel to the widely acclaimed cryptocurrency exchange platform associated with Binance. It enables companies to establish their own platforms like Binance, perfectly parameterized in terms of functionality and user interface of world-famous exchanges. The clone script provides display flexibility with built-in functionality such as spot trading software, futures trading configurations, and wallet systems that are extremely secure.
Basically, it reduces development costs and latency because things like these are already built. And as this is a startup for many young entrepreneurs, they can have saved on their capital to expand or grow their business.
The script is blessed as its feature set caters to future demands in the field. One can enjoy a safe trading experience to customers while ensuring that every peculiarity of Binance’s success opens up to investors of the script.
How does the Binance clone script work?
The Binance clone script works to provide a ready-made platform that replicates Binance’s core features, such as user registration, wallet management, trade and enables users to create accounts, deposit or withdraw cryptocurrency, and trade digital assets through an interface easily and safely. The platform supports various trading methods such as market orders, limit orders and forward trading. It has built-in security features like two-factor authentication (2FA) to save the user money. Admin dashboards allow platform owners to manage users, manage tasks, and set up billing. The script can be tailored to your brand, connecting liquidity sources to make trading more efficient. In short, the Binance clone script provides everything needed to create a fully functional crypto exchange.
key features of a Binance Clone Script
The key features of a Binance Clone Script are designed to make your cryptocurrency exchange platform secure, user-friendly, and fully functional. Here’s a simple overview of these features:
User-Friendly Interface
Multi-Currency Support
Advanced Trading Engine
Secure Wallet System
KYC/AML Integration
Admin Dashboard
Security Features
Trading Options
These features help ensure that your Binance-like exchange is efficient, secure, and ready for the growing crypto market.
Technology Stack Used by BlockchainX
Technology stack used for developing the Binance clone script involves the most advanced technology combination that ensures that the platform must have so much security, scalability, and performance to make it a platform that is secure, scalable, and high-performance as well. Here are a few key technologies and their brief descriptions:
Blockchain Technology:
The underlying part of the cryptocurrency exchange is Blockchain because it ensures the safe and decentralized processing of transactions.
Normally executed on either Ethereum or BSC (Binance Smart Chain) to carry out smart contracts and token transfers.
Programming Languages:
Frontend: For frontend, React or Angular could be engaged in actualization of the user interface leading to a responsive and interactive experience on the various devices.
Backend: In backend, languages like Node.js, Python, or Ruby on Rails can be applied on how internal logic is being run by server and arbitration of user interaction with the module is foremost.
Databases:
These two databases, MySQL or Postgresql, are typically used in user information storage, transaction records, and other exchange information.
NoSQL such as MongoDB or other databases might be used for horizontal scalability and high-volume transaction storage.
Smart Contracts:
It is used to generate and send out smart contracts for auto-trading, token generation, and other decentralized functionalities.
Blockchain Wallets:
Fundamentally, this automatically links famous wallet systems such as MetaMask, Trust Wallet, or Ledger for the secure storage and transactions of cryptocurrency.
Advantages of using a Binance Clone Script
Here are the advantages of using a Binance Clone Script:
Faster Time-to-Market
Cost-Effective
Customizable Features
Liquidity Integration
Multiple Trading Options
So, when entering the marketplace of the cryptocurrencies it would be the most possible work of something to pay off at a rapid pace: the Binance Clone Script proves so.
How to Get Started with BlockchainX’s Binance Clone Script
It is quite a straightforward process to begin working with a BlockchainX Binance Clone Script-this involves the first step of getting in touch with the company for an initial consulting period to understand more about what you require, need, or customize for the site, and what your goals are. When BlockchainX has an understanding of your needs, they offer a detailed list of what a proposal would entail before they can start the work; afterward, they will estimate the costs needed to do the project. Once both sides accept both the presentations and all features and timelines are agreed with, BlockchainX starts working on the development process of building a Binance Clone Script tailored to the brand, user interface, and other features.
After the entire platform is created, it passes through severe testing to ensure that everything functions excellently. Deployment follows the thorough test. BlockchainX customizes your user interface and more extensions, after deployment. BlockchainX also commits to supporting and sustaining your exchange so that it runs successfully and securely.
Conclusion:
At the end, your confusion may as well be cut short. Yes, the Binance Clone Script will be a resilient solution to spark up the exchange platforms synthesizing user-generated cryptocurrency dreams in the blockchain, even without bankroll when it comes to developing the app. Turning with BlockchainX expertise, you can make an adjustment and scale a powerful platform stocked with the likes of Binance that produced Blockchains, while still containing some specific set-ups for your masterpiece. More amazing features are exclusive to the clone script, moreover, such as support for multiple currencies, high-end security, real-time data, and a smooth user interface that completes the trading process for your users without any glitch.
This solution gives easy access to ready-made solutions. It could have quality Depending on the time you conveniently let BlockchainX’s be and use both exchanges or any variation of the two permutations. After all, who decides to couple up with a one-experienced Crypto Exchange developer who is struggling to offer anything new.
#binance clone script#binance clone script development#binance clone script development service#blockchain technology#blockchain#cryptocurrency#cryptocurrencies
2 notes
·
View notes
Text
#Playstation7 Security backend FireWall Dynamic Encryption, NFT integration CG’s and Online Store, Game download, installation and run processes.

Creating a comprehensive backend system for a console that integrates security, encryption, store functionality, NFT integration, and blockchain encoding is an extensive task, but here’s a detailed outline and code implementation for these components:

1. Security and Firewall System with Dynamic Encryption
The security system will need robust firewalls and periodic encryption mechanisms that update dynamically every 5 minutes and every 30th of a second.
1.1 Encryption Structure (Python-based) with Time-Based Swapping
We’ll use the cryptography library in Python for encryption, and random for generating random encryption keys, which will change periodically.
Encryption Swapping Code:
import os
import time
import random
from cryptography.fernet import Fernet
class SecuritySystem:
def __init__(self):
self.current_key = self.generate_key()
self.cipher_suite = Fernet(self.current_key)
def generate_key(self):
return Fernet.generate_key()
def update_key(self):
self.current_key = self.generate_key()
self.cipher_suite = Fernet(self.current_key)
print(f"Encryption key updated: {self.current_key}")
def encrypt_data(self, data):
encrypted = self.cipher_suite.encrypt(data.encode())
return encrypted
def decrypt_data(self, encrypted_data):
return self.cipher_suite.decrypt(encrypted_data).decode()
# Swapping encryption every 5 minutes and 30th of a second
def encryption_swapper(security_system):
while True:
security_system.update_key()
time.sleep(random.choice([5 * 60, 1 / 30])) # 5 minutes or 30th of a second
if __name__ == "__main__":
security = SecuritySystem()
# Simulate swapping
encryption_swapper(security)
1.2 Firewall Setup (Using UFW for Linux-based OS)
The console could utilize a basic firewall rule set using UFW (Uncomplicated Firewall) on Linux:
# Set up UFW firewall for the console backend
sudo ufw default deny incoming
sudo ufw default allow outgoing
# Allow only specific ports (e.g., for the store and NFT transactions)
sudo ufw allow 8080 # Store interface
sudo ufw allow 443 # HTTPS for secure transactions
sudo ufw enable
This basic rule ensures that no incoming traffic is accepted except for essential services like the store or NFT transfers.
2. Store Functionality: Download, Installation, and Game Demos
The store will handle downloads, installations, and demo launches. The backend will manage game storage, DLC handling, and digital wallet integration for NFTs.

2.1 Download System and Installation Process (Python)
This code handles the process of downloading a game, installing it, and launching a demo.
Store Backend (Python + MySQL for Game Listings):
import mysql.connector
import os
import requests
class GameStore:
def __init__(self):
self.db = self.connect_db()
def connect_db(self):
return mysql.connector.connect(
host="localhost",
user="admin",
password="password",
database="game_store"
)
def fetch_games(self):
cursor = self.db.cursor()
cursor.execute("SELECT * FROM games")
return cursor.fetchall()
def download_game(self, game_url, game_id):
print(f"Downloading game {game_id} from {game_url}...")
response = requests.get(game_url)
with open(f"downloads/{game_id}.zip", "wb") as file:
file.write(response.content)
print(f"Game {game_id} downloaded.")
def install_game(self, game_id):
print(f"Installing game {game_id}...")
os.system(f"unzip downloads/{game_id}.zip -d installed_games/{game_id}")
print(f"Game {game_id} installed.")
def launch_demo(self, game_id):
print(f"Launching demo for game {game_id}...")
os.system(f"installed_games/{game_id}/demo.exe")
# Example usage
store = GameStore()
games = store.fetch_games()
# Simulate downloading, installing, and launching a demo

store.download_game("http://game-download-url.com/game.zip", 1)
store.install_game(1)
store.launch_demo(1)
2.2 Subsections for Games, DLC, and NFTs
This section of the store manages where games, DLCs, and NFTs are stored.
class GameContentManager:
def __init__(self):
self.games_folder = "installed_games/"
self.dlc_folder = "dlcs/"
self.nft_folder = "nfts/"
def store_game(self, game_id):
os.makedirs(f"{self.games_folder}/{game_id}", exist_ok=True)
def store_dlc(self, game_id, dlc_id):
os.makedirs(f"{self.dlc_folder}/{game_id}/{dlc_id}", exist_ok=True)
def store_nft(self, nft_data, nft_id):
with open(f"{self.nft_folder}/{nft_id}.nft", "wb") as nft_file:
nft_file.write(nft_data)
# Example usage
manager = GameContentManager()
manager.store_game(1)
manager.store_dlc(1, "dlc_1")
manager.store_nft(b"NFT content", "nft_1")
3. NFT Integration and Blockchain Encoding
We’ll use blockchain to handle NFT transactions, storing them securely in a blockchain ledger.
3.1 NFT Blockchain Encoding (Python)
This script simulates a blockchain where each block stores an NFT.
import hashlib
import time
class Block:
def __init__(self, index, timestamp, data, previous_hash=''):
self.index = index
self.timestamp = timestamp
self.data = data
self.previous_hash = previous_hash
self.hash = self.calculate_hash()
def calculate_hash(self):
block_string = f"{self.index}{self.timestamp}{self.data}{self.previous_hash}"
return hashlib.sha256(block_string.encode()).hexdigest()
class Blockchain:
def __init__(self):
self.chain = [self.create_genesis_block()]
def create_genesis_block(self):
return Block(0, time.time(), "Genesis Block", "0")
def get_latest_block(self):
return self.chain[-1]
def add_block(self, new_data):
previous_block = self.get_latest_block()
new_block = Block(len(self.chain), time.time(), new_data, previous_block.hash)
self.chain.append(new_block)
def print_blockchain(self):
for block in self.chain:
print(f"Block {block.index} - Data: {block.data} - Hash: {block.hash}")
# Adding NFTs to the blockchain
nft_blockchain = Blockchain()
nft_blockchain.add_block("NFT1: Digital Sword")
nft_blockchain.add_block("NFT2: Magic Shield")
nft_blockchain.print_blockchain()
3.2 NFT Wallet Transfer Integration (Python)
This script will transfer NFTs into wallets or digital blockchain systems.
class NFTWallet:
def __init__(self):
self.wallet = {}
def add_nft(self, nft_id, nft_data):
self.wallet[nft_id] = nft_data
print(f"Added NFT {nft_id} to wallet.")
def transfer_nft(self, nft_id, recipient_wallet):
if nft_id in self.wallet:
recipient_wallet.add_nft(nft_id, self.wallet[nft_id])
del self.wallet[nft_id]
print(f"Transferred NFT {nft_id} to recipient.")
# Example usage
user_wallet = NFTWallet()
user_wallet.add_nft("nft_1", "Digital Art Piece 1")
recipient_wallet = NFTWallet()
user_wallet.transfer_nft("nft_1", recipient_wallet)
4. CG (Computer Graphics) Storage for Cutscenes and Artwork
4.1 Storing and Retrieving CG Assets
This system stores CG assets (cutscenes, artwork, etc.) for later viewing and reminiscing.
class CGStorage:
def __init__(self):
self.cg_folder = "cg_assets/"
os.makedirs(self.cg_folder, exist_ok=True)
def store_cg(self, cg_id, cg_data):
with open(f"{self.cg_folder}/{cg_id}.mp4", "wb") as cg_file:
cg_file.write(cg_data)
print(f"CG {cg_id} stored.")
def retrieve_cg(self, cg_id):
with open(f"{self.cg_folder}/{cg_id}.mp4", "rb") as cg_file:
return cg_file.read()
# Example usage
cg_storage = CGStorage()
cg_storage.store_cg("cutscene_1", b"CG video data")
cg_data = cg_storage.retrieve_cg("cutscene_1")
Summary of the System:

1. Security: Dynamic encryption swaps with regular firewall management.
2. Store: Handles game downloads, installations, and demo launches, including storage for games, DLC, and NFTs.
3. NFT Integration: A blockchain-based system for NFT encoding and wallet transfers.
4. CG Storage: Storing and retrieving game cutscenes and artwork for later viewing.
This framework is scalable and can be extended as the console ecosystem grows. Each component works independently but can be integrated into a larger gaming console backend system.


#playstation7#ps7#deardearestbrands#digitalconsole#framework#python#soundcloud#celestiallink#raw code#rawscript#blockchain#NFTs#Security#Frontend#backend#encryption processes
3 notes
·
View notes
Text
Storing images in mySql DB - explanation + Uploadthing example/tutorial
(Scroll down for an uploadthing with custom components tutorial)
My latest project is a photo editing web application (Next.js) so I needed to figure out how to best store images to my database. MySql databases cannot store files directly, though they can store them as blobs (binary large objects). Another way is to store images on a filesystem (e.g. Amazon S3) separate from your database, and then just store the URL path in your db.
Why didn't I choose to store images with blobs?
Well, I've seen a lot of discussions on the internet whether it is better to store images as blobs in your database, or to have them on a filesystem. In short, storing images as blobs is a good choice if you are storing small images and a smaller amount of images. It is safer than storing them in a separate filesystem since databases can be backed up more easily and since everything is in the same database, the integrity of the data is secured by the database itself (for example if you delete an image from a filesystem, your database will not know since it only holds a path of the image). But I ultimately chose uploading images on a filesystem because I wanted to store high quality images without worrying about performance or database constraints. MySql has a variety of constraints for data sizes which I would have to override and operations with blobs are harder/more costly for the database.
Was it hard to set up?
Apparently, hosting images on a separate filesystem is kinda complicated? Like with S3? Or so I've heard, never tried to do it myself XD BECAUSE RECENTLY ANOTHER EASIER SOLUTION FOR IT WAS PUBLISHED LOL. It's called uploadthing!!!
What is uploadthing and how to use it?
Uploadthing has it's own server API on which you (client) post your file. The file is then sent to S3 to get stored, and after it is stored S3 returns file's URL, which then goes trough uploadthing servers back to the client. After that you can store that URL to your own database.

Here is the graph I vividly remember taking from uploadthing github about a month ago, but can't find on there now XD It's just a graphic version of my basic explanation above.
The setup is very easy, you can just follow the docs which are very straightforward and easy to follow, except for one detail. They show you how to set up uploadthing with uploadthing's own frontend components like <UploadButton>. Since I already made my own custom components, I needed to add a few more lines of code to implement it.
Uploadthing for custom components tutorial
1. Imports
You will need to add an additional import generateReactHelpers (so you can use uploadthing functions without uploadthing components) and call it as shown below
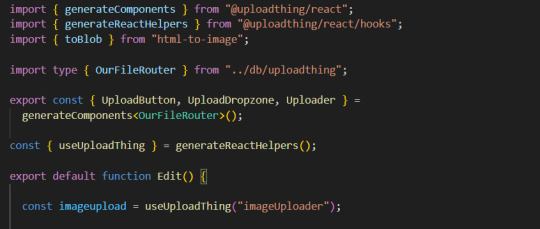
2. For this example I wanted to save an edited image after clicking on the save button.
In this case, before calling the uploadthing API, I had to create a file and a blob (not to be confused with mySql blob) because it is actually an edited picture taken from canvas, not just an uploaded picture, therefore it's missing some info an uploaded image would usually have (name, format etc.). If you are storing an uploaded/already existing picture, this step is unnecessary. After uploading the file to uploadthing's API, I get it's returned URL and send it to my database.

You can find the entire project here. It also has an example of uploading multiple files in pages/create.tsx
I'm still learning about backend so any advice would be appreciated. Writing about this actually reminded me of how much I'm interested in learning about backend optimization c: Also I hope the post is not too hard to follow, it was really hard to condense all of this information into one post ;_;
#codeblr#studyblr#webdevelopment#backend#nextjs#mysql#database#nodejs#programming#progblr#uploadthing
4 notes
·
View notes
Text
The Roadmap to Full Stack Developer Proficiency: A Comprehensive Guide
Embarking on the journey to becoming a full stack developer is an exhilarating endeavor filled with growth and challenges. Whether you're taking your first steps or seeking to elevate your skills, understanding the path ahead is crucial. In this detailed roadmap, we'll outline the stages of mastering full stack development, exploring essential milestones, competencies, and strategies to guide you through this enriching career journey.

Beginning the Journey: Novice Phase (0-6 Months)
As a novice, you're entering the realm of programming with a fresh perspective and eagerness to learn. This initial phase sets the groundwork for your progression as a full stack developer.
Grasping Programming Fundamentals:
Your journey commences with grasping the foundational elements of programming languages like HTML, CSS, and JavaScript. These are the cornerstone of web development and are essential for crafting dynamic and interactive web applications.
Familiarizing with Basic Data Structures and Algorithms:
To develop proficiency in programming, understanding fundamental data structures such as arrays, objects, and linked lists, along with algorithms like sorting and searching, is imperative. These concepts form the backbone of problem-solving in software development.
Exploring Essential Web Development Concepts:
During this phase, you'll delve into crucial web development concepts like client-server architecture, HTTP protocol, and the Document Object Model (DOM). Acquiring insights into the underlying mechanisms of web applications lays a strong foundation for tackling more intricate projects.
Advancing Forward: Intermediate Stage (6 Months - 2 Years)
As you progress beyond the basics, you'll transition into the intermediate stage, where you'll deepen your understanding and skills across various facets of full stack development.

Venturing into Backend Development:
In the intermediate stage, you'll venture into backend development, honing your proficiency in server-side languages like Node.js, Python, or Java. Here, you'll learn to construct robust server-side applications, manage data storage and retrieval, and implement authentication and authorization mechanisms.
Mastering Database Management:
A pivotal aspect of backend development is comprehending databases. You'll delve into relational databases like MySQL and PostgreSQL, as well as NoSQL databases like MongoDB. Proficiency in database management systems and design principles enables the creation of scalable and efficient applications.
Exploring Frontend Frameworks and Libraries:
In addition to backend development, you'll deepen your expertise in frontend technologies. You'll explore prominent frameworks and libraries such as React, Angular, or Vue.js, streamlining the creation of interactive and responsive user interfaces.
Learning Version Control with Git:
Version control is indispensable for collaborative software development. During this phase, you'll familiarize yourself with Git, a distributed version control system, to manage your codebase, track changes, and collaborate effectively with fellow developers.
Achieving Mastery: Advanced Phase (2+ Years)
As you ascend in your journey, you'll enter the advanced phase of full stack development, where you'll refine your skills, tackle intricate challenges, and delve into specialized domains of interest.
Designing Scalable Systems:
In the advanced stage, focus shifts to designing scalable systems capable of managing substantial volumes of traffic and data. You'll explore design patterns, scalability methodologies, and cloud computing platforms like AWS, Azure, or Google Cloud.
Embracing DevOps Practices:
DevOps practices play a pivotal role in contemporary software development. You'll delve into continuous integration and continuous deployment (CI/CD) pipelines, infrastructure as code (IaC), and containerization technologies such as Docker and Kubernetes.
Specializing in Niche Areas:
With experience, you may opt to specialize in specific domains of full stack development, whether it's frontend or backend development, mobile app development, or DevOps. Specialization enables you to deepen your expertise and pursue career avenues aligned with your passions and strengths.
Conclusion:
Becoming a proficient full stack developer is a transformative journey that demands dedication, resilience, and perpetual learning. By following the roadmap outlined in this guide and maintaining a curious and adaptable mindset, you'll navigate the complexities and opportunities inherent in the realm of full stack development. Remember, mastery isn't merely about acquiring technical skills but also about fostering collaboration, embracing innovation, and contributing meaningfully to the ever-evolving landscape of technology.
#full stack developer#education#information#full stack web development#front end development#frameworks#web development#backend#full stack developer course#technology
9 notes
·
View notes
Text

🚀 Python Full Stack Knowledge Post! 🖥️🔥
✅ Backend – Django/Flask for secure apps
✅ Frontend – React.js/Vue.js for dynamic UIs
✅ APIs – Connect frontend & backend with JSON
✅ Databases – SQL (PostgreSQL, MySQL) & NoSQL (MongoDB)
✅ Deployment – Git, Docker, AWS for project management
🎯 Enroll Now!
📞 +91 9704944 488 | 🌐 pythonfullstackmasters.in
2 notes
·
View notes
Text

////////Introduction /////////
Although I have not yet fully experienced the importance of community, I believe in the advantage of having someone to trust when ideas are unclear. I am here to connect with people who share my interests and, if possible, help others in their learning process


///////// About Me /////////
Hello everyone! I'm Daniel
based in Argentina.
My journey into the coding world started with free courses on FreeCodeCamp and an exciting bootcamp at DigitalHouse.
///////// Skills /////////
>>> Backend <<<
MySQL
Express
Nest.js
Node.js
>>> Frontend <<<
React
Tailwind
JS
Cypress

Thank you, @izicodes, for giving me the push I needed to start my blog!
10 notes
·
View notes