#PYTHONPATH
Explore tagged Tumblr posts
Visit Tumblr Blog
Explore Tumblr blogs with no restrictions, modern design and the best experience.
Last Seen Tumblr Blogs


Fun Fact
The Tumblr office adopted Tommy, an 11-year-old Pomeranian.
Text
Understanding the Significance of Environment Variables for Data Scientists
Introduction:
In the realm of data science, environment variables play a crucial role in shaping the working environment for data scientists. These variables hold key information that affects how software applications behave and interact with the system. Understanding the nuances of environment variables is essential for data scientists to optimize their workflow, ensure reproducibility, and enhance efficiency in data analysis and model development.
The Basics of Environment Variables:
Environment variables are dynamic values that define the environment in which a process runs. They contain information such as paths to important directories, default settings for applications, and configuration parameters. In the context of data science, environment variables can influence various aspects of data processing, model training, and deployment.

Setting Environment Variables:
Data scientists often set environment variables to customize their working environment according to specific requirements. These variables can be set temporarily for a session or permanently to persist across sessions. By defining environment variables, data scientists can control aspects like data storage locations, software versions, API keys, and other parameters critical for their analysis tasks.
Impact on Data Analysis:
Environment variables have a significant impact on data analysis workflows. For instance, setting the PYTHONPATH variable allows data scientists to specify additional directories to search for Python modules, facilitating code reuse and modularity. Similarly, configuring the PATH variable enables easy access to essential command-line tools and applications, streamlining data processing tasks.
Enhancing Reproducibility:
One of the key benefits of leveraging environment variables in data science is the enhancement of reproducibility. By encapsulating dependencies, configurations, and settings within environment variables, data scientists can ensure that their analyses are reproducible across different environments. This practice is fundamental in research, where reproducibility is paramount for validating findings and sharing results.
Optimizing Model Development:
In the realm of machine learning and model development, environment variables play a critical role in optimizing the development process. Data scientists can use variables to specify hyperparameters, data paths, model configurations, and training settings. This flexibility allows for seamless experimentation, parameter tuning, and model iteration, leading to more robust and efficient model development pipelines.
Security and Confidentiality:
Environment variables also play a crucial role in maintaining security and confidentiality in data science workflows. By storing sensitive information such as API keys, database credentials, and access tokens in environment variables, data scientists can prevent inadvertent exposure of confidential data in code repositories or shared environments. This practice enhances data security and compliance with privacy regulations.
Best Practices for Managing Environment Variables:
To effectively harness the power of environment variables in data science, it is essential to follow best practices for managing and utilizing them. Data scientists should document their environment variable configurations, use version control to track changes, avoid hardcoding sensitive information in scripts, and ensure proper access control to prevent unauthorized access to critical variables.
Conclusion:
In conclusion, environment variables are indispensable tools for data scientists, enabling them to customize their working environment, enhance reproducibility, optimize model development, and maintain data security. By understanding the significance of environment variables and adopting best practices for their management, data scientists can streamline their workflows, improve efficiency, and elevate the quality of their data analyses and model deployments. Embracing the power of environment variables is not just a best practice but a necessity in the dynamic and evolving field of data science.
0 notes
Link
0 notes
Text
Python Environment Variables: A Step-by-Step Tutorial for Beginners
We want to help newcomers understand the world of Python programming. We’ll explore the exciting world of Python environment variables. If you’re new to Python or programming in general, you might ask yourself, “What are environment variables, and why should I care?” Environment variables, on the other hand, play an important part in configuring and customizing Python applications, allowing you to influence many elements of their behavior.
They allow you to create dynamic and adaptable ecosystems that adapt to various conditions without rewriting your code. In this step-by-step lesson, we will walk you through the fundamentals of Python environment variables, helping you grasp their importance and demonstrating how to use them in your projects properly.
This tutorial is targeted to your needs, whether you’re an aspiring developer or an experienced programmer trying to increase your Python expertise.
Understanding the Importance of Environment Variables in Python
Environment variables are important in Python programming because they provide an adaptable and effective approach to managing different setups and variables within an application. These variables are constants that are set in the operating system’s surroundings that Python scripts can access during execution. The value of environment variables arises from their ability to separate application logic from unique contexts, allowing code to be more reusable and flexible across diverse systems.
Developers may prevent hard-coding highly confidential data, such as API keys, database qualifications, or system-specific paths, into their code by using environment variables. Instead, this important information can be saved as environment variables, which can be controlled securely outside the source code repository. This strategy improves security and lowers the danger of disclosing sensitive information in the event of unauthorized access.
Furthermore, environment variables allow applications to be deployed seamlessly across many environments, such as development, staging, and production. Each environment can have its own set of variables, allowing for simple configuration changes without having to edit the codebase. Because they can adapt to diverse runtime conditions, this flexibility allows for smooth transitions between deployment stages and simplifies the process of scaling programs.
Furthermore, environmental characteristics facilitate collaboration between development teams. Team members can collaborate on projects without revealing their particular machine-specific configurations by using shared variables. This promotes a collaborative and standardized development environment in which team members can work effortlessly together.
The os module in Python gives easy access to environment variables. Environment variables can be retrieved by developers using functions such as os.getenv() and os.environ.get(). These routines make it simple to incorporate environment variables into Python scripts, ensuring that the application’s behavior can be changed without modifying the source. Setting Up and Configuring Python Environment Variables
Go to “My Computer” or “This PC” and right-click. Next, choose “Properties” from the options that appear.
In the properties window that appears, locate and click on “Advanced System Settings”.
In the newly opened window, find and click on the “Environment Variables” button. It will be visible as a distinct option.
Within the “Environment Variables” dialog box, locate the “New” button and click on it.
In the “New Environment Variable” dialog box, enter “PYTHONPATH” as the variable’s name. Specify the desired location where Python should search for modules as the value for the module directory.
Launch the command prompt, and execute your Python script using the following command:
By following these steps, you will successfully configure the PYTHONPATH on your Windows machine.
Accessing Environment Variables in Python Scripts
Step 1: Import the os module
The os module in Python offers functionalities to interact with the operating system.
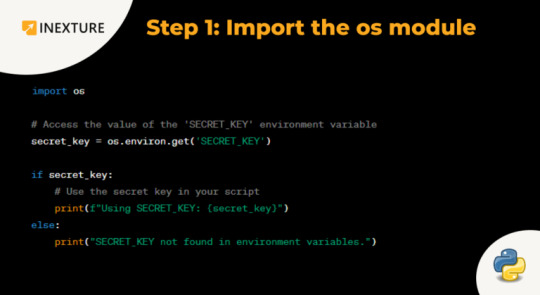
To access environment variables, you’ll need to import this module at the beginning of your script. Please incorporate the following line of code into your script.
Step 2: Retrieve the value of an environment variable
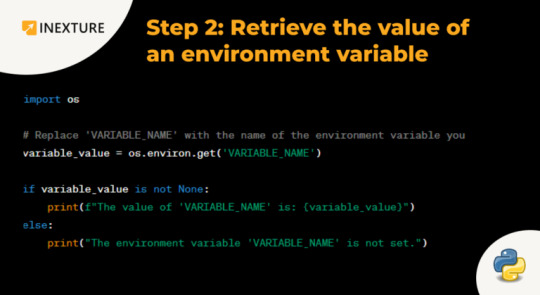
To access the value of an environment variable, you can use the os.getenv() function. It takes the name of the environment variable as a parameter and returns its value. Here’s an example:
# Assuming there is an environment variable named “API_KEY” api_key = os.getenv(“API_KEY”) In the above code snippet, os.getenv(“API_KEY”) retrieves the value of the environment variable named “API_KEY” and assigns it to the api_key variable.
Step 3: Handle cases where the environment variable is not set
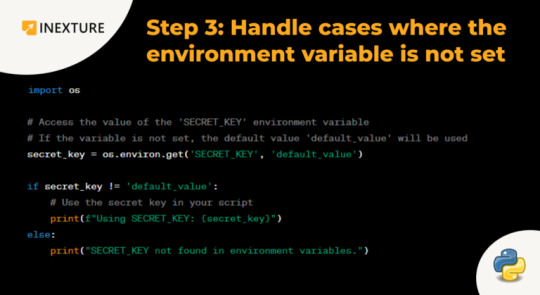
If the specified environment variable does not exist, os.getenv() will return None. It’s important to handle this case in your script to avoid errors. You can use an if statement to check if the environment variable exists before using its value. Here’s an example:
api_key = os.getenv(“API_KEY”) if api_key is not None: # Use the API key print(“API Key:”, api_key) else: print(“API key not found.”) In this code snippet, if the environment variable “API_KEY” exists, it will be printed. Alternatively, it will output the message “API key not found.”
Step 4: Set environment variables
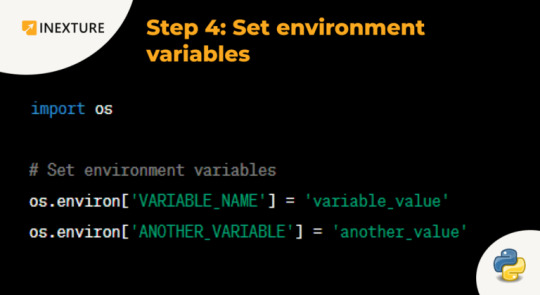
To set an environment variable, you can use the os.environ dictionary. Here’s an example:
# Set an environment variable named “API_KEY” os.environ[“API_KEY”] = “your_api_key_value” In the above code, os.environ[“API_KEY”] = “your_api_key_value” sets the value of the environment variable “API_KEY” to “your_api_key_value”.
Note: Modifying environment variables using os.environ only affects the current process and any child processes that inherit the environment. Changes are not permanent.
That’s it! You now have a step-by-step guide on accessing and setting environment variables in Python scripts using the os module.
Troubleshooting Common Issues with Python Environment Variables
Incorrectly defined or missing environment variables:
Check names and values of environment variables for accuracy.
Use os.getenv() function to retrieve values and verify correct settings.
Scope of environment variables:
Ensure proper propagation to relevant subprocesses.
Pass variables as arguments or use tools like subprocess or os.environ.
Security concerns:
Avoid exposing sensitive information to environmental variables.
Store sensitive data securely (e.g., configuration files, key management services).
Restrict access to environment variables.
Consider encryption or hashing techniques for added protection.
Virtual environment considerations:
Activate the correct environment.
Install required packages and dependencies within the virtual environment.
Verify correct activation and package installation to resolve module or dependency-related issues.
With this extensive tutorial, beginners can gain a solid understanding of Python environment variables, while experienced programmers can further enhance their Python skills. By controlling the potential of environment variables, you can create engaged and adjustable Python applications that are configurable, secure, and easily deployable across diverse environments.
Originally published by: Python Environment Variables: A Step-by-Step Tutorial for Beginners
0 notes
Text
python – PYTHONPATH on Linux
1) PYTHONPATH is an environment variable which you can set to add additional directories where python will look for modules and packages. e.g.:
# make python look in the foo subdirectory of your home directory for # modules and packages export PYTHONPATH=${PYTHONPATH}:${HOME}/foo
Here I use the sh syntax. For other shells (e.g. csh,tcsh), the syntax would be slightly different. To make it permanent, set the variable in your shells init file (usually ~/.bashrc).
2) Ubuntu comes with python already installed. There may be reasons for installing other (independent) python versions, but Ive found that to be rarely necessary.
0 notes
Text
How to change the python version in PySpark ?
How to change the python version in PySpark ?
To switch the python version in pyspark, set the following environment variables. I was working in an environment with Python2 and Python3. I had to use Python3 in pyspark where the spark was using Python 2 by default.

Python 2 was pointing to –> /usr/bin/python
Python 3 was pointing to –> /usr/bin/python3
To configure pyspark to use python 3, set the following environment variables.
View On WordPress
#how to set pyspark_python#how to set python path in pyspark#how to set python version for pyspark#how to update python in pyspark#pyspark#pyspark change python version#pyspark driver python#pyspark executor pythonpath#pyspark python#pyspark python path#switch python in pyspark
0 notes
Text
Python et installation de pip3
Python et installation de pip3
Dans le cadre de l’administration et gestion de parc Windows, j’utilise des outils qui se configure ou utilisent python.
Sous Linux, il n’y a pratiquement rien à faire pour constituer son environnement de développement. Ce n’est pas le cas sous Windows. Je devais installer pip3 et ce n’est pas aussi simple.
(more…)
View On WordPress
0 notes
Text
Mutable Instruments BraidsをDIYする
モジュラーシンセのデジタルオシレータとして人気のBraidsというモジュールがあります。開発元のMutable InstrumentsはBraidsの生産をすでに終了しているのですが、基板やパネルはオープンソースで公開されており、それらを入手してDIYすることが可能です。ということで、DIYしてみました。

Mutable Instrumentsのモジュールの多くは、ハードウェアの設計図やファームウェアのソースコードがGitHubで公開されています。
ファームウェアのライセンスはGPL3.0/MITライセンス、ハードウェアについてはCreative Commons のBY-SA 3.0ライセンスになっており、い���れも商用利用も含む自由な利用/再配布/改変が許可されています。
これによって第三者が勝手に製品を改良したり、改良したものを販売することが可能になっており、実際に第三者による改造ファームウェアなども公開されています。また、Braidsのように生産終了された製品についても第三者が製造を行うことで入手可能になるというメリットもあります。ただしMutable Instrumentsという名称については商標登録されているので第三者が勝手に利用することはできません。また、派生物を流通させる際には名称を変えることが推奨されています。
さて、こういったライセンスで設計図やソースコードが公開されているため、いくつかのネット通販サイトがこれら製品のパネルや基板を作って販売しています。その1つがmagpieという通販サイトです。
このサイトではMutable Instrumentsの各製品の基板やパネルなどが販売されています。また、「micro modular」と名付けられている、Mutable Instrumentsなどのモジュールを独自に小型化した基板やパネルも販売されています。
micro modularシリーズも興味深いのですが、残念ながらBraidsの小型版であるmicroBraidsの基板は売り切れとなっていたため、今回はオリジナルのBraidsと同等の基板(7ドル)と、magpieオリジナルのブラックパネル(33ドル)を注文してみました。ちなみに、とりあえず安く作りたいという方向けにはサンドブラスト仕上げでないパネル(23ドル)や、塗装されていないパネル(8ドル)といった選択肢もあります。送料は8ドルで、合計48ドル。発送は迅速で、1月26日に注文して2月7日に到着しました(普通郵便で郵便受けに入れる形で届きました)。
部品の調達
さて、Mutable Instrumentsの製品は現代のデジタル製品らしく主要部品はほぼ表面実装部品となっています。また、プロセッサ部分は0.5mmピッチ(間隔)で配線されており、組み立て難度はかなり高いと思われます。とはいえ、0.5mmピッチ部品は2点のみなので、半田付けのコツを掴んでそこさえクリアしてしまえば十分DIYは可能です。

部品に関しては秋葉原で入手することは難しいものばかりなので、mouserで注文しました。有志がまとめたMutable Instruments製品のDIY情報スプレッドシートが公開されており、このシート内の「Mouser project」リンクから、必要な部品をまとめてカートに入れられる部品リストページを開くことができます。
このシートには回路図PDFをダウンロードできるリンクも用意されているので、そちらもダウンロードしておきましょう。Eagle(基板エディタソフト)用の基板データファイルへのリンクもあります。 Eagleが利用できるのであれば配線の確認などができるので、こちらもダウンロードしておくと良いかと思います。
なお、自分がチェックした時点ではいくつかの部品が在庫なし/購入不可となっていたため、次の部品は秋月電子で購入できる別のものに置き換えています。どれも一般的な部品であるため、mouser上でも探せば同等製品が入手可能と思います。
トランジスタ MMBT3904LT1G(Q1、Q2、Q3、Q4、Q6) → 2SC3325
チップコンデンサ GRM188F51C474ZA01J(1608サイズ、0.47uF) → 1uFのものに置き換え
チップコンデンサ GRM188R61C104KA01D(1608サイズ、0.1uF) → GRM188F11H104ZA01
チップコンデンサ GRM1885C1H470GA01J(1608サイズ、47pF) → GRM1882C1H470JA01
チップコンデンサ GRM1885C1H180JA01J(1608サイズ、18pF) → GRM1882C1H180JA01
また、チップ抵抗は10個未満だと単価31.5円ですが10個以上だと単価4.4円になるので、チェックして数量を変更しておくと(わずかですが)お得になります。
ボリュームポット(可変抵抗器)と3.5mmフォーンジャックについてはこのリストに入っていないので、別途追加して注文する必要があります。ボリュームポットについてはP0915N-FC15BR10Kを使用しました(必要数量は6)。パネルの穴サイズを見る限り、(未確認ですが)径の大きいALPSの日本製のボリュームポットでも使えそうです。
フォーンジャックはmouserでは取り扱いがないタイプですが、モジュラーシンセ自作では定番のタイプでThonkなどで購入できます(こちらも必要数は6)。また、100個単位でよければAliexpressなどでも購入可能です。

そのほか、ツマミも必要です。適当なものでも良いですし、オリジナルに近いものはThonkで購入できます。
これらも合わせて部品代トータルはおよそ6,000円強となりました。mouserでは6,000円を超えると送料が無料になるので、もし6,000円未満になるようでしたら適当に他のものも合わせ買いして6,000円以上になるよう調整することをオススメします。また、mouserは基本的にUPSでの即日発送なので、発送後2、3日で届きます。
組み立て
組み立て作業はプロセッサの半田付けがやや大変ですが、それ以外は表面実装部品の扱いに慣れていればそこまで難しくはありません。とはいえそれなりに部品点数はあるのでそこそこ作業時間はかかるかと思います。自分の場合、トータルで5、6時間ほどかかりました。

ファームウェアの書き込��
ファームウェア書き込みについてはMutable Instrumentsのフォーラムに情報があります。これによると以下の3種類の方法があるようです。
wavファイルを使った方法
FTDIのUSBシリアル変換器経由
JTAG経由
今回はArduinoのファームウェア書き込みなどでもよく使われる、FTDIのUSBシリアル変換器経由での書き込みを選択しました。FTDIのUSBシリアル変換器は秋月電子で購入できます(980円)。使用時にはスイッチ2を「OFF」にして使用電圧レベルを3.3Vにしておきます。5Vで使うとプロセッサが壊れる可能性が高いので要注意です。
Braidsのファームウェアは、有志によってコンパイルされたものが公開されています。USBシリアル変換器経由で書き込む場合は「braids_bootloader_combo.bin」を使用します。
なお、本来このように誰が公開しているのかよく分からないプログラムをダウンロードして利用することはセキュリティ上問題となる可能性があるため厳禁ですが、Braidsの場合はネットワーク機器ではなく、万が一不正なプログラムであっても与えられる損害は限られるため、あまり気にせずにダウンロードして利用しています。
ファームウェアの書き込みには「stm32loader」というプログラムを使います。
stm32loaderはCUIベースのプログラムなのでターミナルでの操作が必要です。また、別途Pythonも必要となります(macOSならPythonがインストール済みなのでそれを利用可能)。stm32loaderはpipというPython用のパッケージマネージャ経由で入手できます。
macOS 10.12(Sierra)ではそのままではpipが使えなかったので、次のようにしてインストールします(要管理者権限)。
$ curl https://bootstrap.pypa.io/get-pip.py | sudo python
pipをインストールしたら、次のように実行してstm32loaderをダウンロード/インストールします。
$ mkdir -p $HOME/local/lib/python2.7/site-packages $ export PYTHONPATH=$HOME/local/lib/python2.7/site-packages:$PYTHONPATH $ pip install --install-option="--prefix=$HOME/local" stm32loader
これで、~/local/binディレクトリにstm32loaderがインストールされます。また、「~/local/bin/stm32loader -h」と実行することでヘルプを確認できます。
$ ~/local/bin/stm32loader -h
Usage: /Users/***/local/bin/stm32loader [-hqVeuwvrsRB] [-l length] [-p port] [-b baud] [-P parity] [-a address] [-g address] [-f family] [file.bin] -e Erase (note: this is required on previously written memory) -u Unprotect in case erase fails -w Write file content to flash -v Verify flash content versus local file (recommended) -r Read from flash and store in local file -l length Length of read -p port Serial port (default: /dev/tty.usbserial-ftCYPMYJ) -b baud Baud speed (default: 115200) -a address Target address (default: 0x08000000) -g address Start executing from address (0x08000000, usually) -f family Device family to read out device UID and flash size; e.g F1 for STM32F1xx
-h Print this help text -q Quiet mode -V Verbose mode
-s Swap RTS and DTR: use RTS for reset and DTR for boot0 -R Make reset active high -B Make boot0 active high -u Readout unprotect -P parity Parity: "even" for STM32 (default), "none" for BlueNRG
Example: /Users/***/local/bin/stm32loader -e -w -v example/main.bin
stm32loaderの準備ができたら、まずBraidsを電源に接続し、その上で基板左側の「SYSBOOT」ボタンを押しながら「RESET」ボタンを押します。これでファームウェアへの書き込みが可能になるので、続いてUSBシリアル変換器を接続します。基板背面に直線上に並んでいる6ピンヘッダが変換器の接続端子です。基板上に書かれている「GND」と変換器の「GND」が一致する方向に接続します。

変換器を接続したら、次のようにコマンドを実行します。
$ ~/local/bin/stm32loader -V -p /dev/tty.usbserial-A1032GES -b 115200 -e -v -w braids_bootloader_combo.bin
なお、「/dev/tty.usbserial-A1032GES」の部分は環境によって変わりますが、macOS環境であれば「/dev/tty.usbserial-」まで入力してTabキーを押すと適切に補完されるはずです。

書き込み・検証が終わったら、再度「RESET」ボタンを押します。問題なければLED部分に「CSAW」と表示され、オシレータとして利用できる状態になります。

3 notes
·
View notes
Text
How to Fix ModuleNotFoundError and ImportError
How to Fix ModuleNotFoundError and ImportErrorDo proper module imports and make your life easierGiorgos Myrianthous5 min read·tl;drUse absolute importsAppend your project’s root directory to PYTHONPATH — In any environment you wish to run your Python application such as Docker, vagrant or your https://towardsdatascience.com/how-to-fix-modulenotfounderror-and-importerror-248ce5b69b1c
0 notes
Text
Once upon a time in a land far away and long ago, there was a princess who lived in a tall castle that reached the clouds. She had everything she could possibly dream of, she had rooms of gold and pearl, dresses of ivory, a mirror that spoke to her when she woke up and maidservants who bathed her feet in lilac rose water every night and brushed her silken hair. But she was deeply unsatisfied with a life of boredom and leisure.
One day, when she was looking out her tall tower window, she saw a flicker of movement and found it to be a wise owl, flying high. She called to the bird and beseeched it to tell her what to do to fulfill herself. ‘You must do the hardest thing you possibly can think of, but it will be the absolute last thing that you do’, the owl murmured in her ear before it flew away and left the door to her tower open.
The princess, intrigued, put on a travel cloak so no one would recognize her, started to descend from the castle and, sneaking past the throne room and the bustling kitchens, and, with a light touch, walked out of the castle door, which she had never passed in her life. She paused for a moment on the threshold, and then set off down the dusty path leading out of the valley and into the highlands.
The princess travelled long and far and saw and did many hard things. She traversed mountains and escaped the trolls that lived there. She feasted with werewolves during full moons and suffered famine so clenching in the desert she was only moments from death. She met a boy and loved him and lost him and she though that was the hardest until she found him again, and she and the boy traveled together.
When she came to the floating market city, the girl had been traveling for two years, her face lined with sun and wind. She no longer considered herself a princess, and she thought she had done every hard thing there had been to do in the wide world, but a small, wizened woman beckoned her with a crooked finger to her stall. The girl looked back at the boy, hesitant, and he motioned that he would wait for her, unsheathing his sword slightly.
The girl walked into the stall, which as if by magic expanded into a dark corridor with flickering lamps lighting the way. She followed the woman in awed silence.
‘Girl, you know why you were called here,’ the crone said.
‘Yes, I think I do,’ the girl said in anticipation. ‘This is the hardest thing I will have to do. And then I can live with Soren in peace in my valley.And so I shall. For I have experienced many sorrows and I am weary.’
‘Yes,’ the crone said, beckoning her to a glowing light. A dim computer screen flickered. ‘If you can install Python on this Mac machine correctly on the first try and activate a virtualenv for me to use without having to flush my zshrc, reset PYTHONPATH or reload homebrew, I will free you.’
The girl stood a long time looking at the crone, then at the machine. Finally she said, ‘Yeah sorry I think I’m just gonna keep traveling and encountering hardships’ and left the old crone behind, alone looking sadly at her terminal.
0 notes
Text
The linux suffering
Na itt van ez a fasza kis python command line alkalmazás, teszek bele billentyűzetről vezérelhető funkcionalitást
pip install keyboard
import keyboard
Nem megy
Ja, a default python verzióhoz települt, nem baj
python3.11 -m pip install keyboard
Jaaj hát ehhez a verzióhoz nincs még pip telepítve
Oké telepítem, keyboard package-et is
Indítom: hát, ahhoz, hogy a keyboard package menjen, rootnak kell lenni
Ffffffffuuu
Ok, sudo python3.11 main.py
keyboard package not found
.....
sudo módban nincs benne a PYTHONPATH te hüje
Rendben, beleteszem a plusz sort a sudoersbe
Megy
Egyszer, aztán megint nem
FUCK
1 note
·
View note
Link
0 notes
Text
top 5 Python Modules Explained in detail?
Top 5 Python Modules Explained in Detail
Python is a powerful programming language with many capabilities. In this article, we will explore the top 5 Python modules in detail. From the basics of importing modules to more advanced concepts like using the "inspect" module, we will equip you with the knowledge you need to get started using Python modules.
The “import” statement
Python's "import" statement is one of the most important features of the language. It allows you to import modules, which are collections of functions and variables that can be used in your program.
The import statement is usually the first line of code in a Python program. It is also one of the most common places where errors occur.
When you use the import statement, Python looks for the module in several places. The first place it looks is in the same directory as the file containing the import statement. If it doesn't find the module there, it looks in any directories listed in the PYTHONPATH environment variable. Finally, if all else fails, it looks in the standard library directory.
Once Python finds the module, it executes its code. This can have side effects, such as creating new variables or functions. You should be careful about what names you use when importing modules because you might overwrite existing variables or functions with the same name.
The “from…import” statement
Python's "from...import" statement is one of the most important features of the language. It allows you to import modules, classes, functions, and variables from other Python modules into your current module.
The "from...import" statement has a few different forms. The most common form is import X, which imports module X into your current module. You can also use import X as Y to give module X a different name (Y) in your current module.
You can also import multiple modules at once using the "from...import" statement. For example, you could use from A import B, C to import both module A and module C into your current module.
Finally, you can also use the "from...import *" form to import all public names from a module into your current module. This form should be used sparingly, as it can lead to name collisions between the names in your current module and the names in the imported module.
The “dir()” function
The "dir()" function is one of the most important functions in Python. It is used to find out the names of all the modules, functions, and objects defined in a given module. It can also be used to find out the source code of a given module.
The globals() and locals() functions
Python provides two very useful functions for determining the namespaces currently in scope: globals() and locals(). By calling these functions, you can inspect what names are available in each namespace. This can be very helpful when debugging code or working with unfamiliar code.
The globals() function returns a dictionary of all the global variables currently in scope. The keys of this dictionary are the variable names and the values are the corresponding values. For example, if you have a global variable named foo with a value of 42, calling globals() will return {'foo': 42}.
The locals() function works similarly to globals(), but it returns a dictionary of all the local variables currently in scope. So if you have a local variable named bar with a value of 43, calling locals() will return {'bar': 43}.
One important thing to keep in mind is that both globals() and locals() return copies of the actual namespace dictionaries. That means that modifying the dictionary returned by either function will not modify the namespace itself.
The reload() function
Python's reload() function is extremely useful for developers. It allows you to reload a module to make changes to it without having to restart the interpreter. This can save you a lot of time, especially when you're working on large projects.
The reload() function works by taking a module and loading it again. This effectively "refreshes" the module, allowing any changes that have been made to be reflected immediately. Keep in mind, however, that reload() will only work on modules that have already been imported. So if you're making changes to a module that hasn't been imported yet, you'll need to use importlib.reload().
importlib.reload() works in the same way as reload(), but it can be used on modules that haven't been imported yet. This can come in handy if you're working on a project with multiple modules and you want to test your changes before committing them.
Overall, the reload() function is a valuable tool for Python developers. It allows you to make changes to modules without having to restart the interpreter, which can save you a lot of time.
Conclusion
Python is a versatile language that you can use for building all sorts of applications. In this article, we've looked at some of the top Python modules that you should know about in 2023. This list is by no means exhaustive, but it should give you a good starting point if you're looking to learn more about Python and what it has to offer.
Further, if you are looking to build a career in the software or web development domain, Skillslash is just the solution you might need. It provides a comprehensive Full Stack Developer Course, where you will learn from industry experts, receive 1:1 sessions for personalized attention and get your doubts solved in real-time, work with a top AI firm on 8+ industry-specific projects in 6+ domains, and receive unlimited job referrals and interview and resume prep from the Skillslash team to get you placed in big MNCs [specifically in one of the F(M)AANG companies]. Skillslash also has in store, exclusive courses like Data Science Course In jaipur and Data Structure and Algorithm and System Design Course to ensure aspirants of each domain have a great learning journey and a secure future in these fields.
Sounds amazing, doesn't it? Contact the student support team today to know more about the program and how it can benefit you.
0 notes
Text
python – PYTHONPATH on Linux
1) PYTHONPATH is an environment variable which you can set to add additional directories where python will look for modules and packages. e.g.:
# make python look in the foo subdirectory of your home directory for # modules and packages export PYTHONPATH=${PYTHONPATH}:${HOME}/foo
Here I use the sh syntax. For other shells (e.g. csh,tcsh), the syntax would be slightly different. To make it permanent, set the variable in your shells init file (usually ~/.bashrc).
2) Ubuntu comes with python already installed. There may be reasons for installing other (independent) python versions, but Ive found that to be rarely necessary.
0 notes
Text
Top 5 Python Modules Explained in Detail

Python is a powerful programming language with many capabilities. In this article, we will explore the top 5 Python modules in detail. From the basics of importing modules to more advanced concepts like using the "inspect" module, we will equip you with the knowledge you need to get started using Python modules. The “import” statement Python's "import" statement is one of the most important features of the language. It allows you to import modules, which are collections of functions and variables that can be used in your program.
The import statement is usually the first line of code in a Python program. It is also one of the most common places where errors occur.
When you use the import statement, Python looks for the module in several places. The first place it looks is in the same directory as the file containing the import statement. If it doesn't find the module there, it looks in any directories listed in the PYTHONPATH environment variable. Finally, if all else fails, it looks in the standard library directory.
Once Python finds the module, it executes its code. This can have side effects, such as creating new variables or functions. You should be careful about what names you use when importing modules because you might overwrite existing variables or functions with the same name. The “from…import” statement Python's "from…import" statement is one of the most important features of the language. It allows you to import modules, classes, functions, and variables from other Python modules into your current module.
The "from…import" statement has a few different forms. The most common form is import X, which imports module X into your current module. You can also use import X as Y to give module X a different name (Y) in your current module.
You can also import multiple modules at once using the "from…import" statement. For example, you could use from A import B, C to import both module A and module C into your current module.
Finally, you can also use the "from…import *" form to import all public names from a module into your current module. This form should be used sparingly, as it can lead to name collisions between the names in your current module and the names in the imported module. The “dir()” function The "dir()" function is one of the most important functions in Python. It is used to find out the names of all the modules, functions, and objects defined in a given module. It can also be used to find out the source code of a given module. The globals() and locals() functions Python provides two very useful functions for determining the namespaces currently in scope: globals() and locals(). By calling these functions, you can inspect what names are available in each namespace. This can be very helpful when debugging code or working with unfamiliar code.
The globals() function returns a dictionary of all the global variables currently in scope. The keys of this dictionary are the variable names and the values are the corresponding values. For example, if you have a global variable named foo with a value of 42, calling globals() will return {'foo': 42}.
The locals() function works similarly to globals(), but it returns a dictionary of all the local variables currently in scope. So if you have a local variable named bar with a value of 43, calling locals() will return {'bar': 43}.
One important thing to keep in mind is that both globals() and locals() return copies of the actual namespace dictionaries. That means that modifying the dictionary returned by either function will not modify the namespace itself. The reload() function Python's reload() function is extremely useful for developers. It allows you to reload a module to make changes to it without having to restart the interpreter. This can save you a lot of time, especially when you're working on large projects.
The reload() function works by taking a module and loading it again. This effectively "refreshes" the module, allowing any changes that have been made to be reflected immediately. Keep in mind, however, that reload() will only work on modules that have already been imported. So if you're making changes to a module that hasn't been imported yet, you'll need to use importlib.reload().
importlib.reload() works in the same way as reload(), but it can be used on modules that haven't been imported yet. This can come in handy if you're working on a project with multiple modules and you want to test your changes before committing them.
Overall, the reload() function is a valuable tool for Python developers. It allows you to make changes to modules without having to restart the interpreter, which can save you a lot of time. Conclusion Python is a versatile language that you can use for building all sorts of applications. In this article, we've looked at some of the top Python modules that you should know about in 2023. This list is by no means exhaustive, but it should give you a good starting point if you're looking to learn more about Python and what it has to offer.
Further, if you are looking to build a career in the software or web development domain, Skillslash is just the solution you might need. It provides a comprehensive Full Stack Developer Course, where you will learn from industry experts, receive 1:1 sessions for personalized attention and get your doubts solved in real-time, work with a top AI firm on 8+ industry-specific projects in 6+ domains, and receive unlimited job referrals and interview and resume prep from the Skillslash team to get you placed in big MNCs [specifically in one of the F(M)AANG companies]. Skillslash also has in store, exclusive courses like Data Science Course In gurgoan and Data Structure and Algorithm and System Design Course to ensure aspirants of each domain have a great learning journey and a secure future in these fields.
Sounds amazing, doesn't it? Contact the student support team today to know more about the program and how it can benefit you.
0 notes
Text
Top 5 Python Modules Explained in Detail

Python is a powerful programming language with many capabilities. In this article, we will explore the top 5 Python modules in detail. From the basics of importing modules to more advanced concepts like using the "inspect" module, we will equip you with the knowledge you need to get started using Python modules.
The “import” statement
Python's "import" statement is one of the most important features of the language. It allows you to import modules, which are collections of functions and variables that can be used in your program.
The import statement is usually the first line of code in a Python program. It is also one of the most common places where errors occur.
When you use the import statement, Python looks for the module in several places. The first place it looks is in the same directory as the file containing the import statement. If it doesn't find the module there, it looks in any directories listed in the PYTHONPATH environment variable. Finally, if all else fails, it looks in the standard library directory.
Once Python finds the module, it executes its code. This can have side effects, such as creating new variables or functions. You should be careful about what names you use when importing modules because you might overwrite existing variables or functions with the same name.
The “from…import” statement
Python's "from...import" statement is one of the most important features of the language. It allows you to import modules, classes, functions, and variables from other Python modules into your current module.
The "from...import" statement has a few different forms. The most common form is import X, which imports module X into your current module. You can also use import X as Y to give module X a different name (Y) in your current module.
You can also import multiple modules at once using the "from...import" statement. For example, you could use from A import B, C to import both module A and module C into your current module.
Finally, you can also use the "from...import *" form to import all public names from a module into your current module. This form should be used sparingly, as it can lead to name collisions between the names in your current module and the names in the imported module.
The “dir()” function
The "dir()" function is one of the most important functions in Python. It is used to find out the names of all the modules, functions, and objects defined in a given module. It can also be used to find out the source code of a given module.
The globals() and locals() functions
Python provides two very useful functions for determining the namespaces currently in scope: globals() and locals(). By calling these functions, you can inspect what names are available in each namespace. This can be very helpful when debugging code or working with unfamiliar code.
The globals() function returns a dictionary of all the global variables currently in scope. The keys of this dictionary are the variable names and the values are the corresponding values. For example, if you have a global variable named foo with a value of 42, calling globals() will return {'foo': 42}.
The locals() function works similarly to globals(), but it returns a dictionary of all the local variables currently in scope. So if you have a local variable named bar with a value of 43, calling locals() will return {'bar': 43}.
One important thing to keep in mind is that both globals() and locals() return copies of the actual namespace dictionaries. That means that modifying the dictionary returned by either function will not modify the namespace itself.
The reload() function
Python's reload() function is extremely useful for developers. It allows you to reload a module to make changes to it without having to restart the interpreter. This can save you a lot of time, especially when you're working on large projects.
The reload() function works by taking a module and loading it again. This effectively "refreshes" the module, allowing any changes that have been made to be reflected immediately. Keep in mind, however, that reload() will only work on modules that have already been imported. So if you're making changes to a module that hasn't been imported yet, you'll need to use importlib.reload().
importlib.reload() works in the same way as reload(), but it can be used on modules that haven't been imported yet. This can come in handy if you're working on a project with multiple modules and you want to test your changes before committing them.
Overall, the reload() function is a valuable tool for Python developers. It allows you to make changes to modules without having to restart the interpreter, which can save you a lot of time.
Conclusion
Python is a versatile language that you can use for building all sorts of applications. In this article, we've looked at some of the top Python modules that you should know about in 2023. This list is by no means exhaustive, but it should give you a good starting point if you're looking to learn more about Python and what it has to offer.
Further, if you are looking to build a career in the software or web development domain, Skillslash is just the solution you might need. It provides a comprehensive Full Stack Developer Course in Mumbai, where you will learn from industry experts, receive 1:1 sessions for personalized attention and get your doubts solved in real-time, work with a top AI firm on 8+ industry-specific projects in 6+ domains, and receive unlimited job referrals and interview and resume prep from the Skillslash team to get you placed in big MNCs [specifically in one of the F(M)AANG companies]. Skillslash also has in store, exclusive courses like Data Science Course In Kolkata and Data Structure and Algorithm and System Design Course to ensure aspirants of each domain have a great learning journey and a secure future in these fields.
Sounds amazing, doesn't it? Contact the student support team today to know more about the program and how it can benefit you.
0 notes
Text
Jupyterlab vs vscode

#Jupyterlab vs vscode code
In 2001 Fernando Pérez was quite dissatisfied with the capabilities of Python’s interactive prompt compared to the commercial notebook environments of Maple and Mathematica which he really liked. This will also clarify the confusion people sometimes have over IPython, Jupyter and JupyterLab notebooks. In this blog post I will introduce several best practices and techniques that will help you to create notebooks which are focused, easy to comprehend and to work with.īefore we get into the actual subject let’s take some time to understand how Project Jupyter evolved and where it came from. Notebooks that need you to tamper with the PYTHONPATH or to start Jupyter from a certain directory for modules to import correctly. Also sharing these notebooks is quite often an unnecessary pain. In strong contrast to this, and actually more often to find in practise, are notebooks with cells containing pages of incomprehensible source code, distracting you from the actual analysis.
#Jupyterlab vs vscode code
Notebooks that are beautifully designed and perfectly convey ideas and concepts by having the perfect balance between text, code and visualisations like in my all time favourite Probabilistic Programming and Bayesian Methods for Hackers. But as Pythagoras already noted “If there be light, then there is darkness.” and with Jupyter notebooks it’s no difference of course.īeing in the data science domain for quite some years, I have seen good but also a lot of ugly. Due to this unique characteristic, Jupyter notebooks have achieved a strong adoption particularly in the data science community. This combination makes it extremely useful for explorative tasks where the source code, documentation and even visualisations of your analysis are strongly intertwined. Python and R, as well as rich text elements like paragraphs, equations, figures, links, etc. In a nutshell, a notebook is an interactive document displayed in your browser which contains source code, e.g. If you have ever done something analytical or anything closely related to data science in Python, there is just no way you have not heard of Jupyter or IPython notebooks.
0 notes