#Printing Rubber Rollers
Text
0 notes
Link
0 notes
Text
ok i love how my prints turned out and i tried it on watercolor paper as well and it adds a nice texture if i want it
#i mostly have watercolor paper it's the only thichk paper i have#but the smoother side ks good for printing#i do have one huge sheet of paper for print making specifically#but i have no way to cut it well....#can you tell i don't think things through ahdjlj#using a sponge was pretty good for the ink application but it is much quicker to use a roll so i'll invest in one#my mom had some picture frames lying around so i can jse the glass of one to spread out the int with the roller i think#if it isn't fragile glass.....#it shouldn't be lol#anyways. making postcards will be soo much fun#and i'll get linoleum sheets bc that ks much cleaner to work with than these rubber blocks#they create soo much dust it's rly annoying#and the edges of the cuts aren't clean either#anyways. thos is really fun!#and i like that i can make one stamp and then get a picture whenever i want skhkdlj
2 notes
·
View notes
Text
Online Largest Printing Rubber Rollers exporter in Gujarat, India
As the digital age continues to transform industries, Ambica Rubber Industries proudly emerges as the online largest printing rubber rollers exporter in Gujarat, India. With a rich legacy of excellence and innovation, we offer a comprehensive range of high-quality rollers to meet the diverse needs of printing businesses. Whether you're a wholesaler, supplier, or end-user, our commitment to quality and customer satisfaction sets us apart as the preferred choice for printing rubber rollers.
Crafting Precision: Ambica Rubber Industries' Commitment to Quality Printing Rubber Rollers At Ambica Rubber Industries, we take pride in crafting printing rubber rollers with precision and expertise. Our rollers are manufactured using the finest quality rubber materials and state-of-the-art machinery, ensuring superior performance and durability. With our strict quality control measures, we guarantee that every roller meets the highest standards of excellence, delivering exceptional printing results with every use.
Exporting Excellence: Ambica Rubber Industries as Your Largest Printing Rubber Roller Exporter As the largest exporter of printing rubber rollers in Gujarat, Ambica Rubber Industries caters to clients worldwide, delivering premium-quality products that meet international standards. Our online platform offers unparalleled convenience and accessibility, allowing customers to browse through our extensive product catalog and place orders with ease. With our efficient shipping and logistics solutions, we ensure timely delivery to any location, making us the preferred choice for businesses seeking reliable printing rubber rollers.
Wholesaling Excellence: Ambica Rubber Industries as Your Printing Rubber Roller Wholesaler Ambica Rubber Industries also operates as a leading wholesaler of printing rubber rollers, serving businesses of all sizes across Gujarat and beyond. Our extensive product range includes rollers for various printing applications, from offset and flexographic to gravure and digital printing. Whether you're a printing press, packaging company, or label manufacturer, we have the expertise and resources to meet your roller needs with professionalism and efficiency.
Supplying Excellence: Ambica Rubber Industries as Your Printing Rubber Roller Supplier As a trusted supplier of printing rubber rollers, Ambica Rubber Industries is committed to meeting the diverse needs of our clients in Gujarat and beyond. Our dedicated team works closely with customers to understand their specific requirements and provide tailored solutions to meet their needs. With our efficient supply chain management and commitment to customer satisfaction, we strive to be the preferred supplier for businesses seeking premium printing rubber rollers in Gujarat, India.
Customer-Centric Approach: Your Satisfaction, Our Priority At Ambica Rubber Industries, customer satisfaction is at the core of everything we do. We understand the importance of providing reliable service and superior products to our clients, and we go above and beyond to exceed their expectations. Our friendly and knowledgeable team is always available to assist customers with their inquiries and provide expert advice on roller selection, usage, and maintenance. Whether you're a long-standing client or a new customer, you can trust Ambica Rubber Industries to deliver exceptional printing rubber rollers with professionalism and integrity.
Promoting Innovation: Ambica Rubber Industries' Mission Ambica Rubber Industries is more than just a printing rubber roller exporter – we are passionate about driving innovation in the printing industry. We invest in research and development to stay ahead of industry trends and technological advancements, continuously improving our products to meet the evolving needs of our customers. By offering cutting-edge printing solutions, we aim to empower businesses to achieve greater efficiency and productivity in their printing processes.
Conclusion: Ambica Rubber Industries - Your Trusted Partner for Printing Rubber Rollers In Gujarat, India, Ambica Rubber Industries stands as the largest exporter of premium quality printing rubber rollers, offering excellence, reliability, and innovation with every product. Whether you're a wholesaler, supplier, or end-user, partner with us today and experience the difference that Ambica Rubber Industries can make in your printing operations.
0 notes
Note
Does your 1219 have a nickname?
Also, I was wondering if you have any fun stories surrounding it! Strange quirks it has or anything like that.
I'd love to see more photos if you're allowed to post them!
Thanks for the question! These are my favorite part about my blog by far.
Not exactly, the UNIVAC 1219 doesn’t have a nickname. I did realize recently that I should specify the pronunciation (Twelve-Nineteen), but it doesn’t have any nicknames. Apart from ‘the 1219’, it’s also regularly referred to as the CPU or just ‘the computer’.
Fun stories or weird quirks? Boy, I could fill a book with this machine’s weird quirks (or as we say, intermittent issues), but I’ll try to blitz through the most common ones:
Sometimes the computer will stop running and enter a WAIT mode. No reason, it just needs a break. We can’t fix it, it just has to decide to go back into operating mode.
The computer will often start attempting to communicate on IO channel 13. We’re not telling it to talk to anything, it just decides to try to.
One of our teletypes (the Kleinshmidt) stamps ink splotches into the paper rather than characters most of the time. However, this weekend it worked for the first time in 10 months! We didn’t change anything, it just had an extra cup of coffee or something.
The Digital Data Recorder, or the tape drive, has the most gremlins out of any of our units. The top handler works fairly well, but the bottom handler won’t properly read data, write data, move the tape forward, initialize the tape, or any number of other issues.
There’s more but hopefully this satisfies your curiosity.
Fun stories? Well, I can’t name any specific ones, but I can say it’s a very endearing machine. It’s the very last of its kind and being one of three individuals in the world responsible for it makes every issue that more frustrating. There is no real forum for it, the subject matter experts sit next to me and are often just as exasperated as I am.
But the unique nature of this situation make every successful diagnostic test that much sweeter. Every new addition (5.25” floppy drive via serial) that much cooler. I have an IBM PC-XT clone at home, but I thank my lucky stars every day that this big iron is what I get to specialize in.
As for more photos, I have none that are as grandiose as you would probably expect. I do have my working photos though. I took all my photos when I first started working on it and now I am more dedicated to fixes than photo-ops.
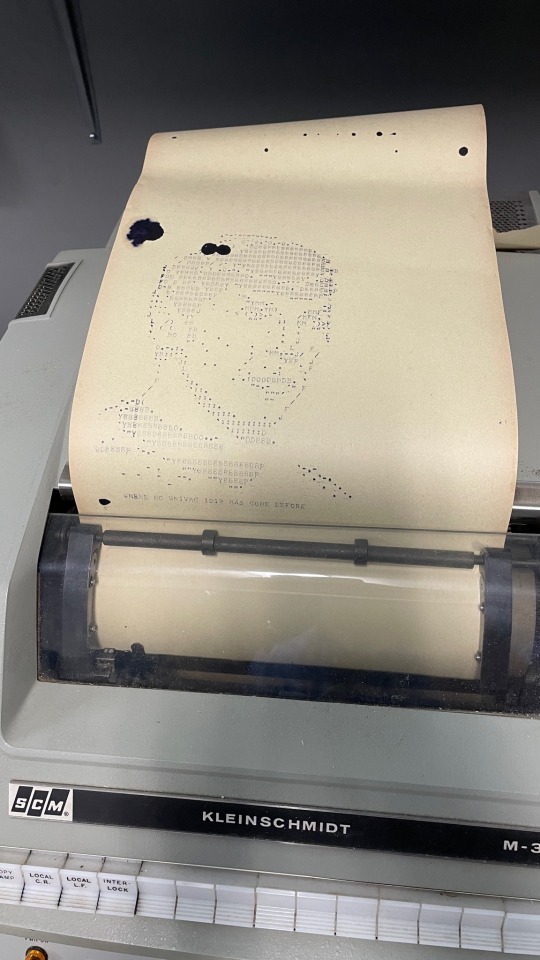
This is a photo of our finicky Kleinshmidt teletype. Still has blotches but it actually printed!
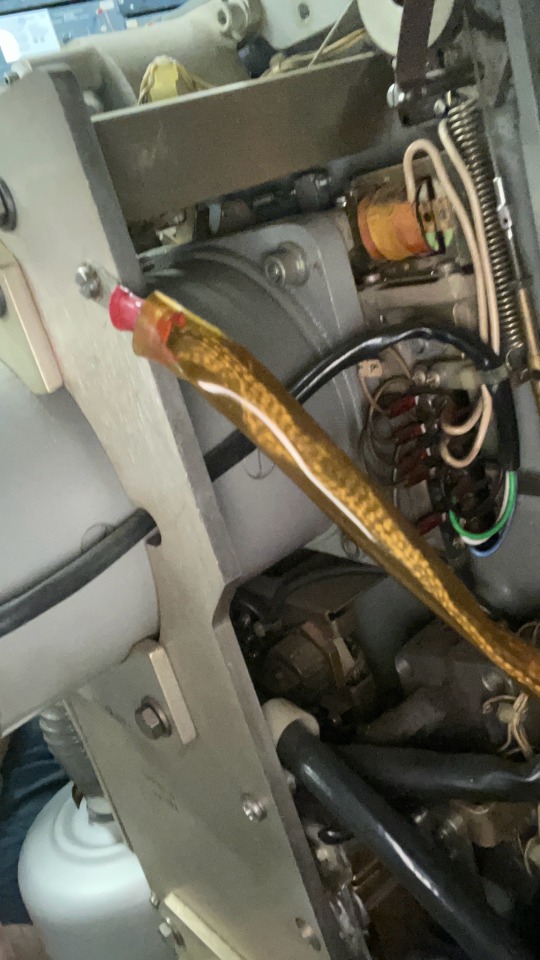
This is the back of the bottom handler. Pictured is the vacuum pump in the bottom left (so sudden stops just yank magnetic tape slack rather than ripping tape). The big cylinder in the center is a motor for running the magnetic tape handler itself. The big black ‘hose’ of wires coming out of the steel plate contains all the cables that come right off the handler’s head for reading and writing data!
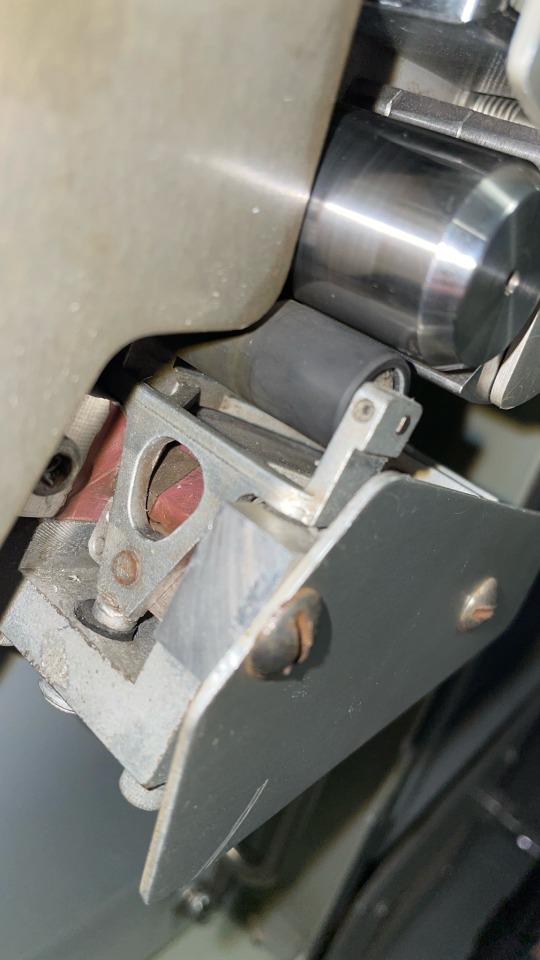
This is the forward pinch roller of the bottom handler. It was replaced after this photo was taken as you can see the rubber has deteriorated in the 55 years this machine has been operating.
As for being allowed to post photos, that’s not an issue. The last 1219 was decommissioned in 2014 and now you can find all of its documentation online at http://www.bitsavers.org/pdf/univac/military/1219/
#vintagecomputing#mainframe#antiquetech#digitalarchaeology#navy#new jersey#oldtechnology#retrotech#tech#univac#new blog#computerarchaeology#computerhistory#old technology#old computers#vintagehardware#classiccomputing#technology#retro tech#big iron#computer
59 notes
·
View notes
Note
heey i have a band and want to make tshirts to sell at our next show, do you have any easy/cheap diy ideas that look nice? silkscreening is too expensive, and i'm not shure if a stencil + fabric paint would stand the test of time...
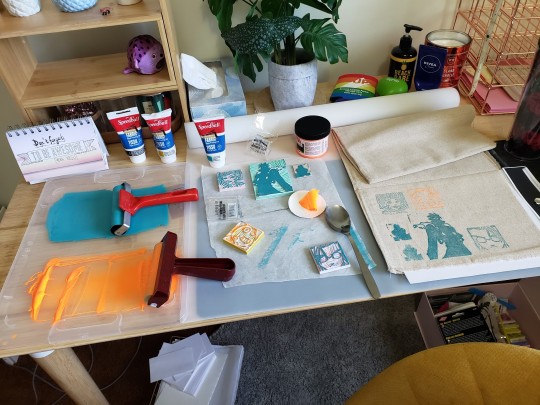
Okay this craft is thin foam board paper, cardboard, and hot glue, super glue if u can whateever to get that down.
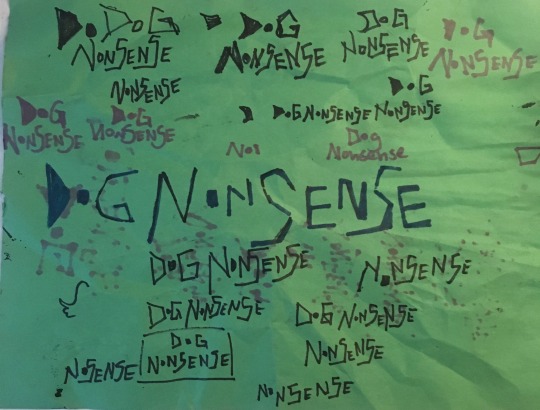
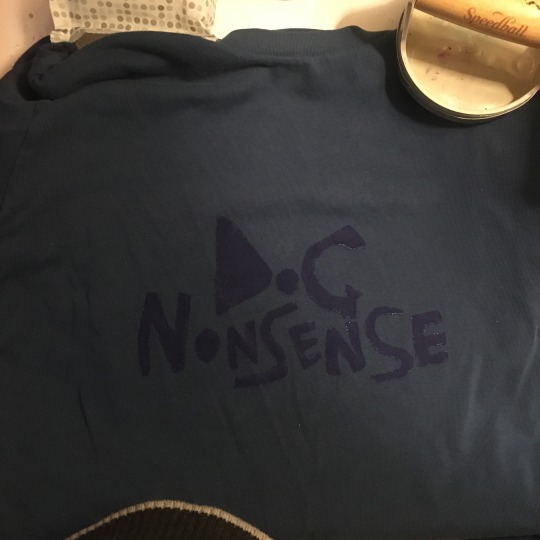
First draw the design you want on the tshirt. Make it simple enough you can cut it out with scissors. Here im drawing out the words again and again playing with making each letter a solid shape with no holes, playing with letter sizes and fonts, trying to draw it smaller and bigger to see how it feels.
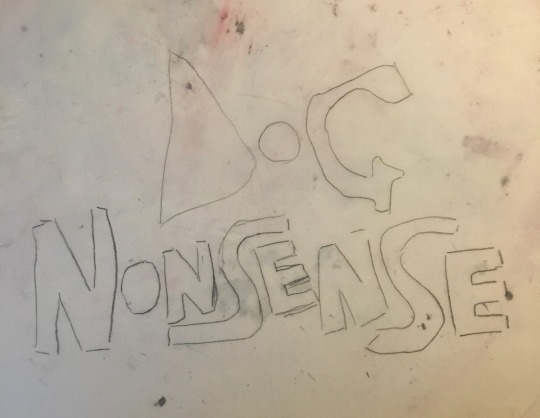
Then the finalised logo and size is done in tracing paper so it can be flipped :3 u can also use white paper, flip it, then shine your phone light under it, and draw the logo on the otherside. i just find havi a reference to work off of and getting familiar with the shapes your working with helps.
You cut the logo out of the foam board, then place it on the cardboard flipped to make the mirror image of your logo. Glue down all the foam pieces. I fucked up the D in my logo because i glued it on the wrong side. So i just cut it out again in some green foam.
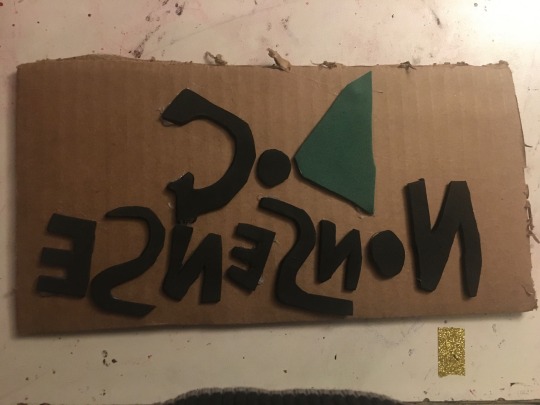
Make sure to cut off the excess cardboard on the edges. Then tada you have a stamp!
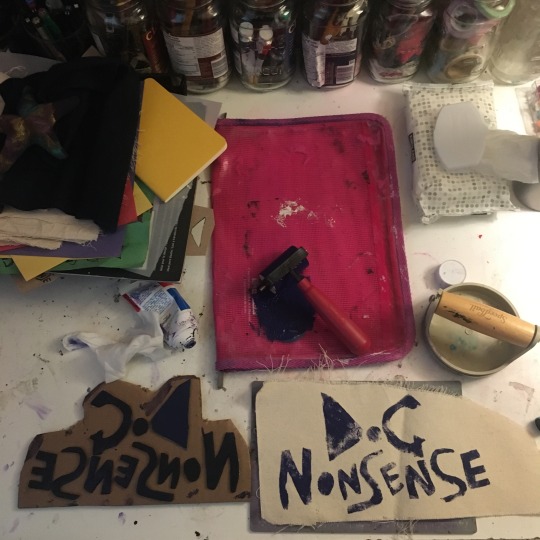
To begin printing with your stamp use a roller to apply fabric paint to it. I personally use speedball fabric ink it is better for rolling onto stamps. The ink stays wet for a long time, applys well to fabric, washs away easy, and it stays better.
I use a rubber speedball roller as well as it applys it evenly. you can definitely diy a roller from a lint roller wrapped in smth. I use an overpriced $40 handle to press down the stamp to fabric. Before i used a heavy mug to press them down.
As you can see by how bad and uneven the color is in the below photo of my first print with the stamp, what really matters is taking your time to apply pressure and your body weight over all of the stamp. And making sure to take your time. It makes the difference in the tshirt print as you can see that i figured out to apply evenly.
If a patch doesnt come out even, you can come back in with a paint brush to fill in the gaps so it looks cleaner, as i did with that patch later.
Good luck with making your tshirts!! I cant wait to start making tshirts myself! So far all ive done is my own clothing but just you wait :3
Also i use wet wipes to try wipe it off. Its not linocut so you cant wash it. So making sure theres no paint on the cardboard before you print is important.
#punk#diy#patches#diy patches#crust punk#folkpunk#folk punk#diy punk#dog nonsense#meme the jester#asks
79 notes
·
View notes
Text

Had my first play around with my new fabric inks. Mixed results and I need to practice more, but its a start. Any suggestions are very welcome.
The turquoise is Speedball Fabric Block printing ink, with a standard rubber roller, hand pressed.
The orange is a Speedball Fabric Screenprinting ink, with soft rubber roller (will be trying with a foam roller next, as yes, the consistency was much more runny and didn't roll well with a rubber roller).
#block printing#linocarving#linoprint#linocut#linoleum#rubber carving#Speedball#Speedball Ink#fabric printing#handmade#carving#relief print#fine art#Trigun#trigun maximum#traditional printing#vintage barbie
58 notes
·
View notes
Note
Hi Ashton, I was wondering if you'll share more about your patch making process? I'd love to start making them for my jackets and I'd love to buy from indie brands like yourself (but I'm in the UK and from what I remember you don't ship outside the US??)
of course!! (i do ship to the UK now, but it is a bit more expensive.) this is great timing bc i’m in the middle of a massive printmaking week >:) i’ll have a BIG shop update early next month!
there are a bunch of different ways to make patches, but mine are linocut prints. it’s a bit of an in-depth process and there are lots of tutorials on every part of it, so i’ll give you kind of an overview! you start with a block of linoleum or, my favourite, speedball carving blocks. you make a design and transfer a reversed version onto the block through a kinda-tedious tracing and transfer paper process, then carve out your design with lino carving tools — essentially little v- or u-shaped blades of different widths attached to a handle. parts you carve are the negative space, whereas parts you leave untouched are the parts of your design that’ll pick up ink. it works like a stamp! once the carving is done, you roll ink onto the block with a brayer (rubber paint-roller-looking thing), and press your stamp onto fabric, paper, or wherever you want it. once it's laid down you apply pressure (some people have big fancy tools for this, i just use the housing that came with my blades). pressure makes sure the ink sticks. then you peel your block off of your material and ta-da, you have a print! repeat as desired for more prints.
it’s definitely a learning curve and a whole process, and not all of it is fun, but i really enjoy it and it’s a relatively cost-effective way to make a lot of prints. if you’re just making patches for yourself, using fabric paint or fabric markers to paint a design or cutting out a stencil to use are less time-intensive options with much less prep work.
i hope this is helpful!! more than happy to answer Qs abt my art process always :))
go make smth rad!
10 notes
·
View notes
Text

#rubber roller#industrial rubber roller manufacturer#printing rubber rollers#printing rubber roller sleeves
0 notes
Text
every time i pull an all nighter i will have this muse of entrepreneurship come down on me and tell me to design a logo for a future store or open up my etsy shop OR GO BUY RUBBER BLOCKS AND INK AND INK ROLLER SO I CAN MAKE PRINTS, AS SOON AS MICHAELS OPENS WHILE I HAVE EXACTLY $20 on my card. lol.
2 notes
·
View notes
Note
Soo, to make the lino types, what kind of eraser did you use? Just the normal rubber kind? And what's the most convenient way to cut them? And what kind of ink to use, a stamp pad or do you dip them?
i bought a 100 pack of standard pink classroom erasers for like 15€, the brand is called Artellius i think. I used lino tools for cutting but it totally also works with a scalpel/craft knife with a sharp blade, the rubber material is way softer than linoleum. For the printing I used linoprint paint applied with a little paint roller but stamp pad ink works just as well, like it did with this little print and a gold stamp pad
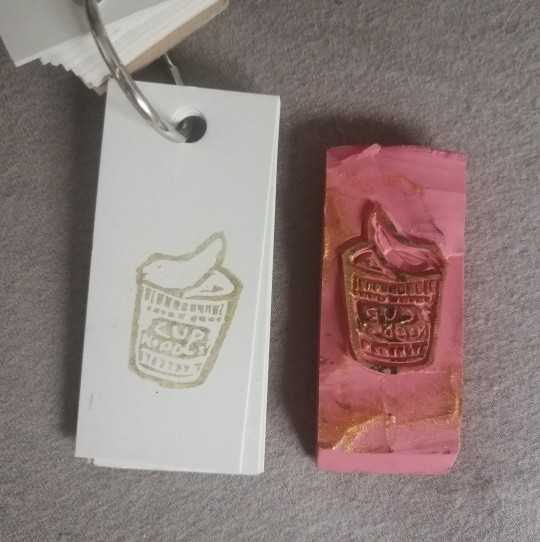
the erasers can be carved double sided and these ones have a usable area of ~5x2.5cm
#i did it with a few friends and one of them had the cool idea that since it's almost cinemascope format you could do tiny film stills#asks
11 notes
·
View notes
Text
Straw Hats crew's preferred Printmaking Mediums

Summary: literally such a self-indulgent thing where I assign everyone a printmaking medium bc I love printmaking + the straw hats
Luffy: Cyanotypes. Doesn't need much diligence, and he finds it fun to collect strange objects or cool elements of nature from different islands to make prints with them. Tried to make a silhouette of meat once by holding it over the cyanotype, but ended up eating it, so it became a print of a bone picked clean.
Zoro: Stone lithography. Means he can use his muscle power carrying the stones and using the big heavy rollers. He can also rely on the natural beauty of wet on wet ink and stuff for nice looking prints since he can't draw well
Nami: Risograph. She likes the colors and the slightly technical side involved with the machine. Easy to mass produce posters and zines.
Ussop: Photography. Likes to photograph nature, different buildings, and sometimes his crewmates. The photo development process is also very fun for him. Sometimes uses Nami’s risograph machine to make colored photos (at a price)
Sanji: Letterpress. With a little diligence he learns to appreciate the art of different fonts and precision involved in the letter work. Treats each print like a dish that must be prepared perfectly.
Chopper: Silkscreen. Also enjoys the colors, and in love with the way layers of ink interact with each other on one surface. Prints t-shirts for everyone in the crew that each has a unique monotype drawing. It’s very endearing.
Robin: Intaglio. Likes how it requires a bit of knowledge about chemicals and markmaking techniques in order to make a fantastic, aesthetically pleasing print. Can get very fine details which is perfect for someone who likes to get “hands on”. With time, she learns to make very good etchings of flowers and such, but actually prefers simple and cute imagery (like what Chopper makes)
Franky: Woodcut relief. Actually so good at this you have no idea. He makes the most beautiful arabesque imagery that would usually decorate the sides of fancy stairwells and ballrooms.
Brook: Linoleum relief. The rubber is flexible and easy to carve into... unlike the bony hands he uses the tools with! It’s a very different art from music, but he finds some enjoyment in it as he can carve illustrations of whatever his heart desires (panties)
Jinbe: Water transfer printing. Requires him to use a more gentle and exact approach to working with water than the techniques he uses to fight, so he enjoys the variation. Gets a hobby of giving all the removable parts of the ship a new colorful coat, making the Sunny look a little clownish from a design point but Luffy likes it so he orders Franky not to touch it.
#I don't have the capacity to draw them doing printmaking so I just wrote it down#your imagination can make the illustrations#one piece#monkey d luffy#vinsmoke sanji#headcanon#roronoa zoro#franky#jinbe#brook#nico robin#nami#tony tony chopper#god usopp#straw hats#headcannons#headcannon
21 notes
·
View notes
Text
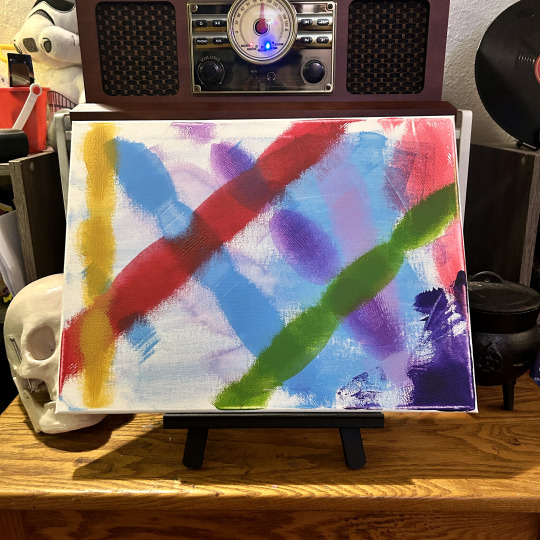

16x12" acrylic on canvas.
I haven't got a whole lot to say about this one, really. It's a pretty simple one, really. Or I don’t know. Maybe it isn’t. I think it’s a pretty simple one, but it’s always these weird little things that seem to do the best when I share them. I did this one with one of the stranger little tools in my collection, because it is a roller, but it’s not a paint roller. I actually have no idea what it is, and I have no idea how it came into my possession. I think it may be for screen printing? Maybe? I’ve never done screen printing, so if that’s the case, who knows how I got it. It’s hard rubber instead of fluff or foam, and mostly just makes a mess, but I like the texture it leaves behind and that’s what I wanted for this piece.
Process write-up on Substack
Prints on InPrnt
Original for sale
3 notes
·
View notes
Note
Hi, I was just wondering what ink you use for linoprinting on fabric? The tote bag prints came out really nice!
Fabric Block Printing ink by Speedbal! It's a bit expensive for a 75 ml bottle (well, which paint isn't expensive) but I've gotten 20 bags out of it at this point and I still have about a quarter left. he bags are linen. The roller I use is a rubber one, to too hard not too soft. And the linolium itself is the classic brown hard one.
It did take me a couple of tries to get it right though. To get coverage like this while not laying the paint on too thick, you need to re-apply the ink in certain places. So the first bags I had the print move a bit so the lines became muddled.
So what I did in the end was inking the lino and laying this down, putting the bag on top entirely, rub the bag with the flat of a wooden spatula, en then I'd pick up half(!) of the bag to check and re-apply paint where needed, put it down, rub again, and then repeated the process with the bottom side of the bag. Because half of the bag was always stuck to the sticky lino the fabric didn't move at all and after that I didn't have a single misprint :)
Fully drying takes 48 hours, I just hang them on a clothesline
#linoprint#printmaking#block printing#artists on tumblr#my work#my regular lino ink is also speedball. The bigger pots you have to scoop ink out of
6 notes
·
View notes
Text


My manager, Jessica, just texted me that all the schools canceled tomorrow. Which sucks but a free, mostly, day off for me. I hope to do lots of quilting and knitting. And I still am working tomorrow night unless something changes. So I'm pretty happy. And honestly I hope the weather is interesting. That would make me happy.
Today was pretty good though. I wasn't feeling great for a lot of it honestly. I was stressed about my meeting with Jessica with the national guard. I spoke to so many Jessica's today. Honestly it's hilarious.
But besides my fears about that meeting, mostly about not knowing where to park, I had a good day.
I woke up at 7. James was sitting in bed with me. It's nice seeing them without their sling. And while they are hurting they are trying very hard to stretch and start building up some muscles.
I got washed and dressed and felt very cozy. I should have worn a coat today, as it was much colder, but I did not. But it was fine. We left and James drove us.
They are having trouble getting their arm to move upwards, apparently it feels like rubber bands, super tensioned. But I'm very proud of them for trying. They got me breakfast and we went to work.
I was an hour early. So I would eat and chill in the back. Jim came and we talked about Christmas stuff. He says all he really wants are printed photos of his grandkids and kids all framed. I thought that was very sweet.
And it was a fun day. We had a Christian private school and the kids were so cute in their uniforms. The saddle shoes and the cardigans and little ties. Just so sweet.
And it was such small classes. I had the 4th graders and there were only 7 of them. We love a low ratio.
They were also so super sweet. They had notebooks and took notes the whole time. Their teacher was an older man and he was great, they obviously respected him a ton. And he had great points to add throughout the tour. I think I gave a pretty good tour and tried to really focus on dates and numbers and spelled words I thought would be useful for their projects. They are going to write reports on things that made them interested. And so when they seemed excited I would expand on things. We were supposed to hit 5 galleries because they came early but we didn't even need that in the end. I was able to end my tour at the ring of fire, where John's older kids joined me, and then they were off to lunch.
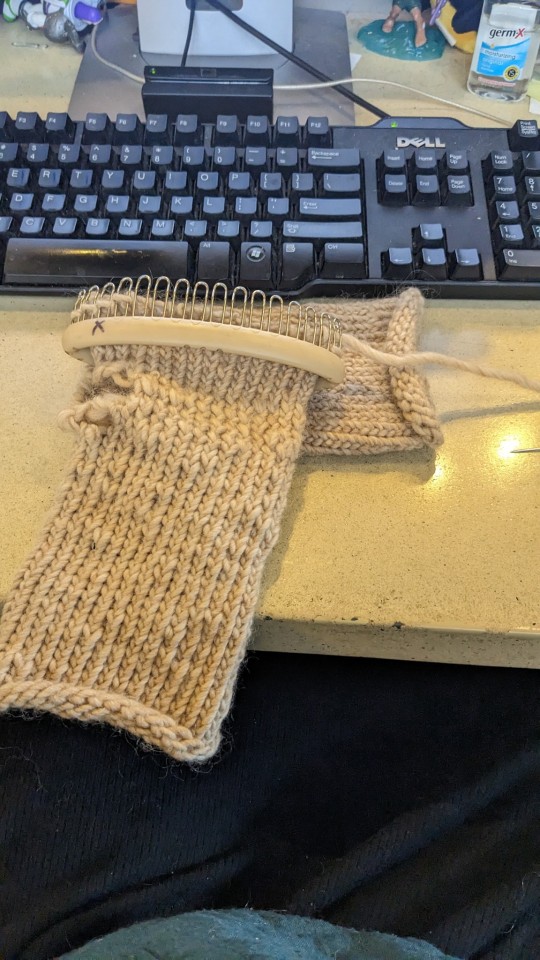
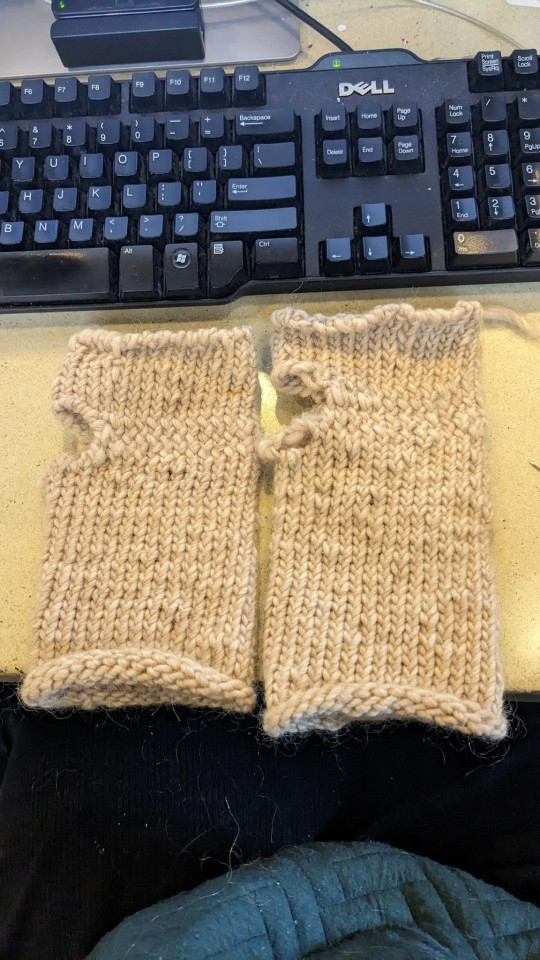
After lunch O'Malley and my groups came together for a scavenger hunt. And I worked on my glove. Which I realized was slightly longer the the first glove. Thankfully not by a ton but annoying. I have to finish the edges but I'm excited anyway.
And at the end of the scavenger hunt a 3rd and a 4th grade group got 8 of the 11 questions correct and got to pick prizes. Erasers and buttons and marbles. I love how excited they get about my silly little prize box.
I took my group to the restoration classroom and we did the roller coaster project. Their teacher required that they draw out and label their rollercoaster in their notebook first. Which is fine by me. It was fun. And they did such a good job. I built my example and they loved trying that and then building their own. Though it was very funny when the teacher was like yeah that looks nice but it won't work!! And then it did and he was like. What!!!! Amazing!!
Once we were done and cleaned up they got to sit in the car. We had to wait for O'Malley's group to be done but that was alright. And then to the gift shop.
I made sure I said goodbye to everyone. The kids told me they had so much fun and that I was the best. What sweethearts.
I went to clean up the classroom and put things away. And soon I would join James in the back office. They brought me a donut. And the I went to take over the front desk.
Which was mostly good except someone came to buy something in the case and I could not figure out how to scan it in and James had to leave their meeting to come save me and I felt very dumb. But the lady was really nice and I suggested she check out Avam's giftshop since she was in the area. I hope she does cause her vibe made me think she would like it.
I finished up my glove. And no one else came in and soon I was able to leave. To go to the armory and meet with Jessica.
I was nervous. I took the long way. But was still early. Not a huge deal. The security guard was nice. And Jessica met me at the door.
The meeting went well. I am getting paid more then my regular workshop rate. I bought all the materials while I was there. We discussed what they had and what I might need. And I told them about my teddy bear workshop and they may be interested in running on as well!! So that's really cool. I felt like a real professional artist.
I was excited to go home. I was a little confused about how to get out of the parking lot but that was fine in the end. And I got home and changed into a different sweatshirt. And laid on the couch to wait for James to come home.
They would get back here and make dinner. And after dinner they ride their stationary bike and I worked in my studio. Half way down my large quilt squares.
I would go lay down after an hour or so. And James took a shower. I heard them go "oh no oh no!" And I'm like what?? Thinking something was wrong with their arm. But actually their new earrings was missing. They are pretty disappointed. But I gave them the other gold hoop I have so now we can match and I think it looks so cute on them. And who knows, maybe the other one will show up. It's a low change but not none.
Now we are in bed. James painted their nails. I took a bubble bath. And now I don't have to wake up early. I hope I have a productive art day. And have a fun event tomorrow evening.
I hope you all sleep great tonight. Stay safe if you are affected by the storm! Goodnight!!
3 notes
·
View notes
Photo

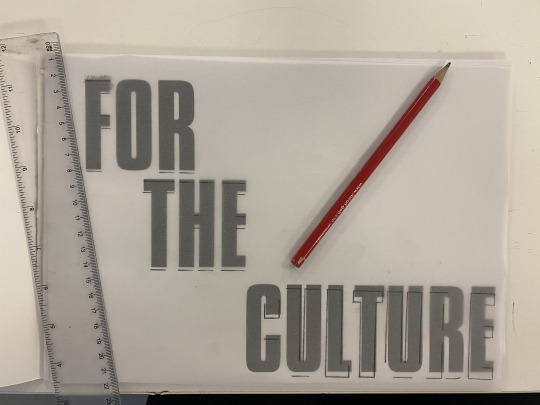

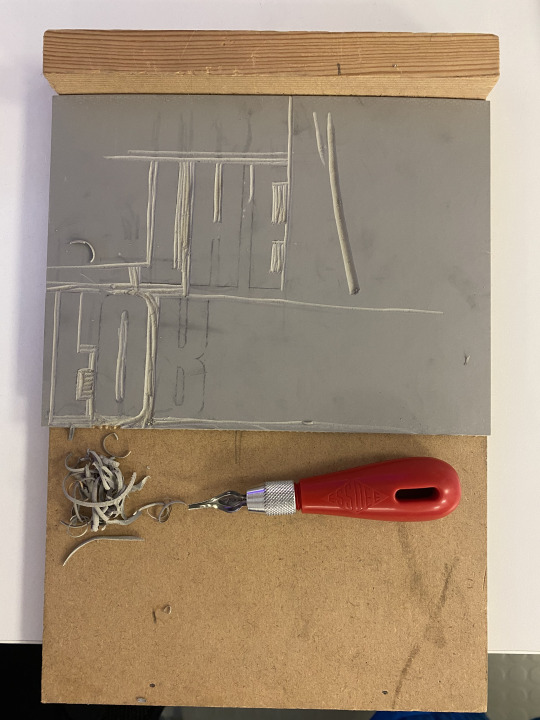
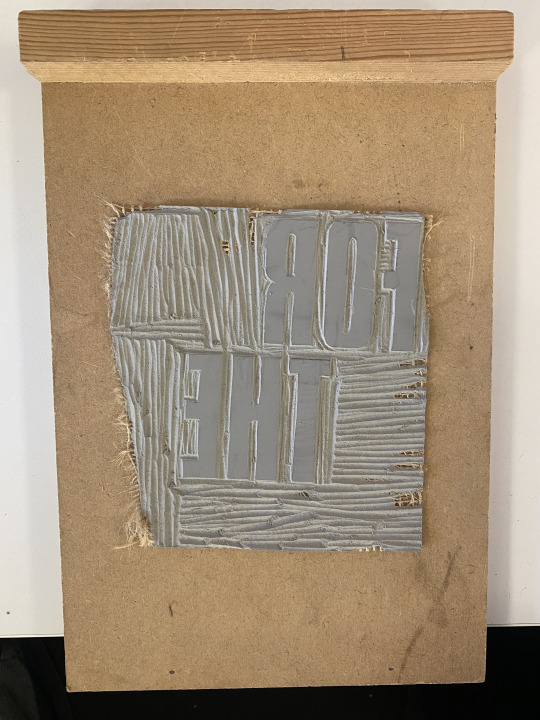


Experimenting with Linocut Printing - ISTD Project
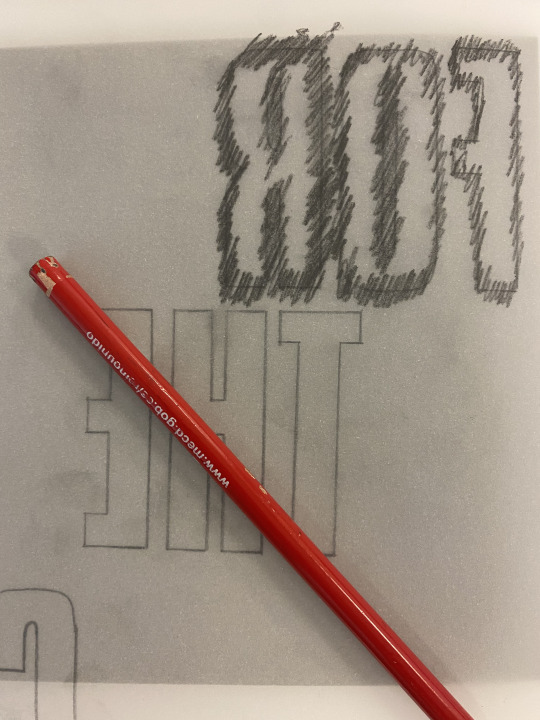
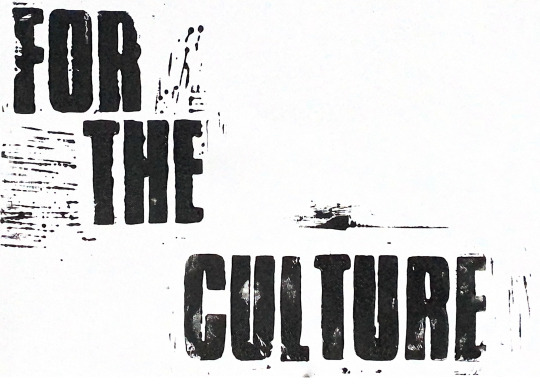
Here I have carved the title of my final outcome ‘For The Culture’ using a rubber surface so that it can be printed. I thought the aesthetic of a hand-made font would bring a personable aesthetic towards the subject matter. The process of making these prints was very fun because I used materials that I would not often use, and it was beneficial in terms of my practical work during the experimental stages.
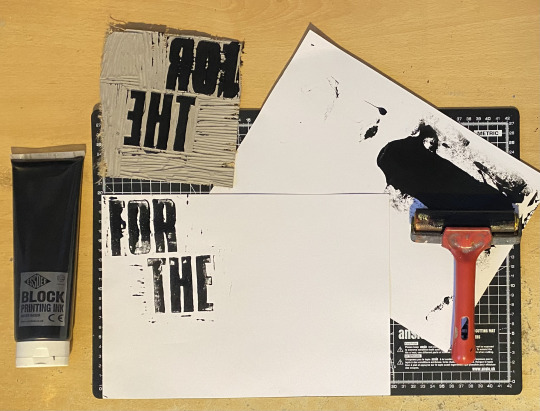
Firstly, I gathered my materials together so that I could begin the experiment. I watched a few tutorials on YouTube prior so that I knew what I was doing. I printed the title of my project from an InDesign document, which I then transferred into a PDF. Then, I used tracing paper to draw over the text, and I applied the typography onto the rubber surface. After that, I used a lino cutter and handle set to carve the negative space, in order to apply ink/paint on to the letters. During this part of the process I made a few errors by accidentally carving corners of the letters. Despite this, I used the 5 different blades to make a precise carving of the letters. The printing ink stage required me to use a roller and multiple sheets of paper so that I can practice printing my carved lino print.
From this experimentation of linocut printing, I was able to follow the step-by-step tutorials in order to provide a typographic print that is aesthetically pleasing. When I practice this type of printing again, I will make sure that my carving technique is precise, and that the ink is applied onto my linocut so that it prints completely on the paper.
1 note
·
View note
Last Seen Blogs

manvikkolhapure-blog
Untitled

breeskvicaa
breeskvicaa

doctordiscosbignaturals
professional cornfield dweller

baradariarts-blog
Baradariarts

vxzii
EGGDXTRYR3