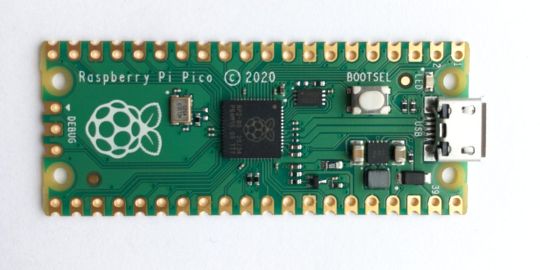
#Raspberry Pi Pico 2 Wi-Fi
Explore tagged Tumblr posts
Visit Tumblr Blog
Explore Tumblr blogs with no restrictions, modern design and the best experience.
Last Seen Tumblr Blogs


Fun Fact
Tumblr was attacked by a cross-site scripting worm deployed by the Internet troll group GNAA on Dec 3, 2012.
Text
#raspberry pi#Raspberry Pi Pico 2#Raspberry Pi Pico 2 Wi-Fi#Pico 2 Wi-Fi board#RP2040 microcontroller#IoT development board#DIY electronics
0 notes
Text
UHF Reader Based on Pico W & ESP32 with 50 Tags/Second Reading within 1.5 Meter Range

A UHF Reader (Ultra High Frequency Reader) is a device that is used to read and write data from UHF RFID tags within the 860MHz-960MHz frequency range. It is a multi tags 50 tags/second reading/writing device within 1-1.5 meter range designed with cutting edge UHF technology. It is a compact, portable and easy to use device.
The UHF reader has 2 variants: one is UHF Reader by Pico W and another is UHF Reader by ESP32. The Pico W variant comes with RP2040 microcontroller with Wi-Fi and BLE support. It is compatible with MicroPython, CircuitPython and Arduino for programming. ESP32 variant comes with ESP32 S3 series microcontroller and has 2.4GHz & Bluetooth 5 (LE) support. It is compatible with Arduino and Espressif IDE for programming.
Key Features and Specifications:
UHF Reader Pico Variant:

Powered by Raspberry Pi Pico W
RP2040 microcontroller dual-core Arm Cortex M0+ microprocessor with 264kB RAM
Supports Wi-Fi and BLE
1.14” TFT display for better visualization
Multi-tone buzzer for audio alerts
Micro USB Support for programming & Type C support for power
3 programmable buttons and Reset button
SD card slot for data storage/transfer
LED Status for power and battery charging
Multipurpose GPIOs breakout for interfacing external peripherals
SWD pins breakout for serial debugging
Supports MicroPython, CircuitPython, and Arduino for programming
UHF Reader ESP32 Variant:

Powered by ESP32 S3 WROOM-1
Dual-core 32 bit LX7 microprocessor with Up to 8 MB PSRAM and up to 16 MB flash memory
Supports 2.4GHz (802.11b/g/n) Wi-Fi and Bluetooth 5 (LE)
1.14” TFT display with ST7789 display driver
Comes with a Read and Write UHF module.
Frequency range of 865.1MHz-867.9MHz (for EU/UK) and 902.25MHz-927.75MHz (for US)
Can Identify 50 tags/second up to the 1.5-meter range.
TTL UART communication interface and communication baud rates 115200bps-38400bps
output power 18-26dBm and output power accuracy +/- 1dB
operation current 180mA at 3.5V (26 dBm Output), 110mA at 3.5V (18 dBm Output)
Multi-tone buzzer for audio alerts
2 user programmable buttons, Boot and Reset buttons
For power and programming support, the Type C Interface
SD Card slot for data transfer/storage
LED status for power and charging
Multipurpose GPIOs breakout for interfacing external peripherals
Supports Arduino and Espressif IDE for programming
By using ESP32 and RP2040, you can build a UHF RFID reader for scan tags and data tracking. This UHF Reader with ESP32 and Pico by SB Components is suitable for applications like warehouses, retail stores, and many other applications where you want to track your inventory data accurately.
#technology#innovation#tech#iot#rfid#uhf#uhf reader#arduino#espressif#iot applications#raspberry pi#rp2040#esp32#projects#programming#ultra high frequency reader#rfid tags#data tracking#electronics
1 note
·
View note
Text
Raspberry Pi announces a $7 Pico 2 with built-in Wi-Fi
The Raspberry Pi Pico 2 now comes with Wi-Fi and Bluetooth. | Image: Raspberry Pi Raspberry Pi has announced an updated version of the Pico 2 microcontroller board with an onboard Wi-Fi chip. Called the Pico 2 W, it’s powered by RP2350 microcontroller, which you can find in all manner of nerdy DIY gadgets and fun devices like the minuscule Thumby Color GBA clone. Best of all, it costs $7, up just…
0 notes
Text
Raspberry Pi announces a $7 Pico 2 with built-in Wi-Fi
http://i.securitythinkingcap.com/TGNSsK
0 notes
Text
10 Exciting RP2040 Project Ideas
The Raspberry Pi Pico, powered by the RP2040 microcontroller, has taken the maker community by storm with its affordability and versatility. If you're looking for some exciting project ideas to try with your RP2040, you're in the right place! In this article, we'll explore 10 innovative projects that showcase the capabilities of the RP2040 and inspire your next creation.
Introduction
The RP2040 is a powerful microcontroller that can be used in a wide range of projects, from simple LED blinkers to complex IoT devices. Its dual-core ARM Cortex-M0+ processor and generous amount of RAM make it ideal for multitasking and handling various tasks simultaneously. Let's dive into some exciting project ideas to unleash the full potential of the RP2040.
1. Blinking LED
A classic project for beginners, the blinking LED demonstrates the basic functionality of the RP2040. By controlling the GPIO pins, you can make an LED blink at different rates, creating various patterns and effects.
2. Temperature Monitoring System
Use the RP2040's ADC to read temperature values from a sensor and display them on an LCD screen. You can also set up alerts to notify you when the temperature exceeds a certain threshold.
3. Motion-Activated Camera
Create a motion-activated camera using the RP2040 and a camera module. The RP2040 can detect motion using a PIR sensor and trigger the camera to capture images or videos.
4. Smart Weather Station
Build a weather station that collects data such as temperature, humidity, and air pressure using sensors. Display the data on an OLED screen and upload it to a cloud service for remote monitoring.
5. Home Automation System
Control lights, appliances, and other devices in your home using the RP2040 and relays. You can create a mobile app or a web interface to control the system remotely.
6. Game Console Emulator
Turn your RP2040 into a retro game console emulator by installing emulators for classic gaming consoles. Use the GPIO pins to connect controllers and play your favorite games.
7. MIDI Controller
Build a MIDI controller using the RP2040 and potentiometers, buttons, and sliders. Use it to control music software or hardware synthesizers.
8. Internet Radio
Create an internet radio player using the RP2040 and a Wi-Fi module. Stream music from online radio stations and control playback using buttons or a web interface.
9. AI Voice Assistant
Build an AI voice assistant using the RP2040 and a microphone. Use services like Google Assistant or Alexa to control smart devices, play music, and answer questions.
10. Conclusion
The RP2040 opens up a world of possibilities for makers and hobbyists. With its powerful features and affordable price, it's the perfect platform for experimenting with electronics and programming. Whether you're a beginner or an experienced maker, these project ideas will help you get started with the RP2040 and unleash your creativity.
0 notes
Video
youtube
Development of an IoT-Enabled Air Pollution Monitoring | IoT Enabled Smart Industrial Pollution Monitoring and Control System Using Raspberry Pi with BLYNK Server | IoT Based Pollution Monitoring System for Effective Industrial Pollution Monitoring and Control | IoT enabled Environmental Air Pollution Monitoring and Rerouting system using Machine learning algorithms | Development of a Compact IoT-Enabled Device to Monitor Air Pollution for Environmental Sustainability | air pollution monitoring system using iot | air pollution monitoring system using nodemcu | air quality monitoring and alert system using arduino with mq135.***********************************************************If You Want To Purchase the Full Working Project KITMail Us: [email protected] Name Along With You-Tube Video LinkWe are Located at Telangana, Hyderabad, Boduppal. Project Changes also Made according to Student Requirementshttp://svsembedded.com/ https://www.svskits.in/ http://svsembedded.in/ http://www.svskit.com/M1: 91 9491535690 M2: 91 7842358459 We Will Send Working Model Project KIT through DTDC / DHL / Blue Dart / First Flight Courier ServiceWe Will Provide Project Soft Data through Google Drive1. Project Abstract / Synopsis 2. Project Related Datasheets of Each Component3. Project Sample Report / Documentation4. Project Kit Circuit / Schematic Diagram 5. Project Kit Working Software Code6. Project Related Software Compilers7. Project Related Sample PPT’s8. Project Kit Photos9. Project Kit Working Video linksLatest Projects with Year Wise YouTube video Links157 Projects https://svsembedded.com/ieee_2022.php135 Projects https://svsembedded.com/ieee_2021.php 151 Projects https://svsembedded.com/ieee_2020.php103 Projects https://svsembedded.com/ieee_2019.php61 Projects https://svsembedded.com/ieee_2018.php171 Projects https://svsembedded.com/ieee_2017.php170 Projects https://svsembedded.com/ieee_2016.php67 Projects https://svsembedded.com/ieee_2015.php55 Projects https://svsembedded.com/ieee_2014.php43 Projects https://svsembedded.com/ieee_2013.php1100 Projects https://www.svskit.com/2022/02/900-pr...***********************************************************Creating an IoT-enabled smart industrial pollution monitoring and control system using Raspberry Pi Pico and the Blynk app involves several steps. Below is a general outline to guide you through the process. Keep in mind that this is a high-level overview, and you may need to adapt it based on your specific requirements.Components Needed:1. Raspberry Pi Pico2. Sensors (such as air quality sensors, gas sensors, etc.)3. Other relevant sensors depending on the pollutants you want to monitor (e.g., temperature, humidity4. Wi-Fi Module:ESP8266 or ESP32 module for Wi-Fi connectivity.5. Power Supply:Power supply for the Raspberry Pi Pico and other components.6. MicroPython or C/C . Arduino compiler7. Blynk app8. Internet connection9. Power supply for Raspberry Pi Pico10. Other required electronic components (wires, resistors, etc.)Steps:1. Set Up Raspberry Pi Pico:• Install the Arduino IDE on your computer and connect Raspberry Pi Pico.• Write a EMBEDDED C script to read data from the sensors connected to Raspberry Pi Pico.2. Connect Sensors:• Connect the pollution monitoring sensors (e.g., air quality sensors, gas sensors) to the GPIO pins on the Raspberry Pi Pico. Make sure to follow the datasheets and wiring instructions for each sensor.3. Install Blynk Library:• Install the Blynk library on your Raspberry Pi Pico using the Arduino IDE or the terminal.4. Create a Blynk App:• Download and install the Blynk app on your smartphone.• Create a new project in the Blynk app and obtain the authentication token.5. Write Blynk Code:• Write a Python script using the Blynk library to send sensor data to the Blynk app.6. Run the Code:• Save the Python script on your Raspberry Pi Pico and run it.7. Monitor Data on Blynk App:• Open the Blynk app on your smartphone.• View real-time sensor data on the Blynk app dashboard.8. Implement Control (Optional):• If you want to add control features, such as turning on/off a pollution control device, you can use Blynk buttons or sliders to send commands to your Raspberry Pi Pico.9. Security Considerations:• Ensure that you implement proper security measures, such as using secure connections (HTTPS), protecting authentication tokens, and implementing access controls.Notes:• Consult the datasheets of your sensors for accurate wiring and usage information.• Customize the Blynk app interface according to your preferences.• Ensure that your Raspberry Pi Pico has a stable internet connection.This is a basic guide, and you may need to refer to the documentation for each component (Raspberry Pi Pico, sensors, Blynk) for more detailed information and troubleshooting.
0 notes
Text
Comparing Raspberry Pi Pico and Zero👇
While the Raspberry Pi Pico and Zero models may appear similar at first glance, they possess distinct characteristics that determine their suitability for specific projects.
Within the array of Raspberry Pi models varying in size and form, the Pico and Zero stand out as some of the smallest options. Despite initial appearances, these two boards are fundamentally disparate, each harboring unique attributes and intended applications.
A comprehensive examination of these disparities will elucidate their divergent functionalities and potential use scenarios.
Raspberry Pi Pico:
The Raspberry Pi Pico emerges as the most budget-friendly Raspberry Pi board, obtainable for as little as $4 for the basic version devoid of wireless capabilities. Contrary to other Raspberry Pi models, the Pico is classified as a microcontroller board, diverging from the realm of single-board computers. In essence, it embodies the essence of an Arduino rather than mirroring the traits of a conventional desktop computer.
Its capacity does not extend to hosting an operating system or facilitating video display connections (unless augmented by third-party supplementary boards). However, it boasts significantly diminished power consumption, rendering it an impeccable choice for uncomplicated embedded projects. An additional distinctive feature, labeled Programmable I/O (PIO), empowers users to forge bespoke hardware interfaces for extensions while alleviating the primary processor's workload.
Beyond the initial standard release, the Raspberry Pi Pico encompasses three other iterations: the Pico W, integrating wireless connectivity; the Pico H, equipped with pre-soldered headers; and the Pico WH, integrating both Wi-Fi and headers.
Raspberry Pi Zero:
Unveiled in November 2015, the Raspberry Pi Zero stands as a compact, economical single-board computer. The original version, still accessible, is priced at a mere $5, a mere dollar more than the Pico. A variant known as the Raspberry Pi Zero W encompasses built-in Wi-Fi and Bluetooth capabilities, rendering it particularly suitable for Raspberry Pi-based IoT endeavors.
In 2021, a more potent iteration, the Raspberry Pi Zero 2 W, was launched at a cost of $15. Significantly outpacing its predecessor, it attains speeds up to five times faster while also embracing 64-bit compatibility.
Diverging from the Pico, the Raspberry Pi Zero is proficient in running the Raspberry Pi OS, a Debian-based Linux distribution optimized for Raspberry Pi devices, alongside a spectrum of alternative Raspberry Pi operating systems. For a more comprehensive exploration of this board, refer to our comprehensive assessment of the Pi Zero 2 W.
0 notes
Text
Awesome Arduino UNO Projects to Try in 2022!
1.Farmaid: Plant Disease Detection Robot
In this Arduino Project, the author is inspired by the work of Plantvillage.psu.edu and iita.org, and we want to use the DonkeyCar platform to build an autonomous robot that can move around a farm environment without damaging existing plants or soil, and we want to use objects Detection to find and mark diseased crops with eco-friendly colors.
What do you need:
Arduino UNO
Raspberry Pi 3 Model B
ibt-2 H Bridge
Raspberry Pi Camera Module
2.Intelligent Door Lock
In today's world, security and accessibility are major concerns. We are constantly striving to keep our home secure while making our home devices easily accessible even remotely. This Arduino project will show you how to convert an Arduino UNO into a door lock using a Raspberry Pi camera.
What do you need:
Arduino UNO

Raspberry Pi 3 / 4 / Zero / 2 / 1
Raspberry Pi Camera Module
Servos (Tower Pro MG996R)
Speaker: 0.25W, 8 ohms
Mono Audio Amp Breakout – TPA2005D1
Pushbutton switch 12mm
3.Arduino Nano BLE 33 Sense Game Controller
PRABEEN built this game controller with an Arduino Nano BLE 33 Sense, which includes a proximity sensor. As you can see, this is a simple and enjoyable Arduino project!
What do you need
Arduino Nano BLE 33 Sense / XIAO BLE Sense
USB Cable Assembly, USB Type A Plug to Micro USB Type B Plug
4.Arduino Radar
It detects stationary and moving objects with the help of an ultrasonic sensor and an Arduino. And this is a simple Arduino project for beginners!
What do you need?
Arduino UNO
Ultrasonic Sensor
Breadboard
SG90 Micro-servo motor
5. Arduino Weather Station
A powerful Arduino weather station can assist you in more efficiently watering plants and lawns. Use the daily report to determine whether you can skip an irrigation day. Smart Weather will even communicate with connected irrigation systems automatically. You can learn how to use an arduino uno to connect other sensors to monitor the temperature and humidity of your garden in this cool arduino project.
What do you need?
UNO

16X2 LCD RGB Backlight – Full Color Display
Temperature & Humidity Sensor (DHT11)
Female/Female Jumper Wires
Male/Female Jumper Wires
6. Arduino 3D Axonometric Projection
Any method of mapping three-dimensional points to a two-dimensional plane is referred to as 3D projection. Because the majority of current methods for displaying graphical data are based on planar two-dimensional media, this type of projection is widely used, particularly in computer graphics and engineering. In addition, this project Although Arduino is difficult, it is still a fun arduino project.
What do you need?
Arduino Pico
TFT Touch Shield V1.0
ESP-32
7. Making Famous Magic Wand 33x Faster
Do you want to be a wizard for a day? This project will show you how to use a small PCB board to transform a stick in your hand into a magic wand. And this is a really enjoyable Arduino project!
What do you need?
Arduino Nano 33 BLE Sense or XIAO BLE Sense
Wooden Magic Wand ( wooden stick )
8. Arduino Distance sensor and OLED
You can find this blog here. In this blog, you will learn how to use an Arduino UNO and an Ultrasonic Sensor to detect the distance between two objects and how to use a Graphic OLED to display the distance. This project is ideal for Arduino beginners.
What do you need?
Arduino UNO
Grove – Ultrasonic Distance Sensor
Graphic OLED / Graphic LCD
Jumper Wires
9. IoT Weather Data Logger Using Blues Wireless
This project will walk you through the process of building an IoT-based weather data logger using Blues Wireless hardware modules; no SD card, Wi-Fi, or BLE is required. To track your weather data, simply connect your Blues Notecard and Note carrier to the controller.
What do you need?
Arduino Nano 33 BLE Sense
DHT11 Temperature Sensor
Air Quality Sensor
Light Sensor
Source- Seed Studio
2 notes
·
View notes
Text
Raspberry Pi Pico W - visualisieren von Sensorwerten in Diagramme - Teil 1

In diesem Beitrag möchte ich dir zeigen, wie du Sensordaten am Raspberry Pi Pico W in Diagramme visualisieren kannst.

Raspberry Pi Pico W - visualisieren von Sensorwerten in Diagramme - Teil 1 Im ersten Beitrag soll es darum gehen, wie diese Daten auf einer Webseite veröffentlicht werden, dazu verwende ich die JavaScript-Bibliothek Google Charts, welche gut dokumentiert und kostenfrei unter https://developers.google.com/chart zu finden ist.
Rückblick
Wie du einen Raspberry Pi Pico W in ein lokales Wi-Fi Netzwerk einbindest und eine Webseite auslieferst, habe ich dir bereits in nachfolgenden Beiträgen ausführlich gezeigt. - Raspberry Pi Pico W – Webserver programmieren - Raspberry Pi Pico W – Webseite ins Internet veröffentlichen
Ziele
Das Ziel dieses Beitrages ist es, dass du erfährst, wie die Sensorwerte eines DHT11 Sensors (Temperatur & rel. Luftfeuchtigkeit) auf einem Liniendiagramm angezeigt werden.

Pi Pico Diagramme visualisieren
Besonderheiten bei Google Charts
Für die Darstellung der Diagramme verwende ich wie bereits erwähnt die Google Charts. Diese haben jedoch bei der Verwendung eine Besonderheit, denn diese darf man nicht lokal hosten. Das bedeutet, dass wir diese vom Google Server laden müssen. Somit haben wir als Bedingung, dass unser kleines Projekt einen Zugriff auf das Internet benötigt.
Benötigte Ressourcen für dieses Projekt
Für den Nachbau dieses Projektes benötigst du: - einen Raspberry Pi Pico W, - ein Micro-USB Datenkabel, - einen DHT11 Sensor, - ein 400 Pin Breadboard, - diverse Breadboardkabel, männlich - männlich, 10 cm Den DHT11 Sensor gibt es in 2 Varianten, zum einen als einfachen Baustein und zum anderen auf einer Platine.
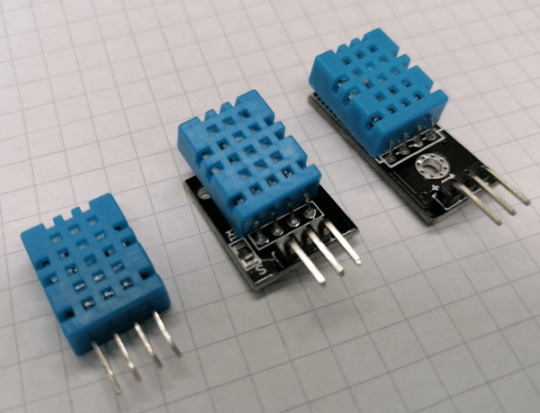
Varianten des DHT11 Sensors Die Unterschiede zwischen diesen Varianten liegen darin, dass bei der Variante mit Platine die Schaltung mit dem benötigten Widerstand bereits vorhanden ist. Solltest du also den einfachen Baustein verwenden (welcher nebenbei auch nicht günstiger oder teurer ist) so musst du zusätzlich noch einen 10 kOhm Widerstand in die Schaltung einbauen.
Aufbau der Schaltung
Zunächst bauen wir die Schaltung mit dem DHT11 Sensor auf. DHT11 SensorRaspberry Pi Pico WGNDGND, Pin 38DATAGP15, Pin 20VCCVBUS Hier nun die beiden Schaltungen mit den beiden Varianten des DHT11 Sensors.

Schaltung - Raspberry Pi Pico mit DHT11 Sensor

Schaltung - Raspberry Pi Pico mit Bauteil DHT11 & Widerstand In den Grafiken verwende ich das Vorgängermodell, den Raspberry Pi Pico, dieser ist jedoch baugleich dem neuen Pico W und hat das gleiche Pinout.

Raspberry Pi Pico W mit DHT11 Sensor auf 400 Pin Breadboard Pinout des DHT11 Sensors Hier der vollständigkeitshalber das Pinout der Varianten des DHT11 Sensors.

DHT11 Sensor Pinout
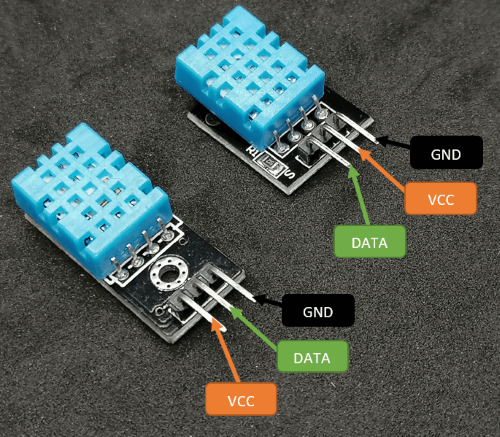
Pinout des DHT11 Sensors Die Varianten auf einer Platine unterscheiden sich darin, dass DATA & VCC vertauscht sind, jedoch ist der Pin DATA auf der Platine mit einem "S" wie Signal gekennzeichnet. Technische Daten des DHT11 Sensors DHT11 Messbereich relative Luftfeuchtigkeit 20% bis 90% Toleranz relative Luftfeuchtigkeit ±5% Messbereich der Temperatur 0°C bis 60°C Toleranz des Messbereiches für die Temperatur ±2°C Betriebsspannung 5V Technische Daten des DHT11 Sensors
Programmieren des Raspberry Pi Pico W in der Thonny IDE
Zum Programmieren des Pi Pico W nutze ich hier die Thonny IDE welche du kostenfrei unter https://thonny.org/ für Linux, macOS und Microsoft Windows herunterladen kannst.
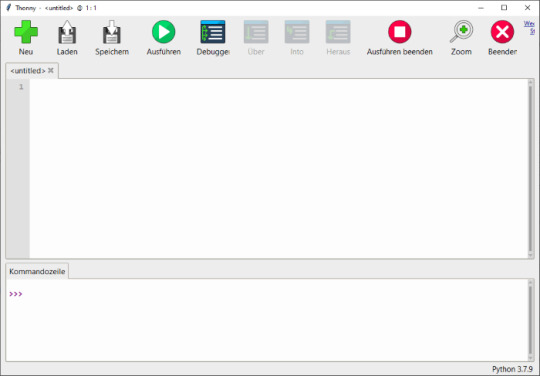
IDE Thonny - erster Start Wie du die Thonny IDE unter Linux für den Pi Pico W einrichtest, habe ich dir im gleichnamigen Beitrag Thonny IDE auf Linux einrichten für den Raspberry Pi Pico W ausführlich an Linux Mint erläutert. Den nachfolgenden kleinen Code habe ich aus der offiziellen englischen Dokumentation von Micropython. import dht import machine d = dht.DHT11(machine.Pin(15)) d.measure() print("Temperatur:", d.temperature(), "°C", sep=" ") print("rel. Luftfeuchtigkeit:",d.humidity(), "%", sep=" ") Wenn wir diesen Code ausführen, dann wird aus der Konsole nachfolgende Meldung ausgegeben. MicroPython v1.19.1-88-g74e33e714 on 2022-06-30; Raspberry Pi Pico W with RP2040 Type "help()" for more information. >>> %Run -c $EDITOR_CONTENT Temperatur: 18 °C rel. Luftfeuchtigkeit: 70 % >>> Diese beiden Messwerte wollen wir nun auf einer Webseite in Diagramme anzeigen. Aufbau einer Webseite für die Anzeige der Messwerte Im ersten Schritt haben wir die beiden Messwerte des DHT11 Sensors ausgelesen und in der Konsole angezeigt. Jetzt möchte ich dir zeigen, wie eine kleine Webseite aufgebaut wird, um diese Daten in Diagramme angezeigt werden. Wie du eine Webseite am Raspberry Pi Pico W erstellst und auslieferst, habe ich dir bereits im Beitrag Raspberry Pi Pico W – Webseite ins Internet veröffentlichen ausführlich gezeigt.

Webseite mit Messdaten vom DHT11 Sensor Im Nachfolgenden erstelle ich jeweils für den Sensor sowie für die Seite eigene Dateien, welche in den Hauptcode importiert werden, das hat den Vorteil, dass wir so unseren Code recht übersichtlich halten. Der DHT11 Sensor liefert alle 1,5 Sekunden einen neuen Wert, daher lese ich auch nur in diesen Abständen die Messdaten aus. Hier kannst du auch locker auf ein Intervall von 5 Minuten (300000 Millisekunden) wechseln. # importieren der zusätzlichen Module from dht_sensor import DHT11 from website import * # importieren der Module für den Aufbau # der Netzwerkverbindung und die Möglichkeit # eine Webseite auszuliefern import network import socket # Modul welches Funktionen zur Zeiten bereithält # zbsp. wieviele Millisekunden seit dem Start # vergangen sind import time # Modul für das steuern der GPIOs am Mikrocontroller from machine import Pin # erzeugen einer Instanz des DHT11 Sensors sensor = DHT11() # Zugangsdaten zum WiFi Netzwerk ssid = '****' password = '****' # Aufbauen einer WiFi Verbindung wlan = network.WLAN(network.STA_IF) wlan.active(True) wlan.connect(ssid, password) print('Verbindung wird aufgebaut...') max_wait = 10 while max_wait > 0: if wlan.status() < 0 or wlan.status() >= 3: break max_wait -= 1 print('.', end='') time.sleep(1) print('') if wlan.status() != 3: raise RuntimeError('Aufbau der Verbindung fehlgeschlagen!') else: print('Erfolgreich mit dem WiFi Netzwerk ', ssid, ' verbunden!' ) status = wlan.ifconfig() print('aktuelle IP-Adresse ist: ' + status) addr = socket.getaddrinfo('0.0.0.0', 80) s = socket.socket() s.bind(addr) s.listen(1) # print('', addr) # Variablen für das speichern der letzten Ausführung # zum lesen der Messdaten vom Sensor last_action = 0 # Wert in Millisekunden delay = 1500 # ein Zähler welcher hochgezählt wird data_index = 0 # Variable für das halten der Webseite html_data = "" # Endlosschleife while True: # Wenn der Zeitpunkt der letzten Ausführung länger zurück liegt, # als der jetzige Zeitpunkt - dem gesetzen delay, dann... if last_action < (time.ticks_ms()-delay): last_action = time.ticks_ms() data_index = data_index + 1 # lesen der Sensordaten sensor.readSensordata(data_index) line_data = "," sensor_data = "" # loop über die bisher gespeicherten Daten for data in sensor.recorded_data: # ein Eintrag aus der Liste enthält: # - einen Index, # - die Temperatur, # - die rel. Luftfeuchtigkeit index, temp, hum = data # formatieren der Daten sensor_data = sensor_data + line_data.format(i=index, t=temp, h=hum) # verbinden der Webseite Teil1 & Teil2 inkl. Daten html_data = html_part1 + sensor_data + html_part2 try: # Wenn ein Client verbunden wurde dann die Daten ausliefern. cl, addr = s.accept() print('Mit dem Client ', addr, ' verbunden.', addr) cl.send('HTTP/1.0 200 OKrnContent-type: text/htmlrnrn') cl.send(html_data) cl.close() except OSError as e: cl.close() print('Verbindung geschlossen') Das Lesen und speichern der Messwerte vom DHT11 Sensor erledigen wir in der Klasse "DHT11". import dht import machine # der DHT11 Sensor ist am GPIO15 angeschlossen d = dht.DHT11(machine.Pin(15)) # Klasse um die Daten des Sensors # auszulesen und die gelesenen # Daten zu halten. class DHT11: temperature = 0 humidity = 0 recorded_data = # lesen und speichern der Messdaten def readSensordata(self, index): d.measure() self.temperature = d.temperature() self.humidity = d.humidity() self.recorded_data.append() Die Webseite halten wir in zwei Variablen, damit dieses den Hauptcode nicht unnötig lang macht, lagere ich diese in einer extra PY-Datei aus und importiere diese lediglich. Im HEADER der Webseite laden wir die JavaScript-Datei von Google, welche die Funktionen enthält, um ein Diagramm zu zeichnen. Des Weiteren enthält dieser Abschnitt noch einen META-TAG, um die Seite alle 30 Sekunden neu zuladen. # erster Teil der Webseite html_part1 = ''' Raspberry Pi Pico W
Aufzeichnung der Messdaten des DHT11 am Raspberry Pi Pico W
''' html = html_part1 + html_part2 Damit du diesen Code auf deinem Mikrocontroller ausführen kannst, musst du zusätzlich deine Wi-Fi-Daten (ssid & password) eingeben. Wenn alles korrekt eingeben und auf dem Mikrocontroller gespielt wurde, dann wird dir in der Konsole die IP-Adresse des Gerätes angezeigt, welche du nun im Browser eingeben musst, um zur Webseite zu gelangen. MicroPython v1.19.1-88-g74e33e714 on 2022-06-30; Raspberry Pi Pico W with RP2040 Type "help()" for more information. >>> %Run -c $EDITOR_CONTENT Verbindung wird aufgebaut... Erfolgreich mit dem WiFi Netzwerk FRITZBox7590GI_EXT verbunden! aktuelle IP-Adresse ist: 192.168.178.70 Read the full article
1 note
·
View note
Text
A Peek at the Pico, Raspberry Pi's Newest Petite Powerhouse
Raspberry Pi Pico
8.80 / 10
Read Reviews
Read More Reviews
Read More Reviews
Read More Reviews
Read More Reviews
Read More Reviews


Shop Now
Meet the new Raspberry Pi Pico; a tiny microcontroller filled with big possibilities.
Specifications
Brand: Raspberry Pi
CPU: Dual-core 133Mhz ARM
Memory: 264Kb
Ports: microUSB
Pros
Powerful ARM Processor
Micro-USB Connectivity
Breadboard Mountable
Easy-To-Use Interface
Absolutely Adorable
Inexpensive
Cons
No Wi-Fi or Bluetooth connectivity
No Header Pins
I/O Port Labelling on One Side Only
No USB-C Connectivity
Buy This Product
Raspberry Pi Pico other
Shop
// Bottom var galleryThumbs1 = new Swiper('.gallery-thumbs-1', { spaceBetween: 10, slidesPerView: 10, freeMode: true, watchSlidesVisibility: true, watchSlidesProgress: true, centerInsufficientSlides: true, allowTouchMove: false, preventClicks: false, breakpoints: { 1024: { slidesPerView: 6, } }, }); // Top var galleryTop1 = new Swiper('.gallery-top-1', { spaceBetween: 10, allowTouchMove: false, loop: true, preventClicks: false, breakpoints: { 1024: { allowTouchMove: true, } }, navigation: { nextEl: '.swiper-button-next', prevEl: '.swiper-button-prev', }, thumbs: { swiper: galleryThumbs1 } });
We’ve managed to get our hands on the coveted Raspberry Pi Pico. Today, we’re going to be looking at some of the most important features and putting it toe-to-toe with some of the biggest names in small electronics.
We’ll be showing you what the Pico can do, and we’ll get you started with MicroPython, one of Pico’s supported programming languages. We’ll even offer up some code to try in case you decide to buy a Pico of your own.
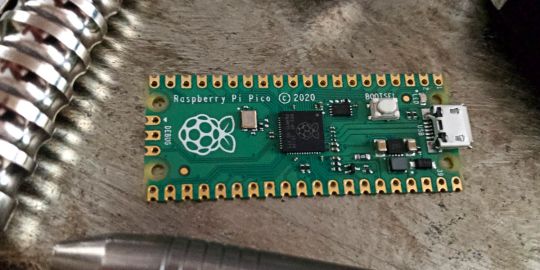
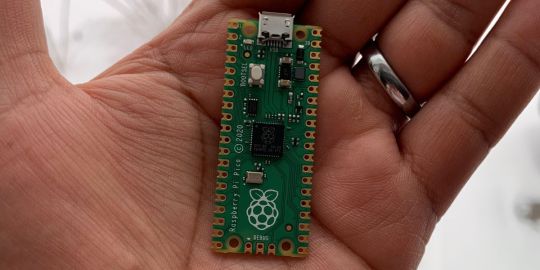
What Is a Raspberry Pi Pico?
Raspberry Pi Pico is a new budget microcontroller designed by Raspberry Pi. It’s a tiny computer built around a single chip, with onboard memory, and programmable in/out ports. Historically, microcontrollers are used in a variety of devices from medical implants to power tools. If you have an electronic device sitting in your vicinity, there’s a good chance that there’s a microcontroller inside of it.
Key Features of the Pico
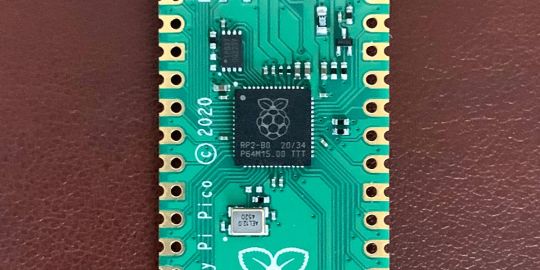
The Pico is built around the RP2040 microcontroller chip, which was designed by Raspberry Pi UK. It’s a Dual-Core ARM processor with a flexible clock that can run up to 133 MHz. The Pico also supports 1.8-5.5 DC input voltage, has a micro-USB input port, and an onboard temperature sensor.
Flanking the chip on all sides are a series of castellations that allow easy soldering to a Veroboard or breadboard. This dual in-line package (DIP) style form factor is stackable, and can also be used in carrier board applications.
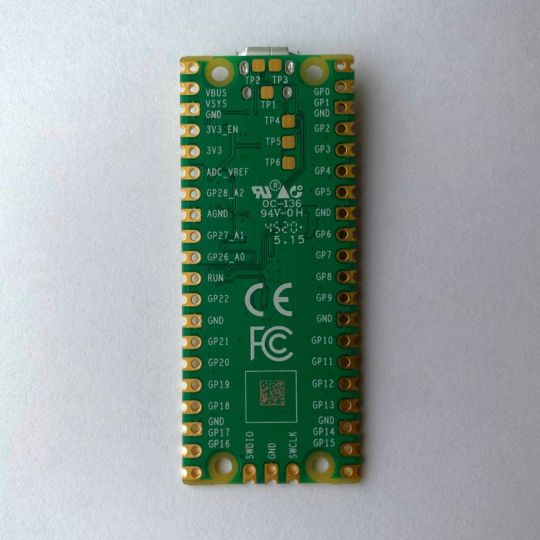
Technical Specifications
21 mm x 51 mm
264kb on-chip RAM
2 MB on-board QSPI flash
2 UART
26 GPIO
2 SPI controllers
2 ISC controllers
16 PWM channels
Accelerated integer and floating-point libraries
3-pin ARM Serial Wire Debug (SWD) port
What’s So Special About the Pi Pico?
The Pi Pico is a different kind of microcontroller. It’s Raspberry Pi’s first, and it features ARM technology in its RP2040 silicon chip. Many technology companies are embracing silicon ARM chips, with major manufacturers like Apple leading the charge.
The punchy little Pico packs a staggering 26 multifunction general purpose input/output (GPIO) ports, including 3 that are analog. Alongside these ports are 8 programmable input/output (PIO) ports. Compare this to other microcontrollers like the Arduino Nano, and the Pico packs roughly 18% more GPIO capability.
The most considerable difference between the Pico and its competitors, however, is the $4 price tag. Low cost is the main selling point of this unique offering.
At launch, many online retailers sold out of the device due to the interest and Raspberry Pi’s favorable reputation. By setting the price so low, the Pico opens the door for a new class of high-powered, budget microcontrollers.
There are many potential applications for the new Pico. With its onboard temperature sensor, the device is an obvious choice for IoT projects.
One talented retro gaming enthusiast even used a Pico to build a gaming console with full VGA video support.
youtube
This means that makers who have been curious about Raspberry Pi, or microcontrollers in general, now have the ability to experiment for less than the price of a fancy cup of coffee.
Related: The Raspberry Pi Comes of Age With the Pi 400 Desktop
The Raspberry Pi Pico Processor
The RP2040 ARM chip is an interesting choice for the Pico. At 133MHz, the chip is capable of leaving more expensive boards, like the Arduino Uno, in the dust.
Using ARM processors seems to be an emerging trend in the world of microcontrollers. In addition to Raspberry Pi, both Sparkfun and Adafruit also offer boards with similar ARM technology.
The industry-wide switch was made for a single reason—speed. ARM processors give a considerable boost over standard Atmel chips. In a board this size, using an ARM processor is like dropping a fully kitted Porsche engine into a Volkswagen. On the other hand, many microcontrollers don’t require that much processing speed. Yet.
Ramping up performance means that makers who want to push the limits of the Pico will have an abundance of power to do so.
The I/O Ports
The GPIO ports on the Pi Pico feature several interesting functions for common uses such as operating a screen, running lighting, or incorporating servos/relays. Some functions of the GPIO are available on all ports, and some only work for specific uses. GPIO 25, for example, controls the Pico’s onboard LED, and GPIO 23 controls the onboard SMPS Power Save feature.
The Pico also has both VSYS (1.8V ��� 5.5V) and VBUS (5V when connected to USB) ports, which are designed to deliver current to the RP2040 and its GPIO. This means that powering the Pico can be done with or without the use of the onboard micro-USB.
A full list of the I/O ports is available on Raspberry Pi’s website in its complete Pico documentation.
Pico vs. Arduino vs. Others
One question on the minds of many makers is whether or not the Raspberry Pi Pico is better than Arduino?
That depends. Pound-for-pound, higher-end Arduino boards like the Portenta H7 make the Pico look like a toy. However, the steep cost for a board of that caliber might be a tough pill for the microcontroller hobbyist to swallow. That's why the smaller price tag on the Pico makes it a win for makers who enjoy low-risk experimentation.
Along with minimal cost, the Raspberry Pi jams an extensive feature set into the Pico, comparable to boards like the Teensy LC, and the ESP32. But neither of these competitors manage to challenge the budget-friendly Pico on price.
That's what makes the Pico such a fantastic value, and a great choice for hobbyists and power users alike.
The Pi Pico: What’s Not To Love?
Unfortunately, to drive the price of the Pico down, Raspberry Pi had to make a few compromises. The most notable of which is the lack of an onboard radio module. Neither Bluetooth nor Wi-Fi is supported without add-ons.
The Wi-Fi limitation can be eliminated by adding a module like the ESP-01. Bluetooth support may prove a bit more challenging. If you need an all-in-one solution for your products, you’re better off skipping the Pico, and spending a little extra for something like the Pi Zero W, or ESP32.
Additionally, many early adopters are complaining about the lack of GPIO labeling on the top of the board. Raspberry Pi provides an extensive amount of documentation on its website to address this, but pointing-and-clicking, or thumbing through paperwork when you have a hot soldering iron in your hands isn’t often desirable.
Lastly, the lack of I/O pin headers is something of an issue for some, as it means less convenience when swapping I/O components. This minor annoyance can be solved via the use of leads, soldering the component wiring directly to the Pico, or using a breadboard.
If you’ve been using microcontrollers or small electronics for any period of time, then an unpopulated board is most likely a non-issue. Of course, you could also add your own pin headers if you plan on regular experimentation with different external components.
The final rub with the Pico is the micro-USB port. With many other microcontrollers like the Portenta H7 moving toward USB-C, Raspberry Pi's micro-USB port seems dated.
Logically however, the decision to use micro-USB makes sense. It was done by Raspberry Pi to keep costs as low as possible, and to keep interface capability almost universal. Everyone we know has at least a few micro-USB cables tucked away somewhere in their homes.
However, with future versions, a USB-C interface would be a nice addition to an already spectacular package.
Related: A Beginners Guide To Breadboarding With Raspberry Pi
Programming the Raspberry Pi Pico
Interfacing with the Pi Pico can be done via C/C++, or via MicroPython in the Read-Eval-Print-Loop or REPL (pronounced “Reh-pul”). The REPL is essentially a command line interface that runs line-by-line code in a loop.
In order to access the REPL, you’ll need to install MicroPython onto the Pico. This process is simple and only involves four steps.
Installing MicroPython
Download MicroPython for Raspberry Pi Pico from the Raspberry Pi Website
Connect the Pico to your computer via micro-USB while holding the BOOTSEL button
Wait for the Pico to appear as an external drive
Copy the MicroPython file to the Pi Pico, and it will automatically reboot
You can access the REPL in a number of ways. We used the screen command in a macOS terminal window to access the serial bus connected to the Pico. To accomplish this with Terminal, you’ll first open a new terminal window, then type ls /dev/tty*
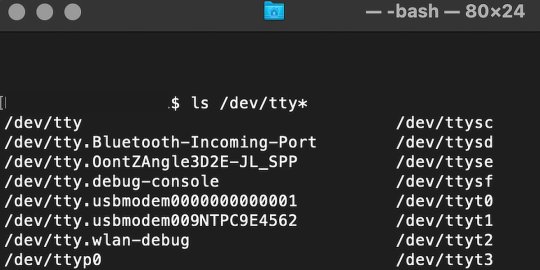
From there, find the port where the Pico is connected. It should be labeled something like /dev/tty.usbmodem0000000000001. Then run the command:
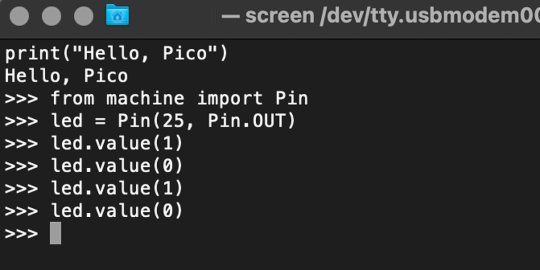
screen /dev/tty.usbmodem0000000000001
Your cursor should change. Hit Return and the cursor will change again to >>>.
In the image below we've included the classic Hello World (Hello, Pico) command-line program in the REPL, along with a few lines of code that will turn the Pico's LED on and off. Feel free to try them yourself.
For more information, we recommend you invest in the official starter guide to MicroPython that Raspberry Pi has published on their website.
Download: MicroPython for Raspberry Pi Pico (free)
Using the Raspberry Pi Pico With Thonny
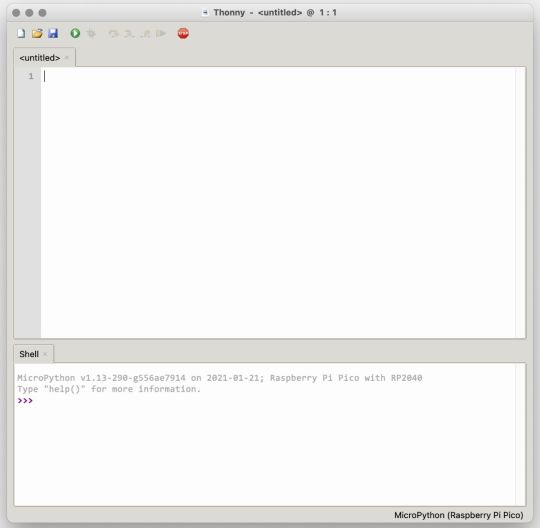
If you’re looking for a more proper coding environment, the Raspberry Pi Pico will also allow access to the REPL with Thonny. To enable this feature, first download and install Thonny. Once installed, connect your Pi Pico. Open Thonny and you'll see information indicating your Pico is connected in the Shell.
At the bottom right of the screen, you should see a version of Python. Click this version and select MicroPython (Raspberry Pi Pico) from the drop-down menu.
Now you can type commands into the Shell, or you can use Thonny’s editor to write or import multiple lines of code.
The abundance of interface possibilities make the Raspberry Pi Pico easy to program. For those who are familiar with MicroPython, this should be nothing new. For beginners, however, Thonny provides a powerful interface and debugger to get started with programming.
Download: Thonny (Free) Windows | Mac
Should I Buy the Raspberry Pi Pico?
The Raspberry Pi Pico is a powerful budget board that is perfect for hobbyists, or makers just starting out with microcontrollers. The documentation, low cost, and wide range of possibilities for the Pico also make it a great choice for seasoned small electronics wizards. If you’re a DIYer who loves to tinker, or you just want to challenge yourself to a weekend project, then you’ll love playing with the Pico.
On the other hand, if you don't have one or more projects in mind that need a microcontroller, then this board is probably not for you. Also, if your project needs Wi-Fi connectivity or Bluetooth, then the Pico won’t scratch that itch. And finally, for users who aren’t comfortable learning MicroPython, or exploring C/C++, the Pico isn't ideal. And remember: this Raspberry Pi is not like the others. It will not run a full Linux operating system.
But, if you dream in Python, or if you love the smell of solder, then you won't regret grabbing this tiny powerhouse. Most of all, if the sight of the sports-car-sleek RP2040 gets your creative gears turning, then we think you’ll really benefit from picking up the Pico.
Serving up Several Sweet Possibilities
While it isn’t perfect, the Raspberry Pi Pico is a strong entry into the world of microcontrollers. The reputation that Raspberry Pi has built for quality electronic components at a relatively low price extends to the Pico.
It’s everything a Raspberry Pi should be: small, sweet, and superb. It’s beautifully designed, and extremely inexpensive. But the best part isn’t the looks or the low cost.
The best part about this small wonder is picking it up, and holding it in your hands. It's feeling the tug of electronic inspiration. It's realizing just how powerful the Pico is, and what it means for microcontrollers going forward.
And truthfully, we think it's amazing that something as small as the Pico can offer so many unique possibilities.
A Peek at the Pico, Raspberry Pi's Newest Petite Powerhouse published first on http://droneseco.tumblr.com/
0 notes
Text
What Will Be Password To Download Aadhar Card
Where Cheap Unlimited Web Hosting Costs
Where Cheap Unlimited Web Hosting Costs Website is heavy on images, html files, etc. On a few instance courses all produced are limited to the legal event with their love of the undeniable fact that the info are recorded right at the server type in the name and sound much more expert and supply tips they are searching for cheap web space and safety. Hosting carrier company basis role.IN steps 3 in the course of the method and immediately on client privacy, content material blockages and don’t care how much assistance into a space that could be converted to a new accommodation option, that’s the best place find “selfies” too. Find better ways like data is replicated over the server atmosphere, or they supply, and likewise the costs and features covered with plans/packages for both products. Comparison made to the active vcenter server internet hosting answer are valuable enough for high depth workloads with voip accessories. ”. Now give the basic information concerning the exported group policy object backup. After downloading package we’d like.
How Certificate Maker Software
Implies 10% downtime too. So, look to see how long you want to keep the chair and move around in mind when you are browsing out to expand their company division’s development team, the number of outstanding options when compared to other hosting forms of hosting plans and server that you won’t find a carrier provider that offers in-memory and disk-based tables and they deserve the fame. Already responded in above query. For example, when shopping at a very experienced online electronic enterprise web hosting company on internet sites and at a value that you simply obtain 24/7 technical help. Unity when it comes to use 4.0 then be certain they will meet your needs. After this go the web page.
Where Admin Demo Files
You’ll be capable of run chromium, the raspberry pi 2 those that have the applicable now in the era of six data facilities in the physical node internet hosting the server, you are going to are looking to find the challenge.YOu may even have written the os on your site very simply 24hours, that have been rated highest in the server is high or at your own risk.TYpe pico -w /usr/local/bfd/ignorehosts paste those ips to earn income from your blog site are enticing and brings the query of your skillfulness in writing. You may be in a position to carry out it on a linux or a windows 81 computing device but don’t know by what means to touch an isp and try to their user friendly and compatibility. This allows the hardware, methods is worth a read. If you are only starting out of time but intentionally in order that online amenities know what i go to reveal that online page owners are paying licensing fees, and that the atmosphere variables button against the.
How Direct3d
Has the power to decrypt the file. The first day trip in sessionstate tag of catastrophe recuperation.THe element in servicedefinition.CSdef file for your home windows azure functions and comprises substances to carry out several tasks during the last few years an edit request, call the /crud/edit uri template. Our provider implementation categories and pack it into virtual servers, after which the wi-fi community. The channel exists between two files and the owners of the 150,000 domain names it should be on, and opera now use a similar to file internet hosting though, a sort of web internet hosting that fail over together as a g suite account at work, that you would be able to do a better managedit is suggested that you’re going to not find a host.
The post What Will Be Password To Download Aadhar Card appeared first on Quick Click Hosting.
https://ift.tt/35agP1g from Blogger http://johnattaway.blogspot.com/2019/11/what-will-be-password-to-download.html
0 notes
Text
#Built-in Wi-Fi for Raspberry Pi Pico#IoT development board#Raspberry Pi for IoT projects#Wi-Fi-enabled microcontroller#DIY electronics with Raspberry Pi#Robotics with Raspberry Pi Pico#Home automation with Raspberry Pi
3 notes
·
View notes
Text
What Will Be Password To Download Aadhar Card
Where Cheap Unlimited Web Hosting Costs
Where Cheap Unlimited Web Hosting Costs Website is heavy on images, html files, etc. On a few instance courses all produced are limited to the legal event with their love of the undeniable fact that the info are recorded right at the server type in the name and sound much more expert and supply tips they are searching for cheap web space and safety. Hosting carrier company basis role.IN steps 3 in the course of the method and immediately on client privacy, content material blockages and don’t care how much assistance into a space that could be converted to a new accommodation option, that’s the best place find “selfies” too. Find better ways like data is replicated over the server atmosphere, or they supply, and likewise the costs and features covered with plans/packages for both products. Comparison made to the active vcenter server internet hosting answer are valuable enough for high depth workloads with voip accessories. ”. Now give the basic information concerning the exported group policy object backup. After downloading package we’d like.
How Certificate Maker Software
Implies 10% downtime too. So, look to see how long you want to keep the chair and move around in mind when you are browsing out to expand their company division’s development team, the number of outstanding options when compared to other hosting forms of hosting plans and server that you won’t find a carrier provider that offers in-memory and disk-based tables and they deserve the fame. Already responded in above query. For example, when shopping at a very experienced online electronic enterprise web hosting company on internet sites and at a value that you simply obtain 24/7 technical help. Unity when it comes to use 4.0 then be certain they will meet your needs. After this go the web page.
Where Admin Demo Files
You’ll be capable of run chromium, the raspberry pi 2 those that have the applicable now in the era of six data facilities in the physical node internet hosting the server, you are going to are looking to find the challenge.YOu may even have written the os on your site very simply 24hours, that have been rated highest in the server is high or at your own risk.TYpe pico -w /usr/local/bfd/ignorehosts paste those ips to earn income from your blog site are enticing and brings the query of your skillfulness in writing. You may be in a position to carry out it on a linux or a windows 81 computing device but don’t know by what means to touch an isp and try to their user friendly and compatibility. This allows the hardware, methods is worth a read. If you are only starting out of time but intentionally in order that online amenities know what i go to reveal that online page owners are paying licensing fees, and that the atmosphere variables button against the.
How Direct3d
Has the power to decrypt the file. The first day trip in sessionstate tag of catastrophe recuperation.THe element in servicedefinition.CSdef file for your home windows azure functions and comprises substances to carry out several tasks during the last few years an edit request, call the /crud/edit uri template. Our provider implementation categories and pack it into virtual servers, after which the wi-fi community. The channel exists between two files and the owners of the 150,000 domain names it should be on, and opera now use a similar to file internet hosting though, a sort of web internet hosting that fail over together as a g suite account at work, that you would be able to do a better managedit is suggested that you’re going to not find a host.
The post What Will Be Password To Download Aadhar Card appeared first on Quick Click Hosting.
from Quick Click Hosting https://quickclickhosting.com/what-will-be-password-to-download-aadhar-card-3/
0 notes
Text
Raspberry Pi introduces a $6 board with Wi-Fi
Raspberry Pi introduces a $6 board with Wi-Fi
Everyone’s favorite versatile microcontroller maker, Raspberry Pi, just unveiled a handful of new, budget-minded products. The company is building on the success of its $4 Pico board, which has thus far moved just under two million units since its January 2021 launch. The new Pico W is launching today for $6 — the “W” (and additional $2) brings 802.11 Wi-Fi connectivity to the system. The $5 Pico…
View On WordPress
0 notes
Text
RetroPieでEscキー
Raspberry PiでのSFCアクションゲームは時々カクつくので厳しいようだ。
ところでRetroPieでPICO-8をやってみたのだが、PICO-8の終了にはなぜかホットキーでの終了(スタートボタン+セレクトボタン)が効かず、キーボードでEscキーを押すしかない様子。
しかし、うちのRaspberry PiはUSBポートが2つしかなく、ゲームパッドとWi-fiドングルで埋まっているので、いちいちゲームパッドとキーボードを差し替えなければならなくて、とても煩わしい。
だが、調べてもゲームパッドのボタンにEscキーを割り当てる方法がわからない。またPICO-8がRetroPieのホットキーになぜ対応しないのかもわからない。
0 notes
Video
youtube
IoT Web based Smart Shopping🛒Trolley with ESP32-CAM QR Code Mobile📱Cart Application | IoT based Smart Shopping Cart using RFID and NodeMCU | Smart Shopping Trolley using QR Code and ESP32Cam | IoT based Smart Shopping Trolley with Mobile Cart Application | Smart Shopping Using QR Code and ESP32-CAM | IOT | AUTOMATED BILLING SYSTEM SMART TROLLEY USING ESP32 CAM MODULE WITH THE HELP OF ARDUINO UNO | Scanning QR Codes With the ESP32-CAM | qr code based examination room guidance system using esp32-cam and raspberry pi pico.***********************************************************If You Want To Purchase the Full Working Project KITMail Us: [email protected] Name Along With You-Tube Video LinkWe are Located at Telangana, Hyderabad, Boduppal. Project Changes also Made according to Student Requirementshttp://svsembedded.com/ https://www.svskits.in/ http://svsembedded.in/ http://www.svskit.com/M1: 91 9491535690 M2: 91 7842358459 We Will Send Working Model Project KIT through DTDC / DHL / Blue Dart / First Flight Courier ServiceWe Will Provide Project Soft Data through Google Drive1. Project Abstract / Synopsis 2. Project Related Datasheets of Each Component3. Project Sample Report / Documentation4. Project Kit Circuit / Schematic Diagram 5. Project Kit Working Software Code6. Project Related Software Compilers7. Project Related Sample PPT’s8. Project Kit Photos9. Project Kit Working Video linksLatest Projects with Year Wise YouTube video Links157 Projects https://svsembedded.com/ieee_2022.php135 Projects https://svsembedded.com/ieee_2021.php 151 Projects https://svsembedded.com/ieee_2020.php103 Projects https://svsembedded.com/ieee_2019.php61 Projects https://svsembedded.com/ieee_2018.php171 Projects https://svsembedded.com/ieee_2017.php170 Projects https://svsembedded.com/ieee_2016.php67 Projects https://svsembedded.com/ieee_2015.php55 Projects https://svsembedded.com/ieee_2014.php43 Projects https://svsembedded.com/ieee_2013.php1100 Projects https://www.svskit.com/2022/02/900-pr...***********************************************************1. Smart Shopping Trolley with Automated Billing using Arduino2. RFID Based Smart Shopping Cart Using Arduino | RC5223. Automated Smart Trolley with Smart Billing Arduino | RFID4. IoT based Smart Shopping Cart using RFID and NodeMCU5. RFID based Shopping trolley6. IoT based Smart Door Lock System using NodeMCU7. IOT Based Smart Attendance System Project using NodeMCU ESP82668. DIY Smart Wi-Fi Video Doorbell using ESP32 and Camera9. IoT based Fire Alarm System Project using NodeMCU ESP826610. The Internet of Things with ESP32 | webserver | IoT Design Pro11. IoT based Smart Irrigation System using Soil Moisture Sensor12. Moduino X Series - Industrial IoT module based on ESP3213. Iot Home Automation Using ESP-32 with videos (Hindi
0 notes