#WAMP HTTPS configuration guide
Explore tagged Tumblr posts
Visit Tumblr Blog
Explore Tumblr blogs with no restrictions, modern design and the best experience.
Last Seen Tumblr Blogs


Fun Fact
In Q3 of 2020, 31% of US users access the Tumblr app daily.
Text
How to configure SSL for WAMP server
The WAMP server (Windows, Apache, MySQL, PHP/Python/Perl) is a software stack designed to create a local development environment on Windows. It bundles “Apache”, a web server to host websites and applications, “MySQL”: A”, a relational database management system for managing data, and “PHP/Python/Perl”, a programming languages for server-side scripting. In this short article, we shall discuss how…
#configure HTTPS for development server#configure SSL for WAMP server#enable HTTPS on WAMP server#enable SSL localhost#install SSL certificate WAMP#Microsoft Windows#secure WAMP server website#secure WAMP server with SSL#SSL#SSL 3.0#ssl certificate#SSL certificate installation WAMP server#SSL configuration tutorial WAMP#SSL Encoding Format and Extensions#SSL setup for localhost WAMP#WAMP HTTPS configuration guide#WAMP server HTTPS localhost#WAMP server secure connection#WAMP server SSL setup#Windows#Windows 10#Windows 11#Windows Server#Windows Server 2012#Windows Server 2016#Windows Server 2019#Windows Server 2022
0 notes
Text
How to Move Your WordPress Site from Localhost to a Live Server
Developing a WordPress site on localhost is a great way to build and test your website in a controlled environment. However, the real challenge arises when it's time to move the site from your local server to a live hosting environment. If not done correctly, you could encounter broken links, missing images, or even database errors.
In this blog, we'll guide you through a step-by-step process to successfully move your WordPress site from localhost to a live server.

Step 1: Choose the Right Hosting Provider
Your first step is to select a reliable web hosting provider that meets your website’s needs. Look for:
Server Speed: Fast servers for better performance.
Uptime Guarantee: At least 99.9% uptime to ensure availability.
Ease of Use: User-friendly dashboards and tools.
WordPress Support: Hosting optimized for WordPress websites.
Popular options include Bluehost, SiteGround, and WP Engine.
Step 2: Export Your Local WordPress Database
The database is the backbone of your WordPress site. To export it:
Open phpMyAdmin on your local server (e.g., XAMPP or WAMP).
Select your WordPress database.
Click on the Export tab and choose the Quick Export method.
Save the .sql file to your computer.
Step 3: Upload Your WordPress Files to the Live Server
To move your files:
Compress Your WordPress Folder: Zip your local WordPress installation folder.
Access Your Hosting Account: Use a file manager or an FTP client like FileZilla.
Upload the Files: Transfer the zipped folder to your hosting server's root directory (usually public_html).
Unzip the Folder: Extract the files once uploaded.
Step 4: Create a Database on the Live Server
Now, set up a new database on your live hosting server:
Log in to your hosting control panel (e.g., cPanel).
Navigate to the MySQL Databases section.
Create a new database, database user, and password.
Assign the user to the database with full privileges.
Step 5: Import the Database to the Live Server
Open phpMyAdmin in your hosting control panel.
Select the new database you created.
Click the Import tab.
Choose the .sql file you exported from your localhost.
Click Go to import the database.
Step 6: Update the wp-config.php File
To connect your site to the live database:
Locate the wp-config.php file in your WordPress installation.
Open the file in a text editor.
Update the following lines: define('DB_NAME', 'your_live_database_name'); define('DB_USER', 'your_live_database_user'); define('DB_PASSWORD', 'your_live_database_password'); define('DB_HOST', 'localhost'); // Keep this unless your host specifies otherwise.
Save the file and upload it to your server via FTP.
Step 7: Update URLs in the Database
Your localhost URLs need to be replaced with your live site URLs.
Use a tool like Search Replace DB or run SQL queries in phpMyAdmin.
In phpMyAdmin, run the following query: UPDATE wp_options SET option_value = 'http://your-live-site.com' WHERE option_name = 'siteurl'; UPDATE wp_options SET option_value = 'http://your-live-site.com' WHERE option_name = 'home';
Step 8: Test Your Live Website
Once everything is uploaded and configured, check your website by entering its URL in a browser. Test for:
Broken Links: Fix them using plugins like Broken Link Checker.
Missing Images: Ensure media files were uploaded correctly.
Functionality: Verify forms, buttons, and features work as expected.
Step 9: Set Up Permalinks
To ensure proper URL structure:
Log in to your WordPress admin dashboard on the live site.
Go to Settings > Permalinks.
Choose your preferred permalink structure and click Save Changes.
Step 10: Secure Your Live Website
After migrating, secure your site to prevent vulnerabilities:
Install an SSL Certificate: Most hosting providers offer free SSL certificates.
Update Plugins and Themes: Ensure everything is up to date.
Set Up Backups: Use plugins like UpdraftPlus for regular backups.
Conclusion
Moving your WordPress site from localhost to a live server may seem daunting, but by following these steps, you can ensure a smooth and error-free migration. A successful move allows you to showcase your site to the world, engage your audience, and achieve your goals.
Start today and take your WordPress project live with confidence!
0 notes
Text
Creating a Simple REST API with PHP: A Beginner's Guide
In the digital era, REST APIs have become the backbone of web and mobile applications, facilitating seamless communication between different software systems. PHP, with its simplicity and wide adoption, is a powerful tool for building robust REST APIs. This guide aims to introduce beginners to the fundamentals of creating a simple REST API using PHP.
Understanding REST APIs
Before diving into the technicalities, it's essential to understand what REST APIs are. REST (Representational State Transfer) is an architectural style for designing networked applications. It relies on a stateless, client-server, cacheable communications protocol -- typically HTTP. In simpler terms, REST uses HTTP requests to GET, PUT, POST, and DELETE data.
Setting Up Your Environment
To start building your REST API with PHP, you'll need a local server environment like XAMPP, WAMP, or MAMP. These software packages provide the necessary tools (Apache, MySQL, and PHP) to develop and test your API locally. Once installed, start the Apache server to run your PHP scripts.
Planning Your API
Before coding, plan what resources your API will provide access to and the corresponding endpoints. For example, if you're building an API for a blog, resources might include articles, authors, and comments. An endpoint for retrieving articles could be structured as http://yourdomain.com/api/articles.
Creating the API
1. Setting Up a Project Structure
Create a new directory in your server's root folder (e.g., htdocs in XAMPP) named my_api. Inside this directory, create two files: .htaccess and index.php. The .htaccess file will be used for URL rewriting, making your API endpoints clean and user-friendly.
.htaccess
apacheCopy code
RewriteEngine On RewriteCond %{REQUEST_FILENAME} !-f RewriteRule ^([a-zA-Z0-9-]+)/?$ index.php?request=$1 [QSA,NC,L]
This configuration redirects all requests to index.php, passing the request path as a query parameter.
2. Implementing the API Logic
index.php
Start by initializing an array to mock a database of articles. Then, parse the request to determine which resource is being accessed.
phpCopy code
<?php // Mock database of articles $articles = [ ['id' => 1, 'title' => 'The First Article', 'content' => 'This is the first article.'], ['id' => 2, 'title' => 'The Second Article', 'content' => 'This is the second article.'] ]; // Get the request path $request = $_GET['request'] ?? ''; // Split the path into components $requestParts = explode('/', $request); // Determine the resource $resource = $requestParts[0] ?? ''; header('Content-Type: application/json'); switch ($resource) { case 'articles': echo json_encode($articles); break; default: http_response_code(404); echo json_encode(['error' => 'Resource not found']); break; }
This script checks the requested resource and returns a JSON-encoded list of articles if the articles resource is accessed. For any other resource, it returns a 404 error with a JSON error message.
3. Testing Your API
To test your API, you can use tools like Postman or simply your browser. For instance, navigating to http://localhost/my_api/articles should display the JSON-encoded articles.
Extending Your API
Once you've mastered the basics, you can extend your API by implementing additional HTTP methods (POST, PUT, DELETE) and adding authentication for secure access. This might involve more advanced PHP programming, including working with headers for content type and authentication tokens, and dealing with more complex routing and database interactions.
Best Practices
When developing your API, keep in mind best practices such as:
Security: Implement measures like authentication, input validation, and sanitization to protect your API.
Versioning: Version your API from the start (e.g., v1/articles) to avoid breaking changes for users as your API evolves.
Documentation: Provide clear, concise documentation for your API's endpoints, request parameters, and response objects.
Embracing PHP's Flexibility for Rapid Development
One of the unique aspects of creating a REST API with PHP is leveraging PHP's inherent flexibility and simplicity for rapid development. As a dynamically typed language, PHP allows developers to iterate quickly without the strict type constraints found in statically typed languages. This flexibility is particularly beneficial in the early stages of API development, where the data model and business logic might frequently change. Furthermore, PHP's extensive standard library and numerous frameworks can significantly speed up the development process. For instance, using a PHP framework like Laravel or Symfony can provide out-of-the-box solutions for routing, security, and ORM (Object-Relational Mapping), enabling developers to focus on the unique aspects of their application rather than boilerplate code. To streamline projects with experts, businesses look for top php development companies and avail their services to implement better development strategies.
The Power of PHP's Community and Resources
Another unique advantage of building REST APIs with PHP is the extensive community support and wealth of resources available. PHP is one of the most widely used programming languages for web development, with a vibrant community that contributes to a vast ecosystem of libraries, frameworks, and tools. This community support means developers can often find solutions to common problems and questions through forums, blogs, and tutorials. Additionally, the availability of comprehensive documentation and best practices makes it easier for businesses to avail PHP development services to delve deeper into advanced topics. The combination of PHP's ease of use and the support of its community makes it an excellent choice for developing REST APIs, providing both beginners and seasoned developers with the resources they need to succeed.
Conclusion
Building a REST API with PHP is a rewarding project that can enhance your web development skills. Following this guide, you've taken the first step towards creating your API, understanding its foundational concepts, and applying best practices. As want to incorporate more features, refine code, and explore the vast possibilities of RESTful services, the natural choice for them is to hire php developers by outsourcing.
Remember, the key to mastering API development is practice and continuous learning. Experiment with different scenarios, contribute to open-source projects, and stay updated with the latest trends in web development. Your journey as an API developer is just beginning, and the digital world eagerly awaits your contributions.
0 notes
Link
WordPress is probably the number one free blogging platform in today's society. So tens of thousands of bloggers across the world use WordPress to power their sites (like me). But how can WordPress, a FREEblogging platform, earn you some significant income? Here is a step-by-step guide showing how to earn money with WordPress. Select a Niche The absolute MOST IMPORTANT part of a website/blog is your market. Choose a specific and one of a kind niche you feel comfortable writing about. For example, if you're excellent at web design, write about a specific part of web design for example coding. Once you've selected your niche, brainstorm some articles you can write. This will aid in the long term; trust me, you don't wish to start a blog and half a year down the road you have a sever brain fart and can not write any more posts. Make sure your market is unique but wide enough so it is possible to compose at least 2,000 articles on it! WordPress is a free blogging platform, but you'll require a site first, and the website has to be hosted one of two ways: Free Hosting or Paid Hosting. Free Hosting If you're trying to find a free hosting service to host WordPress, the best solution for you would likely be WordPress.com hosting. I suggest this option since it is 100% free and from WordPress itself! The WordPress platform automatically comes with the completely free hosting service out of WordPress.com (as its name implies ) and you won't need to be concerned about all the complications of internet hosting (name servers, updates, mysql databases, etc.. )! Plus, setup is a breeze and you get to choose your own domain (has to be a subdomain of WordPress.com though). Trust me, free WordPress hosting does not becoming any better than WordPress.com! An alternative would be finding free web hosting services along with installing WordPress manually. This isn't recommended because it requires a great deal of hassle finding a 100% free web hosting service that has a fantastic up-time and service for WordPress. I'd definitely recommend WordPress.com hosting over free web hosting. The last and worst (in my point of view) choice for free WordPress hosting is self-hosting your website. This is definitely the most complicated process as you need to port forward in accordance with your router, set up a self-hosting service such as WAMP, and receive a free domain from No-Ip. Org (subdomain naturally ). The worst part about it is that your website will have zero bandwidth due to the fact that you yourself are hosting your own website. I'm not even going to go in-depth with this; you can Google the way to self-host WordPress since I won't waste my time describing my least recommended method of free web hosting. Paid Hosting Paid hosting enables you to have total control over your WordPress site (you may write whatever you need; with WordPress.com hosting you have to abide by their terms of service). Bloggers frequently use this to their advantage, as creating beautiful-looking templates and site design is a breeze with hosting. First, you'll need to discover a fantastic hosting service. I recommend HostGator because (in my humble view ) they are cheap yet offer you the very best support and compatibility for WordPress. With HostGator, simply sign up (you also get a free domain with any plan) and in your control panel you can click set up WordPress! Once you've installed WordPress, then you'll be all set! Get a Theme, Configure WordPress Widgets, and Get Started Writing Stuff! As soon as you've setup WordPress, I recommend choosing a theme. WordPress has a large variety of themes, and you can choose on which one matches your blog the best. The next step after installing WordPress is installing widgets. Widgets are special components of your WordPress site that each have a specific function. In my opinion, SEO, Backup, Cache, and anti-Spam would be the widgets you absolutely need. After installing the widgets (it is possible to choose which ones you want and which ones you don't), get ready to write! Hopefully you are already able to spit out a few blog posts from your own brainstorming! Receive Traffic As a webmaster, I can't emphasize the importance of traffic. You might have the BEST article on the planet, but if your site's only loyal guest is your mother, the world will not be able to see your amazing writing. That's why traffic is essential to your blog's survival. To begin, I immediately suggest that you submit your site only to the leading search engines (Google, Yahoo!, Bing). As a little precaution, I recommend you not to concentrate on submitting your website to a lot of search engines, because the majority of the time search engines need to locate your website automatically. Generating some start traffic is rather simple, given that you've got friends and family. Utilize FaceBook, Twitter, and all of other methods to let everyone know about your website. Assuming that you know more than 50 people in the world, this should be quite easy and you should begin to have some steady traffic.
1 note
·
View note
Text
How to Easily Install Joomla 4.x
As you know, Joomla is one of the most popular open-source Content Management Systems in the world. In previous years, you are used to using Joomla 3 to manage and build up their sites. We offered you a way to install Joomla 3.x so that you can easily and simply install and use the Joomla 3 versions. However, currently, the Joomla! 4.x coming with many new features has been released, which means you need a guide on how to install Joomla 4.x. That is the reason why we give you the blog today. So, let's start to explore it now!
The technical requirements to install Joomla 4.x
If you want to install Joomla 4.x, you need to check the technical requirements first in order to ensure that you can smoothly install without any trouble. Let's have a look at the requirements below: - Server: Linux, Apache. Besides, you can also locally install it on your computer using WAMP/ JAMP/ MAMP/ XAMPP software. - PHP: 7.3, 7.4, or 8. - MySQL/ MySQLi 5.6+ or MariaDB. - PostgreSQL: 11 (if you install on localhost). - memory_limit = 128MB or more. - upload_max_file_size = 4M or more. - max_execitopm_time = 180 or more. - CURL library: your server works with url_fopen or curl. - OpenSSL Libraries: enabled. - PHP file_get_contents() function: available or unlocked.
How to install Joomla 4.x
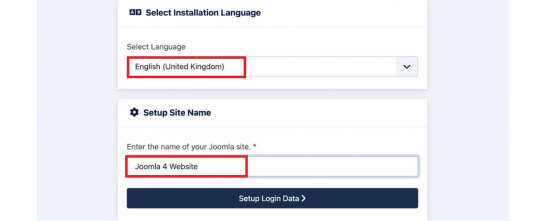
There are 2 ways for you to install Joomla 4.x. Thus, we will find out both of them so that you can easily choose the most suitable one. Install Joomla 4.x on a web server First of all, before you install Joomla 4.x on the web server, you need to download the Joomla! 4 package from the official website. After you click on the download button, the Joomla 4 installation package will be downloaded and saved on your computer. Don't forget to unzip it to a new folder.

Set up the Database Now, it's time for you to generate a MySQL database, then assign a user with full permissions. In order to do that, let's follow the steps below: - Login to the cPanel. - Scroll down and select MySQL Databases in the Database section. - Create a new database by entering the name of the new database, then click on the Create Database button. - Generate a user for the database by filling out the username, password, confirmed password, and pressing the Create User button. Besides that, you can also add more users to the database in the Add User to Database section. - There will be a table of User Privileges, so check the All Privileges box at the top of the table to make sure the user will have all the privileges or full permissions. Install and set up Joomla 4 The next step you need to do is upload the Joomla files to your server via FTP Client. Let's ensure that you are utilizing an official release of an FTP Client so that there will no error during the Joomla 4 installation and setting process. Once uploading the Joomla package, we will start the installation by accessing your URL or domain you uploaded the Joomla 4 files before. For instance, it may be https://your-domain.com/folder-name. The interface will show you the language and site name setup first. Thus, simply choose the language, then fill out the name of your site. After that, you just need to click on the Setup Login Data button to move on to the next step.
Next, you need to enter the login data, including the Super User name, Super User account as well as password, and the email address of the Super User. Then, let's press the Setup Database Connection button.

Now, we will move on to the database configuration. So, you need to choose the database type first. After that, simply enter the hostname, username, password as well as database name. Besides that, you can fill out the table prefix randomly. Once everything was entered, let's click on the Install Joomla button.

Everything is done. You installed Joomla 4 successfully. There will be a congratulation message to ensure that. So, now, you can go to the admin backend dashboard or open the site without any difficulties.

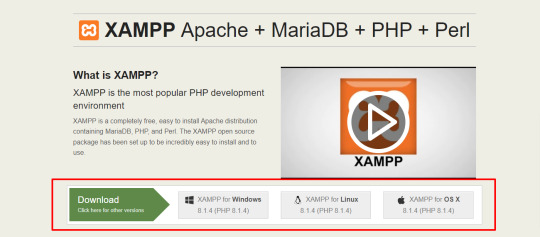
Install Joomla 4.x on Localhost with XAMPP If you don't want to install Joomla 4.x on a web server, you can also do it on Localhost via XAMPP. In order to do that, simply implement the following steps. First of all, you need to download and install XAMPP.
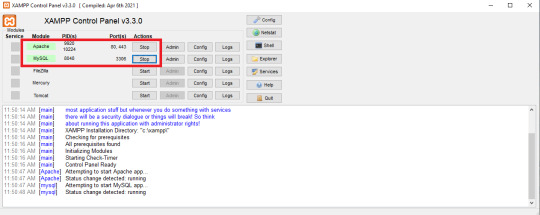
Once installed, it's time for you to start the XAMPP and turn on the two options including Apache and MySQL.
Next, let's open the browser and type localhost/phpmyadm, then click on the New option in the top left of the screen. Now, simply fill out the database name and press the Create button.

We will go on the process by downloading the Joomla 4 package and extracting it from the root of your site. For instance, it may be C drive -> Program Files (x86) -> Ampps -> www -> create a folder and unzip the package there. Now, you just need open the browser to access localhost/yourfoldername. So, this is the place where you moved the unzipped Joomla file. For example, it may be localhost/joomla-file-name. So, the interface will show you the language and site name setting. You just need to follow the Joomla 4 configuration steps we introduce to you above.
Wrap up
In conclusion, we hope that the two methods we bring you will help you install Joomla 4.x quickly and effectively. If you have any trouble or difficulties during the Joomla 4 installation, don't hesitate to leave your comment below so that we can support you as soon as possible. Besides, in case you try to install Joomla 4.x successfully after following the steps below, let's share it with others. Last but not least, once Joomla 4 installation, don't forget to give it an eye-catching and professional appearance. All you need to do is visit our site as well as explore a lot of high-quality, attractive, and responsive Joomla 4 Templates. Thanks for your reading and hope you enjoy the blog. See you the next time with many tutorial blogs related to Joomla 4. Read the full article
0 notes
Text
Xampp On External Drive

To really be able to develop for WordPress or another CMS it’s best to have a local web server. This will save you time in FTPing and editing remote files on your final server. I used to use WAMP server, although very good, it had some limitations. I found I was switching between my desktop and laptop, making things unnecessarily complicated. Than I discovered XAMPP Lite, which I installed on a USB stick, and it works great. Another simple option is Instant WordPress, I haven`t played around to much, but I think you are much more limited.
Getting Started With Xampp
Xampp On External Drive Mac
Xampp Tutorial
Xampp Where Is Localhost
Installing XAMPP Lite
Installing XAMPP lite is pretty straight forward, use the link below to use the self extracting EXE file.
https://bellaload91.tumblr.com/post/654440098576957440/video-converter-to-avi-full-version-downloadmarcus-reid. Download XAMPP USB Lite 1.7.7 – as an EXE file, Zip and 7zip can be downloaded here.
Example, open up the XAMPP Configuration of Control panel by clicking on Config. Then click the button marked Service and Port Settings. A new box will open and be on the Apache tab. Change the port to something random, such as 11111. Then click the Filezilla tab, and change it. Not using the setup script, or selecting relative paths in the setup script, is preferred if you are installing XAMPP on a usb drive. Because on each pc such a drive can have an other drive letter. You can switch from absolute to relative paths at any time with the setup script. I can't seem to start MySQL on my external USB 3.0 drive. In the past, I haven't had problems working off of external drives. This is the first time using a large drive. Any help will be appreciat. If you're trying to get XAMPP to use a network drive as your document root you have to use UNC paths in httpd.conf. XAMPP will not recognize your mapped network drives. For example the following won't work, DocumentRoot 'X:/webroot' But this will, DocumentRoot '//192.168.10.100/webroot' (note the forward slashes, not back slashes). Hi, I am using XAMPP for developing my Inventory management system. I have stored the XAMPP in Drive C in Windows. But there is a risk if windows corrupt I will lose all my data, So I want to save the XAMPP in Drive D and acces all the pages stored in httdocs from Drive D. Please Guide me.
Launch the Installer, and browse where you want to install XAMPP.
Select the flash drive and directory you wish to use. You should have at least 400 MB of free space, plus how ever much space you need for your website, and databases.
Click install, all of the files will be extracted to your flash drive. This may take a few moments depending on your flash drive’s speed.
Click Finish and you are now done!
Launching XAMPP
Launching XAMPP is very easy. Navigate to the directory on your USB drive and launch xampp-control.exe.

Getting Started With Xampp
Click Start beside Apache and MySql to get your webserver running.
Please note: Do not check the Svc box, as this will run the server as a Windows service. To keep XAMPP portable, you do not want it running as a service!
Windows Firewall or your firewall may prompt you that it blocked the server; click Allow access to let your server run.
Open your favorite web browser and type localhost in the address bar. If everything is working correctly you should see the following in your address bar. Choose your default language…
Xampp On External Drive Mac
You should now see the default XAMPP page.
Click status to see that everything is working. If it is not try restarting the services.
You are now ready to start building and adding webpages your mobile webserver. Save all of your web files in the xampphtdocs folder on your flash drive.
Xampp Tutorial
Well that is it for installing XAMPP Lite. Check back tomorrow for how to setup wordpress in XAMPP Lite.
Xampp Where Is Localhost
Complete XAMPP details are available at http://www.apachefriends.org/en/xampp-windows.html.
0 notes
Text
Create Local Mysql Database Mac

Create Mysql Database On Local Machine
Create Local Mysql Database Macro
Create Local Mysql Database Macros
Create Local Mysql Database Mac Os
Whether you are a seasoned PHP / MySQL developer, or a beginner, it really helps to have a local development environment. This allows you to test your code as you develop your web application before publishing it 'live' to the Internet.
Choose a remote MySQL connection method. You can use either of the following methods to access your MySQL databases remotely: SSH tunnel: This is the more secure method. You set up an SSH tunnel that forwards a port on your local computer to the remote MySQL server.
Mysql -u root -p'root' -h 127.0.0.1 -P 3306 -D local no space after -p as specified in the documentation It will take you to the mysql console directly by switching to the mentioned database. In this quickstart, you connect to an Azure Database for MySQL by using Node.js. You then use SQL statements to query, insert, update, and delete data in the database from Mac, Ubuntu Linux, and Windows platforms. This topic assumes that you're familiar with developing using Node.js, but you're new to working with Azure Database for MySQL.
The following power tip will guide you through setting up a PHP, Apache, and MySQL development environment on your local Windows system. We'll also take a look at the UEStudio features that can make your PHP / MySQL development easier.
Please keep in mind that PHP, Apache, and MySQL are software provided by third party entities. Therefore we (IDM) cannot provide technical support for the installation of these on your system.
Step 1. Download the installation files
In days past, you would have had to download Apache server, PHP, and MySQL all separately. However, there are now solutions which include these components bundled together and pre-configured to run 'out of the box' on a Windows system. We recommend using WampServer, which provides the basics for setting up your local Apache / PHP / MySQL environment on Windows.
If you do not wish to use an 'all-in-one' solution, you will need to download and install the Windows installers for each of the below components:
Apache, the web server software.
PHP, the general purpose scripting language that runs on Apache.
MySQL, the database server software that works hand-in-hand with PHP and Apache.
Step 2: Install everything and make sure it works
For the purposes of this power tip, we are assuming that you've chosen to install WampServer. To install it, simply double-click the setup file and follow the prompts.
You can confirm that everything has installed properly by pointing your browser to http://localhost/ while Wamp is running. If you see the WampServer 'welcome' page, you know everything is installed and running properly. You can also verify this by checking the Wamp icon in the system tray – if the icon is green, then everything is up and running.
Note: You may need to download and install the dependencies described in this community forum post in order for WampServer to run properly on your system.

Step 3: Set up MySQL
Since Wamp installs MySQL, all you need to do is set up a user and a database. Click the Wamp icon in the system tray, then go to MySQL » MySQL console. If the console prompts you for a password, just hit Enter.
Create a MySQL database
Now you need to create a new MySQL database. You can do this by issuing the following command in the console:
Make sure to include the semi-colon at the end of the command! The console should give a 'query ok' response.
You can verify that the databases have been created by using the 'Show databases' command. If you type, 'Show databases;' and hit enter, you should see something similar to:
Create a Table
For the purposes of this power tip, we will create a table called 'names' that includes the following fields: key, first, last. Create this table in our 'uestudio_test' database by using the following commands:
USE uestudio_test;
...then:
CREATE TABLE names (id INT NOT NULL AUTO_INCREMENT, first VARCHAR(48), last VARCHAR(48), PRIMARY KEY(id));
We won't cover the syntax of these commands in the scope of this power tip.
You can see the structure of the table and confirm it was created correctly by typing:
You should see something similar to:
Now, we need to insert some sample data into our table. For example, if we want to create an entry to insert the name 'John' (first) 'Smith' (last) into the table 'names', we would do so using the following command:
INSERT INTO names (first, last) VALUES ('John', 'Smith');
You can insert additional data by modifying the VALUES. Because you created the column id as an auto increment, you don't need to specify a value for this field.
To display all the data in the table, simply type:
Because we inserted a few other names into our table, this query produced the following results:
Create a user
It's never a good idea to use the 'root' user in MySQL to interact with your databases. Create a new user and assign it to your database in the MySQL console by issuing the following command:
GRANT ALL PRIVILEGES on uestudio_test.* to 'SomeUser'@'localhost' IDENTIFIED BY 'SomePassword';
Obviously you will want to modify the user name and password in the above to suit your preferences. You should see the console spit out:
Step 5. UEStudio and PHP/MySQL
PHP Support
UEStudio has built in PHP support which allows you to run scripts, check syntax, and more. To configure PHP support, click the Coding tab then open the PHP drop down. Click the last item here to set the location of the PHP executable.
Click the Browse button to browse to and select the folder containing the PHP executable, which in a default Wamp installation would be:
C:wamp64binphpphp7.1.9
Create Mysql Database On Local Machine
Of course this folder path may vary based upon what version of PHP you have installed and running.
After you've set the PHP executable's parent folder, you can use the PHP options in the Coding tab. Simply open a PHP file then click on any of the options from the PHP icon.
UEStudio offers additional options that make developing PHP scripts easier, but before we demonstrate those options we will create a sample PHP script that we can work with.
Learning to code PHP is not within the scope of this power tip, so we won't go into great detail about the script below. This script is simply provided as an example.
The script below will connect to the 'uestudio_test' database running on localhost. This is the database we created earlier. The script connects, then retrieves all the data from the 'names' table and output the results in an HTML table.
If you used different values for the variables, you would need to change them for the script to work according to your environment.
Create and save this script with any file name and a .php extension, like 'mysql_test.php,' in the www directory, which is the same location as the phpinfo.php script from above. If you click on Run script in the PHP drop down, you'll see the output of the script in the output window.
You can try the other commands available in the PHP drop down.
Create Local Mysql Database Macro
To see the contents of the script in the web browser, type http://localhost/mysql_test.php in your browser. You should see something similar to:
1JohnSmith2BobWhite3MikeJones
Create a Project
You don't have to create a project to develop using PHP/MySQL in UEStudio, but there are added benefits to creating a project. If the files you are editing are part of a project, then UEStudio's IntelliTips will parse the PHP script, which provides you a visual representation of classes, functions, etc. in the Classviewer, and provides some context-aware auto-complete when typing source code.
To create a project, click on New project in the Project tab. Name and save the project file. The 'Project settings' dialog will open, and you can add the 'mysql_test.php' to the project by clicking + Active file.
To view the parsed representation of the file, click on the Tags tab at the bottom of the Workspace manager. If the Workspace manager is not open, you can open it by checking Workspace manager in the Layout tab. Using the mysql_test.php file you created in this tutorial, you should see something similar to the below parsed representation:
By adding your source files to a project, you can also access IntelliTips functionality in the Project tab, like Find symbol definition, Display functions, etc.
For a single file like in this example, there really isn't much advantage for this. However, if you are using an object-oriented style of PHP programming, and your project includes many files, you would see something that looks more like:
As you can see, with a large project, this feature can be very helpful.
Link local to remote
If your local development environment is intended to 'mirror' your live site, you can link a local folder to a remote folder. This will allow you to sync or upload / download files between the local and remote folder in a single click. Learn more about linking local folders to remote folders.
The package is located inside a disk image (.dmg) file that you first need to mount by double-clicking its icon in the Finder. It should then mount the image and display its contents.
Before proceeding with the installation, be sure to stop all running MySQL server instances by using either the MySQL Manager Application (on macOS Server), the preference pane, or mysqladmin shutdown on the command line.
To install MySQL using the package installer:
Download the disk image (.dmg) file (the community version is available here) that contains the MySQL package installer. Double-click the file to mount the disk image and see its contents.
Figure 2.1 MySQL Package Installer: DMG Contents
Double-click the MySQL installer package from the disk. It is named according to the version of MySQL you have downloaded. For example, for MySQL server 5.7.35 it might be named mysql-5.7.35-osx-10.13-x86_64.pkg.
The initial wizard introduction screen references the MySQL server version to install. Click to begin the installation.
Figure 2.2 MySQL Package Installer Wizard: Introduction
The MySQL community edition shows a copy of the relevant GNU General Public License. Click and then to continue.
From the Installation Type page you can either click to execute the installation wizard using all defaults, click to alter which components to install (MySQL server, Preference Pane, Launchd Support -- all enabled by default).
Although the option is visible, the installation location cannot be changed.
Figure 2.3 MySQL Package Installer Wizard: Installation Type
Figure 2.4 MySQL Package Installer Wizard: Customize
Click to begin the installation process.
After a successful installation, the installer displays a window with your temporary root password. This cannot be recovered so you must save this password for the initial login to MySQL. For example:
Figure 2.5 MySQL Package Installer Wizard: Temporary Root Password
MySQL expires this temporary root password after the initial login and requires you to create a new password.
Summary is the final step and references a successful and complete MySQL Server installation. the wizard.
Figure 2.6 MySQL Package Installer Wizard: Summary
MySQL server is now installed, but it is not loaded (or started) by default. Use either launchctl from the command line, or start MySQL by clicking 'Start' using the MySQL preference pane. For additional information, see Chapter 3, Installing a MySQL Launch Daemon, and Chapter 4, Installing and Using the MySQL Preference Pane. Use the MySQL Preference Pane or launchd to configure MySQL to automatically start at bootup.
When installing using the package installer, the files are installed into a directory within /usr/local matching the name of the installation version and platform. For example, the installer file mysql-5.7.35-osx10.13-x86_64.dmg installs MySQL into /usr/local/mysql-5.7.35-osx10.13-x86_64/ . The following table shows the layout of the installation directory.
Table 2.1 MySQL Installation Layout on macOS
Create Local Mysql Database Macros
DirectoryContents of Directorybinmysqld server, client and utility programsdataLog files, databasesdocsHelper documents, like the Release Notes and build informationincludeInclude (header) fileslibLibrariesmanUnix manual pagesmysql-testMySQL test suiteshareMiscellaneous support files, including error messages, sample configuration files, SQL for database installationsupport-filesScripts and sample configuration files/tmp/mysql.sockLocation of the MySQL Unix socket
Create Local Mysql Database Mac Os
During the package installer process, a symbolic link from /usr/local/mysql to the version/platform specific directory created during installation is created automatically.
0 notes