#add source url to copied text
Explore tagged Tumblr posts
Visit Tumblr Blog
Explore Tumblr blogs with no restrictions, modern design and the best experience.
Last Seen Tumblr Blogs


Fun Fact
In 2020, 44% of users from Denmark used Tumblr daily.
Text
Mention Source URL, an Attribution PlugIn for WordPress
#add source url to copied text#apache license#append source url on copy#content copyright notice on copy#copy notification#copy text with source link#copy with appropriate credit#creative commons attribution#creative commons license#display source link on copy#gnu general public license#mention source url#MIT License#protect content attribution#source link on copied content
0 notes
Note
Just letting you know that https://www.tumblr.com/aita-blorbos/770330791377059840/am-i-the-asshole-for-getting-my-father-blown-up-i?source=share only happened 2 weeks ago, and breaks the spoiler rule.
Thanks for letting us know, Anon! It's been deleted and will be reposted two weeks from today, 2 January 2025. (By that we mean that we have copied the text of the ask, anonymously re-sent it in, and scheduled it for 2 Jan.)
There was someone in the comments who pointed out that it was spoilers--we forgot to mark down your URL to ping you, but thanks for trying to let us know, too! In the future if you notice a spoiler post, please send us an ask about it, as that's the only way we're garaunteed to see.
General reminder that we have a strict spoiler policy of one month, so please wait until your source material has been out for a month before submitting! If you want to send something in right now immediately, you can also just add a note to your submission that it shouldn't be posted until a certain date, and we'll make sure it isn't.
22 notes
·
View notes
Text
How to Embed Images and Links on AO3
Note: I have a site skin so the colors might look different. Just follow along with the red arrows! Also, this is a tutorial used on the computer, and I assume mobile posting would be different.
First, open archiveofourown.org and log in if you haven't already. If you don't have an AO3 account, sign up for one as soon as possible because it takes about a week for them to verify you and give you access to your new account.

Next, select "Post" in the top right hand corner like you would typically. Set up everything you desire as you normally would until you reach "Work Text*".
Note: If you need further help, I have an AO3 Tag Guide, a Story Title Guide, a List of Random AO3 Shortcuts, and a How to Post a Work on AO3 with Step-by-Step Explanations Guide for your convenience! I also have a Foundations Writing Lesson post for any beginners or for people who would appreciate a review <333

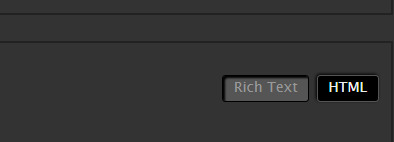
Once there, click on "Rich Text" in the top right of that section, and then select the image icon or the link icon, depending on which you are intending to make.
Note: Check under the cut for more in-depth instructions slash a continuation of this guide! There is an Image Icon Route and a Link Icon Route.
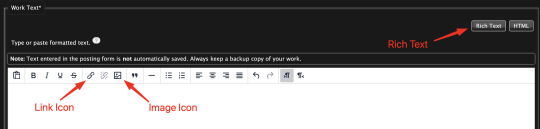
Image Icon Route
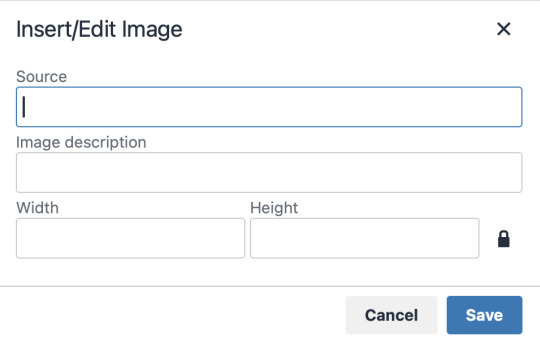
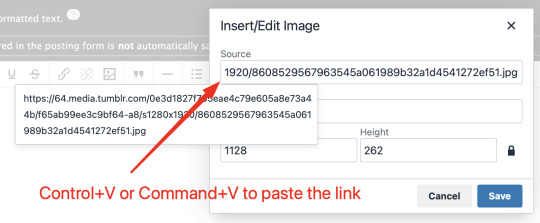
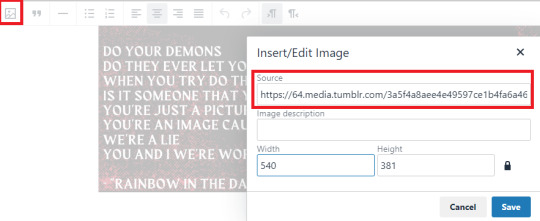
Once you click on the Image Icon, the screen similar to below should pop-up:
*Link Icon Route detour start here
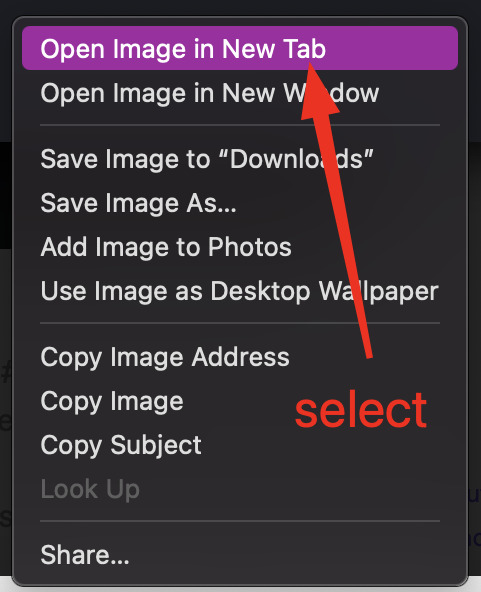
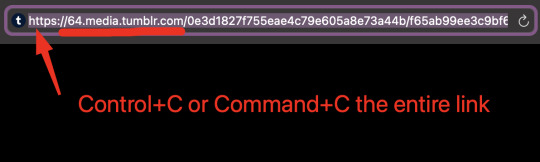
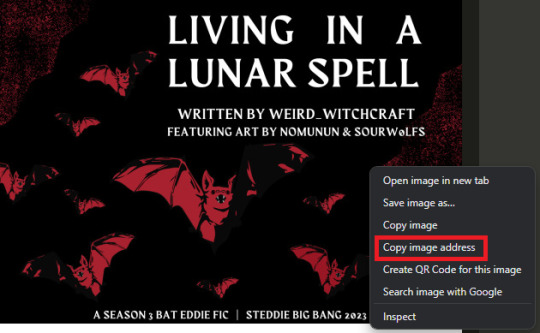
The source is the link to the image you're wanting to add to your work. AO3 doesn't host images itself, but you can use an image hosting site such as postimages.org or even Tumblr itself. If you want to use Tumblr, post a draft with the desired image or locate a post with the desired image. Once you've done that, right click the desired image and Open Image in New Tab (or whatever your computer's equivalent is).
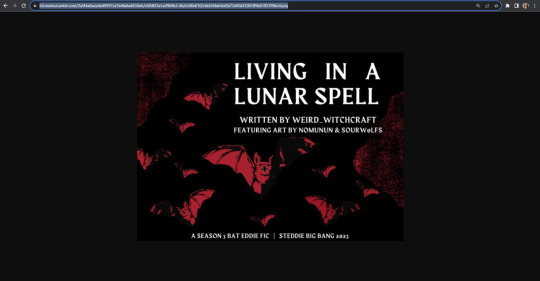
You should have a tab open that starts with "https://64.media.tumblr.com" followed by a bunch of numbers and letters. I want you to copy that link and post it in the source box.
*Link Icon Route detour ends here
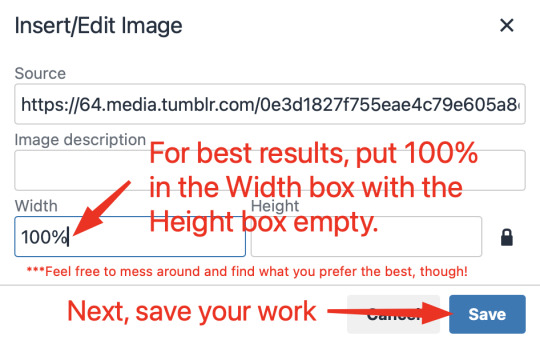
Now that the image link is in place, adjust your Width/Height boxes if desired. Feel free to add an image description as well. For best result, I suggest doing 100% in the Width box with nothing in Height, but this is ultimately a personal decision. Feel free to mess around with the proportions using the work drafts and find what's best for you!
If you prefer, you can also use < img src="LINK" alt="IMAGE DESCRIPTION" width="100%" align="center" /> aka < + img src="https://64.media.tumblr.com/0e3d1827f755eae4c79e605a8e73a44b/f65ab99ee3c9bf64-a8/s1280x1920/8608529567963545a061989b32a1d4541272ef51.jpg" alt="" width="100%" align="center" /> for this example (*excluding the plus sign at the start) to insert an image using HTML instead of Rich Text. It'll look like this:

It is always a good idea to double-check and confirm that everything is how you want it. Previewing your work also allows you to create a draft.
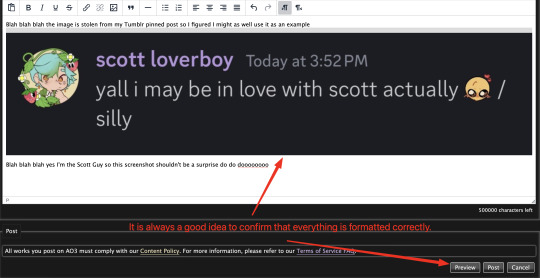

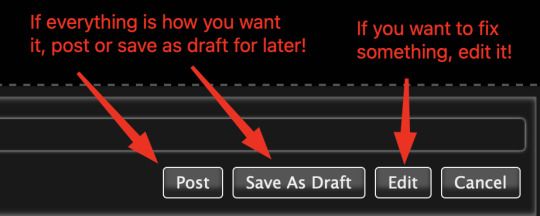
If you're unhappy with something, edit the work to fix it! If you're happy with how everything looks, go ahead and post it! You're finished here! You've successfully posted a work with an image embedded! Well done; good job :D
Link Icon Route
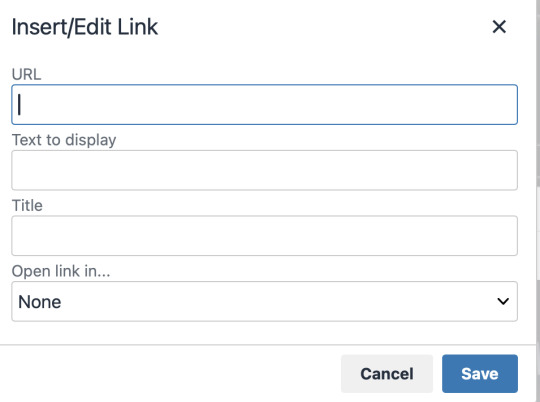
Once you click on the Link Icon, the screen similar to below should pop-up:
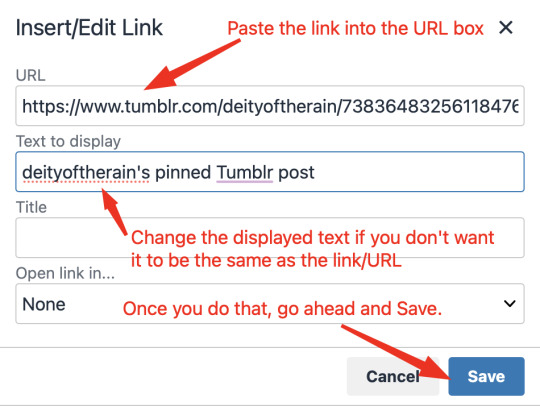
Go copy (Control+C or Command+C) the link to whatever it is you want to insert into the body of the work.
Note: If you're wanting to link specifically to an image and not a post containing that image, scroll up to the link icon route detour colored purple.
Once you got that, paste (Control+V or Command+V) the link into the URL box. If you want something other than the link to display, change the text in the "Text to display" box.
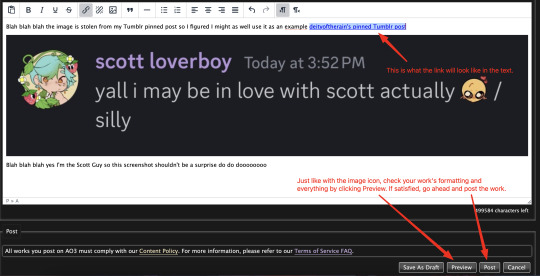
Save your work, check the formatting and everything else like we did in the Image Icon Route section. If everything is how you want it, then congratulations! You have successfully added a link embedded to your work!
If you have any questions or comments, feel free to comment and I'll respond! If this guide was helpful to you, please like and reblog! I appreciate it <333
#rain’s tips#ao3 author#ao3 help#ao3 writers#ao3#archive of our own#embedded#images#links#ao3 link#ao3 images#ao3 guide#idk how to tag this#idk what tags to use#writing help#guide
17 notes
·
View notes
Text
How to Add Images to Ao3
Since it's @steddiebang season I thought I'd do a quick guide on how to add images to your fics in case people don't know how! First off, you need to use the "Rich Text" Editor on Ao3
Next, you need the url of the image you want to embed. This needs to be a direct link to the image (not the post of it on socials) the way to get this is to right click on the pic wherever it's posted and "copy image address" this will copy the direct link to the image
In the Ao3 Rich Text editor click the picture icon to "insert/edit image" paste the "source" url adjust width and height as needed
There you go! Image in your fic! A few things to note: I copied this url from tumblr, the quality is significantly lower than the Ch1 image I already have in there. Since I haven't posted all my title cards on socials I posted them on imgur and set them to private. You could also post them on a private Pinterest board or another hosting site, you just need that url to the image address.
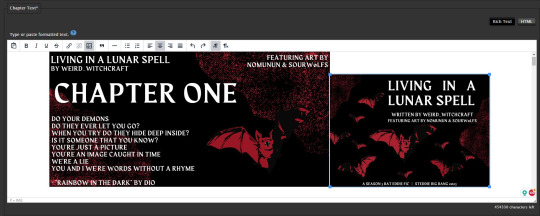
If you want the image to be centered (something i struggled with for a while) you can click next to it to select the text line it's sitting in and center it from there
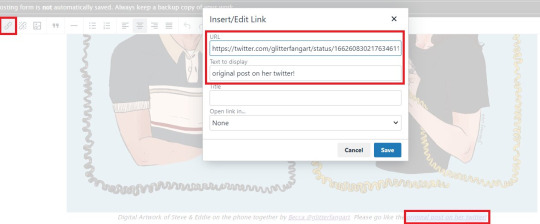
Personally, when I embed art in fics I add a line underneath to link to credit the artist & the original post to encourage readers to engage with the art directly. You can do that in the rich text editor like so:

And cause i'm a stickler for crediting here's the link to this art by @glitterfang on Twitter & Tumblr
If you want to link anything in the Summary or Notes then you need to use html like this: <a href="LINK URL" rel="nofollow">DISPLAY TEXT</a> Okay! Thanks for coming to my ted talk, hope that helps at least one person!


67 notes
·
View notes
Note
Hey! Regarding your question in the comments of my fic, I wanted to explain to you how I add images to my fics on AO3!
When you go to the secion 'Chapter Text', you click on 'Rich Text'.
Then you click on this icon:

You get this box:
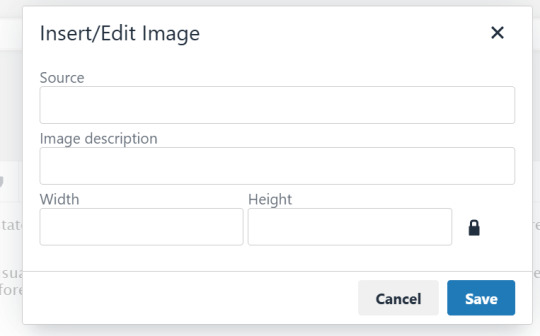
In the box for 'Source' you copy-paste the link to your image. Some people use the link of an image on, for example, Tumblr. I use this website: https://imagekit.io/tools/image-to-url/
You copy the link you just made, and paste it. You pick a width and height and click save!
If you want the image centered, you'll have to add this to the HTML:

I hope this helped! If not, tell me your issue and I'll try to see how I can help!
(And thank you so so so much for the sweet and long comments! 🩷)
Heyy yeah that's basically what i was doing, except for the centering thing. It did work briefly in October but :/ not since then. I did try to use the website u say u used for source cuz maybe it was a source problem but :| nope. I also tried to add the centring thing just in case but, well

This is kinda funny. Doesn't wanna show up but hey at least it's in the middle now! 🥲
It's ok tho thanks for taking the time to explain<33 I appreciate it
#if anyone is wondering the fic was “a case of confusion” go read it it's cool#(i loved to react to it lol twas fun )#sherlock & co#ao3
4 notes
·
View notes
Text
Audacity for Debian-based Linux
So, some time around 2020/2021, Audacity for Linux from the repositories of Debian-based distros (including Ubuntu, Mint, etc.) no longer had access to high quality stretch (change tempo, change pitch, shifting slider). This appears to be due to a combination of Debian no longer updating Audacity at all past 2.4.2 (as Audacity's new owners from 3.0.0 on have had...issues, to put it lightly), but also the fact that 2.4.2 specifically was requiring a version of the SBSMS library past what Debian had. It's still the case that the apt version of Audacity on Linux Mint still lacks the high quality stretch functions.
The workaround for this is to compile from source. HOWEVER. Be apprised that if you specifically go for version 2.4.2, there is still a bug around SBSMS, which causes Audacity to crash when attempting high quality stretching. Apparently, if you go for versions afterwards (3.0+, new Audacity owners), or the version before (2.3.3), you will not run into this issue.
I am stubborn, so I have verified that I can now open Audacity 2.4.2 and do a high quality pitch change without crashing. Here are the solution options. Know that both are still compiling from source.
Option 1: Do it manually command by command on the terminal
You will, however, notice that the important download link for the patch is broken. You must get it from here.
Note that you should preface all of the commands listed in that post with "sudo", or they will likely throw an error. (Or do whatever you need to for terminal to continuously recognize root access.) In addition, note that the "pre-installation test" section is not optional. Audacity will not run if the "Portable Settings" folder is not created, and furthermore, the "Portable Settings" folder and all containing files need to have write permissions enabled to the relevant non-root group/owner.
Whether you installed manually or used the script, you will need to go to "/usr/local/share/audacity/audacity-minsrc-2.4.2/build/bin/Release" to launch Audacity. In the file explorer window, you can click the button to the left of the magnifying glass to switch to text input where you can copy and paste the above path. Or, from /home, go up one level, and then navigate through manually.
Change the launcher's icon and add it to the start menu/desktop, per your specific distro and desktop environment.
Option 2: Modify and run a bash script
I found a helpful Youtube video stepping through the process, before they link to a bash script automating the whole thing. However, the script does not include the 2.4.2 patch. There are also a few modifications that need to be done to the script.
Modifications to make (right click the .sh file, open with, pick some text editor):
Line 35: change the dl_directory to match your own system. (Specifically, you probably need to replace "piuser" with your own account name.)
This change also needs be done on lines 115, 116, and 120 (or replace the hard coded parts with "${DL_DIRECTORY}").
Line 77 (optional): add "patch" as a dependent package to check. Like Python, it's mostly likely already installed, so you could leave this commented out.
Lines 139-142: Not a modification, but a note that I didn't end up using this (left it commented out), so I did have to download the 2.4.2 source code from fosshub manually and put it in the location specified by dl_directory. I also put the patch there. If you do want to try to automate the download, you'll not only have to add another line to also download the patch file, but both the source code for 2.4.2 and the patch have hyphens in their urls, so you need to either add backslashes to escape them, or enclose the entire url in quotation marks. But I also can't guarantee that either of those things will work, since I ended up doing the downloads manually.
Line 150: Per the manual installation above, the patch needs to be applied before the build. Add this code block at line 150 (after the script checks to see if the "Build" folder exists):
#SBSMS patch required for 2.4.2 if [ -f "${DL_DIRECTORY}/changepitch.patch" ]; then sudo cp "${DL_DIRECTORY}/changepitch.patch" "${DIRECTORY}/${VERSION}" fi sudo patch -p 1 < changepitch.patch
That's it for changing the script. Save it, close out of the text editor. (If you decided not to try letting the script do the downloads, then make sure you download the source code and the patch and put them in the dl_directory location at this point.)
Enable the script to be executable. (Right click the .sh file, Properties. On the Permissions tab, check that "Allow executing file as a program" is checked.)
Double click the .sh file. I suggest doing the "Run In Terminal" option so you can see the progress. (And if it's really short, probably something went wrong. The build section takes 20 minutes.)
This script does not include installing the offline manual for Audacity. That is covered in the guide posted in Option 1. Sorry, you'll have to do some terminal typing after all.
Whether you installed manually or used the script, you will need to go to "/usr/local/share/audacity/audacity-minsrc-2.4.2/build/bin/Release" to launch Audacity. In the file explorer window, you can click the button to the left of the magnifying glass to switch to text input where you can copy and paste the above path. Or, from /home, go up one level, and then navigate through manually.
Change the launcher's icon and add it to the start menu/desktop, per your specific distro and desktop environment.
#linux#linux mint#ubuntu#debian#audacity#category: other#vibrating at the mashups now once again at my fingertips
9 notes
·
View notes
Text
How to add images into ao3
A guide for mobile, with pictures
To start: post your image on a platform of your choice, privately or publicly. Personally I use tumblr lol
First, select your image

-to do this with tumblr, go to the website
Hold on your photo and select “open image”

“Opening the image” should bring you to a screen like this


Copy the url, then create a new work on ao3, or open your existing work that you want to put the image into
You’ll notice that ao3 automatically sets you in HTML

Change that to ‘Rich Text’
Once in ‘Rich Text’ click on the button that looks like a picture, the one with the sun over the mountains

Paste the url from earlier into where it says “source”
Then click save

-I encourage you to mess around with the height and width once you get the hang of this process

It should look like this

Then you can post it :]
12 notes
·
View notes
Text
Does anyone still look at people's desktop blogs? You totally should because I just added a custom cursor to my theme <3
My simple method below (people who actually know how to code are physically manifesting worms in my home):
pick the image you want as your cursor; I'd personally recommend a transparent png
(optional step that I did) open the image editing program of your choice and add a png of a cursor to the very top left corner; makes your custom cursor easier to use especially if it's a weird shape
you need the image to have a url, so post it somewere online if it isn't already. I made a private tumblr post. More worms are manifesting
copy the code below without adding or removing spaces or anything else
<style>body, *, a, a:hover { cursor:url(IMG URL), auto; }</style>
replace IMG URL in the code with the url of your desired image
go to our blog theme on desktop: [your url here].tumblr.com
edit appearance from the top right (the pallette icon)
copypaste your shiny code into the bottom of the description. Don't worry, it won't be visible once you hit save
hit save
exit
voila 👍
look at my yosuke, boy
If you don't want to clog your description box with code, invisible or not, you can instead
go to edit appearance again
scroll to the bottom
advanced options
add custom css
copypaste the code without the "style" tags
save and exit
voila 👍
look at my yosuke, boy
full disclosure i've heard not everything works on all themes. but at least you don't have to look at the scary wall of text in the source code
SOURCE for all this is @iluvfairytail's guide but it seems to be a page and not a rebloggable post, so
4 notes
·
View notes
Note
Dobnny anon here,
Do you have any tips on writing multi-chapter fics? Also, how do you get the photographs into ao3? I could never do it when I was trying to post moodboards along with a fic.
Sorry, I haven’t had a good week at all and didn’t want to frustrate you in anyway 😔
i just now got notification of this!!
the one thing i’ll say about multi chaps is Know Your Climax. it’s impossible to write a coherent thing unless you know what it’s building toward. that’s one of my problems with already gone. i don’t actually know where all of this is going? so i’m just flailing around in the deep end with no life jacket.
as far as posting pics to ao3, i have my own little homegrown way of doing it that is probably three steps too many but i start by posting my mood board in my tumblr drafts
right click the image > open image in new tab > copy the url > go to your ao3 rich text editor > click add a photo > paste url into the image source > make it your desired size (i usually do 500px wide) > put a space IN FRONT of the picture > center align the space you just made > should center the photo as well > POST
im sorry you had a bad week. i hope you know that you are never frustrating and always hilarious when you show up in my inbox <3 i’m sorry you had a bad week. and i saw your asks to other hannah and i just want to say that having a child is your decision and yours alone. no one has a right to make that decision for you. love you!
5 notes
·
View notes
Text
IPTV Codes for Android Devices
https://iptvtunes.com/
Are you feeling restricted by the limited channel options on your Android device? Have you ever pondered the possibility of expanding your streaming choices affordably? Look no further! This article delves into the realm of IPTV codes designed for Android devices, showcasing the incredible potential they hold for enhancing your entertainment experience.
In essence, IPTV codes open up a vast array of channels, delivering global content directly to your Android device. With just a few codes, you can gain access to a plethora of movies, TV shows, sports events, and more. Picture enjoying premium content without the burden of hefty subscription fees. This article provides a comprehensive breakdown, guiding you through the process of acquiring and utilizing IPTV codes on your Android device.

Understanding IPTV Codes
IPTV codes play a pivotal role in enhancing the functionality of IPTV on Android devices. Essentially, these codes serve as keys to unlock a vast array of channels, content libraries, and features. The benefits they bring to the table are not only significant but also contribute to the growing popularity of IPTV among Android users.
How to Find and Use IPTV Codes
IPTV (Internet Protocol Television) codes, also known as IPTV subscription codes or M3U codes, are alphanumeric strings that provide access to IPTV services. Please note that using IPTV codes to access content without proper authorization may violate copyright laws and terms of service, so it’s important to use them responsibly and within legal boundaries.
To Become iptv Reseller
Here’s a general guide on how to find and use IPTV codes:
Finding IPTV Codes:
Online Forums and Communities:
Many IPTV users share codes and playlists on forums and online communities. Look for IPTV-related forums or groups where users share their experiences and codes.
Social Media:
Platforms like Reddit, Twitter, and Facebook have communities dedicated to IPTV. Search for keywords like “IPTV codes” or “IPTV playlists” to find relevant discussions.
IPTV Providers:
Some IPTV service providers offer free trial codes to potential customers. Check the official websites of reputable IPTV services to see if they provide trial codes.
YouTube Tutorials:
YouTube often has tutorials and videos where users share IPTV codes. Be cautious and verify the legitimacy of the source before using any codes.
Using IPTV Codes:
M3U Playlist URL:
The most common form of IPTV codes is the M3U playlist URL. It is a text file that contains information about the channels and streams. Copy the M3U URL provided by the code.
IPTV Player:
Use an IPTV player or application to input the M3U URL. Popular players include VLC, Kodi, IPTV Smarters, and others. Download and install the player on your device.
Player Configuration:
Open the IPTV player and locate the option to add a new playlist or source. Paste the M3U URL into the designated field.
Verify and Save:
Verify that the playlist is working by checking a few channels. Save the playlist, and the player will usually refresh to display the available channels.
Enjoy IPTV:
Once the playlist is added successfully, you can start enjoying IPTV channels. Navigate through the channels using the player’s interface.
IPTV Services What You Need to Know Related To IPTV
Important Considerations:
Legal and Ethical Use:
Ensure that you have the legal right to access the content. Avoid using codes that provide unauthorized access to copyrighted material.
Security:
Be cautious about the sources from which you obtain IPTV codes. Avoid sharing personal information, and use reputable sources to minimize security risks.
Quality and Reliability:
Consider using reputable IPTV services to ensure better content quality, reliability, and customer support.
Top IPTV Codes for Android Devices
Navigating through the myriad of available IPTV codes can be overwhelming. To simplify your choices, we review some of the top IPTV codes for Android, comparing their features and performance. This section acts as a comprehensive guide for users looking to make informed decisions.
Tips for Optimizing IPTV Experience on Android
While IPTV codes enhance your streaming experience, it’s crucial to optimize the overall performance on your Android device. Learn about compatibility, and gain insights into troubleshooting common issues to ensure a seamless and enjoyable IPTV experience.
Legal Considerations and Best Practices
Before delving deeper, it’s essential to address the legality of IPTV codes. This section outlines the legal landscape and provides best practices for responsible use, ensuring users stay within the bounds of the law while enjoying IPTV content on their Android devices.
Future Trends in IPTV Technology
As technology advances, so does the world of IPTV. Explore the evolving features and anticipated developments in IPTV for Android devices, providing readers with a glimpse into the future of streaming technology.
User Reviews and Recommendations
Real-world experiences matter. This section showcases user reviews and recommendations, offering valuable insights from those who have explored the world of IPTV on their Android devices. Learn from their experiences and make informed choices.
Conclusion
In conclusion, IPTV codes for Android devices open up a world of entertainment possibilities. Recap the benefits and express final thoughts on how these codes revolutionize the way we consume digital content.
https://iptvtunes.com/
#iptv usa#iptv subscription#iptv firestick#iptv#adult iptv#iptv m3u#best iptv#iptv in 2023#movies#tv series
2 notes
·
View notes
Text
Digital Marketing Course in New Chandkheda
1. Digital Marketing Course in New Chandkheda Ahmedabad Overview
2. Personal Digital Marketing Course in New Chandkheda – Search Engine Optimization (SEO)
What are Search Engines and Basics?
HTML Basics.
On Page Optimization.
Off Page Optimization.
Essentials of good website designing & Much More.
3. Content Marketing
Content Marketing Overview and Strategy
Content Marketing Channels
Creating Content
Content Strategy & Challenges
Image Marketing
Video Marketing
Measuring Results
4. Website Structuring
What is Website?- Understanding website
How to register Site & Hosting of site?
Domain Extensions
5. Website Creation Using WordPress
Web Page Creation
WordPress Themes, Widgets, Plugins
Contact Forms, Sliders, Elementor
6. Blog Writing
Blogs Vs Website
How to write blogs for website
How to select topics for blog writing
AI tools for Blog writing
7. Google Analytics
Introduction
Navigating Google Analytics
Sessions
Users
Traffic Source
Content
Real Time Visitors
Bounce Rate%
Customization
Reports
Actionable Insights
Making Better Decisions
8. Understand Acquisition & Conversion
Traffic Reports
Events Tracking
Customization Reports
Actionable Insights
Making Better Decisions
Comparision Reports
9. Google Search Console
Website Performance
Url Inspection
Accelerated Mobile Pages
Google index
Crawl
Security issues
Search Analytics
Links to your Site
Internal Links
Manual Actions
10. Voice Search Optimization
What is voice engine optimization?
How do you implement voice search optimization?
Why you should optimize your website for voice search?
11. E Commerce SEO
Introduction to E commerce SEO
What is e-commerce SEO?
How Online Stores Can Drive Organic Traffic
12. Google My Business: Local Listings
What is Local SEO
Importance of Local SEO
Submission to Google My Business
Completing the Profile
Local SEO Ranking Signals
Local SEO Negative Signals
Citations and Local
Submissions
13. Social Media Optimization
What is Social Media?
How social media help Business?
Establishing your online identity.
Engaging your Audience.
How to use Groups, Forums, etc.
14. Facebook Organic
How can Facebook be used to aid my business?
Developing a useful Company / fan Page
Establishing your online identity.
Engaging your Audience, Types of posts, post scheduling
How to create & use Groups
Importance of Hashtags & how to use them
15. Twitter Organic
Basic concepts – from setting-up optimally, creating a Twitter business existence, to advanced marketing procedures and strategies.
How to use Twitter
What are hashtags, Lists
Twitter Tools
Popular Twitter Campiagns
16. LinkedIn Organic
Your Profile: Building quality connections & getting recommendations from others
How to use Groups-drive traffic with news & discussions
How to create LinkedIn Company Page & Groups
Engaging your Audience.
17. YouTube Organic
How to create YouTube channel
Youtube Keyword Research
Publish a High Retention Video
YouTube ranking factors
YouTube Video Optimization
Promote Your Video
Use of playlists
18. Video SEO
YouTube Keyword Research
Publish a High Retention Video
YouTube Ranking Factors
YouTube Video Optimization
19. YouTube Monetization
YouTube channel monetization policies
How Does YouTube Monetization Work?
YouTube monetization requirements
20. Social Media Tools
What are the main types of social media tools?
Top Social Media Tools You Need to Use
Tools used for Social Media Management
21. Social Media Automation
What is Social Media Automation?
Social Media Automation/ Management Tool
Buffer/ Hootsuite/ Postcron
Setup Connection with Facebook, Twitter, Linkedin, Instagram, Etc.
Add/ Remove Profiles in Tools
Post Scheduling in Tools
Performance Analysis
22. Facebook Ads
How to create Business Manager Accounts
What is Account, Campaign, Ad Sets, Ad Copy
How to Create Campaigns on Facebook
What is Budget & Bidding
Difference Between Reach & Impressions
Facebook Retargeting
23. Instagram Ads
Text Ads and Guidelines
Image Ad Formats and Guidelines
Landing Page Optimization
Performance Metrics: CTR, Avg. Position, Search Term
Report, Segment Data Analysis, Impression Shares
AdWords Policies, Ad Extensions
24. LinkedIn Ads
How to create Campaign Manager Account
What is Account, Campaign Groups, Campaigns
Objectives for Campaigns
Bidding Strategies
Detail Targeting
25. YouTube Advertising
How to run Video Ads?
Types of Video Ads:
Skippable in Stream Ads
Non Skippable in stream Ads
Bumper Ads
Bidding Strategies for Video Ads
26. Google PPC
Ad-Words Account Setup
Creating Ad-Words Account
Ad-Words Dash Board
Billing in Ad-Words
Creating First Campaign
Understanding purpose of Campaign
Account Limits in Ad-Words
Location and Language Settings
Networks and Devices
Bidding and Budget
Schedule: Start date, end date, ad scheduling
Ad delivery: Ad rotation, frequency capping
Ad groups and Keywords
27. Search Ads/ Text Ads
Text Ads and Guidelines
Landing Page Optimization
Performance Metrics: CTR, Avg. Position, Search Term
Report, Segment Data Analysis, Impression Shares
AdWords Policies, Ad Extensions
CPC bidding
Types of Keywords: Exact, Broad, Phrase
Bids & Budget
How to create Text ads
28. Image Ads
Image Ad Formats and Guidelines
Targeting Methods: Keywords, Topics, Placement Targeting
Performance Metrics: CPM, vCPM, Budget
Report, Segment Data Analysis, Impression Shares
Frequency Capping
Automated rules
Target Audience Strategies
29. Video Ads
How to Video Ads
Types of Video Ads
Skippable in stream ads
Non-skippable in stream ads
Bumper Ads
How to link Google AdWords Account to YouTube Channel
30. Discovery Ads
What are Discovery Ads
How to Create Discovery Ads
Bidding Strategies
How to track conversions
31. Bidding Strategies in Google Ads
Different Bidding Strategies in Google AdWords
CPC bidding, CPM bidding, CPV bidding
How to calculate CTR
What are impressions, impression shares
32. Performance Planner
33. Lead Generation for Business
Why Lead Generation Is Important?
Understanding the Landing Page
Understanding Thank You Page
Landing Page Vs. Website
Best Practices to Create Landing Page
Best Practices to Create Thank You Page
What Is A/B Testing?
How to Do A/B Testing?
Converting Leads into Sale
Understanding Lead Funnel
34. Conversion Tracking Tool
Introduction to Conversion Optimization
Conversion Planning
Landing Page Optimization
35. Remarketing and Conversion
What is conversion
Implementing conversion tracking
Conversion tracking
Remarketing in adwords
Benefits of remarketing strategy
Building remarketing list & custom targets
Creating remarketing campaign
36. Quora Marketing
How to Use Quora for Marketing
Quora Marketing Strategy for Your Business
37. Growth Hacking Topic
Growth Hacking Basics
Role of Growth Hacker
Growth Hacking Case Studies
38. Introduction to Affiliate Marketing
Understanding Affiliate Marketing
Sources to Make money online
Applying for an Affiliate
Payments & Payouts
Blogging
39. Introduction to Google AdSense
Basics of Google Adsense
Adsense code installation
Different types of Ads
Increasing your profitability through Adsense
Effective tips in placing video, image and text ads into your website correctly
40. Google Tag Manager
Adding GTM to your website
Configuring trigger & variables
Set up AdWords conversion tracking
Set up Google Analytics
Set up Google Remarketing
Set up LinkedIn Code
41. Email Marketing
Introduction to Email Marketing basic.
How does Email Marketing Works.
Building an Email List.
Creating Email Content.
Optimising Email Campaign.
CAN SPAM Act
Email Marketing Best Practices
42. SMS Marketing
Setting up account for Bulk SMS
Naming the Campaign & SMS
SMS Content
Character limits
SMS Scheduling
43. Media Buying
Advertising: Principles, Concepts and Management
Media Planning
44. What’s App Marketing
Whatsapp Marketing Strategies
Whatsapp Business Features
Business Profile Setup
Auto Replies
45. Influencer Marketing
Major topics covered are, identifying the influencers, measuring them, and establishing a relationship with the influencer. A go through the influencer marketing case studies.
46. Freelancing Projects
How to work as a freelancer
Different websites for getting projects on Digital Marketing
47. Online Reputation Management
What Is ORM?
Why We Need ORM
Examples of ORM
Case Study
48. Resume Building
How to build resume for different job profiles
Platforms for resume building
Which points you should add in Digital Marketing Resume
49. Interview Preparation
Dos and Don’t for Your First Job Interview
How to prepare for interview
Commonly asked interview question & answers
50. Client Pitch
How to send quotation to the clients
How to decide budget for campaign
Quotation formats
51. Graphic Designing: Canva
How to create images using tools like Canva
How to add effects to images
52. Analysis of Other Website
Post navigatio
2 notes
·
View notes
Note
Hi! Your recent post about gifmakers was so good, I was hoping you could help me navigate tumblr etiquette around gifs.
I assume it's cool to search for gifs via the tumblr search and embed in to my posts, and add alt text if it doesn't already exist, without reaching out to creators or tagging them in addition to the existing credit on the gif, since I think that's opt-in and they get alerts. Am I right about that?
If I can't find a good gif in the search, but I know folks have made good ones in gifsets that I can find in people's posts other ways, is there accepted etiquette around this? Do I need to reach out to the gifmaker first, or look for a statement on their blog? Or is it acceptable to copy the URL and embed it into my post, and then tag the gifmaker and link the post it came from in my post? Or is that last step unnecessary if the gif is already a link?
Just trying to be a good tumblr citizen! Thanks for your help.
Hi! I'm definitely not an expert on this, but I can offer some suggestions based on what I've seen others do. Generally, I think it's fine to use the tumblr gif search function (the yellow 'GIF' button) to embed a gif in your post, since it displays and links the source of the gif. Creators should get a notification when one of their gifs has been added to a post. Here's an example of what using this method looks like:

Admittedly, it's pretty hard to find what you're looking for using the tumblr gif search function. When people embed a gif in a different way (such as copying and embedding the gif link), I've seen them give credit to the creator by tagging them, which will give them a notification. This method doesn't automatically include a link to the original gifset (just a link to the individual gif), so you have to add that manually if you'd like to do so. Here's an example of what using this method looks like:
gif from @justafriend-ql (original gifset)
You can add alternate text (or an 'image description') to a gif that you embed by clicking on the three dots that show up in the bottom right corner when you hover over a gif. You can view the alternate text by clicking on the 'ALT' button in the bottom left corner of the gif. I've added alternate text to the gif below so you can see what it looks like once you do so:
gif from @justafriend-ql (alt text added)
If you want to add alternate text to an entire gifset, I would reblog the original post and type out the alternate text below or ask the original creator if they'd be open to adding alternate text to their post.
These are my initial thoughts, but like I said, I'm not an expert. If anyone has other recommendations, feel free to add onto this post!
#hope this helps!#i'm not super well-versed in this so please do add onto this or correct me as needed#how to tumblr#in my inbox
4 notes
·
View notes
Text
The new Link Cleaner

I released my Link Cleaner web app in 2021 as a way to quickly remove tracking parameters, search queries, and other extra fluff from web links. It was mostly intended for phones and tablets, since editing URLs with a touchscreen keyboard is especially awful, but it was also helpful on desktop browsers.
Link Cleaner is now my most popular software project, with over 44K users and 90K links cleaned just in 2025. I've wanted to give it a proper design overhaul, especially for larger screens, and the big update is now complete.
New design
If you have used Link Cleaner, you know the interface was simple but (mostly) functional. The new version is not a massive change: it's just a lot of usability improvements and a more refined design.
The home page still has the same basic layout, but the URL text box is closer to the center of the screen (more like the Google or DuckDuckGo home pages). There's a new header that I can update with different backgrounds and text—right now it has a Pride Month theme.

The navigation bar has also been moved to the top of the screen, and more closely matches the design of the recent PhotoStack update. The navigation bar (and URL field, if you are on the main page) remain pinned to the top of the screen as you scroll down. The home page also has new explanations of Link Cleaner's core features.
The Bulk Mode page has also been slightly updated, with text fields that now use most of your available screen space. There are many other small changes, like the tab icon (favicon) being more readable in dark browser themes, and improved accessibility on all popup panels.
New features
The navigation bar's History button opens the new Clean History panel, showing all the links you have cleaned recently. This is more secure and (hopefully) more useful than the previous History page, since your links are not actually saved in storage. They're gone if you close the window or switch to another page.

The Install button opens the new Install panel, which can guide you through installing Link Cleaner as a web app, adding the Shortcut to your Apple devices, and using Link Cleaner in custom scripts and automations with the custom share URL. It also includes a new bookmarklet, which you can add to your browser's bookmarks toolbar to instantly get a cleaned URL for the current page in a Link Cleaner popup window.
Link Cleaner now uses the same text field for the URL input and cleaned link output, removing the need to click the back button each time. You just paste in the text field again, or press Enter/Return on your keyboard, to clean the link again. There's still a 'Clear' button for touchscreen devices, since selecting and removing all text is more difficult without a physical keyboard.
If you have a device with a physical keyboard, the merged text field means you can now paste a link with Ctrl+V/Cmd+V, then immediately press Ctrl+C/Cmd+V to copy the cleaned link. No reaching for the mouse or tabbing around required. This update removes the experimental option for automatic clipboard copy, since it was not reliable and difficult to test, and the new keyboard accessibility is a close enough replacement.

The share and copy buttons in Link Cleaner are mostly unchanged, but the QR code option now has a 'Save to Downloads' button. If your browser supports sharing files, you can also quickly share the QR code to another installed application. The QR codes are still generated locally in your web browser, for better privacy and offline support.
Importantly, this update does not remove any functionality, except the experimental automatic clipboard copy that didn't reliably work. If you have a script, bookmarklet, Apple Shortcut, or some other automation using Link Cleaner, it should still work exactly as it always did.
Try Link Cleaner
You can use Link Cleaner by visiting linkcleaner.app in your browser. The code is still open-source on GitHub.
0 notes
Text
UTM Tagging for Social Media Campaigns: Why It’s Essential and How to Do It

What are UTM Tags?
UTM (Urchin Tracking Module) tags are small bits of text you can add to a URL to track the effectiveness of marketing campaigns. They tell you where your traffic is coming from and what content is driving the clicks.
A basic UTM-tagged URL looks like this:
https://yourwebsite.com/landing-page?utm_source=facebook&utm_medium=social&utm_campaign=spring_sale
These tags help Google Analytics and other tracking tools distinguish between sources like paid ads, organic posts, influencer collaborations, and more.
Why UTM Tagging is Essential for Social Media Marketing
As a Social Media Marketing Agency in Pune, we’ve seen firsthand how UTM tags can transform vague traffic insights into actionable metrics. Here’s why UTM tagging is crucial:
✅ Accurate Attribution
Without UTM tags, traffic from multiple social sources may all appear as “Direct” or “Referral” in analytics. UTM tags make it easy to attribute visits and conversions to specific posts, ads, or platforms.
✅ Compare Platform Performance
With properly tagged URLs, a Social Media Marketing company in Pune can evaluate which platforms or campaigns bring the most engaged users or conversions — leading to smarter budget allocation.
✅ Measure ROI with Precision
Whether you’re running paid ads or organic campaigns, UTM tags help track the return on investment (ROI) by tying clicks to conversions.
✅ Improve Reporting Transparency
For agencies managing multiple clients, UTM tracking ensures transparent, data-backed reporting — a must-have for trust and long-term partnerships.
Key UTM Parameters and What They Mean
To track campaign performance properly, use these standard UTM parameters:
utm_source: Where the traffic is coming from (e.g., Facebook, Instagram)
utm_medium: The type of marketing channel (e.g., social, cpc, email)
utm_campaign: The specific campaign name or promotion
utm_term (optional): Keywords or targeting terms used
utm_content (optional): Differentiates similar content (e.g., button vs. banner)
Example:
This allows your Social Media Marketing company in Pune to analyze performance at a granular level.
How to Add UTM Tags
🔧 Manual Tagging
Use Google’s free Campaign URL Builder: https://ga-dev-tools.web.app/campaign-url-builder/
Simply input your website URL and campaign parameters. It will generate a tagged URL to copy and paste into your posts or ads.
💡 Tip: Always maintain consistency in naming. Use lowercase and standard naming conventions across campaigns (e.g., facebook not FB).
🧰 Use Tools to Automate
Tools like Buffer, Hootsuite, or Sprout Social often offer built-in UTM management for posts scheduled via their platforms — ideal for scaling campaigns across multiple platforms.
UTM Tagging Best Practices
As a reputable Social Media Marketing Agency in Pune, we recommend the following UTM tagging best practices:
Be consistent: Use standardized naming across campaigns
Shorten URLs: Long UTM-tagged URLs can be messy — use URL shorteners like Bitly
Avoid duplication: Double-check that UTM links are only used where required
Audit regularly: Track and document your UTM usage in a shared spreadsheet or system
Use UTM templates: Create reusable templates for recurring campaigns
How to Track UTM Performance
Once UTM-tagged links are active, you can view campaign performance in Google Analytics 4:
Traffic Acquisition > Session Source/Medium
Campaigns > All Campaigns
Conversions > Event-based reporting
This gives your Social Media Marketing company in Pune detailed insights into which campaigns and creatives drive traffic and conversions.
Conclusion
UTM tagging is a game-changer for any brand serious about understanding and improving their social media strategy. From organic posts to paid ads, these tiny tags deliver big value in transparency, optimization, and ROI.
At Digital Rhetoric, we specialize in helping businesses harness the full power of social media campaigns. As a trusted Social Media Marketing Agency in Pune, we ensure every campaign is built with clear tracking and measurable impact.
0 notes
Text
Reblogging to add things I've learnt transcribing images of text (only on laptop though) and describing images:
If you right-click on an onscreen image while on Google Chrome – you can search for that image, and Google will automatically recognize the text contained in it (including other language fonts, like Thai, Chinese, Tamil, Korean, Japanese, etc.). You can select the text and copy it directly using Google, which means you can also tidy it up and format it in MS Word, or even in Tumblr directly before posting.
If you right-click somewhere on the screen that is not part of the image, you can draw a window over the part of the image (or anything else onscreen) to let Google know you want it to search for what's specifically in the window, which is useful for transcribing only the text part of an image. (To draw the window, click and hold down the mouse button, then drag to open a window over any text you want Google to search for and/or transcribe.)
Doing either of the above means you can go directly from screen to text without needing to save the image and uploading it into an OCR website.
Sometimes if a post has many reblogs, I often try scanning through the reblog list to see if anyone else has already described it. If there is already a described version, I'll leave a like for the person who reblogged the (undescribed) post on my dash, but then go on reblog the described version instead. The time this saves can be put to use describing other posts. Of course, scanning the reblogs in the notes is tedious, so I'll only spend a minute or so doing that, less if time is pressing.
If you can't find an already described version of a post by scanning the reblogs, you can also search for it by pasting any transcribed and copied text into a Google search. You can then reblog any described version that Google finds. It's surprising how successful Google can be at this. (This only saves formatting time since you already have the text transcribed and copied, but to me that's the tedious bit and I try to avoid it if I can.)
Transcribing and searching for textposts this way is especially useful for tracking down Twitter posts that were put on Tumblr as images. You can then copy the text directly from the source (useful for long threads on Twitter). If I'm not up to it, I will link directly to Twitter by pasting the tweet's URL into Tumblr, whereupon the link will automatically appear as an image with ALT text (in dashboard view). This also attributes the source of the text, which is the correct thing to do anyway.
If I can find the Twitter post, I like to add the UTC time and date of of the post as well, so that it is anchored in time. The time and date on a Twitter post is your local time and date, so I usually ask Google what the time and date would be in UTC.
When typing out a Twitter handle, I use a zero width non-joiner after the '@' so that Tumblr does not automatically turn it into a link, which sometimes happens.
When typing out timestamps and dates, it's better to keep certain blocks of text together for better legibility. For example, you don't want Tumblr to break up '3:00PM UTC', with '3:00PM' at the end of a line and 'UTC' at the beginning of the next line. Nor do you want '5 April 2024' to be broken up as '5 April' on a different line from '2024'. To prevent this, replace the original spaces with no-break spaces.
To keep hyphenated words together, use the non-breaking hyphen instead.
I think the Internet may be divided on this, but if an image already has ALT text I prefer to leave it undescribed in the blog text. I read somewhere that folks who use a text-to-speech reader find having both ALT text and the image description in the blog text to be highly annoying, because they have to listen to essentially the same thing twice.
How to Keep Doing Descriptions (from someone who does a fuckton)
Plain text: How to Keep Doing Descriptions (from someone who does a fuckton)
This is a list aimed mostly at helping people who already write IDs; for guides at learning how to do them yourself, check my accessibility and image description tags! I write this with close to two years of experience with IDs and chronic pain :)
Get used to writing some IDs by using both your phone and your computer, if you can! I find it easier to type long-form on my laptop, so I set up videos and long comics on my phone, which I then prop up against my laptop screen so I can easily reference the post without constantly scrolling or turning my head
I will never stop plugging onlineocr.net. I use it to ID everything from six-word tags to screenshots of long posts to even comic dialogue! On that last note, convertcase.net can convert text between all-caps, lowercase, sentence case, and title case, which is super helpful
Limit the number of drafts/posts-to-be-described you save. No, seriously. I never go above 10 undescribed drafts on any of my four blogs. It doesn’t have to be that low, but this has done wonders (italics: wonders) for my productivity and willingness to write IDs. If I ever get above that limit, even if it’s two or three more, I immediately either describe the lowest-effort post or purge some, and if I can’t do that then I stop saving things to drafts no matter what. No exceptions! Sticking to this will make your life so much easier and less stressful
My pinned post has a link to a community doc of meme description templates!
Ask! For! Help! Please welcome to the stage the People’s Accessibility Server! It’s full of lovely people and organized into channels where you can request/volunteer descriptions and ask/answer questions
I make great use of voice-to-text and glide typing on my phone to save my hands some effort!
Something is always better than nothing!!! A short two-sentence or one-sentence ID is better than no ID at all. Take it easy :)
If you feel guilty about being unable to reblog amazing but undescribed art, try getting into the habit of replying to OP’s post to let them know you liked it! This makes me feel less pressured to ID absolutely everything I see
This is a sillier one, but I tag posts I describe as “described” and “described by me.” When saving to drafts, I never preemptively tag with “described by me,” since for some reason that always makes me feel extra pressure and extra stress. Consider doing something similar for yourself if that applies!
I frequently find myself looking at pieces of art which feel like they need to be considered for a bit before I can write an ID for them, and those usually get thrown into drafts, where the dread for writing a comprehensive ID just builds. Don’t do that! Instead, try just staying in the reblog field for a bit and focus on the most relevant aspects of the piece. Marinate on them for a little; don’t rush, but don’t spend more than a handful of seconds either. I find after that the art becomes way easier to describe than it initially seemed!
On that note, look for shortcuts that make IDs less taxing for you to do! For example, I only ever describe clothes in art if they’re relevant to the piece; not doing that every time saves a lot of time and energy for me personally
Building off of that, consider excusing yourself from a particular kind of ID if you want to. Give yourself a free pass for 4chan posts, or fanart by an artist who does really good but really complex comics, whatever. Let it be someone else’s responsibility and feel twice as proud about the work that you can now allot more energy to!
As always, make an effort to find and follow fellow describers! It’s always encouraging to get described posts on your dash, and I find that sometimes I’m happier to ID an undescribed post when the person who put it on my dash is a friend who tagged it with “no ID”
TL;DR: To make ID-writing less stressful and more low-effort, use different devices and software like onlineocr.net and voice-to-text, limit the amount of work you expect yourself to do, and reach out to artists and other describers!
1K notes
·
View notes
Text
How to Stay Safe from Eat-and-Run Scams with Simple Verification Tools
As online shopping and digital services become more common, so do the risks associated with them. One of the more deceptive forms of fraud today is the eat-and-run scam, where malicious individuals or sites collect money or data and vanish without fulfilling their end of the deal. These scams not only lead to financial loss but also compromise personal information. Fortunately, you don’t need to be a tech expert to stay safe. With the right verification tools and a few simple habits, you can protect yourself from becoming a victim.
Understanding the Power of Verification
Verification tools are digital safety nets designed to confirm the authenticity of websites, vendors, and transactions. They help you determine whether an 먹튀, trustworthy, and safe to use. From checking domain history to confirming payment security, these tools act as your first line of defense against scams. The best part? Many of them are easy to use, free, and accessible to anyone.

Check the Website’s URL and Security Certificate
The most basic yet essential verification step is checking the website address. Always make sure the site uses HTTPS rather than just HTTP—this indicates the connection is secure and encrypted. You can also click the padlock icon next to the URL to view the site’s security certificate details. If a website lacks this or displays security warnings, it’s a sign to stay away. Scam sites often skip this step or use fake certificates that don't match their domain.
Use Domain Lookup Tools
Eat-and-run scams often use newly created or frequently changed domain names to avoid being tracked. By using domain lookup tools (like WHOIS), you can see when a website was registered and who owns it. A newly created site with hidden ownership information can be a red flag, especially if it claims to be a long-established brand. This quick check only takes a minute and can reveal a lot about the legitimacy of a website.
Search for Independent Reviews
Before engaging with any unfamiliar website, take time to look it up on independent review platforms. Trusted sources like Trustpilot, SiteJabber, or even Google Reviews can give you a real sense of a site's reputation. Be cautious of platforms that have only glowing five-star reviews without any specifics, especially if those reviews all appear within a short timeframe. Authentic reviews typically show a mix of feedback and details about customer experience.
Check for Verified Trust Badges
Legitimate businesses often display trust badges or seals from well-known security companies (like Norton, McAfee, or BBB Accredited Business). These symbols show that the site has passed a security audit. However, scammers can copy these images, so make sure the badge is clickable and leads to a verification page confirming the site’s status. If it’s just a static image with no link, it could be a fake.
Use Browser Security Extensions
There are several free browser extensions that offer real-time warnings about unsafe websites. Tools like Web of Trust (WOT), McAfee WebAdvisor, or Norton Safe Web rate websites based on user feedback and professional analysis. These extensions are simple to install and automatically alert you when a site might be dangerous—giving you a chance to back out before it's too late.
Enable Two-Factor Authentication on Accounts
If you’re signing up for an account on any site—especially one that handles your financial information—make sure it offers and supports two-factor authentication (2FA). This adds an extra layer of protection by requiring not just a password, but a second form of identification, like a text message or app code. While this won’t prevent a scam site from being fraudulent, it can keep your account safe if you’re using verified platforms.
Use Trusted Payment Methods
Never send money through wire transfers, cryptocurrency, or direct bank deposits to unknown vendors. Verified sites will always offer secure and traceable payment methods such as credit cards or well-known digital wallets. These options also make it easier to request a refund if something goes wrong, and they often come with built-in fraud protection.

Report Suspicious Sites
If you come across a potential eat-and-run scam, report it to consumer protection agencies or scam-tracking websites. Platforms like Scamwatch, Better Business Bureau (BBB), or your country’s cybercrime unit help warn others and may take action to shut down fraudulent sites. Every report helps build a safer online environment for everyone.
Conclusion: Stay One Step Ahead
Staying safe from eat-and-run scams doesn't require advanced skills—just a little caution and the right tools. By using simple verification methods like checking domain age, reading authentic reviews, confirming security badges, and enabling two-factor authentication, you can drastically reduce your risk of falling victim. In an age where digital deception is everywhere, being alert, informed, and a bit skeptical is the smartest way to shop and interact online.
0 notes