#adobe premiere pro tutorial
Explore tagged Tumblr posts
Visit Tumblr Blog
Explore Tumblr blogs with no restrictions, modern design and the best experience.
Last Seen Tumblr Blogs


Fun Fact
Tumblr is available in 18 languages.
Text
Become a Professional Video Editor with Expert-Led Training Course

Looking to master the art of video editing and launch a successful career in the media industry? Join our advanced video editing course designed for beginners and aspiring professionals. Learn practical skills in Adobe Premiere Pro, After Effects, Final Cut Pro, and other industry-standard tools from experienced trainers.
This professional video editing training covers everything from basic cutting and transitions to cinematic effects, sound design, color correction, motion graphics, and more. Whether you're dreaming of working on YouTube content, short films, or digital marketing campaigns, this course will help you build a strong portfolio and gain hands-on experience.
Visit Attitude Academy
📚 Learn Video editing: Attitude Academy
📍 Visit Us: Yamuna Vihar | Uttam Nagar
📞 Call: +91 9654382235
🌐 Website: www.attitudetallyacademy.com
📩 Email: [email protected]
📸 Follow us on: attitudeacademy4u
#video editing course in uttam nagar#video editing training in yamuna vihar#adobe after effect training#adobe premiere pro tutorial#adobe premiere pro coaching#video editing tutorial#VFX and 3d animation course
0 notes
Text
youtube
0 notes
Text
حل مشكلة تبعثر ادوات الادوبي برمير(Solving the problem of scattering Adobe Premiere tools)
youtube
أدوبي بريمير هو جزء من مجموعة برامج أدوبي الإبداعية، وهو مصمم لتحرير ومونتاج الفيديو بكفاءة واحترافية. يتيح للمحترفين والهواة إنشاء محتوى فيديو مميز بجودة عالية. ظهر برنامج بريمير لأول م��ة في عام 1991، ومنذ ذلك الحين شهد تطوراً كبيراً وتحسينات مستمرة. ## مميزات أدوبي بريمير: 1. واجهة مستخدم بديهية: توفر واجهة بريمير تجربة استخدام سلسة وبديهية، مما يساعد على زيادة الإنتاجية والتركيز على الإبداع. 2. دعم لمجموعة متنوعة من تنسيقات الفيديو: يمكن لبريمير التعامل مع العديد من صيغ الفيديو والصوت، مما يجعله مناسبًا للعمل مع ملفات الفيديو من مصادر مختلفة. 3. أدوات تحرير قوية: يوفر البرنامج مجموعة واسعة من الأدوات لتحرير الفيديو بشكل دقيق وإجراء التعديلات اللازمة على الصورة والصوت. 4. مؤثرات بصرية وتأثيرات انتقالية: يحتوي بريمير على مكتبة ضخمة من المؤثرات البصرية والتأثيرات الانتقالية التي يمكن استخدامها لتحسين جاذبية الفيديو. 5. دعم للمؤقت الزمني والملحقات الإضافية: يسمح بريمير بدمج المؤقت الزمني وإضافة ملحقات إضافية من طرف ثالث لتعزيز قدرات التحرير. 6. التكامل مع منتجات أدوبي الأخرى: يمكن لبريمير التكامل بسلاسة مع برامج أخرى من أدوبي مثل فوتوشوب وأدوبي أفتر إفكتس، مما يسهل عملية العمل المشترك بين مختلف التطبيقات. ## استخدامات أدوبي بريمير: 1. إنتاج الأفلام والأفلام الوثائقية: يستخدم بريمير في صناعة الأفلام والأفلام الوثائقية، حيث يتيح تحرير المشاهد وتنسيقها بشكل احترافي. 2. إنتاج المحتوى للتلفزيون والويب: يستخدم بريمير في إنتاج البرامج التلفزيونية ومقاطع الفيديو للنشر على الإنترنت ومنصات التواصل الاجتماعي. 3. الفيديو التعليمي والتدريب: يستخدم البرنامج لإنتاج مقاطع الفيديو التعليمية والتدريبية التي توضح العمليات والمفاهيم بشكل مرئي. 4. تحرير الفيديو الشخصي: يمكن للمستخدمين الهواة استخدام بريمير لتحرير مقاطع الفيديو الشخصية وتجميع الذكريات بشكل مميز. باختصار، أدوبي بريمير هو أداة قوية وشاملة لتحرير ومونتاج الفيديو. إنه يلبي احتياجات المحترفين والهواة على حد سواء، ويعتبر أحد الأدوات الأساسية في عالم صناعة الفيديو.
#adobe premiere pro tutorial#adobe premiere pro#adobe premiere 2020#adobe premiere 2022#كتابة الملاحظات في برنامج ادوبي أكروبات#how to use premiere pro#برنامج ادوبي أكروبات#premier#adobe creative cloud#adobe#كتابة الملاحظات#برمير#دروس برمير#تصميم بالفوتوشوب#تصميم كتاب#after afffects#تعليم الفوتوشوب#eps#png#indesign#تصميم صورة#photoshop#درس فوتوشوب#دروس فوتوشوب#تعلم انديزاين#اليستريتور فكتور#ps#pdf#jpg#انديزاين
0 notes
Text
i dont know how to edit videos i fear
#ADOBE PREMIERE PRO TUTORIALS PLEASE#IM ON MY KNEES! I CANT EDIT#this program makes me want to DIIIEIDIEIEEIEIEDIEEEIEE#pmtok#paper mario the origami king#paper mario#king olly#super mario#pmtok olly#pmtok olivia
17 notes
·
View notes
Text
youtube
The Best Adobe Alternatives 2025
In this video, we’ll look at how to replace Adobe software. This includes Photoshop, Illustrator, Premier Pro, After Effects, and Lightroom. I’ll show you free Adobe replacements and some that have no subscription cost. Best of all, many of these programs are supported on multiple platforms: Windows, Mac, Linux, iPad, and mobile.
#graphic design#The Best Adobe Alternatives 2025#Adobe#adobe illustrator#photoshop tutorial#beyond the adobe#graphic designer#premier pro#Adobe Alternatives#graphic designers#Canva#tools for designers#education#designer#design#Youtube
4 notes
·
View notes
Text
Fixing Adobes stupid modern icons on Windows
So if you're a frequent adobe user you're probably aware that back in 2020 the icons for a number of their software went from being color coated to homogenized.

While I do understand the motivation to do this it is frankly, very stupid! No longer can you tell at a glance which software is which, you must be vigilant at all times. The amount of times I thought I was opening Audition only to realize I clicked on After Effects must be in the hundreds. While this might sound like a minor problem each these programs can take up 30 seconds to a minute (depending on your hard drive speed) to boot up and close. So if your working on a project that requires you to switch between softwares frequently, that avoidable mistake can add up quick! NO MORE I SAY! Together we shall fix this! (but only on windows, sorry mac users :/)
Step 1
Download the file below V
Place the folder somewhere accessible that you will remember. I recommend creating a new folder in "C:\Program Files\Adobe" called "Icons"
Step 2
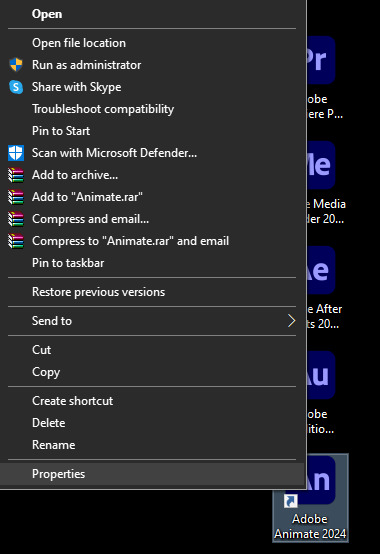

Right click on the shortcut whose Icon you want to change and click on "Properties" and then "Change Icon..."
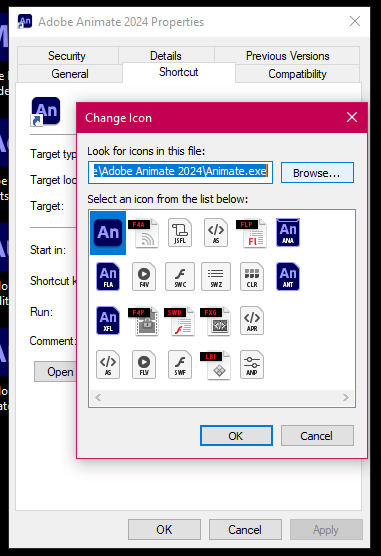

Click "Browse..." and navigate to the folder downloaded in Step 1 and select the icon you want to use and press "open"
Step 3

Violia! We have our new icons! Wasn't that easy!
Sadly every time you update the software you will need to repeat this process, but as long as you have the .ico files it should be pretty painless.
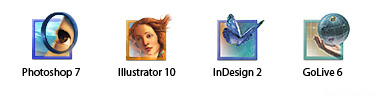
If you found this helpful let me know! Hopefully one day adobe will get their shit together and this guide will be obsolete. Hell maybe we'll even get lucky and they'll start using the 2001 icons again. *sigh* A girl can dream...
#Adobe#adobe creative suite#adobe premiere pro#adobe animate#adobe flash#tutorial#adobe after effects#adobe audition#software
2 notes
·
View notes
Text
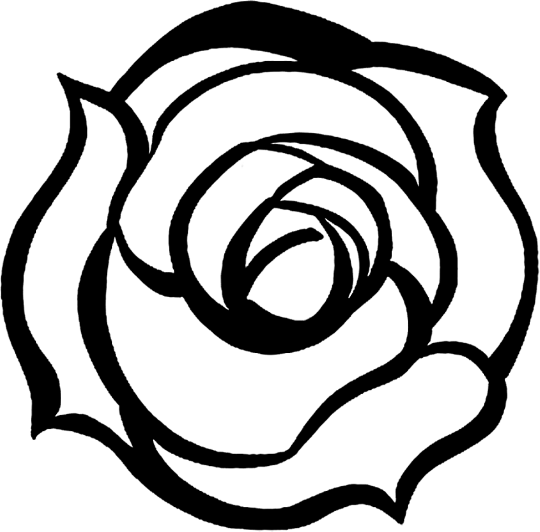
[RGU] Rotating Roses - Video Editing
Clockwise and Counter-Clockwise Start Line: 0.0 | End Line: 360, -360
(Version 1)


Flower: Line-art, Base Color


Background color can be any kind. If considering to make a opening parody of the show, use the color black.
(Version 2)


Flower: Line-art, Base Color


Stem: Line-art, Base Color


The flower rotates, the stem doesn't.

Note that you need to crop the flower to make the rotation easier. Also, don't set or scale the bud to frame size.
4 notes
·
View notes
Text
Dynamic Video Editing Workspaces: Unlocking Creativity and Efficiency
In today’s digital landscape, video editing is more than just cutting and merging clips—it’s about crafting engaging stories. A dynamic video editing workspace is essential for streamlining workflow, enhancing creativity, and boosting productivity.
What Makes a Workspace Dynamic?
A well-structured and adaptable video editing workspace ensures seamless access to tools, optimized layouts, and efficient project management. With the right setup, editors can enhance both speed and quality in their creative process.
Essential Elements of a Productive Editing Space
1. Engaging Visual Elements
Using animations, overlays, and vibrant effects makes videos more appealing. If you're just starting, check out Mastering Video Editing: A Beginner’s Guide for fundamental techniques.

2. The Power of Sound Design
Audio is a key component in storytelling. Soundwaves, background music, and immersive effects help elevate the viewer’s experience.
3. Optimizing the Creative Process
A dynamic workspace highlights efficient software tools, layout configurations, and workflow improvements to speed up editing. Need expert advice? Read the Best Video Editing Tips to refine your skills.
4. Finding Inspiration and Generating Ideas
Keeping an inspiration board with video concepts for YouTube, social media, or professional projects helps maintain a steady creative flow.
Why an Optimized Workspace Matters
An organized, well-designed editing environment improves efficiency, enhances focus, and boosts creativity. Whether you're a beginner or a seasoned editor, refining your setup can transform your workflow.
Ready to enhance your video editing experience? Explore more insights at RTM Creator!
#video editing#workspace#editing#workspaces#video editing tutorial#video#video editor#editing hacks#adobe after effects video course#professional video editing#adobe video editing#video editing for beginners#editing youtube videos#editing videos with premiere pro#learn video editing from scratch#premiere pro cc for beginners: video editing in premiere#reset workspace in premiere pro#video production#editing workflow#premiere pro workspace setup
1 note
·
View note
Text
youtube
¿Cómo y POR QUÉ poner SUBTÍTULOS en Tus VIDEOS para REDES? Tutorial Premiere PRO
0 notes
Video
youtube
Seguimiento perfecto de efectos en Premiere Pro
0 notes
Note
Heyy! If its not too much of an ask, can you explain how you do your "animated panels"? (like the one where frisk and flowey meet gaster). It looks so cool and I wanna try something similar for my own art. Thanks!!!
Heya ! It's absolutely not too much to ask don't worry, of course I can share my secrets 👀
Very simply, I made three versions of the page (One normal, one with Chara, and one super creepy)


Then I put them all in Adobe Premiere Pro (but any other editting software can work), and put a glitch effect on them
I made sure to time the glitches right, to have the effect I wanted (To surprise/scare people with a page that blend in with the other ones, which totally worked so I'm glad :D)
Exported it, the file was a bit too heavy for Tumblr so I compressed it on a random website I found
And bam ! You got it !

(Hope this helps a little, if you need a more detailed tutorial don't hesitate to tell me)
#Very simple process but very efficient one !#I would love to make more animated pages in the future#for the big moments or something#would be cool :D#undertale#undertale au#undertale fandom#undertale alternate universe#gaster's return#undertale comic#art#gaster#gaster undertale#undertale gaster
86 notes
·
View notes
Text
Struggling to Make Your Videos Stand Out? Here’s What You’re Missing

In today’s content-saturated digital world, creating engaging videos is not enough — you need the right skills and tools to truly make your content shine. This infographic highlights the top reasons why your videos may not be standing out and provides actionable insights to fix them.
Visit Attitude Academy
📚 Learn video editing: Attitude Academy
📍 Visit Us: Yamuna Vihar | Uttam Nagar
📞 Call: +91 9654382235
🌐 Website: www.attitudetallyacademy.com
📩 Email: [email protected]
📸 Follow us on: attitudeacademy4u
#video editing course#video editing coaching#adobe after effect coaching#adobe premiere pro tutorials#video editing course in uttam nagar#video editing course in yamuna vihar
0 notes
Text
ㅤㅤㅤ✧ᅠ—ᅠ⋆ᅠTUTORIAL: COMO FAZER GIFS MAIS RÁPIDO!
é, eu disse que ia fazer um vídeo sobre isso, mas a preguiça de editar falou mais alto... eu até cheguei a gravar, mas ficou muito longo e acho que seria mais rápido fazer esse post mesmo, então aqui está! demorou, mas chegou!
para seguir esse tutorial, vocês vão precisar do adobe premiere pro, adobe photoshop e da extensão do premiere after codecs, que conseguem baixar de graça no google.

— BAIXANDO OS VÍDEOS OU EPISÓDIOS.
antes de tudo você precisa ter o vídeo que vai gifar salvo no seu computador, né? então escolha o vídeo ou série e faça o download! aqui estão as formas que eu faço pra baixar o que preciso:
savefrom net para vídeos do youtube.
locoloader para episódios de drama que estão no site bilibili.
extensão stream recorder para gravar episódios de novelas do globoplay.
até hoje não tive nenhum problema com esses métodos, e todos abrem normalmente no premiere. a qualidade geralmente é normal, nada muito tchan nem muito mé, dá pra fazer gifs tranquilamente. a única coisa mais complicadinha é que você tem que reproduzir o episódio pra gravar com o stream recorder, mas isso é bom que você assiste a novela kkkkk.
— CORTANDO AS CENAS NO PREMIERE.
aqui é a parte que mudou totalmente minha maneira de fazer gifs. antes eu transformava tudo em screencap, depois separava as partes do fc que eu queria, e aí tinha que abrir arquivo em pilha no photoshop. nessa brincadeira, levava uma semana ou mais pra fazer 50 gifs, e eu enjoava na metade.
mas usando o premiere isso se torna muito mais rápido!!!! você só precisa separar algumas horinhas (no máximo 2, dependendo da sua máquina) para cortar as cenas, e depois separar as que o fc aparece no próprio premiere usando as cores de rótulo que ele disponibiliza. quando eu tava trabalhando, tinha no máximo 4 horas pra ficar no pc por noite, e conseguia fazer isso tudo em um dia só. muito prático
primeiro, abra o premiere! é igual o photoshop mesmo, nada muito diferente (instale o aftercodecs antes seguindo o passo a passo do site). clica em criar projeto, dá um nome, e aí vai aparecer essa tela:

(quem rir do ativar o windows vai ser torturado por mim no inferno hein) (já vou ensinar a colocar o after codecs ali na tela)
agora, pegue o vídeo que você baixou e jogue ali na linha do tempo. vai ficar assim:

(não consegui abrir o download de law school porque deu um erro, eu tinha baixado de outra forma kkkk mas tinha outro vídeo salvo então deu certo depois)
agora clica com o botão direito do mouse em cima do bloco de vídeo! (baixei sem o áudio já, mas pra tirar o aúdio é só fazer a mesma coisa mas clicar em desvincular primeiro) aí vai clicar em detecção de edição de cena. vai abrir uma janelinha e aí é só clicar em analisar:


vai abrir essa janelinha. basicamente, essa ferramenta vai cortar o vídeo sempre que houver um corte de cena automaticamente, então sempre que tiver uma mudança de plano/cena, deixar de mostrar um ator pra mostrar outro, vai ter um corte e tudo vai ficar separado bonitinho. isso vai levar um tempinho dependendo do tamanho do vídeo, mas você pode deixar rodando em segundo plano e ir responder suas dívidas no rp! ou, como eu faço, fazer colar de miçanga kkkkkk.

depois que o app analisar e cortar o vídeo inteiro, vai ficar tudo separadinho. aí você usa a setinha azul pra ir vendo as cenas e separando as que você vai gifar. uma dica que eu dou é usar as cores de rótulo do premiere! só clicar com o botão direito em cima da cena selecionada e escolher uma cor pra cada fc, e deixar o íris (que costuma ser a cor padrão da faixa inteira) pra quando aparecer mais de um fc na cena. aí você arrasta o clipe pra faixa de cima e, depois de separar todas as cenas, vai em rótulo de novo e em selecionar grupo de rótulos. isso faz todos os clipes com o mesmo rótulo/cor do que você clicou ficarem selecionados.
e outra dica!!! clica com o botão direito em cima do contador de minutagem do vídeo e troca pra contar quadros. o after codecs gratuito só exporta até 500 quadros, mas gifs com mais de 200 quadros não abrem direito no photoshop e ficam muito pesados. então passa cortando os clipes com mais de 200 quadros. dá pra ver quantos quadros cada clipe tem passando o mouse em cima. pra cortar, só escolher o ícone da navalha e clicar em cima do clipe onde você quer cortar.


selecionou todas as cenas do mesmo fc? então é hora de usar o after codecs. pra deixar ele aparecendo igual no print que eu mostrei lá em cima, você vai em janela > extensões > after codecs, aí você coloca a janelinha onde achar melhor. eu prefiro ali junto de "origem". com a janela do after codecs aberta e todas os clipes que vão virar gifs selecionados, vai em add markers for selected clips. você vai ver os marcadores aparecendo e quando acabar, o próprio premiere vai te falar quantos gifs você vai ter no final!

agora clica em exportar. vai aparecer uma tela nova. em formato, escolha after effects e coloque o nome do seu fc e onde você vai salvar os clipes. aí clica em video settings. no formato dessa janela, coloca mp4 e depois clica em open aftercodecs settings!

as únicas coisas que você vai mexer aqui é quality, arrastando a setinha azul até o final em 100%, e marcar a opção multirender em workflow. aperta ok e pronto! o premiere vai exportar clipe por clipe pra pasta que você escolheu, e aí acaba a parte mais chata e longa do tutorial! pode fechar o premiere e abrir o photoshop.

— HORA DE FAZER OS GIFS!
cenas cortadas, exportadas, tudo lindo. chegou a hora que todo mundo esperava! abra seu photoshop, prepare sua action ou psd, e vamos ao trabalho.
na hora de abrir as cenas, vá em arquivo > importar > quadros de vídeo para camadas. seleciona a primeira cena e abra normalmente. infelizmente, não dá pra abrir mais de um arquivo por vez, então tem que ir um por um mesmo. vai aparecer isso aqui, aí só clicar em ok mesmo:

às vezes pode dar esse erro aqui, mas aí é só apertar ok e abrir de novo!

abrindo bonitinho, você pode modificar a velocidade dos quadros e o tamanho. imagino que a maioria das pessoas já sabe mais ou menos como fazer isso, mas você pode me pedir um tutorial mais detalhado se precisar. como já tem muita imagem no post, vou pular essa parte, ok? vou só descrever o que eu faço agora.
seleciono todos os quadros e mudo o intervalo de tempo da animação. tenho uma regra bem básica que é: até 25 quadros, coloco 0,1; 25 até 30 quadros, 0,09; 30 até mais ou menos 40 quadros, 0,08; acima de 40 até 85, 0,07; de 85 até 150 quadros, 0,06; e por aí vou diminuindo o tempo.
seleciono todas as camadas também, e converto a linha do tempo de quadros para vídeo. depois converto as camadas para objeto inteligente. e faço o corte demarcado. o tamanho que eu uso geralmente é 268x146 ou 269x147. lembra de desmarcar a opção de excluir pixels cortados!
arrumo a camada de objeto inteligente dentro do corte pra ficar bonitinho com o famoso ctrl+t, e jogo o meu psd padrão em cima. aí arrumo a coloring direitinho até ficar satisfeito. só com isso já dá pra salvar o gif com ctrl+shift+alt+s, do jeito que você tá acostumado a fazer.
passo opcional: eu gosto de usar action de sharpening, então seleciono a camada do psd e o objeto inteligente, crio outro objeto inteligente e rodo a action. aí é só salvar!
eu sou uma pessoa bem vagabunda hoje em dia, então consigo fazer 150 gifs em uma madrugada de boa. mas, se você tem um tempo limitado, dá pra fazer até 50 gifs por noite, que foi o número que eu fiz quando ainda tava trabalhando. em 3 dias terminei o pack da giselle, inclusive.
espero que o tutorial tenha sido proveitoso pra você, e que consiga fazer muitos gifs dos fcs que gosta. e vamos cobrar dos gringos!!! não sou a favor de cobrar de brasileiros, já que a gente sabe como nossa economia é fodida (e por isso que só compartilho conteúdos gratuitos aqui), mas arrancar dinheiro de gringo tá liberado. aqui alguns exemplos de gifs que fiz seguindo esse tutorial:


49 notes
·
View notes
Text
This is a short animation experiment I made for my thesis on hybrid animation in which I research some of the techniques of combining 2D and 3D animation. The entire thing, when finished, will be around 5 min of animation. (Which will probably take a long time to do as I'm working on a ton of other stuff right now)
Thanks to Kristof Dedene for sky and clouds tutorial: https://www.youtube.com/watch?v=m4aOZm6auxQ
Software used: -Clip Studio Paint -Blender -SpriteIlluminator -Adobe Premiere Pro
I will be posting some behind-the-scenes stuff later.
#art#artists on tumblr#digital art#original art#my art#oc art#original character#animation#2d animation#3d animation#blender#hybrid animation#animation experiment
33 notes
·
View notes
Text
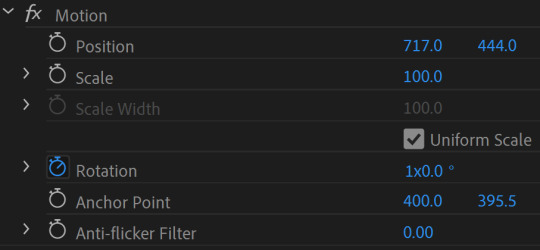
Making my character move, using After Effects!
This semester, I'm taking a class called Motion for Illustration, where we're learning how to use Adobe After Effects, as well as how to animate illustrations/prepping illustrations for animation. I've never really done much with animation so this class sounded like a fun challenge and a useful skill to add to my resume. For our first assignment, we had to pitch an idea for an illustration, create it, make it move and then finally render it for the a class screening. I wanted to make this post to show my process and final result!
First, I had to create my pitch, which included a short about me section my inspiration and what I wanted to do for the actual animating part. I'll show the ideation part for my project here:

I had a drawing that was unfinished for a while and thought maybe some motion would make the story more clear! I included some thumbnails (quick doodles that show the concept), as well as a break down on what parts would be moving. This wasn't required, but I also showed some ideas for color palettes, as I hadn't colored the illustration yet :>
After I got approval for my idea, I colored my drawing in Procreate and exported it out to Photoshop. In Photoshop, I did the final rendering and more importantly, separated the parts I wanted to move into individual layers. This was the most time consuming part, as you have to think about what parts that will be exposed while the illustration is moving and specifically what parts needed to be separated so it moves fluidly.
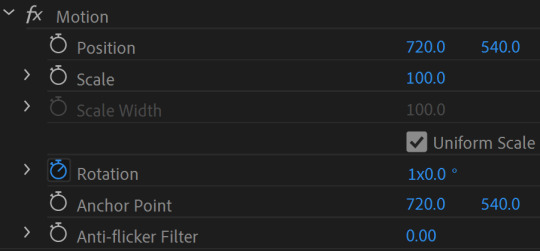
After finishing that up, I saved the file and imported it into After Effects. Since I had already planned out what parts I wanted to move, I used the puppet tool mostly to move the joints back and forth. Besides that, I also added some falling particle effects to add sparkles and moved the hand crank on the music box, making it a 3D object within After Effects and following a tutorial that my professor linked for me to make it move seamlessly. I'll share the link here:
youtube
I also wanted to add music to my animation which turned out to be a lot more complicated than I thought it would be. I found an audio clip that was the right length for my animation, using a website called Freesound.org, linked by my college's website. I imported it into After Effects as an .mp3, as an .mp4 will not give you any sound. Then, as I was rendering it out, each time there would be no sound. I ended up using Premiere Pro to add the music in and it was all good to go!
Here's the final result!
#artwork#illustration#my art#artists on tumblr#digital art#oc#original character#motion graphics#after effects#adobe#adobe after effects#animation#animated#2d animation#SHEMOVES#i love my ocs#video#my video#procreate#photoshop#Youtube
7 notes
·
View notes
Text

hi everyone! I've gotten several requests to make a tutorial on how to make gifs for someone just starting out and I finally got around to slapping a tutorial together.
This tutorial will cover:
software recommendations
choosing what to gif
creating a gif step by step with probably a lot of unnecessary detail
some tips and tricks:)
(This particular tutorial will not cover how to find tv and movies to download and gif, or any specific instructions on coloring. only the basic gif making process.)
so for the purposes of this tutorial, we will be using Adobe Photoshop, which is the most common program for making gifs, and the one I recommend. the version you have doesn't make a major difference in terms of capabilities but the interface may be slightly different looking if you have an older version or a different type of device. you cannot make or edit gifs in any mobile version of the photoshop application. Optionally, we will also be using Adobe Premiere Rush/Pro or another video editing software of your choice. wherever you are downloading Photoshop, whether from Adobe or a third party, you should easily be able to acquire Premiere as well. I am aiming to be as detailed as possible in this tutorial, so it may sound more time consuming than it really is. once you get the hang of things, it goes fast. the most time consuming part by far is the editing and coloring. in my opinion, one thing that majorly saves time while giffing is knowing your keyboard shortcuts and using your mouse/trackpad as little as possible. I will be going over these in this tutorial as well.
before we begin, some general tips:
gifs of single shots that do not cut between angles or subjects generally will look the best, barring exceptions
for a single gif set, choosing scenes and shots with similar lighting will be easiest to get to look uniform when compiled together, since editing wildly different looking scenes to have similar coloring and lighting is hard and takes some practice!
avoid shots that will require you to majorly crop or zoom to properly frame the subject, as this will greatly diminish quality
speaking of quality, gifs will look best using 1080p video, but you can get away with 720p as well. I would not recommend giffing with anything lower resolution than that
Tumblr's upload capacity for image and gif files is 10mb. be sure when exporting your finished gif that it is under that size. if it is a bit over, you can try trimming a few frames off your gif in the video timeline.
if you get frustrated, don't give up! giffing is hard and complicated especially if you are new to photoshop. I tried to make this tutorial as detailed as possible so it's easy to understand (although im sure I still forgot some stuff)
ok onto the tutorial!!!
STEP ONE: choose what range of frames you want to gif, and how.
once you have decided what you want to gif, there are two main way to convert your episode into a range of frames to make into a gif. the first is by screencapping. this involves downloading a program like mplayer or vlc which can be used to convert video files into "stacks" of screencaps, which can then be separated into whatever range of frames you want and imported into photoshop. this is seemingly by far the most common method I have seen amongst gifmakers*, but personally I don't care for it and I think it's more confusing and time consuming overall, so I will be explaining the second method: importing video frames to layers.
now, normally what this would mean is opening the full episode in photoshop and using the pathetic little playheads on either end of the scrub bar to trim the file into a clip. this is where your video editing software comes into play.
open whatever episode or movie you want to gif in your program. if it is a large file like a long movie in 1080p, this may take a few seconds. like I said, I am using Premiere Rush. I will be using a random episode of 9-1-1 for my example gif.
in your media browser, hover over whichever episode you want (you can also just add the whole episode to your project and scrub through, but that can take longer unless you know what time stamp you're after). click the fullscreen button by the bottom righthand corner.
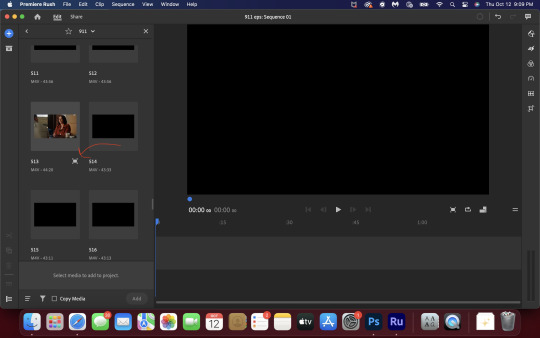
now you can scrub through and trim the episode before you even import it to premiere. this makes trimming your clip even easier.
use the trim bar (yellow outlines) to trim as close as you can around the scene you want to gif.
then click this plus, and then "add" below. this will add the clip to your project.
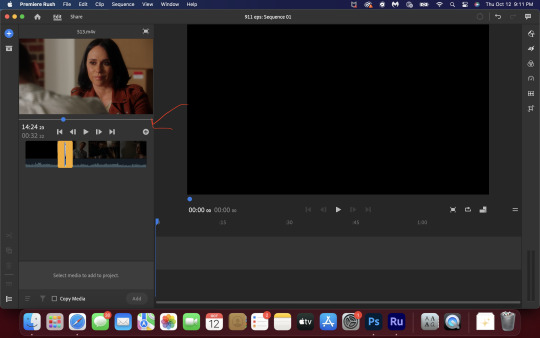
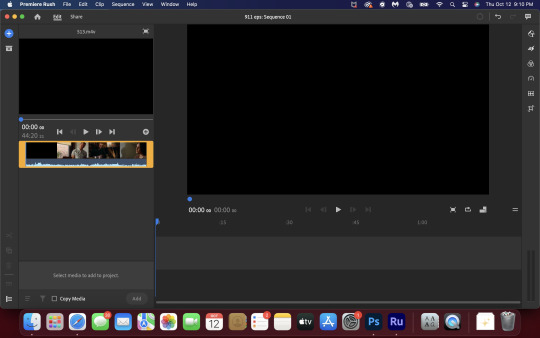
now, move the blue playhead up to the frame you want your gif to start on. then, use the scissors button off to the left to slice the clip. select the portion before the playhead, and delete it.
now move the playhead to where you want the gif to stop. a good length for most gifs is around 1.5-2 seconds in my opinion. some may be shorter depending on how long the shot is, or longer if you plan on making them smaller (remember, the uploading capacity on Tumblr is 10mb per file.) trim again, now delete the portion after the playhead. you can also use the left and right arrows beside the play button to move frame by frame, and you can adjust the side of the horizontal scroll bar below your clip to “zoom” in on it and make scrubbing easier.
once you have your clip, go up to where it says "share". your clip will be rendered, and then you can click export to save it.
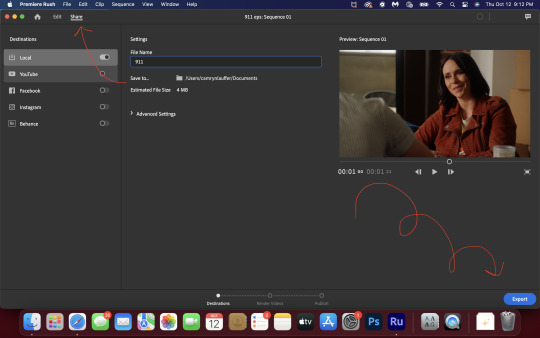
repeat step one as many times as you want for each gif. I know this may sound complicated, but like I said above once you get in the rhythm this step takes only a few seconds.
STEP TWO: create your gif!
close premiere. open photoshop. head to the control bar at the top. select file > import > import video frames to layers.
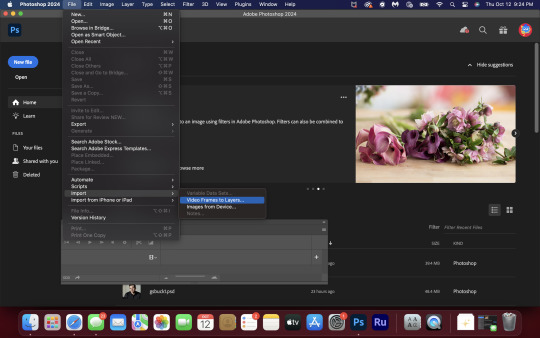
navigate to whatever folder you exported your clip to. select it, and hit enter. a second popup will appear asking you to select your range of frames. since you have already trimmed your clip to your liking, simply hit enter a second time.
now your screen looks like this, and we are going to crop and resize our gif! (troubleshooting: if you do not see the timeline bar at the bottom, select window from the control bar, scroll down, and make sure timeline is selected as part of your workspace. Adjustments and layers should be there automatically but if not add them too).

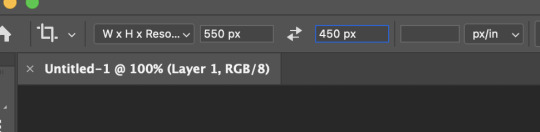
Tumblr posts are 540px wide, so in order to make my gifs as small as possible while maintaining quality, I typically crop my gifs to be around 550-600px wide, with varying heights depending on what shape I want the gif to be. experiment with this a little and decide what works for you. just don't make the width lower than 540px. once you have the portion of the frame you want inside the cropping grid, hit enter again. sometimes you have to hit it twice.
here are the measurements I am using for this gif
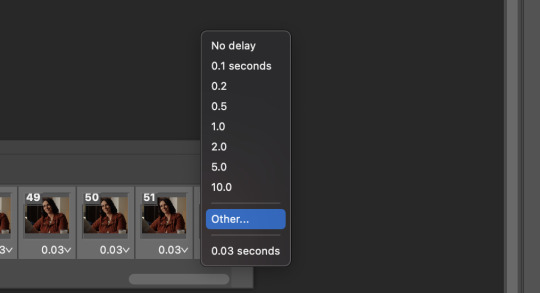
now in your timeline, select frame 1. hold down the shift key and scroll to the end to select the very last frame, thereby highlighting them all. from here we will edit our frame delay rate. photoshop will automatically set it to .03s, which will make your finished gif awkwardly fast. I typically use .05s, or .06s if I want a gif to be subtly slower (this comes in handy if the shot you are trying to gif is very short). anything longer than .06s will look weird though. choose "other" from this menu and type in your delay rate. make sure not to miss the zero after the decimal.
once you've set your frame rate, go to the other end of your timeline and click here to convert your frames into a video timeline.

then press option + command + A (on Mac) or windows + alt + A (on PC) to select all layers. then right click (control + click with a trackpad) on any one of the highlighted layers in your layers tab off to the right. scroll down in the popup menu and select Convert to Smart Object.
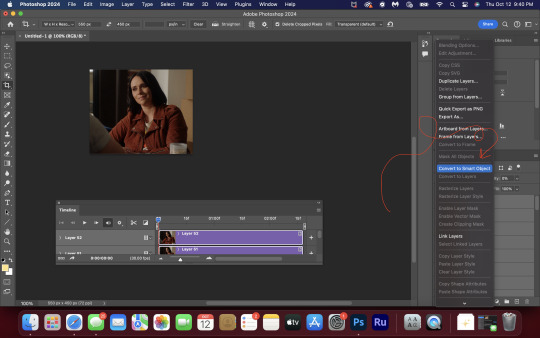
THAT'S IT!! CONGRATULATIONS!!!!! WE HAVE GIF!!!
from here comes the fun part!! you will begin adding action filters like sharpening as well as adjustment layers to color and edit your gif. experiment with different adjustments and styles until you find something you like. too many adjustment layers will up the size of the finished gif though, so I tend to keep mine to 3-4 layers max unless its a really hard to color scene. if anyone is interested in a separate coloring tutorial, please let me know!
once you are finished editing your gif, click file > export > save for web (legacy) OR hit shift + option + command + S. play your gif in the export window to make sure it looks okay, and then hit save!
I hope you guys find this helpful and informative! please hit up my in box if you have any questions or if anything doesn't make sense. happy giffing!!!
*one reason people seem to prefer screencapping to this method, is saving all the individual clips as video files does take up a lot of space on your scratch drive, which in turn can cause your computer to work slowly or crash programs. this can be rectified by making sure to delete the clips from your computer once you are done making the gifs. another space hoarder to look out for is the proxy files of your episodes that will be automatically saved to your hard drive whenever you add an episode to your project in Premiere. Periodically, go through your storage and delete all the .proxy video files. this will not delete the original episode files, only the proxy files created by Premiere.
tagging some mutuals to sb hehe: @shitouttabuck @lover-of-mine @honestlydarkprincess @eddiediaaz @compactdiscmp3 @eddiebabygirldiaz @bigfootsmom @callaplums @athenagranted @firemedicdiaz @sibylsleaves @loserdiaz @buck2eddie @diazass @eddiediaztho @giddyupbuck @monsterrae1 @icecreampotluck @sunflowerdiaiz @swiftfootedachilles @singlethread @aziraaphales @911onabc
145 notes
·
View notes