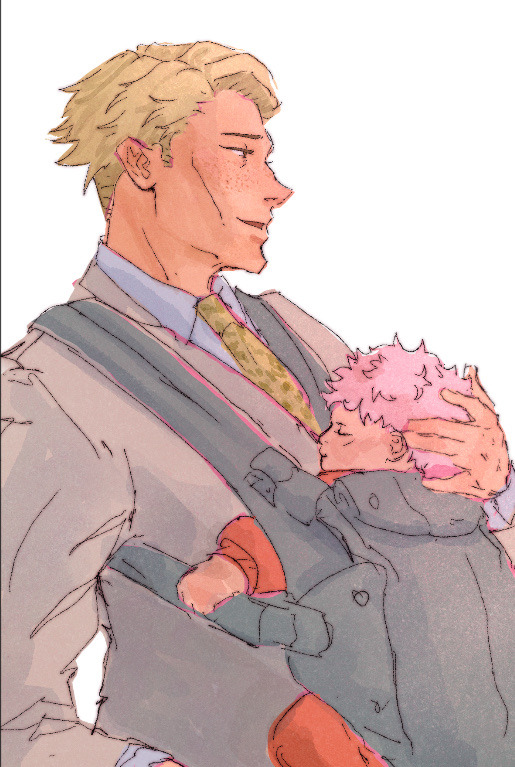
#and I’m not rendering this or doing extra details
Text
Come get y’all juice


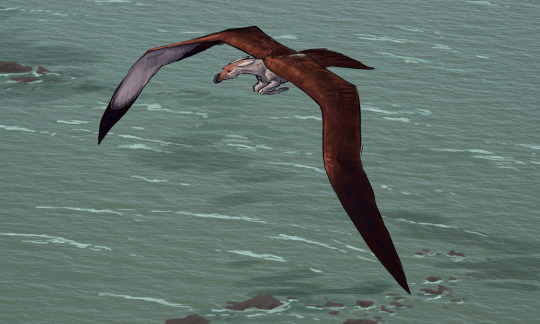
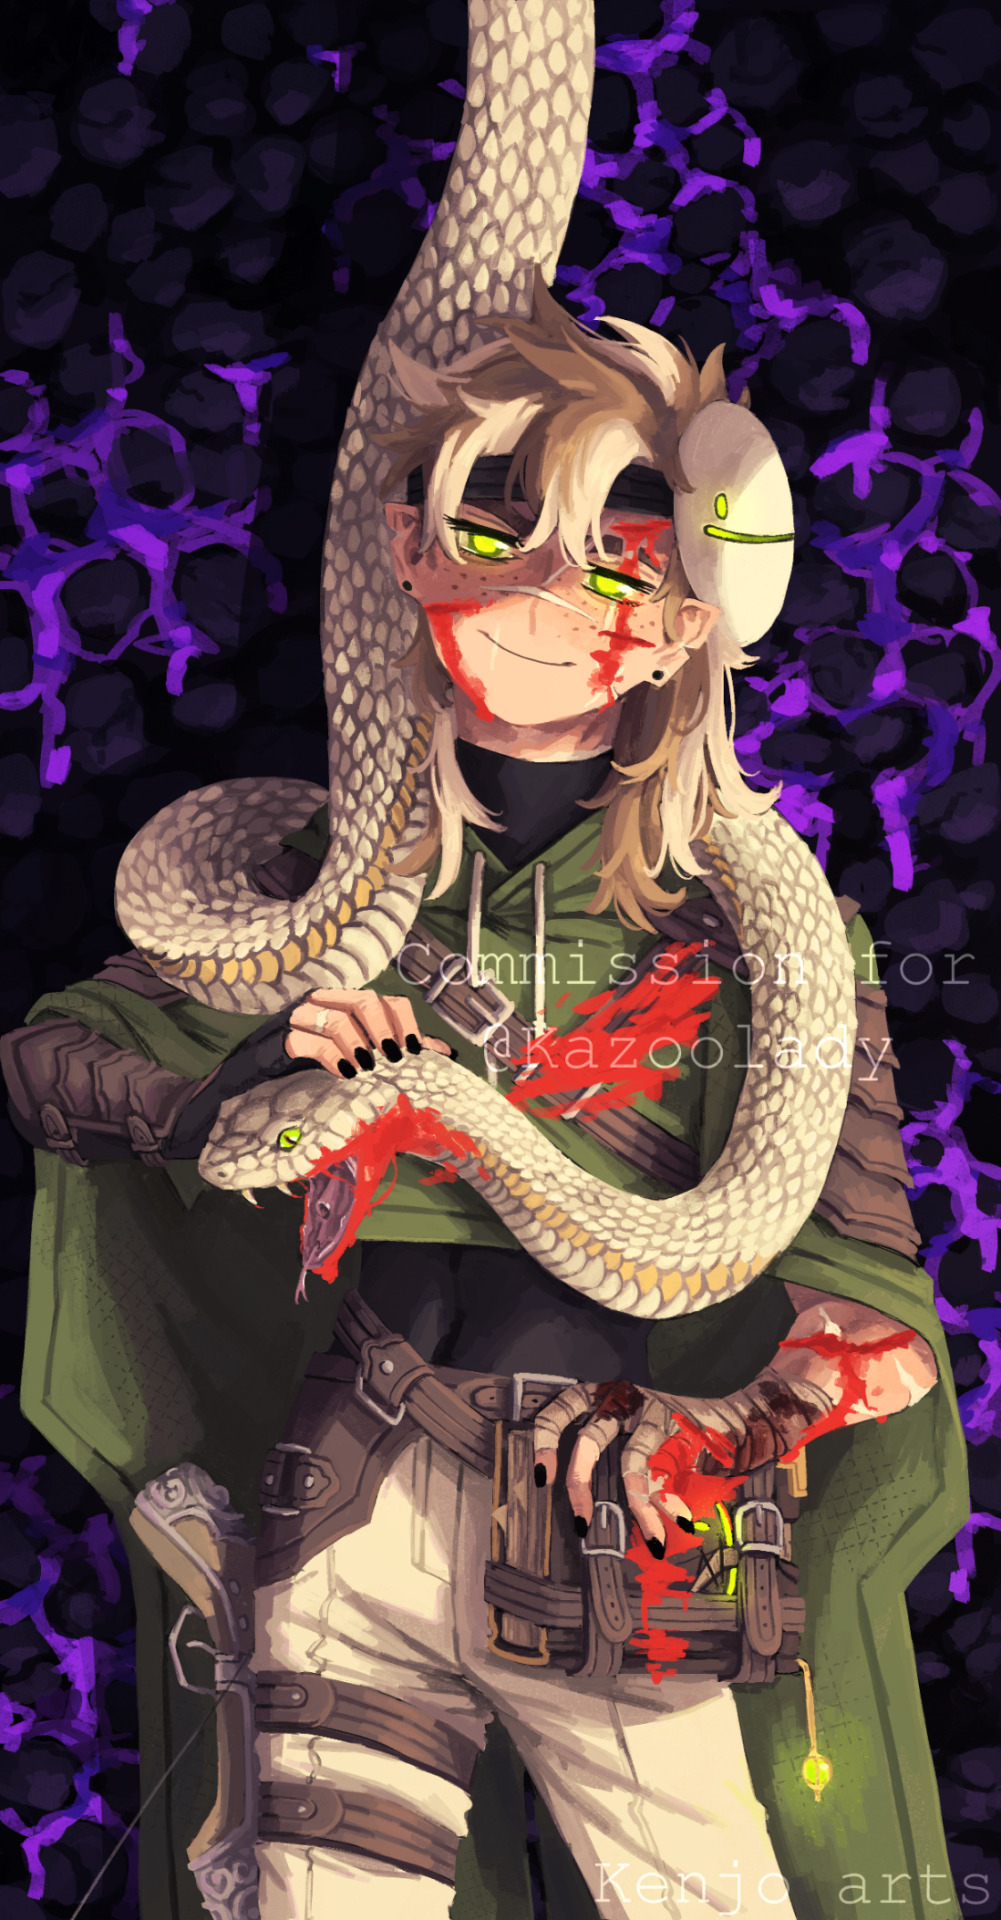
#luke castellan#percy jackson and the olympians#pjoverse#pjo#pjo series#pjo fanart#pjo luke#percy jackson#it’s Luke as a stock photo#this and emo bi-han is my best work#yes I did trace over this#and I’m not rendering this or doing extra details#RestInSlices Art#yes this is art#I just realized his thumb should have the T
30 notes
·
View notes
Text
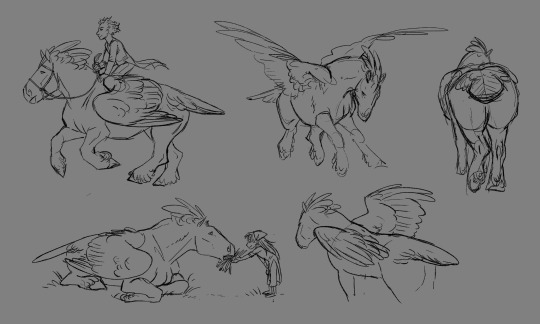
Let’s Draw Wings
I’ve gotten the question/request of how I draw wings lots and lots so I’ve decided to make a dedicated post!
Now...I’m no master, but I have found a way that I like to draw wings that’s efficient for me. There three main points:
References
Simplification
Texture Management
First of all - References
My favorite wing reference of all time is this post by Jenn on Twitter. I have both the images saved but I use the Wing Shapes one, below, alllllll the time. Like for real all the time!

I also keep pretty extensive collections of wing photo reference. When I’m having trouble, I’ll trace a few or do studies to get back into the swing of things. Here are links to my Pinterest boards:
Broadwing Reference (passive soaring and high-speed)
Longwing Reference (active soaring)
Shortwing Reference (elliptical and hovering)
Secondly - Simplification
When I sketch wings, I simplify Jenn’s diagram even further -
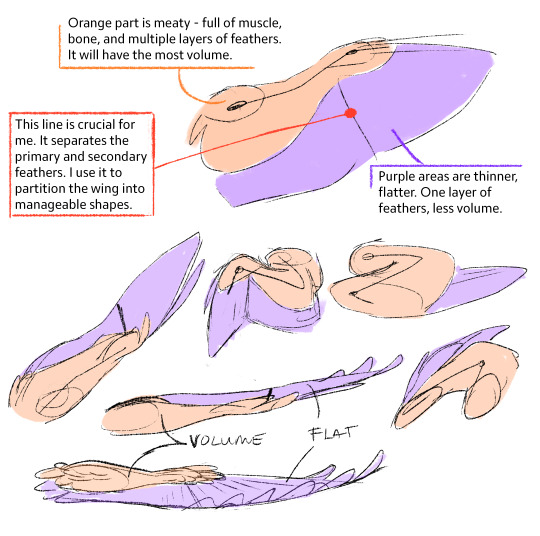
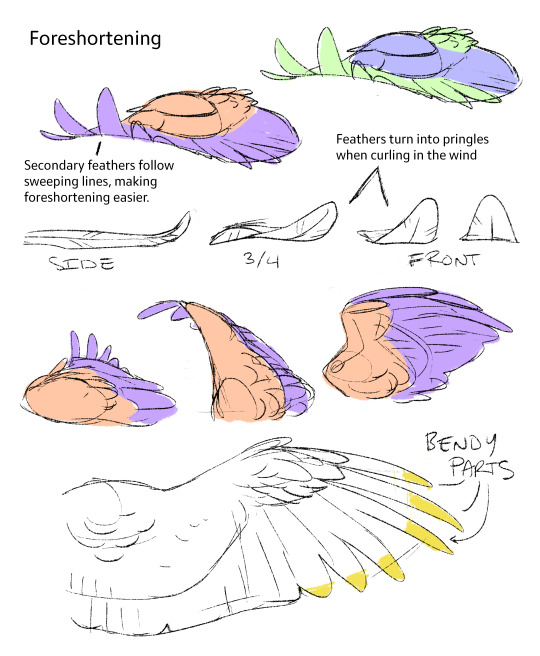
For me, the key to drawing wings is simplifying the wing down - from the structure to the feathers - the goal for me is to be able to draw them quickly and have the proper information conveyed. It needs to look like a wing in the base sketch. If it doesn’t, no amount of rendering and extra feathers will help. I like to break the wing into the three main moving parts. The orange is one part, then the purple contains two main chunks feathers that you can group together and move as their own parts.
On top of that, I like to think of wings like a sheet of paper. They can bend and fold in on themselves, with the orange meaty bits anchoring everything together.
Lastly - Texture
I like to call wings “texture monsters”. Feathers are hard to manage and can easily make wings look over-busy and muddy. Just like before, I break the wing into chunks so I can spend less time drawing the wing and it’s feathers:
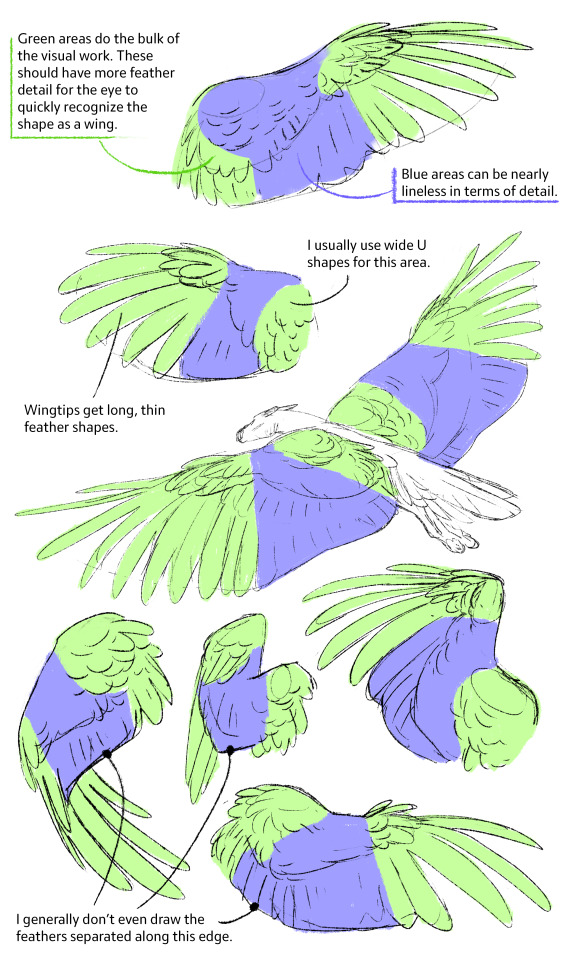
Then you can put it all together and push things further -
So yeah this is how I throw wings together! The wings I draw aren’t super technical or detailed, but I what matters for me is that they look and feel like believable wings at a glance -
~ Larn
--
Discord | Patreon | Art Prints
9K notes
·
View notes
Text
Professor Miguel O’Hara x Reader Headcanons
Warnings: University Professor Miguel, Implications of Smut, Age Gap, Secret Relationship, Teacher’s Pet Reader, Academic Manipulation, Coercion, Abuse of Power, Miguel Abusing his Spider Abilities for Nefarious Purposes, Slight Yandere Miguel, Implied Obsession, Minor Spoilers for Miguel’s Backstory, Extra Yandere Headcanons, Forced Kissing, No Pronouns Used for Reader Except ‘You’.
Miguel knows it’s wrong to want you in the way he does. You’re his best and brightest student, after all — his magnum opus: his academic pride and joy.
Problem is, that appreciation for your work ethic and your eagerness to take heavy loads of work (and eventually heavy loads of other things) charmed him. Sure, he could label you asa kiss-ass, a teacher’s pet, a sycophant, but ever since the first day he met you, he can’t help but feel your concern for him is genuine.
You always ask him how he’s doing. Every class, without fail, you stop off at his desk on your way to your seat and ask: “How are you doing today, Mr. O’Hara?” Followed by questioning some inane, specific detail he told you off-handedly a day or week prior.
You always remembered the little details. Something even Miguel finds trouble with doing; what, with his extracurricular activities as Nueva York’s one and only Spiderman.
The fact that you’re kind to him, a luxury Miguel had long since lost along with his family, strikes a chord with him.
He’s not sure when his platonic appreciation of such a hard-working student turned to something more — a rogue daydream into the lewd — but once he started, he couldn’t get enough.
Something about your unspoken submission to him – your, dare he say, desire to perform just for him, led his mind and his morals astray, left much room for interpretation and experimentation.
Choosing to believe you liked him — like-liked him — made a brand of pride bubble in his chest that he couldn’t abandon, couldn’t find a potent enough alternative to.
He starts shamelessly, yet restrainedly, flirting with you. In his own way, of course.
“I loved your paper on the configuration of water molecules and their behaviour when observed; very enlightening stuff.”
The way your face would light up, your eyes crinkling while a small, almost relieved laugh escaped you, made his chest flutter.
He thought it was pride. How little he knows for a science professor.
Eventually, this escalated into him asking you to do things for him he “Wouldn’t ordinarily ask a student to do.”
He smiles at you, eyes deceptively kind behind his slender glasses, as he watches you so intently listen, hear, for his commands.
He wonders what other things you’d do — how far you’d really go, stretch yourself (as he hopes you’d let him) — for a good grade and a positive impression.
He has a secret weapon that he knows will work on you, regardless of how momentous the task.
“I’m trusting you because you’re my favourite student.”
There it is. The activation phrase. Your heart rate quickens, your pupils blow wide and he can feel, hear, the blood rush to your cheeks as his confession settles in.
He can expect whatever it is he’s asked you to do to be complete before the time he’s set for you to do it. And all because of your eagerness to prove that you’re worthy of such a title as ‘favourite’. His favourite.
Truly, though, you are his favourite.
He feels his heart prick and his eyes search for you whenever the door to the lecture hall opens.
Only once were you unable to come to class, rendered bed-ridden by the flu, and Miguel’s heart sank.
He thought at first it was because he didn’t have your adoring eyes following him, trailing his every movement, stroking off his ego with how furiously you’d type on your laptop, take everything he said and burn it into your memory with laser-life efficiency.
But, as the lecture drew to a close, Miguel felt…concerned about you. Your well-being.
A dangerous emotion.
He cared about you. More than just an academic plaything, a task donkey; he wanted to visit you, to care for you. In ways he knew only he was capable of.
During his surveillance of the city that night, he paid you a visit as Spiderman.
Nothing so overt as to make himself known to you; rather a sideline visit as he watched you through your bedroom window.
Truly, your physical state reflected how monumental your illness was; you lay in bed, unaware of the world around you as you slept, nose tip red and eyes ringed.
He wanted to come in, to tuck you back under the blankets you’d thrashed yourself free from, to check your temperature, to be with you.
He leaves, hand coming up to the glass, wishing to breach it — and all the rules — to see you.
But alas, the next time he sees you is in class a few days later when you’re fully recovered.
As you sidle into your seat, lecture hall (uncharacteristically) devoid of Miguel, your friends lean in to tell you all that you missed.
Though, to your surprise, it’s not academic material they’re covering.
“He kept looking over here while you were gone,” came one friend, smiling. Knowing.
“Yeah,” chimes another, leaning in even closer. “And he didn’t sound like he usually does — he sounded…” They look for the right word, term, eyes sliding upwards as if the answer lay heavenward.
The cogs click, they look at you, pointing.
“Disheartened!”
Of course, your friends knew of your admiration for Miguel, often construing it as romantic attraction, but their jibes never went past a joke – purely satirical. After all, practically every student fancied Miguel.
But, that was the first indication you’d seen that Miguel didn’t just view you as another of his students. Though, you hadn’t seen the other warning signs.
Not that youd knwo this prior to dating him, but Miguel gets unbelievably hard when you call him ‘Mr. O’Hara’. Or, even better, ‘Sir’.
Something about the way you look up at him beneath your lashes, eyes filled with the desire to please him, to get on his good side and undertake any task he set for you, was akin to him having full control over you — academic and otherwise.
It just reminds him of how much power he has over you; for the first time, he feels that he has control over the elements and objects around him — an agent of fate rather than being a subject of it.
That, coupled with his secret identity as Spider Man, sends him on a power trip that often leads him to relieving himself of his growing burden in the privacy of his own four walls, your name laced between the groaning, the panting, the moaning; the only comprehensible instrument in his orchestra.
And, when you eventually start dating, he takes his frustrations out on you.
He makes low, raspy threats when he wants something.
“I’ll lower your grade,” he says, sliding his belt from the loops of his trousers.
The blood draining from your face, your widened stare, your mouth dropping open, make his pants feel tight. Tighter. Goosebumps erupt across his skin.
“Or,” he offers, folding the belt and holding it by the ends. He slaps the belt’s body against itself, sending a crack through the room. You flinch.
“You can be a good little student and earn your grade.”
‘Earning’ often ends with you panting and red and wet, while Miguel watches you between half-lidded, reddened eyes, contact lenses long abandoned, his true nature no longer an enigma to you.
Unfortunately for you.
Extra Yandere Headcanons:
Once you discover Miguel’s true identity, both as Spiderman and a monster, you can never leave.
And not just because you’d be endangering both yourself and him if you ever told anyone.
Miguel, quite simply, cannot live without you. And the thought that you would try to escape him is, despite his intelligence, baffling.
His delusion has blinded him, made him privy only to any positive opinion of him you may have, ignoring your reservations. Invalidating them.
If you ever do make the mistake of trying to leave, Miguel knows he cannot let you have the chance of making it again.
“Can’t risk you getting out, Darling,” he says, placing the finishing knots on the threads of his neon web, keeping your arms constricted behind your back. It’s nigh-impossible to breathe; the likelihood of you breaking your ribs against the pull of the web a certainty rather than you managing to burst it open with any manoeuvre.
He kneels before you, taking your cheek in his hand.
With fleeting defiance, you pull yourself from his grasp, only to see him bear his teeth, fangs and all, and growl. His hands snake about your cheek, your throat, and pull you to him.
“No-one will ever love you like I do,” he rasps. Before you can anticipate, his lips are on yours, parted, tongue lapping at the inside of your mouth. You squeeze your eyes shut, knowing better than to bite him.
His iron grip on your wrists from last time still haven’t healed.
You daren’t close your eyes for fear that doing so will leave you any more vulnerable than you already are.
Only when he’s breathless does he pull back, eyes half-lidded and gleaming. You can tell he’s angling for something more in the way his hand drops to your shoulder, his eyes sweeping across your collarbones.
But, luckily for you, the two of you know he can’t indulge in you just yet. Not while he has you bound in his basement and a class of students awaiting his arrival.
“I’ll be back for you later,” he says, still panting, forehead pressed to yours. His smile, once pointed and serpentine, is incongruously soft compared to the current circumstances. His lips gentle as he presses a kiss to your forehead. His eyes shimmer with a tenderness that often overtook him in moments of great need – of great “love”, as he’d characterise it.
With a tight, embrace, he parts from you. His shirt is an almost blinding white against the light pouring in from the hallway, the basement door now wide open. He retrieves his glasses from his breast pocket, slips them on. His eyes are unreadable, coloured brown with contact lenses which seemed to conceal his inhumanity from all except you.
“Sit tight, Sweetie,” he tells you. And you are plunged once again into darkness with only the dim glow of his web to accompany you.
And, just like the good, obedient student you are, you obey. For you have no other choice.
Reblog for more content like this! It helps creators like myself tremendously and it is greatly appreciated :-)
Masterlist
Masterpost
Yandere Masterlist
Juicy Original Content <3
#miguel ohara#miguel o'hara#miguel o hara#miguel ohara x reader#miguel ohara x you#miguel ohara x y/n#yandere miguel ohara#miguel o'hara x reader#miguel o'hara x you#miguel o'hara x y/n#yandere miguel o'hara#miguel o hara x reader#yandere miguel o hara#miguel o hara x you#spider verse#across the spiderverse#spiderman astv#spiderman 2099#spiderman#yandere spiderman#spiderman x reader#spiderman 2099 x reader#spiderman 2099 x you
2K notes
·
View notes
Text

I am opening comissions!
Hello everyone, I’m re-opening commissions because I recently moved into my first apartment and my cat got immediately sick so money has gotten a bit tight. So if you’ve ever been interested in having me draw something for you, now is the time! :D
more info and commission examples under the cut!
If you’re interested you can contact me through DMs to commission me or ask further questions! sending asks for questions is good too!
Thank you for being interested in my commissions! Before sending your commission request please look at my guidelines and know that by commissioning me you agree to them:
Terms of service
general:
Commissioner can re-upload the image with credits.
The art is for personal use and cannot be used commercially, claimed as your own work, fed into an AI learning software, or turned into an NFT.
I reserve the right to post the commission on social media (you can ask to be tagged or remain anonymous) or use the finished art in my portfolio.
The estimated completion time is roughly 1-4 weeks.
Commissions are first come first serve. If you need a commission done quickly or by a certain deadline, let me know and I’ll let you know if I can get it done in time.
Large revisions that add a lot of time to the commission work will up the price. (redoing finished sketch from scratch, changing up large details in the rendering stage)
Price can be upped depending on the complexity of the drawing.
The commission will be sent to you via Email
I have a right to refuse any commission.
Payment:
Done by PayPal.
Payment before I start working. I will send you an invoice before I start working
I don’t allow full refunds because PayPal takes a cut of what I’m paid.
The item is a digital image
What I do/don’t:
I do
Original characters
Fanart
Furry/anthropomorphic
Light gore
I don’t
NSFW
Mecha
Real people
Heavy gore
Comics
Detailed backgrounds
Things that will make the process easier:
Good references of details.
Reference pictures if you have any
Stickman drawings of your idea/or pose.
Descriptions of what you envision.
If you have any specific way I've drawn before you like the look of, let me know, though I cannot promise to be able to replicate the look 1 for 1
General process:
Once I’ve accepted your commission and am ready to start drawing is when I’ll request the payment. once I have the payment I’ll start drawing.
I’ll send the sketches for revisions, and for the flat colours+ updates if it is a longer process.
Once these things are to your liking I’ll finish the commission and send it to you. You can request a couple of changes to the finished art within 24 hours of my completing it.
Prices: (is in US dollars)
Sketch flat colours :
Full body: 35 $
Half body: 30 $
Headshot: 20 $
Lineart colours :
Full body: 50 $
Half body: 40 $
Headshot: 35 $
Rendered :
Fullbody: 120 $
Half body: 100 $
Headshot: 80 $
Extra character : +70%
Comic flat colours :
Per pannel (2 characters): 20$
Extra character (per pannel the extra characters is in, not overall): 40%
Comic commissions will have a simple background like in the examples
commission examples (one is cropped due to the commissioner's wishes to remain anonymous)


#This is basically a copy of my old commission post but with some updated stuff but the prices are the same#I figured a new one would be better than sharing the old one
211 notes
·
View notes
Text


Hi everyone!
It’s commission time! I’ve been unable to do commissions for a few years due to college, but I’m trying my hand at them again with some updated prices and information since I’ve graduated :3c
There are 3 slots available. When these fill up, a waiting list will be created and you will be notified of your position until you move into a slot. The average completion time for each commission will be 2-3 weeks! Please DM or email me at [email protected] if you’re interested!!
I will be offering two primary options: Flat colored work and rendered work. Both options have backgrounds/scenes available upon request for an extra cost determined by the complexity. Examples such as the collage of characters on the flats section can be requested for a separate estimated price—I’m willing to work with you if you’ve got a fun idea in mind! Please feel free to run an idea by me if you’re unsure if it fits into my comfort zone. I’m still feeling the waters out myself!
The third option I am offering are chibis! These are minimally rendered little guys that are best paired with a prop and some fancy accessories, all included in the price listed! These characters will be delivered as a transparent file and on a plain background, typically grey since that is what I work on, but a different color can be requested before or after the commission is finished. Very simple, graphic backgrounds can be requested as well for free! This would include single-colored, non-detailed floral elements, shapes and patterns, and any symbols that may compliment the character(s).
*For four chibis or more, I will offer a discounted price :D
Terms of Service:
I have the right to decline any commission.
I accept payment in USD with Venmo, Square, and Cashapp.
Payment is upfront for commissions $50 and lower. Anything higher can be split, half upfront and half before the final product is sent.
Updates will be sent throughout the process. Edits to the sketch are free. When the product is completed, two free edits are allowed. After that, each edit will cost $10.
Visual references are a must.
Commissions will take 2-3 weeks. Please inform me if there is a deadline.
The product is for personal use only. Do not use my art for AI, NFTs, or commercial use. Do not resell, copy, or trace my work.
I do not offer refunds unless I am unable to complete the commission.
WILL DRAW: Fanart, OCs, Mild violence, Ships, Anthro/Feral, and Stylized work upon request.
WON’T DRAW: NSFW/Fetish/Gore, Mecha, Realism, Complex Backgrounds, Problematic Content.
Thank you for reading, and please spread the word! I appreciate any and all support <3
#enthusiasm at its best#commissions#commissions open#art commissions#dnd commissions#chibi commissions#myke's comms#official tag mayhaps#very excited to start these up again :D ive been a little disheartened everytime i go to set them up#but alas the art world will always be daunting#i emphasize heavily pleasepleaspelpasleepslae ask questions!!! do not hesitate to reach out if you wanna comm but think the idea is too muc#long post
81 notes
·
View notes
Note
hi! not exactly a request but i do wanna ask, whats your process when you're rendering more paint like art? (if that makes sense, English isnt my first language so apologies hdskhsjdbd) i really love how you use the colors and im curious how you do it :0
i’ve been meaning to answer this one for a while so here’s how i painted miku in today’s post (put under the read more because yeah prepare for a long post
i’d also like to preface this by saying that i never follow a set way of doing things, so in terms of what my personal process is like, these are only broad strokes of what i do! sometimes i’ll combine or skip parts entirely, depending on how i feel. also, this is not a tutorial, just how i do things, so please don’t treat it like one :’D this will read like the ‘how to draw an owl’ picture if you do
first, like every artist, i sketch. more specifically, i’m getting an idea of what i want to paint later on. this could be how a scene is set up or in this case, how a character is posed. here i’m not concerned about details or getting everything perfectly, i’m only planning how the thing will be composed. maybe a lot of canvas size changing, or adjusting what miku’s doing (note how busted miku’s right hand looks from all the transforming!) however, i still have to be concerned with how clear the sketch will be to future me, because the sketch won’t be any good if i can’t read what miku’s doing

after that, i lay down a flat gray under the sketch, mainly focusing on giving miku a clear silhouette. this is also a good time to make adjustments to the composition on the fly if i suddenly feel like something can be improved upon, like shortening miku’s left arm from the sketch!
after painting a flat silhouette, i start shading in grayscale, focusing only on lighting. i usually do it in two passes, one for the lightest and darkest tones i’ll use (not black and white) and then a second for midtones to blend them better with the base gray but i forgot to screenshot the result of the first pass 🗿 nevertheless, here is where i can start adding some amount of details. i’m not including any extra accessories yet, just focusing on the base design of the outfit and the character herself (for anyone wanting to draw characters from That Gacha Game, this is how i personally make the process more bearable for myself.) i still use the dark gray to separate where certain details (like the facial features and fingers) begin and end, mainly to make colouring more bearable later.
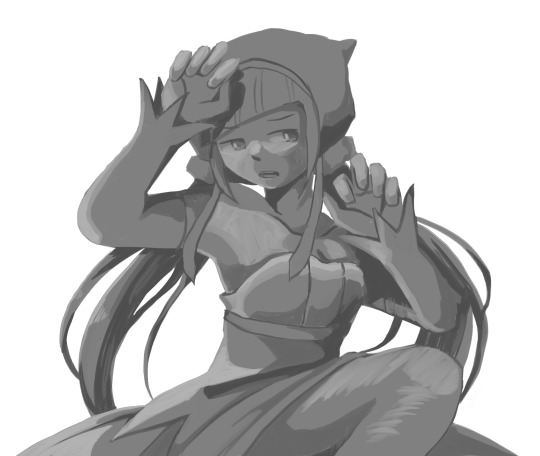
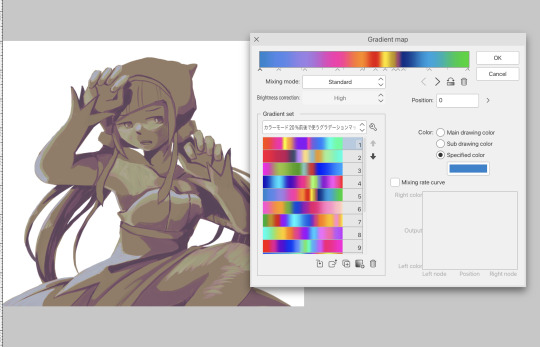
now here’s where i get the Good Colours. it’s a cheat lol. i put a gradient map layer over the grayscale painting so that there’s a little bit of color to start. some gradient maps can be applied as is, some need the layer settings adjusted to make it look good. this one, for example, is a (free) gradient map set from the csp assets store that needs you to set the layer opacity to 20% and to set the blending mode to color to achieve this result. in general, i tend to pick which gradient map i want to use based on vibes, or basically whether i want the work to be warmer or cooler, colour-wise. but this does do quite a bit of lifting for the colors in my stuff.
and then, finally, i add the colours. i add flat base colours in an overlay layer. at this stage, i’ve made the character silhouette clear enough that i don’t need to refer to the sketch anymore for what miku looks like. also, the gradient map layer does its magic by making the shading a bit more vibrant than it would’ve been without it. after that i paint over with a new layer to add details like the lace.
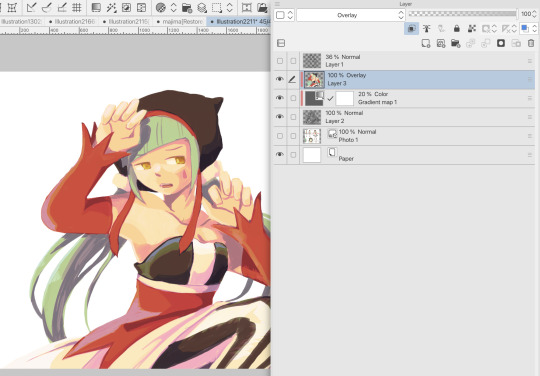
and then i put some extra shading on top. basically this is where the ‘better lighting’ happens. again, this isn’t a tutorial, so i’m not here to say what each part of the lighting is, but i’ve labeled which layers do which job. in other works where the lighting within a scene is more defined (from a window, from a small crack in the walls, etc) the glow dodge layer may be more opaque and sharper, but since this isn’t a work with that, the lighting was applied using an airbrush. the linear burn layer is also there to make the whole thing darker so the glow dodge doesn’t end up oversaturating miku. i also usually match the lights to the vibe i want, and use a complementary color for the shadows. so here you can see i have warm colors on the glow dodge layer, but light purple on both the linear burn and multiply layer.
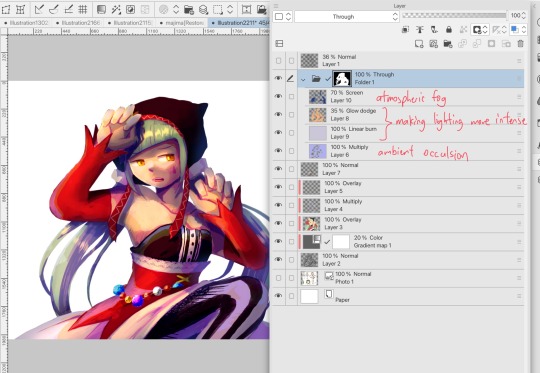
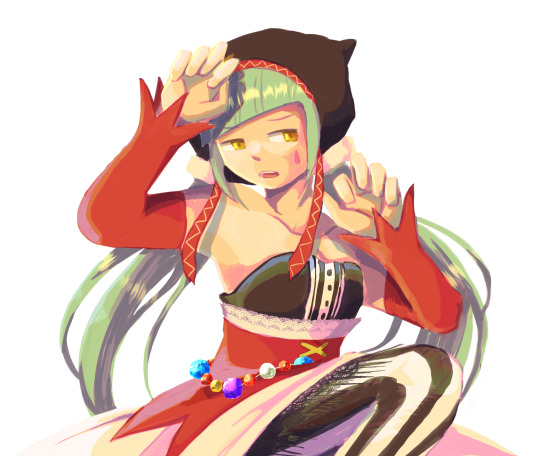
and that’s it for the character—here’s a gif showing how each layer adds to miku! (sorry it’s so toasty)

as for the background, depending on the complexity, it may go through a similar process, or if i can settle with flat image backgrounds, i just go for that. it’s ok to use external image materials. i didn’t have a background in mind for this miku in specific, so i got some default csp materials and threw together something
and that’s about a rough overview of what my process for more finished works looks like! again, art is a fluid process so i never specifically stick to certain steps all the time, and you shouldn’t either. i can probably answer why i’d pick this colour over another in one particular work, but it’s something that kinda has to be learned on a grander scale. i think everyone can already feel what colors work with what atmosphere or what setting, even if they can’t immediately explain why. colors and composition do take some level of experimentation to find what works best!
127 notes
·
View notes
Text
I do commissions!

It’s been a busy few months for me, but I’m finally feeling in a good place to start doing these again! Note that I only accept payment through PayPal at the moment, and my prices are in USD.
Full information below ⬇️
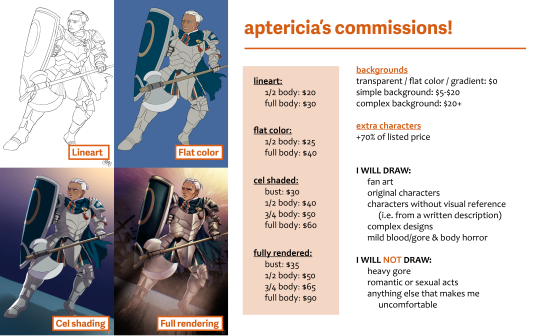
I offer characters illustrations in four styles and three sizes. The images above are not the only possibilities of how a commission could be inked or rendered, as I’m open to using different brushes or techniques on request. If there’s a particular piece of mine you like the style of, let me know and I can refer you to the pricing that applies.
OPTIONS AND RATES
Sketch: a rough sketch with a textured or untextured brush. Sketch commissions will include an under-sketch to determine pose and composition. Some of these prices are intended mostly for inclusion as part of a character sheet. I will add base colors to a sketch for double the original price.
Head/Bust: $5 ($10 with color)
Half Body: $10 ($20 with color)
Full Body: $15 ($30 with color)
Style A: Thick or medium lines with basic colors underneath. Includes simple details and gradients, but not full shading.
Head/Bust: $15
Half Body: $30
Full Body: $40
Style B: Thick or medium lines with soft shading or cell shading.
Head/Bust: $20
Half Body: $40
Full Body: $60
Style C: Medium or thin lines with full shading/render. +$10 for colored line art.
Head/Bust: $30
Half Body: $60
Full Body: $90
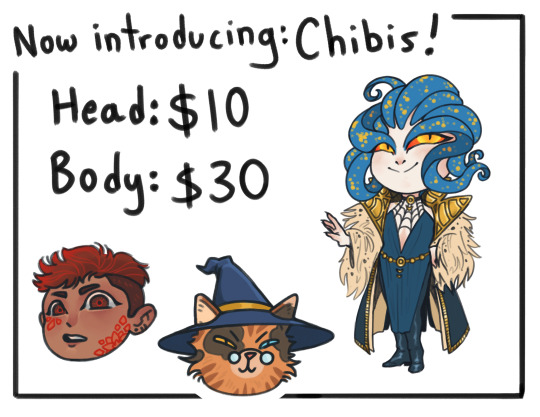
Chibis: I've finally found a style I like for drawing chibi characters, so I'll be including this as a new commission option! Chibis will all be done in the same style, with thick lines and basic coloring.
Head: $10
Full Body: $30
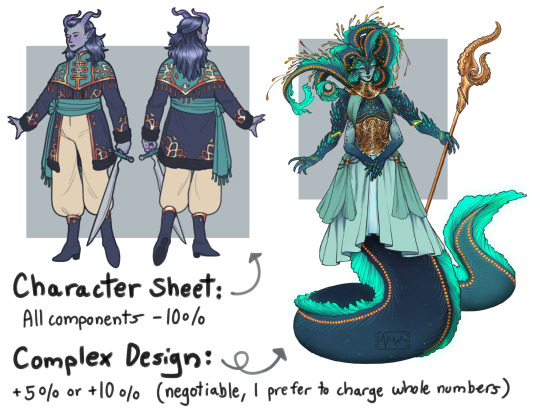
Character Sheet: A series of drawings of a single character, provided they are commissioned at the same time, will cost 10% less than the sum of all components. This includes characters dressed in different outfits, but normal rates apply to a commission of multiple distinct characters.
Complex Design: Since the level of the detail of a design will impact the time it takes me to draw, I am now including an additional charge of 5-10% of the original cost for especially complex designs (very detailed clothing, elaborate anatomy, complicated color/shading situations). As complexity may vary, the additional cost will vary as well (although it literally can't exceed $10 for a single drawing based on my current prices). I appreciate it if clients are understanding when I decide a drawing will cost extra, because this charge helps ensure I am earning a decent rate for my time.
PAYMENT PROCESS
As I mentioned above, I accept payment through PayPal in USD. You can send money directly to my account, @VRWintner, or if it’s more convenient for you/you would like a more specific record of the transaction, I can also send an invoice directly to your PayPal account.
For commissions of $30 or more, I require at least 50% of the cost to be paid upfront (although clients are welcome to pay more than that, or pay in full upfront). The remaining cost can be paid upon completion, and may be paid in installments if necessary. Bear in mind that if you fail to fully pay for a commission, you cannot purchase another until you have done so, and I may be hesitant to accept a commission if you are unreliable with payment.
I always welcome tips! If you're able and willing to toss me a little extra on a comm, I greatly appreciate it (but no stress if you can't--I don't expect to be paid any more than the agreed upon price, anything extra is up to you).
DISCLAIMERS
I Can/Will Draw:
ocs/rpg characters
fanart
ship art (including fanart or ocs)
party/group drawings
furry/anthro/monsters
robots/cyborgs/phyrexians, ect.
prosthetics and other tech
armor and weapons
blood/gore/body horror
non-sexual nudity
specific art styles
I Can't/Won't Draw:
explicitly sexual content
harmful or offensive content of any kind
any material I have personal or ethical issues with drawing. Given the commissions I have had before, I don't see this being a problem, but if this or the above clause applies, I will make it clear with the client that I am unwilling to draw it immediately.
Understand that art commissioned from me is still my art, and I expect to be credited for it. Please don’t repost my art without credit to me (rude), use it for training ai (why), or use it for commercial purposes (again, why). Again, I don't see this being an issue, as you all have been lovely clients thus far!
If you have questions about my rates or policies, please don't hesitate to ask--my inbox and dms are always open, and I will try to respond promptly. Thank you all for the love and support!
93 notes
·
View notes
Text
‼️Semi-Emergency Commissions‼️
Long story short, my housing situation got a lot more expensive and I’m running low on scholarships. It’s my senior year and I graduate in December, so I just need to get through until then—but I’m stressed as hell about being able to afford my last semester in college. I would really appreciate any help :( and you get art out of it!
Basics
I can do just about anything in terms of species. Humans, D&D races, anthro/furry, animal/feral, mechanical, monstrous, alien, cyborg alien beasts, you name it.
I can also draw pets, you, friends and family, fictional characters, whatever.
I can do mild to moderate gore, but I don't have experience with excessive gore, nor do I really like it. Same for body horror.
I will not draw NSFW art. Non-graphic nudity or romantic moments are cool though!
I reserve the right to turn down requests based on my availability, whether I believe them to be out of my skill range, etc, etc.
Notes:
I can take payments through ko-fi, PayPal, or Venmo.
All comms will be run by you a couple of times throughout the process to receive feedback and see what is and isn't working.
Full body digital pieces come with a simplistic background (ie. pattern, very simplified environment/effects, gradients, etc). Sometimes I get silly with it and might add some extra detail, but I won’t charge for extra detail that I added in the process just because I had an idea and was having fun with it.
I am best reached via my Discord, @/dyltgir, but you can also contact me via my DMs here on Tumblr, or on TikTok, Cara, or DeviantArt.
I can also do character design if you don't yet have refs and just loose ideas. :3
If there's anything you're interested in that doesn't appear here, feel free to reach out!
Headshot/Bust
Traditional Sketch: $7
Traditional Lined: $9
Digital Lineart: $12
Digital Flat Color: $15
Digital Full Render: $20
Half Body
Traditional Sketch: $12
Traditional Lined: $15
Digital Lineart: $20
Digital Flat Color: $25
Digital Full Render: $30
Full Body
Traditional Sketch: $17
Traditional Lined: $20
Digital Lineart: $25
Digital Flat Color: $32
Digital Full Render: $50
Other
Character Reference Sheet: $75
Chibi Front/Back Reference: $15
Sticky Note Doodle: $5
Character Poster (like Kass below): $60
Additional Character: +50%
I take payment through ko-fi, Venmo, or PayPal! DM me if you’re interested!
Examples can be found at this link!
To highlight recent work:


#art commisions#reblogs/boosts would be so so so appreciated#I’m really stuck between a rock and a hard place right now :(#commissions open#open comms#emergency art commissions#mutual aid#artists on tumblr
78 notes
·
View notes
Text
Updating... The Tattooer (ver. 3.4)!

Finally! Took me a while, huh. This is the updated version of the Tattooer project. It skips some steps, making the workflow much, much faster! Huge thanks to @applewatersugar for his
suggestion on how to bake textures while preserving the transparency. This is kind of a repost of the original Tattooer post, but it actually has some new stuff and a few changes here and there, so please take a look if you want to learn how to use this new version.
This is a series of Blender template files already set up to quickly bake textures from The Sims 4 to The Sims 2. The different Blender files will allow you to:
-Bake body textures from TS4 to TS2 (Female)
-Bake body textures from TS4 to TS2 (Male)
-Bake body textures from TS4 (Female) to TS2 (Male)
-Bake body textures from TS2 (Female) to TS2 (Male) [Bonus!]
-New! Bake face textures from TS4 to TS2 (Unisex) [Bonus!]
-Bake head textures from TS4 to TS2 (Face + Scalp) (Unisex) [Still experimental]
Check the file names to see which one is which, and the resolution of the baked texture it will give.
Everything you see in the render above was 100% converted using those Blender files.
Download here! SFS / GD
Update: Version 3.4.1 (27/08/2023) Fixed some issues on the shoulders for the AF-body-4t2-1024 and AF-body-4t2-2048 templates. Now the top straps on most converted underwear/swimwear should look right.
Update: Same version (13/12/2023) As requested, added a new spanish version of the included pdf guide!
These templates were made mainly to bake and convert tattoos, but there’s more you can do with them if you get creative. I have to say, these are NOT perfect. Results may vary depending on what you are trying to convert, so! With that in mind, this is all the stuff you will be able to convert almost seamlessly from TS4 to TS2:
-Tattoos.
-Other body details such as body hair, scars, freckles, supernatural/occult details…
-Body painted underwear and swimwear, as well as some other clothing that’s mostly painted on the body.
-Socks, stockings and maybe leggings.
-Even skintones! In some areas they will look weird, so I recommend editing and blending them with other existing TS2 skins.
-Makeup, eyebrows and beards. In the old version this was just a proof of concept, but now I’ve added a new Face file template which gives some pretty decent results!
-Hair scalps. Very useful when converting some hairs! Although keep in mind part of that texture might also need to be baked on the face mesh, you know, that hairline makeup stuff.
Got your attention? Nice! Editing some of the textures from TS4 to match the UV mapping in TS2 using a 2D editing program can be incredibly hard. That’s where texture baking in Blender comes to the rescue!
You will need to download Blender, at least version 3.4, but you could always use a newer version. It is only incompatible with versions older than 3.4.
-You can download Blender for free here.
-You will also need Sims 4 Studio to extract the original Sims 4 CC textures you want.
In the first version of these Blender files, there was a necessary step using Photoshop, but that’s no longer needed. However, there’s still a tiny extra step which requires resizing the newly baked texture on some of the high resolution templates, so you might need a 2D editing program like Photoshop. More on that later.
So, before we begin, let’s clear out some questions you might have. What the heck is this texture baking thing and what does it do? Well, let’s imagine you have a video projector and point an image into a blank wall. Then you pick up some brushes and start painting and copying that projected image in that wall. Texture baking is kinda like that when it comes to 3D models. You align two models and match them as closely as you can in shape and form, and once you adjust some parameters and values, Blender does the rest for you: it will give you a new texture for a new model with a different UV map. These files I’m sharing have everything already set up, so it’s a matter of plopping in that Sims 4 texture and you will get that new texture for TS2 in just a few clicks.
This tutorial assumes you know literally nothing about how to use Blender, so if you feel uncomfortable with it, worry no more! This will guide you with pictures showing where you need to click and explaining what is happening. For Sims 4 Studio and Photoshop the process might be a bit less detailed, but still this should be pretty beginner friendly. For this tutorial, I will use some tattoos as an example (properly credited at the end of the post). Alright, enough with the rambling. Let’s get started!
·EXTRACTING TEXTURES IN SIMS 4 STUDIO:
First things first, you will need to extract as pngs all the textures you want to convert from TS4 using Sims 4 Studio. It should be pretty straightforward. Just open the packages and export the Diffuse textures. Keep them organized in a folder for easy access.
·BAKING THE TEXTURES IN BLENDER:
PRELIMINARY STEP 1: CONFIGURING BLENDER’S GRAPHICS SETTINGS:
Open your preferred Blender file depending on what you’re going to bake and the desired resolution (in this example I’m going to use the AF-body-4t2-1024 file). Before we start messing around in Blender, there’s one thing you should set up. It is a onetime step, and once it’s done, you won’t need to do it again. So, does your computer have a dedicated graphics card? If you don’t know or you’re not sure, just skip to the next step. Configuring Blender so it uses your graphics card instead of your CPU will make the baking render much faster, so it is recommended you set it up correctly.
If your computer has a dedicated graphics card, click File (1) > Preferences (2) > and on the window that pops up click System (3) > and select CUDA and make sure your graphics card is there and tick it (4). I have an Nvidia Graphics card but your case may vary. Once you’re done, click on the tiny button on the bottom left corner and Save Preferences (5).

PRELIMINARY STEP 2: CHOOSING THE RENDERING DEVICE:
Click on the tiny camera button on the right, called Render Properties (1), and on Device (2) select GPU Compute if it’s not already selected. If you’re not sure if you have a graphics card or not, just select CPU. Then select the Material Properties tab (3) and Save your changes, either by pressing Ctrl + S, or clicking File (4) > Save (5). You might need to do this second step with the other Blender files, but once you have it done and saved, you won’t need to do this again. Okay, time to get into the good stuff!

·STEP 1: LOADING YOUR TS4 BASE TEXTURE:
In the Material Properties tab, click the folder icon that says Open (1) and on the window that pops up, navigate through your folders and select your first texture. To navigate easily, the 3 buttons on the top right (2) are for the display mode. They will show your files in list mode, vertical and horizontal, and the one on the right will display the file thumbnails, pretty useful if you want to easily preview your textures here. The icons on the left side (3) will let you go one folder back and forward, go to the parent directory, and refresh the folder in case you just dropped something new in there. Double click on the image you need and that will load the texture into the Sims 4 body model, named “ts4 body”.

·STEP 2: SETTING UP YOUR SELECTION AND BAKING THE TEXTURE:
On the top right of the screen, you will see the names of the 2 models in the scene. Hold the Ctrl key in your keyboard and left click on the “ts2 body” model (1). If you did it correctly, you should see “ts2 body” in a yellowish orange color, and right down below, “ts4 body” should look more like a red orange. If not, try again by clicking first on ts4 body, and then while holding Ctrl click again on ts2 body. Then switch to the Render Properties tab by clicking the tiny camera icon (2) and click Bake (3). Depending on your screen resolution, you might need to scroll down a bit with your mouse to see the Bake button. Wait a few seconds for it to finish. You will see the progress percentage down on the bottom of your screen. Don’t panic if you notice your computer fans start ramping up, that’s completely normal! As I said in the beginning, using your GPU will bake the textures much faster than the CPU.

·STEP 3: SAVING YOUR NEW TS2 TEXTURE:
Once it’s finished, switch to the UV Editing Mode by clicking “UV Editing” on the top of your screen. And there it is: your new texture! You might have to scroll up your mouse wheel a bit to zoom in and see it in all its glory on the left side of the screen. We’re still not done yet though. You need to save it to yet another new folder (always try to keep your stuff organized!).

You can save it by pressing Shift + Alt + S, or clicking on Image* (1) and then Save As… (2). That will pop a window where you’ll need to navigate again and save it somewhere. Give it a proper name (3) and hit Enter to save it… well, Enter doesn’t always work for me for some reason, so if that happens just click Save As Image (4). And that’s it! You’ve successfully converted your baked texture. Congrats!

·STEP 4: GOING BACK TO STEP 1:
Alright! If you’re done with your textures, you can close Blender without saving and call it a day. But let’s say you want to keep baking other swatches. In order to go back to step 1 and start the process once again, click Layout (1), go back to the Material Properties tab (2), select “ts4 body” (3) and click on the folder icon (4) to open and load your next swatch.

Then it’s just a matter of repeating the process from step 2. When you’re ready to move on, close Blender without saving. If you see a small check telling you it will save some images, make sure you uncheck it, so you will be able to use it again in the future from the starting point with no issues. I don’t think it really matters if you accidentally save your progress in these files, but I like to keep it clean and fresh so I can do the process where I left it from the beginning next time I open it. And in case you mess up and save somewhere, you can always just delete the .blend file and download the template files again.
In case you’d like a video tutorial on how to use these files, the amazing @platinumaspiration recorded this fantastic video showcasing the process! You can watch it here.
One final note: some of the baking .blend files save the textures with a resolution of 2048x2048 pixels, as clearly stated at the end of their file name. That’s way too overkill, because TS2 only properly supports up to 1024x1024 for most of its textures and you should always resize your final product to that max resolution (or lower if needed). I just made those 2048 versions because there might be some really tiny and slim details on some tattoos that might look a little too blurry when baked into a 1024 resolution texture, so for those cases use that if you want and then resize them using your 2D editing software of choice.
In Photoshop, in the Resample mode of the Image Size menu, there are a few options to choose. For the fine details, I like the Nearest Neighbor (hard edges) option, which, even if it looks a bit pixelated, it still preserves most of the texture and quality.

For anything else, I would just directly bake them using the 1024 versions in Blender (512 for the face and scalp).
And for the folks who feel comfortable playing around in Blender, this is just the beginning! Texture baking opens a LOT of possibilities, so feel free to move stuff around and edit the models to your liking! If you notice the baked textures look warped or stretched somewhere, or don’t like where some textures are placed in the S2 body, poke around that area moving stuff and then give it another try. The main objective of the baking process is keeping both overlapping models as close in shape as possible. You may also edit and save new copies of the templates, or make new ones from scratch using mine as a reference (keep a close look on those Baking settings and values, I think they work pretty well) and share them if you want to. Go ham, do whatever you want with them! I still have plans on making templates to convert body textures from Sims 3 to Sims 2, but for now it’s not on my priorities, so we’ll see when that happens.
Whew! Hope none of this was too confusing. Need help or have any issues with these? Please ask/message me here and I’ll be glad to help when I’m able to!
Credits for the CC used in the render demonstration:
-Skin by Sims3Melancholic.
-Eyes by Northern Siberia Winds.
-Eyebrows by PeachyFaerie.
-Tattoos by xtc.
-Top by SerenityCC.
And the Tattoo I used for the tutorial can be found here, by ValhallanSim.
Last but not least, a huge thanks to all the people who somehow contributed to make this project and update possible, either by doing initial testing, finding issues to fix, or teaching me new Blender tricks to make the workflow way faster and easier. So thanks again to @elvisgrace @moyokeansimblr and @applewatersugar on Tumblr! <3
And thank you for reading! Hope you have fun playing with this (not so) new toy hehe.
#tattooer project#tattooer update#ts2 tutorial#ts2 resources#ts2 blender#ts2 overlays#ts2 texture baking#4t2 conversion tutorial#this took me so LONG to update#im really sorry for the delay :(
335 notes
·
View notes
Text
Commissions are open!
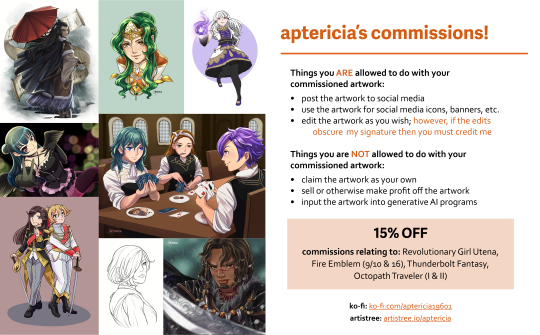
I'm currently opening 5 commission slots! All prices are in USD
You can DM me here, or through my payment platforms:
ko-fi: https://href.li/?https://ko-fi.com/aptericia19601
artistree: https://artistree.io/aptericia
***15% OFF COMMISSIONS FOR FANDOMS IN MY PINNED POST (Revolutionary Girl Utena, Fire Emblem 9/10 & 16/16W, Thunderbolt Fantasy, and Octopath Traveler)***
I will draw:
fanart
original characters
characters without visual reference (i.e. from a written description)
complex designs
mild blood/gore & body horror
I will not draw:
heavy gore
romantic or sexual acts
anything else that makes me uncomfortable
lineart-only style:
1/2 body: $20
full body: $30
flat color style:
1/2 body: $25
full body: $40
cel-shaded style:
bust: $30
1/2 body: $40
3/4 body: $50
full body: $60
fully-rendered style:
bust: $35
1/2 body: $50
3/4 body: $65
full body: $90
backgrounds:
transparent / flat color / simple graphic: $0
simple background: $5-$20
complex background: $20+
extra characters: +70% of listed price
What to expect:
Message me on tumblr, ko-fi, or Artistree for inquiry! Let me know what you’re looking for and I will confirm if I can draw it. Don’t worry if you don’t have all the details figured out—I’m happy to discuss with you! You do not need to provide references for characters who can easily found on the internet, however for OCs and characters from non-visual media, please provide me with descriptions or examples. Same goes for any specific poses, clothes, backgrounds, etc. you’d like me to include.
Once we’ve settled on an idea, I���ll send a rough sketch and confirm the price. After I receive the payment, I’ll continue working and send you updates at various stages of the development (lineart, flat colors, etc). You may request changes at each of the stages (minor ones are free, however large or many changes will require an extra fee). When the last update is approved, I’ll send you the final version in high resolution.
The amount of time a commission takes is highly dependent on the specifics, but most take under a week. If I expect your piece to take longer than that, I will let you know.
By default, I will post the finished commission to all my socials and may use it to promote my services. If you would NOT like your commission to be used this way, please let me know.
Things you ARE allowed to do with your commissioned artwork:
post the artwork to social media
use the artwork for social media icons, banners, etc.
edit the artwork as you wish; however, if the edits obscure my signature then you must credit me
Things you are NOT allowed to do with your commissioned artwork:
claim the artwork as your own
sell or otherwise make profit off the artwork
input the artwork into generative AI programs
#my art#commissions open#art commissions#revolutionary girl utena#fire emblem#fire emblem path of radiance#fire emblem radiant dawn#fire emblem three houses#fire emblem three hopes#thunderbolt fantasy#octopath traveler#octopath traveler 2#long post
61 notes
·
View notes
Text
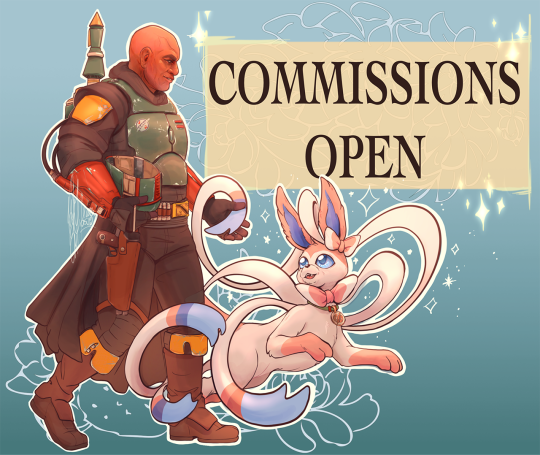


⭐COMMISSIONS ARE OPEN⭐
Reblogs are deeply appreciated even if you cannot afford to ask for a commission <3 However, if you'd prefer to leave just a small tip to support me and my art I have a ko-fi too :)
I’d be happy to draw your OC, favourite character or ship for you; you may check out my art tag for other examples of my work on top of what is in this post, as well as previous commissions I had drawn. If you have further questions don’t hesitate to DM me, or send me an email at [email protected] - detailed descriptions, and reference pictures are greatly appreciated! I truy love learning more about your characters and their backstories through the art process :)
Text transcript of prices, DOs and DON'Ts and additional information under the cut, I encourage you to check that out as well ->
Prices, payment and refund options
All prices are in USD and to be paid through PayPal invoices upfront. Cancellation of the commission is only possible before work on the piece is started. Once the sketch is finalized no refund is possible.
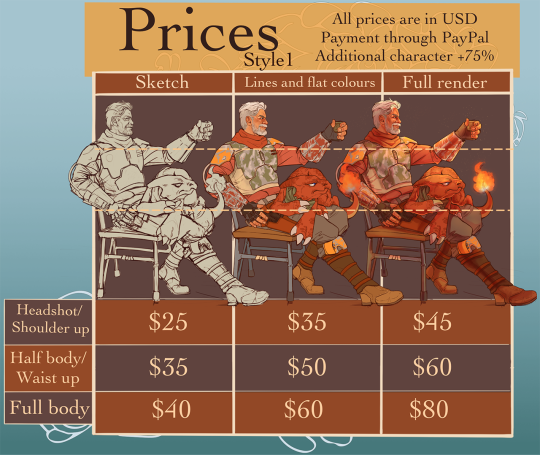
Prices for STYLE 1:
Headshot/bust: sketch $25, lines+flats $35, full render $45
Half-body/waist-up: sketch $35, lines+flats $50, full render $60
Full body: sketch $40, lines+flats $60, full render $80
Prices for STYLE 2 (my painterly style):
Headshot/bust: $60
Half-body/waist-up: $80
Full body: $110
Extra characters are +75%
Simple background is included in the price, anything more complicated (background, very detailed clothing/armour/jewelry/tattoo etc.) can be negotiated for extra ($15+).
DOs and DON'Ts
I WILL draw: fanart, OCs, ships, mild nsfw (e.g. blood, scars, suggestive themes, if unsure pleases ask)
I will NOT draw: mecha, anthro or anything I deem to be harmful content
How it works
Commissioner will receive digital goods - I'll send the high-res version of the commissioned art piece via email. Check-ins can be done via DM or email.
3 minor changes are allowed (e.g. hand placement, flat colours etc) at check-ins with the sketch and colour concepts. Other major changes (like changing the pose after the idea of the sketch is finalized) will cost extra $10.
I have the right to refuse to accept a commission. The work is for personal use only and cannot be used for commercial purposes. I retain rights to the artwork. The commissioned drawing is not to be used in any AI training program or any NFT-related project.
You may post the finished piece to your social media accounts with credits to me as the artist. I might want to post the piece to my own socials as well but I will ask for your permission for that first.
For detailed Terms of Service and further information please check out the following link.
I’m looking forward to working with you :)
#commission#commissions#commissions open#commission info#commission sheet#my art#art commisions#commission open#art commissions#open commissions
218 notes
·
View notes
Note
hey, how are you? i love your art! i am just learning how to use procreate, and i was wondering what brushes or canvas do you use to get the paper effect when you’re drawing? sorry, i hope you don’t mind me asking. thank you. ☺️
hehe well i’m gonna do a basic comprehensive tutorial on my drawing process and general guidelines i follow when doing art (hope you dont mind im using ur ask), i’ll start with my process first
brushes i use:
lineart: “ink bleed” brush that comes preprogrammed in procreate
coloring/texture: maxpacks watercolor set (while in the pricy range, ive been using it for years and i think its a worthy investment, he also has sales occasionally)
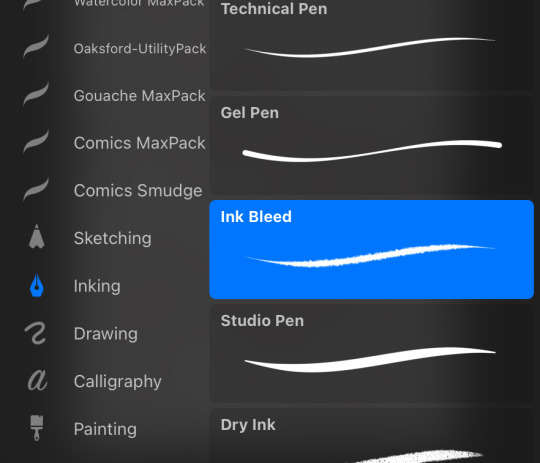
for sketching: HB pencil that comes with procreate but you can use whatever
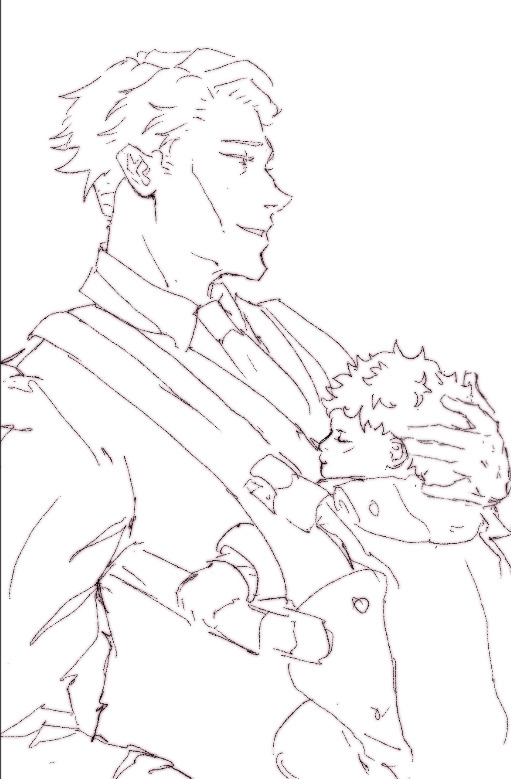
so my lineart, i typically duplicate my original layer, “color fill” the new layer with a dark red (or any dark color of ur choice), gaussian blur it @ 3% and set it to multiply and that just gives it some depth (for this piece i actually copied my dark red lineart and adjusted the opacity to make it a little darker so there’s 3 layers in total here)
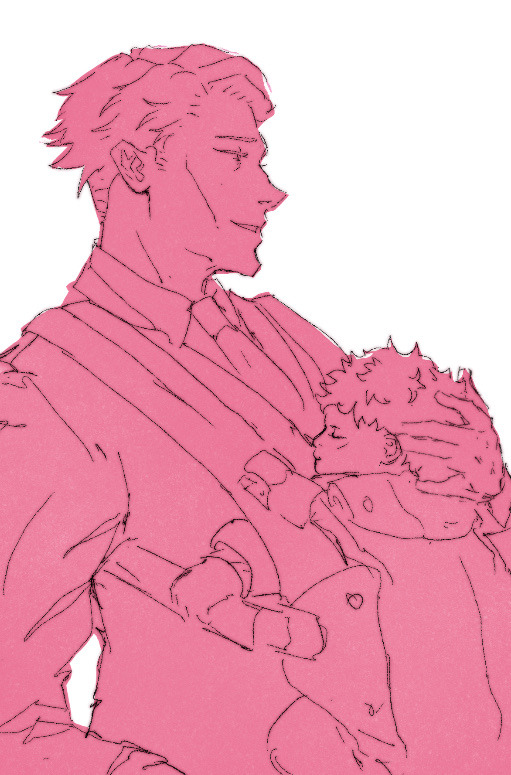
now on to COLORING, i start off with a solid bright color (usually one that goes with the general palette you’d like to use, i wanted something warm so i went with a pink base)
create a new layer and thats where the colors come in, i typically do a rough estimate of the colors i want to use at this point, cause they can be adjusted later in the “color balance” setting under “adjustments” once you have your coloring done (this is all on one layer)
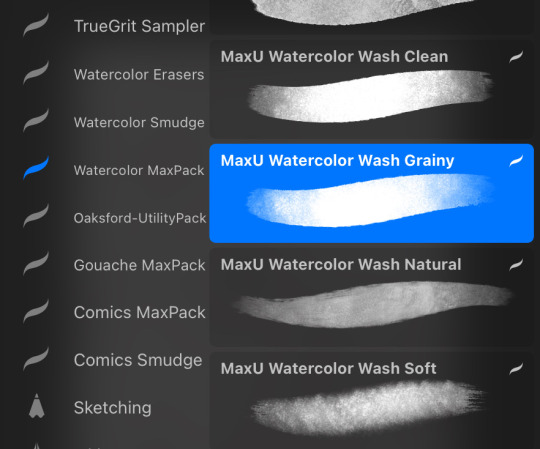
now my SECRET is i use the WASH GRAINY brush as an ERASER and lightly go over my color layer so the pink base comes through a little and unifies the colors and gives it that yummy texture. sometimes i erase the base color too for a little more texture but thats not necessary for every single drawing. once i erase enough, i go to “color balance” adjustment tool and mess with the hues till i get the result i want.
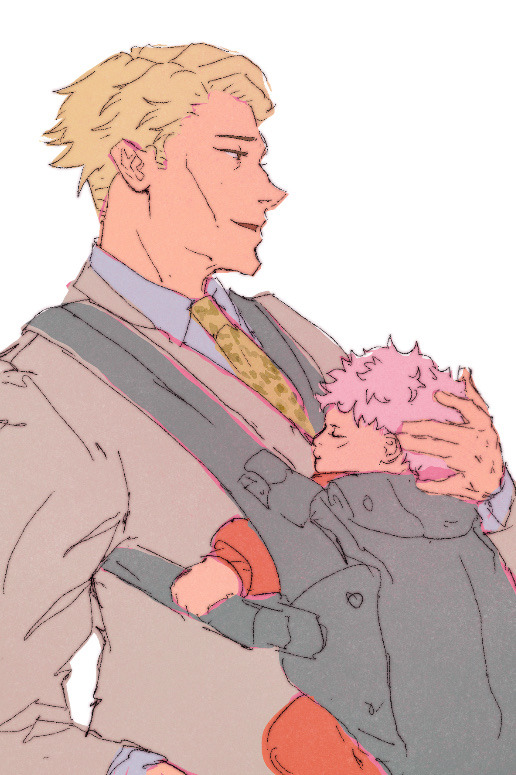
after that i create a multiply layer and with my WASH GRAINY brush i do shadows/face rendering. and with this piece specifically i did an add layer to simulate sunlight on them (i do extra layers at my own discretion, so have fun with it :)

as a final cherry on top i create another multiply layer, fill it with white and then set a noise filter on it @ 17% (dont ask why that number it just works for me lmao) and thats it!
if i need to clarify anything dont hesitate to ask! like i said we dont gatekeep here
and some general tips: dont over-articulate your drawing, cause i find the more i fuss with details the more stiff my drawings look, so i suggest being a little more loose with lineart/sketching and dont sweat the small stuff
same goes for coloring, the more simplistic your shapes are the more cohesive ur drawing will look
another coloring tip: if you’re having trouble with ur drawings looking “muddy” i recommend starting off with a black and white render so you can get a handle on your values before you worry about hue (i do this with my more rendered portraits but i find it helps you focus on the depth of your drawing)
38 notes
·
View notes
Text
Little Help
Pairing: Johnny “Soap” MacTavish x F!Reader
Summary: Breaking bones is never a great experience.
Warning : T-M rating, talks of injuries, nothing too serious, any medical talks might be inaccurate.
A/N: loosely based on my experience after I was in a car crash last year, my S/O had to help me wash my hair.
Part 5 of Little Bear series
Masterlist

You knew you should have bought a new pair of work boots when you were at the shop last week.
So you wouldn’t have to sit on the couch, drowning in your own misery, with a cast and sling over your arm, trying hard not to think of the pain it’s causing you every time you breathe.
You were pretty lucky your neighbour was about to head out the door at the same time when they witnessed you slip down the wet stairs of your shared flat with Johnny, and stayed with you until the ambulance came.
“Sorry Miss. Not only do you manage to break your ulna bone, you somehow manage to fracture your collarbone at the same time.” The doctor looked at you with sympathy. “Good news is, it’s not a complex fracture, no surgical intervention is required. Bad news is, you will have to be in a case for approximately four to six weeks.” Well, should have drank more milk when your parents nagged you every morning when you were young.
You groan at the news. This is the worst time to have an injury that renders you semi functional. Johnny is off on deployment, and Johnny’s sister Mini who is usually on duty at this hospital is off on holiday back at their parent’s farm up in Scotland. All your other friends have families and work. You really don’t want to be a bother to them.
So back to the present. Leaning against the cushion, on your good side, with tears rolling in your eyes, drifting in and out of sleep, waiting for the analgesic to kick in.
“... Bonnie bear? What happened to you?”
Well, it’s either the drug the doctor prescribed to you has unwanted side effects, you swear you are hearing your boyfriend’s voice.
“Teddy bear, come on, open your eyes, you are scaring me right now.” The voice is laced with concern, getting slightly frantic as he calls out to you again.
Slowly opening your eyes with a groan, you were utterly surprised to find Johnny was kneeling by the bedside, his beautiful puppy blue eyes staring with his hand hovering around your body, wanting to touch you but at the same time too scared that he would cause further pain.
“Johnny?” Blinking a few times, “ I thought, I thought … you not back for another few weeks?”
“Mission was aborted. We got sent back early.” No further elaborations as he shuffles towards you a little bit closer, “Which is lucky because.. Why didn’t you tell me you were injured?”
“.. I didn’t want to be a bother..” looking down, you replied with a voice that is barely above a whisper. You hate being useless. You hate asking for help, especially from your boyfriend.
“How many times do I have to tell you, you are NEVER ever a bother to me.” Johnny sighed and lightly carrasses your hair. “You are my treasure, I am always here to look after you, as you always do for me. Now, I am not taking no for an answer, I think you need a lot of help here.”
And you are glad you said yes. Because you've been itching to have your hair washed. Moving was a huge struggle, let alone trying to raise your arm and scrub your hair, which is getting more and more oily and smelly in this unbearable summer heat.
This is also when you notice, your dear boyfriend actually pays more attention to details than you thought. From how to scrub your hair, putting conditioners on, putting on hair oil before blow drying your hair.
“I’m not pulling too hard am I?” Johnny whispered as he gently brushed your hair, taking extra care to brush out the knots at the end.
“You are doing a brilliant job. I assume you had plenty of practise?” You muse and take light playful jabs at him doing the same for his partners from previous relationships.
“I know what you're thinking,” Kissing you lightly on your head as he finishes brushing, “Mini actually trained me to do her hair when she fell off a tree when she was young. She was double casted for weeks.” he chuckled. “She kept complaining I almost pull her head off her head everytime I try to brush it though, such an ungrateful sister.” he puffed in a joking tone.
“Well, aren’t I glad you have learnt your lesson and my scalp and hair is still intact.” You laughed. Letting out a sigh as you enjoyed the lightness of freshly washed and brushed hair. You are already feeling a hundred percent better after a nice shower and the painkiller has finally kicked in.
Leaning back into his chest, letting out a breath you didn’t know you were holding, “Thank you Johnny.” you murmured, full with emotion.
“Anytime. I know you would do the same for me if I was in your situation.” Reaching over to grab the night cream from the dresser table, “Face cream next?”
Looks like you are getting the full spa treatment from your boyfriend tonight.
BONUS:
“.... Gaz? Why are you ringing from Johnny’s phone…”
“ Well,” Gaz paused for a sec as he switched to video mode, his face appeared on the screen, looking at you with guilt, “the … what is the word, bampot boyfriend of yours managed fall out of the helicopter,” You gasped as Gaz deliver the news, “ Oh he is fine, don't worry, he had rope on him, but unfortunately he hit a tree while dangling.”
Moving the camera towards the background, there you can see Soap, on the infirmary cot, with cast to both of his legs and arm on the right hand side, giving you a weak wave and smile.
“OH my heaven JOHNNY!!!”
“Hi Bonnie bear…” he chuckled, “ Quite a pair, aren’t we?”
Simon and Mini ended up staying at the flat for a week before you had your cast removed, helping you both out with daily tasks.

I am lucky enough never had to break a bone ( touch wood. jinxed too many stuff this year ) but S/O mentioned once him and his brother broken an arm and collar bone each a week apart, and their friend laughing their head off at both of them looking very miserable with slings on ( inspiration to the bonus scene.)
Tag list:
@a-small-writer-in-a-big-world
@kaplerrr
@homicidal-slvt
@floral-force
@okayyadriana
@deadbranch
@cumikering
@siilvan
@random-thot-generator
@random0lover
@devcica
@jynxmirage
@nrdmssgs
#johnny soap mactavish x reader#johnny soap mactavish#johnny soap mactavish x fem reader#soap x reader#soap mactavish x reader#johnny soap mactavish imagine#johnny soap mactavish xf!reader#johnny soap mactavish x you#Little bear series#sofasoap writes#call of duty#johnny mactavish#john mactavish fluff#johnny soap mactavish x female!reader#johnny soap mactavish fluff#comfort fic#talks of injury
161 notes
·
View notes
Text

💙 swordmaid’s flash commission | status: closed 💜
hello everyone! im opening my flash commissions for this month and instead of offering one type of drawing im offering two (2)!! 👯♀️
* what im offering:
coloured bust portrait with light rendering of the character of your choice for $40 USD. example: one / two.
coloured waist up drawing with light rendering of the character of your choice for $50 USD. example: one.
i can draw almost any character as long as you give me a visual reference!
* additional costs:
extra character: $10 - since i want to do these pretty quick, I’m only allowing one extra character.
extra detailing: starts at $7. extra detailing includes armor details, fabric patterns, foliage, etc. it depends on what you want me to draw but we can def discuss this first.
i work in a first come first serve basis and my slots are limited so if you are interested, feel free to dm me with what you want me to draw and your visual reference. thank you! 🫡🥰🫶
#flash commissions#commissions#been so long since I did a flash but I want to do it again !! they’re fun !!#honestly this is just bc I’m obsessed with this brush and I wanna draw more portraits lol idk what I’m doing but it always ends up#looking kinda dreamy by the end ??? maybe I’m just delusional
43 notes
·
View notes
Text


Payment up front! The audaciousness of this is because I need money. If you blaze this I’ll do a free bust up render for you. Transcription + not info under the cut. Please reblog this pleaseee
Slide one:
I’M VALERIE AND I DO COMMISSIONS!
THIS FACE NEEDS MONEY!
ABOUT ME: I’m in college as a triple major/ra/tutor/etc. Due to external circumstances I am now broke and need help paying off my bills. Because of this, I’m opening emergency commissions. They’re cheap because I really need the money. 
I TAKE VENMO, CASHAPP, ZELLE, AND PAYPAL.
I’m showing pictures of myself because I am a real person who really does need help. Please share this. I draw ocs, real people fictional characters, anything that’s humanoid. I also draw NSFW. Hell, I’ll even draw furries if you’d give me the chance.
Slide two:
RENDERS PAGE ONE.
Bust: 10 USD
Waist: 15 USD
Full: 20 USD
+ half price per extra character
Simple bg free, complex bg prices vary
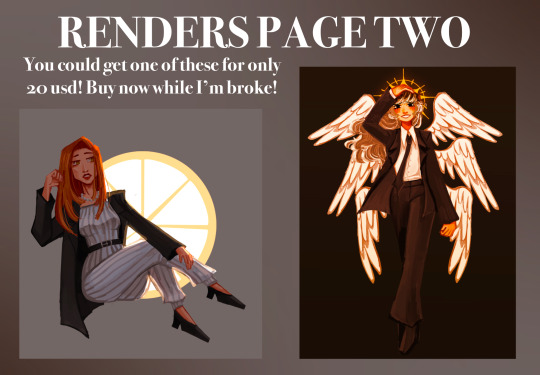
Slide 3:
RENDERS PAGE TWO
You could get one of these for only 20 usd! Buy now while I’m broke!
Slide 4:
PORTRAITS FOR TWENTY BUCKS!
I’d normally charge double! Don’t miss this awesome sale!
Slide 5:
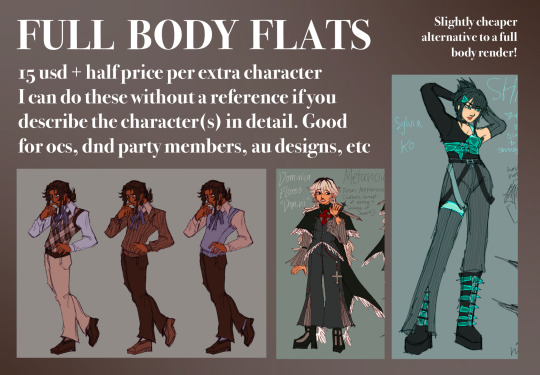
FULL BODY FLATS
Slightly cheaper alternative to a full body render!
15 usd + half price per character. I can do these without reference if you describe the character(s) in detail. Good for ocs, dnd party members, au designs, etc.
Slide 6:
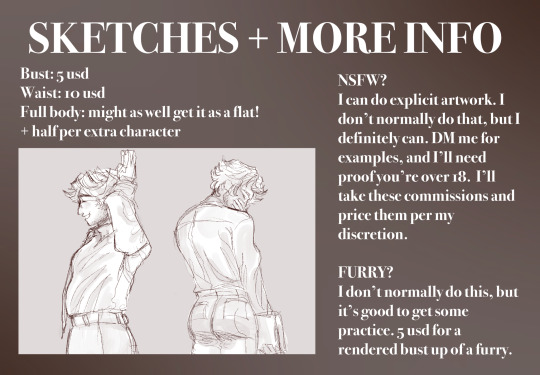
SKETCHES + MORE INFO
Bust: 5 usd
Waist: 10 usd
Full body: might as well get it as a flat!
+ half per extra character
NSFW?
I can do explicit artwork. I don’t normally do that, but I definitely can. DM me for examples, and I’ll need proof you’re over 18. I’ll take these commissions and price them per my discretion.
FURRY?
I don’t normally do this, but it’s good to get some practice. 5 usd for a rendered bust up of a furry.
Slide 7:
OTHER SHIT YOU CAN PAY ME TO DO that I can think of
Ponies: 8 usd + half per extra pony
Lucky star parody: 10 usd per character
Chibi flats: 8 usd + half per extra flat
I’ll do literally any show. You can pay me to make the most gruesome, hardened characters into ponies, chibis, or cutesy lucky star characters. Imagine the possibilities.
Extra things I forgot to include in the pics:
The lucky star parodies will be based on whatever promotional image suits the commission with the buyer’s discretion.
I’m pretty quick with commissions. You’ll get it latest after 2 weeks, or I’ll give you a refund if necessary. Even then, it’s super unlikely.
While I will do nsfw, I’m not going to do super gross shit either. No kids, no depictions of abuse, and I’ll let you know whether I will or won’t depict certain kinks/other things.
Thanks for reading!
#commissions open#emergency commissions#house md#hate crimes md#mlp#Mary cooper#rajesh koothrappali#the rest of the drawings are of my ocs#nsft commissions#omg I’m 19 btw#please help me. pleaseeeeeeeeeeee#I’m so cool guys#commissions
159 notes
·
View notes
Text


Hi,Tumblr! I’m open for digital and traditional art commissions again! I'll do a lovely art piece for you and/or your loved ones!
Lately I’ve been struggling to find new gigs and I really need money to pay my bills, so If you can please consider to commission me. If it's not possible right now, a reblog would me help me a lot! Thank you for your support ♥
The art commission service includes:
Work in process updates
Monochrome background with simple elements if requested.
Transparent background version if needed
If asked, a Cropped version for client
And of course, full resolution png file.
Delivering time:
Your commission will be delivered in 2-3 weeks (Or more, for bigger projects). If you need te art for an specific date please let me know and I'll try have it ready in time! Send me a message if you have any questions.
ADDITIONAL CHARACTER INFO: Prices are below each example, 75% of the base price for each character. *Busts with additional characters are not available. Pets can be added for 60% of the base price!
Terms of service:
I will draw anything (OCs, fanart, real people, humanoid and pets) except mecha, because I’m really bad at it, sorry! I’m okay with NSFW as long is not really explicit. I’m OK with nude art.
Extra detailed accesories like wings, weapons, amors will count as extra details and they will be charged starting at $6 USD. Simple backgrounds such as monochrome bgs, gradients and simple compositions have no extra cost. For detailed backgrounds please send me your ideas and I’ll send you a quote :).
Payments are only through PayPal invoices in USD (US Dollars) or their equivalent in MXN (Mexican Pesos), for the protection of both sides. I also can take Ko-fi.
I Accept two-part payments. I’ll start working on the piece as soon as I receive the first part, first updates will be sent in less than 15 days. The rest of the invoice would be paid before I send the finished illustration.
These prices are only for personal commissions. If you need art for commercial purposes, please read my full TOS (link below) or send me an e-mail and I’ll gladly make a price quote for the commercial rigths.
I have the rights of every commission made. Please don’t take the credits of the art or reproduct it on commercial products.
For more important info, please READ MY FULL TOS.
How to commission?
If you’re interested to commission, please send an email to [email protected] or send me a DM filling this form:
Character/person name(s):
Art style: (Colored sketch, full rendered, handmade watercolor)
Size: (Bust, half or full body)
Photo references:
Outfit/costume references:
Quick Description of the character(s): (Age, height, hairstyle, complexion, personality, likes)
Pose, background and/or extra details
PayPal e-mail:
If you have any questions please leave a comment or send me a message and I’ll respond as quickly as I can! Thank you for your interest ♥
PS: You can also commission me directly on Vgen and Artistree!
Twitter | Instagram | Support me on Ko-fi | Portfolio | Carrd
#illustration#art#digital art#artists on tumblr#looking for artist#artist wanted#oc#looking to commission#paid job#paid request#ocs#oc commissions#commissions#art commissions#watercolor#watercolorart#watercolor commissions#vgen#vgencomm#vgen artist#artistree#fanart#selling#digital artwork#artist#artcommissions#commissions open#open commissions#comissions open#commission sheet
21 notes
·
View notes
Last Seen Blogs

await-ing
Awaiting

loveradioactive
NeoCity

loverboytalaga-blog
Far from the usual

iammharsh
Untitled

lovepressbeauty-blog
Untitled