#arduino blog
Explore tagged Tumblr posts
Visit Tumblr Blog
Explore Tumblr blogs with no restrictions, modern design and the best experience.
Last Seen Tumblr Blogs


Fun Fact
Tumblr has 4 main sources of revenue.
Text
ESP Terminal with 3.5" SPI Capacitive Touch Display
youtube
Product Info: https://www.elecrow.com/wiki/esp-terminal-with-35inch-spi-capacitive-touch-display.html Elecrow sent me this cute little 320x480 ESP32-S3 based SPI capacitive touch display with OV2640 camera. I am going to use this screen to create a touch panel for my home automation system. In this video, I am going to unbox and show you guys how to program and use this cute little touchscreen from Elecrow using SqareLine Studio. You can order this touch screen display from www.elecrow.com. The product link is in the description below.
2 notes
·
View notes
Text


October 5th, 2023
Today I made some codes that I hadn't finished, and I researched the use of sensors for Arduino, the prototype in the photo was finished, now we just need to buy the sensor and configure it.
This prototype is made to recognize movements and sound an alarm when it detects something approaching.
#engineering#stem#study aesthetic#study motivation#studyblr#studyspo#stem academia#studyinspo#arduino#computer engineering#study blog#studying
52 notes
·
View notes
Text
mecha-creative inspiration
When doodling, composing melodies, or writing, I find that it's not too difficult to get inspired if I've hit a small block. For doodles, I just scribble random shapes and make something new. In music, I fool around with notes in a scale until I find something I like. All it takes to get a new idea for my writing endeavors is a snack or a walk.
When it comes to what I should do with all the electronic components I have, however, I find myself often stuck and lacking an idea of what I want to make next.
I'm fortunate enough to have an Elegoo MEGA2560 microcontroller board that I got about seven years ago for a birthday, but to this day, no grand projects have been built with it.
I feel the issue is that it feels like projects I find are either too simple (such as make an LED blink), or too complicated (such as setting up and designing a pinball machine or toy sentry gun). For the seven years I've had this board, I've done very little with it, mostly because I was too young to understand what I was actually holding.
But now that I've had more experience with microcontroller boards, I've found myself wanting to make something with it again.
Unfortunately, I've had no idea what that thing was going to be.
I don't mean to brag, but recently, me and a friend won first place at a science-oriented competition for a redox probe we'd built using another microcontroller.
We struggled with gathering the necessary resources, but by god, when the probe was finally assembled and we'd hooked it up to the board, it was glorious. Never before had I been so proud of something I'd created.
I also threw together a robot for a different event at the same competition, which, despite running into walls thanks to its inability to move straight, still placed fourth overall at the competition. That, too, was amazing.
So now I've got a need to make more bullshit.
Unfortunately, without a competition to guide me, I'm lacking a direction for my builds.
That was until earlier today.
A different friend had expressed their awe with the crap that I'd built, and the conversation naturally led to ideas of what I should build next. They proposed that I should make a tuner, which isn't a terrible idea.
So I think I'll be building some form of a tuner soon.
I've now got more ideas for other projects too, such as a joystick-controlled instrument and other electronic instruments.
Here's hoping I follow through with this project!
0 notes
Text
Explore the seamless integration of Matlab and Arduino to control servo motors, unlocking precision and efficiency in your automation tasks. Dive into our comprehensive guide for step-by-step tutorials, code snippets, and real-world applications.
0 notes
Text
NINE PEOPLE I WANNA GET TO KNOW BETTER
Thanks @lyralu91 and @morning-alfie for the tags! 🎀
LAST SONG? : Cherry Waves - Deftones
FAVOURITE COLOUR? : Purple 💜
CURRENTLY WATCHING? : The Rookie
LAST MOVIE? : Humboldt County
SWEET/SPICY/SAVOURY? : All of them
CURRENT OBSESSIONS? : Firearm mechanics, Excel speedruns, bass guitar covers
LAST THING YOU GOOGLED? : "arduino vs raspberry pi reddit"
People I'm tagging to get to know better:
❤️ @potter-solomons @wooood1 @miuyrr @zablife @mollybegger-blog @leenieweenie12 @kiss-me-hardy @soaps-mohawk @hecatemoon87 ❤️
25 notes
·
View notes
Text
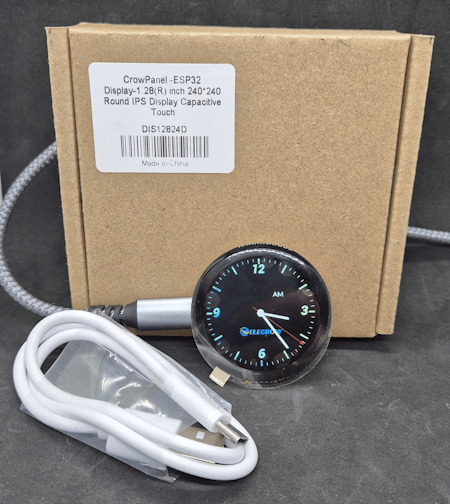
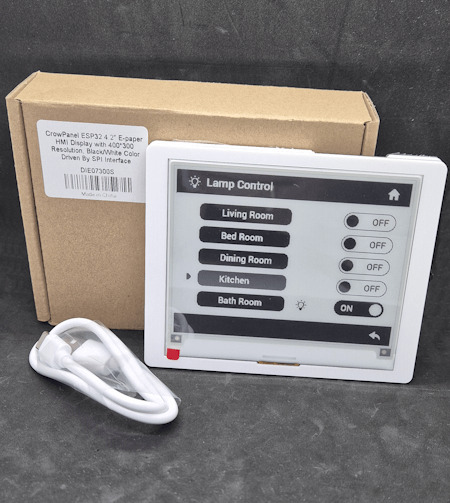
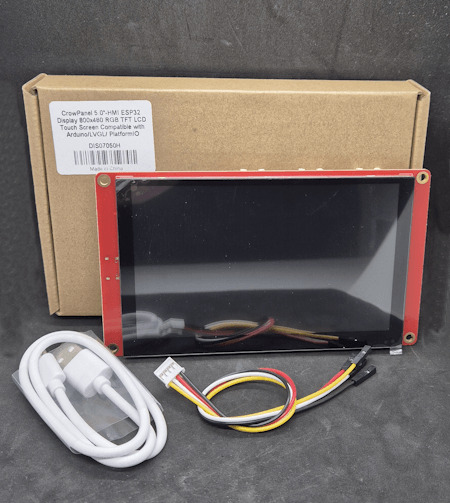
Elecrow CrowPanels vorgestellt: OLED, E-Paper und HMI-Display im Überblick
Elecrow setzt seine Innovationsreihe im Bereich Displays fort und überrascht erneut mit spannenden neuen Geräten (genannt CrowPanels). Nachdem ich bereits ein HMI-Display der Marke unter Review: Elecrow CrowPanel – Das perfekte Display für ESP32-Projekte? auf diesem Blog vorgestellt habe, freue ich mich, nun drei weitere spannende Produkte testen und meinem Publikum präsentieren zu dürfen. Die neuen Geräte – ein rundes OLED-Display, ein energiesparendes E-Paper-Display und ein vielseitiges 5-Zoll-Touch-Display mit HMI-Funktionen – bieten interessante Möglichkeiten für Maker, IoT-Enthusiasten und alle, die innovative Projekte realisieren möchten. https://youtu.be/Eb9wuOQyaVY In diesem Beitrag gebe ich euch einen Überblick über die drei neuen CrowPanels von Elecrow, ihre wichtigsten Eigenschaften und potenziellen Einsatzbereiche. In zukünftigen Beiträgen werde ich die Geräte einzeln genauer unter die Lupe nehmen und euch alle Details zu Performance, Funktionen und Praxiseinsatz liefern.
Disclaimer: Die in diesem Beitrag vorgestellten Geräte wurden mir von der Firma Elecrow kostenfrei für ein Review zur Verfügung gestellt. Dies hat jedoch keinen Einfluss auf meine Meinung oder die Bewertung der Produkte. Alle Tests und Einschätzungen basieren auf meinen eigenen Erfahrungen und sind objektiv.
Wer ist Elecrow? Ein kurzer Überblick über das Unternehmen
Elecrow ist ein Unternehmen, das sich auf die Entwicklung, das Design (einschließlich Prototyping) und die Fertigung von Elektronik spezialisiert hat. Seit der Gründung im Jahr 2014 hat sich die Firma als Anbieter von Open-Source-Hardware und elektronischen Komponenten etabliert und bedient Kunden weltweit. Mit einem Schwerpunkt auf Innovation, Qualität und erschwinglichen Lösungen unterstützt Elecrow sowohl Maker und Technikbegeisterte als auch professionelle Anwender bei der Umsetzung ihrer Projekte.
CrowPanel-ESP32 1.28" Round Display – Kompaktes Runddisplay für vielseitige Projekte
Das CrowPanel-ESP32 1.28" Round Display ist ein kompaktes und leistungsstarkes Displaymodul, das mit einem hochintegrierten ESP32-C3-Chip ausgestattet ist. Durch die Kombination eines runden 1,28-Zoll-IPS-Touchscreens mit vielseitigen Sensoren, Tasten und Schnittstellen eignet sich das Modul ideal für IoT-Projekte, Wearables oder interaktive Anwendungen. Es bietet Unterstützung für zahlreiche Entwicklungsumgebungen wie Arduino IDE, MicroPython oder PlatformIO und ermöglicht dank LVGL-Bibliothek die einfache Erstellung grafischer Benutzeroberflächen. Read the full article
3 notes
·
View notes
Link
2 notes
·
View notes
Text
G3T T0 KN0W M3 !
૮ ․ ․ ྀིა <- me (ena!)
Hey everyone! I thought it was about time I made an introduction post!
‧₊˚✩彡‧₊˚✩彡‧₊˚✩彡‧₊˚✩彡‧₊˚✩彡‧₊˚✩彡‧₊˚✩彡‧₊˚✩彡‧₊˚✩彡‧₊˚✩彡‧₊˚✩彡‧₊˚✩
currently a second yr student studying cyber security
currently learning python both in school and for personal use
linux user :3 (ubuntu)
some knowledge in java and html
Projects I am currently working on (will update):
#address book in python
#gameduino/arduino project (undecided what I want to do yet)
#create my own tumblr blog theme/neocities page
#creating my own personal servers using linux
#helping create a website for an on-campus club I'm in :D
Quick Facts about me !!
I LOVE old tech ; collecting, learning about and tinkering with it!
I modded a psp last year and it is one of my favorite items <3
^^ modding devices in general is something I love doing and learning about
I play the bass guitar and double bass !
I also study german and was learning russian for awhile
^^ very intrested in learning about both cultures!
I have a second tumblr page with my special interests... 🤫
That's about it for now! Thank you all for following my journey ! I am very excited to start posting more and hope to stay somewhat consistent! :)

7 notes
·
View notes
Text

4 notes
·
View notes
Text
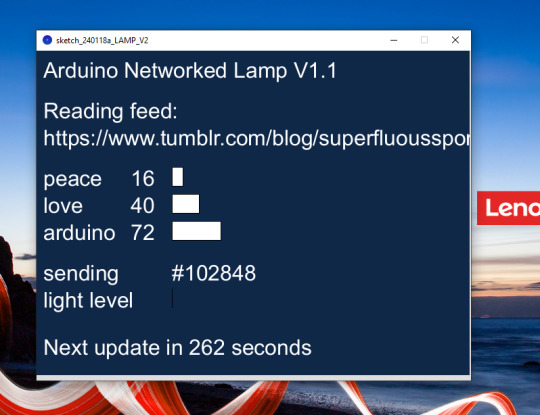
Its doing!! Something!!
:O
I'm testing something please ignore :3
peace love arduino
#peace love arduino#processing#gwen codes#I removed /rss and sent the whole blog through it maybe that did it??
2 notes
·
View notes
Text
okay, so! life update since ive been gone:
my account was deactiviated without warning, and tumblr took a month to actually respond to my support ticket for, hence the absence.
i've moved out from my parent's place, and am now a full time college student living on campus!
ive given up on visual art, for now, and have been focusing all of my artistic energy towards music and technology (arduino, programming, etc.)
i was gifted with a bike (woo!!!) as a college gift from my parents, and have since been riding it pretty much as often as possible.
now that im back on tumblr, i will not be nearly as active as i once was, and will just be using it to post the things i make, for the most part.
I will be deleting a bunch of my blogs; namely the usernames i had hoarded and my NSFW alt. (this is partially because i have no use for them, and partially because i suspect they are the main reasons i got booted in the first place.)
but, anyways, im glad to be back!!! if anyone has any questions just shoot me an ask and ill respond as soon as possible.
15 notes
·
View notes
Text
youtube
DIY Sun Tracking Solar Panel Project using Arduino
Are you looking to boost the efficiency of your solar panels? A dual-axis solar tracking system is the perfect solution! Instead of a static panel, this system automatically follows the sun, ensuring maximum energy absorption throughout the day. In this blog, we'll guide you through building your own Arduino-powered solar tracker and show you how it works in action. 🎥✨
🛠️ How Does this Sun Tracking Solar Panel Project Work?
A solar tracking system adjusts the position of the solar panel in two axes (vertical & horizontal) to follow the sun’s movement. This ensures optimal solar exposure, which significantly increases power output compared to fixed panels.
Using Arduino, LDR sensors, and servo motors, we can create a system that continuously detects sunlight intensity and adjusts the panel accordingly. 🌞⚙️
🔹 Components Needed:
🔧 Arduino Uno– The brain of the system 🔧 LDR Sensors – Light intensity detectors 🔧 Servo Motors – For precise panel movement 🔧 Solar Panel – The power generator 🔧 Resistors & Jumper Wires – For connections
📝 Step-by-Step Instructions
1️⃣ Set up the Circuit: Connect LDR sensors, servo motors, and the solar panel to the Arduino. 2️⃣ Upload the Code: Use the provided Arduino sketch to program the tracker. 3️⃣ Test the System: Place it under sunlight and watch the panel follow the sun in real-time! 4️⃣ Optimize & Improve: Adjust sensor placement for better accuracy.
📌 Full Code & Circuit Diagram: https://quartzcomponents.com/blogs/electronics-projects/dual-axis-solar-tracking-system-using-arduino
🔋 Why Use a Solar Tracker?
✅ Increases energy output compared to a fixed panel ✅ Automatically adjusts for optimal sunlight exposure ✅ Enhances efficiency of solar power systems ✅ Perfect for DIY solar enthusiasts & engineers
Whether you're building a home solar system or a DIY electronics project, this Arduino solar tracker is an exciting way to improve energy efficiency!
📢 Share Your Builds!
Tried making this project? Share your solar tracker setup with us in the comments or tag us! We'd love to see your innovation. 🌍⚡
📌 Full Tutorial & Code: 👉 https://quartzcomponents.com/blogs/electronics-projects/dual-axis-solar-tracking-system-using-arduino
1 note
·
View note
Text
It's getting better all the time
I'm a android developer from Mexico and Im struggel with some kind of existencial crisis, today Im starting this tumblr blog because I need to connect more with the things that like's me and maybe this can help to someone, at least this is my motivation to publish my expirience as a programmer, not just about android but I want to explore game dev, AI, algorithms, arduino, raspberry, electronics and much more…
Thank you for reading me <3
17 notes
·
View notes
Text
What is this?
This is my brand new sideblog, my main blog is @justafoxytwink. I've been wanted to document some of my coding and other projects that I do because I've been having trouble motivating myself and I'm hoping that having a public space to talk about them will help with that. So here's a couple things I'm planning on for the next few months:
Making a simple digital clock - this is a very simple arduino project, but I've gotten a bit out of practice and want something easy to start with
customizing a model for vrchat/vtubing - I've gotten the julia winterpaw canine model and would like to recolor it to my own fursona, and I'll need to get the software to do so running on linux since I don't use windows. I'll have to try getting vtuber plus running, hopefully I can use either wine or proton to do that.
replacing the timing belt in my truck - this is a bit of an odd one out. I have this old truck that belonged to my dad that I'd like to fix up, and this is where I'll start.
general programming practice - I've had to put my cs degree on hold for the last couple years due to a lot of personal issues, so I've got some catching up and relearning to do. I'm hoping to get back to school this coming fall tho
I'll put more stuff up here as I come up with more and have updates, I'll try to post at least once a week with some kind of update.
3 notes
·
View notes
Text
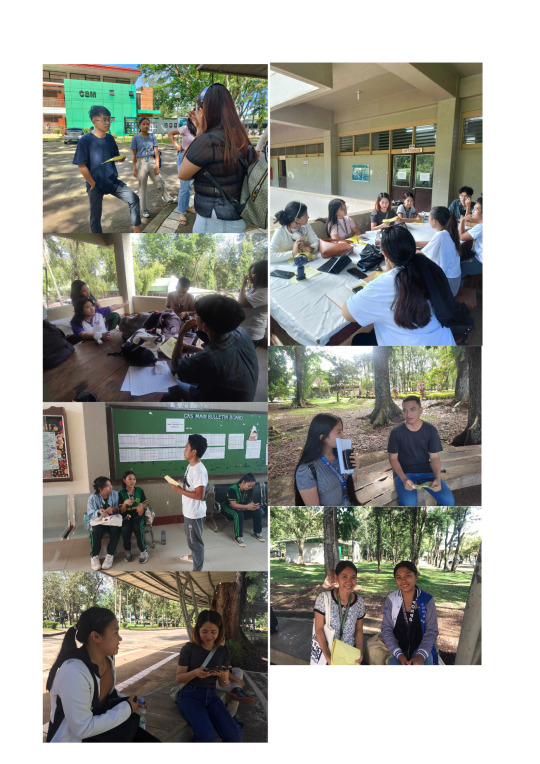
Vie's Entrepreneurial Venture: Formulating start up business innovation.
On the 1st of February, me and my team had an online conversation and wondered what are the possible products for innovation. One of my teammates saw the old trash can and we came up with an idea to ask questions to random people on our campus. What are their observations of our waste disposal and management? Also, what are the possible innovations to come their mind? Here are the questions we formulate: 1. What have you observed about our garbage management disposal? 2. Do you think the waste disposal on our campus involves proper segregation? 3. Have you observed any separation of garbage into biodegradable and non-biodegradable categories? If so, are the bins properly labeled? 4.Using technology, is there anything you would like to change in our ordinary waste disposal?
After that day February 2, 2023 we had a brief meeting and conducted an interview to 44 people in the campus.
*After a few hours of interview, this are the following answers we got from them to our 4 questions: In question number 1 "What have you observed about our garbage management disposal?"
some says that the waste disposals are not organize.
other says, it is not clean enough.
some people are irresponsible in disposing their garbage.
no proper disposal.
This are the general answers we got in question number 1.
In question number 2 "Do you think the waste disposal on our campus involves proper segregation?" this are the general answers we got;
many says their is no proper segregation.
other says it is the work of utility worker.
some says "YES" but in limited places.
In question number 3 "Have you observed any separation of garbage into biodegradable and non-biodegradable categories? If so, are the bins properly labeled? "
many interviewee says a big "NO" as what they observed.
some says trash bins are properly labeled but some people are irresponsible.
some also says that in some places their is only one trash bin and their only choice is to combined the biodegradable and non-biodegradable waste.
In question number 4 "Using technology, is there anything you would like to change in our ordinary waste disposal?"
some says posting in social media about proper waste disposal.
other suggest to have a automatic segregating trash cans.
*After we conduct the brief interview to the random people we had a brief meeting again so that we can brainstorm and discuss the possible innovation we will work on related to the garbage disposal and management.

In conclusion, we came up with an idea to innovate a normal trash can into a "Smart Trash Can" that automatically segregates biodegradable and non-biodegradable garbage. Using Arduino sensors as we did several Arduino projects in our Electronics major subject.
this is the end for this blog........... see you next chapter of our journey......... "Every time we innovate to protect our environment, we invest in our collective future."
2 notes
·
View notes
Text
It was 2010 or so and I needed a blog to document a project for my first master's. So if you scroll really really far back you can see me struggling to animate a strange creature (nicknamed "Der Oarge" from my team) in unity. Arduino was also involved in the project.
I have a question for y'all, both old and new tumblr users
(forgive me if this has been done before, I'm just curious!)
13K notes
·
View notes