#ask: tutorial
Explore tagged Tumblr posts
Visit Tumblr Blog
Explore Tumblr blogs with no restrictions, modern design and the best experience.
Last Seen Tumblr Blogs


Fun Fact
28.6 is the average number of monthly visits per US mobile user.
Note
hey transitions anon back again! I was struggling with sprite (transforms?? animations???) when I sent the ask (still cannot get that scene from Fantastic Wonderland out of my head where Buck butchers the rabbits and the parts fly lol its so wellmade), but I'd love to see how you do with your CGs and scenes too if you have the time or want!!! (Still thinking about the CG in the first arc where Orlam dips Genzou in the water, it hurt but it looked so cool)
sorry for the delay in this i've been having some really bad dizzy spells the past few days making it hard to be on the computer much 😵💫 but i've tried to put together a short basic tutorial here with some fundamentals for sprite movement!
since you mentioned the bucks scene i thought i'd just walk through how you could recreate that as it includes pretty much all of the basic ATL that i use for the majority of my sprite movements. we'll be recreating this scene in ren'py (well, the animation at least):
under the cut! (i'll also share a link to the full code for this scene at the end so you can see the full thing more easily with all the interwoven stuff). note that this is not really written for complete ren'py beginners as it assumes at lease some basic familiarity, such as needing to define images, etc, as i don't really talk about that
i will say first off that none of the actual animation coding... script... stuff is actually that complicated at all. it really only uses a few different commands. it's more how you use them than anything that's particularly complex
the main command you'll use ridiculously often when moving sprites around is ease. ease just tells "something to happen to an object over a period of time with a small ease in and ease out on both sides." this something could be the object moving somewhere (most common) or something else like the object blurring or going transparent, etc.
so for instance you could write ease 1.0 xalign 0.5 and this would just mean "move this object to an xalign of 0.5 over a period of 1 second with a slight ease in and ease out on both sides of the movement." xalign align here is just saying a position aligned horizontally on the screen with 0.0 being the far left and 1.0 being the far right (meaning that 0.5 would be right smack in the middle). you can also use xpos instead of xalign. xpos just refers to a more exact position not relative to the screen and based on the left edge of the object... i tend to use a combination of the two depending on what i need. like if i need to move something completely off the screen i don't normally use xalign because it starts to get all weird since it's relative to the screen. anyway, you'll see some of these in action for the scene in just a bit
so at the start of this scene, bucks is at the center of the screen. i moved her there originally using this code:
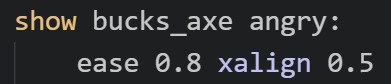
the show command is just how you show or move an image on the screen. so here i'm moving the image bucks_axe angry to xalign 0.5 over a period of 0.8 seconds with an ease in and ease out on both sides. this command happened before the gif started, so bucks is now already at the center of the screen. what happens next?

she needs to go running off the screen to the left!
this is very simple... you just need an ease!
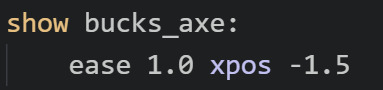
this moves bucks to a position of -1.5 over a period of 1 second. as i mentioned earlier, usually when i'm moving stuff off the screen entirely i switch to xpos. this xpos is super to the left actually, i'm not quite sure why i made it so intense now that i'm looking at it LOL oftentimes if you just have a small sprite you only need to move it to like xpos -0.5 or so depending on how wide it is. anyway, this time she goes all the way to -1.5, which is part of why it looks like she moves very quickly because she has a ways to go in only 1 second
then what happens...
this is a little bit more complex as we're going to have to talk about knots. first let's talk about the red screen and the shake. these are both handled with this code:

the top line is telling the bg to shake. this is a custom transformation i wrote myself called hbounce. i have it defined in the top of my script file (or in my first script file when i use multiple files) and it looks like this:
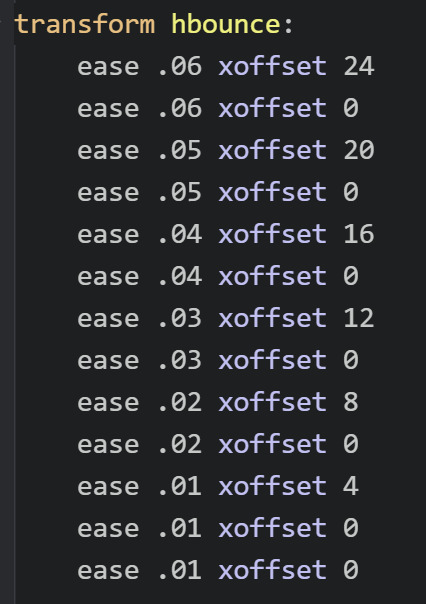
feel free to use it if you want! it's just a rapid-fire sequence of very small eases and xoffsets that when triggered will make it look like the object shakes.
in this instance, the object shaking is the bg, but you can also use it for sprites. i like using it for energetic expressions or like if the sprite is supposed to be doing something that would realistically have a bit of movement
you can use this transformation on any object by using at, just as you see in the first screenshot. so show bg at hbounce, or if you wanted to make bucks shake, you could type show bucks_axe angry at hbounce
next i make the screen red by introducing a new image i have called red that's literally just a 1280x720 red image. i start it off at an alpha of 0.0, which means it's completely transparent. then i use ease 0.5 alpha 1.0 to make it fully visible over of a period of 0.5 seconds.
now things are gonna get a bit more complicated... first i'm going to make the bunny heads and arms appear on the screen. but i need them to be offscreen to the left first, so i first use some code to place them there:

this makes 2 bunny heads and 2 bunny arms appear on screen at various positions. all of them are offscreen to the left (either -0.5 or -0.4). and they have different yposes (ypos is the same as xpos just for vertical instead of horizontal).
now i need them to move onscreen while making an arc downward and going offscreen at the bottom... complicated. you need to use knots for this sob. i hate knots as i always need to tweak them a bajillion times before i get them right, but they're necessary sometimes. knots just make something curve rather than move in a straight line. so the code for the downward arc movement for each object is:
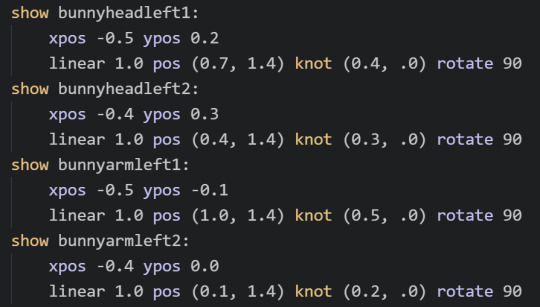
you'll notice each of these is slightly different. that's because i did them all manually to try and make them look good... it's annoying.
first up, you'll see that i repeated the initial position for each object. that's because for some reason knots don't work properly if you don't have the initial position defined within the same command (including both xpos and ypos)??? also if you use xpos/ypos for the initial position, you need to use xpos/ypos for the final position (you can't use xalign/yalign). so the first line of each is just a repeat of the positions from the previous screenshot
then comes a long one. linear 1.0 pos (0.7, 1.4) knot (0.4, .0) rotate 90. this is saying "move the object to a position of xpos 0.7 and ypos 1.4 over a period of 1 second except have it arc towards a position of xpos 0.4 and ypos 0.0 while also rotating that object 90 degrees" WHEW
a ypos of greater than 1.0 will put that object below the bottom of the screen, which is why the heads and arms look like they're falling offscreen. i could not really tell you a good strategy though for figuring out the knot... what i usually do is start by setting it about halfway between the initial position and the final position, then tweaking it based on what looks good by testing it a gajillion times LOL there is probably a better way to do this but i do not know it...
(btw the difference between ease and linear is just that ease puts that small ease in and ease out on both sides of the movement while linear is just a straight movement; i usually use ease for like 95% of my movement as it looks much softer, but sometimes i use linear depending on what needs to happen)
anyway, each of the heads and arms has a slightly different final point and knot, so they all fall just a bit differently, which is good for making it look more realistic (if you could call flying bunny heads and arms realistic)
the next couple movements are going to be basically the same now that you know how to do this:

bucks just needs to move to the opposite side of the screen, followed by the same screen shake, red screen, and flying bunny limbs. you're just going to need to reverse them for the ones on the other side. so first i move bucks to the other side of the screen (offscreen right) using this:
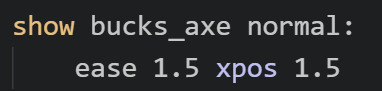
(remember that an xpos greater than 1.0 will be off the screen to the right while an xpos of less than 0 will be offscreen to the left, although since it calculates from the left edge of the object, you'll need to usually do like xpos -0.5 to get it fully offscreen)
then comes the complicated stuff:

so just like before, first i have the bg bounce. then i make the red screen become visible with an ease of 0.5. there's some pauses in there. and then i have the bunny heads and arms appear from the right offscreen this time and fall to the left and offscreen on the bottom. it's the exact same code just with the positions kinda semi-reversed and my heads and arms are flipped...
you might be wondering why i'm constantly showing and hiding and changing alpha for various objects somewhat haphazardly. this is because objects you show later will show on top of objects you show earlier. so whenever you see this type of stuff happening in my code it's usually just because i need to ensure the right things are showing on top... sometimes i need to use a few tricks, like actually showing an image way earlier but having the alpha be 0.0 so it's invisible, then later i change the alpha to 1.0. this lets it still show on the bottom even if i show other objects later. there might be a better way to do this too LOL but i do not know it. my scripts are constantly full of these types of weird tricks that don't make sense at first glance until you figure out that's what i'm doing hahaha. half the time if i haven't looked at it in a while i forget myself what i was even doing...
ok now to the last part (hopefully this hasn't been ridiculously confusing). bucks needs to return to the center of the screen and start spinning, then move offscreen...

this starts out simple using a command we all know and love to get her in the middle of the screen:

now we need to make her spin! for this, i defined completely new images for bucks called bucks_axe spinslow and bucks_axe spinfast:
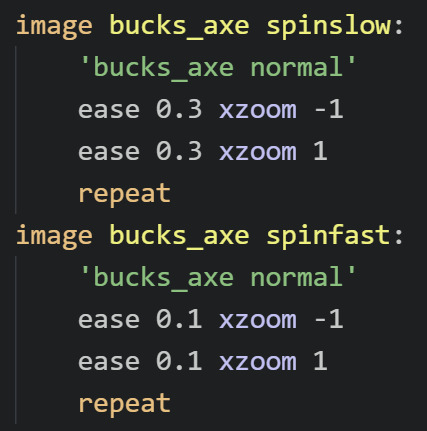
each image uses an image i defined previously as a base: bucks_axe normal. which is just my basic bucks_axe image. then... i flip it horizontally twice in a row and repeat it. an xzoom of -1 will flip an image. while an xzoom of 1 will show an image normally. an xzoom of 0 will make the image look like a tiny line at the center of the screen LOL you can use xzoom to flip a sprite horizontally if you want it to face the other way. and if you use ease with the xzoom, then it'll make it look like it's actively flipping rather than just instantly facing the other way. the repeat at the end here just tells it to keep repeating forever, so it'll keep flipping back and forth, making it look as though it's spinning. i have a slow version defined that takes 0.6 seconds to make a complete spin, and a faster one that does it in only 0.2 seconds
now, this was just defining these objects. this doesn't show these objects on the screen. remember you can only do that with the show command. so next we need to actually show the spinning bucks:

first i show the slower version for a period of 0.4 seconds. then i show the faster version for a period of 0.4 seconds before having the spinning bucks go shooting off the screen to an xpos of 1.8. having the slow version switch to the fast version like this is what helps it look more like she eases into the spin
once she's offscreen, we get to the final part of the scene, where the heads and arms spin upwards very comedically:

for some reason this took me forever to get right. i had to mess around with the code a ton before it started acting the way i wanted it to. tbh that's really what so much of this comes down to. writing code you think could possibly work, then testing and tweaking it 50 million times until it looks how you want it to look. anyway... for this part, the heads and arms have been set up very similarly to the spinning bucks, with each of them having a new defined version of them rotating:
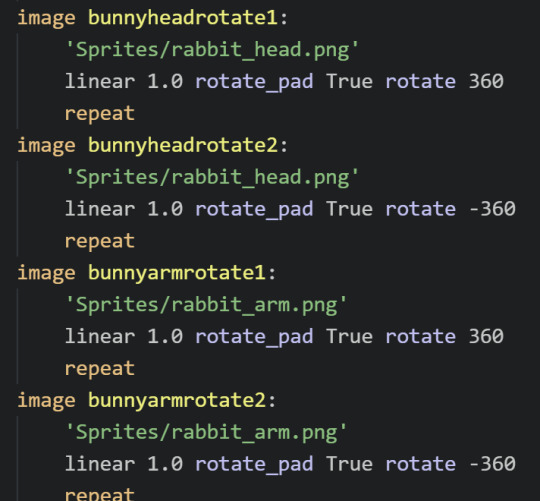
here i have 2 rotating heads and 2 rotating arms. some of them rotate clockwise 360 degrees, while others rotate counter-clockwise 360 degrees over a period of 1 second. and then they repeat so they just keep rotating forever. the rotate_pad True in the middle here makes it so that the objects don't change size while rotating and thus won't start changing position as they rotate. i don't fully understand it tbh but it's necessary if you want your rotating objects to stay in one place while they rotate
now that you have these rotating bunny pieces, they need to jump from the bottom of the screen, hover for a moment, then fall back offscreen. this is, as always, just a series of eases...

each bunny piece starts below the bottom of the screen (greater than ypos 1.0), then leaps up onscreen (ypos 0.0) over an ease of 0.8 seconds, then falls back below the screen (ypos 1.5) over an ease of 0.8 seconds. and i put small pauses in between so that they come up one by one...
...and that's it!!! that's honestly all it is. every single piece of movement happening here is just an ease or a linear to move the object to a different xpos or ypos (or xalign/yalign). some of them are a bit more complex, like when i add a knot in the middle of the movement to make it arc or have base defined images that are spinning or rotating. but the fundamental animations really all just come down to those types of movements
i realize this tutorial might not be nearly as clear as it was in my head as i tried to type it up, especially if you don't have much experience with ATL in ren'py to begin with, so you can feel to ask me any specific questions you may have if something doesn't make sense or if there's something else you're trying to do that you can't get to work
since i only copy-pasted bits and pieces of the most important code to talk about above, i thought i would also share the complete code for this snippet here: https://wtools.io/paste-code/bT61
this way you can see all the rest of the code around it to see everything in context, as well as all the other stuff like how the text is in there, pauses and sounds, repeated stuff i didn't bother to include in the copy-pastes, etc. realize ofc that you can't just copy-paste this entire snippet into your own projects because it references a lot of images you don't have!! LOL however, you can copy-paste bits and pieces of it for different specific movements if you want!
and as i mentioned earlier, feel free to ask me any questions!
19 notes
·
View notes
Note
could you please do a tutorial on how you do your risograph style drawings? they look so cool 😭😭


15K notes
·
View notes
Note
spec. spec. spec youve changed the game. i never realized your pointer finger and your wrist artery are the same. holy shit. im going to draw hands thank you


aasdjsd its not really an artery but its a useful landmark to facilitate the Flow of a pose imo
#nd then the thumb meat is just kinda tacked on there#u will notice also that i like to use the wrist as a tension point so the hand and forearm kind of drape off it#that has nothing to do with anatomy i am just gay#ask#doodle#tutorial#i gueass.
12K notes
·
View notes
Text
Here's some notes on some of the upper body muscles so you, artist, don't need to look them up

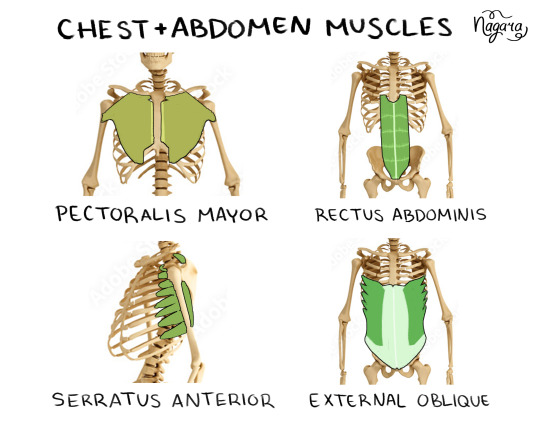
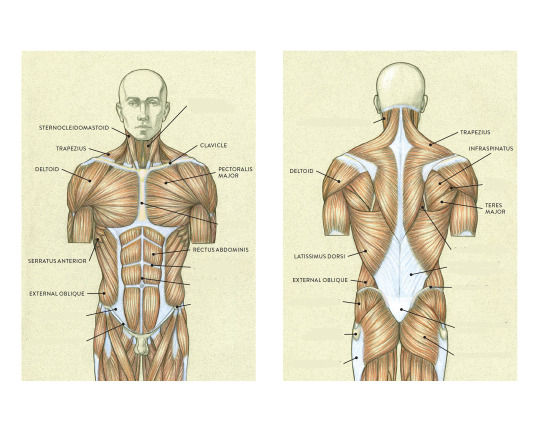


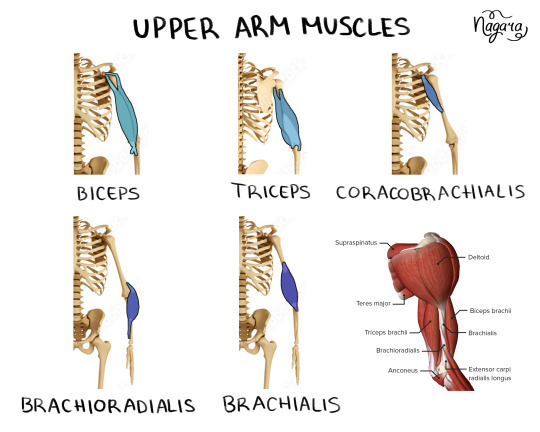
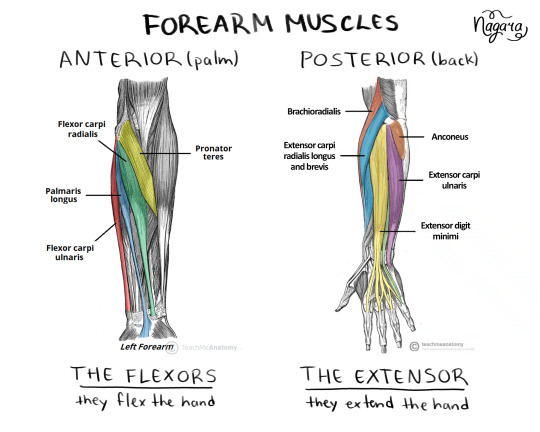

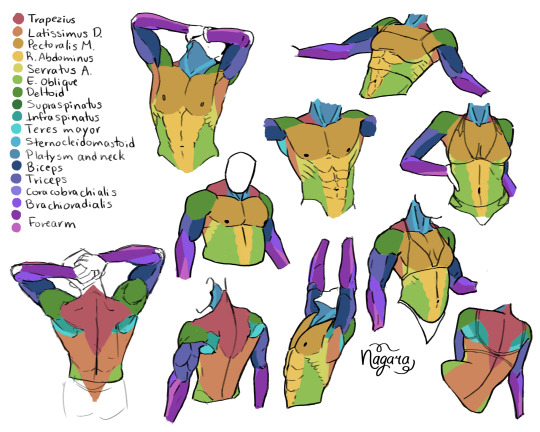
They are not medically accurate, just enough for artists to know the necessary muscles and how they work together
I 100% recommend doing the last exercise I did to be able to actually place the muscles
Here are my notes on the lower body muscles
#lower body muscles notes coming in a month#don't even ask about the forearm there's just too many muscles there#art study#muscles study#upper body muscles#art tutorial#anatomy notes#artists help#nagarart#drawing#digital art#my art#art
47K notes
·
View notes
Text

mike faist as jack twist and lucas hedges as ennis del mar in brokeback mountain 10/?
#one of these posts is going around again tonight. hiii people who like yankee twinks pretending to be cowboys.#there is no slime tutorial idk what anyone is talking about#however. i can send you the link to a mediocre lasagna recipe if you dm me and ask niceys#mike faist#lucas hedges#brokeback mountain#west end brokeback mountain
2K notes
·
View notes
Note
You draw the most ADORABLE kids and babies. Do you have tips for drawing little ones so that they actually look like little ones and not weird renaissance devils?
I apologise in advance if this is the equivalent of "just do it" but my best advice is really to wrap your head around skull structure and how it affects what faces look like!
Of course you can just pinpoint some basic things that make a character look younger (bigger eyes, softer/rounder jaws, smaller noses, etc) but - at least to me - that understanding is more solid if you think of what's happening under the skin, kinda like:

And same for the rest of the body! Babies and children tend to have more "chibi" like proportions but stylisation can definitely go very wrong there 😅
1K notes
·
View notes
Note
Question! How do you draw ur characters 👀 like tips tricks
hihi i hope i didn't misunderstand you meant this like, in generally and not specifically about each of my chara's!! sorry this is so messy LOL n please take everything i say with a grain of salt ive never learnt art professionally_(´ཀ`」 ∠)_


2K notes
·
View notes
Note
maybe i missed this in ur advice tag, but i adore how you draw and render hands! how do you simplify them? any tips for a novice?
Thank you! I'm really just following the most basic of "how-to-draw-hands" rulebooks and then making them sharp and sinewy as all hell. The only thing I think I do differently from most tutorials I've seen is including the wrist joint in the structure of the hand when I sketch it.
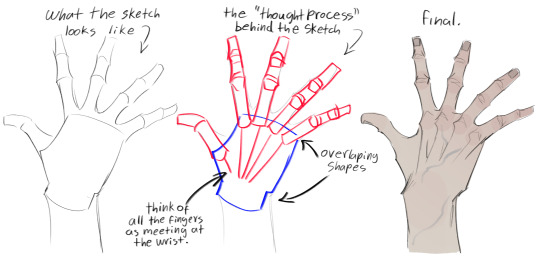

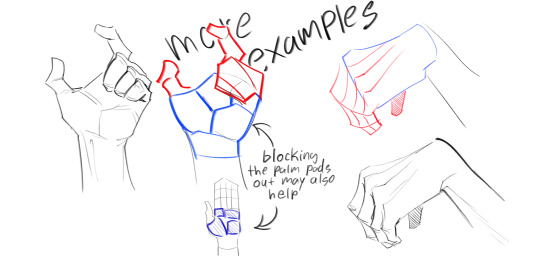
Disclaimer: I draw hands kinda messed up. I enjoy them that way. Your art teacher may not, LOL.
1K notes
·
View notes
Text
hey so i've been working on a lot of things (and also second guessing myself a lot because perfectionism) but here's some very random sneak peeks if y'all are interested!!


#and happy black history month!!#how are we already entering into the final week :((#also#i've been inspired to write some 'creating deco cc' tutorials#i saw someone ask where they could find some easy-to-follow ones on x and i thought why not???#i'm far from the best but i can do lil sumn sumn i suppose
1K notes
·
View notes
Note
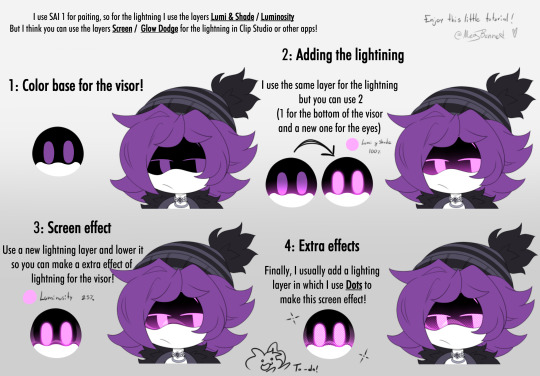
How do you render/shade drone visors? They have a very shiny/glowy look to them that I can't figure out how to replicate. Your style is wonderful.
Like this xD!
810 notes
·
View notes
Note
Could you maybe post a "anatomy" scetch for your mini fellas, I wanna understand their Structure!
Ty!
(im so glad you have anon because I'm not really social :D)

today's mini fella is.. oh wait what's this?
i made a lil tutorial for those who wanna make their own mini fellas!
featuring mini solapunk pearl ;)
for my tools and brushes see my pinned post!
have fun creating! <333✨
#milla art#minifellas#hermit pearl#hc pearlescentmoon#pearlescentmoon fanart#tutorial#art tutorial#milla asks
1K notes
·
View notes
Note
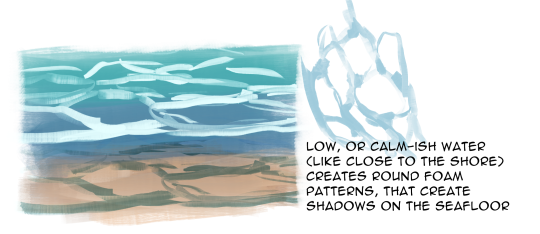
Do you happen to have any tips on drawing water/waves? You do such a lovely job with it!!! You really manage to capture the beauty of light sparkling on the water's surface/passing through the water and it's gorgeous.
The most important thing about being able to draw something is understanding what you're drawing and why it looks like that. How does it function? Draw with intention.
Water doesn't have a fixed shape, but it has weight and moves accordingly. Water moves in a jerky motion and splashes in a violent manner. Water is fluid, but when it hits anything, it literally creates waves, it has a lot of momentum.

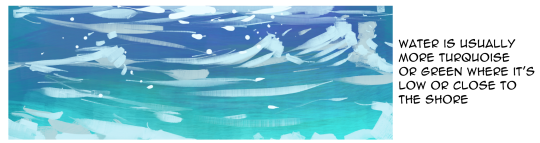
The look of water varies on how much you can see through it, how clear it is, where it is as in what is it reflecting (ocean floor, the sky, swimming pool tiles etc.), how deep is it and so on.
Swimming pools are very clear, you can see far into the water and it's almost like looking at glass
In the sea / lakes deeper water is darker and harder to see into -> the shore is shallow and you can see more into the water
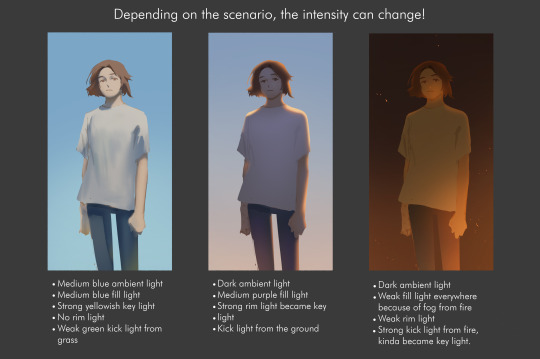
Lighting and the sky affect the look of water a lot, the water is always reflecting the sky in some way.
Time of day and weather -> how dark the water is in relation to the sky
Low sun -> creates highlights on the water (early morning, sunset, sunrise..)

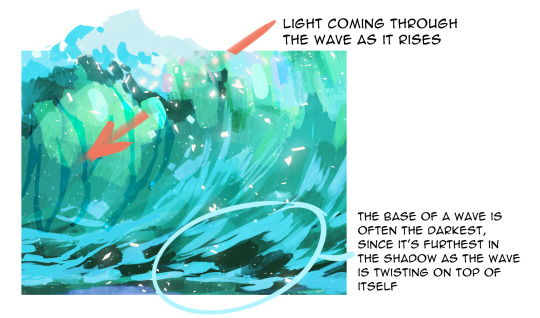
Underwater lighting is always darker and in shadow. Even on a bright day there are heavy shadows. The light is mostly at the top, close to the surface and the rest of the light scatters towards the bottom as pillars of light.

Variety in color is important to bring the water to life!!! A wave or water is never just blue, it's a collection of hues..!

Phew, so there's some thoughts, we'll be here all week if I keep going, there's such an infinite amount of things to point out, but I hope this helps a bit!
And remember references!! Stay curious and really look at a lot of pictures, videos, there's always something new to learn and discover!
694 notes
·
View notes
Note
can you show me how you do everyone's eyss? i struggle to make them look right :(
Of course! Here is my take on every neighbors eyes! Hopefully it's helpful. Thanks for the ask!!


#welcome home puppet show#welcome home#drawing reference#tutorial#wally darling#barnaby b beagle#julie joyful#sally starlet#poppy partridge#howdy pillar#eddie dear#frank frankly#welcome home drawing#welcome home project#artists on tumblr#art#fanart#others original characters#answered asks
2K notes
·
View notes
Note
Hi! Absolutely adore your work 💗 I’m not sure if you’ve gotten a question like this before, so feel free to ignore, but do you have any tips for capturing likeness of characters you draw? You manage to stylize characters, especially live action characters, just right!


Thank you <3
#anon ask#ask box#to be deleted later#personal#my art#please don't repost#tutorial#reference#art resources#artists on tumblr#i tried very hard to explain how i do it but im not a good teacher and it shows#don't listen a word i say#gosh i suck at this#thank you for your lovely words#sarah michelle gellar#christopher plummer#lionel astier#daniel davis#robert downey jr
568 notes
·
View notes
Text

How I do the lights! Hope it can help for your rendering 🫡
4K notes
·
View notes
Note
What's your process for rendering metal? It looks SO good!
Thank you so very much! ❤️ Did a helmet study just for you, here’s a breakdown of the steps (which I’ll go into much more detail on Patreon)

557 notes
·
View notes