#atmega328p
Explore tagged Tumblr posts
Visit Tumblr Blog
Explore Tumblr blogs with no restrictions, modern design and the best experience.
Last Seen Tumblr Blogs


Fun Fact
China blocked Tumblr because of pornography and censorship problems in 2013.
Text

PCB of the day! Adafruit Feather 328P - Atmega328P 3.3V @ 8 MHz 🎛️🪶🔋
Adafruit Feather 328P features an ATmega328P at 3.3V, 8MHz. It’s thin & light with USB-to-Serial, 32K flash, 2K RAM, and battery charging. Compatible with Arduino, it can be paired with various FeatherWings for portable projects.
#adafruit#electronics#pcb#opensource#opensourcehardware#pcboftheday#arduino#feather#microcontroller#portable#batterycharging#usb#atmega328p#developmentboard#flash#ram#arduinochip#featherfamily
3 notes
·
View notes
Text
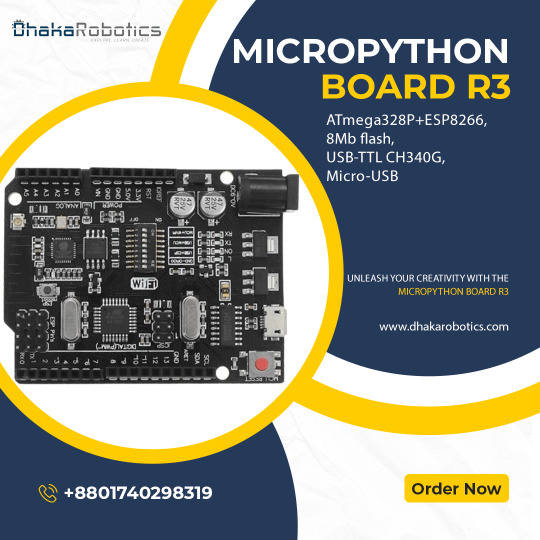
Introducing the MicroPython Board R3 ATmega328P+ESP8266!
Are you ready to take your projects to the next level? Meet the MicroPython Board R3, a powerhouse combining the classic ATmega328P microcontroller with the versatile ESP8266 WiFi chip. Here’s why you’ll love it:
Dual Processors: Enjoy the best of both worlds with the ATmega328P and ESP8266 working together or independently.
8MB Flash Memory: Store more with 8MB of flash memory, perfect for complex projects and data-heavy applications.
USB-TTL CH340G: Seamless USB connectivity with the CH340G converter, making programming and debugging a breeze.
Micro-USB Port: Convenient and modern Micro-USB port for easy power and data transfer.
Versatile Applications: Ideal for IoT projects, home automation, robotics, and more. The possibilities are endless!
Whether you’re a hobbyist or a professional, the MicroPython Board R3 is designed to meet your needs. Get yours today and start creating!
Order Now: https://dhakarobotics.com/.../1039-micropython-board-r3.../
Contact Us: +8801740298319
visit our website: https://dhakarobotics.com/
0 notes
Text
youtube
Micro screws are tiny screws with a diameter typically less than 1.6 millimeters. They are commonly used in electronics, eyeglasses, watches, and other small devices. They are also used in some medical devices.
Micro screws are available in a variety of materials, including steel, brass, and stainless steel. The type of material used will depend on the application. For example, screws used in medical devices will need to be made of a biocompatible material.
There are also a variety of head styles available for micro screws, including Phillips, flat head, and hex head. The head style will be chosen based on the application and the tools that will be used to tighten the screw.
The LGT8F328P is an 8-bit microcontroller manufactured by Logic Green. It's a functional clone of the more popular ATmega328P, commonly used in Arduino Uno, Nano, and Mini boards. This means the LGT8F328P has the same:
Instruction set: Can run the same code written for the ATmega328P. Registers: Same internal memory for storing data during program execution. Pin layout: Can be used on development boards designed for the ATmega328P.
0 notes
Text
Arduino UNO R3 Board ATmega328P DIY Kit | Diykit Solutions
Explore the Arduino UNO R3 Board ATmega328P DIY Kit from Diykit Solutions! Unleash your creativity in electronics and robotics with high-quality materials sourced from trusted suppliers.
Arduino UNO R3 Board ATmega328P DIY Kit
0 notes
Text
Arduino UNO R3 DIP with ATmega328P

Are you looking to buy the Arduino Uno R3 CH340G ATMEGA328P Development Board for your next Arduino project?
Don’t look any further! Ainow, your trusted electronic component supplier in India, offers you this exceptional development board, fully compatible with Arduino Uno R3 projects. In the world of electronics and programming, the Uno R3 CH340G ATMEGA328P Development Board is more than just a microcontroller board; it’s a gateway to endless possibilities.
This board is engineered with precision and durability to meet the needs of both beginners and experienced enthusiasts. Its versatility knows no bounds – whether you’re into robotics, IoT, home automation, or creative automation projects, this board is perfect.
Even new Arduino users will find it easy to use, thanks to the plug-and-play design and user-friendly interface. This development board’s ATmega328P microcontroller and CH340G USB-to-serial converter chip make sure seamless data transfer and efficient performance. You’ll be amazed at how fast your Arduino projects will run with this board.
we believe in offering the best value for your investment. You can buy the Uno R3 CH340G ATMEGA328P Development Board for a competitive price, with no hidden charges. Our nationwide shipping ensures your order reaches you in perfect condition and in the fastest time possible.
We detail Arduino code for making a smart dustbin, the required components, and the circuit diagram for making an automatic dustbin in our blog smart dustbin project using Arduino.
For using this Uno R3 Board compatible with Arduino in your small or DIY projects, you will need some essential components, such as
Breadboard
Wire jumpers
Power supply or batteries
Motors made by BO
Drivers of motor vehicles
The sensors
Check out the Arduino Uno R3 compatible board
1 note
·
View note
Text
Hey guys I can put the arduino bootoader on any random atmega328p you have lying around.
This doesn't help me at all cos I need a different bootloader for my project but WHATEVER still kinda cool, maybe, idk.
15 notes
·
View notes
Text
It's so frustrating right now, Everything seems complicated. I want to get into building Power bank or Arduino nano at Home, In kitchen as I feel like cooking something with electronics, But it's Complicated because I don't know what is SoC or PCB boards?? Wtf is ATmega328P chip? What it is for??? Well, I'm trying and I'm trying really hard to understand it all and I still don't get it. "What can someone except for a 16 y/o" I say to myself but I should know about such stuffs, I believe.
I wanna to create a hobby or I want something to be obsessed with, incessantly into it and I have no passion, no desire for anything but whenever I try, it seems hard like really hard, I feel I lack something everytime and I feel less but never enough in myself.
-bella
#spilled words#spilled ink#words words words#writers#writers on tumblr#dark academia#spilled thoughts#writeblr#aesthetic#quoteoftheday#poetry#electronic#the mechanisms#interiors#building#cooking#i feel empty#i feel insane#feelings#bullseye#i hate everything
2 notes
·
View notes
Text
The Arduino Uno R3 is an ATmega328P microcontroller-based development board. This is widely popular in Embedded electronics because of the available resources and easy to use by everybody features. With 14 digital input/output pins where 6 can be configured and used as PWM outputs, 6 as analog inputs is a great addition for I/O related operations. Powered with a 16 MHz ceramic resonator, an USB connection, a power jack, an ICSP header, and a reset button.
2 notes
·
View notes
Text

ATMEGA328P-AU Embedded System for Atemel IC Distributor Atmega328p specification:IC MCU 8BIT 32KB FLASH 32TQFP. Core Processor:AVR Core Size:8-Bit Speed:20MHz Connectivity:I2C, SPI, UART/USART Peripherals:Brown-out Detect/Reset, POR, PWM, WDT Number of I/O:23 Program Memory Size:32KB (16K x 16) Program Memory Type:FLASH EEPROM Size:1K x 8 RAM Size:2K x 8 Voltage - Supply (Vcc/Vdd):1.8V ~ 5.5V Data Converters:A/D 8x10b Oscillator Type:Internal Operating Temperature:-40°C ~ 85°C (TA) Mounting Type:Surface Mount Package:32-TQFP (7x7) Atmega328 Datasheet here. Note:Online picture for date code only for refference,different lot date code meybe differenct than online picture.All date code or lot number is as actual received shipment. Besides,if you didn't find the correct mcu parts number in our site online,you can also chat with us to confirm due to there are much more inventory parts list maybe not list online yet.Know more business about us. About ATMEGA328P-AU Online Price and MOQ: As for MOQ you see in the quantity blanket,MOQ of this atmega328 mcu is 100 units,if you interested with much more quantity than MOQ online,welcome to chat with us via whatsapp to consult the best support. ...... Other more electronic components inventory stock are not able to post online,welcome drop us email or chat via whatsapp to know more. About Payment: We usually accept bank transfer,credit card payment,like Visa,MasterCard.,Western Union etc. About Warranty: All the parts provided are same quality as original,so quality is same as offical 1 year warranty. About Us: Chengsuchuang are relable and trustworth electronics hardware supplier from China,we are in the electronic components fields since 2014 year,and got lots of experience in the electronics hardware supply chain.If you are looking for something else about other pcb project for the electronic components bom list,they are also available to supply.Integrated circuits including power ic, logic ic, control ic, driver ic, monitor ic, inerface ic etc.MCU including consumer electronics project,industrial,automobile and medical fields etc. The electronic components distribution brand including ADI,Micron,Samsung,Atmel, Microchip, ST, TI, NXP, INFINEON,Cypress,Altera,Xilinx,ON,TDK,Toshiba,Panasonic etc.The more interested parts number quotation request,welcome drop us email to send a enquiry. If you are looking for a reliable and trustworth ic supplier,then this is a good place you comes.Contact us to talk via whatsapp with sourcing request for quotation,we'll respond you soon. Know more about company product catagory here. Read the full article
0 notes
Text
Color Nano V4.0 im Test – Günstiger Arduino Nano mit USB-C!

Beim Stöbern auf Aliexpress bin ich auf ein besonders interessantes Mikrocontroller-Board gestoßen: das Color Nano V4.0 mit USB-Typ-C-Anschluss. Es handelt sich dabei um einen günstigen Nachbau des beliebten Arduino Nano V3, der jedoch mit einem entscheidenden Unterschied daherkommt – einem modernen USB-C-Port. Damit passt das Board perfekt in mein aktuelles Setup, denn ich kann nun meine ESP32-Boards und den Arduino-kompatiblen Nano mit nur einem einzigen USB-C-Kabel direkt am Schreibtisch programmieren und mit Strom versorgen. Für mich ein echter Pluspunkt im Alltag – aber taugt das Board auch in der Praxis?

🔎 Hinweis: Das Color Nano V4.0 Board ist aktuell nur über Aliexpress erhältlich. Der Preis liegt bei rund 3,90 € inklusive Versand, was ich für absolut fair und gerechtfertigt halte – vor allem angesichts der soliden Verarbeitung und des modernen USB-C-Anschlusses.

Color Nano V4 - ohne Header - Vorderseite

Color Nano V4 - ohne Header - Rückseite
Optische Unterschiede zum klassischen Arduino Nano Klon
Da sich die technischen Daten des Color Nano V4.0 nicht vom originalen Arduino Nano V3 unterscheiden, lohnt sich zunächst ein Blick auf die optischen Merkmale. Ich selbst besitze (noch) keinen originalen Nano, da der aktuelle Preis von 27,10 € für meinen Geschmack etwas überzogen ist – besonders im Vergleich zu günstigen China-Klonen.


Im direkten Vergleich mit einem klassischen Arduino Nano Klon fallen beim Color Nano V4.0 einige Besonderheiten ins Auge: - Statt des üblichen blauen PCBs kommt dieses Board mit einer auffälligen weißen Platine daher. - Die Beschriftung ist farbig gehalten: Jede Funktionsgruppe (z. B. digitale Pins, analoge Pins, Stromversorgung) ist in einer anderen Farbe gedruckt – das wirkt nicht nur modern, sondern hilft auch bei der Orientierung. - Auffällig ist der moderne USB-Typ-C-Anschluss, der den veralteten Mini-USB oder Micro-USB-Port ablöst. Kein Herumprobieren mehr beim Einstecken und ideal für Nutzer, die auch mit ESP32-Boards arbeiten – so reicht künftig ein einziges USB-C-Kabel auf dem Schreibtisch. - Die drei Status-LEDs (TX, ON, L) sind seitlich angebracht und gut sichtbar. - Das PCB wirkt insgesamt aufgeräumt, die Lötstellen sind sauber ausgeführt.


Insgesamt macht das Board optisch einen modernen und durchdachten Eindruck, der sich deutlich von den klassischen Nano-Klonen abhebt.
Lieferumfang und Verpackung
Der Lieferumfang des Color Nano V4.0 ist schlicht, aber vollkommen ausreichend. Zum Board selbst werden zwei 1-polige 15-Pin-Stiftleisten (Rastermaß 2,54 mm) sowie eine kleine 2-polige 3-Pin-Leiste beigelegt, die für den ICSP-Sockel gedacht ist.

Lieferumfang des Color Nano V4

Verpackung des Color Nano V4 Eine Variante mit vorgelöteten Pins ist mir bislang nicht bekannt – das Board wird also immer im Bausatz geliefert. Das ist jedoch kein Problem: Das Anlöten der Stiftleisten ist schnell erledigt und erfordert keine besonderen Lötkenntnisse. Auch Einsteiger mit wenig Erfahrung kommen hier problemlos ans Ziel. Verpackt war das Ganze in einem kleinen, antistatisch wirkenden Tütchen – funktional und für den Versandweg absolut in Ordnung.
Technische Daten des Color Nano V4.0
Auch wenn das Color Nano V4.0 optisch aus der Reihe tanzt, bleibt es technisch ein vollwertiger Arduino Nano V3 Klon. Es kommt keine zusätzliche Hardware zum Einsatz, und die Programmierung funktioniert genauso wie beim Original oder bei klassischen China-Klonen – kompatibel mit der Arduino IDE und dem ATmega328P-Bootloader.

Hier die wichtigsten technischen Daten im Überblick: EigenschaftWertMicrocontrollerATmega328ArchitekturAVRBetriebsspannung5 VEingangsspannung (Vin)7–12 VTaktfrequenz16 MHzFlash-Speicher32 KB (davon 2 KB für Bootloader)SRAM2 KBEEPROM1 KBDigitale I/O Pins22 (davon 6 PWM)Analoge Eingänge8PWM-Ausgänge6Max. Strom pro I/O-Pin20 mAStromverbrauchca. 19 mAAbmessungen (PCB)18 × 45 mmGewichtca. 7 g Wichtig: Auch beim Color Nano V4.0 läuft alles über den bekannten ATmega328, was bedeutet, dass bestehende Projekte 1:1 übernommen werden können – nur mit modernerem USB-C-Komfort.
Lötarbeiten & Eindruck nach der Montage
Bevor man den Color Nano V4.0 verwenden kann, müssen zunächst die mitgelieferten Stiftleisten angelötet werden. Der Vorgang ist unkompliziert und auch für Anfänger machbar.


Allerdings offenbarte sich bei der weißen Platine ein kleiner optischer Nachteil: Beim Löten mit Lötzinn mit Flussmittelkern hinterlässt das Flussmittel auf dem hellen PCB sichtbare Rückstände. Eine einfache Reinigung mit Isopropanol reichte zunächst nicht aus – die Platine wirkte danach etwas unsauber und fleckig, was schade ist, da die farbige Beschriftung und das klare Design eigentlich sehr ansprechend sind.


Meine Lösung: Ich habe mir einen sauberen Malerpinsel genommen und die Borsten auf etwa 1,5 cm gekürzt. Dadurch wurde der vormals weiche Pinsel härter – ideal, um die Platine zusammen mit etwas Isopropanol gründlich zu reinigen. Das Ergebnis: Die Platine sieht wieder wie neu aus und glänzt richtig schön. Diese einfache Methode kann ich jedem empfehlen, der ähnliche Probleme mit Rückständen auf hellen PCBs hat.
Programmieren in der Arduino IDE
Die Programmierung des Color Nano V4.0 funktioniert wie gewohnt und ist vollständig kompatibel mit der Arduino IDE. Nach dem Anschließen über USB-C wird das Board in der IDE erkannt – du kannst den Mikrocontroller also problemlos mit deinen Sketchen bespielen. Allerdings zeigt sich – wie bei vielen China-Klonen – ein bekannter Nachteil: Die Funktion „Boardinformationen abrufen“ liefert keine Details. Das liegt daran, dass bei diesen Klonen häufig ein alternativer USB-zu-Seriell-Chip (z. B. CH340) verbaut ist, der keine erweiterten Metadaten über das Board bereitstellt. Für den praktischen Einsatz ist das kein Problem – solange der richtige COM-Port und das passende Boardprofil (Arduino Nano, ATmega328P, Old Bootloader) eingestellt sind, funktioniert alles zuverlässig.
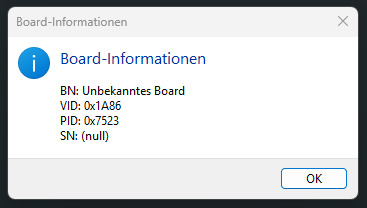
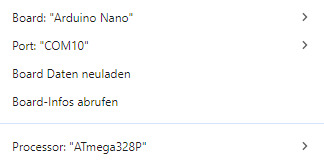
Versuch die Boardinformationen über den Color Nano V4 abzurufen ✅ Tipp: Falls das Board nicht sofort erkannt wird, kann es helfen, den passenden CH340-Treiber manuell zu installieren. Unter Windows geschieht das meist automatisch – für Linux und macOS gibt es entsprechende Treiberpakete online. Prozessorwahl & Funktionsumfang Bei der Auswahl des Boards in der Arduino IDE reicht es aus, das Profil „Arduino Nano“ mit dem Prozessor „ATmega328P“ auszuwählen. Ein Wechsel auf den „Old Bootloader“ ist nicht notwendig – auf dem Color Nano V4.0 ist bereits der neuere ATmega328P mit dem aktuellen Bootloader verbaut. ✅ Das bedeutet für dich: - Du erhältst den vollen Funktionsumfang des Mikrocontrollers - Keine Einschränkungen beim Speicher - Keine Probleme mit der Kompatibilität zu aktuellen Libraries und Sketches Gerade bei China-Klonen ist das nicht immer selbstverständlich: Dort findet man gelegentlich ältere Versionen mit eingeschränktem Speicher oder Bootloader-Problemen, was zu Verbindungsproblemen oder unerklärlichen Fehlern beim Hochladen führen kann.
Auswahl des Arduino Nano in der Arduino IDE Beim Color Nano V4.0 war das in meinem Test nicht der Fall – alles funktionierte auf Anhieb sauber und stabil. Alternative Nano-Klone mit USB-C: Der Seeduino Nano v1.0 Der Color Nano V4.0 ist nicht der einzige Arduino Nano-Klon mit USB-C-Anschluss. Ein weiterer spannender Vertreter ist der Seeduino Nano v1.0 von Seeedstudio. Dieses Board basiert ebenfalls auf dem ATmega328P, bietet jedoch zusätzlich einige praktische Erweiterungen, die besonders im Bereich Sensorik und Rapid Prototyping interessant sind.
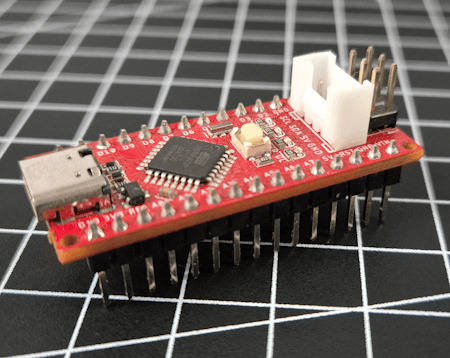
Seeduino Nano v1.0

Seeduino Nano v1.0

Seeduino Nano v1.0 Was den Seeduino Nano besonders macht: - ✅ USB-C Anschluss – wie beim Color Nano modern und bequem - 🔌 Grove-Schnittstelle – ermöglicht das einfache Anschließen von Sensoren und Aktoren aus dem Grove-Ökosystem - 🔄 I²C-Erweiterbarkeit – mit einem passenden Y-Adapter oder Hub können mehrere I²C-Geräte angeschlossen werden (sofern unterschiedliche I²C-Adressen verwendet werden) 💡 Das macht den Seeduino Nano ideal für schnelle Experimente und modulare Aufbauten – gerade auch im Bildungsbereich oder für Prototyping-Projekte.

zwei Mikrocontroller - Arduino Nano Klone mit USB-Typ-C Schnittstelle 🧠 Fazit: Du siehst: Es gibt eine Vielzahl spannender Arduino-kompatibler Mikrocontroller, die auf dem Open-Source-Gedanken basieren und diesen mit eigenen Ideen weiterentwickeln. Der Color Nano V4.0 ist dabei eine besonders günstige, puristische Variante mit modernem USB-C-Komfort – ohne Schnickschnack, aber mit voller Funktionalität. Read the full article
0 notes
Text
CMPE453 LAB: Basic Color Sensor using Atmega328p Analog to Digital Converter. solved
In this lab, our goal is to design a basic color sensor which is able to distinguish between Red, Yellow and Blue color objects. Items Required: 1. Breadboard 2. Color LEDs (Red, Yellow and Blue) = 03 3. Groove Light Sensor 4. Connecting Wires 5. Arduino Uno Board 6. Groove Base Shield 7. Resistors = 220 ohm x3 (For LEDs). 8. Color Balls (or other similar objects)- Red, Blue and Yellow. Operating…
0 notes
Text
Arduino Uno
Arduino Uno The Arduino Uno is an open-source microcontroller board based on the Microchip ATmega328P microcontroller (MCU) and developed by Arduino.cc and initially released in 2010. The microcontroller board is equipped with sets of digital and analog input/output (I/O) pins that may be interfaced to various expansion boards (shields) and other circuits. The board has 14 digital I/O pins (six…
0 notes
Text
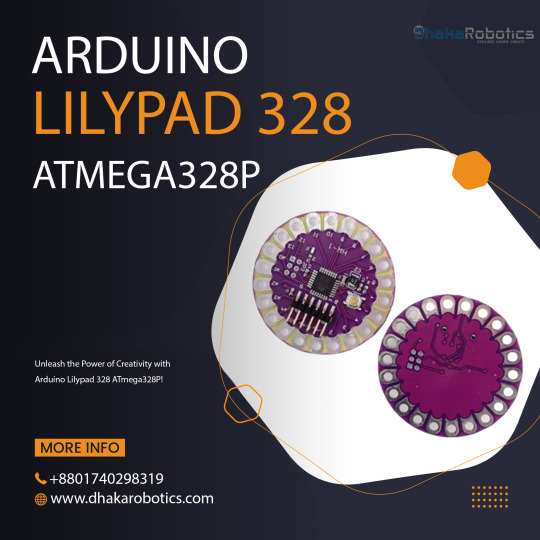
Unleash the Power of Creativity with Arduino Lilypad 328 ATmega328P!
Want to create interactive, tech-infused projects? The Arduino Lilypad 328 ATmega328P is designed specifically for you! Perfect for wearables, e-textiles, and soft circuits, it’s lightweight, flexible, and easy to sew into your designs.
Key Features:
Powered by ATmega328P – Small but mighty!
Lightweight & perfect for wearables
Easy to program for beginners & experts alike
Whether you're adding lights to your clothing or building a unique tech project, Arduino Lilypad is your creative playground!
Start your project today and turn your ideas into reality!
Click here to purchase the product: https://dhakarobotics.com/.../1011-arduino-lilypad-328.../
Contact Us: +8801740298319
visit our website: https://dhakarobotics.com/
0 notes
Text
CMPE453, Section-2 Lab-5 Interrupt Handling using Atmega328p Microcontroller
The purpose of thislab activity isto understand the mechanism of interrupt handling by the microcontroller. Hardware Requirements 1) Arduino Uno Board 2) Breadboard 3) Push Button 4) LED with Resistor (suitable resistance rating) 5) Connecting wires Hardware Setup 1) Assume you have 1 pushbutton (PB1). 2) Connect Push Button with the pin INT0 of microcontroller in such a way that pressing…
0 notes
Text
Unleash Your Creativity with Arduino DIY Kits from Diykit Solutions
Are you ready to dive into the exciting world of electronics and robotics? At Diykit Solutions, we offer a diverse range of DIY kits that empower you to unleash your creativity. Our kits feature high-quality materials sourced from trusted suppliers, ensuring that you can build innovative projects with confidence. Whether you’re a hobbyist, educator, or professional, our Arduino-compatible products will help you turn your ideas into reality.
Explore Arduino-Compatible Sensors and Modules
The world of Arduino opens up a universe of possibilities, especially when you explore the extensive range of Arduino-compatible sensors and modules available at Diykit Solutions. These components are essential for anyone looking to enhance their projects with sensory feedback, interactivity, and automation.
What are Arduino-Compatible Sensors?
Arduino-compatible sensors allow you to collect data from the environment. Whether you’re working on a weather station, a smart home project, or a robotic system, these sensors can help you gather crucial information such as temperature, humidity, light levels, and motion detection. Our collection of sensors is designed to seamlessly integrate with various Arduino boards, making them an ideal choice for your projects.
Enhance Your Projects
By incorporating Arduino-compatible sensors and modules, you can create projects that respond to real-world conditions. For instance, you can use a temperature sensor to trigger an action when the temperature exceeds a certain threshold or a motion sensor to activate lights when someone enters a room. The possibilities are endless!
Build with the Arduino UNO R3 Board ATmega328P DIY Kit
The Arduino UNO R3 Board ATmega328P DIY Kit is a fantastic entry point for anyone interested in electronics and programming. This versatile board is one of the most popular Arduino models and serves as the backbone for countless projects.
Key Features of the Arduino UNO R3
User-Friendly: The Arduino UNO R3 is easy to use, even for beginners. With its straightforward design and compatibility with the Arduino IDE, you can quickly write, upload, and run your programs.
Versatile Connectivity: The board features a variety of input and output pins, allowing you to connect a wide range of sensors, actuators, and other devices.
ATmega328P Microcontroller: The powerful ATmega328P microcontroller ensures that your projects run smoothly and efficiently, enabling complex functionalities without compromising performance.
Ideal for Beginners and Experts
Whether you’re just starting your journey in electronics or looking to create more advanced projects, the Arduino UNO R3 Board ATmega328P DIY Kit has something to offer everyone. With the right resources, you can learn programming, circuit design, and the basics of robotics.
Discover the Arduino-Based Robotics DIY Kit
Robotics is an exciting field that combines engineering, technology, and creativity. With our Arduino-Based Robotics DIY Kit, you can embark on your robotics journey and build your own robots from scratch.

What’s Included in the Kit?
Our robotics kit includes everything you need to create functional robots, including:
Arduino Board: The core of your robot, responsible for processing and controlling its functions.
Motors and Wheels: For movement and mobility, allowing you to create wheeled robots that can navigate their surroundings.
Sensors: To enable your robot to interact with its environment. Use ultrasonic sensors for obstacle avoidance or line-following sensors for navigation.
Learn and Experiment
This kit not only helps you build robots but also teaches you the principles of robotics and programming. By experimenting with different configurations and programming techniques, you can develop your skills and gain a deeper understanding of how robots work.
Explore the Arduino R3 SMD Micro Controller Board Kit
The Arduino R3 SMD Micro Controller Board Kit is another excellent option for those looking to create innovative electronics projects. This compact board offers a range of features that make it suitable for various applications.
Key Benefits of the R3 SMD Board
Compact Size: The SMD (Surface-Mount Device) design allows for a smaller footprint, making it ideal for projects with space constraints.
Integrated Features: This board comes equipped with essential features such as built-in USB connectivity, allowing for easy programming and communication with your computer.
Robust Performance: Designed for reliability and efficiency, the R3 SMD board can handle a variety of tasks, making it suitable for both beginner and advanced projects.
Perfect for Prototyping
Whether you’re prototyping a new idea or creating a final product, the Arduino R3 SMD Micro Controller Board Kit provides the flexibility and functionality you need. Its robust design and compact size make it an excellent choice for any electronics enthusiast.
Why Choose Diykit Solutions?
At Diykit Solutions, we are committed to providing high-quality DIY kits and components that inspire creativity and innovation. Here are some reasons why you should choose us for your Arduino projects:
Diverse Product Range: We offer a wide variety of DIY kits, sensors, and modules to cater to all your electronic and robotic needs.
High-Quality Materials: All our products are sourced from reputable suppliers, ensuring that you receive only the best components for your projects.
Customer Support: Our dedicated team is here to assist you with any questions or concerns you may have. We aim to provide a seamless shopping experience.
Educational Resources: We believe in empowering our customers with knowledge. Our website features tutorials, project ideas, and guides to help you get the most out of your DIY kits.
Start Your Creative Journey Today!
Ready to dive into the world of electronics and robotics? Explore our extensive collection of Arduino-compatible sensors and modules, as well as our Arduino-Based Robotics DIY Kit, Arduino UNO R3 Board ATmega328P DIY Kit, and Arduino R3 SMD Micro Controller Board Kit. At Diykit Solutions, we provide everything you need to unleash your creativity and bring your ideas to life.
Whether you’re a beginner looking to learn or an expert seeking to expand your toolkit, our DIY kits are perfect for anyone passionate about electronics. Don’t wait — start creating innovative projects today!
0 notes
Text
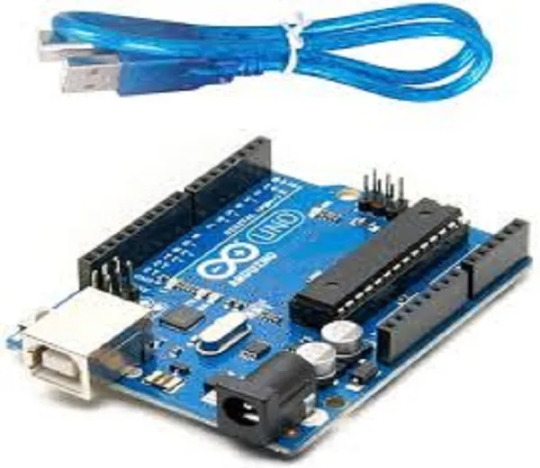
Arduino Nano Board R3 with CH340 chip

Based on the Arduino platform, the Nano R3 Board CH340 Chip without USB Cable does all the functions of the Uno, but has a smaller footprint.
Using Nano CH340 Soldered Board R3 Chip without USB cable is essential for your small project where you don’t need many pins, but the small size is very important to make it look nice.
In comparison to older versions of Arduino Nano with FTDI USB-Serial Chip, the Nano uses a low-cost USB-Serial Chip.
With the ATmega328 (Arduino Nano R3), the Nano is small, complete, and breadboard-friendly. It has more or less the same functionality as the Arduino Uno but in a different package. In addition to lacking a DC power jack, it uses a Mini-B USB cable instead of a standard one.
This device can be powered by a mini-USB cable, a 6-20V unregulated external power supply (pin 30), or a 5V regulated external power supply (pin 27).
Six PWM I/O are included from a total of 14 digital I/O, eight analog inputs, 16Mhz clock speed, and 32kB flash memory.
Please note:
The CH340 chip might not work directly with some PCs/laptops. You will need some drivers for the CH340 chip.
Arduino nano features :
TTL level serial transceiver ports (RX / TX)
Atmel Atmega328P-AU MCU used
It has a bootloader installed
Supports USB download and power supply
Provides support for external DC power supplies of 5V and 12V
2 notes
·
View notes