#australiangamedevoloper
Explore tagged Tumblr posts
Visit Tumblr Blog
Explore Tumblr blogs with no restrictions, modern design and the best experience.
Last Seen Tumblr Blogs


Fun Fact
Post activity is at the highest at 4:00 pm EDT; notes peak at 10:00 pm EDT.
Text
Made a 3D model of a katana samurai sword in less than a day.


13 notes
·
View notes
Text
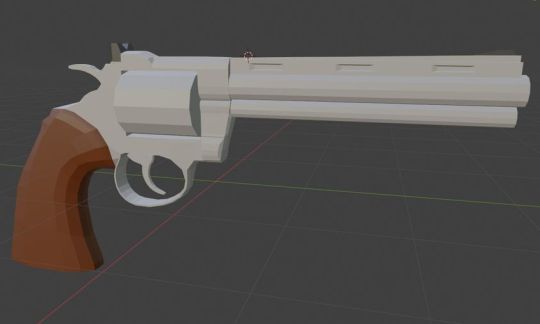
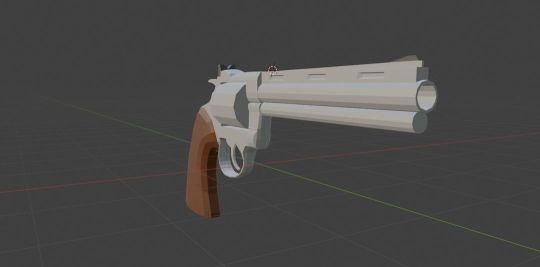
It's high noon, and I finally finished my 3D revolver.
#onthisday#gamedevelopment#australiangamedevoloper#trending#foryou#ftw#3d#3dart#soledevoloper#gamedev#blender
2 notes
·
View notes
Text

Featuring some Arched text and other colorful and creative text I made myself in photoshop.
#viral#onthisday#gamedevelopment#australiangamedevoloper#trending#indie#2d#ftw#lifechanging#important#foryoupage#photoshop#graphic design#soledevoloper#gamedev
2 notes
·
View notes
Text
On this stormy night, you find shelter, but at what cost? Your time to see my portfolio piece and admire the stormy nature of my project, yay!! In this project, I made a simple and short level design project of the player navigating through a tiny forest on a stormy night who will then find a mysterious cabin to stay in.
This project was designed not to be the next game on the market, but to flex my level design skills with particles, and for the first time to use Tree Creator and wind zone to create trees and wind respectfully. The assets (including the fps controller and one of the trees) are mostly borrowed from the Unity asset store, except for the trees I created (which will be shown one by one later in the video).
WHAT I LEARNED:
· How effectively I can use the Tree Creator to create main roots, growth, leaf frequency and growth, textures, branches, LOD, how effective are they in the wind, size (including leaves), and crankiness of branches of trees
· About how to use the wind zone for the first time and how effective and complex it is to use to enable to blow the trees around like the real-life wind.
· How I can make small particles float around until they reset their starting position to play the particle again.
· How I can shape particles. E.g. the dust flying around and the rain particles falling respectfully.
· Rotating around skyboxes to fit in with the scenes better. · Using code to make a randomized range with an enumerator to flick the lightning (directional light) between 15- 20 seconds.
· How effective using flare lights can be used to get players' attention from a distance,
WHAT I IMPROVED:
· I improved on mixing different terrain textures with each other to make it seamless and blended together as possible.
· I managed to control how high and low the terrain is to distinguish which are hills/mountains and walkable areas.
· Getting a better hang with the lighting and post-fx respectfully.
· Snapping modular pieces such as planks and steel roofs to corners of the little house to reduce z-fighting visuals.
WHAT I COULD HAVE DONE BETTER?:
· For rain particles, I could have added a splash particle when the rainwater collides with the terrain to make it more realistic and alive instead of it going through the ground.
· Not all the trees look exactly what I call “natural” trees, some looked a bit randomized with branches and a little bit blobby, so I will need to practice with the Tree Creator in the future to get better realistic trees.
· I would need to be careful how many leaves and branches are attached to the trees, otherwise, it will increase the polycount in the scene and crash the game.
· I only used a minimum of post fx this time because I thought without the player having a flashlight or lamp posts around, the player would struggle to find their way around if the post fx is too dark. So next time I should have a flashlight or lamp posts for the player to navigate around and use more post fx to enable me to use more of my creative freedom of it.
OVERALL:
Not only was this something a little different and a good exercise to improve my level design skills including sculpting the terrain and creating particles, but to try out new things like using the tree creator to create trees and using the wind zone to control how much wind to blow trees. Next time I may need to practice on the terrain editor and tree creator more to create more unique trees and terrain or just simply create trees and land from modular sets instead all respectfully, but that would depend on the next game I will be making. Overall- good exercise to expand my level design toolbelt.
#soledevoloper#australiangamedevoloper#indiedev#gamedev#gamedevelopment#indiegames#indie#indiegame#indiegamedev#indiegaming#game dev#design#project#walking simulator#fps#level design#unityengine#indie games#AustraliamGameDevoloper#game development#Soledevoloper#pcbuild#firstpersonshooter#designer#game design
5 notes
·
View notes
Text
Post mortem for Industrial Run
https://adamtheamazing.itch.io/industrial-run Type: Product Genre: Side scroller/platformer Engine: Unity. Released: 11/6/2025. Last updated: 13/6/2025. Learned from: Originally from Diploma of Digital and Interactive Games (2018), but recently decided to expand it.
Before moving further towards my game dev journey, I wanted to exercise my game and level design skills. I decided to dig out one of my old assessments from my hard drive and expand on it instead of starting a new project from scratch. I also wanted to make a project that can demonstrate the 3D assets I created and my creativity in action.
Originally it was going to be a quick exercise, but due to some issues, it end up taking almost a year to expand it. I had to make sure the game was polished and running as smooth as possible.
This time: I didn’t code as much, and a few of my 3D assets are in the game such as the Glue Cannon, Lightsaw, Security Bot, Security door, and Giant pistons.
Originally the project had 1 level and few sounds. Now the new project has many sounds,9 levels, main menu, and a finish scene.
WHAT WENT WELL?:
Despite some of the 3D models have a higher poly count than others like the Pistons, I was able to make the levels short and run above 60 fps as possibly.
I managed to make and edit particles respectfully like smoke, fire, Glue Cannon particles and sparks really well due to what I learned about making particles last year. Doesn’t include electricity sparks for Tesla coils since I followed a tutorial to help me make it years ago.
For the first time I added a level select menu and a button that takes Players to my home game site.
Despite doing minor code changes, I managed to work around the code that my past programming teacher did. For e.g., I tweaked the checkpoint system to make a sound once when the Player collides with it instead of it sounding multiple times. I changed code for the big button by the Security Door to only press down and activate when a crate has collided with it instead of the Player.
I worked around making sounds activate within the animation instead of code. Good e.g. is the Security doors, once the door activates the animation, it enables a Game object to play a machine moving sound. Once it reach’s the end, It disables the game object and enables a new Game object to play a machine stop moving sound.
I created a endless loop of the player’s character running animation on the platforms on the main menu with the help of a project I made few years ago called Roller ball.
I edited some sounds with Audacity to fit with the game as possible.
WHAT I LEARNT:
• Not much new things I learnt this time, but one thing is I have to think twice before working on a new project. I need to think about... - What good would it do for me? - What new things I will learn? - Is it worth taking months or years on the project.
WHAT WENT WRONG AND WHAT COULD I HAVE DONE BETTER?:
I didn’t realise at the last second that the Pistons had big poly count, I had to tone down the amount of Pistons in the levels so it doesn’t affect the frame rate. I could have reduced the Polycount of the pistons, but it was already animated and I didn’t want to risk anything happening to the Pistons like it not animating or something like that.
I did a lot of breaking the prefabs that were attached to what I made were level prefabs containing all the 3D assets each level, next time I will not make level prefabs and just make a group contacting each type of prefab like I have done before. Once the prefab is broken, I had to manually update the prefab nearly each level rather than clicking “apply�� each prefab .
The Player jumping on Pistons is a little sluggish, I could tweak the jumping code to be more responsive, except its not my code, so I don’t want to be breaking any major code. I may need to make a mechanic in future that the Player can still jump and move well on moving platforms.
I tried to do Occlusion Culling, but it only seem to do minor improvements with the fps, Maybe I didn’t do it correctly or the assets already in the game are not designed to be LOD and blend with Occlusion Culling. I will need to understand it more in order to make noticeable fps improvements.
Making the short trailer for the game for the first time was a last min result, I need to plan and prepare more of what the trailer may showcase, sounds, music, possible cutscenes and what sells it compared to its similar recent competitors.
In the trailer, I don’t think I recorded the right wxh resolution of the video which made the it look outdated, I will need to adjust the record settings to fit on modern wxh resolutions that will fill the entire screen.
I accidently recorded the Mouse in the trailer, I should have the game turn the cursor off or move the cursor off screen and not touch it until recording is done.
Some sounds that that should be heard first (e.g. touch Finish flag), should have a bigger priority to be heard than other sounds, I will need to make sure sound priorities are set properly in the future.
I noticed they were missing faces on the Piston, at the time I thought players wont see that error, but I was wrong. I am going to let it go this time.
I think I should have spent more time getting players parameters and Pistons polished, it has few minor issues that cause the movement including jumping to be sluggish. I spent most of the time making levels rather than Player movement testing. I should REALLY spend more time with the core mechanics like Player movement as possible.
OVERALL:
• Despite this taking longer than expected, I learnt what I can do better next time, things I should consider improving, and what not to do.
It was a fair good exercise, but I do not want to dawdle any further, since I’m still working towards a commercial product rather than a free product.
This project is a definite reminder for me to prioritize Core mechanics rather than level mechanics since I have been building test projects for a long time.
#dystopia#dystopian#newgame#sidescroller#platformer#3d#indie#hardgame#singleplayer#gamedev#gamedeveloper#gamedevelopment#soledevoloper#gamedesigner#important#ftw#indiedev#unity#australiangamedevoloper
0 notes
Text
https://adamtheamazing.itch.io/industrial-run
Introducing my latest game: Industrial Run!
Based on one of my assessments of my 3rd game course.
Escape from containment through 9 challenging Sectors dodging Lightsaws, Rogue Cannons that shoot hot glue, patrolling Security Bots, Tesla coils, and Giant crushing Pistons!
Can you make it too the end without losing your insanity? Than come and play this free game and challenge yourself!
#dystopia#dystopian#newgame#sidescroller#platformer#3d#indie#hardgame#singleplayer#gamedev#gamedeveloper#gamedevelopment#soledevoloper#gamedesigner#important#ftw#indiedev#unity#australiangamedevoloper
0 notes
Text
I am beginning to work on a third-person battle royale multiplayer game and a first-person shooter multiplayer game, both of which are practice prototypes. It's not often that I prototype multiplayer games, so wish me luck.
#multiplayer#thirdperson#firstperson#Action#Unity#BattleRoyale#indiedev#gamedev#australiangamedevoloper
1 note
·
View note
Text


Kick-starting the year, I finally finished my 3D Khopesh based on the ancient sickle sword from ancient Egypt.
Loosely based on the real sword, however this sword is about as big as a long sword and is ancient gold.
#gamedesign #indie #ancientegypt #sword #egypt #pharoah #soledevoloper #ftw #blender #3d #gamedesigner #gamedev #indiedeveloper
#gamedev#indie#soledevoloper#gamedevelopment#indiedev#australiangamedevoloper#ftw#important#gamedesigner#3d#sword#egyptian pharaoh#ancient egypt#egypt
0 notes
Text
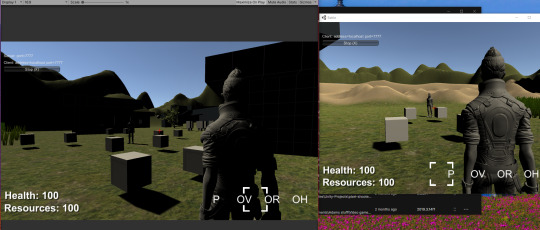
My battle royale prototype is 50% complete.
So far I built the whole level, Player movement, Player shooting pistol, machine gun, and shotgun, weopon pickups, and obstacle creation similar to fortnite.
Next: more weopons, fix player shooting and movement, multiilayer and much more!!!
Player movement and shoot will be improved and fixed respectfully next year.
#gamedev#indie#soledevoloper#indiedev#gamedevelopment#australiangamedevoloper#ftw#important#gamedesigner#battle royale#fortnite
1 note
·
View note
Text
Super Mario Clone (Adams version)
Want to play this game? click here: https://adamh5.itch.io/supermariocloneadamsversion
password is : SMC85
Normally I prefer not making clones of games that already exist on shelves and I also prefer making something original that sets itself apart from similar games, however, it wasn't until recently that I found an online course that contains a Mario Clone tutorial by Awesometuts on Udemy. Originally I started with the Mario Clone lecture (and some other lectures) in the course expecting to learn familiar Super Mario mechanics that are part of the norm of Sidescrollers like coyote time and responsive jumping (the longer the key it held, the higher the jump) for one of the upcoming original games I planned, unfortunately when I found out the game idea would be too complicated for this time round and the responsive jumping mechanic was nowhere in the Mario Clone lecture, I scrapped it and left it too rust in my computer and started with my other projects.
Until recently, I thought: What if the project could help me strengthen my game design, programming, and Level design skills? So I started to get back on the course and proceeded to complete the Mario Clone lecture.
After I completed the lecture, I was unsatisfied with the end result since the project had bugs, unfair difficulty, and unpolished mechanics. So I decided to take roughly more than a month to fix these issues as much as possible without making a full game with many levels since it is not a game I would make money by selling on Steam or Itch.io, that’s why I only made 1 level, used the only sounds in the package rather new sounds, and just generally focused on Quality instead of Quantity.
On the bright side: I learned a lot about managing sprites and Side scroller mechanics, It isn’t the first time I have prototyped a side-scrolling game, but it is the first time I started building the side-scroller game on my own except for the art assets are not mine and I was taught by AwesomeTuts which gave me a head start on building the game.
I was originally going to have it displayed only as a practice project which is unplayable by the public and only displayed on my Portfolio, but because I put so much work and effort into it, I thought of having it as a private product so only certain people can play my game and give me constructive criticism.
I don’t exactly know who made the original sprites and other assets, but I was provided by AwesomeTuts for the project.
WHAT WENT WELL?:
I managed to have little bugs in my game. Some bugs I had to let go like the player going stuck in between edges of snail shells and tree trunk edges because they weren’t too severe since this is not a full commercial game. At least the game does not crash or break mechanics to cause it to be unplayable for the Player.
I managed to stay organized with prefabs this time making folders with different sets of them like Lego bricks. E.g. “Ground” folder contains prefab sets “4x1 ground”, “1x1 Ground with 1 Trunk”, and “1Tree_2x1Ground_1Stump_1flower”. This made finding the exact prefabs for the level easier.
I successfully managed to put up a camera collider that stops the Player from going backward just like the original Mario games without the collider pushing other game objects with physics such as enemies and powerups. However, the Player's fireballs do collide with the camera collider on purpose.
I successfully used a public enum that I called “Item” which allows me to select which powerup the Player gets by jumping underneath the Bonusblock, by default I set it to “coin” which is self-explanatory and gives the Player coins. I figured most of the Bonus blocks in the game would give the Player coins.
I managed to make the Player lose the ability to throw fireballs upon enemy collision after the Player gets the Fireflower just like in the original Mario games.
Managed to get the game to freeze for a few seconds and play at normal speed in an instant. This is done when the Player has run out of lives and than falls off the level yet again just like in the original Mario games.
I set public bools such as “downfirst” and “FlipYDirection” to tell the spider to go down first and to flip its Y position sprite each direction it changes respectfully. If down first is false, it goes up first. This allows me to add character to each spider and to add challenge to the Player with its AI behavior.
Managed to get the spider to only die when the Player jumps on it and is also midair, so if the spider comes underneath the Player on the floating blocks, it will damage the player and still move up and down as normal.
I fixed a bug where if the Player hits underneath the Bonusblock and stays colliding there, multiple powerups will instantiate. Since the bug fix, only one powerup instantiates no matter how fast the Player hits the Bonusblock underneath.
I coded a mechanic where if the Player falls under a certain limit based on his/her Y.transform.position, the camera will stop following the Player, the Player movement script is disabled, play game over audio plays, and then restarts the level without using colliders to cover the empty pits where the Player can fall from.
I have made Player and Enemy scripts a bit tighter with being alive or not. If the enemy or Player is dead, they cannot respond to anything else from the code, for example when the Player dies and gets thrown back falling off the screen: he/she can not collect powerups, Though I did leave the Player accidentally falling on Beetle than bouncing off it while falling off screen because I thought it was a funny harmless glitch that didn't break the design or gameplay. Another example is birds won't drop eggs if already killed by the Player and the Player also cannot bounce off snails or beetles if already jumped on or died respectfully.
Creating the script for the Snail was a real challenge because it needed to execute code for not only the Snail itself, in its shell form but for the Beetle that shares the same script.
WHAT I LEARNT:
--Sprites--
Using the sprite editor to cut out the sprites I want and animate them in a new animation clip. While also changing samples of each animation for the player from 60 to 12 FPS to animate very similar to the 8-bit style.
Flipping Sprites X and Y by code (not transforms).
Changing Order in Layer in inspector by code (like Photoshop layers).
Can enable the sprite's sprite renderer on and off without turning off the Parent game object.
Getting the world width and height than divide them together with Main Camera Orthographic Size and divide them again with Screen height times screen width which are the screen size in screen space of the game view. Then scales the width and height of the background a little bit to match the full aspect of the camera frame.
Having fewer sprite sheets reduces the game's memory use.
--Player--
Using Yield return new WaitForSeconds inside a For loop with some public variables to make the Player flash a certain amount of times and time before the next flash every time the Player has been hit by an enemy. If the enemy attacks the Player while still flashing, the Player will not lose health unless flashing has stopped.
To add velocity on the Player going upwards after jumping on the enemy's head like in the original Mario games.
Able to Fire fireballs from the Player by instantiating at Quaternion identity from one transform.position and set the scale.x +1 or -1 depending on which direction the player is facing.
Getting and Setting the Movement speed value of the fireball script to be multiplied with the PlayerShoot script on transform.localScale.x from where the fireball is instantiated.
Velocity is speed over time for the Player's movement since we are adding speed to the player on inputs.
Changing the Player's sprite facing direction based on whether the Player is moving left or right with changing the X-Axis leaving the Y-Axis on the Rigidbody untouched.
If storing temp variables is not done correctly for Player movement directions, you will get an error telling you to store a temp value.
Converting the Players anim speed with Math.abs into an int to then convert it into the rigidbody x-axis movement either left or right depending on which direction the player is facing.
--Enemys—
For the Boss, using an IEnumerator to not take damage from Players' fireballs for a certain amount of time once hit by one until time is up and can be damaged once again, repeating the process again until it's dead.
Can use the “SendMessage(MethodName)” method to deal damage to the target (Player) propertie of OnCollisionStay2D who collides with the Boss while still alive.
Can change the Player RigidBodyType into dynamic along with turning on its BoxCollider2D trigger so the Player can fall through the level when lost all his/her health.
Using Vector.3 up and Vector3.down for the Spider as private variables to determine where the spider climbs first depending on the direction it's set too. Also to change directions in a certain time by a public variable.
Creating Collider2D’s with a Pyshics2D sphere from each position, size radius, and which layer for enemies to detect player collision depending on where the position.transform is placed. For e.g 1 Collider2D on each left and right side of the snail detects and damages the Player while moving. But the collider2D collision on top of the snail is its weak spot, which if the Player jumps on it, it goes into its shell and stops moving.
Experimented how powerful the Layer mask detection public variable is when detecting different layers of game objects such as which enemies are affected by the Snail shell after it was kicked by the Player.
Able to make a Snail shell be kicked by the Player after he/she jumps on its shell all in Snail Script, just like with the Koopas in the original Mario games. This is done by rigidbody velocity.
Creating RaycastHit2D detection on the Snails from the front and behind the snail while also using Vector2.left and Vector2.right respectfully detecting from a small distance and only the Players collider with the Player damage script. If The Snail is moving, it damages the Player, but if inside its shell after the Player jumps on it, it gets kicked in a direction depending on where the Player kicks it from and does not damage the Player unless the shell comes back towards the Player.
Able to check if the enemy has the appropriate functions to execute certain code. For example, the Beetles share the snail script with the Snails, if the Beetle has a Beetle tag, it will execute certain code, unlike Snails that go in their shells after the Player has jumped on them, the Beetles instead get squashed and die instead when jumped on the Player.
Able to get the Snails and Beetles to change opposite directions if it doesn’t detect any ground from on the edge or collides head first with walls and other enemies (Snails,Frogs and Beetles,) respectfully. These use Transform. positions each with short raycasts and bools for detection. Birds also have one raycast but it is to raycast infinity down to check if the Player is below them before dropping the egg damaging the Player if hit.
For the Bird, I was able to instantiate the egg from the Bird gameobject without an empty transform variable. Only instantiated – y position underneath the bird.
Able to get the bird to change directions with If statements if the Bird moves too far from its original position and change move direction both by Vector3’s.
Able to change the x.scale (-1 or +1) of the Bird depending on which direction the Bird is facing.
Can change the Bird rigidbodytype2D from kinematic to dynamic in code once the player jumps on Bird's head. This causes the bird to fall down.
The Frog is a child of its parent transform, I managed to code for the parent transform position to move to its child position to move the frog forward with every single jump it has made.
--Camera—
Camera options Aspect: gets the aspect ratio of the camera. Orthographic: gets half the size of the camera.
Able to code a camera script that determines the size of the collider for the camera and then resizes the collider for the bounds using a Vector2 for the Main camera’s aspect times the main camera OrthographicSize.
The variable “Bounds” represents the Axis aligned to the bounding box of the sprite background.
Able to get the camera following the player by first storing the Player's last transform position, then offsets the camera following the Player's current position on the Z axis.
Able to get the camera to not move back with a Vector3 whenever the player turns around and tries to go back rather than forward.
Vector3.SmoothDamp moves along the Vector3 to its end position smoothly. It takes 4 refs for player position, current position, current velocity, and camera speed.
The Ref method parameter keyword is to refer to the same variable that is passed into another method. Basically, currentVelocity variable is a ref and will be changed while the camera is moving and storing it there to follow the Player. So if the Player is too far from the camera, the camera will move fast smoothly towards the Player until at its current position and continuously moves behind the Player.
Screen.height is the current height of the screen window in pixels while Screen.width Is the current width of the screen window in pixels. These are the actual screen sizes in the screen space of the game view.
World space canvas are best for 3D games, not 2D games.
Anchors are really important to anchor UI that will adjust to different screen sizes so Players can see the UI easily and clearly.
Rect transform is the UI equalivent to the Vector3 transform.
100 pixels is 1 unit for the camera.
Screen space: The camera allows you to render in the camera view.
Scale With Screen Size: match width and height will closely match with the resolution with Reference Resolution.
Screen space Overlay: Will overly the canvas on the screen space. Used to position in UI elements.
The higher the number of sorting layers, the order of the game object sprites and text will be rendered first to last.
--Other/misc--
Calling Coroutines by public strings rather than by public function names.
Creating Physics2D.OverlapCircles by code to determine what position it starts at, its radius, what layers to detect to do things like damage Player, activate bonusblocks, and Player to detect if on the ground.
Using concatenation (converting int to string) for updating the Player score. Updating text from code like “coinTextScore.text = scoreCount;” won't work. However concatenations like “coinTextScore.text = scoreCount.ToString();” and “coinTextScore.text = "x " + scoreCount;” will work as intended.
The code outside of If statements will be executed regardless of If statements above are true or false.
Yield return new WaitForSecondsRealtime allows for the countdown to happen in real-time even when Timescale is 0 (when the game is frozen). It is independent of Timescale.
How I can set Bonusblocks from a start and end position to move up and back down to the start position smoothly by transform.translate, bools, and If statements once the Player has hit underneath it without moving it by animation.
Able to use parameters in code to determine each OneShotAudio audio clip volume rather than relying on the Audio source volume in the inspector.
FixedUpdate is good for calculating physics and rigidbody code, however, there are times it may need to be executed in an Update function.
Fixedupdate won't be called as often as the Update function. This compares to the Update function which is called in 60 times in 60 frames per second.
GetAxis and GetRawAxis. - Raw means whole number like 1. - GetAxis(not Raw)takes time to get to be a whole number in decimals. - GetAxisRaw goes to 1 as soon as the input has been pressed.
Z axis is not used for 2D game objects, only 3D game objects.
Localscale is a vector 3.
How I can freeze 2D rigidbody constraints such as the X position by code.
SmoothDeltaTime: Smooths out Delta time
Collider components work differently between 2D and 3D, This includes their respective rigid bodies.
Kinematic is not affected by gravity but is affected by physics such as applying force.
Rigidbody and transform don't usually match up well together.
The list of scenes in the build is actually an array list.
1 in animation speed = 100 in Unity.
WHAT WENT WRONG AND WHAT COULD I HAVE DONE BETTER?:
I didn’t organize the code to be cleaner and easier to read. I was full speed ahead testing different codes until one of them worked mostly for the Snail script because it was complex to act like a Koopa shell in the original Mario games, detecting edges, changing directions, dying by Players' fireballs and being hit by Snail shell including each enemy and Player in the game that respond upon collision. I need to stop at an appropriate moment, clean up code, and make comments to reduce running like a headless chook finding the right code I need to edit and make changes before I make catastrophic mistakes to the game.
I couldn’t add the Player Jump sound because I already programmed that you can hold the jump key to bunny hop without pressing the jump button each time you are on the ground. When you jump and the jump sound is played, the jump sound plays almost 3 times in a row each jump in an OneShotAudio which is annoying, I tried to change the input type so you not holding the jump button to keep bunny hoping and you hear the sound once each jump. Still, it leads to some unknown animation issues. I decided to let it go with no sound and hold the Jump key to bunny hop because if I changed it, I would have to redo the entire Player movement mechanic all over again. So next time when I’m making a platformer, I will start with the press once each jump with sound played mechanic.
I couldn’t program a mechanic when two snail shells (after the Player kicks both of them) ram together they both die, I couldn’t figure out why it wasn’t working, but it didn’t help that I did not clean the code to read better, so I decided not to include a game moment where the player can actually collide two snail shells together. I need to stay in the habit of making comments above code, clean code to read, and not repeating the same code in different lines but only one function.
I had to get certain pairs of ground tiles and mid-air blocks to share one collider before I had each tile have its own collider, but for some reason it stopped the player in its tracks despite having a physics material. If I am going to have tiles with colliders snap to each other like Lego bricks, I need to make sure it has the intended mobility for the Player without stopping him/her for no reason.
Regarding the lack of sounds, I could have found royalty-free sounds to fill the gaps of missing sounds like shell impact, or Player shoot fireballs, but since this project was more of a side project than a commercial one, I decided to let the sounds go and use the ones that were given to me by AwesomeTuts.
I tried to swap two detection transforms left and right whenever the Snail turned directions, but the detection transforms just went elsewhere and nowhere near the Snail, so I just simply left them there not to be switched around, and just simply flipped the sprite which did not affect the detection transforms.
I would think its best for the Frog to jump forward using velocity like how the Snails and Player use velocity to move, jump, and push away rather than using moving animations, that way I can easily control how far and high the frog jumps and if midair by the time player jumps on its head, it can just fall down midair like the bird does rather than go back to its previous landing position squashed and died.
I could have made one of the Bonusblocks respawn a Fireflower at the Boss area so the Player can continually fight and kill the Boss, but that ended up being very difficult to do, so I had to let it go.
I could have text feedback like 1Up like in the original Mario games to tell the Player they got an extra life after collecting a mushroom so they know rather than just guess what happened when they first play the game.
Could have had checkpoints around the level to reduce punishing difficulty for the Player, but it would have been extra work and yet again this was a practice product, not a commercial game, so I will keep that in mind next time I create a sidescroller/ platformer.
OVERALL:
Even though Sidescrollers and platformers are not my cup of tea and I prefer not to make clones of existing games. I’m still happy with the end result that I did the best I could to loosely replicate a Mario game from the assets given to me and taught respectfully. Someday I want to make a sidescroller runner, so this was a good start to learning Sidescroller mechanics to make a similar game in future.
It was also good to warm up my level design skills, I needed to do that so I am prepared to organize prefabs of set tiles so it's easy for me to find and use them.
Stand by for the next post on my level design of the game.
#gamedevelopment#indie#mario bros#gamedev#soledevoloper#australiangamedevoloper#indiedev#indiegame#indiegamedev#ftw#super mario#smb#side scroller#platformer#2d#unityengine#unity
1 note
·
View note
Text
youtube
To better understand how to use Photoshop for Game Development such as 2D art, textures, and UI/HUD, I decided to test out some filters from the Adobe app on one of my old favourite pics from when I was in Japan (2018).
In this video, we will look at Photoshop filters of Render, Pixelate, Sharpen, Stylize, and 3D while comparing them with my original pic.
#gamedevelopment#viral#photoshop#foryou#important#ftw#2d#indiedeveloper#indie#photoshopediting#photoshopfilters#gamedev#indiedev#australiangamedevoloper#Youtube
0 notes
Text
youtube
To better understand how to use Photoshop for Game Development such as 2D art, textures, and UI/HUD, I decided to test out some filters from the Adobe app on one of my old favorite pics from when I was in Japan (2018).
In this video, we will look at Photoshop filters of Blur Gallery, Distort, Noise, and Other while comparing them with my original pic.
#gamedevelopment#viral#photoshop#foryou#important#ftw#2d#indiedeveloper#indie#photoshopediting#photoshopfilters#gamedev#indiedev#australiangamedevoloper#Youtube
0 notes
Text
Particle's
This time, I am looking for something a little different, instead of basic 3D art, fps mechanics, and other prototyping, I have decided to get a better understanding of the Unity engine's particle system so not only can I make my own particles in the game engine like fire, muzzle flash, and magic effects, but to get a general idea and understanding of how particles are made so I do things like edit public domain particle's I get from Unity store website, or if I am working with game artists who are using the particle system, I can communicate in their language, terminology and just generally be on the same page as them when creating particle's for games.
I learned how to create the particles with modules from a website called “School of Game Design”. I did not make the particle textures myself, it was probably done by the School of Game Design.
This took a while to assemble, and I learned so many things relating to particles.
WHAT I LEARNT:
--General--
How good the editor for the particle system is when editing multiple child object particles in the parent object particle.
Always good to start with a basic texture prefab particle, then play around with its modules like Renderer, Lifetimes, Texture sheet animation, etc to see how it all fits together until you are satisfied with the end result.
Most of the particle module properties can be determined with a single value, a value between two constants, and curves.
For properties of particles, there is no right or wrong answer, it's whichever one works best and what it needs depending on the particle.
For some particles, you may need child objects to separate different particles of the parent, e.g. dust funnel or snow storm that has debris or small balls covering the house on impact.
How powerful using curves for X,Y,Z options for certain modules, however, can take some practice to get used to.
--Modules--
Prewarm starts the particle before the player starts the level, however, it is costly for performance.
Gravity multiplayer determines if the game's physics affects the gravity of the particle.
For Simulation space: Local simulates sticking with objects while World space trails the particles behind when the game object moves.
For Simulation space: Start lifetime determines how long the particle lasts before being erased, Simulation speed determines how fast or slow it is going, and Size over lifetime determines how big or small it will be over time.
For Shape, turning it off makes the particle appear in one position which is good for making orbs.
For Shape, Radius thickness determines how the particle emits outside its shell shape.
Force over lifetime determines the force that pushes the particles over time.
Collision quality checks each particle collision in the scene but may need to be reduced to ease on performance.
Velocity over lifetime is good for speeds of particles between two constants, It can go slower or faster depending on the value.
For Rotation over lifetime, rotating particles under 90 degrees is generally suitable, depending on the particle, however.
Velocity over lifetime limits the speed of the particle once it spawns. Dampen controls how long or shorter it will be over time.
For Colour over lifetime, it can be used to control the alpha over time for particles, meaning how soon or later the particle is visible or invisible.
For Emission... - Rate over time determines how many particles in a scene at a time. - Rate over distance: determines how many particles are in the scene following a trial at a time. - the more particles you have, the more its harder on the processing performance. - Speed scale determines how big and fast the particle goes to be smaller, larger, slower, or even faster. - Length scale determines the scale of the particle before it shrinks. - Bursts: delays a certain amount of particles at a time.
Start size( at the top) is a good way to start small on the first step and experiment with it all the way to the biggest step before experimenting with other properties.
Texture sheet by Animation... - controls how the texture sheet of the particle is rendered piece by piece. - Single row: Will animate in a simple row, left to right. - Whole sheet: will animate from left to right, up to down. - Frames over time control speed time between frames. - Cycles: how many times it loops.
Sub Emitters - spawns a particle. - Birth: creates a new particle.
--Idea’s for particles in future—
Dust storm could also be used for chemical smoke if colored. The same particles could serve multiple purposes with tweaked colors, modules, or textures.
Fire particles need to be on spreadsheets to animate consistency with their child object particles.
How different child object particles can blend with each other to create one whole particle game object, e.g. Fireball.
Render - determines how it renders in front of the camera, e.g. the particles(s) look straight at the camera when it renders. - Horizontal billboard: renders facing above ground, does not look at the camera. - Billboard: particle looks at the camera. - Billboard> stretched billboard allows you to stretch the rendered particle (e.g. raindrops).
Sort mode - sorts which particles emit first or last. - By distance is good to make sure the particles are not transparent with each other. - If the texture in the particle has lots of detail, it's best to organize the sorting mode so it can be seen better. - Youngest first: emits particles first, think of it like front to back like layers - Oldest first: makes the oldest particle within the particles to be seen first then the newest(simple fire). - Sorting Fudge: sorts the number of layers in order like Photoshop layers to organize which layer is to show first starting from layer 0.
Simulation space: world is good for making particle trails for moving objects.
How effective Shape is for particles to be given a 360 arc so they form like a circle like the Magic effect and Sunrays.
How good controlling the speed rotation of particles while they move, e.g. dust storm.
How effective Size over lifetime is to making particles start small and go smaller or larger over time.
How effective the Collision module is for using properties to behave when colliding in with objects like... - Bounce: how effective does it bounce when colliding with objects. - Dampen: how effective will it lose its friction when colliding with objects. - Max Kill Speed: How fast do particles need to be after it has collided with an object and then it dies. - Can determine which objects with certain Layermask it collides with. - Can be enabled to collide with dynamic objects.
WHAT WENT WRONG AND WHAT COULD I HAVE DONE BETTER?:
Next time, when showing the particles in the scene view, I should have the orange selection outline turned off.
I had a lot of difficulty making the video on Microsoft Clipchamp because it kept deleting the recorded clips and I had to reimport them back in which took a long time to load. I was originally gonna make one whole video, but I had so many problems with it, so instead I had to make separate video parts of the Particles video. Soon I will stop using Microsoft Clipchamp, and use a different movie maker app after I make two last videos of my newest project.
I was not really satisfied with the Smoke funnel because I was hoping it would look like a tornado with all particles blended together rather than look like it's coming apart, I will need to improve on making particles in general if I want to make a tornado particle for next time.
I think the snowflakes from the snow particles should have an actual snowflake texture to be realistic rather than a simple white circle, however, it will depend on my next game's art style and how far the player sees it when in snow-themed levels.
OVERALL:
Overall I’m glad I got a better understanding of how the particle system works, despite it was a bit tedious and a big project to do.
Now that I have learned a lot, it should make new and editing existing particles much easier in development with less headache.
It was tricky to name every single nuts and bolts detail on the post-mortem that I learned, so I did my best. If you have read this, thanks for watching and understanding.
#gamedevelopment#indie#particles#unity3d#australiangamedevoloper#soledevoloper#gamedev#3d#ftw#trending#important#indiedev#indiegamedev#game dev#game development#fire#flame#smoke#water#magic#sun rays#gamedesigner#Lookingforwork#gamedesign#designer#pc#indiegame
1 note
·
View note
Text


I merged 2 images of the human eye and the earth together in Photoshop. I made different variations, enjoy. I am not the original creator of the 2 separate original images, the rights belong to... - Eye (IKO) - Earth (NASA)
#viral#photoshop#2d#gamedevelopment#australiangamedevoloper#trending#foryou#indie#soledevoloper#ftw#earth#eye#like#foryoupage#important#lifechanging
0 notes
Text
Giant Spinner of Death: Obstacle course
youtube
Finishing off the year 2023, I decided to try something a little bit new and simple to see how far I come, I made a simple little obstacle course to see if I was missing anything that I already should have learned and improved with making mechanics before making more complex mechanics and design in games.
For the first time, I decided to simply use Cinemachine to test out the smooth virtual camera to follow the player.
The goal of this game is to reach the goal while avoiding obstacles as much as you can before time runs out. Don’t collide too many obstacles, or you lose!
I did the best I could to not overload the player with so many obstacles at a time, otherwise, it would be overwhelming and difficult for them to dodge the obstacles.
I needed to make sure the was enough room for the player to move around and dodge obstacles, especially the dropped obstacles which I intentionally put close to walls so the player can navigate around them a little easier after being dropped. The giant spinner of death I wanted to be the main threat to the player so the player is forced to keep their eyes on it at all times otherwise it will collide with the player and knock them towards another wall or obstacle.
I put a timer in the game to challenge the player to get to the end goal in time before it runs out. It would be a little too easy and not as challenging for the player if there was no timer since they could just wait a long time before all obstacles are dropped and go slow and steady around obstacles.
WHAT I IMPROVED:
Combining 2 strings and an int making into one sentence with a number countdown which is “you have” + “seconds” + “secs left”.
Got into the habit of making code much cleaner to read by separating some code into functions to avoid writing the same code again, So instead It calls certain functions at appropriate times ( e.g if the player loses by colliding too many objects or time ran out, it calls the function “displayLoseText” to display lose text.
WHAT I LEARNED:
How to set up the virtual camera from the cinemachine package.
How effective it is to make the cinemachine virtual camera smoothly follow the player.
How to turn on and off gravity on game objects by code.
It’s a good idea to start variables with lowercase letters.
Get axis movement is a method.
Delta time makes updating independent by making the time of frames consistent with the user’s computer. It uses the getaxis value multiplys by delta time movement value speed consistent with the user’s computer as it creates a single value.
The spinners that move without using delta time when timescale is 0 will still move. Possibly due to the fact it's not accessing time as it moves on its own.
Using Enumerators to drop obstacles in certain periods of seconds instead of using Time works best if the game level needs to be played again if players lose or win, otherwise the obstacles will not reset is drop counter and drop too quickly because Time has not been reset to zero when replaying the level.
Can change game objects tag names in code.
Tag is actually a property.
OnCollisionEnter is a callback.
Collision is a variable while "other" is a parameter. “other” stores information about what the gameobject might hit and what it might do with that information. I’ve known OnCollisionEnter for a while, but it's good to know more details about it.
Rotate (transform.Rotate) is a method. Methods are in capital letters.
The difference between defining and calling a method.
WHAT WENT WRONG? WHAT I COULD HAVE DONE BETTER?:
I couldn’t get the walls to always stop the player in its tracks, it is a difficult problem to solve. It could be because the player is moving so fast that it can pass through thin walls. I could have made thicker walls.
The player can also pass through walls by holding a move key as soon as the play button on the unity editor is pressed. The player can pass through corners for some reason, I tried to cover the corners as best as I could, but there was no luck succeeding. Thick walls wouldn’t be right for an obstacle course since most of the walls needed to be avoided by the player. So, the easiest solution I did was to add a timer that would pause the game and offer the player to try again if time is up.
When the player moves towards the wall, it shakes rapidly. I tried to see if I could give it a physics material to reduce the wall shaking, but for some reason, it had no effect, so sadly I had to let it go. I will need to find out more about creating physics materials to make it work as intended depending on the game mechanics and player collision.
OVERALL:
Even though I knew most of these data types beforehand, I learned some new details about them which is important for me to understand and how they work so I can work with them (or around them).
I need to get an understanding of some knowledge I may not have known 100% before (e.g. How player cube is not so bouncy on walls) and may need to research more to prevent or reduce the unwanted executions from code.
I could have tested it with a player, but I thought it wasn’t too important for now. The intention was to be more of a programming exercise to see what I know and what I don’t know, not a playable commercial game that the public can play.
#pc#gamedev#gamedevelopment#indiedev#soledevoloper#australiangamedevoloper#indiegames#indiegame#indie#pc games#indiegamedev#indiegaming#casualgames#Lookingforwork#casual#GameDesigner#MechanicTest#Unity3D#SoleDevoloper#indie games#Youtube
1 note
·
View note
Text
Zombie Man (feat animations)
I was originally sculpting and then retoping a 3D zombie to improve my skills in 3D coat after my 3rd gaming course in 2018, but I had to put it on hold because I was about to do my 4th gaming course making me forget it afterward, until recently I decided to finish it off by texturing it in 3D Coat and Photoshop, then using Mixamo to animate the zombie and finally to edit its animations in the Time Editor in Autodesk Maya completing the project for good.
After I finished texturing the zombie, I exported 4 animations from Mixamo using the zombie T-pose model in the process. I exported attack, scream, idle, and catwalk. You heard me, right? Catwalk! I honestly thought it was funny that a zombie was doing a fashion catwalk. Unfortunately, I had issues with editing the animations in Time Editor since it was my first time using it, so I scrapped it.
For Time Editor, I tweaked the animation of the attack, and then for the idle and scream - I blended them together into one animation.
Not only I was happy to finally finish it and learn new things, but I was also happy to warm myself up yet again to do 3D art again due to myself not doing any 3D art for a while. In the future, I will need to use those skills to create assets for my own games, especially when it comes to creating my own original characters and monsters.
Since it’s been a while since I sculpted and retopoed the zombie, I can’t precisely get into nuts-and-bolts detail of what I learned or improved, but I can explain what I learned while I was texturing and animating the zombie recently for the last month.
Post mortem is short because most of the skills I used in 3D Coat and Mixamo are what I learned in the past, however, I did learn new techniques in Photoshop and Autodesk Maya.
WHAT I LEARNED:
Various voxel and sculpting tools to make details of the zombie in 3D coat.
How I can use the Time Editor in Autodesk Maya to edit Mixamo exported animations and blend two of them together with layers.
The difference of creating an Additive layer which adds on animations like moving the head and arms. Override layer which overrides animations on any chosen joint rig in Autodesk Maya's Time editor for animated characters.
Creating a control rig to allow me to control the joints of the zombie easily when animating them in Autodesk Maya.
Making adjustments in Photoshop using the Hue/Saturation and Color Balance to change the zombie's skin color. These adjustments I rarely use for my projects.
Making adjustments in Photoshop using the levels to make some areas darker or lighter depending on the texture map in Photoshop. Yet again I hardly use levels in Photoshop.
WHAT I IMPROVED:
Better making muscle and bone placements on the 3d model based on human anatomy compared when I made Rambit Bonzer 3D model years ago: https://sketchfab.com/3d-models/rambit-bonzer-e5cdc786e744479f884136a3be7c6c83
Making texturing details stand out using a bit of light and dark texturing e.g. (rib cage around the body).
Remembering to save color swatches before I switch to a new texture color to use in 3D Coat.
I got the hang of exporting the retopod 3d model better in 3D Coat so that way it shows its sculpted details better when rendered.
WHAT WENT WRONG? WHAT I COULD HAVE DONE BETTER?:
I could have made some cuts and muscles deeper compared to the source material I used for inspiration on my zombie in 3d coat.
I occasionally make a mistake I paint the texture on the wrong layer in 3D Coat. I need to make sure I don’t do that otherwise development will be slow causing me to not meet certain deadlines in time before the game launch.
It was my first time using the Time Editor in Autodesk Maya, so I couldn’t easily edit the zombie catwalk with it. I need more time practicing using Time Editor in Autodesk Maya.
For the Zombie attack animation, I couldn’t get the other arm that the zombie didn’t swing with to be more flexible. Yet again I need more practice with Time Editor in Autodesk Maya.
I struggled with making the right lighting and rendering on Sketchfab for each zombie man model, I will need to practice with the options more to get a better hang of it.
I could have made the video render shorter so I could encourage people to see the actual 3D model of the zombie and the animations on Sketchfab rather than show it all on social media and spoil the surprise.
OVERALL:
It may have taken a while to complete the zombie, but it feels satisfying that it is now on display on my portfolio so people can see it. The project sure gave me a better idea of how I can make characters and scary monsters better for my games.
I don’t use 3D coat as much as I used to, but I hope I can use it again in the future to give it justice showing how effective it is in creating assets for my games.
I don’t know how likely I will use Time Editor again in Autodesk Maya, but at least I know it’s an effective way to blend and tweak animations if need to be used, but practice using it won’t be my biggest priority for now.
Full 3D models can be viewed here: https://sketchfab.com/Adamh5/collections/adams-zombie-man-d4b3f25a2cd740d4973a8f079065290e
youtube
#gamedevelopment#australiangamedevoloper#zombie#gamedev#indiedev#3dart#soledevoloper#3d model#3d render#autodesk maya#3d character#indie#GameDesigner#Lookingforwork#game development#Youtube
1 note
·
View note