#azure-keyvault
Explore tagged Tumblr posts
Visit Tumblr Blog
Explore Tumblr blogs with no restrictions, modern design and the best experience.
Last Seen Tumblr Blogs


Fun Fact
Tumblr Inc. is funded by 13 investors.
Text
Centralized application settings with Azure App Configuration
Learn how to use Azure App Configuration to centralize your application settings and feature flags. #azure #appconfiguration #featureflags #keyvault

View On WordPress
2 notes
·
View notes
Text
[Fabric] Protegé credenciales en Notebooks con Azure KeyVault
Ciertamente, cuando usamos notebooks, no todo es transformación y limpieza del contenido de nuestro lakehouse. En distintas oportunidades se nos presenta la opción de utilizarlos para integrar datos. Los Notebooks nos pueden ayudar a conectarnos a APIs en nube u otros entornos cloud directamente usando código.
Para que esta opción sea viable, necesitamos evitar exponer las credenciales o claves del origen de datos usadas en el código. Sino imaginen que cualquier persona con acceso al código (ya sea en Fabric o en el repositorio), podría obtener una key de acceso a una API. Para evitar esto, vamos a utilizar un servicio de Azure que ya existe hace tiempo, Azure KeyVaults.
¿Qué es el servicio de Azure Key Vaults?
En palabras Microsoft "Azure Key Vault es un servicio en la nube para el almacenamiento de los secretos y el acceso a estos de forma segura. Un secreto es todo aquello cuyo acceso desea controlar de forma estricta, como las claves API, las contraseñas, los certificados o las claves criptográficas."
Si bien el servicio varias operaciones, nosotros nos quedaremos con la idea que nos permite ingresar una clave o contraseña a encapsular. Solo usuarios con permiso de lectura de claves al servicio podrá utilizar el encapsulado. De ese modo garantizamos que únicamente usuarios aprobados para usarlo, lo usen.
Veamos como crear este secreto antes de usarlo en un Fabric Notebook.
La creación del servicio es bastante simple, basta seleccionar suscripción + grupo de recursos, nombre, region y plan:
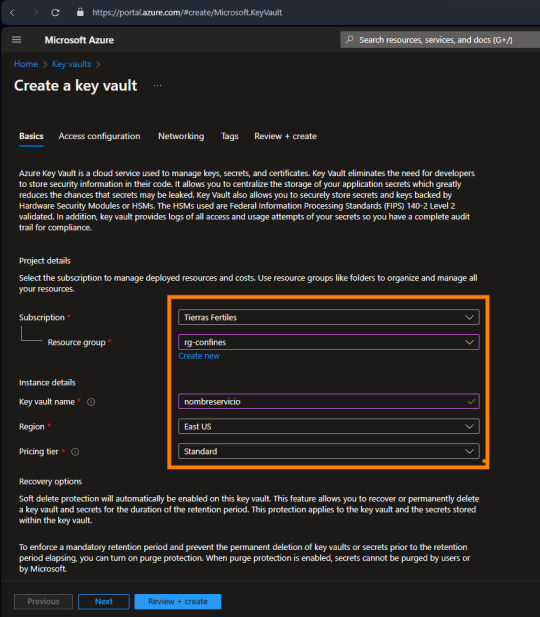
Como mencioné antes, el servicio cuenta con muchas más cosas de las que usaremos nosotros. Ahora nos vamos a concentrar en "Secretos" que es lo que nos interesa.
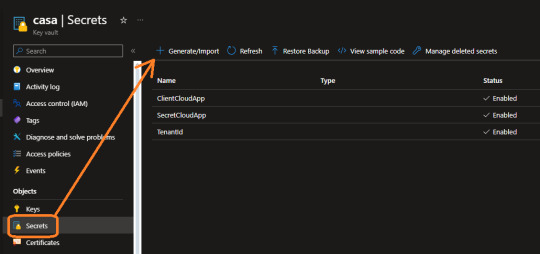
Aqui por ejemplo ya contamos con tres secretos que usaremos para conectar a la PowerBi Rest API. Guardamos secreto para el tenantid, appid y secretvalue de nuestra app registrada en Azure.
Veamos como generar uno nuevo. Es tan simple como darle un nombre y delimitar lo que queremos encapsular. También podemos delimitarlo como algo temporal:
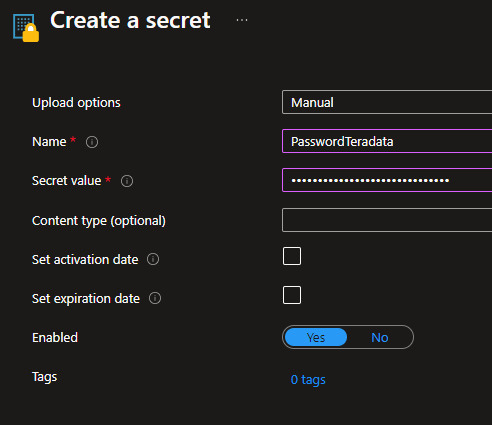
De ese modo podemos crear un nuevo secreto para nuestro almacén de claves. ¿Qué sigue? permitir la lectura a quien vaya a utilizarlo.
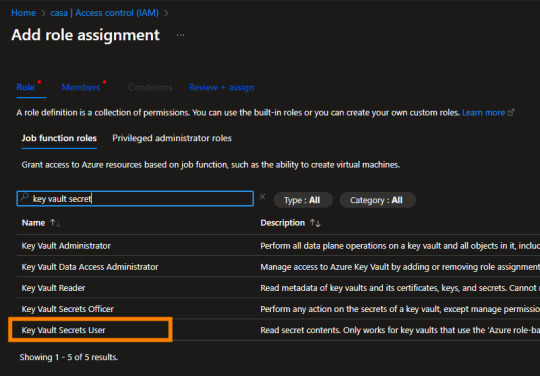
Los recursos de azure se manejan con permisos RBAC (role-based access control). Éstos los encontramos en el "Access Control (IAM)". Podemos abrir nuestro menú de permisos y agregar el que lleva el nombre de "Key Vault Secrets User". La cuenta de EntraID con ese permiso, podrá llamar por código a nuestro secreto almacenado aquí.
Este proceso es muy importante. Imaginen que con esto podríamos dar permisos a un desarrollador para construir un proceso sin saber nunca las credenciales de origen.
¿Cómo llamarlo desde Fabric?
Para utilizar este servicio desde Fabric Notebook usando python, vamos a nutrirnos de la librería de Microsoft que tiene muchas facilidades de interacción. Pueden leer más detalles aqui: https://learn.microsoft.com/en-us/fabric/data-engineering/microsoft-spark-utilities
Dentro de nuestro notebook vamos a comenzar importando SimplePBI para conectarme a la Power Bi Rest API. Luego importaremos las librerías necesarias. El foco está en nuestra tercera celda. Aqui podremos apreciar como llamar el secreto almacenado recientemente:

Utilizamos el método getSecret que necesita dos parámetros. El primero es "Vault URI" que podemos encontrarlo en el Overview de nuestro recurso en el portal de Azure. El segundo es el nombre que le dimos a nuestro secreto.
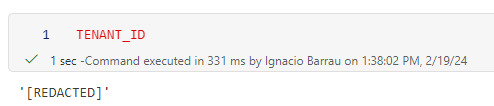
mssparkutils.credentials.getSecret('https://casa.vault.azure.net/','TenantId')
De ese modo almacenamos en variables nuestro resultado y podemos continuar la autenticación de la API en las siguientes filas que crea un token y pide ver el top 5 de workspaces. Recordemos que aquí buscamos seguridad, no solo de exposición de contraseña en código sino de visualización del contenido del secreto. Si el desarrollador intenta leer la variable se encontrará con una limitante:
NOTA: ésta tercera celda pidiendo el secreto solo puede ser ejecutada por una cuenta logueada en Fabric con permisos "Key Vault Secrets User" en nuestro Key Vault. Sino fallará por prohibición de acceso al secreto.
Espero que esto les sea de utilidad para poner automatizar flujos de manera más segura usando Fabric Notebooks.
#Azure#Azure keyvaults#Fabric#Microsoft fabric#Fabric argentina#fabric cordoba#Fabric jujuy#Fabric tutorial#fabric training#Fabric tips#SimplePBI#Fabric python#Fabric notebooks
0 notes
Text
How to print Azure Keyvault secret value in Databricks notebook ? Print shows REDACTED.
As part of ensuring security, sensitive information will not get printed directly on the Databricks notebooks. Sometimes this good feature becomes a trouble for the developers. For example, if you want to verify the value using a code snippet due to the lack of direct access to the vault, the direct output will show REDACTED. To overcome this problem, we can use a simple code snippet which just…
View On WordPress
#Azure Databricks#how to print keyvault secret value in databricks#print redacted content in plain text#show the actual value of a hidden string in databricks#show value of redacted
0 notes
Text
Save and retrieve Secret from Azure KeyVault
How to save and retrieve secret from Azure KeyVault in C#. Nowadays, I’m using a lot of Azure Functions or other Azure services. In a work place where the digital transformation is in progress to achieve better products, security is one of the important aspects to consider.
As a prerequisite, you have to create an account on Azure if you don’t have one. To use Azure KeyVault, also, you need Active Directory in your subscription.
The scope of this post is to create a simple C# application that reads a value from Azure KeyVault. Very common scenario is to read the configuration for the application or important settings such as private key to access other services or connection strings.
Create a new application in Active Directory
First, to save and retrieve secret from Azure KeyVault in C#, you have to allow your app to access to your KeyVault. Go to Azure Portal, then go to “Azure Active Directory” Section.

Active Directory on Azure
So, in the “App registrations” section, click on “New application registration”.
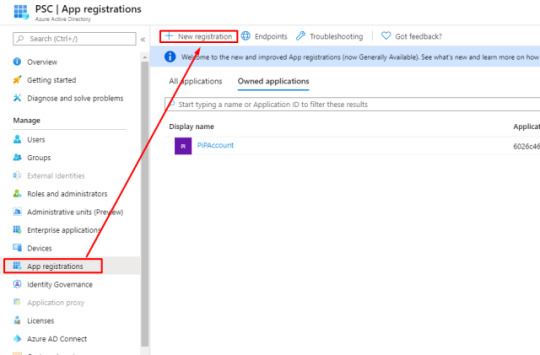
Register a new application in Active Directory
When you click on New registration, another section is open where you have to type or select:
name of the application (it is relevant only for my memory)
what kind of validation you want
redirect URI (optional)
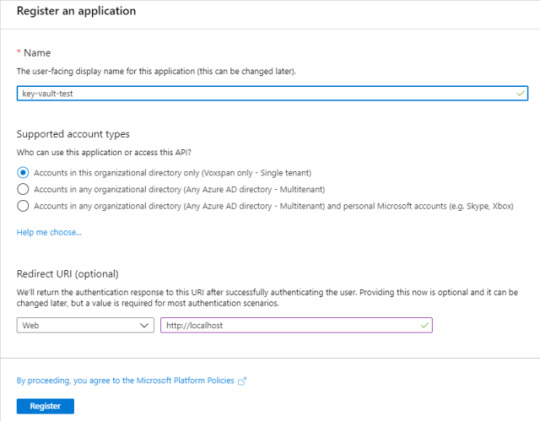
Register an application in Active Directory
Then, press Register. If the KeyVault is successfully created, you redirect to the overview page. In this page, you find the Application (client) Id: this is the ClientId we have to use in the configuration of the KeyVaultClient in the C# application.
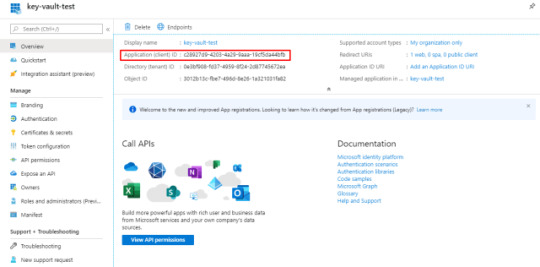
Application Id for the application
Allow the application to access to KeyVault
So, I have to create a ClientSecret for my application. Click on Certificates & secrets, then add a New client secret click on the button (see the image below).
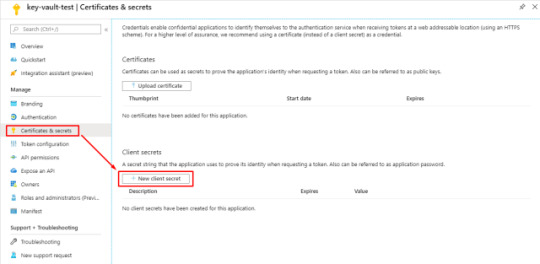
Certificates & secrets for the application
So, when you click on New client secret, a new window is opened with title “Add a client secret“. Here I can add a description and for how long I have to keep this client secret active. For test purpose, I choose Never.
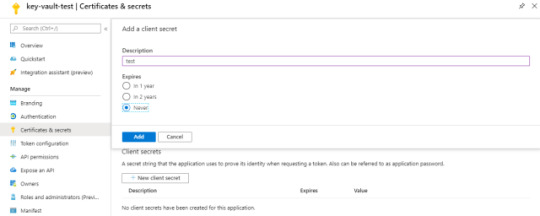
Add a client secret
Now, press the Add button. If the client secret is successfully created, you can see in the list of client secrets, a new one. Copy immediately this value because you won’t see or copy it again.

Client secret for the application
You have to copy it immediately because it will be shown only once, it means that you will not able to see it again next time.
So, the last step is to allow this application to access to the KeyVault. For that, return to the KeyVault page and click Access policies on the left menu.

Access policy to allow the application to access to the keyvault
Then, click on Add Access Policy. In a new section I can choose different options:
Configure from template (optional) but I choose Key, Secret & Certificate Management
Key permissions
Secret permissions
Certificate permissions
Select principal
Therefore, in the dropdown I leave the default options. For Select principal I have to search and add the application (in this case key-vault-test).

Add access policy
So, Click the Select button, the Add. I see the Access policies page and in the application list the app. Remember to Save, click on the button on the top.

Create a C# application
The goal of our post is to save and retrieve secret from Azure KeyVault in C#. First, create a new Console Application with .NET Core 3. Add 2 Nuget packages:
Microsoft.Azure.KeyVault
Microsoft.IdentityModel.Clients.ActiveDirectory

Microsoft.Azure.KeyVault

Microsoft.IdentityModel.Clients.ActiveDirectory
Finally, I have everything to create my KeyVault client. This is the code:
var _keyVaultClient = new KeyVaultClient( async (string authority, string resource, string scope) => { var authContext = new AuthenticationContext(authority); var clientCred = new ClientCredential(clientId, clientSecret); var result = await authContext.AcquireTokenAsync(resource, clientCred); return result.AccessToken; });
Now, a client for the KeyVault is set up but I don’t have keys there. Then, I want to create a secret from my code in the KeyVault. Simple like that.
_keyVaultClient.SetSecretAsync(url, "Password", "This is my password");
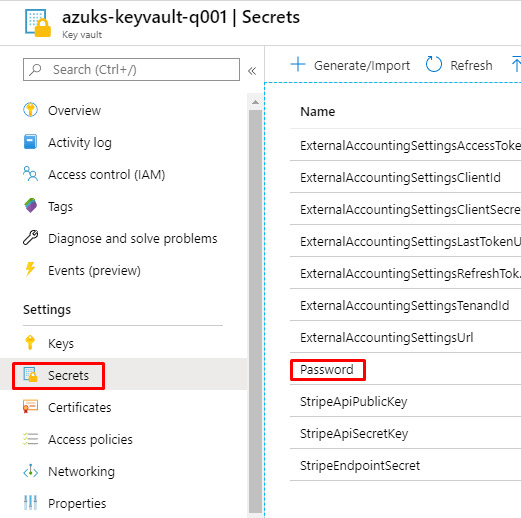
In the Azure Portal I can see all my Secrets
After that, the Password secret was created from my code (the other keys are other tests). For each secret, you can see how many versions there are and add a new version. If you click on one version in the list, we see all details of this secret. If you have the permissions, also you can see the secret.

A secret in KeyVault
It is time to retrieve the secret.
var pwd = _keyVaultClient.GetSecretAsync(url, "Password").GetAwaiter().GetResult(); Console.WriteLine($"The secret passowrd is: {pwd.Value}");
For more documentation about Azure KeyVault, Microsoft has a lot of documentation.
Complete source code
using Microsoft.Azure.KeyVault; using Microsoft.IdentityModel.Clients.ActiveDirectory; using System; namespace ConsoleApp1 { class Program { static string clientId = "<your clientId>"; static string clientSecret = "<your client secret>"; static string url = "https://azuks-keyvault-q001.vault.azure.net/"; static void Main(string[] args) { var _keyVaultClient = new KeyVaultClient( async (string authority, string resource, string scope) => { var authContext = new AuthenticationContext(authority); var clientCred = new ClientCredential(clientId, clientSecret); var result = await authContext.AcquireTokenAsync(resource, clientCred); return result.AccessToken; }); _keyVaultClient.SetSecretAsync(url, "Password", "This is my password"); var pwd = _keyVaultClient.GetSecretAsync(url, "Password").GetAwaiter().GetResult(); Console.WriteLine($"The secret passowrd is: {pwd.Value}"); } } }
Quite a lot of steps but at the end we can save and retrieve secret from Azure KeyVault in C#.
The post Save and retrieve Secret from Azure KeyVault appeared first on PureSourceCode.
from WordPress https://www.puresourcecode.com/dotnet/azure/save-and-retrieve-secret-from-azure-keyvault/
0 notes
Photo

Reading Notes #436 https://ift.tt/30SOxrl
1 note
·
View note
Photo

A nice diagram explaining the authentication workflow for requesting a key (leveraging Azure AD).
Details and context here.
0 notes
Text
Azure devops keyvault
Azure devops keyvault Azure devops keyvault World news Azure devops keyvault Azure Key Vault actions Maik van der Gaag Azure Key Vault Actions is a Build and Release Task for Build / Release pipeline. Actions that can be carried out with this extension are: Get Azure Key Vault secret value Add / Update Azure Key Vault secret Remove Azure Key Vault secret Add access policy Remove access…

View On WordPress
0 notes
Text
CI/CD of Azure Databricks with Azure DevOps
What is Azure Databricks?
Azure Databricks is a cloud-based big data processing and analytics platform that is built on top of Apache Spark. It provides a collaborative and interactive workspace for data engineers, data scientists, and analysts to process and analyze large datasets, build machine learning models, and implement advanced analytics solutions.

What is Azure DevOps?
Azure DevOps is a suite of cloud-based services provided by Microsoft that supports the entire software development lifecycle. It provides tools for source control management, continuous integration and delivery, testing, and deployment automation. Azure DevOps can be used to manage projects of any size, from small teams to large enterprises.
Steps to configure the Azure Databricks with Azure DevOps?
1: Create the Key vault . For this go to the azure portal and search key vault and create it.
2: Now create the Azure Databricks workspace, fill the needful information.
3: Create the project in Azure DevOps and initialize the repository. Along with it go to the resource group and launch workspace under azure databricks section.
4: Go to the portal of workspace navigate towards user settings and connect to repo using git integrations options, select “Azure DevOps service” under git provider section.
5: Create a Notebook using preferred language and then go to “revision history” to add the link of repository of azure devops project that created earlier along with it create a new feature branch for it.
6: Create a pull request and merge the feature branched to the master or main branch and then you see the code in master or main branch also then go to user settings on azure databricks and generate the access token and make sure you copy it otherwise it will gone and add it in keyvault.
7: Go to the library in azure devops add a variable and on this so that it can link secrets for azure keyvault.

8: Now create a pipeline go to classic editor option use the azure repository and under the build pipeline section search for “Publish build artifacts” and save it and run it.
9: Go to the release pipeline link the variable gorup then select the empty job anf use powershell for testing and write the inline script of powershell you will get it from docs.
10: Add the production server task to deploy and run the pipeline for testing.
Thanks!!!!
0 notes
Text
Introducing new Azure Firewall capabilities
We are happy to share several key Azure Firewall capabilities as well as updates on recent important releases into general availability (GA) and preview.
New GA regions have been established in central Qatar, China East, and China North.
IDPS Private IP ranges are now widely available.
Single Click Upgrade/Downgrade now in preview.
Enhanced Threat Intelligence now in preview.
KeyVault with no internet access is now in preview.
Azure Firewall is a cloud-native firewall-as-a-service offering that allows customers to centrally govern and log all of their traffic flows using a DevOps methodology. The service supports both application and network-level filtering rules and is integrated with the Microsoft Threat Intelligence feed to filter known malicious IP addresses and domains. Azure Firewall has built-in auto-scaling and is highly available.
Read More: https://prolabsit.com/microsoft-azures-comprehensive-approach-to-cloud-vulnerabilities/
0 notes
Text
Snapshot studio professional

Snapshot studio professional for mac#
Snapshot studio professional update#
Snapshot studio professional full#
Snapshot Studio is in this profession for many years.
Snapshot studio professional full#
Providing the full set of original, raw, unedited images and video footages of nuptial ceremonies and wedding day they click the photographs with utmost precision which tells a beautiful story of the love story.
Snapshot studio professional for mac#
Surprising their wedding couples with photographs and albums they ensure to deliver the same within the span of 20 days. SnapShot Studio Professional for Mac By Allen Christopher Free to try Visit Site Developer's Description By Allen Christopher SnapShot Studio Photo booth is a more than a breeze to set up. This snapshot of your ISIS system at a single point in time, coupled with. Be it engagement, reception, cocktail, sangeet night or wedding they will be part of your journey for sure. The ISIS Snapshots page collects information currently displayed by the ISIS. Clicking snapshots with utmost perfection and minutest detailing this venture is well-equipped with camera tools and techniques. and lens of your choice in our specially created studio and backdrop set. Children and family portrait studio (pets welcome) Special occasions, Upsherin, Communion, holiday cards, cake smash, school portraits, etc. Photography is an art to represent the natural setting in the most unique and creative manner. Whether you are a hobbyist, enthusiast or professional, SNAPSHOT gives you the. My fianc and I had a wonderful time shooting our engagement photos with Mitchell We had never done any kind of professional shoot together before and he made. Remove-AzVmssExtension -VirtualMachineScaleSet $vmss -Name Studio is a professional wedding photography company that is based in Hyderabad. Virtual machine scale sets: $vmss = Get-AzVmss -ResourceGroupName $rgName -VMScaleSetName $vmssName Virtual machine: Remove-AzVMExtension -ResourceGroupName $rgName -VMName $vmName -Name There are several ways to disable the Snapshot Debugger:Ĭloud Explorer > your virtual machine/virtual machine scale set resource > Disable DiagnosticsĪzure portal > your virtual machine/virtual machine scale set resource blade > Extensions > Uninstall extension My background in customer service and leadership influence the. For more information about Application Settings, see Configure an App Service app in the Azure portal.įor virtual machine/virtual machine scale sets: Portrait photography small business started in 2020. $extension = $ | Where ) | Out-NullĪny changes to Application Settings will initiate an app restart.
Cloud Explorer > your virtual machine resource > Disable Debugging (Disabling Debugging does not exist for virtual machine scale set on Cloud Explorer).ĭisable the Remote Debugger with PowerShell Scripts/Cmdletsįor virtual machine: Remove-AzVMExtension -ResourceGroupName $rgName -VMName $vmName -Name .VSRemoteDebuggerįor virtual machine scale sets: $vmss = Get-AzVmss -ResourceGroupName $rgName -VMScaleSetName $vmssName.
To deactivate an app, right click its icon in the dock and select Quit option (or choose SnapShot Studio Professional > Quit SnapShot Studio Professional on the Menu. There are several ways to disable the Remote Debugger for virtual machines and virtual machine scale sets:ĭisable the Remote Debugger through Cloud Explorer Prior to the removal of SnapShot Studio Professional, you should first log into your Mac with an administrator account, and turn SnapShot Studio Professional off if it is running. Drag SnapShot Studio Professional to the Trash (or right click on it and then select Move to Trash option). Open up the Finder, click Applications on the left side, and then select SnapShot Studio Professional.
Rebuild and redeploy the modified Docker image.įor virtual machine/virtual machine scale sets remove the Remote Debugger extension, Certificates, KeyVaults and InBound NAT pools as follows: Option 1: Drag SnapShot Studio Professional icon to the Trash. See Instagram photos and videos from Gourmet Snapshot Studios (gourmetsnapshot).
Snapshot studio professional update#
Update your Dockerfile to remove the sections corresponding to the Visual Studio Snapshot Debugger on Docker images.
Navigate to the Debugging section and click the Off button for Remote debugging.
Azure portal > your Application Service resource blade > Application Settings.
Disable Remote Debugger extension via the Azure portal for your App Service.
0 notes
Text
[Media] UNiD
UNiD E2E Secure Messaging Platform. UNiD is an open-source libraries for building end-to-end secure messaging between all devices including IoT, micro services, and on-premise servers, using features of decentralized identifiers (DIDs) as a basis of security and privacy. Build atop DIDComm messaging protocol which works over any transports, it makes end-to-end messaging reliable, secure, and easy. Features: ▫️ Device's identity, keys, and profiles management with RoT ▫️ Automated provisioning without centralized servers and certificate authorities and intermediaries ▫️ Mutual authentication and end-to-end encrypted messaging ▫️ ABAC & Dynamic policy management ▫️ Libraries for multiple language - Rust, C, NodeJS, Python ▫️ Middleware for multiple OS - Linux kernel x86(32bit) & x86-64(64bit), FreeRTOS ARM Cortex-M33(32bit) ▫️ RoT support - TPM, ARM TrustZone, Renesas SCE, Azure KeyVault https://github.com/getunid/unid

0 notes
Text
Storage Account Key Management using Azure Key Vault
Learn about Storage Account Key Management using the Azure Key Vault service. #azure #keyvault #storage

View On WordPress
0 notes
Text
Origen web para evitar gateway PowerBi y Azure Functions
Existen diversos escenarios donde PowerBi nos va a exigir un gateway para actualizar nuestra información. A veces es muy necesario y tiene sentido, pero otras veces no y resulta hasta molesto.
Puede que haya muchos escenarios más que los que voy a mencionar pero normalmente al escrapear un sitio web (funcion Web.Pages de power query) se exige un gateway. Tal vez tenes alguna operación tan compleja que se te ocurre usar Python para resolverla porque esta dentro de Power Bi, pero con eso también te exige Gateway.
Este artículo mostrará como podemos usar Azure Functions para realizar una operación simple con Python para luego leerlo desde PowerBi como un simple Get Request de API.
Primero que nada un poco de teoría. Existen escenarios web los cuales requeiren de Gateway para su tratamiento. Aun si estamos en power query online (dataflows) necesitaremos uno. Hay tres funciones cláscias que son de interés y funcionan distinto. WebContent, WebPages y WebContentBrowser. Si quieren conocer la diferencia y entender cual pide gateway y cual no, pueden leer la siguiente doc: https://learn.microsoft.com/en-us/power-query/connectors/web/web-troubleshoot
Me gustaría comenzar aclarando que no voy a hacer una introducción a Azure Functions. No voy a explicar que es, cómo funciona y cómo setear el entorno. Para eso ya hay excelentes videos en internet o podemos leer más en la siguiente doc de microsoft:
https://learn.microsoft.com/es-es/azure/azure-functions/create-first-function-vs-code-python?pivots=python-mode-configuration
Para este post necesitamos conocimientos previos en Python básico y Visual Studio Code. Asumiendo que ya tenemos el entorno seteado con las extensiones de Visual Studio code, vamos a comenzar con un ejemplo sencillo conectando a una API. Ya logueados en el apartado de Azure y con visibilidad a nuestra suscripción, vamos a crear una Function App. Podemos pensarlo como el servidor de procesamiento de muchas Azure Functions. En ese espacio podemos tener muchas functions, pensemos a cada una como un request.
Al momento de crearla tenemos 4 pasos
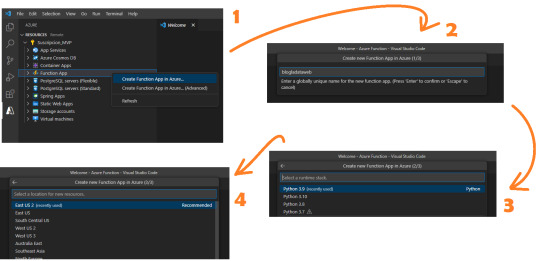
Ese nombre será participe de la URL de la API que estamos generando.
Ahora podremos crear la función. Se almacenará en la carpeta que tengamos apuntando el Visual Studio Code. Clickeamos el rayito para crear una función dentro de la Function App

La aplicación creada se verá así:
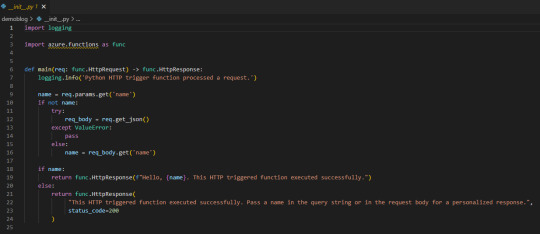
Lo que necesitamos saber es que tenemos una función main donde se ejecutará el código principal. Luego depende si llamamos a la función con get o post si podemos capturar items de parametros de url o body. Eso nos ayudaría a incrementar la seguridad puesto que sin los parametros correctos o autenticación no podríamos obtener la respuesta. A modo de ejemplo vamos a hacer una simple lógica para que la url retorne el resultado cada vez que sea llamada sin necesidad de nada más puesto que considero que no es sensible la data del nombre de los workspaces en mi tenant de demo.
Veamos que simple es escribir código dentro de main devolviendo un dict o json en el return bajo el status_code deseado. Podemos aprovecharnos de los mensajes para ser claros en fallas para recibirlas en Power Bi.
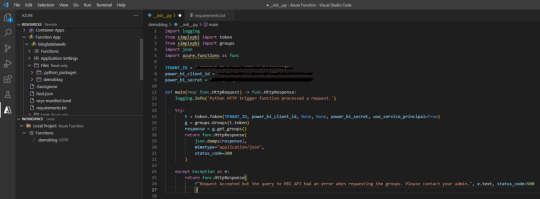
Código de la imagen en mi Github.
Usando SimplePBI para obtener grupos, pueden ver que simplemente generamos token, creamos objeto de grupo (workspaces) y llamamos a los workspaces que nuestro Service Principal puede ver.
Luego agregue al return una aclaración adicional para cuando lo que queremos devolver no es un “texto” literal sino un dict o json que es el “mimetype”.
NOTA: Si no sabes que es SimplePBI podes pasar por aqui.
IMPORTANTE: aclaro que tenemos un secret expuesto en este código, lo mejor para una azure function así sería usar un Azure KeyVault a nuestras contraseñas y secretos para que no queden expuestos.
Si vamos a usar una librería importada tendremos que buscar el archivo requirements.txt en el panel de recursos y agregarla. Yo lo hice para SimplePBI.
Si necesitamos utilizar pandas para tomar datos de un origen estructurado, podemos utilizar “ DataFrame.to_dict(orient="records") ” en el json.dumps del return para convertir nuestro frame al formato de mimetype json.
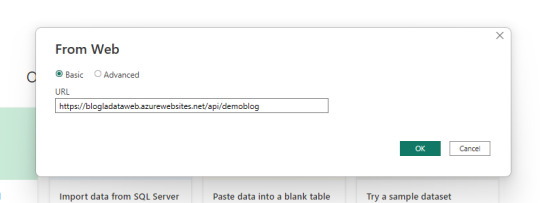
Get data
Mucho sobre python y funciones, vamos a PowerBi Desktop a conectarnos. Usaremos el conector web para traer la información con credenciales anónimas.
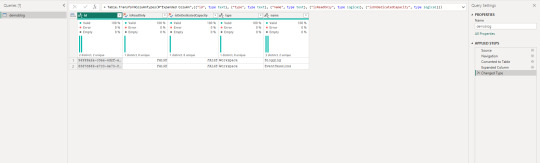
Dependiendo como orientamos nuestro json devuelto en la API que nos generamos en Azure Functions vamos a tener que efectuar transformaciones en power query. En este caso la devuelta por SimplePBI es muy uniforme y el motor practicamente lo resuelve solo.
Veamos como queda:
Ahora tenemos nuestra data cargada en Power Bi usando python sin necesidad de un gateway personal. Ya podemos publicar nuestro informe al servicio de power bi y configurar las credenciales como anónimas.
ACLARACIÓN: las Azure Functions tiene un límte de uso (timeout) en 5 minutos. Nuestra ejecución no puede durar más de eso o fallaría y nuestro propósito quedaría perdido.
Conclusión
Esta metodología puede ayudarnos a dar más velocidad a pequeños desarrollos, scrappings u origenes cloud complicados que PowerBi no tenga connector sin driver (ejemplo: oracle o mysql). Con una Azure Function construir rápido y fácilmente una API que responda. Para aumentar la seguridad es necesario utilizar Azure KeyVaults en nuestro código y en caso de necesitar disponibilizar data más sensible, lo mejor sería pedir un parámetro o body con alguna clase de key (que puede ser inventada por nosotros) para que no todo quede sobre una URL pública. Espero que este ejemplo les despierte nuevas ideas.
#powerbi#power bi#power bi desktop#power bi python#python power bi#azure functions#Azure functions python#power bi tips#power bi argentina#power bi jujuy#power bi cordoba#power bi tutorial#power bi training#azure functions power bi#ladataweb
0 notes
Text
How to migrate the secrets from one Azure Keyvault to another Keyvault quickly ?
If you come across migrating secrets from one keyvault to another keyvault, then you have a solution in this article. Migrating all the secrets manually from one keyvault to the other one will be time consuming process. Also the manual process may end up with errors also. I am sharing an automated approach using a python program to copy all the secrets from the source keyvault and write it to…
View On WordPress
#automated tool for migrating azure keyvault secrets#how to copy and paste secrets from one keyvault to another#how to export keyvault secrets#how to migrate secrets from one keyvault to another azure keyvault#how to replicate keyvault secrets#Python program to migrate keyvault secrets from one keyvault to another keyvault present in a different azure tenant
0 notes
Text
Save and retrieve Secret from Azure KeyVault
Save and retrieve Secret from Azure KeyVault
How to save and retrieve secret from Azure KeyVault in C#. Nowadays, I’m using a lot of Azure Functions or other Azure services. In a work place where the digital transformation is in progress to achieve better products, security is one of the important aspects to consider.
As a prerequisite, you have to create an account on Azure if you don’t have one. To use Azure KeyVault, also, you need Ac…
View On WordPress
0 notes
Photo

Reading Notes #448 https://ift.tt/3oQObwA
0 notes