#Fabric tutorial
Explore tagged Tumblr posts
Visit Tumblr Blog
Explore Tumblr blogs with no restrictions, modern design and the best experience.
Last Seen Tumblr Blogs


Fun Fact
Tumblr was named as a finalist in Lead411’s New York City Hot 125 in Aug 2010.
Text

From Davis Ray: It took me 55 years to make this quilt! At 10 years old, in 1968, I told my mom I wanted to make a quilt for my bed. She gave me fabric and suggested I trace a postcard. Smart woman…I wouldn’t have to match corners! Well, time flies and here I am in 2023, aged 65. I retired and finally finished it. Mom is 99 years old and I am thrilled to have a photo of both of us with the quilt. I hand sewed a pocket on the back to hold the postcard, photos and the story of this quilt.
#crafts#decor#sewing#quilting#briar rose quilts#bedding#gifts#shopping#quilters of tumblr#holiday#postcard quilt#quiltblr#quilt pattern#quilt tutorial#quilting as art#fabric art#embroidery#textile art#art quilt#fiber arts#quilt#quilts#textiles#davis ray
487 notes
·
View notes
Text
youtube
Today's cosplay post is a tutorial! I sat down and put together a full breakdown on how I use fabric painting to get my cosplay details. In this world where it seems like everyone on the big social media pages has an embroidery machine, a desktop laser cutter, and a heat-transfer vinyl workflow, I feel like sometimes we need to get back to basics and understand how to achieve clean finishes without a $2k overhead.
Video is fully captioned using the script I read from (not auto-generated captions!) And includes timestamps for different parts of the process. I recreated Marcille's t-shirt from one of Ryoko Kui's illustrations in this video, but it's useful for way more than just shirts!
I've never tried my hand at video tutorials before so I hope this is helpful!
#cosplay tutorial#cosplay how to#fabric painting#painting tutorial#beginner tutorial#cosplay reference#cosplay ref#reference#dungeon meshi#delicious in dungeon#cosplay#my posts#Youtube
136 notes
·
View notes
Text
Free Sewing Pattern: Janet Vest via Mood Fabrics


Written by Shavonne Cruz for Mood Fabrics, this vest pattern is modeled after Janet from The Good Place. The pattern is offered free via email subscription, and the tutorial provides detailed instructions. You can check it out here!
The CovidSafeCosplay blog and its admin are unaffiliated with the patternmaker or Mood Fabrics, and are simply sharing the resource. Blog admin has not personally tested this pattern. Please thoroughly read the pattern and tutorial for full instructions.
Do you have a favorite free pattern resource? Share in the comments or via a reblog! Bonus points for those that are free, include image descriptions, or contain detailed tutorials for newbies to follow.
#the good place#cosplay#sewing patterns#sewing pattern#free sewing pattern#free sewing patterns#vests#vest#the good place janet#janet the good place#sewing tutorials#mood fabrics#id in alt text
208 notes
·
View notes
Text
The Why of Sewing 5: Avoiding Bad Tutorials
There are so many tips and tricks and tutorials online and some of them are handing out great advice, but not all the advice is good. Here are a few things that if you see happen in that video you should immediately take a larger grain of salt.
Red Flag #1: Sewing over pins
Sewing over pins is controversial. Some will tell you it is fine, and it almost never causes a problem. Which may be true, but what they don’t tell you is what actually happens if your needle hits a pin. The best case scenario of a needle hitting a pin is a bent pin and a damaged needle.
Sewing machine needles are not designed to hit metal, ever. At the very least every time the needle passes through the fabric it becomes less and less sharp. Hitting a pin will destroy the tip. It can also bend the needle. Or it can break the needle. It can cause the needle to jam up and disrupt the timing of the moving parts inside the machine. A machine with broken timing is generally repairable by a professional, but do you want to spend $100 and loose access to your hobby for a week because you didn’t want to remove a pin? That may be the worst case scenario to you - but remember that broken needle? If you are lucky, the thread through the eye keep all the bits of the needle in one place, but when the needle breaks fragments sometimes go flying. They can fly into your machine, causing damage (again $100 and a week of lost sewing time). Or they can fly out into your room, lurking to be stepped on by yourself, or your child, or your pet. OR they can fly into your face. Many a sewist has a tale of a needle fragment bouncing off their glasses or having to take a trip to the ER because they didn’t have glasses on. It isn’t how frequently a problem occurs when sewing over pins, it is how disastrous the outcome has the potential to be when it does occur.
When it comes down to it, sewing pins is a dangerously bad habit that can damage your machine and your person. If you see someone sewing over pins in the tutorial you can lay money down that they a) do not know better or b) know and do not value your safety.
Red Flag #2 Not Pressing Seams
If you are watching the tutorial and you never see the creator pressing, or see evidence that seams are pressed be wary. I see this most often in "tutorials" made by folks who have just learned a very little bit and want to monetize their new knowledge. If the seams in their final product look like they laid a hardcover book open on a table, that is a big red flag.
I saw something somewhere long ago that said “Sewing is just ironing with extra steps” and no truer meme has ever been made. Wish I could find it. No teacher worth your time is skipping the ironing. Look for the following things: ironing on camera, mentioning that pressing should be done at certain points, and of course nice flat seams.
Red Flag #3 Big Changes with an "Easy Method"
Beware of “easy” tutorials that make a significant change to a garment. Your jeans will not become high or low waisted from anything short of taking them apart and remaking them. They can become shorts rather easily. Yes it is possible to turn jeans into a skirt but I am old enough to know better. It won’t be easy and it will not be cute. Best case scenario you will look fundamentalist.
Making one garment into another kind of garment is usually more difficult than sewing from scratch.
Orange Flag #1 Unfinished Seams
I am calling this an orange flag, but ONLY an orange flag if the original tutorial was focused on costumes and cosplay. If the tutorial is teaching you to make anything that needs to survive more than a couple wears and washes this becomes a red flag.
It is common in cosplay to leave seams unfinished, as an item has limited wear and washing in its future. Unfinished fabric edges fray from washing and friction, some fabrics fray faster than others and leaving your seam allowances on a regularly worn garment as naked as a jaybird is a glaring mark of inexperience.
There are many types of seam finishes, and there are times when seams DON'T need extra finishing, but a good tutorial will either show the finishing, describe ways to finish the seams, or explain why they don't need to be finished. Some examples of seams that can be left to fly free are seams on the bias, most knit fabrics, and seams that will be enclosed in a lining.
Orange Flag #2 Gimmicks and "Hacks"
Lifehack has become code for a gimmicky trick that rarely works the way it is shown via television magic. If you see a nifty trick in a short video, look at the account it comes from. If everything they post is about gimmicks or shortcuts - using straws or cardboard contraptions to do things in sewing with no explanation of how they are normally done, be wary. It is one thing to show a tip, but if all they do are 30 second gimmick videos - it is unlikely that those tricks will actually work when you try them. Most will likely be no better or worse than a waste of your time.
Now that I've given you things to avoid, here are some youtube channels I personally watch and love and learn from.
If you do not know how to sew - start here https://www.youtube.com/@Evelyn__Wood Even if you are not into vintage style I think Evelyn Wood is one of the best at explaining how sewing is done to the beginner.
This is the only channel I actually tune in for live videos, but even if you don't catch it live Saremy has a wealth of knowledge and always goes into why things work the way they do. https://www.youtube.com/@SewSewLive
Sewing therapy is another channel where you can just watch someone go through the process of sewing from start to finish. She shares tips, and there is nothing better about learning the order of operations than just watching someone sew an item. https://www.youtube.com/@SewingTherapy
If you do not have or want a sewing machine start here. https://www.youtube.com/@sewncompany - Many years ago the creator and I lived in the same city and would occasionally cross paths. I don't think she knows me from Adam but I love her tutorials and she has been kind and gracious in every encounter we had. Her tutorials include both right and left handed instructions!
General tutorials from someone who knows what they are doing https://www.youtube.com/@ProfessorPincushion
Garment Sewing content that includes tips as well as styling ideas. Karina does a lot of pattern testing and I think does a really good job at showing how to incorporate the garments into everyday life. https://www.youtube.com/@LiftingPinsandNeedles
If you want to learn to quilt, start here https://www.youtube.com/@JustGetitDoneQuilts
and here https://www.youtube.com/@thelasthomelyhouse - this one is a lot more inspiration for me than a tutorial but its kind of a combination.
Stitch with Rachel has lots of quilting tutorials and inspiration and is really great for English and Foundation Paper Piecing tutorials. https://www.youtube.com/@stitchwithrachel
#quilting#sewing#sewing tutorial#fabric#textile art#sewing tips#sewing techniques#the why of sewing#fabric grain#Youtube
99 notes
·
View notes
Text
Turn your tiniest scraps into snazzy, stuffed bugs! - perfect for making a wall a little less boring
youtube
#solar punk#solarpunk#bugs#insects#scrap fabric#sewing#hobbies#crafts#crafting#art and craft#diy#diy projects#upcycle#upcycling#cute#beetles#tutorial#diy tutorial#diy sewing#no waste#Youtube
62 notes
·
View notes
Note
Do you have any personal tips on drawing and rendering wrinkles and folds for your painting? I’ve seen so much of your work and it just fascinates me every time!
Have a slug my amigo 🐌
Thank you for the slug :3 Now I'm no teacher, but this is usually my thought process when drawing "wrinkles" on a fabric
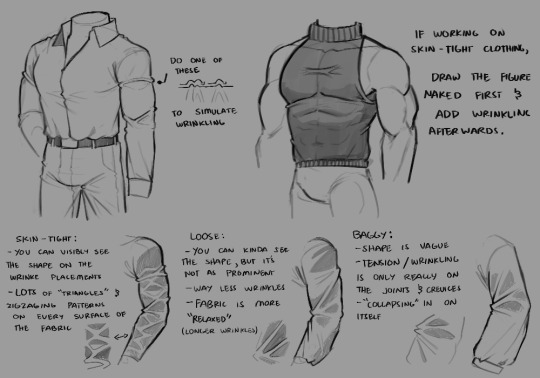
1st): I like to add one of those "bumps" on the edge of the fabric to emphasize that yes, there are wrinkles there. it pretty much helps the eyes process the idea of wrinkles being present, and it helps making it feel like figure's plausible to exist on a 3D space.
2nd): triangles, loops and zigzag-ing patterns. when I make wrinkles on fabrics, my brain automatically looks for places where "tension" would begin, and then fold everything. This means areas like joints, elbows, armpits, knees, etc. Triangles are a go-to if you want to make tighter fabrics, zigzags are more so for looser clothing depending.
When I draw tighter clothing, I also tend to draw the figure in detail first --ex. if I want to draw a tight shirt, I draw the torso in detail first-- and then adding wrinkles on where they would form after that. References definitely help a lot.

There's also the fact that I always imagine wrinkles to be two areas having a tug of war, but there's no winners
the unaffected areas of wrinkles are also ALWAYS darker (even if ever so slightly), because the wrinkles itself are more exposed to light than the rest of the fabric, except of course, on certain lighting placements. (like the light being shone directly onto the unaffected area)
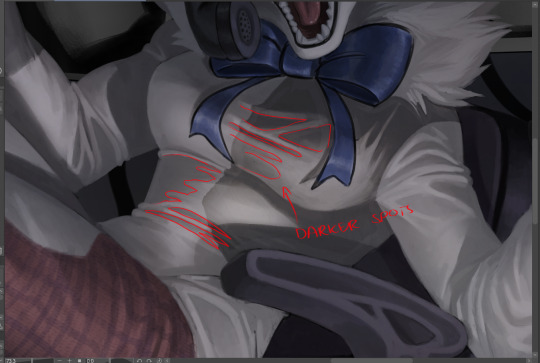
(this is a commission I'm working on)
Hopefully what I've put here is comprehensible and not overwhelming, I tried my best to explain it as much as possible lol
#thanks for the ask!#Ziku's insane rambles#simple wrinkle tutorial :3#it's not 100% accurate to real life wrinkles btw it's what I would call “the bare minimum” lol#because there's SO many types of fabric wrinkling#but these methods are what I use/encounter the most when making character art#so yeah#also OC JUMPSCARE AGAIN!!!!!
95 notes
·
View notes
Text

Further Rit Dye pro-tip: If you have to match a very specific color or only need to sew like one buttonhole and don't want to buy a whole spool, you can just dye pearl cotton!
This fabric has a dull teal warp and a copper-brown weft, which gives it a cool shifting verdigris effect. To get thread to match it, I started with that sky-blue pearl cotton and dyed it teal, then overdyed that with brown. It gives it a similar hue to the fabric and also a lot of depth!
#super happy with this; I wasn't sure the overdying would work this well!#dyeing#sewing#(eventually! using this fabric to make an 18th-century shirt using Vincent Briggs' tutorial)
32 notes
·
View notes
Text


Chat which do we like more, with or without the extra little patches of colors (ignore that the bark edge on the top isn't finished- I'm gonna do it once I've figured put the rest of the bark)
#my art#my textures#<-uhhh new tag?? fun!#This is for a tree growing in the End and I'm calling it eucalyptus. this is because I watched a series YEARS ago with a blue + little-#-rainbow patches Eucalyptus tree in one of the mods (it was Stacyplays' Dogcraft)#and that has permanantly imprinted on my brain#also I needed a name for a powder-blue-y wood type lmao#I've got the plank texture too I made it first and i actually REALLY like it I'm excited#nowhere NEAR any kind of result for the project but I've got a lot of cool ideas and I'm suer hyped#Project Starsailor#<- thats its name (at least for now but I'm kinda attached)#also definitly not related. but does anybody know how to make a minecraft mod for fabric. namely adding new blocks to start with#or I guess does anyone have links to good tutorials for complete beginners#minecraft#mineblr#minecraft art#minecraft modding#minecraft textures#my wips
34 notes
·
View notes
Text

fabric studies! They’re kind of shit but at least I tried
#my art#art#artists on tumblr#artwork#Fabric studies#pen drawing#pen and ink#sketching#sketches#sketch#traditional art#drawing#doodle#regency aesthetic#fabric#fabric study#art study#art process#art practice#drawings#anatomy#drawing reference#art reference#human anatomy#tutorial#art tips#illustration#illustrators on tumblr
20 notes
·
View notes
Text

Various Log Cabin Quilt Blocks
#quilting#briar rose quilts#bedding#shopping#sewing#quilters of tumblr#decor#gifts#crafts#holiday#quilt#quilt pattern#quiltblr#quilt tutorial#textile art#quilting as art#embroidery#fabric arts#art quilt#weaving#log cabin blocks#log cabin quilt#courthouse steps#courthouse steps quilt
73 notes
·
View notes
Text
Moth pin/brooch
A couple people asked me how I made this so I figured I’d just make a little post explaining it.
Before I start I WOULD like to disclose that the pin I’ve made is hugely inspired by the one by TheClosetHistorian (on YouTube) and you should definitely consider checking out her video if you want more instruction or like that format better.
I made a little graphic showing some work in progress pictures as well as materials and techniques used in the different areas. I will type it out in more detail below.
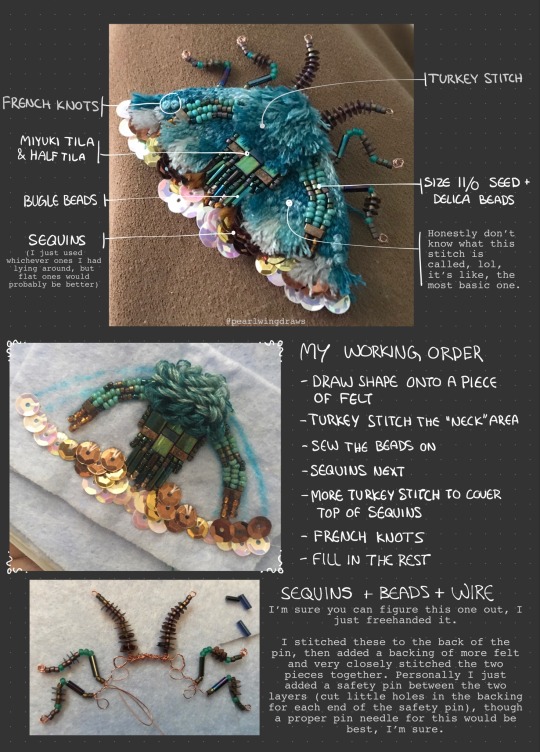
1. First draw out the shape I want on a piece of felt. Add some guide lines for different parts of the design. I layered mine double because it’s quite thin. I used an (unused) dish rag, so don’t worry about the quality of your felt.
2. I start off embroidering the “neck area”, using turkey stitch. Starting from the bottom up, I use a dark turquoise floss, then later mix in a lighter shade.
3. Next I sew on the beads. String on 5-6 at a time and then go back and tack them down with small stitches. I don’t know much about embroidering with beads, so this may not be the “correct” way to do it. The types of beads I used are size 11/0 seed beads and delica beads, as well as bugle beads and Miyuki’s Tila and half Tila.
4. Sequins. I recommend using flat ones instead of the ones I used. I work from the bottom up, trying to get a nice silhouette with the bottom layer, as this will form the outline of the finished piece.
5. After finishing with the sequins, I do some more turkey stitch around the top, so it covers up that edge where you can see the tread. Optionally you can do the whole thing with sequins if you want.
6. Next thing I did was some French knots, just above the turkey stitch in a contrasting color. This is just for some textural variety and decoration, as little “spots”. You can really add them wherever you’d like, or not at all.
7. Then I just finished embroidering the thing. Don’t know what the stitch is called, it’s just making little stitches beside each other until it’s all filled in. I did a little gradient because I felt like it.
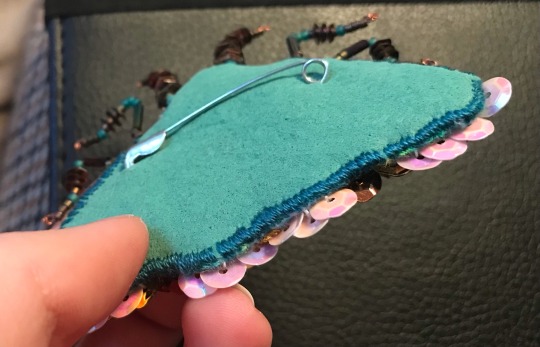
For the legs and antennae, i also just winged it. The legs and antennae got layered double in wire and twisted before adding the beads and sequins, then I just used the very tip of my round plier to curl the remaining ends into round little “feet”. Then stitch them securely to the backside of the pin.
I finish it off with another layer of felt, this one painted with a fabric paint I happened to have lying around, both for some extra strength and to match the color scheme better. I cut little slits to fit in a regular safety pin (I recommend get a proper pin/brooch needle) and stitched the backing on with very dense stitches. Pictures below.

Extra suggestions:
If you don’t have sequins, or want a different look, you can embroider the whole thing. Alternatively you can fill the whole space with sequins if you don’t want to embroider it all. You can of course do any shape, size and color scheme, whether based on real life moths or just fantasy!
Lastly I just want to thank everyone for the love you’ve shown for this silly little bug 💖 it means the world to me, and it has really inspired me. I wish I could sell these, but I don’t think that’s really an option for me right now. I’ll let you know if that changes in the future, but until then, I hope those of you who have the interest to make your own find this helpful.
#my art#art tag#embroidery#jewelry#accessories#embroidered pin#embroidered brooch#fabric art#textile art#tutorial#art tutorial#i guess??#moth#moths#insects#bugs
157 notes
·
View notes
Text
youtube
This Layer Cake no-waste version of quick cutting a Hunter's Star has my mind properly blown.
#quilt block tutorial#quilt block#tutorial#quilt tutorial#hunter's square block#hunter's square block tutorial#video#hunter's square layer cake block tutorial#layer cake#layer cake block tutorial#layer cake hunter's star block tutorial#quilt#quilting#modern quilt#sewing#fabric#Youtube
17 notes
·
View notes
Text
The Why of Sewing 3: Fabric Anatomy (Fiber Content)
This post is in a series I am starting that is going to talk about concepts in sewing and fiber arts and try and explain some of the whys behind the hows.
The beginner sewist is often (correctly) advised at the beginning of their journey to start with cotton fabric, sometimes specifically woven cotton, but not always. Nevermind that cotton fabric can vary from a tshirt to denim and canvas.
We have learned the difference between a knit and a woven fabric in my previous posts (check the tag #the why of sewing which should bring up the whole series). Let's talk fiber content.
Like fabric structure I basically break fiber down into two groups: natural fibers and synthetic fibers. Below I am going to talk about the fibers you are most likely to encounter as you shop as a home sewist. It is NOT a complete list of fibers, nor could I list the entirety of fabric types made with each fiber.
Natural fibers: these are fibers that come from plants and animals and require minimal processing to be made into fabric.
Wool: This comes from sheep, which are sheared 1-2 times a year. The animal is not hurt in the process and even sheep not raised for fiber production must be sheared for their health. Wool is warm, but breathable. It can be easy to work with in some ways, but it does shrink when washed and so many modern sewists avoid wool. Some folks have sensitivities to wool as well. Wool is most commonly used in suitings and knits.

Image: Shorn sheep in a verdant field (Source: By Roger Kidd, CC BY-SA 2.0, https://commons.wikimedia.org/w/index.php?curid=13035358)
Silk: Silk is made from the cocoons of silkworms, and generally harvested prior to the hatching of silkworm larvae. Silk is expensive to produce and considered a luxury good. Silk is shiny and lightweight, it can be surprisingly warm. Silk can loose its sheen in the wash and because the fiber is so delicate it can be difficult to sew. There is a lot of misinformation on the production of both silk and wool online. Worm Spit has been educating fiber artists about the process of making silk since 2002.
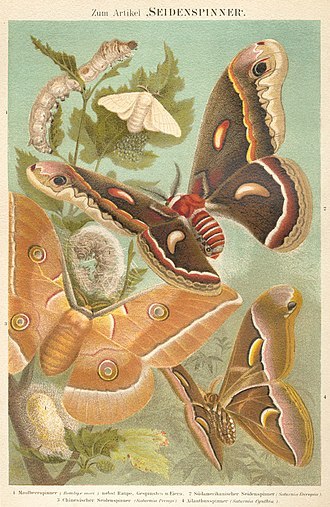
Image: a vintage style poster showing various stages of the silkworm moth (By Bibliographisches Institut, in Leipzig - Meyers Konversations-Lexikon, 4th Auflage, Band 14, Seite 826a (4th ed., Vol. 14, p.826a), Public Domain, https://commons.wikimedia.org/w/index.php?curid=2317808)
Cotton: Cotton comes from the cotton plant, there are several varieties commonly grown and it is the most common natural fiber used in textile production. The cotton fiber comes from the seed head of the plant. Cotton can be made into light breathable fabrics and warm cosy fabrics. The list of fabrics made from cotton might actually be endless but here are a few you might encounter: jersey knits, denim, quilting cotton, gauze, lawn, voile, sweatshirting, twills, poplin, oxford cloth, canvas...
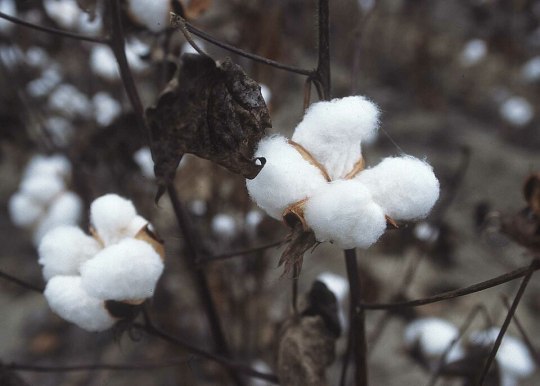
Image: the cotton boll, or seed pod (source: Public Domain, https://commons.wikimedia.org/w/index.php?curid=689304)
Linen: Linen comes from the flax plant. The fiber comes from the long stem of the flax plant and can be difficult to break down into a usable state. It is also difficult for modern spinning equipment to make into threads, which is why linen tends to be quite expensive in comparison to cotton. Linen is cool to the touch and very strong. It also wrinkles very easily. Coarsely woven linen can be uncomfortable for some to wear. Linen tends to be made into simple plain woven fabric, occasionally knit fabrics, and can vary in weight from handkerchief linen (very fine, almost transparent) to canvas. I recently reblogged THIS POST which had some incredible links regarding linen production.
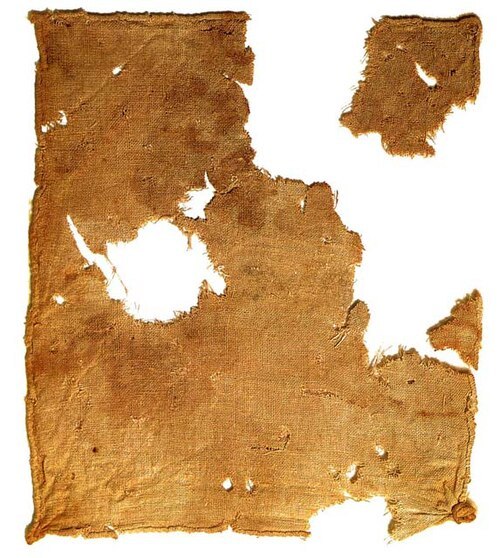
Image: linen cloth recovered from Qumran Cave 1 near the Dead Sea (Public Domain, https://commons.wikimedia.org/w/index.php?curid=248420)
Synthetic fabrics: these are fibers that have been manufactured through industrial processes.
Polyester/Acrylic/Nylon: These fabrics are plastic. They are made from different types of plastic, but ultimately a liquid petrolum product is extruded into a long filiment and made into cloth. They can be made into woven or knit fabric. The way they are made can have many different properties. Generally polyester is what you find in the home sewing world. Polyester is not breathable and because it is oil based it tends to hold on to smells. It melts when it is too hot and therefore can only be ironed carefully. Polyester also tends to be very strong and can help make very sturdy fabrics. Because polyester is very inexpensive to produce it is frequently combined with other fibers to reduce production cost.
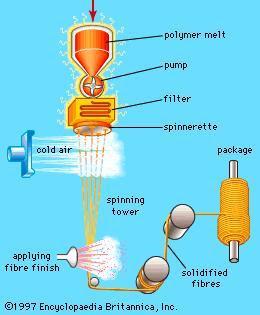
A diagram of "dry spinning" polyester fibers (source: https://encyclopedia.che.engin.umich.edu/fiber-spinning/)
Spandex/Lycra/Elastine: this is the stretchy stuff! Generally found in combination with other materials this is what makes fabric go beyond the mechanical stretch that is produced by the fabric structure. In small amounts mixed with cotton it makes a fantastic tshirt jersey, 100% spandex is great for swim and dancewear. As we discussed in the knit article I posted previously adding stretch to sewing does make it more complicated to work with, but used wisely spandex is your friend. Best not pressed excessively as the fiber has a protein structure that breaks down when it is hot. Also if you have a garment or fabric with a lot of spandex content you might want to consider avoiding the dryer.
Rayon/Viscose/Bamboo/Lyocell/Cupro/Tencel: There are SO MANY names for cellulose fabrics. These are sometimes categorized as semi-synthetic fibers, or even put in with natural fibers. They are all the same thing deep down. Cellulose (generally sourced from trees and plants) is chemically broken down into its most essential parts and then extruded into a filiment. These fibers were originally developed as a silk substitute. Rayons are fine, breathable, and have a drape that clings to the body. They shrink in the wash and can continue to shrink through several washes. They also can be fragile when wet. Rayons are made into both woven fabrics and knits and they tend to be thin and fine fabrics. Rayon fabrics, especially those labeled as bamboo are frequently greenwashed as environmentally friendly, because they are sourced from a renewable resource, but the process of producing cellulose fibers is highly polluting and uses significant amounts of water.
While there are outliers, most textiles you will encounter while shopping for fabric will be made of the above fibers. A deeper dive into these would be fun, but I find at least 3 potential rabbit holes I could go down every single post I make here.
#quilting#sewing#sewing tutorial#fabric#textile art#sewing tips#sewing techniques#the why of sewing#fabric content#fiber#fiber content#cotton#wool#linen#silk#rayon
103 notes
·
View notes
Note
Quilted postcards! Tell us more!
45 notes
·
View notes
Text
made my first handmade ornament! Excited to make a few more for gifts this year. Wanna try a couple more complicated ones but this was nice since it was basically just weaving instead of sewing 😊

14 notes
·
View notes
Text
youtube
In this tutorial, I will walk you step by step through making this lined, gathered skirt from one piece of fabric. This pattern is great for beginners, super customizable, and low to zero waste. The possibilities are endless with this skirt! I have a few ideas of my own and will be posting a follow up video covering some easy ways to customize and make it your own. I’m here to help! If you give this a try and get stuck at any step, leave me a comment and I will help you through it. :-)
#design#handcrafted#handmade#fashion#slow fashion#textiles#textile art#youtube#artists on tumblr#outfit inspiration#outfit#one of a kind#fiber arts#fashion art#art#sewing#fashion design#fabric#video#sewing tutorial#my sewing#sewing project#sewing patterns#skirt#gathered skirt#DIY#diy tutorial#Youtube
18 notes
·
View notes