#bed tutorial
Explore tagged Tumblr posts
Visit Tumblr Blog
Explore Tumblr blogs with no restrictions, modern design and the best experience.
Last Seen Tumblr Blogs


Fun Fact
130K people were victims of a chain letter scam that affected Tumblr in May 2011.
Text

From Davis Ray: It took me 55 years to make this quilt! At 10 years old, in 1968, I told my mom I wanted to make a quilt for my bed. She gave me fabric and suggested I trace a postcard. Smart woman…I wouldn’t have to match corners! Well, time flies and here I am in 2023, aged 65. I retired and finally finished it. Mom is 99 years old and I am thrilled to have a photo of both of us with the quilt. I hand sewed a pocket on the back to hold the postcard, photos and the story of this quilt.
#crafts#decor#sewing#quilting#briar rose quilts#bedding#gifts#shopping#quilters of tumblr#holiday#postcard quilt#quiltblr#quilt pattern#quilt tutorial#quilting as art#fabric art#embroidery#textile art#art quilt#fiber arts#quilt#quilts#textiles#davis ray
485 notes
·
View notes
Text

#girlhood#pink#mitski#help#makeup#makeup tutorial#girlcore#girlblogging#tumblr girls#sadgirl#sad quotes#quotes#wlw#just girly things#female rage#coquette#music#hell is a teenage girl#female hysteria#bed rotting#insecurity#blog#pinkcore#self care#lana del rey#this is what makes us girls
205 notes
·
View notes
Text
Elizabeth, arriving at Netherfield looking bright eyed, flushed, and disheveled: hi. I care about none of you — except you, Bingley, nice to see you — where’s my sister?
Darcy’s big brain: it’s nice that she’s so devoted to her sister, who is obviously the only respectable member of her family. I like that in a woman.
Darcy’s little brain: I bet that’s what she’d look like after being tumbled in a haystack. I really like that in a woman.
Darcy’s big brain: shut up little brain. Now I’m worried about whether I should like obvious devotion in a woman in case it leads her to be so overcome by emotion as to be not respectable or endanger herself.
Caroline, loudly: oh my goooooood. She looked so blowsy —
Darcy’s little brain: hot
Caroline: and flushed —
Darcy’s little brain: hot
Caroline: and like she was practically rolling in mud!
Darcy’s little brain: HOT!
Caroline: I bet you wouldn’t appreciate your baby sister whose virginity you just saved not that I know about that tramping all over creation looking like that, would you Mr Darcy?
Darcy’s big brain: what the fuck?
Darcy’s little brain: yeah, gross! Now I’m sad
Darcy’s big brain: I can’t even appreciate that you’re behaving again. Jesus Christ.
#I can’t believe I have to spell this out#of fucking course Darcy appreciates dishevelment what do you all think those ‘just got out of bed’ hair and eyeliner tutorials implied?#pride and prejudice
101 notes
·
View notes
Text
I can now do all the steps of my cube and have memorized the patterns yayyyy!!! :o]
#I love my CUBE#cube posting#went from 3 solves watching YouTube tutorial… to now repeating the patterns in my head before bed#and solving on my walks/during work#I wish I understood the reason it works more#but I think I’ll look more into it after it becomes muscle memory <3
32 notes
·
View notes
Text
still working on tweening and etc but small self-indulgent sneak peek hehe
#my art#wip#bocchiposting#i wholly underestimated the amount of tweening needed and the amount of layers#originally i wanted to cover the entire song with parts for kita and bocchi#but given my current health condition + having work i think i'll just finish small chunks first and then see how much i can do b4 school#i can definitely finish the intro but i really want to draw in bocchi for a specific part sdjfhdskfjks#unfortunately i currently have the constitution of a sick victorian child! Any stress or strain sends me to the bed!#so i cannot crank this out within 5 hours like i used to be able to#the song is mesmerizer obv credits to that#it really has been a process of oh im just gonna do something small for fun oh no this needs more for a better streamline#halfway through i was like. would this have been easier if i just used. live 2d. probably. but i am too far in.#i need a good video editor program so bad but all the tutorials online are for AE and i do not have the money for that </3#and the next best option is apparently blender and i've done a few tutorials but i have never been able to retain the information <3#the learning curve is seriously hard and i don't have the time for that either </3 time is money fr#i tell myself to not feel guilty for drawing when i could be studying bc this is needed <3 this is self indulgent <3#self care!!!!!! rahhhhhhhhhh!!!!!!#kk rambles
52 notes
·
View notes
Text
sooo obsessed with them v

#operation mincemeat#im a bit sick rn so im just lying in bed and listening to the soundtrack it's sooo gooooood#please.....spare slime tutorial......dm me please i will gatekeep it i prommy 🙏🏼#according to jules
21 notes
·
View notes
Text
Hi, skykids and artists alike!
WARNING: THIS IS LONG. I can't stop yappin'.
I was taking a series of screenshots of my art process for my own reference (to review later, see how my process has changed, etc. I’m not much of a timelapser) and figured I’d share my process and show off how much the game Sky: COTL has DRAMATICALLY improved my art (and also have a post to show people in the very, hopefully, unlikely chance anyone ever doubts that I draw my own art). I also have seen a lack of written out with screenshots explanations of art, as video format becomes more popular across not only Youtube, but Instagram and Tiktok as well. This is not a learning style I jive with, so this is something for all the artists out there looking for this kinda thing.
For reference, here is my FIRST EVER Sky digital painting compared to my most recent (before the one used for this lil infodump). <3 This is CSP specific as far as brushes go, but I’ve seen people make amazing art in freaking PowerPoint, so if I can do it, you can do it.
F’real. This is the process of a VERY LAZY artist with hand tremors and hecked up wrist ligaments as a result of an autoimmune disease.. I’m talking, drawing in bed in a blanket nest watching vodcasts and cuddling cats.
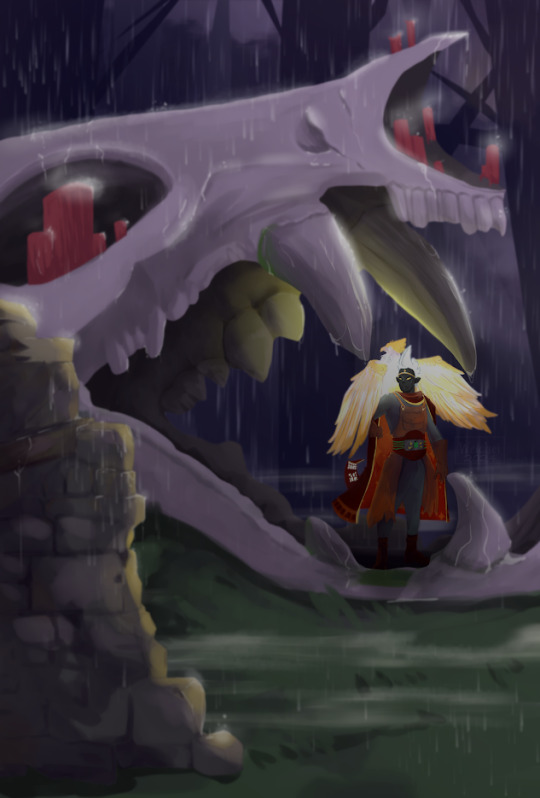

(May 2024) -----> (January 2025)
Added info - the pic on the left is exactly why I wanted to do this. I'm even a little embarrassed by it, now, but when I had originally posted it on another platform, I was questioned and disbelieved that I was able to draw a background at all. This was the start of me taking digital painting seriously (versus general character/creature design) with lineart and a cell shading style. That disbelief from someone who knew me IRL hurt a lot, and I often have the concern of that happening again. This is me alleviating that anxiety once and for all, so I can finally move past it. YAH, FRIENDO, THIS IS MY THERAPY SESSION.
Anyway; I’m nowhere near new to art, but it’s always been a hobby for me so I never sought to actively improve with proper studies -- but wanting to create lore for my silly lil skydude forced my hand. With a semi-open world game that’s genuinely gorgeous made collecting references easy, and the Sky community here on Tumblr has not only inspired but encouraged me to keep going despite 2024 being a very rough year. This game has brought me joy, and I hope you find this lil doodad helpful. 🕯️
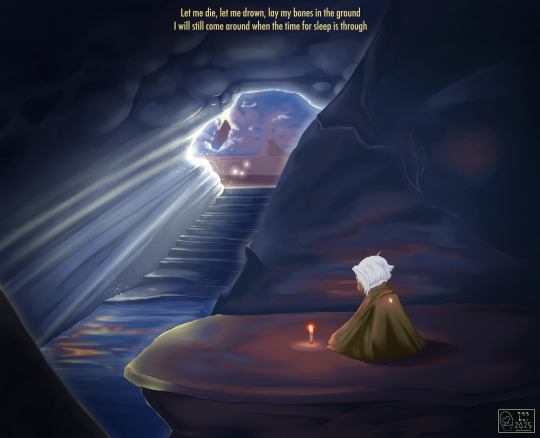
Now on with the show! This piece will be a part of a little series I’m working on that will include lyrics to a song that gives me the biggest Sky vibes (To Thus Onto Tyrants by The Oh Hellos).
The brush that did the heavy lifting (“spread pencil”) seems to be either very elusive or no longer available. Everything else is listed here :)
What I could find:
Turnip Pen - Default brush in CSP
“Crunchy” - Specifically the second to last one in this brushpack
“Hard Round V1”
“Hard Round V2”
“YN Soft Round” (Not free, sorry ): )
“Pecas” - for sparkleys
“Toothbrush” - For more sparkleys
So the first step is to gather references. They’re a MUST HAVE and DON’T LET ANYONE ELSE TELL YOU OTHERWISE. Use references, redline, and yes - EVEN TRACE. I may make a lil thingy about how to do these things ethically, but for now, just art process. Let’s see what references I used: self harvested!
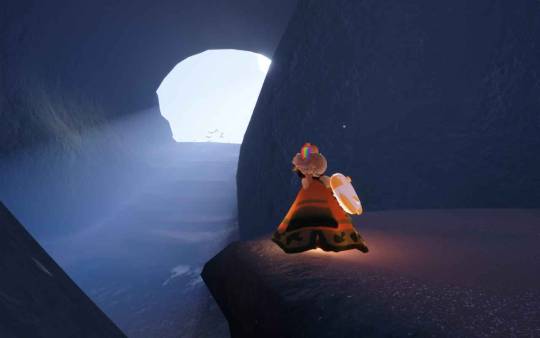
Shout out to the Skykid screaming in the background.
I also used this for a reference for the moth that I grabbed off the interwebs-

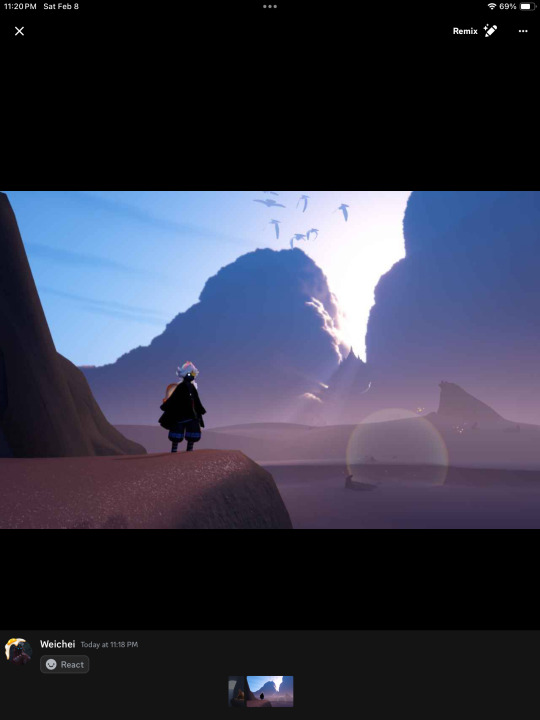
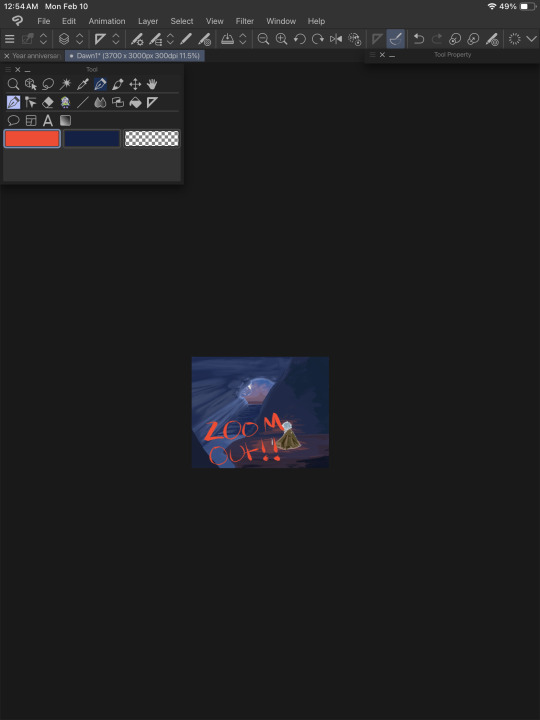
For this, I wanted to try and recreate what it felt like as a moth (but after getting at least one starboi lol). Isle of Dawn will always hold a very special place in my heart. The first impression was impactful, even though I was incredibly confused on what I was doing. I knew I wanted the temple, but there’s something so calming and melancholy about that first cave. Putting these references together, I got the most hot garbage sketch I’ve ever done - but it’s okay! We’re not doing any lineart, so we WANT messy. The more you work on a sketch at this stage, the harder and more intimidating it will be to get to the next step. You’ll become too attached to those details and things you sketched, that if you have to go over them later it will be devastating. Just using this to work out composition :)

Currently, I have two main layers (CSP makes an automatic background and I just leave that one alone and do not count this as a layer)
Top - moth sketch
Bottom - everything else
Moving forward, we’re working in three main sections. Background, midground, and foreground. I show a screenshot of how I organized these layers later.
The next step is to block in colors. Layer styles are VALID and AMAZING, I do not use them much. They have their time and place, and I prefer to keep those for finishing touches. For now, I’m just doing my best to eyeball colors I like from the reference photos. Color picking is amazing and helpful too, but I’ll add a little note* at the end about why I try to avoid doing that too often from my reference.
I put the colors on their respective layers (Four to start with. One for each mentioned above, and another for the moth). I try to block out shading and lighting but I keep it sloppy because it’s likely to change a LOT. This is just planning and fiddling, seeing what colors look good together.

(Spread Pencil is the one brush I couldn’t find >: at this point, this is the ONLY brush I’ve used. Don’t be tempted by blending things yet. Be sloppy.)
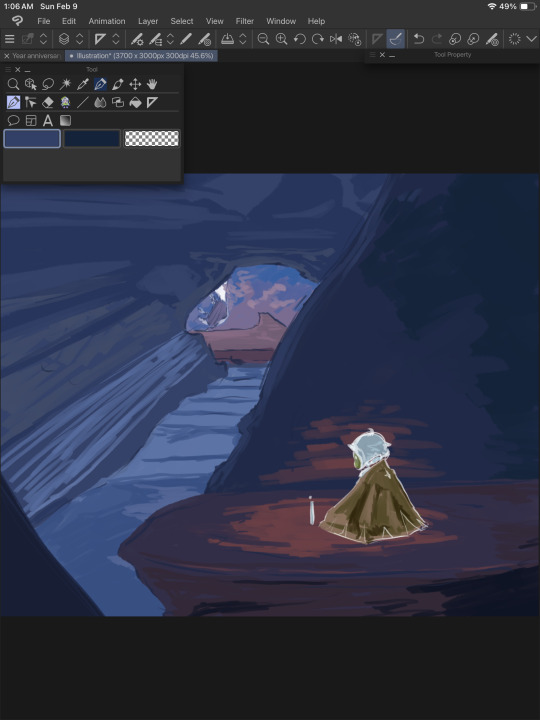
Once I get the general idea of what I want, I WORK FROM THE BACK. I hid any layer that would be ‘blocking’ that section and allow myself to go ‘outside the lines’ a bit. The overlap is helpful when making changes to the ‘front’ elements later. Remember, we’re still being SUPER MESSY.
I kept the moth/foreground visible so I can still check that the general color theme was working.
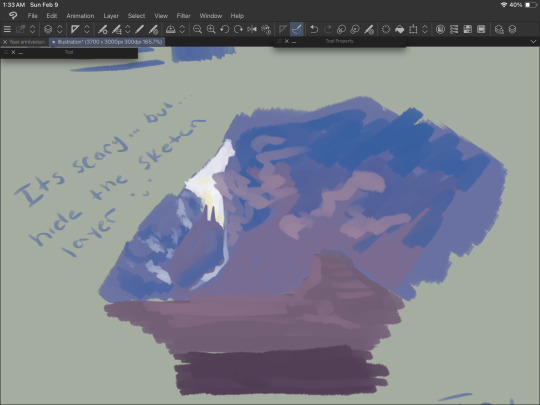
Hide the sketch layer. Do it. We’re painting, not doing lineart. You gotta. I believe in you. Look at this slop. Beautiful.

Alright, now we’re cooking! The layers are in the following order going from top (front) to bottom (back):
-Moth sketch (will be hidden later)
-Moth colors
-Background sketch (will be hidden later)
-The rock the moth is sitting on and that little rock section on the bottom left
-The rock behind the moth (hidden in this screenshot)
-The rest of the cave
-The temple
At some point around here I used “Crunchy” on the clouds to blend em a bit.
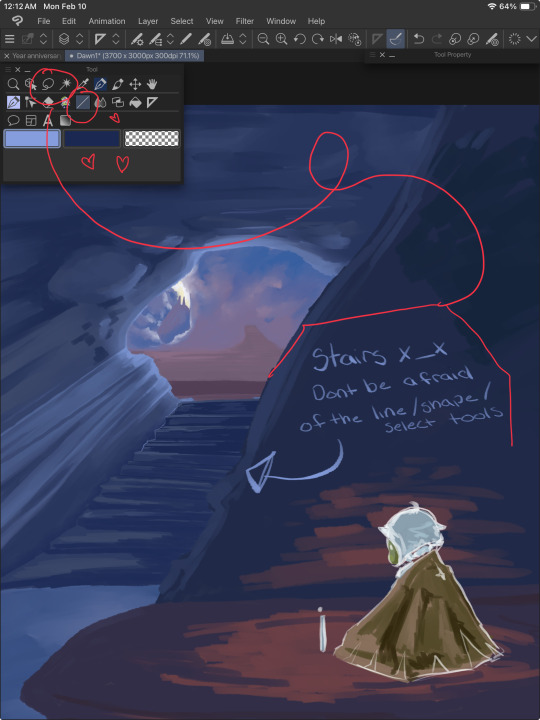
NOW IS THE FUN PART. RENDERIIINNNGGGGGG. I started with the stairs because they looked annoying. USE YOUR LINE/SHAPE AND SELECTION TOOLS. These will help you keep your lines straight and achieve crispiness if you desire. More on the stairs in a moment, but while you’re doing this, remember to
ZOOM THE HECKIE OUT. Make it thumbnail sized and squint. Can you still tell what you’re painting? Evaluate. Are the colors working well together? Is there enough contrast? How’s that composition doing? Zooming out rocks.
After taking a moment to zoom out and squint, I came up with the following notes:
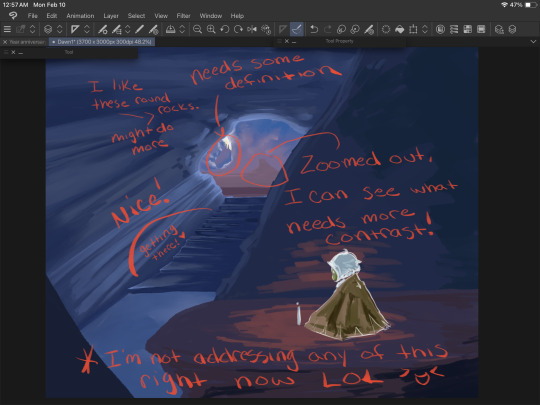
Do this regularly throughout your process, even if you’re in the middle of something mundane like drawing stairs. A LOT more contrast is needed, and taking a moment to notate this will help prevent you from doing TOO much that you’ll regret later when you end up covering it up to fix these issues you missed earlier.
Back to the stairs.
I blocked things in with the line tool and the turnip pen, then scribbled it around using ‘Hard Round V2”. When I say scribble, I mean literally. Scribble. It’s fun and freeing. We’re not trying to be precise or make anything hyper realistic. We just gotta get those colors down yknow.

Good luck.
Water is weird, and I don’t understand it. We guess and hope for the best. Remember that water is clear, and for the most part you’ll be able to see through it, so unless you have a blue toned drawing (like this one), the water itself may not be blue. I generally color pick the areas around it and lighten/darken it based on those. I also knew there’d be a light beam in this area, and the reflection from the moth’s candle so some bright oranges and yellows were nice to add, as well. Don’t forget reflections/highlights if the scene calls for it!

Time for the part that actually requires a shred of skill. Thankfully, this pose is very simple and the moth’s design is, well, a moth. Don’t be afraid to toggle that sketch layer on and off for this. The moth is the main focus, and should be clear and easy to read as such - requiring a bit more work for colors and shape language.

Don’t work on one single thing for long. The moment your brain goes “im getting annoyed/frustrated/bored”, move to another piece of the painting. If you notice your character has a horrible tangent with a background piece and it’s just really bothering you - stop working on the character and fix that background area. Give it a bit more bulge (or less), shift things around. Paint over stuff.
“But I drew this really well, and it would be a shame to cover it up if I won’t be able to do it that well again!” You may ponder, anxiety filling your chest at the very thought of redrawing a hand or that one rock that just looks really, really good somehow.
And to that I ask - why won’t you be able to do it again? You did it once before, CLEARLY you have the skill and ability. If you’re worried, draw over it on a new layer so if you have to fall back on the old thing, you can. ART IS FUN. Don’t let it stress you out too much. The moment you look at that canvas and go “you know what, I CAN do it again”, you will be able to do it again.
Trust me.

With some more scribbling done, we can start detailing things that aren’t stairs. Yay! Let’s work from the back again.

LITERALLY. SCRIBBLE.
You can start blending around now, too, though. We’re getting there, and look at all we have to show for it! I tried to mimic the clouds as best I could from the screenshot because like water - they are weird and wonky and yah, hard. Cloud brushes can be helpful, but give you significantly less control IMO, but to each their own and whatever works for you, works.

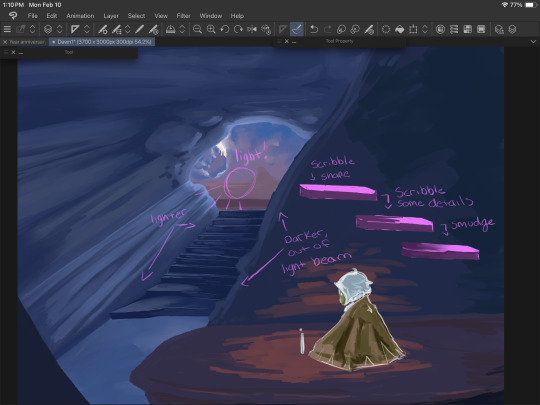
BG looking good, but remember ZOOM OUT. I can see the contrast of the temple/background elements looks a bit better now, and now that I’m bored with that, I wanna bounce to that midground area, and fix up the moth a bit more. I also used an ADD (GLOW) layer to messily test some different ways to paint light beams and to find a nice color. I settled on the same yellow I used on the candle flame. I didn’t work too hard on this just yet, since there’s a lot of elements that will hit that light that I haven’t even thought about yet.
I fiddle with the main cave texture a LOT. Painting over it entirely MULTIPLE TIMES to find something that sticks. What you see here is not it. I also added some details to the ‘moth rocks’ but this also changes a little as we go.
Painting/art is a lot of push and pull. You add some darkness, take away some. Add some light, take away some. Add an element, remove one. Go with the flow and trust yourself. Turn on an audiobook or a movie and turn off your brain while you plop colors here and there. An artist I VERY MUCH look up to (Julia Lepetit of Drawfee and Secret Sleepover Society) said, “Zoom in and zone out”. It’s time to turn off that brain and paint.
I zoned out too hard and stopped taking screenshots because oops. On the top left shows the YN Soft Round, Pecas, and Toothbrush, in that order going from the top and counter clockwise.
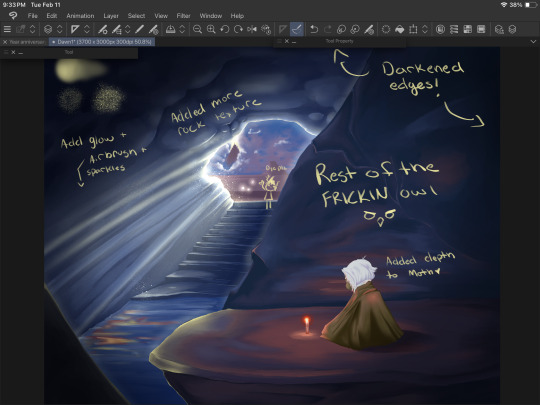
I darkened up the cave quite a bit and finally settled on a look for those upper rock formations. I used a MULTIPLY layer to darken up the moth’s shadow a bit, then merged the layers and used those same colors to blend it with the rest of the rock. I also deleted and added a new ADD (GLOW) layer and fixed up that lighting. This is where we get to darken shadows and add highlights and bounce light to things. Anything in bright, direct light has its original color showing through (from the original layer it’s colored on, that wonky light blue area by the stairs). Rim lighting is a great way to separate elements like this (the different rock edges) without having to use a gajillion different shades/values of the same boring blue to make it stand out.
Details on the moth are also done now - mostly in the hair. A few hair strands, ESPECIALLY in Sky with the white hair we all have - looks incredible in a painty style IMO. I also SHOULD HAVE added the star on the moth’s cape at this point, but BOIIS, GORLS, AND CRYPTIDS, i forgot until I saved/exported it and had to go back and fix it. But anyway, so you don’t have to scroll up, here’s the finished piece again:
Thank you for reading, if you did! I hope it was helpful, or at the very least served me in the future like this post is intended to do!
And I will leave you off with the promised note* about color picking -
Color picking from a reference can be really cool and easy and tempting, but you know what makes that NOT work? Color theory. When you blend your colors (this goes for real life, too), there's a LOT more grey and diluted tones than you'd expect. A lot of these bright colors aren't ACTUALLY bright, save for the details on the candle light and the ADD (GLOW) layers. The orange reflections on the rocks and water are actually quite dark and diluted, but because it contrasts so well with the darker blues - it looks a lot brighter. Blending these colors together allows for a more natural soft light. This is also why I try to work on so few layers for pieces like this that are relatively simple. I can easily take a bright color and use a softy kind of brush - the hard round v1 brush is GREAT for this, a little bit of pressure over the colors you already painted down will blend them together with some minor elbow grease and mindfulness. It gets a more natural transition between your lights and darks.
Where as if you zoom in on your reference and color pick - look at it. Look at it all zoomed up, I BEG you. Make it super pixely, and you will see how much that 'one' color varies in that entire area. Unless you're color picking pixel by pixel, which at that point you're not really drawing/painting at all, it's just not going to work out and help you recreate that reference.
My personal preference is to color pick for base colors to get me started with a vibe, and then once I have a few colors down, I'm eyeballing it all the way baybee.
#doodle#digital painting tutorial#digital art tutorial#tute#art tute#painting process#digital art#digital painting#sky children of the light#sky cotl#scotl#sky children fanart#a rambling mess that's mostly for me but maybe it will help someone idk#it's 3am#im throwing this in my queue and going to bed good night ilu tumblr <3
13 notes
·
View notes
Text
Now may also be the time to back up any and all tutorials manually
Tired brain had a thought in relation to the post I reblogged earlier about backing up our respective tumblrs. While that would preserve many tutorials, I think it would also be a good idea to back them up elsewhere on an external site. That way they'd be readily available for anyone that would need them.
IF this site is going down (which is a big if, but you never know which fire alarm pull will be the real one) a lot of tutorials, be it for getting sims to run, improving graphical fidelity, and creating cc all have the potential to be lost. This site is over a decade old, and with a lot of information that would effectively become lost. Of course this also includes anything that's outside this little niche of Simmers on the net to other shareable skills as well.
Have them saved as posts on an external blog, google doc, github repository, or any other site that works best for you.
#sims 3#tutorial#backup#just in case#hopefully the backups won't be needed#but better to have them and not need them#than need them and not have them#I'm going to bed now
8 notes
·
View notes
Text

Various Log Cabin Quilt Blocks
#quilting#briar rose quilts#bedding#shopping#sewing#quilters of tumblr#decor#gifts#crafts#holiday#quilt#quilt pattern#quiltblr#quilt tutorial#textile art#quilting as art#embroidery#fabric arts#art quilt#weaving#log cabin blocks#log cabin quilt#courthouse steps#courthouse steps quilt
73 notes
·
View notes
Text

#girlhood#pink#bed rotting#dolette#coquette#girlcore#hell is a teenage girl#girlblogging#tumblr girls#girl problems#pinkcore#pink aesthetic#pinterest#makeup tutorial#makeup#makeup girl#wlw#this is what makes us girls#getting ready#crush#school#school crush#pretty#pretty girls#just girly things#cinnamon girl#beauttiful girls#mitski#lana del rey#lana del ray aka lizzy grant
38 notes
·
View notes
Text
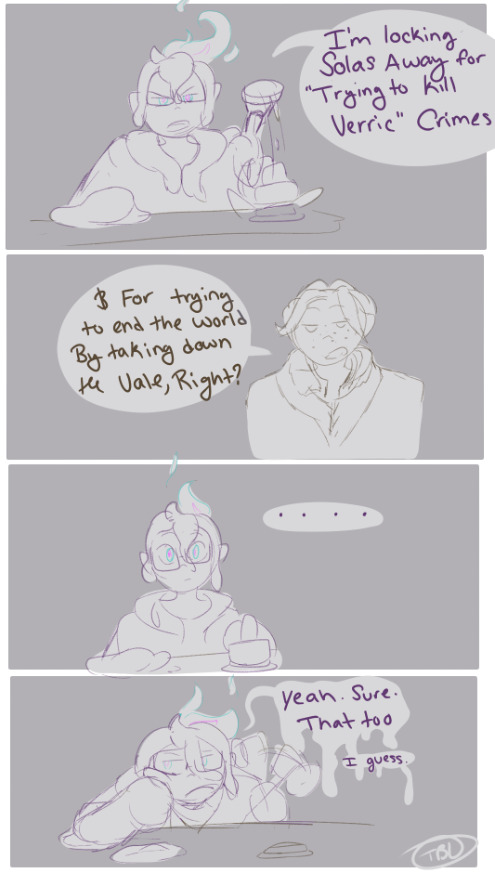
Priorities are had lol.
i can't say i've played a lot of veilguard but here's some sillies for the beginning of it anyways. b/c, ngl, i kinda wanna see what exactly would happen if Solas took down the veil. But if he had actually killed Verric i would have quit then and there.
#dragon age veilguard#does it count as spoilers if it happens withing the first 30 minutes?#dav spoilers#just to be safe#my doodles#dav harding#i'm just trying to do some doodles to get back in the swing of things#b/c my burn out is pretty much gone#but ive also discovered new hobbies that are taking the time that drawing and writing used to have all to itself#ngl just a bit disappointed in veilguard#ive only played like 10 hrs or so and i still feel like i'm in the tutorial#plus after the very open world of inquisition this semi open world feels very limiting#(i also low key hate the fighting mechanics)#(why do we need ten million things to keep track of)#(i've noticed this in a lot of new games and i am not a fan)#(i'm not good at fighting in general so it's just making it more confusing for me)#(plus it's all reaction based and my reaction time is shit)#(i am honestly having more fun playing infinity nikki than i am dragon age right now)#(which is not something i ever thought i'd say)#(anyways i'm done complaining)#(I'm going to get some work done before i have to go to bed)
12 notes
·
View notes
Text
Me everytime I find a new dateable in Date Everything

#im flying high#so far they have been attractive hardcore#I know there are some ugly but cool ones and I haven’t gotten to them yet since I’m on the first day after the tutorial#Betty the bed is my favorite so far
5 notes
·
View notes
Text
oh no. I rediscovered Blender and my love for animating.
#Kingdom Hearts#It took me hours to figure everything out#I don't mean 'across one day' either. I mean actual *hours* of trying to import stuff#then the armature wouldn't work and I got frustrated and went to bed#I'm NOT rigging if I don't have too#Then the texture wouldn't work and there were no tutorials on that so I had to painstakingly figure it out for myself#but... I got to animate a headbanging Flood so#worth#what's he listening too? who knows#I was going to animate a sit but... maybe later. I'm hapy with this tiny victory#I am VERY rusty#I haven't used Blender or animated anything in 10 whole years#I don't know how to properly render things but we'll jump that gap when we come to it
34 notes
·
View notes
Text
//Just a little update: I decided to no longer fine-tune my writing to a point where I’m nitpicking everything and a reply takes me over 2 - 3 hours to write. It seriously kills my muse for writing each time. I still fine-tune it after I’ve written the first version, but I’ll no longer write it over and over again. That’s the reason why I always take so long to reply or… just fail to find the energy to write at all. English isn’t my first language and I want it to be perfect. But I reflected during my small break on what’s more important: having fun writing or making writing a job while matching people’s amazing writing skills, which I never achieved anyway, but that’s beside the point. I consciously chose to have fun and that comes at the cost of a more simplistic writing style.
I hope this doesn’t push people away, but I really want RP to be a hobby again.
#i did a lot of reading on how to be a better writer and have all these writing sources for using different words and what not#but it stresses me out and i lose my fun in writing#like i pushed out quite some stuff tonight without looking at all of these tutorials in how to make my writing better while replying and#honestly it made me so much happier \o/#i suppose i picked up some stuff here and there but i do see a clear difference from the way i've written today with little fine tuning vs#fine tuning to a point i'm exhausted#i'll do this on all my rp blogs from now on#time for bed and tomorrow more a few more drafts \o/#ooc
5 notes
·
View notes
Note
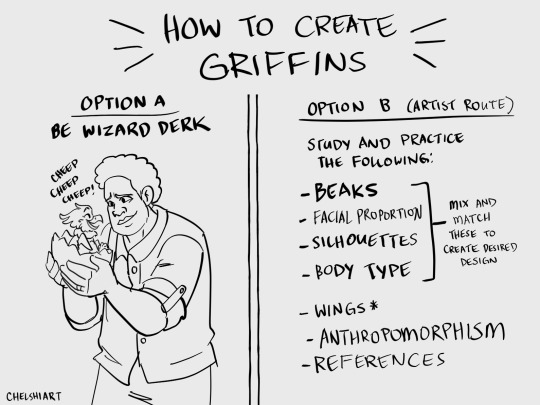
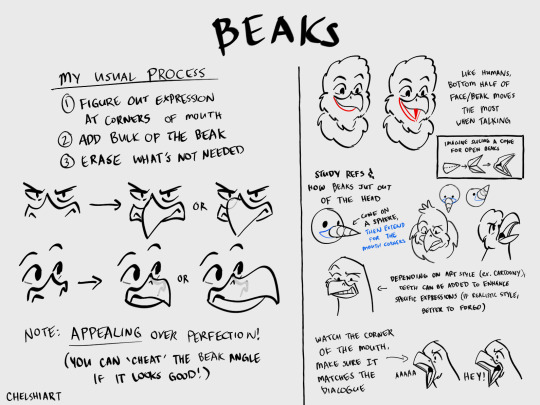
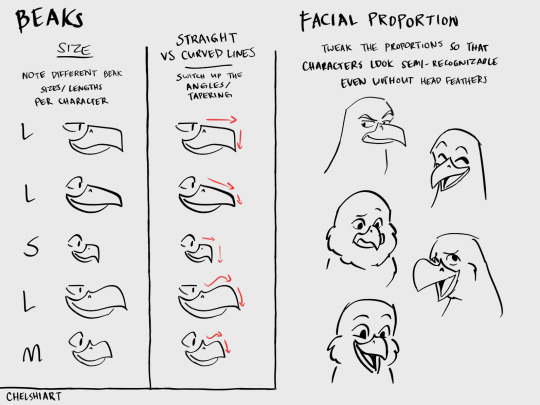
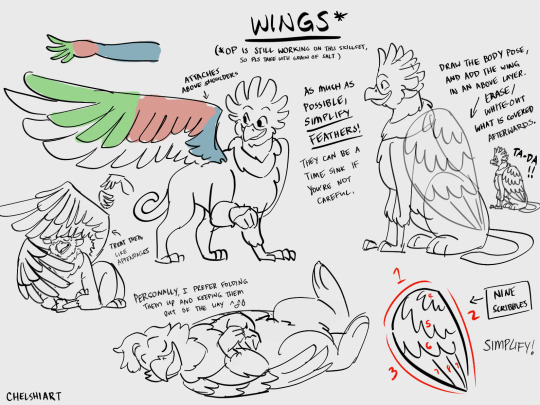
I love your Derkholm art! Do you have any tips on drawing griffins? I’m planning a webcomic that includes some griffin characters, and I don’t have any experience with A) drawing them in the first place and B) making them look like individuals. Thanks!
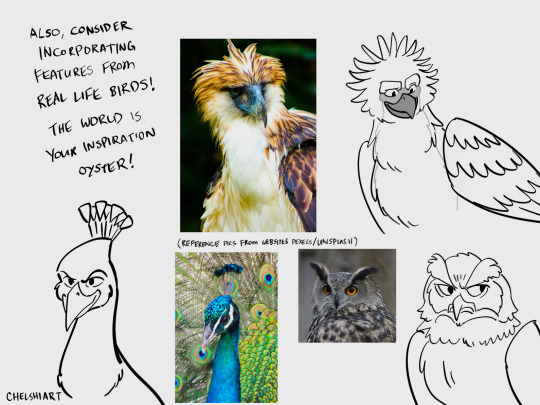
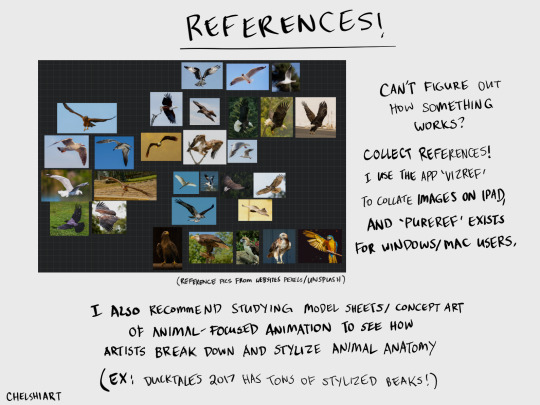
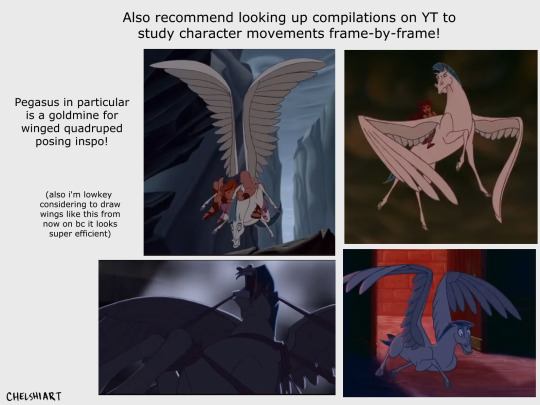
Thanks for being so patient for this reply - had a pretty busy couple of weeks preparing stuff for artist conventions. Anyway, was a lot of fun to ruminate on - here are a bunch of things I've thought about (and am still thinking about) when drawing the griffin kids! Heads up that I'm still practicing myself, and there are definitely a lot of aspects of creature design I could work on (the wiiiiiings gah), but hopefully this helps give you some direction on designing your own bird-lion-cats.


#enchantress-emily#tutorial#art process#featuring special interests#dark lord of derkholm#year of the griffin#diana wynne jones#this was fun!!#ok time for bed kfdlajgfdg#griffins#fantasy#derkholm series
47 notes
·
View notes
Text

Spotlight: Lulu Moonwood Murakami, Mixed Media Artist
Meet Lulu Moonwood Murakami, mixed media artist. You’ll find her creating with paper clay or making an art quilt with a variety of textiles. She manipulates fabrics into 3D pieces and reflects on current affairs through her art.
#quilting#briar rose quilts#bedding#shopping#quilters of tumblr#holiday#sewing#crafts#gifts#decor#quilt#quilting as art#quilt tutorial#embroidery#fabric arts#art quilt#quilt pattern#quiltblr#textiles#patchwork#quilts#lulu moonwood murakami#create whimsy#media artist
22 notes
·
View notes