#fabric arts
Text
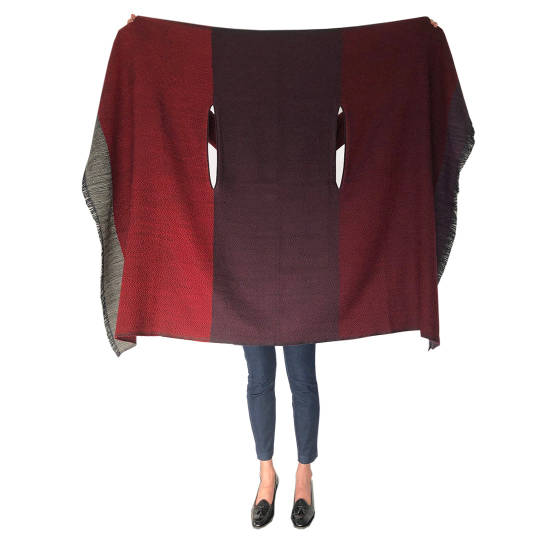
So I came across this image on pinterest and was like... I want that!
Then I saw the €135 price tag and was like... nah, I don't want that.
I want something like that. But less expensive, and also less multicoloured. The company calls it a cape, so I started project The Cape.

I went to the fabric store, saw a huge amount of fun stuff but nothing with the stubtle star pattern I had imagined for The Cape, so I just got 200x135cm of the plainest black linen.

Made some arm holes and hung it up because I have no time to work on it today.

Tomorrow I'll search through my stash for suitable fabric to line the armholes. And I might commit to the herculean task of hemming the unfinished edges
Project The Cloak pt.2!
Project The Cloak pt.3!
Project The Cloak pt. 4!
#project The Cloak#things i made#fabric arts#crafts#sewing#handsewing#handmade clothing#handmade clothes#diy#diy clothing#goth diy#gothic fashion
460 notes
·
View notes
Text

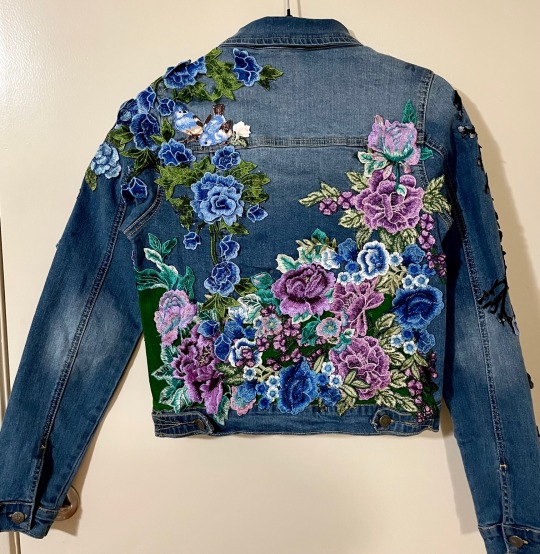


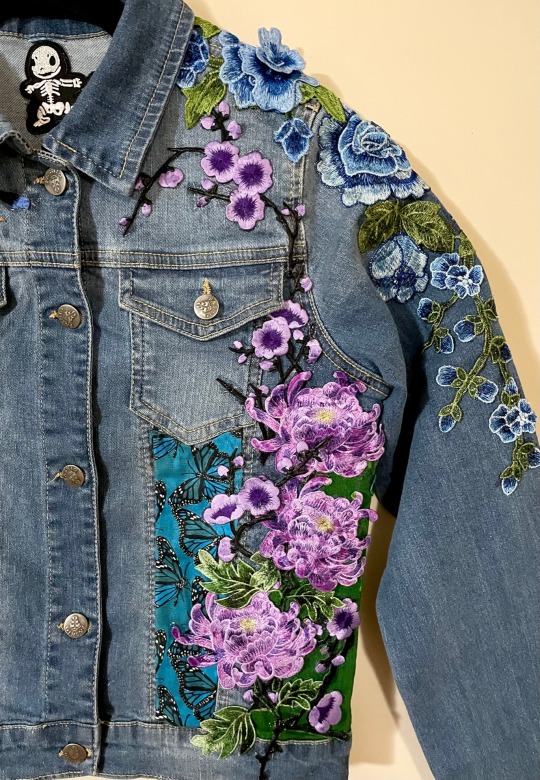
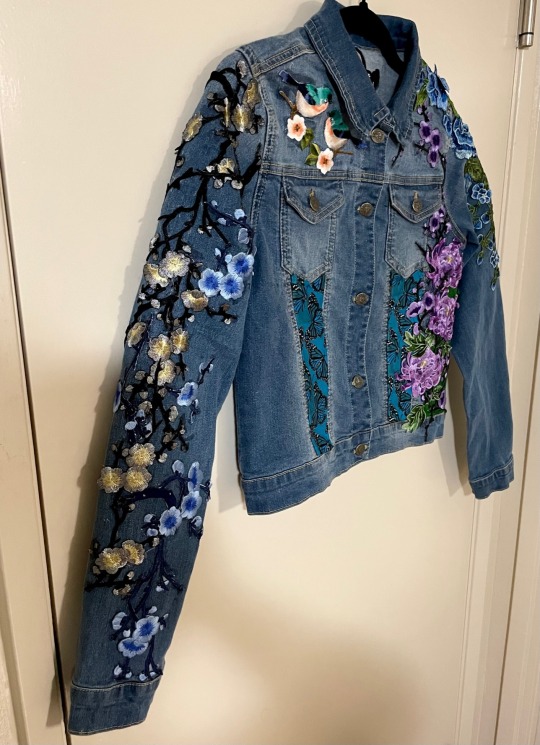
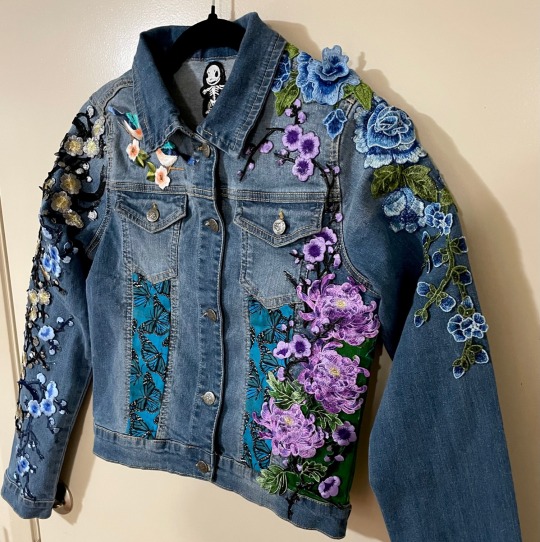

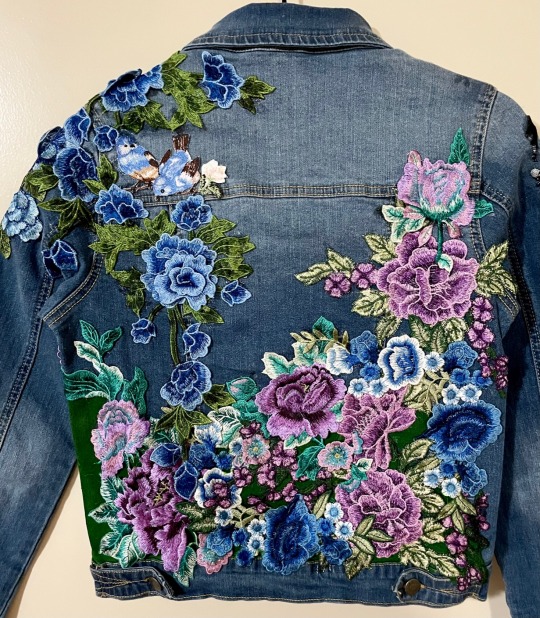

Finished!!
Pre-made embroidered appliques & patches, fabric paint, fabric patches. Attached with fabric glue and some sewing.
145 notes
·
View notes
Text
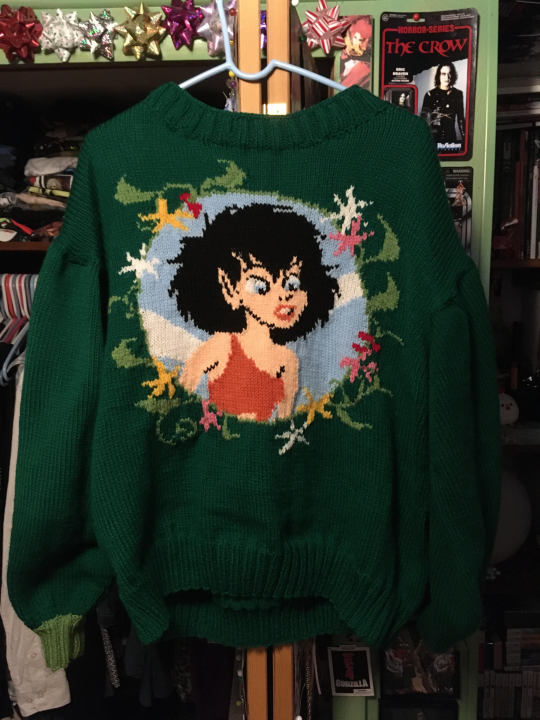


FernGully sweater!!! most challenging thing i've knitted yet (i felt like a clown juggling all those different colors lol)
charts/pattern under the cut for anyone interested!


back pattern (directly above) uses the measurements for the 36 bust option (132 stitches across the back) --remember to adjust accordingly! or you can rearrange the flowers in any design you want. or just put a single mushroom on a sweater--whatever makes you happy!

one more thing: i made the sleeves on my sweater poofier by going from the 84 to 132stitches in i think about 6 rows (maybe 8?) I think I did 1/3 of the amount, then one row even, then 1/3, one even, 1/3. but of course, i didn't write it down so i'm not entirely sure. if you do do some variation on the sleeves though, make sure you write it down so you remember what to do for the second one!
144 notes
·
View notes
Text
Plarn is plastic yarn a way of recycling plastic bags and using them as a source of material rather then a waste!
Plarn can be used to support the homeless by knitting the plastic strips into mats for them to sleep on
#i like knitting so this is something cool!#plarn#plastic yarn#sustainable fashion#fabric arts#knitting#recycling#upcycling#diy
345 notes
·
View notes
Text

@onenicebugperday
534 notes
·
View notes
Text
Acid Dyes In Squirt Bottles: kinda a tutorial
So I bought some silk scarves with an eye toward dyeing them to use for giftwrapping for Christmas, and I'd idly meant to research techniques but suddenly realized I'm running out of time.
Almost all the tutorials on dyeing anything at all that I can find lately are for ice dyeing. Which is cool and I love that that's so trendy now. But some of the ones I've watched...
Well, see the point of ice dyeing is that powdered dyes often split into components and so you get really cool edge-effects where the different pigments in the dye penetrate the fabric differently because of the slow wicking action of the melting ice etc. I watched a tutorial where someone just had three primary colors, which are generally pure pigments, and did this, and I was like, you could have put those into squirt bottles and saved yourself about 8 hours plus all the time you spent making that ice. It did give a nicely feathered spectrum effect but the ice mostly did not contribute anything to the process.
But what I did learn from that tutorial was some advice on how to get acid dyes to strike in a cold low-immersion process. So I'm going to write up what I did, since that's what I was actually looking for, and every bit of information I can currently find is contained in overly-long videos that spend most of their runtime on irrelevant stuff.
Mostly this is for my own reference later, as I'm now old enough that I keep stumbling across things I've made and being like "wait I don't remember how I did this. I really made this? I have to have, nobody else lives here. How did I do this??" So anyway, overly-long and underly-technical writeup below the cut. Pictures to follow in a separate post.
What do I mean, cold low-immersion process??
Immersion is how most dyeing works. You make a dye bath, and you dunk your fabric into it. Low-immersion means you lie your stuff all out on some flat surface, maybe over a wire rack maybe over a sheet of plastic, and just put enough dye on for it to soak in. That's low-immersion, and generally is how you're gonna get multiple unmixed colors on one object.
and cold? Well, acid dyes, which work best on protein-based fibers like wool and silk, need heat to strike, or actually bond to the fabric. If you just dunk some silk in a dye bath and then rinse it, the dye mostly rinses out. You need heat to set it.
Let's back up a second-- acid dyes?? So there are two main types of dyes you use on fabric. Acid dyes are called that because you add some vinegar once the dye has soaked in, to get it to stick. (Yes, you need acid and heat!) The other kind, which you usually use for ice dyeing, is fiber-reactive dyes. Fiber-reactive are what you want for cotton, linen-- plant-based fibers, and some synthetics. (Nylon works with acid dyes for some reason, rayon needs fiber-based. I don't remember why but the Internet surely knows, it's surely very simple.)
So anyway. Fiber-reactive dyes are applied to fabric that's been pre-treated with soda ash and then set without much heat, though they do need to "cure" at a high temperature-- it doesn't have to be as hot as with acid dyes though. (A black plastic bag in the sun, an electric blanket lying overtop the bag they're in, that level of heat at most.) So they're the usual, traditional type of dyes you use for tie-dyeing, which is normally done on cotton t-shirts, and which very often is done with low-immersion methods to let you get a bunch of colors on there, are fiber reactive dyes. Many many many tutorials exist for this, including how to tie them. Very cool stuff.
I wanted that effect on silk though.
(*the alkali pre-rinse is fine for cotton and linen and such. alkali on silk is Generally Bad News. This is another reason people generally don't do fiber reactive dyes on silk. Silk shrugs off acid reasonably well but alkali is no bueno. Also for the record never ever try to bleach silk for any reason, that dissolves it. Now You Know!)
So. I did find this tutorial from Dharma Trading, about space dyeing. Remember when space-dyed stuff was trendy?? Many of you whippersnappers probably don't. It used to be cool and is probably what led to the invention of ice-dyeing, which clearly like A Person invented but I have no idea who and I bet finding out would be difficult so my ADHD ass is NOT going down that rabbit hole right.
So i tried that. I used aluminum foil instead of plastic wrap for the simple reason that my kitchen is currently torn apart and all my worldly goods in cardboard boxes but I had a roll of aluminum foil in the basement for some reason. I put down a vinyl tablecloth on my washing machine and used it as a work surface. And I found a broken old steamer insert and set it in an old aluminum pot that lives in the basement.
I mixed up squirt bottles of four colors of acid dye in approximately the proportions from the Dharma tutorial. I don't have measuring implements currently, see above re: kitchen (I'm planning on retiring a number of my measuring implements to serve in fiber arts, and keeping only the nice ones for the new nice kitchen, but that hasn't happened yet) so it was all very approximate.
And then I just lay each silk scarf out on the aluminum foil on the dryer and went to town.
I learned to be careful and sparing with the amount of dyes, to keep them from pooling underneath the material-- silk scarves aren't very absorbent. Any excess dye pooling on the aluminum foil will of course spread and get muddy. So what I wound up doing was working from right to left (on my left was the laundry sink), and doing my lightest color on the right and my darkest on the left, and then when I was done, I used an eyedropper to apply white vinegar to lock in the pigment, and then I picked the whole works up very carefully and tipped it to the left and let everything extra run off into the sink. So having my, say, fuschia run across the back of what was supposed to be a dark purple section didn't lead to any notable color contamination. One colorway had bright lemon yellow in it, and I was incredibly careful not to let any smudges or drips touch that-- kept it on the right of my workspace, propped up slightly. The yellow draining across the red and purple of that colorway didn't cause a problem, but I did wind up with a fingerprint of darker color in the yellow area (I think that's what caused the blot anyway).
Anyway, once the dye was all applied, and I'd let it drip into the sink for a moment, I then folded up each scarf into its own packet, careful to still keep the lighter end upward, and put it into my busted-ass steamer basket which made this easier because one of the legs has fallen off it, see, so it tilts anyway, that's why I retired it, and put the lid on and steamed each packet for about half an hour to 45 minutes.
At the end of that I pulled each packet out (there were overlaps, where I'd put a second packet in halfway through the first one. Most of the Strict Rules About Steaming Silk don't apply to this process because drips aren't a problem, dips in temperature that might lead to uneven mottling aren't a problem, this is just meant to be pretty color splotches with random patterns so literally none of the intimidating stuff you have to do to achieve perfection are a problem here), I let it cool off a bit and then unwrapped it and rinsed the scarf. Not much color came off them, and I was able to reuse the foil, which it's not that I'm being eco-friendly so much as that I only had the one roll of foil with not much left on it and this was the last day I could really do this, so. Not very scientific, but in the end I really was very thrifty LOL. Yes! I was being eco-friendly, that's why i'm like this.
I then let the scarves dry on my drying rack overnight, and came back the next day to collect them. I brought them all back to my mother-out-law's to wash them in her washing machine since mine is currently not properly hooked up (additional nightmare, love it)-- I figured this wouldn't be messy in her impeccable laundry room and I was right, very little dye to rinse out. Gave them a wash with dharma's professional detergent, then a rinse with milsoft, then an extra rinse, and I've now let them dry again, ironed them, and have them in a plastic bag with some perfume because the detergent smells kind of awful LOL. I'm letting them sit like that for a day or two and then I'll get them out and package them up for gifts.
27 notes
·
View notes
Photo

Evan Carter Wilson ( b. 1953 US )
Mending the Kimono.
142 notes
·
View notes
Text
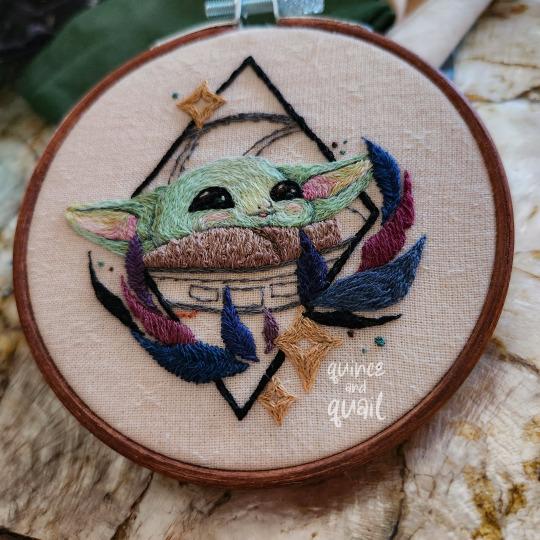
Super freshly finished, basically still steaming from the oven!
#embroidery#hand embroidery#this is the way#the mandalorian#grogu#star wars#baby yoda#modern embroidery#thread painting#fan art#disney#work in progress#crafts#artists on tumbr#original art#illustration#needlework#fabric arts#artists on tumblr#disabled artist#spoonie#star wars art#fanart#handmade#i made this#original design#mando and grogu
120 notes
·
View notes
Text
I kinda wanna start a chill fabric arts collective for older BIPOC youth in my city (age 20-30). Just to hang online or in person and knit/sew/crochet/embroider/bead/weave! Parallel play! Chat about life!
The only knitting groups I know of are dominated by old(er) white women or is run specifically as a teen club.
(Side note: I’m sick of everyone forgetting to resource or give a shit about older youth. Mid-late 90s babies I love you and see you and we’re figuring out this adulting thing together.)
35 notes
·
View notes
Text
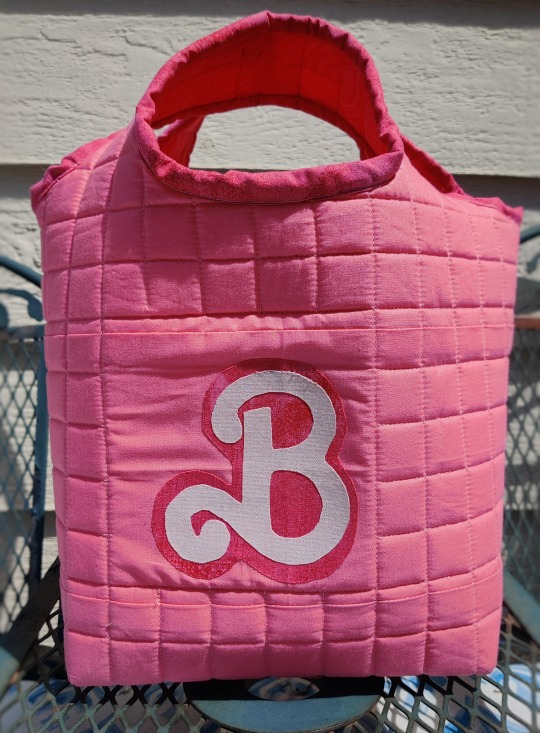
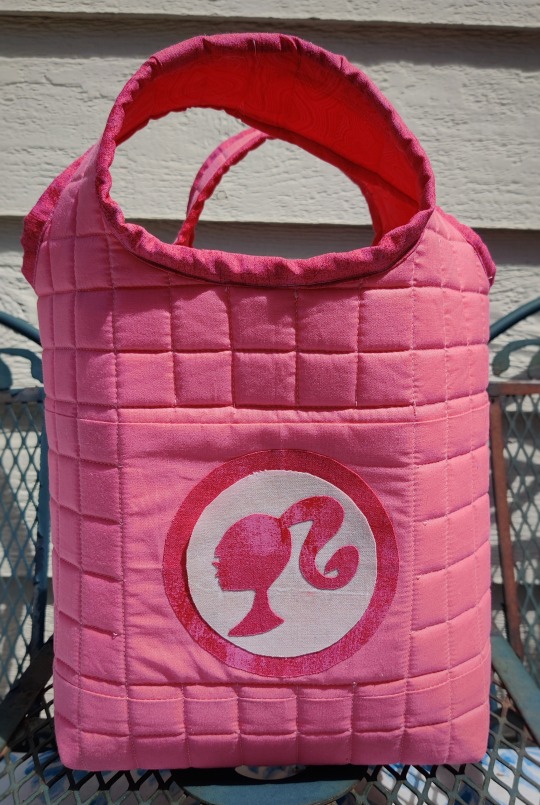
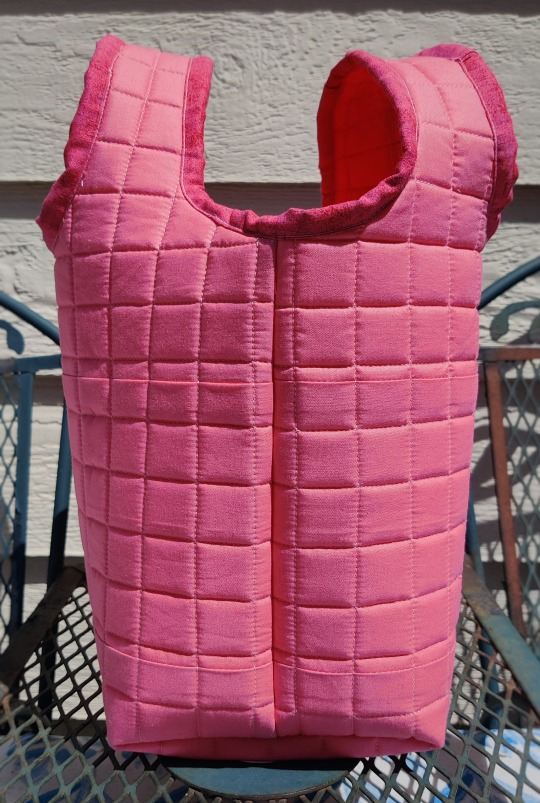

going to the barbie movie tonight so i of course had to make a bag to bring. this is the first time i ever have done applique and first time making a quilted bag so it came with some challenges. considering the time crunch i was on, i think i did pretty well!
i used this free pattern from redquilt!
#rosymothquilts#yes i know what bias binding is pls don't mention it to me#sewing#quilting#textile art#bag making#barbie#barbie 2023#barbie movie#pink aesthetic#pinkcore#coquette#fabric arts#art
42 notes
·
View notes
Text

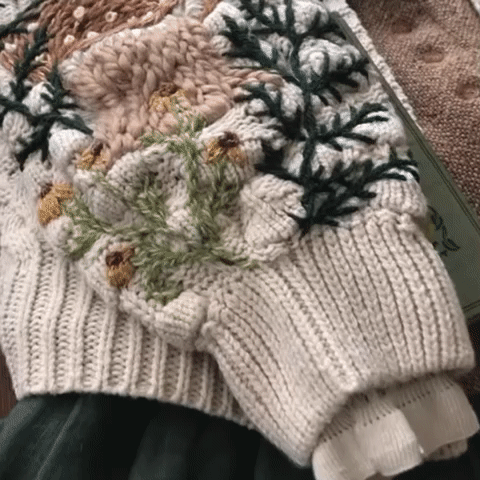
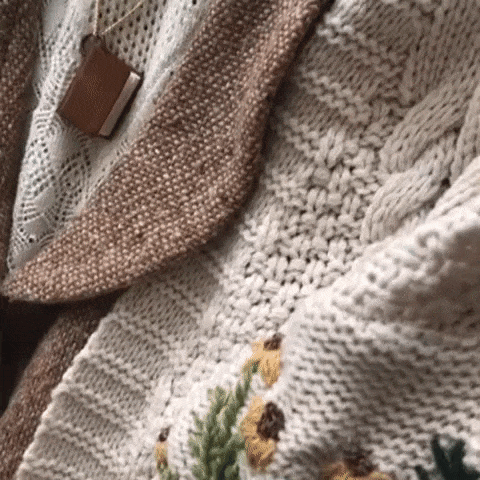
🦌🌼custom embroidered sweater🍃🍄
#cottagecore#brown stim#forestcore#naturecore#grandmacore#embroidery#sweater#clothing stim#fashion#cottagecore stim#cottagecore fashion#cardigan#fabric arts#green#my post#my gifs#sensory
434 notes
·
View notes
Text
Gender jacket V2: day 7
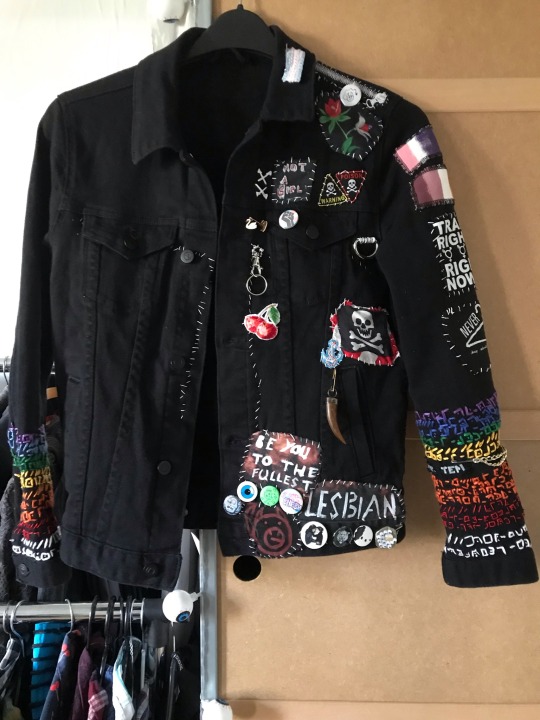
Left side done!!
Also here’s some details I love:


The other progress days are in the tag “gender jacket reform”!
157 notes
·
View notes
Text
yall i need you to visit nacho ann’s online fabric store. it’s all thrifts and shit and it is SOOOOOOO cheap i got so much stuff today for like 20 bucks i’ll update when it arrive but i am so excited
13 notes
·
View notes
Text


I knitted a Saw sweater!! And I’m including the chart i made if anyone else wants to knit one too! I picked Saw7 bc its my favorite but it shouldn’t be too hard to swap the 3d out for whichever number you prefer (or if it’s the first one you’ll have to shift the whole logo to the center) And.. if you do go with 1-6 you might also prefer using red for the blood instead of pink.
tips and tricks and the sweater pattern i used are under the cut :)
Helpful tips: I recommend starting the design from the left (with a purl row) and when you get to it, sewing in the bottom three stitches of the line that comes down from the A (the two by theirself and the bottom one in the group of three) once the whole thing’s finished so you don’t have to carry the yarn the whole way across the back for a couple of stitches.
And remember, even though I didn’t fill it all in, everything inside the saw blade that isn’t pink/red (exception of the hole in the middle) is grey (or whatever color you pick). I know this might seem obvious but I myself tripped up on this a few times from misreading the pattern so just.. be aware what you’re doing lol.
And, of course, you can put the design on whatever sweater pattern you wish, but here’s the one I use:

#i wanted to do some blood splatter around the bottom of the sleeves but i only had so much hot pink#i didnt want to get halfway thru then run out#my art#sweater pattern#knitting pattern#knitting#saw#saw 7#saw 3d#saw franchise#horror#saw movies#knit sweater#fabric arts
368 notes
·
View notes
Photo

Collectors Weekly: The Revolutionary Crochet of Birgitta Bjerke
24 notes
·
View notes
Text

Nature's Bullion
Sweet, sweet nuggets
Giant nectar drops
Guardians of blossoms
Chaperons of crops
They do the buddings biddings
And savour natures copse
See it in my shop
Gouache, paper, ink, pencil, fabric and stitch on a 4" x 4" canvas panel
#textile art#mixed media#floral wall decor#hand embroidery#artists on tumblr#fabric arts#yarn crafts#slow stitching#botanical pattern#cottage aesthetic#cottagecharm#cottagecore#pink and blue#fiber art#wall decor#art#abstract embroidery#pretty#flowers#i made it myself
21 notes
·
View notes
Last Seen Blogs

poetrybysaraa
Untitled
lockscreenxd
Lockscreens and Layouts

lynkolnevans
( ͡° ͜ʖ ͡°)

rotnorth1
Aftermatt // Rogi

cutiepie-keith-blog
My Heart for Lance McClaine ♥