#beginners hike
Text
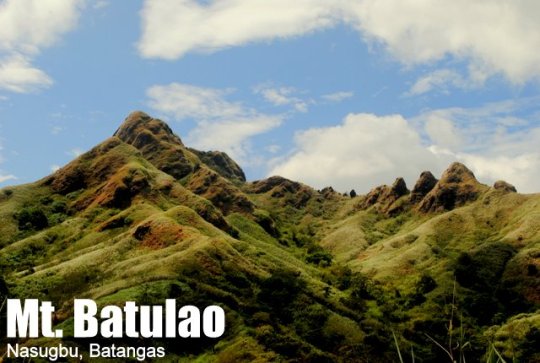
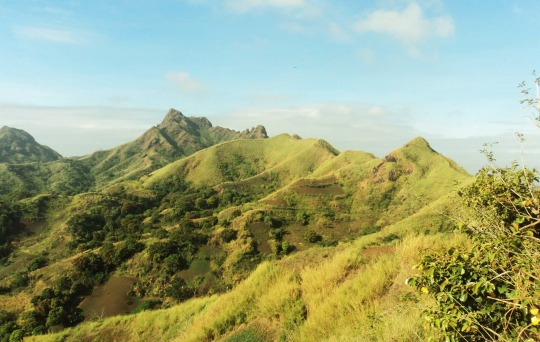
Nasugbu, Batangas
Jump-off point: Evercrest Golf Course, Nasugbu
LLA: 14.0408 N 120.8011 E 811 MASL
Days required / Hours to summit: 1 day / 2-4 hours
Features: Open trails, rolling slopes, scenic views of Batangas
Specs: Minor climb, Difficulty 4/9, Trail class 3 with 60-70 degrees assualt
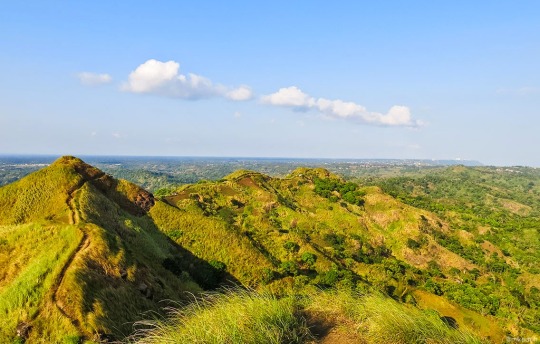
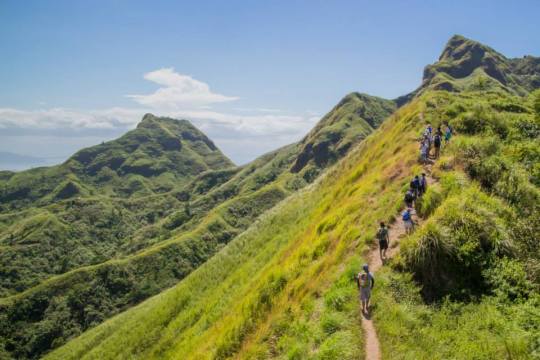
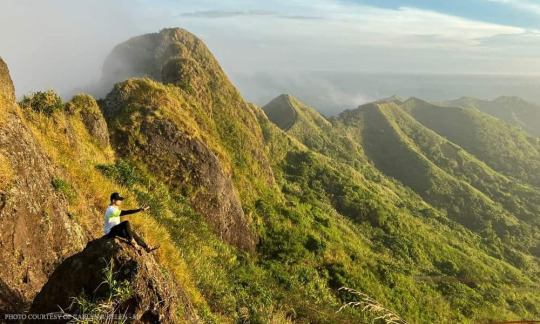
Mt. Batulao's cool environment provides an enjoyable getaway from the city. On a clear day, it provides magnificent views of the terrain in Batangas and other adjacent provinces. The height of Mt. Batulao is 811 meters (2,660 feet) above sea level. It features established paths that are suitable for beginners and has a 4/9 difficulty rating. Its gorgeous rolling slopes and somewhat steep topography make it one of the coolest mountains to climb in Southern Luzon.
The name of Mount Batulao has a fascinating beginning. The word "yellow stone" is Batong Dilaw in Tagalog. According to legend, the mountain received its name because, on clear days, the early morning sun's rays would paint the slope yellow. Mt. Batulao's beauty throughout the year is more than enough to make it one of the most popular hiking destinations in the Southern Luzon region, even though this only occurs during the last week of December.
You will experience the same chill as Tagaytay visitors the moment you arrive at the Evercrest Golf Course, the jumpoff. And this temperature will follow you around, even in the typically dry and chilly months of January and February. On the other hand, due to the exposed aspect of its routes and its propensity for muddiness during the wet season (June to October), there are some days when Mt. Batulao can feel like a desert—extremely hot and humid. However, Mt. Batulao frequently receives gusts that make any trek, regardless of how hot or how cool, delightful.
8 notes
·
View notes
Text
Foot Care for Hiking - A Guide

Hiking is rough on your feet. Any activity where you spend a lot of time moving around upright is going to be, but between the added weight of a pack, the irregularity of the terrain, and the intensity of conditions in the outdoors with heat, cold, wet, etc., hiking for miles can leave your feet far more sore than walking an equal distance on a flat paved road. From getting blisters to bruising toenails to even cases of trench foot among thru-hikers, there’s a lot of problems that can arise.
But if you’re out in the backcountry and your feet are blistered and miserable... you still need them to walk out. So it’s essential that you take care of them, so they can carry you and back safely!
Here are some tips for foot care and maintenance for the new hiker:
BEFORE YOU PLAN TO HIKE
1 - Get Hiking Shoes That Fit Well. This is honestly the biggest thing.
Proper hiking footwear with decent support and traction is really important, not just for comfortable feet, but also for overall safety. A lot of injuries among novice hikers stem from inappropriate footwear that leads to slipping and falling. Hiking boots, hiking shoes, or hiking sandals designed for cushioning your feet and gripping the terrain are worth investing in, since even an expensive shoe is cheaper than the doctor’s bill for a broken leg (ask me how I know!)
But the right type of shoe won’t matter if it doesn’t fit your foot. If your shoe is too tight, it’s going to pinch and rub against your foot uncomfortably and give you blisters. If your shoe is too big, your foot is going to slip around in it, rubbing against the shoe... and give you blisters. If your toes repeatedly ram into the end of the toebox of your shoe because of poor fit, this will result in achy toes, bruised toenails, and possibly even toenail loss on long-haul hikes.
When you buy hiking footwear, try to do so in person. Different brands will have different fits, and you may find one in particular is better suited to the shape of your foot. For instance: I almost exclusively wear Keens because of the wide toe box, since I have narrow heels and wide toes on my weird-ass Daffy Duck feet. An associate may be able to guide you, especially if you’re in an outdoors-oriented store.
So once you have some shoes that fit comfortably and are hiking appropriate--
2 - Break Those Bad Boys In.
Don’t immediately go on a long hike in a brand new pair of shoes you’ve never worn. Practice first wearing them around the house, running errands in them, going for walks in them, running up and down stairs in them, and letting them mold to your feet. Then try some longer walks or short hikes before setting out on a lengthy expedition. If you’re like me and wear specific insoles, wear them in your hiking boots while breaking them in.
If you notice certain issues, like heel slippage or pressure on the top of your foot if you have high arches, try looking into different lacing techniques. This article has some suggestions, and there’s a lot more techniques out there. Experiment with what lacing technique is most comfortable for you!
PREPARING FOR YOUR HIKE
You have your boots and you’re planning to hike. Awesome! Here are some foot care steps that should be part of your hiking prep routine:
1 - Trim Your Nails. Long toenails can snag, and also can ram into the ends of your shoes, causing bruising, pain, and even ingrown toenails. Google “Hiker’s Toe” at your own risk. Keeping your toenails neatly trimmed is a good preventative step, and one I always take the night before a hike.
2 - If you’re prone to blistering, Tape Your Feet. I know that because of some weirdness in my stance and gait and the shape of my feet, there are spots where I am always prone to blistering on a hike. If you’re a brand new hiker, you might not be aware of any problem spots yet -- or you might be the lucky sort who doesn’t have any! -- but if you know you tend to get blisters on the backs of your heels, or anywhere else, get your tape out.
I use Leukotape P, since it’s breathable and sticks well even when it gets damp from sweat, but plain old drug store brand cloth medical tape will do in a pinch. Tape up any problem areas preventatively before setting out -- the tape will provide a barrier between your skin and the area of your boot that’s rubbing against it, reducing the friction. It also secures that top layer of skin in place, reducing the shearing effect between upper and lower layers of skin that results in blister formation from repetitive rubbing.
3 - Put on Good Socks. Your socks should be the right height for your shoe. If you have ankle-high boots, don’t wear low-cut socks; you want your socks to be a consistent barrier between your shoe and your skin. You also want socks that-- like your shoes -- fit. You don’t want them so snug that they’re digging into your calves and cutting off circulation, but they shouldn’t be loose and moving around in your boot either, and the heel cup should line up with your foot’s heel.
For sock material, merino wool is the go-to choice among hikers, though polyester and nylon also make appearances. Wool socks are great because wool stays warm even when it gets a bit damp, and wool socks can absorb a lot of moisture before they feel wet, and dry quickly. As a bonus, wool doesn’t hold on to stink as much as some other fabrics!
4 - Stock Your First Aid Kit. You should always hike with first aid supplies, and I always keep extra blister pads, blister dressings, and medical tape in mine...
ON THE TRAIL
So now you’ve finally hit the trail and you’re heading out into the wilderness -- but you still shouldn’t forget about your feet! Pay attention to any pain, pinching, rubbing, or other discomfort in your feet, and don’t hesitate to take a pause to fix problems as they come up. Got a pebble in your shoe? Don’t suck it up-- stop and take it out!
An ounce of prevention is worth a pound of cure when it comes to foot first aid, and smart hikers address small problems early on before they have a chance to become big problems and potentially incapacitate you out in the backcountry. So never be afraid or ashamed to stop if something is up with your feet -- you might feel like a pain in the ass if you’re calling a stop while hiking with a group, but I guarantee you, it’s way less trouble to stop for five minutes for someone to fix their shoe than it is to half-carry your friend with horrible blisters the last mile back to the parking lot.
KEEP YOUR FEET DRY
For hikes with a lot of water crossings, I usually pack extra socks in case I fall in and soak a foot. Wet socks and shoes can cause a whole host of problems for your feet, from blisters on a short hike to trench foot in multi-day hikes in wet conditions. Wearing wool or quick-dry materials in your socks will help, but a spare pair if you get drenched is always helpful. If you get wet and need to change socks -- do it. If you need to take a break to dry out your feet -- do so.
SPOT THE HOTSPOTS
If you’re hiking at an incline, such as going through hilly terrain or up a mountain, you may feel your shoes slipping and rubbing in new ways, causing chafing or pinching that didn’t happen when you were breaking your shoes in on flat ground. This is unfortunately pretty normal, as the angle of your foot and ankle are different when you’re going up a slope than on flat ground. Be very mindful of hotspots forming from this change in angle and stop to deal with them ASAP!
“Hotspots” are precursors to blisters. When you pause to take your shoe and sock off, you might see an angry red patch of skin, but no visible injury -- yet. At this point, you can still prevent a blister from forming. I mentioned earlier taping up with Leukotape, and I always keep a roll of medical tape in my pack, along with a knife I can cut it with. Blister pads (that essential thing to have in your hiking first aid kit!) are also great -- I’ve kept a bad hotspot from fully turning into a blister and rupturing by putting on a blister pad directly over the affected area, and then securing it in place by taping up the entire back of my foot before continuing.
DEAL WITH BLISTERS SOONER THAN LATER
If you didn’t notice the warning signs until it’s too late and you’ve got blisters -- again, blister pads. Keep them as cushioned as possible to try to avoid rupturing them. If your feet are in a lot of pain and you’re still outbound, seriously consider turning around and heading back -- it’s only going to get worse, and you’ll be even further from help. There’s being tough, and then there’s being stupid.
Again: try not to let your blisters rupture. A torn blister is an open wound and an easy vector for infection, plus they take longer than intact blisters to heal. If your blisters do tear, immediately get your first aid kit out and clean and bandage them. Don’t just slap a standard band-aid on them either -- use an actual blister dressing that seals it in on all sides to minimize infection risk. If your blisters are extremely fluid-filled and you can’t get your shoes back on and can’t hike out without draining it and have NO OTHER CHOICE... (this is anecdotal advice and NOT the advice of a medical professional)... sterilize the area and your tools with alcohol wipes, then make a small incision with a knife or pin from your repair kit (again, STERILIZE IT FIRST) at the EDGE of the blister to drain the fluid. Make the incision as small as you can while still allowing it to drain, don’t tear or remove the top of the blister, and then clean and bandage the area thoroughly. Check on your dressings periodically when you take breaks, and change them as needed.
Side note: Do not apply medical tape directly on an unruptured blister. When you peel that tape off at the end of the day, there’s a good chance it will rip that blister right open and you will scream like a banshee and scare the dog.
TAKE REST BREAKS IF YOU NEED THEM
If you’ve been doing mile after mile and your feet are just sore, take a break, even if there isn’t a blister emergency. Sit down on a nice rock, take your shoes off, rub your feet, air out your socks, and enjoy the scenery. You’re out in nature -- enjoy it for a minute. I’ve stopped by an ice cold babbling mountain brook and let my feet soak for some nice chilling hydrotherapy and to listen to the running water, just because I could. Allow your body to rest a bit, and then continue onward.
AFTER YOUR HIKE / BETWEEN HIKES
You’ve successfully completed your hike and made it home! Now what?
Immediately:
Take off your hiking shoes, and undo the laces so they can air out. Those puppies are gonna be ripe, so maybe toss in some baking soda to soak up the stank. Hot, wet conditions inside hiking boots are a good place for bacteria and fungus to bloom, so don’t just stuff them in a dark and musty closet until they’re good and dry.
Carefully peel off any tape on your feet you’ve added, and tend to any blister dressings or injuries.
WASH YOUR FEET. I shower pretty much immediately after a hike, but always put extra attention into cleaning and scrubbing my feet -- again, don’t want bacteria or fungus. Afterwards, I often rub in some lotion.
After that:
Take note of any issues you had, and think about how to deal with them in the future. If you got hot spots in certain places, write that down and tape those places up preemptively next time you hike. If your socks kept riding down in your boots, try different socks next time. If you forgot something in your first aid kit, or used up something that needs replacing, make sure you’re well stocked for your next hike.
If your feet are sore after a hike, a nice hot soak can be very soothing. If they’re swollen, try icing them for 15-20 minutes and elevating them. If foot pain still persists after a couple of days and hasn’t improved, you may want to check in with your doctor as there could be a bigger problem such as tendonitis, plantar fasciitis, or a stress fracture.
You might find yourself developing calluses in certain places, and while calluses can have protective qualities as your feet’s homemade armor, letting them get too thick can also cause problems. I shave down my calluses periodically and try to keep them at the texture of “supple worn leather” and not “crunchy horn” to avoid cracking and blistering.
--
Hiking can be a lot of fun, and it’s even more fun when your feet aren’t an absolute disaster zone. So get good shoes, be prepared to address any problems that come up, and listen to your feet. Take good care of them, and they’ll take you anywhere!
#lena hikes#beginner hiking guide#foot care#hiker#blisters cw#foot problems#long post for ts#don't fuck up your feet kids!
235 notes
·
View notes
Text

Rila Lakes, Bulgaria (2024)
#mountains#travel#europe#photography#travel photography#bulgaria#rila lakes#beginner photographer#35mm#fujifilm#x e1#landscape#nature#hiking#wanderlust
23 notes
·
View notes
Text


#my photography#my photos#nature#nature hikes#nature photography#nature photos#nautre photographer#photographers of tumblr#photographers#beginner photographer#photography#photos#nautre pictures#cows#pictures#original photography on tumblr#original photos#original photography blog#original photogrpahy#photography blog
4 notes
·
View notes
Text

this country is cool sometimes
Dovedale National Park, England
photo. me
edit. me
#kiran.irl#phone camera is shite but here is one of the like three photos i took yesterday#also fell a couple times on the way down and scraped my foot but we good. i'm aching today though#i love going out and hiking (beginner level) but i'm also incredibly unfit which makes it less fun but we roll
2 notes
·
View notes
Text

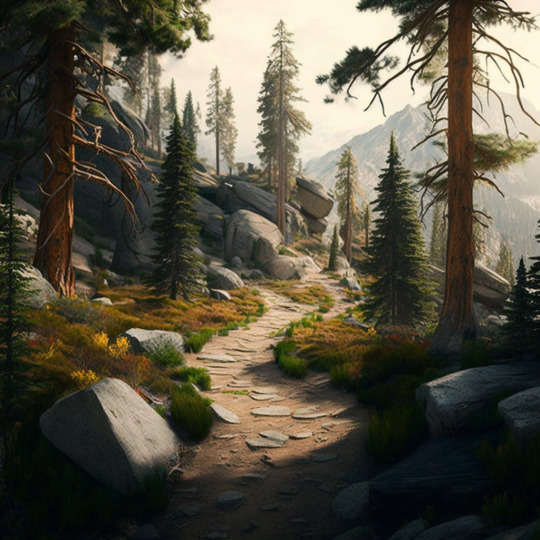
Into the green with a splash of color. 🌿🎒
#nikon#beginner photographer#original photographers#photographers on tumblr#photography#original photography blog#nature#berlin#naturephotography#trees#forest#naturecore#nature hikes#hikers#IntoTheWild#NatureExploration"#IntoTheTrees#NaturePhotography#QuietMoments#exploitation#explore
5 notes
·
View notes
Text
42 notes
·
View notes
Text
So there’s a woc outdoors group for the pnw and I signed up for the backpacking trip and it’s a beginner one bc I haven’t done that before and I got in and I’m sooo excited that was one of my goals for my 30th birthday lmao
Also nervous bc it’s all strangers and guides and all that but at same time what an adventure haha
#a group of beginners make me less nervous bc I’m always self conscious about how slow I hike#I fractured an ankle a couple years ago and so I’m avoiding injuries and evan just zooms
3 notes
·
View notes
Text
Beginner Hikers: Trail Etiquette
@somesuchnonsense added some EXCELLENT info in the tags on my beginner gear post about Hiking Etiquette, and frankly, it deserves its own post:
While you might be going out hiking to get away from other people, odds are good you're still going to encounter a few other folks doing the same, and some basic politeness and understanding of trail etiquette can keep you from being that guy.
So!
How to Not Be An Asshole Hiker:
Acknowledge Other Hikers. You don't have to have a whole conversation -- most people don't want you to -- but making eye contact with a brief nod or 'hello' as you cross paths is considered polite.
Respect the Right of Way. While you're going one way on the trail, someone else may be coming the other way. If the trail is narrow, one of you is going to have to step to the side. The general rule is that hikers going uphill have the right of way, and hikers going downhill should yield. That being said, if you have the right of way but notice that you have a better spot to step off to the side of the trail safely than the other person or party, it's polite to do so. Also, if you are hiking solo and there's a large group coming through the other way, it's polite to let them pass since it's easier for one person to move aside than a whole troupe. It's also polite to acknowledge people going the same way as you at a slower pace that you may be passing, and give them a chance to step aside before you pass them.
Stay On The Trail. Apart from stepping aside to the edge of the trail to let others pass, you should stick to the blazed trail and avoid bushwhacking. This is important for your safety so you don't get lost, and also for the ecosystem -- you could be damaging protected plant life or increasing erosion by trying to make your own shortcut. (Reasonable excuses to leave the trail are if you need to relieve yourself, or if there is a tree down or rock slide across the trail that you need to circumvent for safety)
Leave No Trace. On the topic of not damaging the ecosystem -- If you're gonna have a picnic, bring a bag for your garbage (or any toilet paper if you had to use some), and be sure to clean up after yourself, and erase any signs you were there. Everyone else wants to enjoy the scenic beauty of nature too, so leave it as pristine as you found it. [Side note: Leave the rocks alone, do not stack them into cairns, but also do not mess with existing cairns by adding or removing rocks if you see any -- these are often built by trail maintainers as trail markers in places above tree line where blazes may be obscured by snow and are important to keep folks from getting lost]
No One Wants to Hear Your Music. So you have a cool little Bluetooth speaker so you can blast your favorite tunes with your friends? Cool! Keep it at home! If you want to listen to music when you hike, wear headphones. Don't make your noise everyone else's problem. Enjoy the sounds of nature, and respect that other hikers may be out here for the serenity of the wild, and not your spotify playlist.
Look Out For Other Hikers. If you see another hiker in distress, see if they need help. If there's a problem on the trail up ahead or conditions they should be aware of for safety, give other hikers a heads up. Step up to be a good samaritan where one is needed if you are able. Some of the kindest strangers I've had the honor of meeting, I've encountered on a trail. It can be a really wonderful community!!!
#lena hikes#hiking etiquette#this isn't getting into the winter hiking etiquette about snow pack and post holing and all that jazz#because frankly winter hiking is its own animal and I'm still learning a lot there#beginner hiking#thank you somesuchnonsense!
785 notes
·
View notes
Text

Can Beginners Trek to Everest Base Camp?
#everest#hiking#beginners#nepal#heavenhimalaya#explorenepal#landscapephotography#mounteverest#everestbasecamp
4 notes
·
View notes
Text
Tips for Beginners: How to Start Hiking
Hiking is a great way to enjoy the outdoors, get some exercise, and clear your mind. However, if you're new to hiking, it can be daunting to know where to start. Here are some tips for beginners to help you get started on your hiking journey.
Start small: Don't jump into a long, strenuous hike right away. Start with shorter hikes on easy trails to build up your endurance and confidence.
Choose the right trail: Make sure to choose a trail that's appropriate for your fitness level and experience. Research the trail beforehand to ensure you know what to expect in terms of difficulty, terrain, and elevation gain.
Wear appropriate gear: Wear comfortable, sturdy shoes with good traction and support, as well as breathable clothing appropriate for the weather. Don't forget to bring a hat, sunscreen, and bug spray.
Stay hydrated: Bring plenty of water and snacks to keep your energy levels up. It's important to stay hydrated, especially on longer hikes.
Pack the essentials: Bring a map, a compass, and a first-aid kit. It's always better to be over-prepared than under-prepared.
Hike with a friend: Hiking with a friend can make the experience more enjoyable and safer. Plus, it's always a good idea to have someone to rely on in case of an emergency.
Leave no trace: Respect the environment and wildlife by leaving no trace of your visit. Pack out all trash and avoid disturbing plants and animals.
By following these tips, you can start hiking with confidence and enjoy all that the great outdoors has to offer. Happy trails!
3 notes
·
View notes
Link
Love to explore new places? Visit The Eager Traveler today to get the best Travel tips & recommendations from experts! We will give you the right suggestions on travelling as per your fitness level, age or skill.
#Travel tips & recommendations#Backpacking guide for beginners#Destination guide Santa Maria Valley#Destination guide Carmel#Camping guide Joshua Tree#World travel guide#Thailand travel guide#Hiking adventures Washington#Best vacation destinations#Backpacking in Europe#California adventure tips#backpacking Southeast Asia#Female travel bloggers#Travel photography blogs#Europe travel blog#Travel blog & adventure news#Budget travel guide Europe
2 notes
·
View notes
Text
I finally found a cool ski event on meetup buts it's 1250 euro not even including flights 😩
Why do I have such expensive taste...
#why can't i enjoy hiking like a normal person#also I'd be a complete beginner and im sure the rest wouldn't be#plus i need to save money for Oz#eh another time
4 notes
·
View notes
Text
10 Essential Tips for Beginner Hikers: Start Your Journey Right
Discover essential beginner hiking tips to kickstart your outdoor adventures. Learn about gear, safety, and trail etiquette for a confident start on the trail.
Starting your first hiking trip can be thrilling and fulfilling. But, it’s key to be well-prepared and have the right mindset. These 10 essential tips for beginners will set you up for success, whether it’s a day hike or a longer backpacking trip.
Key Takeaways
Follow the Leave No Trace principles to respect the outdoors and minimize your impact
Choose a beginner-friendly trail that matches…
#beginner hiking tips#elevation gain#first aid#hiking backpack#hiking boots#hiking clothing#hiking safety#hiking shoes#hiking trails#leave no trace#map reading#offline maps#respect the outdoors#trail difficulty
0 notes
Text
10 Easy Hikes In Catskill Mountains with the Best Views
If you love the outdoors but prefer to keep things easy, the Catskill Mountains offer some beautiful, beginner-friendly trails. These Easy Hikes In Catskill are perfect for families or anyone looking for breathtaking views without the strenuous climb.

Here are the must-visit hikes that will reward you with incredible scenery:
1. Awosting Falls

Awosting Falls is a stunning 60-foot waterfall located in Minnewaska State Park, New York. The easy hike to the falls offers picturesque views and is ideal for a quick nature escape.
Why it’s great:
This short, easy trail leads to a stunning 60-foot waterfall.
Located in Minnewaska State Park.
Great for a peaceful walk with plenty of photo opportunities.
2. Stony Kill Falls

Stony Kill Falls is a hidden gem in New York’s Minnewaska State Park, offering a short hike to a beautiful cascading waterfall. The trail is ideal for nature lovers seeking a peaceful escape.
Why it’s great:
A quiet hike that feels like a hidden gem.
Offers a picturesque waterfall and an easy path.
Perfect for a relaxing, nature-filled afternoon.
Read Also: 8 Exciting Things To Do In Charlotte, North Carolina Before the End of 2024
3. Diamond Notch Falls

Diamond Notch Falls is a serene waterfall in the Catskills, accessible via a short and easy hike through scenic mountain terrain. The trail is perfect for families and offers beautiful views year-round.
Why it’s great:
A short, family-friendly trail with a charming waterfall.
Located at the end of Spruceton Road.
Enjoy a scenic walk through lush forests.
4. Plattekill Falls

Plattekill Falls is a stunning 60-foot waterfall located in the Platte Clove Preserve in the Catskills, accessible via a short, moderately challenging 0.4-mile trail
Why it’s great:
This is one of the Quick and Easy Hikes In Catskill with the prettiest falls in the region.
Tucked away but accessible.
Ideal for a short adventure with stunning views.
Get More Easy Hikes in Catskill Here: 10 Easy Hikes in Catskill that are Perfect for Beginners
0 notes
Text
Essential Accessories for Mountain Biking: Gear Up for Your Ride

Are you an adventure outdoor enthusiast looking to elevate your mountain biking experience? Whether you’re a seasoned rider or just getting started, having the right mountain bike accessories can make all the difference. From safety gear to gadgets that enhance performance, these accessories are essential to enjoy your ride while staying prepared for any situation fully.
This guide will explore the must-have mountain bike accessories every rider should consider. Whether planning a leisurely trail ride or tackling rugged terrain, these items will ensure you’re equipped for whatever lies ahead. Let’s dive into the essentials that will boost your confidence on the trails and enhance your overall biking experience.
Helmets: Your First Line of Defense
Regarding mountain biking, safety should always be a top priority. The most critical gear you can invest in is a high-quality helmet. But not just any helmet will do; you need one specifically designed for mountain biking.
Why a Mountain Bike Helmet?
Mountain bike helmets differ from road bike helmets in a few key ways. They offer more coverage, particularly at the back of the head, which is crucial when navigating rough trails. These helmets also have better ventilation and are often equipped with visors to protect your eyes from the sun, rain, or mud.
Wearing a helmet is non-negotiable. It’s not just about following the rules but protecting your head from serious injuries. Look for helmets with MIPS (Multi-directional Impact Protection System) technology, which provides extra protection against rotational forces during a fall, giving you a sense of security on the trails.
Top Helmet Brands for Mountain Bikers
Bell: Known for its rugged construction and advanced safety features, Bell helmets are a favorite among mountain bikers.
Giro: Combining style with functionality, Giro offers helmets that are lightweight yet sturdy, perfect for long rides.
POC: POC helmets are renowned for their innovative designs and safety features, making them a top choice for serious riders.
Protective Gear: Armor Up for the Adventure
In addition to a helmet, several other pieces of protective gear can help prevent injuries while mountain biking. Each piece of gear serves a specific purpose, ensuring you’re covered from head to toe.
Body Armor and Pads
Mountain biking can be unpredictable, and falls are inevitable, especially when pushing your limits on challenging trails. This is where body armor comes in. Elbow pads, knee pads, and chest protectors can significantly reduce the impact of a fall and help you avoid scrapes, bruises, or more severe injuries.
Knee and Elbow Pads: These pads should be lightweight, breathable, and comfortable so they don’t hinder your movement. Brands like Fox Racing and G-Form offer excellent options.
Chest Protectors: For those tackling particularly rough trails, a chest protector can shield you from hard impacts, especially in areas with lots of rocks or roots.
Gloves and Eyewear
Remember to consider the importance of gloves and eyewear. Mountain bike accessories like these enhance your comfort, grip, and visibility.
Gloves: Look for gloves with padded palms to absorb shock and reduce hand fatigue. Full-finger gloves are preferred for better protection.
Eyewear: Goggles or sunglasses with interchangeable lenses are ideal. They protect your eyes from dust, debris, and harmful UV rays while allowing you to adapt to varying light conditions.
Hydration Systems: Stay Fueled and Hydrated
Long rides on challenging trails can quickly deplete your energy reserves. Staying hydrated is crucial; carrying enough water is essential for maintaining performance and avoiding dehydration.
Hydration Packs vs. Water Bottles
Regarding hydration, you have two main options: hydration packs or water bottles. Both have pros and cons, and the choice often depends on the length and intensity of your ride.
Hydration Packs: These are backpacks equipped with a bladder that holds a significant amount of water (usually 2-3 liters). They’re perfect for long rides, allowing you to drink hands-free via a tube. Brands like CamelBak and Osprey are well-known for their durable and comfortable hydration packs.
Water Bottles: For shorter rides, a water bottle may be sufficient. Look for bottles with easy-to-use lids that can be operated with one hand while riding. Insulated bottles can also keep your water cool during hot rides.
Nutrition on the Go
In addition to staying hydrated, it’s important to keep your energy levels up. Energy bars, gels, and trail mix are easy to carry and can provide a quick boost during your ride. Consider stashing a few snacks in your hydration pack or bike-mounted bag.
Tools and Repair Kits: Be Your Mechanic
When you’re out on the trails, the last thing you want is to be stranded due to a mechanical issue. Carrying the right tools and repair kits can save you from a long walk back to your car or, worse, being stuck in the middle of nowhere.
Essential Tools to Carry
Every mountain biker should have a basic tool kit with key items. These tools can help you make quick adjustments or repairs, ensuring you can continue your ride.
Multi-Tool: A good multi-tool should include a variety of Allen wrenches, a chain breaker, screwdrivers, and other essential tools. Brands like Crankbrothers offer compact and durable options that are easy to carry.
Tire Repair Kit: Flat tires are one of the most common issues on the trail. Carry a patch kit, tire levers, and a mini pump or CO2 inflator to fix flats quickly.
Spare Parts and Extras
In addition to tools, it’s wise to carry a few spare parts. A spare tube, extra chain links, and even a derailleur hanger can be lifesavers when you’re miles away from the nearest bike shop, giving you reassurance and confidence in your preparedness.
Tubes: Always carry at least one spare tube that fits your tire size. Even if you have tubeless tires, a spare tube can be a quick fix if you can’t repair a puncture.
Derailleur Hanger: These small, inexpensive parts are prone to bending or breaking but are crucial for your bike’s shifting performance. A spare derailleur hanger is easy to carry and can save your ride.
Lights and Visibility: Brighten Up Your Ride
Whether you’re riding at dawn, dusk, or during the night, having proper lighting is essential for your safety. Lights not only help you see but also ensure that you’re visible to others on the trail.
Front and Rear Lights
Your bike should be equipped with both front and rear lights. The front light illuminates the trail ahead, while the rear light ensures that other riders or vehicles can see you from behind.
Front Lights: Look for powerful LED lights with multiple brightness settings. Rechargeable lights are more convenient and eco-friendly. Brands like Lezyne and NiteRider offer excellent options with long battery life and high lumens.
Rear Lights: Rear lights are typically smaller and less powerful than front lights, but they are just as important. Flashing modes can help increase your visibility, especially in low-light conditions.
Reflective Gear
In addition to lights, consider wearing reflective gear or adding reflective tape to your bike. Reflective clothing, stickers, and ankle bands can make a huge difference in your visibility to others.
GPS and Navigation: Never Lose Your Way
A reliable GPS or navigation system can prevent you from getting lost when exploring new trails or venturing into remote areas. Modern GPS devices offer more than just directions; they provide valuable data on your ride, such as distance, speed, and elevation.
GPS Devices for Mountain Bikers
There are several GPS devices designed specifically for mountain biking. These devices are rugged and waterproof, often with preloaded trail maps.
Garmin Edge Series: Garmin is a leader in GPS technology, and its Edge series is popular among mountain bikers. These devices offer detailed maps, turn-by-turn navigation, and the ability to track your performance metrics.
Wahoo ELEMNT: Another great option, the Wahoo ELEMNT series offers easy-to-read displays, customizable data screens, and seamless integration with other cycling apps.
Smartphone Apps
If you prefer to use your smartphone for navigation, several apps are designed for mountain biking. Apps like Trailforks and Komoot offer detailed trail maps, user reviews, and offline navigation, making them excellent tools for planning and tracking your rides.
Conclusion
Mountain biking is an exhilarating sport that combines the thrill of adventure with the beauty of the great outdoors. By equipping yourself with the right mountain bike accessories, you can enhance your riding experience and stay prepared for anything that comes your way. From helmets and protective gear to hydration systems and GPS devices, these essentials are designed to keep you safe, comfortable, and confident on the trails.
So, whether you’re an adventure outdoor enthusiast or a beginner just starting, remember to gear up with the best accessories. With the right equipment, you can focus on enjoying the ride and exploring new trails. Happy riding! For more mountain bike accessories and gear recommendations, visit Adventure Gear Tech.
#Win Free Outdoor Gear#Backpacking Gear Reviews#Beginner Snowboarding Gear Reviews#Camping Equipment Reviews#Women's Hiking Boots#Winter Camping Essentials#Adventure Outdoor Enthusiast
1 note
·
View note
Last Seen Blogs

dogtrainingmarket
Untitled

wingingitonwheels
Winging it on Wheels

musicistheair-blog
Music Is The Air


peoplelikegames
People Like Games