#best tutorials in c programs
Explore tagged Tumblr posts
Visit Tumblr Blog
Explore Tumblr blogs with no restrictions, modern design and the best experience.
Last Seen Tumblr Blogs


Fun Fact
In 2020, Tumblr had 29.4 million users in the US.
Text
youtube
#c programming#c programs#code with c program#code with c#learn c programming#best c programs#best tutorials in c programs#real life problem solving#c program with c 2025#udemy best course in c#best udemy c programming course#Youtube
0 notes
Text
Advanced C Programming: Mastering the Language
Introduction
Advanced C programming is essential for developers looking to deepen their understanding of the language and tackle complex programming challenges. While the basics of C provide a solid foundation, mastering advanced concepts can significantly enhance your ability to write efficient, high-performance code.
1. Overview of Advanced C Programming
Advanced C programming builds on the fundamentals, introducing concepts that enhance efficiency, performance, and code organization. This stage of learning empowers programmers to write more sophisticated applications and prepares them for roles that demand a high level of proficiency in C.
2. Pointers and Memory Management
Mastering pointers and dynamic memory management is crucial for advanced C programming, as they allow for efficient use of resources. Pointers enable direct access to memory locations, which is essential for tasks such as dynamic array allocation and manipulating data structures. Understanding how to allocate, reallocate, and free memory using functions like malloc, calloc, realloc, and free can help avoid memory leaks and ensure optimal resource management.
3. Data Structures in C
Understanding advanced data structures, such as linked lists, trees, and hash tables, is key to optimizing algorithms and managing data effectively. These structures allow developers to store and manipulate data in ways that improve performance and scalability. For example, linked lists provide flexibility in data storage, while binary trees enable efficient searching and sorting operations.
4. File Handling Techniques
Advanced file handling techniques enable developers to manipulate data efficiently, allowing for the creation of robust applications that interact with the file system. Mastering functions like fopen, fread, fwrite, and fclose helps you read from and write to files, handle binary data, and manage different file modes. Understanding error handling during file operations is also critical for building resilient applications.
5. Multithreading and Concurrency
Implementing multithreading and managing concurrency are essential skills for developing high-performance applications in C. Utilizing libraries such as POSIX threads (pthreads) allows you to create and manage multiple threads within a single process. This capability can significantly enhance the performance of I/O-bound or CPU-bound applications by enabling parallel processing.
6. Advanced C Standard Library Functions
Leveraging advanced functions from the C Standard Library can simplify complex tasks and improve code efficiency. Functions for string manipulation, mathematical computations, and memory management are just a few examples. Familiarizing yourself with these functions not only saves time but also helps you write cleaner, more efficient code.
7. Debugging and Optimization Techniques
Effective debugging and optimization techniques are critical for refining code and enhancing performance in advanced C programming. Tools like GDB (GNU Debugger) help track down bugs and analyze program behavior. Additionally, understanding compiler optimizations and using profiling tools can identify bottlenecks in your code, leading to improved performance.
8. Best Practices in Advanced C Programming
Following best practices in coding and project organization helps maintain readability and manageability of complex C programs. This includes using consistent naming conventions, modularizing code through functions and header files, and documenting your code thoroughly. Such practices not only make your code easier to understand but also facilitate collaboration with other developers.
9. Conclusion
By exploring advanced C programming concepts, developers can elevate their skills and create more efficient, powerful, and scalable applications. Mastering these topics not only enhances your technical capabilities but also opens doors to advanced roles in software development, systems programming, and beyond. Embrace the challenge of advanced C programming, and take your coding skills to new heights!
#C programming#C programming course#Learn C programming#C programming for beginners#Online C programming course#C programming tutorial#Best C programming course#C programming certification#Advanced C programming#C programming exercises#C programming examples#C programming projects#Free C programming course#C programming for kids#C programming challenges#C programming course online free#C programming books#C programming guide#Best C programming tutorials#C programming online classes
2 notes
·
View notes
Text
We have many episodes in Unreal Engine and C++, but none with Rider. Rider is a great IDE for Windows, Linux, and Mac when working with Unreal!
youtube
#shawnthebro#ue4#unreal#stb#tutorial#youtube#unrealengine#unrealtutorial#unrealengine4#programming#unreal engine 5#unreal engine 4#unreal engine#ue5#rider#CLion#jet brains#ide#ide for c++#ide for unreal#for UE#best ide for unreal#best code for unreal#best program for unreal#for unreal#for#c#c++#cpp#cpp code
0 notes
Text
Navigating the Nervous Waters of Coding
Daily writing promptWhat makes you nervous?View all responses AI-generated image. “This code is going well…a little too well.” The Code Creep: Why Every Line Can Feel Like a Tightrope Walk What makes me nervous? You might think it’s a looming deadline or a particularly gnarly algorithm. And while those definitely get the heart racing, the real source of my coding jitters? It’s the act of…
#Artificial Intelligence#best practices#c#c++#career advice#Cloud computing#coding#dailyprompt#dailyprompt-1916#data science#debugging#devops#java#javascript#machine learning#mobile development#Programming#python#software development#testing#tutorials#web development
1 note
·
View note
Text
⭐ So you want to learn pixel art? ⭐
🔹 Part 1 of ??? - The Basics!
Edit: Now available in Google Doc format if you don't have a Tumblr account 🥰
Hello, my name is Tofu and I'm a professional pixel artist. I have been supporting myself with freelance pixel art since 2020, when I was let go from my job during the pandemic.


My progress, from 2017 to 2024. IMO the only thing that really matters is time and effort, not some kind of natural talent for art.
This guide will not be comprehensive, as nobody should be expected to read allat. Instead I will lean heavily on my own experience, and share what worked for me, so take everything with a grain of salt. This is a guide, not a tutorial. Cheers!
🔹 Do I need money?
NO!!! Pixel art is one of the most accessible mediums out there.
I still use a mouse because I prefer it to a tablet! You won't be at any disadvantage here if you can't afford the best hardware or software.
Because our canvases are typically very small, you don't need a good PC to run a good brush engine or anything like that.
✨Did you know? One of the most skilled and beloved pixel artists uses MS PAINT! Wow!!
🔹 What software should I use?
Here are some of the most popular programs I see my friends and peers using. Stars show how much I recommend the software for beginners! ⭐
💰 Paid options:
⭐⭐⭐ Aseprite (for PC) - $19.99
This is what I and many other pixel artists use. You may find when applying to jobs that they require some knowledge of Aseprite. Since it has become so popular, companies like that you can swap raw files between artists.
Aseprite is amazingly customizable, with custom skins, scripts and extensions on Itch.io, both free and paid.
If you have ever used any art software before, it has most of the same features and should feel fairly familiar to use. It features a robust animation suite and a tilemap feature, which have saved me thousands of hours of labour in my work. The software is also being updated all the time, and the developers listen to the users. I really recommend Aseprite!
⭐ Photoshop (for PC) - Monthly $$
A decent option for those who already are used to the PS interface. Requires some setup to get it ready for pixel-perfect art, but there are plenty of tutorials for doing so.
Animation is also much more tedious on PS which you may want to consider before investing time!
⭐⭐ ProMotion NG (for PC) - $19.00
An advanced and powerful software which has many features Aseprite does not, including Colour Cycling and animated tiles.
⭐⭐⭐ Pixquare (for iOS) - $7.99 - $19.99 (30% off with code 'tofu'!!)
Probably the best app available for iPad users, in active development, with new features added all the time.

Look! My buddy Jon recommends it highly, and uses it often.
One cool thing about Pixquare is that it takes Aseprite raw files! Many of my friends use it to work on the same project, both in their office and on the go.
⭐ Procreate (for iOS) - $12.99
If you have access to Procreate already, it's a decent option to get used to doing pixel art. It does however require some setup. Artist Pixebo is famously using Procreate, and they have tutorials of their own if you want to learn.
⭐⭐ ReSprite iOS and Android. (free trial, but:) $19.99 premium or $$ monthly
ReSprite is VERY similar in terms of UI to Aseprite, so I can recommend it. They just launched their Android release!
🆓 Free options:
⭐⭐⭐ Libresprite (for PC)
Libresprite is an alternative to Aseprite. It is very, very similar, to the point where documentation for Aseprite will be helpful to Libresprite users.
⭐⭐ Pixilart (for PC and mobile)
A free in-browser app, and also a mobile app! It is tied to the website Pixilart, where artists upload and share their work. A good option for those also looking to get involved in a community.
⭐⭐ Dotpict (for mobile)
Dotpict is similar to Pixilart, with a mobile app tied to a website, but it's a Japanese service. Did you know that in Japanese, pixel art is called 'Dot Art'? Dotpict can be a great way to connect with a different community of pixel artists! They also have prompts and challenges often.
🔹 So I got my software, now what?
◽Nice! Now it's time for the basics of pixel art.
❗ WAIT ❗ Before this section, I want to add a little disclaimer. All of these rules/guidelines can be broken at will, and some 'no-nos' can look amazing when done intentionally.
The pixel-art fundamentals can be exceedingly helpful to new artists, who may feel lost or overwhelmed by choice. But if you feel they restrict you too harshly, don't force yourself! At the end of the day it's your art, and you shouldn't try to contort yourself into what people think a pixel artist 'should be'. What matters is your own artistic expression. 💕👍
◽Phew! With that out of the way...
🔸"The Rules"
There are few hard 'rules' of pixel art, mostly about scaling and exporting. Some of these things will frequently trip up newbies if they aren't aware, and are easy to overlook.
🔹Scaling method
There are a couple ways of scaling your art. The default in most art programs, and the entire internet, is Bi-linear scaling, which usually works out fine for most purposes. But as pixel artists, we need a different method.


Both are scaled up x10. See the difference?
On the left is scaled using Bilinear, and on the right is using Nearest-Neighbor. We love seeing those pixels stay crisp and clean, so we use nearest-neighbor.
(Most pixel-art programs have nearest-neighbor enabled by default! So this may not apply to you, but it's important to know.)
🔹Mixels
Mixels are when there are different (mixed) pixel sizes in the same image.

Here I have scaled up my art- the left is 200%, and the right is 150%. Yuck!
As we can see, the "pixel" sizes end up different. We generally try to scale our work by multiples of 100 - 200%, 300% etc. rather than 150%. At larger scales however, the minute differences in pixel sizes are hardly noticeable!
Mixels are also sometimes seen when an artist scales up their work, then continues drawing on it with a 1 pixel brush.

Many would say that this is not great looking! This type of pixels can be indicative of a beginner artist. But there are plenty of creative pixel artists out there who mixels intentionally, making something modern and cool.
🔹Saving Your Files
We usually save our still images as .PNGs as they don’t create any JPEG artifacts or loss of quality. It's a little hard to see here, but there are some artifacts, and it looks a little blurry. It also makes the art very hard to work with if we are importing a JPEG.

For animations .GIF is good, but be careful of the 256 colour limit. Try to avoid using too many blending mode layers or gradients when working with animations. If you aren’t careful, your animation could flash afterwards, as the .GIF tries to reduce colours wherever it can. It doesn’t look great!

Here's an old piece from 2021 where I experienced .GIF lossiness, because I used gradients and transparency, resulting in way too many colours.
🔹Pixel Art Fundamentals - Techniques and Jargon
❗❗Confused about Jaggies? Anti-Aliasing? Banding? Dithering? THIS THREAD is for you❗❗ << it's a link, click it!!
As far as I'm concerned, this is THE tutorial of all time for understanding pixel art. These are techniques created and named by the community of people who actually put the list together, some of the best pixel artists alive currently. Please read it!!
🔸How To Learn
Okay, so you have your software, and you're all ready to start. But maybe you need some more guidance? Try these tutorials and resources! It can be helpful to work along with a tutorial until you build your confidence up.
⭐⭐ Pixel Logic (A Digital Book) - $10 A very comprehensive visual guide book by a very skilled and established artist in the industry. I own a copy myself.
⭐⭐⭐ StudioMiniBoss - free A collection of visual tutorials, by the artist that worked on Celeste! When starting out, if I got stuck, I would go and scour his tutorials and see how he did it.
⭐ Lospec Tutorials - free A very large collection of various tutorials from all over the internet. There is a lot to sift through here if you have the time.
⭐⭐⭐ Cyangmou's Tutorials - free (tipping optional) Cyangmou is one of the most respected and accomplished modern pixel artists, and he has amassed a HUGE collection of free and incredibly well-educated visual tutorials. He also hosts an educational stream every week on Twitch called 'pixelart for beginners'.
⭐⭐⭐ Youtube Tutorials - free There are hundreds, if not thousands of tutorials on YouTube, but it can be tricky to find the good ones. My personal recommendations are MortMort, Brandon, and AdamCYounis- these guys really know what they're talking about!
🔸 How to choose a canvas size
When looking at pixel art turorials, we may see people suggest things like 16x16, 32x32 and 64x64. These are standard sizes for pixel art games with tiles. However, if you're just making a drawing, you don't necessarily need to use a standard canvas size like that.
What I like to think about when choosing a canvas size for my illustrations is 'what features do I think it is important to represent?' And make my canvas as small as possible, while still leaving room for my most important elements.
Imagine I have characters in a scene like this:

I made my canvas as small as possible (232 x 314), but just big enough to represent the features and have them be recognizable (it's Good Omens fanart 😤)!! If I had made it any bigger, I would be working on it for ever, due to how much more foliage I would have to render.
If you want to do an illustration and you're not sure, just start at somewhere around 100x100 - 200x200 and go from there.
It's perfectly okay to crop your canvas, or scale it up, or crunch your art down at any point if you think you need a different size. I do it all the time! It only takes a bit of cleanup to get you back to where you were.
🔸Where To Post
Outside of just regular socials, Twitter, Tumblr, Deviantart, Instagram etc, there are a few places that lean more towards pixel art that you might not have heard of.
⭐ Lospec Lospec is a low-res focused art website. Some pieces get given a 'monthly masterpiece' award. Not incredibly active, but I believe there are more features being added often.
⭐⭐ Pixilart Pixilart is a very popular pixel art community, with an app tied to it. The community tends to lean on the young side, so this is a low-pressure place to post with an relaxed vibe.
⭐⭐ Pixeljoint Pixeljoint is one of the big, old-school pixel art websites. You can only upload your art unscaled (1x) because there is a built-in zoom viewer. It has a bit of a reputation for being elitist (back in the 00s it was), but in my experience it's not like that any more. This is a fine place for a pixel artist to post if they are really interested in learning, and the history. The Hall of Fame has some of the most famous / impressive pixel art pieces that paved the way for the work we are doing today.
⭐⭐⭐ Cafe Dot Cafe Dot is my art server so I'm a little biased here. 🍵 It was created during the recent social media turbulence. We wanted a place to post art with no algorithms, and no NFT or AI chuds. We have a heavy no-self-promotion rule, and are more interested in community than skill or exclusivity. The other thing is that we have some kind of verification system- you must apply to be a Creator before you can post in the Art feed, or use voice. This helps combat the people who just want to self-promo and dip, or cause trouble, as well as weed out AI/NFT people. Until then, you are still welcome to post in any of the threads or channels. There is a lot to do in Cafe Dot. I host events weekly, so check the threads!
⭐⭐/r/pixelart The pixel art subreddit is pretty active! I've also heard some of my friends found work through posting here, so it's worth a try if you're looking. However, it is still Reddit- so if you're sensitive to rude people, or criticism you didn't ask for, you may want to avoid this one. Lol
🔸 Where To Find Work
You need money? I got you! As someone who mostly gets scouted on social media, I can share a few tips with you:
Put your email / portfolio in your bio Recruiters don't have all that much time to find artists, make it as easy as possible for someone to find your important information!
Clean up your profile If your profile feed is all full of memes, most people will just tab out rather than sift through. Doesn't apply as much to Tumblr if you have an art tag people can look at.
Post regularly, and repost Activity beats everything in the social media game. It's like rolling the dice, and the more you post the more chances you have. You have to have no shame, it's all business baby
Outside of just posting regularly and hoping people reach out to you, it can be hard to know where to look. Here are a few places you can sign up to and post around on.
/r/INAT INAT (I Need A Team) is a subreddit for finding a team to work with. You can post your portfolio here, or browse for people who need artists.
/r/GameDevClassifieds Same as above, but specifically for game-related projects.
Remote Game Jobs / Work With Indies Like Indeed but for game jobs. Browse them often, or get email notifications.
VGen VGen is a website specifically for commissions. You need a code from another verified artist before you can upgrade your account and sell, so ask around on social media or ask your friends. Once your account is upgraded, you can make a 'menu' of services people can purchase, and they send you an offer which you are able to accept, decline, or counter.
The evil websites of doom: Fiverr and Upwork I don't recommend them!! They take a big cut of your profit, and the sites are teeming with NFT and AI people hoping to make a quick buck. The site is also extremely oversaturated and competitive, resulting in a race to the bottom (the cheapest, the fastest, doing the most for the least). Imagine the kind of clients who go to these websites, looking for the cheapest option. But if you're really desperate...
🔸 Community
I do really recommend getting involved in a community. Finding like-minded friends can help you stay motivated to keep drawing. One day, those friends you met when you were just starting out may become your peers in the industry. Making friends is a game changer!
Discord servers Nowadays, the forums of old are mostly abandoned, and people split off into many different servers. Cafe Dot, Pixel Art Discord (PAD), and if you can stomach scrolling past all the AI slop, you can browse Discord servers here.
Twitch Streams Twitch has kind of a bad reputation for being home to some of the more edgy gamers online, but the pixel art community is extremely welcoming and inclusive. Some of the people I met on Twitch are my friends to this day, and we've even worked together on different projects! Browse pixel art streams here, or follow some I recommend: NickWoz, JDZombi, CupOhJoe, GrayLure, LumpyTouch, FrankiePixelShow, MortMort, Sodor, NateyCakes, NyuraKim, ShinySeabass, I could go on for ever really... There are a lot of good eggs on Pixel Art Twitch.
🔸 Other Helpful Websites
Palettes Lospec has a huge collection of user-made palettes, for any artist who has trouble choosing their colours, or just wants to try something fun. Rejected Palettes is full of palettes that didn't quite make it onto Lospec, ran by people who believe there are no bad colours.
The Spriters Resource TSR is an incredible website where users can upload spritesheets and tilesets from games. You can browse for your favourite childhood game, and see how they made it! This website has helped me so much in understanding how game assets come together in a scene.
VGMaps Similar to the above, except there are entire maps laid out how they would be played. This is incredible if you have to do level design, or for mocking up a scene for fun.
Game UI Database Not pixel-art specific, but UI is a very challenging part of graphics, so this site can be a game-changer for finding good references!
Retronator A digital newspaper for pixel-art lovers! New game releases, tutorials, and artworks!
Itch.io A website where people can upload, games, assets, tools... An amazing hub for game devs and game fans alike. A few of my favourite tools: Tiled, PICO-8, Pixel Composer, Juice FX, Magic Pencil for Aseprite
🔸 The End?
This is just part 1 for now, so please drop me a follow to see any more guides I release in the future. I plan on doing some writeups on how I choose colours, how to practise, and more!
I'm not an expert by any means, but everything I did to get to where I am is outlined in this guide. Pixel art is my passion, my job and my hobby! I want pixel art to be recognized everywhere as an art-form, a medium of its own outside of game-art or computer graphics!

This guide took me a long time, and took a lot of research and experience. Consider following me or supporting me if you are feeling generous.
And good luck to all the fledgling pixel artists, I hope you'll continue and have fun. I hope my guide helped you, and don't hesitate to send me an ask if you have any questions! 💕
My other tutorials (so far): How to draw Simple Grass for a game Hue Shifting
28K notes
·
View notes
Text

i told my friend i would find him some beginner’s giffing tutorials, but all the one’s i could find were either years out of date, used a method that made me go “huh”, or incorporated ready-made actions. all perfectly fine, but if i’m sending someone a tutorial i’d rather it be one for a method i understand enough to help with.
so, here is a beginner’s guide to giffing, as told by cleo, a neurotic, detailed, and organization happy individual. there will be many pictures.
this tutorial will strictly cover the gif making portion of the process, from getting your screencaps to importing in photoshop, resizing/cropping, and sharpening. i was going to briefly go over colouring, but tumblr only allows 30 images and i ran out of space, so i'll have to do a separate colouring tutorial (which also means i can go into more detail, yay).
downloading the videos, whether direct downloads or t*rrents, is also another tutorial. but make sure you’re using at least 1080p, and the bigger the file the better. a single episode of a ~45 minute show should ideally be 2gb at minimum. a full length movie should ideally be at least 5gb. imo 2160p/4k files are not really necessary; the quality increase is negligible, and it takes a lot longer to screencap them. if you do use 2160p/4k files, try and make sure it is not HDR, as those videos are often washed out and require a different screencapping program to fix.
Programs
I am using a cracked version photoshop 2022, but whichever version you use should be pretty much the same
Actions. not a program but a function inside photoshop, where you essentially record a series of steps, and then you can simple play that action when needed and those steps will repeat, which saves considerable time when giffing. I will note which parts of the tutorial are best saved as actions, and explain how to create actions at the end.
For screencapping i use kmplayer it’s free and very simple to use
not at all a necessary program, but i use freecommander instead of the regular windows file explorer as i find the dual panels very helpful when moving the frames around
Screencapping
there are many programs you can use to get the screencaps from a video, a lot are basically the same, some are better suited for particular video file types. kmplayer is a very simple program to use, but afaik the capture function only works on mkv. files (the only other file type i’ve tried is mp4, which plays but does not capture)
once you open your video file in kmplayer, we’re going to open the advanced capture window, found under capture→advanced capture, or alt+v
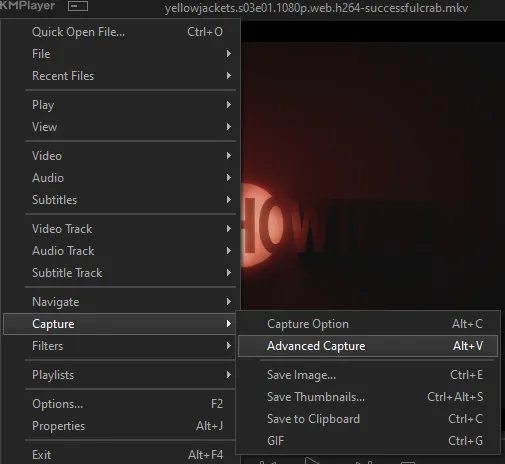
the window should look like this
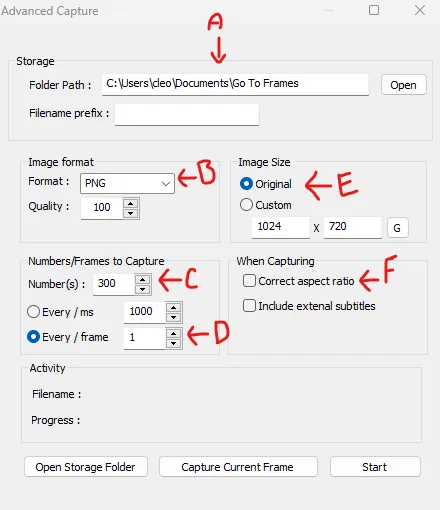
A-this is where all your screencaps will save to. i recommend making a specific folder for all your screencaps
B-make sure this is set to png for best quality
C-this is the number of screencaps you want to take, guesstimate how many you will need, keeping in mind that most videos are approx. 25 frames per second, and you should always cap a bit more than you think just in case
D-make sure “every/frame” is selected and set to 1
E-make sure “original” is selected, resizing will be done in photoshop
F-make sure “correct aspect ratio” is unselected
go to the part of the video you want to gif, and pause it just slightly before that part starts, then select ‘start’. the screencaps will start to save to the file, no need to play the video, and will automatically stop once it has capped the number of frames you have chosen
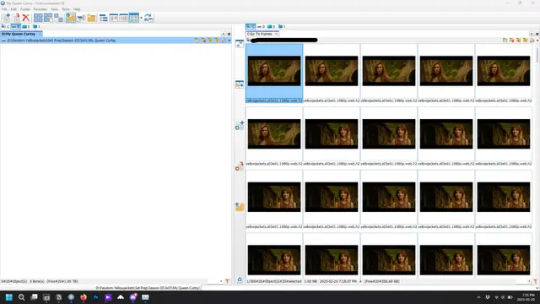
and here is how they look inside freecommander. i have already made a folder for this gifset, which is on the left. now you’re going to make a folder for each individual gif. i’ve decided this one will have four gifs, so create four folders (i just label them gif 01, gif 02, etc) and then move the frames for each gif into their respective folder
while you can always delete frames once the gif is made if it’s too big, i prefer to make sure i have the correct number of frames before i start. the gif limit on tumblr is 10mb, so it’s good to look at the scene/shots you’re giffing and decide approx. what dimensions your gif will be. full size gifs have a width of 540px and your choice of height. if you go for a square gif (540x540) you can usually fit 40-50 frames. if you’re planning for a smaller height (such as 540x400) you can usually fit more around 50-60 frames.
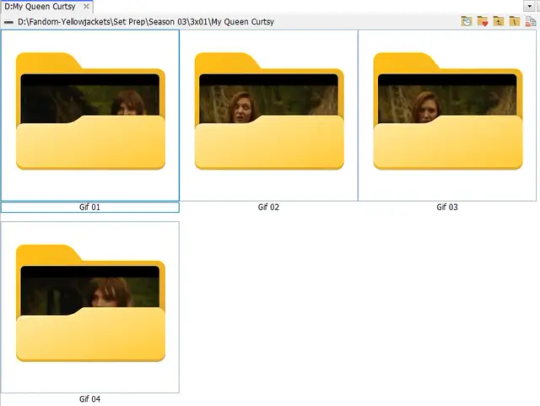
and here are the caps inside the folders. another reason i like freecommander is it’s ability to “multi-rename” files. the default file explorer can do so as well, but you have to do each folder individually and you can’t customize the new names as much. either way, i prefer to rename the files to each gif just to scratch my organization itch.
Introduction to Photoshop
NOTE: i have changed many of my keyboard shortcuts in photoshop to ones i prefer, so any you see listed in the menus of these screenshots are likely not the original shortcuts. you can see and change them yourself under edit→keyboard shortcuts

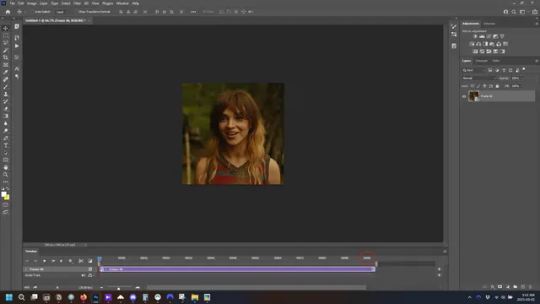
quick run-down of the photoshop interface. i have adjusted placement of some things from the default so this isn’t exactly how your photoshop will look when you open it, but everything is labelled, either on top or by hovering over the element. once you’re more familiar and have your process down i would recommend adjusting the workspace to suit your process.
A-your main tools and colour selector. almost all the tools have either several tools in one, or have alternate options which can be accessed by right-clicking the tool. you can also hover over each tool to get a pop-up with a quick explanation of the tool
B-additional “windows” such as history, properties, actions etc. can be opened from the window menu at the top and moved around with click-and-drag. history and properties should already be there by default, but probably on the right hand side instead. each window opens and closes with a click
C-the timeline window where the gif is made. the white square is a single frame of a gif, and on the row below is the play controls. this will not be there by default and will need to be opened from the window menu
D-adjustment layers for colouring
E-layers box. this is where the screencaps will show, along with adjustment layers, text layers, etc.
Opening Screencaps in Photoshop
go to file → open navigate to the folder for your first gif, select the first screencap, and check the image sequencing, and click open

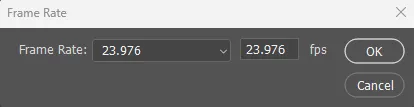
a window will open labelled frame rate. set it to 23.976 and select ok
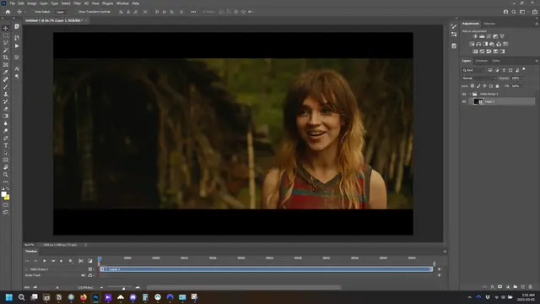
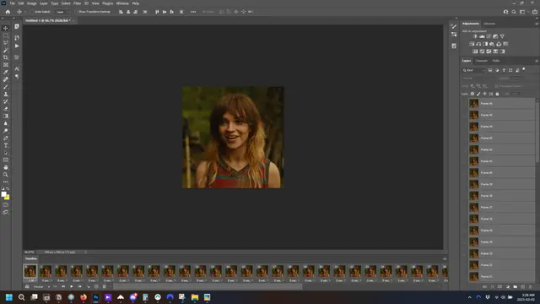
the screencaps will open in the timeline view, seen as the blue panel line at the bottom, and the screencaps are combined into video layer in the layer panel on the right.
Creating Frames
technically, you could go right into your cropping/resizing and sharpening from here, however if you do that directly then you have to keep the screencaps in the folders you have, otherwise if you save and re-open the gif it won’t move.
this next part should be made into an action.
at the top right of the timeline window, click four vertical lines to open the menu and select convert frames → flatten frames into clips. depending on how long the gif is, this can take a minute.

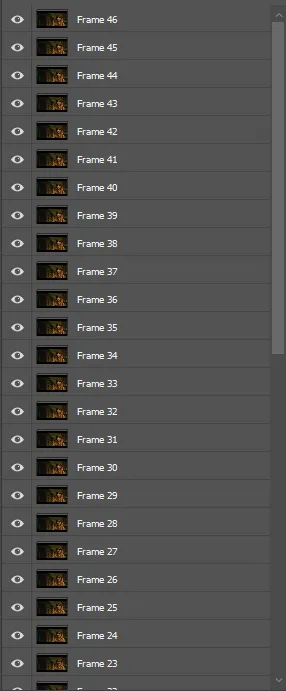
the layers panel should now look like this, each frame of the gif is now its own layer.
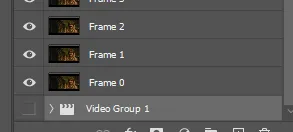
the very bottom layer will be the video group. this can be deleted as we’ve made the frames from it
in same timeline menu as before, right under “flatten frames into clips”, select “convert to frame animation” and the screen should now look like this. this will be the end of this action.
Cropping and Resizing
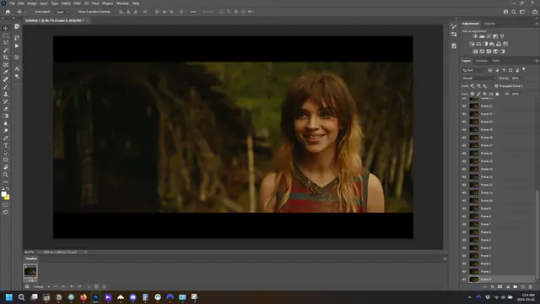
with widescreen footage, sometimes it’s just shorter than 1080p, but most of the time it will have the black bars on the top and bottom, and frustratingly, they’re not always the same size. it’s good to save the most common sizes as actions.
to find the size of the actual screen you turn on the rulers under view→rulers and check the height. then open your canvas size dialogue box under image→canvas size and change the height, making sure pixels are selected in the dropdown. yellowjackets is what i call “xtra wide” which is 800px. “normal” widescreen is 960px.
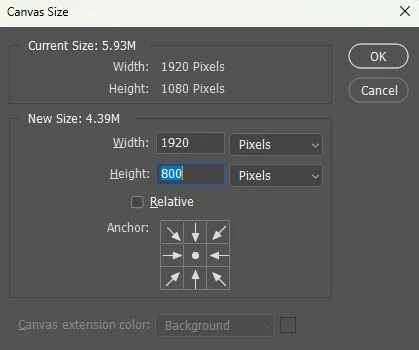
next we’re going to resize the caps. i also make actions for this, one for each potential gif size. open the image size dialogue box under image→image size and change the height of the image to your desired height plus 4 pixels. these extra pixels are to prevent a line at the top and/or bottom of your completed gif. now re-open the canvas size box, change the width to 540px, and the height to the desired, removing those 4 extra pixels. i have set this one to 540x540. this is where you would end the resizing action.
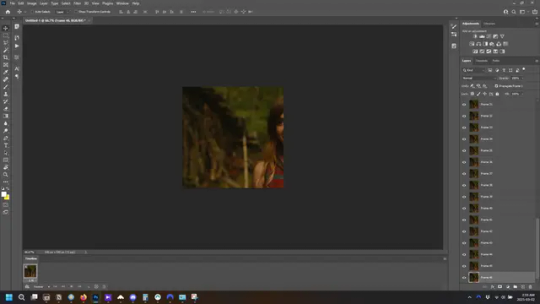
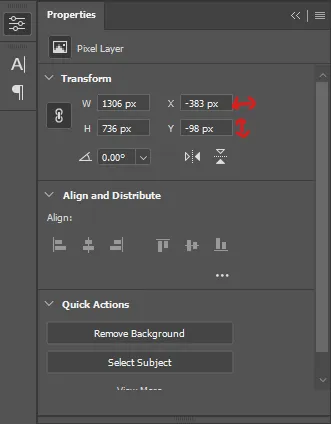
and as you can see she is off-screen. select the top layer, hold down shift and select the bottom layer to select them all, and with the move tool (the very top one) activated, click and drag to move it left to right as needed to centre the figure/s. as you move it a box will appear telling you how far you are moving it in any direction. make sure you are only moving it left or right, not up or down. to be certain of that, open the properties tab.
the y axis is your up/down, x is left/right. for this gif the y needs to stay at -98. you can also manually change the x axis number instead of dragging the image. also helpful for making sure multiple gifs of the same shot are all positioned the same.
the layer are currently ordered with the 1st at the top and the last at the bottom. with all layers still selected, go to layers→arrange→reverse. the last layer will be on top now. if there is movement in your gif, check if you need to alter the position again to make sure the movement properly centred. but once you are satisfied with the position, the layers should be in “reverse” position, of last layer on top. this is to ensure that the gif plays forwards.
Converting Gif
this should also be made into an action, going through sharpening process
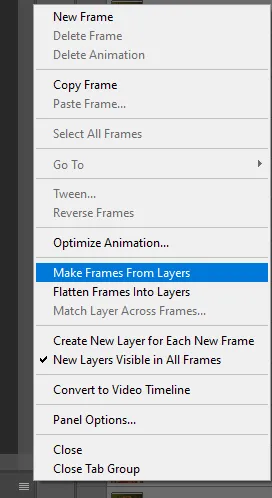
in the timeline menu, select “make frames from layers”
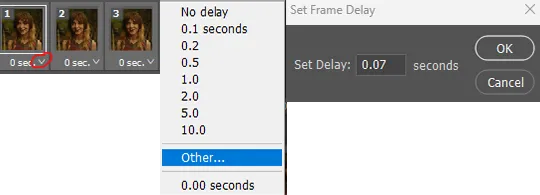
the frames are now populated in animation window. in timeline, click select all frames. go to any of the frames on the bottom and click the little arrow beneath it, select other, and enter 0.07 seconds. this is not a necessary step, as we will have to adjust the frame rate at the end, most likely to 0.05, but if we don’t change the frame rate here, then when we play the gif while working on it to check how it looks, it will play very fast.
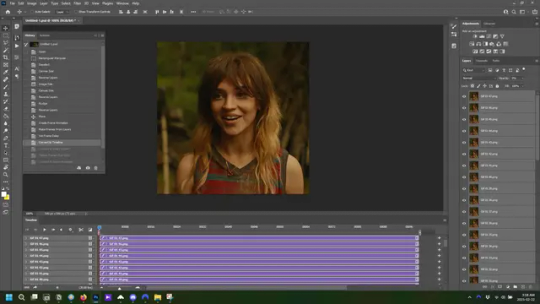
in the same menu at the right of the timeline box, select “convert to video timeline”
then, making sure all layers in the panel on the right are selected, go to filter→convert for smart filters. this turns all the layers into a single smart object.
but if you look where i’ve circled, it says the gif is 99 frames long*, when in fact there are only 47. if you are making regular “scene” gifs, basic colouring and maybe a caption, this is fine and does not need to be fixed, it will play at the same speed. if you want to change it to display (approx.**) the correct number of frames, go to the timeline menu on the right, select “set timeline frame rate” and change it from 30 to 15
*if it does not list a frame number by 4 digits but instead says 5f, 10f, 15f, etc. go to the timeline menu on the right, select panel options, and change timeline units to “frame number”
**the reason why this is only approximate is because the actual frame rate is not a a whole number, so when changing the frame rate it isn’t a 1:1, and 47 frames becomes 50 frames. the extra frames are removed at the very end, but if you are not doing any edits that require working frame by frame, there’s no need to change the frame rate here at all
Sharpening
this is, as it sounds, making the gif look sharper. to start go to filter→sharpen→smart sharpen and this window opens. play around with the dials to see what each ones does. the below settings are good for most high quality footage.
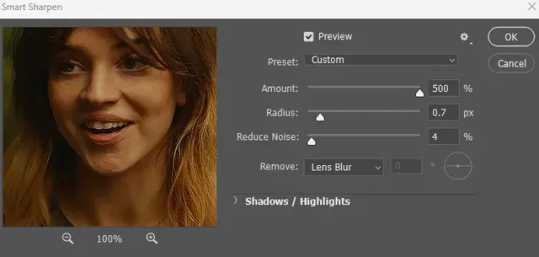
Amount-basically, how sharp do you want it
Radius-hard to explain, but this essentially sets how deep the lines of the sharpness are
Reduce Noise-smooths the pixels
once you click okay your single layer should look like this.
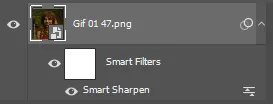
you’re going to then right click the layer and select duplicate layer. with the top layer selected, go to filters→blur→gaussian blur and set the radius to 1.0 pixels.
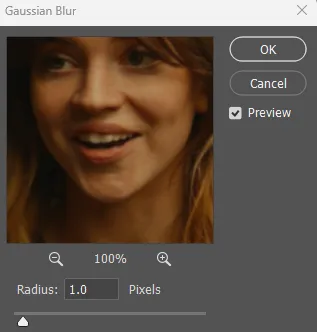
then change the opacity of the top layer to 10%. this is to essentially soften the sharpening a bit, as if it’s too sharp it can make the colouring wonky. this opacity level can also be changed depending on need.
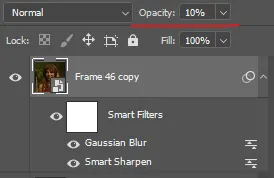
finally, select both layers, right click, and click “group from layers”. your gif is now fully made and sharpened.
Colouring
yeah. ran out of image space. but this is where you would do your colouring and add a caption or any other text.
Converting & Exporting
when all your colouring is done, you’re ready to start saving your gif. you can do it directly from your current file, but that means essentially losing your colouring, as all those layers will be merged together. i am someone who likes to save my psd’s (photoshop files), at least until i’ve posted the gifs, in case i need to fix something in the colouring. if you’d like to keep yours as well, open the history tab and select the first icon at the bottom “create new document from current state”. this will open a copy of the file in a new tab. save the original file and you can close it, continuing all work on the copy file.

select your all your layers, convert them into a smart object from filter->convert for smart filters, then follow the same steps from Creating Frames above. once you're back in frame animation, select Create Frames From Layers, and once again set the frame animation speed.
most people set the speed to 0.05. i personally set it to 0.05 or 0.06 depending on the length of the gif. check how it looks at 0.05, if it seems too fast, try 0.06.
now to save. go to file->export->save for web (legacy). the number is the lower left corner is your gif size, it needs to be under 10mb or else you'll have to delete some frames.

the right panel is your save options. the preset dropdown has some built-in settings, but you won't use them because (at least on my version) the presets only go up to 128 colours, instead of the full 256. the 3 i've highlighted in green are the only one's you'll adjust as needed. the settings below i use for i'd say 90% of my gifs. i'll sometimes change the adaptive dropdown to one of the other options, ocaissionaly the diffusion, and rarely the no transparency dither, but play around with them and see how they change the look of the gif.

when you're satisfied with the look of your gif, click save at the bottom right of the window.
voilà! you now have a gif.
Actions
this is your actions panel. the triangle on the left side is the button to open it. remember, if it's not already there, go to windows->actions to open it.
the buttons on the bottom, left to right, are stop recording, record action, play action, new folder, new action, and delete.

as you can see, i have different folders for my resizing, sharpening, captions, saving, and my 1 step (temporary) actions. to run an action is very simple; click the action, and click play.
to create an action, click the new action button, a box will pop up, give the action a name, and click record. the record button at the bottom of the action window will turn red. now perform all the steps you want it to record, and click stop recording. keep in mind it will record every single thing you do, including in other open files, so if the action you plan to record will have a lot of steps, it might help to write them down first.
to modify an action, select the step in the action above where you'd like the new step to be, hit record, perform the step, stop recording. select the step you'd like to delete, and click the delete button.
steps within the actions can be clicked and dragged, both within that action and moved to other actions. actions can also be moved between folders.
260 notes
·
View notes
Text


Roads Redesigned
One of the small things that has always bugged me with The Sims 1 is the default, jet black roads used on lots that do not match the grey roads seen in the neighborhood view.
So I've created a new, more accurate, grey asphalt road texture.
I have also created new, more accurate road markings.
However - rather than making road markings that are baked into a floor tile, I have instead made them decals that can be applied over any floor tile! This opens up more flexibility when it comes to placing markings, finding other uses (like parking lots), and using different road textures underneath (if you so choose).
Pack Includes:
1 Default Asphalt Road Floor Texture (Build Mode > Floor)
4 Road Marking Decals (Buy Mode > Decorative/Miscellaneous/Street) - A double yellow Center Line - A narrow white Shoulder Line - A medium white Crosswalk Line - A wide off-center Stop Line [Optional]
Community Lot Stop Sign for Residential Lots (Buy Mode > Decorative) [Optional]
Just enable the "move_objects on" cheat, replace the default road with your new road texture, and start placing those decals.
I was going to provide a tutorial on how best to place stuff to be most accurate to the neighborhood view - and I still can if people want that - but honestly, just play around with it! You'll find what works best for you.
Very Important:
Be VERY careful when DELETING ANYTHING while you have the "move_objects on" cheat enabled - ESPECIALLY around roads & sidewalks.
There are hidden objects that are essential to the game - spawn points for sims/vehicles etc. If you need to delete a decal, make sure you definitely have the decal selected before hitting delete. Hidden objects will look something like this...

I would suggest making a backup of your lots before editing the roads, just in case you accidentally delete a hidden object without noticing. Just work slowly and carefully.
Stop Line / Stop Sign


I have provided optional files for a Stop Line and a Stop Sign for use on residential lots.
Stop Lines were only seen on roads in the smaller, pre-Unleased version of the neighborhood. They aren't seen in the large Old Town version of the neighborhood or Downtown. So whether you want to include them is up to you.
If you choose to include Stop Lines - it makes sense to have a Stop Sign to go with them. By default they are only accessible in Buy Mode on community lots - so the optional file enables them in Buy Mode on residential lots as well!
Download
(Simply copy each file from the folders inside the .zip file into their corresponding folders in The Sims directory [C:\Program Files (x86)\Maxis\The Sims].)
Optional Stop Line & Stop Sign Download
(Simply copy each file from the folders inside the .zip file into their corresponding folders in The Sims directory [C:\Program Files (x86)\Maxis\The Sims].)
105 notes
·
View notes
Note
how do you access the audio files man I need to build a personal collection of my fav Chance voice lines </3
I'm glad you asked! I too have a collection of Chance and Jerry voice lines (and sprites) and I'd love to help another dice lover. Here's a quick tutorial for everyone
I downloaded Unity Asset Studio (or AssetStudioGUI) (its free) and that's all you need, plus a copy of the demo on Steam, obv
Then you go to this file folder: C:\Program Files (x86)\Steam\steamapps\common\Date Everything! Demo\Date Everything_Data\StreamingAssets\aa\StandaloneWindows64 - This has all the texture and audio .bundle files for each character cleanly labeled. Stuff like splash screen audio (when you unlock a dateable or a relationship route) is the sfx_audio_assets file near the bottom
Pick any file and load it on the asset studio (It'll start on a Scene Hierarchy tab initially, just click Asset List. I'd also recommend clicking Name to alphabetize it, although this will not put the numbered audios in numerical order, so it's not the best)
Here you can right click on any file and click "export selected assets" and then you have them! The audio files will save as a .wav fyi, and if you want sprites, make sure to download the Sprite file and not the Texture2D file
P.S. Characters that show up in other character's scenes (like the campaign partners, or even the narrator) will have audio in the main characters file
Happy collecting! :)
#if yall dont want to be possibly spoiled#dont click on the “r” files in the texture bundles#not sure what those are yet actually#but theres your warning#date everything#tutorial
13 notes
·
View notes
Note
If you are going to make a game here’s some things that might be helpful!
Game engines:
Godot: very new dev friendly and it’s free. Has its own programming language (GDscript) but also supports C#. It’s best for 2D games but it can do 3D also.
Unity: I don’t even know if I should be recommending Unity. It has caused me much pain and the suffering. But Unity has an incredible amount of guides and tutorials. And once you get the hang of something it’s hard to get caught on the same thing again. It also has a great Visual Studio integration and uses C#. I will warn you the unity animator is where all dreams go to die. It’s a tedious process but you can probably get some plugins to help with that.
Unreal: Don’t use it unless you’re building a very large or very detailed 3D game. It also uses C++ which is hell.
Renpy: Made for visual novels but has support for small mini games. It only supports Python iirc. Basically if you’re making a VN it’s renpy all the way otherwise you should look elsewhere.
What to learn: Game design and how to act as your own game designer. As a designer you need to know if a part of your game isn’t meshing with the rest of it and be willing to give up that part if needed. Also sound design is very important as well. If you want to make your own sounds audacity is perfect for recording and cutting up your clips. If you want to find sound effects I recommend freesound.org and the YouTube royalty free music database.
Sadly I can’t recommend a lot of places to learn this stuff because I’m taking Game Development in Uni. So most of my info comes from my lectures and stuff. One of my game design textbooks is pretty good but it’s around $40 CAD. It’s called the game designers playbook by Samantha Stahlke and Pejman Mirza-Babaei if you’re interested (fun fact there’s a photo of Toriel in there)
Anyway sorry for dumping this large ask on you I’m just really passionate about game design and I like to see other people get into it.
please do not apologize I'd never heard half of this stuff so this is super useful!! I've seen some godot tutorials on YouTube although so far I've played around with RPG maker MV (it was on sale. very very fiddly interface, i had trouble getting around it) and gamemaker, which recently became free for non-commercial use (a lot more approachable on first impact but like i said, haven't really done anything substantial in either yet).
mostly, I'm still in the super vague stage. I've got an idea for the main story conflict, the protagonist and their foil, the general aesthetic i want to go for (likely 2D graphics, but it would be cool to make like. small cutscenes in low-poly 3D) but not much else. haven't exactly decided on the gameplay either! it's gonna necessarily be rpg-esque, but I'm not much of a fan of classic turn-based combat so. I'm gonna check out other games and see if i can frankenstein anything cooler :P
#like for example. if i were ever to make a daemo game (knock on wood) i was thinking that it would work out quite well#if i made it a PUZZLE rpg kind if game. since the player character is no longer frisk/chara/connected to the player#and daemo doesn't really have any reason to 1) be possessed or 2) go on murderous rampages#so with a base game like undertale where those ARE crucial parts of player-world interaction I'd have to redirect it elsewhere#it being player input in the story#but I'm not sure puzzles are quite the solutions for this other story....... we'll see#answered asks#SAVE point#thank you so much!
83 notes
·
View notes
Text
In response to this post:
I think it's because it has the best story progression and build up.
Everyone appreciates a story with rising action, climax, and resolution. You need the "lows" in order for the "highs" to stand out, and vice versa. A small problem some other chapters had was the use of too much "high", tense moments, which results in feeling like the player was just thrown into the climax of a story.
One thing Xkour also does with its "low"s is set up a growing sense of unease, teasing the player with mystery.
Xkour starts with a friendly tutorial into the game, the player feels welcomed as no imminent threat is found. However, that changes as the tutorial goes slightly haywire and with the newly learnt fact that dying actually has consequences. This unease steadily grows until the third quest where it reaches its peak. So, what does the summoner do? Flee this "peace" and "fun" to find out the dangerous truth behind it all. One exposition later, and we've reached the first climax and subsequent resolution. Beautiful.
But of course, the story isn't done. After the first resolution, we get another moment of "low"s getting "higher" as the guardian trials start, but similarly with that unease that something is wrong back at main and even here. This time, instead of reaching its peak when the exposition drops, the story suddenly goes into a relative "low" with the reveal that the threat, the creator, wasn't here all along. But of course, it almost immediately shifts back into a "high" once another similar truth is revealed. So then we have the big climax of the whole two chapters, and then the story somewhat manages with its resolution.
Another thing would be the story's relatability.
What I mean is that players can easily connect with the characters that appear since everyone is a player here. (Also, who doesn't like the idea of a VR parkour game?) So this connection makes the stakes hit harder.
The ultimate threat of this chapter is the imprisonment and brainwashing of the players. And I assume it's easier to understand the dread of being trapped forever as opposed to other fantastical threats.
The story also uses Cyto as a way to personalise the danger of being potentially stuck in a game forever. Something about feeling more for one person's story rather than a general populace's. Although that may be the case, the story kind of fails to deliver on his anguish and thus people, us, are going to rewrite that sh** because it's too good to give up on.
(Luna's emotional anguish with herself as a program rather than a real being was also a treat.)
Another neat thing about Xkour is that it's the only chapter to have a clear connection to Luni that isn't about the swords of corruption.
There are a plethora of other minor things about this story that compile up to make this my favourite two chapters in Gacha World, some of which may differ from individuals.
tldr:
The Xkour storyline applies story writing 101 (the hill) well enough and is quite relatable, allowing the player to easily get invested into the story.
Cyto is an underrated character with almost as much emotional baggage as DJ X, and that's something this small community likes to see.
(I say that with a straight face as I continue typing out my currently 2600 word count analysis on Vale in canon and her despair with being trapped under C!Kilios' rule.)
Goodness, I love Xkour.
#gacha world#xkour#xkour skylines#gw cyto#{(You mention Xkour I'll come running to get to you.)}#{(That's what that smiley face was for OP.)}#{(I know it was a semi joke but duck it why not post a short analysis on main?)}
22 notes
·
View notes
Text
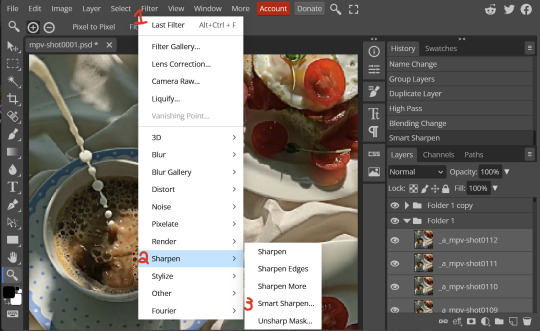
someone sent in this ask and I spent literal hours putting together this tutorial but then it wouldn't let me post it and when I went back into my inbox the ask was gone?? good thing I copy and pasted it, so here it is in its own post
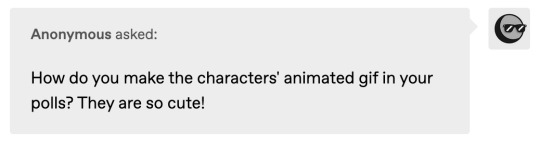
I'm not sure if this will work with programs other than photoshop, but this is how I do it. I know @shinobi-bacon has a tutorial here on how they do it which is pretty different from the way I do it, so if my tutorial is confusing maybe theirs will click with you better lmao. I stole the greenscreen idea from them anyway
SO FIRST, you want your villager on a green screen background. to do this, go to harv's island and use a custom pattern to make the walls and floors bright green. If the villager you're using has green in their design, you'll have to pick a different colour that isn't in their design, but for most villagers green is fine.
if your villager has every colour on them like pietro or stiches then rip you're gonna have to do some manual editing frame by frame. try to choose a colour that doesn't touch the edges of their silhouette too much in that case because it'll make life easier for you
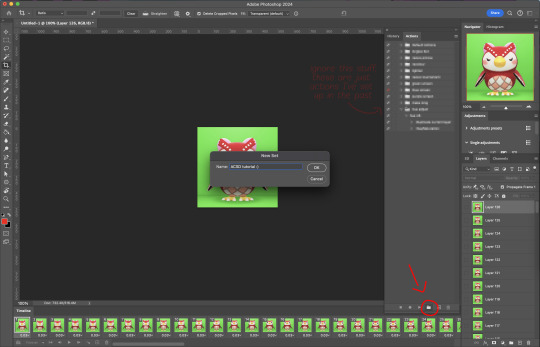
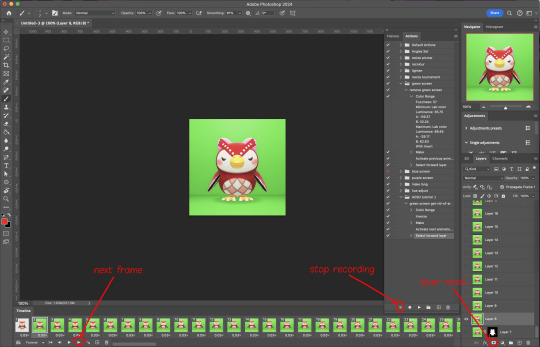
so once you have them in green purgatory, record them doing their emote or whatever. I just use the built-in screen record function that the switch has. press and hold this button to record the last 30 seconds that your switch displayed:

next send that video to your computer and trim off the start of the video so it starts right before a recognizable part of the animation. for this emote I cut it off right before the blink. if you have a slow computer, you'll probably want to trim the end off too so the video is only a little bit longer than one full animation loop
(you can use the video editing software of your preference, I just use quick time player Edit -> Trim)
okay time for photoshop. go File -> Import -> Video Frames to Layers
for "range to import" select "from beginning to end" (or you could skip the last step about trimming the video and select a range here, but I find it kind of finicky), and make sure "make frame animation" is checked
once imported, if it doesn't pop up on it's own, go Window -> Timeline to get your animation at the bottom

click through those frames at the bottom until you find an easily recognizable frame (I chose the first frame where her eyes are closed) and delete all the frames before it. in the layers panel, the layer from the frame you've selected should be the only one turned on. delete all the layers below it
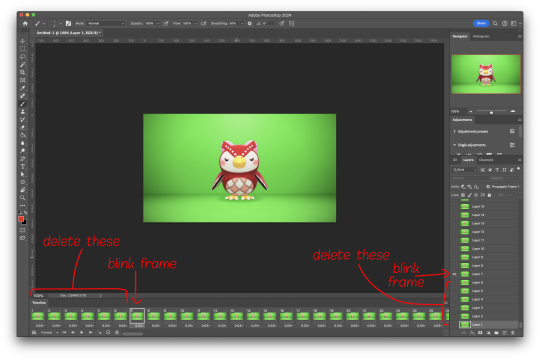
now go through the frames to find the next identical frame. this is where the animation loops. delete that frame and all the frames after it, as well as all of their corresponding layers (note in the picture, frame 121 is selected, and it's exactly the same as the frame from the start of the animation)

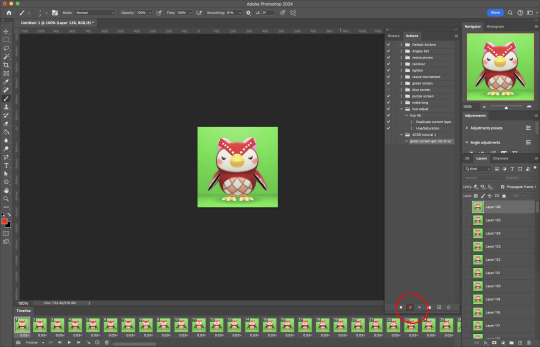
hit the play button on the bottom left to double check that it loops properly
next, make sure both THE FIRST FRAME AND BOTTOM LAYER are selected, and crop and reduce the image to your desired size. you can do this step later if you want, it's just that doing it now will reduce the load on your computer and make it run a bit faster. just as long as the first frame and bottom layer are selected, you can do this at any time
SAVE HERE because if you mess up this next part it's a pain to fix, but it's easy to quit and start over if need be
now it's time for my best friend the actions panel !! say hi actions panel !! (Window -> Actions). what the actions panel does is record your steps so you can quickly automate repetitive tasks.
in the actions panel, click the folder and name it whatever you want
then click the little plus and name that whatever you want and hit record. You'll see the dot turn red to indicate that your actions are now being recorded
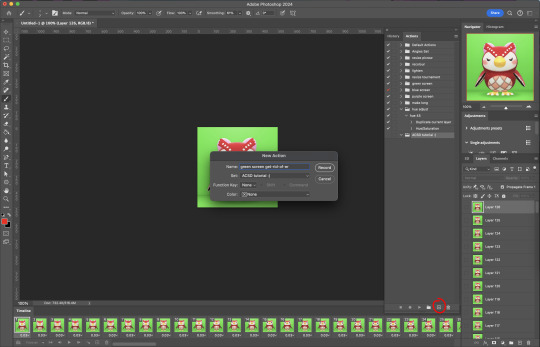
now with the BOTTOM LAYER AND FIRST FRAME selected (ignore that I have the wrong layer selected in the pictures, I fixed it after), go to Select -> Colour Range

click on a part of the canvas that would be green

shift+click on the rest of the green background and adjust the fuzziness until just the character's silhouette remains
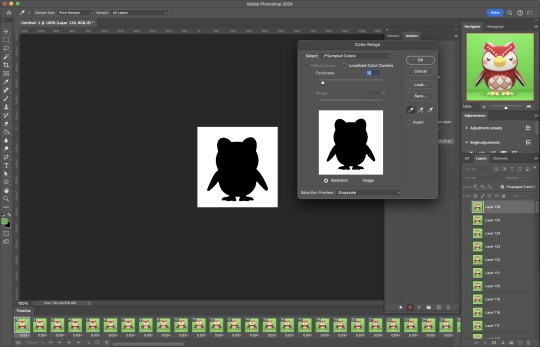
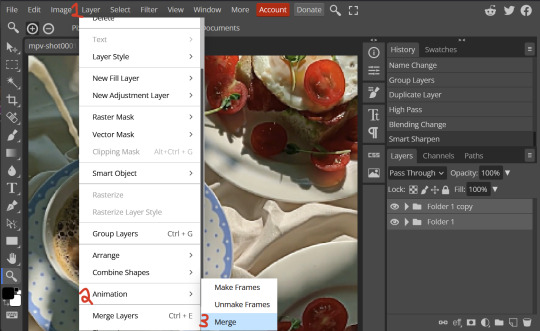
hit OK, now the background should be selected. go Select -> Inverse so that the character is selected, and click on layer mask.
click the next frame button (you MUST click the button, not the actual frame. you need the recording to recognize "go to next frame" and not "select frame 2"),
then keyboard shortcut option + ] to select the next layer up (again, you MUST use the shortcut so it knows to move up one layer and not just "select layer 2"),
and then stop recording.
now just repeatedly click the play button and it will do all those steps we just did for each frame :)

this part is usually where it gets messed up for me. if it did something weird like duplicate the same frame or layer your animation over a static frame, just quit and reopen that save I told you to make earlier. the action recording you just made will still be there when you reopen photoshop, so just select the first frame and bottom layer and repeatedly hit play again. if it STILL doesn't work, you probably did something wrong
the recording is now saved in photoshop forever until you delete it, so you can reuse the recording for other gifs! but if they use a different colour background, you'll need to make a new recording (you can see I have separate ones for blue and purple screens). also if you were working with one of those colourful villagers and parts got masked out that shouldn't have been, you'll have to go frame by frame and manually fix them. that's why we masked out the background instead of deleting it.
now it's time to make it into a gif! go File -> Export -> Save for Web. make sure Matte is set to "none" so you don't get those weird white flecks. colours and dither you want as high as they can go, but you can lower them if you need to make the file smaller (though I'd recommend resizing the image smaller first). the bottom left shows your file size. currently as of January 2024, tumblr allows gifs of up to 10MB
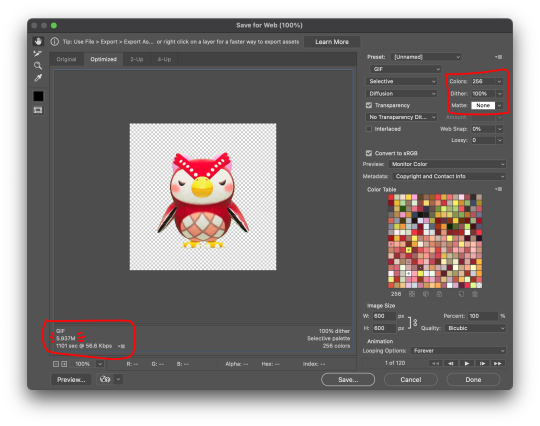
and there ya go! gif! :)
63 notes
·
View notes
Text
stim gifs in photopea
[PT: Stim gifs in photopea /End PT]
Hello! This is my (lengthy) tutorial for how I make GIFs for stimblr using Photopea. It's not going to be as extensive as how I make for shows, celebrities, etc, because I have different processes for both, however I'm still aiming to cover everything I think necessary!
It'll be split into multiple sections with headers, so feel free to skip whatever you want if you don't find it necessary :•] Reblogs appreciated if you found it useful, but no pressure obviously!
Sections:
Getting your video
Importing into Photopea
Making the GIF
Sharpening the GIF
Coloring
Exporting & Optimization (in EZGIF)
End results, and misc tips and comments
1. Getting your video
[PT: 1. Getting your video /End PT]
Short section! These are the ways I download and source videos for use
Youtube - yt-dlp (installation instructions)
Instagram
Tiktok (Allows without watermark)
Pexels
For yt-dlp, check out this basic list of commands I made solely for downloading material to GIF! If you have further questions, either send me an ask or refer to the github page.
2. Importing into Photopea
[PT: 2. Importing into Photopea /End PT]
There are two ways to import into Photopea, the first is importing footage directly, and the second is screencapping (which I won't cover in detail, but this tutorial is for installing the program I use on mac & how to use it, and this is for installing on windows)
Option 1: Importing footage directly (see end for comments)
On the home page of Photopea, you'll want to click "Open from computer", and select your clip, upon selecting you'll be presented with a popup like below

All that really matters here is where you see "30 FPS", that's the videos native frame rate. I always put whatever that number is as my frame rate because I find it to be the best, but you can use different presets (Like ezgif, which gives you 12, 20, etc). The less frames you have, the chopper it will be. If you plan to slow it down later, I'd also recommend having more frames so it looks smoother after slowing.
Now you just have to wait for it to load all the frames, then you're set!
Option 2: Importing screencaps
This is my personal way of doing things, so this is assuming you've installed a screencapping program and already have your frames ready.
For this, when you click "open from computer", select the first frame and open it by itself. Once that's loaded, look in the top left at the "File" tab, select "Open & Place", then ctrl + shift to select the rest of your frames. Once they've all loaded in, you can either rasterize them now, or wait until after cropping and resizing (goes faster then).
What's important though, is use the shift key to select all your layers, in the top left open the "Layer" tab, hover over "Animation" at the bottom to expand it, and select "Make frames". With your frames still selected, hit the folder button in the bottom left.

Without this, Photopea won't recognize this as an animation, therefore you'll be unable to export it as a GIF.
3. Making the GIF
[PT: 3. Making the GIF /End PT]
3A. Cropping
To begin with cropping, select the crop tool, which is the fifth one down on the left bar (if you hover over, it will say the name), or the "C" key on the keyboard.
Along the top now, you should have some new options. The dropdown menu that says "Free" is going to be how you select an aspect ratio or fixed size, and I always set to 1:1 since most people on stimblr use square GIFs, but you can do whatever works for you! Make sure to leave "Delete uncropped pixels" unchecked, because that lets you move stuff around later without having to recrop.
Crop your animation down as you see fit, then either hit the enter key, or the check button along the top bar. If you're unhappy with the placement, you can undo it OR, select all your layers, then use the move tool (First icon on the left, or the "V" key) and drag it around as you see fit.
3B. Resizing
With all your layers selected still, open the "Image" tab in the top left, towards the bottom select "Image Size", then select what you want to resize to.
Tumblr's exact GIF sizing
1 per row: 540px
2 per row: 268px
3 per row: 177px
HOWEVER. For stim GIFs, I find the quality difference so negligible, you can resize to what you want. It's also better for it to be bigger and scale down, then smaller and scale up. For this reason, I typically do 268px no matter what, or 300px.
As far as resampling goes, leave it turned on, and I personally leave it on bilinear, but the different options vary slightly, so experiment and see what works for you!
If you're happy at this step, go ahead and skip down to exporting! But when doing this way, I do recommend sharpening for better quality at smaller size.
4. Sharpening the GIF
[PT: 4. Sharpening the GIF /End PT]
The fun thing about this section is you get to experiment and find what works for you! I'll give you my personal method, but you can play around, add and remove bits, etc until you get something you're happy with!
4A. High pass
High pass is my personal favorite way to sharpen GIFs, and for stim GIFs I'll often use only this.
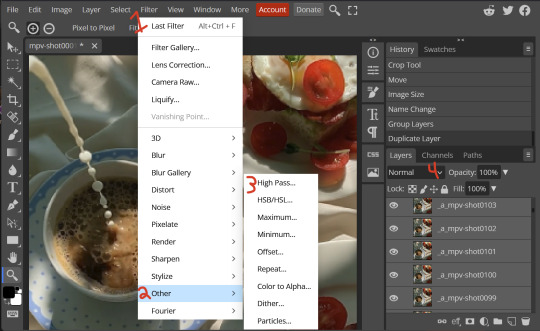
(Steps 1-3 in image) To do, start by right clicking the *Folder* all your frames are in, and select "Duplicate Layer". Select all the frames in Only the folder on top, then go to the "Filter" tab along the top left, hover over "Other", and select "High Pass". The grey look is entirely normal! I normally set my high pass at 2-4, but play around with this step and find something you like!
Select the *Folder* all your high pass frames are in, and change the blending mode (fourth step in image) to "Soft Light", it should be on "Pass Through" initially. With that done, you've used high pass on your GIFs! If you're content here, skip the next section about smart sharpening, and see about merging animation folders under it.
4B. Smart Sharpen
Note: I recommend testing your sharpening settings on one layer BEFORE applying them to all layers, as it will be easier on your computer.
I utilize this in addition to high pass usually, but you can do it all by itself as well! To begin, select all the frames in your folder (if you used high pass, select the frames in the *Bottom* folder). Open the "Filter" tab on the top left, hover over "Sharpen", and select "Smart Sharpen". Now find what you like!
For stim GIFs, if I used high pass, I'll go for 75-110% amount, and a .1 radius. I personally don't like the look of an over sharpened GIF, so I only use smart sharpen if I want to enhance some small details high pass didn't touch enough, which is why I use so little. If you don't like high pass, you might use more here!
4C. Combining animation folders
If you used high pass, you'll notice you have two animation folders. To fix this, select both folders using ctrl + shift, open the "Layer" tab, hover over "Animation", and select "Merge". It will give you a popup to confirm, and you can go ahead and accept!
If you don't merge these, Photopea will think they're two GIFs in one document, rather than only one, which is why this step is so important.
As a note, once you merge these folders, you can no longer shift the frames around to change where they are in the crop like you could earlier.
5. Coloring (Image Heavy)
[PT: 5. Coloring (Image Heavy) /End PT]
This section is going to be less of a tutorial and more a basic rundown of the adjustment layers and what they do. Coloring will change from GIF to GIF, and you can do light or intense coloring, so this is just a guide to begin with, but really just play around and find what you like!
To access the adjustment layer menu, in the bottom right where "New Folder" was, the one directly next to it that looks like a circle made of two half-circles, will bring up your adjustment layers.
As a note, I always group my adjustment layers in a folder above my animation, for ease of hiding to compare with and without.
5A. Levels
Levels is one I almost *Always* use on a GIF because it makes it look cleaner to me. In the first box, sliding the black square on the left *increases* the blacks, sliding the white square on the right *increases* the whites, and the one in the center changes the general brightness up or down.
Sliding the black box on the bottom bar *decreases* the blacks, sliding the white box *decreases* the whites.
If you change the channel from RGB to another option, you can change the balance of reds/cyans, greens/magentas, or blue/yellows, I personally don't touch this for stim GIFs. In the RGB channel, I set the top black box at ~10, and the top white box at ~245 usually.

5B. Curves
This is another way of adjusting brightness, blacks and whites, or color balance. By adjusting the dot in the bottom corner you adjust blacks, the top corner adjusts whites, and if you make a dot in the center, it adjusts general brightness! You can also make multiple dots to separately adjust some values. By changing the channels, you adjust color channels rather than white/black.

5C. Exposure
This is another way of adjusting the lights and darks of the GIF. Sliding the exposure up and down will add/take away light from the lighter parts of your images. Adjusting the gamma correction up and down will add/take away shadow from the darker parts of your image. Offset increases/decreases the brightness of the whole thing but I almost never use it.

5D. Vibrance
Vibrance is what I like to think of as a "softer" way to increase intensity of colors, instead of using a Hue/Saturation layer. It affects warmer colours more intensely than cooler colours, whether you use the vibrance or saturation slider. The saturation slider here is more intense than the vibrance one, but less intense than saturation in a Hue/Saturation layer.

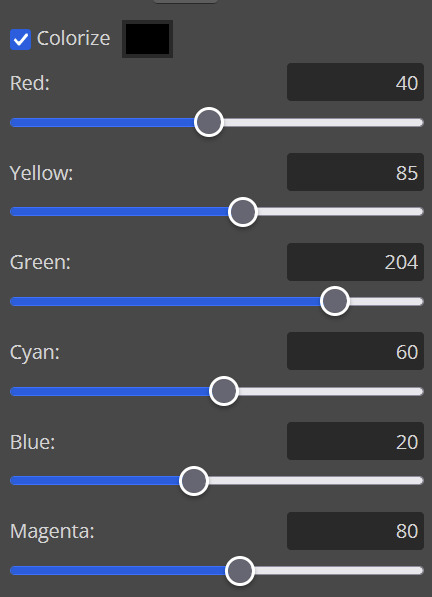
5E. Hue/Saturation
This one is simple! Sliding the hue slider changes the colour, sliding the saturation slider increases/decreases saturation, and sliding the lightness is basically like directly adding black/white to a color. I use lightness only sparingly.
What's cool here, is you can adjust the range to target a specific batch of colours! If you find your reds are too bright compared to everything else, you can target the saturation of them specifically.

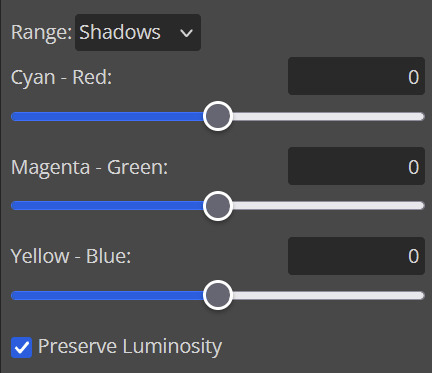
5F. Color balance
This is a simple way to adjust the base colors of an image, by changing it to be more cyan or red, magenta or green, or yellow and blue. This can be useful for making a GIF appear warmer or cooler!
I almost only touch the shadows & midtones, and highlights sparingly. "Preserve Luminosity" preserves the highlights and shadows of the image, so by unchecking it, you can achieve some more intense results.
5G. Black & White
The black and white layer is useful because you can change exactly how light or dark a color appears after making it black and white. For that reason, I prefer it over a gradient map if I need to make something black and white.
5H. Photo filter
Photo filter is a simple way to add a color filter over the entire image, and adjust how strong or weak it is. "Preserve luminosity" once again just keeps the darks and whites of the original GIF.

5I. Channel mixer
I couldn’t even begin to cover channel mixer here, but this is for very intense color edits (I typically use it when I'm trying to make a GIF fit a board). However, here's another tutorial solely about channel mixer if you're interested in taking a crack at it!
5J. Selective color
Finally, selective color allows you to adjust the amounts of color or lightness/darkness of a specific batch of color.
By changing the color channel, you can affect different batches of color. The cyan slider controls cyan/red, the magenta slider controls magenta/green, the yellow slider controls yellow/blue, and the black slider controls black/white.
Checking the "absolute" is essentially like "Preserve Luminosity" in the other layers. With absolute, it's like shifting the color one way or the other, and without absolute, it's like adding to the pre-existing color.

6. Exporting and Optimization
[PT: Exporting and Optimization /End PT]
6A. Exporting
With all that done, we're ready to finish it up! To finish your GIF, open the "File" tab in the top left, go to "Export As", and select GIF!
Here you can rename, adjust the size (WILL ruin the sharpening you did), the quality (I leave at 100%), and the speed.
Another important thing to note is the "Dither". If you leave dither off, you can potentially encounter color banding, which is where (typically gradients) with look like strips of color, rather than smooth. This is because GIFs only have 256 colors they can render, so if something has too many, it bands.
By checking dither, it can get rid of color banding, at the cost of dots on the image (around where the worst color banding is usually). Sometimes the dots aren't noticeable and this is the better option, however it will Also increase your file size. It's up to you if you want to use it!

6B. Optimization
This is technically an optional step, as tumblr's GIF size limit is 10mb, so as long as you're under that, you can post, however, smaller GIFs load faster and I personally find are better for use in stimboards where you're loading a lot of GIFs! So to help this, let's head on over to the optimize section of ezgif. My personal goal is UNDER 4.5MB, ideally under 4MB.
The two main things I recommend are Lossy GIF, or removing frames, and I always start with Lossy GIF. I do anywhere from 5-15, and usually this will bring down GIFs a lot if you made them in Photopea! My example GIF was 6.7 MB to begin with, and afterwards it was 4.2MB.
However if you find that to be not enough, you can remove frames. When you remove frames, it speeds the GIF up, so I also recommend slowing it down (this is why I set my frames high in the beginning as well). I typically do "Remove every 4th frame" and slow it down to 75%-85%.
7. End results, and misc tips and comments
[PT: 7. End results, and misc tips and comments /End PT]


(source) The first GIF is without sharpening/colouring, the second is with sharpening but no colouring, and the third is with sharpening and colouring. I didn't color it much besides making it slightly warmer, but I hardly ever do much anyways!
As for misc comments:
In firefox, when you import footage directly, sometimes it glitches and tries to load 4000 blank frames, which is extremely resource intensive on a computer. The solution is import the footage in chrome, save as PSD, then open the PSD in firefox. (Or work in chrome but why do that /half silly). The other solution is screencap which I do since I do this often, but both work fine.
In firefox, sometimes you're unable to slow the GIF down upon export and it will export faster than it actually is. Slowing the video down to 50% restores it to native speed I've found, and you can do this in ezgif before other optimization.
When colouring, my number one tip is slide something all the way up first, then adjust down! By seeing it at max, you have a better idea of what's getting adjusted.
If you have any questions, drop me an ask :•]
And that concludes our tutorial! My apologies for the length, but I wanted to cover every possible thing here. It definitely seems like a lot, much more than working in ezgif, but when you get used to what you're doing, it goes extremely fast (even if you spend extra time screencapping). I personally find it worth it for the ability to sharpen GIFs alone, but as well as more detailed coloring opportunities.
Thank you for reading, I hope this has been useful!
#i did it :•]#not stim#stimblr#gif tutorial#photopea#big thanks to talos for proofreading this :3 🖤💚🖤💚🖤💚🖤
78 notes
·
View notes
Text
HGS ReShade presets for SSO
Five atmospheric ReShade presets made by yours truly.
---
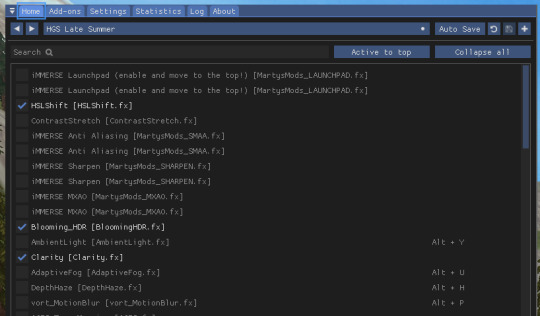
Late Summer

The basic one, works well almost everywhere. More natural looking greenery with a little bit of fog.
Playability: Fully playable. Adjustable for better performance*.
---
Enchanted
The forests are now blue, what else is there to say. Works best in denser woods where the sky is covered.
Playability: Limited, high performance cost and only looks good in certain areas. Notes: Palomino and buckskin horses may look a bit green. Does not work well in Goldenhills. The sky is blindingly bright if not covered.
---
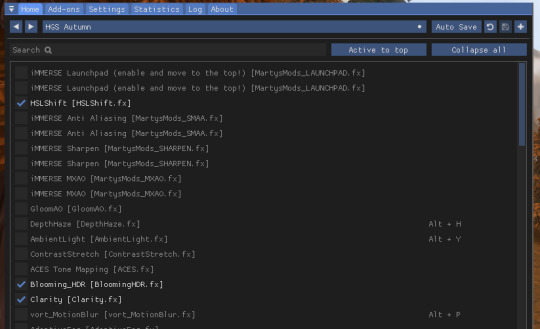
Autumn


Almost the same as Late Summer but with lovely orange hues.
Playability: Fully playable. Adjustable for better performance*. Notes: In areas with blue fog, like Mistfall and Wildwoods, distant terrain will look green.
---
Silent Hill


Foggy and gloomy. Originally designed to work in Jarlaheim and Silverglade but looks surprisingly nice almost everywhere.
Playability: Limited, high performance cost and you can barely see in front of you.
---
Pandoric Rift
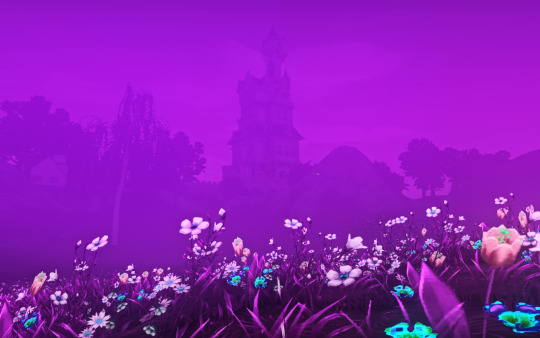

Everything is aggressively purple. A bit rough around the edges but you should be able to get goodish photos with a some elbow grease and editing.
Playability: Limited, high performance cost. Notes: I'm not sure if it's possible to make the grass-ground transition look natural, if someone figures out a solution please let me know. Palomino and buckskin horses may look a bit green.
---
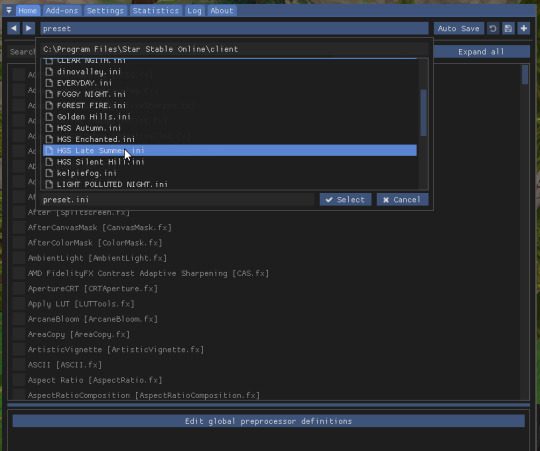
Download link & more
Download
To use ReShade presets, you first need to install ReShade. I recommend this tutorial:
youtube
Once ReShade is installed, you need to move the unzipped presets into the same folder you installed ReShade in. In Windows it should be: C:\Program Files\Star Stable Online\client
You should then be able to find and select the presets from the in-game menu.

---
*If you are having performance issues with Late Summer & Autumn, these are my recommended minimal settings.
#sso#sso reshade#ssoblr#star stable online#hgspresets#I rly hope the link works asdbhfgafjs#but ye I hope yall like these#Youtube
101 notes
·
View notes
Text
What’s the Big Deal About Python?
If you’ve been around the tech world even for a minute, you’ve probably heard people raving about Python. No, not the snake, we’re talking about the programming language. But what’s so special about it? Why is everyone from beginner coders to AI researchers using Python like it’s their best friend? Let’s break it down in simple words.

Easy to Learn, Easy to Use
First things first, Python is super easy to learn. The code looks almost like regular English, which means you don’t have to memorize weird symbols or endless rules. If you’re just starting your programming journey, Python won’t scare you away.
For example, printing a sentence in Python is as simple as:

That’s it. No extra setup, no confusing syntax. It just works.
Used Everywhere
Python isn’t just for small scripts or learning projects. It’s everywhere, web development, data science, automation, artificial intelligence, game development, even robotics.
Big companies like Google, Netflix, and Instagram use Python behind the scenes to make their products work better.
Huge Library Support
One of the best things about Python is its rich library ecosystem. Libraries are like pre-written tools that help you do complex stuff without writing all the code yourself. Want to analyze data? Use Pandas. Want to build a web app? Try Django or Flask. Want to build a chatbot or train a machine learning model? There’s TensorFlow and PyTorch for that.
Great Community
Python has a massive community. That means if you ever get stuck, there’s a good chance someone has already solved your problem and posted about it online. You’ll find tons of tutorials, forums, and helpful folks willing to guide you.
Not the Fastest, But Fast Enough
Python isn’t the fastest language out there — it’s not meant for super high-speed system-level programming. But for most tasks, it’s more than fast enough. And if you really need to speed things up, there are ways to connect Python with faster languages like C or C++.
So, Should You Learn Python?
Absolutely. Whether you’re a student, a hobbyist, or someone switching careers, Python is a great place to start. It’s beginner friendly, powerful, and widely used. You’ll be surprised how much you can build with just a few lines of Python code.
2 notes
·
View notes
Text
📁 Section 3, “OTOing your UTAU voicebank.”

After setting, and aliasing your UTAU voicebank, it is time to fine tune their samples! To do this we will be going through a process called, "otoing." Oto, "音," means sound. So for this process we will be setting parameters at which the sound will be rendered in the program.
Why? In this step you will be labeling your samples so that the program knows where the consonant starts and how to loop the vowels.
To oto your UTAU voicebank, we will need to understand what each parameter does. For this tutorial, I will be demonstrating how to oto in UTAU-Synth’s GenEditor as it is what I have been using for the last 6 years! *(As of writing this document.)
If you are on MacOS Silicon, I recommend referring to my followup vLabeler tutorial. This is because UTAU-Synth is quite unstable on MacOS Silicon, and most users use it just for the frequency generation. If your hardware is not experiencing any issues, then feel free to proceed.
UTAU-Synth GenEdit
Let’s talk about the 5 parameters you will be utilizing for your OTO. Offset, fixed, blank, pre-utterance, and overlap.

In the GenEdit, you will see a visual of each parameter highlighting the sample.
Offset - The first blue highlight on the left of the sample.
Overlap - The green line before the red line.
Pre-utterance - The red line after the green line.
Fixed - The red highlight at the beginning of the note.
Blank - The second blue highlight at the end of the note.
Now that you can recognize them, let’s go over what each of these functions do!
Section A. "Offset and Blank . . ."
The negative spaces in the sample, by placing these two functions in they perform the same feature at the beginning and end of the note. By setting the offset and blank, you will silence anything in the set area. Also can be refereed to as noise exclusion.
Section B. "Pre-utterance . . ."
By setting the pre-utterance, you mark where the consonant ends in a sample. How do you tell where the consonant ends? By observing the waveform sample, the consonant is normally more condensed and shorter than the vowel, by observing the waveform you can normally guess where it is by contrasting the shape.

Section C. "Overlap . . ."
The green line before the pre-utterance is the overlap. The overlap marks the area that will be overlapped with the previous syllable.
Section D. "Fixed . . ."
Is the pink highlighted area, that will tell UTAU what area not to stretch. Possibly the best place for this would be a little after the consonant.
After completing this step, we will now move onto generating frequencies in UTAU-Synth.
5 notes
·
View notes
Text
The French Fortran Code From Hell
My first job held the grandiose-sounding title of Technical Consulting Engineer, which was a very fancy way of saying "glorified customer support with some additional maintenance tasks."
I was assigned to a piece of software that was used to help people make their code more efficient. Among my duties were: creating documentation and how-to tutorials for the software; answering support tickets for the software; giving lectures on the software; and providing hands-on assistance in what we called Dungeons.
Dungeons were what happened when you locked a bunch of engineers in a windowless room with a handful of TCEs and lunch catering and let them go at their code with the software for the entire duration of the day, completely dead to the outside world - often repeating this process for several days.
I was in quite a few Dungeons during my three horrible years at that soul-sucking job. I want to be clear: the vast majority of this job was the soul-crushing tedium and agony of answering support tickets. The software in question was... not great at providing helpful error messages. 90% of everything resulted in "There's a problem with your license file" even when the license file was fine. So debugging was always an ordeal.
The best ones, strangely enough, were always the tickets from the military, because everything was classified. Anything that happens on their computer is classified. What does the error message say? That's classified. Can you send me the log output? That's classified. What does your license file say on line three? That's classified. You might wonder how this makes anything better for the poor sap trying to debug it. See, when they can't provide you any info, all you can do is send them the entire support script and tell them to go through the steps themselves. Then they message you back a while later politely telling you that it worked and you can now close the ticket. On the other end of the spectrum you had individual customers who bought the software for their own use, and some of these people were real pieces of work. Anyone who has worked customer-facing jobs knows the kind of person I'm talking about.
Anyway, Dungeons were more of an occasional interruption to the never-ending slog of support tickets, and usually a very welcome interruption.
But a couple times it was... let's say interesting. And both of these stories, oddly enough, involve the French.
The first one was the unfortunate time I was in a Dungeon full of engineers who had flown in from France - Paris specifically if I recall correctly. On the 15th of April, 2019. I received a text from my mother with rather alarming news, and thus I had to be the one to inform the room full of French engineers that Notre Dame Cathedral was actively on fire. Needless to say, very little got done that day.
The second one was just plain painful for me. The software in question supports code in both C++ (commonly used language, good) and Fortran (relic from the 1950s, extremely different from most programming languages). It was fairly rare for us to actually deal with the Fortran side of it, however.
But on this occasion, the French engineers I was in a Dungeon with wanted my help optimizing their Fortran code. Fine, I'm not exactly "fluent" but I can probably get the gist of it, I thought.
I was wrong.
You see, this Fortran code was auto-generated. It was not written by human hands and was not intended to be read by human eyes. It contained statements that were hundreds of lines long. Not functions, statements. To those not initiated in programming, this is akin to a run-on sentence that lasts 38 pages. It had variables with such helpful names as xyz and abc. Likewise, for the uninitiated, this is akin to having a pharmacy where all of the bottles are labeled "Medicine, probably."
It had, at some point, been minimally edited, or at least annotated, by humans, however. Because there were a very small handful of comments!
...Which were in French.
I do not speak French.
The French engineers did not know how to translate French Jargon into English.
Obviously, our company did not ever want us to say "we can't." But in this one case, nobody took issue when I looked these French engineers in the eye and just told them "I'm sorry, but this code is beyond our ability to optimize. It is beyond anyone's ability to optimize. It must be cast into the fire and destroyed; and may god help you."
#programming#this is longer than I expected#what do I even tag this with#stories from paladin's personal life
2 notes
·
View notes