#blender 3d tutorial blender basics
Explore tagged Tumblr posts
Visit Tumblr Blog
Explore Tumblr blogs with no restrictions, modern design and the best experience.
Last Seen Tumblr Blogs


Fun Fact
Tumblr has 16.74 million mobile monthly users in the US.
Note
Please i gotta know HOW DO YOU COLOR YOUR MODELS PLEASE I CANT SPEND A DAY TRYING TO FIGURE OUT HOW AGAIN /nf
no worries anon :} i literally just use materials / material slots. i avoid texturing because 1. that's closer to phighting's style (there's very very few things that are actually textured in phighting) and also because 2. i can't texture for the life of me. thankfully for both of us, materials are actually super simple to use!
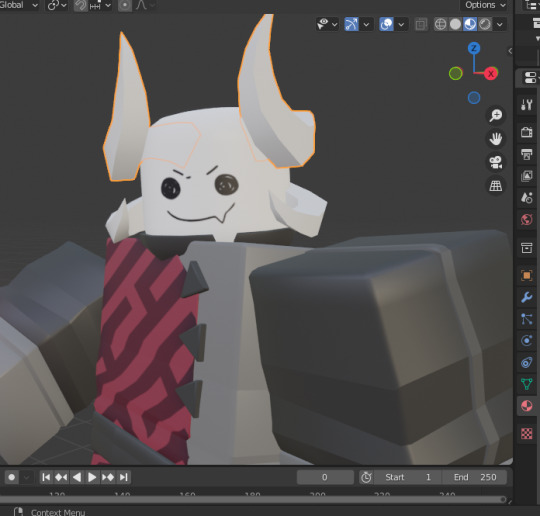
first, make sure to be on material preview mode in the viewport shading, you do this by selecting it in the top right

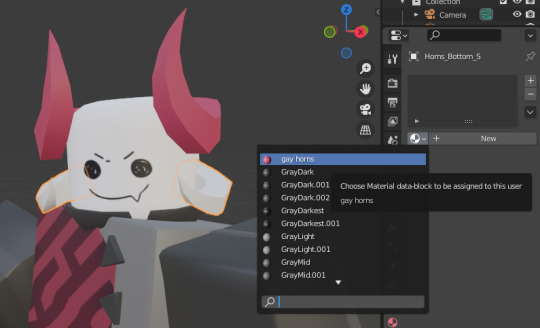
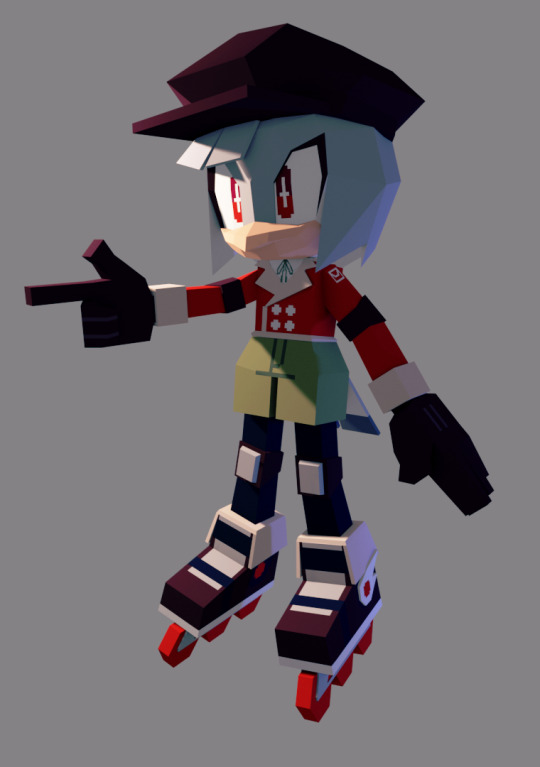
so, let's say we want to color subspace's horns here (i removed their color for the sake of this post. don't worry, they'll get it back)

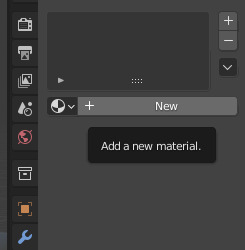
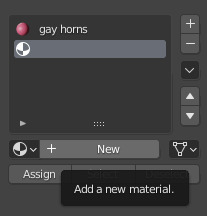
what you want to do is select an object (in this case, his horns here) and go to its material properties
and here you can add a new material
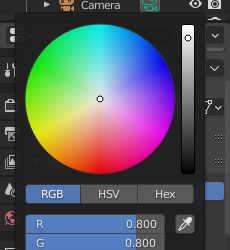
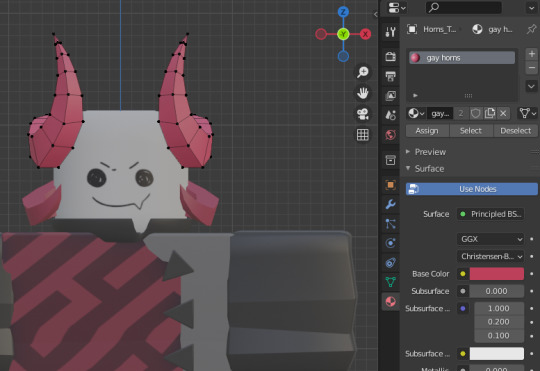
now all these things will show up. (if they don't, you'll have to click the 'use nodes' button under the surface tab.) though you probably won't be needing nodes unless you want something more specific. in this case though, we want to pay attention to where it says 'base color'

if you click on the white box next to base color, this little colorwheel should show up. you can choose any color here, or input a hex code in the hex tab if you want a specific color
once you choose a color here, it should show up on the current object you have selected

now i just do the same for his bottom horns. any material that you've created before will save, so here i just selected the exact same material as the horns on the top of his head

and there you go :} one thing to mention. because both of these objects are under the same material, if you change the color then it should change for both of them at the same time!

here you can see i only have the bottom horns selected, but because they're under the same material as the top horns, it's changed colors too
there's also a way for an object to have more than one material. to do this you have to select an object and go into edit mode
(i had to reset his pose here. goodbye to his gay ass pose)
let's say that, for example, we want only the tips at the top to be a different color. so we do this by selecting the faces at the top
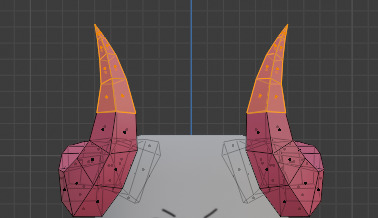
and we click on 'add new material slot', then 'new'
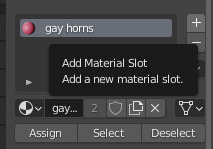
because we already have the faces we want a different color selected, we just click 'assign'
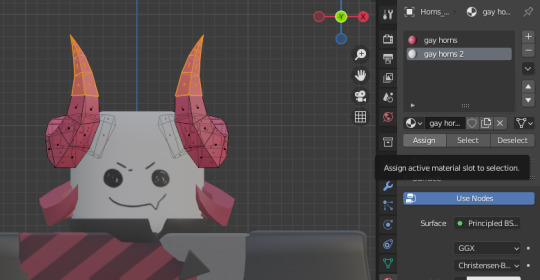
now you can just change the base color as we did before, and only the assigned faces will change color while the rest stays the same

^ he dyed his horns. so stylish
and there you go :} sorry for the long tutorial, but i hope this helps! there's a lot more you can do with materials and it can go a lot more in-depth, but generally for this sort of style the very basic features will suffice (at least for me. i don't like to do texturing. it hurts me)
#answers#long post#SORRYYY i got carried away. i was malding over something and answering this helped me take my mind off it. so thank you anon#3d#tutorial#? it's very basic stuff but it'll help someone out there i imagine#blender is very much not intuitive to use and how to use materials definitely evaded me at first. orz
57 notes
·
View notes
Text
i need to learn 3d modelling so that more than anything my power to mod persona 4 golden can grow
#rambles#modding#the thing is i'm SO BAD at following tutorials#i've always learned better by doing my own thing. messing around with whatever tool it is until it works#but that isn't really something i can do with 3d modelling.#or at least it's not something i can do at a total beginner level. i imagine it'll be kinda like how i learned coding#(did a couple free online classes and once i learned the very basics/got bored i just did my own thing)#but i started THAT when i was like 14. i wanna be as good at blender as i am with html/css NOW!!!!!!#<- is not even that good w html#<- because of the aforementioned ''hates taking classes on this kind of thing'' thing
3 notes
·
View notes
Text

very cursory attempts at rendering in blender. i have no idea how to change the background colour or make the entire thing brighter or crop the render so i did a fair few adjustments in procreate cause it was way too dark with way too much dead space. i did figure out how to switch the texture interpolation to nearest instead of linear so it’s not blurry, how to make the ribbon texture properly transparent instead of opaque, and sorta how to edit and add light sources, so it’s still a win. the quality difference between the blockbench screenshots i put in the progress posts vs even rudimentary blender renders is so stark lmao
#blender is just so dense it’s extremely not beginner friendly#whereas in blockbench once i understood the basic controls i could make immediate progress#i know i should look up blender tutorials but man i really don’t wanna make a donut#rambles#3d adventures
23 notes
·
View notes
Text

Month 6, day 21
More objects made without following a video guide! I did lean more heavily on the cheat sheet/step-by-step instructions than I wanted to, but that's okay :) That's what practice is for!
#the great artscapade of 2024#art#my art#blender#blender render#blender 3d#eevee render#cg fast track blender basics#the guy running the tutorial DID say to make these things 3-5 more times before I start on the next part of the series#and this is only my second try#now the real question: do I want to practice the exact steps I was taught?#or do I want to incorporate some easier methods I know?#we'll find out later#I think I'll do a different base for the table though#I don't actually like the tree stump tbh#it feels completely incongruous with the rest of the scene#we'll see what I decide to do; that's a future!Bobbi problem lol
4 notes
·
View notes
Text
dognut
#goldie speaks#im trying to follow a tutorial about blender bc I want to have experience with 3D programs#bc that's basically all of the job offers in my choice of work#so I gotta start somewhere!#thankfully it's easy it's just remembering the shortcuts oh my god there's so many
2 notes
·
View notes
Text
lmao a $42 tutorial to make CC...
ANYHOO:
Requirements You will need: Sims 4 Studio Photoshop (however you choose to acquire it), or an alternative DDS Plugin (unless you choose to save files as PNGs) Blender (any version between 2.76 and 4.3 - I use 3.3) The Basics
Recolours and Textures
The easiest thing to start with is a recolour. If you have some knowledge of photo editing software, this should be fairly straightforward, but if you’re new to it, the following tutorial covers it well: Recolouring Tutorial - Softpine
If you’re feeling confident with your recolours, but want to add a little extra to your textures, it’s worth checking out specular and normal files.
Speculars are my favourite thing for elevating CC (by that I mean covering it in glitter and sequins). This tutorial covers the basics:
Speculars - Teanmoon
Normal maps (bumpmaps) are a little different. They can give a 3d texture to an item without altering the mesh (within reason). Teanmoon also has a tutorial on that:
The Bump Map - Teanmoon
If you’re feeling extra (I know I often do), you can use emission maps to make your item glow and/or flash/twinkle.
Get to know emission the map - S4S
Meshing
Meshing is a little more complicated (or perhaps not, depending on what your strengths are. I recommend starting with the Blender Donut Tutorial (pick the one that matches your Blender version) to familiarise yourself with Blender. I didn’t do this. I went in raw from using Milkshape for over a decade (don’t start me on Milkshape lol) I would have learned faster if I did…
Once you’ve navigated the majestic plate of donuts, you might be ready for a touch of frankenmeshing! This tutorial covers the basics really well, as well as a touch of texturing:
How to Make CC Clothing for The Sims 4 - Powluna
@joliebean also has some great tutorials covering some of the more technical details.
Going forward:
So you’re feeling confident and want to mesh from scratch! There are 3980193890381 CC creators and a limited pool of meshes to frankenmesh, so you may want to create something new. Trust me, start with earrings and work your way down from there.
For the alpha girlies:
Start to Finish Marvelous Designer Tutorial by owlplumbob
I'm also happy to answer any questions people might have as they're starting out. I don't know everything, nor am I one of the top-tier CC creating girlies by a long shot, but I'll do what I can and try to sign post if I don't know.
613 notes
·
View notes
Text
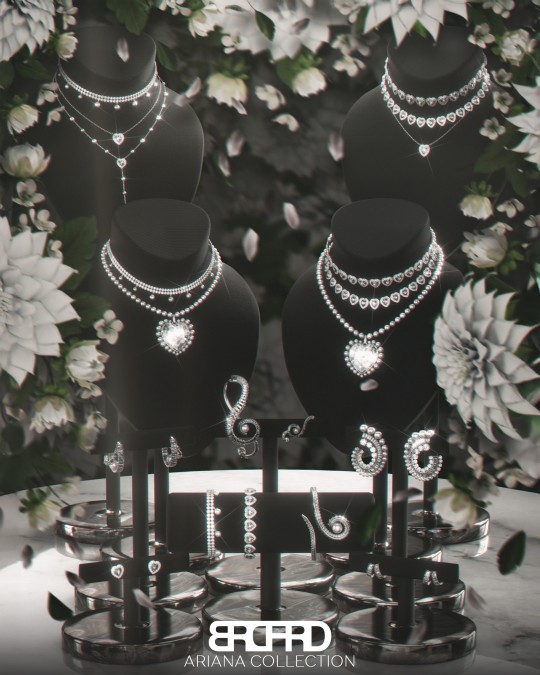
ARIANA COLLECTION /// GAME EDITION
/// New Meshes /// Unisex T/E /// 62 Packages
/// HQ Compatible /// BG Compatible
/// All LODs /// Custom Thumbnails /// Disallowed for Random
///↓DOWNLOAD↓///
PATREON [PUBLIC RELEASE: JUN 19]
------------------------------------------------------------------------------
/// Bracelets come in standalone and also in one set variant:

/// Earrings come in standalone and also in three set variants:

/// Necklaces come in standalone and also in ten set variants:

/// Necklace Sets:


------------------------------------------------------------------------------
ARIANA COLLECTION /// BLENDER EDITION* [SHOWN ON COVER]
/// Render Ready /// Adjustable Models /// Full Mix & Match Availability
/// File was made in Blender 4.4 using Cycles Materials
/// 8k Textures /// Material Nodes for Customization
/// How-To-Use Tutorial Included
///↓DOWNLOAD↓///
PATREON
-------------------------------------------------------------
BRADFORD'S SOCIAL MEDIA:
INSTAGRAM /// PINTEREST /// PATREON
-------------------------------------------------------------
*WHAT IS BLENDER EDITION?
Blender Edition is a special edition that has more texture space (usually 2048x2048) and can be used only in Blender due to different UV Mapping. This edition allows you to create renders with more quality and flexibility than models exported from the game itself.
Archive with this edition contains .blend file, diffuse textures, normal maps and tutorials on how to use it.
IMPORTANT NOTE:
Blender Editions will be available to Platinum and Diamond members only + Patreon Shop. Early Access doesn't apply to Blender Edition since this edition weren't made for the game and is basically a separate 3D Model.


#sims 4 cc#sims 4#sims 4 custom content#sims 4 accessories#sims 4 jewelry#sims 4 earrings#sims 4 necklace#sims 4 choker#sims 4 bracelet#ts4cc
332 notes
·
View notes
Text
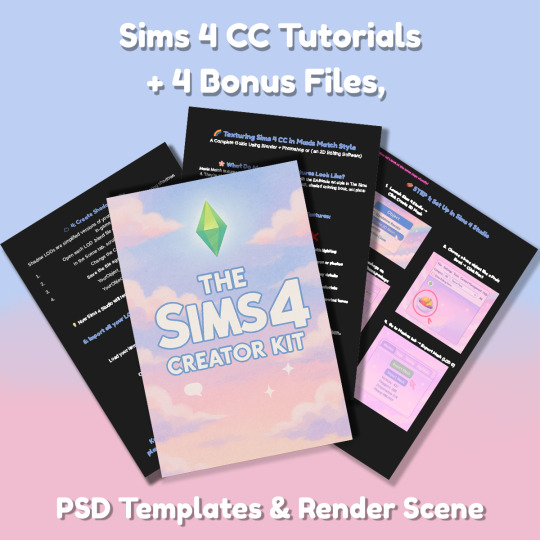
Sims 4 CC Kit — Make Your Own Lights, Decor, Clutter & Textures
Ever wanted to create Sims 4 clutter or decor CC but got stuck?
This kit is for you.
It’s a step-by-step guide that shows you how I make my own Sims 4 decor CC — lights, clutter, textures — in a way that I found works for me. You get guides, cheatsheets, templates, and my personal workflow that I’ve figured out through trial & error.
This probably isn’t the “proper” way of creating CC — but it’s how I learned, and it works and I use it every single time I create something new.
⚠️ Just to be clear:
This is a written tutorial kit, not a video or image course.
BUT — I’ve included some visuals, some screenshots & cheatsheets to help you follow along but its alot of written stuff. It would also be beneficial for you to have some basic knowledge of blender.
✅ What You Get:
Decor, clutter, lights CC Creation Guide
Shadow Mesh Tutorial
Mesh Cleanup Workflow
LOD Creation Steps
Maxis Match Texturing Cheat Sheet
Alpha Textures Basics
Vertex Paint for Lights Guide
Custom Thumbnail Tutorial
Normal & Specular Map Basics
Blender Basics Recap
Sims 4 Studio Quick Fix Cheatsheet
Blender Hotkeys Cheatsheet
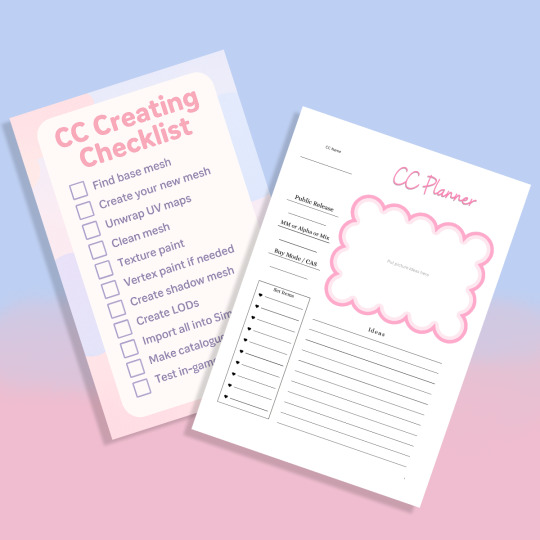
CC Planner to organize your ideas
CC Creating Checklist
PSD Thumbnail Templates (Decor)
Blank Normal & Specular Maps
Blender Render Setup File for Catalog Thumbnails
Texture Tips & Tricks
🎯 Why You’ll Love This:
No fluff — real steps, real help
Written for beginners who know basic Blender but need a hand
Includes a little bit of visual guides, printables & templates
Saves you HOURS of googling random problems
Helps you actually finish your CC & get it in-game
🖤 This is for you if:
You know basic Blender stuff (grab, rotate, edit mode) Got 3D Models you want to put into The Sims 4
You want to make clutter, decor CC and lights (not clothes or CAS yet)
You’re tired of tutorials that make you more confused
PS: Accessories & Clothing Creator Kits are coming soon.
If you get stuck, you can always join my Discord
(link’s on www.simmerkate.com).
Get Here (xx)
181 notes
·
View notes
Text
Sims 4 Render Lighting Tutorial

"Environmental Lighting" won my most recent poll, so let's get right into it!
A few notes before we begin:
I render exclusively in cycles!
This tutorial assumes some basic knowledge of blender
Though this tutorial covers the basics, HDRIs can be used in conjunction with any scene/your built scenes
I decided to focus on environmental and other lighting in this tutorial, since they all kind of go hand in hand.
For this tutorial, I'll be using my recent Cupid Sim. Here's a render of her with no additional lighting:

1. Base lighting
In any full body, single sim render (like lookbooks, for example), I really like to use a glowing base. It grounds the sim a bit and casts some interesting lighting on them.
To do this, I add a circle under their feet by pressing shift+A and selecting circle.

An empty circle will appear, but we need it to be a solid disk, so go into Edit mode (by pressing tab while the circle is selected) then hitting F on the keyboard to fill it.


After that, you can go into the Materials tab and add in color and glow.
Mine is adjusted like this:

And gives this rendered result:

2. HDRIs
HDRIs (High Dynamic Range images) are extremely useful when it comes to environmental lighting, I always use them now to add better/more dynamic lighting to my renders.
HDRIs are 3D/panoramic, which makes them extremely useful.
You can find/download HDRIs online in a few diff places: PolyHaven, AmbientCO, and Blender Market.
There are also several available for FREE using BlenderKit (my preferred method).
So how do you use an HDRI?
We can add HDRIs to our render by navigating to the world tab and changing the color to "environment texture".


I chose this vaporware HDRI from BlenderKit, & here it is with no adjustments, but it's looking a little rough so let's adjust it.

By adding vector nodes, we can adjust how the HDRI behaves. Here I mostly use the Z rotation and the background strength:


Here's the same render with the Z-rotation set to 50, 150, 200, & 250.


You can put in any value for the Z-rotation, this is just an example of how the HDRI turns. This is maybe not the best example of the rotation, but putting her in a forest just didn't feel right lmfaooo, hopefully you can see how the light changes on her depending on the rotation.
You can also adjust the strength of the HDRI. Here's the HDRI (rotated to 150) set at .5 and 1.5 strength:


For this tutorial, my favorite lighting is the HDRI set to 150, and the strength set to .5, like this (this is a rendered image):

3. Transparent HDRIs + Point Lights
But I'm not fully happy with the lighting. I don't love how the HDRI is a bit blurry, so I'm going to set it to be transparent.
To do this, go to the Render Tab, scroll down to the Film option, and check Transparent:


The lighting effect from the HDRI will stay the same, but the background will be transparent.
From here, you can add a background (when I do this, I like adding a plane, & moving/shading it until I'm happy (kinda like this):


NOTE that you have to put the plane far enough behind your sim so it doesn't affect the HDRI lighting too much.
SECOND NOTE You can use this same method to use HDRIs in conjunction with scenes. They can provide the perfect backdrop!
This is still really dark, so I'm going to add three point lights: -Two on either side of her head/shoulders that will be smaller (in radius) and brighter -One in front of her to add actual light (so details aren't lost)

Here's how I set up my lights.


The pink light settings are for the two point lights on the sides The white light setting is for the light in front of her
For a basic render, this is almost good enough for me, but I really like the glowing effect I get in my renders.
To achieve this, we have to go to the compositing tab:
4. Compositing
Full disclosure, my compositing tab is set to glow by default (that's how much I love it), so all of the renders in this tutorial have it turned on.
I use the glare node and set it to fog glow.
Here's my preferred setting:

I prefer the fog glow effect, but bloom, ghost, streaks and star are also options.
Here's a guide to the glare node!
Tbh, I never use any of the other settings, so I'll leave this tutorial here for today.
Here's the final result (with no additional editing):

If you have any questions, please don't hesitate to send an ask, message or join my discord (no minors pls) for help! <3
#ts4 render tutorial#ts4 blender tutorial#sims 4 render tutorial#sims 4 blender tutorial#sims render tutorial#sims blender tutorial#salemsims tutorial#render school tutorial#blender
209 notes
·
View notes
Text
remembered this while talking to a friend about lazy cc makers
once, maybe about a year ago, a person dm’d me and said they needed help with cc and it’s difficult to find someone who’d help
i’m used to people asking me how to fix something or solve a problem like “cc moves weirdly”, “strange triangle shadows”, “texture overlapping” etc. i help with a lot of the usual stuff that creators know how to deal with, but beginners might yet not. and it’s not a problem for me to help or explain whenever i know how, or even fix it for that person myself (though i prefer to teach them how instead of fixing because i myself prefer to learn how rather than get it done for me, and be self sufficient in the future). so i was like, sure, okay, i’ll try my best, what’s the problem
and they were like “so i make cc, and i took this 3d model [i don’t remember on which site], and i opened blender tutorial and didn’t understand it” – here i was thinking they’d ask me to explain some blender basics, so in my head i was like oh boy it’ll be long, but alright – until they continued “so in short, i need you to make the blender part of this cc for me”
i was so... how do you call that emotion when you’re just “huh?..”, flabbergasted? gobsmacked? ah, astonished! i was so astonished that i just failed to answer and went to sleep, and woke up to a bunch of question marks in dm
so i said, no, sorry, i don’t mind helping with troubleshooting, but i’m not doing your work for you, you have to give blender tutorial another go and try to understand it
and they were like “easy for you to say, you know how to move things in blender!”
yup, i was so lucky to be born with this innate knowledge and didn’t have to learn how to fix every problem i encountered at some point
96 notes
·
View notes
Text
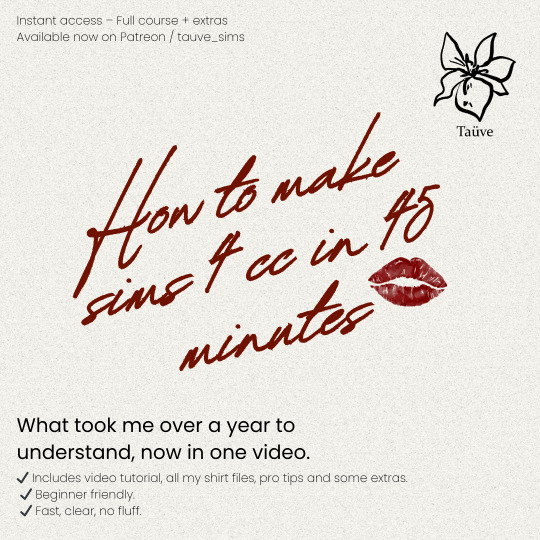
TAUVE SIMS - BEGINNERS CC COURSE (LEARN HOW TO MAKLE CC IN 45 MINUTES)
Hey everyone!! I’ve seen many of you asking for a course on how to make CC, so I’ve been working hard to make that happen for you.
In this course, you’ll learn all the basics you need to create (for starters) a shirt but the same method can be used to make pants, dresses, and much more.
3D CLOTHING MASTER STARTER KIT
One-time purchase – USD 42
46-minute video tutorial (with everything written down, no guessing what I just said).
Includes all project files, base models for Marvelous Designer and Blender.
Premium brushes to start designing right away.
Tips that took me over a year to figure out.
Direct links to the exact tools and resources I actually use.
Checklist of all key steps so you don’t get lost during the video.
Everything is explained step by step, assuming you know nothing. yes, even how to operate Blender. (This is the shortcut I wish I had when I started.)
Not for resale or redistribution. All files are for personal use only.
BUY HERE
#sims4cc#sims4#sims 4#sims#my sims#simscas#simslookbook#simdump#download#ccfinds#ts4 download#ts4 cas#ts4 custom content#ts4 lookbook#ts4#ts4 sim download#ts4cc#ts4 simblr#ts4 screenshots#ts4 legacy#ts4 gameplay#the sims 4#sims 4 cc#thesims4#sims4ccfinds#the sims4#sims4clothes#sims 4 build#sims 4 cc finds#sims 4 cas
82 notes
·
View notes
Note
Hey!! Ive been seeing your icons, they look really cool and I recently saw they're actually 3d/digital, I was wondering if you had any particular tutorials you recommend for getting into 3D that youve found helpful? I'd really like to get into it to do stuff like that but I find it really hard to pick a place to start
haiiiii !!!! personally, i really like Ryan King Art's blender tutorials, and he's my go to when i need help making a Specific material (or a specific Anything tbh) because he explains everything in a very clear and concise way. i found out he has a blender course for beginners, so this may be of use to you !
73 notes
·
View notes
Note
Hi i love your art!! I really like how you integrate 3d in illustrations, which tips would you tonnato someone who wants to learn 3d art / how do you approach it?
thanks in advance!
i never took a proper class for it, but youtube tutorials do a pretty dang good job for this! and messing around by yourself!
first things first, is to choose the software to use i use blender, it's free and very powerful for 3d and animation
starting out, follow some tutorials for basic functionality perhaps a stick figure-esque rigged model
after that, you can experiment yourself with what you want to make and look up specific things as you go along
Here are some links, it's been awhile since I've started so idk how helpful they are but hope they help!
Beginner Tutorial Playlist
Rigged Character Playlist
UV Transparency
Shape Keys
69 notes
·
View notes
Text
Month 6, day 18
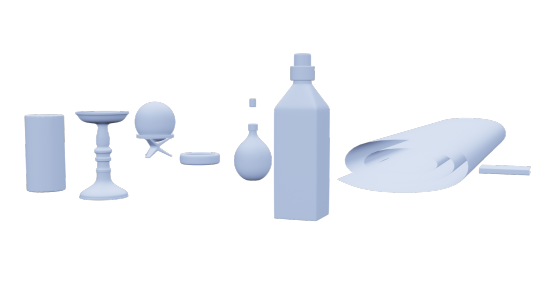
(╯°□°)╯OBJECTS!!!!
I'm not even done. I still have stuff to do to that cylinder to make it look like a slightly melted candle. I've been at this for five hours. The course said it would take three ;-; I am WIPED. OUT. XD
#the great artscapade of 2024#art#my art#blender#blender 3d#blender render#eevee render#cg fast track blender basics course#the scaling for all this stuff is all sorts of wonky#I can't wait to fix it because it's been bugging me XD#also don't let my kvetching fool you I'm having a blast lol#but the rest of this part of the tutorial series is gonna have to wait#I've been sitting so long I can't feel my but and also it's past my bedtime#or it would be if I had work tomorrow :D#which I do not :D#so I'm gonna tackle more of this course aaaaaall day!!#or until I can't handle any more#which is actually why I stopped now lol#I am hashed tagged done for today y'all#gonna snuggle a kitty cat and go to sleep
4 notes
·
View notes
Note
hello and happy new year! ceci, do you happen to have or could you please make a tutorial on creating teeth if it's not a big hassle? i wanted to make a very particulat teeth shape for my sim, but apparently i do something wrong because the result morphs the whole face in a weird way
gurl the "happy new year" is beating my ass rn, not this exposing the state of my inbox...... 😭😭😭
but ok more seriously, I'll get on with the tutorial 😳
Step 1
first, we're going to use s4studio to create our package. we're going to clone the EA teeth to use as our base.

open s4studio and select "create 3D mesh" under "CAS"
click the blue "CAS" button
Step 2

select "Face" from the Part Type dropdown menu. this will make only the teeth files show up.
we're interested in both "yuTeeth" and "yuTeeth_Snaggle", but select yuTeeth first! (you can hover over each picture to see the names too)
click next, and save your package file as whatever you want.
Step 3

zoom in close to the model with mouse wheel until you can see the teeth, to make sure everything is correct, then go to the "meshes" tab on the right side
export your mesh and save it where you can find it.
note: if you've never used s4s or blender before, make sure your blender location is set up correctly in the s4s settings. otherwise, the sims4studio tools won't show up in blender & we won't be able to edit our cut numbers later.
Step 4
now that we have our mesh, we need to edit it in blender. I'm currently using version 4.2. the controls are different in different versions, so feel free to ask me about it if you're using another version and something isn't working right.

open your mesh in blender. press the N key to get rid of the side panel and Numpad 5 to make the view better/less disorienting. you can zoom in and out with the mouse wheel, and move around by holding the mouse wheel and moving the mouse.
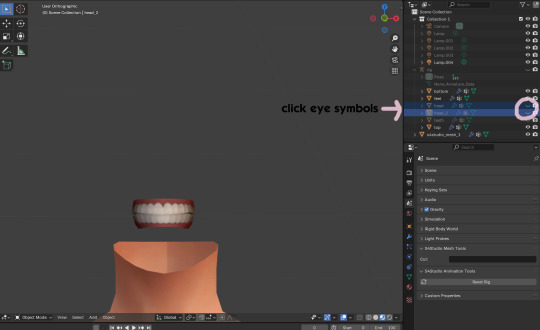
look to the right panel where "rig" is listed. click the arrow to expand the list so you can see all parts of the rig.
click the eye symbols next to "head" and "head_2" to make them invisible so you can easily see the teeth!
Step 5
there are many ways of editing teeth, of course, but what i'm going to show you is basically how to frankenmesh them. this is a good way of creating subtle variety in MM style, without it being overly difficult! we're going to combine the regular and snaggle teeth as an example.
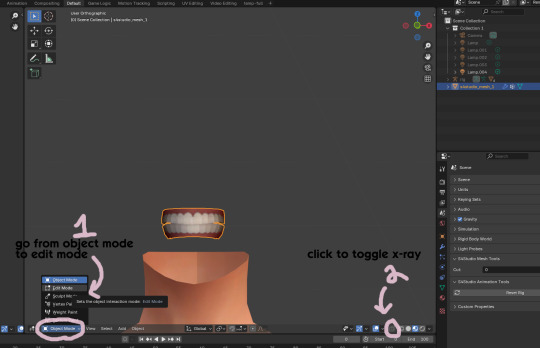
go from object mode to edit mode by clicking the menu at the bottom and selecting "edit mode"
afterwards, click the symbol on the bottom right to toggle "x-ray" so you can see all your vertices when editing.
Step 6

left click in the gray space to deselect all. there will be no orange left anywhere on the mesh.
then, hover over the top teeth and press the "L" key over a vertice (the small black dots) to start selecting the top half only. you should only have to select a couple vertices until everything on the top half is highlighted orange. you can change your view by holding down the mouse wheel and moving the mouse.
Step 7

now, press "X" key to bring up the delete menu.
click "vertices" to delete the parts of the mesh we've highlighted. only the bottom half of the teeth will be left behind. if there's any floating parts left over, highlight those with L and delete them the same way.
Now, repeat Steps 1-3 with "yuTeeth_Snaggle". when you have that mesh exported and saved where you can find it, continue to the next step.
Step 8

go back into object mode. you must be in object mode to append meshes.
go to file -> append to bring up another window

double click your snaggle mesh you just exported
double click "object"
double click "s4studio_mesh_1"
click "append" (if the window didn't close already) and the snaggle mesh will be added to your current mesh!
Step 9
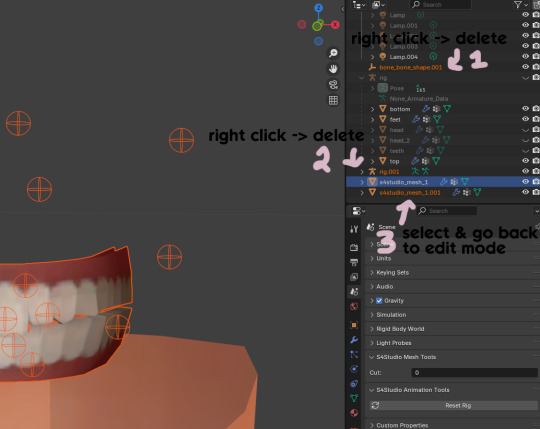
you will see several new mesh parts in the list on the right. right click over "bone_bone_shape.001" and click delete to remove it, since it's just a duplicate.
do the same thing with "rig.001" to delete it as well
select the mesh part you just appended- which is "s4studio_mesh_1.001" to select it and go back to object mode (you can also rename it now by double clicking it if you want)
Step 10

repeat what we did in Steps 6-7 to remove the bottom teeth of the snaggle mesh. you may need to be more careful since these teeth are less straight & overlap more. take your time, and if you make a mistake, you can press CTRL+ Z to undo. you can also click the eye icon next to our first mesh part to hide it so you can see better.
when you're done deleting, unhide the first mesh part to see how it looks together. you now have the top teeth from yuTeethSnaggle and the bottom teeth from yuTeeth on the same mesh! you can mix and match many teeth parts this way.

I decided to rename my mesh parts to top & bottom to keep them organized. you can click the eye symbols to hide either one and see how each part looks. when you're ready, select the top teeth mesh part and return to edit mode.
Step 11
some of EA's meshes have very few polys, so they can be hard to edit, especially if you want to move individual teeth. but, teeth are so small that they don't need/shouldn't have too high of a poly count. having every single tooth be super detailed is overkill, so it's a good idea to only increase polys in the specific areas you want to edit. for this example, i'm going to mainly focus on the front teeth.

select the front teeth by right clicking + dragging over the area you want to select, and it will highlight orange.
go to "edge -> subdivide" to increase the polys in the selected area only, which will give you more to work with. DO NOT SUBDIVIDE TOO MUCH! once should be plenty for this.
Step 12
now for the fun part- actually editing the teeth to be unique! you don't have to do this if you only want to mix & match EA parts, but it's neat to toy around with, even if you just do tiny edits. there's a variety of ways to do this, and I like to do a mixture, but for this example I'm going to use proportional editing.
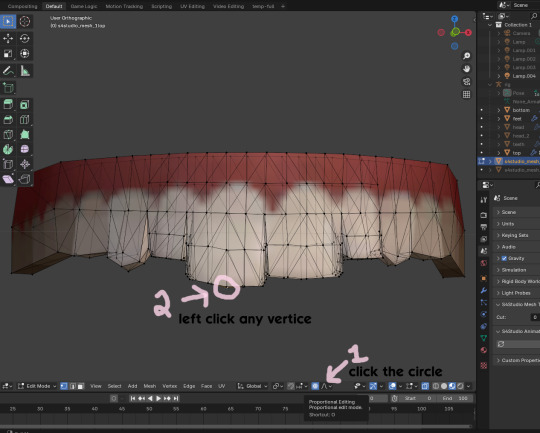
click the circle button to turn on proportional editing
left click any vertice you'd like to edit
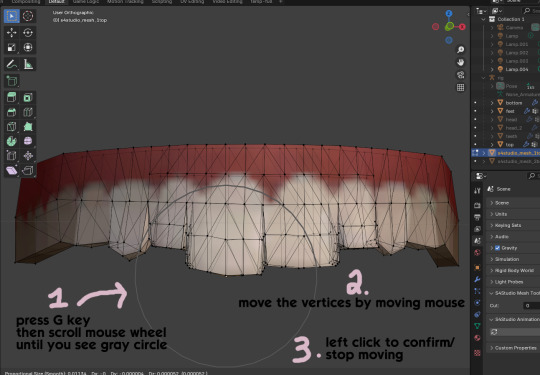
press the G key (move tool) and scroll the mouse wheel forward until the gray circle appears on your screen. this circle represents the influence of editing- the bigger the circle, the wider range of vertices will be moved around that point. the smaller the circle, the smaller/more detailed the change.
move the vertices around by moving your mouse. you'll see right away how it moves. play around with it by using a combination of scrolling the wheel back and forth and moving the mouse.
left click to confirm/stop moving the vertices. you can undo using CTRL + Z if you need to. keep repeating this step by selecting vertices, pressing G, and moving them around how you want. you can also use proportional editing with the S key (scale tool) to make areas bigger or smaller. in blender 4.2, you can also click the tools on the top left side of the window if you want to mostly use your mouse, but I usually use the keyboard.
when you're done editing your mesh and you're ready to test it out, save your file before moving to the next step. keep a copy to the side so you have something to come back to later if you want to change anything!
Step 13
now we're going to prepare our mesh to be game-ready. some of the most important aspects of that is ensuring a) the mesh part is correctly named and b) the "cut" number is correct. if these things are off, the game won't know how to read it, and we'll get odd bugs like missing heads or our mesh just not showing up at all. we currently have two mesh parts and teeth only need one, so we'll fix that first.
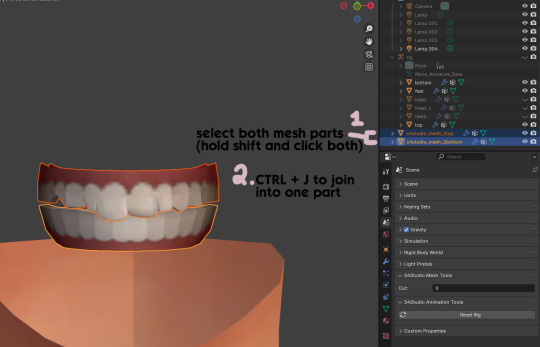
first, go to object mode and select both mesh parts by holding shift and clicking each one.
press CTRL + J to join them together into one part.
Step 14
another thing we need to do is remove doubles so our mesh doesn't look weird or have any odd shadows in-game. in blender 4, it's "merge by distance", but in earlier versions it's just "remove doubles". you should do this when you're done editing, because it'll be difficult to edit after this step. I always do it after I merge all my mesh parts & am about to import for testing. I also double check the cut numbers after this to be sure they're right.
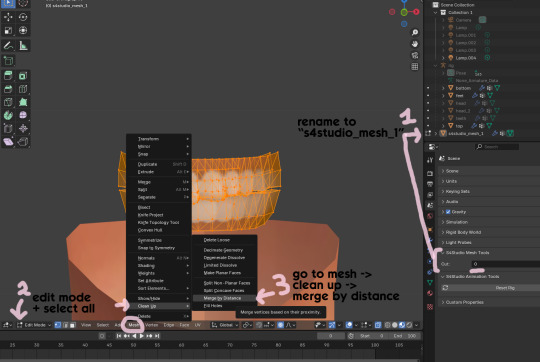
rename your combined mesh part to "s4studio_mesh_1" and ensure the cut number is 0.
go to edit mode and select all by pressing the A key
go to mesh -> clean up -> merge by distance
unhide the "head" and "head_2" parts of the rig you hid in Step 4
save your mesh as a new file name so you don't overwrite your working mesh, in case you want to go back and change something
Step 15
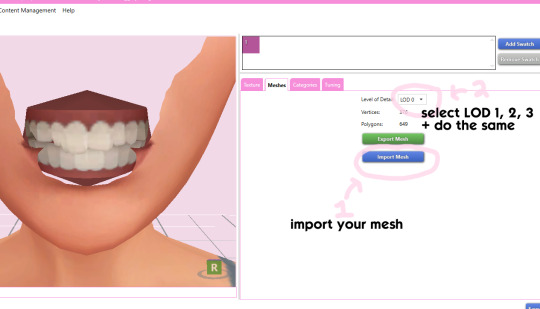
go back into your package in s4studio and import your new mesh
if you like how it looks & are done editing, select LODs 1, 2, and 3 in the dropdown menu and import your mesh there too. these are normally different meshes, but since EA based teeth are so insanely low poly, there isn't much point making individual LODs for them. but it's not that difficult to make them if you want to- if anyone wants a quick tutorial for that, let me know!
Step 16
you can stop here if you want- the teeth will take on the texture of your defaults if you used the yuTeeth package as a base. however, since we've used the Snaggle teeth on top, I think an adjusted texture might look better. I always use the textures by @ice-creamforbreakfast for my teeth, so head over there and grab their defaults if you haven't already! then grab the "uneven teeth" package file and open it in s4s.
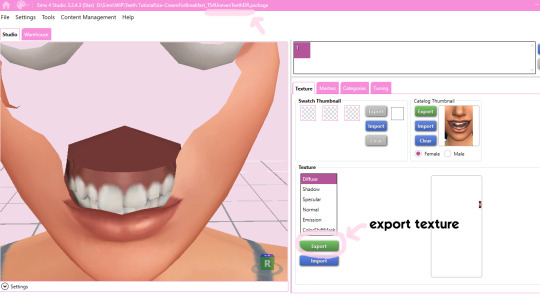
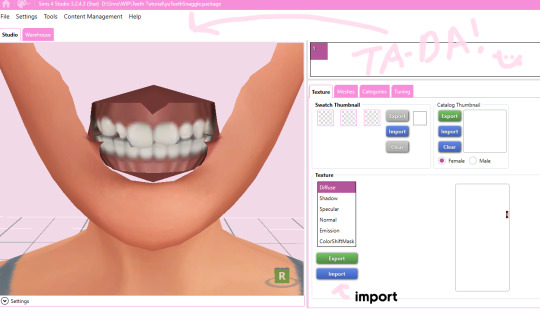
export the texture from the uneven teeth package file as dds
go back to your package file and import it! (and don't forget to credit ice-cream if you post your teeth publicly ;3)
Step 17
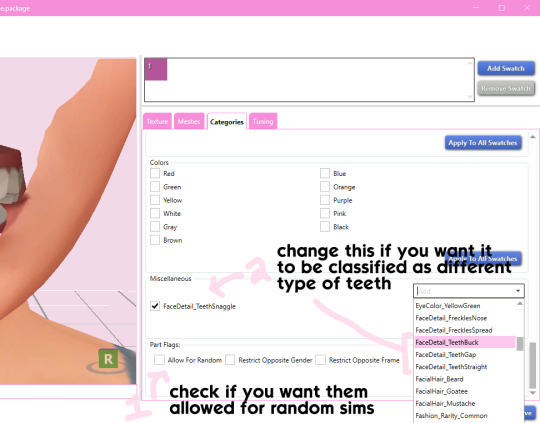
lastly, go to categories tab and scroll to the bottom. if you want your teeth to be enabled for random sims, check the box
if you want the teeth to be considered a certain type (like buck teeth), change the miscellaneous to that type. if it doesn't matter or you're not sure, just keep it as TeethStraight.
Finally, save your package and you're done! :)
#asks#adelarsims#ceci speaks#tutorial#reference#phewph!#long post#i don't think i missed anything#let me know of any questions!
65 notes
·
View notes
Text
How to make a triangle in Blender
How to make a triangle in Blender Feel free to watch more Blender tutorials on【YouTube Playlist】 Subscribe YouTube channel for more Blender Tutorials! Blender basics, tutorial video shows how we can make a triangle in Blender. In Blender to make a triangle, we can start with a Cylinder, and then modify Cylinder settings to make cylinder to be triangle. We can follow below steps to make a…
0 notes