#ts4 render tutorial
Explore tagged Tumblr posts
Visit Tumblr Blog
Explore Tumblr blogs with no restrictions, modern design and the best experience.
Last Seen Tumblr Blogs


Fun Fact
12.7% of mobile users access Tumblr.
Text
Sims 4 Render Lighting Tutorial

"Environmental Lighting" won my most recent poll, so let's get right into it!
A few notes before we begin:
I render exclusively in cycles!
This tutorial assumes some basic knowledge of blender
Though this tutorial covers the basics, HDRIs can be used in conjunction with any scene/your built scenes
I decided to focus on environmental and other lighting in this tutorial, since they all kind of go hand in hand.
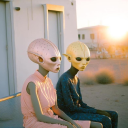
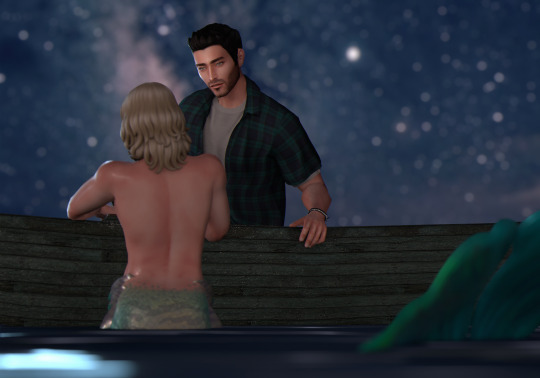
For this tutorial, I'll be using my recent Cupid Sim. Here's a render of her with no additional lighting:

1. Base lighting
In any full body, single sim render (like lookbooks, for example), I really like to use a glowing base. It grounds the sim a bit and casts some interesting lighting on them.
To do this, I add a circle under their feet by pressing shift+A and selecting circle.

An empty circle will appear, but we need it to be a solid disk, so go into Edit mode (by pressing tab while the circle is selected) then hitting F on the keyboard to fill it.


After that, you can go into the Materials tab and add in color and glow.
Mine is adjusted like this:

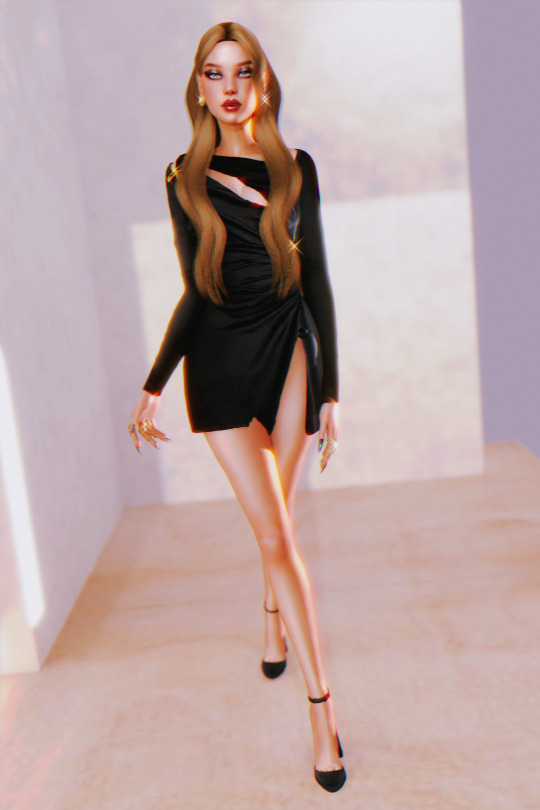
And gives this rendered result:

2. HDRIs
HDRIs (High Dynamic Range images) are extremely useful when it comes to environmental lighting, I always use them now to add better/more dynamic lighting to my renders.
HDRIs are 3D/panoramic, which makes them extremely useful.
You can find/download HDRIs online in a few diff places: PolyHaven, AmbientCO, and Blender Market.
There are also several available for FREE using BlenderKit (my preferred method).
So how do you use an HDRI?
We can add HDRIs to our render by navigating to the world tab and changing the color to "environment texture".


I chose this vaporware HDRI from BlenderKit, & here it is with no adjustments, but it's looking a little rough so let's adjust it.

By adding vector nodes, we can adjust how the HDRI behaves. Here I mostly use the Z rotation and the background strength:


Here's the same render with the Z-rotation set to 50, 150, 200, & 250.


You can put in any value for the Z-rotation, this is just an example of how the HDRI turns. This is maybe not the best example of the rotation, but putting her in a forest just didn't feel right lmfaooo, hopefully you can see how the light changes on her depending on the rotation.
You can also adjust the strength of the HDRI. Here's the HDRI (rotated to 150) set at .5 and 1.5 strength:


For this tutorial, my favorite lighting is the HDRI set to 150, and the strength set to .5, like this (this is a rendered image):

3. Transparent HDRIs + Point Lights
But I'm not fully happy with the lighting. I don't love how the HDRI is a bit blurry, so I'm going to set it to be transparent.
To do this, go to the Render Tab, scroll down to the Film option, and check Transparent:


The lighting effect from the HDRI will stay the same, but the background will be transparent.
From here, you can add a background (when I do this, I like adding a plane, & moving/shading it until I'm happy (kinda like this):


NOTE that you have to put the plane far enough behind your sim so it doesn't affect the HDRI lighting too much.
SECOND NOTE You can use this same method to use HDRIs in conjunction with scenes. They can provide the perfect backdrop!
This is still really dark, so I'm going to add three point lights: -Two on either side of her head/shoulders that will be smaller (in radius) and brighter -One in front of her to add actual light (so details aren't lost)

Here's how I set up my lights.


The pink light settings are for the two point lights on the sides The white light setting is for the light in front of her
For a basic render, this is almost good enough for me, but I really like the glowing effect I get in my renders.
To achieve this, we have to go to the compositing tab:
4. Compositing
Full disclosure, my compositing tab is set to glow by default (that's how much I love it), so all of the renders in this tutorial have it turned on.
I use the glare node and set it to fog glow.
Here's my preferred setting:

I prefer the fog glow effect, but bloom, ghost, streaks and star are also options.
Here's a guide to the glare node!
Tbh, I never use any of the other settings, so I'll leave this tutorial here for today.
Here's the final result (with no additional editing):

If you have any questions, please don't hesitate to send an ask, message or join my discord (no minors pls) for help! <3
#ts4 render tutorial#ts4 blender tutorial#sims 4 render tutorial#sims 4 blender tutorial#sims render tutorial#sims blender tutorial#salemsims tutorial#render school tutorial#blender
201 notes
·
View notes
Text

blender lighting tutorial + tips.
requested by @thecrimsonsimmer + recommended viewing: youtube video one, two, three, and four. this post will be dealing with newer versions of blender (2.8+) and cycles since that's what i'm more familiar with + commonly used for rendering. this is coming from me as an artist with some dabbling in photography and things i've learned in college!
references and setting the mood
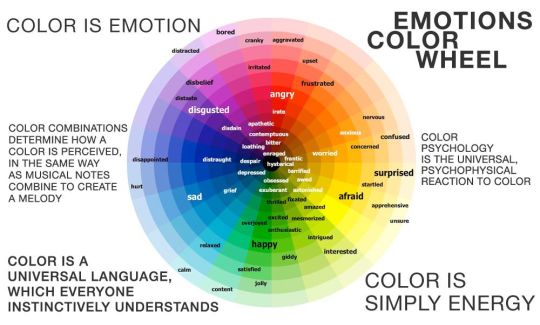
are you basing your render on an existing photo? study the light source and what direction it's coming from: that's what's going to tell you your set up for a similar effect. if you're not basing it on an existing piece, a good start is knowing How you want to set your subject (your sim) up - do you want them to be in the spotlight? are they in a specific environment that has neon lights? are you going for moody or something fresh, bright? definitely look up colors and their meaning (color theory, movie screencaps, etc.) to create a stronger image!
using resources to start the set up
it's always a good thing to mix your tools with different communities, such as the art community! many have lighting tools to figure out how to color their subject, such as this free-to-use head figure that depicts where the lighting source should be placed.

there's also the photography community and teaching people how to set up their lights for certain setups. video three and four linked in the beginning are from photography viewpoints.
spot? area? point? sun?
let's think of the lighting types as objects - a spot is like a plain lightbulb, area is a reflective sheet, spot is a flashlight, and the sun... well is the sun!
a spot is similar to an area light, but triangular/a cone. think of a helicopter search light, it's focused on a small area with the most light concentration. these can be used for lamps with lampshades, car headlights, or a lighthouse.
an area light is great for lighting up technology. a phone screen, tv screen, tablet, anything that's an LED screen emitting from a surface. the light is not as concentrated as a spot and is meant to cover more flatly (hence the rectangular source)
a point is best used for small pops of colors such as candlelight, lamppost, lightning bug tail, etc. a small source that has nothing covering it.
a sun covers the entire area and can be used as the overall mood setter. it can create filter over the entire render by just shifting the color like you would see in a movie. you'll be given a line with a sun light that gives the direction of where the sun is coming from. basically a spot light just on a much larger scale LOL.
power + coloring

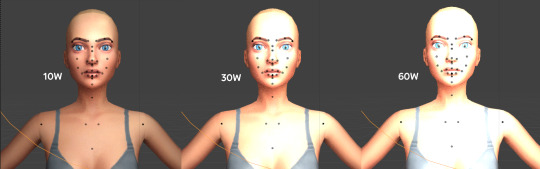
this screenshot is mostly what you'll only use to start off with. watts is the unit of measurement and the higher you go, the brighter the light will be. examples with a white colored point light 10W-20W: general portrait lighting 30W-50W: bright source, close flashlight for example 60W+: blinding
coloring is just like the system for in game lights for ts4. shift it to whatever you want it to be (click the white bar, that's the color preview) and mess around with the vibrancy. the darker, more intense color, the less it's going to appear on the sim.

closeness and intensity
similar to what's shown in the head lighting tool shown earlier, the closer the light is, the more that specific area is lit up. go too close and your sim could be completely washed out. it helps to change the size of the light (change with the radius slider) to better imitate what you're wanting. the larger the radius, the more diffused and softer the light source will be. close + small = very clear of the light source shape, can obviously tell where it is in relation to the subject far away + large = soft lighting, more of a hazy lighting of the color you choose.


to quickly adjust the light, press "G" and hold down your middle mouse button to adjust which axis you'd like to edit along. green is the x-axis, blue is the y-axis, and red is the z-axis. you can also press "G" and type the letter of the axis you want to use. drag the mouse to change the placement on that specific axis to however you want. if you want to freely edit the placement, just press "G" to move it out of the axis bounds.
world lighting
take this step as setting your canvas color before you start painting. in order for the values to look their best, change the world color to the same hue of the color you are mostly using. for example, this is set in a red-toned environment:


this is essentially changing the cast shadow onto the sim. the default is gray and will muddy up your undertones if not changed properly. for this instance, if you were to still use the same red point light in a gray world color it'd look like this:

of course, this will be based on if you have an environment image or not that can affect your lighting overall. this post is based on the fact there is no environment image and what not! if you need a visual demonstration on how to mess with the world lighting, check out this short video.

i hope that helped anyone beginning to render or wanting to light up your own scenes! i'm no rendering expert, but here's some of the helpful tricks i've learned and collected over the years<3 if you have any other questions feel free to send an ask!
#ts4 blender tutorial#sims 4 blender tutorial#ts4 render tutorial#sims 4 render tutorial#lighting tutorial#lyko posts#tutorial#long post
242 notes
·
View notes
Text
An excellent tutorial by the ever wonderful @wistfulpoltergeist !
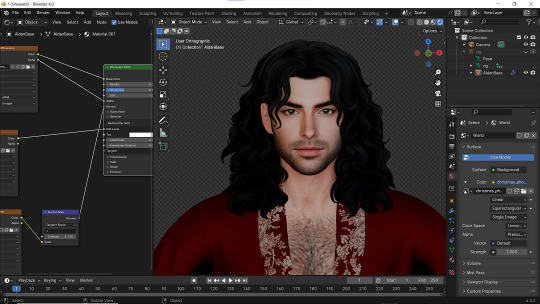
How to apply textures in Blender 4.0 For newbies (´。• ᵕ •。) ♡
So you imported your lovely doll into Blender 4.0, but the textures are messed or missing, here's how to apply base simple textures from the scratch!
I'm using Blender 4.0.2 (Sorry 4.3, but your EEVEE is currently nothing but tears for me) and my lovely Aidan is here to assist me. SO! Seat your bum comfortable and let's begin!
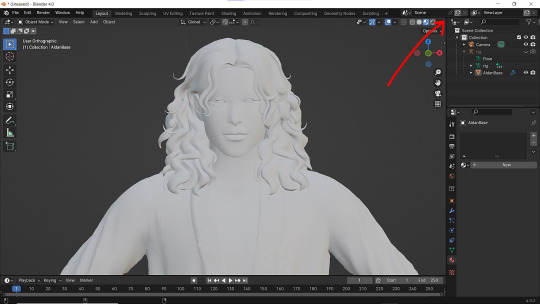
1 - Split your working space by pulling the corner of the screen:
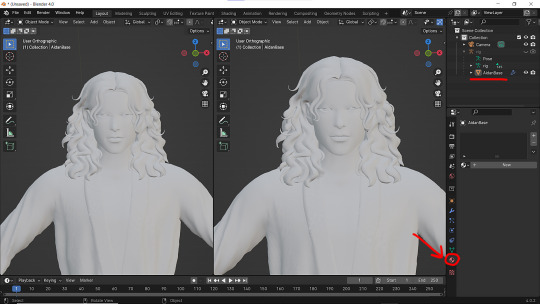
2 - Then click on Material with your mesh selected.
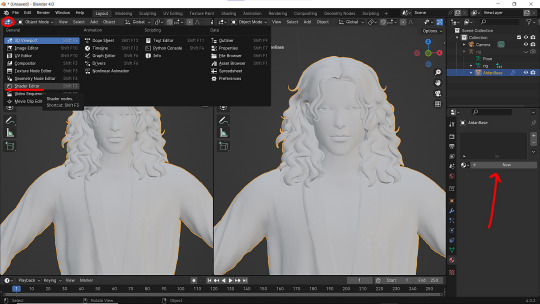
3 - Pick Shader Editor on the left part of the screen and hit New in the Material on the right. You'll get something like this:
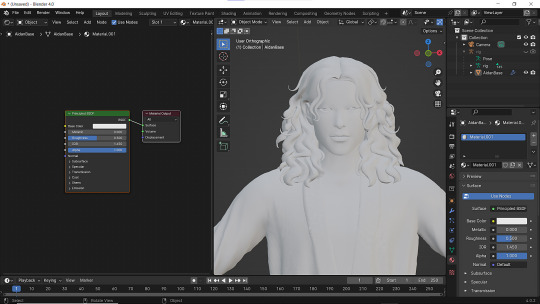

4 - On the left choose Add - Texture - Image Texture. We need three of them at very least :D
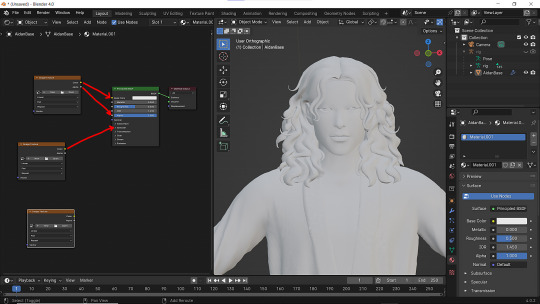
5 - First Image texture: Connect Color to the Base Color and Alpha to Alpha. Second Image texture connect to Specular IOR Level. Don't forget to upload your textures! Color - is well... color pics. Specular looks like Black/White pics and Normal is purple!
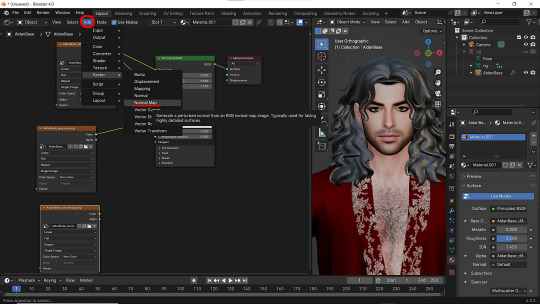
6 - Now add Normal Map. And connect it like on the picture below:
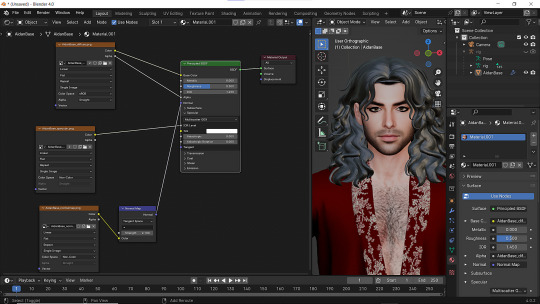
7 - Specular and Normal maps should be NON - COLOR in the Image Texture - Color Space
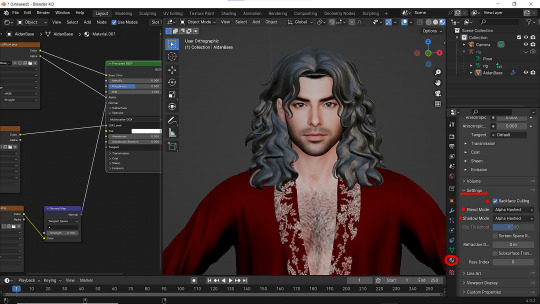
8 - Turn on the alpha. In Material - Settings - Blend Mode/Shadow Mode change on Alpha Hashed + You can check Backface Culling. In some cases it's vital :D
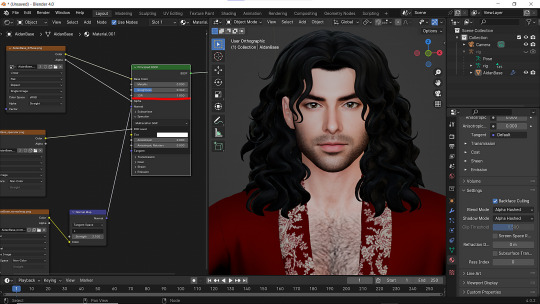
9 - Change the Specular settings in case of weird shining by changing IOR and Roughness parameters.
10 - You did it! (ノ◕ヮ◕)ノ:・゚✧
289 notes
·
View notes
Text
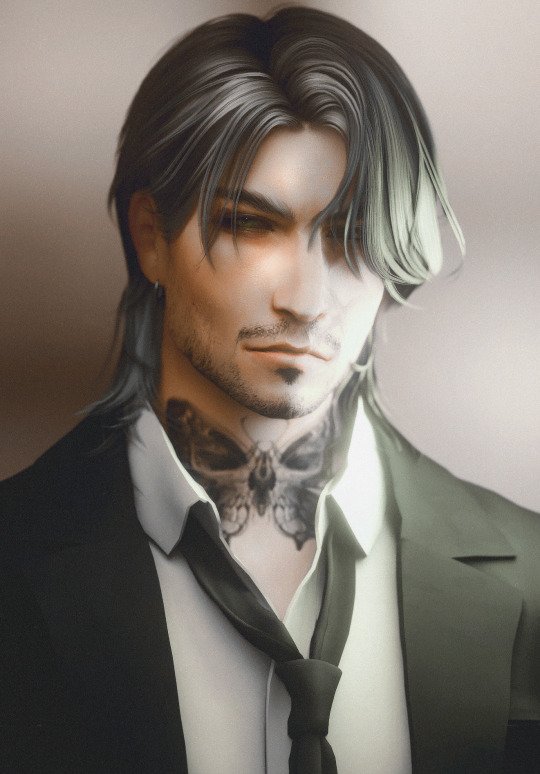
a speedrun of teddy render
not rlly a 'how to render' or anything special just the process of a basic sim portrait for peeps that were wondering of lighting/etc!
157 notes
·
View notes
Text


#any plastic beach fans?#GUYS GIUYS EFwehseguhwe I FUCJKIN DID IT !#also IF U NEED A REC TO A TUTORIAL I GOT ONE FOR U IT MADE SO MUCH SENSE AFTER THAT#frances... ur real OMFGH AHHHHHHHHHHHHHHHHHHH#watch this look like caca on mobile wHO FUCKING CARES#for a first in wisp history:#ts4 render#sims 4 render#ts4#simblr#sims community#oc: frances
190 notes
·
View notes
Text
one more medicated peaceful moment.
#ts4#the sims 4#simblr#ts4 render#show us your sims#deja senti b sides: edits#jay#from tha lighting tutorial#daddy merrik#god and his voice claim is linked.............i won't him 5ever im ngl#the vitiligo in his brow that i COMPLETELY FORGOT TO GIVE BOWIE HSKLHJHG#we're gonna pretend shes always had it
104 notes
·
View notes
Text
finished a render and realized there's a tiny mistake. don't re-render the whole thing: a tutorial
realized a lot of people don't know that you can do this so here's a quick post on it!
so let's say i didn't notice the hair was clipping with the ear like this:
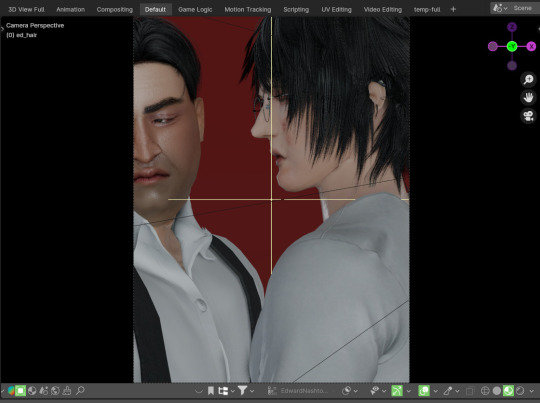
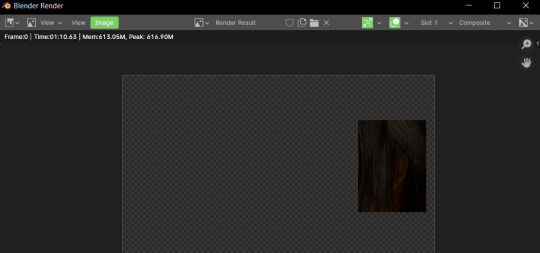
i render out the whole thing and it takes like 30 minutes. only after do i notice. save the messed up version! then do this:
fix whatever's clipping or messed up or you just want to change. so now let's only render what we fixed. use control + b to draw a square around the part you changed.
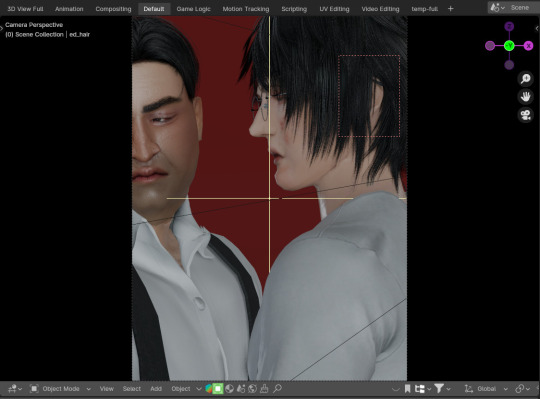
this will only render what's in that box. it only took a minute in cycles! (it's usually shorter than this, honestly. i was just doing some weird things in this render. also you couldn't even see his ear in the lighting lol)
save this piece, and then in photoshop, you can lay the fixed part over the clipping version, and there!!!
if for whatever reason you need to clear the mask, you can just hit control+alt+b.
(minor problem if you use ambient occlusion or glare compositing nodes, there will be a slight border on the edges, but you can just erase it! make sure to give yourself enough room on the edges!)
85 notes
·
View notes
Text
these are the two tutorials i followed when i first started out with sims renders! they’re super easy to follow along with (and as you can see, i go back to the first one all the time for help) !!! links: 1 / 2
#ts4#ts4 resources#ts4 tutorial#idk how to tag this#these are probably the first videos you’ll see if you search ‘sims render’ but i wanted to share anyway#they’re very helpful
85 notes
·
View notes
Text

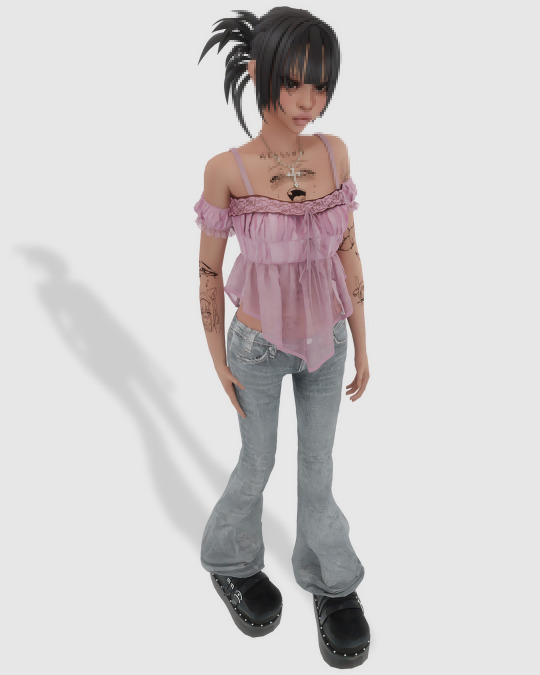
#ts4 render#sims 4 render#ts4 edit#my sims#simblr#sims community#back at it w the renders again#im also rly unsatified w my renders/edits these days😭#idk i wanna change the editing style im so bored of my current but idk whattt style i wanna do#and im struggling to even figure out what direction id like to take my blog in#i want a cohesive theme but i feel like i dont rly have one#its just so random lol#also pls ignore the terrible shadow issue around the lace#idk how to fix that#and i can't find any easy tutorials to follow😭#if anyone knows a fix tell me how. i'd love u forever lol
107 notes
·
View notes
Text

2nd attempt at a render, i now know the hotkey to center back on the sim, progress? lmao
#ts4 render#ts4#simblr#this other tutorial video was easier lmao#lucky for me i love a transparent ass png#but i still want to know how to do scenes tho
15 notes
·
View notes
Text
youtube
Learn to Render from a beginner!
I have started doing tutorials, This is my first tutorial there will be many more to come!
I plan on making many more, from Rendering to animating, blender modeling, Building blender scenes, As I learn so shall you!
Make sure to share, Like, subscribe to get the next one that comes out!
#sims 4#sims4#the sims 4#sims 4 cc#sims 4 blender#blender render#blender#b3d#blender 3d#3d art#3d model#blender3d#blender art#blender animation#sims4 blender scene#ts4 blender scene#blender scene#sims 4 blender scene#tutorial#blender tutorial#blender tutorials#Youtube
11 notes
·
View notes
Text
Lazy Background for render in Blender
So I’ve been asked about my backgrounds for render in Blender. Do I create sky simulation or environment simulation for my renders? Although there’s a splendid tutorial on How to setup an hdri environment background:
youtube
I use the laziest way ever! :D
So here’s my blender scene form this post (my lovely siren fish-boy and his werewolf^^).
As you can see the background is just a simple plane over there.
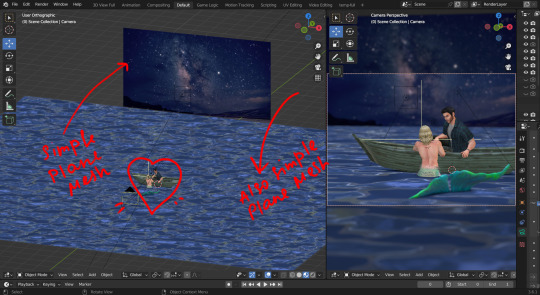
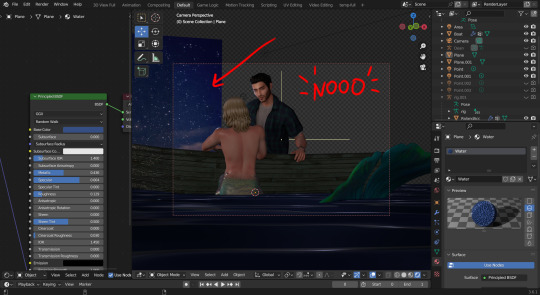
With even... simpler material :D it’s important for this material not to have any specular or other characteristics.
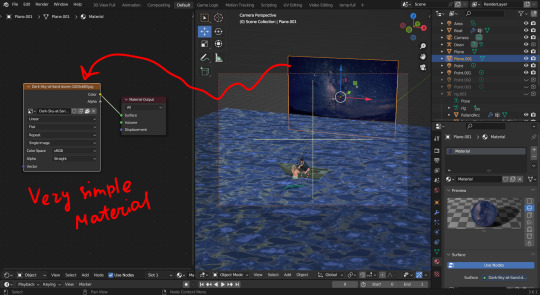
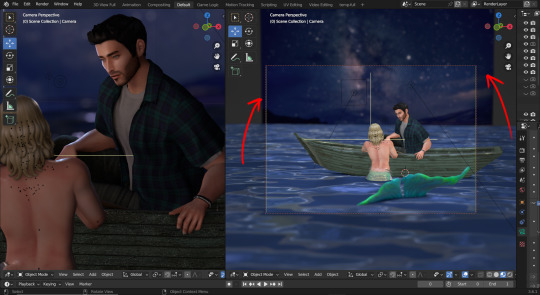
So, for example, I want my picture under this angle. What should I do?
Well! Move and rotate of course! (Scale if needed :D)
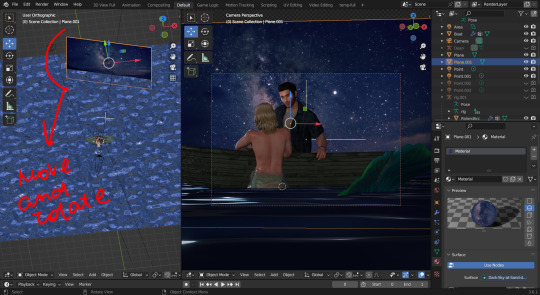
Then add Depth of Field...

And. Tada! The picture is done:D
Thank you, @glammoose for appreciating my work ^^. I doubt you’ll discover something new here, but who knows!
#sims 4 tutorials#sims 4 blender render#sims 4 blender tutorial#blender background for render#lazy background for render in blender#blender render#the sims 4 blender#sims 4 blender#blender#blender tutorial#how i set up background for my renders#render background in blender#TS4#WistfulTutorialSims4
161 notes
·
View notes
Text
How I Make and Render My Sims
I made some videos on how I make and render my sims! They're very much not tutorials and this is my first time trying to edit videos, so they're a little choppy.
I've posted the videos on both my Patreon and YouTube accounts, you can just pick whichever is easiest to watch on.
YouTube
Patreon

#sims 4 cc#blender sims#the sims 4#blender render#sims 4#blender#sims#the sims#ts4 cc#sims 4 custom content#blender tutorial#blender learning#blender sims 4
25 notes
·
View notes
Text
youtube
Learn How To Make Transparent Objects In Blender 3.0
In This Video, You'll Learn How To Make Any Object Transparent a.k.a Glass Like !
Don’t Forget To LIKE, SHARE & SUBSCRIBE ! I Appreciate All The Love & Support !! ♡
#3d art#3d modeling#3d render#3d blender#sims 4 blender#blender3d#pinkglacierz#sims tutorial#blender tutorial#ts4 tutorial#viral#black content creator#youtube#Youtube
14 notes
·
View notes
Photo
For those making their own poses, try this!

avoiding squiggly fingers when posing in blender a tutorial + rig downlad by ratboysims
hey! when i deleted my old blog i completely forgot to back up my old tutorial on this, so i’m just gonna remake it :-) this tutorial will show you how to lock joints in blender, so you can bend body parts (in this case fingers) in only one or more directions depending on what you need!
Keep reading
700 notes
·
View notes
Text
a little list of links to how-to posts and videos. i'll add more on as i find them! these are tutorials i found really helpful. if there's something you wanna learn how to do and it isn't linked here, then send me an ask and i'll search for a tutorial for it lol.
meshing tutorials by platinumluxesims
changing lot sizes in s4s
turning builds into deco houses
how to make animations by pixifiedtips
neon sign tutorial by simslife
how to make cc objects by sieory
how to make cc clothing by powluna
how to make custom tv shows by pixifiedtips
how to make backdrops into objects by awingedllama
how to make custom loading screens by goddessgamez
how to make custom poses by katsverse
how to make animations by simmer_creator
how to make objects by illogicalsims
newborn overlay tutorial by awingedllama
how to make alpha hairs by iconicsims
how to make maxis match hairs by alerii
how to make alpha clothing by famsimsss
blender render tutorial by famsimsss
ts4 studio tutorial index
how to make cc nails by pinkpusay
how to make cc earrings by christopher067
last updated: 08/30
785 notes
·
View notes