#sims 4 blender render tutorial
Explore tagged Tumblr posts
Visit Tumblr Blog
Explore Tumblr blogs with no restrictions, modern design and the best experience.
Last Seen Tumblr Blogs


Fun Fact
In Q3 of 2020, 31% of US users access the Tumblr app daily.
Text
How to apply textures in Blender 4.0 For newbies (´。• ᵕ •。) ♡
So you imported your lovely doll into Blender 4.0, but the textures are messed or missing, here's how to apply base simple textures from the scratch!
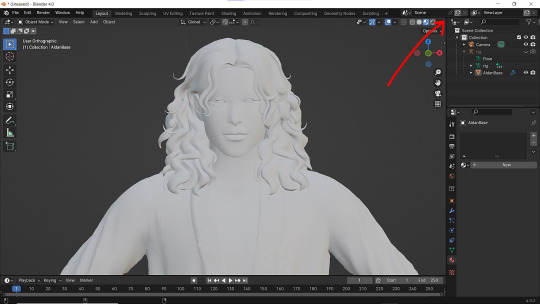
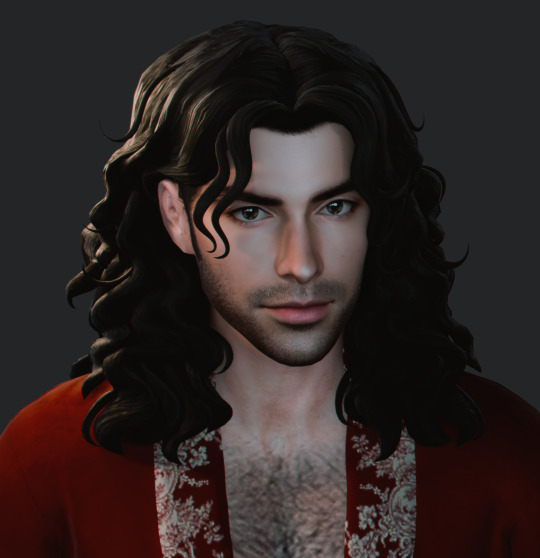
I'm using Blender 4.0.2 (Sorry 4.3, but your EEVEE is currently nothing but tears for me) and my lovely Aidan is here to assist me. SO! Seat your bum comfortable and let's begin!
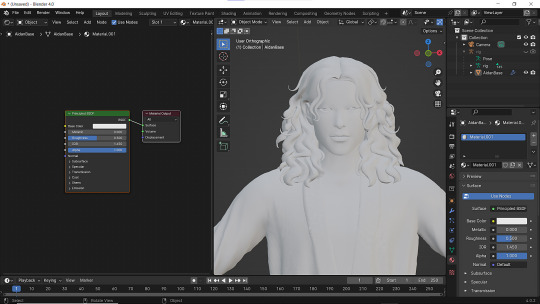
1 - Split your working space by pulling the corner of the screen:
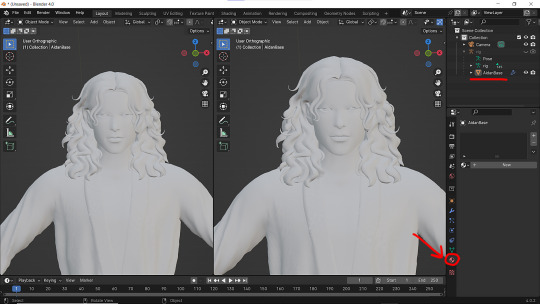
2 - Then click on Material with your mesh selected.
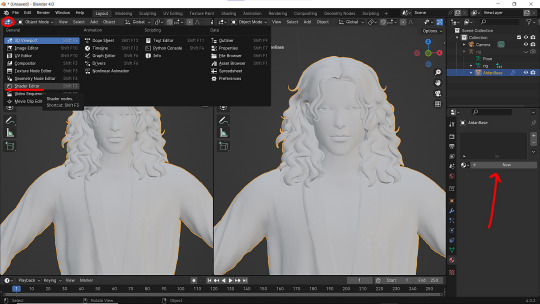
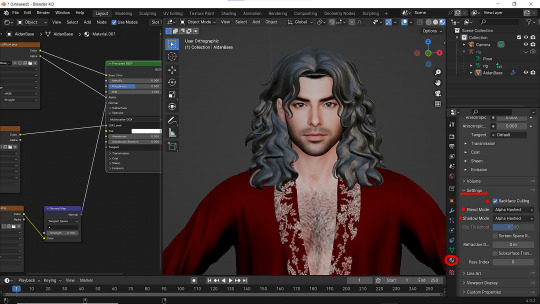
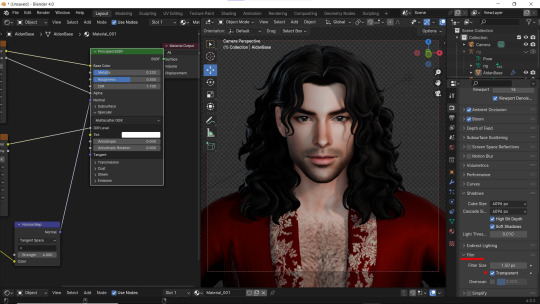
3 - Pick Shader Editor on the left part of the screen and hit New in the Material on the right. You'll get something like this:

4 - On the left choose Add - Texture - Image Texture. We need three of them at very least :D
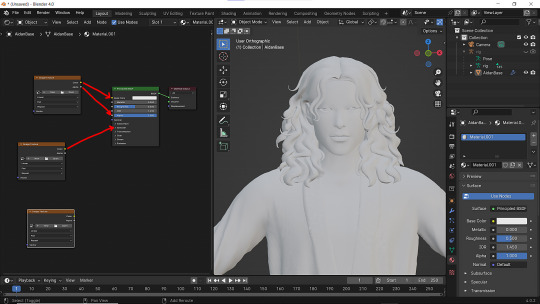
5 - First Image texture: Connect Color to the Base Color and Alpha to Alpha. Second Image texture connect to Specular IOR Level. Don't forget to upload your textures! Color - is well... color pics. Specular looks like Black/White pics and Normal is purple!
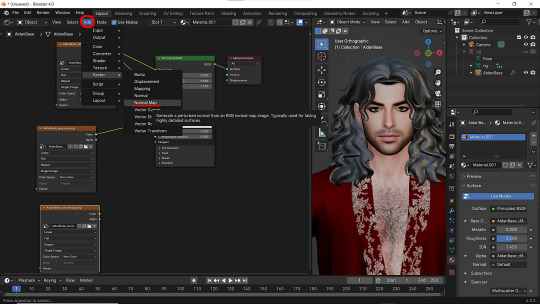
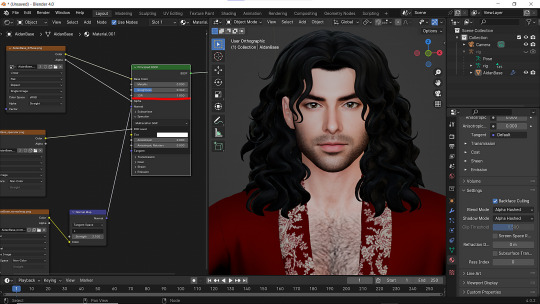
6 - Now add Normal Map. And connect it like on the picture below:
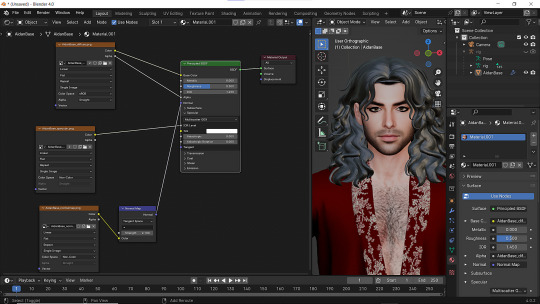
7 - Specular and Normal maps should be NON - COLOR in the Image Texture - Color Space
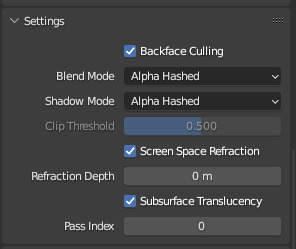
8 - Turn on the alpha. In Material - Settings - Blend Mode/Shadow Mode change on Alpha Hashed + You can check Backface Culling. In some cases it's vital :D
9 - Change the Specular settings in case of weird shining by changing IOR and Roughness parameters.
10 - You did it! (ノ◕ヮ◕)ノ:・゚✧
#WistfulTutorialSims4#the sims 4 blender#sims 4 blender render#blender 4.0#blender eevee#sims 4 tutorials#blender tutorial#sims 4 blender render tutorial#blender render
289 notes
·
View notes
Text
Sims 4 Render Lighting Tutorial

"Environmental Lighting" won my most recent poll, so let's get right into it!
A few notes before we begin:
I render exclusively in cycles!
This tutorial assumes some basic knowledge of blender
Though this tutorial covers the basics, HDRIs can be used in conjunction with any scene/your built scenes
I decided to focus on environmental and other lighting in this tutorial, since they all kind of go hand in hand.
For this tutorial, I'll be using my recent Cupid Sim. Here's a render of her with no additional lighting:

1. Base lighting
In any full body, single sim render (like lookbooks, for example), I really like to use a glowing base. It grounds the sim a bit and casts some interesting lighting on them.
To do this, I add a circle under their feet by pressing shift+A and selecting circle.

An empty circle will appear, but we need it to be a solid disk, so go into Edit mode (by pressing tab while the circle is selected) then hitting F on the keyboard to fill it.


After that, you can go into the Materials tab and add in color and glow.
Mine is adjusted like this:

And gives this rendered result:

2. HDRIs
HDRIs (High Dynamic Range images) are extremely useful when it comes to environmental lighting, I always use them now to add better/more dynamic lighting to my renders.
HDRIs are 3D/panoramic, which makes them extremely useful.
You can find/download HDRIs online in a few diff places: PolyHaven, AmbientCO, and Blender Market.
There are also several available for FREE using BlenderKit (my preferred method).
So how do you use an HDRI?
We can add HDRIs to our render by navigating to the world tab and changing the color to "environment texture".


I chose this vaporware HDRI from BlenderKit, & here it is with no adjustments, but it's looking a little rough so let's adjust it.

By adding vector nodes, we can adjust how the HDRI behaves. Here I mostly use the Z rotation and the background strength:


Here's the same render with the Z-rotation set to 50, 150, 200, & 250.


You can put in any value for the Z-rotation, this is just an example of how the HDRI turns. This is maybe not the best example of the rotation, but putting her in a forest just didn't feel right lmfaooo, hopefully you can see how the light changes on her depending on the rotation.
You can also adjust the strength of the HDRI. Here's the HDRI (rotated to 150) set at .5 and 1.5 strength:


For this tutorial, my favorite lighting is the HDRI set to 150, and the strength set to .5, like this (this is a rendered image):

3. Transparent HDRIs + Point Lights
But I'm not fully happy with the lighting. I don't love how the HDRI is a bit blurry, so I'm going to set it to be transparent.
To do this, go to the Render Tab, scroll down to the Film option, and check Transparent:


The lighting effect from the HDRI will stay the same, but the background will be transparent.
From here, you can add a background (when I do this, I like adding a plane, & moving/shading it until I'm happy (kinda like this):


NOTE that you have to put the plane far enough behind your sim so it doesn't affect the HDRI lighting too much.
SECOND NOTE You can use this same method to use HDRIs in conjunction with scenes. They can provide the perfect backdrop!
This is still really dark, so I'm going to add three point lights: -Two on either side of her head/shoulders that will be smaller (in radius) and brighter -One in front of her to add actual light (so details aren't lost)

Here's how I set up my lights.


The pink light settings are for the two point lights on the sides The white light setting is for the light in front of her
For a basic render, this is almost good enough for me, but I really like the glowing effect I get in my renders.
To achieve this, we have to go to the compositing tab:
4. Compositing
Full disclosure, my compositing tab is set to glow by default (that's how much I love it), so all of the renders in this tutorial have it turned on.
I use the glare node and set it to fog glow.
Here's my preferred setting:

I prefer the fog glow effect, but bloom, ghost, streaks and star are also options.
Here's a guide to the glare node!
Tbh, I never use any of the other settings, so I'll leave this tutorial here for today.
Here's the final result (with no additional editing):

If you have any questions, please don't hesitate to send an ask, message or join my discord (no minors pls) for help! <3
#ts4 render tutorial#ts4 blender tutorial#sims 4 render tutorial#sims 4 blender tutorial#sims render tutorial#sims blender tutorial#salemsims tutorial#render school tutorial#blender
209 notes
·
View notes
Text

blender lighting tutorial + tips.
requested by @thecrimsonsimmer + recommended viewing: youtube video one, two, three, and four. this post will be dealing with newer versions of blender (2.8+) and cycles since that's what i'm more familiar with + commonly used for rendering. this is coming from me as an artist with some dabbling in photography and things i've learned in college!
references and setting the mood
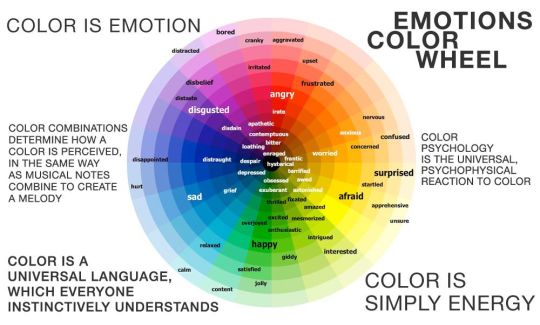
are you basing your render on an existing photo? study the light source and what direction it's coming from: that's what's going to tell you your set up for a similar effect. if you're not basing it on an existing piece, a good start is knowing How you want to set your subject (your sim) up - do you want them to be in the spotlight? are they in a specific environment that has neon lights? are you going for moody or something fresh, bright? definitely look up colors and their meaning (color theory, movie screencaps, etc.) to create a stronger image!
using resources to start the set up
it's always a good thing to mix your tools with different communities, such as the art community! many have lighting tools to figure out how to color their subject, such as this free-to-use head figure that depicts where the lighting source should be placed.

there's also the photography community and teaching people how to set up their lights for certain setups. video three and four linked in the beginning are from photography viewpoints.
spot? area? point? sun?
let's think of the lighting types as objects - a spot is like a plain lightbulb, area is a reflective sheet, spot is a flashlight, and the sun... well is the sun!
a spot is similar to an area light, but triangular/a cone. think of a helicopter search light, it's focused on a small area with the most light concentration. these can be used for lamps with lampshades, car headlights, or a lighthouse.
an area light is great for lighting up technology. a phone screen, tv screen, tablet, anything that's an LED screen emitting from a surface. the light is not as concentrated as a spot and is meant to cover more flatly (hence the rectangular source)
a point is best used for small pops of colors such as candlelight, lamppost, lightning bug tail, etc. a small source that has nothing covering it.
a sun covers the entire area and can be used as the overall mood setter. it can create filter over the entire render by just shifting the color like you would see in a movie. you'll be given a line with a sun light that gives the direction of where the sun is coming from. basically a spot light just on a much larger scale LOL.
power + coloring

this screenshot is mostly what you'll only use to start off with. watts is the unit of measurement and the higher you go, the brighter the light will be. examples with a white colored point light 10W-20W: general portrait lighting 30W-50W: bright source, close flashlight for example 60W+: blinding
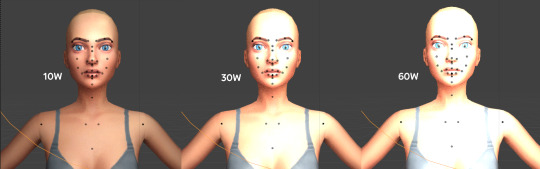
coloring is just like the system for in game lights for ts4. shift it to whatever you want it to be (click the white bar, that's the color preview) and mess around with the vibrancy. the darker, more intense color, the less it's going to appear on the sim.

closeness and intensity
similar to what's shown in the head lighting tool shown earlier, the closer the light is, the more that specific area is lit up. go too close and your sim could be completely washed out. it helps to change the size of the light (change with the radius slider) to better imitate what you're wanting. the larger the radius, the more diffused and softer the light source will be. close + small = very clear of the light source shape, can obviously tell where it is in relation to the subject far away + large = soft lighting, more of a hazy lighting of the color you choose.


to quickly adjust the light, press "G" and hold down your middle mouse button to adjust which axis you'd like to edit along. green is the x-axis, blue is the y-axis, and red is the z-axis. you can also press "G" and type the letter of the axis you want to use. drag the mouse to change the placement on that specific axis to however you want. if you want to freely edit the placement, just press "G" to move it out of the axis bounds.
world lighting
take this step as setting your canvas color before you start painting. in order for the values to look their best, change the world color to the same hue of the color you are mostly using. for example, this is set in a red-toned environment:


this is essentially changing the cast shadow onto the sim. the default is gray and will muddy up your undertones if not changed properly. for this instance, if you were to still use the same red point light in a gray world color it'd look like this:

of course, this will be based on if you have an environment image or not that can affect your lighting overall. this post is based on the fact there is no environment image and what not! if you need a visual demonstration on how to mess with the world lighting, check out this short video.

i hope that helped anyone beginning to render or wanting to light up your own scenes! i'm no rendering expert, but here's some of the helpful tricks i've learned and collected over the years<3 if you have any other questions feel free to send an ask!
#ts4 blender tutorial#sims 4 blender tutorial#ts4 render tutorial#sims 4 render tutorial#lighting tutorial#lyko posts#tutorial#long post
242 notes
·
View notes
Text
Adding extra details to your sim!
So any fans of @kikovanitysimmer ‘s renders know that she adds a lot of extra detail to her sim’s skin. Her process has changed since then, but she still hosts her old tutorials on her discord!
We’ve been getting a lot of talk about how hard it can be to follow so I’m providing a text-based step by step tutorial!
Requirements
TheSims4Ripper
Blender 2.9+ (I’ll be using 4.0.0)
Any photo editing software (I’ll be using Ibis Paint) that has these features:
Multiple layers
Adding noise
Changing brightness/contrast and Hue/Saturation/Value
Inverting colours
Sims4studio (optional)
First things first:
You do not need to export a custom skin. Using the _diffuse.png you got from exporting your sim works just fine!
It’s preferable that you export your sim naked. Not a requirement, but makes it a lot easier. Here’s a video tutorial about dressing your sim in blender.
Onto the tutorial!
Displacement Map (Pores and the like)
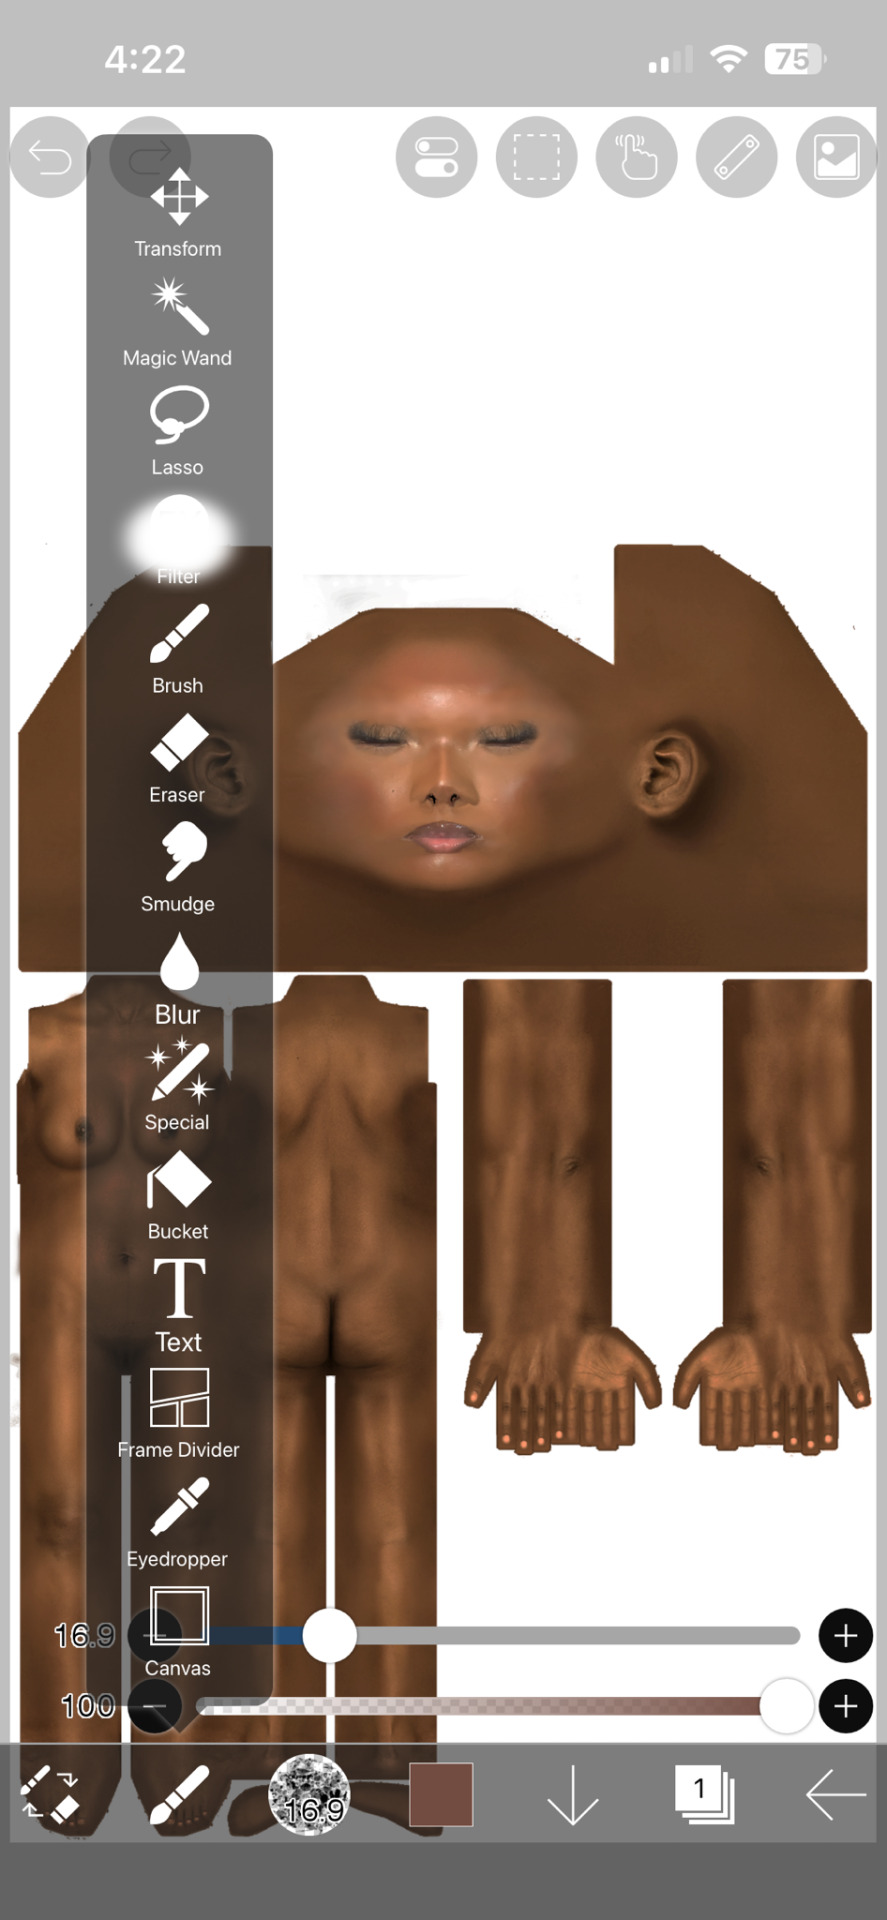
Import your texture. Here, I’m using Kiegross’s Kiera Skin, edited for personal use.

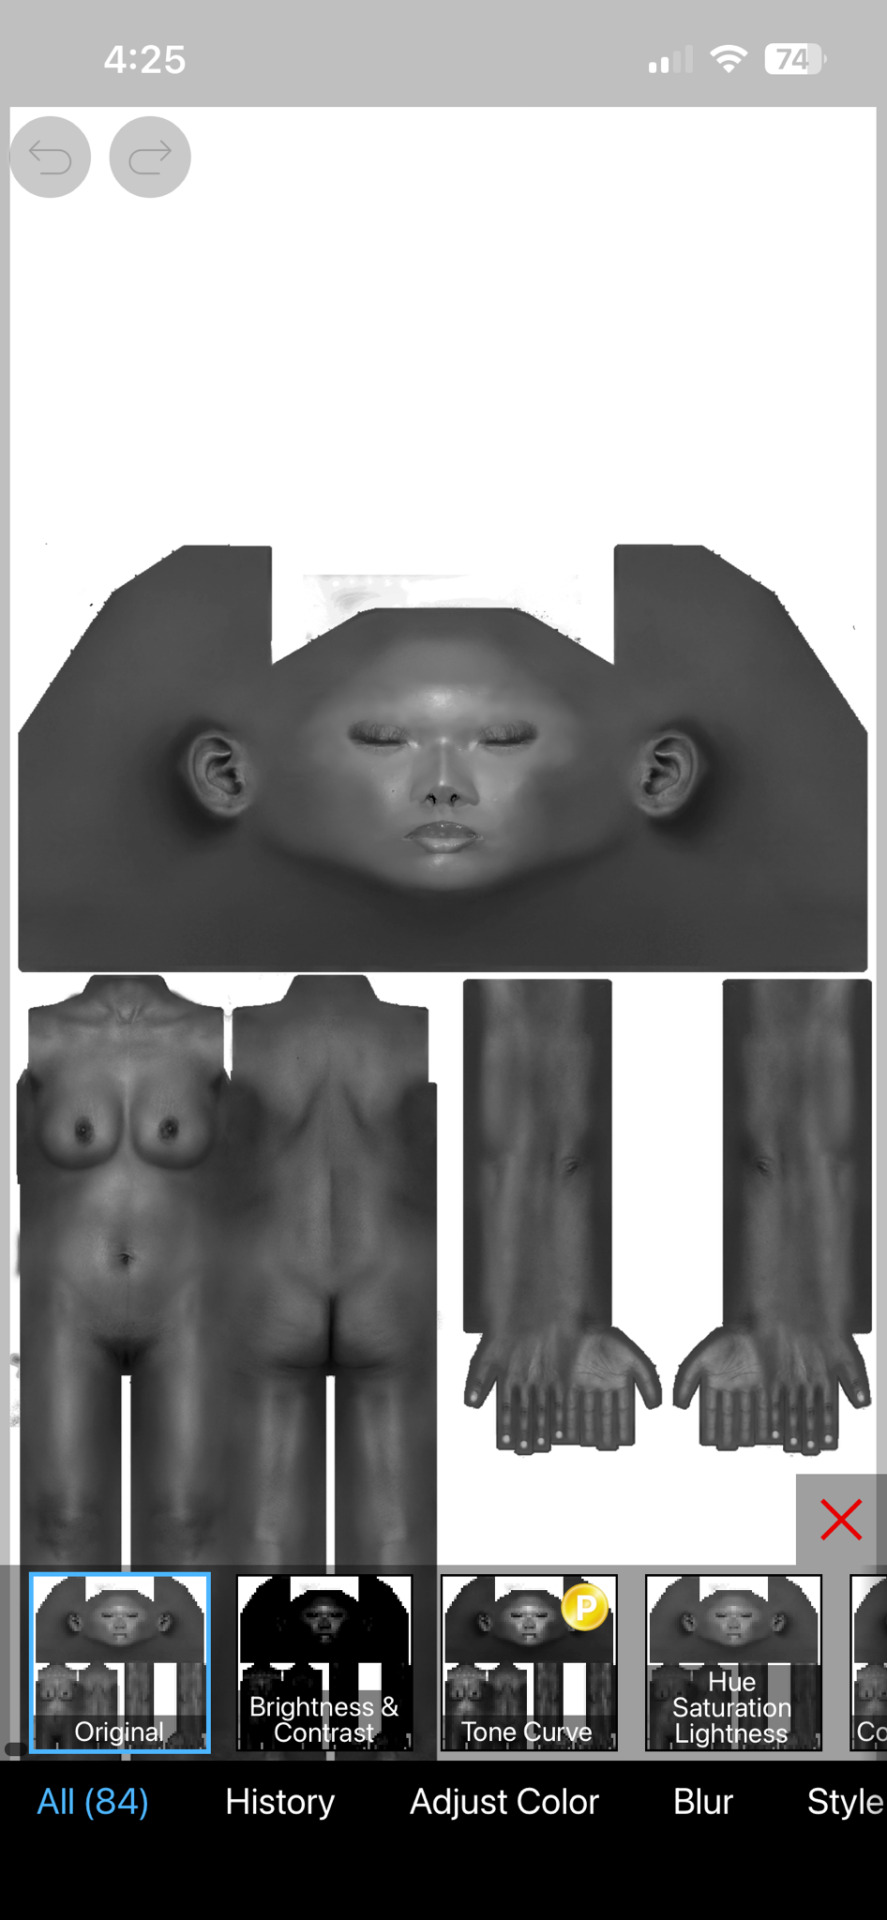
2. Change the texture to black and white


3. Duplicate the layer

4. Edit the Brightness and Contrast to your liking

5. Add noise. Pictured here are my personal settings
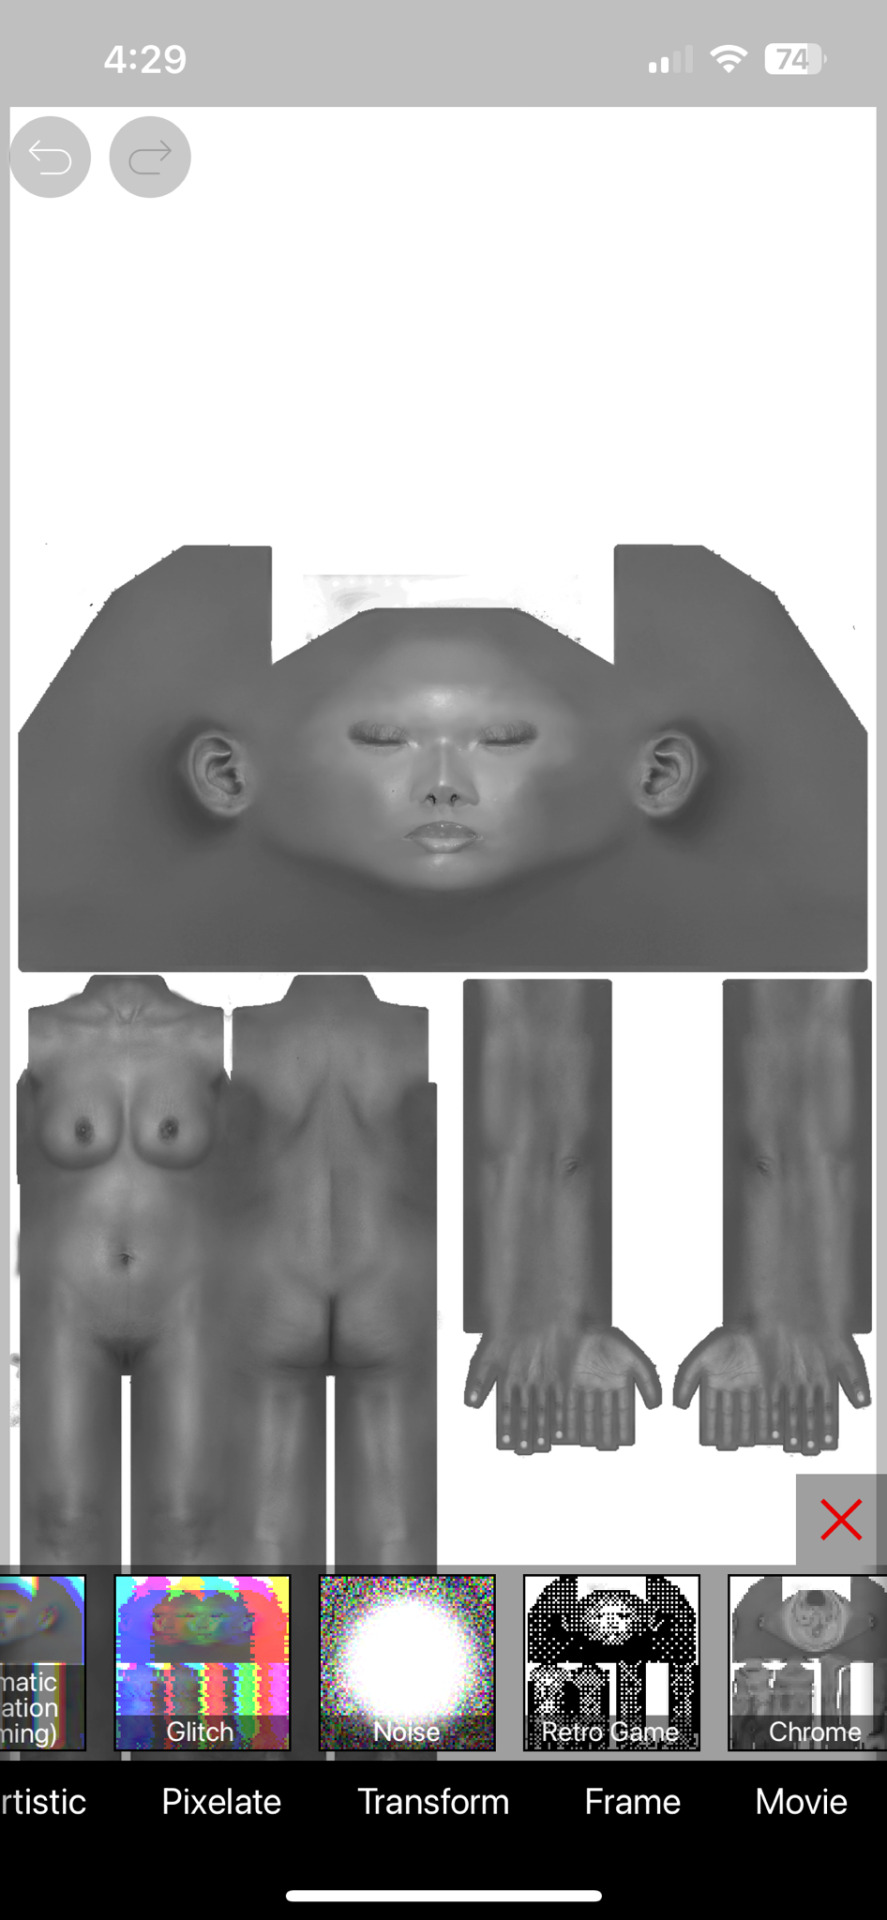
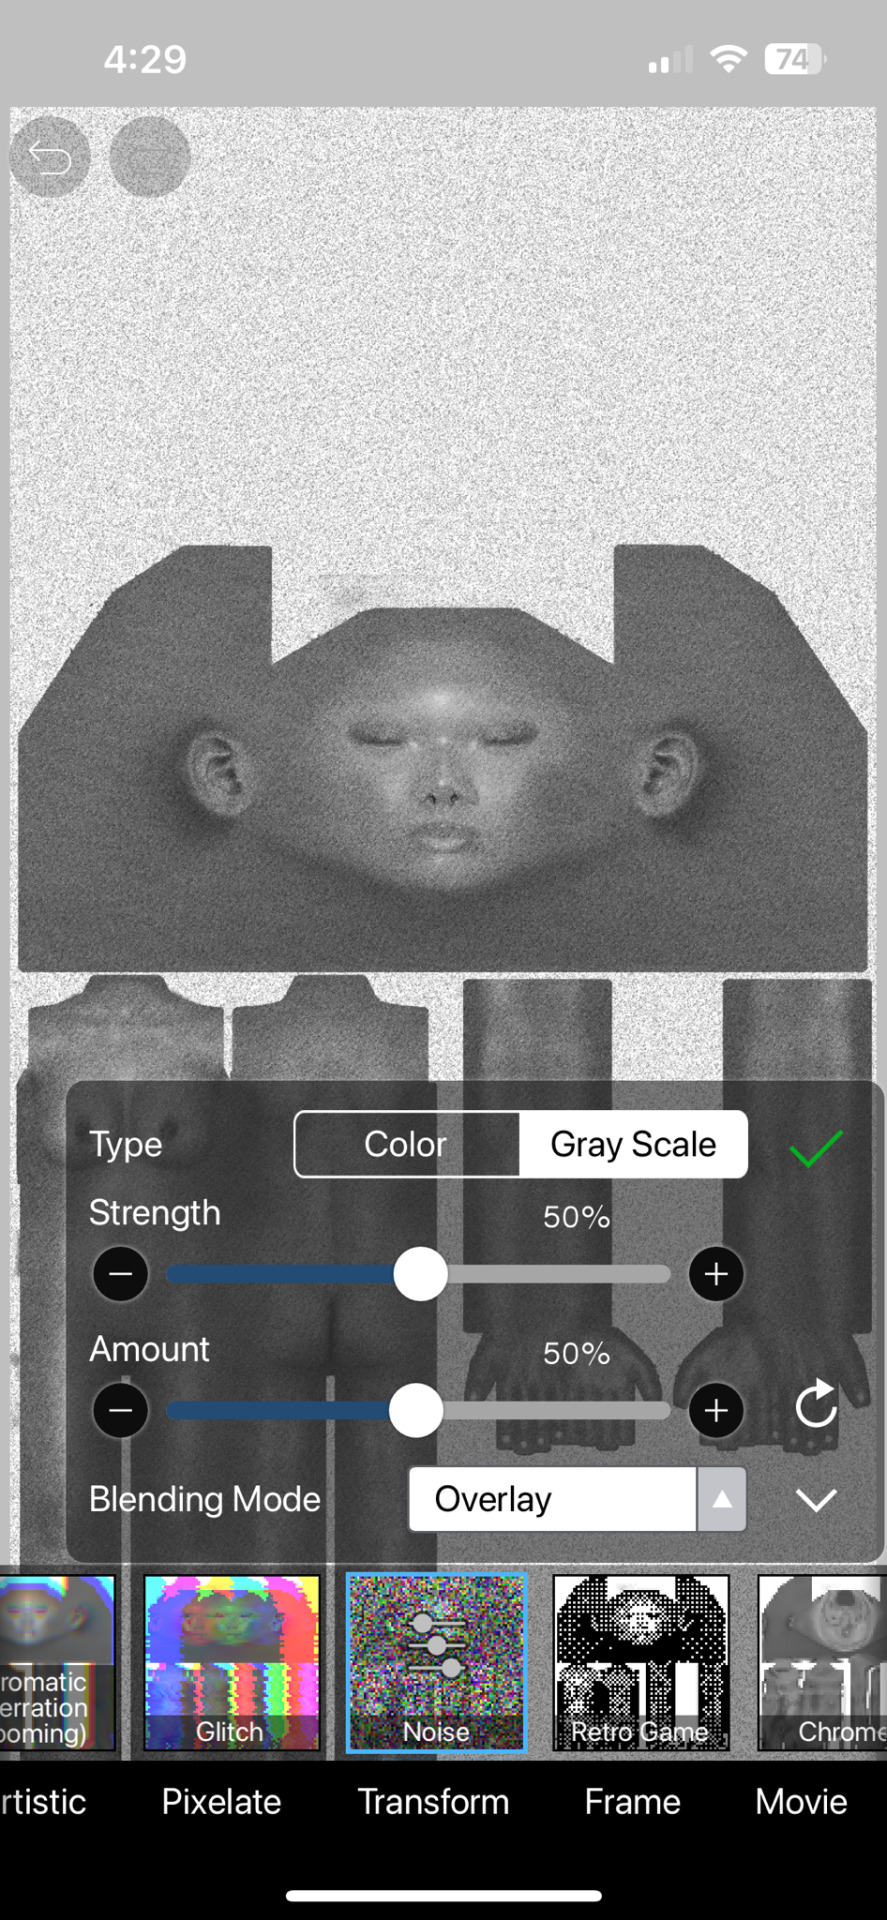
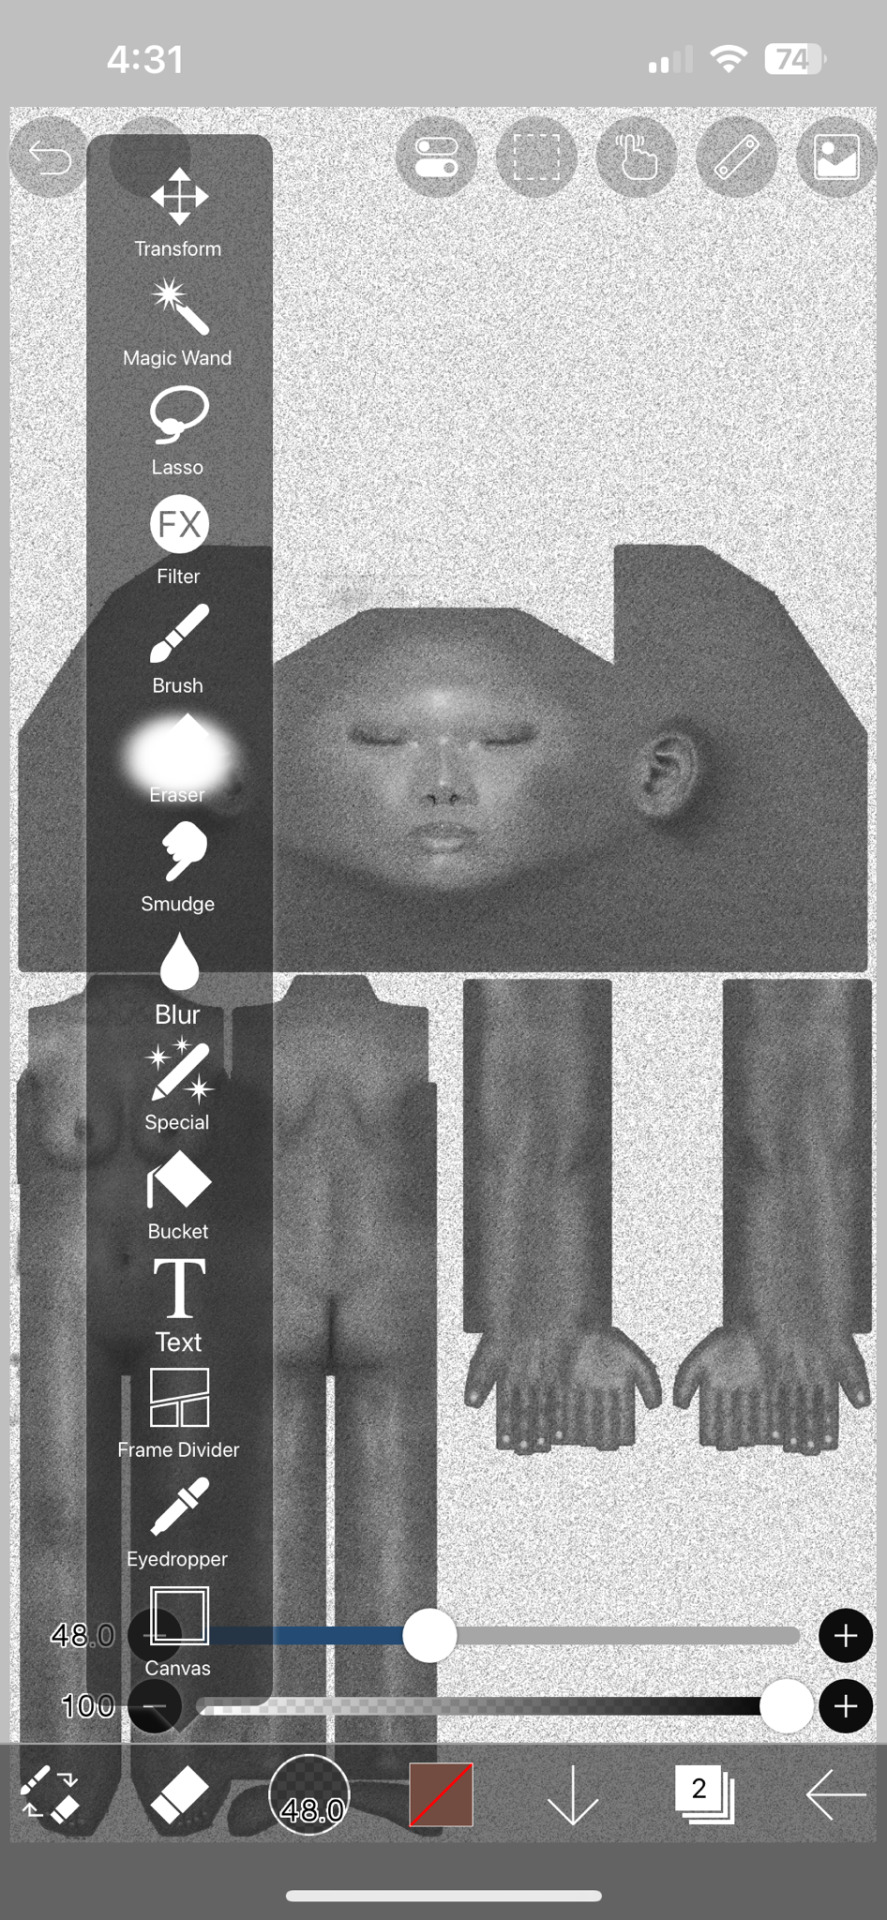
6. Erase parts that realistically would not have a lot of pores, ex. Lips, hands and feet. Kiko suggests putting your eraser hardness or opacity lower as these areas still have texture to them.

7. Save picture as is! You can delete the noisy layer if you wish, but we will need the original black and white layer for everything else.
Specular and Roughness Map (Shine)
Creating a new layer is highly recommended so you can backtrack
Using the original layer, edit the brightness and contrast. Pictured here are my preferred settings


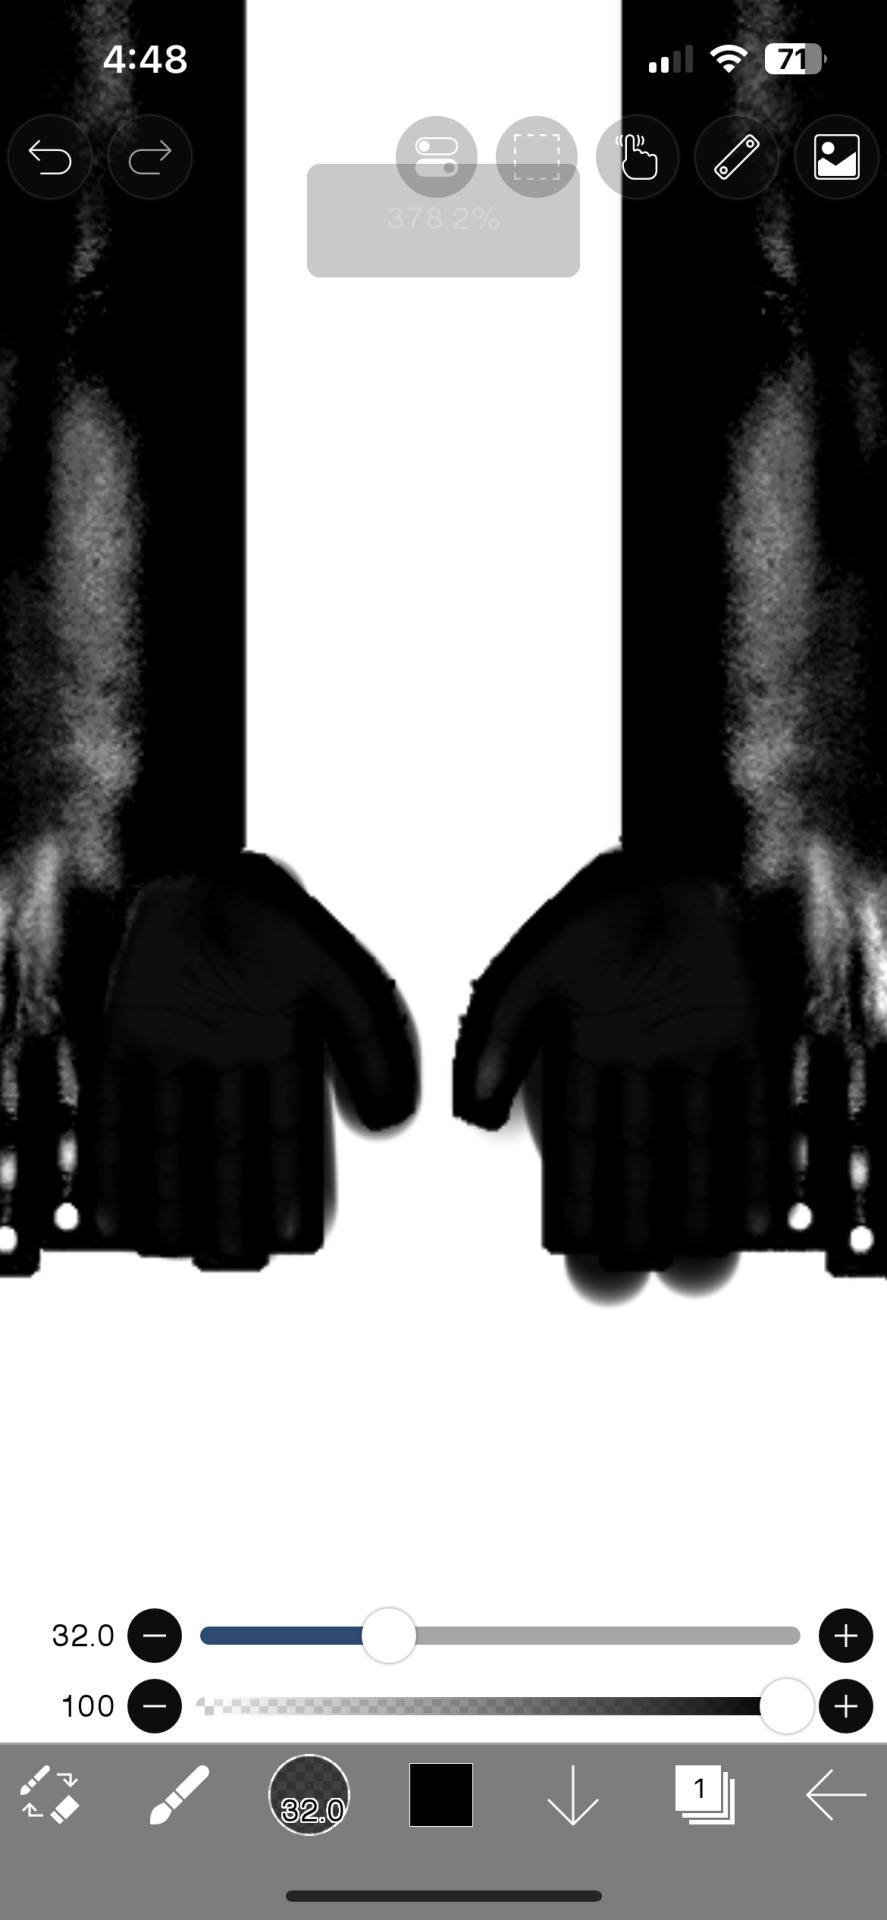
2. Take a black brush and colour in areas you don’t want to shine. Realistically, these are the palms of your hands and the soles of your feet and their respective nails. You may also want to take a white brush to the areas you do want to shine, like lips, chest or thighs.
3. Save as is!
Adding to Blender
First things first: Go into the Shading tab. Link your sim's materials using Ctrl+L to make it easier on yourself!

Add your new Displacement and Roughness Map to your material
2. Add a Displacement Node

3. Plug the Displacement Map's colour into the Height. Change the scale to whatever you like (I chose 0.0005)

4. Add two Color Ramp Nodes to your material
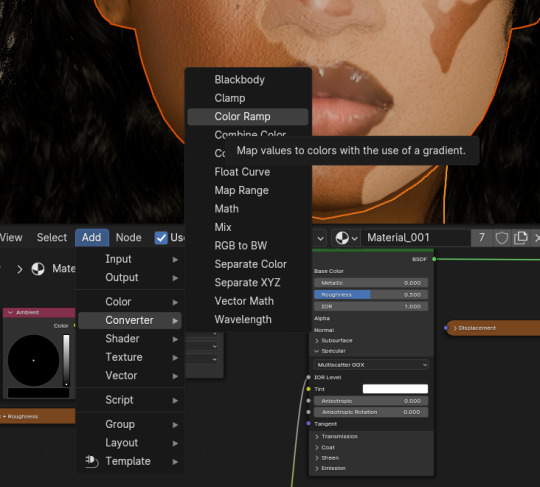

5. Plug the Spec + Roughness Map's colour into each Color Ramps' Fac

6. Plug one Color Ramp into the Roughness and another into the Specular/IQR (you may need to roll out the Specular tab to find it)

7. Drag tabs on the Color Ramp to change the strength of them. For the Roughness Color Ramp, you'll need to swap them around to have the desired effect.
And that's how you get the details! There are other ways to get the details, but for beginner renderers, you can start with this!
32 notes
·
View notes
Note
Hello there! I'm Eden :D I LOVE your renders! I've been rendering for well over a year at this point, however I only stuck to the super basic stuff since it took me a year before that to even know how to do it at all. I've wanted to up my game and get to where you are now. I'm SO SORRY if this question was asked already (I haven't gotten too far in your posts yet), but;
How do you personally edit your renders? I understand you use photoshop, but how do you do it exactly? Your renders have that kind of digital art style, like you drew them yourself. Feel free to be as descriptive or brief as you'd like!
Hi Eden!!! Thank you so much! 🥹😍♥️
I've followed you back and glad we're moots! I'd love to see some of your work!
I'm not sure if I've answered this before but I'm happy to answer it again! Also I haven't advertised it in a while (and I really need to try to get up a new tut, maybe soon), but my alt account is a Render School where I post tutorials, with plans to post editing tutorials in the future!
But honestly as far as my editing, I really don't do much.
Actions are my secret weapon, and I have a few favorites/go-tos I'll link! A few are by simmers and a few are just action sets. I'm in a family of photographers, so I have access to a wealth of resources for my editing.
Sonder set by @intramoon
Cold Water set by @intramoon
Retro Prime photoshop actions
Indie camera photoshop actions
But my "secret weapon," as it were, and the set of actions that I think most helps me accomplish that digital art style is a set of actions that are sadly expensive and hard to find now.
My favorite set is by Totally Rad! and I think in recent years it's been folded in to this Pixel Sugar product on their website. I know that's a steep price point but it's possible you can find it around the corners of the Internet for less, or if you can't, you might be able to find "dupes" of the better ones, which imo are:
Technicolor dream world
Super Fun Happy
Bullet Tooth
Grandma's Tap Shoes
As for my method, I know a lot of simmers paint over their renders, and I've done that a few times but find I'm too impatient tbh. My goal is always to have to do only minor touchups over my renders and some color/vibe adjustments before the finished product. My "raw" files are always exactly what blender spits out for me, unaltered in any way except to resize them for Tumblr.
To get that digital art style, I'd recommend rendering with alpha details if you don't already. If your computer can't handle alpha cc in the game, DM me and I can give you some pointers (sneak peek info for a future tut lmao) on how to accomplish it without bogging down your game.
When I go into photoshop I adjust the brightness and contrast, as I tend to personally prefer high contrast pieces that contain dark subject matter but you can still see the details. Then I'll paint/blur/clone/adjust anything that needs it, then I'll "stack" and adjust a handful of actions before applying edge blur and vignette and any other color adjustments (levels, curves, etc).
That's a very oversimplified rundown of what I do, but really overall my editing process is simple. The bulk of my work happens in blender itself. I find that the more time I take to perfect the lighting and shadows and angles in blender, the less frustrating the editing process and the happier I am with the end result. So, that said, be sure you're spending a lot of time in blender getting the light and shadows to be exactly where you need/want them to be before running it.
I know this is a bit long I'm sorry! If any of it is super confusing or you'd like a more in-depth look at any of it please let me know! I do plan to do editing tutorials for my side blog, but the latter half of this year has kind of run over me like a train, and for now I'm just trying to get by day by day. But I'm happy to help if you have more specific questions!
& thank you again!! ♥️
#replies#thank you so much this literally made my day#I was having a bad one too ugh I needed this#mini blender tutorial#tutorial ish#sims 4 blender tutorial#sims 4 render tutorial#sims 4 editing tutorial#I can't tell yall how happy it makes me when yall love my work#legit holding back tears#♥️♥️♥️
39 notes
·
View notes
Text
youtube
Learn to Render from a beginner!
I have started doing tutorials, This is my first tutorial there will be many more to come!
I plan on making many more, from Rendering to animating, blender modeling, Building blender scenes, As I learn so shall you!
Make sure to share, Like, subscribe to get the next one that comes out!
#sims 4#sims4#the sims 4#sims 4 cc#sims 4 blender#blender render#blender#b3d#blender 3d#3d art#3d model#blender3d#blender art#blender animation#sims4 blender scene#ts4 blender scene#blender scene#sims 4 blender scene#tutorial#blender tutorial#blender tutorials#Youtube
11 notes
·
View notes
Text
How I Make and Render My Sims
I made some videos on how I make and render my sims! They're very much not tutorials and this is my first time trying to edit videos, so they're a little choppy.
I've posted the videos on both my Patreon and YouTube accounts, you can just pick whichever is easiest to watch on.
YouTube
Patreon

#sims 4 cc#blender sims#the sims 4#blender render#sims 4#blender#sims#the sims#ts4 cc#sims 4 custom content#blender tutorial#blender learning#blender sims 4
25 notes
·
View notes
Text
youtube
Learn How To Make Transparent Objects In Blender 3.0
In This Video, You'll Learn How To Make Any Object Transparent a.k.a Glass Like !
Don’t Forget To LIKE, SHARE & SUBSCRIBE ! I Appreciate All The Love & Support !! ♡
#3d art#3d modeling#3d render#3d blender#sims 4 blender#blender3d#pinkglacierz#sims tutorial#blender tutorial#ts4 tutorial#viral#black content creator#youtube#Youtube
14 notes
·
View notes
Photo
For those making their own poses, try this!

avoiding squiggly fingers when posing in blender a tutorial + rig downlad by ratboysims
hey! when i deleted my old blog i completely forgot to back up my old tutorial on this, so i’m just gonna remake it :-) this tutorial will show you how to lock joints in blender, so you can bend body parts (in this case fingers) in only one or more directions depending on what you need!
Keep reading
700 notes
·
View notes
Text
Sims 4 CC Kit — Make Your Own Lights, Decor, Clutter & Textures
Ever wanted to create Sims 4 clutter or decor CC but got stuck?
This kit is for you.
It’s a step-by-step guide that shows you how I make my own Sims 4 decor CC — lights, clutter, textures — in a way that I found works for me. You get guides, cheatsheets, templates, and my personal workflow that I’ve figured out through trial & error.
This probably isn’t the “proper” way of creating CC — but it’s how I learned, and it works and I use it every single time I create something new.
⚠️ Just to be clear:
This is a written tutorial kit, not a video or image course.
BUT — I’ve included some visuals, some screenshots & cheatsheets to help you follow along but its alot of written stuff. It would also be beneficial for you to have some basic knowledge of blender.
✅ What You Get:
Decor, clutter, lights CC Creation Guide
Shadow Mesh Tutorial
Mesh Cleanup Workflow
LOD Creation Steps
Maxis Match Texturing Cheat Sheet
Alpha Textures Basics
Vertex Paint for Lights Guide
Custom Thumbnail Tutorial
Normal & Specular Map Basics
Blender Basics Recap
Sims 4 Studio Quick Fix Cheatsheet
Blender Hotkeys Cheatsheet
CC Planner to organize your ideas
CC Creating Checklist
PSD Thumbnail Templates (Decor)
Blank Normal & Specular Maps
Blender Render Setup File for Catalog Thumbnails
Texture Tips & Tricks
🎯 Why You’ll Love This:
No fluff — real steps, real help
Written for beginners who know basic Blender but need a hand
Includes a little bit of visual guides, printables & templates
Saves you HOURS of googling random problems
Helps you actually finish your CC & get it in-game
🖤 This is for you if:
You know basic Blender stuff (grab, rotate, edit mode) Got 3D Models you want to put into The Sims 4
You want to make clutter, decor CC and lights (not clothes or CAS yet)
You’re tired of tutorials that make you more confused
PS: Accessories & Clothing Creator Kits are coming soon.
If you get stuck, you can always join my Discord
(link’s on www.simmerkate.com).
Get Here (xx)
180 notes
·
View notes
Text
How I do my lighting in EEVEE for Blender 4.0 (´。• ᵕ •。) ♡
Are you running your Blender on a toaster? Don't wanna spend much time on rendering in Cycles? Here's some EEVEE tips for you!
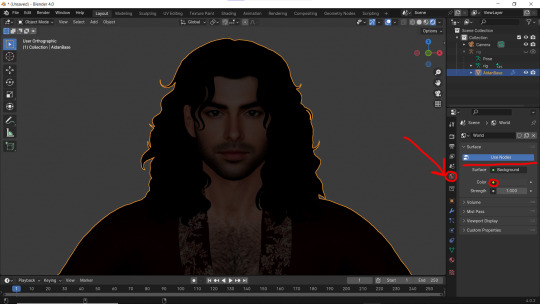
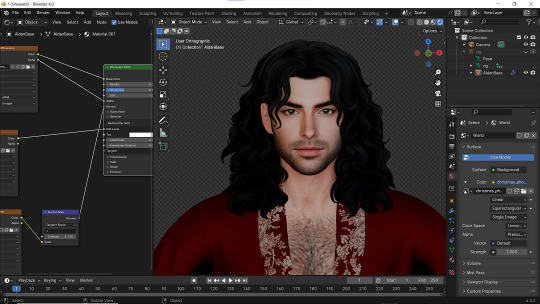
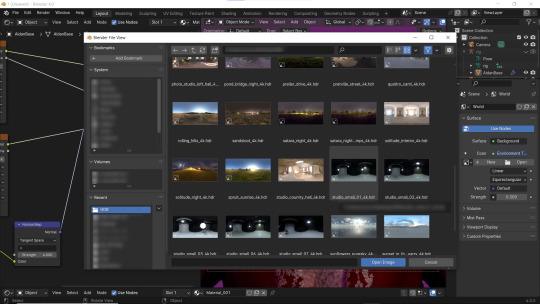
1 - Let's put some HDR lighting on! Go to the Worlds, choose Use Notes and hit that little yellow dot next to the Color.
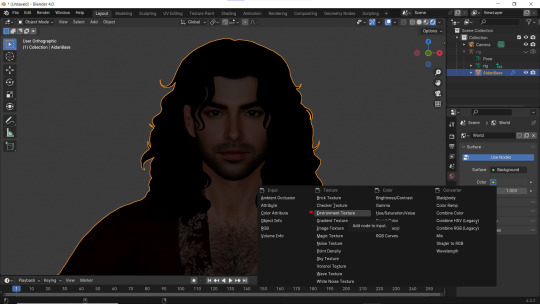
2 - Pick 'Environment Textures'
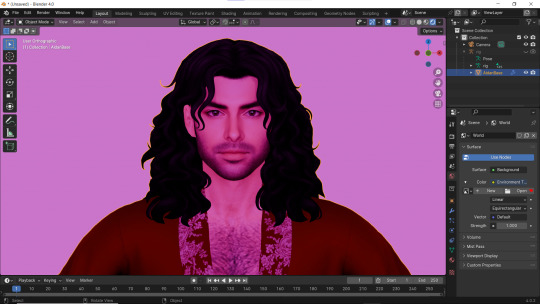
3 - You'll see everything in purple. But worry not! It's just bc you haven't applied any textures yet! Just go on and hit Open.
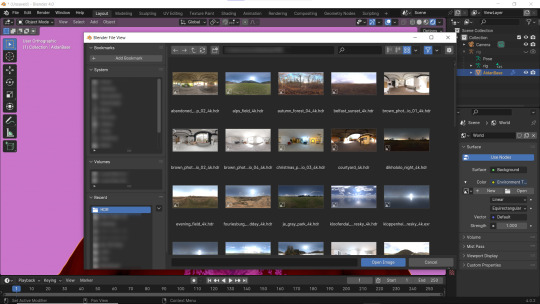
4 - You can find plenty of free, high resolution HDRI textures on Poly Haven. I have almost all of them! Go get some for yourself too and navigate to their location. Pick any you like!
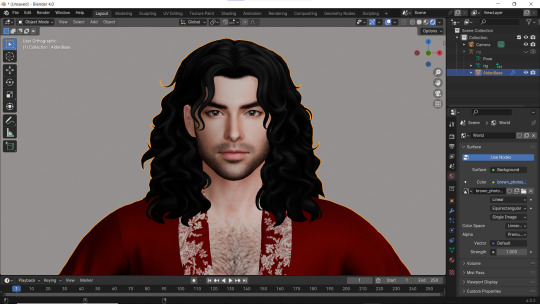
Well... It doesn't look good yet :D
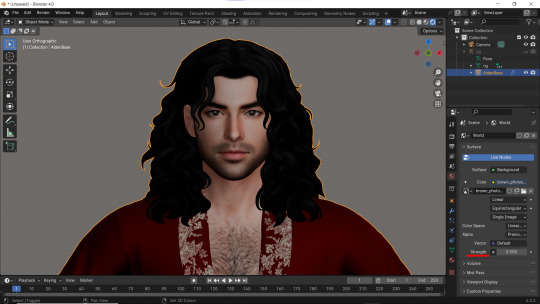
5 - Lower the Strength of the light.

6 - Now. Let's go to the Render Properties and check Ambient Occlusion and Bloom (you can play with it's parameters and see which fits you better). THEN... Go to Shadows and increase the resolution to the max. High Bit Depth and Soft Shadows must be checked too!
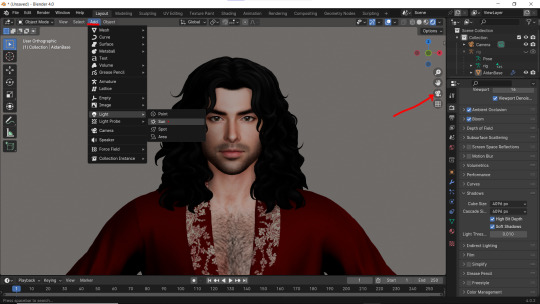
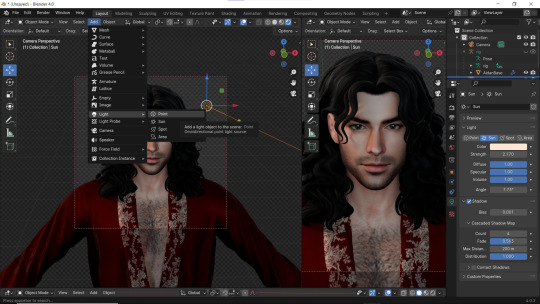
7 - Let's Add our very first light (The Sun)! And go to the Camera Mode.

8 - In the Sun Shadow settings: Soften the light by increasing the Angle; Lower Bias to the max.
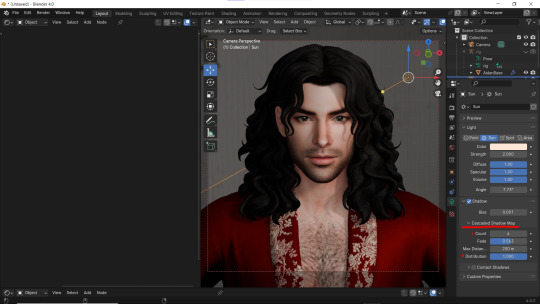
9 - Change the parameters of Cascade Shadow Map the way it looks better for you.
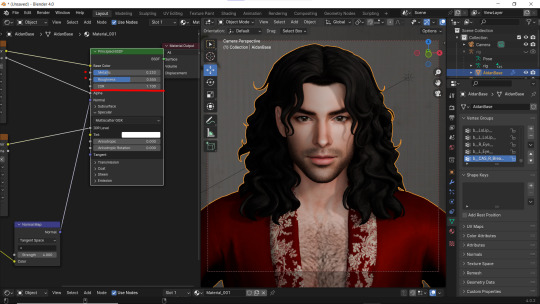
10 - Also don't forget to fix the specular appearance of your model ;3
Now. I don't hate it. But I don't like it much either... So I played and tried several Environment textures for better result.
11 - Looks way better! Now let's go to the Render Properties once again and remove the background in the Film category (in case you don't want one)
12 - It's time to add another light source!
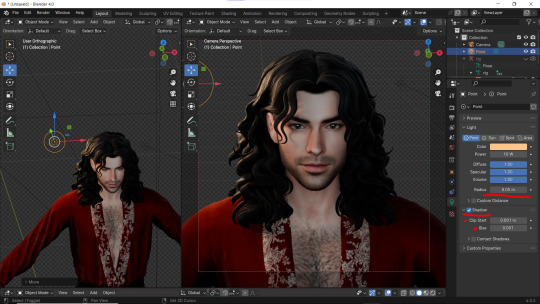
13 - Settings for the new light are quite similar. I made them softer, lowered Bias, changed color, etc.
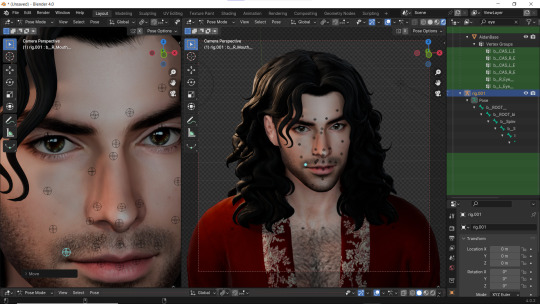
14 - Preparing for the shoot. ▓▒░(°◡°)░▒▓
15 - You did it! (ノ◕ヮ◕)ノ:・゚✧
#WistfulTutorialSims4#the sims 4 blender#sims 4 blender render#blender 4.0#blender eevee#sims 4 tutorials#blender tutorial#sims 4 blender render tutorial#blender render#blender eevee lighting#blender environment textures#sims 4 blender#blender render eevee#blender light#blender light eevee#eevee#blender#simblr#the sims 4#my sims
157 notes
·
View notes
Text

So you want to make a sims render: a beginner's guide
But what does that even mean? What do you need to start?
To get started with sims renders, you'll need the following programs:
Blender 3.6 - to render your sims
Blender 2.7 - to export poses, accessories and objects from s4s
Sims Ripper - to rip your sims to prepare them for blender
Sims 4 Studio - to export poses, accessories and objects for your renders
All of these programs are FREE to download and use!
Blender outputs fantastic renders depending on your settings, but you'll probably want to edit them after the fact.
For editing, I recommend:
Photoshop
GIMP
Photopea
I'll be posting editing tutorials in Photoshop, but any of these programs will get the job done.
Stay tuned for in-depth tutorials on using Blender, Sims ripper and Sims 4 Studio!
#salemsims tutorial#render school tutorial#sims 4 render tutorial#sims 4 blender tutorial#blender#sims ripper#sims 4 studio#resources#ts4#sims 4#sims
333 notes
·
View notes
Text
OKAY, SO I FIGURED IT OUT, tutorial under the cut!
So this was DIFFICULT to figure out, because I'm stupid, and I scoured the internet for tutorials, and I found one that worked for me!
Blender Tutorial - Ghost material
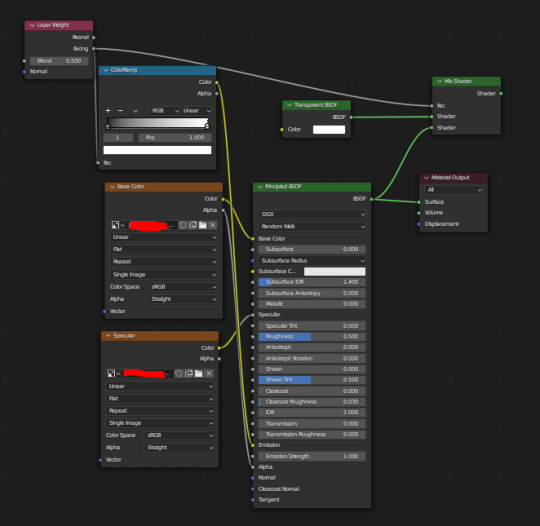
But it needed some fine-tuning to work, so here's the way my nodes are set up
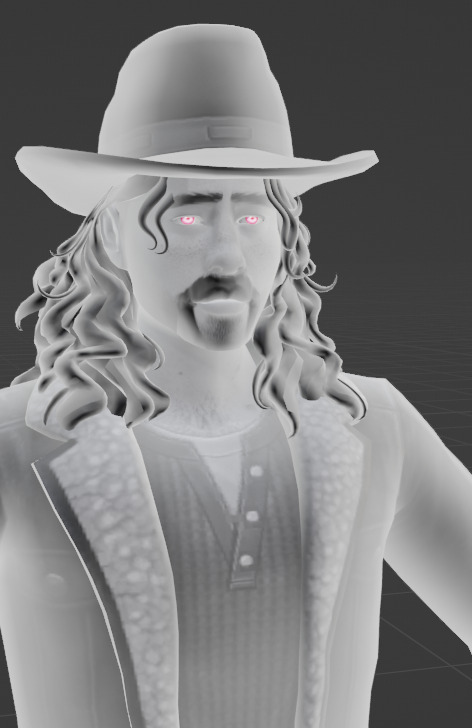
PINK EYES NOT INCLUDED, the eyes were separated and a different shader was applied to make them glow
OH and don't forget to set transparency in your material settings!
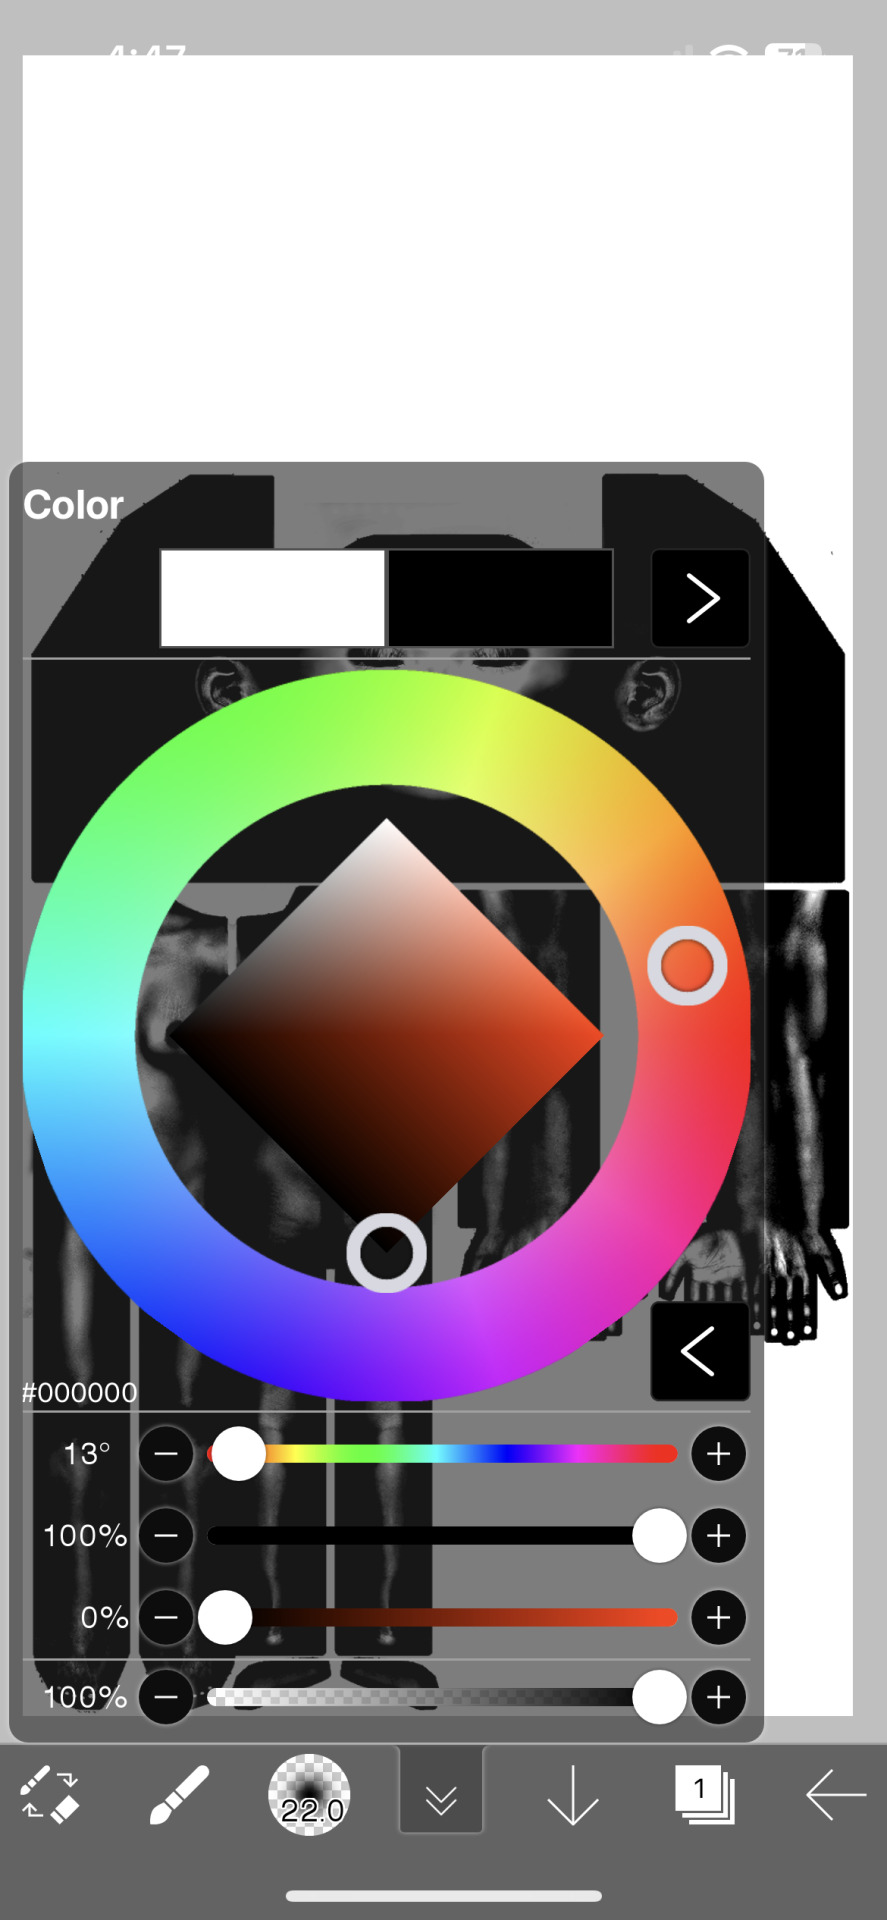
Also make sure your diffuse texture is black and white, go into your art application of choice (Photoshop, Sai, Gimp, Clip studio etc) and just turn the saturation all the way down to make it look exactly like mine!
Good luck everyone!
Blender help!
Does anybody know how to make your ripped sims in Blender have that same sort of shading ghosts do in the game? I tried making one myself, but the eyes were entirely visible in the head and I didn't like that
#TS4 render#sims 4 render#blender render#sims render#Sims 4#TS4#The sims 4#simblr#ts4 simblr#sims 4 simblr#ts4 tutorial#thesims4#the sims#tutorial#the sims 4 tutorial#sims 4 blender tutorial#ts4 blender tutorial#blender tutorial#sims 4#ts4#mine#the sims 4#blender#shaders#shader tutorial#blender shader tutorial
4 notes
·
View notes
Text
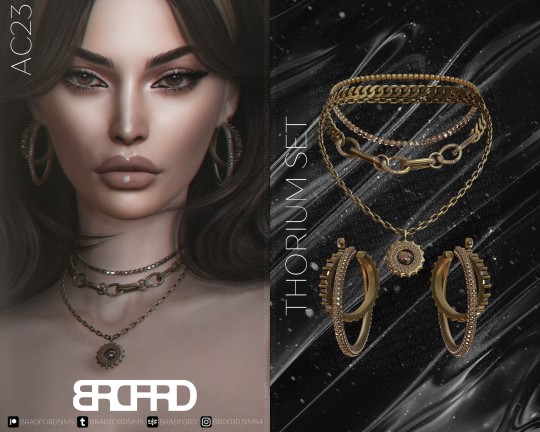
[AC23 - DAY 9] THORIUM SET - GAME EDITION
New meshes
HQ/BG compatible
All LODs
Custom thumbnails
Disallowed for random
DOWNLOAD:
PATREON [PUBLIC RELEASE: JAN 3]
FULL GAME EDITION COLLECTION
------------------------------------------------------------------------------
[AC23 - DAY 9] THORIUM SET - BLENDER EDITION [SHOWN ON COVER]
New meshes
HQ textures [4096x2048]
4 diffuse textures for each model + normal maps
Material Nodes for customization
Tutorials included
DOWNLOAD:
PATREON
FULL BLENDER EDITION COLLECTION
-------------------------------------------------------------
WHAT IS BLENDER EDITION?
Blender Edition is a special edition that has more texture space (usually 2048x2048) and can be used only in Blender due to different UV Mapping. This edition allows you to create renders with more quality and flexibility than models exported from the game itself.
Archive with this edition contains .blend file, diffuse textures, normal maps and tutorials on how to use it.
IMPORTANT NOTE:
Blender Editions will be available to Platinum and Diamond members only. Early Access doesn't apply to Blender Edition since this edition weren't made for the game and is basically a separate 3D model.
#sims 4 cc#sims 4#sims 4 custom content
#sims 4 cc#sims 4#sims 4 custom content#sims 4 accessories#sims 4 jewelry#sims 4 earrings#sims 4 necklace#sims 4 choker
295 notes
·
View notes
Text
How to fix Transparency w/ Lashes and Alpha Hair in Blender! Cycles & Eevee!
(This tutorial also helps with adding transparency to Sims 4 Object cc. If needed, I can make a post on that as well.)
This is NOT a Tutorial on how to fix broken/ glitched lashes in the SIMS game!!!
It was brought to my attention that others do not know how to fix this issue in blender, so I've made this post to help out. This tutorial works for BOTH Eevee and Cycles! (This only matters at the end when in the materials tab.)
None of the CC is Mine! Ty to ALL creators!
This is work for all methods of DAE exports.
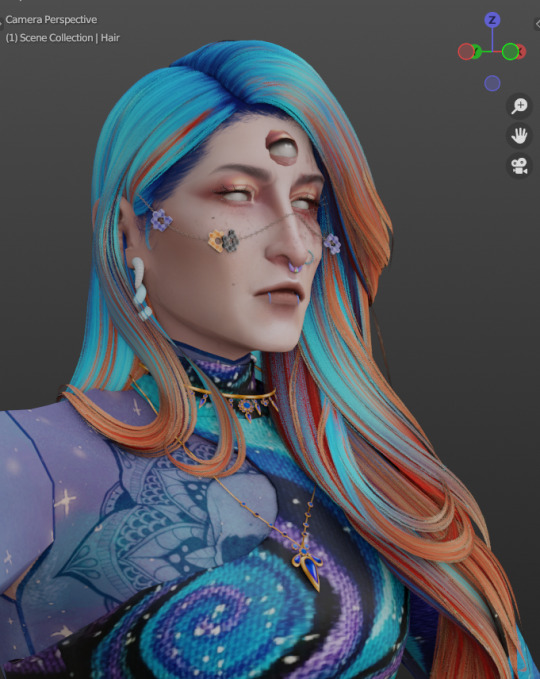
This is Erecen. They will be our tutorial model today.
As you can see, the Alpha CC hair and lashes are not... working like how we saw them in game. So! We will need to fix this up within our Shading Node Wranglers to correct this.
(If you use a GLASS mesh, make sure you are shade wrangling on the GLASS!)

(This picture is only showing which is the Glass mesh!) Plz ignore this if you are not using Glass mesh export on Ripper.
Lashes/Hair Transparency
First import your sim and wire the texture nodes how you normally would. Stay in Shade Editor/Shading tab.
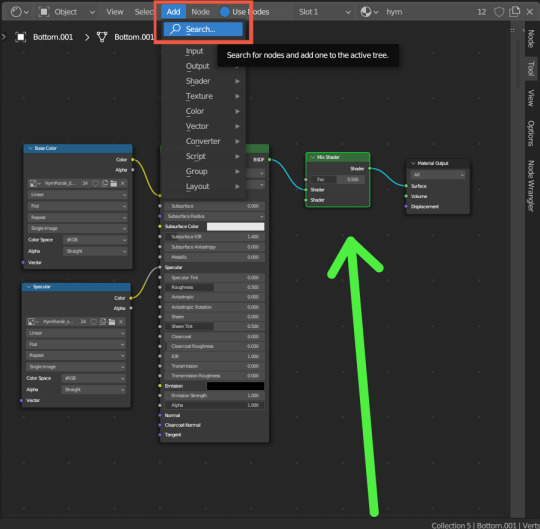
You will now want to Add a 'Mix Shader' node. Search for it by typing in "Mix Shader". Select and now drop it between your Principle BSDF node and Material Output node.
After this, you will want to Add a Transparent BSDF. I added mine the same way as the Mix Shader and have place it under my Mix Shader node.
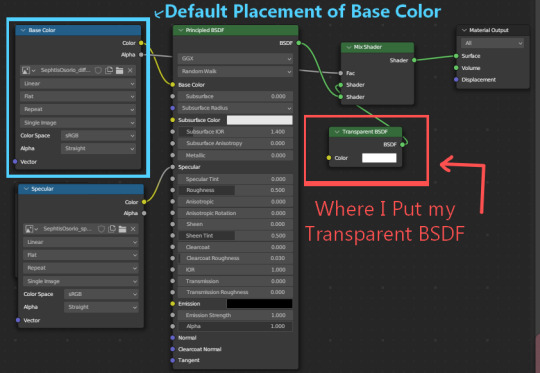
With this Transparent BSDF node, you'll want to wire it to the TOP Green Circle of your Mix Shader node. (1 in pic below) This will disconnect your current wiring from Principle BSDF. This is fine since you now want to wire the Principle BSDF node to the BOTTOM Green Circle of your Mix Shader node. (2 in pic below)
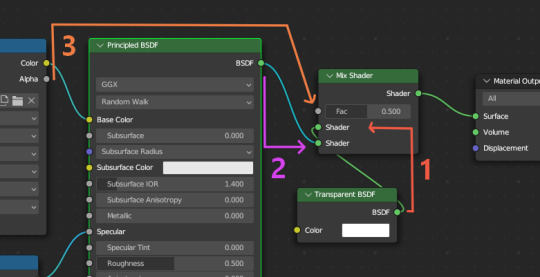
Afterwards, you will now need to go to your Base Color node; (Where your sims diffuse lies!) It should be the top left node, unless you have moved it. (3 in pic above) Now take the Alpha dot and drag it all the way to FAC on the same Mix Shader node. From here, we need to go to 'Editor Type'.
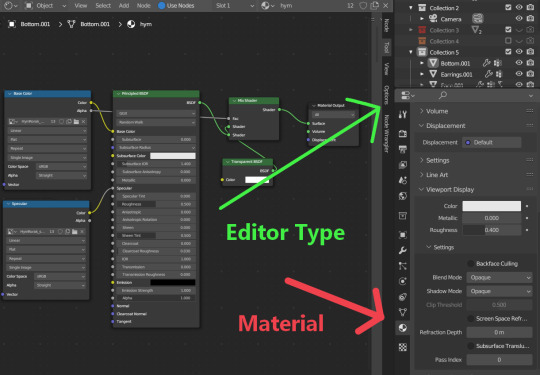
After locating Editor Type, you now want to locate the sphere listed as Material.
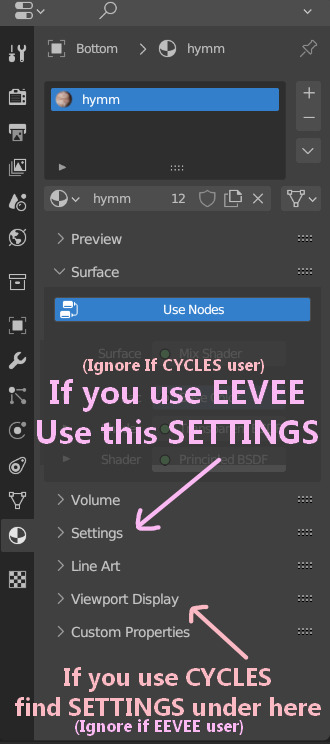
You now want to find the correct SETTINGS tab. Please note how you render your renderings. If you render in EEVEE, take note of the picture above. Same for CYCLES as taking note in the picture above. This is very important since the SETTINGS options switch between these two areas depending on the Engine.
In Eevee, this should be in the first SETTINGS tab in the materials properties tab.
In Cycles, the SETTINGS you will need is located under the tab listed as Viewport Display. From there, a new drop down will be available called Settings. (This is the correct SETTINGS you want)
Either engine will now have a few modes now visible.
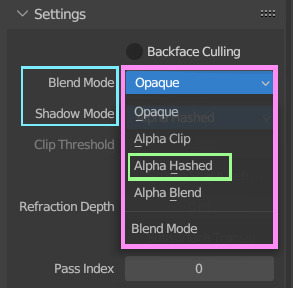
For both Blend Mode and Shadow Mode, change them from Opaque to Alpha Hashed. (It is only required to change Blend Mode to Alpha Hashed for the transparent textures to work. Hashing shadows makes a nice balance of translucency and ambient occlusion.)
And that should be it! Your lashes/Alpha CC hair should be working correctly now!
I hope this helps! If not, please feel free to msg me of any other further know issues. Thank you to @spookyxdoom for bringing this topic up!
I even had my bf try it out without knowing a single thing about Blender and they figured it out just fine with this tutorial.
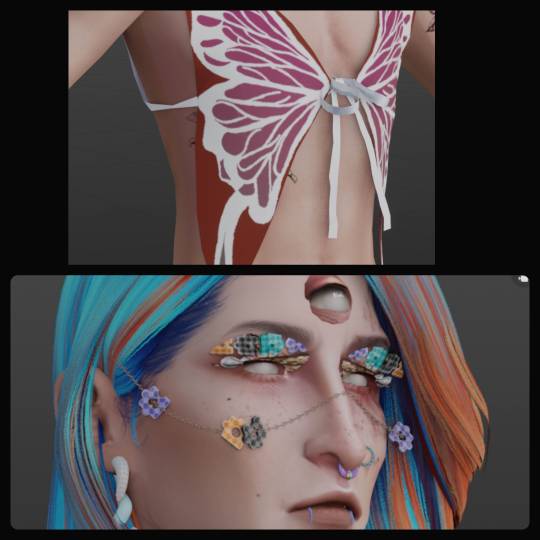
I already plan on doing other tutorials on how I fix overlapping textures as shown below.
35 notes
·
View notes
Text
🧾️ ask replies-
series questions
thank you for all the love on the series! i'm so happy to hear you guys like it and how you're looking forward to part 2. thank you thank you thank you!
the next part isn't season 4, it is just part 2 of season 3. it's meant to be a bit more slice of life/fantasy instead of the dark fantasy we've been doing.
i agree, owen and grey are a mess. i wouldn't be surprised if they broke up.
yes, melissa is still coming to visit in november. idk if she and ame will cross paths, but wouldn't that be interesting?
yes, ernest is a gorgon! his appearance is inspired by a rattlesnake.
no, he and eloise did not sleep together that night he stayed at her home.
blender questions
i use blender 3.6. i talked about my render settings in this post.
my (unfinished) render tutorial is here.
sometimes i download a scene, other times i'll make my own scene. i just find random ones on like pinterest to use. i have some that i've paid for by architecture sims and ehsims. would highly recommend ehsims. love the quality of the scenes. the lighting is always always good.
yes, blender content for dulce (now jade & marie) will be paywalled. it's not meant for ts4 at all. not rigged for ts4 and will use none of its assets. if i do release anything from the brand for ts4 it will be free. i don't fw making y'all pay for cc. no early access or anything either cause i hate waiting just like how y'all do. but rn it's meant to just be a digital brand for me to practice 3d modeling with.
general questions
the shots of sav's apt and ernest's room were taken in-game.
the reshade preset i use is personal. i only make my own and i usually switch things up with every shot.
i use srwe to get better in-game quality shots!
the glow effect is a mix of relight and the arcanebloom effect.
typically i make my own builds, but lately i've been downloading a few. it's a lot harder to do now since the switch to dx11. i have to run all the cc through the patcher, so it takes a bit longer to get builds in game. i haven't branched out too much lately but i'm looking for more alpha cc builds! i've got a few now from bean's builds.
wcifs
the jm bags are a recolor of these bags.
i get all my cars from breeze motors. they're high poly.
ernest's hair is by estrojans. it's the dee cut. find that here.
i made the light in kaila's home. i can put it out if you'd like. it won't be as neat as an official MA post, but i can throw it up on s4s in the next few days.
ceres' locs are all by khadijah! love love love her work.
i haven't finished ernest's room but i will do a full lookbook for it soon. the computers are by hanraja!
his snake terrarium is by sg5150. the light inside of it is just a relight effect lamp.
imogen's skin is a mix of things, so it's hard to give specifics. i also use the color slider mod. all of the cast use some variation of skins by thisisthem.
the roses eloise is holding in the blender scene are by solethesimmer. they are for blender only.
imogen's orchid earrings are personal. i made them. i haven't posted them publicly.
26 notes
·
View notes