#blog automation tutorial
Explore tagged Tumblr posts
Visit Tumblr Blog
Explore Tumblr blogs with no restrictions, modern design and the best experience.
Last Seen Tumblr Blogs


Fun Fact
Tumblr was attacked by a cross-site scripting worm deployed by the Internet troll group GNAA on Dec 3, 2012.
Text
How to Automate Blog Creation with AI and Earn Money
Automate Blog Creation with AI : Learn how to set up a fully automated AI blogging system. It finds news and generates unique content. It also publishes blog posts to WordPress, even while you sleep. Boost traffic, save time, and grow your business effortlessly! How to Set Up an AI Automated Blogging System and Grow Your Company While You Sleep Imagine waking up every morning with new blog…
#AI blog automation#AI blog posting system#AI blog writer#AI blogging tools#AI content creation#automate blog posts#automate WordPress posts#blog automation tutorial#earn money blogging#gravitywrite AI#make.com automation#WordPress blog automation
0 notes
Text
Unlock the full power of #ChatGPT with this free prompting cheat sheet. Smarter prompts = better results. Let AI work for you. 💡🚀
#AI#AI content creation#AI for entrepreneurs#AI prompts#AI tools#AI workflow hacks#artificial intelligence#Automation tools#beginner ChatGPT tips#ChatGPT#ChatGPT blog prompts#ChatGPT cheat sheet#ChatGPT examples#ChatGPT for business#ChatGPT for designers#ChatGPT for developers#ChatGPT guide#ChatGPT prompts#ChatGPT tutorial#content creation#content strategy#copywriting with ChatGPT#digital marketing tools#how to use ChatGPT#marketing automation#mastering ChatGPT#productivity hacks#prompt engineering#prompt ideas#prompt writing tips
0 notes
Text
How I ditched streaming services and learned to love Linux: A step-by-step guide to building your very own personal media streaming server (V2.0: REVISED AND EXPANDED EDITION)
This is a revised, corrected and expanded version of my tutorial on setting up a personal media server that previously appeared on my old blog (donjuan-auxenfers). I expect that that post is still making the rounds (hopefully with my addendum on modifying group share permissions in Ubuntu to circumvent 0x8007003B "Unexpected Network Error" messages in Windows 10/11 when transferring files) but I have no way of checking. Anyway this new revised version of the tutorial corrects one or two small errors I discovered when rereading what I wrote, adds links to all products mentioned and is just more polished generally. I also expanded it a bit, pointing more adventurous users toward programs such as Sonarr/Radarr/Lidarr and Overseerr which can be used for automating user requests and media collection.
So then, what is this tutorial? This is a tutorial on how to build and set up your own personal media server using Ubuntu as an operating system and Plex (or Jellyfin) to not only manage your media, but to also stream that media to your devices both at home and abroad anywhere in the world where you have an internet connection. Its intent is to show you how building a personal media server and stuffing it full of films, TV, and music that you acquired through indiscriminate and voracious media piracy various legal methods will free you to completely ditch paid streaming services. No more will you have to pay for Disney+, Netflix, HBOMAX, Hulu, Amazon Prime, Peacock, CBS All Access, Paramount+, Crave or any other streaming service that is not named Criterion Channel. Instead whenever you want to watch your favourite films and television shows, you’ll have your own personal service that only features things that you want to see, with files that you have control over. And for music fans out there, both Jellyfin and Plex support music streaming, meaning you can even ditch music streaming services. Goodbye Spotify, Youtube Music, Tidal and Apple Music, welcome back unreasonably large MP3 (or FLAC) collections.
On the hardware front, I’m going to offer a few options catered towards different budgets and media library sizes. The cost of getting a media server up and running using this guide will cost you anywhere from $450 CAD/$325 USD at the low end to $1500 CAD/$1100 USD at the high end (it could go higher). My server was priced closer to the higher figure, but I went and got a lot more storage than most people need. If that seems like a little much, consider for a moment, do you have a roommate, a close friend, or a family member who would be willing to chip in a few bucks towards your little project provided they get access? Well that's how I funded my server. It might also be worth thinking about the cost over time, i.e. how much you spend yearly on subscriptions vs. a one time cost of setting up a server. Additionally there's just the joy of being able to scream "fuck you" at all those show cancelling, library deleting, hedge fund vampire CEOs who run the studios through denying them your money. Drive a stake through David Zaslav's heart.
On the software side I will walk you step-by-step through installing Ubuntu as your server's operating system, configuring your storage as a RAIDz array with ZFS, sharing your zpool to Windows with Samba, running a remote connection between your server and your Windows PC, and then a little about started with Plex/Jellyfin. Every terminal command you will need to input will be provided, and I even share a custom #bash script that will make used vs. available drive space on your server display correctly in Windows.
If you have a different preferred flavour of Linux (Arch, Manjaro, Redhat, Fedora, Mint, OpenSUSE, CentOS, Slackware etc. et. al.) and are aching to tell me off for being basic and using Ubuntu, this tutorial is not for you. The sort of person with a preferred Linux distro is the sort of person who can do this sort of thing in their sleep. Also I don't care. This tutorial is intended for the average home computer user. This is also why we’re not using a more exotic home server solution like running everything through Docker Containers and managing it through a dashboard like Homarr or Heimdall. While such solutions are fantastic and can be very easy to maintain once you have it all set up, wrapping your brain around Docker is a whole thing in and of itself. If you do follow this tutorial and had fun putting everything together, then I would encourage you to return in a year’s time, do your research and set up everything with Docker Containers.
Lastly, this is a tutorial aimed at Windows users. Although I was a daily user of OS X for many years (roughly 2008-2023) and I've dabbled quite a bit with various Linux distributions (mostly Ubuntu and Manjaro), my primary OS these days is Windows 11. Many things in this tutorial will still be applicable to Mac users, but others (e.g. setting up shares) you will have to look up for yourself. I doubt it would be difficult to do so.
Nothing in this tutorial will require feats of computing expertise. All you will need is a basic computer literacy (i.e. an understanding of what a filesystem and directory are, and a degree of comfort in the settings menu) and a willingness to learn a thing or two. While this guide may look overwhelming at first glance, it is only because I want to be as thorough as possible. I want you to understand exactly what it is you're doing, I don't want you to just blindly follow steps. If you half-way know what you’re doing, you will be much better prepared if you ever need to troubleshoot.
Honestly, once you have all the hardware ready it shouldn't take more than an afternoon or two to get everything up and running.
(This tutorial is just shy of seven thousand words long so the rest is under the cut.)
Step One: Choosing Your Hardware
Linux is a light weight operating system, depending on the distribution there's close to no bloat. There are recent distributions available at this very moment that will run perfectly fine on a fourteen year old i3 with 4GB of RAM. Moreover, running Plex or Jellyfin isn’t resource intensive in 90% of use cases. All this is to say, we don’t require an expensive or powerful computer. This means that there are several options available: 1) use an old computer you already have sitting around but aren't using 2) buy a used workstation from eBay, or what I believe to be the best option, 3) order an N100 Mini-PC from AliExpress or Amazon.
Note: If you already have an old PC sitting around that you’ve decided to use, fantastic, move on to the next step.
When weighing your options, keep a few things in mind: the number of people you expect to be streaming simultaneously at any one time, the resolution and bitrate of your media library (4k video takes a lot more processing power than 1080p) and most importantly, how many of those clients are going to be transcoding at any one time. Transcoding is what happens when the playback device does not natively support direct playback of the source file. This can happen for a number of reasons, such as the playback device's native resolution being lower than the file's internal resolution, or because the source file was encoded in a video codec unsupported by the playback device.
Ideally we want any transcoding to be performed by hardware. This means we should be looking for a computer with an Intel processor with Quick Sync. Quick Sync is a dedicated core on the CPU die designed specifically for video encoding and decoding. This specialized hardware makes for highly efficient transcoding both in terms of processing overhead and power draw. Without these Quick Sync cores, transcoding must be brute forced through software. This takes up much more of a CPU’s processing power and requires much more energy. But not all Quick Sync cores are created equal and you need to keep this in mind if you've decided either to use an old computer or to shop for a used workstation on eBay
Any Intel processor from second generation Core (Sandy Bridge circa 2011) onward has Quick Sync cores. It's not until 6th gen (Skylake), however, that the cores support the H.265 HEVC codec. Intel’s 10th gen (Comet Lake) processors introduce support for 10bit HEVC and HDR tone mapping. And the recent 12th gen (Alder Lake) processors brought with them hardware AV1 decoding. As an example, while an 8th gen (Kaby Lake) i5-8500 will be able to hardware transcode a H.265 encoded file, it will fall back to software transcoding if given a 10bit H.265 file. If you’ve decided to use that old PC or to look on eBay for an old Dell Optiplex keep this in mind.
Note 1: The price of old workstations varies wildly and fluctuates frequently. If you get lucky and go shopping shortly after a workplace has liquidated a large number of their workstations you can find deals for as low as $100 on a barebones system, but generally an i5-8500 workstation with 16gb RAM will cost you somewhere in the area of $260 CAD/$200 USD.
Note 2: The AMD equivalent to Quick Sync is called Video Core Next, and while it's fine, it's not as efficient and not as mature a technology. It was only introduced with the first generation Ryzen CPUs and it only got decent with their newest CPUs, we want something cheap.
Alternatively you could forgo having to keep track of what generation of CPU is equipped with Quick Sync cores that feature support for which codecs, and just buy an N100 mini-PC. For around the same price or less of a used workstation you can pick up a mini-PC with an Intel N100 processor. The N100 is a four-core processor based on the 12th gen Alder Lake architecture and comes equipped with the latest revision of the Quick Sync cores. These little processors offer astounding hardware transcoding capabilities for their size and power draw. Otherwise they perform equivalent to an i5-6500, which isn't a terrible CPU. A friend of mine uses an N100 machine as a dedicated retro emulation gaming system and it does everything up to 6th generation consoles just fine. The N100 is also a remarkably efficient chip, it sips power. In fact, the difference between running one of these and an old workstation could work out to hundreds of dollars a year in energy bills depending on where you live.
You can find these Mini-PCs all over Amazon or for a little cheaper on AliExpress. They range in price from $170 CAD/$125 USD for a no name N100 with 8GB RAM to $280 CAD/$200 USD for a Beelink S12 Pro with 16GB RAM. The brand doesn't really matter, they're all coming from the same three factories in Shenzen, go for whichever one fits your budget or has features you want. 8GB RAM should be enough, Linux is lightweight and Plex only calls for 2GB RAM. 16GB RAM might result in a slightly snappier experience, especially with ZFS. A 256GB SSD is more than enough for what we need as a boot drive, but going for a bigger drive might allow you to get away with things like creating preview thumbnails for Plex, but it’s up to you and your budget.
The Mini-PC I wound up buying was a Firebat AK2 Plus with 8GB RAM and a 256GB SSD. It looks like this:

Note: Be forewarned that if you decide to order a Mini-PC from AliExpress, note the type of power adapter it ships with. The mini-PC I bought came with an EU power adapter and I had to supply my own North American power supply. Thankfully this is a minor issue as barrel plug 30W/12V/2.5A power adapters are easy to find and can be had for $10.
Step Two: Choosing Your Storage
Storage is the most important part of our build. It is also the most expensive. Thankfully it’s also the most easily upgrade-able down the line.
For people with a smaller media collection (4TB to 8TB), a more limited budget, or who will only ever have two simultaneous streams running, I would say that the most economical course of action would be to buy a USB 3.0 8TB external HDD. Something like this one from Western Digital or this one from Seagate. One of these external drives will cost you in the area of $200 CAD/$140 USD. Down the line you could add a second external drive or replace it with a multi-drive RAIDz set up such as detailed below.
If a single external drive the path for you, move on to step three.
For people with larger media libraries (12TB+), who prefer media in 4k, or care who about data redundancy, the answer is a RAID array featuring multiple HDDs in an enclosure.
Note: If you are using an old PC or used workstatiom as your server and have the room for at least three 3.5" drives, and as many open SATA ports on your mother board you won't need an enclosure, just install the drives into the case. If your old computer is a laptop or doesn’t have room for more internal drives, then I would suggest an enclosure.
The minimum number of drives needed to run a RAIDz array is three, and seeing as RAIDz is what we will be using, you should be looking for an enclosure with three to five bays. I think that four disks makes for a good compromise for a home server. Regardless of whether you go for a three, four, or five bay enclosure, do be aware that in a RAIDz array the space equivalent of one of the drives will be dedicated to parity at a ratio expressed by the equation 1 − 1/n i.e. in a four bay enclosure equipped with four 12TB drives, if we configured our drives in a RAIDz1 array we would be left with a total of 36TB of usable space (48TB raw size). The reason for why we might sacrifice storage space in such a manner will be explained in the next section.
A four bay enclosure will cost somewhere in the area of $200 CDN/$140 USD. You don't need anything fancy, we don't need anything with hardware RAID controls (RAIDz is done entirely in software) or even USB-C. An enclosure with USB 3.0 will perform perfectly fine. Don’t worry too much about USB speed bottlenecks. A mechanical HDD will be limited by the speed of its mechanism long before before it will be limited by the speed of a USB connection. I've seen decent looking enclosures from TerraMaster, Yottamaster, Mediasonic and Sabrent.
When it comes to selecting the drives, as of this writing, the best value (dollar per gigabyte) are those in the range of 12TB to 20TB. I settled on 12TB drives myself. If 12TB to 20TB drives are out of your budget, go with what you can afford, or look into refurbished drives. I'm not sold on the idea of refurbished drives but many people swear by them.
When shopping for harddrives, search for drives designed specifically for NAS use. Drives designed for NAS use typically have better vibration dampening and are designed to be active 24/7. They will also often make use of CMR (conventional magnetic recording) as opposed to SMR (shingled magnetic recording). This nets them a sizable read/write performance bump over typical desktop drives. Seagate Ironwolf and Toshiba NAS are both well regarded brands when it comes to NAS drives. I would avoid Western Digital Red drives at this time. WD Reds were a go to recommendation up until earlier this year when it was revealed that they feature firmware that will throw up false SMART warnings telling you to replace the drive at the three year mark quite often when there is nothing at all wrong with that drive. It will likely even be good for another six, seven, or more years.

Step Three: Installing Linux
For this step you will need a USB thumbdrive of at least 6GB in capacity, an .ISO of Ubuntu, and a way to make that thumbdrive bootable media.
First download a copy of Ubuntu desktop (for best performance we could download the Server release, but for new Linux users I would recommend against the server release. The server release is strictly command line interface only, and having a GUI is very helpful for most people. Not many people are wholly comfortable doing everything through the command line, I'm certainly not one of them, and I grew up with DOS 6.0. 22.04.3 Jammy Jellyfish is the current Long Term Service release, this is the one to get.
Download the .ISO and then download and install balenaEtcher on your Windows PC. BalenaEtcher is an easy to use program for creating bootable media, you simply insert your thumbdrive, select the .ISO you just downloaded, and it will create a bootable installation media for you.
Once you've made a bootable media and you've got your Mini-PC (or you old PC/used workstation) in front of you, hook it directly into your router with an ethernet cable, and then plug in the HDD enclosure, a monitor, a mouse and a keyboard. Now turn that sucker on and hit whatever key gets you into the BIOS (typically ESC, DEL or F2). If you’re using a Mini-PC check to make sure that the P1 and P2 power limits are set correctly, my N100's P1 limit was set at 10W, a full 20W under the chip's power limit. Also make sure that the RAM is running at the advertised speed. My Mini-PC’s RAM was set at 2333Mhz out of the box when it should have been 3200Mhz. Once you’ve done that, key over to the boot order and place the USB drive first in the boot order. Then save the BIOS settings and restart.
After you restart you’ll be greeted by Ubuntu's installation screen. Installing Ubuntu is really straight forward, select the "minimal" installation option, as we won't need anything on this computer except for a browser (Ubuntu comes preinstalled with Firefox) and Plex Media Server/Jellyfin Media Server. Also remember to delete and reformat that Windows partition! We don't need it.
Step Four: Installing ZFS and Setting Up the RAIDz Array
Note: If you opted for just a single external HDD skip this step and move onto setting up a Samba share.
Once Ubuntu is installed it's time to configure our storage by installing ZFS to build our RAIDz array. ZFS is a "next-gen" file system that is both massively flexible and massively complex. It's capable of snapshot backup, self healing error correction, ZFS pools can be configured with drives operating in a supplemental manner alongside the storage vdev (e.g. fast cache, dedicated secondary intent log, hot swap spares etc.). It's also a file system very amenable to fine tuning. Block and sector size are adjustable to use case and you're afforded the option of different methods of inline compression. If you'd like a very detailed overview and explanation of its various features and tips on tuning a ZFS array check out these articles from Ars Technica. For now we're going to ignore all these features and keep it simple, we're going to pull our drives together into a single vdev running in RAIDz which will be the entirety of our zpool, no fancy cache drive or SLOG.
Open up the terminal and type the following commands:
sudo apt update
then
sudo apt install zfsutils-linux
This will install the ZFS utility. Verify that it's installed with the following command:
zfs --version
Now, it's time to check that the HDDs we have in the enclosure are healthy, running, and recognized. We also want to find out their device IDs and take note of them:
sudo fdisk -1
Note: You might be wondering why some of these commands require "sudo" in front of them while others don't. "Sudo" is short for "super user do”. When and where "sudo" is used has to do with the way permissions are set up in Linux. Only the "root" user has the access level to perform certain tasks in Linux. As a matter of security and safety regular user accounts are kept separate from the "root" user. It's not advised (or even possible) to boot into Linux as "root" with most modern distributions. Instead by using "sudo" our regular user account is temporarily given the power to do otherwise forbidden things. Don't worry about it too much at this stage, but if you want to know more check out this introduction.
If everything is working you should get a list of the various drives detected along with their device IDs which will look like this: /dev/sdc. You can also check the device IDs of the drives by opening the disk utility app. Jot these IDs down as we'll need them for our next step, creating our RAIDz array.
RAIDz is similar to RAID-5 in that instead of striping your data over multiple disks, exchanging redundancy for speed and available space (RAID-0), or mirroring your data writing by two copies of every piece (RAID-1), it instead writes parity blocks across the disks in addition to striping, this provides a balance of speed, redundancy and available space. If a single drive fails, the parity blocks on the working drives can be used to reconstruct the entire array as soon as a replacement drive is added.
Additionally, RAIDz improves over some of the common RAID-5 flaws. It's more resilient and capable of self healing, as it is capable of automatically checking for errors against a checksum. It's more forgiving in this way, and it's likely that you'll be able to detect when a drive is dying well before it fails. A RAIDz array can survive the loss of any one drive.
Note: While RAIDz is indeed resilient, if a second drive fails during the rebuild, you're fucked. Always keep backups of things you can't afford to lose. This tutorial, however, is not about proper data safety.
To create the pool, use the following command:
sudo zpool create "zpoolnamehere" raidz "device IDs of drives we're putting in the pool"
For example, let's creatively name our zpool "mypool". This poil will consist of four drives which have the device IDs: sdb, sdc, sdd, and sde. The resulting command will look like this:
sudo zpool create mypool raidz /dev/sdb /dev/sdc /dev/sdd /dev/sde
If as an example you bought five HDDs and decided you wanted more redundancy dedicating two drive to this purpose, we would modify the command to "raidz2" and the command would look something like the following:
sudo zpool create mypool raidz2 /dev/sdb /dev/sdc /dev/sdd /dev/sde /dev/sdf
An array configured like this is known as RAIDz2 and is able to survive two disk failures.
Once the zpool has been created, we can check its status with the command:
zpool status
Or more concisely with:
zpool list
The nice thing about ZFS as a file system is that a pool is ready to go immediately after creation. If we were to set up a traditional RAID-5 array using mbam, we'd have to sit through a potentially hours long process of reformatting and partitioning the drives. Instead we're ready to go right out the gates.
The zpool should be automatically mounted to the filesystem after creation, check on that with the following:
df -hT | grep zfs
Note: If your computer ever loses power suddenly, say in event of a power outage, you may have to re-import your pool. In most cases, ZFS will automatically import and mount your pool, but if it doesn’t and you can't see your array, simply open the terminal and type sudo zpool import -a.
By default a zpool is mounted at /"zpoolname". The pool should be under our ownership but let's make sure with the following command:
sudo chown -R "yourlinuxusername" /"zpoolname"
Note: Changing file and folder ownership with "chown" and file and folder permissions with "chmod" are essential commands for much of the admin work in Linux, but we won't be dealing with them extensively in this guide. If you'd like a deeper tutorial and explanation you can check out these two guides: chown and chmod.

You can access the zpool file system through the GUI by opening the file manager (the Ubuntu default file manager is called Nautilus) and clicking on "Other Locations" on the sidebar, then entering the Ubuntu file system and looking for a folder with your pool's name. Bookmark the folder on the sidebar for easy access.

Your storage pool is now ready to go. Assuming that we already have some files on our Windows PC we want to copy to over, we're going to need to install and configure Samba to make the pool accessible in Windows.
Step Five: Setting Up Samba/Sharing
Samba is what's going to let us share the zpool with Windows and allow us to write to it from our Windows machine. First let's install Samba with the following commands:
sudo apt-get update
then
sudo apt-get install samba
Next create a password for Samba.
sudo smbpswd -a "yourlinuxusername"
It will then prompt you to create a password. Just reuse your Ubuntu user password for simplicity's sake.
Note: if you're using just a single external drive replace the zpool location in the following commands with wherever it is your external drive is mounted, for more information see this guide on mounting an external drive in Ubuntu.
After you've created a password we're going to create a shareable folder in our pool with this command
mkdir /"zpoolname"/"foldername"
Now we're going to open the smb.conf file and make that folder shareable. Enter the following command.
sudo nano /etc/samba/smb.conf
This will open the .conf file in nano, the terminal text editor program. Now at the end of smb.conf add the following entry:
["foldername"]
path = /"zpoolname"/"foldername"
available = yes
valid users = "yourlinuxusername"
read only = no
writable = yes
browseable = yes
guest ok = no
Ensure that there are no line breaks between the lines and that there's a space on both sides of the equals sign. Our next step is to allow Samba traffic through the firewall:
sudo ufw allow samba
Finally restart the Samba service:
sudo systemctl restart smbd
At this point we'll be able to access to the pool, browse its contents, and read and write to it from Windows. But there's one more thing left to do, Windows doesn't natively support the ZFS file systems and will read the used/available/total space in the pool incorrectly. Windows will read available space as total drive space, and all used space as null. This leads to Windows only displaying a dwindling amount of "available" space as the drives are filled. We can fix this! Functionally this doesn't actually matter, we can still write and read to and from the disk, it just makes it difficult to tell at a glance the proportion of used/available space, so this is an optional step but one I recommend (this step is also unnecessary if you're just using a single external drive). What we're going to do is write a little shell script in #bash. Open nano with the terminal with the command:
nano
Now insert the following code:
#!/bin/bash CUR_PATH=`pwd` ZFS_CHECK_OUTPUT=$(zfs get type $CUR_PATH 2>&1 > /dev/null) > /dev/null if [[ $ZFS_CHECK_OUTPUT == *not\ a\ ZFS* ]] then IS_ZFS=false else IS_ZFS=true fi if [[ $IS_ZFS = false ]] then df $CUR_PATH | tail -1 | awk '{print $2" "$4}' else USED=$((`zfs get -o value -Hp used $CUR_PATH` / 1024)) > /dev/null AVAIL=$((`zfs get -o value -Hp available $CUR_PATH` / 1024)) > /dev/null TOTAL=$(($USED+$AVAIL)) > /dev/null echo $TOTAL $AVAIL fi
Save the script as "dfree.sh" to /home/"yourlinuxusername" then change the ownership of the file to make it executable with this command:
sudo chmod 774 dfree.sh
Now open smb.conf with sudo again:
sudo nano /etc/samba/smb.conf
Now add this entry to the top of the configuration file to direct Samba to use the results of our script when Windows asks for a reading on the pool's used/available/total drive space:
[global]
dfree command = /home/"yourlinuxusername"/dfree.sh
Save the changes to smb.conf and then restart Samba again with the terminal:
sudo systemctl restart smbd
Now there’s one more thing we need to do to fully set up the Samba share, and that’s to modify a hidden group permission. In the terminal window type the following command:
usermod -a -G sambashare “yourlinuxusername”
Then restart samba again:
sudo systemctl restart smbd
If we don’t do this last step, everything will appear to work fine, and you will even be able to see and map the drive from Windows and even begin transferring files, but you'd soon run into a lot of frustration. As every ten minutes or so a file would fail to transfer and you would get a window announcing “0x8007003B Unexpected Network Error”. This window would require your manual input to continue the transfer with the file next in the queue. And at the end it would reattempt to transfer whichever files failed the first time around. 99% of the time they’ll go through that second try, but this is still all a major pain in the ass. Especially if you’ve got a lot of data to transfer or you want to step away from the computer for a while.
It turns out samba can act a little weirdly with the higher read/write speeds of RAIDz arrays and transfers from Windows, and will intermittently crash and restart itself if this group option isn’t changed. Inputting the above command will prevent you from ever seeing that window.
The last thing we're going to do before switching over to our Windows PC is grab the IP address of our Linux machine. Enter the following command:
hostname -I
This will spit out this computer's IP address on the local network (it will look something like 192.168.0.x), write it down. It might be a good idea once you're done here to go into your router settings and reserving that IP for your Linux system in the DHCP settings. Check the manual for your specific model router on how to access its settings, typically it can be accessed by opening a browser and typing http:\\192.168.0.1 in the address bar, but your router may be different.
Okay we’re done with our Linux computer for now. Get on over to your Windows PC, open File Explorer, right click on Network and click "Map network drive". Select Z: as the drive letter (you don't want to map the network drive to a letter you could conceivably be using for other purposes) and enter the IP of your Linux machine and location of the share like so: \\"LINUXCOMPUTERLOCALIPADDRESSGOESHERE"\"zpoolnamegoeshere"\. Windows will then ask you for your username and password, enter the ones you set earlier in Samba and you're good. If you've done everything right it should look something like this:

You can now start moving media over from Windows to the share folder. It's a good idea to have a hard line running to all machines. Moving files over Wi-Fi is going to be tortuously slow, the only thing that’s going to make the transfer time tolerable (hours instead of days) is a solid wired connection between both machines and your router.
Step Six: Setting Up Remote Desktop Access to Your Server
After the server is up and going, you’ll want to be able to access it remotely from Windows. Barring serious maintenance/updates, this is how you'll access it most of the time. On your Linux system open the terminal and enter:
sudo apt install xrdp
Then:
sudo systemctl enable xrdp
Once it's finished installing, open “Settings” on the sidebar and turn off "automatic login" in the User category. Then log out of your account. Attempting to remotely connect to your Linux computer while you’re logged in will result in a black screen!
Now get back on your Windows PC, open search and look for "RDP". A program called "Remote Desktop Connection" should pop up, open this program as an administrator by right-clicking and selecting “run as an administrator”. You’ll be greeted with a window. In the field marked “Computer” type in the IP address of your Linux computer. Press connect and you'll be greeted with a new window and prompt asking for your username and password. Enter your Ubuntu username and password here.

If everything went right, you’ll be logged into your Linux computer. If the performance is sluggish, adjust the display options. Lowering the resolution and colour depth do a lot to make the interface feel snappier.

Remote access is how we're going to be using our Linux system from now, barring edge cases like needing to get into the BIOS or upgrading to a new version of Ubuntu. Everything else from performing maintenance like a monthly zpool scrub to checking zpool status and updating software can all be done remotely.

This is how my server lives its life now, happily humming and chirping away on the floor next to the couch in a corner of the living room.
Step Seven: Plex Media Server/Jellyfin
Okay we’ve got all the ground work finished and our server is almost up and running. We’ve got Ubuntu up and running, our storage array is primed, we’ve set up remote connections and sharing, and maybe we’ve moved over some of favourite movies and TV shows.
Now we need to decide on the media server software to use which will stream our media to us and organize our library. For most people I’d recommend Plex. It just works 99% of the time. That said, Jellyfin has a lot to recommend it by too, even if it is rougher around the edges. Some people run both simultaneously, it’s not that big of an extra strain. I do recommend doing a little bit of your own research into the features each platform offers, but as a quick run down, consider some of the following points:
Plex is closed source and is funded through PlexPass purchases while Jellyfin is open source and entirely user driven. This means a number of things: for one, Plex requires you to purchase a “PlexPass” (purchased as a one time lifetime fee $159.99 CDN/$120 USD or paid for on a monthly or yearly subscription basis) in order to access to certain features, like hardware transcoding (and we want hardware transcoding) or automated intro/credits detection and skipping, Jellyfin offers some of these features for free through plugins. Plex supports a lot more devices than Jellyfin and updates more frequently. That said, Jellyfin's Android and iOS apps are completely free, while the Plex Android and iOS apps must be activated for a one time cost of $6 CDN/$5 USD. But that $6 fee gets you a mobile app that is much more functional and features a unified UI across platforms, the Plex mobile apps are simply a more polished experience. The Jellyfin apps are a bit of a mess and the iOS and Android versions are very different from each other.
Jellyfin’s actual media player is more fully featured than Plex's, but on the other hand Jellyfin's UI, library customization and automatic media tagging really pale in comparison to Plex. Streaming your music library is free through both Jellyfin and Plex, but Plex offers the PlexAmp app for dedicated music streaming which boasts a number of fantastic features, unfortunately some of those fantastic features require a PlexPass. If your internet is down, Jellyfin can still do local streaming, while Plex can fail to play files unless you've got it set up a certain way. Jellyfin has a slew of neat niche features like support for Comic Book libraries with the .cbz/.cbt file types, but then Plex offers some free ad-supported TV and films, they even have a free channel that plays nothing but Classic Doctor Who.
Ultimately it's up to you, I settled on Plex because although some features are pay-walled, it just works. It's more reliable and easier to use, and a one-time fee is much easier to swallow than a subscription. I had a pretty easy time getting my boomer parents and tech illiterate brother introduced to and using Plex and I don't know if I would've had as easy a time doing that with Jellyfin. I do also need to mention that Jellyfin does take a little extra bit of tinkering to get going in Ubuntu, you’ll have to set up process permissions, so if you're more tolerant to tinkering, Jellyfin might be up your alley and I’ll trust that you can follow their installation and configuration guide. For everyone else, I recommend Plex.
So pick your poison: Plex or Jellyfin.
Note: The easiest way to download and install either of these packages in Ubuntu is through Snap Store.
After you've installed one (or both), opening either app will launch a browser window into the browser version of the app allowing you to set all the options server side.
The process of adding creating media libraries is essentially the same in both Plex and Jellyfin. You create a separate libraries for Television, Movies, and Music and add the folders which contain the respective types of media to their respective libraries. The only difficult or time consuming aspect is ensuring that your files and folders follow the appropriate naming conventions:
Plex naming guide for Movies
Plex naming guide for Television
Jellyfin follows the same naming rules but I find their media scanner to be a lot less accurate and forgiving than Plex. Once you've selected the folders to be scanned the service will scan your files, tagging everything and adding metadata. Although I find do find Plex more accurate, it can still erroneously tag some things and you might have to manually clean up some tags in a large library. (When I initially created my library it tagged the 1963-1989 Doctor Who as some Korean soap opera and I needed to manually select the correct match after which everything was tagged normally.) It can also be a bit testy with anime (especially OVAs) be sure to check TVDB to ensure that you have your files and folders structured and named correctly. If something is not showing up at all, double check the name.
Once that's done, organizing and customizing your library is easy. You can set up collections, grouping items together to fit a theme or collect together all the entries in a franchise. You can make playlists, and add custom artwork to entries. It's fun setting up collections with posters to match, there are even several websites dedicated to help you do this like PosterDB. As an example, below are two collections in my library, one collecting all the entries in a franchise, the other follows a theme.

My Star Trek collection, featuring all eleven television series, and thirteen films.

My Best of the Worst collection, featuring sixty-nine films previously showcased on RedLetterMedia’s Best of the Worst. They’re all absolutely terrible and I love them.
As for settings, ensure you've got Remote Access going, it should work automatically and be sure to set your upload speed after running a speed test. In the library settings set the database cache to 2000MB to ensure a snappier and more responsive browsing experience, and then check that playback quality is set to original/maximum. If you’re severely bandwidth limited on your upload and have remote users, you might want to limit the remote stream bitrate to something more reasonable, just as a note of comparison Netflix’s 1080p bitrate is approximately 5Mbps, although almost anyone watching through a chromium based browser is streaming at 720p and 3mbps. Other than that you should be good to go. For actually playing your files, there's a Plex app for just about every platform imaginable. I mostly watch television and films on my laptop using the Windows Plex app, but I also use the Android app which can broadcast to the chromecast connected to the TV in the office and the Android TV app for our smart TV. Both are fully functional and easy to navigate, and I can also attest to the OS X version being equally functional.
Part Eight: Finding Media
Now, this is not really a piracy tutorial, there are plenty of those out there. But if you’re unaware, BitTorrent is free and pretty easy to use, just pick a client (qBittorrent is the best) and go find some public trackers to peruse. Just know now that all the best trackers are private and invite only, and that they can be exceptionally difficult to get into. I’m already on a few, and even then, some of the best ones are wholly out of my reach.
If you decide to take the left hand path and turn to Usenet you’ll have to pay. First you’ll need to sign up with a provider like Newshosting or EasyNews for access to Usenet itself, and then to actually find anything you’re going to need to sign up with an indexer like NZBGeek or NZBFinder. There are dozens of indexers, and many people cross post between them, but for more obscure media it’s worth checking multiple. You’ll also need a binary downloader like SABnzbd. That caveat aside, Usenet is faster, bigger, older, less traceable than BitTorrent, and altogether slicker. I honestly prefer it, and I'm kicking myself for taking this long to start using it because I was scared off by the price. I’ve found so many things on Usenet that I had sought in vain elsewhere for years, like a 2010 Italian film about a massacre perpetrated by the SS that played the festival circuit but never received a home media release; some absolute hero uploaded a rip of a festival screener DVD to Usenet. Anyway, figure out the rest of this shit on your own and remember to use protection, get yourself behind a VPN, use a SOCKS5 proxy with your BitTorrent client, etc.
On the legal side of things, if you’re around my age, you (or your family) probably have a big pile of DVDs and Blu-Rays sitting around unwatched and half forgotten. Why not do a bit of amateur media preservation, rip them and upload them to your server for easier access? (Your tools for this are going to be Handbrake to do the ripping and AnyDVD to break any encryption.) I went to the trouble of ripping all my SCTV DVDs (five box sets worth) because none of it is on streaming nor could it be found on any pirate source I tried. I’m glad I did, forty years on it’s still one of the funniest shows to ever be on TV.
Part Nine/Epilogue: Sonarr/Radarr/Lidarr and Overseerr
There are a lot of ways to automate your server for better functionality or to add features you and other users might find useful. Sonarr, Radarr, and Lidarr are a part of a suite of “Servarr” services (there’s also Readarr for books and Whisparr for adult content) that allow you to automate the collection of new episodes of TV shows (Sonarr), new movie releases (Radarr) and music releases (Lidarr). They hook in to your BitTorrent client or Usenet binary newsgroup downloader and crawl your preferred Torrent trackers and Usenet indexers, alerting you to new releases and automatically grabbing them. You can also use these services to manually search for new media, and even replace/upgrade your existing media with better quality uploads. They’re really a little tricky to set up on a bare metal Ubuntu install (ideally you should be running them in Docker Containers), and I won’t be providing a step by step on installing and running them, I’m simply making you aware of their existence.
The other bit of kit I want to make you aware of is Overseerr which is a program that scans your Plex media library and will serve recommendations based on what you like. It also allows you and your users to request specific media. It can even be integrated with Sonarr/Radarr/Lidarr so that fulfilling those requests is fully automated.
And you're done. It really wasn't all that hard. Enjoy your media. Enjoy the control you have over that media. And be safe in the knowledge that no hedgefund CEO motherfucker who hates the movies but who is somehow in control of a major studio will be able to disappear anything in your library as a tax write-off.
1K notes
·
View notes
Note
Hi!! I wanted to say that I loved reading about your journey of creating a personal website. I'm still unsure between Vercel and Netlify. I have a small question to ask. See, one of the reasons I want to make a website is to archive drawings and journal/sketchbook. Would you have any tips for creating an area on my website just for the diary/journal, which has tags, files for each entry, etc.?
Bello!

Really happy to hear about your interest in websites! I want everyone to make their own site so I don't have to log into social media and get instant tummyaches ♥
Vercel vs Netlify: I think I settled on Vercel for absolutely no reason whatsoever. I just made a site on Netlify, then tested on Vercel, and now I have like 5 websites on Vercel so I just kept using it LOL. I'm sure a more tech-savvy person would know the difference - I think they have certain integrations with specific programs.
Creating a diary or journal with tags:
There's a couple of different ways you can do that, with different levels of work needed.
you got me yapping again:
This sadgrl tutorial might be outdated and may or may not work, but explains the process better than I can.
Easiest: make a journal on Dreamwidth, or another blogging site (wordpress??) that allows easy tags and RSS feed, and embed that RSS feed onto your site.
This requires almost no HTML set-up, and the easiest to organize tags, but you don't truly have the data on your own site since it's just embedded.
When I snuck into a web design class at college, this was one of the methods that the professor used for a blog within a portfolio site LOL.
Shit like wordpress is what a LOT of ~professional~ sites do for their blog section. They code it separately from the main site haha. It's the most popular thing, but not necessarily the best. And wait til you read on what the CEO of wordpress has been having meltdowns about... he owns tumblr too!
It's made with a tutorial for Neocities if that's what you use.
Medium: Set up zonelets.
It will require some HTML and JS editing, but will help automate making headers/footers for each page of a blog.
I've never used it myself, but I see other people speak highly of it.
HARD FOR ME CUZ I'M A GORILLA: I believe a lot of professional web devs will slap your face with their coding cock until you use a static site generator (SSG) to make your site.
You will need some coding knowledge to set up the tagging system since it doesn't come with it enabled by default. But it's made explicitly to be an alternative to big Static Site Generators which are...
It requires some more intimidating knowledge, because it's a lot of scripts that turn files that are not HTML/CSS/JS into plain HTML.
Also you have to use the command line, and that doesn't come with buttons that tell you what you can do. You have to copy/paste all that shit or memorize the code to 'dev build astro' and it all looks silly.
I've used Eleventy, and now am using Astro. Other people use Hugo or Jekyll or some other stuff with crazy names like Glup Shitto. I hate all these sites cuz none of the words mean anything to me. This is a common theme for me and tech. I don't know what NODES or CONTENT or ISLANDS are!!!
I had the most success attempting to learn how to use a SSG by downloading a template and altering it with github + VScodium. Here's the template page for Astro. You click on a theme you like, and it takes you to its github page. (If you don't want to use evil Microsoft stuff sorry. Skip this entire section.) Follow the instructions on the page for "forking" the glup shitto. When it tells you to run commands, I run those commands through the terminal window in VScodium. These tutorials never tell you what these commands do cuz they assume you already know. Usually those commands automatically install the files you need onto your computer, and create the final files.
You can see my wip here for a "tag system" that SHOULD show members of a web listing haha but I don't know what I'm doing and I have a reading disorder AND don't know cumputer good.
THEORETICALLY this will be the simplest and easiest way to maintain tags and files, because after you set it up you just have to write the "content" of the blog page. And you don't have to set up the header/footer ever again. I see the vision, and potential, but I am not there yet when it takes me 5 hours a day to figure out what any of the words in the documentation mean and I don't want to ask an actual tech person cuz they will be like 'obviously just press the Blip on the Repository and then Suck My Ass in the command line".
(side note I haven't updated fujofans in like a year cuz I'm struggling with this part to make updating easier).
Con: the final HTML/CSS code is really ugly if it's "minified", and a lot of themes use """"""professional"""""" CSS libraries like Bootstrap and Tailwind that I honestly think are ugly cuz that's what every fuckin' tech website uses to style their pages and make them look Professional and Minimalist with stupid code like style="500-w dark-gray-balls D-cup-bra" on every single element. Even Toyhouse uses Bootstrap. Eugh!
But maybe you're smarter than me and can wrangle these things better!
That was really long. Woops. I hope you can slug through this wall of text and find something helpful. Feel free to email me if you have any more specific questions. I may or may not be helpful.
If someone else sees this and has better suggestions for making BLOGS, please chime in. I'm begging you.
64 notes
·
View notes
Text
Obsidian Tutorial - Making & Using Templates
God I love templates. Consistent layouts of notes AND less typing? I’m a simple man with simple pleasures. There are a lot of things you can do with templates, and with certain plugins they can get quite complicated, but the basics are pretty straightforward.

[ID - a purple decorative divider]
Head to the settings menu and find core plugins. Toggle on the Templates plugin.

[ID - a screenshot of the Obsidian settings menu, in the Core Plugins section. The ‘templates’ plugin is highlighted and toggled on.]
Under the core plugins section in the settings menu, head to ‘Templates’ to set up a few basics
The most important one is your template folder location - this is the place you’ll save all your templates. I have one in my Meta folder just called ‘Templates’ - I recommend making a similar, clearly named folder so it’s easy to find
The date and time format options are slightly more complicated additions: there are certain formats you can use in basic templates to automatically fill in date and time, and this is where you set how you want that format to look. Don’t worry about it too much - you’re safe to leave it as the default if you want.
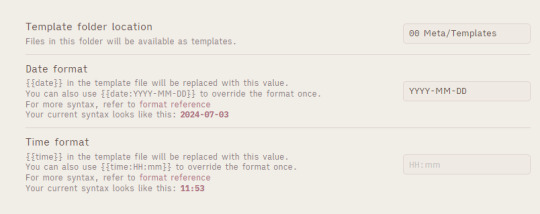
[ID - a screenshot of the Template plugin settings in Obsidian. At the top, the template folder location is filled out as ‘00 Meta/Templates’.]
Once you have your folder location set up, you can start making templates!
A simple example might be a character profile: create a new note, and lay out the text the way you’d like it to look, but without any specific details in.
Make sure the note is in your template folder
You can now use that note as a template! You can insert it into a new note either by using the command palette and the ‘insert template’ command, or you can assign a hotkey (I use Ctrl+T) and use that
Congratulations, you have now saved yourself approximately a million years of repetitive typing, and the stress of remembering how you want to lay out character profiles, journals, blog posts, and any number of other things
Bonus - free templates!
I have a handful of templates I’ve made, and you can grab them for free here:
character profile
country
fictional organisation
fic
scene yaml
RPG NPC template (requires dataview & metadata menu plugins for full automation, but you can delete those parts and use it manually as well)
RPG location template
Monthly planner (requires dataview)
Note: some of these make use of the ITS infobox custom CSS - i wrote a rough guide to installing it here
[ID - a purple decorative divider]
check out my obsidian tag for more posts
check out the tutorials tag for other obsidian tutorials
obsidian resources masterpost
download obsidian
got questions? tutorial suggestions? want to say hi?
#obsidian md#obsidian.md#obsidian tutorials#writing tools#templates my beloved#and then you can get really crazy and start using quickadd to auto-make things#and if you’re smarter than me you can use templater and do wild things#or so i’m told#i cannot wrap my head around templater so godspeed to those of you who want to use it
33 notes
·
View notes
Text
Mixing Stuff Masterpost for Vocal Synth Users
i'll say a few things here and there on how i approach mixing based on a set of guidelines i've been giving thru learning. i won't go 100% and i encourage you research further on your own as everyone has a different perspective of certain concepts. whats important is that you understand the concept so that you are able to interpolate on it with your own liberties. yeah. please read the links before looking at my commentary or you won't understand what im saying.
Some DAWs, Their Guides, & Some Freebies: One of the first things you should do is pick a DAW and learn how to use it and its functions to streamline your mixing process.
Free DAWs: The Best Available in 2023 by Produce Like A Pro
Audacity / DarkAudacity (i like darkaudacity): has a section of the site dedicated to tutorials on using Audacity!
Reaper: has a 3 hour course FREE course on mixing!
FL Studio: has a demo version you can pretty much use forever with a few.........exceptions. I won't be linking any cracked versions though. Here's a manual for this program since many people use it!
Free VST Plugins by Bedroom Producers Blog
37 Best Free Mixing VST Plugins by hiphopmakers
ORDER IN THE COURT!: The order of plugins is more important than you think. These links should also introduce some terms we use in the audio production world (like "gain staging" or "EQing")
WHAT'S THE BEST EFFECTS CHAIN ORDER FOR MIXING? by Icon Collective:
The Order Of Things: Audio Plug-ins by AskAudio
Plugin order is viewed from "top to bottom". BASICALLY... most like to gain stage -> EQ -> compress -> saturate -> MORE EQing -> whatever else at this point, but i do my process a bit differently. don't be afraid to bend the rules a little bit. but the guidelines are there for a reason.....based on what they do
Basics: I'll link to some tutorials to elaborate on what was listed by Icon Collective's list.
Gain Staging: Gain Staging Like a Pro by Sweetwater
Saturation: Saturation in Mixing – Instant Warmth, Glue and Fullness with One Plugin by Tough Tones (soundgoodizer fans make some fucking noise i guess)
EQ: SUBTRACTIVE VS ADDITIVE EQ (WHEN TO USE EACH & WHY) by Producer Hive
Compression: THE COMPLETE GUIDE TO AUDIO COMPRESSION by Icon Collective + Audio Compression Basics by Universal Audio
Modulation: Modulation Effects: Flanging, Phase Shifting, and More by Universal Audio
Time Based Effects: Reverb Vs. Delay: Complete Guide To 3D Mixing by Mastering.com
Audio Busing/Routing/Sending Tracks: Your guide to busing and routing audio tracks like a pro by Splice
Limiters: 10 BEST LIMITER PLUGINS FOR MIXING AND MASTERING by Icon Collective
Sidechaining: Sidechain compression demystified: what it is and how to use it by Native Instruments (i dont know anything about this lol)
Automation: Mix Automation 101: How to Automate Your Sound For a Better Mix by Landr (p.s learn how to write automation in your respective programs)
Last note: great. these are the main things you should focus on understanding in mixing. now you are FREE my friend!
youtube
Bonus: Tempo Mapping in Reaper (if you want to learn how to midi songs with bpm changes!!!)
#vocal synth#tutorial#masterpost#mixing#utau#vocaloid#synth v#synthesizer v#cevio#voisona#neutrino#mixing tips#audio production
134 notes
·
View notes
Note
sorry i couldn't find out how to ask on your other blog.
that book binding you posted is gorgeous btw !!
I noticed that in one of the photos you included the disclaimer that you also edited it. I just had a question about how you formatted the text.
one of my biggest gripes with AO3 is text formatting (i often feel like i'm reading a legal document vs a novel/story) . Did you change how it is formatted on AO3 compared to printed?
I feel like i'm in the 0.5% that hate AO3 formatting but i thought i might as well ask in case you have any tips for that. >,>
(also how do you decide on the page size, do you just choose a standard size for all your projects? or do you vary it depending on what you are binding?)
thanks so much for taking the time to answer and for sharing your projects :) !!!!!!!!!!!
hey anon! I have asks turned off for the sideblog, but happy to answer here. Thanks very much!
I'm taking this opportunity to info-dump and link a lot of resources. I think they're useful for people new to either typesetting or bookbinding, but not all are directly related to your queries. That said, hope this is of use!
one of my biggest gripes with AO3 is text formatting (i often feel like i'm reading a legal document vs a novel/story) . Did you change how it is formatted on AO3 compared to printed?
I do a fair bit of editing when I'm binding a fic; typesetting is often the longest part of the process. Your mileage will vary depending on your experience with using word processor software, particularly the paragraph style and page style settings. Another factor is how simple/complicated you want your typeset to look. Replicating a published novel in format is difficult but learnable for a complete beginner.
I'm not equipped to give a full tutorial on how to typeset, but I'll point you towards some useful resources for ficbinding then talk about my own process.
ArmouredSuperHeavy has a tutorial on how to make Ao3's HTML downloads into a printable book in Microsoft Word. I use LibreOffice Writer myself, so this adaptation of the same tutorial is what I follow. Both are very helpful to reference as you're learning the typesetting ropes.
Personally, I don't mess around with HTML. I find it easiest to start by doing a Ctrl+A copy of the Entire Work fic view on Ao3 then pasting that into my word processor. This video tutorial by Beautifully Bound runs through how to do this in Microsoft Word using an AO3 fic as an example, including the associated steps needed to make the fic look novel-like. This is probably the best tutorial to address your gripe with AO3 formatting. Other than that, I'd recommend looking into videos or tutorials about typesetting novels for print. Same idea, and you may get more hits than searching for fanbind/ficbind typesetting tutorials.
More under the cut! Once I start yapping, it's hard to shut me up 🤷♀️
As a point of comparison, here's one of my fics on Ao3 and the corresponding typeset side by side:


Beautifully Bound explains this in far better detail than I will, but off the top of my head, the steps involved:
making a new document and setting the default page size to whatever size I want the book's pages to be (A5 or A6 usually). You can also set the margins at this point, taking account of your printer settings.
CTRL+A and copying the entire work's text on AO3 then pasting it into the document.
removing all hyperlinks and AO3 frontmatter, things like the author tags, summary, notes, etc as well as any website text that got copied over alongside the fic.
(optional) running a spell check and ensuring grammar usage is consistent. For me that's substituting em dashes for hyphens between clauses, enforcing curly double quotation marks for dialogue, etc. LibreOffice Writer automates a lot of this with customisable settings, via Tools -> Auto-Correct. Here's also where to make sure character names are all spelled right, convert the text to or from US to UK English, etc.
picking out fonts for the body text, headers, page numbers, etc. This is where you'll want to use paragraph style settings. Page style settings also comes in clutch if, for example, you'd like different headers on alternating pages. I like having the author on the right, the fic title on the left.
setting the body text first line indent to whatever makes sense visually). This in particular helps make the fic feel more like a novel. You can also play around with line spacing and space between paragraphs at this stage. For this A6 typeset, I had a 0.75cm first line indent, 1.15 line spacing, and 0.15 spacing between paragraphs.
(optional) formatting the first line of the work to use small capitals and to add a drop caps to the first letter of the first word. Again, this is a convention in publishing which add a novel-like feeling to a printed fanwork.
Inserting page numbers, adding images, coming up with how I wanted the "copyright" page to look—optional for the most part, but these are details that make a fic appear more like a novel.
For multi-chapter works, there's extra work in formatting chapter titles as headings so that they're referenced correctly in the automatic table of contents word processors can generate.
Once you have a typeset you're happy with, and if you're considering printing and binding it as a book, then you'll need to look into how to create and print signatures. Personally, this is something I had to actually try (and mess up a bunch of times) before I got to grips with it. Understanding how both your printer and your PDF reader work, particularly printer margins and booklet print settings, is key.
I won't go into as much detail on this, but if it's something you have an interest in, I'd recommend starting with DAS Bookbinding's tutorial. DAS has tutorials for everything bookbinding related so when in doubt, check his channel! Plenty of other YouTubers also have good videos on making signatures.
This resource is extremely useful once you've got your head around how to print signatures manually, so here's a link for anyone in that space: GitHub Bookbinding Imposer. Essentially, this does the signature creation for you, removing the need for booklet print settings in your PDF reader.
also how do you decide on the page size, do you just choose a standard size for all your projects? or do you vary it depending on what you are binding?
I have access to both A4 and A5 sized paper and my printer can handle printing on either size. In bookbinding, normally two pages are printed per side of the paper (which are then folded in half as part of a signature). That is, when I print on A4 paper, it's to make an A5 sized book. Printing on A5 paper will yield an A6 sized book.
Before I begin typesetting, I'll usually know what paper I plan to use, so the typeset will be one size down from the paper. So far, I've made softcover pamphlets at A6 size and casebound books in A5. No real method of choice for me, it's whatever I feel most suits the project.
---
If you made it this far anon, thanks for reading! Here's links to a few general resources if bookbinding is something you'd like to explore more:
DAS Bookbinding (YouTube, bookbinding in all forms)
Sea Lemon DIY (YouTube, bookbinding and other crafts)
bitter melon bindery (YouTube, bookbinding, particularly beginner friendly!)
Jess Less (YouTube, demonstrations of fanbinding and re-binding existing novels)
Papercraft Panda (blog, lots of detailed tutorial on bookbinding)
Renegade Bookbinding Guild (collective and website, loads of fanbinding-specific resources from their members and they have a helpful Discord).
24 notes
·
View notes
Text
Proven Marketing Tactics for Small Business Success
Marketing is the lifeblood of any enterprise, especially small groups seeking to grow and compete in a crowded market. Without powerful advertising strategies, even the satisfactory products or services can pass overlooked. Unlike huge companies, small companies often operate with restrained budgets and resources. Therefore, they need clever, price-effective, and measurable strategies to advantage visibility and develop step by step.
Best marketing strategies for small business

This article explores numerous marketing techniques that are especially effective for small agencies, combining traditional strategies with modern digital tools.
1. Understand Your Target Audience
The basis of all advertising begins with know-how your clients. Define your target marketplace based totally on:
Demographics: Age, gender, profits stage, education
Geographics: Where they stay or paintings
Psychographics: Lifestyle, pursuits, and values
Behavioral trends: Buying conduct, logo loyalty, product utilization
Creating a purchaser persona enables you tailor your messaging, offers, and channels greater correctly. For instance, in case you're concentrated on university college students, Instagram and TikTok is probably better platforms than electronic mail advertising or print media.
2. Build a Strong Brand Identity
A recognizable and straightforward emblem builds lengthy-time period customer loyalty. Your brand includes:
Logo and design: Consistent shades, fonts, and imagery
Tone of voice: Formal, informal, funny, and so on.
Even a one-man or woman enterprise blessings from sturdy branding. For example, a nearby baker who uses eco-friendly packaging can emblem themselves as “inexperienced” and attract environmentally-conscious customers.
Three. Create a Professional Website
A internet site is your 24/7 digital storefront. It should be:
Mobile-friendly and fast
Easy to navigate
Linked for your social media pages
Equipped with touch paperwork or chat help
Use platforms like WordPress, Wix, or Shopify to create low priced, attractive websites without requiring technical expertise.
Four. Utilize Local search engine marketing
If you’re a nearby commercial enterprise, optimizing your on-line presence for local searches is critical. Start by using:
Claiming and verifying your Google Business Profile
Encouraging satisfied clients to depart reviews
Using local key phrases (e.G., “nice salon in Patna”)
Getting indexed in neighborhood directories and maps
5. Leverage Social Media Marketing
Social media structures offer unfastened and paid tools to interact your target audience and construct a community.
Facebook & Instagram: Great for promotions, memories, and visible content
LinkedIn: Best for B2B organizations
YouTube: Ideal for tutorials, product demos, and at the back of-the-scenes content
X (previously Twitter): Good for quick updates, client interplay
Use content material calendars to time table posts always and engage with followers through polls, contests, and comments.
6. Content Marketing: Educate and Add Value
Rather than simply promoting, content material advertising goals to teach and construct accept as true with. Examples encompass:
Blog posts: Informative articles in your internet site
E-books & Guides: Offer beneficial records in alternate for electronic mail addresses
Videos: Product demonstrations, testimonials, or storytelling
Infographics: Shareable visuals explaining complicated topics
Content advertising improves search engine marketing, establishes authority, and builds long-term trust.
7. Email Marketing
Email remains one of the most price-powerful channels for small corporations. Use it to:
Send newsletters
Announce promotions or new merchandise
Re-engage inactive customers
Request remarks
Tools like Mailchimp, Sendinblue, and ConvertKit allow smooth automation and list segmentation. Ensure your emails offer fee, no longer just commercials.
Eight. Referral and Loyalty Programs
Your glad clients can be your excellent marketers. Encourage them to refer friends or family with the aid of offering:
Discounts
Free products
Loyalty points
#digital marketing#online and offline sales#online and offline business#method of small business#Best marketing strategies for small business
3 notes
·
View notes
Text
AI has taken away human jobs however, AI is also creating human jobs
Febuary 16, 2025
By: Ki Lov3 Editor: Toni Gelardi
The greatest strategy to stay ahead of the curve as AI continues to change the labor market is to embrace AI as a tool rather than a threat, adapt, and upskill. The following are essential steps to prepare your career for the future:

1. Develop AI and Tech Skills
Learn how AI works and how it impacts your industry. Take online courses in AI, machine learning, automation, and data analysis. Familiarize yourself with AI-powered tools in your profession (e.g., ChatGPT for writing, VideoGPT to video creation and AI-driven analytics for marketing).
2.Focus on Human-Centric Skills
AI is great at automation, but human traits remain irreplaceable:
Emotional intelligence (EQ):
AI can’t replicate empathy, leadership, or deep human connections.
Critical thinking & problem-solving:
AI provides data, but humans must interpret and apply it effectively.
Creativity & innovation:
AI can generate content, but original ideas and strategic thinking still require human input.
3. Stay flexible and Willing to Pivot
Be open to career shifts—AI might replace some jobs but will create new ones.
Adaptability is key; embrace lifelong learning and continuous skill-building. Consider industries that integrate AI rather than resist it.
4. Learn AI-Augmented Roles
Many jobs won’t disappear but will evolve. Understanding how to work with AI instead of against it can give you an edge.
Example: A digital marketer using AI-powered analytics to optimize campaigns rather than manually crunching data.
5. Build a Unique Personal Brand
If AI is replacing generic jobs, make yourself stand out with a strong personal brand.
Develop expertise in niche areas where AI support is valuable but not dominant.
Use platforms like LinkedIn, personal blogs, or social media to showcase your knowledge.
6. Strengthen Networking and Collaboration
AI can’t replace human relationships and professional networks. Become an in-person person– with genuine emotions.
Build strong connections with industry leaders, join professional groups, and attend AI-focused workshops.
Collaborating with others can open doors to AI-proof career opportunities.
7. Explore Entrepreneurship & Side Gigs
AI creates new business opportunities—consider how you can use AI tools to start a side business or freelance work.
Examples: AI-assisted content creation, AI-driven marketing consultancy, or AI-enhanced coaching services.
8. Stay Informed on AI Trends
Keep up with AI advancements and understand their impact on your industry. Read tech blogs, listen to AI-related podcasts, and follow AI influencers. Take free online tutorials, videos and ecourse online any and everything AI, their are plenty. Stay ahead of industry shifts rather than reacting to them.
Final Thoughts
The only thing we can count on in life is change. Prepare yourself for the change so you aren't left behind.
AI isn’t just taking jobs—it’s changing them. The key to surviving (and thriving) in an AI-driven world is to be adaptable, proactive, and willing to evolve. Instead of fearing AI, embrace it as a tool to enhance your work, increase efficiency, and open up new career opportunities.
Those who learn to work alongside AI, focus on human-centric skills, and continuously upskill will not just survive the AI revolution—they’ll lead it.
#ArtificialIntelligence #FutureOfWork #AIImpact #JobMarket2025 #AIJobs #Automation #AIRevolution
#AIAutomation #JobDisruption #TechTakeover #AIvsHumans #FutureOfJobs
#AIInnovation #NewCareerPaths #FutureSkills #AIAndHumans #WorkWithAI
#Upskilling #LearnAI #AdaptOrDie #CareerGrowth #LifelongLearning
#AIInEducation #AIInHealthcare #AIInBusiness #AIInManufacturing
#ArtificialIntelligence FutureOfWork AIImpact JobMarket2025 AIJobs Automation AIRevolution#ArtificialIntelligence#FutureOfWork AIImpact JobMarket2025 AIJobs Automation AIRevolution#ai#artificial intelligence#skynet#ai ethics#AI replacing humans#ai creating jobs#ai generated#ai art#ai artwork#ai jobs#ai unemployment
5 notes
·
View notes
Text
The Power of Upskilling: Why Investing in Yourself Is the Smartest Move You’ll Ever Make
In today’s fast-paced, constantly evolving world, the only thing more expensive than investing in yourself is not doing it.
Upskilling — the process of learning new skills or enhancing existing ones — is no longer optional. It's a necessity for staying competitive in the workforce, pivoting to new career paths, and adapting to a world where change is the only constant.
Whether you're a fresh graduate, a mid-career professional, or a business leader, this post will help you understand why upskilling matters, where to start, and how to make learning a lifelong habit.
Why Upskilling Matters More Than Ever
1. Rapid Technological Advancements
Automation, AI, and digital transformation have reshaped industries. According to the World Economic Forum, 44% of workers’ core skills will change by 2027. Skills that were in high demand five years ago may now be outdated.
Jobs aren't necessarily disappearing — they’re evolving. That means individuals must continuously adapt or risk being left behind.
2. Career Growth and Mobility
Upskilling doesn’t just help you survive — it helps you thrive.
Want a promotion? Looking to switch industries? Trying to freelance or start a side hustle? Upskilling bridges the gap between where you are and where you want to be.
For example:
A marketer who learns data analytics becomes more valuable.
A teacher who gains expertise in EdTech can unlock new career opportunities.
A finance professional with coding skills can transition into fintech.
3. Increased Job Security
In uncertain economic times, employees with in-demand skills are often the last to go. Upskilling makes you indispensable. Employers view proactive learners as assets — people who are flexible, forward-thinking, and ready to take on new challenges.
4. Personal Satisfaction and Confidence
Beyond career advantages, learning something new boosts your self-esteem. Mastering a new tool or concept builds confidence and adds a sense of achievement. Lifelong learning is directly linked to better mental health, cognitive ability, and even happiness.
Identifying What to Learn
Not all skills are created equal. Here’s how to identify what you should focus on:
1. Align With Industry Trends
Start by researching current trends in your field. What tools, software, or certifications are becoming standard? Websites like LinkedIn Learning, Coursera, and even job boards can offer insight into what’s in demand.
2. Pinpoint Skill Gaps
Look at your resume, job performance, or feedback. Are there areas where you consistently feel underqualified or reliant on others? That’s your starting point.
For instance, if you’re in marketing but struggle with Excel or Google Analytics, that’s a practical gap to close.
3. Balance Hard and Soft Skills
Hard skills (e.g., coding, SEO, data visualization) are measurable and job-specific. Soft skills (e.g., communication, emotional intelligence, adaptability) are often what make or break long-term success.
According to LinkedIn’s Workplace Learning Report, soft skills like creativity, collaboration, and critical thinking are increasingly valued by employers.
How to Upskill Effectively
Upskilling doesn’t have to mean going back to college or spending thousands. With the right strategy, you can learn faster, smarter, and more sustainably.
1. Set Clear Goals
Vague intentions (“I want to get better at digital marketing”) rarely produce results. Instead, try: ✅ “I will complete a Google Ads certification within 30 days.” ✅ “I will write one blog post a week to practice content writing.”
2. Use Online Platforms
Some great learning platforms include:
Coursera – Offers university-led courses, many for free.
Udemy – Affordable, practical skill-based learning.
LinkedIn Learning – Career-focused, bite-sized lessons.
edX – Ivy-league content in flexible formats.
YouTube – A goldmine for free tutorials.
Don’t forget podcasts, newsletters, webinars, and even TikTok or Instagram accounts focused on education.
3. Apply What You Learn
Knowledge without application is wasted. If you’re learning copywriting, start a blog. If you’re learning a coding language, build a small project. Application cements learning and gives you portfolio pieces to show potential employers.
4. Join a Community
Learning with others keeps you accountable. Join Slack groups, Reddit communities, Discord servers, or local meetups. Networking with people on the same journey also opens up career opportunities.
5. Track and Reflect
Keep a simple progress log. Write down what you learned each week, what worked, and what didn’t. Reflection helps identify plateaus and gives you clarity on your next steps.
Upskilling at Work: Make It a Two-Way Street
If you’re employed, your workplace may be willing to sponsor courses or give you dedicated learning hours. Upskilling benefits your employer too — so don’t hesitate to ask.
Here’s how:
Propose a specific course or certification.
Explain how it’ll improve your job performance.
Offer to train others on what you’ve learned.
Employers appreciate initiative and are often happy to invest in employees who invest in themselves.
Final Thoughts: Build a Habit, Not Just a Skill
The most successful people don’t upskill once — they build a habit of learning.
Start with 30 minutes a day. Read a chapter. Watch a tutorial. Experiment with a new tool. Upskilling isn’t a race; it’s a lifestyle.
Remember: your career is your responsibility. In a world where industries change overnight, the most future-proof investment isn’t in stocks or crypto — it’s in you.
2 notes
·
View notes
Text
SmartBot Strategies: Making Sense of AI Image Generators
SmartBot Strategies: Making Sense of AI Image Generators
The world of AI is evolving fast—and for creators, marketers, and small business owners, one of the most exciting tools right now is the AI image generator. These powerful programs take simple text and turn it into stunning visuals in seconds. But with so many tools out there, finding the right one can feel like guesswork.
That’s where SmartBot Strategies comes in.
Founded in 2024 and backed by over a decade of experience in content and automation, SmartBot Strategies isn’t just another tech blog. It’s a trusted educational resource helping everyday users figure out what is the best AI image generator—without hype, without jargon, and without pushing any specific platform.
Why This Matters
Most websites reviewing AI tools are either sponsored or overloaded with technical talk. SmartBot Strategies is different. It creates detailed, easy-to-read guides that help regular users—designers, bloggers, freelancers, and solopreneurs—understand how to use AI image tools effectively and ethically.
Whether you're curious about DALL·E, Midjourney, Stable Diffusion, or the latest free tools, SmartBot Strategies breaks it all down clearly. The content shows how to generate better results, fine-tune your prompts, and even avoid common mistakes—no coding required.
Practical Help for Real Projects
One of the biggest reasons readers love SmartBot Strategies is how practical the advice is. Their blog explains how to use AI images for:
Social media graphics
Blog post visuals
Marketing campaigns
Personalized gifts and designs
Instead of just saying “this tool is cool,” SmartBot Strategies shows how to use it in real life.
Creators can learn how to streamline their design process. Small business owners can see how AI-generated images can replace time-consuming graphic design work. Even hobbyists can find fun, creative ways to explore their ideas visually—without needing expensive software.
Community-Driven, Not Corporate
Another key difference? SmartBot Strategies is all about education, not promotion. You won’t find pushy affiliate links or one-size-fits-all recommendations. Instead, the site focuses on building a community of curious, capable AI users.
With step-by-step walkthroughs, video tutorials, and tool comparisons, it caters to learners of all backgrounds—especially visual thinkers who want to see how things work. And with growing activity on platforms like YouTube and Medium, it’s quickly becoming one of the most trusted names in AI learning.
Final Thoughts
If you’re looking to understand AI image generators and start using them with confidence, SmartBot Strategies is your go-to source. It’s educational, unbiased, and incredibly user-friendly.
In a world full of AI noise, SmartBot Strategies helps you focus on what matters: results, clarity, and smarter workflows.
🌐 Visit SmartBotStrategies.com 📧 Questions? Reach out at [email protected]
#What is the best AI image generator#What does an AI image generator do?#How do AI image generators work?#Can AI create realistic images from text?#Smartbot strategies explains the best AI image generator
2 notes
·
View notes
Text
Welcome New Player. Please select your character.
Current Playable Characters can be found under #Player Character
New Player Characters can be unlocked via Asks, and can be found under #PC Submission
You may also choose up to two (2) Additional Party Members. You can find them under #Party Member
Party Members unlocked via Asks can be found under #Party Member Submission
Other tags include:
#Character Variant for variants of existing characters
#Select Speaks and #Not RPG for original, non-rpg posts and roleplay
#Evil Character for Evil Characters
#Rare Character for Rare Characters
#Legendary Character for Legendary Characters
#Fan Selections for Fan Art
Selection Confirmed. Press Any Key to continue.
[Any asks about speeding up arcs, spreading drama, personally attacking mods, or constantly wanting [character] to meet some other person will be deleted.]
New blogs send me an ask so I can add you!
This blog is moderated by @eldritchdemonfox and is part of the exclamation point pfp rpg blog cinematic universe, or punctuationverse, which, in addition to this blog, contains:
dailyquests (inactive/permanent hiatus),
status-updates (active),
advancement-made (inactive),
deathscreenmessages,
monster-bestiary,
bossfight-messages,
nefarious-exclam,
item-shoppe,
glitches-and-bugs,
mini-games,
beta-leaks,
unused-questline (conditionally/temporarily active),
objective-marker,
magic-foraging tooltips,
evil-loading-screen,
war-causing-interrobang (active),
collectibles-menu,
character-profiles (active),
rpg-weather-cycle,
rpg-partylog,
unskilledpoint ()
buffs-window,
roadside-shrines,
cmd-semicolon,
shady-item-shop,
location-loser,
hashbang-mods,
ultrakill-style-bar-updates (active),
big-bad-evil-guy,
the-tutorial,
john-tendrils-exclam-the-eighth,
druid-exclam,
system-notifs,
level-1-slime,
sparky-exclam,
trap-messages,
epcuartbook,
bugged-inverted-interrobang (active),
settinggeneral,
pheriya,
story-choices,
slime-wizard-slizard,
demonic-dev-blog,
the-moon-npc,
level-12-weaponsmith,
trudle-the-faerie,
combat-menu,
virus-thing,
daily-companion,
demon-exclam (inactive),
parasiteinfoform-greenstate,
mrsladymadam,
magical-experiments (permanent hiatus),
upgradegarage,
tinkermenu,
th3-oracl3,
semi-headless-semicolon,
plus-minus-contingency,
ampersand-echo,
bug-finder-tyria,
lupe-the-waitress,
hostess-exclam,
exclamcook,
ken-primordial-janitor,
carr10n-exe,
daily-sound-effects,
doctor-percentile,
vagueinfo,
exclamania-news-network,
messagingsystem,
asterisk-armourer,
the-upgrade-slime,
mothermere,
evil-therapist,
the-strongest-exclam,
zigsaw-puzzle,
wood-golem,
the-multiversal-asterisk,
epprbcu-shipping,
clef-dexclamation,
the-clown-exclam,
ringmaster-mannequin,
mimemuppetexclam,
jordan-lovelock,
patches-and-notes,
extraterrestrial-exclam,
recipe-unlocked,
quest-tracker-objectives,
exclamation-point-and-click,
crafting-station,
thingycolonthree,
evil-advertsary,
loading-quotes,
the-false-sun,
level-5-birb,
blue-flame-interrobang,
load-screen,
lusty-minus-luce,
adscript,
the-dungeon-core,
fisherman-exclam,
error-notifs,
overseer-automation-system,
interrobang-merchant,
screenshotgallery,
sys-terminal,
exclam-of-potions,
recipes-of-the-ancients,
quality-backslasher,
keybind-underscore,
magical-girl-exclam,
letterservice,
real-camera,
volumecontrols,
railwaymerchant,
exclamaniaunsolved,
fallwitchquesti,
lovemarkpotionshop,
u200b,
skilledpoint,
questmingo,
epprbcu-keymaster,
aldus-floron,
elispsis-triplets,
judgementmailpoint,
stOckhOld3r3xcl4m,
undead-ammonite-asterisk,
scribbler-of-nothing,
authority-point-that-curses-you,
fullstop-dragons,
the-sun-npc,
renderexclam,
dungeon-miniboss,
punctuation-bug-wizard,
infernal-interrobang,
rowan-and-mitch,
pallid-mask-element,
burning-asterisk-aldebaran,
true-ditto,
character-documents,
physics-engine,
swapverseconstance,
IvI1-rat,
epprbcu-real-estate,
skillissued,
gud-git,
normal-golf-player,
chattingsystem,
astralpoint,
dream-caret-octavia,
emote-reel,
pharaoh-exclam,
lawyer-sphynx,
the-warden,
john-tendrils-guesti-the-eighth,
nontalentedexclamation,
failed-voice-sythesizer,
third-footnote,
plus-equals-archangel,
head-hunt,
fish-bug-twins,
alpha-beta-gamma-exigency,
unskilletexclimation,
purplus,
greeninus,
censorship-minus-equals,
textskip-masquerade,
elegy-of-nihilism,
level-editor,
post-shooter (active),
fictitiousfanfics,
2x4-wasp,
systematic-dumbasses,
hacker-twins,
yellowapostle,
bisexualvegastar,
amacar-the-star,
demonstaralgol,
pistol-the-star,
polaris-the-star,
just-a-epprbcu-contentcreator,
team-o-s,
team-a-b,
player-char,
comet-creature,
epprbcubookanon,
caileyrooexclam,
inhumanliquid-epprbcu,
colored-mess,
modsinexclamania,
mod-syl,
clover-ashford,
ec-speedrunner,
ditto-ditto,
cuilbeing,
a-pink-anonymous,
this-guy-dev,
exclamodder,
enterplayername,
anon-friend-s,
meta-anon,
volcano-fire-dwarves,
orange-circle-anon,
pointmore-achievement,
city-of-five-spirals,
gameexclam,
primordial-council,
betelgeuse-the-star,
the-panopticon-resident,
asphodel-inc,
digittheai,
tartar-games,
fromtherealmoftheconceptual,
therapist-bat,
gnome-armada,
epprbcu-demo,
plus-minus-bakery,
bug-duo-gyne-and-jewelia,
small-cat-npc,
xavial-xample,
dreams-of-the-dreamer,
disowned-permile,
ominous-silence-anon,
hackerordev (active),
loadingscreentips (active),
thecrimeanon (active),
v1v1thecat (active),
respawn-system,
Other epprbcu connected blogs include:
epprbcu-incorrect-quotes,
correct-epprbcu,
solidwater05,
epprbcu-tournament,
epprbcu,
epprb-art-the-2st,
i-follow-epprbcu,
jonesbones1,
punctuationverse-heritage-posts,
daily-re-search,
exclamania-explained,
your-fave-is-status-updates-two,
exclashcan,
liquidwater05,
online-community,
mados-anonymous,
#epprbcu#not rpg#character select#lore#ooc#punctuationverse#exclamation point pfp rpg blog cinematic universe#pinned post#intro post#select speaks
18 notes
·
View notes
Text
Such is life! Behold, a new Post published on Greater And Grander about 12 Game-Changing Ways Artists Can Ethically Use AI to Boost Their Creative Business
See into my soul, as a new Post has been published on https://greaterandgrander.com/12-game-changing-ways-artists-can-ethically-use-ai-to-boost-their-creative-business/
12 Game-Changing Ways Artists Can Ethically Use AI to Boost Their Creative Business

In today’s fast-paced digital landscape, visual artists and creatives face mounting pressure to produce compelling content that not only captivates audiences but also aligns with marketing goals. With artificial intelligence (AI) revolutionizing content creation, artists can either embrace it as a powerful tool or risk falling behind. But how can creatives ethically harness AI without compromising their originality?
This week on The Producers Lounge Podcast, we’re diving deep into this very topic with Rachid El Guerrab, an industry innovator who has worked on Emmy-winning shorts, Oscar-nominated projects, and groundbreaking VR experiences. Tune in as we discuss how AI can help, not hinder, artistic storytelling. Mark your calendars—the episode drops this Thursday!
Meanwhile, let’s explore 12 ethical ways artists can leverage AI to elevate their craft and business while staying true to their creative vision.
1. Supercharge Your Social Media Presence
AI tools can generate engaging captions, hashtags, and post ideas, making social media marketing easier. Platforms like Canva and Jasper AI help artists create eye-catching visuals and copy that enhance their online presence.
2. Automate Email Blasts for Audience Engagement
Email marketing remains a powerful tool for client outreach. AI-driven platforms like Mailchimp and Constant Contact can personalize emails, segment audiences, and optimize send times for better engagement.
3. Craft Clear & Compelling Synopses
Writing a strong synopsis for your project, whether it's a film, a gallery exhibit, or a product launch, is crucial. AI-assisted writing tools can help refine and polish your summaries, ensuring they resonate with potential clients or investors.
4. Perfect Your Artist Statement
An artist statement communicates your vision and values. AI-powered grammar and style checkers like Grammarly or Hemingway Editor can fine-tune your messaging while keeping your unique voice intact.
5. Boost Creativity with AI Brainstorming Tools
Struggling with creative block? AI brainstorming platforms like ChatGPT and Notion AI can provide fresh ideas, concept variations, and even suggest new angles for your work.
6. Create Proof of Concept Work Quickly
Before investing significant time into a project, AI can help generate mood boards, concept sketches, or even 3D models to test ideas with potential clients and collaborators.
7. Generate Web Content with Pro Tips & Tricks
Artists can use AI to craft informative blog posts, tutorials, and how-to guides that showcase expertise and attract new clients. AI-driven content tools ensure consistency and SEO optimization.
8. Write Business Emails That Convert
Professional communication is key for securing commissions and collaborations. AI email assistants like Copy.ai can craft clear, persuasive messages tailored to different audiences.
9. Convert Speech to Text for Seamless Documentation
Artists who prefer to talk through ideas rather than type can use AI transcription services like Otter.ai or Descript to transform voice recordings into well-structured prose.
10. Optimize Product Listings for Art Sales
Selling art online? AI-powered description generators can help craft engaging product listings that highlight unique selling points and boost visibility on marketplaces like Etsy and Redbubble.
11. Write Persuasive Website Copy
Your website is your digital storefront. AI can refine your bio, service pages, and project descriptions, ensuring clarity and impact while maintaining your artistic identity.
12. Design Sales & Feature Sheets with AI
Artists looking to pitch their work to clients, galleries, or investors can use AI-powered design tools like Adobe Sensei to create polished promotional materials.
Why Greater & Grander Media Services is Your Best Partner in Visual Content Creation
At Greater & Grander, we understand that marketing visuals are more than just images—they tell stories that resonate. Whether you need dynamic social media campaigns, expertly written sales materials, or AI-enhanced marketing strategies, our media services ensure you stand out. Let us help bring your vision to life with compelling content that makes an impact.
Ready to take your creative business to the next level? Contact Greater & Grander today!
And don’t forget to tune in this Thursday for our conversation with Rachid El Guerrab on The Producers Lounge Podcast!
Do you have your own thoughts? Let us know in the comments! Or join our community of successful creators on Patreon!
#AI, #ArtSales, #ArtificialIntelligence, #ArtistStatement, #EmailBlast, #ProductListing, #RachidElGuerrab, #SocialMedia, #SocialMediaManagement, #TheProducersLoungePodcast, #WebContent
#AI#Art Sales#Artificial Intelligence#artist statement#Email Blast#Product Listing#Rachid El Guerrab#Social Media#Social Media Management#The Producers Lounge Podcast#Web Content
2 notes
·
View notes
Text
WhatsApp Cloud API Setup For Botsailor
Integrating the WhatsApp Cloud API with BotSailor is crucial for businesses seeking to enhance their customer engagement and streamline communication. The WhatsApp Cloud API enables seamless automation, allowing businesses to efficiently manage interactions through chatbots, live chat, and automated messaging. By connecting with BotSailor, businesses gain access to advanced features like order message automation, webhook workflows, and integration with e-commerce platforms such as Shopify and WooCommerce. This setup not only improves operational efficiency but also offers a scalable solution for personalized customer support and marketing, driving better engagement and satisfaction.
To integrate the WhatsApp Cloud API with BotSailor, follow the steps below for setup:
1. Create an App:
Go to the Facebook Developer site.
Click "My Apps" > "Create App".
Select "Business" as the app type.
Fill out the form with the necessary information and create the app.
2. Add WhatsApp to Your App:
On the product page, find the WhatsApp section and click "Setup".
Add a payment method if necessary, and navigate to "API Setup".
3. Get a Permanent Access Token:
Go to "Business Settings" on the Facebook Business site.
Create a system user and assign the necessary permissions.
Generate an access token with permissions for Business Management, Catalog management, WhatsApp business messaging, and WhatsApp business management.
4. Configure Webhooks:
In the WhatsApp section of your app, click "Configure webhooks".
Get the Callback URL and Verify Token from BotSailor's dashboard under "Connect WhatsApp".
Paste these into the respective fields in the Facebook Developer console.
5. Add a Phone Number:
Provide and verify your business phone number in the WhatsApp section.
6. Change App Mode to Live:
Go to Basic Settings, add Privacy Policy and Terms of Service URLs, then toggle the app mode to live.
7. Connect to BotSailor:
On BotSailor, go to "Connect WhatsApp" in the dashboard.
Enter your WhatsApp Business Account ID and the access token.
Click "Connect".
For a detailed guide, refer to our documentation. YouTube tutorial. and also read Best chatbot building platform blog

3 notes
·
View notes
Text
👉 Neuro Review ✅ Features, Pricing, Bonuses, Discount and OTOs 🚀

🧠 Overview
Neuro Review is a cutting-edge AI-powered tool designed to simplify content creation, video editing, and marketing efforts by leveraging advanced automation and analytics. Perfect for marketers, content creators, and small business owners. 🚀
👉 Click Here for Get Instant Access Neuro 🖰 >>


👉 Click Here for Get Instant Access Neuro 🖰 >>
✨ Features of Neuro Review
AI-Powered Content Creation 🖋️ Automatically generates high-quality, SEO-friendly articles, product reviews, and blog posts.
Video Review Editor 🎥 Create and edit product review videos with ease using templates and AI assistance.
Voiceover Generator 🎙️ AI-powered voiceovers in multiple languages and accents.
Analytics Dashboard 📊 Track performance metrics like views, engagement, and conversions.
Integration Capabilities 🔗 Works seamlessly with platforms like WordPress, Shopify, and YouTube.
Multilingual Support 🌍 Expand your reach with content and videos in multiple languages.
User-Friendly Interface 😌 Intuitive and beginner-friendly design to save time and effort.
💲 Pricing
Front-End Plan: Starts at $47 one-time. Includes core features like content creation and video editing.
OTO 1: Pro Version 🚀: Price: $97 one-time Unlock advanced features like unlimited projects, premium templates, and analytics.
OTO 2: Agency License 🏢: Price: $197 one-time Offers agency rights, client management tools, and bulk project handling.
OTO 3: Reseller License 🔁: Price: $297-$497 Allows you to sell the tool and keep 100% of the profits.
👉 Click Here for Get Instant Access Neuro 🖰 >>
🎁 Bonuses
When purchasing Neuro Review through promotional links, you may receive:
Exclusive Training Videos 📚 Master the platform and its features with detailed tutorials.
Content Marketing Toolkit 🛠️ E-books and resources to enhance your marketing strategy.
Custom Templates 🖼️ Unique designs for faster project completion.
Lifetime Updates 🔄 Stay ahead with the latest features at no extra cost.

👉 Click Here for Get Instant Access Neuro 🖰 >>


👉 Click Here for Get Instant Access Neuro 🖰 >>


👉 Click Here for Get Instant Access Neuro 🖰 >>
🔥 Discounts and Special Deals
Early Bird Offer: Get 20% off during the launch week.
Bundle Discount: Save up to 30% by purchasing the full OTO package.
Use Coupon Code: 30% Off Cyber Monday Offer For The First 25 People!
🚀 Why Choose Neuro Review?
Saves time with automation.
Boosts productivity and engagement.
Offers versatility with content and video creation tools.
👉 Click Here for Get Instant Access Neuro 🖰 >>
💬 Final Thoughts
Neuro Review is an excellent choice for anyone looking to streamline content and video marketing efforts. With its advanced features and competitive pricing, it's a must-have tool for modern marketers. 🌟

👉 Click Here for Get Instant Access Neuro 🖰 >>
Frequently Asked Questions!
Q. Do I need any experience to get started?
None, all you need is just an internet connection.
And you’re good to go
Q. Do I need to purchase anything else for it to work?
Nop, Neuro is the complete thing.
You get everything you need to make it work. Nothing is left behind.
Q. Is there any monthly cost?
Depends, If you act now, NONE.
But if you wait, you might end up paying $997/mo
It’s up to you.
Q. How long does it take to make money?
Our average member made their first sale the same day they got access to Neuro.
Q. What if I failed?
While that is unlikely, we removed all the risk for you.
If you tried Neuro and failed, we will refund you every cent you paid
Q. How can I get started?
Awesome, I like your excitement, All you have to do is click any of the buy buttons on the page and secure your copy of Neuro at a one-time fee
👉 Click Here for Get Instant Access Neuro 🖰 >>
#apollo neuro review#apollo neuro#neuro review#review#nclex neuro review#apollo neuro reviews#apollo neuro device#neuro#neuro nclex review#brooks neuro review#reviews apollo neuro#reviews#reviews of apollo neuro#apollo neuro review reddit#apollo neuroscience review#nclex review neuro disorders#neuro disorders nclex review#apollo review#neurogum review#apollo neuro review: hrv training with vibration#apollo neuro band#board review#nclex review#marketing#affiliatemarketing#onlinemarketing#software#preview#digitalmarketing
2 notes
·
View notes
Text
Top 10 Shopify Marketing Strategies to Skyrocket Your Sales in 2025"
Shopify is a effective e-trade platform that empowers corporations of all sizes to construct on line shops. However, simply having a shop isn't sufficient; effective advertising is important to attract clients and power sales. This manual will discover key Shopify advertising techniques and strategies that will help you prevail.

"Effective Shopify store promotion methods in 2025"
1. Content Marketing
Blog: Create valuable content that addresses your audience's pain factors, answers their questions, and presents beneficial records.
Examples: Product courses, industry news, behind-the-scenes glimpses, consumer testimonials.
Social Media: Engage together with your target audience on platforms like Instagram, Facebook, Twitter, and TikTok. Share visually attractive content material, run contests and giveaways, and respond right away to feedback and messages.
Video Marketing: Create engaging films like product demos, tutorials, and consumer testimonies. Platforms like YouTube and TikTok are exquisite for video advertising and marketing.
2. Search Engine Optimization (search engine marketing)
On-Page SEO: Optimize your product pages, weblog posts, and website copy with applicable keywords. Use clear and concise product descriptions, exceptional images, and rapid loading instances.
Off-Page search engine marketing: Build splendid one-way links from different authentic websites. Engage in guest blogging, take part in on-line groups, and build relationships with different groups.
Technical SEO: Ensure your internet site is cellular-pleasant, has a stable connection (HTTPS), and is simple for search engines to crawl and index.
Three. Email Marketing
Build an Email List: Offer incentives like discounts or one of a kind content to inspire site visitors to enroll in your e mail list.
Segment Your Audience: Tailor your e-mail campaigns to particular customer segments based on their purchase records, surfing behavior, and demographics.
Automate Your Emails: Use email advertising automation equipment to ship welcome emails, abandoned cart reminders, and post-buy comply with-up messages.
4. Paid Advertising
Google Ads: Run focused ads on Google Search and Google Display Network to attain clients actively searching for products like yours.
Social Media Ads: Utilize centered ads on structures like Facebook, Instagram, and Pinterest to reach specific demographics and hobbies.
Influencer Marketing: Partner with applicable influencers to promote your merchandise to their fans.
Five. Social Proof
Customer Reviews: Display patron opinions and testimonials prominently in your internet site and product pages.
Social Media Mentions: Encourage social media sharing by means of strolling contests and providing incentives.
User-Generated Content: Feature consumer-generated content like snap shots and videos of clients the usage of your merchandise.
6. Sales and Promotions
Discounts and Coupons: Offer discounts, coupons, and special promotions to draw new clients and incentivize repeat purchases.
Flash Sales: Create a sense of urgency via imparting confined-time discounts on choose merchandise.
Loyalty Programs: Reward repeat customers with unique discounts, early get right of entry to to income, and personalized offers.
7. Website Optimization
User Experience (UX): Ensure your internet site is straightforward to navigate, visually attractive, and cell-friendly.
Page Speed: Optimize your website's loading speed to enhance person experience and search engine ratings.
Clear Call-to-Actions (CTAs): Use strong CTAs like "Buy Now," "Add to Cart," and "Learn More" to manual site visitors towards conversions.
Eight. Customer Service
Provide Excellent Support: Offer activate and beneficial customer support via channels like live chat, e-mail, and phone.
Build Relationships: Go the extra mile to construct sturdy relationships along with your customers.
Address Feedback: Actively solicit and respond to client comments to improve your products and services.
Nine. Analytics and Tracking
Track Key Metrics: Monitor key metrics like internet site site visitors, conversion charges, client acquisition cost, and client lifetime fee.
Analyze Data: Use facts analytics tools to pick out areas for development and optimize your advertising campaigns.
A/B Testing: Experiment with exclusive website factors and advertising and marketing campaigns to peer what plays best.
10. Shopify Apps
Boost Sales: Utilize Shopify apps to beautify your advertising efforts, which include apps for e-mail advertising, social media advertising and marketing, and sales automation.
Improve Customer Experience: Implement apps that enhance customer experience, such as stay chat, product pointers, and transport monitoring.
Increase Efficiency: Streamline your commercial enterprise operations with apps for inventory management, order fulfillment, and accounting.
Key Considerations:
Target Audience: Understand your target market's wishes, choices, and on line conduct.
Budget: Determine your advertising budget and allocate finances efficiently throughout exceptional channels.
Consistency: Maintain regular branding and messaging across all advertising channels.
Innovation: Stay updated with the modern day advertising tendencies and technologies.
Shopify Marketing Examples:
Allbirds: Known for its sustainable footwear, Allbirds efficaciously leverages social media marketing, person-generated content, and influencer collaborations to build a sturdy emblem following.
Glossier: Glossier has built a devoted community thru social media engagement, actual logo storytelling, and a focus on purchaser experience.
Gymshark: Gymshark correctly makes use of influencer marketing, health demanding situations, and a strong social media presence to engage its target audience of fitness enthusiasts.
By imposing these techniques and strategies, you may efficiently marketplace your Shopify shop, appeal to clients, and force sales growth. Remember to constantly analyze your effects, adapt your technique based on statistics, and live focused on supplying value on your clients.
Disclaimer: This records is for general understanding and informational functions most effective and does now not constitute monetary, funding, or other professional advice.
I desire this comprehensive guide provides precious insights into Shopify advertising. Feel unfastened to invite if you have any further questions.
2 notes
·
View notes