#can you layer with acrylic paint
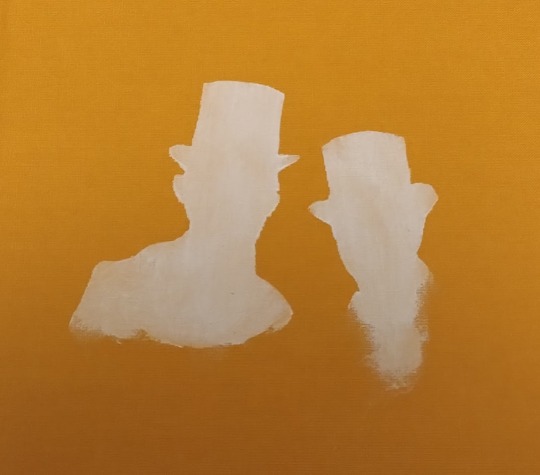
Text
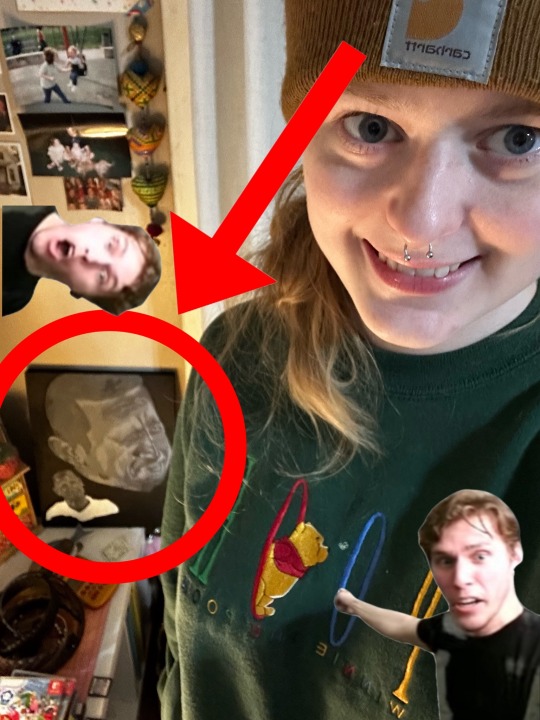
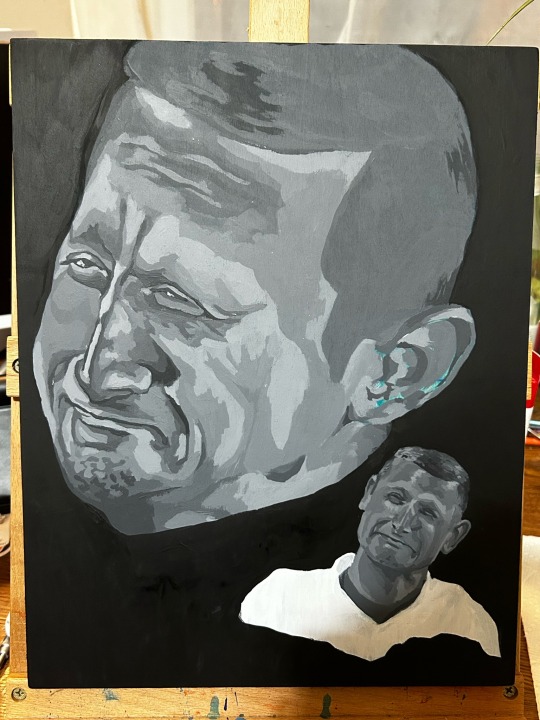
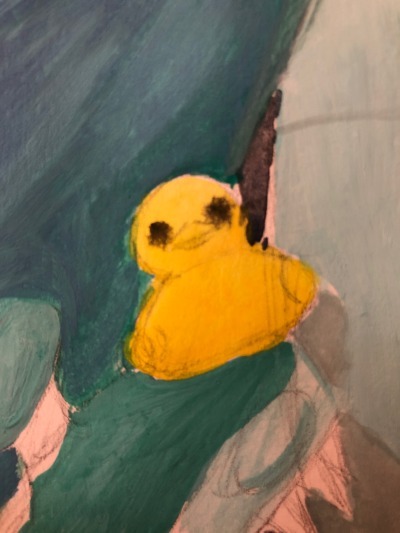
crazy eyes bc i got sick of having this ITYSL summer lovin’ skit painting on my floor. didn’t really finish it so much as i gave up but thats okay i think. happy new year more details in the tags :]
#my art#ok to rb#:d#used the ‘fuck an1sh kap00r vanta blk 3.0’ paint for the background#(its on a wood surface#i started this at the end of July (i think) right after the new season came out#id been really yearning to get back into acrylic painting again so i thought If i can finish this then that means im capable and also it#will get the scaries out by refamiliarizing myself w the medium#but basically it sat half finished on my floor until dec 27 when i was like you know what im sick of this i need it gone#anyway theres a lot of things i wish id finished on this but i think i just need to move on for my own sake perhaps ill revist it in the#future. I dont think ive ever shared a painting on here but i guess you could call this my style? i think it’s informed by doing mostly#digital painting and not really knowing how to blend. i like acrylics because they dry quickly. i like for my layers to be pretty visible#and shapey.#i think you should leave#itysl#i put it right next to my bed the two tims watch over my sleeping body now
7 notes
·
View notes
Text

warm tea for cold hands
#my art#pokemon#pokemon legends arceus#warden ingo#submas#dear arrtx can you please for the love of god put shades of gray that Arent metallic in your paint marker sets#so i dont have to take this at the weirdest angle so that the gray shows up the way i want it to#other than that this was really fun :) if you’re like me and cant sit down long enough to paint w acrylics these r a good buy#probably couldve layered this with colored pencils to better match the colors but whatever its late and im tired
46 notes
·
View notes
Text

that candelabra is going to be my worst nightmare but i like how the tree ended up :) enough for today though
#guy who uses gouache like acrylics#tom and greg r going for last bc....as you can see im very messy while painting. they will probably be in like the 3rd layer#txt
3 notes
·
View notes
Text
being a digital artist forced 2 do traditional art is so evil.
#“forced” lol i chose this class#i wanna get better at traditional but its SO HARD#im good at watercolor and thats abt it#i was doing ok on this acrylic painting but i fucked it up so rip lol#it is weird im better at watercolor tho since youd think. that acrylic is a more forgiving medium#and it like is to an extent but if you later it TOO MUCH itll start to look gross#and like since im going “oh i can layer it!” i dont think abt trying to conserve. the paint#and then it just looks.gross
0 notes
Text
Someone on discord asked how I was making pins with bottle caps so here goes nothing
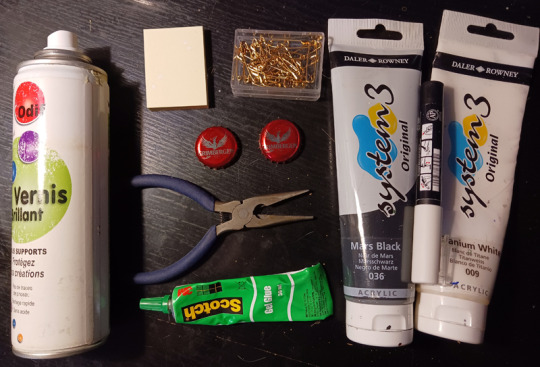
you need
bottle caps (the ones made of metal obv)
pliers
safety pins
paper
glue
optional acrylic paint
optional paint varnish (the kind you would spray on top of an acrylic painting)
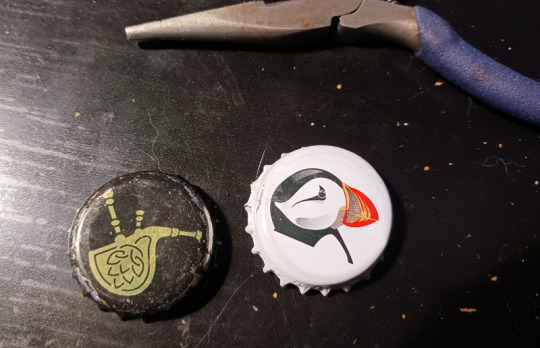
I'm only saying "optional" because sometimes you just like what's already printed on the bottle cap. I mean look at this puffin, it's so cute. But you should probably spray the print with varnish anyway if you don't want it to disappear too quickly (that cap on the left was in my pocket for like 3 months and the print has already disappeared around the edge)
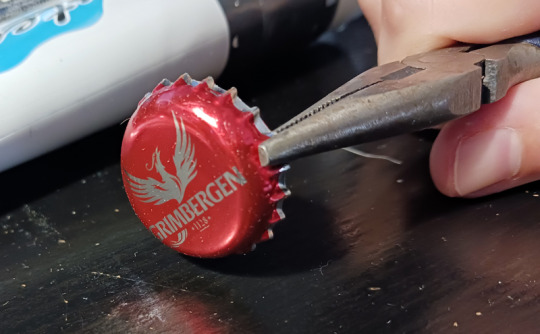
pinch the edge of the cap with the pliers and turn it slightly toward the top side of the cap. Continue to do so around the entire cap but don't try to flatten it all in one go cause it's kinda hard. It should only take two minutes or so anyway
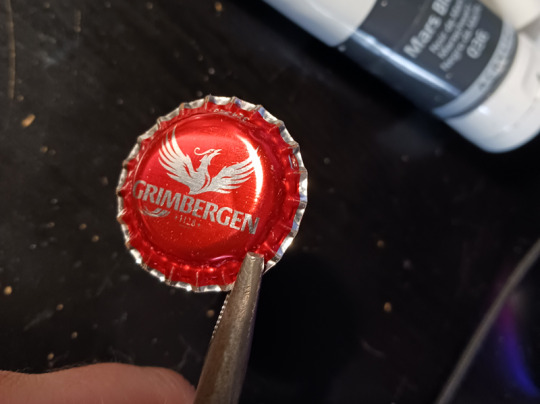
almost there
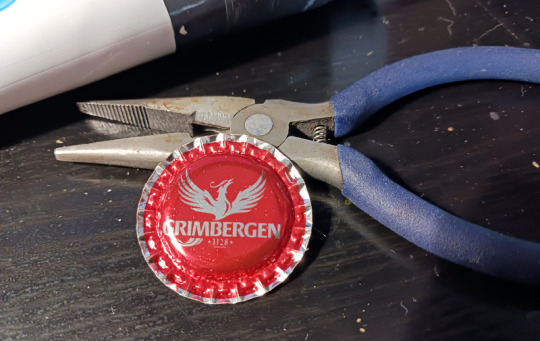
there, it's flat now. If you want to paint or write something on it, add a couple of layers of acrylic paint on it before you paint/write what you actually want on the pins
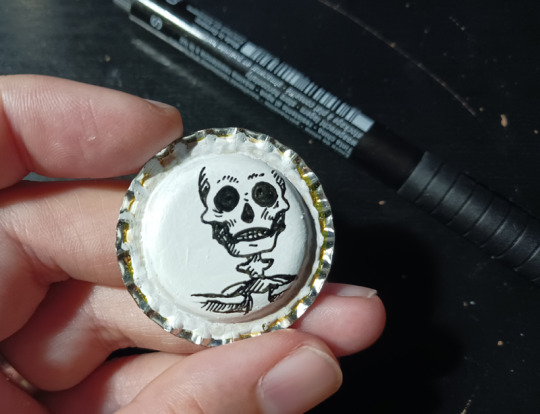
I wanted skeleton parts on mine because I saw someone with pins like that and idk where they bought them
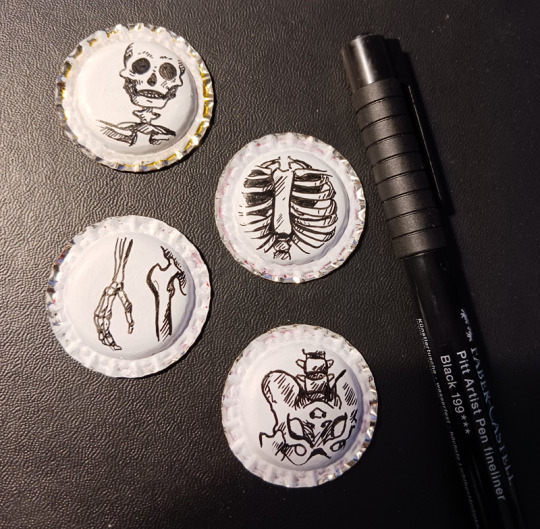
I drew them with a Pitt pen on top of 4 layers of white acrylic
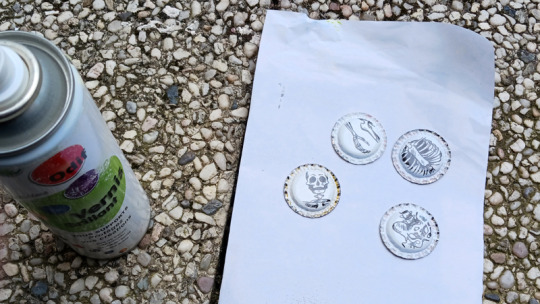
spray a coat of varnish on them but PLEASE do that outside, you do NOT want to breathe that stuff. Then wait a few hours for it to dry
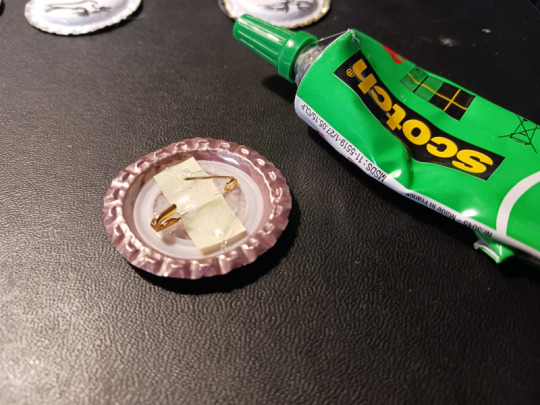
on the back, add 1) glue 2) one safety pin 3) a thin paper across the pin - squish the paper against the wet glue. When it's dry, add another layer of glue on top. Just drown the back of the pin in crystal glue otherwise it's gonna break too easily. Just make sure the safety pin can still open and close easily
let it dry until the next day just to be sure. Tug on the safety pin a bit to make sure it's glued correctly
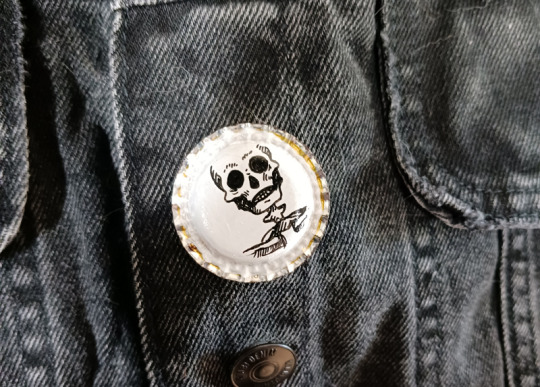
congrats you've made pins with bottle caps
1K notes
·
View notes
Text

@kernyen-xo /
Cheaply.
Watercolor sets made by Crayola. Acrylics made by Crayola. The brushes these kits come with are frustrating, cheap brushes are typically $3-5 each. You can spend as much as you want on a brush, the cheap ones are surprisingly good. This is extremely common advice, this isn't just from me.
When you find "ah I like this" go with a student grade of whichever you prefer. Or both! I find watercolor frustrating. I find acrylic doesn't look graphic as much as I want. I fell in love with a paint called gouache because it is very flat, layers nicely.
I would not start with oil paint. It is expensive, requires a lot of special care to keep you safe. Fumes, cleaning agents, etc. Fall in love with painting, then if you want, give oil a try. Be prepared for days (weeks, months, literally) for paint to dry. This isn't to scare you off it -- it's great -- but I wouldn't start here.
Oil has tremendous variety of things you can do with it.
Watercolor is ethereal.
Acrylic has great graphic qualities, lots of range.
I like gouache because it looks almost animated (there is a reason for that, it was/is used in animation background sometimes). It's tricky and tempermental.
Paint by numbers kits if you don't draw. Maybe even if you do and just want to dive into painting.
Mixed media sketchbooks. Lets you experiment a lot, cheaply. The big thing about sketchbook paper is it comes in a few forms -- very cheap (newsprint) and takes dry media (pencils, etc.) well, cheap (mixed media, lets you experiment quickly and a lot), and expensive (hot press has no texture, cold press has a texture).
Painting needs something that can get wet and not fall apart.
Start with a cheap mixed media sketchbook and see how you like it. Move on from there.
Ton of videos across lots of social media and much content. Has the advantage of multiple perspectives, you don't get trapped in "I think this is crap" or "This is the best" versus your thoughts.
Start cheaply.
Art stores and product manufacturers exist to make money. This is a neutral statement. The point is they are a store, they will sell you whatever you think you need, whether you need it or not.
Conversely!
Some things that are not universally useful but sold in art stores are great labor savers. Some people look down at disposable palette paper, others need the flexibility because they have a hard time washing palettes... etc.
Start cheaply. Look at hardware stores, lots of duplicate functions in items.
I come from a background of digital art and a lifetime of business where "ah where the BONES ARE WE GOING TO FIND MONEY FOR--"
Have fun.
Get in deep and frustrated and then drink the frustration (but not the paint water) because you realize you're frustrated because you can FEEL how it should look but you can't get there yet.
The journey is amazing.
I've started looking at the mountain of business problems I have been sorting through for the last few years.
"Okay. How is this supply chain issue with stationery compared to a painting I want to do of the piranha plants of Super Mario Brothers?"
This is literally something I asked myself.
It took me out of the problem (supply chain issue, boxes, our office size, the number of stationery items I want to design) and forced me to look at it as a painting (structure, where does it stay simple, where does it get complex -- what makes sense -- ah, PDF downloads).
Paint.
Learn by doing.
Start cheaply.
Keep going. Build up.
2K notes
·
View notes
Text
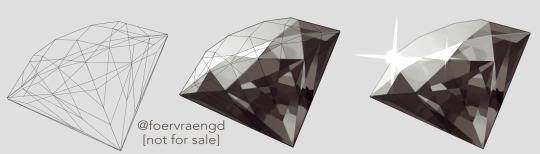
Mirre’s “How i render gemstones” tutorial!
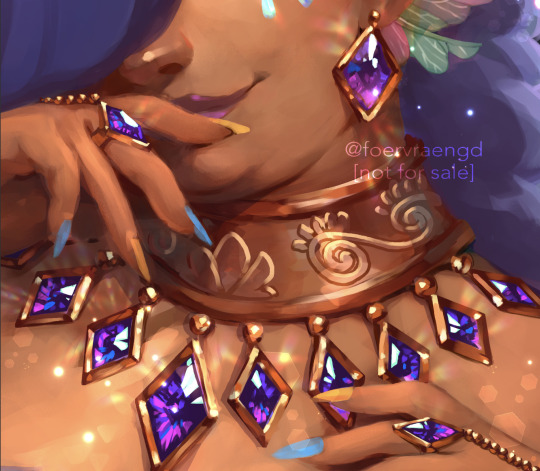
(note: image above is not what is shown in the walkthrough. It is an example piece)
Ingredients:
Art program that has layers and selection tools
Patience (hubris or stubbornness is fine too)
(recommended) photo references of gemstones and/or prisms
(Optional but very helpful) Knowledge on how to use Reference layers and anti-overflow in Clip studio Paint
For this tutorial i am going to use clip studio’s “anti-overflow” feature. This post is not going to explain how to use that specific setting but you should be able to find guides on how to use it on clip studio’s official website or on youtube.
Please Note: The result of this technique will not 100% represent real life gemstones. These are more simplified but should still make an impression of the brilliance and appeal of gems, crystals and diamonds.
If you don’t work in CSP: the best workaround is to use the polygonal lasso selection tool for the same purpose.
This ended up being a long post so I am putting it under the readmore:
First off; Basic idea on how the light refracts inside a solid transparent object:
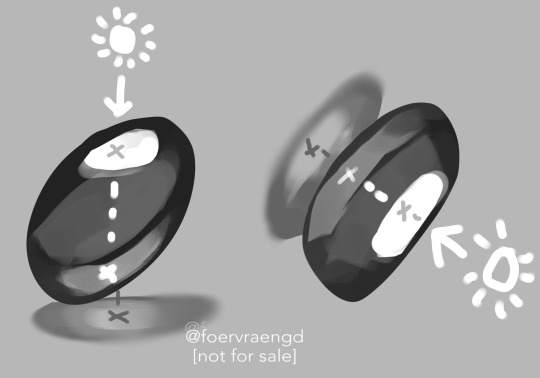
Wether it is acrylic, glass, water or crystal, the way light pass through more or less should behave the same as long as it is solid and not hollow inside. Pay attention to how the darkest parts of the stone goes along the inner edges, leaving a ”mid tone” sort of in the center. However, this might vary depending on the light setting. But it is a generally good rule-of-thumb to follow if you’re drawing something not based on a photo. Another thing to pay attention to here is how the placement of the highlight will lit up the inside of the gem in a parallel line. It also shows through on the cast shadow.
Light refraction on a cube:
I have already made two posts on this, so definitely go through them:
CUBE BREAKDOWN POST HERE
But a rough summary from those two links would be: Every side/facet of a gem or a cube etc refracts the light individually and not as one entity (that would make it look hollow and not solid). Think of it like how each piece in a broken mirror individually reflect your face back to you. Like a weird patchwork!
Putting this into practice:
For this tutorial I’m going to be nice to myself and not try to draw perfectly accurate gemstones. Instead I’m gonna draw them with a more ”natural” looking set of facets. Which actually isnt as common in real world as video games makes us think. Some crystals have geometric shapes naturally, but a lot of other stones are not as fancy. Anyway, im taking artistic liberty on these example stones because the technique I’m going to use will work for these just fine.
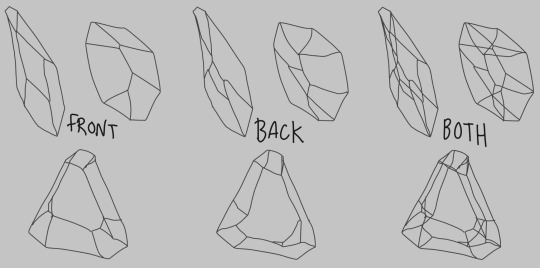
So, in clip studio paint, I first draw the stones on a vector layer. I give them facets for the front side. Then I duplicate the layer, remove the front facets and replace them with the facets on the back of the stone. The third image here shows both layers visible on top of each other. I now put these into a layer folder and mark the folder as ”reference”.
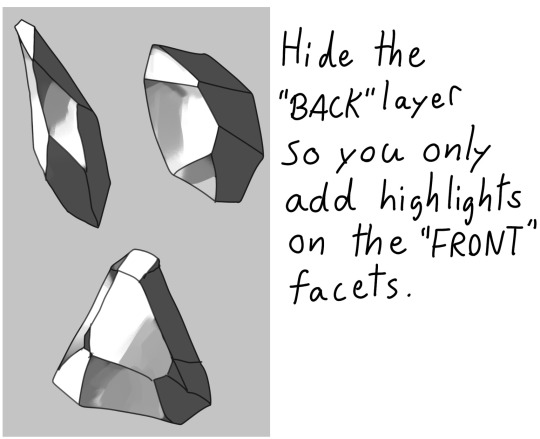
Now, on a layer below the lineart folder, fill with your base tone. Then make a layer on top (if you can clip it to the base tone, do that), this layer is where you decide where the highlight will be placed. In some cases the highlight is only lighting up one single facet - it really depends on the design of the stone. You can also blend and soften the highlight here if it looks good for you, just make sure not every facet is highlighted. The highlight layer should be on top of all the other layers clipped to the base tone layer.
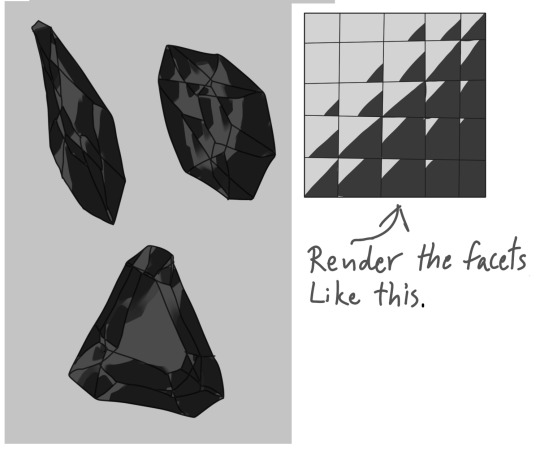
Now it is time for the juicy juicy stuff! Turn on both lineart layers so they’re both visible. I hid the hilight layer here because it was in the way, but might not be needed in your case. Make a layer clipped to the base tone and paint in the darkest tone. This is where anti-overflow helps me out, because when i run my brush over all these crossed lines it will make the stroke pop in and out for each facet. If you dont use CSP, this is where you can use the lasso tool and select every second facet. It will take a bit more time but it should work similarly.
After the darkest tones I then make a layer for the inside light that the highlight has lit up. Here i keep it inside the darkest tone but this might vary depending on the light setting. If it looks good to me, then that’s what i stick to.
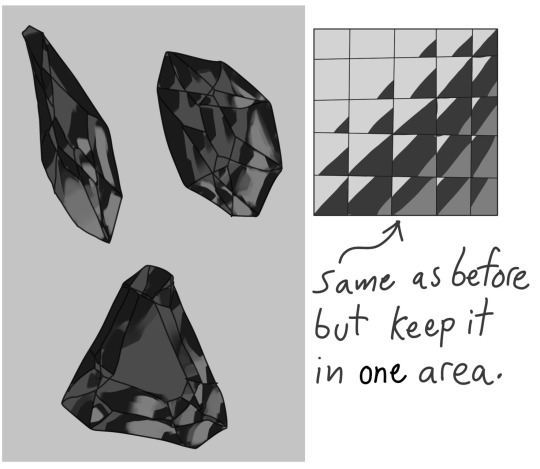
The way I approach rendering the facets here is like the grid in the example images above, every shade and tone appear more or less in each facet but the amount is relative to their position. So a gradient wouldnt have a smooth transition; it would be slightly scewed in each square on this example grid. Essentially like how some bathroom window glass panes look like.
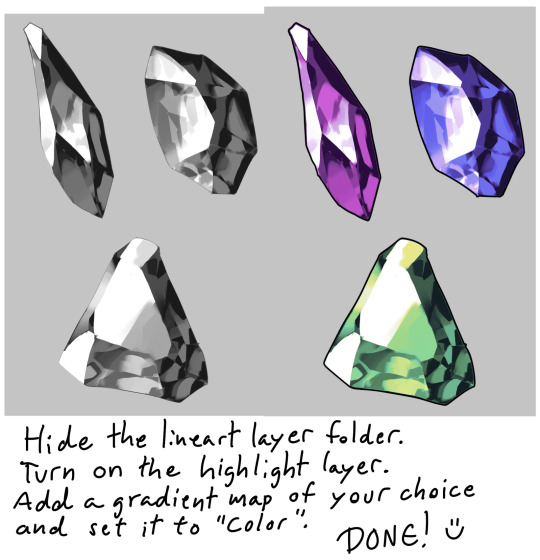
Now it’s time to hide the lineart layer folder and check if the gemstones look decent to you. If not, then you can look up some reference photos and analyze where the values group together the most; be careful not to focus too much on the photos 500 million sparkles. Squint your eyes or blur the reference and try to see how the overall values behae.
I, personally, am satisfied with these rocks so I slap on a gradient map (you can manually color in them too if that’s your thing) and call it a day. The lit up inside of a gemstone tend to have a brighter and more saturated color than the mid tone.
Other Examples with this technique:
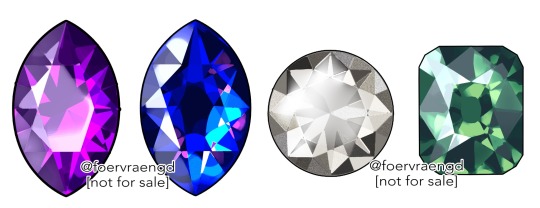
If you look up ”gemstone types” you can often find images displaying various facet types from more than just front view. These can serve as useful base templates for practicing this rendering technique. The backside of a gemstone is called the “pavillion” and is really useful to have at hand when it comes to painting the inner refractions. You can probably also use 3D models and convert the wireframe into lineart. But that is slightly out of my pool of knowledge.
Applying this knowledge without using a base lineart layer is of course possible. In this painting I followed a simplified summary of how the facets sparkle: Keep the highlight shape to match the front facet design, and all the inner refractions should be more scattered and split up but face a direction towards the center of the gem. Now don’t you think this sort of makes the gems look like eyes? That’s right! You can, and absolutely should, apply this on eyes to create the most sparkly anime eyes ever.
Now, refracted light that lands on the surface surrounding gemstones varies depending on the material - and if the gem is inside a metal frame it usually doesnt create this much refraction around it. But I want to have fun so i decided to break this rule in the name of pretty sparkles. :)
3K notes
·
View notes
Text
How to start a pair of punk patch pants
(a potentially really shitty tutorial)
I've seen a couple videos on this but a lot of them seem to skip out on some really key information and tricks so I thought I'd just write a probably really long and really rambly post about it!!!
Step one: gathering supplies
In terms of supplies the main things you'll need are:
The pants
Approximately 4 rolls of dental floss (this can change depending on number of patches and your pant size)
A needle with a big enough eye to fit the floss through
Acrylic paints
Brushes
Scrap denim or other scraps of fabric for the patches
Pins
Some kind of marker or pencil that will work on the fabric you've chosen
I will be going into some detail below about why you need each of these items!!
The pants themselves
personally I prefer either using a pair of jeans I already own or thrifting a pair to be as sustainable as possible, however if you really need to go out and buy a new pair for whatever reason get a high quality pair, this will help in the long run with preventing them from falling apart as easily.
The second main point I want to make is that the pants should not be skinny jeans. This is because when you sew on patches it slightly cinches in the fabric, and with skinny jeans generally being stretchy, this is going to result in the thread of the patches stretching out and snapping. Your patches will all just start falling off and it'll ruin your hard work.
This is why I'd recommend using a pair of jeans or pants that are a bit looser of a fit, such as straight legged pants or a pair of pants a size up from your actual size if possible!
Dental floss
The reason it's generally suggested to use dental floss rather than actual thread is because dental floss tends to overall be a lot stronger than your average thread, as well as often being more easily accessible to buy.
Needle
This ones pretty self-explanatory, just make sure you get a needle with a long/wide enough eye (the hole the thread goes through) for your floss to be able to fit through without trouble.
Acrylic paints
You may be wondering why I'm suggesting acrylics over fabric paints and there are a few reasons!
The first is simply that they're both cheaper and far easier to purchase for the average person than fabric paints, and I want this tutorial to be as accessible as possible for as many people as possible.
The second reason is that fabric paints require a lot of fucking around with setting the paint, whereas acrylics can just be left to dry and be finished, and so long as your pants are hand washed, the paints won't come out (unless you layer it on super thick or are really rough when you clean them).
Brushes
Another pretty obvious one, these are needed so you can actually paint your patches!!!
Fabric/spare denim
You need fabric or scraps to be able to actually create patches for your pants, so this is essential.
Any kind of scrap fabric can do, a lot of fabric stores tend to have bins of scrap fabric that are either pre-priced or priced by weight and that can be a really good opportunity to acquire the fabric you need!
Another way (the method I tend to use) is thrifting a few pairs of jeans alongside the pair I want to patch and then ripping them up into patch-sized pieces!
Either way, I really advise against buying straight up new fabrics by the metre for this as it kinda goes against the entire idea of sustainability and reuse.
A really big tip I have for when you're cutting the fabric of your choice up for patches is to actually only cut a little slit, and then rip. This produces a really nice distressed edge and will help add some texture and more of a fucked up look to your pants a lot quicker than if you waited for the fabric to fray by itself!
Marker/pencil
This is literally just so you can draw your designs onto your patches! I've personally found that either a black or white (depending on how dark the fabric you're using is) pastel pencil is generally good enough to get the general gist of what you want down well enough for you to paint it on.
Pins
These are literally just to hold your patches in place and literally any kind from proper sewing pins to safety pins will work! (just don't forget they're in the jeans before you put them on I promise you it isn't fun to put on a pair of jeans full of pins).
Optional: a sketchbook
You may want a sketchbook or alternatively scraps of paper if you have any kind of original concept for a patch so you can draw it out a few times first to really nail it, and it's also helpful to have if you aren't as confident in your painting and drawing abilities!
Step two: patch making
I personally pre-rip/cut all of my patches before I paint anything on them generally speaking and then fit whatever design I want onto whatever piece I think it would fit on, however if you want to paint your patches and then rip/cut the design out that's also an option (and probably a much smarter one I'm just incredibly stubborn).
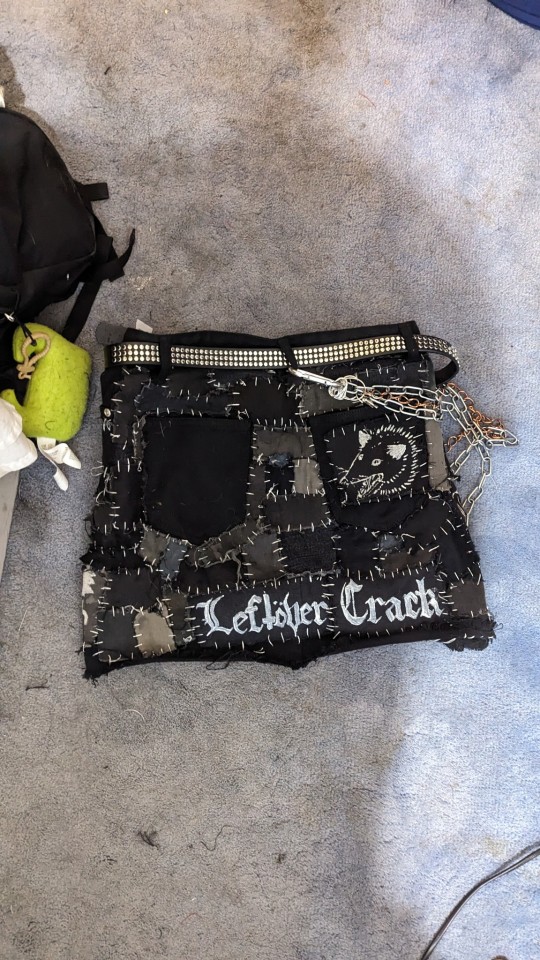
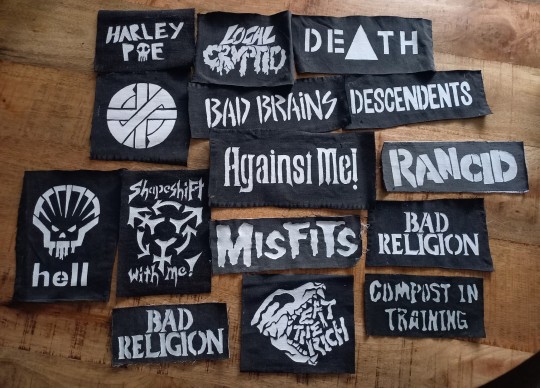
For punk pants you want a good mix of both punk bands, politics, and also maybe something a bit daft (I have the "he scream at he own ass" possum on the back pocket of a patched skirt for example). If you don't have bands and such, it kinda defeats the point of them being punk patched pants.
I personally generally pick a theme (eg. colourful patches, all black and white) when making anything patched because I think it makes everything look a bit more cohesive, but that is by no means a rule you actually have to follow I'm just autistic a fuck tbh.
Step three: the assembly
I personally put my main/bigger patches on first and put them on in a few different places until I get the placement I like, and then sew them on with the floss like this:

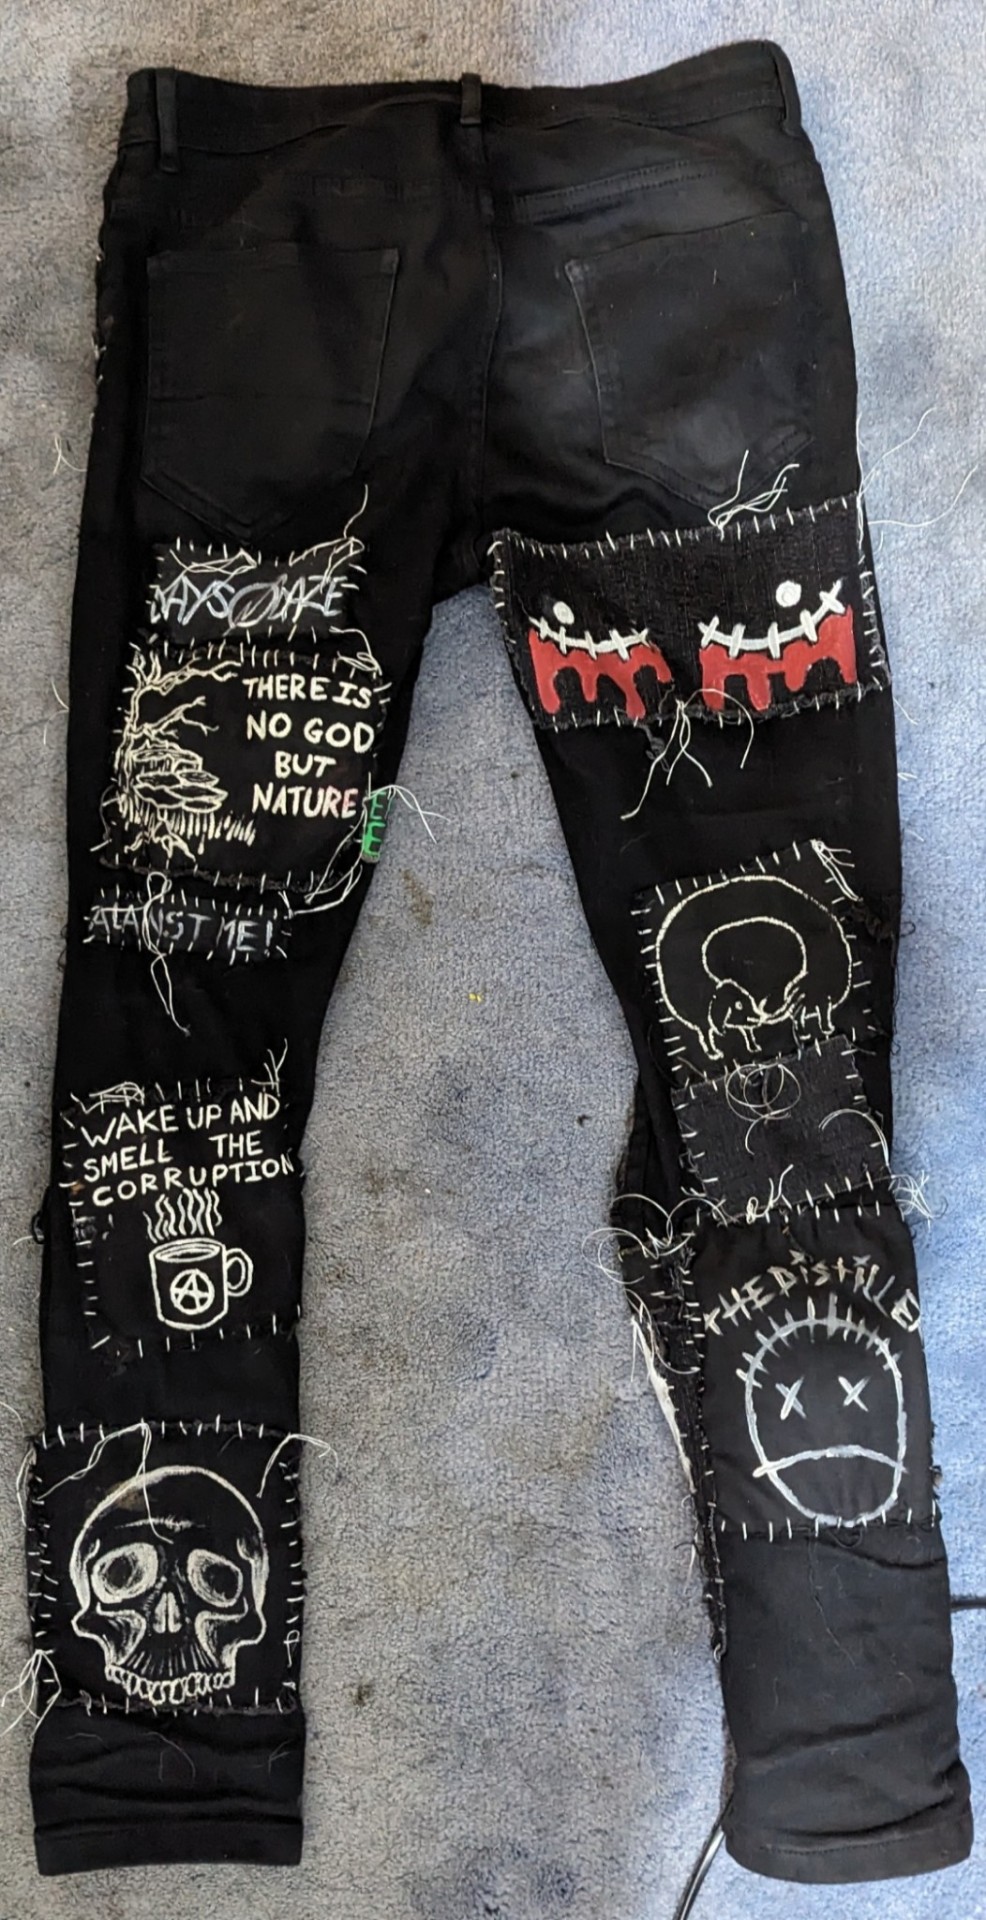
The main thing you want to do to make sure your pants don't wind up looking a bit weird or bare is to fill in any gaps between your painted patches with small, blank patches. Like this:
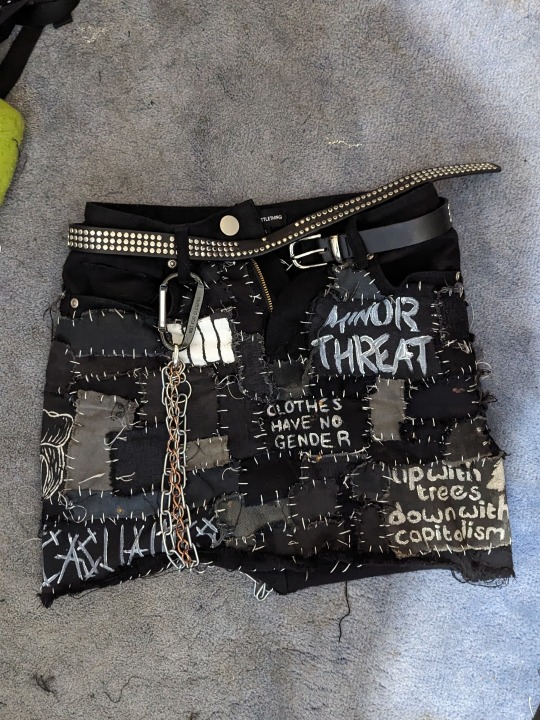
and that's pretty much it!!! I can't really explain via written text how to sew and how I personally tie off etc but if anyone would like a video tutorial lmk!!!
#punk#alternative#cripple punk#queer punk#diy or die#punk patches#diy punk#punk diy#patched pants#crust pants#patched skirt#punk skirt#crust skirt#punk pants#crust punk#punk style#punk fashion#punk culture
2K notes
·
View notes
Note
Patch making tutorials?
and here i am once again, with a patch making tutorial
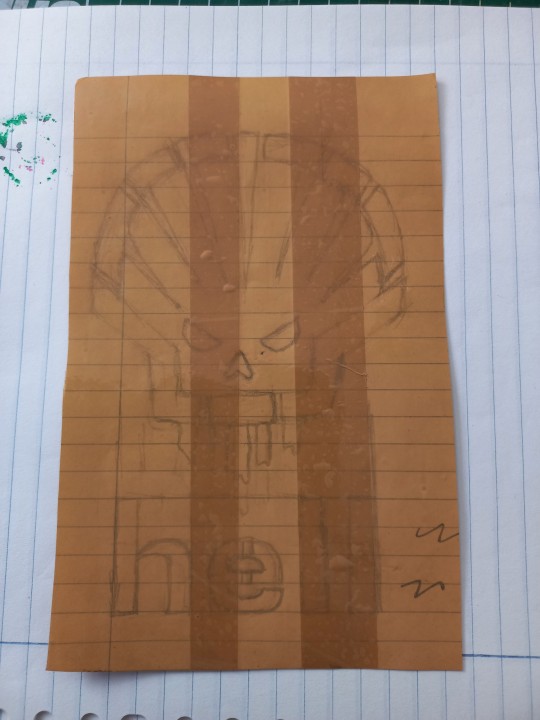
how to make stenciled patches:
i'll post a part two in the future which will cover freehanding and stamping ur patches
-
first some general info that might be useful:
i get my patch design inspo from pinterest, etsy, and tumblr. if sell your patches make sure you arent ripping off another artists patch design when using etsy for inspo. anarchostencilism also has tons of stencils both on deviantart and reddit which are free to use.
i use acrylic paint for my patches, but if you can afford it id advise fabric paint. to seal paint into the fabric iron the patches, it helps em last longer. some acrylic paint survives very well in the washing machine, but wash your stuff by hand the first time to see how well it holds up.
if you make your patches multiple colors, dont first make the whole patch one color and then paint over it with the other colors. if the paint starts cracking the base color will show through. (if you like that however then dont mind this)
i paint my patches on jean fabric, cause it makes the patches sturdy yet flexible. but shirt fabric or canvas both work very well too. anything except really plasticy/slippery or textured fabric can be used
i pin my patches down with pins onto multiple layers of taped together cartboard, to prevent the fabric from moving around and distorting the print
-
there's two ways in which i make my stencils
1. with paper covered in tape
2. with the plastic folder you put in your binders
-
option 1:
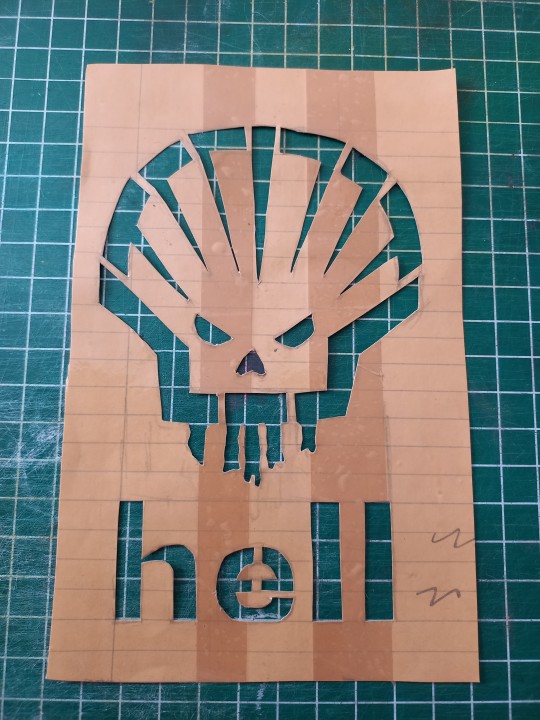
draw out your design onto some paper, make sure there arent any "loose" parts in the design that will get lost when cutting out the stencil

cover the paper in tape front and back, make sure you can still see your design through the tape
cut out your design, i use scissors and an exacto knife
-
option 2:
draw out your design (you can also draw the design directly onto the plastic folder)
cut a piece of plastic out of the folder big enough to cover your drawing and tape it down.
trace the design onto the plastic with pen or marker (any mistakes can be wiped out)
cut out your stencil
-
continuation from both option 1 and 2
after finishing your stencil you can pin them down on some fabric
dap on your paint with the point of a big brush or a sponge, depending on the paint it'll take 2-3 layers.
make sure your previous layer dried completely before adding the next one

after the paint has fully dried you can carefully take off your stencil.
!!dont unpin the patch before it fully dried, or the drying paint may cause the fabric to warp!!

thats it, questions are always welcome, now go and make stuff!!
#punk diy#diy fashion#punk#queer punk#diy punk#punk clothes#punk style#punk patches#patches#tutorial#my stuff
2K notes
·
View notes
Text
gouache paints my beloved 💕
#is it acrylic? is it watercolor? depends! what're you in the mood for?#don't wanna wait for your watercolor to dry before painting another layer? gouache dries FAST and u can add a drier layer for richer colors#made a mistake? need to blend something or adjust the color?#decided you want it different hours later?#no problem! add water to dried gouache and it comes back to life and you can do whatever you want with it!#cannot recommend picking up painting as a hobby even if you arent an 'artist' or cant draw for shit#the cool thing about painting is you can just literally just fingerpaint or mix some colors and have FUN with it#itll usually look pretty cool (if youre going for abstract) and more importantly its just fun to make something!#**cannot recommend it ENOUGH
1 note
·
View note
Note
does bff!rafe ever yell at latina reader? like does he ever correct her/put her in her place like he would prolly be so hot
he’s kinda mean in this one sorry :(

it wasn’t an often occurrence for you to be put in your place by rafe, but it did happen at times. you were always so perky and bubbly that just couldn’t contain yourself, or you worked yourself out to the point of being a restless little brat. nevertheless, rafe wasn’t afraid to check you back into reality, if needed — plus, he was your bestest friend in this world, he couldn’t steer your wrong! and sure, to the public eye, his methods would seem to be a bit harsh, but you knew deep down that rafe was a man, and men had a duty to take care of the ones they love and keep them in a straight line, right?
today had been one of those days — you were sat next to rafe, all pretty and dolled up, your soft makeup enhanced but your fresh set of lash extensions and dior gloss that glazed your swollen lips, tiffany earrings glinting under the sun as you sat in your slinky cherry blossom skims dress, your feet adorned with miu miu mules. too bad, your doll-like cadence was quickly soured by the displeased frown that painted your face, your doe eyes squinted as you mindlessly chewed on your acrylic nail.
you got off on being the center of rafe’s attention, so having to take the backseat to some blonde kook who was schmooze some free coke out of him was a serious no-no.
crossing your arms, you subconsciously pushed your tits further against your chest, flipping your tousled and freshly layered hair over your shoulder, “fucking pendeja,” you mumbled, just loud enough for rafe to turn to you, his sunglasses covering the silencing glare that he sent your way.
“cut it out,” rafe warns, his voice low as he returns his attention back to the pathetic blonde, leaving you dumbfounded and a bit embarrassed.
letting out an unimpressed scoff, you raise from your seat, making your way over to barry who stood with a knowing smirk of his face, “what’s goin’ on, princesa — country club pissin’ y’off again?” he chuckles, taking a sip from the chilled bottle of beer that sat in his grip.
smoothing a manicure hand down your hip, you shrug, batting your full lashes, “i wanna go home, m’bored,” you announce, adjusting the strap of your cream mini prada bag that sat on your shoulder, “a mi no me importa que el dice — he’s mean,” you continue, earning a raised eyebrow from barry.
“if i took y’little ass home, that boy would freak out and m’not dealin’ with his crazy ass,” barry sighs, not missing the way you quickly whipped your head back to rafe, a low huff leaving your lips as he continued flashing his million dollar smile at the ditsy blonde, “yo, he’s just doin’ business, a’ight? don’t need to get all sad,” barry consoles, earning a forced smile from you.
with a small and uneasy nod, you turn your pretty little head to find rafe your rafe man spread with the blonde sat right on his lap, whispering little nothings into her ear as she snorts a line clean off of the coffee table. hot tears were quick to brim at your waterline as you stand with parted lips, your heart beating in your chest as you whip your head back to barry, who ran a stressed hand over his face.
your sad little head could barely process all of the emotions and thoughts that crashed over you. rafe was supposed to be your best friend — he wasn’t supposed to hurt you, he was supposed to be yours. he kissed you, he took you shopping, he danced with you, he read novels with you, he knew you better than you knew yourself … you were supposed to be his girl.
keeping your wet bambi eyes trained on your feet, you let out a quiet whimper, “barry, can you please take me home?” you asked politely, quickly knuckling your stream of tears as barry wordlessly nodded, nudging your forearm with the surface of his rough hand.
𝜗𝜚 ‧₊˚ ⊹
sat on your fluffy powder pink duvet, thumb in mouth, you managed to chip the pearlescent polish that coated you structured nail, knees curled into your chest. your dress had been swapped for tiny pink shorts and a skimpy white camisole that clung to your frame. barry was so nice to you, even making sure that you were inside of your house, before he sped off.
you was sparkly eyes now blinked all swollen from your relentless tears, nose and cheeks flushed as the sound of heavy footsteps grew closer to your locked bedroom door, pulling your thumb out of your mouth, you sniffle as rafe’s voice calls out from the other side of your door, his hand fumbling with the secure knob, “c’mon kid, just open the door, yeah? i know y’mad at me,” he sighs, taking a brief pause from jiggling the door knob, before sending a light shove into the door, “i swear to god, i’ll fuckin’ break this door,” he calls out, sending a harder shove into the door.
your doe eyes widened with fear as you hopped off of your bed, rafe’s frustrated hits against the door growing harder as you pad over to unlock the door, barefoot and all.
wrapping your small hand around the knob, you coyly open the door, your short and meek frame met with an impatient rafe who towered over you with blown pupils, “fuck are y’doing, leavin’ with barry, huh?” he questions menacingly, his button-up now revealing his firm chest as he tongues the inside of his cheek, “y-y’say that slick shit while m’doin business, and then y’wanna fuckin’ leave?” he laughs, completely unamused as he cocks his head to the side.
remaining silent, you shrug, bottom lip poked out into a pout as you reach to softly close the door behind rafe, “i dunno,” you whimper, your voice cracked as rafe shoves your arm away from the door, before slamming it shut and locking it with a forceful hand.
“i let y’spoiled ass get away with a looot of shit, don’t i? y’get your little fuckin’ attitude — who’s the one that fixes it, huh?!” rafe asks rhetorically, jabbing his fingers into his chest as you squeeze your dolly eyes shut, stray tears rolling down your cheeks.
letting out an unfazed scoff, rafe shoots a hand out to latch onto your jaw, painfully mushing your cheeks together, “y’think i let people bitch me around, princess? look at me when m’talkin to you!” he shouts, your dewy eyes fluttering open as a choked-up cry leaves your pillowy lips.
gently pawing at rafe’s flexed wrist, your eyes soften, “y’scaring me, papi,” you squeak out, small shorts wedged between your ass cheeks as rafe’s eyes shoot down to the bff locket that sits between the valet of you supple breasts.
returning his eyesight to meet yours, rafe swiftly removes his hand from your sore jaw as he grabs ahold of your waist, spinning you to face your bed as he bends you over the edge of your bed. muffled cries leave your lips, the side of your face mushed against your duvet as rafe’s front pushes against the exposed curves of your ass.
“rafe— stop—”
“m’scarin you, yeah? y’wanna know what a guy like barry would do to your little ass?” rafe mutters, his strong hand maintaining its hold on the back of your head.
“rafe, stop! please!” you scream, pure terror in your voice as you hiccup against the sheets, loud sobs heaving out of you as rafe abruptly pulls away from you.
pained cries seep out of your mouth as you remained bent over, fat teardrops soaking your duvet as you mewl into the soft plush, you heart raced a million miles a minute, shaky hands reaching to cover your own mouth.
passing a hand through his buzzed hair, rafe lets out a shaky breath, the sound of your sharp and intense cries ringing through his ears as he shakes his head, he knew that he went entirely too far. you remained on your bent, your small frame shuddering with shock as your eyes squeezed shut, your wet lashes clumped together.
laying a hesitant hand to your sweaty lower back, rafe winces in shame as you flinch away from his touch with a scared little sob, “fuck — mama, please — m’sorry a’ight,” he sighs, pinching the bridge of his nose with his ringed finger and thumb, your sharp cries becoming entirely too much for him to bear, “okay-okay, m’gonna sit you on my lap, okay?” he coos, his palm sliding down your back in soothing strokes.
tucking his bottom lip underneath his sharp teeth, rafe waits until your cries has somewhat subsided, before he gently pulls you into his sturdy arms. still skittish, you keep your eyes shut, burying your face to hide in the crook of his cologne-scented neck. low cries sniffle from your nose as rafe carefully maneuvers himself to lean against the headboard of your bed, while keeping you securely curled against him.
“there we go,” he mumbles under his breath, gently placing one of your legs to straddle over him, you back arched as your small hands fist into his shirt for dear life.
raising a hand to stroke over your hair, rafe presses his lips to the side of your head, lightly caressing you, until your breathing evened out, your eyes still closed.
adjusting the waistband of your pink shorts, rafe gently pats your poked out ass, his other hand now scratching at your scalp as he leans his lips closer to your ear, “can y’open your eyes for me — miss those pretty eyes,” rafe asks, his voice light and airy as your fists unravel from his shirt.
slowly raising your head from rafe’s chest, you let out a smooth huff, the tip of your nose shiny as your bloodshot eyes meet rafe’s. allowing his pink lips to expand into a satisfied smile, rafe nudges your chin, “hi pretty girl … didn’t mean to scare y’like tha—”
“i thought you were going to hurt me, papi. i-i don’t like when you get like that,” you rush out, licking over your dry lips, your fingers lazily fumbling with the hem of rafe’s shirt.
mindlessly drumming his hands against the sides of your hips, rafe nods in agreeance, “i know, sweetheart an—”
“and i left, because you w-were with that stupid girl and you let her sit on your lap … you only let me do that,” you cut in once more, tits stretching against the thin fabric of your cami as you take in a shaky inhale, still not secure enough to maintain an elongated eye contact with rafe.
bringing both hands to cradle your face, rafe raises your head, requiring your full attention, “gotta let me talk for this one, okay?” he reprimands softly, earning a short nod from you.
just as rafe parted his lips to continue, you sighed, “only i can sit on your lap, mi vida,” you whine.
accepting defeat, rafe nods, pulling you in by your bff necklace to get you in a warm kiss. a gasp of shock seeped into rafe’s mouth from yours as he pulls away with a loud and wet smack, “i know, kid.”
#asks#anon#obx#rafe cameron#rafe cameron imagine#rafe cameron prompt#rafe cameron x reader#obx imagine#rafe cameron smut#bff!rafe#rafe x reader
999 notes
·
View notes
Text
here's some punk diy tips and ideas
[other than crusty pants and battle jacket, although we still love those greatly.]
why should you diy, when you can just find decorated items everywhere, you can ask. what if you are clumsy at painting or anything?
firstly, good questions. we diy so we don't give credit to the big companies who rule the world. we diy to get more independent from the system we dislike. we diy so to save money. to express uniqueness, recognize eachother and be recognized. and especially to have fun and feel cool. diy is not only about clothing, but anything you can set your mind on. of course, one cannot make EVERYTHING for themselves, there isn't enough time and energy. but making at least small steps are already a statement and more than nothing. also, helping small artists by buying their products is also pretty punk.
that being said, i provide you with some tips of mine, all gained from experience:
anything you drew/painted on, you will WANT TO protect. acrylic paint/markers + acrylic paint varnish/transparent nail polish/textile medium are your best friends. read after anything that's new to you.
i highly recommend working with old clothing or thrift shop finds when it comes to textiles, as it is environmentally friendly and you will stay in budget. Anyways, always make sure that the material you use isn't gonna be problematic. for example, if you want to do some patchwork, the material shouldn't decay easily (if it does, it will come off so quickly.). if you want to paint on it, it shouldn't be rugged.
you can not only draw/paint on your canvas shoes, but can also sew, embroidery (just make sure to use a thimble, plus floss instead of thread could make your work more durable), and add beads and trinkets to your shoelaces. in the case of shoes, never use glue (neither hot nor instant glue) – it will come off quickly. for some inspiration, i'll show you my shoes!
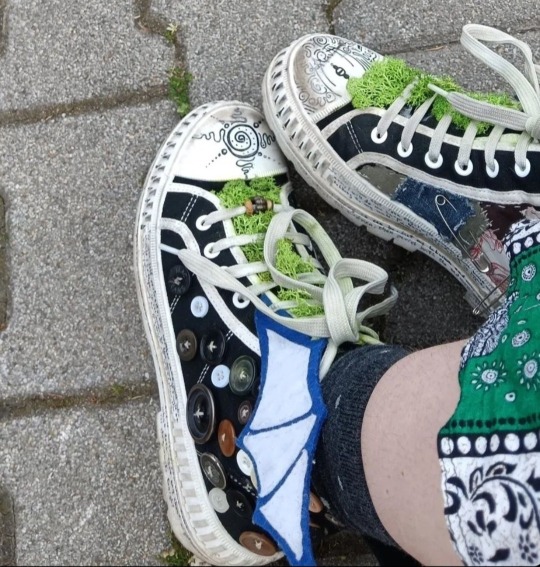
(the fake moss is literally unstoppable from falling off or getting dirty. risky idea.)
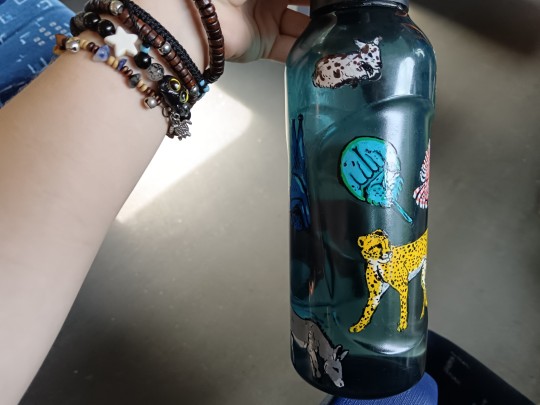
it's good to carry around water and food!! you don't even have to pay for decorative water bottles and food boxes, as you can draw on glass and plastic just fine with acrylic markers. just don't forget to paint transparent nail polish all over your drawing. in at least two layers. don't be lazy or laid-back. even posca comes off while washing the dishes. and you WANT TO save your reference pictures/final designs, as the case of emergency is likely. but after all, my water bottle is exactly fine after six months, with no accuring problem.
if your current best option to get stickers from is aliexpress or overpriced decor stores, search for local artists and shops on instagram and tiktok, as it may be their most efficent way of getting you to know them. if it seems like you have no chance, you may can still find a print shop with the option of printing on self-adhesive sheets (at least in hungary, those are pretty cheap). and if you want drawings to print out as stickers, you may use your own or –ONLY IF YOU GET PERMISSION– other artist's work. not only good for decorations for like, headphones, but for vandalism too. WAIT WAIT who said that. who said it. not me. no never
(in case that's also impossible, you can create stickers by printing out/drawing a picture, cover it up in transparent adhesive tape, and then put some two-sided adhesive tape on the white side of the pic. it won't be that durable, but it functions.)
if you want to bleach-paint clothing, get some plastic brushes!! any other brush dissolves. draw your design first with chalk!! never forget to put cardboard inside the clothing, and to wash the finished work in a washing machine before you'd put it on. prepare to be patient with the process. and it's not dangerous to touch 5%-9% household bleach, just wash your hands soon after.
if you want your crusty pants to last veryyy long, wax them. look up on youtube jeans waxing.
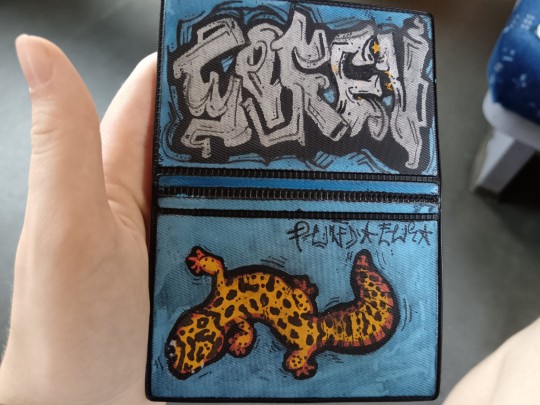
some more things i made for myself so to give you some inspiration: totebag with pockets, a small crystal holder cabinet, badges, and i decorated some t-shirts, button-ups, an id card case, phonecase, laptop.
theoretically speaking, there is nothing that an individual would be unable to learn how to make, when it comes to diy. you can't imagine how easy it is to bake bread at home. consuming-focused media makes people believe that it's hard to make anything. of course, everyone has to decide about their own priorities, i don't want to convince or change anyone in here. and if you have any questions, send an ask!! i hope i had been helpful.
#punk diy#tips#tutorial#clothes painting#do it yourself#bleaching#alternative clothing#soren's hoard of words#i hope you'll have fun with this#stay safe and drink water
160 notes
·
View notes
Note
why is gouache the evilest watercolor? my boyfriend got me a set of gouache paints bc i’ve wanted to get into painting for a while, mainly to play with colors bc i love colors oh so much. do you have any advice/tips/suggestions? do you know anything about abstract art, or good ways to go about making it?
It's greatest strength is also it's greatest weakness: gouache will always rehydrate.
It's a paint that needs a lot of layers because it doesn't go down with very high opacity, and each subsequent layer has the chance to ruin everything that's gone before if you use too much water.
Don't get me wrong. I paint in gouache now. I've given up on acrylics. But it's a very fussy and temperamental paint medium especially for little freshman who are also trying to master form, observation, sight measuring, and a million other rendering techniques at the same time they're praying a single brushstroke doesn't rip up all their progress.
My advice: Make ugly paintings. Practice. Because this:
Can turn into this:

if you're patient.
193 notes
·
View notes
Text
The Depths 1

Warnings: non/dubcon, stalking and other dark elements. My username actually says you never asked for any of this.
My warnings are not exhaustive but be aware this is a dark fic and may include potentially triggering topics. Please use your common sense when consuming content. I am not responsible for your decisions.
Character: fisherman!Geralt of Rivia x artist!reader
Summary: your sleepy existence is thrown into chaos by a mysterious man.
As usual, I would appreciate any and all feedback. I’m happy to once more go on this adventure with all of you! Thank you in advance for your comments and for reblogging ❤️
The water crashes onto the coast. The sound is dulled by the distance of your perch. The sky melds into the lake's surface as the sun hides behind a swathe of clouds.
You lean in to squint at the strokes on the canvas, sweeping your brush in repetition of the rippled horizon. You use the wnd of the brush to scratch your cheek.
Almost...
You peek above the easel and watch the small speck growing larger as it moves across the water. The fishing boat is there so often that you've added its silhouette to the acrylic tides. A stalwart to your early mornings and listless afternoons.
Day after day is layered before you in shades of cerulean, slate, and lavender. The grey sky with a tinge of golden sunlight, the waters stirring in sparkling shades of aquamarine and pearl, the coast rippled in fawn and umber. Another eye might see it and deem it finished but not you.
You step back to let the paint dry and rinse your brushes in the jar. Hmm. You're out of clean water.
You close up the easel and hook the canvas on the backside, carrying it like a briefcase as you pick up your canvas bag with your roll of brushes and pots of paint, your palette around your index finger.
You make a slow descent down the cliffside and curl around towards the shore. You veer away from the dock and head down into the silt. You put your stuff on a flat rock. You take the used brushes and palette to rinse in the shallows.
The water laps over your sandals as you linger in the soothing cool foam. The approach of evening skews the water with emerald and jade. You shake it all off and step back to dry it with a paint-blotted cloth.
You rearrange the bag so it all fits and hook it over your shoulder. You look down at the your linen apron. You can recall where every splotch and streak came from.
You take your easel and canvas and head back up along the dock. As you reach the post, the fishing boat knocks against the other end. You peer over at the man that lays a board across the spanse between.
You see him every night. You couldn't forget a man with snow white hair and golden eyes. His age is less than his locks might suggest and his eyes seem to look through you, not at you.
You smile, like you do every night. He doesn't react. Just like every other time.
The smell of fish wafts in the boat as he drags his net across the wooden ramp. You turn and press on. He's much to busy for you. It doesn't bother you. You came out here to get away from people.
Your feet leave divets in the dirt as the rock of the boat knocks in a rhythm against the dock. The man's toil adds to thunks and thuds and they fade behind you. The peace here is immaculate, you wouldn't want to ruin it for anyone else.
Past the seaside houses left vacant in the colder seasons and the smaller basins of the lake, between the rocky ridges and grassy knolls, you return to your little house.The cornflower paint chips from the wooden siding and the stairs are worn in the middle from the tramp of feet. A bench stands on the other side of the white railing between a plinthed flowerpot and folding table with a book forgotten on its slats. Home.
The spindly wreath on the front door rattles as you push through and the screen door snaps behind you. The evening breezs drifts in through the mesh as you set your easel down and rest the canvas on crate just beside the mat. You put your bag in front of the wooden stand and bask in the calm.
You hang your wicker hat and untie your apron. Your hands are covered in paint. You'll wash them before you eat. You leave your wet sandals at the door.
You pull out the pot of chowder you made two nights past from the fridge. You put it over a burner and wait for it to warm. The fare lasts you near a week when you take the time to put it together. Every ingredient must be used to its last, especially when it is so far to market. And expensive.
You scoop out a bowl and eat it on the front porch. Your eyes are too tired to read. When you finish, you recline on the bench and yawn. You lay in the dimming hue of the evening as the stars wink down at you.
A whistle carries on the wind. You sit up and look for the culprit. They are close enough to hear but that could still be far. It could even be a bird.
You take the empty bowl inside and rinse it. You retreat to the bedroom and change
You open the window to let the night in. Around here, you can do that. Not like the city and its grated windows.
You laze in the dusk shade and drift slowly into yourself. Sleep enshrines you atop the cushy bed, the water stirring from afar, the loons calling into the dark. Tomorrow you'll figure out the exact right colour for the undertow.
You're more than due to sell a new piece. You need to if you want to stay in paradise.
#geralt of rivia#dark geralt of rivia#dark!geralt of rivia#geralt of rivia x reader#the witcher#au#series#drabble#the depths
182 notes
·
View notes
Text
The Secret of Sherlock Holmes bookbinding project!
I've really wanted a hard copy for a while of 'The Secret of Sherlock Holmes' play by Jeremy Paul, which was performed by Jeremy Brett and Edward Hardwicke (and is very high on my list of things to go and see if I get a time machine, because there aren't any video recordings of it.)
ANYWAY it's long out of print and very expensive to buy so I figured... I can just make one myself!
First I bound the text block. It's so slim, at a grand total of 75 pages.
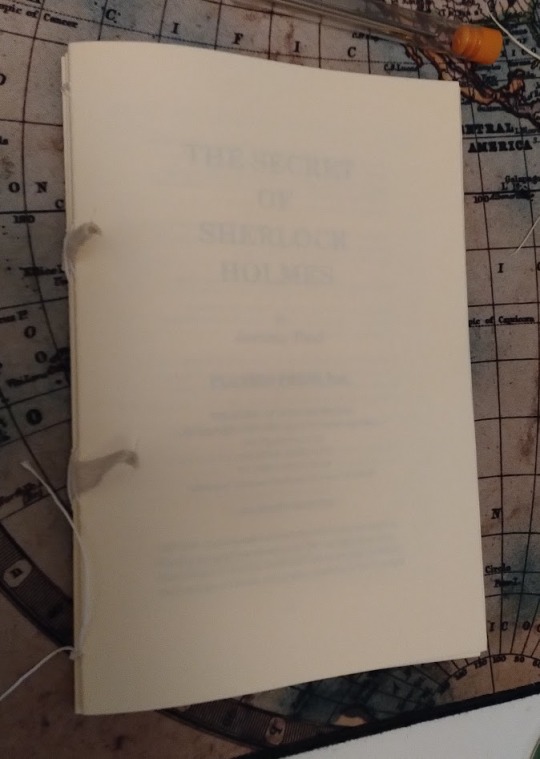
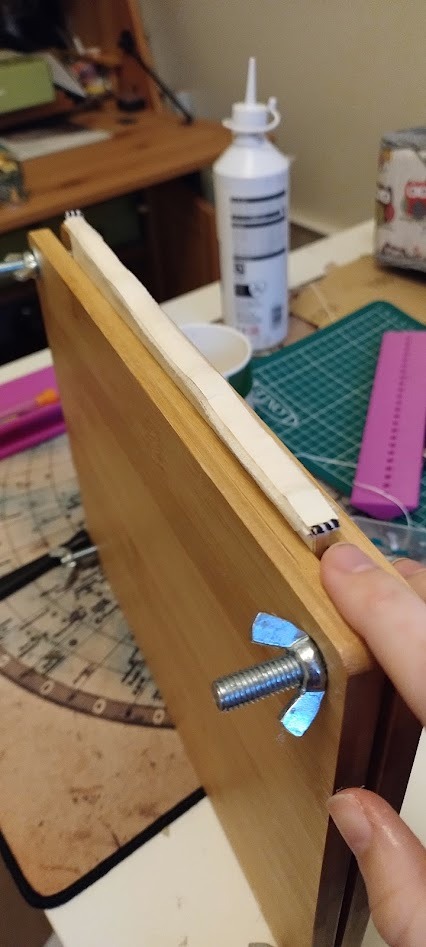
I bound the cover in honey-coloured book cloth, and then set about creating a cover design.
I wanted to use the official logo of the play and this amazing publicity photo, so I went into my paint package of choice (clip studio) and tweaked the photograph until I was happy I'd got a likeness of the actors only using black and white. I think Jeremy Brett lost a little of his handsomeness, alas.


A while ago I bought a cutting machine, a Silhouette Portrait, which comes with some great software which can automatically convert an image like this into a path for the cutting machine to follow, although I usually tweak it manually too.
For example, I figured the weave on Hardwicke's tie was too intricate so I removed it.
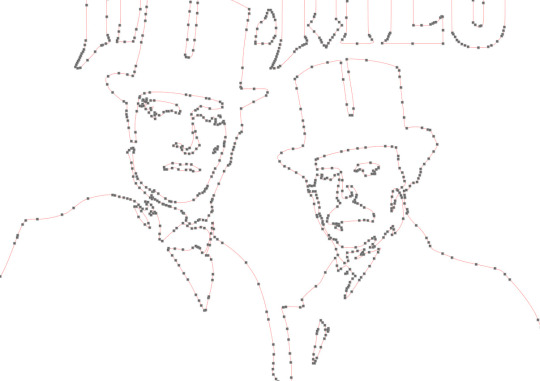
Then I set the cutting machine to work!
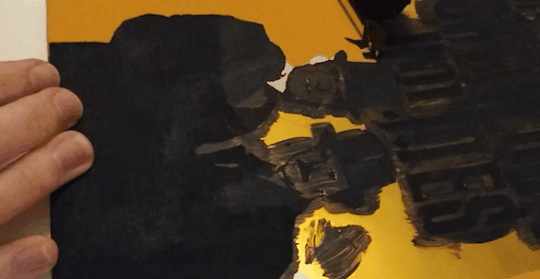
For a while I tried using self-adhesive vinyl to make covers, but I found that it wasn't very hard-wearing and would start peeling off. These days I use self-adhesive vinyl to make a stencil, and then paint onto the book cloth in acrylic. The fact that the stencil is self-adhesive reduces the chances of any paint sneaking in underneath!
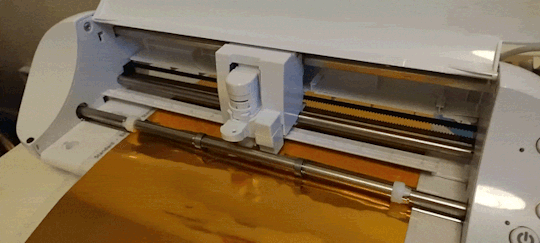
(The stencil is gold just because I have a lot of spare gold vinyl - it's probably not the best colour to use.)
For this project I did something I've never done before, which is doing two layered stencils, a white layer underneath, and then a black layer on top.
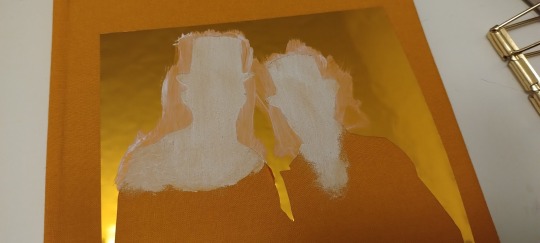
I kind of regret not painting all of the figures in white because if you squint you can see the line where the white stops on the final piece.
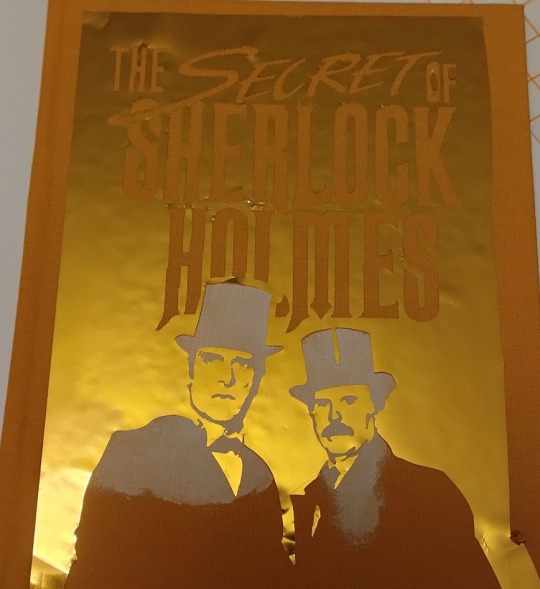
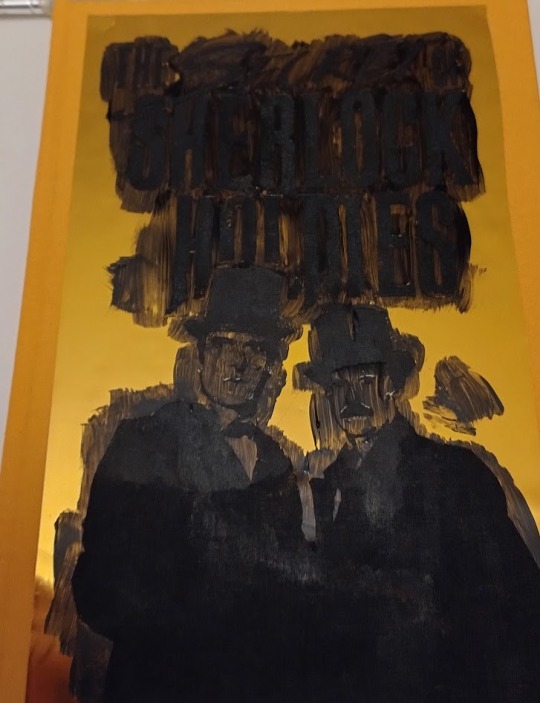
And now for the really satisfying bit - peeling of the stencil when everything has dried!
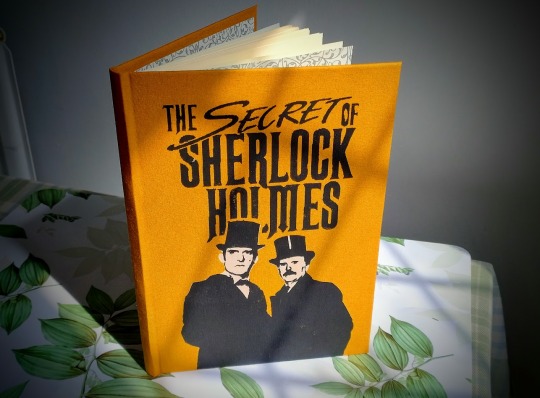
I'm really pleased with the finished book, and it's so fun to possibly have the only hardback version of this play... ever...???


402 notes
·
View notes
Note
Mr. Fiberglass looks very dashing and extremely gender. May I ask how you made that mask? It looks great and I may want one for myself 👀
Thank you!
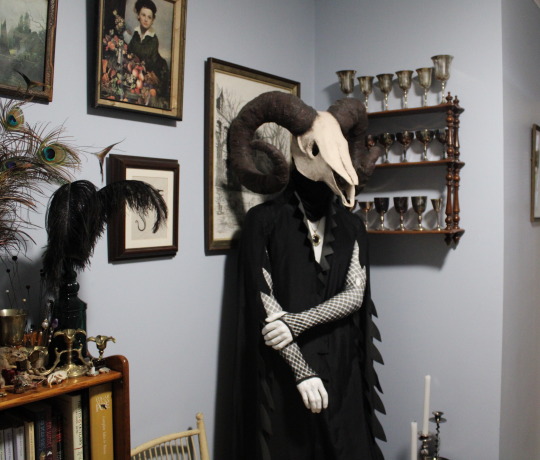
It was 8 or 9 years ago so I don't remember it super well, but it's mostly cardboard and papier mâché. I built the base using cardboard boxes and a lot of masking tape, and you can still see some of the tape and cardboard inside the snout.

I made the horns by cutting 2 identical spiral shapes out of cardboard, and stretching them like a slinky, which is a much easier way to get them to spiral and be symmetrical than starting out with a straight thing and curving it. I'm pretty sure I bulked them up and got them to stay in that shape by taping lots of wads of crumpled up newspaper to the sides.
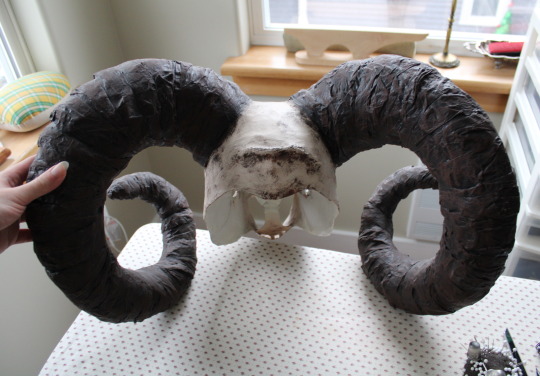
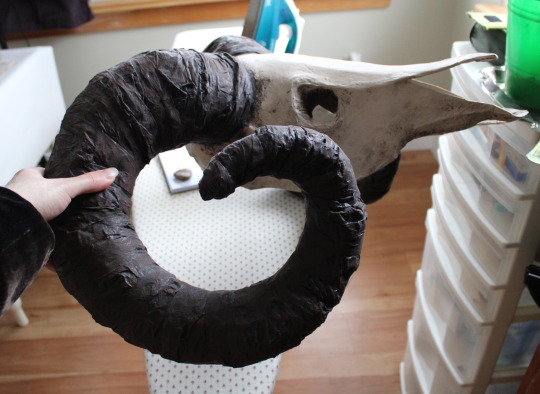
I covered the whole thing in layers of very cheap paper towel and Elmer's art paste, and used that to add a few little ridges and such.
The texture on the horns was made by just wrapping one long continuous strip of paper towel around and around, straight off the roll. (It was the really cheap stuff with no perforations and with obvious flecks of recycled paper in it.)
I have a piece of polyester batting shoved into the top because I didn't quite get it to the same shape as the top my head, and it's a bit uncomfortable.
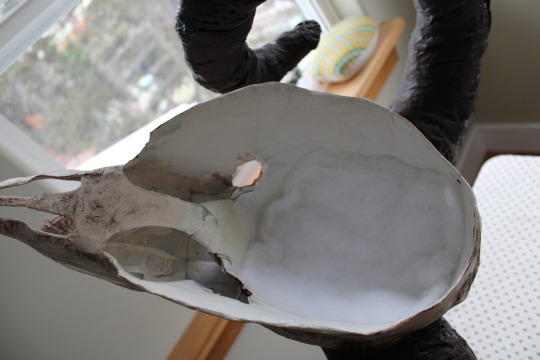
It's also very hard to see in! I looked at photos of real sheep skulls for reference, and I put the eyes further forward to account for my human binocular vision, but they're still really far back and hard to see out of, so you have to look out the nose too.

I seem to remember first painting it with glossy acrylic paint, and then repainting it with matte paints because it just doesn't look as skull-like when shiny. The shading is awful because acrylic paints dry so dang fast, so it might be nice to go back and refine the texture a bit and repaint it again someday, but that's not at all on my priority list right now.
I hope this helps, and that you have fun making one!
433 notes
·
View notes
Last Seen Blogs

isaacs-analogue-blog
Isaac's Analogue Blog

sexygirlsforyou
Sexy Girls For You

princesscloudblr-blog
Coffee and ART

vixidol
You are the perfect, ultimate idol

getforce-space
GetForce