#chmod calculator
Explore tagged Tumblr posts
Visit Tumblr Blog
Explore Tumblr blogs with no restrictions, modern design and the best experience.
Last Seen Tumblr Blogs


Fun Fact
In 2020, Tumblr had 29.4 million users in the US.
Text
CONVERT FOR FREE- THE BEST SITE FOR RELIABLE CHOMAD CALCULATORS!

This site can be used to convert or calculate almost anything. Finding a specific conversion is attainable with its on-site search. Easy to use on all platforms and browsers with a simple and straightforward interface, online conversion is a mobile-friendly site. It has conversions sorted in categories and alphabetical order. Helpful in everything from calculating the exchange rate of currency to finding the day of a specific date to figuring the Chmod code and more are the uses of this site. It is a useful site which is easy to use for everyone.
Contact US
Email: [email protected]
url: http://www.convertforfree.com/chmod-calculator/
Hit the follow button and get in touch.
#chmod calculator#Chmod Command Calculator#free chmod calculator#chmod calc#chmod mode calculator#online#convert#converter#Online Calculator#convert for free#chmod calculator free#Online free Calculator#linux permissions#linux chmod calculator#chmod calculator 4 digit#digital chmod calculator
0 notes
Text
Comment vraiment pirater un compte Instagram ?

J'ai remarqué que sur les forums, beaucoup d’internautes se demandent comment pirater un compte Instagram. Dans cet article, je vais vous montrer comment le faire. Je vais utiliser Kali Linux, un système Linux, qui est populaire pour le piratage informatique. Si vous ne savez pas comment installer Kali sur votre machine, regardez simplement cet article: comment installer Kali Linux sur Windows.
Est-ce vraiment possible de pirater un compte Instagram ?
Sachez qu'un logiciel de piratage Instagram direct n’existe pas. En aucun cas, il n’y aura un miracle qui vous fera pirater une personne. C’est vrai, la sécurité informatique n’existe pas, mais pour pirater vraiment un compte Instagram, il faut être patient et intelligent. Ici, je vais donc utiliser la méthode attaque par force brute. Le principe de l’attaque consiste à essayer de trouver le mot de passe d'un compte Instagram en testant toutes les combinaisons de caractères possibles jusqu’à la découverte du mot de passe . Notez que pour réussir cette attaque, trois facteurs sont à prendre en compte: - La puissance de calcul de votre machine. - La complexité du mot de passe. - Les mots qui contient le dictionnaire du logiciel utilisé. Donc si le mot de passe que vous cherchez fait plus de 8 ou 9 caractères au total et qu’il contient des caractères spéciaux et des chiffres… cela risque d’être impossible de le trouver avec votre PC.
Étapes pour pirater un compte Instagram
Remarque: Cet article est à but éducatif et préventif uniquement. Apprendre l’attaque pour mieux se protéger. Vous êtes le seul(e) responsable de vos actions, et aucune responsabilité de la part de l’instructeur ne sera engagée quant à la mauvaise utilisation du contenu enseigné. Ce qu'il vous faut - Python v3.9 - L'application Instagram Bruter - Liste des mots de passe - Liste des proxy
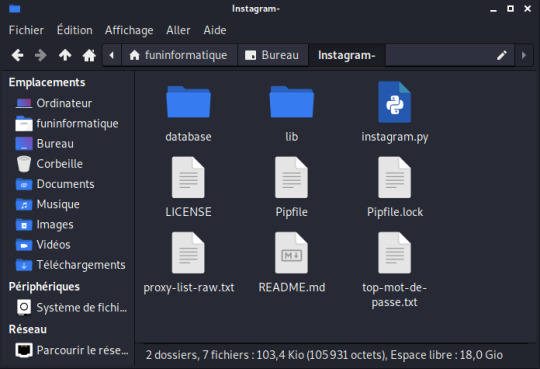
Installer les dépendances Installer Pipenv apt install pip apt install pipenv Créer un environnement pipenv Assurez-vous que Python 3.9 est installé pipenv --python 3.9 Téléchargement du Programme Instagram Bruter Pour pirater un compte Instagram, vous devez tout d’abord obtenir le programme Instagram Bruter qui permet de réaliser des attaques par force brute. Pour cela, ouvrez le terminal sur Kali Linux et tapez simplement: git clone https://github.com/Bitwise-01/Instagram- Cette commande va cloner le programme sur votre ordinateur.

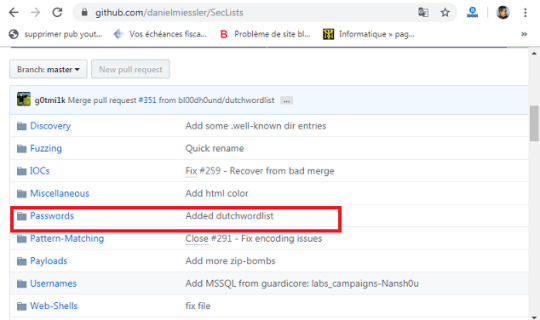
Ensuite, vous devez changer les droits du dossier Instagram- avec la commande chmod. Tapez donc: chmod -R 755 Instagram- && cd Instagram- Exécution du programme Maintenant que vous avez téléchargé le programme. Tapez: "ls" pour voir ce qu'il y a dans le dossier. Eh bien, nous avons trois fichiers dans le dossier: "Core", "README.md" et "instagram.py". Le fichier qui nous intéresse ici est "instagram.py". Lancez ce script en tapant: python3 instagram.py Oh non ! On dirait qu'il y a des erreurs ! Mais pourquoi ? Tout simplement parce que je n'ai pas encore ajouter le fichier txt contenant une série de mots de passe potentiels. Rappelez-vous qu’il s’agit d’une attaque par force brute. Pour trouver un mot de passe, le script doit tester une série de mots de passe potentiels, les uns à la suite des autres, en espérant que le mot de passe utilisé par le compte Instagram soit contenu dans le dictionnaire. Si ce n'est pas le cas, l'attaque échouera. Le programme a besoin également d'une liste de proxys pour fonctionner. Obtenir une liste de mots de passe potentiels Si vous voulez simplement tester ce programme, vous pouvez créer votre propre liste de mots de passe. Mais si vous essayez d'obtenir le mot de passe du compte Instagram de votre conjoint alors il faut télécharger une vraie liste. Pour cela, allez dans votre navigateur web et cherchez dans Google "daniel miessler passwords github". Ensuite cliquer sur le premier résultat des recherches Google. Maintenant, vous serez dans le site GitHub. Cliquez sur Passwords.
Choisissez un fichier txt. Je choisi la liste des 10 millions de mots de passe. Le plus gros sera le mieux, car vous aurez plus de chances de réussir. Enfin, téléchargez et enregistrez le fichier texte dans le dossier Instagram-. Maintenant nous pouvons commencer le test de piratage Instagram en toute simplicité. Télécharger une liste de proxys Pour lancez cette attaque, il faut téléchargez une liste de proxys dans le programme. Le fichier proxy doit avoir un format ip:port proxies_list.txt 3.238.111.248:80 206.189.59.192:8118 165.22.81.30:34100 176.248.120.70:3128 191.242.178.209:3128 180.92.194.235:80 Pour télécharger une liste de proxys, c'est par ici: https://github.com/clarketm/proxy-list/blob/master/proxy-list-raw.txt Enregistrer ce ficher texte dans le dossier Instagram- Ensuite, pour installer ces proxy dans la base de données du programme, tapez la commande suivante: Python3 instagram.py -px proxy-list-raw.txt Exécuter à nouveau ... Faisons ce que nous avons fait avant: ouvrez le terminal Kali Linux et tapez: python instagram.py -u nom_utilisateur_Instagram -p liste_des_mots_passe.txt Remplacer nom_utilisateur_instagram par le nom de votre cible et liste des_mots_passe par le nom de votre liste des mots de passe. Félicitations! L’attaque par force brute va commencer. Sur le terminal vous allez voir s'afficher les tentatives et le mot de passe que le script tente actuellement.

Patientez quelques temps, vous aurez la progression au fur et à mesure que le script avance dans la procédure. Si le script trouve le mot de passe, celui-ci sera clairement affiché. Il ne vous restera plus qu’à le saisir dans la page d'identification Instagram. Read the full article
0 notes
Link
Introduction
Hello, freeCodeCamp readers. I hope I can bring you some great coding content for inspiration, education and of course, fun! In this tutorial, we will learn about keyword density and how to build a tool that can calculate keyword density with Laravel. The web tool will allow us to paste in a full page of HTML. Then, magic will be executed to give us a precise keyword density score. In a quick summary, here are some basic skills we will touch upon whilst building the tool.
Laravel routes, controllers, and views
Laravel layouts
HTML & forms
JQuery & Ajax
Some native PHP
A bit of SEO!
What is keyword density?
If you have your own website or blog, you possibly already know what keyword density is. For those who don't know what it means I will give a short and sweet explanation below. Keyword density is a calculation of word or keyword occurrences usually in a large piece of text. The density is reported in a percentage which is simply calculated with the following formula. KeywordDensity = (Keyword Count / Word Count) * 100
Why is this important?
Keyword density is a key factor in the Google search engine algorithm. It is widely thought that a good keyword density for optimising web pages for Google rankings is around 3.5%. If the percentage is higher, for example 20%, then this could be seen as 'keyword stuffing' and therefore could badly affect your Google search rankings. So, that is a minuscule lesson on SEO and to give you a bit of context of what we are trying to build.
Building a Keyword Density Tool with Laravel
This tutorial will presume we are all starting with a fresh Laravel build enabling anyone to follow on from any particular point. (Apologies if the beginning sections are telling you to suck eggs!) Also, just for further context, I'm building this on MacOS with XAMPP locally.
Prerequisites
A PHP environment installed and access to the root directory
Composer installed
Your favourite code editor that interprets PHP, HTML, CSS & JS.
With all of these prerequisites checked off, we can now get our hands dirty.
Creating Our Laravel App
First of all we need to download and install a fresh Laravel build. Follow the steps below to achieve this.
Open your command line interface at the root directory of your web server, for example XAMPP/xamppfiles/htdocs/
Run the following command and let composer do it's magic
composer create-project --prefer-dist laravel/laravel KeywordDensityApp
Top Tip: If you are working on MacOS, then check out the following steps to enable permissions on the Laravel storage folder.
Navigate to your CLI to the project folder ('KeywordDensityApp')
Run the following command
sudo chmod -R 777 storage/*
Adding a controller and view
Now that we have the basics out of the way, we can start to build our controller and web page that will allow a user to paste in and analyse some HTML. We can create a new controller in two ways: via the PHP artisan command line helper or simply by creating with your code editor. Feel free to use any of the below methods, just make sure the controller matches
Create controller with PHP artisan
php artisan make:controller ToolController
Create controller with code editor
Locate the following - ProjectFolder/App/Http/Controllers
Create a new .php file named ToolController
Make sure this newly created file has the following contents:
<?php namespace App\Http\Controllers; use Illuminate\Http\Request; class ToolController extends Controller { // }
Now let's create the view.
Create view with code editor
Locate view folder under ProjectFolder/resources/views
Create a new folder named tool
Create a new view PHP file named index.blade.php
Now let's create a layout file
With most Laravel applications, you will want to build a layouts file so that you don't have to repeat lots of HTML over and over to get the same design across the board. This layout is pretty basic, using a simple Bootstrap template and has a @yield call to the 'content' area which we will utilise in our views. In addition, there's a @yield call to 'scripts' which we will utilise later.
Locate view folder under ProjectFolder/resources/views
Create a new folder here named layouts
Create a new file named master.blade.php
Add the following code to the file
<!DOCTYPE html> <html lang=""> <head> <meta charset="utf-8"> <meta name="viewport" content="width=device-width, initial-scale=1"> <title>Keyword Density Tool</title> <link rel="stylesheet" href="https://stackpath.bootstrapcdn.com/bootstrap/4.4.1/css/bootstrap.min.css" integrity="sha384-Vkoo8x4CGsO3+Hhxv8T/Q5PaXtkKtu6ug5TOeNV6gBiFeWPGFN9MuhOf23Q9Ifjh" crossorigin="anonymous"> <!-- Fonts --> <link href="https://fonts.googleapis.com/css?family=Nunito:200,600" rel="stylesheet"> <meta name="csrf-token" content=""> <style> body {padding-top: 5em;} </style> </head> <body> <nav class="navbar navbar-expand-md navbar-dark bg-dark fixed-top"> <a class="navbar-brand" href="#">Keyword Density App</a> <button class="navbar-toggler" type="button" data-toggle="collapse" data-target="#navbarsExampleDefault" aria-controls="navbarsExampleDefault" aria-expanded="false" aria-label="Toggle navigation"> <span class="navbar-toggler-icon"></span> </button> <div class="collapse navbar-collapse" id="navbarsExampleDefault"> <ul class="navbar-nav mr-auto"> <li class="nav-item"> <a class="nav-link" href="/">Home <span class="sr-only">(current)</span></a> </li> <li class="nav-item active"> <a class="nav-link" href="">Tool</a> </li> </ul> </div> </nav> <main role="main" class="container mt-3"> @yield('content') </main><!-- /.container --> <script src="https://code.jquery.com/jquery-3.2.1.min.js"></script> <script src="https://cdn.jsdelivr.net/npm/[email protected]/dist/umd/popper.min.js"></script> <script src="https://stackpath.bootstrapcdn.com/bootstrap/4.4.1/js/bootstrap.min.js"></script> @yield('scripts') </body> </html>
Extend our views to use the layout file
Let us now use the newly created layouts file in both our welcome view and tool index view. Follow these steps to extend to the layout.
Add the following code to both ProjectFolder/resources/views/welcome.blade.php and ProjectFolder/resources/views/tool/index.blade.php
@extends('layouts.master') @section('content') @endsection
Try rendering the index page of the tool directory, for example localhost/tool. It should look something like below.

Basic view layout
Linking up the Controller, Route, & View
Now that we have a controller and view we need to first define a route and second add a return view method to the controller.
Define the route
Locate web routes file under ProjectFolder/routes/web.php
Add the following code to the bottom of the file:
Route::get('/tool', 'ToolController@index')->name('KDTool');
Create the new controller method
Now, go back to your ToolController and add the following function:
public function index() { return view('tool.index'); }
Feel free to change the view names, route URLs, or controller functions to your personal liking. Just make sure they all match up and the page renders.
Building up our tool view
Now, with our earlier set up of views and layout files, we can start to add the content in the form of HTML that we are going to need. It will consist of nothing more than some text, textarea input form, and a submit button. Add the following HTML to the content section of the ProjectFolder/resources/views/tool/index.blade.php file.
<form id="keywordDensityInputForm"> <div class="form-group"> <label for="keywordDensityInput">HTML or Text</label> <textarea class="form-control" id="keywordDensityInput" rows="12"></textarea> </div> <button type="submit" class="btn btn-primary mb-2">Get Keyword Densities</button> </form>
The view should now render like this:
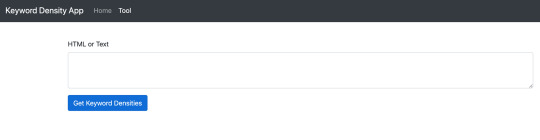
Keyword Density Tool View with Text Area input
Creating the bridge between the front end and the back end
Now, we pretty much have everything we need on the front end: a simple input text area where users can paste in their plain text or HTML. What's missing is the logic for when the button is pressed 'Get Keyword Densities'. This bridging logic will essentially do the following.
Listen for clicks on the Get Keyword Density Button
Grab the contents of the non-empty text area input
Use JQuery Ajax to send the data to the backend to be processed and await a response.
When the response is passed back, handle the data and create a HTML table with the human-readable statistics (keyword density).
Front end
To do this we will use an in-page script which we can inject using the @section tag. Add the following to the tool/index.blade.php view, after the content section.
@section ('scripts') <script> $('#keywordDensityInputForm').on('submit', function (e) { // Listen for submit button click and form submission. e.preventDefault(); // Prevent the form from submitting let kdInput = $('#keywordDensityInput').val(); // Get the input if (kdInput !== "") { // If input is not empty. // Set CSRF token up with ajax. $.ajaxSetup({ headers: { 'X-CSRF-TOKEN': $('meta[name="csrf-token"]').attr('content') } }); $.ajax({ // Pass data to backend type: "POST", url: "/tool/calculate-and-get-density", data: {'keywordInput': kdInput}, success: function (response) { // On Success, build a data table with keyword and densities if (response.length > 0) { let html = "<table class='table'><tbody><thead>"; html += "<th>Keyword</th>"; html += "<th>Count</th>"; html += "<th>Density</th>"; html += "</thead><tbody>"; for (let i = 0; i < response.length; i++) { html += "<tr><td>"+response[i].keyword+"</td>"; html += "<td>"+response[i].count+"</td>"; html += "<td>"+response[i].density+"%</td></tr>"; } html += "</tbody></table>"; $('#keywordDensityInputForm').after(html); // Append the html table after the form. } }, }); } }) </script> @endsection
This entire script that we inject will handle all of the numbered list items above. What is left to do is handle the data coming in on the back end side of things.
Back end
Firstly, before we go any further with coding, we need to handle the fact that both plain text and HTML can be submitted. For this we can use a nifty tool to help us out. html2text is the perfect PHP library for this use case, so it's time we install it. html2text does exactly what it says on the tin, converts HTML markup to plain text. Luckily, this package has a composer install command, so enter the following command into the CLI on the projects root directory.
composer require html2text/html2text
Now, our backend controller is going to receive either HTML or plain text in requests firing from the HTML form we created in our view. We now need to make the route to handle this call and to route the call to the specific controller that will work the magic. Add the following PHP to the web.php routes file:
Route::post('/tool/calculate-and-get-density', 'ToolController@CalculateAndGetDensity');
Secondly, add the following to ToolController.php file:
public function CalculateAndGetDensity(Request $request) { if ($request->isMethod('GET')) { } }
OK, so the stage is set. Let's code in the magic that will calculate the keyword density and return the data. Firstly, add use statement is required for the newly installed html2text package. Add the following to the top of the ToolController.php, just below other use statements:
use Html2Text\Html2Text;
Then we need to handle the get parameter that is to be passed in, making sure it's not set and then converting the parameter of content to plain text. Refactor the CalculateAndGetDensity function to look like below:
public function CalculateAndGetDensity(Request $request) { if ($request->isMethod('GET')) { if (isset($request->keywordInput)) { // Test the parameter is set. $html = new Html2Text($request->keywordInput); // Setup the html2text obj. $text = $html->getText(); // Execute the getText() function. } } }
Now that we have a variable to hold all of the text stripped for the keywordInput parameter, we can go ahead and start to calculate density. We need to handle the following:
Determine the total count of words
Analyse the textual string and convert it to a key value array (the key being the keyword, the value being the occurrence of the word)
Sort into order by descending with the biggest occurrence first in the array
Loop over the key and value array, pushing the values to a new array with an additional field of 'density' which utilises the keyword density formula we looked at earlier in the article. This formula will use the value (occurrence) and the total word count.
Finally, to return the data
Refactor the function to look like the following, taking note of the comments:
public function CalculateAndGetDensity(Request $request) { if ($request->isMethod('GET')) { if (isset($request->keywordInput)) { // Test the parameter is set. $html = new Html2Text($request->keywordInput); // Setup the html2text obj. $text = strtolower($html->getText()); // Execute the getText() function and convert all text to lower case to prevent work duplication $totalWordCount = str_word_count($text); // Get the total count of words in the text string $wordsAndOccurrence = array_count_values(str_word_count($text, 1)); // Get each word and the occurrence count as key value array arsort($wordsAndOccurrence); // Sort into descending order of the array value (occurrence) $keywordDensityArray = []; // Build the array foreach ($wordsAndOccurrence as $key => $value) { $keywordDensityArray[] = ["keyword" => $key, // keyword "count" => $value, // word occurrences "density" => round(($value / $totalWordCount) * 100,2)]; // Round density to two decimal places. } return $keywordDensityArray; } } }
Note: The beauty of html2text is that it doesn't really care if it's converting HTML or plain text in the first place, so we don't need to worry if a user submits either. It will still churn out plain text.
Putting it to the test
Finally, we are ready to test the tool, wahoo! Go ahead and render the tool index view (localhost/tool).
Now, you can go to any website of your choice on the web, load a page from that site, right click and click view source.
Copy the entire contents and come back to the tool.
Paste the contents into the text area and click the Get Keyword Densities button.
Await the response and check out the table of keyword densities!
Check out my example below which uses the HTML of this page.
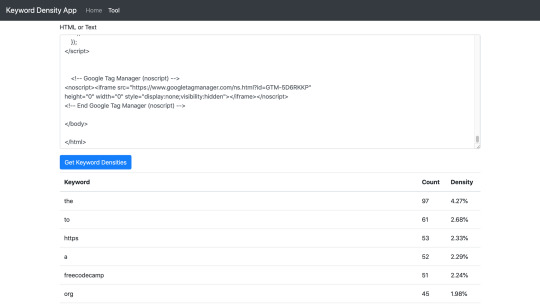
Keyword Density Tool & Table of keywords
And that is it!
Summary
In this article we learned how to build a Laravel application from scratch. It touched on some of the different parts of the full stack in development such as JQuery, PHP, HTML etc. Hopefully, with the understanding of this application, the same methodology can be used to build something else, perhaps bigger and better.
Possible further developments
The keyword density tool currently takes 'stop' words into account. Stop words are known to be ignored by Googles crawlers. Words such as it, the, as, and a. Looking at the tool screenshot above, you can see that they are used a lot! Further development could be carried out to filter the stop words and only calculate density on the non-stop words which is potentially a better view for SEO scoring.
0 notes
Text
Moving an ASP.NET Core from Azure App Service on Windows to Linux by testing in WSL and Docker first
I updated one of my websites from ASP.NET Core 2.2 to the latest LTS (Long Term Support) version of ASP.NET Core 3.1 this week. Now I want to do the same with my podcast site AND move it to Linux at the same time. Azure App Service for Linux has some very good pricing and allowed me to move over to a Premium v2 plan from Standard which gives me double the memory at 35% off.
My podcast has historically run on ASP.NET Core on Azure App Service for Windows. How do I know if it'll run on Linux? Well, I'll try it see!
I use WSL (Windows Subsystem for Linux) and so should you. It's very likely that you have WSL ready to go on you machine and you just haven't turned it on. Combine WSL (or the new WSL2) with the Windows Terminal and you're in a lovely spot on Windows with the ability to develop anything for anywhere.
First, let's see if I can run my existing ASP.NET Core podcast site (now updated to .NET Core 3.1) on Linux. I'll start up Ubuntu 18.04 on Windows and run dotnet --version to see if I have anything installed already. You may have nothing. I have 3.0 it seems:
$ dotnet --version 3.0.100
Ok, I'll want to install .NET Core 3.1 on WSL's Ubuntu instance. Remember, just because I have .NET 3.1 installed in Windows doesn't mean it's installed in my Linux/WSL instance(s). I need to maintain those on my own. Another way to think about it is that I've got the win-x64 install of .NET 3.1 and now I need the linux-x64 one.
NOTE: It is true that I could "dotnet publish -r linux-x64" and then scp the resulting complete published files over to Linux/WSL. It depends on how I want to divide responsibility. Do I want to build on Windows and run on Linux/Linux? Or do I want to build and run from Linux. Both are valid, it just depends on your choices, patience, and familiarity.
GOTCHA: Also if you're accessing Windows files at /mnt/c under WSL that were git cloned from Windows, be aware that there are subtleties if Git for Windows and Git for Ubuntu are accessing the index/files at the same time. It's easier and safer and faster to just git clone another copy within the WSL/Linux filesystem.
I'll head over to https://dotnet.microsoft.com/download and get .NET Core 3.1 for Ubuntu. If you use apt, and I assume you do, there's some preliminary setup and then it's a simple
sudo apt-get install dotnet-sdk-3.1
No sweat. Let's "dotnet build" and hope for the best!
It might be surprising but if you aren't doing anything tricky or Windows-specific, your .NET Core app should just build the same on Windows as it does on Linux. If you ARE doing something interesting or OS-specific you can #ifdef your way to glory if you insist.
Bonus points if you have Unit Tests - and I do - so next I'll run my unit tests and see how it goes.
OPTION: I write things like build.ps1 and test.ps1 that use PowerShell as PowerShell is on Windows already. Then I install PowerShell (just for the scripting, not the shelling) on Linux so I can use my .ps1 scripts everywhere. The same test.ps1 and build.ps1 and dockertest.ps1, etc just works on all platforms. Make sure you have a shebang #!/usr/bin/pwsh at the top of your ps1 files so you can just run them (chmod +x) on Linux.
I run test.ps1 which runs this command
dotnet test /p:CollectCoverage=true /p:CoverletOutputFormat=lcov /p:CoverletOutput=./lcov .\hanselminutes.core.tests
with coverlet for code coverage and...it works! Again, this might be surprising but if you don't have any hard coded paths, make any assumptions about a C:\ drive existing, and avoid the registry and other Windows-specific things, things work.
Test Run Successful. Total tests: 23 Passed: 23 Total time: 9.6340 Seconds Calculating coverage result... Generating report './lcov.info' +--------------------------+--------+--------+--------+ | Module | Line | Branch | Method | +--------------------------+--------+--------+--------+ | hanselminutes.core.Views | 60.71% | 59.03% | 41.17% | +--------------------------+--------+--------+--------+ | hanselminutes.core | 82.51% | 81.61% | 85.39% | +--------------------------+--------+--------+--------+
I can build, I can test, but can I run it? What about running and testing in containers?
I'm running WSL2 on my system and I've doing all this in Ubuntu 18.04 AND I'm running the Docker WSL Tech Preview. Why not see if I can run my tests under Docker as well? From Docker for Windows I'll enabled the Experimental WSL2 support and then from the Resources menu, WSL Integration I'll enable Docker within my Ubuntu 18.04 instance (your instances and their names will be your own).
I can confirm it's working with "docker info" under WSL and talking to a working instance. I should be able to run "docker info" in BOTH Windows AND WSL.
$ docker info Client: Debug Mode: false Server: Containers: 18 Running: 18 Paused: 0 Stopped: 0 Images: 31 Server Version: 19.03.5 Storage Driver: overlay2 Backing Filesystem: extfs ...snip...
Cool. I remembered I also I needed to update my Dockerfile as well from the 2.2 SDK on the Docker hub to the 3.1 SDK from Microsoft Container Registry, so this one line change:
#FROM microsoft/dotnet:2.2-sdk AS build FROM mcr.microsoft.com/dotnet/core/sdk:3.1 as build
as well as the final runtime version for the app later in the Dockerfile. Basically make sure your Dockerfile uses the right versions.
#FROM microsoft/dotnet:2.1-aspnetcore-runtime AS runtime FROM mcr.microsoft.com/dotnet/core/aspnet:3.1 AS runtime
I also volume mount the tests results so there's this offensive If statement in the test.ps1. YES, I know I should just do all the paths with / and make them relative.
#!/usr/bin/pwsh docker build --pull --target testrunner -t podcast:test . if ($IsWindows) { docker run --rm -v d:\github\hanselminutes-core\TestResults:/app/hanselminutes.core.tests/TestResults podcast:test } else { docker run --rm -v ~/hanselminutes-core/TestResults:/app/hanselminutes.core.tests/TestResults podcast:test }
Regardless, it works and it works wonderfully. Now I've got tests running in Windows and Linux and in Docker (in a Linux container) managed by WSL2. Everything works everywhere. Now that it runs well on WSL, I know it'll work great in Azure on Linux.
Moving from Azure App Service on Windows to Linux
This was pretty simple as well.
I'll blog in detail how I build andd eploy the sites in Azure DevOps and how I've moved from .NET 2.2 with Classic "Wizard Built" DevOps Pipelines to a .NET Core 3.1 and a source control checked-in YAML pipeline next week.
The short version is, make a Linux App Service Plan (remember that an "App Service Plan " is a VM that you don't worry about. See in the pick below that the Linux Plan has a penguin icon. Also remember that you can have as many apps inside your plan as you'd like (and will fit in memory and resources). When you select a "Stack" for your app within Azure App Service for Linux you're effectively selecting a Docker Image that Azure manages for you.
I started by deploying to staging.mydomain.com and trying it out. You can use Azure Front Door or CloudFlare to manage traffic and then swap the DNS. I tested on Staging for a while, then just changed DNS directly. I waited a few hours for traffic to drain off the Windows podcast site and then stopped it. After a day or two of no traffic I deleted it. If I did my job right, none of you noticed the site moved from Windows to Linux, from .NET Core 2.2 to .NET Core 3.1. It should be as fast or faster with no downtime.
Here's a snap of my Azure Portal. As of today, I've moved my home page, my blood sugar management portal, and my podcast site all onto a single Linux App Service Plan. Each is hosted on GitHub and each is deploying automatically with Azure DevOps.
Next big migration to the cloud will be this blog which still runs .NET Framework 4.x. I'll blog how the podcast gets checked into GitHub then deployed with Azure DevOps next week.
What cool migrations have YOU done lately, Dear Reader?
Sponsor: Like C#? We do too! That’s why we've developed a fast, smart, cross-platform .NET IDE which gives you even more coding power. Clever code analysis, rich code completion, instant search and navigation, an advanced debugger... With JetBrains Rider, everything you need is at your fingertips. Code C# at the speed of thought on Linux, Mac, or Windows. Try JetBrains Rider today!
© 2019 Scott Hanselman. All rights reserved.


Moving an ASP.NET Core from Azure App Service on Windows to Linux by testing in WSL and Docker first published first on https://deskbysnafu.tumblr.com/
0 notes
Text
Moving an ASP.NET Core from Azure App Service on Windows to Linux by testing in WSL and Docker first
I updated one of my websites from ASP.NET Core 2.2 to the latest LTS (Long Term Support) version of ASP.NET Core 3.1 this week. Now I want to do the same with my podcast site AND move it to Linux at the same time. Azure App Service for Linux has some very good pricing and allowed me to move over to a Premium v2 plan from Standard which gives me double the memory at 35% off.
My podcast has historically run on ASP.NET Core on Azure App Service for Windows. How do I know if it'll run on Linux? Well, I'll try it see!
I use WSL (Windows Subsystem for Linux) and so should you. It's very likely that you have WSL ready to go on you machine and you just haven't turned it on. Combine WSL (or the new WSL2) with the Windows Terminal and you're in a lovely spot on Windows with the ability to develop anything for anywhere.
First, let's see if I can run my existing ASP.NET Core podcast site (now updated to .NET Core 3.1) on Linux. I'll start up Ubuntu 18.04 on Windows and run dotnet --version to see if I have anything installed already. You may have nothing. I have 3.0 it seems:
$ dotnet --version 3.0.100
Ok, I'll want to install .NET Core 3.1 on WSL's Ubuntu instance. Remember, just because I have .NET 3.1 installed in Windows doesn't mean it's installed in my Linux/WSL instance(s). I need to maintain those on my own. Another way to think about it is that I've got the win-x64 install of .NET 3.1 and now I need the linux-x64 one.
NOTE: It is true that I could "dotnet publish -r linux-x64" and then scp the resulting complete published files over to Linux/WSL. It depends on how I want to divide responsibility. Do I want to build on Windows and run on Linux/Linux? Or do I want to build and run from Linux. Both are valid, it just depends on your choices, patience, and familiarity.
GOTCHA: Also if you're accessing Windows files at /mnt/c under WSL that were git cloned from Windows, be aware that there are subtleties if Git for Windows and Git for Ubuntu are accessing the index/files at the same time. It's easier and safer and faster to just git clone another copy within the WSL/Linux filesystem.
I'll head over to https://dotnet.microsoft.com/download and get .NET Core 3.1 for Ubuntu. If you use apt, and I assume you do, there's some preliminary setup and then it's a simple
sudo apt-get install dotnet-sdk-3.1
No sweat. Let's "dotnet build" and hope for the best!
It might be surprising but if you aren't doing anything tricky or Windows-specific, your .NET Core app should just build the same on Windows as it does on Linux. If you ARE doing something interesting or OS-specific you can #ifdef your way to glory if you insist.
Bonus points if you have Unit Tests - and I do - so next I'll run my unit tests and see how it goes.
OPTION: I write things like build.ps1 and test.ps1 that use PowerShell as PowerShell is on Windows already. Then I install PowerShell (just for the scripting, not the shelling) on Linux so I can use my .ps1 scripts everywhere. The same test.ps1 and build.ps1 and dockertest.ps1, etc just works on all platforms. Make sure you have a shebang #!/usr/bin/pwsh at the top of your ps1 files so you can just run them (chmod +x) on Linux.
I run test.ps1 which runs this command
dotnet test /p:CollectCoverage=true /p:CoverletOutputFormat=lcov /p:CoverletOutput=./lcov .\hanselminutes.core.tests
with coverlet for code coverage and...it works! Again, this might be surprising but if you don't have any hard coded paths, make any assumptions about a C:\ drive existing, and avoid the registry and other Windows-specific things, things work.
Test Run Successful. Total tests: 23 Passed: 23 Total time: 9.6340 Seconds Calculating coverage result... Generating report './lcov.info' +--------------------------+--------+--------+--------+ | Module | Line | Branch | Method | +--------------------------+--------+--------+--------+ | hanselminutes.core.Views | 60.71% | 59.03% | 41.17% | +--------------------------+--------+--------+--------+ | hanselminutes.core | 82.51% | 81.61% | 85.39% | +--------------------------+--------+--------+--------+
I can build, I can test, but can I run it? What about running and testing in containers?
I'm running WSL2 on my system and I've doing all this in Ubuntu 18.04 AND I'm running the Docker WSL Tech Preview. Why not see if I can run my tests under Docker as well? From Docker for Windows I'll enabled the Experimental WSL2 support and then from the Resources menu, WSL Integration I'll enable Docker within my Ubuntu 18.04 instance (your instances and their names will be your own).
I can confirm it's working with "docker info" under WSL and talking to a working instance. I should be able to run "docker info" in BOTH Windows AND WSL.
$ docker info Client: Debug Mode: false Server: Containers: 18 Running: 18 Paused: 0 Stopped: 0 Images: 31 Server Version: 19.03.5 Storage Driver: overlay2 Backing Filesystem: extfs ...snip...
Cool. I remembered I also I needed to update my Dockerfile as well from the 2.2 SDK on the Docker hub to the 3.1 SDK from Microsoft Container Registry, so this one line change:
#FROM microsoft/dotnet:2.2-sdk AS build FROM mcr.microsoft.com/dotnet/core/sdk:3.1 as build
as well as the final runtime version for the app later in the Dockerfile. Basically make sure your Dockerfile uses the right versions.
#FROM microsoft/dotnet:2.1-aspnetcore-runtime AS runtime FROM mcr.microsoft.com/dotnet/core/aspnet:3.1 AS runtime
I also volume mount the tests results so there's this offensive If statement in the test.ps1. YES, I know I should just do all the paths with / and make them relative.
#!/usr/bin/pwsh docker build --pull --target testrunner -t podcast:test . if ($IsWindows) { docker run --rm -v d:\github\hanselminutes-core\TestResults:/app/hanselminutes.core.tests/TestResults podcast:test } else { docker run --rm -v ~/hanselminutes-core/TestResults:/app/hanselminutes.core.tests/TestResults podcast:test }
Regardless, it works and it works wonderfully. Now I've got tests running in Windows and Linux and in Docker (in a Linux container) managed by WSL2. Everything works everywhere. Now that it runs well on WSL, I know it'll work great in Azure on Linux.
Moving from Azure App Service on Windows to Linux
This was pretty simple as well.
I'll blog in detail how I build andd eploy the sites in Azure DevOps and how I've moved from .NET 2.2 with Classic "Wizard Built" DevOps Pipelines to a .NET Core 3.1 and a source control checked-in YAML pipeline next week.
The short version is, make a Linux App Service Plan (remember that an "App Service Plan " is a VM that you don't worry about. See in the pick below that the Linux Plan has a penguin icon. Also remember that you can have as many apps inside your plan as you'd like (and will fit in memory and resources). When you select a "Stack" for your app within Azure App Service for Linux you're effectively selecting a Docker Image that Azure manages for you.
I started by deploying to staging.mydomain.com and trying it out. You can use Azure Front Door or CloudFlare to manage traffic and then swap the DNS. I tested on Staging for a while, then just changed DNS directly. I waited a few hours for traffic to drain off the Windows podcast site and then stopped it. After a day or two of no traffic I deleted it. If I did my job right, none of you noticed the site moved from Windows to Linux, from .NET Core 2.2 to .NET Core 3.1. It should be as fast or faster with no downtime.
Here's a snap of my Azure Portal. As of today, I've moved my home page, my blood sugar management portal, and my podcast site all onto a single Linux App Service Plan. Each is hosted on GitHub and each is deploying automatically with Azure DevOps.
Next big migration to the cloud will be this blog which still runs .NET Framework 4.x. I'll blog how the podcast gets checked into GitHub then deployed with Azure DevOps next week.
What cool migrations have YOU done lately, Dear Reader?
Sponsor: Like C#? We do too! That’s why we've developed a fast, smart, cross-platform .NET IDE which gives you even more coding power. Clever code analysis, rich code completion, instant search and navigation, an advanced debugger... With JetBrains Rider, everything you need is at your fingertips. Code C# at the speed of thought on Linux, Mac, or Windows. Try JetBrains Rider today!
© 2019 Scott Hanselman. All rights reserved.


Moving an ASP.NET Core from Azure App Service on Windows to Linux by testing in WSL and Docker first published first on http://7elementswd.tumblr.com/
0 notes
Link
1 note
·
View note
Text
BitMEX Margin Signal AI with React Native android and ios application (Mobile)
Are you interesting to make one AI application on Android and iOS to calculator BitMEX cryptocurrency margin signal. MexAI is the best choise for you.
This is an automated system for analyzing price data of XBT on bitmex. Application will automatically find the right entry points with Long or Short type for you all times of the day.
Developed and integrated with the world’s leading expert in the financial and crypto market, Application will automatically find the right buy and sell points for you all times of the day.
When using this application, you do not need to do any work from the smallest to the most important.
You do not have to: - Technical analysis - Sitting at the price - Manual operation - Manipulation - No need to wake up the night.
You just need to install the application and use signals.
You will be extremely idle, with the value of your account still increasing day by day.
HOW TO SETUP API SERVER:
1. archive source code to /var/www/mexai on your server.
2. set crontab to calculator BitMEX Margin LONG SHORT Signal every 5 minutes: */5 * * * * cd ”/var/www/mexai” && /usr/bin/php artisan BitmexSignal >> /var/log/BitmexSignal.log 2>&1 &
NOTE: /var/www/mexai is path of source code api
3. Config web api; open config/database.php file – Change info DB connect: ‘database’ => env(‘DB_DATABASE’, ’’), ‘username’ => env(‘DB_USERNAME’, ’’), ‘password’ => env(‘DB_PASSWORD’, ’’),
4. chmod 777 folder – storage – bootstrap
5. import DB: file mexai.sql
6. Edit React Native code with Visual Studio Code : https://code.visualstudio.com/
6.1 Change you api url on file: Globals.js
7. Build your iOS app by Xcode
8. Build your Android app by Android Studio
Done.
from CodeCanyon new items https://ift.tt/2Pch30v via IFTTT https://goo.gl/zxKHwc
0 notes
Text
Benefits OF CHMOD CALCULATOR | ConvertForFree

Chmod Calculator generates the code which is readable, writeable and executable by everyone. Generally, Linux permission users face problems such as not being able to upload a file or modify a document due to not getting permissions. To overcome this, the Webmaster would need to change the Chmod code.
Contact US
Email: [email protected]
URL: http://www.convertforfree.com/chmod-calculator/
Follow us on Social Media
Like on FB: https://www.facebook.com/getConvertForFree/
Follow us on Twitter: https://twitter.com/Convert_ForFree
Connect on Linkedin: https://www.linkedin.com/company/convert-for-free/
Follow Us On Instagram: https://www.instagram.com/convertforfree/
Follow us on Pinterest: https://www.pinterest.com/ConvertForFree/
#chmod calculator#Chmod Command Calculator#free chmod calculator#chmod calc#chmod mode calculator#convert#converter#convert for free#smart conversion#chmod calculator free#Online free Calculator#Online Calculator#chmod calculator online#linux permissions#linux chmod calculator#online
0 notes
Link
Easiest way to generate file or directory permissions
0 notes
Text
Common administrator responsibilities on Amazon RDS and Amazon Aurora for PostgreSQL databases
Amazon Web Services (AWS) offers Amazon Relational Database Service (RDS) and Amazon Aurora as fully managed relational database services. With a few commands, you can have your production database instance up and running on AWS. An online database frees the database administrator (DBA) from many maintenance and management tasks. However, there are a few significant responsibilities to be aware of. This post discusses the DBA tasks to perform on Amazon RDS for PostgreSQL and Aurora with PostgreSQL-compatible databases. As a DBA, you face daily pressure to deliver value to your business across many fronts. Maintaining the right platform for running mission-critical databases is becoming increasingly difficult. Maintenance is also a challenging job. The launch of Amazon RDS and Aurora has vastly reduced the time you spend on tasks like installation, configuration, monitoring, and security. Nevertheless, you must still carry out several critical tasks: several of them daily, a few weekly, and some only at the time of Amazon RDS or Aurora installation (at the time of instance creation). Some of the administrative tasks that you must carry out include: Configuring the parameter group Managing IP traffic using a security group Auditing the database log files Maintenance and management activities Planning backup and recovery strategies User management Monitoring the database Configuring the parameter group The data directory of an on-premises PostgreSQL cluster contains the configuration file postgresql.conf. You can manage the parameters through this configuration file. Similarly, for Amazon RDS and Aurora PostgreSQL instances, you manage the parameters through a parameter group. Before you create a new Amazon RDS and Aurora instance, customize your DB parameter group. For more information about creating a new parameter group, modifying the parameters, and attaching it to the instance, see Working with DB Parameter Groups. If you do not have a customized parameter group at the time of creation, you can perform an instance restart. Replace the default DB parameter group with the custom parameter group, which allows the customized parameters to take effect. The following overview describes which parameters you should turn on for optimal performance: Enter the following logging parameters: log_autovacuum_min_duration 0 log_checkpoints '1' log_connection '1' log_disconnection '1' log_min_duration_statement '' log_temp_files '1' log_statement='ddl' rds.force_autovacuum_logging_level='log' Enter the following autovacuum parameters: autovacuum_max_workers autovacuum_vacuum_cost_limit autovacuum_vacuum_cost_delay Enter the following as other parameters: random_page_cost default_statistics_target shared_preload_libraries='pg_hint_plan, pg_stat_statements' Managing IP traffic using a security group In Amazon RDS and Aurora, the security group controls the traffic in and out of the instance. It controls both incoming and outgoing traffic by applying appropriate rules to the security group. For example, the following screenshot shows how you can allow PG traffic from your applications to the database via port 5432: Do not open your database to the world by using 0.0.0.0/0. Auditing the database log files The busier your database is, the higher the number of transactions. The more transactions, the more logs it generates. The more log files, the more complicated it becomes to extract specific information from those log files. Most DBAs review their log files as a last resort, but you should turn to them frequently for the ERROR, FATAL, WARNING, and HINTS messages they contain. It is vital to check and audit the log files regularly. When it becomes difficult to analyze the log files every day due to size, you can use pgBadger, which is available on GitHub. pgBadger is an open-source PostgreSQL log analyzing tool that generates HTML reports from your PostgreSQL log file. By default, RDS and Aurora instances retain logs for 3–7 days. Run custom bash scripts to download the log files locally or to an Amazon EC2 instance or an Amazon S3 bucket to maintain log files for a longer period. To install and generate pgBadger reports, complete the following steps: Sign in to the AWS Management Console and create one EC2 RHEL or CentOS instance. Download the pgdg repo on Amazon EC2. To install, enter the following code: sudo yum install ftp://ftp.pbone.net/mirror/apt.sw.be/redhat/7.3/en/i386/rpmforge/RPMS/perl-Text-CSV_XS-0.65-1.rh7.rf.i386.rpm perl perl-devel sudo yum install https://download.postgresql.org/pub/repos/yum/reporpms/EL-7-x86_64/pgdg-redhat-repo-latest.noarch.rpm sudo yum install pgbadger -y This post tested the preceding steps on RHEL 7 with pgdg-10 (PostgreSQL repo). To generate the report, complete the following steps: Download the PostgreSQL log files from Amazon RDS or Aurora to Amazon EC2 and run pgBadger. Enable the logging parameters in your DB parameter group. Schedule a cron job to download the log files to an appropriate location on Amazon EC2 and generate the pgBadger report. Download and convert your log files with the following code: #This Script helps to download the Postgres log files from cloud and store it on EC2. ## 1. Delete the logs and pgBadger reports older than 3 days. ## 2. Download the latest Postgres log from Amazon RDS instance: . ## 3. Generate the pgBadger report for newly downloaded log file. #create pgBadger dir under /home/ec2-user mkdir -p /home/ec2-user/pgBadger, # mkdir -p /home/ec2-user/pgBadger/logs , mkdir -p /home/ec2-user/pgBadger/reports #Use must install pgbadger and it should be in path. #Here is link for pgbadger installation: https://github.com/darold/pgbadger #Install awscli on EC2 instance set the env (https://docs.aws.amazon.com/cli/latest/topic/config-vars.html) # to download the log files. home_dir="/home/postgres/pgBadger" logDir="/home/postgres/pgBadger/logs" rptDir="/var/www/pgbadger" identifier='' date=`date -d "-1 days" +%Y-%m-%d` sudo find $logDir -name '*.log.*' -type f -mtime 0 -exec rm {} ; sudo find $rptDir -name 'postgresql*.html' -type f -mtime +10 -exec rm {} ; sudo mkdir -p $logDir/$date sudo chown -R postgres:postgres $logDir/$date #how to generate pgbadger report #Install pgbadger on EC2 . To install, follow the link: https://github.com/darold/pgbadger for i in `seq -w 00 23` do sudo aws rds download-db-log-file-portion --db-instance-identifier $identifier --log-file-name error/postgresql.log.$date-$i --starting-token 0 --output text > $logDir/$date/postgresql.log.$date-$i done if [ $? -eq 0 ] ; then sudo pgbadger --prefix '%t:%r:%u@%d:[%p]:' $logDir/$date/*.log.* -o $rptDir/postgresql.$date.html -f stderr #-f $logDir/*.log.* sudo chmod -R 777 $rptDir/postgresql.$date.html if [ $? -eq 0 ]; then #mailx -s "Successfully Generated the pgbadger report for Date: $date" echo "Successfully Generated the pgbadger report for Date: $date" else #mailx -s "UNSUCESSFUL GENERATION of pgbadger report for Date: $date" echo "Successfully Generated the pgbadger report for Date: $date" fi gzip -r9 $logDir/$date fi This script generates the pgbadger report that you can use to analyze the activities performed on the database. For a sample pgBadger report, see postgres_sample. Maintenance and management activities A remote database still requires maintenance. The following section discusses autovacuuming, the VACUUM ANALYZE command, and long-running queries and sessions. Autovacuuming Query slowness due to table or index bloat is one of the most common scenarios in PostgreSQL. Amazon RDS and Aurora enable autovacuuming by default to reduce this bloat. As you manage slowdown, keep the following in mind: Autovacuum holds a less-priority lock on the table. It might cancel its own job when another high-priority operation wants to acquire a lock on the table. The same table can become a candidate for repeated autovacuums, which causes other tables to remain bloated. Because these are the common scenarios in PostgreSQL, you should tune your autovacuum parameter properly. If tuning does not work, you must schedule a manual vacuum/analyze script. Based on the frequency of the bloat, you can decide whether to perform VACUUM ANALYZE, VACUUM FULL, or PG_REPACK. Scheduling VACUUM ANALYZE To keep the stats updated, remove bloat in reused space, and avoid the transaction wraparound, schedule VACUUM ANALYZE on your database. VACUUM removes the bloat and avoids transaction wraparound. ANALYZE helps to update the database stats, which helps the planner generate good plans for queries. Before you proceed, you should understand the differences between VACUUM ANALYZE, VACUUM FULL, and PG_REPACK. VACUUM ANALYZE – Removes the bloat from the tables and indexes and updates the tables’ statistics. This is a non-locking operation; you can run it at a table level or database level. It cleans the bloated pages but does not reclaim the space. VACUUM FULL – Writes the entire content of the table into a new disk file and releases the wasted space back to OS. This causes a table-level lock on the table and slow speeds. Avoid using VACUUM FULL on a high-load system. PG_REPACK – Writes the entire content of the table into a new disk file and releases the wasted space back to OS and does it online without holding the lock on the table. It is faster than VACUUM FULL, and Amazon Aurora and Amazon RDS support it as an extension. Instead of re-indexing or performing a VACUUM FULL, you should use PG_REPACK to back up. PG_REPACK is available as an extension in Amazon Aurora for PostgreSQL and Amazon RDS PostgreSQL. The following code calculates the bloat and extra space that bloated pages occupy: SELECT current_database(), schemaname, tblname, bs*tblpages AS real_size, (tblpages-est_tblpages)*bs AS extra_size, CASE WHEN tblpages - est_tblpages > 0 THEN 100 * (tblpages - est_tblpages)/tblpages::float ELSE 0 END AS extra_ratio, fillfactor, CASE WHEN tblpages - est_tblpages_ff > 0 THEN (tblpages-est_tblpages_ff)*bs ELSE 0 END AS bloat_size, CASE WHEN tblpages - est_tblpages_ff > 0 THEN 100 * (tblpages - est_tblpages_ff)/tblpages::float ELSE 0 END AS bloat_ratio, is_na -- , (pst).free_percent + (pst).dead_tuple_percent AS real_frag FROM ( SELECT ceil( reltuples / ( (bs-page_hdr)/tpl_size ) ) + ceil( toasttuples / 4 ) AS est_tblpages, ceil( reltuples / ( (bs-page_hdr)*fillfactor/(tpl_size*100) ) ) + ceil( toasttuples / 4 ) AS est_tblpages_ff, tblpages, fillfactor, bs, tblid, schemaname, tblname, heappages, toastpages, is_na -- , stattuple.pgstattuple(tblid) AS pst FROM ( SELECT ( 4 + tpl_hdr_size + tpl_data_size + (2*ma) - CASE WHEN tpl_hdr_size%ma = 0 THEN ma ELSE tpl_hdr_size%ma END - CASE WHEN ceil(tpl_data_size)::int%ma = 0 THEN ma ELSE ceil(tpl_data_size)::int%ma END ) AS tpl_size, bs - page_hdr AS size_per_block, (heappages + toastpages) AS tblpages, heappages, toastpages, reltuples, toasttuples, bs, page_hdr, tblid, schemaname, tblname, fillfactor, is_na FROM ( SELECT tbl.oid AS tblid, ns.nspname AS schemaname, tbl.relname AS tblname, tbl.reltuples, tbl.relpages AS heappages, coalesce(toast.relpages, 0) AS toastpages, coalesce(toast.reltuples, 0) AS toasttuples, coalesce(substring( array_to_string(tbl.reloptions, ' ') FROM 'fillfactor=([0-9]+)')::smallint, 100) AS fillfactor, current_setting('block_size')::numeric AS bs, CASE WHEN version()~'mingw32' OR version()~'64-bit|x86_64|ppc64|ia64|amd64' THEN 8 ELSE 4 END AS ma, 24 AS page_hdr, 23 + CASE WHEN MAX(coalesce(null_frac,0)) > 0 THEN ( 7 + count(*) ) / 8 ELSE 0::int END + CASE WHEN tbl.relhasoids THEN 4 ELSE 0 END AS tpl_hdr_size, sum( (1-coalesce(s.null_frac, 0)) * coalesce(s.avg_width, 1024) ) AS tpl_data_size, bool_or(att.atttypid = 'pg_catalog.name'::regtype) OR count(att.attname) <> count(s.attname) AS is_na FROM pg_attribute AS att JOIN pg_class AS tbl ON att.attrelid = tbl.oid JOIN pg_namespace AS ns ON ns.oid = tbl.relnamespace LEFT JOIN pg_stats AS s ON s.schemaname=ns.nspname AND s.tablename = tbl.relname AND s.inherited=false AND s.attname=att.attname LEFT JOIN pg_class AS toast ON tbl.reltoastrelid = toast.oid WHERE att.attnum > 0 AND NOT att.attisdropped AND tbl.relkind = 'r' GROUP BY 1,2,3,4,5,6,7,8,9,10, tbl.relhasoids ORDER BY 2,3 ) AS s ) AS s2 ) AS s3; You receive the following code as output: current_database | schemaname | tblname | real_size | extra_size | extra_ratio | fillfactor | bloat_size | bloat_ratio | is_na ------------------+--------------------+-------------------------+------------+------------+------------------+------------+------------+------------------+------- postgres | public | sample_table | 1565351936 | 239951872 | 15.3289408267611 | 100 | 239951872 | 15.3289408267611 | f To reclaim the space, run VACUUM FULL or PG_REPACK: Postgres# vacuum full analyze sample_table; After you run VACUUM FULL, the query returns something similar to the following output: current_database | schemaname | tblname | real_size | extra_size | extra_ratio | fillfactor | bloat_size | bloat_ratio | is_na ------------------+--------------------+-------------------------+-----------+------------+--------------------+------------+------------+--------------------+------- postgres | public | sample_table | 41746432 | 24576 | 0.0588697017268446 | 100 | 24576 | 0.0588697017268446 | f VACUUM FULL and re-indexing are locking operations that block other sessions, but PG_REPACK is an online method to reorganize the tables and indexes. You can query the pg_stat_all_tables and pg_stat_user_tables to check the last autovacuum or manual vacuum execution. For example, see the following code: SELECT schemaname,relname as table_name, last_vacuum, last_analyze, last_autovacuum, last_autoanalyze, n_live_tup,n_dead_tup from pg_stat_user_tables; You receive the following code as output: schemaname | table_name | last_vacuum | last_analyze | last_autovacuum | last_autoanalyze | n_live_tup | n_dead_tup ------------+-------------+-------------+--------------+-----------------+-------------------------------+------------+------------ public | vacuum_test | | | | 2019-01-23 06:44:56.257586+00 | 13671089 | 0 You can also use this code: SELECT schemaname, relname as table_name, last_vacuum, last_analyze, last_autovacuum, last_autoanalyze, n_live_tup, n_dead_tup from pg_stat_all_tables; You receive the following code as output: schemaname | table_name | last_vacuum | last_analyze | last_autovacuum | last_autoanalyze | n_live_tup | n_dead_tup --------------------+----------------+-------------------------------+-------------------------------+--------------------+------------------+------------+------------ information_schema | sql_sizing | 2019-01-23 07:05:06.524004+00 | 2019-01-23 07:05:06.52429+00 | | | 23 | 0 To run VACUUM ANALYZE on a table, enter the following code: Vacuum analyze ; To run VACUUM ANALYZE on the database, enter the following code: Vacuum analyze verbose; Only the superuser or database owner can run a vacuum on system tables. If substantial bloat in system tables causes performance degradation, or when you must free up bloated space to the disk, you must run VACUUM FULL. Only run this command outside of business hours, because it locks the tables on which it runs. To check the transactional age of the database, enter the following code: SELECT datname, age(datfrozenxid) from pg_database order by age(datfrozenxid) desc limit 20; To prevent transaction wraparound issues in the database, enter the following code: Vacuum freeze; The autovacuum process can also perform these activities, and it is highly recommended that you keep it enabled. Amazon RDS for PostgreSQL has autovacuuming enabled by default. Make sure that you tune the autovacuum parameters to best suit your requirements. In Amazon RDS, the parameter rds.adaptive_autovacuum helps automatically tune the autovacuum parameters whenever the database exceeds the transaction ID thresholds. Enter the following code to check if autovacuum is running in PostgreSQL version 9.6 and above: SELECT datname, usename, pid, waiting, current_timestamp - xact_start AS xact_runtime, query FROM pg_stat_activity WHERE upper(query) like '%VACUUM%' ORDER BY xact_start; Long-running queries and sessions To terminate queries that have run for a long time or are blocking another session, check the PID of the query from the pg_stat_activity table. To kill the query, run the following commands. To cancel the query without disconnecting the connection, enter the following code: SELECT pg_cancel_backend(pid); To terminate the connection and cancel all other queries in that connection, enter the following code: SELECT pg_terminate_backend(pid); To cancel the running queries, always use PG_CANCEL_BACKEND. If the query is stuck and locking other processes, you can use PG_TERMINATE_BACKEND. After termination, you might need to re-run the session again to establish the connection. Planning backup and recovery strategies Unlike on-premises databases, which require manual backup and recovery, Aurora for PostgreSQL and RDS PostgreSQL instances have built-in features to automate backups using snapshots. You must enable these during the creation of the Amazon RDS or Aurora instance. Amazon RDS creates a storage volume snapshot to back up the entire database instance. When you create a DB snapshot, you must identify which DB instance you want to back up, and then give your DB snapshot a name so you can restore from it later. The amount of time it takes to create a snapshot varies depends on the size of your databases. For more information, see Restoring from a DB Snapshot. User management User management is one of the most critical admin tasks, and you must perform it with utmost care. When you create a new Amazon RDS PostgreSQL or Aurora for PostgreSQL instance, it creates an RDS_SUPERUSER role. This is similar to the PostgreSQL user of a typical PostgreSQL instance, but with a few limitations. You can manage users that connect to the database by setting appropriate permission levels. In a default PostgreSQL environment, you can manage user connection through the pg_hba.conf file, but in Amazon RDS for PostgreSQL, you must use GRANT/REVOKE. You can also assign access and privileges to users at a schema level or table level. You can decide on what kind of privileges you want to provide to the users. For more information, see Managing PostgreSQL users and roles. Monitoring the database Monitoring is an integral part of maintaining the reliability, availability, and performance of Amazon RDS and your AWS solutions. Collect monitoring data from all the parts of your AWS solution so that you can debug a multi-point failure if one occurs. One of the major tasks is to set up a detailed level of monitoring for your Amazon RDS and Aurora instances. Amazon Aurora and Amazon RDS offer two types of monitoring by default: Amazon CloudWatch and Amazon RDS Performance Insights. Monitoring with CloudWatch CloudWatch offers the following metrics available for Amazon RDS and Aurora PostgreSQL: High CPU or RAM consumption Disk space consumption Network traffic Database connections IOPS metrics Maximum Used Transaction IDs Queue Depth For more information, see Monitoring Amazon Aurora DB Cluster Metrics. CloudWatch has many metrics available to monitor the health of the Amazon RDS and Aurora instances at the hardware level. However, you must configure Amazon SNS (alarm) on each metric. Monitoring with Performance Insights Amazon RDS Performance Insights employs lightweight data collection methods without impacting the performance of your applications to tune the database for performance. Performance Insights offers the following metrics: OS metrics: CPU Utilization – Wait, Idle, Steal, Nice Disk I/O – Read KbPS, Write IOsPS Load Average Swap – Cached, Free, Total Database metrics: Cache – blocks hit, buffers allocated Checkpoint – Checkpoint timed, buffers checkpoint, checkpoint write latency For more information, see Performance Insights for Amazon RDS for PostgreSQL. Summary This post shared a few common administrator responsibilities on Amazon RDS and Aurora for PostgreSQL databases. This provides a basic framework that you can implement on your test and production workloads. The post also highlights logging and log auditing for better management of the instances. If you have questions or comments about this post, post your thoughts in the comments. About the Author John Solomon is a Consultant with AWS Global Competency Center India, working closely with customers who are migrating from on-premises to the AWS Cloud. He is an AWS certified speaker and speaks at various meetups, breakout sessions, webinars, etc. He is an ardent member of the PostgreSQL community and works as a database administrator for PostgreSQL databases. https://probdm.com/site/MjI4MDE
0 notes
Link
New to Kali Linux ? or to Linux world at all ... welcome to this new experience i'm sure you will enjoy once you start to try ... and why not to try over and over we are learning at end and this is the most Important part of it, commands and commands almost everything in Linux need a command we are not in Windows to click we are in Linux to write! so here is a list for some of the basic commands for Kali Linux
If you are looking for Linux Chart Sheet Check this post
lets start with details of commands : 1.Command: ls The command “ls” stands for (List Directory Contents), List the contents of the folder, be it file or folder, from which it runs. The most common options are -a (all files) and -l (long or details) Tab completion is supported and may be configured with .inputrc When output to file the files are listed one per line. By default, colour is not used to distinguish types of files. That is equivalent to using --color=none. Using the --color option without the optional WHEN argument is equivalent to using --color=always. With --color=auto, color codes are output only if standard output is connected to a terminal (tty).
ls
A.Command “ls -a“, list the content of folder, including hidden files the hidden files is colored blue 2. Command: lsblk The “lsblk” stands for (List Block Devices), print block devices by their assigned name (but not RAM) on the standard output in a tree-like fashion.
lsblk
The “lsblk -l” command list block devices in ‘list‘ structure (not tree like fashion). Note: lsblk is very useful and easiest way to know the name of New Usb Device you just plugged in, especially when you have to deal with disk/blocks in terminal. 3. Command: sudo he “sudo” (super user do) command allows a permitted user to execute a command as the superuser or another user, as specified by the security policy in the sudoers list.
1sudo add-apt-repository ppa:tualatrix/ppa
Note: sudo allows user to borrow superuser privileged, while a similar command ‘su‘ allows user to actually log in as superuser. Sudo is safer than su. It is not advised to use sudo or su for day-to-day normal use, as it can result in serious error if accidentally you did something wrong, that’s why a very popular saying in Linux community is: “To err is human, but to really foul up everything, you need root password.” 4. Command: mkdir The “mkdir” (Make directory) command create a new directory with name path. However is the directory already exists, it will return an error message “cannot create folder, folder already exists”.
1 mkdir Kalitut
Note: Directory can only be created inside the folder, in which the user has write permission. mkdir: cannot create directory `Kalitut‘: File exists (Don’t confuse with file in the above output, you might remember what i said at the beginning – In Linux every file, folder, drive, command, scripts are treated as file). 5.Command: chmod The Linux “chmod” command stands for (change file mode bits). chmod changes the file mode (permission) of each given file, folder, script, etc.. according to mode asked for. There exist 3 types of permission on a file (folder or anything but to keep things simple we will be using file).
123Read (r)=4 Write(w)=2 Execute(x)=1
So if you want to give only read permission on a file it will be assigned a value of ‘4‘, for write permission only, a value of ‘2‘ and for execute permission only, a value of ‘1‘ is to be given. For read and write permission 4+2 = ‘6‘ is to be given, ans so on. Now permission need to be set for 3 kinds of user and usergroup. The first is owner, then usergroup and finally world.
1rwxr-x--x abc.sh
Here the root’s permission is rwx (read, write and execute). usergroup to which it belongs, is r-x (read and execute only, no write permission) and for world is –x (only execute). To change its permission and provide read, write and execute permission to owner, group and world.
1chmod 777 abc.sh
only read and write permission to all three.
1chmod 666 abc.sh
read, write and execute to owner and only execute to group and world.
1chmod 711 abc.sh
Note: one of the most important command useful for sysadmin and user both. On a multi-user environment or on a server, this command comes to rescue, setting wrong permission will either makes a file inaccessible or provide unauthorized access to someone. 6.Command: tar The “tar” command is a Tape Archive is useful in creation of archive, in a number of file format and their extraction.
123 tar -zxvf abc.tar.gz (Remember 'z' for .tar.gz) tar -jxvf abc.tar.bz2 (Remember 'j' for .tar.bz2) tar -cvf archieve.tar.gz(.bz2) /path/to/folder/abc
Note: A ‘tar.gz‘ means gzipped. ‘tar.bz2‘ is compressed with bzip which uses a better but slower compression method. 7. Command: cp The “copy” stands for (Copy), it copies a file from one location to another location.
1cp /home/user/Downloads abc.tar.gz /home/user/Desktop
Note: cp is one of the most commonly used command in shell scripting and it can be used with wildcard characters (Describe in the above block), for customised and desired file copying. 8. Command: mv The “mv” command moves a file from one location to another location.
1mv /home/user/Downloads abc.tar.gz /home/user/Desktop
Note: mv command can be used with wildcard characters. mv should be used with caution, as moving of system/unauthorised file may lead to security as well as breakdown of system. 9.Command: pwd The command “pwd” (print working directory), prints the current working directory with full path name from terminal.
1 pwd /home/user/Desktop
Note: This command won’t be much frequently used in scripting but it is an absolute life saver for newbie who gets lost in terminal in their early connection with nux. (Linux is most commonly referred as nux or nix). 10. Command: cd Finally, the frequently used “cd” command stands for (change directory), it change the working directory to execute, copy, move write, read, etc. from terminal itself.
123 cd /home/user/Desktop pwd /home/user/Desktop
Note: cd comes to rescue when switching between directories from terminal. “Cd ~” will change the working directory to user’s home directory, and is very useful if a user finds himself lost in terminal. “Cd ..” will change the working directory to parent directory (of current working directory). Now i will leave you with few more commends File Operations: pwd Print Name Of Current/Working Directory The pwd is an acronym for print working directory. The pwd command is considered as one of the most frequently used commands on Linux, AIX, HP-UX, *BSD, and other UNIX like operating systems along with the ls, and cd commands. It can be used for the following purposes under Apple OS X or UNIX or Linux operating systems: => Find the full path to the current directory. => Store the full path to the current directory in the shell variable. => Verify the absolute path. => Verify the physical path i.e exclude . cd Changing The Working Directory cp Copy Files Or Directory rm Remove Files And Directory ls List Of Directory Contents mkdir Make Directory cat Concatenate Files And Print On Standard Output mv Move Files chmod Change Files Permissions Know Your System uname Print System Information who Show Who Is Logged On cal Displays Calculator date Print System Date And Time df Report File System Disk Space Usage du Estimate File Space Usage ps Displays Information Of Current Active Processes kill Allows To Kills Process clear Clear The Terminal Screen cat /proc/cpuinfo Cpuinfo Display CPU Information cat /proc/meminfo Display Memory Information Compression tar Store and Extract Files From An Archive File gzip Compress Or Decompress Named Files Network ifconfig To Config Network Interface ping Check Other System are reachable from The Host System wget Download Files From Network ssh Remote Login Program ftp Download/Upload Files From/To Remote System last Displays List Of Last Logged In User telnet Used To Communicate With Another Host Using THe Telnet Protocol Searching Files grep Search Files(s) For Specific Text find Search For Files In A Directory Hierarchy locate Find Files By Name
0 notes
Text
Apagar el sistema de forma automática después de un tiempo

Apagar el sistema de forma automática después de un tiempo definido, con un script bash. Hoy vemos un sencillo script bash, que nos permite apagar el sistema transcurrido el tiempo que nosotros mismos hayamos definido. Parece una tontería de script, pero te aseguro que no lo es. Por ejemplo... lo puedes usar para que se apague el sistema cuando calcules que termino una tarea, también es realmente útil para controlar el tiempo que puede estar un niño/a enganchado a internet. En fin sus objetivos son muchos. Ayúdanos a crecer, vota por SoloLinux en la siguiente encuesta. Gracias por colaborar. Apagar el sistema de forma automática Creamos el script bash. sudo nano apagar.sh Copia y pega el siguiente código. En la línea "TIMELIMIT" puedes definir el tiempo que transcurrirá desde que se ejecute el script, hasta su apagado total (en minutos). #!/bin/bash # Puedes definir un crontab: # */1 * * * * /root/bin/apagar.sh TIMELIMIT=120 # Equivale a 120 minutos. CUR_DIR=$( dirname $( readlink -e "$0" )) TIMECURRENT=$CUR_DIR/log/$( date +%Y.%m.%d ).log echo "1" >> $TIMECURRENT ALLTIME=$( wc -l $TIMECURRENT | cut -d" " -f1 ) ] && /sbin/shutdown -h now Guarda el script y cierra el editor. Le concedes los permisos requeridos. chmod u+x apagar.sh Ya lo tienes listo para operar, disfrútalo. Read the full article
0 notes
Link
Permissions Calculator provides a straight forward way to work out how to change permissions with the chmod command.
This is cool.
0 notes
Photo

New Post has been published on https://www.techy360.com/2017/11/29/linux-bash-script-step-step-guide/
Linux Bash Script Step By Step Guide , You Will Love It
Today we are going to talk about bash scripting or shell scripting and how to write your first bash script. Actually, they are called shell scripts in general, but we are going to call them bash scripts because we are going to use bash among the other Linux shells.
There are zsh, tcsh, ksh and other shells.
In the previous posts, we saw how to use the bash shell and how to use Linux commands.
The concept of a bash script is to run a series of Commands to get your job done.
To run multiple commands in a single step from the shell, you can type them on one line and separate them with semicolons.
pwd ; whoami
Actually, this is a bash script!!
The pwd command runs first, displaying the current working directory then the whoami command runs to show the currently logged in users.
You can run multiple commands as much as you wish, but with a limit. You can determine your max args using this command.
getconf ARG_MAX
Well, What about putting the commands into a file, and when we need to run these commands we run that file only. This is called a bash script.
First, make a new file using the touch command. At the beginning of any bash script, we should define which shell we will use because there are many shells on Linux, bash shell is one of them.
Bash Script Shebang
The first line you type when writing a bash script is the (#!) followed by the shell you will use.
#! <=== this sign is called shebang. #!/bin/bash
If you use the pound sign (#) in front of any line in your bash script, this line will be commented which means it will not be processed, but, the above line is a special case . This line defines what shell we will use, which is bash shell in our case.
The shell commands are entered one per line like this:
#!/bin/bash # This is a comment pwd whoami
You can type multiple commands on the same line but you must separate them with semicolons, but it is preferable to write commands on separate lines, this will make it simpler to read later.
Set Script Permission
After writing your bash script, save the file.
Now, set that file to be executable, otherwise, it will give you permissions denied. You can review how to set permissions using chmod command.
chmod +x ./myscript
Then try run it by just typing it in the shell:
./myscript
And Yes, it is executed.
Print Messages
As we know from other posts, printing text is done by echo command.
Edit our file and type this:
#!/bin/bash # our comment is here echo "The current directory is:" pwd echo "The user logged in is:" whoami
Perfect! Now we can run commands and display text using echo command.
If you don’t know echo command or how to edit a file I recommend you to view previous articles about basic Linux commands
Using Variables
Variables allow you to store information to use it in your script.
You can define 2 types of variables in your bash script:
Environment variables
User variables
Environment Variables
Sometimes you need to interact with system variables, you can do this by using environment variables.
#!/bin/bash # display user home echo "Home for the current user is: $HOME"
Notice that we put the $HOME system variable between double quotations, and it prints the home variable correctly.
What if we want to print the dollar sign itself?
echo "I have $1 in my pocket"
Because variable $1 doesn’t exist, it won’t work. So how to overcome that?
You can use the escape character which is the backslash before the dollar sign like this:
echo "I have $1 in my pocket"
Now it works!!
User Variables
Also, you can set and use your custom variables in the script.
You can call user variables in the same way like this:
#!/bin/bash
# User variables grade=5 person="Adam" echo "$person is a good boy, he is in grade $grade" chmod +x myscript ./myscript
Command Substitution
You can extract information from the result of a command using command substitution.
You can perform command substitution with one of the following methods:
The backtick character (`).
The $() format.
Make sure when you type backtick character, it is not the single quotation mark.
You must enclose the command with two backticks like this:
mydir=`pwd`
Or the other way:
mydir=$(pwd)
So the script could be like this:
#!/bin/bash mydir=$(pwd) echo $mydir
The output of the command will be stored in mydir variable.
Math calculation
You can perform basic math calculations using $(( 2 + 2 )) format:
#!/bin/bash var1=$(( 5 + 5 )) echo $var1 var2=$(( $var1 * 2 )) echo $var2
Just that easy.
if-then-else Statement
The if-then-else statement takes the following structure:
if command then do something else do another thing fi
If the first command runs and returns zero; which means success, it will not hit the commands after the else statement, otherwise, if the if statement returns non-zero; which means the statement condition fails, in this case, the shell will hit the commands after else statement.
#!/bin/bash user=anotherUser if grep $user /etc/passwd then echo "The user $user Exists" else echo "The user $user doesn’t exist" fi
We are doing good till now, keep moving.
Now, what if we need more else statements.
Well, that is easy, we can achieve that by nesting if statements like this:
if condition1 then commands elif condition2 then commands fi
If the first command return zero; means success, it will execute the commands after it, else if the second command return zero, it will execute the commands after it, else if none of these return zero, it will execute the last commands only.
#!/bin/bash user=anotherUser if grep $user /etc/passwd then echo "The user $user Exists" elif ls /home then echo "The user doesn’t exist" fi
You can imagine any scenario here, maybe if the user doesn’t exist, create a user using the useradd command or do anything else.
Numeric Comparisons
You can perform a numeric comparison between two numeric values using numeric comparison checks like this:
number1 -eq number2 Checks if number1 is equal to number2.
number1 -ge number2 Checks if number1 is bigger than or equal number2.
number1 -gt number2 Checks if number1 is bigger than number2.
number1 -le number2 Checks if number1 is smaller than or equal number2.
number1 -lt number2 Checks if number1 is smaller than number2.
number1 -ne number2 Checks if number1 is not equal to number2.
As an example, we will try one of them and the rest is the same.
Note that the comparison statement is in square brackets as shown.
#!/bin/bash num=11 if [ $num -gt 10] then echo "$num is bigger than 10" else echo "$num is less than 10" fi
The num is greater than 10 so it will run the first statement and prints the first echo.
String Comparisons
You can compare strings with one of the following ways:
string1 = string2 Checks if string1 identical to string2.
string1 != string2 Checks if string1 is not identical to string2.
string1 < string2 Checks if string1 is less than string2.
string1 > string2 Checks if string1 is greater than string2.
-n string1 Checks if string1 longer than zero.
-z string1 Checks if string1 is zero length.
We can apply string comparison on our example:
#!/bin/bash user ="Hello" if [$user = $USER] then echo "The user $user is the current logged in user" fi
One tricky note about the greater than and less than for string comparisons, they MUST be escaped with the backslash because if you use the greater-than symbol only, it shows wrong results.
So you should do it like that:
#!/bin/bash v1=text v2="another text" if [ $v1 > "$v2" ] then echo "$v1 is greater than $v2" else echo "$v1 is less than $v2" fi
It runs but it gives this warning:
./myscript: line 5: [: too many arguments
To fix it, wrap the $vals with a double quotation, forcing it to stay as one string like this:
#!/bin/bash v1=text v2="another text" if [ $v1 > "$v2" ] then echo "$v1 is greater than $v2" else echo "$v1 is less than $v2" fi
One important note about greater than and less than for string comparisons. Check the following example to understand the difference:
#!/bin/bash v1=Hello v2=Hello if [ $v1 > $v2 ] then echo "$v1 is greater than $v2" else echo "$v1 is less than $v2" fi
sort myfile Hello Hello
The test condition considers the lowercase letters bigger than capital letters. Unlike the sort command which does the opposite.
The test condition is based on the ASCII order, while the sort command is based on the numbering orders from the system settings.
File Comparisons
You can compare and check for files using the following operators:
-d my_file Checks if its a folder.
-e my_file Checks if the file is available.
-f my_file Checks if its a file.
-r my_file Checks if it’s readable.
my_file –nt my_file2 Checks if my_file is newer than my_file2.
my_file –ot my_file2 Checks if my_file is older than my_file2.
-O my_file Checks if the owner of the file and the logged user match.
-G my_file Checks if the file and the logged user have the idetical group.
As they imply, you will never forget them.
Let’s pick one of them and take it as an example:
#!/bin/bash mydir=/home/Hello if [ -d $mydir ] then echo "Directory $mydir exists" cd $mydir ls else echo "NO such file or directory $mydir" fi
We are not going to type every one of them as an example. You just type the comparison between the square brackets as it is and complete you script normally.
There are some other advanced if-then features but let’s make it in another post.
That’s for now. I hope you enjoy it and keep practicing more and more.
Thank you.
0 notes
Text
find Linux Command
find
find [pathnames] [conditions]
An extremely useful command for finding particular groups of files (numerous examples follow this description). find descends the directory tree beginning at each pathname and locates files that meet the specified conditions. The default pathname is the current directory. The most useful conditions include -name and -type (for general use), -exec and -size (for advanced use), and -mtime and -user (for administrators). Conditions may be grouped by enclosing them in \( \) (escaped parentheses), negated with !, given as alternatives by separating them with -o, or repeated (adding restrictions to the match; usually only for -name, -type, or -perm). Note that "modification" refers to editing of a file's contents, whereas "change" means a modification, or permission or ownership changes. In other words, -ctime is more inclusive than -atime or -mtime.
Conditions and actions
-amin +n| -n| n Find files last accessed more than n (+n), less than n (-n), or exactly n minutes ago. -anewer file Find files that were accessed after file was last modified. Affected by -follow when after -follow on the command line. -atime +n| -n| n Find files that were last accessed more than n (+n), less than n (-n), or exactly n days ago. Note that find changes the access time of directories supplied as pathnames. -cmin +n| -n| n Find files last changed more than n (+n), less than n (-n), or exactly n minutes ago. -cnewer file Find files that were changed after they were last modified. Affected by -follow when after -follow on the command line. -ctime +n| -n| n Find files that were changed more than n (+n), less than n (-n), or exactly n days ago. A change is anything that changes the directory entry for the file, such as a chmod. -daystart Calculate times from the start of the day today, not 24 hours ago. -depth Descend the directory tree, skipping directories and working on actual files first, and then the parent directories. Useful when files reside in unwritable directories (e.g., when using find with cpio). -empty Continue if file is empty. Applies to regular files and directories. -exec command{ } \ ; Run the Linux command, from the starting directory on each file matched by find (provided command executes successfully on that file—i.e., returns a 0 exit status). When command runs, the argument { } substitutes the current file. Follow the entire sequence with an escaped semicolon (\;). In some shells, the braces may need to be escaped as well. -false Return false value for each file encountered. -follow Follow symbolic links and track the directories visited (don't use with -type l). -fstype type Match files only on type filesystems. Acceptable types include minix, ext, ext2, xia, msdos, umsdos, vfat, proc, nfs, iso9660, hpfs, sysv, smb, and ncpfs. -gid num Find files with numeric group ID of num. -group gname Find files belonging to group gname. gname can be a group name or a group ID number. -ilname pattern A case-insensitive version of -lname. -iname pattern A case-insensitive version of -name. -inum n Find files whose inode number is n. -ipath pattern A case-insensitive version of -path. -iregex pattern A case-insensitive version of -regex. -links n Find files having n links. -lname pattern Search for files that are symbolic links, pointing to files named pattern. pattern can include shell metacharacters and does not treat / or . specially. The match is case-insensitive. -maxdepth num Do not descend more than num levels of directories. -mindepth num Begin applying tests and actions only at levels deeper than num levels. -mmin +n| -n| n Find files last modified more than n (+n), less than n (-n), or exactly n minutes ago. -mount, -xdev Search only for files that reside on the same filesystem as pathname. -mtime +n| -n| n Find files that were last modified more than n (+n), less than n (-n), or exactly n days ago. A modification is a change to a file's data. -name pattern Find files whose names match pattern. Filename metacharacters may be used but should be escaped or quoted. -newer file Find files that were modified more recently than file; similar to -mtime. Affected by -follow only if it occurs after -follow on the command line. -nogroup The file's group ID does not correspond to any group. -noleaf Normally, find assumes that each directory has at least two hard links that should be ignored (a hard link for its name and one for "."--i.e., two fewer "real" directories than its hard link count indicates). -noleaf turns off this assumption, a useful practice when find runs on non-Unix-style filesystems. This forces find to examine all entries, assuming that some might prove to be directories into which it must descend (a time-waster on Unix). -nouser The file's user ID does not correspond to any user. -ok command { }\; Same as -exec, but prompts user to respond with y before command is executed. -path pattern Find files whose names match pattern. Expect full pathnames relative to the starting pathname (i.e., do not treat / or . specially). -perm nnn Find files whose permission flags (e.g., rwx) match octal number nnn exactly (e.g., 664 matches -rw-rw-r--). Use a minus sign before nnn to make a "wildcard" match of any unspecified octal digit (e.g., -perm -600 matches -rw-******, where * can be any mode). -print Print the matching files and directories, using their full pathnames. Return true. This is the default behavior. -regex pattern Like -path, but uses grep-style regular expressions instead of the shell-like globbing used in -name and -path. -size n[c] Find files containing n blocks, or if c is specified, n characters long. -type c Find files whose type is c. c can be b (block special file), c (character special file), d (directory), p (fifo or named pipe), l (symbolic link), s (socket), or f (plain file). -user user Find files belonging to user (name or ID).
Examples
List all files (and subdirectories) in your home directory: find $HOME -print List all files named chapter1 in the /work directory: find /work -name chapter1 List all files beginning with memo owned by ann: find /work -name 'memo*' -user ann -print Search the filesystem (begin at root) for manpage directories: find / -type d -name 'man*' -print Search the current directory, look for filenames that don't begin with a capital letter, and send them to the printer: find . \! -name '[A-Z] *' -exec lpr { }\; Find and compress files whose names don't end with .gz: gzip `find . \! -name '*.gz' -print` Remove all empty files on the system (prompting first): find / -size 0 -ok rm { } \; Search the system for files that were modified within the last two days (good candidates for backing up): find / -mtime -2 -print Recursively grep for a pattern down a directory tree: find /book -print | xargs grep '[Nn] utshell' If the files kt1 and kt2 exist in the current directory, their names can be printed with the command: $ find . -name 'kt[0-9] ' ./kt1 ./kt2 Since the command prints these names with an initial ./ path, you need to specify the ./ when using the -path option: $ find . -path './kt[0-9] ' ./kt1 ./kt2 The -regex option uses a complete pathname, like -path, but treats the following argument as a regular expression rather than a glob pattern (although in this case the result is the same): $ find . -regex './kt[0-9] ' ./kt1 ./kt2
from Java Tutorials Corner http://ift.tt/2w9k32V via IFTTT
0 notes
Text
This CHMOD Calculator Makes Creating CHMOD Commands a Cakewalk
Every web server has a form of CHMOD which stands for change mode. It lets you change the permissions of any given folder/file, based on each user in the system. CHMOD is one of the main reasons that all developers should learn the command line. It’s a huge part of website maintenance and working on […]
The post This CHMOD Calculator Makes Creating CHMOD Commands a Cakewalk appeared first on 3MS News.
from 3MS News http://www.news.3ms.website/this-chmod-calculator-makes-creating-chmod-commands-a-cakewalk/
0 notes