#convert key format OpenSSL
Explore tagged Tumblr posts
Visit Tumblr Blog
Explore Tumblr blogs with no restrictions, modern design and the best experience.
Last Seen Tumblr Blogs


Fun Fact
Tumblr was the first site to host the blog for President Barack Obama in 2011.
Text
How to Install OpenSSL on Windows Computers
In this article, we shall discuss how to Install OpenSSL on Windows Computers. OpenSSL is an open-source command-line tool that is used to generate the SSL certificate and private key and is available in both versions 32 and 64 bit. Please see How to fix Windows Update Fails with Error 0x80092004, how to Fix the Port used for the Virtualhost is not an Apache Listen Port, and Shell Scripting: How…
#convert key format OpenSSL#convert PEM to DER OpenSSL#extract public key OpenSSL#generate private public key OpenSSL#how to use OpenSSL on Windows#install OpenSSL Windows#Microsoft Windows#OpenSSL installation#OpenSSL key conversion#OpenSSL key generation tutorial#OpenSSL key management#OpenSSL public key extraction#OpenSSL Windows#OpenSSL Windows installation steps#Windows#Windows 10#Windows 11#Windows OpenSSL setup#Windows Server#Windows Server 2012#Windows Server 2016#Windows Server 2019#Windows Server 2022
1 note
·
View note
Text
Encryption and Information Security

As our lives and businesses become increasingly digital, protecting sensitive information has never been more critical. Encryption and information security play a vital role in safeguarding data from unauthorized access, cyberattacks, and data breaches. This post explores the fundamentals of encryption, security strategies, and how developers can implement protection in their applications.
What is Encryption?
Encryption is the process of converting readable data (plaintext) into an unreadable format (ciphertext) using an algorithm and a key. Only those with the correct key can decrypt and access the original data.
Types of Encryption
Symmetric Encryption: Uses the same key for encryption and decryption (e.g., AES, DES).
Asymmetric Encryption: Uses a public key to encrypt and a private key to decrypt (e.g., RSA, ECC).
Hashing: Converts data into a fixed-length string; used for data verification, not reversible (e.g., SHA-256).
Common Use Cases
Securing communications (HTTPS, email)
Protecting stored data (databases, files)
User authentication and password protection
Digital signatures and certificates
Secure financial transactions and blockchain
Basic Encryption Example in Python (AES)
from Crypto.Cipher import AES import base64 key = b'ThisIsASecretKey' # 16 bytes cipher = AES.new(key, AES.MODE_EAX) nonce = cipher.nonce ciphertext, tag = cipher.encrypt_and_digest(b'Confidential Data') print("Encrypted:", base64.b64encode(ciphertext))
What is Information Security?
Information security (InfoSec) is the practice of preventing unauthorized access, use, disclosure, disruption, or destruction of data. It includes policies, practices, and technologies to protect digital and physical assets.
Pillars of Information Security (CIA Triad)
Confidentiality: Ensures data is accessible only to authorized users.
Integrity: Ensures data remains accurate and unaltered.
Availability: Ensures data and services are accessible when needed.
Best Practices for Developers
Use HTTPS and SSL/TLS for data transmission
Encrypt sensitive data in databases and files
Use secure password hashing (e.g., bcrypt, Argon2)
Regularly update and patch software dependencies
Implement access control and user authentication
Log and monitor activity for anomalies
Popular Tools and Libraries
OpenSSL: Toolkit for SSL/TLS encryption
PyCryptodome: Cryptographic library for Python
GnuPG: Open-source encryption tool for emails and files
OWASP ZAP: Security testing tool for web applications
Compliance and Legal Considerations
Follow regulations like GDPR, HIPAA, and PCI-DSS
Use encryption standards approved by NIST
Be transparent with users about data collection and protection
Conclusion
Encryption and information security are essential components of any modern software system. Whether you're a developer or a tech-savvy user, understanding how to protect data can help prevent devastating cyber incidents. Start applying encryption techniques and InfoSec principles to make your applications and digital life more secure.
0 notes
Text
does bitdefender encrypt vpn
🔒🌍✨ Get 3 Months FREE VPN - Secure & Private Internet Access Worldwide! Click Here ✨🌍🔒
does bitdefender encrypt vpn
Bitdefender VPN encryption
Bitdefender VPN employs top-notch encryption protocols to ensure the utmost security and privacy for its users. Encryption is the process of converting data into a code to prevent unauthorized access. In the case of Bitdefender VPN, it utilizes advanced encryption algorithms to safeguard your online activities, such as AES (Advanced Encryption Standard) with 256-bit keys.
AES 256-bit encryption is widely recognized as one of the most secure encryption standards available today. It utilizes a complex mathematical algorithm to scramble data into a format that is practically impossible for unauthorized parties to decipher without the correct decryption key. This means that even if hackers or cybercriminals intercept your data while it's being transmitted over the internet, they won't be able to make sense of it.
Bitdefender VPN also incorporates additional security features such as tunneling protocols like OpenVPN, IKEv2/IPSec, and WireGuard, which further enhance the protection of your online communications. These protocols establish secure connections between your device and the VPN server, ensuring that your data remains encrypted and secure throughout the entire transmission process.
By encrypting your internet traffic with Bitdefender VPN, you can browse the web, stream content, and communicate online with the peace of mind knowing that your sensitive information is shielded from prying eyes. Whether you're accessing public Wi-Fi networks, conducting online banking transactions, or simply browsing social media, Bitdefender VPN's robust encryption measures help keep your digital footprint secure and your personal data private.
VPN encryption protocols
VPN encryption protocols are crucial components of ensuring online security and privacy. These protocols establish the framework for how data is encrypted and transmitted over a virtual private network (VPN), safeguarding it from unauthorized access or interception. Here are some common VPN encryption protocols used today:
OpenVPN: Widely regarded as one of the most secure protocols, OpenVPN utilizes OpenSSL encryption library and supports various cryptographic algorithms. Its open-source nature allows for regular security audits and updates, making it a popular choice for both personal and enterprise VPN solutions.
IPsec (Internet Protocol Security): IPsec operates at the network layer of the OSI model and offers robust encryption and authentication mechanisms. It can be implemented in tunnel mode for VPNs, providing confidentiality, integrity, and authenticity of data packets.
L2TP/IPsec (Layer 2 Tunneling Protocol/IPsec): L2TP/IPsec combines the advantages of L2TP and IPsec, offering both tunneling and encryption/authentication capabilities. While it provides strong security, it may not be as fast as other protocols due to the double encapsulation process.
IKEv2 (Internet Key Exchange version 2): Known for its speed and stability, IKEv2 automatically re-establishes the VPN connection if the connection is interrupted, making it ideal for mobile devices. It supports strong encryption algorithms and is widely supported on various platforms.
WireGuard: A relatively new protocol gaining popularity for its simplicity and performance. WireGuard aims to be lean and efficient while still providing strong security through modern cryptographic techniques.
When choosing a VPN service, it's essential to consider the encryption protocol it employs, as well as other security features such as kill switches and DNS leak protection, to ensure your online activities remain private and secure.
Bitdefender VPN security features
Bitdefender VPN is a powerful tool designed to ensure your online safety and privacy while browsing the internet. With its robust security features, Bitdefender VPN offers users a secure and encrypted connection that helps protect their sensitive data from hackers, cybercriminals, and other malicious third parties.
One of the key security features of Bitdefender VPN is its military-grade encryption. By using advanced encryption protocols like OpenVPN, IPSec, and IKEv2, Bitdefender VPN encrypts all data transmitted between your device and the internet, making it nearly impossible for anyone to intercept or decipher your online activities.
Additionally, Bitdefender VPN includes a kill switch feature that helps protect your privacy in case your VPN connection drops unexpectedly. The kill switch automatically shuts down your internet connection if the VPN connection is lost, preventing your data from being exposed to prying eyes.
Moreover, Bitdefender VPN offers DNS leak protection, which ensures that your internet service provider (ISP) cannot see which websites you visit, further enhancing your online privacy. By routing your DNS queries through the VPN server, Bitdefender VPN helps prevent any leakage of sensitive information.
Furthermore, Bitdefender VPN operates under a strict no-logs policy, meaning that it does not track, store, or share any of your online activities. This commitment to user privacy ensures that your browsing history, connection logs, and IP addresses remain confidential and secure.
In conclusion, Bitdefender VPN is a reliable and feature-rich solution for individuals looking to safeguard their online security and privacy. With its strong encryption, kill switch, DNS leak protection, and no-logs policy, Bitdefender VPN offers a comprehensive set of security features to keep your data safe while browsing the web.
Data encryption in Bitdefender VPN
Data encryption in Bitdefender VPN
Bitdefender VPN offers robust data encryption to ensure the privacy and security of your online activities. With the proliferation of cyber threats and privacy concerns, the importance of encryption cannot be overstated, especially when accessing sensitive information over public Wi-Fi networks or while traveling.
Bitdefender VPN employs AES (Advanced Encryption Standard) with 256-bit encryption, which is recognized as one of the most secure encryption algorithms available today. This level of encryption ensures that your data is protected against unauthorized access, interception, and eavesdropping by hackers or malicious entities.
When you connect to the internet through Bitdefender VPN, all of your data traffic is encrypted before it leaves your device. This means that even if someone were to intercept your data packets, they would appear as unintelligible gibberish without the encryption key. This significantly reduces the risk of data breaches and identity theft, providing you with peace of mind while browsing the web, accessing online banking services, or communicating with others.
Additionally, Bitdefender VPN employs secure tunneling protocols such as OpenVPN and IKEv2/IPsec to further enhance the security of your connections. These protocols establish a secure tunnel between your device and the VPN server, preventing third parties from monitoring your online activities or tampering with your data.
Moreover, Bitdefender VPN operates on a strict no-logs policy, meaning that it does not store any information about your browsing history, DNS queries, or connection logs. This further ensures your privacy and anonymity online, as there is no trail of your online activities for anyone to follow.
In conclusion, data encryption in Bitdefender VPN provides a crucial layer of protection for your online privacy and security. By encrypting your data traffic with AES 256-bit encryption and employing secure tunneling protocols, Bitdefender VPN safeguards your sensitive information from prying eyes and cyber threats, allowing you to browse the internet with confidence.
Bitdefender VPN encryption strength
Bitdefender VPN offers robust encryption to ensure the security and privacy of users' online activities. Encryption strength is a critical aspect of any VPN service, as it determines the level of protection for data transmitted over the internet.
Bitdefender VPN utilizes military-grade encryption protocols to safeguard users' data from unauthorized access and interception. It employs AES (Advanced Encryption Standard) with 256-bit encryption, which is widely recognized as one of the most secure encryption methods available. AES 256-bit encryption is used by governments, financial institutions, and security experts worldwide due to its strength and reliability.
With AES 256-bit encryption, all data transmitted through Bitdefender VPN is converted into complex code that is nearly impossible for hackers or eavesdroppers to decipher. This encryption ensures that sensitive information such as passwords, financial transactions, and personal communications remain confidential and protected from prying eyes.
Additionally, Bitdefender VPN employs other security features such as tunneling protocols like OpenVPN and IKEv2/IPSec, which further enhance the privacy and security of users' internet connections. These protocols create a secure tunnel through which data travels, preventing it from being intercepted or manipulated by third parties.
In conclusion, Bitdefender VPN offers top-notch encryption strength with AES 256-bit encryption, providing users with peace of mind knowing that their online activities are secure and their sensitive information is protected. By leveraging advanced encryption technologies and robust security protocols, Bitdefender VPN ensures that users can browse the internet safely and anonymously, without compromising their privacy or security.
0 notes
Text
Generate Jks File From Crt And Key Using Keytool
Convert Pfx To Jks Keytool
Keytool Create Jks Keystore
How To Create Jks Keystore
Keytool Import Crt
Hi, Please give me the exact keytool commands to convert.key and.crt files to.jks file of keystore. I am unable to import.key to.jks. Please send me both commands. While we create a Java keystore, we will first create the.jks file that will initially only contain the private key using the keytool utility. 1 keytool -genkey -keystore keystore.jks -alias ssl.
Tutorial
Introduction
Java Keytool is a key and certificate management tool that is used to manipulate Java Keystores, and is included with Java. A Java Keystore is a container for authorization certificates or public key certificates, and is often used by Java-based applications for encryption, authentication, and serving over HTTPS. Its entries are protected by a keystore password. A keystore entry is identified by an alias, and it consists of keys and certificates that form a trust chain.
This cheat sheet-style guide provides a quick reference to keytool commands that are commonly useful when working with Java Keystores. This includes creating and modifying Java Keystores so they can be used with your Java applications.
How to Use This Guide:
If you are not familiar with certificate signing requests (CSRs), read the CSR section of our OpenSSL cheat sheet
This guide is in a simple, cheat sheet format–self-contained command line snippets
Jump to any section that is relevant to the task you are trying to complete (Hint: use the Contents menu on the bottom-left or your browser’s Find function)
Most of the commands are one-liners that have been expanded to multiple lines (using the symbol) for clarity
Creating and Importing Keystore Entries
This section covers Java Keytool commands that are related to generating key pairs and certificates, and importing certificates.
Generate Keys in New/Existing Keystore
Use this method if you want to use HTTP (HTTP over TLS) to secure your Java application. This will create a new key pair in a new or existing Java Keystore, which can be used to create a CSR, and obtain an SSL certificate from a Certificate Authority.
This command generates a 2048-bit RSA key pair, under the specified alias (domain), in the specified keystore file (keystore.jks):
If the specified keystore does not already exist, it will be created after the requested information is supplied. This will prompt for the keystore password (new or existing), followed by a Distinguished Name prompt (for the private key), then the desired private key password.
Generate CSR For Existing Private Key
Use this method if you want to generate an CSR that you can send to a CA to request the issuance of a CA-signed SSL certificate. It requires that the keystore and alias already exist; you can use the previous command to ensure this.
This command creates a CSR (domain.csr) signed by the private key identified by the alias (domain) in the (keystore.jks) keystore:
After entering the keystore’s password, the CSR will be generated.
Import Signed/Root/Intermediate Certificate
Use this method if you want to import a signed certificate, e.g. a certificate signed by a CA, into your keystore; it must match the private key that exists in the specified alias. You may also use this same command to import root or intermediate certificates that your CA may require to complete a chain of trust. Simply specify a unique alias, such as root instead of domain, and the certificate that you want to import.
Convert Pfx To Jks Keytool
This command imports the certificate (domain.crt) into the keystore (keystore.jks), under the specified alias (domain). If you are importing a signed certificate, it must correspond to the private key in the specified alias:
You will be prompted for the keystore password, then for a confirmation of the import action.
Note: You may also use the command to import a CA’s certificates into your Java truststore, which is typically located in $JAVA_HOME/jre/lib/security/cacerts assuming $JAVA_HOME is where your JRE or JDK is installed.
Keytool Create Jks Keystore
Generate Self-Signed Certificate in New/Existing Keystore
Use this command if you want to generate a self-signed certificate for your Java applications. This is actually the same command that is used to create a new key pair, but with the validity lifetime specified in days.
This command generates a 2048-bit RSA key pair, valid for 365 days, under the specified alias (domain), in the specified keystore file (keystore.jks):
If the specified keystore does not already exist, it will be created after the requested information is supplied. This will prompt for the keystore password (new or existing), followed by a Distinguished Name prompt (for the private key), then the desired private key password.
Viewing Keystore Entries
This section covers listing the contents of a Java Keystore, such as viewing certificate information or exporting certificates.
List Keystore Certificate Fingerprints
This command lists the SHA fingerprints of all of the certificates in the keystore (keystore.jks), under their respective aliases:
You will be prompted for the keystore’s password. You may also restrict the output to a specific alias by using the -alias domain option, where “domain” is the alias name.
List Verbose Keystore Contents
This command lists verbose information about the entries a keystore (keystore.jks) contains, including certificate chain length, fingerprint of certificates in the chain, distinguished names, serial number, and creation/expiration date, under their respective aliases:
You will be prompted for the keystore’s password. You may also restrict the output to a specific alias by using the -alias domain option, where “domain” is the alias name.
Note: You may also use this command to view which certificates are in your Java truststore, which is typically located in $JAVA_HOME/jre/lib/security/cacerts assuming $JAVA_HOME is where your JRE or JDK is installed.
Use Keytool to View Certificate Information
This command prints verbose information about a certificate file (certificate.crt), including its fingerprints, distinguished name of owner and issuer, and the time period of its validity:
You will be prompted for the keystore password.
Export Certificate
This command exports a binary DER-encoded certificate (domain.der), that is associated with the alias (domain), in the keystore (keystore.jks):
You will be prompted for the keystore password. If you want to convert the DER-encoded certificate to PEM-encoding, follow our OpenSSL cheat sheet.
Modifying Keystore
This section covers the modification of Java Keystore entries, such as deleting or renaming aliases.
Change Keystore Password
This command is used to change the password of a keystore (keystore.jks):
You will be prompted for the current password, then the new password. You may also specify the new password in the command by using the -new newpass option, where “newpass” is the password.
Delete Alias
This command is used to delete an alias (domain) in a keystore (keystore.jks):
You will be prompted for the keystore password.
Rename Alias
This command will rename the alias (domain) to the destination alias (newdomain) in the keystore (keystore.jks):
You will be prompted for the keystore password.
Conclusion
That should cover how most people use Java Keytool to manipulate their Java Keystores. It has many other uses that were not covered here, so feel free to ask or suggest other uses in the comments.
This tutorial is based on the version of keystore that ships with Java 1.7.0 update 65. For help installing Java on Ubuntu, follow this guide.
Tutorial
Introduction
Java Keytool is a key and certificate management tool that is used to manipulate Java Keystores, and is included with Java. A Java Keystore is a container for authorization certificates or public key certificates, and is often used by Java-based applications for encryption, authentication, and serving over HTTPS. Its entries are protected by a keystore password. A keystore entry is identified by an alias, and it consists of keys and certificates that form a trust chain.
This cheat sheet-style guide provides a quick reference to keytool commands that are commonly useful when working with Java Keystores. This includes creating and modifying Java Keystores so they can be used with your Java applications.
How to Use This Guide:
If you are not familiar with certificate signing requests (CSRs), read the CSR section of our OpenSSL cheat sheet
This guide is in a simple, cheat sheet format–self-contained command line snippets
Jump to any section that is relevant to the task you are trying to complete (Hint: use the Contents menu on the bottom-left or your browser’s Find function)
Most of the commands are one-liners that have been expanded to multiple lines (using the symbol) for clarity
How To Create Jks Keystore
Creating and Importing Keystore Entries
This section covers Java Keytool commands that are related to generating key pairs and certificates, and importing certificates.
Generate Keys in New/Existing Keystore
Use this method if you want to use HTTP (HTTP over TLS) to secure your Java application. This will create a new key pair in a new or existing Java Keystore, which can be used to create a CSR, and obtain an SSL certificate from a Certificate Authority.
This command generates a 2048-bit RSA key pair, under the specified alias (domain), in the specified keystore file (keystore.jks):
If the specified keystore does not already exist, it will be created after the requested information is supplied. This will prompt for the keystore password (new or existing), followed by a Distinguished Name prompt (for the private key), then the desired private key password.
Generate CSR For Existing Private Key
Use this method if you want to generate an CSR that you can send to a CA to request the issuance of a CA-signed SSL certificate. It requires that the keystore and alias already exist; you can use the previous command to ensure this.
This command creates a CSR (domain.csr) signed by the private key identified by the alias (domain) in the (keystore.jks) keystore:
After entering the keystore’s password, the CSR will be generated.
Import Signed/Root/Intermediate Certificate
Use this method if you want to import a signed certificate, e.g. a certificate signed by a CA, into your keystore; it must match the private key that exists in the specified alias. You may also use this same command to import root or intermediate certificates that your CA may require to complete a chain of trust. Simply specify a unique alias, such as root instead of domain, and the certificate that you want to import.
Keytool Import Crt
This command imports the certificate (domain.crt) into the keystore (keystore.jks), under the specified alias (domain). If you are importing a signed certificate, it must correspond to the private key in the specified alias:
You will be prompted for the keystore password, then for a confirmation of the import action.
Note: You may also use the command to import a CA’s certificates into your Java truststore, which is typically located in $JAVA_HOME/jre/lib/security/cacerts assuming $JAVA_HOME is where your JRE or JDK is installed.
Generate Self-Signed Certificate in New/Existing Keystore
Use this command if you want to generate a self-signed certificate for your Java applications. This is actually the same command that is used to create a new key pair, but with the validity lifetime specified in days.
This command generates a 2048-bit RSA key pair, valid for 365 days, under the specified alias (domain), in the specified keystore file (keystore.jks):
If the specified keystore does not already exist, it will be created after the requested information is supplied. This will prompt for the keystore password (new or existing), followed by a Distinguished Name prompt (for the private key), then the desired private key password.
Viewing Keystore Entries
This section covers listing the contents of a Java Keystore, such as viewing certificate information or exporting certificates.
List Keystore Certificate Fingerprints
This command lists the SHA fingerprints of all of the certificates in the keystore (keystore.jks), under their respective aliases:
You will be prompted for the keystore’s password. You may also restrict the output to a specific alias by using the -alias domain option, where “domain” is the alias name.
List Verbose Keystore Contents
This command lists verbose information about the entries a keystore (keystore.jks) contains, including certificate chain length, fingerprint of certificates in the chain, distinguished names, serial number, and creation/expiration date, under their respective aliases:
You will be prompted for the keystore’s password. You may also restrict the output to a specific alias by using the -alias domain option, where “domain” is the alias name.
Note: You may also use this command to view which certificates are in your Java truststore, which is typically located in $JAVA_HOME/jre/lib/security/cacerts assuming $JAVA_HOME is where your JRE or JDK is installed.
Use Keytool to View Certificate Information
This command prints verbose information about a certificate file (certificate.crt), including its fingerprints, distinguished name of owner and issuer, and the time period of its validity:
You will be prompted for the keystore password.
Export Certificate
This command exports a binary DER-encoded certificate (domain.der), that is associated with the alias (domain), in the keystore (keystore.jks):
You will be prompted for the keystore password. If you want to convert the DER-encoded certificate to PEM-encoding, follow our OpenSSL cheat sheet.
Modifying Keystore
This section covers the modification of Java Keystore entries, such as deleting or renaming aliases.
Change Keystore Password
This command is used to change the password of a keystore (keystore.jks):
You will be prompted for the current password, then the new password. You may also specify the new password in the command by using the -new newpass option, where “newpass” is the password.
Delete Alias
This command is used to delete an alias (domain) in a keystore (keystore.jks):
You will be prompted for the keystore password.
Rename Alias
This command will rename the alias (domain) to the destination alias (newdomain) in the keystore (keystore.jks):
You will be prompted for the keystore password.
Conclusion
That should cover how most people use Java Keytool to manipulate their Java Keystores. It has many other uses that were not covered here, so feel free to ask or suggest other uses in the comments.
This tutorial is based on the version of keystore that ships with Java 1.7.0 update 65. For help installing Java on Ubuntu, follow this guide.
0 notes
Text
Using Openssl To Create Keys For Mac

Using Openssl To Create Keys For Mac Osx
How To Use Openssl On Mac
In the example below openssl will use the RSA algorithm combined with the DES3 digest algorithm to generate the 2048 bit key. Our key will be protected by a passphrase (password) and stored in ciphered plain text in the file named secret.key. Openssl genrsa -des3 -out secret.key 2048 Generating a Public Key. Mac OS X also ships with OpenSSL pre-installed. For Windows a Win32 OpenSSL installer is available. Remember, it’s important you keep your Private Key secured; be sure to limit who and what has access to these keys. Converting PEM encoded certificate to DER openssl x509 -outform der -in certificate.pem -out certificate.der.
SYNOPSIS
openssldgst (-Idigest) (-help) (-c) (-d) (-hex) (-binary) (-r) (-outfilename) (-signfilename) (-keyformarg) (-passinarg) (-verifyfilename) (-prverifyfilename) (-signaturefilename) (-hmackey) (-fips-fingerprint) (-randfile..) (-engineid) (-engine_impl) (file..)
openssl Idigest (..)
DESCRIPTION
The digest functions output the message digest of a supplied file or files in hexadecimal. The digest functions also generate and verify digital signatures using message digests.
The generic name, dgst, may be used with an option specifying the algorithm to be used. The default digest is sha256. A supported digest name may also be used as the command name. To see the list of supported algorithms, use the openssl_list--digest-commands command.
Options

-help
Print out a usage message.
-Idigest
Specifies name of a supported digest to be used. To see the list of supported digests, use the command openssl_list--digest-commands.
-c
prints out the digest in two digit groups separated by colons, only relevant if hex format output is used.
-d
prints out BIO debugging information.
-hex
outputs digest as a hex dump. This is the default case for a 'normal' digest as opposed to a digital signature. See NOTES below for digital signatures using -hex.
-binary
outputs the digest or signature in binary form.
-r
output the digest in the 'coreutils' format used by programs like sha1sum.
-outfilename
specifies the file name to output to, or standard output by default.
Using Openssl To Create Keys For Mac Osx
-signfilename
. Note this option does not support Ed25519 or Ed448 private keys. Use the openssl_pkeyutl command instead for this.
digitally signs the digest using the private key in filename.
-keyformarg
Specifies the key format to sign digest with. The DER, PEM, P12, and ENGINE formats are supported.
-sigoptnm:v
Pass options to the signature algorithm during sign or verify operations. Names and values of these options are algorithm-specific.
-passinarg
the private key password source. For more information about the format of arg see the PASS PHRASE ARGUMENTS section in openssl.
-verifyfilename
verifies the signature using the public key in filename. The output is either Verification OK or Verification Failure.
-prverifyfilename
verifies the signature using the private key in filename.
-signaturefilename
specifies the actual signature to verify.
-hmackey
create a hashed MAC using 'key'.
-macalg
create MAC (keyed Message Authentication Code). The most popular MAC algorithm is HMAC (hash-based MAC), but there are other MAC algorithms which are not based on hash, for instance gost-mac algorithm, supported by ccgost engine. MAC keys and other options should be set via -macopt parameter.
-macoptnm:v
Passes options to MAC algorithm, specified by -mac key. Following options are supported by both by HMAC and gost-mac
key:string
Specifies MAC key as alphanumeric string (use if key contain printable characters only). String length must conform to any restrictions of the MAC algorithm for example exactly 32 chars for gost-mac.
hexkey:string
Specifies MAC key in hexadecimal form (two hex digits per byte). Key length must conform to any restrictions of the MAC algorithm for example exactly 32 chars for gost-mac.
-rand file..
specifies a file or files containing random data used to seed the random number generator. Multiple files can be specified separated by an OS-dependent character. The separator is ; for MS-Windows, , for OpenVMS, and : for all others.
(-writerandfile)
Writes random data to the specified file upon exit. This can be used with a subsequent -rand flag.
-fips-fingerprint
compute HMAC using a specific key for certain OpenSSL-FIPS operations.
-engineid
Use engine id for operations (including private key storage). This engine is not used as source for digest algorithms, unless it is also specified in the configuration file or -engine_impl is also specified.
-engine_impl
When used with the -engine option, it specifies to also use engine id for digest operations.
file..
specifies the file or files to digest. If no files are specified then standard input is used.
EXAMPLES
To create a hex-encoded message digest of a file:
To sign a file using SHA-256 with binary file output:
To verify a signature:
NOTES
The digest mechanisms that are available will depend on the options used when building OpenSSL. The openssl_listdigest-commands command can be used to list them.
New or agile applications should use probably use SHA-256. Other digests, particularly SHA-1 and MD5, are still widely used for interoperating with existing formats and protocols.
When signing a file, dgst will automatically determine the algorithm (RSA, ECC, etc) to use for signing based on the private key's ASN.1 info. When verifying signatures, it only handles the RSA, DSA, or ECDSA signature itself, not the related data to identify the signer and algorithm used in formats such as x.509, CMS, and S/MIME.
A source of random numbers is required for certain signing algorithms, in particular ECDSA and DSA.
The signing and verify options should only be used if a single file is being signed or verified.
Hex signatures cannot be verified using openssl. Instead, use 'xxd -r' or similar program to transform the hex signature into a binary signature prior to verification.
HISTORY
The default digest was changed from MD5 to SHA256 in OpenSSL 1.1.0. The FIPS-related options were removed in OpenSSL 1.1.0.
COPYRIGHT
Copyright 2000-2019 The OpenSSL Project Authors. All Rights Reserved. Mukis kitchen siterip.
Licensed under the OpenSSL license (the 'License'). You may not use this file except in compliance with the License. You can obtain a copy in the file LICENSE in the source distribution or here: OpenSSL.
AVAILABILITY
Tableau jira connector. PTC MKS Toolkit for System Administrators PTC MKS Toolkit for Developers PTC MKS Toolkit for Interoperability PTC MKS Toolkit for Professional Developers PTC MKS Toolkit for Professional Developers 64-Bit Edition PTC MKS Toolkit for Enterprise Developers PTC MKS Toolkit for Enterprise Developers 64-Bit Edition
PTC MKS Toolkit 10.3 Documentation Build 39.
How To Use Openssl On Mac
0 notes
Text
Export and Convert Private Keys to .PEM Format in Windows
Microsoft Management Console (MMC) does not natively export private keys in .PEM format. Instead, it exports private keys in .PFX (.PKCS#12) format which includes both the certificate and private key in an encrypted container. If you need the private key in PEM format, you must first export the certificate as PFX from MMC and then convert it using OpenSSL. Therefore in this article, we shall show…
#12#Certificate Authority#Certificate Signing Request#Certificate Warnings#Certificates#Certificates Import in Windows#Certificates imports in Windows#Error Code 0x8009030D#fix Client Certificate Mapping Authentication error#Import certificates#Internal State 10001#Personal certificate store#ssl certificate#SSL Certificate Formats#Windows#Windows 10#Windows 11#Windows Server 2016
0 notes
Text
Software Data Encryption and Protection Methods

In today's digital world, protecting sensitive information is more important than ever. Whether you're building a web app, mobile platform, or desktop software, data encryption and security should never be an afterthought. Here’s a breakdown of essential encryption techniques and protection methods developers should implement.
1. What Is Data Encryption?
Data encryption is the process of converting readable data (plaintext) into an unreadable format (ciphertext) to prevent unauthorized access. Only someone with the correct decryption key can read the encrypted data.
2. Types of Encryption
Symmetric Encryption: Uses one secret key for both encryption and decryption. Examples: AES (Advanced Encryption Standard), DES, Blowfish
Asymmetric Encryption: Uses a public key to encrypt and a private key to decrypt. Examples: RSA, ECC
3. Hashing vs Encryption
Hashing is different from encryption. It’s a one-way process used to verify data integrity (like passwords). You can’t “decrypt” a hash.
Common hashing algorithms: SHA-256, SHA-3, Bcrypt, Argon2
Use case: Store passwords using salted hashes, not plain text!
4. Data Protection Methods
Besides encryption, software should use other protective techniques to secure data:
Secure Transmission: Always use HTTPS (TLS) to encrypt data in transit.
Access Controls: Implement authentication and authorization mechanisms (OAuth, JWT).
Database Security: Use encrypted fields, SQL injection protection, and secure ORM practices.
Environment Security: Store secrets in environment variables or secure vaults (e.g., HashiCorp Vault, AWS Secrets Manager).
5. Best Practices for Developers
Never hardcode credentials or keys in your codebase.
Use well-tested encryption libraries instead of building your own.
Regularly update dependencies to patch known vulnerabilities.
Use 2FA (Two-Factor Authentication) for admin accounts and APIs.
Log access attempts and monitor for unusual activity.
6. Real-World Tools and Libraries
OpenSSL – Encryption and SSL/TLS implementation
PyCryptodome (Python), CryptoJS (JavaScript), Bouncy Castle (Java) – for app-level encryption
Let's Encrypt – Free SSL/TLS certificates for HTTPS
Conclusion
Strong encryption and data protection methods are crucial in preventing breaches and building user trust. By implementing these practices, developers can create more secure and reliable software. Remember — security is not a feature, it’s a responsibility.
0 notes
Text
How to issue Let's Encrypt certificates using Certbot with DNS validation
Case
You need to issue a SAN (Subject Alternate Name) or Wildcard TLS certificate from Let's Encrypt. You have a Windows or a Linux machine without any Web server installed. You only have one or more registered DNS domains for which you have access to their authoritative DNS server zones. All you need to do is issue Let's Encrypt certificates using Certbot with DNS validation.
Solution
Let's Encrypt works with the Certbot tool (provided by EFF - Electronic Frontier Foundation) to anyone who wishes to issue a free Let's Encrypt certificate. The Certbot tool offers very detailed documentation. Certbox is a CLI tool which comes with a variety of command parameters, to match all possible configurations. Unless you have a Web server installed (Apache, NGinx, IIS, etc) you cannot use the relevant command parameters to utilize your existing online Web server to validate your DNS domains. In this case, if you simply own a few DNS domains and have access to their authoritative DNS server zones, you will have to use a Certbox DNS plugin. A DNS plugin allows you to validate ownership of your DNS domains without an active/live Web server. Alternatively you can use the Certbot manual certificate issuance method by using the --preferred-challenges parameter with value "dns". Also bear in mind that autorenewal of --manual certificates requires the use of an authentication hook script (--manual-auth-hook). Unless you provide the --mannual-auth-hook parameter, you will have to repeat the same certbot manual certificate issuance before the new certificate's expiry date.

Carry out the following step-by-step procedure to issue your certificate using Certbot using DNS validation: - Download and install Certbot CLI tool by following instructions depending on your operating system: https://certbot.eff.org/. - Install any additional certbot plugins which may be required depending on your usage scenario, e.g. the Certbot DNS plugins. - Run the suitable certbot commands based on your scenario. Consult the certbot certificate issuance guide for details and options: https://certbot.eff.org/docs/using.html. - After your Let's Encrypt certificate files are generated (.pem, .cer and .key files), they will be available in a Let's Encrypt folder. In the case of Linux this folder is usually /etc/letsencrypt/live. In order to access the certificate files, you will have to run the following command: sudo chmod 755 /etc/letsencrypt/live/. You may need to also run a few more commands to resolve any permissoins-related errors. Consult the following article for relevant options: https://stackoverflow.com/questions/48078083/lets-encrypt-ssl-couldnt-start-by-error-eacces-permission-denied-open-et 5. At this point you will probably need to convert your Let's Encrypt certificate from .pem/.cer to .pfx format which will include the private key as well. Run the following command (you will need to install openssl if you dont already have it installed): openssl pkcs12 -export -out certificate.pfx -inkey privkey.pem -in cert.pem -certfile chain.pem Consult the following Let's Encrypt community article for more details: https://community.letsencrypt.org/t/how-to-get-from-pem-to-pfx/59961/3 Read the full article
0 notes
Text
Create Apple p12 File
Create Apple p12 File
Generate Private Key with OpenSSL
$ openssl genrsa -out aps.key 2048
Output
Generating RSA private key, 2048 bit long modulus ...............................................+++ ..................+++ e is 54321 (0x10001)
Convert the .cer file into .pem format aps.cer is the certificate downloaded from Apple Dev Area
$ openssl x509 -in aps.cer -inform DER -out aps.pem -outform PEM
Use the .pem file and the private .key to generate the .p12 file:
$ openssl pkcs12 -export -inkey aps.key -in aps.pem -out aps.p12
Output
No certificate matches private key
End result files
aps.cer aps.key aps.p12 aps.pem
0 notes
Text
Convert private key generated via OCI Console to ppk
I am pretty new on the Oracle Cloud Infrastructure technology, so maybe I am talking about something you already know. But anyway I prefer to share this case: it can help if you encounter the same problem as me. Let’s take the risk to have too much information rather than nothing! The problem I was doing some tests on the new MySQL Database Service and during the setup I decided to generate my ssh keys via the OCI console: When I tried to connect via PuTTY or MobaXterm to my compute instance using the opc account and my private key (generated previously), I got the following error: Looking at the keys generated via the Oracle Cloud console, I saw that they were defined in the following format: The solution Actually I don’t work directly on a Linux system. So I need to convert my private key if I want to make it usable via my connection tools. First step is to transform it to RSA format. I can do it using OpenSSL: # openssl rsa -in ssh-key-2020-11-24.key -out ssh-key-2020-11-24.rsa Second and last step is to convert it to ppk format. I can do it using PuTTYgen. I load the private key: I filter on all files types: I select my RSA key and I click on Open: I click on Ok on the following message: and then on Save private key: So I save the key with a ppk format: Tests I can now use my private key to connect to my OCI compute instance via PuTTY: or MobaXterm: Hope this can help you! Cet article Convert private key generated via OCI Console to ppk est apparu en premier sur Blog dbi services. https://blog.dbi-services.com/convert-private-key-generated-via-oci-console-to-ppk/
0 notes
Text
How to convert RSA / OpenSSL / GPG keys to JSON format
You might using vault to store secrets and you need to pull them down to kubernetes or ECS cluster whatever. So you need to store your SSL certs and GPG keys / RSA keys in JSON format which is a huge pain.
So this is how you convert your key files into a JSON compatible one line:
``` $ awk 'NF {sub(/\r/, ""); printf "%s\\n",$0;}' ssl.ca ```
0 notes
Text
Capture the Coin — Cryptography Category Solutions
Capture the Coin — Cryptography Category Solutions
By Jake Craige, Max Mikhaylov, Jesse Posner

In the last post of the Capture the Coin competition series we will dive into the solutions for our cryptography challenges. Also, feel free to revisit our other write ups in the series for Trivia, Blockchain as well as the Competition and Prizes announcements.
AES Encryption Flaw
By Jake Craige
This challenge presents you with the output of an encryption and asks for the message that was encrypted (plaintext) as the solution. It was encrypted with Ruby as follows:
def encrypt(message)
require ‘openssl’
# Encrypt the message using random key+iv with AES-128-OFB
cipher = OpenSSL::Cipher.new(‘AES-128-OFB’).encrypt
random_key = cipher.random_key
cipher.key = random_key
random_iv = cipher.random_iv
cipher.iv = random_iv
ciphertext = cipher.update(message) + cipher.final
# Encrypt the IV with AES-128-ECB
simple_cipher = OpenSSL::Cipher.new(‘AES-128-ECB’).encrypt
simple_cipher.key = random_key
encrypted_iv = simple_cipher.update(random_iv) + simple_cipher.final
{
ciphertext: ciphertext.unpack(‘H*’).first,
encrypted_iv: encrypted_iv.unpack(‘H*’).first
}
end
If you have worked with AES before there are a few parts of this that may stand out to you.
First, it uses the Output Feedback (OFB) mode of operation as seen by usage of “AES-128-OFB” in the prompt. There isn’t anything wrong with this on its own, but the Cipher Block Chaining (CBC) and Counter (CTR) modes are more common and in practice, authenticated encryption (AE) like Galois/Counter Mode (GCM) should be used.
Next, we see that the IV is encrypted and uses the Electronic Codebook (ECB) mode. IVs are non-secret values and do not need to be encrypted. The security of the block cipher relies on them being random, but not secret. Furthermore, using ECB mode for encryption is never what you want. It is meant to serve as a building block for other modes, but should not be used as a mode on its own.
Block Ciphers & Modes
Let’s review what block ciphers and modes are, as they are key to solving this problem. A block cipher is a deterministic algorithm that accepts a fixed size secret key and plaintext as input and outputs a fixed size output, called a block. They are used for encryption which implies they also have a decryption operation that accepts the key and ciphertext and returns the plaintext.
A block cipher on its own is not secure for encrypting more than one message because encrypting the same message twice would result in the same ciphertext, put another way, a block cipher is deterministic.
Why is this a problem? Let’s say an army sends the message “Attack at dawn” one day and their adversary figures it out. On another day, if the army sends the same message and the adversary is watching, the will know that an attack is imminent and can set up defenses.
Formally, we say that a block cipher is not IND-CPA secure (indistinguishable under a chosen plaintext attack). This means that if we have a service encrypting data and we provide it two separate plaintexts to encrypt, we should not be able to identify which one was encrypted from the ciphertext.
We solve this issue by introducing different block cipher “modes of operation”. The default is ECB which is insecure, and other modes make it secure by introducing randomness and chaining blocks together in various ways.
We’ll review the ECB and OFB modes as they are the what the challenge uses.
Electronic Codebook (ECB)
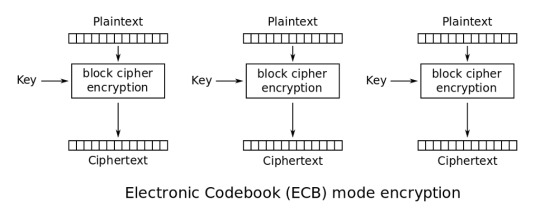
source: https://en.wikipedia.org/wiki/Block_cipher_mode_of_operation#Electronic_Codebook_(ECB)
ECB mode works by splitting the plaintext into blocks and independently encrypts each block. The final ciphertext is the concatenation of each block ciphertext.
A popular example of why this mode fails at providing enough security can been seen with the “ECB Penguin” image. We see that even when the image is encrypted, you can still see the penguin. This is clearly an undesirable property of an encryption scheme. An ideal encryption scheme would make the encrypted image look random as seen in the third image. Modes other than ECB provide this.
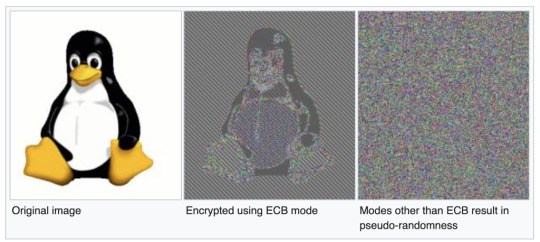
source: https://en.wikipedia.org/wiki/Block_cipher_mode_of_operation#Electronic_Codebook_(ECB)
Output Feedback (OFB)
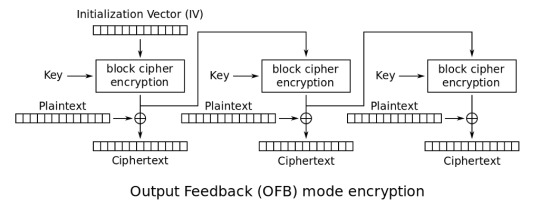
source: https://en.wikipedia.org/wiki/Block_cipher_mode_of_operation#Output_Feedback_(OFB)
OFB introduces an initialization vector, exclusive ORs (XOR), and the ciphertext from the previous block is used as input to another. The IV is a random value chosen at the time of encryption and prefixed to the ciphertext. The combination of the random IV and chaining blocks together solves the issues we described with ECB.
The Solution
With an understanding of the block ciphers used in the prompt, we can review how they were used and find the solution. Recall that the two ciphertexts are generated are as follows:
The message is encrypted with a random key and IV using AES-128-OFB.
The same IV is then encrypted with AES-128-ECB using the same key.
Looking at the size of the message ciphertext, we can see that it is 16 bytes long which means the plaintext is exactly one block since AES-128 uses 128-bit blocks. Given this, we can describe the message ciphertext as Encrypt(Key, IV) XOR Message. For the IV encryption, ECB mode was used, so the encrypted IV is simply Encrypt(Key, IV). Due to the property of XOR where a XOR b XOR a = b, we can solve for the plaintext by Ciphertext XOR EncryptedIV which is equivalent to Encrypt(Key, IV) XOR Message XOR Encrypt(Key, IV) = Message.
The solution in Ruby can be found as follows:
message_ct = [“1b08dbade73ae869436549ba781aa077”].pack(“H*”)
iv_ct = [“6f60eadec7539b4930002a8a49289343a7c0024b01568d35d223ae7a9eca2b5c”].pack(“H*”)
message_ct.bytes.zip(iv_ct.bytes).map { |l, r| l ^ r }.pack(“C*”)
This correctly outputs the CTF flag “th1s is sec01234”.
ECDSA Nonce Reuse
By Jake Craige
This challenge is described as follows:
The data below provides two hex encoded ECDSA-SHA256 signatures using the secp256k1 curve for the provided public key. These signatures were generated using the same nonce value which allows recovery of the private key.
Your task is to find the private key and submit it (hex encoded with 0x prefix) as the solution to this challenge.
Pubkey (SER-compressed): 0x2341745fe027e0d9fd4e31d2078250b9c758e153ed7c79d84a833cf74aae9c0bb
Sig #1 (msg): what up defcon
Sig #1 (r, s): (0x5d66e837a35ddc34be6fb126a3ec37153ff4767ff63cbfbbb32c04a795680491, )
Sig #1 (msg): uh oh this isn’t good
Sig #2 (r, s): (0x5d66e837a35ddc34be6fb126a3ec37153ff4767ff63cbfbbb32c04a795680491, 0xd67006bc8b7375e236e11154d576eed0fc8539c3bba566f696e9a5340bb92bee)
The prompt explains what is wrong, so all we have to do is figure out how to solve for the private key. A quick search will provide various explanations of the problem and how to solve it. Wikipedia provides a good explanation of how ECDSA signatures are generated and documents the solution to nonce reuse. We’ll describe the math here using the same variable names as Wikipedia.
Given two signatures s and s’ of different messages digests z and z’ which used the same nonce, the first step is solving for the private key is solving for k.

Now that we know k, we have enough public information to restructure the signature equation and solve for the private key d_a.

We can solve this problem in Python with the following code:
import hashlib
# secp256k1 order
order = int(“fffffffffffffffffffffffffffffffebaaedce6af48a03bbfd25e8cd0364141”, 16)
# Input from challenge
z = int(hashlib.sha256(“what up defcon”).hexdigest(), 16)
z_prime = int(hashlib.sha256(“uh oh this isn’t good”).hexdigest(), 16)
s = int(“1a53499a4aafb33d59ed9a4c5fcc92c5850dcb23d208de40a909357f6fa2c12c”, 16)
s_prime = int(“d67006bc8b7375e236e11154d576eed0fc8539c3bba566f696e9a5340bb92bee”, 16)
r = int(“5d66e837a35ddc34be6fb126a3ec37153ff4767ff63cbfbbb32c04a795680491”, 16)
# dividing within a field is not standard division so we need to define it as follows
def modinv(a, modulus): return pow(a, modulus — 2, modulus)
def divmod(a, b, modulus): return (a * modinv(b, modulus)) % modulus
# Solve for private key d
k = divmod(z — z_prime, s — s_prime, order)
d = divmod(k * s — z, r, order)
# output challenge flag
print(hex(d))
This correctly outputs the challenge flag 0x128e06938ac462d9.
Linkable Payments
By Max Mikhaylov
This is a cryptography challenge. We will use Python to solve it. I assume that you are familiar with scalar multiplication for elliptic curves over finite fields. If this topic doesn’t sound familiar, read the first 3 chapters of Jimmy Song’s Programming Bitcoin book. This is a prerequisite for understanding the challenge.
For this challenge I need only one nonstandard package — fastecdsa. We use it to do arithmetic on ECC points of brainpoolP160r1 curve. We will be using only two classes from that package: Point and brainpoolP160r1.
Examining the data
Looking at transactions that were broadcast to the node, we see that all of them contain an invalid destination key. The problem clearly establishes the format for ECC points and the destination key doesn’t follow it (‘dest_key’: ‘G0’). It’s not even a valid hex number.
But the transaction public key looks valid. Let’s try converting those public keys to ECC points on brainpoolP160r1 curve. Let’s write a function that converts a single public key to a point on the curve.
def key_to_point(key):
return Point(int(key[2:42], 16), int(key[42:], 16), curve=brainpoolP160r1)
If we try converting some public keys to points with this function, we will get an error: ValueError: coordinates are not on curve <brainpoolP160r1>
It looks like the public key provided by the sender is not on the brainpoolP160r1 curve. In fact, none of the provided public keys are on that curve. From the description of the transaction model from the Cryptonote whitepaper we know that the node needs to perform scalar multiplication using the sender’s transaction public key and its own private key. Is it dangerous for the node to perform this multiplication with a point that is not on the expected curve? Yes! We will find out why in a bit.
If the node’s implementation wasn’t flawed, it would have checked if the public key provided by the sender is on the expected curve and throw an exception if it is not on the curve (just like fastecdsa library does). However, the node accepted this public key, performed scalar multiplication using its private tracking key and tried to compare whether its version of the shared secret (P_prime) is different from the one provided by the sender (P). Only when comparing those values, the node threw an error since one of the values is not a valid ECC point (the destination key provided by the sender). To make matters worse (or better for us as an attacker), the node exposed its version of the shared secret (P_prime) in the log.
Analyzing ECC points
The first hint of the challenge tells us that we need to concentrate on these invalid ECC points provided by the sender. Since the flawed node software doesn’t check if the provided point is on the curve, we can monkey patch the Point class of fastecdsa library to remove the following check:
def point_init_monkey_patch(self, x, y, curve):
self.x = x
self.y = y
self.curve = curve
Point.__init__ = point_init_monkey_patch
We can now try converting tx_pub_key to ECC point for all transactions one more time; no error:
Input:
pub_key_points = txs_to_pub_key_points(txs) # txs is dict of txs.json contents
We can also convert shared secret values from node logs to ECC points, now that we monkey patched the ECC library:
def err_log_to_shared_secret_points(err_log):
shared_secret_points = []
for entry in err_log:
msg = entry[‘err_msg’]
shared_secret = msg.split(‘P_prime=’)[1].split()[0]
shared_secret_point = key_to_point(shared_secret)
shared_secret_points.append(shared_secret_point)
return shared_secret_points
shared_secret_points = err_log_to_shared_secret_points(err_log) # err_log is dict of err_log.json contents
Let’s go back to public key points. The first public key point looks very suspicious. I am talking about the Y-coordinate being 0. Let’s try calculating the order of this point.
Input:
def point_order(p):
for x in range(2, brainpoolP160r1.p):
if x * p == p:
return x — 1
point_order(pub_key_points[0])
Output:
2
This is very low order! Turns out other public key points have low order as well. Does this give us some way to derive the private key used by the node to calculate shared secrets?
Invalid-curve attack
It turns out that these exact conditions allow us to carry out an invalid-curve attack. You can read more about what an invalid-curve attack is in “Guide to Elliptic Curve Cryptography” by Hankerson, Menezes and Vanstone on page 182. Also read a recent CVE-2019–9836 describing this attack in a practical setting (this was the second hint for this challenge).
The gist of the attack: if we can make the node compute shared secrets from low order points of relatively prime order, and can find results of these computations, we can recover the secret using the Chinese Remainder Theorem (CRT). To be more specific, we need the product of all low order points to be greater than the private key in order for the recovered key to be unique (thus, match the private key). If we calculate the product of the order of all points in `pub_key_points`, we can in fact see that this number doesn’t fit in 160 bits, thus has to be larger than the private key used with brainpoolP160r1 curve.
Input:
product = 1
for point in pub_key_points:
product *= point_order(point)
from math import log2
log2(product)
Output:
175.1126248794482 # the product occupies 176 bits in binary representation
First, we need to be able to use the CRT. There are many resources on how CRT works, so you can read those if you are curious about math behind it. For solving this problem, I copied the CRT implementation from Rosetta Code.
We are now ready to perform the attack! The main idea behind this is the following:
We know that multiplying a low order point by a very large scalar (the private key) will result in a point of the same low order (the shared secret).
We can calculate the smallest possible scalar that, when multiplied by the public key, will result in the same low order shared secret.
We can do that by simply trying all possible scalars that are smaller than the order of the public key.
By bruteforcing the smallest possible scalar that gives us the shared secret when multiplied by the public key, we can construct a system of simultaneous congruences in the exact format that is suitable for applying the CRT. Since the product of all relatively prime orders is greater than the private key we are looking for, the result of applying the CRT is unique.
Input:
v = [] # can think of values in this list as the minimum number of EC additions of E_hat to itself to get shared_secret
moduli = [] # prime moduli of the system
print(“Constructing a system of simultaneous congruences:”)
for P_hat, shared_secret in zip(pub_key_points, shared_secret_points):
order = point_order(P_hat)
# search for shared_secret mod o_prime; i.e. the min number of additions of E_hat to itself to get shared_secret
for x in range(1, brainpoolP160r1.p):
if x * P_hat == shared_secret: # found the min number of additions
print(f’e ≡ {x} mod {order}; ’, end=’’)
v.append(x) moduli.append(order) break
Output:
Constructing a system of simultaneous congruences:
e ≡ 1 mod 2; e ≡ 1 mod 11; e ≡ 7 mod 23; e ≡ 1 mod 5; e ≡ 34 mod 41; e ≡ 4 mod 7; e ≡ 273 mod 293; e ≡ 161 mod 691; e ≡ 93 mod 347; e ≡ 7 mod 17; e ≡ 162 mod 229; e ≡ 19 mod 53; e ≡ 7 mod 13; e ≡ 380 mod 977; e ≡ 83 mod 89; e ≡ 82 mod 109; e ≡ 4771 mod 9767; e ≡ 381213 mod 439511; e ≡ 758 mod 10009; e ≡ 14048 mod 26459; e ≡ 11 mod 37; e ≡ 196934 mod 949213;
Input:
e = chinese_remainder(moduli, v)
hex(e)
Output:
‘0xdec1a551f1edc014ba5edefc042019’
This private key hex looks unusual… This is definitely a flag!
P.S. If you are curious about how I found low order points in the first place, see my question on Cryptography Stack Exchange that I asked when working on this challenge.
Schnorrer Signature
By Jesse Posner
This challenge describes a defective signature scheme called Schnorrer signatures. This scheme is nearly identical to Schnorr signatures, however, it contains a critical flaw that allows Schnorrer signatures, unlike Schnorr signatures, to be easily forged. The goal of the challenge is to produce a valid Schnorrer signature for a given public key and message.
A Schnorrer signature, and its defect, are best understood by contrasting them with a Schnorr signature. A Schnorr signature applies the Fiat-Shamir heuristic to the Schnorr identification protocol, an interactive proof-of-knowledge sigma protocol, and transforms it into a digital signature protocol.
In Schnorr, the Fiat-Shamir heuristic challenge is generated by hashing the message and the public nonce, but in Schnorrer the challenge is the hash of the message and the public key. By replacing the public nonce with the public key in the challenge hash, the Schnorrer signature undermines the security of the scheme.
Schnorr Identification Protocol
The Schnorr identification protocol consists of 3 elements: (1) a key generation algorithm, (2) a prover and (3) a verifier. The prover generates a secret, `x`, and wants to prove to the verifier that she knows `x` without revealing it to the verifier.
Both parties will need to agree on some parameters: a cyclic group, with a generator, `G`, and a prime modulus, `q`. For example, the Bitcoin protocol uses the secp256k1 parameters, with a generator specified by an elliptic curve point with compressed coordinates:
02 79BE667E F9DCBBAC 55A06295 CE870B07 029BFCDB 2DCE28D9 59F2815B 16F81798
An uppercase letter, such as `G`, `P`, or `R`, denotes a group element, for example, an elliptic curve point. Lowercase letters denote scalar values, such as `x`, `r`, and `s`.
Key Generation Algorithm
The prover uses the key generation algorithm to produce a public-private key pair, `x` and `P`. `x` is an integer selected at random from a finite field with modulo `q`. The public key `P` is calculated by using `x` as a scalar value and multiplying it by `G`:
```x*G```
The private key, `x`, is the discrete logarithm of `P` with the base `G`, and thus the verifier is unable to efficiently derive the private key from the public key, and so the prover can reveal a public key without revealing the private key, hence the “public” and “private” denotations.
Protocol
Let’s suppose that Alice wants to prove to Bob that she knows the value `x`. Alice begins the Schnorr identification protocol by generating a nonce, `r`, to be used as a scalar, similar to the private key. However, unlike the private key, the nonce must be used just once (“for the nonce”). Alice then computes the value `r*G` to derive the group element `R`, similarly to how the public key was generated. This value, `R`, is typically referred to as the public nonce, or the nonce commitment. Once Alice has her public key, `P`, and public nonce, `R`, she sends those values to Bob.
Bob now must generate another scalar value called the challenge value, `c`. After Bob receives `P` and `R`, he then generates `c` and sends it to Alice. Note that while `c` is independent from `R`, it is very important that Bob wait until he has received `R` from Alice before sending `c` to her. In fact, if Bob fails to do this, and sends `c` to Alice prior to receiving `R`, Alice can trick Bob into believing that she has knowledge of the secret key without actually knowing it. The integrity of the verification depends on `R` being generated prior to `c`, as we will see shortly.
Alice completes the conversation with Bob by multiplying her private key, `x`, by the challenge, `c`, and adding that product to her private nonce, `r`, to produce what is referred to as the `s` value. `s` must be modulo `q` (all scalar values must be modulo `q` so that they fall within the curve order).
We can now see the purpose of the nonce: it allows Alice to produce a value that is the product of (1) the private key, `x`, and (2) a value chosen solely by Bob, namely, the challenge, `c`. Yet Alice must accomplish this without directly disclosing `x` to Bob. If we omitted the nonce from the protocol, then `s` would be equal to `x*c`, and, while this value would indeed prove Alice’s knowledge of `x` to Bob, it does so far too aggressively and allows Bob to trivially compute `x` by dividing `s` by `c`.
```x = s/c```
However, with the addition of the nonce, x is hidden from Bob and cannot be computed solely from `s`.
```x = (s — r)/c```
Upon receiving `s` from Alice, Bob verifies the outputs of the protocol, `s` and `R` as follows: Bob computes `s*G`, and checks whether that value is equal to the sum of (1) the public nonce, `R`, and (2) the public key, `P`, multiplied by the challenge, `c`. Bob can be confident that Alice knows `x` if this equality holds, because Bob scaled `P` by `c`, and yet Alice knew the discrete logarithm of the result (offset by the public nonce), `s`. Thus, unless Alice has an efficient means of calculating discrete logarithms, she must know `x`.
However, as alluded to above, if Bob provides `c` to Alice prior to receiving `R`, then Alice can choose a malicious `R` and trick Bob into verifying the output, despite Alice not actually having knowledge of the private key, `x`, and the nonce, `r`. Alice does this by selecting a random integer modulo `q` to be used as `s`, and then computes `s*G` and `c*P`. Next, Alice subtracts `c*P` from `s*G` to compute `R`.
```R := s*G — c*P```
Now Alice has a valid public nonce, `R`, without knowing the private nonce, `r`, and a valid `s` without knowing the private key, `x`. Thus, we can see that it is critically important that Bob not disclose `c` to Alice until he has received `R` from her, otherwise Alice can choose `R` maliciously, by computing the difference between `c*P` and `s*G`.
Schnorr Signature
The Fiat-Shamir heuristic is a method that transforms Sigma protocols into digital signature schemes. It does this by replacing the challenge value, `c`, with a cryptographic hash of (1) a message, `m`, which is the data that is being signed, and (2) the public nonce, `R`. Requiring `R` as an input to a hash function that creates `c` prevents Alice from computing `R` from `c*P` and `s*G`, because `c` is now generated based on `R`, and thus `R` must preexist `c`.
The signature protocol proceeds similarly to the identity protocol: Alice multiplies her private key, `x`, by the challenge value, `c`, and then adds it to the private nonce, `r`, to produce `s`. The signature consists of the pair of values, `s`, and the nonce commitment, `R`, which are provided to Bob by Alice. Bob can compute `c` himself because `c := H(m || R)`.
The structure of the verification algorithm is the same as the identity protocol: `s*G == R + c*P`
Schnorrer Signature
A Schnorrer signature is identical to a Schnorr signature, except the challenge value, `c`, is a hash of (1) the message and (2) the public key, `P`, instead of (1) the message and (2) the nonce commitment, `R`. This seemingly small modification to the scheme renders it insecure.
The forgery attack proceeds along the same lines as the identification attack described above. In the identification attack, Bob provided the challenge value to Alice prior to receiving the public nonce, `R`. Similarly, because the Schnorrer signature challenge value does not include `R`, Alice can reverse the order of the protocol, and choose an `s` value first, and then calculate `R` as the difference between `s*G` and `c*P`, and thus forge a signature, in other words, with this defect, Alice can produce a valid Schnorrer signature without knowing the private key, `x`, (and also without knowing the nonce, `r`).
Forging A Signature
By Jake Craige
This challenge is described as follows:
Given two Pedersen commitments in and out, you must construct a proof that the difference between the commitment amounts is zero. We’ll use the secp256k1 curve and define `g` as the standard base point of the curve and `h=g^SHA256(“CoinbaesRulez”)`.
We’ll define out input and output commitments as `in=g¹³³⁷⋅h⁹⁸⁷⁶` and `out=g²⁶⁷⁴ ⋅h³⁴⁵⁶` and walk through the evaluation here.
= in⋅out^−1
= (g¹³³⁷⋅h⁹⁸⁷⁶)⋅(g^−2674⋅h³⁴⁵⁶)^−1
= g^(1337+2674)⋅h^(9876−3456)
y = g⁴⁰¹¹⋅h⁶⁴²⁰
We see that this is not a commitment to zero and actually creates more money thaen went into it. Your task is to provide us a `(t, s)` pair that convinces a verifier that `y` is a commitment to zero even though that’s not true.
Here is the input data you should use to create the signature. The elliptic curve points (commitments) are provided in the SEC compressed encoding. For the signature, we’ll use the Schnorr Identification Protocol proof described in the attached PDF. You must use the provided nonce so that we get a deterministic outcome for the CTF verification.
in=0x25b0d4d0ad70054b53c16d6b3269b03e7b8582aa091317cab4d755508062c6f43
out=0x35e3bdfa735f413f2213aa61ae4f7622596feddb96ecc0f263892cb35ca460182
y=0x20ab37bbcc43b8e96714aae06fdc1bbfc386d0165afb69500c9df1553e6c94ed1
nonce=0x19
The submission should be in the format `(t, s)` where both `t` is the hex encoded compressed point and `s` is a hex encoded unsigned integer. They should both have a `0x` prefix and the parenthesis and `,` must be present to verify. An example format would be: `(0xdead, 0xbeef)`.
The problem with the construction defined above is how `h` is selected. For a pedersen commitment to be trusted no one can know the discrete log of `h` with respect to `g`. Restated: no one should know `x` such that `h=g^x`. Knowledge of that allows one to forge commitments.
Recall that our commitment looks like `y=g^a⋅h^b` where `a` is the amount and `b` is the blinding factor. We provide a proof for `y=h^z`. With a non-malicious prover, this proves a commitment to a zero amount because `y=g⁰⋅h^b=h^b`, so we simply prove that we know the blinding factor `b` and verify against the public key `y`.
Unfortunately, by naively deriving `h` from `g`, we know the discrete log and can forge the signature. Here’s how.
We first set up the equality we wish to forge, and restructure it such that everything is done in base `g`. This is the step that can only be done if you know the discrete log of `h` which is the value `x`.

From this, we can solve for the value `z` which is what we need to create the proof. For simpler notation, we drop the base to show how this value is solved for.

With that equation in hand, we can proceed to create the proof. The values for `a, b, x` can be found in the problem statement: `a=4011`, `b=6420`, and `x=SHA256(“CoinbaesRulez”)` We treat the byte output of the SHA256 function as big-endian to represent it as a number.
Using this information we can compute `z` using our equation from before. In Python this can be done as follows:
import hashlib
# secp256k1 order
order = int(“fffffffffffffffffffffffffffffffebaaedce6af48a03bbfd25e8cd0364141”, 16)
def modinv(a, modulus): return pow(a, modulus — 2, modulus)
a = 4011
b = 6420
x = int(hashlib.sha256(“CoinbaesRulez”).hexdigest(), 16)
z = (a * modinv(x, order) + b) % order
Now that we know `z`, the last step is to create a proof of knowledge of discrete log to submit as the solution flag. This is done using the Schnorr Identification Protocol where we use the Fiat-Shamir transform to make it non-interactive by setting the challenge value to be the big-endian representation of the SHA256 output of the compressed points H, T, and Y concatenated together as bytes. The problem description provides a fixed nonce to make the output deterministic. The solution in Python, building on the former Python code, is:
from fastecdsa.curve import secp256k1
from fastecdsa.point import Point
from fastecdsa.encoding.sec1 import SEC1Encoder
# Challenge input
H = secp256k1.G * x
r = 0x19
# Generate the proof of knowledge of discrete log
T = H * r
Y = H * z
hashInput = SEC1Encoder.encode_public_key(H)
hashInput += SEC1Encoder.encode_public_key(T)
hashInput += SEC1Encoder.encode_public_key(Y)
c = int(hashlib.sha256(hashInput).hexdigest(), 16)
s = (r + c*z) % order
# Print the formatted flag
print(“(0x” + SEC1Encoder.encode_public_key(T).encode(“hex”) + “, 0x” + format(s, ‘x’) + “)”)
To see more about how these Pedersen Commitments are used in practice in blockchains, I recommend reading up on MimbleWimble based blockchains.
Conclusion
This concludes our writeups for the Capture the Coin competition. We hope you enjoyed learning more about a variety of blockchain security topics and can join us again next year.
In the meantime, if solving blockchain security challenges is something that you see yourself doing full time, then join us at Coinbase to help build the most trusted brand in the Crypto here.
This website contains links to third-party websites or other content for information purposes only (“Third-Party Sites”). The Third-Party Sites are not under the control of Coinbase, Inc., and its affiliates (“Coinbase”), and Coinbase is not responsible for the content of any Third-Party Site, including without limitation any link contained in a Third-Party Site, or any changes or updates to a Third-Party Site. Coinbase is not responsible for webcasting or any other form of transmission received from any Third-Party Site. Coinbase is providing these links to you only as a convenience, and the inclusion of any link does not imply endorsement, approval or recommendation by Coinbase of the site or any association with its operators.
All images provided herein are by Coinbase.
Capture the Coin — Cryptography Category Solutions was originally published in The Coinbase Blog on Medium, where people are continuing the conversation by highlighting and responding to this story.
from Money 101 https://blog.coinbase.com/capture-the-coin-cryptography-category-solutions-fe94d82165c5?source=rss----c114225aeaf7---4 via http://www.rssmix.com/
0 notes
Link
Patterns & Best PracticesConnecting Heroku data services to MuleSoft Last updated 11 September 2020 This article is about accessing Heroku Data Services through MuleSoft. To use MuleSoft as an integration layer that connects external services to a Heroku App, see Integrating Heroku and the Salesforce Platform. MuleSoft is an Integration Platform as a Service (IPaaS) for connecting multiple systems and services together so they can be accessed and managed from one central interface. This article describes how to connect Heroku Data Services (Heroku Postgres, Heroku Kafka, and Heroku Redis) to the MuleSoft platform. Heroku Enterprise customers can request in-depth guidance on this topic from the Customer Solutions Architecture team. Common integration use cases There are many reasons you might want to connect your Heroku data to MuleSoft, but the most common use case is users who are using Heroku Connect and Heroku Postgres to store and manage customer data from Salesforce. By connecting these Heroku data services to MuleSoft, you can access this data and integrate it with other services also connected to the MuleSoft platform. By using Heroku and MuleSoft together, you can take advantage of the data management flexibility on Heroku while still using any external services your app requires. Configuring MuleSoft connectors for the Common Runtime Heroku data services like Redis, Apache Kafka, and Postgres can be integrated into MuleSoft using specific Connectors. This section highlights the three connectors necessary for connecting to Heroku data services running on the Common Runtime. If you are running Heroku Postgres in a private space, first read the next section: “Configuring MuleSoft connectors for Private and Shield Heroku services”. Database Connector The Database Connector allows you to connect to any JDBC-compliant database, which includes Heroku Postgres. To set up a Database Connector on the MuleSoft side, follow the instructions found in this MuleSoft article, “How to connect to Heroku Postgres using the MuleSoft Database Connector”. Redis Connector The Redis Connector allows you to connect to any Remote Dictionary Server, including Heroku Redis. To set up a Redis Connector on the MuleSoft side, follow the instructions found in the Redis Connector documentation. The following information will be necessary to configure the connector: Connection: From the drop-down menu, select “NonClustered” Host, Port, Password: These three fields are all located in the REDIS_URL configuration variable for your application. The value for REDIS_URL is in the following format: . Use these values when configuring the Redis Connector in MuleSoft. This connector will only work if you’re using Heroku Redis in the Common Runtime — if you’re running Redis in a Private Space, see Configuring MuleSoft connectors for Private and Shield Heroku services. Apache Kafka Connector The Kafka Connector allows you to connect your Heroku Kafka cluster to the MuleSoft platform. To set up the Kafka Connector on the MuleSoft side, follow the instructions found in this MuleSoft article, “How to connect to Apache Kafka on Heroku using the MuleSoft Kafka Connector”. This connector will only work if you’re using Heroku Kafka in the Common Runtime — if you’re running Kafka in a Private Space, see see Configuring MuleSoft connectors for Private and Shield Heroku services. Configuring MuleSoft connectors for Private and Shield Heroku services If you are running Heroku Postgres, Heroku Redis, or Heroku Kafka in a Private or Shield Private space, there is additional configuration required to set up a secure and mutually-authenticated channel between MuleSoft and Heroku. This section provides the additional information necessary to connect Heroku data services to MuleSoft when running in Private or Shield Private spaces. Database Connector Take these steps first, then configure the database connector as described above Whitelist static external IPs In order for Heroku Postgres to connect successfully to your MuleSoft application, you must add the MuleSoft application’s static external IP address to the allowlist in Heroku mTLS configuration. Adding this IP to the allowlist will enable MuleSoft access to connect to your Private Heroku Postgres database. Using the instructions from MuleSoft’s documentation, allocate a static IP for your application. Add the generated static IP to your mTLS allowlist following the instructions in this article, Connecting to a Private or Shield Heroku Postgres Database from an External Resource You can use your local machine’s public IP while developing locally in Anypoint Studio. Download client-side certificates Use the Heroku CLI to download client-side certificates that will authorize a connection between MuleSoft and Heroku. This process is described in Connecting to a Private or Shield Heroku Postgres Database from an External Resource. Convert client private key to Java-understandable format If you followed the commands in the previous step, you should now have a directory in your project called folder. One of the files in that folder is the client private key, which MuleSoft needs to know about in order to connect. In order for MuleSoft to be able to read that key, you need to convert it to a Java-like format that MuleSoft will be able to use. To convert the key to its required format, you can run the following command from within your project directory. Before you run the command: Make sure openssl is installed on your command line, otherwise this command will error. Change to the name of the *.key file in your folder directory, usually something like PREFIX_postgresql.key -outform DER -nocrypt -out postgresql.key.der Import certificates to your MuleSoft application In order for MuleSoft to access the certificates for the Heroku connection, it is best to embed them within your MuleSoft application. Move all three files that were downloaded in folder into the src/main/resources directory of your MuleSoft application. Configure database connection URL Once you’ve completed the steps above, you can create a connection URL to use with the MuleSoft database connector. The URL can be constructed using the following format. ?sslmode=verify-ca&sslcert=${mule.home}/apps/${app.name}/PREFIX_postgresql.crt&sslkey=${mule.home}/apps/${app.name}/postgresql.key.der&sslrootcert=${mule.home}/apps/${app.name}/PREFIX_root.crt Replace , , and with values from your Heroku Postgres dashboard. Leave ${mule.home} and ${app.name} as-is to be replaced at runtime by the Connector The Database Connector will also ask for a Username and Password, which can both also be found in the Heroku Postgres dashboard. Redis Connector and Kafka Connector Heroku Redis and Heroku Kafka running in a Private Space will only support trusted connections from resources using AWS PrivateLink, which is not supported by MuleSoft. If you wish to connect your Heroku Redis and Heroku Kafka services running on Private Spaces with MuleSoft, you must add the external static IP of the Mule application to the allowlist of your Private Space before following the instructions above for configuring connectors for the common runtime. For more information on this service, see Trusted IP ranges for data services.
0 notes
Text
RSA Public Key and Public Key
"BEGIN RSA PUBLIC KEY" is PKCS#1, which can only contain RSA keys.
"BEGIN PUBLIC KEY" is PKCS#8, which can contain a variety of formats.
If you just want to convert them with the command-line, "openssl rsa" is good for this.
To convert from PKCS#8 to PKCS#1:
openssl rsa -pubin -in <filename> -RSAPublicKey_out
To convert from PKCS#1 to PKCS#8:
openssl rsa -RSAPublicKey_in -in <filename> -pubout
0 notes
Text
X.509 client certificates with Spring Security
A disclaimer: this blogpost is a story about the reasons why I ended up securing my API using the X.509 client certificate, in addition to a step-by-step guide on how to implement this yourself. Someone will hopefully find it useful.
Securing your application or an API is always a challenge, and lack of experience with the topic makes it even more complicated. Deciding on what security approach to take, how to properly implement it, what vectors of attacks you’ll be vulnerable to, dealing with the soup of acronyms and nouns such as SSL/TLS, CA, CRT, public/private keys, keystore, truststore – you quickly find yourself with a panicky feeling in your stomach. And this is a pretty common reaction.
First of all, X.509 is a digital certificate which uses the X.509 public key infrastructure standard to verify that a public key, which belongs to a user, service or a server, is contained within the certificate, as well as the identity of said user, service, or server. The certificate can be signed by a trusted certificate authority, or self-signed. SSL and TLS are most widely known protocols which use the X.509 format. They are routinely used to verify the identity of servers each time you open your browser and visit a webpage via HTTPS.
The goal in mind is to secure communication from a known server to my service. The decision ultimately came down to use the client certificate approach since authenticating users is not my concern – users do not interact with me directly. This means that there are no username/passwords being sent back and forth, no cookies and no sessions – which means that we maintain statelessness of our REST API. Also, as I am the certificate authority, I’m always going to stay in control of who gets a valid certificate, meaning I only trust myself to manage and maintain who can talk to my service.
The general workflow
In order to secure and authenticate communication between client and the server, they both need to have valid certificates. When you send a browser request to an HTTPS website, your browser would just verify that the site is certified by a trusted authority. In this case, not only the server’s identity is verified, but also the server gets to verify the client.
Credit to Daniel Marks for his wonderful drawing skills.jpg
The first thing the client has to do in order to communicate with the secured service is to generate a private key and a certificate signing request (CSR). This CSR is then sent to a Certificate Authority (CA) to be signed. In my use case, I represent both the server and the CA, since I want to be in charge of managing who gets to talk to my service. Signing the CSR produces the client certificate which is then sent back to the client. In order to send a valid and authenticated HTTPS request, the client also needs to provide the signed certificate (unlocked with the client’s private key), which is then validated during the SSL handshake with the trusted CA certificate in the Java truststore on the server side.
Enough theory, let’s see what the implementation looks like.
Spring Security Configuration
My REST service is a regular spring-boot 2.0.2 app using the spring-boot-starter-security dependency:
org.springframework.boot spring-boot-starter-security
The configuration class:
@EnableWebSecurity public class SecurityConfig extends WebSecurityConfigurerAdapter { /* * Enables x509 client authentication. */ @Override protected void configure(HttpSecurity http) throws Exception { // @formatter:off http .authorizeRequests() .anyRequest() .authenticated() .and() .x509() .and() .sessionManagement() .sessionCreationPolicy(SessionCreationPolicy.NEVER) .and() .csrf() .disable(); // @formatter:on } /* * Create an in-memory authentication manager. We create 1 user (localhost which * is the CN of the client certificate) which has a role of USER. */ @Override protected void configure(AuthenticationManagerBuilder auth) throws Exception { auth.inMemoryAuthentication().withUser("localhost").password("none").roles("USER"); } }
Usually known to be cumbersome, in this case the SpringSecurityConfig class is pretty lightweight, since we want to authenticate all requests coming into the service, and we want to do so using x509 authentication. SessionCreationPolicy.NEVER tells Spring to not bother creating sessions since all requests must have a certificate. We can also disable cross-site request forgery protection since we aren’t using HTML forms, but only send REST calls back and forth. You must do so if you’re going to follow this blog to the end, because CURL requests won’t pass through Spring’s csrf filter.
Enabling HTTPS on the REST service itself is just a manner of setting a couple of properties in our application.properties file:
server.port=8443 server.ssl.key-store=classpath:keystore.p12 server.ssl.key-store-password=changeit server.ssl.trust-store=classpath:truststore.jks server.ssl.trust-store-password=changeit server.ssl.client-auth=need
And this is pretty much it, you can go on and create your @RestControllers with endpoints fully secured behind a x509 certificate.
Generating a server CA certificate
Let’s see what has to be done on the server’s side with regards to creating the certificate:
openssl genrsa -aes256 -out serverprivate.key 2048
First of all, we have to generate an rsa key encrypted by aes256 encryption which is 2048 bits long. 4096 length would be more secure, but the handshake would be slowed down quite significantly. 1024 is also an option for faster handshakes but is obviously less secure. Used server as pass phrase here.
openssl req -x509 -new -nodes -key serverprivate.key -sha256 -days 1024 -out serverCA.crt
Now, we use the generated key in order to create a x509 certificate and sign it with our key. A form must be filled out which will map the certificate to an identity. Most of the fields can be filled out subjectively, except the CN (common name) which must match the domain we are securing (in this case, it’s localhost).
keytool -import -file serverCA.crt -alias serverCA -keystore truststore.jks
imports our server CA certificate to our Java truststore. The stored password in this case is changeit.
openssl pkcs12 -export -in serverCA.crt -inkey serverprivate.key -certfile serverCA.crt -out keystore.p12
exports the server CA certificate to our keystore. The stored password is again changeit.
Note: you could use .jks as the format of the keystore instead of .p12, you can easily convert it with:
keytool -importkeystore -srckeystore keystore.p12 -srcstoretype pkcs12 -destkeystore keystore.jks -deststoretype JKS
Generating a client certificate
The client has to go through a similar process:
openssl genrsa -aes256 clientprivate.key 2048
Again, the first thing we have to do is to create the private key. Interactively asks for a passphrase, I’m using client here.
openssl req -new -key clientprivate.key -out client.csr
Now we create the certificate signing request and sign it with the client’s private key. We are asked to fill a form to map the identity to the output certificate. Similar to the step 2 when generating the Server CA, the CN is the most important field and must match the domain.
Client sends the CSR to the CA
openssl x509 -req -in client.csr -CA serverCA.crt -CAkey serverprivate.key -CAcreateserial -out client.crt -days 365 -sha256
CA does this step, not the client. We sign the certificate signing request using the server’s private key and the CA.crt. client.crt is produced, and it has to be securely sent back to the client.
Certificates in action
Now that we have everything configured and signed, it’s time to see if it all ties in properly. First thing, we can send a request without the certificate:
curl -ik "https://localhost:8443/foo/"
and this will produce an error, just as we would have hoped:
curl: (35) error:14094412:SSL routines:SSL3_READ_BYTES:sslv3 alert bad certificate
This time we create a request with the certificate (using the client’s private key):
curl -ik --cert client.crt --key clientprivate.key "https://localhost:8443/foo/"
at this point we are asked for the key’s passphrase, type in client produces a nice “200 OK” response!
HTTP/1.1 200 X-Content-Type-Options: nosniff X-XSS-Protection: 1; mode=block Cache-Control: no-cache, no-store, max-age=0, must-revalidate Pragma: no-cache Expires: 0 Strict-Transport-Security: max-age=31536000 ; includeSubDomains X-Frame-Options: DENY Content-Type: text/plain;charset=UTF-8 Content-Length: 12 Date: Fri, 10 Aug 2018 11:39:51 GMT hello there!%
Example POST request:
curl -ik --cert client.crt --key clientprivate.key -X POST -d '{"greeting": "Hello there"}' "https://localhost:8443/foo/"
type in client as before
HTTP/1.1 201 X-Content-Type-Options: nosniff X-XSS-Protection: 1; mode=block Cache-Control: no-cache, no-store, max-age=0, must-revalidate Pragma: no-cache Expires: 0 Strict-Transport-Security: max-age=31536000 ; includeSubDomains X-Frame-Options: DENY Content-Type: text/plain;charset=UTF-8 Content-Length: 15 Date: Fri, 10 Aug 2018 12:02:33 GMT Hello there GENERAL KENOBI!%
You can set
logging.level.org.springframework.security=DEBUG
in your application.properties to trace the handshake.
2018-08-16 16:24:40.190 DEBUG 7206 --- [nio-8443-exec-3] o.s.s.w.a.p.x.X509AuthenticationFilter : X.509 client authentication certificate:[ [ Version: V1 Subject: [email protected], CN=localhost, O=DS, L=Berlin, ST=Who even knows at this point, C=DE Signature Algorithm: SHA256withRSA, OID = 1.2.840.113549.1.1.11 Key: Sun RSA public key, 2048 bits modulus: 2378026949349077149739661818238276092512323423424567832352996635790995122159840933949972327793790189970024798612439632633724982673364484809428691398923428004247310754863945150807792627712558813908791623601497931450739871341026099867732456702955088658091162530456218851145877831865961036637685012583440079032243774378463018497851565983485066259457033740417226709148321675286715367166340015131812147321619943539868370944770507019591372067335310435075401719933452132656596915712312312312347438076525959407549710102054016537474852860499356560314974040838659325953995234234078263724509076739574167 public exponent: 65537 Validity: [From: Fri Aug 10 13:35:10 CEST 2018, To: Sat Aug 10 13:35:10 CEST 2019] Issuer: [email protected], CN=localhost, OU=Banja Luka office, O=cc, L=Solingen, ST=Whatever, C=DE SerialNumber: [ aecc9b1c 2b56df2d] ] Algorithm: [SHA256withRSA] Signature: 0000: 69 97 0A EF 5C F8 64 58 50 C8 A4 A5 33 86 0B 6A i...\.dXP...3..j 0010: 64 24 D9 90 BF CF FB EC 7B AC E9 3C 23 88 81 7E d$.........<#... 0020: 66 11 77 87 A8 AF 52 49 C9 8F F4 7B 2D 9F F2 50 f.w...RI....-..P 0030: FF 76 38 C1 89 2B 56 A8 26 21 DA 7B C1 A7 D1 13 .v8..+V.&!...... 0040: 2B 84 5D 14 2C FD F6 B1 23 28 A3 DB A6 35 BB 97 +.].,...#(...5.. 0050: 11 60 E5 58 24 42 68 91 43 21 BD E3 75 34 A8 14 .`.X$Bh.C!..u4.. 0060: F7 E1 95 01 E6 E0 79 9E 86 E8 8D D4 64 DD 77 CF ......y.....d.w. 0070: 27 1B A4 H4 25 8E AF 36 49 C9 2C 7D 0F 2A 6C 11 '...%..6I.,..*l. 0080: C6 3A DE 02 7F 06 91 CF 73 3B 4F E8 81 E5 54 E1 .:......s;O...T. 0090: 2B CB D8 DD FE EB 64 8B A3 5A 15 EB 86 D4 11 9D +.....d..Z...... 00A0: B1 F8 57 FF FA A1 2E B0 AF B5 D9 71 21 25 9F 0F ..W........q!%.. 00B0: 18 33 A4 M9 CA E5 C4 83 A8 28 00 81 DF 81 20 E9 .w.......w.... . 00C0: 45 FA 37 F3 20 07 19 51 1F AE BA FD 79 A8 C9 6D E.7. ..Q....y..m 00D0: 82 7D 1A C8 B5 7A 40 19 38 76 0E AF 52 F3 AB 87 [email protected]... 00E0: 01 05 B9 94 79 EA 4B 20 19 74 6B 4B 84 E6 6F CE ....y.K .tkK..o. 00F0: E8 BB F3 F3 A5 54 DF EB 5D 6B A6 8F 15 5E 36 28 .....T..]k...^6( ] 2018-08-16 16:24:40.190 DEBUG 7206 --- [nio-8443-exec-3] .w.a.p.x.SubjectDnX509PrincipalExtractor : Subject DN is '[email protected], CN=localhost, O=DS, L=Berlin, ST=Who even knows at this point, C=DE' 2018-08-16 16:24:40.190 DEBUG 7206 --- [nio-8443-exec-3] .w.a.p.x.SubjectDnX509PrincipalExtractor : Extracted Principal name is 'localhost' 2018-08-16 16:24:40.192 DEBUG 7206 --- [nio-8443-exec-3] o.s.s.w.a.p.x.X509AuthenticationFilter : preAuthenticatedPrincipal = localhost, trying to authenticate
We can see that the received certificate is signed by our own trusted serverCA.crt (Issuer: EMAILADDRESS being [email protected] - the email was set in the second step when generating the serverCA.crt, and the Subject: EMAILADDRESS is [email protected], the value that was set when the client was generating the CSR).
The security principal:
o.s.s.w.a.p.x.X509AuthenticationFilter : Authentication success: org.springframework.security.web.authentication.preauth.PreAuthenticatedAuthenticationToken@c7017942: Principal: org.springframework.security.core.userdetails.User@b8332793: Username: localhost; Password: [PROTECTED]; Enabled: true; AccountNonExpired: true; credentialsNonExpired: true; AccountNonLocked: true; Granted Authorities: ROLE_USER; Credentials: [PROTECTED]; Authenticated: true; Details: org.springframework.security.web.authentication.WebAuthenticationDetails@b364: RemoteIpAddress: 0:0:0:0:0:0:0:1; SessionId: null; Granted Authorities: ROLE_USER
And that would be it!
Special thanks to Jonas Hecht, whose example helped me quite a bit to grasp the workflow of this topic (you can find it here: https://github.com/jonashackt/spring-boot-rest-clientcertificate) and to Daniel Marks, for helping me fill out the missing pieces of the puzzle.
Der Beitrag X.509 client certificates with Spring Security erschien zuerst auf codecentric AG Blog.
X.509 client certificates with Spring Security published first on https://medium.com/@koresol
0 notes
Photo

Video on demand (VOD) HLSをPCで作成 https://ift.tt/2GbSBeU
こんにちは、動画チームのhagi@streampackです。
はじめに
今回は”Video on demand (VOD) HLSをPCで作成”について書きたいと思います。 mp4をそのまま置いてプログレッシブダウンロードでVODを提供することもできますが、HLSにしてABRや暗号化と組み合わせることでダウンロードをめんどくさくすることが可能な上、再配布も簡単にできないようにすることができます。
環境
配信について
HLSは特別な配信サーバーは必要ないです。 インターネットからアクセスできてプレイヤーが必要なファイルをダウンロードできれば再生できます。
今回は配信環境はs3としますがwebサーバーであれば配信可能です。
HLSの作成
ffmpeg、mediafilesegmenter(OSX)、Media Converter(AWS)などありますが今回は”簡単”に”ローカルPC”で作成という自己テーマなので簡単に利用できるツールと思い、そこでWindows/Mac/Linux用バイナリやソースコードがあるbento4を使います。
動画のHLS作成環境はMAC(OSX)としていますが他のOSでも大きく変わらないと思います。
bento4の準備
bento4とは
bento4(https://www.bento4.com)
A fast, modern, open source C++ toolkit for all your MP4 and MPEG DASH media format needs
要約:MP4とMPEG DASH用のツールキット
あれ、HLSは?
HLSについてはこちらに記述
While Bento4 is an MP4 file format library, and HLS uses the MPEG2 TS (Transport Stream) format, Bento4 includes a set of tools and functions that allow the conversion from MP4 to MPEG2 TS, as well as tools to create the .m3u8 playlists for HLS (HTTP Live Streaming).
意訳:MP4からMPEG2 TSの変換もできるのでHLSもできますよー
ただし入力ファイルはMP4である必要がある。
bento4のインストール
ダウンロードページに行く https://www.bento4.com/downloads/
OSに対応したパッケージをダウンロードする(今回はMAC OSX用)
ダウンロードしたzipファイルを解凍
以上
mp4のhls化
上記で解凍したパッケージにはbinフォルダーがあり、いくつものコマンドが準備されています。各コマンドの一覧や詳細はこちらをご参照ください。
例:
Bento4-SDK-1-5-1-622.universal-apple-macosx/bin aac2mp4 mp42avc mp42ts mp4dashclone mp4dump mp4extract mp4iframeindex mp4rtphintinfo libBento4C.dylib mp42hevc mp4compact mp4dcfpackager mp4edit mp4fragment mp4info mp4split mp42aac mp42hls mp4dash mp4decrypt mp4encrypt mp4hls mp4mux mp4tag
HLS化で利用するのが mp42hlsです。
Usage
usage: mp42hls [options]
一番簡単な使い方が
HLSの格納フォルダーを作成 – コマンド実行場所が格納場所となってしまうため。 $ mkdir <dir>
作成したフォルダーに移動 $ cd <dir>
コマンド実行 $ mp42hls <動画>
例:
$ mkdir demohls $ cd demohls $ ../Downloads/Bento4-SDK-1-5-1-622.universal-apple-macosx/bin/mp42hls ../Downloads/Videos/demovid.mp4 $ ls segment-0.ts segment-1.ts segment-2.ts segment-3.ts segment-4.ts segment-5.ts segment-6.ts segment-7.ts stream.m3u8
作成されたファイルについて
コマンドを実行しますと下記のファイルが作成されます。
segment-0.ts segment-1.ts segment-2.ts segment-3.ts segment-4.ts segment-5.ts segment-6.ts segment-7.ts stream.m3u8
*.m3u8 – プレイリスト *.ts – mpeg2 ts データファイル
プレイリスト
#EXTM3U #EXT-X-VERSION:3 #EXT-X-PLAYLIST-TYPE:VOD #EXT-X-INDEPENDENT-SEGMENTS #EXT-X-TARGETDURATION:7 #EXT-X-MEDIA-SEQUENCE:0 #EXTINF:7.382375, segment-0.ts #EXTINF:6.965292, segment-1.ts #EXTINF:7.090417, segment-2.ts #EXTINF:6.923583, segment-3.ts #EXTINF:6.923583, segment-4.ts #EXTINF:7.173833, segment-5.ts #EXTINF:7.007000, segment-6.ts #EXTINF:0.959292, segment-7.ts #EXT-X-ENDLIST
プレイリストには動画再生の順番や各ファイルの再生時間が記述されています。 プレイヤーはこのファイルの情報を元に動画を再生します。
ts データファイル
分割されたデータファイルです。
配信
1.プレイリスト+tsファイルを全てs3にアップロードします。 場合によってはPublicにするのを忘れずに 2.プレーヤーにアップロードされたs3のプレイリストを指定します。(Safariであればそのまま再生ができるはずです。)
https://s3-ap-northeast-1.amazonaws.com/XXXXXXXX/demo/segment.m3u8
オプション例
AES-128暗号化を利用したい
フォーマット
mp42hls --encryption-key <key hexvalue> --encryption-key-uri <key location> <video name>
実行例
$ mp42hls --encryption-key 47de45c1b3931ab8baf4f7394bbecc02 --encryption-key-uri demo.key demovid.mp4 $ ls demo.key segment-0.ts segment-1.ts segment-10.ts segment-2.ts segment-3.ts segment-4.ts segment-5.ts segment-6.ts segment-7.ts segment-8.ts segment-9.ts stream.m3u8
マニフェスト内容
EXT-X-KEYにAES-128と鍵のURIが記述されていることを確認
$ cat stream.m3u8 #EXTM3U #EXT-X-VERSION:3 #EXT-X-PLAYLIST-TYPE:VOD #EXT-X-INDEPENDENT-SEGMENTS #EXT-X-TARGETDURATION:10 #EXT-X-MEDIA-SEQUENCE:0 #EXT-X-KEY:METHOD=AES-128,URI="demo.key" #EXTINF:6.715042, segment-0.ts #EXTINF:6.506500, segment-1.ts #EXTINF:8.133125, segment-2.ts #EXTINF:6.965292, segment-3.ts #EXTINF:6.464792, segment-4.ts #EXTINF:10.093417, segment-5.ts #EXTINF:6.506500, segment-6.ts #EXTINF:6.589917, segment-7.ts #EXTINF:6.673333, segment-8.ts #EXTINF:6.339667, segment-9.ts #EXTINF:7.507500, segment-10.ts #EXT-X-ENDLIST
AES-128鍵の作成方法
いくつもの方法があると思いますがここではopensslでの作成方法を記述いたします。
適当な16byteの値を使って鍵を作成
$ openssl rand 16 > demo.key
鍵のhex値を確認
$ xxd -ps demo.key 47de45c1b3931ab8baf4f7394bbecc02
ファイル名を指定したい
マニフェストのみ
フォーマット
$ mp42hls --index-filename <manifest filename>.m3u8 <video name>
実行例
$ mp42hls --index-filename demomanifest.m3u8 demovid.mp4 $ ls demomanifest.m3u8 segment-0.ts segment-10.ts segment-3.ts segment-5.ts segment-7.ts segment-9.ts demovid.mp4 segment-1.ts segment-2.ts segment-4.ts segment-6.ts segment-8.ts
マニフェスト+データファイル名
フォーマット
$ mp42hls --index-filename <manifest filename>.m3u8 --segment-filename-template <segment filename>.%d.ts --segment-url-template <segment filename>.%d.ts <video name>
実行例
$ mp42hls --index-filename demomanifest.m3u8 --segment-filename-template demoseg%d.ts --segment-url-template demoseg%d.ts demovid.mp4 $ ls demomanifest.m3u8 demoseg1.ts demoseg2.ts demoseg4.ts demoseg6.ts demoseg8.ts demovid.mp4 demoseg0.ts demoseg10.ts demoseg3.ts demoseg5.ts demoseg7.ts demoseg9.ts
マニフェスト内容
#EXTM3U #EXT-X-VERSION:3 #EXT-X-PLAYLIST-TYPE:VOD #EXT-X-INDEPENDENT-SEGMENTS #EXT-X-TARGETDURATION:10 #EXT-X-MEDIA-SEQUENCE:0 #EXTINF:6.715042, demoseg0.ts #EXTINF:6.506500, demoseg1.ts #EXTINF:8.133125, demoseg2.ts #EXTINF:6.965292, demoseg3.ts #EXTINF:6.464792, demoseg4.ts #EXTINF:10.093417, demoseg5.ts #EXTINF:6.506500, demoseg6.ts #EXTINF:6.589917, demoseg7.ts #EXTINF:6.673333, demoseg8.ts #EXTINF:6.339667, demoseg9.ts #EXTINF:7.507500, demoseg10.ts #EXT-X-ENDLIST
segment長を指定したい
フォーマット
$ mp42hls --index-filename <manifest filename>.m3u8 --segment-filename-template <segment filename>.%d.ts --segment-url-template <segment filename>.%d.ts --segment-duration <segment length> <video name>
実行例
$ mp42hls --index-filename demomanifest.m3u8 --segment-filename-template demoseg%d.ts --segment-url-template demoseg%d.ts --segment-duration 18 demovid.mp4 $ ls demomanifest.m3u8 demoseg0.ts demoseg1.ts demoseg2.ts demoseg3.ts demoseg4.ts demovid.mp4
マニフェスト内容
EXT-X-TARGETDURATIONをご確認ください。
$ cat demomanifest.m3u8 #EXTM3U #EXT-X-VERSION:3 #EXT-X-PLAYLIST-TYPE:VOD #EXT-X-INDEPENDENT-SEGMENTS #EXT-X-TARGETDURATION:19 #EXT-X-MEDIA-SEQUENCE:0 #EXTINF:18.226542, demoseg0.ts #EXTINF:18.435083, demoseg1.ts #EXTINF:18.184833, demoseg2.ts #EXTINF:19.936583, demoseg3.ts #EXTINF:3.712042, demoseg4.ts #EXT-X-ENDLIST
最後に
VODのHLS化はだいぶハードルが下がりmp4同様にウェブサーバーからの配信が可能です。 s3から配信すれば設定すらほぼいらずとなります。
またBento4はHLS作成以外にもMP4を操作して動画と音声を分けたり、MPEG-DASHを作成したり、動画に音声をつけたりも可能です。
https://www.bento4.com/documentation/
ぜひお試しください!
元記事はこちら
「Video on demand (VOD) HLSをPCで作成」
March 27, 2018 at 12:00PM
0 notes