#OpenSSL key generation tutorial
Explore tagged Tumblr posts
Visit Tumblr Blog
Explore Tumblr blogs with no restrictions, modern design and the best experience.
Last Seen Tumblr Blogs


Fun Fact
The most popular pages on Tumblr are about Minecraft, GIFs, and David J. Peterson.
Text
How to Install OpenSSL on Windows Computers
In this article, we shall discuss how to Install OpenSSL on Windows Computers. OpenSSL is an open-source command-line tool that is used to generate the SSL certificate and private key and is available in both versions 32 and 64 bit. Please see How to fix Windows Update Fails with Error 0x80092004, how to Fix the Port used for the Virtualhost is not an Apache Listen Port, and Shell Scripting: How…
#convert key format OpenSSL#convert PEM to DER OpenSSL#extract public key OpenSSL#generate private public key OpenSSL#how to use OpenSSL on Windows#install OpenSSL Windows#Microsoft Windows#OpenSSL installation#OpenSSL key conversion#OpenSSL key generation tutorial#OpenSSL key management#OpenSSL public key extraction#OpenSSL Windows#OpenSSL Windows installation steps#Windows#Windows 10#Windows 11#Windows OpenSSL setup#Windows Server#Windows Server 2012#Windows Server 2016#Windows Server 2019#Windows Server 2022
1 note
·
View note
Text
Install openssh server ubuntu 20.04

Install openssh server ubuntu 20.04 how to#
Install openssh server ubuntu 20.04 install#
Install openssh server ubuntu 20.04 mac#
Install openssh server ubuntu 20.04 windows#
If you have no results on your terminal, you should ��enable” the service in order for it to be launched at boot time. To check whether your service is enable or not, you can run the following command sudo systemctl list-unit-files | grep enabled | grep ssh It is also very likely that it is instructed to start at boot time. sudo ufw statusĪs you probably saw, your SSH server is now running as a service on your host. If you are not sure if you are actively using the UFW firewall, you can run the “ufw status” command. To enable SSH connections on your host, run the following command sudo ufw allow ssh If you are using UFW as a default firewall on your Ubuntu 20.04 host, it is likely that you need to allow SSH connections on your host. Enabling SSH traffic on your firewall settings Your SSH server is now up and running on your Ubuntu 20.04 host. If you want to go into further details, you can actually check that the SSH server is listening on port 22 with the netstat command. sudo systemctl status sshdīy default, your SSH server is listening on port 22 (which is the default SSH port).
Symbolic links are created : one named rvice (your systemd service) and one in the multi-user target (to boot SSH when you log in).Īs stated earlier, a SSH service was created and you can check that it is actually up and running.
A configuration file is created in the /etc/ssh folder named sshd_config.
This command should run a complete installation of an OpenSSH server.įrom steps displayed on your console, you should see the following details :
Install openssh server ubuntu 20.04 install#
Now that all packages are up-to-date, run the “apt-get install” command in order to install OpenSSH. Installing OpenSSH Server on Ubuntu 20.04įirst of all, as always, make sure that your current packages are up to date for security purposes. Now that all prerequisites are met, let’s see how you can install an OpenSSH server on your host. ssh -VĪs you can see, I am currently running OpenSSH 8.2 on Ubuntu with the OpenSSL 1.1.1 version (dated from the 31th of March 2020).īe careful : this information does not mean that you have a SSH server running on your server, it only means that you are currently able to connect as a client to SSH servers. To check that this is actually the case, you can run the “ssh” command with the “-V” option. groupsīy default, SSH should already be installed on your host, even for minimal configurations. User user may run the following commands on server-ubuntu:Īlternatively, you can run the “ groups” command and verify that “sudo” is one of the entries. If you see the following lines on your terminal, it means that you currently belongs to the sudo group. To check whether you have sudo privileges or not, you can launch the following command. Note : there are no practical differences between adding a user to sudoers on Ubuntu and Debian. In order to install a SSH server on Ubuntu 20.04, you need to have sudo privileges on your server.
Install openssh server ubuntu 20.04 how to#
How to Install Nvidia Drivers on Ubuntu 20.04.
Install openssh server ubuntu 20.04 windows#
How To Setup SSH Keys on GitHub | How to Generate SSH Keys Windows & Linux?.
Install openssh server ubuntu 20.04 mac#
How To Generate Git SSH Keys | Process of Git Generate SSH Key on Windows, Linux, Mac.
We are also going to see how you can install OpenSSH on your fresh Ubuntu distribution. In this tutorial, we are going to see how you can install and enable SSH on Ubuntu 20.04 distributions. SSH comes as an evolution to the Telnet protocol: as its name describes it, SSH is secure and encrypts data that is transmitted over the network.Īs a power user, you may want to onboard new machines with SSH servers in order to connect to them later on. Short for Secure Shell, SSH is a network protocol used in order to operate remote logins and commands on machines over local or remote networks. This tutorial focuses on setting up and configuring an SSH server on a Ubuntu 20.04 desktop environment.Īs a system administrator, you are probably working with SSH on a regular basis.
0 notes
Text
In our previous articles, we discussed the installation of OpenLDAP Server on Ubuntu and how to setup OpenLDAP client on Ubuntu. This short tutorial will cover securing LDAP Server with SSL/TLS certificate and key. You have two options of obtaining an SSL certificate used for securing LDAP Server. Using Self Signed SSL Certificate Purchasing SSL certificates from trusted CA This guide will explain use of self signed certificates. So Let’s get started. Step 1: Generate Self signed SSL cerificates Login to your LDAP server and generate SSL certificates to be used. $ mkdir ~/ldap_ssl && cd ~/ldap_ssl $ openssl genrsa -aes128 -out ldap_server.key 4096 Generating RSA private key, 4096 bit long modulus …………………………………………………………………………………..++ ………………………………….++ e is 65537 (0x010001) Enter pass phrase for ldap_server.key: Verifying - Enter pass phrase for ldap_server.key: Remove passphrase from the generated private key: $ openssl rsa -in ldap_server.key -out ldap_server.key Enter pass phrase for ldap_server.key: writing RSA key Generate csr. $ openssl req -new -days 3650 -key ldap_server.key -out ldap_server.csr You are about to be asked to enter information that will be incorporated into your certificate request. What you are about to enter is what is called a Distinguished Name or a DN. There are quite a few fields but you can leave some blank For some fields there will be a default value, If you enter '.', the field will be left blank. Country Name (2 letter code) [AU]:KE State or Province Name (full name) [Some-State]:Nairobi Locality Name (eg, city) []:Nairobi Organization Name (eg, company) [Internet Widgits Pty Ltd]:Computingpost Organizational Unit Name (eg, section) []:Computingpost Common Name (e.g. server FQDN or YOUR name) []:ldap.example.com Email Address []:[email protected] Please enter the following 'extra' attributes to be sent with your certificate request A challenge password []: An optional company name []: Then sign your certificate: $ sudo openssl x509 -in ldap_server.csr -out ldap_server.crt -req -signkey ldap_server.key -days 3650 Signature ok subject=C = KE, ST = Nairobi, L = Nairobi, O = Computingpost, OU = Computingpost, CN = ldap.example.com, emailAddress = [email protected] Getting Private key Step 2: Configure SSL on LDAP Server Copy Certificates and Key to /etc/ldap/sasl2/ directory. sudo cp ldap_server.key,ldap_server.crt /etc/ssl/certs/ca-certificates.crt /etc/ldap/sasl2/ Set ownership of the certificates to openldap user. sudo chown -R openldap. /etc/ldap/sasl2 Configure LDAP Server to use SSL certificates. Create LDAP configuration file for SSL, $ vim ldap_ssl.ldif dn: cn=config changetype: modify add: olcTLSCACertificateFile olcTLSCACertificateFile: /etc/ldap/sasl2/ca-certificates.crt - replace: olcTLSCertificateFile olcTLSCertificateFile: /etc/ldap/sasl2/ldap_server.crt - replace: olcTLSCertificateKeyFile olcTLSCertificateKeyFile: /etc/ldap/sasl2/ldap_server.key Apply configuration using the following command. $ sudo ldapmodify -Y EXTERNAL -H ldapi:/// -f ldap_ssl.ldif SASL/EXTERNAL authentication started SASL username: gidNumber=0+uidNumber=0,cn=peercred,cn=external,cn=auth SASL SSF: 0 modifying entry "cn=config" Restart LDAP server: sudo systemctl restart slapd Step 3: Configure LDAP Client for TLS/SSL Connection Configure LDAP client to ensure connection between client and server is encrypted. Add TLS_REQCERT allow line to /etc/ldap/ldap.conf . echo "TLS_REQCERT allow" | sudo tee /etc/ldap/ldap.conf Now configure OpenLDAP SSL mechanism by uncommenting the lines below on file ldap.conf. $ sudo vim /etc/ldap.conf # Line 259 - OpenLDAP SSL mechanism ssl start_tls ssl on You can now enjoy SSL connection between LDAP client and Server.
0 notes
Text
OpenSSL: Creating/Inspecting Key Pair, Encrypting/Decrypting and Sign/Verify
OpenSSL: Creating/Inspecting Key Pair, Encrypting/Decrypting and Sign/Verify
Hello Guys, We are back with new article on OpenSSL. Secure Layer Certification on your Network to secure data transfer. In this Tutorial, you’ll learn how to generate RSA private and public key pairs using the OpenSSL utility, So without wasting your time lets begin…. OpenSSL is a commercial-grade utility toolkit for Transport Layer Security (TLS) and Secure Sockets Layer (SSL) protocols. It’s…

View On WordPress
0 notes
Text
Come installare un certificato SSL e usare HTTPS in localhost / MAMP
In genere molti sviluppatori lavorano con il proprio computer e usano magari MAMP per far girare i propri siti web in locale, nel qual caso può sorgere il bisogno di testare i propri lavori anche con un certificato SSL e in https in localhost, vediamo come si può fare utilizzando il proprio Mac Osx (in questo caso High Sierra 10.13.6), MAMP con Apache e Chrome.
Installare MAMP
Se non lo avete installato, ovviamente il primo passo è installare MAMP. MAMP è una soluzione veloce per macOS e Windows per crearsi un ambiente di sviluppo locale. Combina i software che in genere troviamo nel server hosting per far girare il nostro sito web: Apache oppure NGINX e MySQL, PHP ed è una applicazione molto usata dagli sviluppatori in genere. Non mi dilungo su come installarlo, in rete si possono trovare migliaia di tutorial per questo.
Generazione di un certificato autofirmato per uso locale
Da Chrome 58, i certificati da utilizzare su localhost devono avere un nome alternativo soggetto SAN. Ottenere un certificato con le giuste proprietà può essere un compito scoraggiante, ma fortunatamente in rete si possono trovare delle soluzioni. La guida scritta da Alexander Zeitler può essere di aiuto per questo, bisogna usare un po' il terminale e la riga di comando, ma non dovrebbe essere troppo complicato seguendo le sue istruzioni. Riassumiamo in pratica come si crea un certificato con SAN per localhost:
Generazione del certificato
Apriamo un terminale e digitiamo i comandi di seguito: mkdir ~ / ssl / che serve per creare una directory chiamata ssl nella cartella principale, fatto questo dobbiamo posizionarci nella directory creata digitando: cd ~ / ssl a questo punto creiamo un file chiamato server.csr.cnf . Ognuno userà il suo editor di testo preferito, io in questo caso sto usando vi e con un comando solo creo e apro il file: vi server.csr.cnf Appena vi compare il file vuoto e aperto digitate il comando i che attiva la modalità di inserimento dati dell'editor vi e quindi fate un copia e incolla o scrivete le seguenti informazioni (se avete interesse a capire di più sugli attributi di ogni campo dopo potete consultare questa guida di Oracle). Chiaramente potete modificare gli attributi a piacere per inserire quelli della vostra organizzazione: default_bits = 2048 prompt = no default_md = sha256 distinguished_name = dn C=US ST=New York L=Rochester O=End Point OU=Testing Domain emailAddress=your-administrative-address@your-awesome-existing-domain.com CN = localhost Appena sicuri di aver copiato tutto e/o di avere scritto bene, per salvare il file, digitare prima il tasto ESC, e poi :wq Seguito da invio. In questo modo si salva il tutto e si esce dalla modifica del file. Ora abbiamo bisogno di creare un altro un file chiamato v3.ext vi v3.ext sempre all'apertura del file digitiamo il comando i per iniziare l'inserimento e copiamo il seguente contenuto: authorityKeyIdentifier=keyid,issuer basicConstraints=CA:FALSE keyUsage = digitalSignature, nonRepudiation, keyEncipherment, dataEncipherment subjectAltName = @alt_names DNS.1 = localhost Come prima di nuovo digitiamo ESC per uscire dalla modalità inserimento e per salvare uscire di nuovo digitiamo: :wq Ora verifichiamo che i file siano nella directory digitando: ls -la Che mostrerà tutti i file nella directory ~/ssl/. E magari controlliamone il contenuto a video con il comando: cat (nomedelfile) per verificare di aver scritto bene tutto. A questo punto siamo pronti per generare una chiave privata RSA, quindi digitiamo a terminale il seguente comando: openssl genrsa -des3 -out ~ / ssl / rootCA.key 2048 Fatto questo Successivamente genereremo il certificato radice (root) che sarà valido per 1024 giorni: openssl req -x509 -new -nodes -key ~ / ssl / rootCA.key -sha256 -days 1024 -out ~ / ssl / rootCA.pem Successivamente andiamo a creare la chiave privata per il certificato (server.key): openssl req -new -sha256 -nodes -out server.csr -newkey rsa: 2048 -keyout server.key -config Read the full article
0 notes
Text
Native/Web Facebook Authentication with Firebase in Ionic
The Firebase JavaScript SDK - which we will be using in this tutorial - provides a really simple web-based method for authenticating your users in an Ionic application by using Facebook. If we are intending to launch the application as a PWA then this method will work fantastically.
However, if we are using Capacitor (or Cordova) to create native builds for the iOS/Android platforms, this web-based authentication flow becomes a little bit more awkward.
If you are using Facebook for authentication, then you are probably expecting that your users will have the native Facebook application installed on their iOS/Android device. If we make use of that native Facebook application (which the user is probably already logged into) we can provide a really smooth log-in experience, where the user will just need to click to allow access to your application.
The downside of using a web-based authentication flow is that we won’t be able to utilise the native Facebook application in the login flow, it would have to be done through the browser instead, which would likely require the user to manually enter in their username and password. This isn’t ideal, and doesn’t provide a good user experience (in fact, this is likely something that would cause users to quit the app right away).
But do not despair! In the wise words of everybody’s favourite commercial taco meme: Por qué no los dos?:

Fortunately, Capacitor (and Cordova if you prefer) will allow us to quite simply use both of these authentication methods. When our code is running on the web we will use the web-based authentication flow, and when the application is running natively we will use the native authentication flow.
Before We Get Started
Last updated for Ionic/Angular 4.7.1
This is an advanced tutorial, and I will be assuming that you already have a reasonably good understanding of how to use both Ionic and Angular, and also how to set up and configure native platforms with Capacitor. Although I won’t be explaining the more basic concepts in this tutorial, I will try to link out to additional resources where possible for those of you who might not be as familiar.
This tutorial will be specifically for Ionic/Angular, but it should be quite adaptable to other frameworks. For example, I have previously covered a similar process for an Ionic/StencilJS application that used Anonymous authentication instead of Facebook: Firebase: Anonymous Authentication. It would require a bit of tweaking, but you could implement most of the concepts we will be discussing in this tutorial in an Ionic/StencilJS application as well.
We will not be building the application from scratch in this tutorial, I will just be using a Login page and a Home page as an example which you could then integrate into however your application is set up. If you don’t already have an application to work with, just create a new blank Ionic/Angular application:
ionic start ionic-facebook-login blank --type=angular
create a Login page:
ionic g page Login
and set up your routes in src/app/app-routing.module.ts as follows:
import { NgModule } from "@angular/core"; import { PreloadAllModules, RouterModule, Routes } from "@angular/router"; const routes: Routes = [ { path: "", redirectTo: "login", pathMatch: "full" }, { path: "home", loadChildren: () => import("./home/home.module").then(m => m.HomePageModule) }, { path: "login", loadChildren: "./login/login.module#LoginPageModule" } ]; @NgModule({ imports: [RouterModule.forRoot(routes, { preloadingStrategy: PreloadAllModules })], exports: [RouterModule] }) export class AppRoutingModule {}
The general idea is that we want the Login page to be the default page, and then we will go through our authentication process before proceeding to the Home page. On future visits to the application, this process should happen automatically (unless the user manually logs out).
1. Set up Facebook
First, we are going to set up everything that is required to interact with Facebook. This will involve quite a few different steps including:
Creating an application through the Facebook developer portal
Installing plugins/packages in our application
Creating a key hash (if you are building for Android)
Configuring for the native platforms
Each of these steps individually are quite straight-forward, but there is a bit to get through.
1.1 Configure the App with Facebook
First, we will register our application through the Facebook developer portal. To do that, follow these steps:
Go to developers.facebook.com and create an account if necessary
Go to My Apps and click Create App
Add a Display Name and click Create App ID
Under Add a Product click Set Up on Facebook Login
Select Settings from the left side menu (we don’t want to use the “Quickstart” we are presented with initially)
Select Basic
From here, you will be able to see your App ID and App Secret - make a note of both of these for later
Scroll to the bottom and click + Add Platform
Select iOS (if you are building for iOS) and add the Bundle ID of your application (e.g. com.yourcompany.yourapp)
Select + Add Platform again and then select Android (if you are building for Android) and add your Bundle ID to the Google Play Package Name
Click Save Changes
If you are building for Android you will also need to create a key hash of your keystore file that will be used to sign your Android application. You will need to provide a key hash for the keystore file you use for the production version of your application, but throughout development, you can just provide a key hash of the default debug.keystore file used by Android Studio.
If you are using a Mac, you can use the following command:
keytool -exportcert -alias androiddebugkey -keystore ~/.android/debug.keystore | openssl sha1 -binary | openssl base64
or if you are using Windows you can use the following command (this will require OpenSSL):
keytool -exportcert -alias androiddebugkey -keystore %HOMEPATH%\.android\debug.keystore | openssl sha1 -binary | openssl base64
You will need to enter the password: android. Once you do this, your key hash will be displayed on the screen and you can add it to the Key Hashes field in the Facebook devleoper portal. Remember that you will need to update this key hash later (or add an additional one) to reflect the keystore file that is used to sign the production version of your application.
NOTE: If you do not already have a JDK installed you may be asked to do so when performing this step. Typically, this isn’t required because Android Studio comes bundled with its own JDK. However, attempting to use this command from your terminal to generate the key hash will require the JDK to be installed separately from Android Studio. If you are on a Mac, you can get around this requirement by using the keytool command in the context of Android Studio like this:
/Applications/Android\ Studio.app/Contents/jre/jdk/Contents/Home/bin/keytool -exportcert -alias androiddebugkey -keystore ~/.android/debug.keystore | openssl sha1 -binary | openssl base64
1.2 Install the Required Dependencies
In order to interact with the Facebook API, we will be installing the cordova-plugin-facebook4 plugin, as well as the matching Ionic Native package for using this plugin. You can install both of these by running the following commands:
npm install cordova-plugin-facebook4 --save
npm install --save @ionic-native/facebook
Since we are using Ionic Native, we will also need to add this plugin into the app.module.ts file as a provider.
Modify src/app/app.module.ts to include the Facebook plugin:
import { NgModule } from "@angular/core"; import { BrowserModule } from "@angular/platform-browser"; import { RouteReuseStrategy } from "@angular/router"; import { IonicModule, IonicRouteStrategy } from "@ionic/angular"; import { AppComponent } from "./app.component"; import { AppRoutingModule } from "./app-routing.module"; import { Facebook } from "@ionic-native/facebook/ngx"; @NgModule({ declarations: [AppComponent], entryComponents: [], imports: [BrowserModule, IonicModule.forRoot(), AppRoutingModule], providers: [ Facebook, { provide: RouteReuseStrategy, useClass: IonicRouteStrategy } ], bootstrap: [AppComponent] }) export class AppModule {}
1.3 Configure the Native Platforms
There is just one more step we need to complete now. In order for the Cordova plugin to work, we need to configure our applications APP_ID and APP_NAME with the native iOS/Android platforms. We can not use “install variables” when using Capacitor, so we will just need to add these values directly to the native projects.
NOTE: This section assumes that you already have Capacitor installed and have added the iOS/Android platforms. If you need more information on installing Capacitor and adding native platforms, you can read more here: Using Capacitor with Ionic.
Run the following command to open your project in Android Studio:
ionic cap open android
Once the project is open, you will need to open the following file:
android > app > src > main > res > values > strings.xml
Inside of this file, you will need to add the following entries inside of the <resources> tag:
<string name="fb_app_id">YOUR APP ID</string> <string name="fb_app_name">YOUR APP NAME</string>
Make sure to replace YOUR APP ID with your Facebook App ID and YOUR APP NAME with your Facebook App Name. Now we need to do something similar for iOS. Open the iOS project with:
ionic cap open ios
Once the project is open, you should:
Click App from the left menu (above Pods, select it don’t expand it)
In the right panel, click the Info tab
Under Custom iOS Target Properties hover over any of the existing Keys and click the little + icon to add a new key
Create a new entry for FacebookDisplayName, set it to String, and add your Facebook App Name
Crete a new entry for FacebookAppID, set it to String, and add your Facebook App ID as the value
Crete a new entry for FacebookAutoLogAppEventsEnabled, set it to Boolean, and set the value to NO
Crete a new entry for FacebookAdvertiserIDCollectionEnabled, set it to Boolean, and set the value to NO
You will need to add an array of values under the LSApplicationQueriesSchemes key, add the key and set it to Array, and then add the following items under that array (by first clicking to expand the key - the arrow should point down - and then right click > Add Row):

The items in the image above are:
Item 0 - String - fbshareextension
Item 1 - String - fb-messenger-api
Item 2 - String - fbapi
Item 3 - String - fbauth2
You will also need to add a new URL Scheme that reflects your Facebook App ID prefixed with fb, like this:
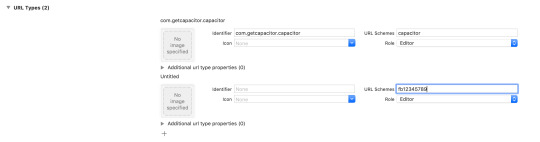
Just scroll down to URL Types and click the + button to add a new URL scheme. You will need to put the fbxxxxx value in the URL Schemes field. If you do not do this, you will get an error complaining about not having the URL scheme registered:
Terminating app due to uncaught exception 'InvalidOperationException', reason: 'fb123456789 is not registered as a URL scheme.
You will also need to update your capacitor.config.json file to include the cordovaLinkerFlags property under ios:
{ "appId": "io.ionic.starter", "appName": "ionic-angular-firebase-facebook", "bundledWebRuntime": false, "npmClient": "npm", "webDir": "www", "ios": { "cordovaLinkerFlags": ["-ObjC"] } }
2. Set up Firebase
We will also need to set up a few things in order to use Firebase in our application, this is quite a bit simpler than the Facebook steps. First, we need to install the firebase package:
Run the following command to install Firebase:
npm install firebase --save
If you would like a little more context/explanation for getting Firebase set up and installed in your application, I would recommend watching the video I linked to earlier: Firebase: Anonymous Authentication. This walks through setting up everything required on screen (except for a StencilJS application). I will just outline the basic steps you need to follow below.
Go to console.firebase.google.com and click Add Project (assuming you have an account)
Once you have created the project and are taken to the Dashboard, click the web icon </> above where it says Add an app to get started
After this step, you will be given your configuration code. We will not be using that code as is in our application, but we will need the details in the config object. Make note of this for later (or you can just come back to the dashboard again to get the configuration code).
You will also need to enable Facebook Authentication inside of Firebase, to do this follow these steps:
Click on Authentication from the menu on the left side of the screen
Enable Facebook as a Sign-in method and add your App ID and App secret from the Facebook application you created in the previous step
Copy the OAuth redirect URI and add it to Products > Facebook Login > Settings under Valid OAuth Redirect URIs in your application in the Facebook developer portal
Click Save
NOTE: Keep in mind that there is also a package available called @angular/fire that you can use to help integrate an Angular application with the various features Firebase offers. Our requirements for this example are quite simple, but depending on what you are trying to do, you might consider using this package.
3. Create the Auth Service
With all of the configuration out of the way, we can finally get to implementing the functionlaity in our application. We are going to create an Auth service that will handle everything for us in an easy to use way. The basic idea is that we will simply call login() or logout() through the service, and it will handle everything for us and figure out the best authentication flow (web or native) for the platform the application is running on.
To create this Auth service, you can run the following command (or you might prefer to add this functionality to one of your own services):
ionic g service services/Auth
We are going to implement the entire code for this at once, and then talk through it.
Modify src/services/auth.service.ts to reflect the following:
import { Injectable, NgZone } from "@angular/core"; import { Platform } from "@ionic/angular"; import { Facebook } from "@ionic-native/facebook/ngx"; import { BehaviorSubject } from "rxjs"; import firebase from "@firebase/app"; import "@firebase/auth"; @Injectable({ providedIn: "root" }) export class AuthService { public loggedIn: BehaviorSubject<boolean> = new BehaviorSubject<boolean>(false); constructor(private platform: Platform, private zone: NgZone, private facebook: Facebook) {} init(): void { // Your web app's Firebase configuration const firebaseConfig = { apiKey: "YOUR-API-KEY", authDomain: "YOUR-DOMAIN.firebaseapp.com", databaseURL: "YOUR-URL", projectId: "YOUR-PROJECT-ID", storageBucket: "", messagingSenderId: "********", appId: "*******" }; // Initialize Firebase firebase.initializeApp(firebaseConfig); // Emit logged in status whenever auth state changes firebase.auth().onAuthStateChanged(firebaseUser => { this.zone.run(() => { firebaseUser ? this.loggedIn.next(true) : this.loggedIn.next(false); }); }); } login(): void { if (this.platform.is("capacitor")) { this.nativeFacebookAuth(); } else { this.browserFacebookAuth(); } } async logout(): Promise<void> { if (this.platform.is("capacitor")) { try { await this.facebook.logout(); // Unauth with Facebook await firebase.auth().signOut(); // Unauth with Firebase } catch (err) { console.log(err); } } else { try { await firebase.auth().signOut(); } catch (err) { console.log(err); } } } async nativeFacebookAuth(): Promise<void> { try { const response = await this.facebook.login(["public_profile", "email"]); console.log(response); if (response.authResponse) { // User is signed-in Facebook. const unsubscribe = firebase.auth().onAuthStateChanged(firebaseUser => { unsubscribe(); // Check if we are already signed-in Firebase with the correct user. if (!this.isUserEqual(response.authResponse, firebaseUser)) { // Build Firebase credential with the Facebook auth token. const credential = firebase.auth.FacebookAuthProvider.credential( response.authResponse.accessToken ); // Sign in with the credential from the Facebook user. firebase .auth() .signInWithCredential(credential) .catch(error => { console.log(error); }); } else { // User is already signed-in Firebase with the correct user. console.log("already signed in"); } }); } else { // User is signed-out of Facebook. firebase.auth().signOut(); } } catch (err) { console.log(err); } } async browserFacebookAuth(): Promise<void> { const provider = new firebase.auth.FacebookAuthProvider(); try { const result = await firebase.auth().signInWithPopup(provider); console.log(result); } catch (err) { console.log(err); } } isUserEqual(facebookAuthResponse, firebaseUser): boolean { if (firebaseUser) { const providerData = firebaseUser.providerData; providerData.forEach(data => { if ( data.providerId === firebase.auth.FacebookAuthProvider.PROVIDER_ID && data.uid === facebookAuthResponse.userID ) { // We don't need to re-auth the Firebase connection. return true; } }); } return false; } }
First of all, notice that we are using a BehaviorSubject:
public loggedIn: BehaviorSubject<boolean> = new BehaviorSubject<boolean>(false);
We are providing this loggedIn observable that we will be able to subscribe to elsewhere, and it will emit data whenever the user logs in or out. We are going to utlise this to trigger our page navigations when necessary. You might wish to implement this in a different way for your own purposes.
Next, we have our init() function that handles configuring Firebase - you will need to make sure to replace the values here with your own config that was provided to you in the Firebase dashboard earlier. As well as configuring Firebase, we also do this:
firebase.auth().onAuthStateChanged(firebaseUser => { this.zone.run(() => { firebaseUser ? this.loggedIn.next(true) : this.loggedIn.next(false); }); });
We set up a listener for onAuthStateChanged which will trigger every time the user logs in or out. When this happens, we want to trigger that loggedIn observable that we created. If there is a firebaseUser it means the user is logged in and so we trigger the observable with true, otherwise we trigger it with false.
Notice that we run this code inside of the run method of NgZone. Since these auth state changes are originating from the Firebase SDK, it is occurring outside of Angular’s “zone”, and so we might run into trouble with Angular’s change detection not triggering as a result of this. To solve this, we just force the code to run inside of Angular’s zone by using NgZone.
Our login() function is quite simple, but it is responsible for the “cleverness” of our service. It just detects whether the application is running natively (i.e. on the capacitor platform) or if it is running through the web. We trigger two different authentication functions depending on the platform.
In both cases, we are just using the authentication code that is provided by Firebase (with some slight modifications). In the case of our “native” authentication, we are manually retrieving the authResponse from Facebook by using the Facebook plugin that we installed - this will allow us to grab the required information for Firebase from the native Facebook application installed on the device. In the case of a “browser” environment, we just run the regular Firebase signInWithPopup method.
We have also defined a logout method that will sign the user out of both Facebook and Firebase. If the application is not running natively, we skip the native Facebook log out.
Before we move on, there is one more thing we need to do, and that is to trigger the init method of our Auth service at some point. A good place to do this is in the root component.
Call init inside of src/app/app.component.ts:
import { Component } from "@angular/core"; import { Platform } from "@ionic/angular"; import { SplashScreen } from "@ionic-native/splash-screen/ngx"; import { StatusBar } from "@ionic-native/status-bar/ngx"; import { AuthService } from "./services/auth.service"; @Component({ selector: "app-root", templateUrl: "app.component.html", styleUrls: ["app.component.scss"] }) export class AppComponent { constructor( private platform: Platform, private splashScreen: SplashScreen, private statusBar: StatusBar, private authService: AuthService ) { this.initializeApp(); } initializeApp() { this.authService.init(); this.platform.ready().then(() => { this.statusBar.styleDefault(); this.splashScreen.hide(); }); } }
4. Use the Auth Service
Finally, we just need to make use of our Auth service. To do that, you might implement some logic on your Login page that looks like this:
import { Component, OnInit } from "@angular/core"; import { NavController, LoadingController } from "@ionic/angular"; import { AuthService } from "../services/auth.service"; @Component({ selector: "app-login", templateUrl: "./login.page.html", styleUrls: ["./login.page.scss"] }) export class LoginPage implements OnInit { private loading; constructor( public authService: AuthService, private navCtrl: NavController, private loadingCtrl: LoadingController ) {} async ngOnInit() { await this.showLoading(); this.authService.loggedIn.subscribe(status => { this.loading.dismiss(); if (status) { this.navCtrl.navigateForward("/home"); } }); } async login() { await this.showLoading(); this.authService.login(); } async showLoading() { this.loading = await this.loadingCtrl.create({ message: "Authenticating..." }); this.loading.present(); } }
The key part here is that we subscribe to that loggedIn observable, and then trigger the navigation if we receive a true value from that. All we need to do is call the login method at some point to kick off the process (e.g. when the user clicks the login button). We have also added in a loading overlay here so that something is displayed whilst the authentication with Facebook is happening.
We can also do something like the following on the Home page to log the user out:
import { Component, OnInit } from "@angular/core"; import { NavController } from "@ionic/angular"; import { AuthService } from "../services/auth.service"; @Component({ selector: "app-home", templateUrl: "home.page.html", styleUrls: ["home.page.scss"] }) export class HomePage implements OnInit { constructor(public authService: AuthService, private navCtrl: NavController) {} ngOnInit() { this.authService.loggedIn.subscribe(status => { if (!status) { this.navCtrl.navigateBack("/login"); } }); } }
Summary
The result of the work we have done above is a seamless login experience with Facebook, regardless of whether the application is running as a PWA or natively on iOS or Android. There is quite a lot of set up work involved to get the native Facebook authentication working, but it is well worth it for the improved experience that it provides.
We have covered a lot in this tutorial, and I didn’t want to bloat it with even more stuff. However, it would also be a good idea to combine this functionality with an “auth guard” to “protect” specific routes from being accessed by users that are not authenticated. I have another tutorial available on doing that which you can check out here: Prevent Access to Pages in Ionic with Angular Route Guards.
via joshmorony - Learn Ionic & Build Mobile Apps with Web Tech https://ift.tt/2MvJ1X9
0 notes
Text
TMail - Multi Domain Temporary Email System
New Post has been published on https://intramate.com/php-scripts/tmail-multi-domain-temporary-email-system/
TMail - Multi Domain Temporary Email System
LIVE PREVIEWGet it now for only $30
8th February, 2020 – Download email option is now available in v5.5 with other automatically generation of API key in Admin Panel. This version also contains few bug fixes as well. Click here to see full changelog
TMail is simple to use, fast and mobile ready temporary email system with impressive feature set. It takes just 3 min to install TMail on your server. You can watch video tutorial on how to install TMail here – https://www.youtube.com/watch?v=QcIeTlGNJqo
Requirements
Below are server requirements. Usually, all major hosting providers covers each and every requirement specified below.
Server Requirements
PHP >= 7.1.3
MySQL >= 5.1
OpenSSL PHP Extension
PDO PHP Extension
Mbstring PHP Extension
Tokenizer PHP Extension
XML PHP Extension
Ctype PHP Extension
JSON PHP Extension
BCMath PHP Extension
IMAP PHP Extension
iconv PHP Extension
ZIP PHP Extension
Set allow_url_fopen = ON
Email with IMAP Support
Default Email Forwarder (Catch all Email)
Everything which requires Laravel to run
Note : New version of TMail will not work in sub directory. You can either install TMail on Sub Domain or a Proper Domain
Don’t hesitate to contact if you have any questions
Support
Need help in installing? Did you find any bug? Having some amazing ideas? Throw them here
Top quality support with 48hrs response time is always available to support you with any question or query you might have.
Feedback
Your honest review is always important. It encourages and helps to improve my product.
Special Thanks To
Omar Abubker – Arabic Translation – Connect RhoG725 – Spanish Translation – Connect
Changelog
v5.5 - 3 February 2020 - Added ability to Download Email - Added missing logout on mobile screens - Added functionality to automatically generate API Key in Admin Panel - Fixed console errors - Fixed ENV file getting cleared v5.4 - 2 December 2019 - Added more refined Ad Spaces - Fixed page url appended if set as homepage - Fixed API Issues - Fixed Password Reset Issue - Fixed Logo getting replaced after update issue v5.3 - 4 October 2019 - Re-organised Admin Panel - Added ability to add custom header for Pages (for Meta Tags, etc) - Added function to delete emails after specific seconds, hours, minutes and days - Fixed menu saving issue - Fixed weird code being shown with Google Adsense - Fixed console error in Admin Panel - Fixed "View All Emails" button being non functional on iPad / iPhone - Fixed inline images not being displayed - Fixed TMail buttons colors going back to default after language change v5.2 - 8 August 2019 - Added WordPress Blog Integration - Added support to delete emails via CRON - Added support to check for emails in CC field - Added ability to change timezone - Fixed attachments not getting deleted after email deletion - Fixed Visual Texts - Fixed Forbidden email Ids being case insensitive v5.11 - 13 June 2019 - Open Social Media Links in New Tab - Add Custom Header Field - Open Email Content Links in New Tab - Ads and Custom Code Issues v5.1 - 5 June 2019 - Added IP Logs - Added Custom CSS and JS Options - Fixed Social Links Issue - Fixed Ad Space Issues v5.0 - 2 June 2019 - Revamped UI and Backend Functionality - Upgraded App to Utilize Laravel Framework - Page Module - Menu Module - Multiple API Keys - Auto Generate Email - Stats Functionality - Social Media Links - Support for PHP v7.1 and above v4.3.7 - 5 March 2019 - Added Ads on Homepage (Top & Bottom) - Added Language support for Push Notifications - Fixed error on PHP 7.0 (Modern Layout) v4.3.6 - 19 January 2019 - Added ability to change application colors from Admin Panel (Modern Layout) - Added ability to logout from Admin Panel - Fixed UI issue related to switching email on mobile - Fixed Clear email button issue on mobile v4.3.5 - 12 January 2019 - Added "Test SMTP Connection" in Admin Panel - Fixed 'DIE' notification error - Fixed countdown issue in Modern - Minor Design Fix v4.3.4 - 30 December 2018 - Fixed PHP Server Variables Issues - Minor Design Fix v4.3.3 - 26 December 2018 - Added API Support - Added countdown in Modern Layout v4.3.2 - 16 December 2018 - Fixed loading screen issue - Fixed translation issues in few seconds - Fixed timezone bug v4.3.1 - 24 November 2018 - Fixed attachment issue while deleting or download email - Auto delete attachments after X days based on delete emails settings v4.3 - 22 November 2018 - Added attachments functionality - Added ability to encode email ID in URL - Fixed minor code issues v4.2 - 9 October 2018 - Fixed language string - Fixed bug in switch ID drop-down in Modern Layout - Fixed mails not getting cleared after email IDs are switched v4.1 - 16 August 2018 - Fixed German Language Issue - Push Notifications in Modern Layout - Ability to change Timezone - The ability for the user to Clear Email List - Tracking Codes can now be added directly from Admin Panel v4.0 - 15 August 2018 - Modern Layout Released - Menu Links Support - Minor Bug Fixes v3.4 - 3 July 2018 - Ability to enable or disable Push Notifications - Address not allocated Bug Fix - Minor Bug Fixes v3.3 - 7 April 2018 - Added ability to save a list of Emails - Added Web Notifications - Added ability to set Default language in Admin Panel - Minor Bug Fixes v3.2 - 26 February 2018 - Added Searchability for EMails - Added Multi - Email Functionality - Minor Bug Fixes v3.1 - 20 October 2017 - Added Admin Panel - Fixed Minor Cosmetic Issues - Optimized Configuration and Options Data v3.0 - 11 September 2017 - Added ability to save IP Logs with Date and EMail-ID created - Added option to use or not to use SSL for connecting to server - Added configurable about us - Added forbidden mail ids - Optimized Downloading of EMails - Fixed address attribute PHP Notice - Fixed countdown timer - Fixed total emails count in the title bar v2.2 - 19 August 2017 - Added ability to view total mails count in the title bar - Added 2 more languages (German & Polish) - Fixed minor bugs and cosmetic issues v2.1 - 28 July 2017 - Added 7 different languages support. - Fixed iPhone blank email. - Fixed blank email received from some email servers. v2.0 - 7 July 2017 - Added Custom Email ID Option - Added Ads Support - Added moving countdown for retrieval of new emails - Added option to customize 'After X number of days, emails gets deleted from server' - Added option to set refresh time for retrieval of new emails - Optimized JS for setting up Email ID - Optimized security - Fixed minor bug for Download Email option on some servers - Fixed formatting issue on Email v1.2 - 29 June 2017 - Added button for getting new Email ID - Fixed CSS issue - Fixed responsive issue on iPhone 4 and iPhone 4s v1.1 - 25 June 2017 - Fixed accordion expand issue - Fixed download button issue - Optimized retrieval of new emails v1.0 - 22 June 2017 - Initial Release! Yay!
LIVE PREVIEWGet it now for only $30
0 notes
Quote
Running your web server without SSL can create the impression that your content is not secure. Chrome shows a nasty "Not Secure" note next to your domain. It sucks. But it only takes 30 minutes of your time to start serving via HTTPs on a Node/Express server. Just follow the instructions in this SSL tutorial. You can follow me on Twitter to get updates on my free coding tutorials, or just check out this page with my coding books on JavaScript and CSS if you need a copy. SSL Connections via HTTPS Protocol SSL encrypts outgoing and incoming data between client and server. This helps provide increased security for data such as credit card numbers, emails and passwords. With HTTP protocol, the data is sent as-is. (Perhaps, it may have been compressed, but not really encrypted by an encryption algorithm.) This is important because unless you implement SSL the data sent to the server is not secure. Also Chrome and other browsers will display "Not Secure" message next to your domain name which might prevent users from buying your products. Luckily for us Node already has a module called https: // Import the https module let https = require("https"); // Choose port based on whether we're on loaclhost or production server const port = process.env.node_env === 'production' ? 443 : 3000; // Link to generated certificate files // (replace example.com with your own domain name) // (see how to generate them later in this tutorial) const key = `/etc/letsencrypt/live/example.com/privkey.pem`; const cert = `/etc/letsencrypt/live/example.com/fullchain.pem`; const options = { key: fs.readFileSync(key), cert: fs.readFileSync(cert) }; https.createServer(options, function(request, response) { /* Your SSL server is running */ /* Of course here... you would write your API implementation */ }).listen(port); But if you are running on Express, you don't even have to do that. Express will simply take an array of cert files pointing to the certificates we will generate later in this tutorial. Here is an Express.js example: // Import packages const express = require('express'); const https = require('https'); const port = 443; // Create Express app const app = express(); let site = 'example.com'; let port = 443; // Link to generated certificate files // (replace example.com with your own domain name) // (see how to generate them later in this tutorial) const certificates = { "key": fs.readFileSync(`/etc/letsencrypt/live/${site}/privkey.pem`), "cert": fs.readFileSync(`/etc/letsencrypt/live/${site}/fullchain.pem`) }; const server = event => { console.log(`${site} is listening on port ${port}!`); }; // Launch Node server with Express "app" https.createServer(certificates, app).listen(port, server); Remember that every time you add a new require statement to your app you need to also actually install the package associated with it: npm install https --save The --save directive adds a package to your package.json file. We can now use this https module to start our server. But that's not enough. The most important part is setting up the SSL certificate so that the server does a handshake with the certificate authority before serving content and a lock icon appears: Lock icon on infinite sunset - my secure PWA app.We'll use LetsEncrypt - it's free and easy to set up. Unlike openssl, LetsEncrypt generates production-quality SSL certificates that should be enough for everything. Let's Encrypt Let's go over setting up free SSL certificates on Linux-based operating systems. The preferred OS for most web host providers. However, the commands described in this section are the same in Terminal and bash.exe on Windows. To use LetsEncrypt we must update packages, install git (if you haven't already,) clone and install the letsencrypt repository and execute a few bash commands. For no reason in particular I'll use bash.exe on Windows 10, but you can use Terminal on OSX. First, I will launch bash.exe from the Start menu. The command line window opens: Let's login to your web host as root user using the ssh command. Just replace XX.XXX.XX.XXX with the static IP address where you host your website. You will be asked to enter your root user password (unless you have passwordless login set up but that's outside of this tutorial's scope.) We should now be logged into the web host. See server log below: You will be greeted by a screen similar to this. (I'm running Ubuntu 18.) To install certbot we need to update the packages first. This is because certbot developers continue applying improvements and your Ubuntu server may not have the latest version on initial server installation. Run sudo add-apt-repository ppa:certbot/certbot command to add certbot repository to your Ubuntu server: Just press Enter and the latest packages will be added to the mirror files which is a list of links pointing to the latest version of the packages. Now run the sudo apt-get update to actually download the updated packages: This step is important - it will update your certbot packages to the latest version. If you find yourself on CentOS or Debian you can do the same thing as follows: On CentOS run sudo yum update && sudo yum upgrade. On Debian run sudo apt update && sudo apt upgrade. Linux && symbols will cause your packages to be updated followed by being upgraded without having to execute each command separately. Installing certbot Run apt-get install certbot to install the certbot package. We're already logged in as root so there is no need to use the sudo command (otherwise also prepend sudo.) Press Y and hit Enter. Or run the same command with -y or --yes flag. The installation log should roll on the screen and after that we should be good to go! Installing git In order to install letsencrypt we need to clone the latest version from git. But in order to do that we first need to make sure we have git installed on our system: The installation process will scroll on your screen... We can now use git. If you're in the Terminal chances are you already have the packaget installers apt or apt-get. Keep in mind in this example we're in bash.exe on Windows 10. If sudo or apt-get are not working there is a work-around. First...if you are hosting your server remotely use ssh in bash.exe to log into your server and all linux commands will become available over there. Second if you are developing on localhost and don't need to log into your remote host, you must install Ubuntu for Windows in addition to bash.exe. Once installed you should have apt-get and other common Linux commands in your Windows 10 bash. Cloning letsencrypt Now we're ready to clone the latest version of letsencrypt to our server. This is accomplished by running the following Linux command: git clone https://github.com/letsencrypt/letsencrypt /opt/letsencrypt Just copy and paste it into your Terminal or bash! You might also want to precede it with sudo as shown in the following example. Cloning begins... Create SSL Certificate Finally, we're ready to create the SSL certificate that will ultimately enable us to serve files via https instead of http. Following previous steps type this command to navigate to newly created letsencrypt directory: cd /opt/letsencrypt You will navigate to the folder where textbf{letsencrypt} was just installed. cd stands for Change Directory on Linux-based OS. After that run the following command... sudo -H ./letsencrypt-auto certonly --standalone -d A.com -d www.A.com (Just don't forget to replace A.com with your domain name.) Initiate creation of the SSL certificate for example.com (Again, make sure it matches your domain name instead of example.) After this you will see letsencrypt-auto command generating the needed certificate files with certbot and automatically creating http challenges. At this stage you might be asked several questions. I'm not going to include them here to save space. Just enter your email address when asked and a few other things. Choose the (A)gree or (Y)es option every time you're asked (required.) Let's take a look at what actually happened once the certificate was generated. The important parts are highlighted: LetsEncrypt created and verified http challenges (this is needed in order to verify that the domain name belongs to you, but in this instance this is done for us automatically.) It also generated two pem keys for our example.com domain. Congratulations on your secure SSL domain! At this point your domain name is https-enabled. Assuming you passed the two keys to your Node or Express as shown in the very beginning of this tutorial. Just restart the server and you should see the secure lock in the address bar. But there is one more thing! Let's check where the files live and get familiar with the directory where the keys were actually generated: The certificate files were created in /etc/letsencrypt/live directory. Let's output the contents of the live directory. This is where letsencrypt saved all certificate keys for all domain names on the server under their respective folder names. Run the ls command to list the contents of the directory. You will see that our site example.com now has a folder (should show your domain name.) In the example.com directory you will find several pem files generated by letsencrypt. We only need cert.pem and privkey.pem. We're ready to start using the certificate. All we need to do is add some new code to the existing index.js file. ACME Challenge If you completed the steps to install the SSL certificate in the previous section you don't need to do this next step. But in some cases ACME challenges are required by some server configurations in order to verify that you are the owner of the domain name. Run certbot certonly --manual or certbot certonly --manual (note this is actually double dash as shown below, not one dash.) If you're hosting multiple domains, you can use the same certificate, so just specify as many domain names as you need separated by a space or comma. In this case we're simply adding example site awesomesite.com Enter your domain name (without www.) and press Enter. Type Y and press Enter to agree and proceed. To verify we own the domain name, we need to manually create the file named afBX9EXvQqUqzFooe02-22EfJ5TzcniFw7CvqlaMXCA -- just the part before the dot (.) highlighted in yellow in the screenshot above. Place this file into your .well-known/acme-challenge directory on your server. (At the root folder of your site.) You might have to create these folders first. Now edit the contents of that file by pasting the whole string generated by certbot into it. In our case it is the long text afBX9EXvQqUqzFooe02-22EfJ5TzcniFw7CvqlaMXCA.rX9ThTxJ4y47aLEr7xgEWcOm4v7Jr5kJeT4PLA98-0 Keep in mind that this filename will be generated every time you run certbot. So if you've already run this command before it should be changed again. Press Enter to Continue. At this point certbot will verify the existence of the file. Again, if you used the first method in this section without the acme challenge you should already be good to go. Adding PEM Files To Enable HTTPS Server Navigate to /etc/letsencrypt/live/site.com directory to verify the pem files were actually generated by the steps taken in the previous section. Now that we have privkey.pem and cert.pem generated we need to pass them to our Node server configuration using an options object. const express = require('express'); const https = require('https'); const port = 443; // Create Express app const app = express(); let site = 'example.com'; let port = 443; const certificates = { "key": fs.readFileSync(`/etc/letsencrypt/live/${site}/privkey.pem`), "cert": fs.readFileSync(`/etc/letsencrypt/live/${site}/fullchain.pem`) }; const server = event => { console.log(`${site} is listening on port ${port}!`); }; // Launch Node server with Express "app" https.createServer(certificates, app).listen(port, server); Just replace example.com with your actual domain name. For https connections it is proper to use port 443. However this is not a requirement - any allowed port number will still work. Whatever port you are using you also need to open it on your system for it to start working. Update the index.js file with code above. Log into your web host. Navigate to the root directory of your application and run node index. If all goes well at this point your server will be accessible via https protocol and the "Not Secure" message in Chrome (and some other browsers) should disappear. But There Is One More Thing... A Common Stumbling Point A certificate chain is the list of certificates that contains SSL certificate, intermediate certificate authorities and root certificate authority that enables the connecting device to verify that the SSL certificate is trustworthy. This is required for production servers. At this point your https site will open in Chrome and IE without a hitch! But if you open it in Firefox you may still see the lock icon. Firefox (among many other programs) hinges on checking the certificate chain. To properly set up a certificate you have to set up a certificate chain not just one key. Chrome and IE gracefully overlook this detail and show connections as secure. If you don't link to the certificate chain, you will not be able to successfully validate your https connection. This might interfere with things like adding Twitter cards to your site (because Twitter cards with images stored at a https address require chain verification) when looking up your card image via Twitter meta tags. And that's just one example. Many issues can arise if you don't link to the certificate chain. Luckily for us, the solution is simple. In previous steps Let'sEncrypt already generated fullchain.pem file in the same directory with cert.pem. All we have to do change cert.pem to fullchain.pem in the previous source code example as follows. Change the following line: const cert = /etc/letsencrypt/live/site.com/cert.pem; To: const cert = /etc/letsencrypt/live/site.com/fullchain.pem; Restart your Node server with node index.js and you should have a properly installed and fully working SSL certificate!
http://damianfallon.blogspot.com/2020/04/how-to-install-ssl-certificates-for.html
0 notes
Text
Social Network Integration on Android
Many mobile apps require a user to create an account or to sign up for a service in order to use them. From a user’s point of view, this can be somewhat troublesome or annoying, and it’s not always the best user experience.
So how can you overcome this when building your app? To give users a seamless experience, you can give them the ability to sign in to your app with just a single tap of a button, using one of their social networking accounts, e.g., Facebook or Twitter.
In this tutorial, you’ll learn how to integrate a user’s Facebook and Twitter accounts into your Android app to allow them to log in and also share posts from your app into their social networking account.
Getting Started
Use the Download Materials link at the top or bottom of this tutorial to download and extract the Starter Project for this tutorial.
Next, open Android Studio 3.1.3 or later, and choose Open an existing Android Studio project from the welcome screen or File > Open form the menu. Open the folder root folder of the Sharetastic starter project.
You’ll be working on an app called Sharetastic, which allows a user to share a status update to Facebook or a tweet to Twitter.
Build and run the project and you’ll see the login screen for the app:
As of now, the app does nothing. In this tutorial, you’ll go through it step-by-step and complete the social network integration.
Connecting With Facebook
To connect your app to Facebook, you’ll need an active Facebook account with which you’ll create an app to get a Facebook App ID.
Creating a Facebook App ID on Developers Portal & Setting Up
Go to the Facebook Developers Portal (log in with your Facebook account if needed).
On this page, you’ll see an option to Add a New App. Click the button and you’ll then need to create a Facebook App ID if you haven’t already:
Enter Sharetastic in the Display Name field and enter your email address in the Contact Email field, then click Create App ID. Facebook will prompt you with a captcha dialog; complete the request and click Submit.
Facebook will then direct you to another page:
Click on Set Up on the Facebook Login component. Then, from the new page containing the platform options, select Android.
You’ll then see the following page with the steps to build your Android project:
At this point, you will skip steps 1 and 2 because they have already been completed for you in the starter project. Even so, it’s good to know what they are:
Step 1 includes downloading the Facebook SDK, and Step 2 tells you how to import it into the project. Here, Gradle will be used to sync the Facebook SDK rather than manually downloading the SDK, which you can see in the app module build.gradle file:
implementation 'com.facebook.android:facebook-login:[4,5)'
In Step 3, you’ll add your Package name com.raywenderlich.sharetastic and default Activity name com.raywenderlich.sharetastic.MainActivity.
Click on Save and then Continue (you may need to also confirm that your app is not yet in the Play Store).
For Step 4, you need to create a Development Key Hash and also a Release Key Hash if your app is live. A key hash is a 28-character-long string, which Facebook uses to verify the communication between your app and Facebook.
A key hash can be generated by typing the following command in the terminal:
For Mac and Linux:
keytool -exportcert -alias androiddebugkey -keystore ~/.android/debug.keystore | openssl sha1 -binary | openssl base64
For Windows:
Things are not that simple here. First, you need to have keytool from the JDK, Secondly, get the openssl library here.
keytool -exportcert -alias androiddebugkey -keystore "C:\Users\USERNAME\.android\debug.keystore" | "PATH_TO_OPENSSL_LIBRARY\bin\openssl" sha1 -binary | "PATH_TO_OPENSSL_LIBRARY\bin\openssl" base64
Finally, after generating your Key Hash, paste it in the section provided in the fourth step.
Click Save then Continue.
For Step 5 on Single Sign On, if you’re working on a different app that is using notifications, you want want to set it to Yes, but, for now, leave it set to No and click on Save, then Next.
Now, for Step 6, open up strings.xml in the app/res/values folder, and paste the following after updating the placeholders with the values provided by Facebook:
<string name="facebook_app_id">Your-App-ID</string> <string name="fb_login_protocol_scheme">fbYour-App-ID</string>
Then, open AndroidManifest.xml and add the permission for accessing the Internet:
<uses-permission android:name="android.permission.INTERNET"/>
Additionally, under the application tag, paste the needed Facebook meta-data and activities:
<meta-data android:name="com.facebook.sdk.ApplicationId" android:value="@string/facebook_app_id"/> <activity android:name="com.facebook.FacebookActivity" android:configChanges= "keyboard|keyboardHidden|screenLayout|screenSize|orientation" android:label="@string/app_name" /> <activity android:name="com.facebook.CustomTabActivity" android:exported="true"> <intent-filter> <action android:name="android.intent.action.VIEW" /> <category android:name="android.intent.category.DEFAULT" /> <category android:name="android.intent.category.BROWSABLE" /> <data android:scheme="@string/fb_login_protocol_scheme" /> </intent-filter> </activity>
Finally, you’re done setting things up from the Facebook developer console! The remaining steps you’ll need to login are handled in the next section.
Now it’s time move on to writing some code.
Log in With Facebook
Open up the main layout file activity_main.xml and add a Facebook login button below the TextView:
<com.facebook.login.widget.LoginButton android:id="@+id/facebookLoginButton" android:layout_width="wrap_content" android:layout_height="47dp" android:paddingBottom="15dp" android:paddingStart="10dp" android:paddingEnd="5dp" android:paddingTop="15dp" android:textSize="16sp" app:layout_constraintBottom_toBottomOf="parent" app:layout_constraintLeft_toLeftOf="parent" app:layout_constraintRight_toRightOf="parent" app:layout_constraintTop_toTopOf="parent" app:layout_constraintVertical_bias="0.58" />
In MainActivity, create the following constants at the top of the class:
val EMAIL = "email" val PUBLIC_PROFILE = "public_profile" val USER_PERMISSION = "user_friends"
Inside the empty method facebookSetup(), add the following code:
callbackManager = CallbackManager.Factory.create() facebookLoginButton.setOnClickListener { facebookLoginButton.setReadPermissions(Arrays.asList(EMAIL, PUBLIC_PROFILE, USER_PERMISSION)) facebookLoginButton.registerCallback(callbackManager, object : FacebookCallback<LoginResult> { override fun onSuccess(loginResult: LoginResult) { } override fun onCancel() { } override fun onError(exception: FacebookException) { Toast.makeText(context,exception.localizedMessage, Toast.LENGTH_SHORT).show() } }) }
This code first initializes the CallbackManager Facebook property that was declared but uninitialized in the starter project. It then adds a click listener for the Facebook login button. Inside the click listener, it provides the permissions needed to read the email, public profile and friends of the user. It also logs in the user by returning the AccessToken.
Then in onActivityResult(), pass the result onto the CallbackManager:
callbackManager.onActivityResult(requestCode, resultCode, data)
In the onSuccess of the callback, you’ll get the user’s profile by using Facebook’s Graph API. You’ll then send the user to the Share screen. First, we need to talk to the Graph API.
User Profile from the Graph API
You’ll now create a Kotlin object, whose sole purpose will be to contain the helper methods to connect to the Graph API.
Create an object called Helper in a new package com.raywenderlich.sharetastic.util.
Once created, write the method getFacebookUserProfileWithGraphApi() inside of it:
object Helper { fun getFacebookUserProfileWithGraphApi(context: Context) { if (AccessToken.getCurrentAccessToken() != null){ val activity = context as Activity val request = GraphRequest.newMeRequest( AccessToken.getCurrentAccessToken() ) { jsonObject, _ -> val email = jsonObject?.get("email")?.toString() ?: "" val name = jsonObject.get("name").toString() val profileObjectImage = jsonObject?.getJSONObject("picture")?.getJSONObject("data")?.get("url").toString() } val parameters = Bundle() parameters.putString("fields", "id,name,link,picture.type(large), email") request.parameters = parameters request.executeAsync() } } }
This method uses a call to GraphRequest.newMeRequest() to fetch the userid, name, picture and email of the user who is currently logged in.
To keep things clean, create a package com.raywenderlich.sharetastic.model and create a class in the package called UserModel to contain the user’s data after the Graph API returns the results.
Your UserModel class would look something like this:
class UserModel(val name: String, val userName: String, val profilePictureUrl: String, val socialNetwork: SocialNetwork) : Serializable enum class SocialNetwork { Facebook, Twitter }
I have created the enum class SocialNetwork in the same class; you could create a separate file for that if you wish. The enum class is only for identifying which social network account the user is currently logged in with.
Head back to Helper where you’ll now write the method that will help in sending the user to the Share screen.
fun startShareActivity(context: Context, user: UserModel) { val activity = context as Activity val intent = Intent(context, ShareActivity::class.java) intent.putExtra("user", user) activity.startActivity(intent) activity.finish() }
This code takes the passed-in UserModel and sends it to the ShareActivity.
Go back to the method getFacebookUserProfileWithGraphApi() and after the line:
val profileObjectImage = jsonObject?.getJSONObject("picture")?.getJSONObject("data")?.get("url").toString() ?: ""
add the following:
val user = UserModel(name, email, profileObjectImage, SocialNetwork.Facebook) startShareActivity(context, user)
These lines convert the user’s info to a UserModel and pass it into the method startShareActivity().
After completing that, go back to MainActivity. In the onSuccess inside of facebookSetup(), write:
Helper.getFacebookUserProfileWithGraphApi(context)
The user should only be sent to the Share screen when the user has a valid AccessToken, and this can happen only in the onSuccess block of code.
Additionally, you need to set up a few things in the ShareActivity.
Create a UserModel property in the class:
lateinit var user: UserModel
And inside onCreate(), add:
user = intent.extras.get("user") as UserModel setData(user)
This piece of code is getting the passed in UserModel from the Intent method and passing the data to a new method setData().
The setData() method simply sets up the data in the UI, and includes conditionals that take slightly different actions depending on whether the logged in network is Facebook or Twitter.
fun setData(user: UserModel) { nameTextView.text = user.name userNameTextView.text = if (user.socialNetwork == SocialNetwork.Twitter) "@${user.userName}" else user.userName connectedWithTextView.text = if (user.socialNetwork == SocialNetwork.Twitter) "${connectedWithTextView.text} Twitter" else "${connectedWithTextView.text} Facebook" characterLimitTextView.visibility = if (user.socialNetwork == SocialNetwork.Twitter) View.VISIBLE else View.GONE postButton.text = if (user.socialNetwork == SocialNetwork.Twitter) "POST" else "CREATE POST" Picasso.with(this).load(user.profilePictureUrl).placeholder(R.drawable.ic_user).into(profileImageView) postEditText.visibility = View.GONE }
Now, run your app then tap on Continue with Facebook. You’ll be asked to give your app the permission to access the information. After this step, you’ll be redirected to the following screen:
You’ve successfully logged in!
Sharing on Facebook
It’s time to move on to posting a status to Facebook. For this, you need to change a few things.
Facebook recently changed its documentation and has removed the permission that was once required for the using the Graph API to share something on a user’s timeline. The alternative for that is now using the Facebook Share SDK.
Open the app build.gradle file, and add the following dependency in it:
implementation 'com.facebook.android:facebook-share:[4,5)'
Additionally, in your AndroiManifest.xml add the following line within the application tag:
<provider android:authorities="com.facebook.app.FacebookContentProvider{@string/facebook_app_id}" android:name="com.facebook.FacebookContentProvider" android:exported="true"/>
Now, open the ShareActivity class and write the method for posting status to Facebook:
fun postStatusToFacebook() { val builder = AlertDialog.Builder(this) builder.setTitle("Share Link") val input = EditText(this@ShareActivity) val lp = LinearLayout.LayoutParams( LinearLayout.LayoutParams.MATCH_PARENT, LinearLayout.LayoutParams.MATCH_PARENT) input.layoutParams = lp builder.setView(input) builder.setPositiveButton(android.R.string.ok) { dialog, p1 -> val link = input.text var isValid = true if (link.isBlank()) { isValid = false } if (isValid) { val content = ShareLinkContent.Builder() .setContentUrl(Uri.parse(link.toString())) .build() ShareDialog.show(this, content) } dialog.dismiss() } builder.setNegativeButton(android.R.string.cancel) { dialog, p1 -> dialog.cancel() } builder.show() }
This code will present an alert dialog to allow the user to enter a link to share, and then show the user the Facebook share dialog. We’re not doing any validation on the link other than to check that it’s not blank; you’d want to do some validation to make sure it’s a valid URL.
In later versions of the Facebook Share SDK, including the one you’re using in Sharetastic, you must provide some type of content to share. Your options are links, photos, videos, and other multimedia. See the Facebook Share SDK documentation for more details.
Next, in the postButtonAction() method, inside the setOnClickListener, add a call to the new function:
postStatusToFacebook()
Build and run the app again. You’ll need to tap logout on the Facebook button and re-connect. In a production app, you’ll want to saved the logged in state of the user so that they don’t have to log in again.
Click on CREATE POST. Now, try posting something to Facebook:
After pressing POST, go and check the Facebook app.
Hurray! Your status is posted to Facebook.
Logging Out of Facebook
Logging out is simply a one-line code, but, for logging out, you need to perform two additional tasks. You’ll now write a method in your ShareActivity that’ll do these tasks:
fun sendToMainActivity() { LoginManager.getInstance().logOut() finish() val intent = Intent(this, MainActivity::class.java) startActivity(intent) }
Going over the above: the first line of code allows a user to log out of Facebook. The rest of the lines finish the current activity and take a user to MainActivity. Finally, call this method inside the onOptionsItemSelected like this:
R.id.action_logout -> { sendToMainActivity() return true }
Once you tap the Logout button on top-right of the Share screen, you’ll be logged out from the app and taken to the Home screen.
Now, let’s connect the app with Twitter.
Connecting With Twitter
Like Facebook, you need a working Twitter account in order to integrate Twitter into your app, Twitter provides a Consumer Key and Consumer Secret for communication.
Creating a Twitter App on Developer Portal
Login to Twitter in a browser and head to Twitter’s Application Management Portal and click on Create New App.
Complete the necessary fields with the appropriate information (you’ll need to use a unique name like Sharetastic + your initials, and you also must provide a Privacy Policy URL and Terms of Service URL in order to follow along, but these can be placeholders like example.com) then click Create your Twitter application.
You’ll be taken to the following page:
I had to name the app Share-tastic because Sharetastic wasn’t available. :]
Copy the Consumer Key and Consumer Secret from the Keys and Access Tokens tab and paste them into the strings.xml with the names Twitter_CONSUMER_KEY and Twitter_CONSUMER_SECRET, respectively.
Then click on the Permissions tab.
If you want to get user’s email at the time of login, you have to check the option that says Request email addresses from users then click on Update Settings.
Setting Up
After finishing the creation of the app on the Twitter developer portal, you’ll now move on and add the Twitter Kit dependency.
Adding Twitter Kit Dependency
Note: This step can be skipped because it’s already done in the Starter Project
There are many dependencies provided by Twitter like Twitter Core, Tweet UI, Tweet Composer, and Twitter Mopub. For now, stick with Twitter Core because that’s the only dependency you need for this tutorial.
implementation 'com.twitter.sdk.android:twitter-core:3.1.1'
Paste the above dependency in the app build.gradle file and let the project sync.
Initializing Twitter Kit
Create a CustomApplication class extending from Application under a new package root. Override the onCreate() of the Application class as follows:
class CustomApplication : Application() { override fun onCreate() { super.onCreate() val config = TwitterConfig.Builder(this) .logger(DefaultLogger(Log.DEBUG)) .twitterAuthConfig(TwitterAuthConfig( resources.getString(R.string.Twitter_CONSUMER_KEY), resources.getString(R.string.Twitter_CONSUMER_SECRET))) .debug(true) .build() Twitter.initialize(config) } }
Then open AndroidManifest.xml and inside the tag application, paste the following snippet.
android:name=”com.raywenderlich.sharetastic.root.CustomApplication”
You are done setting up now and are ready to dive into writing some Twitter code!
Log in With Twitter
Add a Twitter login button to activity_main.xml:
<com.twitter.sdk.android.core.identity.TwitterLoginButton android:id="@+id/twitterLoginButton" android:layout_width="wrap_content" android:layout_height="wrap_content" app:layout_constraintBottom_toBottomOf="parent" app:layout_constraintLeft_toLeftOf="parent" app:layout_constraintRight_toRightOf="parent" app:layout_constraintTop_toBottomOf="@+id/facebookLoginButton" app:layout_constraintVertical_bias="0.1" />
Open MainActivity and inside the twitterSetup() method, add the following:
twitterLoginButton.callback = object : Callback<TwitterSession>() { override fun success(result: Result<TwitterSession>) { } override fun failure(exception: TwitterException) { Toast.makeText(context,exception.localizedMessage, Toast.LENGTH_SHORT).show() } }
And in the onActivityResult() method, add the following line:
twitterLoginButton.onActivityResult(requestCode, resultCode, data)
Like the method you wrote that fetches the user info after Facebook’s login is complete, you need to write a similar method for Twitter that gets the user’s info at login.
Open the Helper file and write the following method:
fun getTwitterUserProfileWthTwitterCoreApi( context: Context, session: TwitterSession) { TwitterCore.getInstance().getApiClient(session).accountService .verifyCredentials(true, true, false) .enqueue(object : Callback<User>() { override fun success(result: Result<User>) { val name = result.data.name val userName = result.data.screenName val profileImageUrl = result.data.profileImageUrl.replace("_normal", "") val user = UserModel(name, userName, profileImageUrl, SocialNetwork.Twitter) startShareActivity(context, user) } override fun failure(exception: TwitterException) { Toast.makeText(context, exception.localizedMessage, Toast.LENGTH_SHORT).show() } }) }
You’re using TwitterCore to authenticate the user and then going to the share screen on a successful authentication.
Next, open MainActivity and in the success part of the twitterLoginButton callback, add:
Helper.getTwitterUserProfileWthTwitterCoreApi(context, result.data)
Now, build and run your project and tap on Log in with Twitter. You’ll need to be running Sharetastic on a device or emulator that has the Twitter app installed and in which you are logged in.
You’ll be shown a screen to accept connecting your Twitter account to Sharetastic, and after you allow it, you’ll successfully log in and be taken to the Share screen.
A Tweet for the Tweeps
Before posting a tweet, make the app a little more interactive by placing the Twitter’s character limit — i.e., 240 — and change the TextView count placed on the top right with respect to the number of characters written in the posting TextView.
Write a method onTextChangeListener inside ShareActivity:
fun onTextChangeListener() { postEditText.addTextChangedListener(object : TextWatcher { override fun afterTextChanged(s: Editable) { characterLimitTextView.text = "${s.length}/240" } override fun beforeTextChanged(s: CharSequence, start: Int, count: Int, after: Int) { } override fun onTextChanged(s: CharSequence, start: Int, before: Int, count: Int) { } }) }
This code is handling the character count change logic at runtime.
Furthermore, change the setData() method of ShareActivity by replacing the line that sets the postEditText to be GONE with the following code:
if (user.socialNetwork == SocialNetwork.Twitter) { postEditText.filters = arrayOf<InputFilter>(InputFilter.LengthFilter(240)) onTextChangeListener() } else { postEditText.visibility = View.GONE }
Here, a character limit is applied on the TextView to stop a user from writing more than 240 characters.
Now, move on to posting a tweet. For that, you’ll write another method:
fun postATweet(message: String) { val statusesService = TwitterCore.getInstance().apiClient.statusesService val context = this statusesService.update(message, null, null, null, null, null, null, null, null) .enqueue(object : Callback<Tweet>() { override fun success(result: Result<Tweet>) { Toast.makeText(context,R.string.tweet_posted,Toast.LENGTH_SHORT).show() } override fun failure(exception: TwitterException) { Toast.makeText(context,exception.localizedMessage,Toast.LENGTH_SHORT).show() } }) postEditText.setText("") }
Finally, you need to tweak the postButtonAction() method a little bit:
fun postButtonAction() { postButton.setOnClickListener { view -> if (postEditText.text.toString().isBlank() && user.socialNetwork == SocialNetwork.Twitter) { Toast.makeText(this, R.string.cannot_be_empty, Toast.LENGTH_SHORT).show() } else if (user.socialNetwork == SocialNetwork.Facebook) { postStatusToFacebook() } else { postATweet(postEditText.text.toString()) } } }
Now the time has come in which you post your first tweet!
Build and run the app again. Like before, since you’re not saving the authenticated state of the user, you’ll need to login to Twitter again.
After logging in write, say, Hello Twitter from Sharetastic!
Then tap on POST and open the Twitter app.
You can finally see your tweet.
Feels good, doesn’t it?
Logging Out of Twitter
Like Facebook, logging out is pretty simple. All you have to do is change the method sendToMainActivity() in ShareActivity to the following:
if (user.socialNetwork == SocialNetwork.Facebook) { LoginManager.getInstance().logOut() } else { TwitterCore.getInstance().sessionManager.clearActiveSession() } finish() val intent = Intent(this, MainActivity::class.java) startActivity(intent)
The only change here is that the Twitter session is being cleared.
Once you run the app again, you’ll be able to log out from Twitter as well. :]
Where to Go From Here?
The Final Project for this tutorial can be found in the Download Materials link at the top or bottom of this tutorial. If you try to build the final project, please be sure to add in your own Facebook and Twitter app ID’s and keys.
You now know how to authenticate a user into Facebook and Twitter, post content to each, and log a user out of each.
As was mentioned in the tutorial, in your app you’re going to want to persist the state of the logged in user, so that the user does not have to log in to Facebook or Twitter every time the app runs. Try saving the user state as a challenge, once you’ve worked your way through the tutorial. If the user is logged in, take them right to the share screen.
If you want to explore more about the Facebook SDK and TwitterKit, visit the resources below:
Getting Started with Android Facebook SDK
Twitter Kit for Android
If you have any questions or comments, please let us know in the discussion below!
The post Social Network Integration on Android appeared first on Ray Wenderlich.
Social Network Integration on Android published first on https://medium.com/@koresol
0 notes
Text
Creating a personal VPN
The Razzer is ideal ideal as a personal VPN server. No more censored web as you travel, no more insecure connections from your local cafe WiFi. It’s free and easy. Why would you not do it?
To begin with, this tutorial assumes you’ve already learned about the security issues around installing a VPN. If not, go and do this now! Essentially, you will be opeining up a new port from your local wifi to the internet - a new back door for any hacker to see your network and personal files. Make sure your firewall is well configured and your passwords for your router, network shares and RaspberryPi administrator accounts are highly sophisticated and un-guess-able. What you do here is your choice and I cannot be held responsible for someone finding out your bank account details. Or worse, your secret recipe for gluten free banana loaf bread.
Ok, with that out of the way, it’s all yours.
The first step is to update your RaspberryPi with the latest Linux disto. Details are in an earlier entry.
The second step is to ensure you can access your Pi from outside your private network from the internet. The instructions presented here are not a detailed explanation of this - you will need, for example, a fixed address for you RaspberryPi on your network, a port forwarding capability to this address from your router and either a fixed address for your router on the internet, or one of the free online DNS services (try https://www.noip.com/free).
Step 3:
sudo apt-get install openvpn
Step 4:
sudo -s
Step 5:
cp -r /usr/share/doc/openvpn/examples/easy-rsa/2.0 /etc/openvpn/easy-rsa
Make sure you have spaces in the right places (before /usr and /etc). This instruction copies all of the files from the easy-rsa 2.0 directory into a directory in your openvpn installation.
Step 6:
cd /etc/openvpn/easy-rsa
Step 7:
nano /etc/openvpn/easy-rsa/vars
Step 8:
In the text that opens find the line that begins: export EASY_RSA=
You need to move the cursor down to edit this line to read:
export EASY_RSA="/etc/openvpn/easy-rsa"
Step 9:
Next move your cursor down until you see the line: export KEY_SIZE=1024
This line can be left as is, but if you are extra paranoid and have time to make a coffee, then change 1024 to 2048.
Step 10:
Keep scrolling to the end of the file and you will see a bunch of export parameters such as Country, Province and City etc. You can choose to change these to set new defaults (this will potentially save you some typing in various later stages), but doing so will not affect the workings of your VPN.
Type CTRL and X then Y then ENTER to save this file.
Step 11:
Build the certificates your VPN will use to grant authority to devices you want to connect with. Open the easy-rsa directory with the command prompt type:
cd /etc/openvpn/easy-rsa
Next type:
source ./vars
./clean-all
./build-ca
This final line builds your certificate authority. The Raspberry Pi will now ask you to complete some additional export values, like Country, Province, City, Organisation etc. (if you changed these in the previous stage you will see your own choices already set as default).
Step 12: Name the server
./build-key-server [ServerName]
… replacing [ServerName] with your choice of name. Call it whatever you like but do not forget it.
You will now be given some more fields to enter values. You can change these or leave them as the defaults, but pay attention to three fields:
Common Name MUST be the server name you picked.
A challenge password? MUST be left blank.
Sign the certificate? [y/n] Obviously, you must type "y."
Finally when prompted with the question:
1 out of 1 certificate requests certified, commit? [y/n]
Type "y"
Your server is now set up and you need to build keys for all the devices you want to be able to connect.
Step 13:
To assign a user a key type:
./build-key-pass [UserName]
… substituting the [UserName] with your desired text - for example to make a key to connect my android to the VPN I chose the name KateAndroid
You will get some more prompts now:
Enter PEM pass phrase
… choose a password you will remember! It asks you to input this twice to eliminate errors.
A challenge password? MUST be left blank.
Sign the certificate? [y/n]
Hit "y"
Step 14:
Type
cd keys
then (using my example username, which you should change for your own):
openssl rsa -in KateAndroid.key -des3 -out KateAndroid.3des.key
This last line adds an extra layer of encryption to make it harder for hackers to break in.
You will be asked to enter pass phrase for KateAndroid.key - this is the phrase you entered in the previous step.
You will then be asked to enter and repeat a new PEM pass phrase for the des3 key. I used the same pass phrase for both so you only have one to remember. You will need the 3des.key pass phrase at the end of this process when you import your files to your devices.
Repeat these steps for all the usernames you want to build a key for.
You have now created your "client certificates".
Step 15: Generate the Diffie-Hellman key exchange:
This is the code that lets two entities with no prior knowledge of one another share secret keys over a public server. Type:
Type:
cd ..
./build-dh
This is where you go and make a coffee. And feed the dog. Then clean out the chicken coop. Have a hair cut. Book a holiday. Call that long lost Aunt you’ve been meaning to speak with. Make another coffee.
Step 16: Denial of Service (DoS) attack protection
OpenVPN protects against this kind of attack by generating a static pre-shared hash-based message authentication code (HMAC) key. This means the server will not try to authenticate an access request if it does not detect this key. To generate the static HMAC key type:
openvpn --genkey --secret keys/ta.key
Step 17
nano /etc/openvpn/server.conf
This opens an empty file. Fill it with this text, taking care to change the details where indicated with a comment in # CAPS LOCK. (Placing a "#" in front of a sentence in the code like this tells the system it is a comment and to ignore it when building the program). Also when changing the YOUR SERVER NAME sections I refer to the server name that was given to the 'build-key-server' command earlier on.
local 192.168.2.0 # SWAP THIS NUMBER WITH YOUR RASPBERRY PI IP ADDRESS
dev tun
proto udp
port 1194
ca /etc/openvpn/easy-rsa/keys/ca.crt
cert /etc/openvpn/easy-rsa/keys/XX.crt # SWAP XX WITH YOUR SERVER NAME
key /etc/openvpn/easy-rsa/keys/XX.key # SWAP XX WITH YOUR SERVER NAME
dh /etc/openvpn/easy-rsa/keys/dh1024.pem # IF YOU CHANGED YOUR ENCRYPTION TO 2048, CHANGE THAT HERE
server 10.8.0.0 255.255.255.0
# server and remote endpoints
ifconfig 10.8.0.1 10.8.0.2
# Add route to Client routing table for the OpenVPN Server
push "route 10.8.0.1 255.255.255.255"
# Add route to Client routing table for the OpenVPN Subnet
push "route 10.8.0.0 255.255.255.0"
# your local subnet
push "route 192.168.0.10 255.255.255.0" # SWAP THE IP NUMBER WITH YOUR RASPBERRY PI IP ADDRESS
# Set primary domain name server address to the SOHO Router
# If your router does not do DNS, you can use Google DNS 8.8.8.8
push "dhcp-option DNS 192.168.0.1" # THIS SHOULD ALREADY MATCH YOUR OWN ROUTER ADDRESS AND SHOULD NOT NEED TO BE CHANGED
# Override the Client default gateway by using 0.0.0.0/1 and
# 128.0.0.0/1 rather than 0.0.0.0/0. This has the benefit of
# overriding but not wiping out the original default gateway.
push "redirect-gateway def1"
client-to-client
duplicate-cn
keepalive 10 120
tls-auth /etc/openvpn/easy-rsa/keys/ta.key 0
cipher AES-128-CBC
comp-lzo
user nobody
group nogroup
persist-key
persist-tun
status /var/log/openvpn-status.log 20
log /var/log/openvpn.log
verb 1
Hit CTRL and X then Y and ENTER to save.
Step 17
There is one last edit to make in the server configuration files to make sure your Raspberry Pi knows you want it to forward Internet traffic through our new network.
Type:
nano /etc/sysctl.conf
Near the top it says, "Uncomment the next line to enable packet forwarding for IPv4."
Uncomment this line by removing the hash at the beginning.
Hit CTRL and X, then Y and ENTER to save.
Step 18
Finally you need to action the change you just made in the sysctl.conf file. To do this type:
sysctl -p
You have now made a functioning server that can access the internet.
Step 19 Pass through the firewall
Raspbian has a built-in firewall that will block incoming connections, so we need to tell it to allow traffic from OpenVPN to pass through.
To create a file that will run each time you start up your Raspberry Pi issuing this permission type:
nano /etc/firewall-openvpn-rules.sh
Inside this new file type:
#!/bin/sh
iptables -t nat -A POSTROUTING -s 10.8.0.0/24 -o eth0 -j SNAT --to-source 192.168.0.10
# SWAP THE IP NUMBER WITH YOUR RASPBERRY PI IP ADDRESS
CTRL and X then Y and ENTER to save.
Newly created files are not executable by default, so we will need to change the permissions and ownership of this file you just created. To do this type:
chmod 700 /etc/firewall-openvpn-rules.sh
then:
chown root /etc/firewall-openvpn-rules.sh
This script gives OpenVPN permission to breach the firewall.
Step 20
Now need to add it into the interfaces setup code so it runs on boot. Type:
nano /etc/network/interfaces
Find the line that says: "iface eth0 inet static." We want to add a line below the list of numbers that follow it. This line needs to be added at an indent so hit TAB first:
pre-up /etc/firewall-openvpn-rules.sh
CTRL and X then Y and ENTER to save.
Finally, reboot your Raspberry Pi by typing:
Reboot
Step 21: Create profile scripts for the devices you want to connect
We have created keys for clients (computers and devices) to use to connect to your VPN, but we have not told the clients where to find the server, how to connect, or which key to use.
If you created several different client keys for each of the devices you want to grant access, it would be a lot of trouble to generate a new configuration file for each client from scratch.
Luckily Eric Jodoin of the SANS institute has written a script to generate them automatically.
First type:
sudo nano /etc/openvpn/easy-rsa/keys/Default.txt
Fill in the blank text file with the following:
client
dev tun
proto udp
remote [YOUR PUBLIC IP ADDRESS] 1194 #REPLACE YOUR DYNAMIC DNS VALUE FROM CHANGEIP.COM
resolv-retry infinite
nobind
persist-key
persist-tun
mute-replay-warnings
ns-cert-type server
key-direction 1
cipher AES-128-CBC
comp-lzo
verb 1
mute 20
CTRL and X then Y and ENTER to save.
Step 22: Create the script that makes your profile keys
type:
sudo nano /etc/openvpn/easy-rsa/keys/MakeOVPN.sh
In this file you need to add the text that Jodoin wrote to create the script:
#!/bin/bash
# Default Variable Declarations
DEFAULT="Default.txt"
FILEEXT=".ovpn"
CRT=".crt"
KEY=".3des.key"
CA="ca.crt"
TA="ta.key"
#Ask for a Client name
echo "Please enter an existing Client Name:"
read NAME
#1st Verify that client's Public Key Exists
if [ ! -f $NAME$CRT ]; then
echo "[ERROR]: Client Public Key Certificate not found: $NAME$CRT"
exit
fi
echo "Client's cert found: $NAME$CR"
#Then, verify that there is a private key for that client
if [ ! -f $NAME$KEY ]; then
echo "[ERROR]: Client 3des Private Key not found: $NAME$KEY"
exit
fi
echo "Client's Private Key found: $NAME$KEY"
#Confirm the CA public key exists
if [ ! -f $CA ]; then
echo "[ERROR]: CA Public Key not found: $CA"
exit
fi
echo "CA public Key found: $CA"
#Confirm the tls-auth ta key file exists
if [ ! -f $TA ]; then
echo "[ERROR]: tls-auth Key not found: $TA"
exit
fi
echo "tls-auth Private Key found: $TA"
#Ready to make a new .opvn file - Start by populating with the default file
cat $DEFAULT > $NAME$FILEEXT
#Now, append the CA Public Cert
echo "<ca>" >> $NAME$FILEEXT
cat $CA >> $NAME$FILEEXT
echo "</ca>" >> $NAME$FILEEXT
#Next append the client Public Cert
echo "<cert>" >> $NAME$FILEEXT
cat $NAME$CRT | sed -ne '/-BEGIN CERTIFICATE-/,/-END CERTIFICATE-/p' >> $NAME$FILEEXT
echo "</cert>" >> $NAME$FILEEXT
#Then, append the client Private Key
echo "<key>" >> $NAME$FILEEXT
cat $NAME$KEY >> $NAME$FILEEXT
echo "</key>" >> $NAME$FILEEXT
#Finally, append the TA Private Key
echo "<tls-auth>" >> $NAME$FILEEXT
cat $TA >> $NAME$FILEEXT
echo "</tls-auth>" >> $NAME$FILEEXT
echo "Done! $NAME$FILEEXT Successfully Created."
#Script written by Eric Jodoin
\ No newline at end of file
CTRL and X then Y and ENTER to save.
Step 23
Next you need to give this script permission to run. Type:
cd /etc/openvpn/easy-rsa/keys/
NB: If you have issues with CD, try sudo chmod go+rx /etc/openvpn/easy-rsa/keys/ first.
The to give it root privileges type:
chmod 700 MakeOVPN.sh
Finally, execute the script with:
./MakeOVPN.sh
As it runs, it will ask you to input the usernames names of the clients for you generated keys for earlier (in my case KateAndroid). Type that when prompted and you should see the line:
Done! KateAndroid.ovpn Successfully Created.
Repeat this step for each additional username you added client.
Client Software Recommendations:
http://www.wikihow.com/Connect-to-an-OpenVPN-Server
Mac
https://tunnelblick.net/downloads.html
http://accc.uic.edu/answer/how-do-i-configure-and-use-openvpn-macos
Windows PC
Windows Mobile
iOS
0 notes
Text
openssl grabbag
https://www.digitalocean.com/community/tutorials/openssl-essentials-working-with-ssl-certificates-private-keys-and-csrs
https://www.sslshopper.com/article-most-common-openssl-commands.html
https://serverfault.com/questions/644572/openssl-save-x509-certificate-of-a-website This has a nice way of stripping out the combined certs in a chain:
echo "" | openssl s_client -host {HOST} -port 443 -showcerts | awk '/BEGIN CERT/ {p=1} ; p==1; /END CERT/ {p=0}' > allcerts.pem
https://jamielinux.com/docs/openssl-certificate-authority/introduction.html Setting up your own CA.
https://support.rackspace.com/how-to/generate-a-csr-with-openssl/
https://en.wikibooks.org/wiki/Cryptography/Generate_a_keypair_using_OpenSSL
0 notes
Text
Botble - Laravel CMS, CRUD generator, Modular & Theme system, Role permissions, Multilingual blog
New Post has been published on https://intramate.com/php-scripts/botble-laravel-cms-crud-generator-modular-theme-system-role-permissions-multilingual-blog/
Botble - Laravel CMS, CRUD generator, Modular & Theme system, Role permissions, Multilingual blog
LIVE PREVIEWGet it now for only $69
Botble CMS v5.2 – PHP platform based on Laravel Framework 6.x
Demo
Homepage: https://cms.botble.com
Author login page: https://cms.botble.com/login
Author: [email protected] – 12345678
Admin login page: https://cms.botble.com/admin
Admin: botble – 159357
Note: default username & password are autofilled.
Video tutorials
Working with plugin: https://www.youtube.com/watch?v=JAiKnnb9dH8
Key Features
Page, blog, menu, contact, gallery, statics blocks… modules are provided with the use of components to avoid boilerplate code.
Multi language support. Unlimited number of languages.
SEO & sitemap support: access sitemap.xml to see more.
Powerful media system, also support Amazon S3
RESTful API using Laravel Passport.
Custom fields: easy to add new fields to page, post, category…
Google Analytics: display analytics data in admin panel.
CRUD generator: easy to create new plugin/package with just one command.
Theme generator: generate a new theme with just one command.
Widget generator: generate theme’s widgets using command.
2 themes are ready to use.
Powerful Permission System: Manage user, team, role by permissions. Easy to manage user by permissions.
Admin template comes with color schemes to match your taste.
Fully Responsive: Compatible with all screen resolutions.
Coding Standard: All code follow coding standards PSR-2 and best practices.
Requirements
Apache, nginx, or another compatible web server.
PHP >= 7.2.5 >> Higher
MySQL Database server
PDO PHP Extension
OpenSSL PHP Extension
Mbstring PHP Extension
Exif PHP Extension
Fileinfo Extension
XML PHP Extension
Ctype PHP Extension
JSON PHP Extension
Tokenizer PHP Extension
Module Re_write server
PHP_CURL Module Enable
5 stars reviews
Botble Team
Visit us at botble.com
LIVE PREVIEWGet it now for only $69
0 notes
Text
more openssl linkdump
Check site's certificates against local cert
https://stackoverflow.com/a/23554225
DigitalOcean generate CSRs etc
https://www.digitalocean.com/community/tutorials/openssl-essentials-working-with-ssl-certificates-private-keys-and-csrs
UWisc verify privkey matches cert
https://kb.wisc.edu/middleware/page.php?id=4064
Security Stackexchange verify cert using chained trust with CApath and CAfile to point to different security stores
https://security.stackexchange.com/questions/117515/how-to-verify-a-signature-of-one-entity-by-another-using-openssl-cli
Security Stackexchange how to use -partial-chain to verify
https://security.stackexchange.com/a/118125
Feisty Duck... testing ... really all one should need
https://www.feistyduck.com/library/openssl-cookbook/online/ch-testing-with-openssl.html#
Check CSR against key
https://www.shellhacks.com/openssl-check-private-key-matches-ssl-certificate-csr/
0 notes