#generate private public key OpenSSL
Explore tagged Tumblr posts
Visit Tumblr Blog
Explore Tumblr blogs with no restrictions, modern design and the best experience.
Last Seen Tumblr Blogs


Fun Fact
12.7% of mobile users access Tumblr.
Text
How to Install OpenSSL on Windows Computers
In this article, we shall discuss how to Install OpenSSL on Windows Computers. OpenSSL is an open-source command-line tool that is used to generate the SSL certificate and private key and is available in both versions 32 and 64 bit. Please see How to fix Windows Update Fails with Error 0x80092004, how to Fix the Port used for the Virtualhost is not an Apache Listen Port, and Shell Scripting: How…
#convert key format OpenSSL#convert PEM to DER OpenSSL#extract public key OpenSSL#generate private public key OpenSSL#how to use OpenSSL on Windows#install OpenSSL Windows#Microsoft Windows#OpenSSL installation#OpenSSL key conversion#OpenSSL key generation tutorial#OpenSSL key management#OpenSSL public key extraction#OpenSSL Windows#OpenSSL Windows installation steps#Windows#Windows 10#Windows 11#Windows OpenSSL setup#Windows Server#Windows Server 2012#Windows Server 2016#Windows Server 2019#Windows Server 2022
1 note
·
View note
Text
Microsoft PQC ML-KEM, ML-DSA algorithms for windows & Linux

Microsoft has made significant progress in post-quantum cryptography (PQC) with SymCrypt-OpenSSL version 1.9.0 for Linux and Windows Insiders (Canary Channel Build 27852 and higher). This modification allows customers to test PQC algorithms like ML-KEM and ML-DSA in actual operational situations. Linux and Windows Insiders Get Quantum-Resistant Cryptography.
Due to quantum computing, modern cryptography faces significant challenges. Microsoft is providing early access to PQC capabilities to help organisations evaluate the performance, interoperability, and integration of these novel algorithms with current security infrastructure. This pragmatic approach helps security teams identify challenges, refine implementation strategies, and ease the transition when industry standards evolve. Early adoption also helps prevent new vulnerabilities and protect private data from quantum threats.
Next-generation cryptography API update
Cryptography API: Next Generation (CNG) enhancements are crucial to this Windows edition. CryptoAPI will be superseded forever by CNG. It is extendable and cryptography-independent. Programmers designing programs that allow safe data production and sharing, especially across insecure channels like the Internet, use CNG. CNG developers should know C, C++, and Windows, though it's not required. Cryptography and security knowledge are also advised.
Developers designing CNG cryptographic algorithm or key storage providers must download Microsoft's Cryptographic Provider Development Kit. First to support CNG are Windows Server 2008 and Vista. The latest PQC upgrades use encrypted communications, CNG libraries, and certificates.
New Windows PQC Algorithms
Microsoft is providing ML-KEM and ML-DSA, two NIST-standardized algorithms, to Windows Insiders via CNG updates.
Developers can now try ML-KEM for public key encapsulation and key exchange. This helps prepare for the “harvest now, decrypt later” scenario, in which hackers store encrypted data now to use a quantum computer to decipher it tomorrow. Microsoft proposes a hybrid method that combines ML-KEM with RSA or ECDH for defence in depth throughout the transition, ideally with NIST security level 3 or higher.
By incorporating ML-DSA in CNG, developers can evaluate PQC algorithms for digital signature verification of identity, integrity, or authenticity. Microsoft recommends a hybrid approach, using ML-DSA alongside RSA or ECDSA throughout the transition.
Size and performance will affect these new algorithms, according to preliminary research. Customers should analyse these consequences on their environment and apps early.
Customers can test installing, importing, and exporting ML-DSA certificates to and from the certificate store and CNG and PQC updates using the Windows certificate API interface win crypt. PQ certificate chains and trust status can be verified.
PQC Linux Features
Microsoft is releasing PQC upgrades in the SymCrypt provider for OpenSSL 3 because Linux customers expect them. The provider allows Linux programmers to use OpenSSL's API surface, which uses SymCrypt cryptographic procedures.
The latest IETF internet draft recommends SymCrypt-OpenSSL 1.9.0 for TLS hybrid key exchange testing. This lets you prepare for “harvest now, decrypt later” risks early. This feature allows for a full study of how hybrid PQC algorithms affect handshake message length, TLS handshake delay, and connection efficiency. Such research are needed to understand PQC's actual trade-offs.
It is important to remember that SymCrypt-OpenSSL will be updated when standards change to ensure compliance and compatibility, and that Linux updates are based on draft specifications.
What Next?
PQC's Linux and Windows Insider integration must be described first.
Plans call for more features and improvements:
Upcoming efforts include adding SLH-DSA to SymCrypt, CNG, and SymCrypt-OpenSSL.
Add new algorithms to assure broad compatibility as PQC standards expand, improve security, and comply with international law.
Working with industry partners on X.509 standardisations for the IETF's LAMPS working group's broad use of ML-DSA algorithm, composite ML-DSA, SLH-DSA, ML-KEM, and LMS/XMSS. These efforts will involve PKI use cases and signature approaches for firmware and software signing.
TLS hybrid key exchange for Windows users is being implemented using the Windows TLS stack (Schannel).
Develop and standardise quantum-safe authentication methods for TLS and other IETF protocols including SLH-DSA, Composite ML-DSA, and pure ML-DSA with the IETF. SymCrypt for OpenSSL, Windows TLS stack (Schannel), and Linux Rust Wrapper will deliver standards as they are established.
Active Directory Certificate Services actively supports PQC. Customers setting up a Certification Authority (CA) can use ML-DSA-based CA certificates. PQC algorithms sign CA-issued CRLs for customers who enrol in end-entity certificates. We'll support all ADCS role services.
Supporting PQC certificates in Microsoft Intune's Certificate Connector lets endpoints and mobile devices sign up for quantum-safe credentials. This will unlock SCEP & PKCS #12 scenarios for on-premises CAs utilising ADCS.
TLS 1.3 is essential for PQC. Microsoft strongly advises customers to abandon older TLS protocols.
These new features will be available to Windows Insiders and development channels for real-world testing. Microsoft can make incremental modifications before release by getting feedback on usability, security, and compatibility. Microsoft will distribute dependable and compatible solutions to supported platforms using a flexible and adaptable approach after standards are finalised. Working with standards organisations and industry partners will ensure features fit global regulatory framework and ecosystem needs.
Future challenges and prospects
Due to their youth, PQC algorithms are an emerging field. This shows how important “Crypto Agility” is in building solutions that can use different algorithms or be modified when standards change.
Microsoft recommends hybrid PQ and crypto-agile solutions for PQC deployment. Composite certificates and TLS hybrid key exchange use PQ and RSA or ECDHE algorithms. Pure PQ implementations should increase as algorithms and standards improve.
Despite integration being a turning point, PQC algorithms' performance, interoperability with current systems, and acceptance remain issues.
Performance: PQC algorithms often require more processing power than standard algorithms. Its efficient implementation without affecting system performance is a big hurdle. Technology for hardware acceleration and optimisation is essential. Keccak is utilised in many PQ algorithms, and hardware acceleration is needed to boost its performance for PQC cryptography.
Larger key encapsulation and digital signatures, especially in hybrid mode, may increase TLS round-trip time. Although signatures cannot be compressed, IETF proposals are examining certificate compression and TLS key sharing prediction. These effects should be assessed on applications and surroundings.
Adoption and Compatibility: PQC requires upgrading and replacing cryptographic infrastructure. Developers, hardware manufacturers, and service providers must collaborate to ensure legacy system compatibility and broad acceptance. Education and awareness campaigns and government-mandated compliance deadlines will boost adoption.
In conclusion
PQC incorporation into Linux and Windows Insiders is a major quantum future preparation step. Microsoft is proactively fixing cryptographic security flaws to help create a digital future that uses quantum computing and reduces security risks. PQC is needed to protect data, communications, and digital infrastructure as quantum computing evolves. Cooperation and security are needed to build stronger systems.
#MLDSAalgorithm#CryptographyAPI#PQCAlgorithms#MLKEM#MLDSA#PQalgorithms#MLKEMalgorithms#technology#technews#technologynews#news#govindhtech
0 notes
Text
HTTPS 101: A Beginner's Guide to the Basics of Web Security

If you've visited a website that starts with https://, you may have noticed a padlock icon in your browser's address bar. This means the website is using HTTPS. It's a secure version of HTTP. It encrypts the data between your browser and the web server. But what exactly is HTTPS, and why is it important for web security? In this article, we will explain what HTTPS is, how it works, what its benefits are, and how to enable it on your website. We will also show you how HTTPS can improve your SEO and user experience. By the end of this article, you will better understand web security. You will also learn how to protect your website and visitors with HTTPS. What is HTTPS and why is it important for web security? HTTPS stands for Hypertext Transfer Protocol Secure. It is the secure version of HTTP, which is the primary protocol used to send data between a web browser and a website. To increase the security of data transfer, HTTPS encrypts data. How does HTTPS work, and what are its benefits? HTTPS uses an encryption protocol called Transport Layer Security (TLS) 1. Not possible to remove the adverb. This protocol secures communications with an asymmetric public key infrastructure. This means that two keys encrypt and decrypt data. A public key, which anyone can access, and a private key, known only to the website's owner. The benefits of HTTPS are: - It protects the privacy and integrity of data exchanged between the browser and the website. - It stops hackers from stealing or altering sensitive data, like passwords and credit card numbers. - It verifies the website owner's identity. It ensures you are connected to the right server. - It boosts your site's ranking on search engines like Google. They prefer secure sites over insecure ones. What are TLS/SSL certificates, and how do they enable HTTPS? To enable HTTPS on your website, you need to get and install TLS/SSL certificates. These are digital documents. They contain information about your website's identity and public key. Trusted third parties called certificate authorities (CAs) issue them. CAs verify your domain name's ownership and validity. How to get and install TLS/SSL certificates for your website? To get a TLS/SSL certificate for your website, you need to: - Choose a CA that suits your needs and budget. There are different types of certificates with different levels of validation and features. Some examples are DigiCert, Let's Encrypt, Cloudflare SSL, etc. - Generate a certificate signing request (CSR) on your web server. This is a file that contains your domain name and public key. - Submit your CSR to the CA along with some proof of identity and ownership. - Receive your certificate from the CA after it confirms your request. - Install your certificate on your web server according to its instructions. How to test and troubleshoot HTTPS on your website? To test and troubleshoot HTTPS on your website, you can: - Use online tools such as SSL Labs Server Test or Why No Padlock? It is not possible to remove the adverb. - Use Chrome DevTools or Firefox Developer Tools. Inspect network requests and responses for errors or warnings related to HTTPS. - Use extensions like HTTPS Everywhere or Smart HTTPS. They force HTTPS on all websites. Here are some examples of how HTTPS works: HTTP works without encryption. So, anyone can see or change data sent between the user's browser and the website's server. This is how HTTPS works with encryption. Only the user's browser and the website's server can see or change the data sent between them. Here are some screenshots. They show how browsers indicate a site's secure connection. This is how Chrome indicates a secure site with a lock icon. This is how Firefox indicates an insecure site with a warning icon. Here are some code snippets of how to generate a CSR on different web servers: openssl req -new -newkey rsa:2048 -nodes -keyout /etc/httpd/conf/example.key -out /etc/httpd/conf/example.csr On Nginx openssl req -new -newkey rsa:2048 -nodes -keyout example.key -out example.c Check this video for a more in-depth understanding of https works from renowned expert in the industry: https://youtu.be/7l1cTUz_NGE Conclusion - We covered HTTPS and its importance for web security. - We explained how HTTPS works and its benefits for website owners and visitors. - You also learned about TLS/SSL certificates and how to get and install them. - We discussed testing and fixing HTTPS issues. - We also talked about improving website speed and accessibility. - Finally, we showed that HTTPS boosts SEO and user experience. It does this by increasing trust, ranking, and performance. If you have questions or feedback, please reach out. I hope this article clarifies HTTPS and its importance. It also guides you on using HTTPS for web security. For any questions or feedback, feel free to comment or email us. Read the full article
0 notes
Text
does open vpn encrypt all traffic
🔒🌍✨ Get 3 Months FREE VPN - Secure & Private Internet Access Worldwide! Click Here ✨🌍🔒
does open vpn encrypt all traffic
OpenVPN encryption
OpenVPN encryption stands at the forefront of safeguarding online privacy and security. As a robust virtual private network (VPN) protocol, OpenVPN employs a combination of sophisticated encryption algorithms to protect data transmitted over networks, ensuring confidentiality, integrity, and authenticity.
At its core, OpenVPN utilizes the OpenSSL library to implement encryption protocols, including both symmetric and asymmetric encryption. Symmetric encryption, such as Advanced Encryption Standard (AES), is employed for bulk data encryption, offering high-speed performance and efficiency. AES, in particular, is renowned for its strength and is widely adopted across various industries.
Additionally, OpenVPN incorporates asymmetric encryption through the use of public-key cryptography, typically utilizing RSA or Elliptic Curve Cryptography (ECC). This method enables secure key exchange and authentication between parties without the need to share secret keys beforehand. Through asymmetric encryption, OpenVPN establishes secure tunnels, allowing users to transmit data securely over untrusted networks.
Furthermore, OpenVPN supports the use of cryptographic hash functions, such as SHA-256, for data integrity verification. These hash functions generate unique checksums for data packets, enabling recipients to verify if the received data has been tampered with during transmission.
Moreover, OpenVPN offers the flexibility to choose from various encryption cipher suites and key exchange protocols based on security requirements and performance considerations. Users can configure OpenVPN to utilize the most suitable encryption parameters, balancing security with computational overhead.
In conclusion, OpenVPN encryption provides a robust framework for securing online communications, offering a blend of symmetric and asymmetric encryption, along with cryptographic hash functions. By leveraging these technologies, OpenVPN ensures that sensitive data remains protected from unauthorized access and tampering, empowering users to maintain their privacy and security in an increasingly interconnected digital world.
Internet traffic security
Internet traffic security is a critical concern in today's digital landscape, where data breaches and cyber threats loom large. Ensuring the security of internet traffic involves safeguarding the transmission of data between users and servers, preventing unauthorized access, and protecting against various forms of cyberattacks.
One of the fundamental aspects of internet traffic security is encryption. Encryption transforms data into an unreadable format during transmission, making it indecipherable to unauthorized parties. Secure Socket Layer (SSL) and Transport Layer Security (TLS) protocols are commonly used to encrypt internet traffic, providing a secure connection between web servers and users' browsers.
Firewalls play a crucial role in internet traffic security by monitoring and controlling incoming and outgoing network traffic based on predetermined security rules. They act as a barrier between internal networks and external threats, blocking malicious traffic while allowing legitimate data to pass through.
Virtual Private Networks (VPNs) offer an additional layer of security by creating a private and encrypted connection over a public network, such as the internet. By masking users' IP addresses and encrypting their internet traffic, VPNs help protect sensitive information from interception by cybercriminals or surveillance by third parties.
Implementing strong authentication measures, such as multi-factor authentication (MFA) and biometric verification, further enhances internet traffic security by ensuring that only authorized users can access sensitive data and resources.
Regularly updating software and security patches is essential for maintaining internet traffic security, as it helps address vulnerabilities and weaknesses that could be exploited by cyber attackers.
In conclusion, internet traffic security is paramount for protecting sensitive data and maintaining the integrity of online communications. By employing encryption, firewalls, VPNs, authentication mechanisms, and staying vigilant with software updates, individuals and organizations can mitigate the risks associated with cyber threats and safeguard their online activities.
VPN protocol protection
Title: Safeguard Your Online Privacy with VPN Protocol Protection
In an era where online privacy is increasingly at risk, utilizing a Virtual Private Network (VPN) has become essential. However, not all VPNs are created equal. Understanding VPN protocols and their role in protecting your data is crucial for ensuring your privacy remains intact.
VPN protocols serve as the framework for encrypting and transmitting data between your device and the VPN server. Different protocols offer varying levels of security and speed, catering to diverse user needs.
One of the most common VPN protocols is OpenVPN, renowned for its robust security features and flexibility. It utilizes open-source technology, allowing for regular updates to address emerging threats. OpenVPN employs SSL/TLS encryption, making it highly secure and resistant to cyberattacks.
Another popular protocol is IPSec (Internet Protocol Security), which operates at the network layer of the OSI model. IPSec provides strong encryption and authentication, ensuring data integrity and confidentiality. It's often used in conjunction with other protocols to enhance security.
For those prioritizing speed without compromising security, L2TP/IPSec (Layer 2 Tunneling Protocol with Internet Protocol Security) is an excellent choice. While it may not offer the same level of encryption as other protocols, it delivers faster performance, making it ideal for streaming and gaming.
IKEv2 (Internet Key Exchange version 2) is another protocol known for its speed and reliability, particularly on mobile devices. It seamlessly handles network changes, such as switching between Wi-Fi and mobile data, without interrupting the VPN connection.
Regardless of the protocol you choose, ensuring it supports strong encryption standards is paramount. Look for VPN providers that offer a variety of protocols and prioritize security to safeguard your online activities effectively. By understanding VPN protocols and selecting the right one for your needs, you can enjoy enhanced privacy and security in an increasingly interconnected digital landscape.
Data encryption methods
Data encryption is a crucial aspect of cybersecurity, aiming to protect sensitive information from unauthorized access or cyber attacks. There are various data encryption methods available to secure data and ensure confidentiality and integrity.
One of the most common encryption techniques is symmetric key encryption, where the same secret key is used for both encryption and decryption of the data. This method is efficient and fast, making it suitable for securing large volumes of data. However, the challenge lies in securely sharing the secret key between the communicating parties.
Asymmetric key encryption, also known as public-key encryption, uses a pair of keys - a public key for encryption and a private key for decryption. This method eliminates the need to share secret keys, making it more secure for data transmission over untrusted networks. Although asymmetric encryption is more secure, it is computationally intensive and slower compared to symmetric encryption.
Hashing is another essential encryption method used to validate the integrity of data. Hash functions generate a unique fixed-length hash value from the input data, making it ideal for verifying data authenticity and detecting tampering. However, hashing is a one-way process, making it unsuitable for decrypting data.
Secure Sockets Layer (SSL) and Transport Layer Security (TLS) protocols are encryption methods commonly used to establish secure communication channels over the internet. These protocols encrypt data during transmission, ensuring that sensitive information remains confidential and secure from eavesdroppers.
In conclusion, data encryption methods play a vital role in safeguarding sensitive information from unauthorized access and cyber threats. Organizations must implement robust encryption techniques to protect their data and maintain data privacy and security.
Secure traffic encryption
In the digital age, ensuring the security of online communications is paramount. One of the most effective measures to achieve this is through secure traffic encryption.
Secure traffic encryption involves encoding data transmitted between a user's device and a server, making it unreadable to anyone who might intercept it. This encryption is typically implemented using cryptographic protocols such as SSL (Secure Sockets Layer) or its successor, TLS (Transport Layer Security).
SSL and TLS use a combination of symmetric and asymmetric encryption techniques to secure data transmission. Symmetric encryption employs a single key to both encrypt and decrypt data, while asymmetric encryption uses a pair of keys – a public key for encryption and a private key for decryption. This dual-key system enhances security by ensuring that even if the public key is intercepted, the private key, which is kept secret, is required to decrypt the data.
When a user accesses a website with HTTPS (Hypertext Transfer Protocol Secure), their browser and the server engage in a handshake process to establish a secure connection using SSL or TLS. During this process, they negotiate encryption parameters, exchange cryptographic keys, and verify the authenticity of the server's digital certificate.
Once the secure connection is established, all data transmitted between the user and the server – including login credentials, financial information, and personal details – is encrypted, protecting it from eavesdropping and tampering.
Secure traffic encryption is essential for safeguarding sensitive information and maintaining user privacy in an increasingly interconnected world. By encrypting data in transit, organizations can mitigate the risk of data breaches, identity theft, and unauthorized access, enhancing trust and confidence among their users.
0 notes
Text
does vpn hide my browsing from a hotel
🔒🌍✨ Get 3 Months FREE VPN - Secure & Private Internet Access Worldwide! Click Here ✨🌍🔒
does vpn hide my browsing from a hotel
VPN encryption protocols
VPN encryption protocols play a crucial role in ensuring the security and privacy of online communications. When using a VPN service, data is encrypted before it is transmitted over the internet, making it unreadable to anyone who may intercept it. There are several VPN encryption protocols available, each offering different levels of security and performance.
One of the most commonly used VPN encryption protocols is OpenVPN, known for its strong security features and flexibility. OpenVPN uses a custom security protocol that utilizes the OpenSSL encryption library to ensure data confidentiality and integrity. It is highly configurable and supports various encryption algorithms, making it a popular choice among VPN users.
Another popular VPN encryption protocol is IKEv2/IPSec, which is known for its stability and fast connection speeds. IKEv2/IPSec is particularly well-suited for mobile devices due to its ability to quickly reconnect to the VPN server after a network change. It offers strong security through the use of advanced encryption algorithms and authentication methods.
Additionally, there is the L2TP/IPSec protocol, which combines the best features of the Layer 2 Tunneling Protocol (L2TP) and IPSec to provide strong encryption and authentication. While it may not be as secure as some other protocols, L2TP/IPSec is widely supported across various platforms and devices, making it a convenient choice for many users.
Overall, the choice of VPN encryption protocol depends on the user's specific needs and preferences. It is essential to understand the strengths and weaknesses of each protocol to make an informed decision when selecting a VPN service for secure and private online browsing.
Hotel network monitoring
Hotel network monitoring is a critical aspect of ensuring the smooth functioning of operations in the hospitality industry. With the increasing reliance on technology for various hotel services, such as room bookings, guest services, and billing, maintaining a secure and efficient network is vital.
By implementing a robust network monitoring system, hotels can proactively identify and address potential issues before they escalate into major problems. Monitoring tools can track network performance, detect any anomalies or security breaches, and provide real-time alerts to IT staff for immediate action.
One key benefit of hotel network monitoring is the ability to ensure uninterrupted guest services. With guests expecting seamless connectivity for work, communication, and entertainment, any network downtime can lead to negative reviews and customer dissatisfaction. Monitoring the network round the clock can help prevent such situations, guaranteeing a positive guest experience.
Moreover, network monitoring can also help hotels optimize their IT infrastructure and resource allocation. By tracking data usage patterns and identifying areas of improvement, hotels can enhance their network efficiency, reduce operational costs, and better plan for future expansions.
In conclusion, hotel network monitoring is a fundamental practice for modern hospitality establishments looking to deliver reliable services, maintain data security, and enhance operational efficiency. Investing in advanced monitoring tools and skilled IT professionals can go a long way in ensuring the success and competitiveness of a hotel in today's technology-driven market.
Privacy risks with public Wi-Fi
Using public Wi-Fi networks can be convenient when you need internet access on the go, but it also comes with significant privacy risks. Public Wi-Fi networks are generally unsecured, meaning that any data you transmit over them can potentially be intercepted by cybercriminals.
One of the main privacy risks associated with public Wi-Fi is the threat of data interception. Hackers can easily set up fake Wi-Fi hotspots in public places, such as cafes, airports, and hotels, to trick unsuspecting users into connecting to their network. Once connected, hackers can intercept sensitive information such as passwords, credit card details, and personal messages.
Another privacy risk with public Wi-Fi is the potential for malware attacks. When you connect to a public network, your device is exposed to a wide range of security threats, including malware and viruses. Cybercriminals can use these vulnerabilities to infect your device and steal your personal data without your knowledge.
To protect your privacy while using public Wi-Fi, there are several precautions you can take. Avoid accessing sensitive information, such as online banking or shopping accounts, when connected to public networks. Use a virtual private network (VPN) to encrypt your data and protect it from prying eyes. Make sure your device's security software is up to date to guard against malware attacks.
By being aware of the privacy risks associated with public Wi-Fi and taking preventative measures, you can enjoy the convenience of staying connected while protecting your personal information from cyber threats.
Geo-blocking bypass with VPN
Title: Unlocking Geo-blocking Restrictions: The Power of VPNs
In today's interconnected world, accessing online content from different regions should be effortless. However, many websites and streaming platforms enforce geo-blocking restrictions, limiting access based on the user's location. This can be frustrating for travelers, expatriates, or anyone wanting to explore global content. Fortunately, there's a solution: Virtual Private Networks (VPNs).
A VPN works by rerouting your internet connection through a server located in a different geographical region. This effectively masks your true location and assigns you a new IP address associated with the VPN server's location. As a result, websites and services perceive you as browsing from the VPN server's location rather than your actual one.
By using a VPN, you can bypass geo-blocking restrictions and unlock content that's otherwise unavailable in your region. For example, if you're in a country where certain streaming services are restricted, you can connect to a VPN server in a country where those services are accessible. This allows you to enjoy your favorite shows, movies, or music without limitations.
Furthermore, VPNs encrypt your internet traffic, enhancing your online privacy and security. This encryption prevents hackers, ISPs, or government agencies from monitoring your online activities, protecting your sensitive data from potential breaches.
When choosing a VPN provider for bypassing geo-blocking, it's essential to consider factors such as server locations, connection speed, and security features. Opt for a reputable VPN service with a wide range of servers worldwide to ensure reliable access to geo-blocked content.
In conclusion, VPNs offer a convenient and secure solution for bypassing geo-blocking restrictions and accessing global content. Whether you're traveling abroad or simply seeking unrestricted access to online resources, a VPN can be your key to unlocking a world of possibilities.
Online anonymity advantages
Online anonymity offers several advantages to internet users, fostering a sense of privacy and security in the digital realm. One primary benefit is the ability to protect personal information from malicious actors and unauthorized access. By concealing one's identity online, individuals can minimize the risk of identity theft, cyberstalking, and other forms of online harassment.
Moreover, anonymity empowers individuals to express themselves freely without fear of repercussions. In environments where political or social dissent may be met with censorship or persecution, online anonymity provides a vital platform for marginalized voices to be heard. It enables whistleblowers, activists, and journalists to share important information while safeguarding their identities from retaliation.
For many, online anonymity also facilitates open and honest communication. People may feel more comfortable discussing sensitive topics or seeking advice on personal matters when they can do so without revealing their true identity. This can foster supportive online communities where individuals can connect with others who share similar experiences or interests.
Furthermore, anonymity can be crucial for accessing information and services in restrictive environments. In regions with internet censorship or surveillance, anonymous browsing tools such as virtual private networks (VPNs) or Tor can circumvent restrictions and enable access to blocked websites and online resources.
Overall, online anonymity offers a layer of protection and freedom in an increasingly interconnected digital world. While it can be misused by some for nefarious purposes, its benefits in promoting privacy, free expression, and access to information cannot be overlooked. As internet users navigate the complexities of online interactions, anonymity remains a valuable tool for safeguarding personal privacy and enabling uninhibited expression.
0 notes
Text
Generate Public Key From Private Key Certificate

Aug 18, 2015 Navigate to the correct Certificate Store (typically 'Personal' or 'Web Hosting') to find the desire certificate. Right-click the desired certificate and go to All Tasks Export. Proceed through the Certificate Export Wizard, selecting 'Yes, export the private key'. The CSR (Certificate Signing Request) is essential for the issuing of the certificate, as it contains the public key. The public key will be generated by your web host or the administrators of the servers, on which the domain runs that you wish to secure with the SSL certificate. How to Generate a Self-Signed Certificate and Private Key using OpenSSL Generating a private key and self-signed certificate can be accomplished in a few simple steps using OpenSSL. We provide here detailed instructions on how to create a private key and self-signed certificate valid for 365 days.

-->
Certificate Services is one foundation for the Public Key Infrastructure (PKI) that provides the means for safeguarding and authenticating information. The relationship between a certificate holder, the certificate holder's identity, and the certificate holder's public key is a critical portion of PKI. This infrastructure is made up of the following parts:
The Public/Private Key Pair
PKI requires the use of public/private key pairs. The mathematics of public/private key pairs is beyond the scope of this documentation, but it is important to note the functional relationship between a public and a private key. PKI cryptographic algorithms use the public key of the receiver of an encrypted message to encrypt data, and the related private key and only the related private key to decrypt the encrypted message.
Similarly, a digital signature of the content, described in greater detail below, is created with the signer's private key. The corresponding public key, which is available to everyone, is used to verify this signature. The secrecy of the private key must be maintained because the framework falls apart after the private key is compromised.
Given enough time and resources, a public/private key pair can be compromised, that is, the private key can be discovered. The longer the key, the more difficult it is to use brute force to discover the private key. In practice, sufficiently strong keys can be used to make it unfeasible to determine the private key in a timely manner, making the Public Key Infrastructure a viable security mechanism.
A private key can be stored, in protected format, on a disk, in which case it can only be used with that specific computer unless it is physically moved to another computer. An alternative is to have a key on a smart card that can be used on a different computer provided it has a smart card reader and supporting software.
The public key, but not the private key, of the subject of a digital certificate is included as part of the certificate request. (Hence, a public/private key pair must exist before making the certificate request.) That public key becomes part of the issued certificate.
The Certificate Request
Before a certificate is issued, a certificate request must be generated. This request applies to one entity, for example, an end-user, a computer, or an application. For discussion, assume that the entity is yourself. Details of your identity are included in the certificate request. After the request is generated, it is submitted to a certification authority (CA). The CA then uses your identity information to determine whether the request meets the CA's criteria for issuing a certificate. If the CA approves the request, it issues a certificate to you, as the entity named in the request.
Public Key For Certificate
The Certification Authority
Before issuing your certificate, the CA verifies your identity. When the certificate is issued, your identity is bound to the certificate, which contains your public key. Your certificate also contains the CA's digital signature (which can be verified by anyone who receives your certificate).
Because your certificate contains the identity of the issuing CA, an interested party that trusts this CA can extend that trust to your certificate. The issuance of a certificate does not establish trust, but transfers trust. If the certificate consumer does not trust the issuing CA, it will not (or at least should not) trust your certificate.
A chain of signed certificates allows trust to be transferred to other CAs as well. This allows parties who use different CAs to still be able to trust certificates (provided there is a common CA in the chain, that is, a CA that is trusted by both parties).
The Certificate
In addition to your public key and the identity of the issuing CA, the issued certificate contains information about the purposes of your key and certificate. Furthermore, it includes the path to the CA's list of revoked certificates, and it specifies the certificate validity period (beginning and ending dates).
Assuming the certificate consumer trusts the issuing CA for your certificate, the certificate consumer must determine whether the certificate is still valid by comparing the certificate's beginning and ending dates with the current time and by checking that your certificate in not on the CA's list of revoked certificates.
The Certificate Revocation List
Assuming the certificate is being used in a valid time period and the certificate consumer trusts the issuing CA, there is one more item for the certificate consumer to check before using the certificate: the certificate revocation list (CRL). The certificate consumer checks the CA's CRL (the path to which is included as an extension in your certificate) to ensure your certificate is not on the list of certificates that have been revoked. CRLs exist because there are times when a certificate has not expired, but it can no longer be trusted. Periodically, the CA will publish an updated CRL. Certificate consumers are responsible for comparing certificates to the current CRL before considering the certificate trustworthy.
Your Public Key Used for Encryption
If a sender wants to encrypt a message before sending it to you, the sender first retrieves your certificate. After the sender determines that the CA is trusted and your certificate is valid and not revoked, the sender uses your public key (recall it is part of the certificate) with cryptographic algorithms to encrypt the plaintext message into ciphertext. When you receive the ciphertext, you use your private key to decrypt the ciphertext.
If a third party intercepts the ciphertext email message, the third party will not be able to decrypt it without access to your private key.
Generate Public Key From Private Key Certificate Template
Note that the bulk of the activities listed here are handled by software, not directly by the user.
Generate Public Key From Private Key Certificate Florida
Your Public Key Used for Signature Verification
Generate Public Key From Private Key Certificate X 509
A digital signature is used as confirmation that a message has not been altered and as confirmation of the message sender's identity. This digital signature is dependent on your private key and the message contents. Using the message as input and your private key, cryptographic algorithms create the digital signature. The contents of the message are not changed by the signing process. A recipient can use your public key (after checking your certificate's validity, issuing CA, and revocation status) to determine whether the signature corresponds to the message contents and to determine whether the message was sent by you.
Generate Ssh Public Key From Private Key
If a third party intercepts the intended message, alters it (even slightly), and forwards it and the original signature to the recipient, the recipient, upon examination of the message and signature, will be able to determine that the message is suspect. Similarly, if a third party creates a message and sends it with a bogus digital signature under the guise that it originated from you, the recipient will be able to use your public key to determine that the message and signature do not correspond to each other.
Nonrepudiation is also supported by digital signatures. If the sender of a signed message denies sending the message, the recipient can use the signature to refute that claim.
Note that the bulk of the activities listed here are also handled by software, not directly by the user.
Generate Public Key From Private Key Certificate Download
Microsoft Certificate Services Role
Microsoft Certificate Services has the role of issuing certificates or denying requests for certificates, as directed by policy modules, which are responsible for ensuring the identity of the certificate requester. Certificate Services also provides the ability to revoke a certificate, as well as publish the CRL. Certificate Services can also centrally distribute (for example, to a directory service) issued certificates. The ability to issue, distribute, revoke, and manage certificates, along with the publication of CRLs, provides the necessary capabilities for public key infrastructure.
1 note
·
View note
Text
Something Awesome Project Milestone 2 - Week 6
My other subjects and their mid-semester assessments have taken their toll on me, and I haven’t quite reached the milestone i expected to reach after week 6. I severely overestimated my coding skills
Level 11:
cat data.txt to find a string that was clearly “the password is #########” shifted 13 letters over
used tr ‘A-Za-z’ ’N-ZA-Mn-za-m’ to use rot13
then i pasted the cat data.txt to find the key
key: 5Te8Y4drgCRfCx8ugdwuEX8KFC6k2EUu
Level 12:
I go pretty stuck with this one, i tried cat data.txt and got an unreadable string, then i tried xxd -r to reverse it, but i still got something strange. At this stage I was pretty stuck for an hour or so with no progress so I had to look up the answers, and i found that if i used file on my target file, it would tell me how it was last compressed, and sure enough, i found it was compressed by gzip. Now i knew that i had to decompress it that way so i used zcat and file again, now it was telling me it was compressed by bzip, so now I need to use bacat, and it turns out it was gzip-ed again. lastly, i found out it was a tar archive so I had to use tar -xo to print to stdout. i repeated this process until i ended up with
zcat lol.bin | bzcat | zcat | tar xO | tar xO | bzcat | tar xO | zcat to get the key.
key: 8ZjyCRiBWFYkneahHwxCv3wb2a1ORpYL
Level 13:
learning how to use ssh with rsa keys
I looked through man ssh and found ssh -i which means lets you select anprivate key for the public authentication to read. I copied the key to my computer and then tried using this method. but i ran into a message that read
@@@@@@@@@@@@@@@@@@@@@@@@@@@@@@@@@@@@@@@@@@@@@@@@@@@@@@@@@@@
@ WARNING: UNPROTECTED PRIVATE KEY FILE! @
@@@@@@@@@@@@@@@@@@@@@@@@@@@@@@@@@@@@@@@@@@@@@@@@@@@@@@@@@@@
Permissions 0644 for ‘sshkey.private.rtf’ are too open.
It is required that your private key files are NOT accessible by others.
This private key will be ignored.
So I tried using chmod to change the permissions of the file. (chmod 600) to make the key not open to anyone using it except me and it worked
ssh key: MIIEpAIBAAKCAQEAxkkOE83W2cOT7IWhFc9aPaaQmQDdgzuXCv+ppZHa++buSkN+
gg0tcr7Fw8NLGa5+Uzec2rEg0WmeevB13AIoYp0MZyETq46t+jk9puNwZwIt9XgB
ZufGtZEwWbFWw/vVLNwOXBe4UWStGRWzgPpEeSv5Tb1VjLZIBdGphTIK22Amz6Zb
ThMsiMnyJafEwJ/T8PQO3myS91vUHEuoOMAzoUID4kN0MEZ3+XahyK0HJVq68KsV
ObefXG1vvA3GAJ29kxJaqvRfgYnqZryWN7w3CHjNU4c/2Jkp+n8L0SnxaNA+WYA7
jiPyTF0is8uzMlYQ4l1Lzh/8/MpvhCQF8r22dwIDAQABAoIBAQC6dWBjhyEOzjeA
J3j/RWmap9M5zfJ/wb2bfidNpwbB8rsJ4sZIDZQ7XuIh4LfygoAQSS+bBw3RXvzE
pvJt3SmU8hIDuLsCjL1VnBY5pY7Bju8g8aR/3FyjyNAqx/TLfzlLYfOu7i9Jet67
xAh0tONG/u8FB5I3LAI2Vp6OviwvdWeC4nOxCthldpuPKNLA8rmMMVRTKQ+7T2VS
nXmwYckKUcUgzoVSpiNZaS0zUDypdpy2+tRH3MQa5kqN1YKjvF8RC47woOYCktsD
o3FFpGNFec9Taa3Msy+DfQQhHKZFKIL3bJDONtmrVvtYK40/yeU4aZ/HA2DQzwhe
ol1AfiEhAoGBAOnVjosBkm7sblK+n4IEwPxs8sOmhPnTDUy5WGrpSCrXOmsVIBUf
laL3ZGLx3xCIwtCnEucB9DvN2HZkupc/h6hTKUYLqXuyLD8njTrbRhLgbC9QrKrS
M1F2fSTxVqPtZDlDMwjNR04xHA/fKh8bXXyTMqOHNJTHHNhbh3McdURjAoGBANkU
1hqfnw7+aXncJ9bjysr1ZWbqOE5Nd8AFgfwaKuGTTVX2NsUQnCMWdOp+wFak40JH
PKWkJNdBG+ex0H9JNQsTK3X5PBMAS8AfX0GrKeuwKWA6erytVTqjOfLYcdp5+z9s
8DtVCxDuVsM+i4X8UqIGOlvGbtKEVokHPFXP1q/dAoGAcHg5YX7WEehCgCYTzpO+
xysX8ScM2qS6xuZ3MqUWAxUWkh7NGZvhe0sGy9iOdANzwKw7mUUFViaCMR/t54W1
GC83sOs3D7n5Mj8x3NdO8xFit7dT9a245TvaoYQ7KgmqpSg/ScKCw4c3eiLava+J
3btnJeSIU+8ZXq9XjPRpKwUCgYA7z6LiOQKxNeXH3qHXcnHok855maUj5fJNpPbY
iDkyZ8ySF8GlcFsky8Yw6fWCqfG3zDrohJ5l9JmEsBh7SadkwsZhvecQcS9t4vby
9/8X4jS0P8ibfcKS4nBP+dT81kkkg5Z5MohXBORA7VWx+ACohcDEkprsQ+w32xeD
qT1EvQKBgQDKm8ws2ByvSUVs9GjTilCajFqLJ0eVYzRPaY6f++Gv/UVfAPV4c+S0
kAWpXbv5tbkkzbS0eaLPTKgLzavXtQoTtKwrjpolHKIHUz6Wu+n4abfAIRFubOdN
/+aLoRQ0yBDRbdXMsZN/jvY44eM+xRLdRVyMmdPtP8belRi2E2aEzA==
Level 14:
so for this level, i am meant to be able to get the password for the next level if i submit the password for the current level in port 30000 in localhost, but unfortunately, i logged into this level with an ssh key so i don’t actually know the password. Fortunately, in level 0 they told us that you can always access the password for the current level in the /etc/bandit_pass folder, and therefore I found the key for level 14:
4wcYUJFw0k0XLShlDzztnTBHiqxU3b3e
now all i have to do is submit using one of the functions they’ve given me, telnet or nc, i tried nc which allows you to create a connection to a target host at a specific host.
nc localhost -p 30000, then i typed in the level 14 key to find the level 15 key
key: BfMYroe26WYalil77FoDi9qh59eK5xNr
Level 15:
for this level i need to submit the password in localhost through port 30001 using ssl encryption, i tried doing the same thing as last level and nothing happened.
i looked up the manual for openssl, which was listed as a function that could be helpful and scrolled through the commands until i found s_client which was also on the list. s_client implements a generic SSL client which can establish a connection to a remote server, so Instead of nc I tried openssl s_client. it didn’t do anything so I added the -help tag and found i needed to use more options for the s_client and found the first two options, -host and -port told me to use -connect which was the third option. I tried that, and it gave me an input from stdin so I pasted the key and got the key for the next level!
key: cluFn7wTiGryunymYOu4RcffSxQluehd
Level 16:
This time it is similar to last level, except I’m meant to find the localhost server in-between 31000 and 32000. The final helpful command in the spec is nmap, so I used the manual for to find out what it does, and apparently it is a tool that scans ports on a network.
“ In addition to all of the scan methods discussed previously, Nmap offers options for
specifying which ports are scanned and whether the scan order is randomised or sequential. By
default, Nmap scans the most common 1,000 ports for each protocol.” I used the -p option to specify which range of ports I’m searching and then specified the network I’m scanning with “nmap -p 31000-32000 localhost”
I found two open ports and checked them: 31518 and 31790
31518 only echoed whatever i typed in, but from 31790 i got the credentials:
RSA key:
—–BEGIN RSA PRIVATE KEY—–
MIIEogIBAAKCAQEAvmOkuifmMg6HL2YPIOjon6iWfbp7c3jx34YkYWqUH57SUdyJ
imZzeyGC0gtZPGujUSxiJSWI/oTqexh+cAMTSMlOJf7+BrJObArnxd9Y7YT2bRPQ
Ja6Lzb558YW3FZl87ORiO+rW4LCDCNd2lUvLE/GL2GWyuKN0K5iCd5TbtJzEkQTu
DSt2mcNn4rhAL+JFr56o4T6z8WWAW18BR6yGrMq7Q/kALHYW3OekePQAzL0VUYbW
JGTi65CxbCnzc/w4+mqQyvmzpWtMAzJTzAzQxNbkR2MBGySxDLrjg0LWN6sK7wNX
x0YVztz/zbIkPjfkU1jHS+9EbVNj+D1XFOJuaQIDAQABAoIBABagpxpM1aoLWfvD
KHcj10nqcoBc4oE11aFYQwik7xfW+24pRNuDE6SFthOar69jp5RlLwD1NhPx3iBl
J9nOM8OJ0VToum43UOS8YxF8WwhXriYGnc1sskbwpXOUDc9uX4+UESzH22P29ovd
d8WErY0gPxun8pbJLmxkAtWNhpMvfe0050vk9TL5wqbu9AlbssgTcCXkMQnPw9nC
YNN6DDP2lbcBrvgT9YCNL6C+ZKufD52yOQ9qOkwFTEQpjtF4uNtJom+asvlpmS8A
vLY9r60wYSvmZhNqBUrj7lyCtXMIu1kkd4w7F77k+DjHoAXyxcUp1DGL51sOmama
+TOWWgECgYEA8JtPxP0GRJ+IQkX262jM3dEIkza8ky5moIwUqYdsx0NxHgRRhORT
8c8hAuRBb2G82so8vUHk/fur85OEfc9TncnCY2crpoqsghifKLxrLgtT+qDpfZnx
SatLdt8GfQ85yA7hnWWJ2MxF3NaeSDm75Lsm+tBbAiyc9P2jGRNtMSkCgYEAypHd
HCctNi/FwjulhttFx/rHYKhLidZDFYeiE/v45bN4yFm8x7R/b0iE7KaszX+Exdvt
SghaTdcG0Knyw1bpJVyusavPzpaJMjdJ6tcFhVAbAjm7enCIvGCSx+X3l5SiWg0A
R57hJglezIiVjv3aGwHwvlZvtszK6zV6oXFAu0ECgYAbjo46T4hyP5tJi93V5HDi
Ttiek7xRVxUl+iU7rWkGAXFpMLFteQEsRr7PJ/lemmEY5eTDAFMLy9FL2m9oQWCg
R8VdwSk8r9FGLS+9aKcV5PI/WEKlwgXinB3OhYimtiG2Cg5JCqIZFHxD6MjEGOiu
L8ktHMPvodBwNsSBULpG0QKBgBAplTfC1HOnWiMGOU3KPwYWt0O6CdTkmJOmL8Ni
blh9elyZ9FsGxsgtRBXRsqXuz7wtsQAgLHxbdLq/ZJQ7YfzOKU4ZxEnabvXnvWkU
YOdjHdSOoKvDQNWu6ucyLRAWFuISeXw9a/9p7ftpxm0TSgyvmfLF2MIAEwyzRqaM
77pBAoGAMmjmIJdjp+Ez8duyn3ieo36yrttF5NSsJLAbxFpdlc1gvtGCWW+9Cq0b
dxviW8+TFVEBl1O4f7HVm6EpTscdDxU+bCXWkfjuRb7Dy9GOtt9JPsX8MBTakzh3
vBgsyi/sN3RqRBcGU40fOoZyfAMT8s1m/uYv52O6IgeuZ/ujbjY=
—–END RSA PRIVATE KEY—–
Level 17:
Since I didn’t have a password I had to connect using the same method as level 13, with the -i option. First I found the current password by using cat /etc/bandit_pass/bandit17,
current key: xLYVMN9WE5zQ5vHacb0sZEVqbrp7nBTn
next I used diff to find the difference between the two files, two keys came up, but I was looking for the one in .new and not .old so I copied the 2nd key after using diff passwords.old passwords.new
key: kfBf3eYk5BPBRzwjqutbbfE887SVc5Yd
Level 18:
So I tried using the key to log into bandit18, however straight away I was greeted with a message saying “bye-bye !” and i was forcefully logged out… hmmm…
The useful commands include ssh, ls, and cat, and I’m pretty sure cat and ls won’t have anything else to do with not getting logged out in ssh, so i pulled up the manual again for ssh. I command+F-ed to find something with the word ‘force’ to maybe force log in, options -4 and -6 changed the usage of IP addresses, but i found -t which said it could force open a pseudo terminal, so I tried that. Still got the same result however, and I realised that it was because (as the specs mentioned) .bashrc was modified. in order to bypass this, I needed to create open a new shell before bashrc gets called.
So I added on at the end: ssh -t username@hostname /bin/sh
key: IueksS7Ubh8G3DCwVzrTd8rAVOwq3M5x
Level 19:
Upon logging in, and a cheeky ls, the only file in the directory is an executable called bandit20-do and under permissions, anyone can’t read or write, but anyone can execute. After a bit of reading, I found out that running this program lets u run other commands with under the permissions of another user, because out is a
key: GbKksEFF4yrVs6il55v6gwY5aVje5f0j
Level 20:
Spec: There is a setuid binary in the homedirectory that does the following: it makes a connection to localhost on the port you specify as a commandline argument. It then reads a line of text from the connection and compares it to the password in the previous level (bandit20). If the password is correct, it will transmit the password for the next level (bandit21).
So form what i gather, I need to set up some kind of listener in a port on the localhost so that I can send the setups binary the password, and receive the next key in turn. To do this I’m probably going to need two terminal windows, one to set up the port, and the other to run the binary, for the listener, I looked up on stack exchange how to set one up and you use the -l option with the nc command, if i use the -p option to specify port then I’ll have set up my listener. I then ran suconnect with the same port and the typed in the previous password into the listener and got a neat message from suconnect saying that the passwords match, and got the next key from stdout of the listener.
key: gE269g2h3mw3pwgrj0Ha9Uoqen1c9DGr
1 note
·
View note
Text
Why Encryption is Essential for App Security and How to Implement It
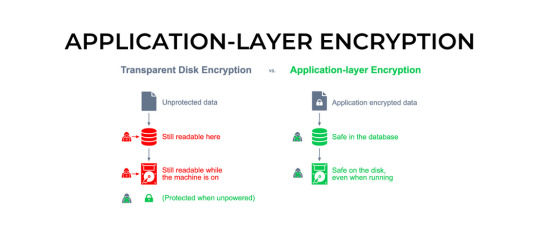
Encryption is essential for app security because it helps protect sensitive data from unauthorized access or interception by hackers or other malicious actors. Encryption involves scrambling data so that it can only be read by someone who has the decryption key or password. This ensures that even if a hacker intercepts the data, they will not be able to read it without the proper key or password.
There are several types of encryption that can be used to secure an app, including symmetric encryption, asymmetric encryption, and hashing. Symmetric encryption involves using the same key to encrypt and decrypt data, while asymmetric encryption uses a public key to encrypt data and a private key to decrypt it. Hashing involves creating a unique digital signature for a piece of data that cannot be reversed or decrypted.
Also Read : Importance of Data Encryption and How It Works
To implement encryption in an app, developers can use encryption libraries or frameworks such as OpenSSL or the Java Cryptography Architecture. They can also use application programming interfaces (APIs) provided by cloud service providers such as Amazon Web Services (AWS) or Microsoft Azure.
The following are some general steps to implement encryption in an app:
Identify sensitive data: Determine which data needs to be encrypted to ensure it remains confidential and secure.
Choose an encryption algorithm: Select an encryption algorithm that is appropriate for the level of security required by the app.
Generate encryption keys: Generate encryption keys for symmetric encryption or public and private keys for asymmetric encryption.
Encrypt the data: Use the chosen encryption algorithm and keys to encrypt the data.
Store the encryption keys securely: Store the encryption keys securely, so they cannot be accessed or intercepted by hackers.
Decrypt the data when needed: Use the appropriate key to decrypt the data when it needs to be accessed by authorized users.
Test and validate: Test the encryption implementation thoroughly to ensure it works as expected and does not introduce any vulnerabilities or weaknesses.
By implementing encryption, developers can help ensure that their app is secure and can protect sensitive data from unauthorized access or interception.
0 notes
Text
Openvpn gate list

Openvpn gate list license#
9.1 The pull-resolv-conf custom scripts.
8.4 Connect both the client and server LANs.
7 Routing client traffic through the server.
6.4.4 Automatically connect to VPN via CLI.
6.4 NetworkManager-native VPN configuration.
6.3 Letting NetworkManager start a connection.
5.6 Configure the MTU with Fragment and MSS.
5.4 Converting certificates to encrypted.
5.2.4 Running multiple instances of OpenVPN on different ports on the physical machine.
5.2.3 Deviating from the standard port and/or protocol.
5 A basic Layer-3 IP routing configuration.
4 Create a Public Key Infrastructure (PKI) from scratch.
3 Connect to a VPN provided by a third party.
Openvpn gate list license#
OpenVPN was written by James Yonan and is published under the GNU General Public License (GPL). Overall, it aims to offer many of the key features of IPSec but with a relatively lightweight footprint. OpenVPN is designed to work with the TUN/TAP virtual networking interface that exists on most platforms. Additionally it supports unencrypted TCP/UDP tunnels. It supports conventional encryption using a pre-shared secret key (Static Key mode) or public key security ( SSL/TLS mode) using client & server certificates. OpenVPN is tightly bound to the OpenSSL library, and derives much of its crypto capabilities from it. Additionally it has support for dynamic IP addresses and DHCP, scalability to hundreds or thousands of users, and portability to most major OS platforms. It supports SSL/TLS security, Ethernet bridging, TCP or UDP tunnel transport through proxies or NAT. OpenVPN is a robust and highly flexible VPN daemon. For more detailed information, please see the OpenVPN 2.4 man page and the OpenVPN documentation. This article describes a basic installation and configuration of OpenVPN, suitable for private and small business use.
0 notes
Text
Current business needs continue to advance owing to the increased security breaches worldwide. As a result, every organization pulls up their socks as they tighten and reduce their attack surface as much as possible. Be it applications, networks, servers or databases, security standards are key requirements that should not be evaded at all. As a result of that we are going on a journey involving securing your powerful, open source object-relational PostgreSQL database. PostgreSQL is a powerful, open source object-relational database system that uses and extends the SQL language combined with many features that safely store and scale the most complicated data workloads. Source: PostgreSQL Page We are going to look at how to enable SSL/TLS connection to your PostgreSQL database by first enabling SSL on the database then adding the certificate to the client for secure connection. Additionally, we are going to enable SCRAM-SHA-256 password authentication in our PostgreSQL database. So that we are all on the same page, we shall describe SCRAM-SHA-256 password authentication. The scram-sha-256 password authentication method performs SCRAM-SHA-256 authentication, as described in RFC 7677. It is a challenge-response scheme that prevents password sniffing on untrusted connections and supports storing passwords on the server in a cryptographically hashed form that is thought to be secure. Source: PostgreSQL Page Now that the formalities are out of the way, we shall proceed to enabling SSL and SCRAM-SHA-256 password authentication by following the steps below. NOTE: We shall be using CentOS for this example, the directory paths presented may differ in different distributions. Step 1: Install PostgreSQL database In case you do not have a PostgreSQL database, the guides listed below will bring it up in your server as soon as possible. Install PostgreSQL 13 on Fedora How To Install PostgreSQL 13 on CentOS / RHEL 8 Install PostgreSQL 13 on Debian How To Install PostgreSQL 13 on CentOS 7 After you are done, we can proceed to implement SSL on your PostgreSQL database. Step 2: Create Certificates PostgreSQL has native support for using SSL connections to encrypt client/server communications for increased security. In case you do not have purchased certificates, create a server certificate whose identity can be validated by clients. To do that, first create a certificate signing request (CSR) and a public/private key file like so openssl req -new -nodes -text -out root.csr \ -keyout root.key -subj "/CN=root.computingforgeeks.com" Make sure you change “root.computingforgeeks.com” to match your domain name. After the root key has been created, make sure its permissions are set as secure as possible. Make sure “group” and “others” will not be able to read, write and execute. sudo chmod og-rwx root.key After that is done, sign the request with the key to create a root certificate authority (using the default OpenSSL configuration file location on Linux). You can check OpenSSL configuration file location on Linux by running “openssl version -d” command. openssl x509 -req -in root.csr -text -days 3650 \ -extfile /etc/pki/tls/openssl.cnf -extensions v3_ca \ -signkey root.key -out root.crt Finally, create a server certificate signed by the new root certificate authority: \##Generate private server key and set secure permissions openssl req -new -nodes -text -out server.csr \ -keyout server.key -subj "/CN=datab.computingforgeeks.com" sudo chmod og-rwx server.key Then also create the server certificate signed by the new root certificate authority openssl x509 -req -in server.csr -text -days 365 \ -CA root.crt -CAkey root.key -CAcreateserial \ -out server.crt The above commands will produce server.crt and server.key. These are the server certificates that we shall be adding to PostgreSQL. On the other hand, root.crt should be stored on the client so the client can verify that the server’s certificate was signed by its trusted root certificate.
root.crt should now be embedded in your applications written in Java and any other programming language. For Java, this should be added in its keystore. Keep root.key in a secure location for it can be used in creating future certificates. For convenience, we shall copy the server and root certificates into the place PostgreSQL keeps its main configuration files. That way, Postgres will be able to read them in the same location it reads its configuration files. The locations in CentOS are /var/lib/pgsql/13/data/ for PostgreSQL 13, /var/lib/pgsql/12/data/ for PostgreSQL 12 and /var/lib/pgsql/11/data/ for PostgreSQL 11. We shall use PostgreSQL 11 in this example. sudo cp server.* root.crt /var/lib/pgsql/11/data/ ##For PostgreSQL 11 Step 3: Configure PostgreSQL database to enable SSL Now that we have our certificates, nothing denies us the chance of enabling SSL in our PostgreSQL Server. Depending on the version of your PostgreSQL Database, open up its configuration file. We shall use version 11 as an example here. Look for the ssl related lines that are commented in the file and uncomment them. The lines are shared below. $ sudo vim /var/lib/pgsql/11/data/postgresql.conf ssl = on ssl_ca_file = 'root.crt' ssl_cert_file = 'server.crt' ssl_key_file = 'server.key' ssl_ciphers = 'ALL:!ADH:!LOW:!EXP:!MD5:@STRENGTH' ssl_prefer_server_ciphers = on ssl_ecdh_curve = 'prime256v1' After that is done, we need to enable hostssl record in pg_hba.conf file which will match connection attempts made using TCP/IP, but only when the connection is made with SSL encryption. Open the file and edit as follows: $ sudo vim /var/lib/pgsql/11/data/pg_hba.conf hostssl all all 10.38.87.40/32 md5 clientcert=verify-full hostssl all all 10.38.87.41/32 md5 clientcert=verify-full hostssl all all 10.38.87.42/32 md5 clientcert=verify-full hostssl all all 10.38.87.43/32 md5 clientcert=verify-full To persist the changes we have made thus far, we need to restart PostreSQL service thus: sudo systemctl restart postgresql- Verify that SSL is enabled To make sure that the SSL settings are working, we are going to login to the database and check the message it will present to us. You can run the command below inside the server or from another server with psql installed and allowed to connect to the database. You should see a message like the one shared below and SSL should be successfully enabled. $ psql -U postgres -h 10.38.87.46 -d postgres Password for user postgres: psql (11.11) SSL connection (protocol: TLSv1.2, cipher: ECDHE-RSA-AES256-GCM-SHA384, bits: 256, compression: off) Type "help" for help. postgres=# Step 4: Configure PostgreSQL database to enable SCRAM-SHA-256 Now that SSL is enabled and working as configured, let us now add another layer of security by enabling SCRAM-SHA-256 password authentication. This is a very simple process. First, open main postgresql configuration file and change the line below to be as shown. $ sudo vim /var/lib/pgsql/11/data/postgresql.conf password_encryption = scram-sha-256 Once that is done, we need to enforce clients to authenticate via this new scheme by editing pg_hba.conf file as shown below. You will notice that all occurrences of md5 have been replaced with scram-sha-256. $ sudo vim /var/lib/pgsql/11/data/pg_hba.conf hostssl all all 10.38.87.40/32 scram-sha-256 clientcert=verify-full hostssl all all 10.38.87.41/32 scram-sha-256 clientcert=verify-full hostssl all all 10.38.87.42/32 scram-sha-256 clientcert=verify-full hostssl all all 10.38.87.43/32 scram-sha-256 clientcert=verify-full To persist the changes we have made thus far, we need to restart PostreSQL service thus: sudo systemctl restart postgresql-11
Once those changes have been made, we will have to update passwords for all users in your database or you will not be able to login. To do so, access your database as follows. You must have sudo rights. $ sudo su - postgres Last login: Fri Feb 19 17:16:16 EAT 2021 on pts/0 -bash-4.2$ psql psql (11.11) Type "help" for help. postgres=# Then run the password command like so, then press enter. You will be prompted to enter the password twice. You can enter the same same password that was there before. It will now be encrypted using the new scram-sha-256 scheme. postgres=#\password Enter new password: Enter it again: postgres=# Once that is done, the only step remaining is to add certificates to the client applications. For *nix systems, you can place the client certificate under $user.home/.postgresql/ directory. How to embed the client certificate in various applications written in various languages is beyond the scope of this guide. An example for Java has been provided in PostgreSQL JDBC Documentation When making connection using JDBC driver, the connection string should conform to the following format. Notice the ssl=true option added. jdbc:postgresql://:/?ssl=true ##For example jdbc:postgresql://datab.computingforgeeks.com:5432/all_cent_customers?ssl=true Last Words Ensuring your organization remains secure should remain top priority as you continue to administer and steward their dear systems. As a custodian of their infrastructure, it is incumbent upon you to protect, prevent and pro-actively fight against any form of vulnerability. Seal them as much as you can. We hope the guide was beneficial and in case you have further ideas, feel entirely free to point them out. Finally, we are very grateful for visiting the site and we continue to appreciate the colossal support you relentlessly extend.
0 notes
Text
Generate Jks File From Crt And Key Using Keytool
Convert Pfx To Jks Keytool
Keytool Create Jks Keystore
How To Create Jks Keystore
Keytool Import Crt
Hi, Please give me the exact keytool commands to convert.key and.crt files to.jks file of keystore. I am unable to import.key to.jks. Please send me both commands. While we create a Java keystore, we will first create the.jks file that will initially only contain the private key using the keytool utility. 1 keytool -genkey -keystore keystore.jks -alias ssl.
Tutorial
Introduction
Java Keytool is a key and certificate management tool that is used to manipulate Java Keystores, and is included with Java. A Java Keystore is a container for authorization certificates or public key certificates, and is often used by Java-based applications for encryption, authentication, and serving over HTTPS. Its entries are protected by a keystore password. A keystore entry is identified by an alias, and it consists of keys and certificates that form a trust chain.
This cheat sheet-style guide provides a quick reference to keytool commands that are commonly useful when working with Java Keystores. This includes creating and modifying Java Keystores so they can be used with your Java applications.
How to Use This Guide:
If you are not familiar with certificate signing requests (CSRs), read the CSR section of our OpenSSL cheat sheet
This guide is in a simple, cheat sheet format–self-contained command line snippets
Jump to any section that is relevant to the task you are trying to complete (Hint: use the Contents menu on the bottom-left or your browser’s Find function)
Most of the commands are one-liners that have been expanded to multiple lines (using the symbol) for clarity
Creating and Importing Keystore Entries
This section covers Java Keytool commands that are related to generating key pairs and certificates, and importing certificates.
Generate Keys in New/Existing Keystore
Use this method if you want to use HTTP (HTTP over TLS) to secure your Java application. This will create a new key pair in a new or existing Java Keystore, which can be used to create a CSR, and obtain an SSL certificate from a Certificate Authority.
This command generates a 2048-bit RSA key pair, under the specified alias (domain), in the specified keystore file (keystore.jks):
If the specified keystore does not already exist, it will be created after the requested information is supplied. This will prompt for the keystore password (new or existing), followed by a Distinguished Name prompt (for the private key), then the desired private key password.
Generate CSR For Existing Private Key
Use this method if you want to generate an CSR that you can send to a CA to request the issuance of a CA-signed SSL certificate. It requires that the keystore and alias already exist; you can use the previous command to ensure this.
This command creates a CSR (domain.csr) signed by the private key identified by the alias (domain) in the (keystore.jks) keystore:
After entering the keystore’s password, the CSR will be generated.
Import Signed/Root/Intermediate Certificate
Use this method if you want to import a signed certificate, e.g. a certificate signed by a CA, into your keystore; it must match the private key that exists in the specified alias. You may also use this same command to import root or intermediate certificates that your CA may require to complete a chain of trust. Simply specify a unique alias, such as root instead of domain, and the certificate that you want to import.
Convert Pfx To Jks Keytool
This command imports the certificate (domain.crt) into the keystore (keystore.jks), under the specified alias (domain). If you are importing a signed certificate, it must correspond to the private key in the specified alias:
You will be prompted for the keystore password, then for a confirmation of the import action.
Note: You may also use the command to import a CA’s certificates into your Java truststore, which is typically located in $JAVA_HOME/jre/lib/security/cacerts assuming $JAVA_HOME is where your JRE or JDK is installed.
Keytool Create Jks Keystore
Generate Self-Signed Certificate in New/Existing Keystore
Use this command if you want to generate a self-signed certificate for your Java applications. This is actually the same command that is used to create a new key pair, but with the validity lifetime specified in days.
This command generates a 2048-bit RSA key pair, valid for 365 days, under the specified alias (domain), in the specified keystore file (keystore.jks):
If the specified keystore does not already exist, it will be created after the requested information is supplied. This will prompt for the keystore password (new or existing), followed by a Distinguished Name prompt (for the private key), then the desired private key password.
Viewing Keystore Entries
This section covers listing the contents of a Java Keystore, such as viewing certificate information or exporting certificates.
List Keystore Certificate Fingerprints
This command lists the SHA fingerprints of all of the certificates in the keystore (keystore.jks), under their respective aliases:
You will be prompted for the keystore’s password. You may also restrict the output to a specific alias by using the -alias domain option, where “domain” is the alias name.
List Verbose Keystore Contents
This command lists verbose information about the entries a keystore (keystore.jks) contains, including certificate chain length, fingerprint of certificates in the chain, distinguished names, serial number, and creation/expiration date, under their respective aliases:
You will be prompted for the keystore’s password. You may also restrict the output to a specific alias by using the -alias domain option, where “domain” is the alias name.
Note: You may also use this command to view which certificates are in your Java truststore, which is typically located in $JAVA_HOME/jre/lib/security/cacerts assuming $JAVA_HOME is where your JRE or JDK is installed.
Use Keytool to View Certificate Information
This command prints verbose information about a certificate file (certificate.crt), including its fingerprints, distinguished name of owner and issuer, and the time period of its validity:
You will be prompted for the keystore password.
Export Certificate
This command exports a binary DER-encoded certificate (domain.der), that is associated with the alias (domain), in the keystore (keystore.jks):
You will be prompted for the keystore password. If you want to convert the DER-encoded certificate to PEM-encoding, follow our OpenSSL cheat sheet.
Modifying Keystore
This section covers the modification of Java Keystore entries, such as deleting or renaming aliases.
Change Keystore Password
This command is used to change the password of a keystore (keystore.jks):
You will be prompted for the current password, then the new password. You may also specify the new password in the command by using the -new newpass option, where “newpass” is the password.
Delete Alias
This command is used to delete an alias (domain) in a keystore (keystore.jks):
You will be prompted for the keystore password.
Rename Alias
This command will rename the alias (domain) to the destination alias (newdomain) in the keystore (keystore.jks):
You will be prompted for the keystore password.
Conclusion
That should cover how most people use Java Keytool to manipulate their Java Keystores. It has many other uses that were not covered here, so feel free to ask or suggest other uses in the comments.
This tutorial is based on the version of keystore that ships with Java 1.7.0 update 65. For help installing Java on Ubuntu, follow this guide.
Tutorial
Introduction
Java Keytool is a key and certificate management tool that is used to manipulate Java Keystores, and is included with Java. A Java Keystore is a container for authorization certificates or public key certificates, and is often used by Java-based applications for encryption, authentication, and serving over HTTPS. Its entries are protected by a keystore password. A keystore entry is identified by an alias, and it consists of keys and certificates that form a trust chain.
This cheat sheet-style guide provides a quick reference to keytool commands that are commonly useful when working with Java Keystores. This includes creating and modifying Java Keystores so they can be used with your Java applications.
How to Use This Guide:
If you are not familiar with certificate signing requests (CSRs), read the CSR section of our OpenSSL cheat sheet
This guide is in a simple, cheat sheet format–self-contained command line snippets
Jump to any section that is relevant to the task you are trying to complete (Hint: use the Contents menu on the bottom-left or your browser’s Find function)
Most of the commands are one-liners that have been expanded to multiple lines (using the symbol) for clarity
How To Create Jks Keystore
Creating and Importing Keystore Entries
This section covers Java Keytool commands that are related to generating key pairs and certificates, and importing certificates.
Generate Keys in New/Existing Keystore
Use this method if you want to use HTTP (HTTP over TLS) to secure your Java application. This will create a new key pair in a new or existing Java Keystore, which can be used to create a CSR, and obtain an SSL certificate from a Certificate Authority.
This command generates a 2048-bit RSA key pair, under the specified alias (domain), in the specified keystore file (keystore.jks):
If the specified keystore does not already exist, it will be created after the requested information is supplied. This will prompt for the keystore password (new or existing), followed by a Distinguished Name prompt (for the private key), then the desired private key password.
Generate CSR For Existing Private Key
Use this method if you want to generate an CSR that you can send to a CA to request the issuance of a CA-signed SSL certificate. It requires that the keystore and alias already exist; you can use the previous command to ensure this.
This command creates a CSR (domain.csr) signed by the private key identified by the alias (domain) in the (keystore.jks) keystore:
After entering the keystore’s password, the CSR will be generated.
Import Signed/Root/Intermediate Certificate
Use this method if you want to import a signed certificate, e.g. a certificate signed by a CA, into your keystore; it must match the private key that exists in the specified alias. You may also use this same command to import root or intermediate certificates that your CA may require to complete a chain of trust. Simply specify a unique alias, such as root instead of domain, and the certificate that you want to import.
Keytool Import Crt
This command imports the certificate (domain.crt) into the keystore (keystore.jks), under the specified alias (domain). If you are importing a signed certificate, it must correspond to the private key in the specified alias:
You will be prompted for the keystore password, then for a confirmation of the import action.
Note: You may also use the command to import a CA’s certificates into your Java truststore, which is typically located in $JAVA_HOME/jre/lib/security/cacerts assuming $JAVA_HOME is where your JRE or JDK is installed.
Generate Self-Signed Certificate in New/Existing Keystore
Use this command if you want to generate a self-signed certificate for your Java applications. This is actually the same command that is used to create a new key pair, but with the validity lifetime specified in days.
This command generates a 2048-bit RSA key pair, valid for 365 days, under the specified alias (domain), in the specified keystore file (keystore.jks):
If the specified keystore does not already exist, it will be created after the requested information is supplied. This will prompt for the keystore password (new or existing), followed by a Distinguished Name prompt (for the private key), then the desired private key password.
Viewing Keystore Entries
This section covers listing the contents of a Java Keystore, such as viewing certificate information or exporting certificates.
List Keystore Certificate Fingerprints
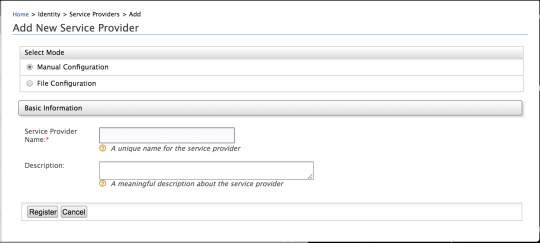
This command lists the SHA fingerprints of all of the certificates in the keystore (keystore.jks), under their respective aliases:
You will be prompted for the keystore’s password. You may also restrict the output to a specific alias by using the -alias domain option, where “domain” is the alias name.
List Verbose Keystore Contents
This command lists verbose information about the entries a keystore (keystore.jks) contains, including certificate chain length, fingerprint of certificates in the chain, distinguished names, serial number, and creation/expiration date, under their respective aliases:
You will be prompted for the keystore’s password. You may also restrict the output to a specific alias by using the -alias domain option, where “domain” is the alias name.
Note: You may also use this command to view which certificates are in your Java truststore, which is typically located in $JAVA_HOME/jre/lib/security/cacerts assuming $JAVA_HOME is where your JRE or JDK is installed.
Use Keytool to View Certificate Information
This command prints verbose information about a certificate file (certificate.crt), including its fingerprints, distinguished name of owner and issuer, and the time period of its validity:
You will be prompted for the keystore password.
Export Certificate
This command exports a binary DER-encoded certificate (domain.der), that is associated with the alias (domain), in the keystore (keystore.jks):
You will be prompted for the keystore password. If you want to convert the DER-encoded certificate to PEM-encoding, follow our OpenSSL cheat sheet.
Modifying Keystore
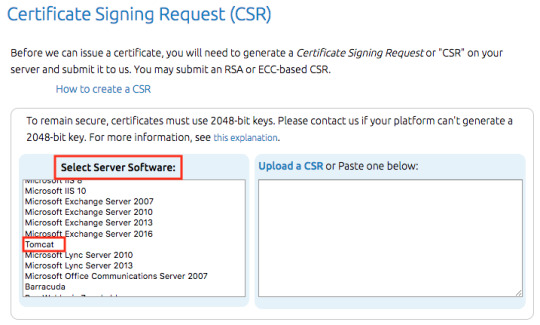
This section covers the modification of Java Keystore entries, such as deleting or renaming aliases.
Change Keystore Password
This command is used to change the password of a keystore (keystore.jks):
You will be prompted for the current password, then the new password. You may also specify the new password in the command by using the -new newpass option, where “newpass” is the password.
Delete Alias
This command is used to delete an alias (domain) in a keystore (keystore.jks):
You will be prompted for the keystore password.
Rename Alias
This command will rename the alias (domain) to the destination alias (newdomain) in the keystore (keystore.jks):
You will be prompted for the keystore password.
Conclusion
That should cover how most people use Java Keytool to manipulate their Java Keystores. It has many other uses that were not covered here, so feel free to ask or suggest other uses in the comments.
This tutorial is based on the version of keystore that ships with Java 1.7.0 update 65. For help installing Java on Ubuntu, follow this guide.
0 notes
Text
Using Openssl To Create Keys For Mac

Using Openssl To Create Keys For Mac Osx
How To Use Openssl On Mac
In the example below openssl will use the RSA algorithm combined with the DES3 digest algorithm to generate the 2048 bit key. Our key will be protected by a passphrase (password) and stored in ciphered plain text in the file named secret.key. Openssl genrsa -des3 -out secret.key 2048 Generating a Public Key. Mac OS X also ships with OpenSSL pre-installed. For Windows a Win32 OpenSSL installer is available. Remember, it’s important you keep your Private Key secured; be sure to limit who and what has access to these keys. Converting PEM encoded certificate to DER openssl x509 -outform der -in certificate.pem -out certificate.der.
SYNOPSIS
openssldgst (-Idigest) (-help) (-c) (-d) (-hex) (-binary) (-r) (-outfilename) (-signfilename) (-keyformarg) (-passinarg) (-verifyfilename) (-prverifyfilename) (-signaturefilename) (-hmackey) (-fips-fingerprint) (-randfile..) (-engineid) (-engine_impl) (file..)
openssl Idigest (..)
DESCRIPTION
The digest functions output the message digest of a supplied file or files in hexadecimal. The digest functions also generate and verify digital signatures using message digests.
The generic name, dgst, may be used with an option specifying the algorithm to be used. The default digest is sha256. A supported digest name may also be used as the command name. To see the list of supported algorithms, use the openssl_list--digest-commands command.
Options

-help
Print out a usage message.
-Idigest
Specifies name of a supported digest to be used. To see the list of supported digests, use the command openssl_list--digest-commands.
-c
prints out the digest in two digit groups separated by colons, only relevant if hex format output is used.
-d
prints out BIO debugging information.
-hex
outputs digest as a hex dump. This is the default case for a 'normal' digest as opposed to a digital signature. See NOTES below for digital signatures using -hex.
-binary
outputs the digest or signature in binary form.
-r
output the digest in the 'coreutils' format used by programs like sha1sum.
-outfilename
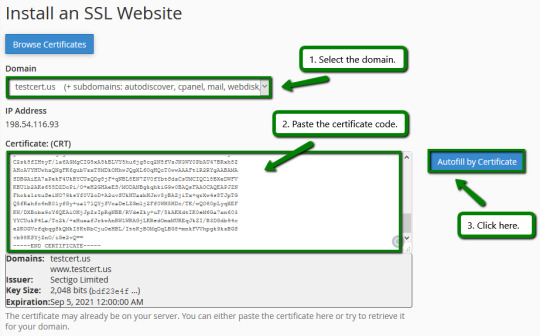
specifies the file name to output to, or standard output by default.
Using Openssl To Create Keys For Mac Osx
-signfilename
. Note this option does not support Ed25519 or Ed448 private keys. Use the openssl_pkeyutl command instead for this.
digitally signs the digest using the private key in filename.
-keyformarg
Specifies the key format to sign digest with. The DER, PEM, P12, and ENGINE formats are supported.
-sigoptnm:v
Pass options to the signature algorithm during sign or verify operations. Names and values of these options are algorithm-specific.
-passinarg
the private key password source. For more information about the format of arg see the PASS PHRASE ARGUMENTS section in openssl.
-verifyfilename
verifies the signature using the public key in filename. The output is either Verification OK or Verification Failure.
-prverifyfilename
verifies the signature using the private key in filename.
-signaturefilename
specifies the actual signature to verify.
-hmackey
create a hashed MAC using 'key'.
-macalg
create MAC (keyed Message Authentication Code). The most popular MAC algorithm is HMAC (hash-based MAC), but there are other MAC algorithms which are not based on hash, for instance gost-mac algorithm, supported by ccgost engine. MAC keys and other options should be set via -macopt parameter.
-macoptnm:v
Passes options to MAC algorithm, specified by -mac key. Following options are supported by both by HMAC and gost-mac
key:string
Specifies MAC key as alphanumeric string (use if key contain printable characters only). String length must conform to any restrictions of the MAC algorithm for example exactly 32 chars for gost-mac.
hexkey:string
Specifies MAC key in hexadecimal form (two hex digits per byte). Key length must conform to any restrictions of the MAC algorithm for example exactly 32 chars for gost-mac.
-rand file..
specifies a file or files containing random data used to seed the random number generator. Multiple files can be specified separated by an OS-dependent character. The separator is ; for MS-Windows, , for OpenVMS, and : for all others.
(-writerandfile)
Writes random data to the specified file upon exit. This can be used with a subsequent -rand flag.
-fips-fingerprint
compute HMAC using a specific key for certain OpenSSL-FIPS operations.
-engineid
Use engine id for operations (including private key storage). This engine is not used as source for digest algorithms, unless it is also specified in the configuration file or -engine_impl is also specified.
-engine_impl
When used with the -engine option, it specifies to also use engine id for digest operations.
file..
specifies the file or files to digest. If no files are specified then standard input is used.
EXAMPLES
To create a hex-encoded message digest of a file:
To sign a file using SHA-256 with binary file output:
To verify a signature:
NOTES
The digest mechanisms that are available will depend on the options used when building OpenSSL. The openssl_listdigest-commands command can be used to list them.
New or agile applications should use probably use SHA-256. Other digests, particularly SHA-1 and MD5, are still widely used for interoperating with existing formats and protocols.
When signing a file, dgst will automatically determine the algorithm (RSA, ECC, etc) to use for signing based on the private key's ASN.1 info. When verifying signatures, it only handles the RSA, DSA, or ECDSA signature itself, not the related data to identify the signer and algorithm used in formats such as x.509, CMS, and S/MIME.
A source of random numbers is required for certain signing algorithms, in particular ECDSA and DSA.
The signing and verify options should only be used if a single file is being signed or verified.
Hex signatures cannot be verified using openssl. Instead, use 'xxd -r' or similar program to transform the hex signature into a binary signature prior to verification.
HISTORY
The default digest was changed from MD5 to SHA256 in OpenSSL 1.1.0. The FIPS-related options were removed in OpenSSL 1.1.0.
COPYRIGHT
Copyright 2000-2019 The OpenSSL Project Authors. All Rights Reserved. Mukis kitchen siterip.
Licensed under the OpenSSL license (the 'License'). You may not use this file except in compliance with the License. You can obtain a copy in the file LICENSE in the source distribution or here: OpenSSL.
AVAILABILITY
Tableau jira connector. PTC MKS Toolkit for System Administrators PTC MKS Toolkit for Developers PTC MKS Toolkit for Interoperability PTC MKS Toolkit for Professional Developers PTC MKS Toolkit for Professional Developers 64-Bit Edition PTC MKS Toolkit for Enterprise Developers PTC MKS Toolkit for Enterprise Developers 64-Bit Edition
PTC MKS Toolkit 10.3 Documentation Build 39.
How To Use Openssl On Mac
0 notes
Text
Direct Mail Mailing List

Targeted Mailing Lists – US & International Business Lists – Business & Consumers E Mail List – Turnkey Direct Mailing Campaigns – Nationwide Sales Leads Email & Telemarketing – Donor Mailing List – Solar Panel Mailing List – Gambler Lists Sweepstakes Lists – Sports Gamblers Mailing List – Online Gamblers Lists Mailing & E Mail List – Accredited Investor List
Direct Mail Companies Near Me
Direct Mail Address Lists
Top 10 Direct Mail Companies
Direct Mail Companies Near Me

Few things are as important to a business’ marketing strategy as its Direct mail and email marketing lists. Having an accurate, effective Mailing List is important and a key part of a complete marketing campaign. Because of this, we take pride in providing marketing lists that work for your business.
We are one of the leading providers for general contractor mailing lists & direct mail in the nation. Our team of professionals can handle your entire campaign from designing, mailing service, fulfillment service, digital & offset printing, and mailing list service. Wechat app web. Check our other direct mail offerings: Brochure Mailing. Debt Settlement Mailing. Number of Records Price Per Record 1 - 5,000 $0.049/record 5,001 - 10,000 $0.045/record. Welcome to Mailing Lists Direct. We’re here to help! You’re looking for data – mailing lists, email lists, telemarketing lists. We’ve got you covered. Providing accurate, privacy-compliant marketing data is the cornerstone of what we do. Data drives your direct marketing campaigns. If our data isn’t any good you don’t make money. The correct mailing list will contain your most valuable prospects. The more careful you are in analyzing and selecting direct mailing lists, the better your chances for success. Consumer Direct Mailing Lists. For consumer sales leads, the characteristics used to refine direct mailing lists might be a combination of the following.
Our lists focus on accuracy, regular updates, and powerful filters that let you identify exactly who to contact at a business. You’ll get lists where everyone is a responder and that is tailored to target your specific target audience. Only real companies, real contacts, and proven responders are included in our list. Consumer volunteers to be on Sprint Data Solutions Worldwide Marketing lists from surveys and incentive-based offerings. We’ve single handedly started a new era of mailing lists, and if you’re ready to build a better mailing lists list for your next marketing push, we can help put your company, product, service on the map.

At Sprint Data Solutions Worldwide Marketing, our clients get a huge boost to their marketing results and improved ROI every time. You’ll get access to the freshest, most accurate, and most response driven data available anywhere and be able to build your mailing list accordingly. We take pride in being a solution that will supercharge your Sprint direct mail, email, telemarketing, and text marketing pushes in a huge way.
Sprint Data Solutions Worldwide Marketing provides the ability to create a custom Sprint business, email list for your next marketing campaign. We look at consumers or businesses that have previously responded to marketing campaigns, remove nonresponsive entities, and get the contact info for those who oversee decision making instead of their subordinates with no or limited buying power. This way, our clients get contact info that works for them and their needs and more importantly works to increase your bottom line on each campaign.
By creating a finely tuned mailing list using sourced data that has been refined and perfected, you give your marketing efforts the supercharge they need. Best of all, each mailing list is customized and personalized for your market. Whether you’re in the tech industry, hospitality, or something else, you’ll get a customized contact list that only targets your specific business clients or consumers – no wasting time on marketing to those who aren’t interested, aren’t in your industry, or who have a history of not responding. You’ll put all your time, energy, and effort into reaching leads who will become conversions. AI data screening is available!
Already, a huge number of companies have changed to Sprint Data Solutions to solve their marketing needs including those in fields like:
If you have a Dropbox Basic account, you can upgrade to Dropbox Plus to get 2 TB of space or Dropbox Professional to get 3 TB of space. If you have a Plus or Professional account and work with two or more colleagues, you may want to consider upgrading to Dropbox Business, which comes with 5 TB of space. How helpful was this article? Complete the Dropbox ‘Get Started’ guide. You could earn upto 250 MB additional space by doing. Learn how you can earn more space for your Dropbox Basic account. Dropbox Basic accounts offer 2 GB of storage space for free. Our upgraded personal plans come with more space, starting at 2 TB for a Dropbox Plus or Dropbox Family account, 3 TB for a Dropbox Professional account, or 5 TB for a Dropbox Business account. Refer friends and family – up to 32GB. One easy way to quickly add a bit more capacity to your. I wanted to show you exactly what happens and what steps you'll need to follow in order to get more free space in your Dropbox. From your Account Settings page you see all your current space and all the space you've earned. To begin earning more free space, you can visit the Drop. Get more dropbox space.
Telemarketing
Hotels
Airlines
Tech Fields
Catalog mailers
Travel companies
Cruise lines
Publishing companies
Insurance Companies
Start Ups
Investment
Many Many More
Sales Leads And New Customers Sprint Data Worldwide Marketing has one of the largest and fastest growing economies in the nation, and there is so much potential here for any business that you just need to know how to reach out and capture it to lead your business into the future. Generating viable sales leads is the primary focus here, and building a better company begins with having the right contacts on your marketing list.
At Sprint Data Solutions, we believe in giving you the most accurate, up to date sales leads you can find anywhere. Just review our lists, use the powerful filter systems to identify the ones that are most aligned with your marketing strategy, and create your Mailing List accordingly. Boosting your sales means finding the right consumers, and that means those who have a history of responding and turning to conversions. Malware full.

Direct Mail Address Lists
Plus, it is vital that you talk to the right person. Just knowing that a business is a good target audience for what you offer is only the first step. Who do you contact there? In most cases, the actual person who is truly in charge of making decisions isn’t easy to identify. Instead, you end up reaching out to subordinates who really don’t have decision making power or who don’t even know what they’re doing. With our lists, you get the contact who is in charge of making the decisions. This means that you don’t waste time – you contact the right person and get their attention immediately.

About Sprint Data Solutions headquartered in Las Vegas, Sprint Data Solutions has affiliates in all 50 states. This way, we are able to offer clients the chance to create a specialized local consumer mailing list, email list, or business list. We provide custom creations that are tailored for your company, product, or service. This site is our Mailing List, Sprint E Mail List and Business List portal.
# Open FileZilla site open-filezilla 'My Site' # Change the remote directory # Upload the file to user's home directory put d:examplefile.txt /home/user This is not recommended though as you rely on a configuration stored in your Windows account profile. On the right side, select Enable FTP over SSL/TLS support. In Private Key file, browse the location of the key file (created at the time of CSR). In Certificate file box, enter.pem certificate file. Enter Key Password in Key Password box.(Note – not applicable for the CSR generated using OpenSSL) Click on the OK button and Restart the server. Filezilla sftp pem file. Right-click the icon and select 'Add Key' and select your private key (PPK) file. Follow the prompt to enter your pass phrase and you're done. Now simply launch FileZilla and connect to your server using SFTP using SSH-2 with a username and an empty password. Don't forget to. The FileZilla Client not only supports FTP, but also FTP over TLS (FTPS) and SFTP. It is open source software distributed free of charge under the terms of the GNU General Public License. We are also offering FileZilla Pro, with additional protocol support for WebDAV, Amazon S3, Backblaze B2, Dropbox, Microsoft OneDrive, Google Drive, Microsoft Azure Blob and File Storage, and Google Cloud Storage.
Our databases are derived from multiple sources using survey responders, online data, and everyone has volunteered to be in the database Each database is updated daily and when building your mailing list you are able to create a list that is tailored for you. No more cookie cutter lists, one size fits all list that everyone of your competitors just downloaded. Why bother focusing on the same exact contacts that have been tried and tried again? With our high-powered exclusive mailing lists, you’re able to get advanced results that you can depend on. We provide unique, customized lists for each of our clients to ensure you get the best results possible.
More than 50 years of combined direct marketing experience powers our team, and we ensure that every list is designed to give your business the best results and the best ROI. With more than a million records coming in every day, our databases are the most powerful and accurate that you can find anywhere. You get:
Customized lists
The deepest, most accurate database in the world
Regular daily updates
Highly accurate and deep filter options
Competitive pricing
When you choose Sprint Data Solutions Worldwide Marketing, you are choosing a partner that will help you find success with your marketing campaigns that you may not have even thought possible. With our Mailing Lists, Telemarketing Lists, Sprint Business Lists, E-Mail lists, Donor Mailing Lists, Hunting Camping, Gun Owners, Gambling List, Voter Data and more, you’ll get results with Sprint Data Worldwide Marketing on your team. And all leads are certified and verified by a minimum of two independent third parties to ensure total accuracy.
Top 10 Direct Mail Companies
If you’re tired of wasting time and resources on your marketing efforts, it’s time to find out what a difference the right resources can make. With us on our side, you never have to wonder if you’re getting the most from your efforts. Contact our team today and see the difference! Sprint Data Solutions Worldwide Marketing is a Disabled Veteran Owned Company. When making a purchase at Sprint Data Solutions Worldwide Marketing you are supporting a Disabled Veteran Owned Operation. Please support all your Local and National Veteran Organizations. We thank you for your continued support over the years! Free download computer temperature.
0 notes
Text
OpenSSL: Creating/Inspecting Key Pair, Encrypting/Decrypting and Sign/Verify
OpenSSL: Creating/Inspecting Key Pair, Encrypting/Decrypting and Sign/Verify
Hello Guys, We are back with new article on OpenSSL. Secure Layer Certification on your Network to secure data transfer. In this Tutorial, you’ll learn how to generate RSA private and public key pairs using the OpenSSL utility, So without wasting your time lets begin…. OpenSSL is a commercial-grade utility toolkit for Transport Layer Security (TLS) and Secure Sockets Layer (SSL) protocols. It’s…

View On WordPress
0 notes