#dash icon tutorial
Explore tagged Tumblr posts
Visit Tumblr Blog
Explore Tumblr blogs with no restrictions, modern design and the best experience.
Last Seen Tumblr Blogs


Fun Fact
25% of US internet users with an annual income of $80-100K use Tumblr.
Text
*✶ please please please
a template by cozysip.
by clicking in the source link you’ll find 02 different dash icon templates made by me from scratch. credit is not needed , but do not claim as your own ! if you enjoy this or you use it, please reblog or like this post . thank you !
#01. PSD TEMPLATES : mine.#template#free template#rp template#psd template#free psd#dash icon#dash icons#dash icons template#icon template#icon psd#psd#rpc#rph#graphic tutorial#free graphics
279 notes
·
View notes
Text
tag drop ❀
#🎧 𐔌 . 𝑤𝑎𝑛𝑡𝑒𝑑 ⁄ plot .ᐟ#🎧 𐔌 . 𝑤𝑎𝑛𝑡𝑒𝑑 ⁄ face .ᐟ#🎧 𐔌 . 𝑤𝑎𝑛𝑡𝑒𝑑 ⁄ opp .ᐟ#🎧 𐔌 . 𝑤𝑎𝑛𝑡𝑒𝑑 ⁄ ship .ᐟ#🎧 𐔌 . 𝑟𝑒𝑠𝑜𝑢𝑟𝑐𝑒𝑠 ⁄ by me .ᐟ#🎧 𐔌 . 𝑟𝑒𝑠𝑜𝑢𝑟𝑐𝑒𝑠 ⁄ dash icons .ᐟ#🎧 𐔌 . 𝑟𝑒𝑠𝑜𝑢𝑟𝑐𝑒𝑠 ⁄ template .ᐟ#🎧 𐔌 . 𝑟𝑒𝑠𝑜𝑢𝑟𝑐𝑒𝑠 ⁄ carrd .ᐟ#🎧 𐔌 . 𝑟𝑒𝑠𝑜𝑢𝑟𝑐𝑒𝑠 ⁄ theme .ᐟ#🎧 𐔌 . 𝑟𝑒𝑠𝑜𝑢𝑟𝑐𝑒𝑠 ⁄ writing .ᐟ#🎧 𐔌 . 𝑟𝑒𝑠𝑜𝑢𝑟𝑐𝑒𝑠 ⁄ sites .ᐟ#🎧 𐔌 . 𝑟𝑒𝑠𝑜𝑢𝑟𝑐𝑒𝑠 ⁄ gif pack .ᐟ#🎧 𐔌 . 𝑟𝑒𝑠𝑜𝑢𝑟𝑐𝑒𝑠 ⁄ others .ᐟ#🎧 𐔌 . 𝑟𝑒𝑠𝑜𝑢𝑟𝑐𝑒𝑠 ⁄ tutorial .ᐟ#🎧 𐔌 . 𝑟𝑒𝑠𝑜𝑢𝑟𝑐𝑒𝑠 ⁄ ask meme .ᐟ#tags
4 notes
·
View notes
Text
tag dump cause i can never remember which tags to use 🥴
#template#templates#themes#theme#google docs template#dash icons#dash icon template#psd#tags#tutorial#writing#symbols#sentence starters#ask games#prompts#important#page#dividers#faceclaims#fonts#oc help#codes#names#music#writing help#character building
0 notes
Note
Hi, I love your gifs for Himiko!!!
https://www.tumblr.com/biblical-love/781849514019536896/lgbtqcreators-event-27-doomed-by-the?source=share
Please tell me how you made the shape and its color in the third gif

thank you for your kind words anon, and of course, i'd be happy to show you how i did this effect!
(note: i did my best to make this tutorial as beginner friendly as possible, but absolutely do let me know if there's anything i need to elaborate on!)
STEP ONE: TYPE OUT YOUR TEXT
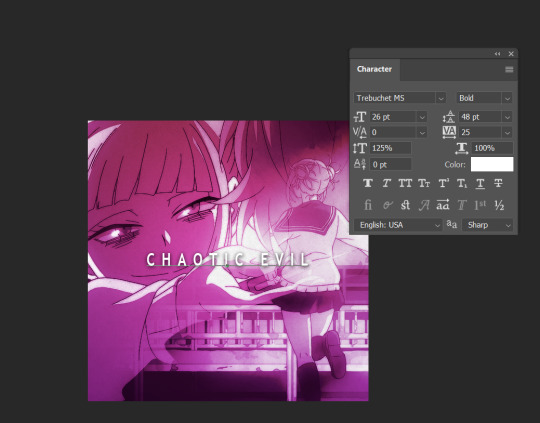
These are the text settings I used (in case you were curious).
STEP TWO: ADD A ROUNDED RECTANGLE

it doesn't actually matter if your rectangle is in front of or behind your text. the hex code for the shade of gray i used i #a9a2a7, but you can also go lighter or darker if you want to, so long as it's a shade of white / black / gray.
STEP THREE: SELECT YOUR TEXT
To do this, hold down your "ctrl" key, and click on the icon for the text layer under your "layers window". it's somewhat difficult to see in this screenshot, but you should see a dashed line outlining your text after you've done this
STEP FOUR: INVERT THE SELECTION

Use your Marquee tool (which you can access by clicking the "m" key), and right click on the selected typography
STEP FIVE: ADD A LAYER MASK TO THE RECTANGLE
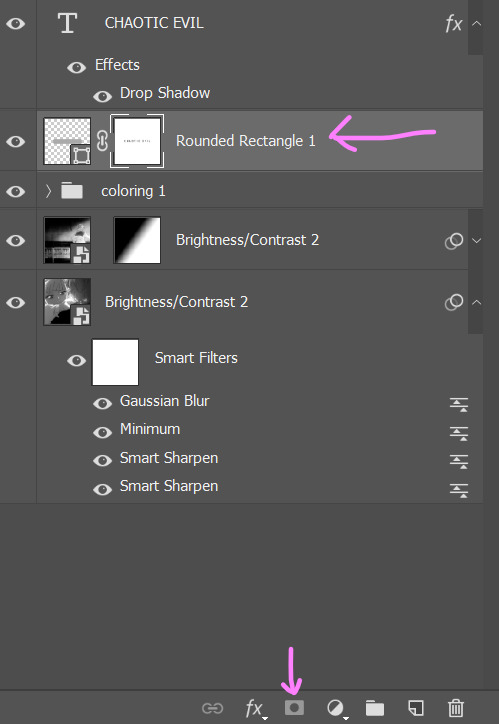
MAKE SURE YOUR INVERTED SELECTION IS STILL OUTLINED. click on the layer for your rounded rectangle in the layers window. then, find the icon at the bottom of the window that looks like a rectangle with a circle missing from the middle.
STEP SIX: DELETE YOUR TEXT

this will leave you with just the rectangle, which has had the text cut out by the layer mask.
STEP SEVEN: CHANGE THE RECTANGLE'S BLEND MODE TO "DIFFERENCE" OR EXCLUSION

honestly, there isn't really much of a difference between the settings and what they do, so just pick whichever one you like more. if you don't like the colors, don't sweat it. we're going to be changing them in the next step.
STEP EIGHT: ADD A GRADIENT OR COLOR OVERLAY

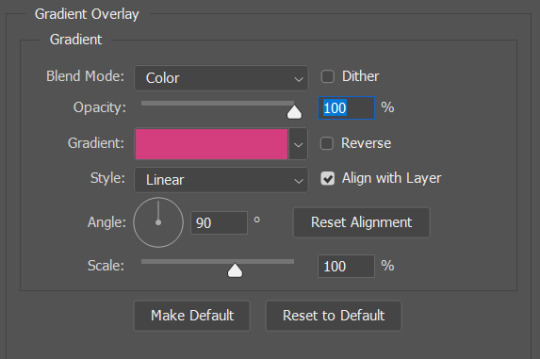
to add the overlay, click on your rounded rectangle layer, and then find the button that looks like the letters "fx" (it should be right next to the layer mask button from earlier).
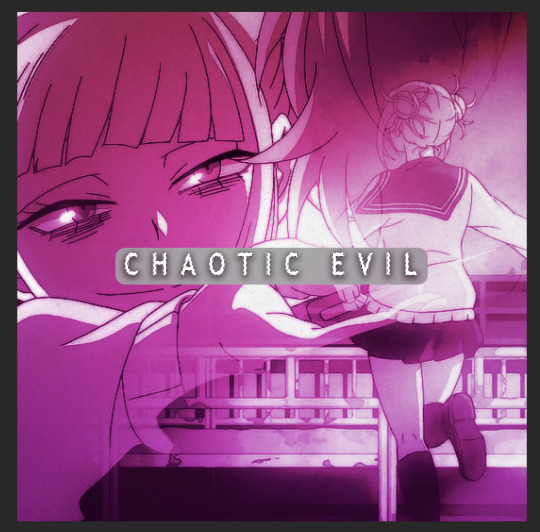
and that's it! you now have a custom block font!

if you use this tutorial to create any gifs, make sure to tag me (by using the #tuserecho tag) - i'd love to see them!
#behind the gifs#userbaz#userrobin#userishh#usersadie2#rosedavid#tuserheidi#carolook#tuserhol#userahri#phillycheesesteph#uservivaldi#usercats#tsusermels#usernolan#userbunneis#userrsun#usergif#dailyresources
50 notes
·
View notes
Note
HOW DO YOU GET THE STRAW HAT BADGE???
Ok, I'll give a step-by-step tutorial to hopefully help you because it took me a hot minute to figure it out with Tumblr's new layout.
1. While on desktop, go to TumblrMart (it's on the left side of the dash, just beneath Settings) and click on that.
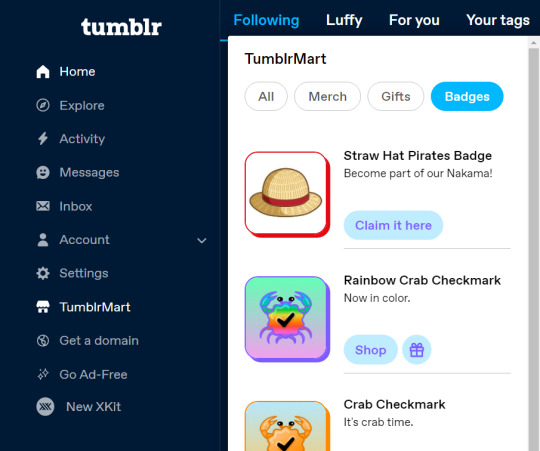
2. You can either go to Badges or just stick with All because it's thankfully right there. Click the "Claim it here" button. It's free and thankfully can be added to sideblogs. When you do this, you'll be taken to this window where you click the "Claim this badge for free" button.
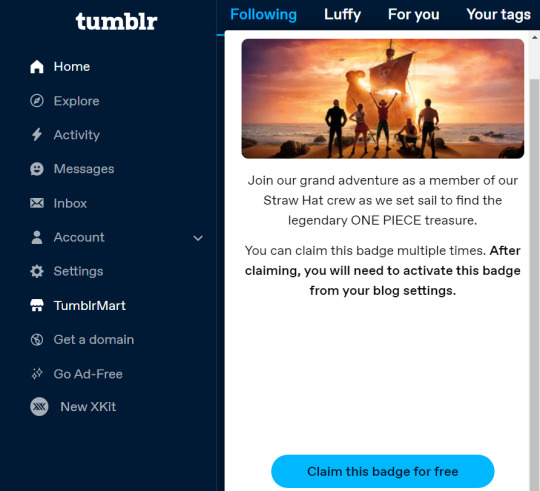
3. This will take you to the Edits page of your blog and you'll automatically be able to add it there. You can apparently collect multiple of the straw hat badges to add to your blog (I've heard up to 50), and they can be distributed to sideblogs too!
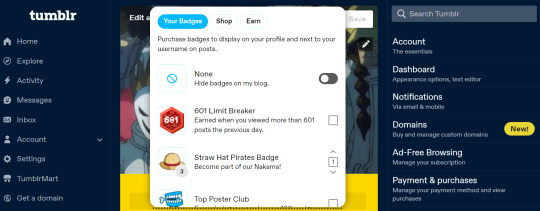
4. Hit save and you're good to go! If you get lost like I did the first time around, just go to your Edit Appearance page for your blog. There will be a little button under your icon that says Add Badges if you don't have any. You should be good to go!
#Time for Maintenance (OOC)#straw hat badge#straw hat badge tutorial#(figured I'd make it a tutorial with visuals to make it easy for anyone who might not know)#(visual aids definitely work better for me)#luffy#one piece#tumblr badge
452 notes
·
View notes
Text


people were wondering how i got my tumblr to look ^^ like this and asked for a mini tutorial so. here is how to get a custom tumblr theme (if youre on desktop) (obviously) [included screenshots of both the old & new layout so you can see how it looks]

go to the firefox (or chrome) store and install this extension. or just look up 'stylus browser extension' and it should show up


once youve got it installed, click the 'find' button in the bottom right. it should just show you tumblr stuff and if u scroll down a bit itll be there. but if it doesnt for whatever reason, look up the custom dashboard palette and install That One specifically

theres a gear icon. click it. you can change a whole bunch of stuff in here (notably, the color palette of basically everything on the site) but for backgrounds specifically theres this

find whatever image you want to use. it'll probably be the most convenient to find an aesthetic picture off tumblr itself. or, if you have a wallpaper you want to use thats downloaded onto your pc, upload it onto your blog or something. for whatever picture you want to use, right click and select 'copy image link' specifically and then paste it into the 'custom background image url' box and hit save. if it has a https in the link, then it should work out just fine

voila. that should do it. and side note if you want the old tumblr dash layout before they twitter-ized it, heres a post about that & the stylus extension for it
39 notes
·
View notes
Text

— COMO BUSCAR TEMPLATES?
Onde e como encontrar templates.

Recebi uma ask pedindo por um tutorial de como encontrar templates, e mesmo que seja um trabalho que não tem como eu facilitar, sei que muita gente chega aqui no tumblr e não sabe onde procurar e por onde começar.
Por isso, nesse guia, vamos discutir onde procurar templates para usar aqui no tumblr, seja em um blog pessoal, 1x1, blogs de personagens ou, até mesmo, em uma central.
Antes de tudo, como eu disse ali em cima, não tem muito como cortar caminho. Se você quer encontrar templates que gosta, vai ter que passar um tempo fuçando nas tags até encontrar o que você está procurando. Aqui você não vai encontrar uma fórmula mágica, e é importante saber que demanda tempo além do que você vai dispor para editar seu template. Dito, isso, vamos começar.
Adendo: o casal do @twilightalks postou um super post com vários blogs e sites pra vocês encontrarem conteúdo pra edições e que vai facilitar muito a sua vida. Clique aqui pra ser direcionado para o post!
RPHs
Primeiro, a maioria (se não todos) os tumblrs de rph reblogam templates. Você pode abrir um rph da rp br ou da tag gringa e vai encontrar resources, isso é fato. Mas se você não sabe o que procurar, abrir um blog não vai te ajudar tanto assim, já que é impossível ir olhando página por página.
Para facilitar a sua vida, eu vou colocar aqui algumas tags de helpers brasileiros onde você encontra templates:
jackhelps
#char psd; templates específicos para introdução de personagens. #ps template; templates em geral. #icon borders; templates para banners & ícones. #psd; psd para aplicar em imagens. #dividers; divisores para posts.
sakurajjam
#( templates ) #( psd ) # ♡ · ❄️ : photoshop
neozhelps
#⊰ 🍄:photoshop resources ˎˊ˗
desireeh
#templates
yeagrist
#* ⠀𓈒 ׄ ✮ ﹕ 𝐫𝐞𝐬𝐨𝐮𝐫𝐜𝐞𝐬 ⸝⸝ template . # * ⠀𓈒 ׄ ✮ ﹕ 𝐫𝐞𝐬𝐨𝐮𝐫𝐜𝐞𝐬 ⸝⸝ psd .
gwldcnz
#m: templates. #m: dash icons. #m: graphics. #m: colorings. #m: ps resources. #r: templates. #r: colorings. #templates. #colorings.
yixinc
#template
twilightalks
Mega post de help com vários links úteis, incluindo perfis de criadores de conteúdo.
Tags
Certo, mas onde esses rphs procuram esse tipo de coisa pra reblogar? E se não encontrar nada ali, como procurar?
Pra ir direto na fonte, você vai precisar usar as tags do tumblr. Se você notou ali pelos links, temos termos específicos mas em geral usamos template em rph. É assim com todo conteúdo? Não, você vai precisar pesquisar tags específicas pra encontrar algo que você procura.
#rph
Essa é a tag geral de helpers do tumblr, então você pode encontrar conteúdos em geral, como templates, gif packs, pngs, etc. Não é frequentemente que vejo templates por ali, a maior parte dos posts é de gif packs, mas pode ser que você encontre algo se der uma olhada pela tag.
#rp resources
Resources variadas, desde pngs, templates, ícones, etc. Aqui você vai encontrar tudo mais misturado, e com outros tipos de resources como starters e etc. Se você está procurando algo mais específico, pode dar um trabalhinho. Se não, vai encontrar bastante coisa bacana.
#rp template #psd template #rp psd template #graphic template #photoshop template
Nessas tags você encontra templates gerais. Acontece de ter alguns posts irrelevantes, mas, em geral, são só templates que você pode usar, só precisa filtrar conteúdo gratuito.
#character graphic #character template #character psd #char psd
Character psd/graphic/template são aqueles templates que se encaixam em fichas. São especificamente feitos para mostrar personagens, e podem ser usados como fixado também. Alguns têm espaço para nome e outras informações, outros são focados só em imagens. Quando você estiver buscando esse tipo de template, as tags acima são ideais para essa busca.
#rp psd #psds #free psd #psd
Quando você quer encontrar ajustes de cor para colocar nas suas imagens, e não templates, as tags que usamos são as de psd. Nelas você encontra psds gratuitos e pagos, alguns que só alteram coloring e outros que alteram as cores de forma mais extrema.
Outras tags úteis:
#faceless gif pack para packs de gifs de cenários, pessoas que não mostrem os rostos, objetos, etc.
#aesthetic pngs #transparent png #png icons #transparent icons para ícones em png. Podem ser usados em templates e como ícones.
#dividers #tumblr dividers #aesthetic dividers #post dividers são os divisores de posts em png.
#icon border #free rp icon border #icon borders sendo bem sincero eu só me deparei com esses templates recentemente, vejo eles sendo usados (e já usei) como banners.
#dash icons template são os templates pra fazer ícones transparentes pra dashboard.
Deviantart
Se você pretende usar templates com frequência, vai ter que se acostumar a usar o Deviantart. É um site onde criadores postam arte, mas também armazenam templates, psds, e etc, e disponibilizam para baixar. Alguns criadores aqui do tumblr armazenam lá, e você recebe um link para baixar pelo deviantart, e outros você só encontra por lá.
Para baixar, você vai precisar criar uma conta, o que é bem simples de se fazer, e depois ir até o link do que pretende baixar. Embaixo da imagem do template, você vai encontrar esses bot��es:

Você clica na seta de download, e o conteúdo vai ser baixado. Algumas vezes vem direto como psd, outras em uma pasta com arquivos, ou até mesmo um arquivo zipado. Depende do criador.
Mas atenção, se você entrar em um conteúdo em que no lugar da seta, apareça o valor, assim:

Significa que esse conteúdo é pago, infelizmente.
Mas, além de ser direcionado para o Deviantart apenas para download, você também pode pesquisar templates diretamente por lá. Eu considero até um pouco mais fácil, pois você consegue especificar exatamente o que está buscando.
Exemplos:


É claro que vai surgir algum conteúdo que não interessa, mas você consegue fazer uma busca mais direcionada ao que você está buscando.
Aconselho sempre adicionar o termo template no final da busca para garantir que você filtre por templates mesmo, e buscar usando termos em inglês pra ter mais resultados. Depois é só ir selecionando os que você gostar e conferir se não são pagos. Não se esqueçam, é claro, de dar uma olhada na descrição do conteúdo para saber como o criador gostaria de ser creditado.
No post do twilightalks também tem uma lista ótima de usuários que postam templates, o que facilita essa busca.
Buscar templates é um trabalho um pouco cansativo, não tem muito como correr disso, infelizmente. Mas sabendo onde buscar facilita bastante e poupa um pouco do seu tempo. Então espero que esse guia ajude, e qualquer dúvida, só chegar na ask!
23 notes
·
View notes
Text
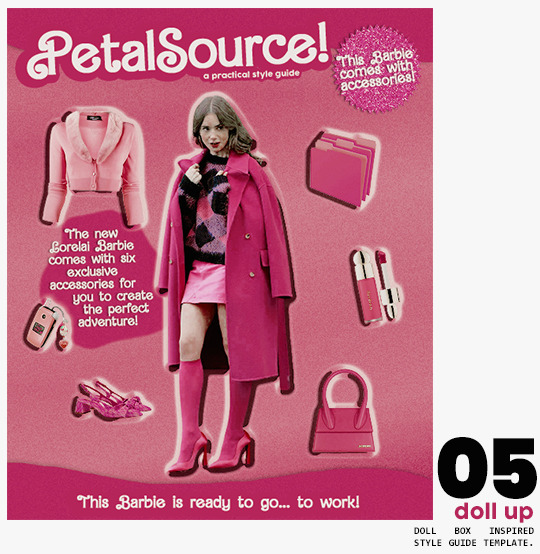
⋆ barbie fever . . . by petalsource .
. . . a complete blog makeover inspired by barbie .
hi, barbies! today, i bring you a complete makeover fully inspired by our favorite pink lady, barbie herself, to allow all of you to bring your own characters into her world in plastic!
feel free to tweak and adjust to your needs, add different background colors and overlays, but kindly do not claim as your own or use it for commercial purposes. feel free to tag me on your creations with this on #petalsource! seriously... i can't wait to see what comes of this!
💐 click the source link to get it as a package or individually on deviantart or payhip !
and . . . keep reading to find more details about the graphics, hq live previews and important tips to use the templates !
✩ about the items!
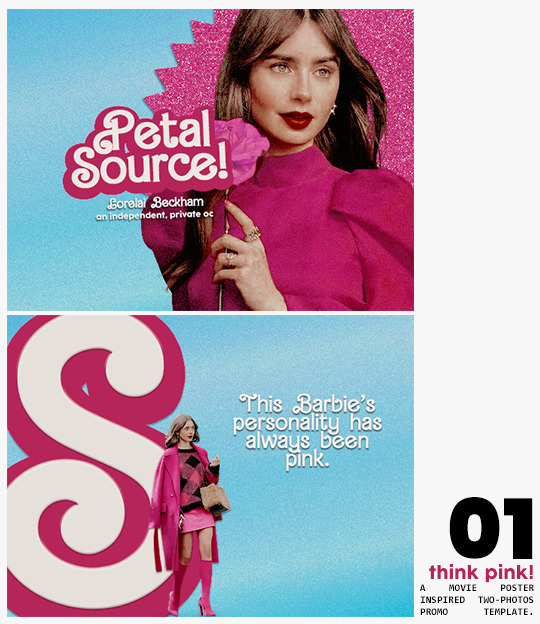
➷ think pink! -- a two-picture promo template inspired by the iconic 2023 movie posters. you'll need: two pngs of your faceclaim of choice, and the custom fonts (listed below). the glittery polygon of the first picture is available in 7 different glitter colors! high quality examples.
➷ this barbie -- two options of transparent dash icons; one matching the "initial" poster and one matching the "glittery polygon" poster. high quality examples.
➷ so plastic -- two options of centralized headers; one matching the "initial" poster and one matching the "glittery polygon" poster. to use it at its best quality, disable the "stretch header image" option when uploading the header. high quality examples.
➷ magenta -- version 1.0: pinned post (or miscellaneous) banner inspired by the 2023 barbie poster. version 2.0: pinned post (or miscellaneous) pair of banners mimmicking the layout of a barbie doll box. one banner goes on top of the postbox, insert pinned post or text, and the other banner goes on the bottom! high quality examples.
➷ doll up -- lookbook template inspired by the barbie doll box, featuring a "doll" picture and six customizable objects / accessories. you'll need: full body png of your faceclaim of choice, custom fonts (listed below), and 6 pngs of random objects or clothes to "come with" your doll. i've added a short tutorial down below on how to find and use some easily! high quality examples.
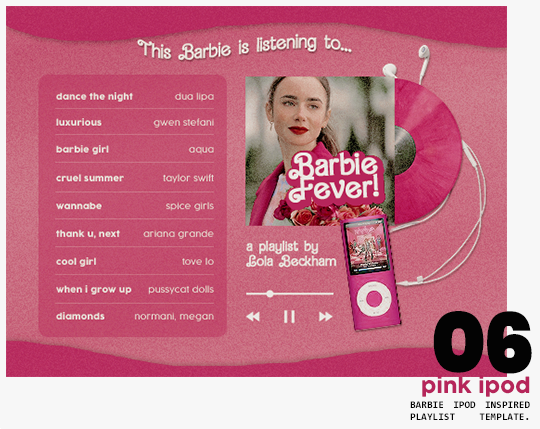
➷ pink ipod -- playlist template inspired by the barbie ipod, featuring a cover art and nine songs. high quality examples.
you can purchase all items as a package (deal price) or individually!
✩ important tips & useful information!
➷ needed fonts: bartex, cocogoose.
➷ object pngs + removing background of images: i found a super useful pinterest board with photos that can be used on your graphics: oxfordcommah's object pngs. additionally, the clothes png search on p*nterest is really diverse, and you can narrow your interests like "pink clothes png" or "vintage shoes png" and find a lot of options. once you found your images, go to remove.bg and paste their urls in there. it'll remove the background of those images for you and you can just paste them on your template and have fun!
➷ used coloring psds: the beautiful and super pink psds i used on the previews were not made by me and are NOT included in the downloads. in case you want to use them, they can be found here: dreams, 003.
➷ styles: the download includes two styles, one for a subtle drop shadow used in a few layers and one for the plastic box effect in the lookbook template. you can install them by opening the styles tab on photoshop > the four lines > load styles > find the barbie styles on your downloads!
➷ in case you have any questions, pop into my inbox or ims and i'll be happy to help you!
#template psd#template psds#barbie psd#character psd#character psds#𓂅 ♡ ⋆ 𝐦 ‚ templates .#i really really really hope you guys like this!!! i had so much fun doing it
348 notes
·
View notes
Text
How to properly reblog a fic tutorial/ Q&A
Q: Why do I have to put tags on a reblog?
A: You don't technically have too, but when you are reblogging without tags you are basically only putting that authors work onto your account and not boosting it to be put into other peoples dash.
Q: How do you put tags onto a reblog?
A: (yes I know this is formatted awkwardly. I'm awkward. let me live.)
First, your going to go to the post that you want to reblog. I'm going to insert one of my own fics for example.
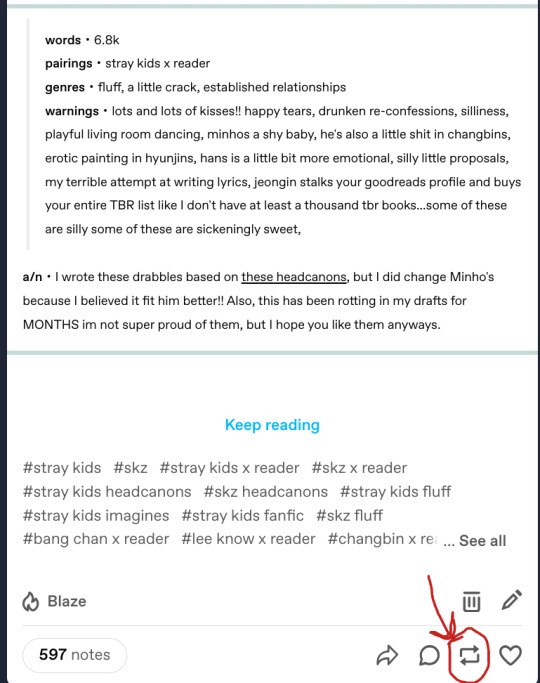
Second, you are going to click the reblog icon that I have circled there. When you click that icon you will pull this up. You will then click the "add tags" button that I have circled.
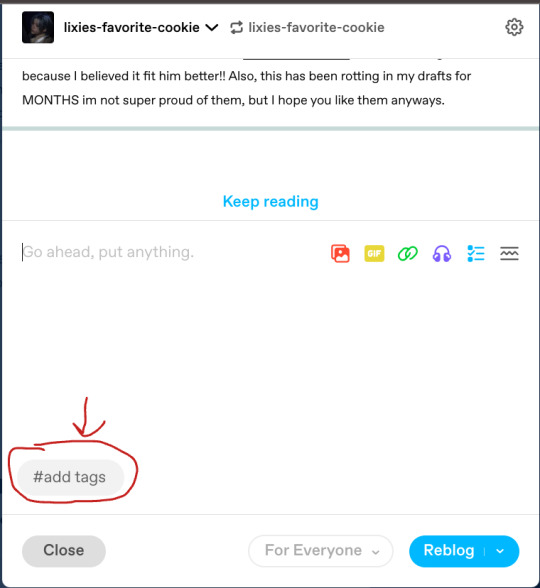
From here you can write your own tags/feedback, but if you are just trying to boost the authors work, you will then begin to click as many of the original posters tags as you want (the more the better I have found out). these tags are the ones that the author has already tagged for their work, so you don't have to stress about wrongly tagging a fic or anything!!

*note: if you are on your phone those tags will show up right above your keyboard and then you can just start clicking them from there!
And then, my lovely rebloggers, you will reblog the post and support all your amazing authors!!
#I hope that my absolutely terrible explaining helped someone *awkward smile*#tumblr fyp#Tumblr etiquette#tumblr#how to use Tumblr#tumblr tutorial
25 notes
·
View notes
Text
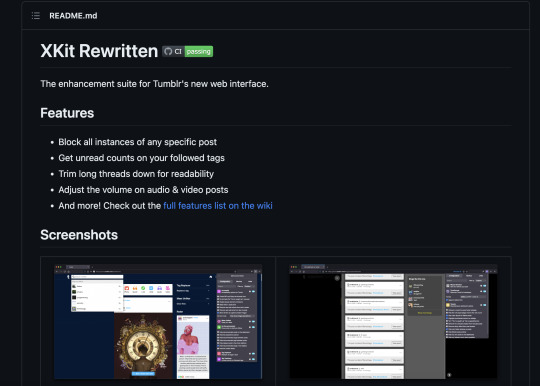
REBLOGGING FROM SOURCE WITH XKIT REWRITTEN !
hey friends!! okay, so i can't believe it took me this long to figure out how to do this, but thanks to the new xkit rewritten extension, we can bring back easily reblogging from the source! the newest update is kind of a pain for a lot of people, and it was much easier to just click on the username of the source where someone reblogged a post from. but thankfully, we can bring it back!!
i'm not the greatest at giving tutorials, but because i think this is important for a lot of us roleplayers, especially those who like reblogging things from their respective sources for whatever reason, and also generally for the majority of us who became frustrated with the new update. so, here's an attempt at teaching all y'all lovely people how to get your dash back to the way you liked it!! with that being said, it is greatly appreciated if this post is reblogged so as many people as possible see this tip!
TUTORIAL. ( skip to step 3 if you already have xkit rewritten installed. )
STEP 1. first, download xkit rewritten from tumblr's new xkit github page. right now it only works with chrome and firefox. instructions are under the "installation" section (you may have to scroll down a bit).
STEP 2. once you install the extension, click on the xkit icon at the top of your browser. it should look like a small purple box with a white "x".

STEP 3. under the "configuration" tab at the top of the pop-up, scroll down to the "tweaks" option. it should have a yellow icon with a gear and is (probably) the third option from the bottom.
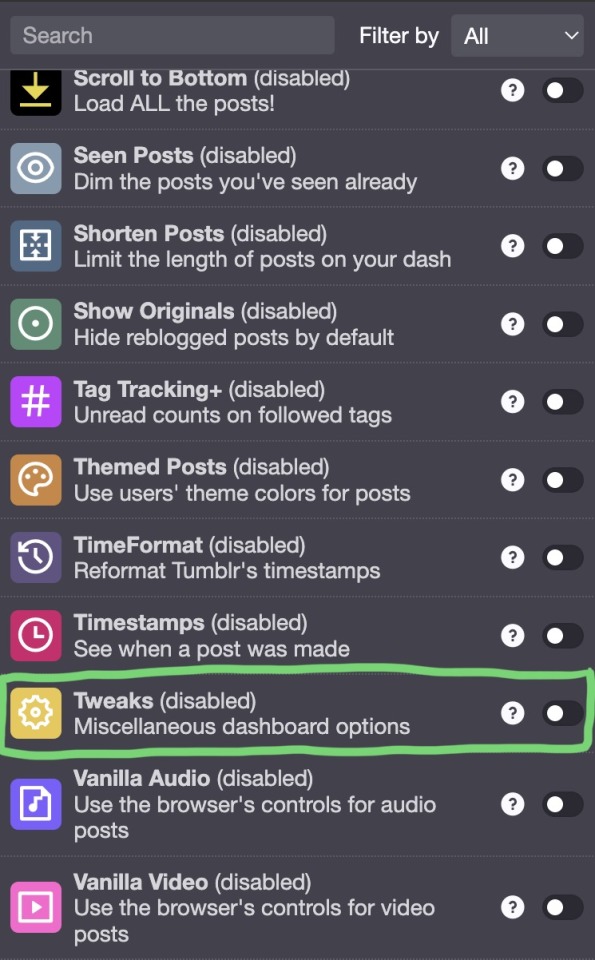
STEP 4. the "tweaks" option should be marked as "disabled", especially if you are using the new xkit for the first time or if you haven't seen this extension before. click the slider on the right side of the pop-up to turn the extension on.
STEP 5. once you toggle the extension on, a drop-down menu should appear under the extension label. you can also toggle this menu by clicking on the extension label. click on "restore links to individual posts in the post header", which should be the first option in the drop-down menu.

STEP 6. and that's it! you should now be able to click on the url next to another url and it should bring up the source that that person reblogged from. you may need to close the tumblr tab or restart your browser for the extension to take effect.
and that's it! i hope you enjoyed this tutorial and that it was helpful! if you have any questions, suggestions, or reservations, do not hesitate to reach out! please remember to reblog to spread this information! <3
227 notes
·
View notes
Text
Quick-N'-Easy Icon Editing Set-up with Krita!
I'm sure there are already a few tutorials like this one out there, but hey, what can one more hurt?
What's this do?: Krita has features you can use so you can make quick edits to your icons all at once, and save them all out individually with the press of a button. It's a great time-saver, and gives you a lot of flexibility in your edits!
What you'll need:
Krita, a free and open-source painting / image editing program!
Icons!
Part 1: How to export your icons all at once.
( warning: long and image-heavy! Written with beginners in mind. )
Once you open Krita, you'll want to go to Window > Workspace > Animation on the uppermost bar to change the layout for what we'll need, here.
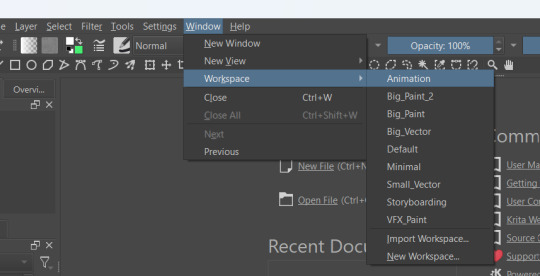
We're going to be using Krita's animation features to make iconing / icon-editing a little easier.

( as an extra note, hitting '1' on your keyboard will set Krita's zoom to the image's actual size, while '2' will have it fill the available space. Helpful for seeing how your icons will appear on the dash. )
Okay, let's get started! Make a new image ( File > New or press Ctrl + N ), set it to whatever dimensions you want ( I default to 100x100px ). Make a new layer ( Click the plus icon in the layers tab, or press ins ), and then put that layer in a group ( Right-click the layer and click group > quick group, or press Ctrl+G while its selected. )
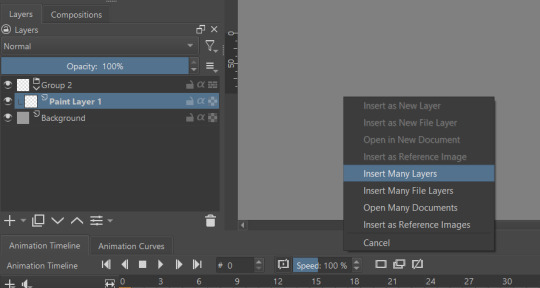
With that grouped layer selected, Grab your icons, and click & drag them into Krita, onto the canvas ( the big empty grey space in the center ). When Krita prompts you, select 'insert many layers.' This will load in each image as its own layer. If you don't have the grouped layer selected, you'll have to select them all and put them back in the group. ( No big deal, just shift + click the first and last layers, and drag them where you need them. )
You can now delete your initial paint layer in the group, if you want. Otherwise it will make an 'empty' icon when we export.
Select that group, then go to Layer > Convert > Convert Group to Animated Layer on the top bar. ( This is only accessible through the top bar, not the menu that appears when you right-click on a group. I don't know why. )
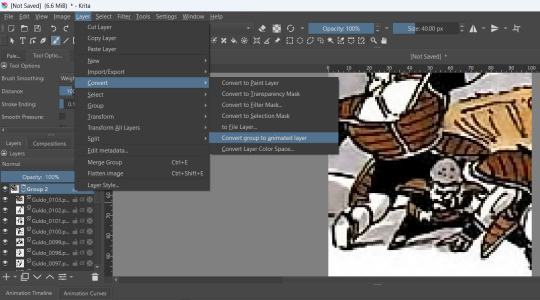
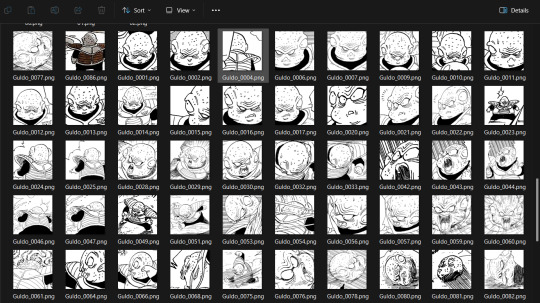
Congrats! Now all your icons are frames in an animation. Each cell on the timeline is a single icon. If you have a scroll wheel, you can scroll to quickly look through them all.
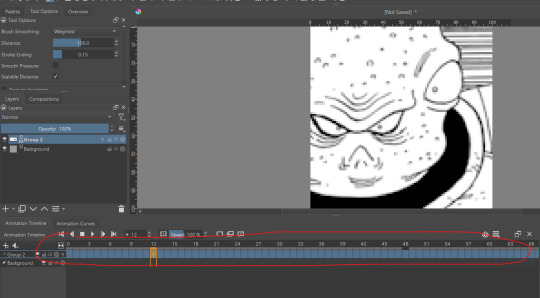
If you can't see all of your icons on the timeline, click the three bars here and set 'clip end' to whatever number of icons you have ( or a little more, for extra wiggle room. )
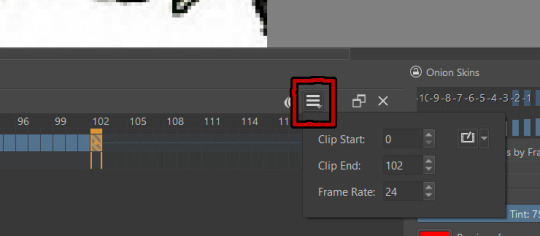
Find the last filled cell, right-click it and select 'set end time.'
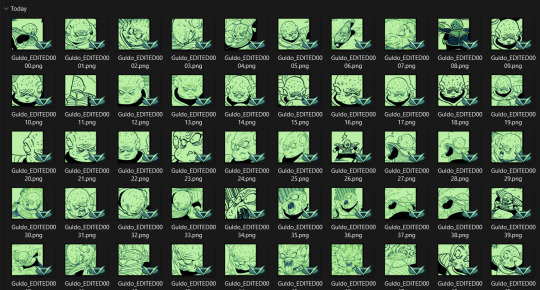
When you're ready, hit File > Render animation.
You'll want to make sure you set it to export as an image sequence, and select where you want your icons to go on your computer. Give them a naming scheme. Make sure you save before you export your icons, as I've had Krita crash while exporting a large number of icons all at once. ( If it does this to you, just try again. Worst comes to worst, you can export by setting the first frames and last frames to smaller chunks instead of all at once. )
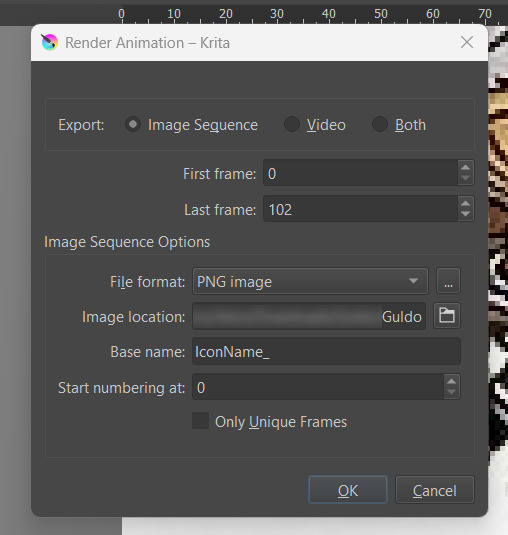
Hit OK and voila! No more saving icons out one-by-one!
Of course, we haven't done any editing yet, so this is all redundant unless you're saving out your own freshly-cropped icons. Let's move onto the fun part:
Part 2: Editing
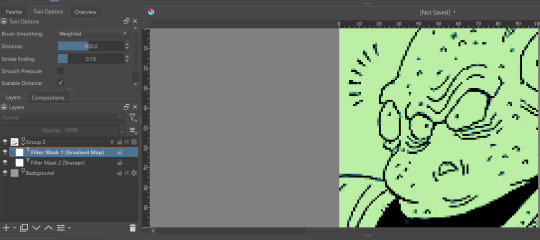
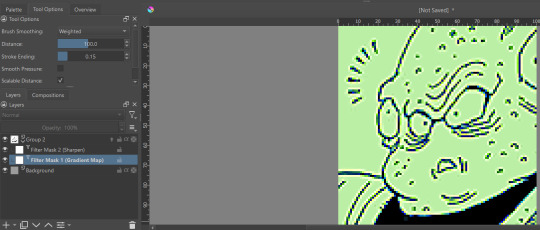
Right-click your new group layer and hit add > filter mask. Choose any you want- for demonstration purposes, I'll be using my favorite: gradient map.
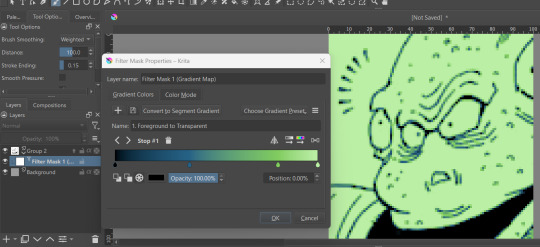
This will put that filter over all frames in that animation layer, meaning you won't have to repeat your edits per icon.
If you want to edit your filter mask after you click off, just right-click it in the layer tab and select 'properties.' It will bring the initial prompt up again for you to adjust.
You can add as many filter masks as you want! The order the layers are in does matter, though, so keep that in mind.
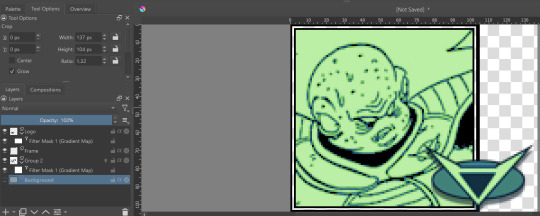
If you want to add frames, banners, name tags, symbols etc, you can do that on layers over or under that animation layer! They'll stay consistent across the 'animation' unless you add new frames to them on the timeline.
If you want to edit your icons again, just do so, and re-export! If the naming scheme and numbers are the same, Krita will automatically overwrite the old files. But watch out; if you're trying to save new icons, make sure you start numbering at a higher number than your last icon, or change the base name.
Happy iconing!
#rp icons#rp icon tutorial#rp resource#rp tutorial#icon editing#icon edits#not icons#no clue what to tag this as...
51 notes
·
View notes
Note
dude you need to teach me your ways of coloring and how you make it look so good,,,, how do you do that,,,,
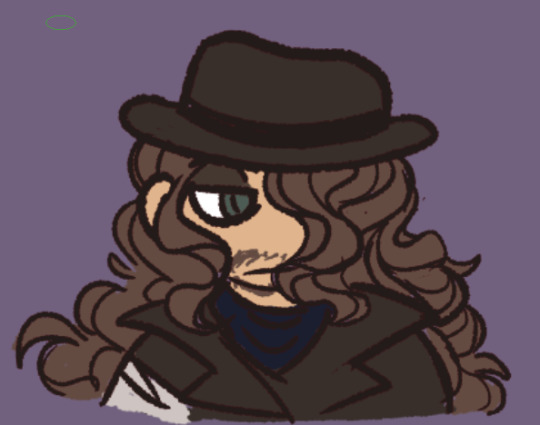
HONESTLY. Colour picking is one of the things I am like the LEAST confident in ever, so the compliment very very very nicies to hear ehehehhee thank you (: BUT!!!!!!!!!! TIPS AND TRICKS I DO HAVE! (With a Seven from HLVRV as a reference because I've been rotating her lately and she was the first thing to come to mind haha) (Cut just because I put a lot of pictures and rambling and I don't want to flood people's dashes haha)
Filtering layers baby!!!! They are my everything ever when it comes to getting colours looking good haha. My secret. My trick. My personal flair in all the art ever. The Key Ingredient. You see my sona? THATS IT BABY!!! I use my iconic reddish purple shade from my hair for pretty much everything ever and it works wonders hehehe watch watch this.
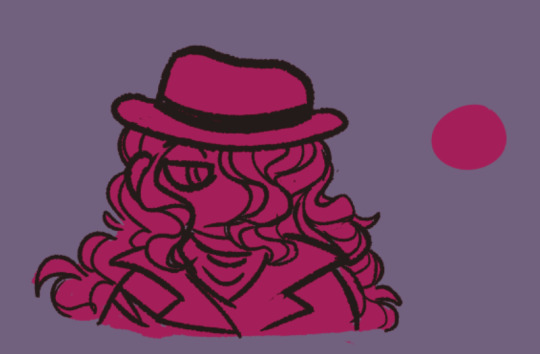
BA BAM. We have a guy. Plain ol flat colours. BUT!!! We make a layer above that. And colour EEEEEEEVERYTHING in with a good ol saturated sample of the reddish purple. AND THEN!!!!!!! We put a layer effect on that bad boy. I flip flop between a few but for this example I did Overlay, and then I turn the opacity down to! Whatever feels right! today it's 20% (:

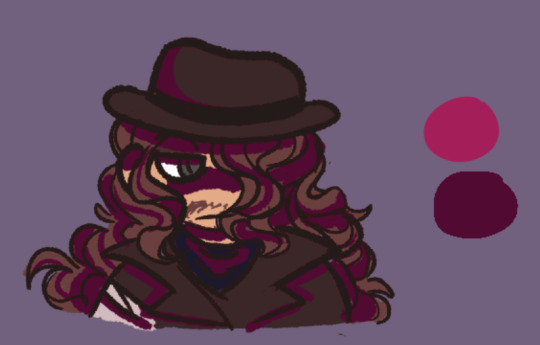
WA POW!!!!!! The canvas upon which you can keep layering various bright colours with various filtering effects to your liking hehehehe. I switch it up a lot, But I usually keep it in the orange to pink range just cause thats what I like (: BUT!!!!!! to REALLY get that Merin Merklins colouring job in there? We take! ANOTHER SHADE OF REDDISH PURPLE! A DARKER ONE! (Or sometimes I'll take a blue if it vibes better with the piece haha) and we draw ALL THE SHADOWS! It will look VERY ODD AT FIRST. BUT!!! Back to our layer effects baby. Pick whichever one looks niciest. I bounce between Darken, Multiply, Overlay, Soft Light, or even just Normal. I did Darken here (: and THEN!!!! Turn your opacity down again until you like what you're seeing, I did 40% here.

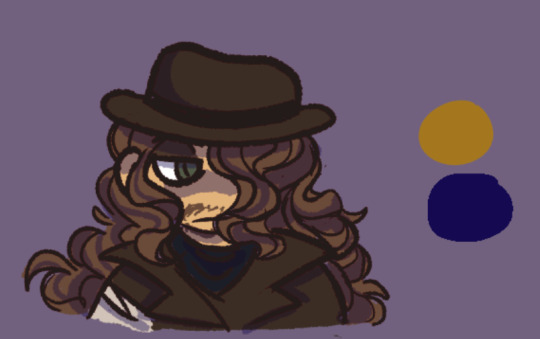
BA BAM!!!!!! CHECK OUT THOSE COLOURS BABYYYYY. Ehehehehehe! You can do it with any colour you want, it doesn't have to be the red-purple, but thats My Brand and My Favourite so thats what I do (: You can also!!! Make the lighter colour and the darker colour two DIFFERENT colours, and it can look VERY sick (: Here's a few examples so you can see!

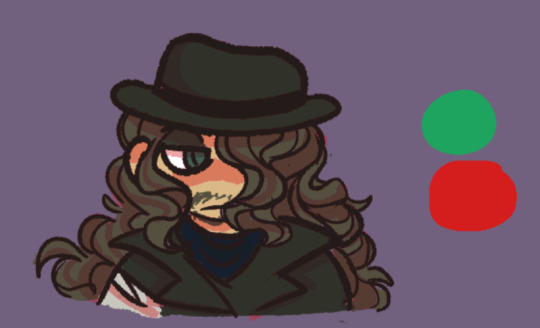
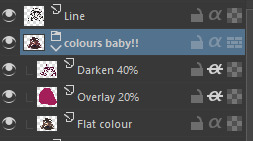
AND TAADAAAAAHHHHH Thats one way to get what I think are some real nicies tasty colours going on hehehe. Again, LOTS of wiggle room! I tend to spend forever futzing around with layers because they each play a little differently based on what colours you're using! Try different colours different layer effects, see whatever floats your boat (: ALSO Screenshot of my layers for simplicity's sake and easy reference too!
BA BAM!!!!!!! TUTORIAL OVER!!! Basically fool around do whatever you want forever, but bright saturated colours is what I do and bright saturated colours are fun hehehe. THANK YOU FOR ASKING (: Very fun to ramble and put the process into words haha! Wishing you bestest of lucks with your art stuffs (:
#m scribbles#m asks#VERY fun to get to do one of these!! Always happy to ramble and share stuffs ifever anyone else is ever curious about anything (:#ALSO I GRIP YOU BY THE SHOULDERS#I DIDNT SAY IT IN THE TUTORIAL BUT. AS LONG AS THIS ISN'T AN ART YOU'RE GOING TO COLOUR PICK FROM LATER#OR USE AS A REFERENCE FOR COLOURS. GRADIENTS BABY!!#GRADIENTS!!!!!!!!!#PINK TO ORANGE IS MY GO TO (: Put it over your finished piece put a filter effect and BA BAM!!!!!!!!!!! COOL TASTY COHESIVE COLOURS!
15 notes
·
View notes
Note
Okay I didn't say anything at first because I was nervous and didn't wanna be annoying or something but I came back because like,, woah mY GOD I LOVE YOUR ART STYLE
I was going through the hatsune miku tag and just!! Woah the COLOURS the SHAPES the LINEART RARAGGDHAHS CHEF'S KISS

immediately it reminded me a lot of rourow's art (one of those iconic muse dash artists <3) and like,, oh my god they're my biggest inspiration for my art style. I find it funny I could spot the muse dash inspiration immediately /pos
But you also put your own spin on it and AGH <3 both rourow's art AND YOURS is just,, aregsgshh I wanna eat it. I think your art would taste like fruit gushers
I will be taking notes I wish I could absorb your art style into my blood
OKAY THIS IS GETTING LONG SORRY LMAO but if you ever have any more tips or tutorials or even speedpaints I will be there with a pen and paper <33
Rourow art is soooo coool right? The Reimu just stole my heart. The colors were fun, stylish, seemingly unrestricted by any rules or seams in their structure... I wanted a look like that.
Then Miku arrived and the envy in my heart became too much to bear.
Here's my epic Dizzy tips to studying, my fellow Muse Dash enthusiast. I broke down the artwork into shapes, lineart, and color. I noted what I enjoyed and especially how it differed to what I drew. I refined the notes further until I had some main ideas/commonalities, and try to reason the whens and whys for these choices. Do they reinforce lighting, the shape of the subject, to vary the colors present, etc. There were also a lot of 'just because' reasonings (X happens when Y). All those became a 'rulebook' of sorts.
After that was lots of replicating, tracing, etc. Making sure that style was the first thing my intuition and muscle memory jumps to. My first dozen or so original drawings after that were done with many references and notes on hand until I got the hang of things.
The plan was actually to go as identical as possible, but differences were inevitable. I wanted to do my own thing proportions/faces wise, anyways. And it IS great to have people enjoy my work as its own thing AND acknowledge the clear influence.
Still so much I wanna absorb though... The flowy and varied lineweight, and I've yet to reach the sheer elaborateness of the color use.
If it helps in your quest, I don't mind talking about certain choices I make (there's usually a reason for it). Just try to be specific! Makes it easier to choose my words. Thanks!
21 notes
·
View notes
Note
Can you please do a tutorial teaching how to do this border? post/727473920188481536/well-this-has-been-fun-die-choking-on-your-own
absolutely, thanks for asking!!
in this post, the border is actually pretty simple (yay)! you can use ctrl+u to call up the shape tool or just click on it. you'll need to then right-click on that icon and choose rounded rectangle tool

these were my settings for a 540 x 540px gif but play around and see what you think looks nice!

if that's difficult to read, from left to right, we want: fill: none stroke: whichever color you want (in my case, it was white) at 2px (this will adjust the thickness of the border stroke options: straight, solid line (but there are options for a dashed line as well as dotted i didn't touch anything else after that 🤷♀️
to actually create the border, just click somewhere on your canvas and this menu will come up
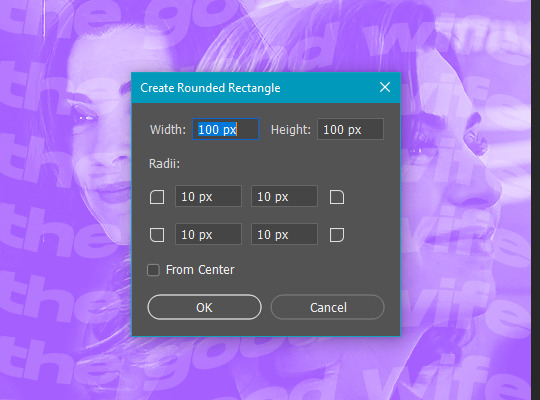
this is where you adjust your dimensions and how curved you want the edges to be. these were my settings:

520px x 520px and left the radii at 10 for each corner
then i just used ctrl+t to drag it around the canvas until it snapped to perfect center!
the fun part of doing borders like this is you can make them any color, add layer effects like drop shadow, gradient overlays, etc. or even throw a texture over the top with a clipping mask! for just a rectangular border without the rounded corners, you would just choose the rectangle tool instead of rounded rectangle tool.
in that sub-menu, there's also the ellipse tool (hold shift while you drag the shape to make a perfect circle or input the same dimensions for width and height), polygon tool, line tool, and custom shape tool. highly recommend playing around with those guys (gn)!
if you have any other questions on this tutorial or other gifs, just let me know, i'm happy to help any way i can! 💙
#answered#Anonymous#tutorial#gif tutorial#photoshop tutorial#shape tool#completeresources#gifmakerresource#dailyresources#my tutorials#idk how else to tag this so yay that's it!
71 notes
·
View notes
Text
Tutorial: how to get Xkit on mobile, so you can trim your roleplay posts (July 2024)
Short version:
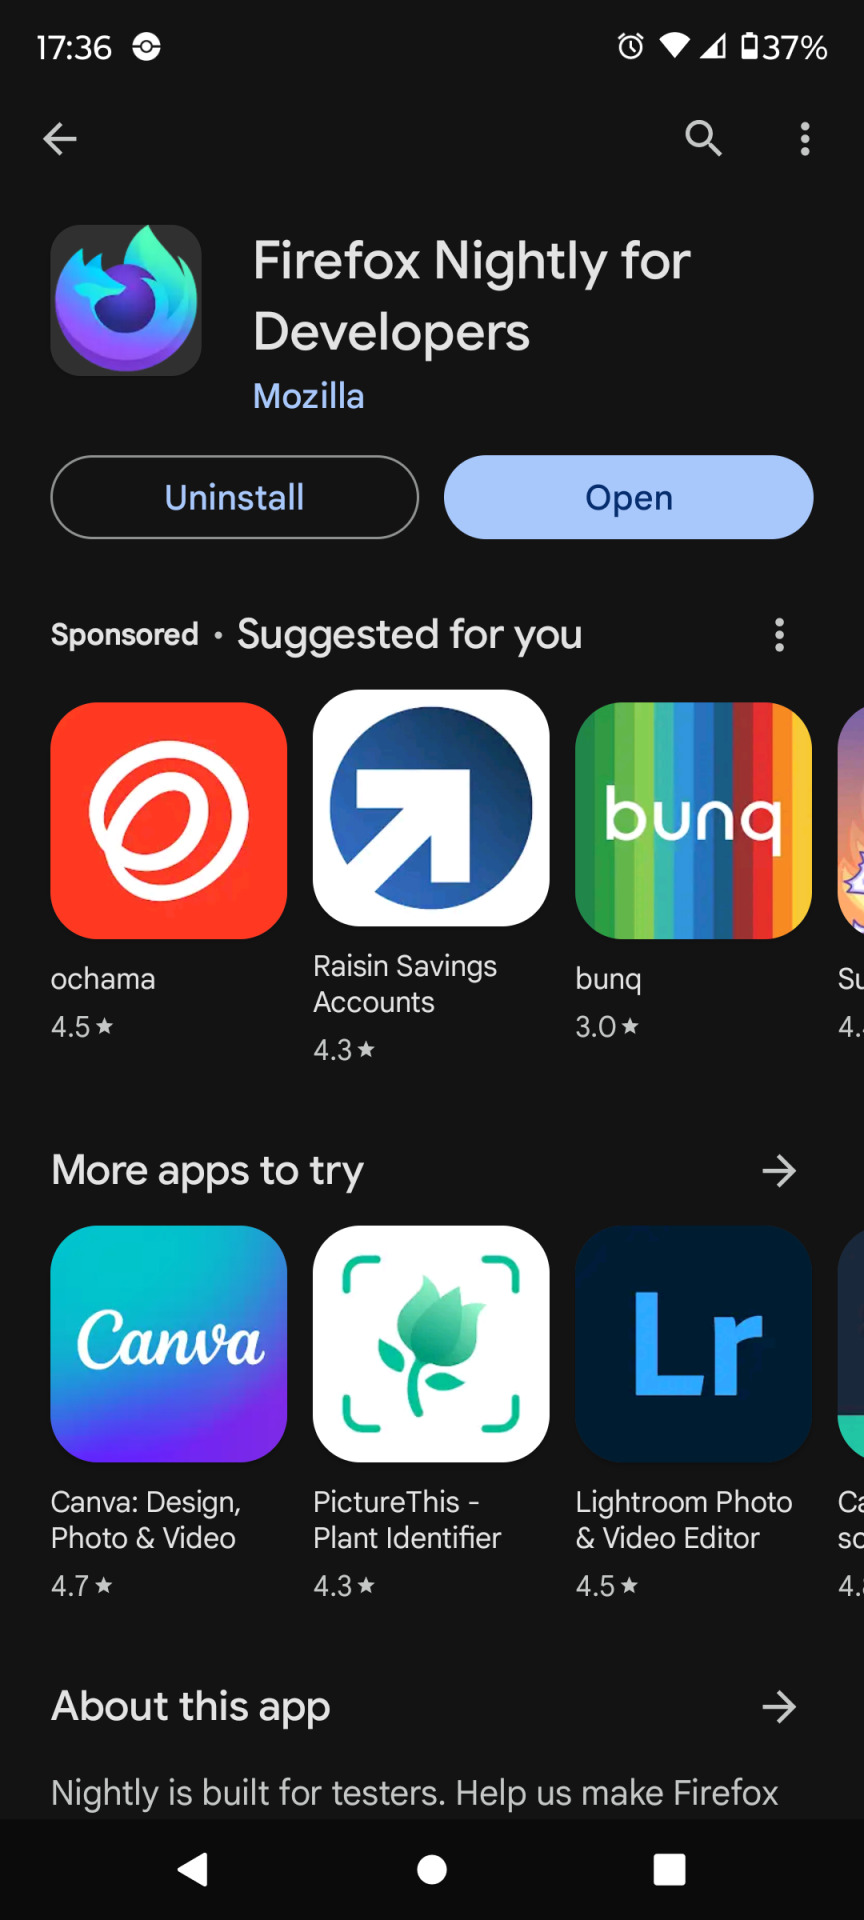
Download Firefox Nightly For Developers.
Go to settings → extensions → 'more' button → search+add xkit.
Log in to tumblr
in browser's settings, go to extensions, enable xkit's setting "trim posts" and you're ready to go!
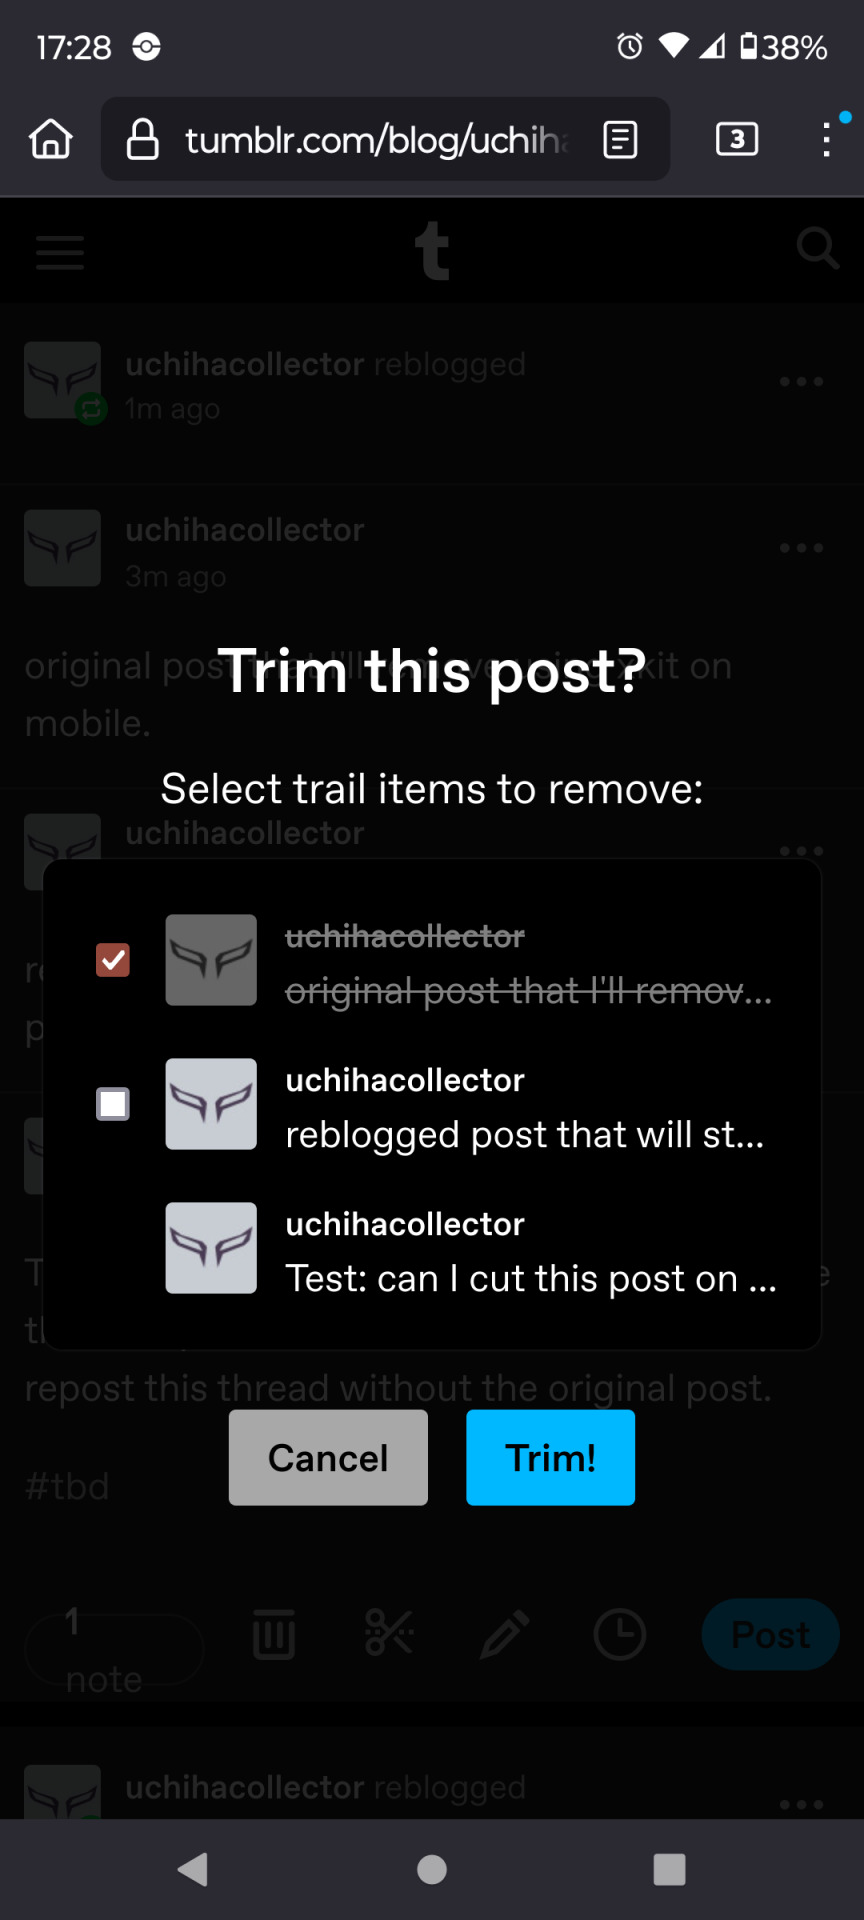
On your drafts page, click the scissors icon on your drafted post to trim it. Done!

Longer step-by-step explanation:
Download Firefox Nightly For Developers. (see first image)
Go to Settings.
Click 'Extensions' (it is under the subheader 'Advanced'.)
In the next page (you see suggested extensions such as UblockOrigin) scroll to the bottom and click the button "find more extensions."
This opens on a page called "Firefox Browser Add-Ons" and in the search bar at the top, you type in "Xkit Rewritten" and search, then click the big button to add it.
Good job. Close the page. Fresh tab. Let's enable it.
Log in to tumblr on your new browser.
Click the three dots, then click Extensions. Click Xkit Rewritten.
Now you see (the above middle image) where you can toggle the option called 'trim post'.
Now go back to your dash.
Pick a post that has been reblogged twice or more, and save it to your drafts.
On your drafts page, is now the scissor icon in the post's footer, next to the reblog and the bin icons.
Well done! You trimmed your post!
Happy roleplaying!
.
If you get stuck anywhere in this process, start from the top and this time use developer mode as described in this post.
9 notes
·
View notes
Text

WELCOME TO DAILY-ICONS!
We are a source blog focused on icons edits, dash icons, tutorials about icons and more! This blog honors all icons makers, the credits are all for them!
We track #dailyiconsedit — tag us!
#signal boost#iconedit#iconsedit#dailyresources#iconfrenzy#hisources#rresources#completeresources#fineresources#allresources#evansyhelp#userbru#perfectopposite#usermiia#usergiady#icons
39 notes
·
View notes