#datedif
Explore tagged Tumblr posts
Visit Tumblr Blog
Explore Tumblr blogs with no restrictions, modern design and the best experience.
Last Seen Tumblr Blogs


Fun Fact
Tumblr Inc. is funded by 13 investors.
Text
I've worked in an office for 8 years now and have barely touched Excel at all and know next to nothing on how to use it but with just a few days and a sudden burning drive to document and record my gaming backlog and I am now feeling like the god of spreadsheets with how galaxy brain I am with formula now
#I'm adding unnecessary shit in there just bc it's cool to see stats adjust#why have I got a column there to show how many days have passed since I bought a game?#the first game I finished this year was little inferno and I completed it 3463 days after I was first gifted it in 2014#“=DATEDIF” is kinda cool#blah
13 notes
·
View notes
Text
overhearing mom's group project discussion & theyre using excel and talking about slicers which reminded me slicers exist and i mentally went "ohhhh that explains why its such a pain for me to make those out of cell functions you're supposed to just use a button lol"
#reinventing datedif strikes again 😔#in my defense half my stuff also has to be compatible to gsheets and idk if that has them
1 note
·
View note
Text
Make google sheets automatically calculate your character’s age!
I like using google sheets for story data like this and maybe you do too so here’s a simple way to make your life a lot easier. Plus it automatically updates itself if you change one of the dates for whatever reason.
You can also have it tell you how old your character is on any date, or really, the difference in time between any two dates you want.
Formula and explanation is below the cut.
=DATEDIF(Startdate, Enddate, "Y") & " Years " & DATEDIF(Startdate, Enddate, "YM") & " Months " & DATEDIF(Startdate, Enddate, "MD") & " Days"
Basic format. What you change is in red and green. Here’s an example:
=DATEDIF(B2,C2, "Y") & " Years " & DATEDIF(B2,C2, "YM") & " Months " & DATEDIF(B2,C2, "MD") & " Days"
You will probably skip B1, C1 because that’s usually your header row, as well as column A because that will likely be where your character’s name goes. Just copy and paste the whole formula into the first cell of a new column you want to spit out the age (date difference).
Delete all three instances of B2 and type in or click on the cell that has the start/birthdate for that character, then do the same with C2 but input the enddate.
If you just want the year and month, use this one.
=DATEDIF(Startdate, Enddate, "Y") & " Years " & DATEDIF(Startdate, Enddate, "YM") & " Months "
This one gives you just the year.
=DATEDIF(Startdate, Enddate, "Y") & " Years "
You can also erase “ Years ” at the end if you just want it to display 45 instead of 45 years
After you enter it in once, google sheets should guess the pattern (simply moving down the same column) and all you have to do is click formula cell once, then click and hold the bottom right corner where a dot will appear, and drag it down as far down the column as you need it to go.
Also, if you want your date columns to automatically format a specific way, do this:
Click the top of the column so that it highlights everything beneath it.
At the top hit Format
Hover over Number
Sidemenu will expand and towards the bottom click custom date and time formats
It will give you various options. Pick whichever one you like. You can fiddle with the up and down arrows by Month Day and Year to further customize it
Click apply
Now even if you type out “jan 3 1997” it will automatically change it to “January 3, 1997” or “01-03-1997” or “1/3/97” etc.
You also might need to freeze your header row for it to work properly. Right click on the 1 next to the header row, and all the way at the bottom it says view more row actions, click freeze up to row 1.
22 notes
·
View notes
Text
Master Your Data: Microsoft® 365 – Excel Intermediate Level
Why Intermediate Excel Skills Are Crucial for Today's Professionals
Excel is far more than a simple spreadsheet program. At its intermediate level, it transforms into a powerful tool for data manipulation, analysis, and visualization. Acquiring these skills can drastically improve productivity, accuracy, and insights across various roles and industries.
Enhanced Data Management: Move beyond simple data entry to efficiently organize, sort, filter, and clean large datasets, making information readily accessible and reliable.
Powerful Data Analysis: Learn to use functions and tools that allow you to extract meaningful insights from raw data, identify patterns, and support strategic decision-making.
Increased Productivity: Automate repetitive tasks, create dynamic reports, and streamline workflows, saving valuable time and reducing manual errors.
Improved Reporting and Visualization: Present complex data in clear, compelling ways using charts, graphs, and structured reports that are easy for stakeholders to understand.
Career Advancement: Strong Excel skills are highly valued across all sectors, making you a more valuable asset to your organization and enhancing your career prospects.

Key Skills Covered at the Intermediate Excel Level
An intermediate Excel course focuses on equipping users with practical skills to handle more complex data scenarios and perform deeper analysis. Here are some of the essential areas covered:
Advanced Formulae and Functions:
Logical Functions: Master IF, AND, OR, and nested IF statements for complex decision-making within your spreadsheets.
Lookup Functions: Efficiently retrieve data from large tables using VLOOKUP, HLOOKUP, and the more powerful XLOOKUP (in newer M365 versions) to connect related information.
Text Functions: Manipulate text strings, extract specific parts of data, and clean up inconsistent entries using functions like LEFT, RIGHT, MID, LEN, CONCAT, and TRIM.
Date and Time Functions: Work with dates and times for scheduling, tracking, and financial analysis using functions like TODAY, NOW, DATEDIF, and NETWORKDAYS.
Data Management and Organization Techniques:
Sorting and Filtering Data: Apply advanced multi-level sorting and custom filters to quickly find and organize specific information.
Data Validation: Implement rules to ensure data consistency and accuracy, minimizing errors at the point of entry.
Conditional Formatting: Visually highlight important data, trends, or outliers using various conditional formatting rules to make your spreadsheets more insightful.
Working with Tables: Convert data ranges into Excel Tables for easier management, automatic formula propagation, and structured referencing.
Introduction to Data Analysis Tools:
PivotTables: Learn to create and manipulate PivotTables to summarize, analyze, explore, and present large datasets from different perspectives.
Charts and Graphs: Go beyond basic charts. Understand different chart types and when to use them to effectively visualize data and trends.
What-If Analysis (Goal Seek, Data Tables): Explore different scenarios and outcomes to support decision-making, such as finding the input value needed to achieve a specific target.
Spearhead Training, a leading provider in the region, offers comprehensive Microsoft Training Courses In Dubai, including their highly beneficial "Microsoft® 365 – Excel Intermediate Level" program. If you're looking for expert-led Microsoft Excel Training in Dubai that promises not only practical also real-world application.
0 notes
Text
Excel Ka Secret Formula! DATEDIF Se Sab Kuch Aasaan | Excel Tips by KAiS...
youtube
Excel ka Secret Formula DATEDIF Sikhiye!
Age, experience ya koi bhi date difference — ab sab kuch aasaan hai Excel me.
Video dekhiye by KAiSH Computer Institute:
Sath hi, join kijiye hamare Govt. Certified Computer Courses:
Tally | DCA | ADCA | Excel | Python | Programming | Data Analytics | CCC | CCC Plus | O Level | Power Bi
Admissions Open in Lucknow
#ExcelTips #ComputerCourses #KAiSHInstitute
0 notes
Video
youtube
EXCEL - Formulas and Functions - Date and Time - datedif #viralvideo #vi...
#youtube#excel MicrosoftExcel Exceltutorial Exceltips Exceltricks Excelshortcuts Excelfunctions Excelformulas Pivottables VLOOKUP HLOOKUP XLOOKUP Con
0 notes
Text
تحميل مجاني: برنامج "احسب عمرك" بالإكسل - حساب العمر مفتوح المصدر
تحميل مجاني: برنامج "احسب عمرك" بالإكسل - حساب العمر مفتوح المصدر تحميل مجاني: برنامج "احسب عمرك" بالإكسل - حساب العمر باليوم والشهر والسنة هل تبحث عن طريقة ��هلة لحساب عمرك أو عمر أي شخص بدقة؟ مع برنامج "احسب عمرك" المصمم بواسطة Microsoft Excel، يمكنك إدخال تاريخ الميلاد في TextBox والحصول على العمر محسوبًا تلقائيًا بالسنوات والأشهر والأيام! هل تبحث عن برنامج حساب العمر بدقة؟ في هذا المقال، سنتعرف على: - كيفية عمل البرنامج. - طريقة تحميله مجانًا. - كيفية استخدامه وتعديله (حيث أنه مفتوح المصدر). كيف يعمل البرنامج؟ البرنامج بسيط ويعتمد على صيغ Excel ووظيفة VBA (لجعل الواجهة سهلة الاستخدام). إليك مكوناته الرئيسية: هذا النموذج يدعم حساب العمر باليوم والشهر والسنة 1. واجهة المستخدم (UserForm) - TextBox: لإدخال تاريخ الميلاد (مثال: `01/01/1990`). - زر "احسب": عند الضغط عليه، يعرض العمر بالتفصيل. - خانة النتيجة: تظهر العمر بالصيغة: `XX سنة، XX شهر، XX يوم`. 2. الصيغ المستخدمة في الحساب كيفية حساب العمر في Excel باستخدام دالة DATEDIF يستخدم البرنامج دالة DATEDIF` في Excel لحساب الفرق بين تاريخ الميلاد والتاريخ الحالي: =DATEDIF(تاريخ_الميلاد, TODAY(), "Y") ' لحساب السنوات =DATEDIF(تاريخ_الميلاد, TODAY(), "YM") ' لحساب الأشهر المتبقية =DATEDIF(تاريخ_الميلاد, TODAY(), "MD") ' لحساب الأيام المتبقية كيفية استخدام البرنامج؟ 1. افتح ملف الإكسل بعد التحميل. 2. اضغط على زر "فتح الواجهة" (إذا كان هناك ماكرو، فعّله من `خيارات الملف` → `تفعيل المحتوى`). 3. أدخل تاريخ الميلاد في `TextBox` (مثال: `15/05/1995`). 4. اضغط "احسب" لرؤية النتيجة. مثال على النتيجة: - إذا كان تاريخ الميلاد `01/01/2000`، ستكون النتيجة: `24 سنة، 4 أشهر، 10 أيام` (حسب التاريخ الحالي). كيفية تعديل البرنامج (مفتوح المصدر) إذا كنت تريد تطوير البرنامج، يمكنك: 1. تغيير واجهة `UserForm`: - تعديل الألوان، الخطوط، أو إضافة صورة. 2. تطوير الكود `VBA`: - إضافة ميزات جديدة مثل حساب العمر في تاريخ معين (وليوم الحالي فقط). 3. إضافة تقارير إضافية: - مثل حساب عدد الأيام المتبقية لعيد الميلاد القادم. تحميل ملف Excel جاهز لحساب العمر مجانًا برنامج "احسب عمرك" في Excel هو أداة بسيطة ومجانية تساعدك على حساب العمر بدقة. يمكنك تحميله وتعديله بسهولة لأنه مفتوح المصدر، مما يجعله خيارًا رائعًا للمبتدئين والمحترفين. جهز البرنامج الآن وحمّله مجانًا! كلمات مفتاحية برنامج حساب العمر حساب العمر بالتاريخ كيفية حساب العمر في Excel تحميل برنامج احسب عمرك حاسبة العمر مجانًا برنامج حساب العمر بالإكسل اكسل حساب العمر باليوم والشهر والسنة DATEDIF في Excel كود VBA لحساب العمر نموذج Excel جاهز لحساب العمر تحميل ملف إكسل جاهز لحساب العمر طريقة حساب العمر في Excel بالهجري والميلادي برنامج احسب عمرك مفتوح المصدر كيفية عمل حاسبة العمر في Excel خطوة بخطوة تنزيل برنامج حساب العمر بدون ماكرو تحميل مجاني لبرنامج حساب العمر نموذج Excel جاهز للاستخدام حاسبة العمر بصيغة XLSX رابط مباشر لتحميل ملف حساب العمر برنامج حساب العمر بدون برمجة شرح دوال التاريخ في Excel للمبتدئين كود VBA بسيط لحساب العمر تعديل برنامج حساب العمر حسب الرغبة أفضل صيغ Excel لحساب الفرق بين تاريخين تصميم واجهة مستخدم لحاسبة العمر كيفية حساب العمر في Excel باستخدام دالة DATEDIF تحميل ملف Excel جاهز لحساب العمر مجانًا كود VBA لبرنامج حاسبة العمر خطوة بخطوة هل تبحث عن برنامج حساب العمر بدقة؟ هذا النموذج يدعم حساب العمر باليوم والشهر والسنة. اكسل متقدم, برامج مجانية via عالم الاوفيس https://ift.tt/IVB6bO1 May 09, 2025 at 03:58AM
0 notes
Text
Calculation Of Actuarial Valuation Of Gratuity Excel | Simplifying The Concept

Have you ever come across this question, 'is actuarial valuation compulsory for gratuity'? Then let us tell you that gratuity is a significant aspect of employee benefits in India, governed by the Payment of Gratuity Act, 1972. To simplify the often intricate process of calculating gratuity, an Excel sheet can be a handy tool. Let us break down the steps to calculation of actuarial valuation of gratuity excel, ensuring simplicity and compliance with legal requirements.
Gratuity Actuarial Valuation Formula
The first step is comprehending the basic gratuity actuarial valuation formula. Gratuity is calculated using the following simple formula: Gratuity = (Last drawn salary * 15 * tenure) / 26. The 'last drawn salary' includes both the basic salary and dearness allowance (DA). Tenure, crucial for the calculation, is measured in completed years of service.
Setting Up the Excel Sheet
Employee Details Section
Create columns for essential employee details – name, joining date, and leaving date.
Salary Details Section
Establish columns for the last drawn salary, basic salary, and DA. Ensure clarity in differentiating between these components.
Tenure Calculation Section
Use Excel functions like DATE and DATEDIF to calculate the tenure. For instance, the formula for tenure could be =DATEDIF([Joining Date], [Leaving Date], "Y").
Gratuity Calculation Section
Devote a section specifically for gratuity calculations. Here, you can incorporate the formula: =([Last Drawn Salary] * 15 * [Tenure]) / 26.
Formula Implementation
Link the calculated tenure and last drawn salary to the gratuity actuarial valuation formula. For example, if the tenure is in cell A1 and last drawn salary in cell B1, the gratuity cell (C1) will contain the formula = (B1 * 15 * A1) / 26.
Usage of Mortality Rates, Assumptions (salary growth rate, attrition rate Discount rate), Creating Cashflows of each employee using these assumptions. Then Calculating their Gratuity Actuarial Liability. Using the Gratuity Formula.
Validation and Review
Cross-Verification
Ensure the accuracy of the Excel sheet by cross-verifying the results with manual calculations. This step helps in identifying and rectifying any discrepancies.
Legal Compliance
Confirm that the Excel sheet aligns with the legal guidelines outlined in the Payment of Gratuity Act, 1972. Keep an eye on any updates or changes in statutory requirements.
Employer Policies
Customize the Excel sheet to accommodate any specific employer policies related to gratuity. This could include variations in the calculation method or additional factors considered.
Consultation From an Expert
Professional Guidance
Seek professional advice to guarantee the correctness and compliance of your gratuity calculation Excel sheet. Professionals can offer insights into specific nuances and help in adapting the sheet to unique organizational needs.
Regular Updates
Stay informed about any amendments to the Payment of Gratuity Act or changes in legal requirements. Regularly update the Excel sheet to reflect these modifications.
Benefits of Using Excel for Gratuity Calculation
Automation
Automation reduces the chances of human errors, ensuring accurate and efficient gratuity calculations.
Quick Estimates
Excel enables quick estimates, facilitating a streamlined process for HR departments and employers.
Transparency
The use of an Excel sheet enhances transparency in the gratuity calculation process, making it easier to understand and validate.
Conclusion
Creating an Excel sheet for gratuity calculation simplifies a complex process and brings efficiency to the payroll system. However, it is essential to approach this tool with caution, ensuring compliance with legal requirements and regular updates to reflect any changes. Seeking professional guidance further fortifies the accuracy of the Excel sheet, making it a reliable resource for gratuity calculations. By following these simple steps, organizations can streamline their gratuity processes, benefiting both employers and employees.
0 notes
Video
youtube
دالة حساب الفرق بين تاريخين فى الاكسل الدالة Datedif
قد تحتاج فى بعض الاحيان لحساب الفرق بين تاريخين فى برنامج الاكسل ؟؟ فالتاريخ يختلف عن الارقام فكيف يمكن ذلك!!!!؟لاتقلق فى هذا الفيديو سنتعرف على الدالة datedif ومن خلالها سيكون الموضوع سهل جداا وسريعة فى الحل وستتعلم كيفية استخدام هذه الدالة فى تطبيقاتك فى مشاريع الاكسل الخاص بك تابع الدرس الى نهايته واى استفسار سنرد عليكم
0 notes
Text
Formulas and Functions
In spreadsheet software like Microsoft Excel or Google Sheets, formulas��and functions are essential tools for performing calculations and manipulating data. They serve various purposes, and different types of formulas and functions cater to specific needs. Here's a breakdown of some common types:
Basic Arithmetic Formulas:
- Addition: `=A1 + B1`
- Subtraction: `=A1 - B1`
- Multiplication: `=A1 * B1`
- Division: `=A1 / B1`
2. Statistical Functions:
- Purpose: Analyze and summarize data statistically.
- Examples:
- `AVERAGE(range)`: Calculates the average of a range of numbers.
- `SUM(range)`: Adds up all the numbers in a range.
- `COUNT(range)`: Counts the number of cells in a range that contains numbers.
3. Logical Functions:
- Purpose: Make decisions based on logical conditions.
- Examples:
- `IF(logical_test, value_if_true, value_if_false)`: Performs a specified action based on a given condition.
- `AND(logical1, logical2, ...)`: Returns TRUE if all arguments are TRUE.
- `OR(logical1, logical2, ...)`: Returns TRUE if any argument is TRUE.
4. Text Functions:
- Purpose: Manipulate and analyze text data.
- Examples:
- `CONCATENATE(text1, text2, ...)`: Combines multiple text strings into one.
- `LEFT(text, num_chars)`: Extracts a specified number of characters from the beginning of a text string.
- `LEN(text)`: Returns the number of characters in a text string.
5. Date and Time Functions:
- Purpose: Perform operations on date and time data.
- Examples:
- `TODAY()`: Returns the current date.
- `NOW()`: Returns the current date and time.
- `DATEDIF(start_date, end_date, "unit")`: Calculates the difference between two dates in years, months, or days.
6. Lookup and Reference Functions:
- Purpose: Retrieve information from a table or range.
- Examples:
- `VLOOKUP(lookup_value, table_array, col_index_num, [range_lookup])`: Searches for a value in the first column of a table and returns a value in the same row from another column.
- `INDEX(array, row_num, col_num)`: Returns the value of a cell in a specified row and column of a range.
7. Mathematical Functions:
- Purpose: Perform various mathematical calculations.
- Examples:
- `SQRT(number)`: Returns the square root of a number.
- `POWER(number, exponent)`: Raises a number to a specified power.
- `ROUND(number, num_digits)`: Rounds a number to a specified number of digits.
These are just a few examples, and there are many more functions and formulas available in spreadsheet software, each serving a specific purpose in data analysis and manipulation.
Watch Now:- https://www.youtube.com/watch?v=M6r15VKffK8
0 notes
Text
Unleashing the Power of Microsoft Excel 2019: Exploring Its Features and Functions
Introduction
Microsoft Excel 2019 is a robust spreadsheet application that has become an indispensable tool for businesses, students, and professionals worldwide. Whether you are tracking financial data, creating charts and graphs, or performing complex calculations, Excel 2019 offers a wide array of features and functions to streamline your tasks and enhance your productivity. In this article, we will delve into the essential Excel features and explore the key functions that make it such a versatile application.
Excel Features: A Brief Overview
User-Friendly Interface: Excel 2019 boasts an intuitive user interface that makes it accessible to both beginners and advanced users. The ribbon toolbar organizes commands logically, making it easy to find the tools you need.
Powerful Calculation Engine: Excel's calculation engine is one of its standout features. You can create complex formulas and perform calculations with precision, making it ideal for financial modeling and data analysis.
Data Visualization: Excel offers an array of chart and graph types, allowing users to transform raw data into visually appealing and easy-to-understand representations. From simple pie charts to sophisticated scatter plots, Excel has you covered.
Data Import and Export: You can import data from various sources, including databases, web pages, and text files, and export your Excel sheets to different file formats. This feature simplifies data integration and sharing.
Data Analysis Tools: Excel 2019 includes a range of data analysis tools, such as PivotTables and PivotCharts, which help you summarize and analyze large datasets effortlessly.
Conditional Formatting: Conditional formatting enables you to highlight specific cells based on predefined criteria. This feature aids in data interpretation and decision-making.
Collaboration: Excel offers real-time collaboration features, allowing multiple users to work on the same spreadsheet simultaneously. This enhances teamwork and reduces version control issues.
Automation with Macros: Macros enable users to automate repetitive tasks by recording a series of actions and playing them back with a single click. This saves time and minimizes errors.
Function of Microsoft Excel
Mathematical Functions: Excel provides a wide range of mathematical functions, including SUM, AVERAGE, MIN, MAX, and COUNT. These functions simplify calculations and data analysis.
Text Functions: Excel allows you to manipulate text using functions like CONCATENATE, LEFT, RIGHT, and MID. These functions are invaluable for text parsing and formatting.
Date and Time Functions: Managing dates and times is a breeze with functions such as DATE, TIME, NOW, and DATEDIF. You can calculate durations, determine weekdays, and perform other date-related operations.
Logical Functions: Excel includes logical functions like IF, AND, OR, and NOT, which are essential for decision-making and creating conditional formulas.
Lookup and Reference Functions: Functions like VLOOKUP, HLOOKUP, INDEX, and MATCH enable you to search for and retrieve data from tables, making data retrieval more efficient.
Statistical Functions: Excel's statistical functions, such as STDEV, AVERAGEIF, and CORREL, empower users to perform advanced data analysis and make data-driven decisions.
Financial Functions: For financial professionals, Excel offers a suite of financial functions like NPV, IRR, and PMT, which are indispensable for investment analysis and financial planning.
Conclusion
Microsoft Excel 2019 is more than just a spreadsheet program; it is a versatile tool equipped with a rich set of features and functions. Whether you are crunching numbers, creating charts, or collaborating with colleagues, Excel 2019 offers the tools you need to excel in your tasks. Understanding and harnessing the power of Excel's features and functions can significantly enhance your productivity and decision-making capabilities, making it an indispensable application in today's digital world.
0 notes
Text
Bias Spreadsheet Math
Okay, so I have a spreadsheet for my biases because I have quite a few (currently on this sheet: 27) and I like to keep facts about them stored. Just to see what lines up with the other ones. (Side note: None of my biases seem to line up...)
Anyways, I always have to manually put in the age they've turned. And I've had this spreadsheet for like a few years now. And it's tiring...
Cause I'm lazy & okay with math- I made an equation? So, the =DATEDIF() equation only works w/numbers. While Google does have the function for "TODAY" it wouldn't work in said function.
So, if I wanted it to always solve from birthdate to today. I'd have to come up with a different way, so I'd never had to type their ages manually again. I configured a little 'today's date' cell in the sheet. Thus, dubbing "AB2" as the dedicated cell.
And here 'X' will stand for any birthdate/cell w/birthdate. And years will be represented by "Y." After all, that is what we are solving for.
Thus the equation looks like:
=DATEDIF(X, AB2, "Y")
I'll be the first to admit I love math, but as a person who doesn't like to do the same tedious work over and over... This is going to make a nice difference when I look at the sheet again in the future.
Also, disclaimer: I didn't get the idea for the bias spreadsheet, someone else made the original. I have just made it custom to me. It does have some functions from the original, most of them have been scrapped tbh. Especially because this is my third version of the spreadsheet. (I don't keep up w/a lot of groups anymore, so I made a new one to decrease clutter). I don't know how much of it remains? I do have the link to the official one tho.
Anyways- if you've read on this far- and are still intrigued! If you wish to start your own: I have the link to the original and can also link mine! And if you'd like I'd be more than happy to help you set it up!
Idk I'm very proud of myself for figuring it out. It took me a little bit, but algebra was my favorite in school, so it came with ease! :)
(Also, this post marks: 25,000 posts *reblogs & originals* 🥰)
#bias spreadsheet#math#math functions#kpop things#bias things#side projects#it is 230am- i literally could have been sleeping-#i didn't even look at the clock til i typed up that tag...#spreadsheet talk#math talk#algebra#i love solving math problems tbh#if any of this doesn't make sense and you want it to be explained lmk-#bias spreadsheet math#my senior math teacher always scolded me for not taking college math- but did college math have my friends? no- i hated those snobby kids-#while i'm good at math and problems- atp i only use it for personal gain#hwvr could totally put this into work and become an accountant or actuary but here i am making bias math spreads...#i'm quite content with that tbh#side note: i already had to deal with the snobby kids during adv. science- adv. history and college eng. i needed a break even tho#i def say i was better at math than science but wtv- i'm happy with how it worked out- i just find it interesting to think about w/nearly#3am me-#this is what kate does with her time~#the other new category that was created was moon phases~
1 note
·
View note
Text
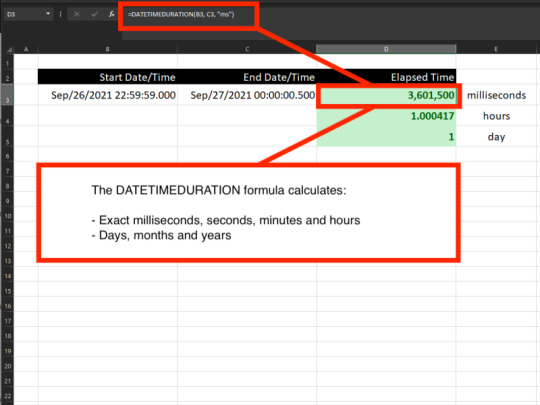
Excel Date Time Duration
Excel Date Time Duration
This article explains how to calculate date/time differences between cells, including milliseconds. I had once received a large amount of log data in an Excel file, and was charged with having to find the duration between some of those logged events. There were thousands of events, time-stamped with values that even included milliseconds! As an example, one of the time stamps looked like…
View On WordPress
#accurate time#addins#data analysis#date#date calculator#date difference#date time#date time duration#DATEDIF#DATEDIFF#datetime#DATETIMEDURATION#DATETIMEDURATION formula#duration#elapsed time#Excel#Excel date time#Excel formula#fractional time#log files#Microsoft#milliseconds#precise time#SCADA#software#time#time calculator#time difference#time elapsed#time series
4 notes
·
View notes