#definitely not a tutorial
Explore tagged Tumblr posts
Visit Tumblr Blog
Explore Tumblr blogs with no restrictions, modern design and the best experience.
Last Seen Tumblr Blogs


Fun Fact
Average visit duration of Tumblr.com is 10 mins and 25 secs.
Text
Behold
A TABLE

#3d model#art#calamity mod#terraria#why did i think this was funny#table#wood#blender#definitely not a tutorial
4 notes
·
View notes
Text

It's in the eye of the beholder
#comic#birds#my art#I've had this idea for a while#after a lecture that talked about how traits we consider cute are traits found in babies#I feel like birds would have a very different definition of cute from us#anyway after making the bird tutorial I feel the pressure to draw perfect bird anatomy#but tbh I still just wing it a lot of the time!!#hehe “wing it”
64K notes
·
View notes
Note
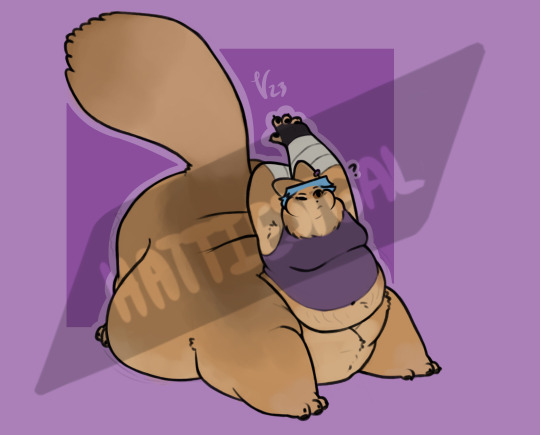
If you don't mind my asking, how do you go about drawing fat? :3
JUST THE EXCUSE I WAS LOOKING FOR
So, for me personally, a lot of the time when I draw fat characters, I'm not looking to specifically capture the specifics of fat as much as the feel of fat. Bulkier, rounder shapes in the right places that has a feeling of weight to em! A lot of that is intuition and simplification at this point, but it all works on the same frame as just any ol' person. Like take this-

For example. This is the basis for any body shape, not just the more average one that it may imply. Sure- it can be that average body shape:
But also a fat one too!

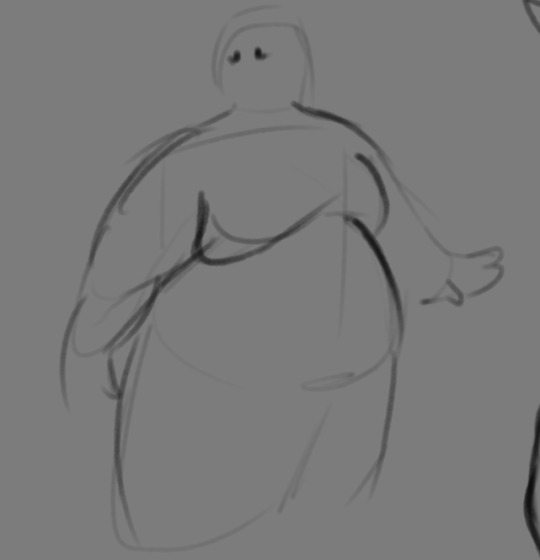
And a big part of that is knowing where fat usually tends to bunch up on the body, so lets take a look piece by piece! (Please keep in mind this is very simplified, and not completely precise in some parts)
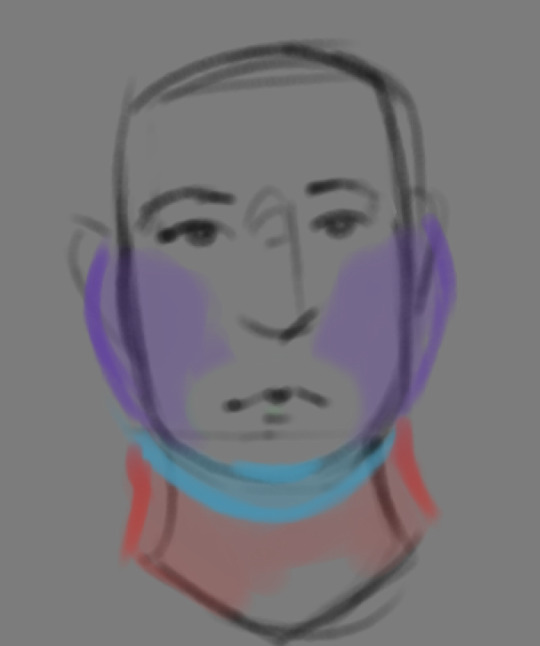

THE FACE: Cheeks (in purple) and especially the chin (in light blue) are the places where a lot of the fat is gonna wanna gather and round out on your face! Additionally, theres a small pocket of fat beneath the cranium on the backside of your head. It's small, but it is there. I believe fat can build up elsewhere like the bridge of your nose and forehead, but generally speaking, you're gonna have a whole lot more buildup in other places first.
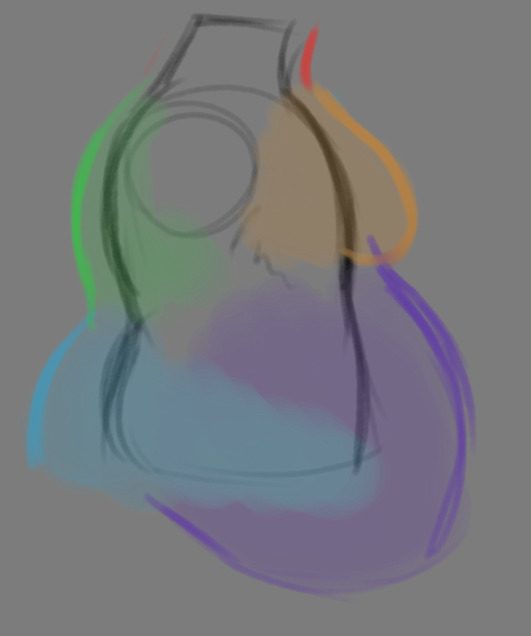
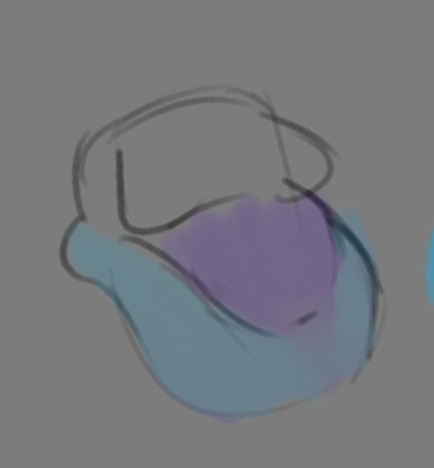
THE TORSO: A lot of the fat built up on the torso is gonna be sent to your tummy. More cushioning for vital organs, mostly out of the way, it just makes sense. Additionally, the lower backs fat builds up and joins with a patch of fat on your sides that forms what is typically referred to as the love handles to make that double belly look. Along with this, the immediate next target for the torso is the breasts, followed by the upper back!
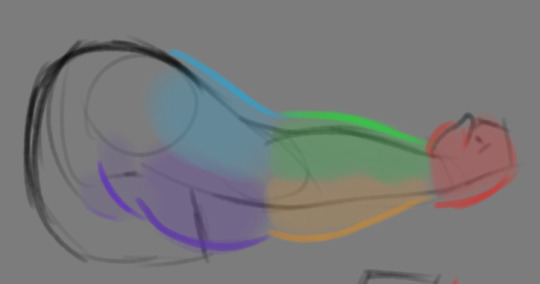
THE ARMS: For this limb, a VERY notable amount of the fat present builds up on the tricep and bicep areas, lessening once you get towards the flexor and extensor areas. You can almost think of the arm as a sort of triangular shape, wide side starting from the shoulder and tapering towards the hand, which itself mostly builds up fat around the back of the hand and the fingers. The shoulders themselves don't build up too much fat unless you got a lot
THE LEGS: And finally, you can think of the legs having pretty similar curves to what you're probably already used to thinking. The front of the thighs getting a big buildup, along with the back of the calves, the other parts being flatter in turn. As far as the feet go- similarly to the hands, the top of the feet, along with the heels get most of the buildup, as fat on your soles would impede mobility. The glute, hip and crotch area will also especially build up fat, lending to the same triangular shape that you can see in the arm!
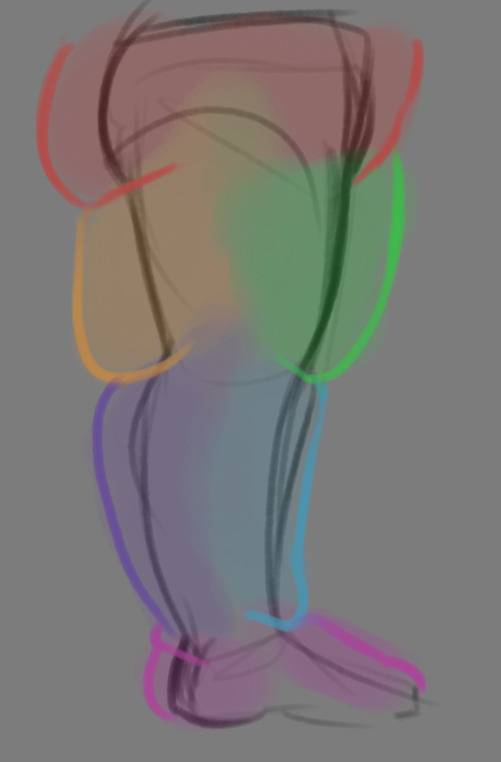
A big thing to note with fat is that it tends to taper off towards joints. Your knees, elbows, shoulders, hips, and all the other places are gonna have significantly less fat so that you remain mobile and flexible, as that's important!
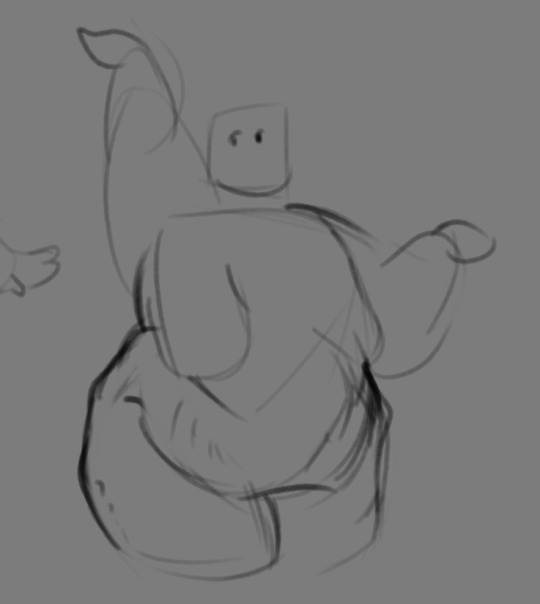
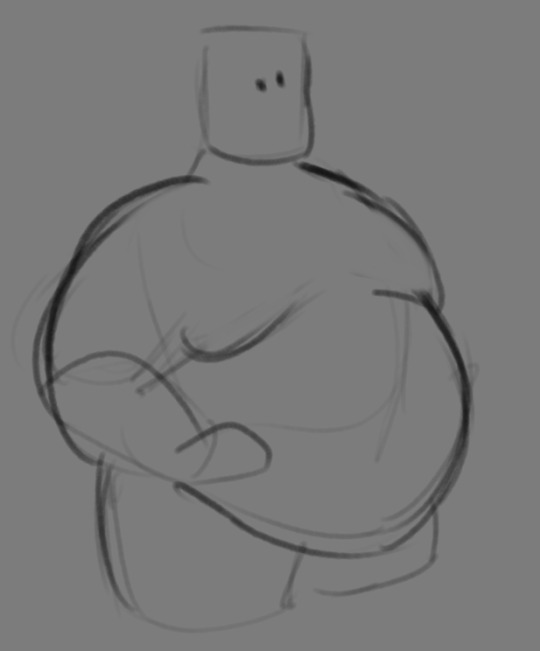
Now that we have an idea of where fat builds up on the body, you might have something that looks kinda like this
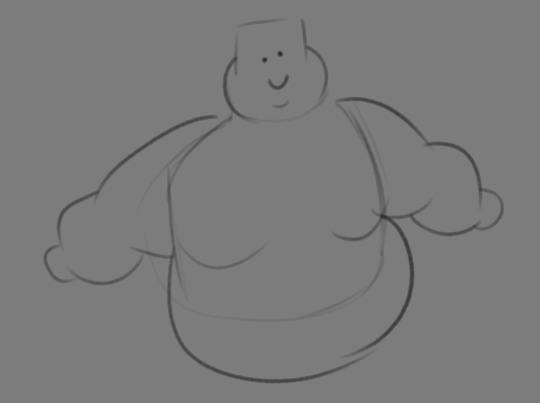
Which yes, does demonstrate a solid understanding of the places fat builds up, lacks the weight you're probably trying to convey, which brings us to out next point! Fat is well... heavy! Gravity is what gives fat much of it's shape, especially as you tread towards larger and larger bodies.
This is demonstrated really well on the arms especially-


Those big ol' bits of fat'll really start to sag when left hanging, and they will squish like hell if they run into something. I like to think of these bits of fat as big ol' ovals that squash and stretch depending on if there's an obstacle in their way or not


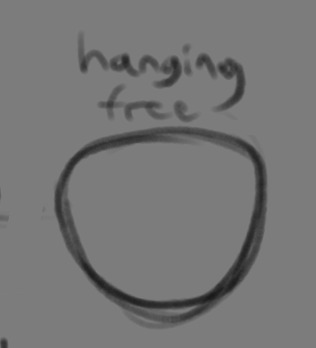
These are the important shapes to remember when it comes to the weightiness of fat! If you take all of this into mind, you should be getting something a lot closer to that shape you've been after!

Oh, and always remember that fat bodies come in all variety of shapes and sizes! Play around with a whole lot, and seek out all the resources you can! it'll really lend to your knowledge when it comes to this kinda stuff!
And as I always recommend when it comes to learning art- look at what your favorite artists do with fat bodies. See what you really like about the fat bodies they draw and try to replicate it in your own work, I promise you it's one of the most helpful things ever.
This is like the most basic of basics when it comes to drawing fat bodies though. If there's any additional thing about fat bodies, or maybe you want clarification on something, don't be afraid to ask! If there's enough to cover, I'll make an addition to this post!
#hat answers#my art#design talk#tutorials#yeah im unfortunately pretty tired so this gets a liiiitle rambly at the end but i think this covers like the basic basics#i hope this was helpful at all#and again dont be afraid to ask questions and stuff#if theres enough traction/questions on this i will most definitely try to clear up as much as i can in an addition to the post#whoops this took a bit!
3K notes
·
View notes
Note
Hello so I really like your art style and the way you draw the transformers. And I was wondering if I could ask how did you learn how to draw them?
And do you have any tips for beginners?
Also read the fic btw and it’s genuinely one of the best things I’ve read. So keep up the good work and take breaks when you need too.
There're definitely ppl who can explain it better than me, like @bloominglegumes in this post here , but I here's a bit about how I approach it!


That's basically how I visualize it. It also helps to have reference when you're first starting out. Transformers are wacky to draw cause u need knowledge of organic and inorganic shapes and how they mesh. Personally I try not to let my guys look too stiff. I try to keep lines curved, even if they look straight on first inspection. Technically not realistic since they're made of metal, but it just looks better.
#Hope that helps!#Maybe not the most comprehensive but that's just how I do it#There are definitely also more resources out there#best advice tho is practice and have fun lol#transformers#drawing#tutorial#kinda
230 notes
·
View notes
Note
Fav art tips?
These're some of my general art / drawing tips!
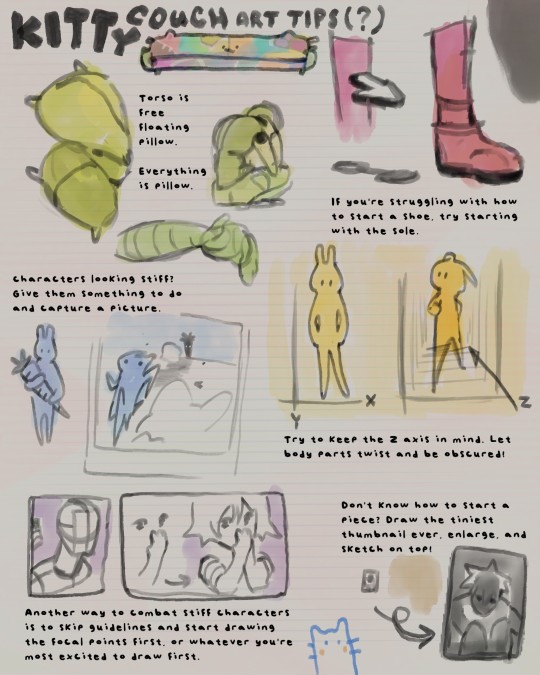
✎⁾⁾ ◞
Just incase text is hard to read:
1) torso is free-floating pillow. Everything is pillow. (soft, flexible anatomy)
2) if you're struggling with how to start a shoe, try outlining the sole first.
3) characters looking stiff? Give them something to do and take a snapshot mid-action.
4) try to keep z-axis in mind! Let body parts twist and be obscured.
5) another way to combat stiff characters is to skip the guidelines and start drawing the focal points first... or whatever you're most excited to draw first.
6) don't know how to start a piece? Draw the tiniest thumbnail ever, enlarge, and sketch on top!
#hi sorry this ask has definitely been collecting dust#art help#art tutorial#art ref#art tips#how to draw#how to art#tut#ref
272 notes
·
View notes
Text
im a scrub and im tryna holla
#spacie scribbles#i am by definition. a scrub.#i don't have a car. im walkin.#i live at home with my momma.#im BROKE and i have NO MONEY#FUCK WIT ME#FUCK WIT ME.#you know how they had those sex tutorials on youtube in the early 2000s#i would watch those and take notes. i would attend SEX CLASS for these monkeys#i would get myself EDUCATED#WATCH ME WHIP OUT THIS GRAPEFRUIT#GAWK GAWK GAWK GAWK#or#record scratch record scratch record scratch record scratch#wow thats rally innaporpriat......#u think that writers of this show see posts like this#what is going thru their heads. personally if this happened to MY characters i would become hysterical#suggestive#shitpost#lawwwdd!!!#he knew that if he made my f/os real i would a pussy GOD!!!!!!!!!!!!!!!!!!!!#I WOULD COP HELLA ASS#<- no the fuck they wouldn't they would be too scared to even approach
57 notes
·
View notes
Note
Can I ask how you mixed the dark colours for your lovely blue-black goat charm?? It’s so vivid and velvety - my watercolour darks keep coming out very flat.
Hello! sorry it took so long to reply! let me think. It might be because I use more than just watercolours! My base is normally watercolours mixed with a bit of light gouache and then, once dry, I use dark colored pencils to add details and Unify some of the areas where the paint might have been too blotchy. Or you can use light colored pencils over dark areas!
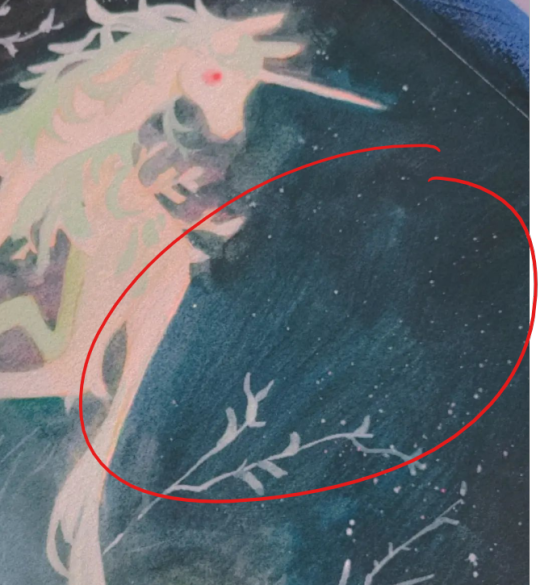
for example you can tell I used an almost dry paint brush with some paler gouache on a still damp dark color here.
Then Later on, once dry I went it with darker colored pencils and "carved" the trees and plant shape with them.:)

Its a lot of playing around with media until you find what gives you the effect you want! As for pencils I use Caran d'ache or Faber castel, but back in the days I would use any prismacolor or dollar store colored pencils for that and it still worked pretty well! (You dont want to push on the paper. rather gently go back on the area over and over so that it has that smooth gradient effect to it.)
#the ghosts are asking#my art#tutorial#kinda#most of the stuff I do is mostly because I was curious and wanted to see how those mediums would mix.#colored pencils work great to add definition to your copic marker pieces!
203 notes
·
View notes
Text
Tried out procreate for the first time and redrew a meme. Original image under the cut.

Is this anything?

#nakajima atsushi#akutagawa ryuunosuke#sskk#meme redraw#my procreate tutorial was trying this out I guess#I haven’t really done much digital art and definitely not for a while#bungou stray dogs#my art
52 notes
·
View notes
Text

She's back to destroy the organization...!!
#my captain o7#i watched a tutorial abt blurs can you tell? xcmvnbcx#she has so many cool pics i couldnt decide which to start with#so i'll definitely do something again for her <3#claymore#miria#phantom miria#mp#anime poster#manga poster#poster design#manga edit
246 notes
·
View notes
Text

one of the gang's fondest memories... DIY piercing each other's ears on a random friday
bonus: matt didn't want to risk his ear getting infected.

#eddsworld#ew edd#ew tord#ew tom#ew matt#(hints of eddtord. shhh)#definitely very fun and calm and no blood was spilled. at all#it was tord's idea but tom volunteered to do it and actually looked a tutorial up#tord still wears his stud to this day. tom had his replaced. edd stopped wearing it but still puts it on occassionally to keep the hole ope#(matt got hers professionally done when he was older. the other three boo-ed at her for it)#also gonna try adding alt text to these now 👁️ any notes or tips on how to make em better are appreciated
72 notes
·
View notes
Text
Okay Tumblr is being an ABSOLUTE ASSHOLE about being able to insert links today for some reason and so won't let me embed it, but I published Chapter 1 of the podfic for The Risen Lamb and the Fallen God. Here it is! https://archiveofourown.org/works/61946524/chapters/158403568
For those who may not know what a podfic is, it's basically an audiobook of a fanfic! I'm doing a podfic of my own fic, but there are many people who podfic the works of other authors (with permission, of course). Podfics currently don't really get a lot of "reach", but I think they're an underrated medium of fanwork.
Anyway, if you struggle to read long texts and would rather listen to fanfic like an audiobook, here ya go!
#hannah's rambles#cult of the lamb#narilamb#cotl#Hannah writes#podfic#narinder#the lamb#one of the tutorial articles i read said that podfics average about 12 kudos#i definitely think there's untapped potential there#so im not expecting a ton of traction for this its just fun and yay accessibility#if i wanted “reach” or whatever id write WAY more smut than i do LMAOOOOOOOO
63 notes
·
View notes
Note
SHAKES YOU how do you draw taurs. i need help i genuinley cant wrap my head around the anatomy of it. optionally i need help with fat taurs but any kind of taur is okay
Ooh, I love these sorta questions!!!
So there are two main things folks usually struggle with when it comes to drawing taurs as a whole. 1, they struggle with quadrupedal anatomy and 2. connecting the humanoid upper body to the quadrupedal lower body. Obviously there's no shame in either of these things, drawing four legged animals, especially if you're more used to the anatomical structure of something more humanoid is quite tough! And finding the sweet spot where humanoid and quadruped meet to make a taur is a bit of a struggle for folks who're still figuring it out.
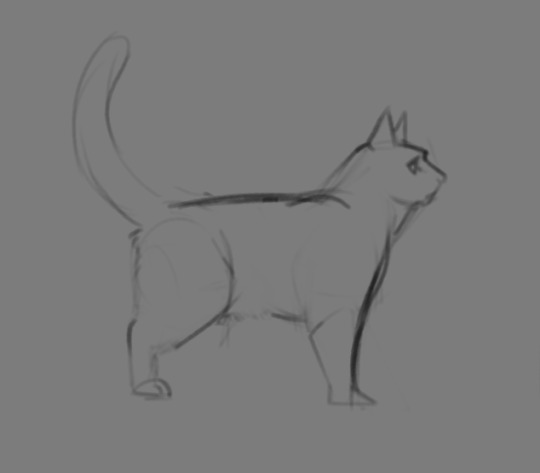
So! The first thing you wanna do really is just familiarize yourself with quadrupedal anatomy. Look at the skeleton of the creature you're trying to taur and see how things like their limbs bend differently or how they're just differently naturally posed as compared to someone who walks upright.
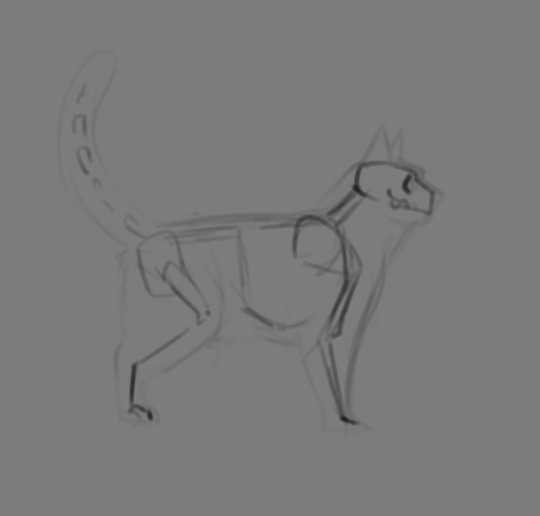
This is a very simplified skeleton of a cat, but you can pretty immediately see how differently everything bends. And I'm not saying it's something you have to perfectly master to know how to draw a taur (especially when you get to drawing fat taurs), but i highly recommend becoming familiar with how a quadrupedal body is structured, the silhouette of most animals is quite misleading! And absolutely use reference!
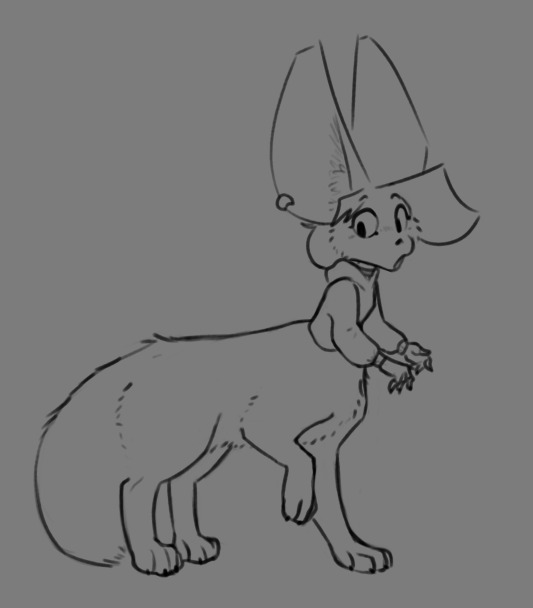
Heck, our first go at drawing taur Riley was super heavily referenced (I'll even share the ref image if anyone is interested!), and this still came out real jank. Practice makes perfect!
As for connecting the upper body to the lower body, this is a little more subjective and up to you, but I'll lay out some general guidelines.

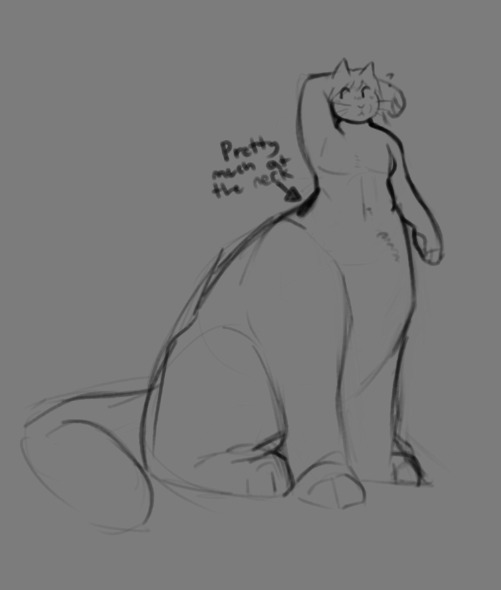
Generally speaking, you wanna put the humanoid torso where the base of the neck is, the front of the torso kinda merging with the rest of the taur body just after the tummy, basically just before the crotch starts.

As for the back, you're gonna want to shoot for just shy of where the butt starts, waist having curved back outwards. It gets a little awkward if you go higher or lower than that. And obviously, you wanna make sure the torso is firmly planted in the center of where the neck should be, ehehe.
That's pretty much the basics though! As always, i recommend looking at how your favorite taur artists draw the creatures and studying off of that! Familiarize yourself with quadrupedal anatomy, and use reference!! You will absolutely get it down with time. I will absolutely cover fat taurs if there's interest in it, and ofc, lemme know if there's anything I missed or need to go over! I hope this helps!
#hat answers#my art#my ocs#Riley Foxglove#design talk#tutorials#taurposting#i imagine this one'll find a much more niche audience but i really do hope its helpful!#these are the two things that definitely gave me grief when i was first figuring out how to Taur#but im sure theres plenty more i missed!#never be afraid to ask about stuff!!!!!!
218 notes
·
View notes
Text
twisting ft. @miodiodavinci's SALVADOR Auto Recovery

credits under the cut
original, instrumental by They Might Be Giants
UST, tuning, mix, art by @epicdogymoment
#leologisms#leography#utau#ijo Lijo#salvador auto recovery#tmbg#they might be giants#haaaaaahhh. yet another one that had to go through numerous rounds of mixing and re-mixing#so hard to get a sense for keeping vocals and bg vocals and instrumental balanced.....#the audio cover image is a quick redraw/study (?) of a very very cropped version of the flood album cover#what else is there to say. aaahhh right THIS is the thing i was doing the salvador english test (chug jug) for#ill say im definitely happy with how well i got him to articulate. but i also know all of the words to this song by heart so#im definitely biased. i like this song toooo much and doing this cover reminded me how much i like it#this is also my first time getting an utau to scream!! its very difficult to pull off. especially because the vast majority of tutorials ar#specifically for like screamo-style screams? not what im going for#anyway. thank you tmbg for the flood (1990) album and all the short songs and the official (official!!!) instrumental versions#and thank you mio for making this lovely lad. so i could force him to sing in english.#also i figured i should credit myself for ? things ? feels weird because its on my blog#but yeah i make my own usts. just think its easier to build em from scratch so theyre tailored to the vb im using and how i want to tune it#............bows really deeply.
42 notes
·
View notes
Text
Pro tip: if youre broke but want an easier way to make backgrounds, theres an app/website called homebyme thats free ✨️✨️
#elodie room reveal (sorta)#i just wish there were more camera and poster options because thered definitely be more here#élodie desrosiers#mlb oc#miraculous ladybug#mlb#my art#artists on tumblr#oc#art tips#art tutorial
24 notes
·
View notes
Text

When they ask what these six fingers do :)
Ford Pines cosplay kind of?? I imagine after 30 years on the other side of the portal he has become quite proficient at handling various kinds of blades
See more under the cut - cw: open knife - fake knife/toy kinfe/not real!!! (also fake finger obviously lol)

#cw knife#tw knife#fake knife#ford pines#before this one I bought a cheap butterfy style hair comb (lol) and kind of got into tricks watching youtube tutorials#it is definitely more challenging with one extra finger that i cant move#im glad its really dull otherwise i would probably be in hospital without an eye by now#horrific ravioli accident or something#please dont do this with real knives#stanford pines#the book of bill#billford#gravity falls cosplay#mine#my cosplay
40 notes
·
View notes
Text
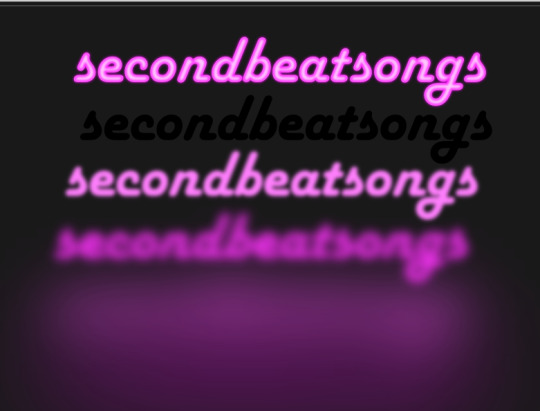
how to make neon signs in inkscape!
I lost my mind and spent a large amount of hours yesterday perfecting my methods and figuring out how to do this, so if you're interested in making something like this:

here's how to do that!
step 1: cover your workspace in a dark grey rectangle, and lock that layer down.
I've been using 80% or 90% grey - you want this so you can see your neon effect, but you don't want it entirely black at this stage, or you won't be able to see your shadow layer.

step 2: create some text!
pro tip: rounder sans-serif fonts look the best for this, because think about what a neon sign is made of - it's tubes, bent into shapes! so if your font or design looks too sharp and pointy, it'll feel unrealistic when you make it neon.
(this is, of course, a perfectionism thing on my end, so feel free to ignore any and all rules in order to make the thing that you want to make. as with all art, you can do whatever you want forever!)
bonus pro tip: if you, like me, have over 1400 fonts installed and programs tend to lag when you browse through all of them, nexusfont is a great free software that lets you sort your fonts into categories, search them, and preview what any text looks like in different fonts! I love it. it is my best friend
now I'm going to do this with a few different fonts, so that you can see how it works with them. so today, I'm picking Futura Round, Harlow Solid Italic, and then to challenge myself, Beauty School Dropout and Block

make the text white, and also select the text and go to Paths -> Object to Path, because some things don't work right if they're not paths.
let's start off easy with Futura Round!
Step 3: duplicate your text layer
now bear with me here. but you need to take the text you're working with, and either right-click duplicate or copy/paste the layer until you have seven total copies of the text you're working with.

arrange them like this, making sure the top one is the first layer on the list (and so on), and then in the layers tab, label them like so:
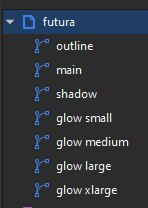
pro tip: if you don't have the layers tab open, go to Objects -> Objects and Layers, and that'll pop it right up
Step 4: blur time!
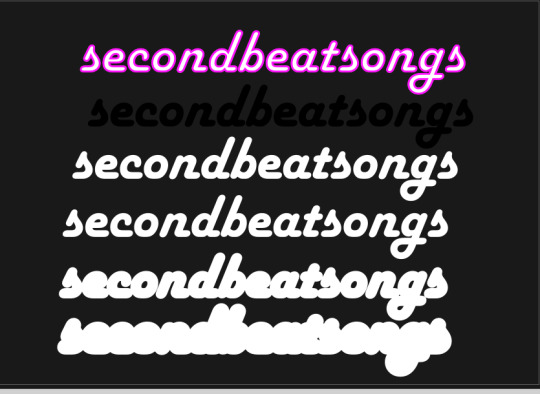
switch to the Fill and Stroke tab, and make these changes to the paths:
glow small: 15% blur, 100% opacity
glow medium: 20% blur, 90% opacity
glow large: 50% blur, 70% opacity
glow xlarge: 70% blur, 70% opacity
your workspace should now look like this:

this is good!
pro tip: these numbers are just loose guidelines! at the end, mess around with everything to make sure that the glow looks right to you! nothing is an exact science
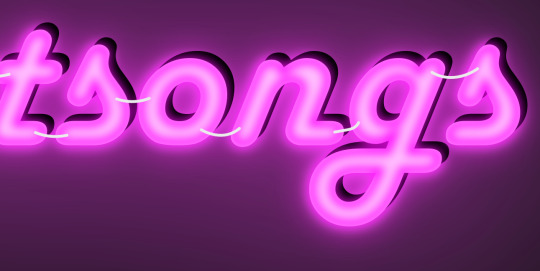
Step 5: shadow and outline
for the shadow layer, make it solid black, and then change the opacity to 50%
for the outline layer, we're doing something fun and weird. so right now it's a fill object, but we want it to be an outline instead! so let's hit the X in the lower left to make it empty, and then shift-click on...for the sake of this, let's say blue. to make our nice blue outline.
now's the weird part
now. use the align tool (Objects -> Align and Distribute), select the outline layer and the main layer, and align them so the outline text is exactly centered on the main one.
then go to Paths -> Path Effects, and when the tab opens, select just the outline layer, then click the drop-down arrow in the Path Effects tab and select Offset
here's our goal right now:
we want to offset the outline until it fits inside the text underneath it, and also mess with the stroke layer settings until you have a nice thick outline that doesn't overlap itself.
mess around with the plus and minus buttons. there are no exact numbers here; you just have to know when it looks good! but for me, the settings were a -0.34mm offset, with a stroke width of 0.700mm
this is roughly what you want it to look like:

now, with the outline layer still selected, blur it out just a bit until it looks fuzzy, and like the white center is a highlight rather than a separate layer. for me, the right number was about 8.3% of blur, to get a result like this:

Step 6: layering and changing colors
okay! at this point your work should look something like this:

you now want to select every layer except the shadow layer, and use Align to center them all on top of each other.
pro tip: make sure to untoggle "move/align selection as a group", otherwise this will not work.
you should now have something that looks like this, with the shadow layer sitting all by itself somewhere off to the side

now's the fun part: colors!
since we've decided that this neon light is going to be blue, it's time to change the glow to reflect that!
here's what it looks like when you change all of the glow layers to be that same, #0000FF blue as the outline layer

and here's what it looks like when you take the glow small layer and make it just a bit lighter (#4343FF) using the stroke and fill tab

in general, mess around with the layer colors until you like how they look! I find that it generally looks better if the glow small layer is a bit lighter, and the glow medium layer is as dark as the original color. everything else is fair game.
also the main layer can stay white (if you want it to seem very bright), or you can make it a very very light blue if you want it to be a bit more subdued.
Step 7: final steps
take your sad, neglected shadow layer, and move it slightly up and to the right of your main layer, so that it works...well, basically like a drop shadow.
then take your original rectangle, and switch it to 100% black.
now. gaze upon your masterpiece

that's a good neon sign if I've ever seen one.
but now. now's when we lose our minds
Steps 8-??: perfectionism and nonsense
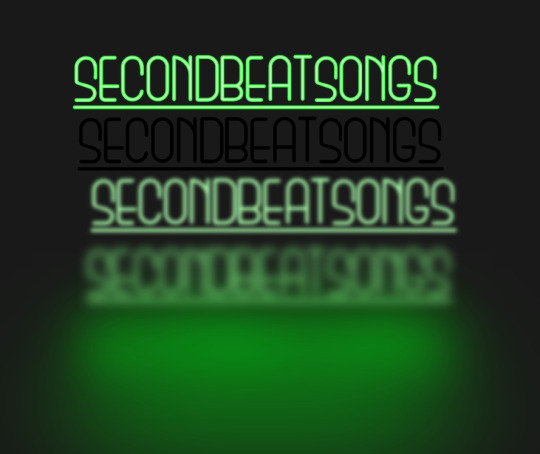
so let's move the Futura one aside (and hide it! inkscape lags if there are too many blurry layers visible at once, so hide anything you're not using!), set the rectangle back to grey, and move on to Harlow Solid Italic.
I've sped through a few of the steps here (out of order) so you can see what I'm doing. I've added outlines to the large glow and xlarge glow, and bumped them up a bit so they'll have a larger glow area in general
this time I've made the large glow a little bit lighter than the xlarge glow and medium glow, and made the main layer a very pale pink instead of just white. I also blurred the outline layer just a bit more, because this font needed a bit more fuzz to make it look good.

hell yeah. this rocks.
now, one detail for perfectionism: in neon signs IRL, if you look closely, there are wires attaching them in the back, often connecting each letter to the next. so...let's do that!
get your pen tool, set it to spiro path, and then make little droopy lines connecting each letter.
make these thin, 100% opacity, and a very light (almost white) grey color. then group all of them together, and move this group under the small glow layer
pro tip: some of the cords might go mostly through the shadow layer. if this is the case, just put the cord group one layer above the shadow layer instead, and then it'll be fine. but you might make the cord color a pale-greyish pink to make it look like there's glow hitting it.
ultra advanced technique: duplicate the cord group, make it black and 50% opacity, position it slightly up and to the right of the original, and then move it one layer below it. you've got cord shadows babey!

lookit that. stare at that beautiful perfection. I love it. this brings me joy.
and now: the one that will be the most work
let's gooo Beauty School Dropout!
this one I'm using as an example for what to do with a font that's a bit too pointy to look realistic

this font is really fun and bendy, but the ends of the letters are flat instead of rounded, and the corners are a bit too sharp. so...let's fix that!
now, there are several ways we can do this (after doing Object to Path ofc).
one way is to edit the path yourself, going slowly, and making sure everything is perfect, editing the nodes individually.
or, you could select the text layer using the node tool, then click the button in the top bar labeled Add Corners LPE, and then drag the little circles and triangles around to smooth out the corners
I've decided to do the LPE method, but the problem here is that if you apply the LPE effect before making sure all of the corners look good nodes-wise, it's hell to try and fix it. so before LPE-ing, look at all the spots that you're going to apply the effect, and make sure each has one point at each sharp corner, with no weird overlapping bits. okay? okay.
also for the line beneath the text, it looks like it's made up of a bunch of different segments

and since I want to keep this line because I think it looks cool, we're going to have to deal with that, and make sure that it's all one solid piece, otherwise the outlining won't work. so I've gotta delete all the extra segments, and then move the points on just one of those segments until it's the full original line width, before rounding those corners as well.
basically I've got my work cut out for me here, this will all take a bit.
...aaand an episode and a half of Supernatural later, here's this!

look at how nice and round that is! perfect for the rest of the neon process
and with cords, shadows, layering, etc

hell yeah.
more things: it's block font time
let's make an outline-style neon sign!
my seven layers:

for all but the last two, I've not used the fill option with them at all - I have simply used the stroke outline.
now don't be worried! the stroke-to-path still works just the same way even using an outline to begin with! so it's easy to get an outline of an outline, and do the offset thing just like you did before
however, because this font is more complex-looking, there will probably be some errors when you offset it

for example, it didn't fully outline the second half of the Os, so I just copied the left halves, mirrored them, and replaced the right half with the complete left half
pro tip: keep in mind that you have to re-apply the offset to any bits that you add to the outline layer!
doing the same steps as last time, editing the glow blurs as I see fit, once again we end up with beauty and perfection.

another thing you can do: turn off the lights!
I'm going to use Beauty School Dropout and Harlow for this, but after making your beautiful neon signs, here's how to make it look like a turned-off sign, for if you want to make...idk, a gif of a light turning on and off, or a burned-out sign, or something like that.
so start with (ideally, duplicated copies of) your neon signs:

and then simply delete every glow layer, change the outline layer to 90% grey and your main layer to 70% grey, change the cords' color to a darker shade of grey than whatever it already is, and lower the opacity of the shadows by about 10-15%.
doing that, you end up with this

bam! lights turned off!
last thing: logos and other stuff
you can make neon signs with images as well as with text! the steps are essentially the same, though you may have to do more editing to make it look good, and use simplify on the path if it's too detailed.
and if you're using anything besides an .svg, you first go to Paths -> Trace Bitmap to turn your image into a vector! but unfortunately I've already used 29 images in this post, so here, just look at this Keith Haring thing I made as an example:

is it messier than the text? yeah for sure. does it have some pointy bits I could smooth out more? definitely. but, I've watched three episodes of Supernatural today, and that is more than enough time spent on this. so this is what you get.
but yeah, that's how I make neon signs in inkscape! I used to do it in GIMP, but this works much better, and looks so nice and clean! <3
(man, graphic design really is my passion)
#tutorials#inkscape#reference#neon#graphic design#tbh this is definitely for my own reference too because I know I will eventually forget this process#but I want it to also be useful to other people#so here!#inkscape tutorial#enjoy#graphic design is my passion#tutorial
137 notes
·
View notes