#edit tutorials
Explore tagged Tumblr posts
Visit Tumblr Blog
Explore Tumblr blogs with no restrictions, modern design and the best experience.
Last Seen Tumblr Blogs


Fun Fact
BuzzFeed published a report claiming that Tumblr was utilized as a distribution channel for Russian agents to influence American voting habits during the 2016 presidential election in Feb 2018.
Text
a list of resources i used for making my helena wayne edit set, feel free to reach out if you need any in-depth explanation for any of this!!
the first edit:
word search maker
robin:


+ logo from google images
huntress:
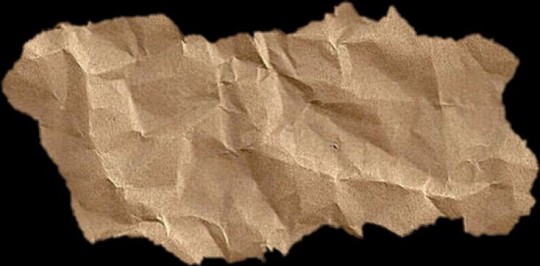
folded paper effect photoshop tutorial
+ logo from google images
batwoman:
liquid text effect photoshop tutorial
+ various texture overlays from pinterest
+ i looked up "batwoman tv show font" and use gotham womans
batman:
i made a simple newspaper effect with the help of some white boxes and texts, honestly. inspired from whatever i found from searching "batman gotham newspaper articles" + i pasted the daily planet logo on it because in earth 2 society, helena wayne's batman was reported by the daily planet
famine:
+ some various textures
+ used the stranger things font
helena wayne attorney at law
i took inspiration from how to get away with murder for this one!! it was a lil reference!! and also
2 notes
·
View notes
Text
Needle Felt Siffrin Build Log: (oct 6 - nov 20, 2024)


Credits goes wholely to @insertdisc5 for creating ISAT and siffrin's design! I am just here to attempt to make cool fanart (and get more people to play isat.. my devious plans are going great so far :3) As always, this isn't a tutorial- it is just a log about how i go about approaching a sculpture and I hope this collection of resources can help others make their own sifs!!
PSA: this has some spoilers for endgame CGs/sprites on my references image board ( also might see it in the backgrounds of my process pics). And bc this is needle felting, you will see some sharp needles! beware!
my inspiration was the intro cutscene where Sif eats the star, so my main goal was to adhere to the style of ISAT as closely as possible while transfering it to 3D space. And I knew i also wanted to try making the cloak for stopmotion purposes, so my process was tailored towards having control over the fabric with wire inlaid within the cloak (more on that later).
I ended up not sticking eyebrows on top of siffrin's bangs lol but anyways, first order of business is Gather Reference! v important. pureref is free and an awesome program. I also do some sketches to visualize the pose and important details i wanted to include in the sculpt.
behold the isat wiki gallery page! tawnysoup wrote an awesome ISAT style guide that absolutely rings true in 3d space too!! adrienne made a sif hair guide here!! (sorry i couldnt find the original link, but it's on the wiki). It says ref komaeda hair so that's what i looked at, along with other adjacent hairstyles! I also like doing drawovers on in progress photos to previs shapes n stuff to get a better idea of the end result.
Also if you're like me and struggle with translating stuff into 3D space, take a look at how people make 3d models and figurines! sketchfab is also a great resource! I looked at the link botw model by Christoph Schoch here for hair ref. (I used Maya, but there's a blender version too ! you can pose characters too if your model has been rigged!)


Face:
Started off blocking out the main shapes of eyelids and iris, and then filling in the colour details in the iris and the star highlights before moving onto adding thin black outlines and eyelashes. I didn't take many in-progress photos cause i kept ripping stuff out to redo them many many times, sorry!! This eye took about 3 hrs bc i just wasn't happy with it!! Sometimes it do be the vibe to give up, go to bed and see how it looks in the morning (more often than naught, it looks fine and it was the "dont trust yourself after 9pm" speaking)

The Mouth:
Couldn't decide if i even wanted to add a mouth as per usual with all my humanoid sculptures.. but i did some drawover tests first to see what expression i liked and to try to visualize it from multiple angles. (I was also testing the placement of stars on the hat brim here)

And then I redid the mouth like 3 times cause the angle just wasn't right (this went on for about the course of a week yay!)
Hair: woe baldfrin be upon ye


I made the hair strands individually first, and then since Sif has some of the hair at the back dyed black, i covered some of the tips with black wool (manually) (I think it would go much faster if i just took a marker to it, but hahaha i love pain and detailing!! )
And then the rest of it was positioning strands with sewing pins layer by layer, always looking at it from different multiple angles- sometimes tailoring the angle or swoop of individual hair flippies. At one point I thought the back looked too cluttered, but the hat covers a lot of it anyways!! yay for hiding mistakes! (imo this is a similar process to how cosplayers style wigs, but on a smaller scale and the same level of time consuming)
As always, look to your reference for guides, and I always do a whole bunch of drawovers over in progress photos to ascertain what was working and what wasn't.
Hat:
A trick to get a super pointy tip, make another tip seperately while keeping the connection point unfelted, and then combine the two to make super pointy hat!! (this also helps if you made the hat too short and need it to be taller. ask me how i know)

The embroidery on the hat brim was done in a hoop and then invisible stitched to the felted top portion. Technically you don't need a hoop but it helps keep the fabric tension, so you avoid puckers in your embroidery. You can also use iron-on stabilizer if your fabric is loose weave or particularly thin. this is the tutorial i used for the stars embroidery! particularly the fly stitch one, french knots, and the criss-cross stitches. highly recommend needlenthread for embroidery stitches and techniques! i learned all my embroidery from this single site alone.

For fabric, I think I used a polycotton i had in my stash,, unsure of the actual fiber content bc i bought it a long time ago. I used DMC Satin floss which was nice and subtle shiny but frayed a lot so it was kind of a pain to stitch with... but keep a short thread length and perservere through it!! After the embroidery was done, I folded up the raw edges and invisible sewed it to the top portion of the hat.
General shape:
Ok general structure of the body is this: wire armature body covered with black wool -> cloak lining & wire cage -> edge of lining is invisibly sewn to the main cloak at the hem -> head

Don't be afraid to mess around with the pattern, it's essentially a pizza with a slice taken out of it to form a steep cone shape!! Use draft paper before cutting into felt to save material! (i think i made like 3 cloaks before i was happy with the shape lol).
You can also hide the seam of the cloak and collars by gently messing up the fibers of the felt with your fingers or a felting needle btw! you can also sandpaper the seams according to Sarah Spaceman in this vid (highly recommend them for their in depth cosplay/crafting builds holy smokes), though since sif cloak is at such a smol scale, I just blended the seam with my felting needle.
For the lining wire cage section, I sewed in wire around the cloak, so the main rotation point is at the top neck area under the collar. These paddles are used to keep whatever pose I need the cloak to be in for stopmotion purposes. Then after the wire is done, I invisibly sewed the lining to the cloak at the hem (same technique as the hat brim to the lining there).
In hindsight, I should've used a thinner fabric for the lining, but i only had sheer white in my stash so had to go with double felt, thus resulting in a really bulky lining but oh well!

Heels:
started with the general boot shape, then tacking on the diamond shape heel stack and also diamond shape sole bc we're committed to the bit here. I skewer the boot onto the armature which also conveniently hides the connection point into the base to keep the whole thing upright and also I can rotate the boot to tweak the angle if needed.

Pins:
I kinda just trial and error'd jewellery wire with pliers into the pin shapes. They're itty bitty!! had a whole bunch of fails before i got two nice ones. A hot tip is to use needle nose pliers and wrap the wire around the tip to get a smooth circle shape!

Base:
I smoothed out the edge of a circular wood base with a dremel, and then used wood stainer to get the black colour. It ended up kinda looking like I took a sharpie to it, but whatever.... now i have a whole ass can of black wood stainer........ I then made a rough mountain of black wool and stuck the feet armature in. And now he's standing!!

Normally at this point when I'm done felting everything, to get a smooth finish, I'd take a small pair of scissors and carefully snip away any flyaway fibers, but this time, I just left them fluffy cause i think that's what sif would do :3c
Photoshoot:
Normally I do shoots using daylight but it was winter so the sun was nonexistent. So I broke out the home lighting setup aka dollarstore posterboard for a nice smooth background, and then hit it with the overhead Fill, side Fill 2, and Rim light, and use white paper/posterboard for bounce light if one side feels too dark. But if things are overexposed, you can move the light sources away until the harshness dims down. I'm using a Olympus mirrorless camera (handed down to me by my sibling so i dont remember the model exactly), which can connect to my phone as a remote so I can avoid shaking the camera when i take photos. Pretty nifty for stopmotion purposes! (yes my camera stand is a stack of notebooks, a tissuebox and some eva foam under the lens, don't judge me)


Stopmotion animation:
I'm still figuring stopmo out on my part, but my process was straight ahead animation ... move the cloak a cm, take a pic.... move another cm, click.... and repeat until i get a version I was happy with. My ref was the cloak animation from Gris (beautiful game btw). The 2d star animation was also done straight ahead using procreate, exported in png with a transparent background, and finally stitched together with the stopmotion footage in photoshop.

My turnarounds are also stopmotion! also secret hack, the turntable is a fidget spinner sticky tacked to a cake platter.
And i think that's all! i mainly wanted to share how I go about thinking about taking a 2d concept and moving it to 3D. I also didn't go in depth into how to actually do the needle felting bc I don't think I''d be very helpful I'm a very good teacher by telling yall to just keep stabbing until it looks right (i'm self taught for this hobby),,, if anyone wants it though, i can share a bunch of tutorials and other felters' process that helped me learn more needle felting!
Hopefully this was helpful to someone! Feel free to send asks if ya got any questions or if anything needs clarification! Or show me your works! I love seeing other people's crafts :3
here have a cookie for making it this far 🥐
#in stars and time#siffrin#isat#isat siffrin#isat fanart#needle felt#soft sculpture#know that i am devouring all the nice words yall leave in the tags/comments of my posts :holding back tears:#I hesitate to call this a tutorial bc this is just how i fumble my way through crafting anything lmao#the only reason I know how long I worked on a project are timestamps on wip photos and however long the day's video essay or letsplay is#sorry time is immaterial when i get into crafting mode#reason why this log is so late is bc after i finish a project i'm perpetually hit with the ray of 'i dont ever want to look at this again'#hence why photos never get edited#AND THIS POST SAT IN MY DRAFTS FOR 2 MONTHS DUE TO BLOODBORNE BRAINROT SORRY#done is better than perfect!!!#sorry i dont control the braincell#sorry for using a million exclaimation points! i am not good at this.. conveying my anxiety in written form!!! my toxic trait
1K notes
·
View notes
Text


i got it!
(og panels below!!)
HAPPY BIRTHDAY SIFFRIN!!! <- i say, scheduling this to post at midnight september 2nd. it’s his birthday somewhere!! and also loops birthday but look i had a deadline here. don’t ask why This of all things is their birthday art. i make normal choices!!!
also. somehow this entire thing only took 4 and a half hours??? insanity. i literally started this Today. thats how it Gets Me i suppose. anyways!!!! here’s the og panels!! no colored version this time, i didn’t think it’d fit the scene. also i didn’t want to render 3 colored panels.


#marshdoodles#isat#in stars and time#isat spoilers#shoutout to the 2 people on discord who immediately wished to be the tutorial sadness when i posted this#honestly . i get it.#we were out all day today and i STILL managed to get this done somehow#i dont think i can call myself a slow artist anymore#part of me wanted to make a happy birthday edit of this in the same vein as the merry christmas edit but#it is. 10pm. and i am sleepy#no cake for him
2K notes
·
View notes
Text
How It's Done (Full Video) - KPop Demon Hunters
#IT'S THE FULL SONG GUYS#OMIGOD THIS IS MY BIGGEST FIND#me looking through the netflix family magazine: huh a charm tutorial??#*opens it* OMIGOD IT IS A FULL SONG#THEY SING WHILE THEY FIGHT OMIGOD#we got a full song before the movie is even released this is amazing hahaha#how it's done#kpop demon hunters#kpop demon hunters song#kpop demon hunters video#huntrix#rumi#mira#zoey#videos in the palace#how its done#how its done song#Youtube#edit: netflix privated the youtube video we found it too fast LOL#ironic bc they technically were the ones to give us the link via the magazine
462 notes
·
View notes
Text
🌴 ─ 𝗧𝗨𝗧𝗢𝗥𝗜𝗔𝗟 𝗗𝗘 EDIT 👅$
#art#artists on tumblr#ig random#messy icons#pinterest#tropical#tropical ig#tumblr#edit fakeland#my edit#my art#tutorial#instragram#kpop gg#kpop#kpop idols#visual arts#digital art#fakeland
536 notes
·
View notes
Text


God, I'm jumping in the deep end It's more fun to swim in Heard the risk is drownin', but I'm gonna take it I'm gonna take it 💕
#bucktommy#bucktommyedit#bucktommy gif#vicki's gifs#911edit#adventures in gifmaking#baby's first lyric gifset! lol#dailykinley#loafrunners#911 spoilers#my gifs#911 abc#buck x tommy#bucktommy kiss#evan buckley#tommy kinard#tevan#*gifs#the 20 tommy fans#lyric edit#lyric gifset#lyric gif#911 7x04#911 8x11#911 8x06#911 8x15#gracie abrams lyrics#huge shoutout to abi (tommykinard) and her gif tutorials <3#the coloring is not exactly matching but this is the best I can do rn lol im new to this haha
473 notes
·
View notes
Text


Backing up some stuff from my ipad and I stumbled on the pieces of this Ylfa video I never finished, and... tbh I should, I still like this!! (2023)
#artists on tumblr#dimension 20#d20 neverafter#ylfa snorgelsson#TWO ART POSTS IN THE SAME NIGHT??? UNREAL#(working on smth silly and procreate dreams apparently eats gigabytes of memory for fuel)#(I remember being frustrated trying to edit the video but the actual art is still cool.... maybe we'll like.#look up a tutorial and finish it out!!!)#pic#fanart#babiest girl
564 notes
·
View notes
Text

brain rotting about how fucked it is to be a darkner again lately. how do you care about being abandoned by your gods if they never seemed to care that much about you in the first place
#my art#deltarune#rouxls kaard#utdr#this isn’t really what i had in mind when i tried first making this and im still really unsatisfied with how it looks but i need to just#stop and decide when something’s finished haha. i really wish it looked better but im not sure how to begin fixing it so it is what it is#also sorry that im trying to make genuine things with the blue thing. i know its stupid to try making something serious with him 😅#ah edit to the tags also to clarify this is in part based off of a hc i have that rouxls was the tutorial guy before the puzzles were.#rather useless job when there isn’t anyone who needs that guide
918 notes
·
View notes
Text

"On first meeting, Michaela presents as a devilish charmer: quick-witted, fast talking, always with a joke. But beneath that exterior is a perceptive, kind, loyal soul. She'll very rarely let you in that deep though, because Michaela knows she doesn't fit into what's expected of young ladies and is afraid of being scrutinized too closely. Crack her exterior even deeper and you'll find a well-concealed sadness about the fact that she hasn't been able to find the right romantic partner with whom to share her loyalty and love." – Michaela's character description // insp. x x x x
MASALI BADUZA as MICHAELA STIRLING BRIDGERTON (2020 - ) 3.08 | "Into the Light"

#tvedit#wlwedit#bridgertonedit#michaelastirlingedit#perioddramaedit#bridgertonblr#dailybridgerton#wlwsource#wlwgif#dailytvwomen#dailyflicks#filmtvcentral#cinematv#cinemapix#useroptional#filmtvtoday#userbbelcher#chewieblog#*m#*gifs#*500#bridgerton#michaela stirling#this doesn't look at all like I planned and even if I went in a different direction I'll put the insp set it needs more appreciation <3#those 30 seconds really got me by the throat asjkdgh can't wait to know more about her <33#edit: added another link it was in my drafts so idk how I forgot to put it here but anyways bless the talented ppl who makes tutorials <3
556 notes
·
View notes
Note
¿oodrías hacer un tutorial de cómo difuminar el marco de las fotos tipo así, por favor?

holii, ahí te grabe uno. no se si me explique bien, pero de esa manera es muy fácil para mi. solo le pones filtros a una foto de color, los que le puse son para difuminarlos (depende del gusto de cada uno de como ajustarlos) luego le pones la foto arriba y con la flechita de al lado del candado la superpones y ya esta.
(ignoren lo de capcut 💔💔)
si no quieres que la foto quede tan visible, por así decirlo, le bajas la opacidad (lo marcado en rojo)

espero que te sea de ayuda. cualquier duda que tengas, puedes escribirme por aquí o por mi ig 👊🏻!!
#fakeland#rp moodboard#tropical moodboard#kpop moodboard#tropical#kpop#moodboard#random moodboard#argentina#brasil#my edit#photo edit#editblr#edit#short bios#kpop bios#messy bios#messy icons#messy layouts#messy moodboard#instagram#tutorial
296 notes
·
View notes
Text
How do you clip GIFs onto masks?
[PT: How do you clip GIFs onto masks? /END PT]
Right click on your mask layer, click Select Pixels.
Click the Folder icon and then the Raster Mask icon on the bottom right. This should create a new folder.
Duplicate your gif into your project, either by clicking and dragging it into it or by right clicking and duplicating it into your project.
Simply put your gif into the folder that you made earlier and adjust it as needed. (make sure you have the WHOLE GIF FOLDER selected and have AUTO-SELECT OFF! otherwise it'll only edit one frame)
Export it as a gif and you're done.
You CAN do this with images that have faded borders, but it is important to note that gifs will make masks with any fading solid if you export it as a gif. Exporting it as a webp will keep the fading, though.
#𐐪 tutorials and help.#𐐪 from praysia.#𐐪 by praysia.#photopea#photopea tutorial#edit help#editing help#rentry resources#masks#rentry masks#how to#how-to#photopeablr#photopea resources#editblr
442 notes
·
View notes
Text
is this anything
#hi rtc fandom please accept me as one of your own#someone has probably done this before but oh well#i've been teaching myself how to use capcut by editing the rtc slime tutorial#and come to the conclusion that i will never use capcut again#ride the cyclone#rtc#ocean o'connell rosenberg#noel gruber#bagel thoughts
1K notes
·
View notes
Note
https://www.tumblr.com/pupsec/777071487795478528/messing-around-with-layouts-and-shit?source=share HOW DID U DO THE COLORINGGGGGG I LOVE ITTT CAN U SHARE PLEASE AND TYY
[EDIT 235 GODDAMN NOTES WHAT THE SHIT.]
hi! i am happy you liked it 💗💗😭😭
unfortunately it's something i cannot share because, well, it's something i worked a lot for.
it's not that i dont encourage inspo/asking for help, it's just that with experience you find a style that's unique to you and expresses you!
however, here are some really good overlays i reccomend using for a similar style!
remember to grayscale all of them before you apply a blending mode! that's what i mostly do, no pressure.


example:

if you want a tutorial for how to use blending modes and stuff, and how to mess around with filters, do let me know!
#♡̵ ⠀⠀・ ⠀⠀pupsec ⠀⠀ᜑ⠀⠀💗꣒#♡̵ ⠀⠀・ ⠀⠀edits ⠀⠀ᜑ⠀⠀💗꣒#♡̵ ⠀⠀・ ⠀⠀requests ⠀⠀ᜑ⠀⠀💗꣒#♡̵ ⠀⠀・ ⠀⠀resources ⠀⠀ᜑ⠀⠀꣒#rentry#rentryblr#rentry resources#rentry stuff#rentry icons#rentry overlays#rentry overlay#overlay#overlays#editblr#editblr resources#editblr help#editblr stuff#editblr tutorial#tutorial#rentry tutorial#editing tutorial#hyacine#hsr#hsr hyacine
287 notes
·
View notes
Text


radskier + same shot (s3)
#radskier#thewitcheredit#the witcher#witcheredit#fantasyedit#my edit#ughmerlin#jemmablossom#userhann#userava#arthurpendragonns#userbecca#ivashkovadrian#adaptationsdaily#thewitchersdaily#witcherdaily#witchersdaily#usergay#thewitcherdaily#jaskierxradovid#(hope it's ok to tag!)#radovid#special thank you to becca for her coloring tutorials bc i made this set before (unpublished) and my attempt was......... bad
298 notes
·
View notes
Text


jagged, crystalized and pixelated tumblr banner masks!
for the 2 anons that asked!
okay to repost, just dont claim as yours. and free to use (its what they were made for, duh!)
keep in mind gifs dont mesh well with translucent colors if youd like to use these with them :0
#🌫️ i know what you dread | creations#anonymous#carrd resources#rentry resources#rentry#web graphics#rentry tutorial#rentry inspo#rentry gif#rentry decor#rentry graphics#rentry template#image masks#edit resources#editing resources
1K notes
·
View notes
Note
literally how are you doing the gradient text thing. i need to know.
✨ Snappy's Gradient Text Tutorial
You might have seen me use gradient text in a few of my artworks, and it is a great tool to make a posts tand out! I learned from this post, but find some of the information outdated, so I am making a tutorial of my own!
To my knowledge, this is only possible via desktop mode* (mobile method at end), but not the app, as access to the HTML function is necessary. Alongside that, you need access to a text color fader! There's a few options out there, but I use:
Patorjik's Text Color Fader
Let's get to the tutorial!
Have the text you want to turn into a gradient ready and copy it to your clipboard.

2. Open the text color fader and paste your text into the box labeled "your message".
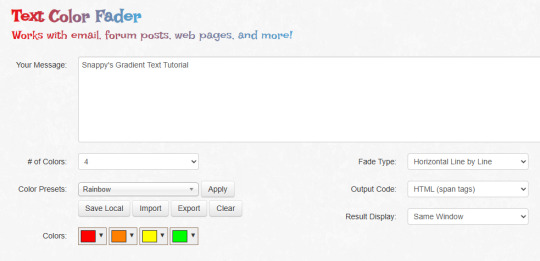
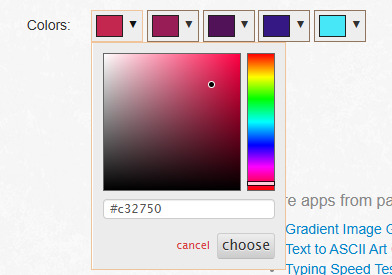
3. For the most basic gradients, you may ignore the boxes on the right. The leftmost boxes allow you to choose between preset colors or making your own colors.
Tip: if you are making a gradient for something such as art, I reccoment grabbing a few hex codes from the image to use for your gradient. This allows you to have control over your colors. You may also save a pallet if you want to use it again


4. When you are happy with your colors, generate your text.

5. You will be brought to this page. If you are happy with the colors, click "select all" and copy the HTML to your clipboard.
TIP: check your text against both a dark and light background to ensure it will be readable to viewers on dark and light mode. If it is not you can tweak the colors by choosing "create new fade".

6. Open Tumblr again and open your post. At the top right there is a grear icon. Click the icon and scroll down to the text editor. Change the setting from "rich text" to "HTML"


7. When you move to HTML, your post will look very different! In the HTML, your goal is to find the text you want to replace in the code.
TIP: If you can't find it, use "Ctrl + F" to open the keword search function and it will highlight your word.
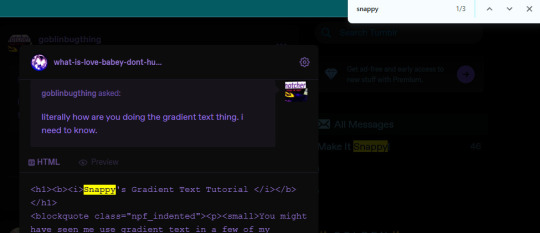
8. Highlight your plain text, right click it, and paste your HTML from Patorjik into the space.
TIP: The HTML is a confusing mess to look at. Click the "preview" tab to check if your code worked


9. You should see a gradient when you swicth modes!

If the HTML broke your formatting, you can edit it in the preview mode. Once you have done a gradient a couple of times this process is very easy and takes LESS than two minutes. It looks intimidating but after you get the hang it is very achievable! I believe in you guys being able to do it. Happy gradient texting for you guys!
*EDIT: It is possible via mobile through the method of entering your account on a web browser and putting it on computer mode, then following the same process. Reportedly it is less comfortable but it works, thank you to chocokeyboard for letting me know!
#sent to snappy#asks#snappy speaks#web resources#tumblr resources#gradient text#tumblr tutorial#gradient text tutorial#loveee doing this for my posts it adds so much#if anyone DOES know if it can be done on mobile let me know! I will edit this post to include it#EDIT: mobile method found! to my knowledge not app compatable but if anyone knows how to do it via app let me know and I will include it!
213 notes
·
View notes