#file recovery software
Explore tagged Tumblr posts
Visit Tumblr Blog
Explore Tumblr blogs with no restrictions, modern design and the best experience.
Last Seen Tumblr Blogs


Fun Fact
130K people were victims of a chain letter scam that affected Tumblr in May 2011.
Text
lesson learned: own a fucking pen drive
#nothing better than a good old pendrive i dont trust those recovery softwares...#i need my corrupted files back please baby give me that virussy- *gets shot*
4 notes
·
View notes
Text
will i ever learn how to save properly or will i just keep reaping the consequences of my idiocy over and over
#⎯ ପ(๑•ᴗ•๑)ଓ ♡ talks#photoshop PLEASSEEEEEE#develop file recovery software#im begging on my hands and knees it would change the lives of so many dumbasses (me)
1 note
·
View note
Text
youtube
#Data Recovery#Lost Files#Data Rescue#Hard Drive Recovery#ssd File Recovery#Digital Recovery#free data recovery#Data Recovery Software#Data Loss#Recover Lost Data#Storage Recovery#memory card recover#Youtube
0 notes
Text
Dealing with Seagate NAS Data Loss: How to Address Common Complaints

In today's interconnected world, data is at the heart of nearly every operation, whether it's personal, professional, or academic. As a result, any loss of data can be not just inconvenient but also potentially disastrous. Seagate NAS (Network Attached Storage) devices are popular choices for storing and accessing data, but like any technology, they're not immune to issues. Data loss complaints related to Seagate NAS devices can be frustrating, but with the right approach, many of these issues can be resolved. Let's delve into some common complaints and explore how to address them effectively.
Complaint: Accidental Deletion of Data
One of the most common complaints regarding data loss involves accidental deletion. It's all too easy to mistakenly delete files or folders, especially in a shared environment. However, there are steps you can take to mitigate the impact of accidental deletions:
Backup Regularly: Implement a regular backup schedule using Seagate's built-in backup features or third-party solutions. Regular backups ensure that even if data is accidentally deleted, you can restore it quickly from a backup.
Enable Recycle Bins: Many NAS devices, including those from Seagate, offer a recycle bin feature that temporarily stores deleted files, giving you the opportunity to restore them if needed.
Complaint: Hardware Failure Leading to Data Loss
Hardware failures, such as disk corruption or mechanical issues, can result in data loss on Seagate NAS devices. When faced with this complaint, consider the following steps:
Stop Using the Device: Continuing to use a device experiencing hardware failure can exacerbate the issue and make nas drive data recovery more challenging. Immediately power down the device to prevent further damage.
Assess the Damage: Determine the extent of the hardware failure. If the issue is with the hard drive itself, it may be necessary to replace the drive or seek professional assistance for data recovery.
Complaint: Software Corruption or Firmware Issues
Software glitches, firmware bugs, or improper shutdowns can lead to corruption of the file system or data stored on the NAS device. Here's how to address these complaints:
Update Firmware: Regularly check for firmware updates for your Seagate NAS device and apply them as soon as they become available. Firmware updates often include bug fixes and improvements that can help prevent data loss due to software issues.
Perform Regular Maintenance: Schedule regular maintenance tasks, such as disk checks and file system scans, to detect and repair any potential issues before they lead to data loss.
Complaint: Virus or Malware Attacks
Seagate NAS devices connected to a network are vulnerable to virus or malware attacks, which can corrupt files or delete data stored on the device. To address this complaint:
Implement Security Measures: Take proactive measures to secure your Seagate NAS device and network against malware and cyber threats. This may include installing antivirus nas recovery software, enabling firewalls, and implementing strong access controls.
Regularly Scan for Threats: Perform regular virus and malware scans on your NAS device to detect and remove any malicious software that may pose a threat to your data.
Conclusion
While data loss complaints related to Seagate NAS devices can be distressing, they're not necessarily insurmountable. By taking proactive measures to prevent data loss or to seagate data recovery, such as implementing regular backups, keeping firmware up to date, and implementing robust security measures, you can minimize the risk of experiencing data loss in the first place. Additionally, in the event of data loss, knowing how to respond effectively, such as stopping device use immediately and seeking professional assistance if necessary, can greatly increase the likelihood of successful data recovery.
Remember, prevention is often the best defense against data loss. By taking steps to safeguard your data and address any complaints or issues promptly, you can enjoy peace of mind knowing that your valuable data is safe and secure on your Seagate NAS device.
#seagate nas data recovery#seagate data recovery#nas data recovery software#nas file recovery#nas data recovery
0 notes
Text
Someone accessed my Gmail 2 days ago, compromising my linked accounts like Twitter and YouTube. Here's how it happened, why I fell for it, and what you can learn to avoid making the same mistake:

The scam I fell victim to was a cookie hijack. The hacker used malicious software to steal my browser cookies (stuff like autofill, auto sign in, etc), allowing them to sign in to my Gmail and other accounts, completely bypassing my 2FA and other security protocols.
A few days ago, I received a DM from @Rachael_Borrows, who claimed to be a manager at @Duolingo. The account seemed legitimate. It was verified, created in 2019, and had over 1k followers, consistent with other managers I’d seen at the time n I even did a Google search of this person and didnt find anything suspicious.


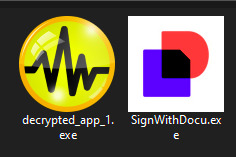
She claimed that @Duolingo wanted me to create a promo video, which got me excited and managed to get my guard down. After discussing I was asked to sign a contract and at app(.)fastsigndocu(.)com. If you see this link, ITS A SCAM! Do NOT download ANY files from this site.
Unfortunately, I downloaded a file from the website, and it downloaded without triggering any firewall or antivirus warnings. Thinking it was just a PDF, I opened it. The moment I did, my console and Google Chrome flashed. That’s when I knew I was in trouble. I immediately did an antivirus scan and these were some of the programs it found that were added to my PC without me knowing:
The thing about cookie hijacking is that it completely bypasses 2FA which should have been my strongest line of defense. I was immediately signed out of all my accounts and within a minute, they changed everything: passwords, 2FA, phone, recovery emails, backup codes, etc.
I tried all methods but hit dead ends trying to recover them. Thankfully, my Discord wasn’t connected, so I alerted everyone I knew there. I also had an alternate account, @JLCmapping, managed by a friend, which I used to immediately inform @/TeamYouTube about the situation

Meanwhile, the hackers turned my YouTube channel into a crypto channel and used my Twitter account to spam hundreds of messages, trying to use my image and reputation to scam more victims

Thankfully, YouTube responded quickly and terminated the channel. Within 48 hours, they locked the hacker out of my Gmail and restored my access. They also helped me recover my channel, which has been renamed to JoetasticOfficial since Joetastic_ was no longer available.

Since then, I’ve taken several steps to secure my accounts and prevent this from happening again. This has been a wake-up call to me, and now I am more cautious around people online. I hope sharing it helps others avoid falling victim to similar attacks. (End)
(side note) Around this time, people also started to impersonate me on TikTok and YouTube. With my accounts terminated, anyone searching for "Joetastic" would only find the imposter's profiles. I’m unsure whether they are connected or if it’s just an unfortunate coincidence, but it made the situation even more stressful.


3K notes
·
View notes
Text
hell yeah i actually managed to rescue the 500gb microsd
#using *legally aqcuired* disk recovery software#it's the microsd i use for my hacked switch#there's probably a bunch of stray corrupted files but at least it boots into atmosphere
1 note
·
View note
Text
BDRSuite v7.0.0 GA Released New Features
BDRSuite v7.0.0 GA Released New Features #VembuBDRSuitev7.0.0GARelease #BackupandRecoverySoftware #KVMBackup #AzureBackup #AWSBackup #PostgreSQLBackup #FileShareBackup #TwoFactorAuthentication #ImportBackupData #PrePostBackupScripts #FileLevelRecovery
Vembu Technologies has recently unveiled the latest BDRSuite v7.0.0 GA, introducing many new features. This release has many new features and enhancements for comprehensive backup and recovery capabilities. Let’s look at BDRSuite v7.0.0 GA and the new features it contains. Table of contentsWhat is BDRSuite?Free version for home lab environmentsOverview of the new featuresKVM Backup and…

View On WordPress
#aws backup#azure backup#Backup and Recovery Software#File Level Recovery#File Share Backup#Import Backup Data#KVM Backup#PostgreSQL Backup#PrePost Backup Scripts#two-factor authentication#Vembu BDR Suite v7.0.0 GA Release
0 notes
Text
Repair Your PC and Access Your Data with Active@ Data Studio
Active@ Data Studio provides you with a useful set of tools for accessing your data and repairing your PC in the event that Windows fails to start up and you cannot find any other way to access your data.
#disk utilities#disk manager#partition manager#partition recovery#bootable usb#burn cd#burn dvd#burn iso#cd burner#dvd burner#iso burner#clone disk#file recovery#data recovery#undelete#password recovery#backup#backup software#backup and restore#data backup#winpe#disk burner#burn disk#boot disk#erase disk#erase hard drive#wipe disk#disk image#create partition#unformat
0 notes
Text
For those who are not aware: Bitlocker is encryption software, it encrypts your computer and makes it impossible to access the information on the computer unless you have the key.
It should be standard practice for IT companies to document the bitlocker keys as they are configuring bitlocker on a computer; generally you would do this by creating a record in your client management software for that specific device and putting the key in the record. Sometimes software can be used to extract that information in the event that it's necessary, but even if there's theoretically a way to extract the key, it should be documented somewhere *other* than on the encrypted computer.
This is something that a lot of IT people fuck up on kind of a lot (we've definitely had problems with missing bitlocker keys and I'm quite happy that the people who didn't document those keys aren't my coworkers anymore).
So what do you do if you want to use encryption software and you're NOT an IT company using a remote management tool that might be able to snag the keys?
When you are setting up encryption, put the encryption key in your password manager. Put it in your password manager. Document the important information that you cannot lose in your password manager. Your password manager is a good place to keep important things like your device encryption key, which you do not want lost or stolen. (If you run your password manager locally on an encrypted computer, export the data every once in a while, save it as an encrypted file, and put the file on your backup drive; you are going to have a bad time if your computer that hosts the only copies of your passwords shits the bed so *make a backup*)
This is my tip for home users for any kind of important recovery codes or software product keys: Print out the key and put it in your underwear drawer. Keep it there with your backup drive. That way you've got your important (small) computer shit in one place that is NOT your computer and is not likely to get shifted around and lost (the way that papers in desks often get shifted around and lost).
2K notes
·
View notes
Text
Installing Linux (Mint) as a Non-Techy Person
I've wanted Linux for various reasons since college. I tried it once when I no longer had to worry about having specific programs for school, but it did not go well. It was a dedicated PC that was, I believe, poorly made. Anyway.
In the process of deGoogling and deWindows365'ing, I started to think about Linux again. Here is my experience.
Pre-Work: Take Stock
List out the programs you use regularly and those you need. Look up whether or not they work on Linux. For those that don't, look up alternatives.
If the alternative works on Windows/Mac, try it out first.
Make sure you have your files backed up somewhere.
Also, pick up a 5GB minimum USB drive.
Oh and make a system restore point (look it up in your Start menu) and back-up your files.
Step One: Choose a Distro
Dear god do Linux people like to talk about distros. Basically, from what all I've read, if you don't want to fuss a lot with your OS, you've got two options: Ubuntu and Linux Mint. Ubuntu is better known and run by a company called Canonical. Linux Mint is run by a small team and paid for via donations.
I chose Linux Mint. Some of the stuff I read about Ubuntu reminded me too much of my reasons for wanting to leave Windows, basically. Did I second-guess this a half-dozen times? Yes, yes I did.
The rest of this is true for Linux Mint Cinnamon only.
Step Two: Make your Flash Drive
Linux Mint has great instructions. For the most part they work.
Start here:
The trickiest part of creating the flash drive is verifying and authenticating it.
On the same page that you download the Linux .iso file there are two links. Right click+save as both of those files to your computer. I saved them and the .iso file all to my Downloads folder.
Then, once you get to the 'Verify your ISO image' page in their guide and you're on Windows like me, skip down to this link about verifying on Windows.
Once it is verified, you can go back to the Linux Mint guide. They'll direct you to download Etchr and use that to create your flash drive.
If this step is too tricky, then please reconsider Linux. Subsequent steps are both easier and trickier.
Step Three: Restart from your Flash Drive
This is the step where I nearly gave up. The guide is still great, except it doesn't mention certain security features that make installing Linux Mint impossible without extra steps.
(1) Look up your Bitlocker recovery key and have it handy.
I don't know if you'll need it like I did (I did not turn off Bitlocker at first), but better to be safe.
(2) Turn off Bitlocker.
(3) Restart. When on the title screen, press your Bios key. There might be more than one. On a Lenovo, pressing F1 several times gets you to the relevant menu. This is not the menu you'll need to install, though. Turn off "Secure Boot."
(4) Restart. This time press F12 (on a Lenovo). The HDD option, iirc, is your USB. Look it up on your phone to be sure.
Now you can return to the Linux Mint instructions.
Figuring this out via trial-and-error was not fun.
Step Four: Install Mint
Just follow the prompts. I chose to do the dual boot.
You will have to click through some scary messages about irrevocable changes. This is your last chance to change your mind.
I chose the dual boot because I may not have anticipated everything I'll need from Windows. My goal is to work primarily in Linux. Then, in a few months, if it is working, I'll look up the steps for making my machine Linux only.
Some Notes on Linux Mint
Some of the minor things I looked up ahead of time and other miscellany:
(1) HP Printers supposedly play nice with Linux. I have not tested this yet.
(2) Linux Mint can easily access your Windows files. I've read that this does not go both ways. I've not tested it yet.
(3) You can move the taskbar (panel in LM) to the left side of your screen.
(4) You are going to have to download your key programs again.
(5) The LM software manager has most programs, but not all. Some you'll have to download from websites. Follow instructions. If a file leads to a scary wall of strange text, close it and just do the Terminal instructions instead.
(6) The software manager also has fonts. I was able to get Fanwood (my favorite serif) and JetBrains (my favorite mono) easily.
In the end, be prepared for something to go wrong. Just trust that you are not the first person to ever experience the issue and look it up. If that doesn't help, you can always ask. The forums and reddit community both look active.
171 notes
·
View notes
Text
Complete Guide to Recovering Data from SD Cards
SD cards are widely used in devices like cameras, smartphones, and tablets to store photos, videos, and other data. However, data loss from SD cards is a common issue caused by accidental deletion, formatting, corruption, or physical damage. Fortunately, in many cases, the lost data can be recovered with the right tools and techniques. This comprehensive guide will walk you through the steps to successfully recover data from SD cards.
1. Understand the Causes of Data Loss
Identifying the cause of data loss is the first step in the recovery process. Common causes include:
Accidental Deletion: Files deleted manually by mistake.
Formatting: Unintentional formatting of the SD card or device.
File System Corruption: Errors caused by improper ejection or malware.
Physical Damage: Damage from water, heat, or bending of the SD card.
Bad Sectors: Portions of the SD card’s memory that become unreadable over time.
Knowing the root cause can help determine the best approach to recovery.
2. Stop Using the SD Card Immediately
When data loss occurs, stop using the SD card immediately to avoid overwriting the lost files. New data written to the card can overwrite the space previously occupied by deleted files, making recovery much harder or even impossible.
Key Tips:
Avoid saving new files to the card.
Do not attempt to reformat the card.
Eject the card safely and store it in a secure location.
3. Check for Backups
Before starting the recovery process, check if the lost files were backed up.
Cloud Storage: Services like Google Photos, iCloud, or Dropbox may have automatically backed up your data.
Device Backups: Some smartphones or cameras offer built-in backup options.
Local Backups: If you regularly back up your SD card to a computer or external drive, your files might still be accessible.
4. Use Built-In Repair Tools
Both Windows and macOS include utilities to repair minor issues with SD cards. These tools can fix file system errors and make your data accessible again.
For Windows Users:
Connect the SD card to your computer using a card reader.
Open File Explorer, right-click the SD card, and select Properties.
Navigate to the Tools tab and click Check under the Error-checking section.
Follow the prompts to scan and repair the card.
For macOS Users:
Open Disk Utility from the Applications folder.
Select the SD card in the left-hand menu.
Click First Aid and follow the prompts to repair the card.
If the issue persists, move on to recovery software.
5. Recover Data Using SD Card Recovery Software
Specialized recovery software can scan SD cards for recoverable files, even if they’ve been deleted or the card has been formatted.
Popular SD Card Recovery Tools:
EaseUS Data Recovery Wizard: User-friendly with deep scan options for photos, videos, and other files.
Disk Drill: Comprehensive tool for Windows and macOS that supports a wide range of file formats.
Recuva: Free recovery tool for Windows users, ideal for basic recovery tasks.
Stellar Data Recovery: Known for its ability to recover data from corrupted or formatted SD cards.
PhotoRec: Open-source software focused on recovering photos and videos.
Steps to Use Recovery Software:
Connect the SD card to your computer using a card reader.
Install and open the recovery software.
Select the SD card as the target drive for scanning.
Run a deep scan to locate recoverable files.
Preview the recovered files and save them to a different storage location.
6. Create a Disk Image Before Recovery
If the SD card is severely corrupted or physically compromised, creating a disk image is essential. A disk image is a complete copy of the card’s data, preserving its current state.
How to Create a Disk Image:
Use tools like dd (Linux), Clonezilla, or Macrium Reflect.
Save the disk image to a reliable storage device.
Perform recovery attempts on the disk image rather than the original SD card to prevent further damage.
7. Address Physical Damage
Recovering data from a physically damaged SD card requires special care.
What to Do:
Avoid DIY Repairs: Opening or tampering with the SD card can worsen the damage.
Seek Professional Help: Professional data recovery services, such as DriveSavers or Ontrack, have the expertise and tools to recover data from physically damaged SD cards.
Tip: If the card was exposed to water, place it in a sealed bag of rice or silica gel packets to absorb moisture before seeking help.
8. Recover Data from Formatted SD Cards
Accidental formatting doesn’t always erase data entirely. Recovery software can often retrieve files from formatted SD cards.
Steps to Recover Formatted SD Cards:
Use advanced recovery software like Stellar Data Recovery or Disk Drill.
Select the “Formatted Recovery” or similar option in the software.
Scan the SD card for recoverable files.
Save the recovered files to a separate device.
9. Backup Recovered Data Immediately
Once you’ve successfully recovered your data, back it up to multiple locations to ensure it’s safe from future losses.
Backup Strategies:
Use external drives or NAS (Network Attached Storage) for local backups.
Enable cloud backup services like Google Drive or OneDrive.
Regularly update backups to include new data.
10. Prevent Future Data Loss
Taking preventive measures can reduce the risk of losing data from SD cards in the future.
Tips to Protect SD Cards:
Eject Properly: Always eject SD cards safely to avoid corruption.
Store in a Secure Place: Protect SD cards from water, heat, and physical damage.
Monitor Health: Use tools like H2testw to test SD card integrity and detect bad sectors.
Use High-Quality Cards: Invest in SD cards from reputable brands like SanDisk, Samsung, or Kingston.
Recovering data from SD cards is often possible with the right tools and techniques. Start by diagnosing the issue, use built-in repair tools, and turn to recovery software if needed. For severe damage or corruption, professional recovery services can help. Once your data is recovered, focus on implementing a robust backup strategy and handling your SD cards with care. By following these steps, you can minimize the risk of future data loss and safeguard your valuable information.
#data recovery Calgary#Apple data recovery#hard drive recovery#SSD recovery Calgary#deleted file recovery#Data Recovery#Data Recovery Services#Data Recovery Software#Data Recovery Perth#Data Recovery Company
0 notes
Text
One of the things enterprise storage and destruction company Iron Mountain does is handle the archiving of the media industry's vaults. What it has been seeing lately should be a wake-up call: Roughly one-fifth of the hard disk drives dating to the 1990s it was sent are entirely unreadable.
Music industry publication Mix spoke with the people in charge of backing up the entertainment industry. The resulting tale is part explainer on how music is so complicated to archive now, part warning about everyone's data stored on spinning disks.
"In our line of work, if we discover an inherent problem with a format, it makes sense to let everybody know," Robert Koszela, global director for studio growth and strategic initiatives at Iron Mountain, told Mix. "It may sound like a sales pitch, but it's not; it's a call for action."
Hard drives gained popularity over spooled magnetic tape as digital audio workstations, mixing and editing software, and the perceived downsides of tape, including deterioration from substrate separation and fire. But hard drives present their own archival problems. Standard hard drives were also not designed for long-term archival use. You can almost never decouple the magnetic disks from the reading hardware inside, so if either fails, the whole drive dies.
There are also general computer storage issues, including the separation of samples and finished tracks, or proprietary file formats requiring archival versions of software. Still, Iron Mountain tells Mix that “if the disk platters spin and aren’t damaged," it can access the content.
But "if it spins" is becoming a big question mark. Musicians and studios now digging into their archives to remaster tracks often find that drives, even when stored at industry-standard temperature and humidity, have failed in some way, with no partial recovery option available.
“It’s so sad to see a project come into the studio, a hard drive in a brand-new case with the wrapper and the tags from wherever they bought it still in there,” Koszela says. “Next to it is a case with the safety drive in it. Everything’s in order. And both of them are bricks.”
Entropy Wins
Mix's passing along of Iron Mountain's warning hit Hacker News earlier this week, which spurred other tales of faith in the wrong formats. The gist of it: You cannot trust any medium, so you copy important things over and over, into fresh storage. "Optical media rots, magnetic media rots and loses magnetic charge, bearings seize, flash storage loses charge, etc.," writes user abracadaniel. "Entropy wins, sometimes much faster than you’d expect."
There is discussion of how SSDs are not archival at all; how floppy disk quality varied greatly between the 1980s, 1990s, and 2000s; how Linear Tape-Open, a format specifically designed for long-term tape storage, loses compatibility over successive generations; how the binder sleeves we put our CD-Rs and DVD-Rs in have allowed them to bend too much and stop being readable.
Knowing that hard drives will eventually fail is nothing new. Ars wrote about the five stages of hard drive death, including denial, back in 2005. Last year, backup company Backblaze shared failure data on specific drives, showing that drives that fail tend to fail within three years, that no drive was totally exempt, and that time does, generally, wear down all drives. Google's server drive data showed in 2007 that HDD failure was mostly unpredictable, and that temperatures were not really the deciding factor.
So Iron Mountain's admonition to music companies is yet another warning about something we've already heard. But it's always good to get some new data about just how fragile a good archive really is.
75 notes
·
View notes
Text
Free software recommendations for various things:
LibreOffice - A full home office suite comparable to Microsoft Office. Easy to use and you can choose the UI layout from several types; it can handle docx and other Microsoft Office document formats; it still does not include AI unless you specifically add that extension on purpose, so unlike other office suites it's not shoving AI down your throat.
Calibre - Ebook manager bundled with an ebook editor and ereader software. It can follow news feeds, downloading them into epub format. Convert ebooks from one format into (many) others. Run a server to make access your books from different computers/phones/tablets easier. And so much more... without even touching on the additional functionality that plugins can add. With plugins it can be used for DRM stripping (which can still remove DRM from even Kindle ebooks, if you have a kindle that you can download the ebook to and use to transfer to your computer). It can also handle downloading fanfics and their metadata using the FanFicFare plugin. (Which I've written tutorials about.) There are officially supported plugins (like FanFicFare) that are easy to install and unofficial plugins (like the DRM stripper) that take more work, so it's extremely customizable.
Syncthing - Want to host your own local file backup system? Have an old laptop that you can reformat with a linux distro? And maybe a spare hard drive? Perfect, you have what you need to set up a home file backup system. Reformat the computer with the new operating system, install syncthing on that computer and on the computer you want to back up files for and the two installations of the software can sync over your home network. Put it on your phone and back up your photos. The software is open source, encrypted, and you can turn it off so that your computer (or phone) is only running it on a trusted network. You control where the synced data lives, which computers on your network those synced folders are shared with (allowing for sharing between multiple computers) and even what type of file backups happen if data is, say, accidentally deleted. (File recovery!!!)
Plex or Emby - Both are free to install on any computer, point at any movie/tv show/audiobook/music files you've got sitting around, and bam you've got a home media streaming server. Both have paid tiers for more features (including tv tuner integration to act as a DVR), but what they can do for free is already impressive and well handled. Both have easy to use UI and it largely comes down to personal preference as to one is better than the other.
Notepad++ - A notepad type program that can also serve as a decent lightweight code editor. I use it for noodling around with code scripts and snippets, writing lists, and various other small tasks. It's not something I'd use for my professional code writing but it's great for just messing around with something on my own time.
14 notes
·
View notes
Text
How to Recover Data from Corrupted/Failed BitLocker Drive

Introduction: Encountering a corrupted or failed BitLocker drive can be a daunting experience, potentially leading to the loss of valuable data. However, with the right approach and tools, it's possible to recover your files and regain access to your encrypted data. In this guide, we'll explore the steps to recover data from a corrupted or failed BitLocker drive and delve into how BitLocker data recovery tools can help restore your data effectively.
Understanding BitLocker Drive Encryption:
BitLocker is a built-in feature in Windows operating systems that provides encryption for your files and drives. It secures data by requiring a password or encryption key to access it, protecting against unauthorized access and data breaches. However, in the event of drive corruption or failure, recovering data from a BitLocker-encrypted drive becomes necessary.
Steps to Recover Data from Corrupted/Failed BitLocker Drive:
Assess the Extent of Corruption: The first step to recover bitlocker data from a corrupted or failed BitLocker drive is to assess the extent of the damage. Connect the corrupted drive to a computer running a Windows operating system and check if it's recognized by the system. Use Disk Management or DiskPart to identify the status of the drive, whether it's healthy, damaged, or showing as RAW.
Utilize BitLocker Recovery Options: If the BitLocker drive is partially accessible or recognized by the system but inaccessible due to corruption, attempt to decrypt it using the BitLocker recovery key or password. You can find the BitLocker recovery key in your Microsoft account, on a USB drive, or in a printed copy if you've saved it during the encryption process. Use the BitLocker Recovery Console or Recovery Wizard to access recovery options.
Use BitLocker Data Recovery Software: If traditional recovery methods fail to restore your data, consider using BitLocker data recovery software. These specialized tools are designed to recover data from corrupted or failed BitLocker drives effectively. Choose a reputable BitLocker data recovery tool that supports BitLocker drive recovery and follow the software's instructions to initiate the recovery process.
Scan and Recover Data: Once you've selected a BitLocker recovery tool, scan the corrupted drive thoroughly to identify and recover any accessible data. The software will analyze the drive's file system and attempt to recover lost or inaccessible files. Follow the software's prompts to select the files you want to recover and specify a destination for the recovered data.
Seek Professional Assistance: If all else fails and your data is critically important, consider seeking assistance from professional data recovery software services. These experts have advanced tools and techniques to recover data from severely corrupted or damaged drives. Contact reputable data recovery specialists to assess the situation and explore recovery options.
Conclusion:
Recovering data from a corrupted or failed BitLocker drive requires a systematic approach and the right tools. By assessing the extent of corruption, utilizing BitLocker recovery options, and using specialized BitLocker data recovery software, you can increase your chances of successfully recovering your valuable files. Remember to keep backups of your important data to avoid data loss in the future. With patience and persistence, you can overcome BitLocker drive failures and restore your encrypted data effectively.
#bitlocker data recovery software#bitlocker data recovery tool#bitlocker file recovery software#recover bitlocker data#retrive bitlocker data#restore bitlocker key
0 notes
Text
Begin Recording.
[A camera is hastily set up, facing a set of dual monitors. One of the monitors is running a simulated desktop. The other has a file explorer open containing the GORGON zip file. A cat-girl appears awkwardly in frame] Okay is that angle good? Yeah, I think so- alright- so I got this rattly recording set up on, because you recommended that I record it. I can't find a good enough recording software, so I got this... thing going on.
[Her cursor drags the .zip file from one file explorer to another. It appears on the simulated desktop.] Alright, so I know that Styx said to have a Metafold, but unfortunately I couldn't figure that out in time, curiosity got to me.
[Rose double clicks the file to open it. Her unzipping program nags her to actually purchase. She closes it, scrolling through the loose files scattered inside the folder. They are too small to actually read.] Looks like a lot of these are printer files. I could use these, let me know if you want me to print any of these. Snicker-snack sounds like a funny thing to print. Lots of random text files, too.
[Double clicking another file, she opens a text file, which opens into ASCII art of the Horus Collective's main symbol. Another file contains more text that is too blurry to pick up.] What is that, a poem? Okay...
[She pauses for a moment, staring at one file, highlighted.]
This one's an executable. 'basilisk.exe,' they wouldn't put an infohazard in a computer, right? I'm gonna do it.
[ERROR. FILE CORRUPTED. AUDIO RECOVERY... DONE.] Shit- SHIT SHIT SHIT SHIT.
[Thud.]
[END RECORDING.]
10 notes
·
View notes
Text
Top 10 Open Source NAS software in 2023
Top 10 Open Source NAS software in 2023 #homelab #selfhosted #opensourceNASsolutions #freeNASsoftware #networkattachedstorage #NASserverhardware #datastoragesolutions #selfhostedNASbenefits #personalcloudserver #filesharingprotocols
There are many freely available open-source NAS solutions you can download for free. An open-source NAS server offers an excellent way to manage and protect your data. Let’s dive deeper into the top free NAS software solutions available in 2023. Network attached storage nas for home Table of contentsIntroduction to Open Source NAS SolutionsTrueNAS Scale and TrueNAS Core: Great Open Source…

View On WordPress
#data backup and recovery#data integrity and security#data storage solutions#file sharing protocols#free NAS software#NAS server hardware#network attached storage#open source NAS solutions#personal cloud server#self-hosted NAS benefits
0 notes