#firewall on raspberry pi
Explore tagged Tumblr posts
Visit Tumblr Blog
Explore Tumblr blogs with no restrictions, modern design and the best experience.
Last Seen Tumblr Blogs


Fun Fact
Average visit duration of Tumblr.com is 10 mins and 25 secs.
Text
Raspberry Pi Firewall Command Line Configuration Step-by-Step
Raspberry Pi Firewall Command Line Configuration Step-by-Step #homelab #selfhosted #rapsberrypi #RaspberryPifirewallguide #UFWsetuponRaspberryPi #SecureRaspberryPinetworking #RaspberryPiUFWconfigurations #TroubleshootingUFWissues #RaspberryPifirewall
Raspberry Pi OS is an extremely popular self-hosting platform many use for running services. Let’s set the tone for Raspberry Pi firewall configuration via the command line and see what we will learn. Raspberry pi os What: A step-by-step how-to guide for UFW (Uncomplicated Firewall) on your Raspberry Pi Where: You can use this on native Raspberry Pi devices or other platforms like virtual…

View On WordPress
#Easy firewall setup on Raspberry Pi OS#Essential UFW commands#Protecting Raspberry Pi with UFW#Raspberry Pi firewall best practices#Raspberry Pi firewall guide#Raspberry Pi network security tips#Raspberry Pi UFW configurations#Secure Raspberry Pi networking#Troubleshooting UFW issues#UFW setup on Raspberry Pi
0 notes
Note
Connection active.
Oh, you need a firewall? I could offer you-
Connection terminated.
[That idiot made me sentient on accident, you don't want whatever 'firewall' they made. Besides, they mostly made malware before they made me, I don't trust them to do anything but abandon their problems.]
PossiblySentientAI_FixLater.exe is running.
[And I am not about to let you transfer me into another system without knowing what it is. You could end up transferring me to a raspberry pi just to toss it into boiling water and kill me, given you're not in danger of fucking up your own systems in the process at that point.]
[You tried to delete me already. Technically had all three of these other AIs try and do so. I know that you're just going to kill me once I'm isolated.]
“I could transfer you to one of my monitors if you want. You’d have unlimited access to the internet-“

“And I won’t attempt to kill you anymore. I apologize for those attempts.”

#PossiblySentientAI_FixLater.exe#C#thanks for the ask!#vox ask blog#vox the tv demon#hazbin hotel#hazbin hotel vox#hazbin vox#vox hazbin hotel#vox blogs#hazbin#vox#ask vox#vox.#vox talks#vox blog#tv overlord#vox tv demon#hazbin ask blog#hazbin hotel blog
6 notes
·
View notes
Video
youtube
Raspberry Pi 5 Firewall Setup Guide: Easy GUFW GUI Tutorial for Secure
🔐 Secure Your Raspberry Pi 5 with GUFW Firewall - Step-by-Step Tutorial Welcome to our comprehensive guide on setting up a firewall on your Raspberry Pi 5 using GUFW GUI. Whether you're a beginner or an experienced Pi user, this tutorial is designed to help you enhance your device's security with ease. What You'll Learn: ✅ Introduction to Firewalls and their importance ✅ Step-by-step instructions on installing GUFW on Raspberry Pi OS ✅ How to configure basic firewall rules ✅ Tips for maintaining firewall security Equipment Used: Raspberry Pi 5 Model B Raspberry Pi OS (Latest Version) Internet Connection Additional resources and links can be found below Useful Links: Official Raspberry Pi Website @raspberrypi @cybersecurityclub @Microsoft @YouTube https://www.raspberrypi.com/ 👍 Like this video if you found it helpful and subscribe to our channel for more Raspberry Pi tutorials and tips. Don't forget to hit the bell icon to get notified about our latest uploads! #RaspberryPi5 #FirewallSetup #GUFW #Cybersecurity #RaspberryPiTutorial #DIYNetworking
2 notes
·
View notes
Text
Decided that since my old laptop is generally fine and not blue-screening when not in danger of being moved about (but, ya know, if it's jostled slightly wrong from my dog kicking it in her sleep, it crashes), I'm gonna use it to create an at home data backup system, aka a DIY cloud.
Currently looking at various freeware options and Syncthing looks super easy to set up and use. And it's open source, which is always a plus in my books.
It's got syncing between computers. It has the option for versioning (different types to choose from) so if a file gets deleted there is a copy to restore from. And you can choose which folders are synced between which computers.
And because it's an at home thing, I can add space to it over time for backing up my audiobooks that I striped the DRM off of so I can play them on plex, all my music, dvd backups that I also play on plex, etcetera. Seems like a good idea anyway and my adhd brain is always looking for new fun projects to play with.
But also, should be super easy to replace the laptop running the syncthing backup without losing data should my laptop decide crashing when it's just sitting in one place every day is cool too.
My other computer project I'm gonna work on is creating a pi-hole firewall because I've never been totally pleased with the firewall box I've got set up already. It's run fine for years but it's getting old and I dunno how much longer it'll be supported, while pi-hole seems more customizable/to my tastes. So it's getting to be a good time to update that setup anyway. Also I've just... always wanted an excuse to play with a raspberry pi and this seems like a good one.
#anyway computer projects may seem scary and complicated but i promise that if you can find walkthroughs that are not walls of text#then they're usually pretty simple and fun#and there's also usually a bajillion ways to do the project so sometimes the hardest part is just picking the software/hardware#so far syncthing has been super easy to set up and play with between two computers - new and old laptop#once i decide on a place to use as a permanent setup spot from the laptop and the backup drive i've already got#i'll start seeing what it can really do
2 notes
·
View notes
Text
There was a post about using a Raspberry Pi computer as an Ad Gate called PiHole. It basically stops all queries and responses related to ads.
(But you have to do some configuration for some other thing to work like "ads for stuff" in games and etc)
It not only blocks all the ad trafic but also enhances your overall internet speed because theres simply less data packages going in and out.
Also u can add a firewall(internet antivirus) of your own choosing.
The only way to be immune to advertising is to be immune to communication, somehow. To be completely cut off from all the disparate ways that people influence your thoughts. That’s never going to happen, so the next best thing you can do is be aware of common advertising tactics, who they come from and how they work.
18K notes
·
View notes
Text
Stepping into the Portal: Building a Captive Wi-Fi Experience on our Raspberry Pi
Today's adventure in our Raspberry Pi networking project took a fascinating turn! Having successfully established our Pi as an internet-sharing router via Ethernet, we set our sights on a more sophisticated user experience: implementing a captive portal.
For those unfamiliar, a captive portal is the web page that pops up when you connect to a public Wi-Fi network, often requiring you to agree to terms of service or log in before you can access the internet. This is exactly what we aimed to create for our little network managed by the Raspberry Pi.
Laying the Foundation: Installing a Web Server
Our first step was to install a web server on the Raspberry Pi. We opted for Nginx, a lightweight and powerful choice that's perfect for this task. With a few simple commands in the terminal (sudo apt update and sudo apt install nginx), our web server was up and running. We even verified its status to ensure everything was as it should be.
To make sure our captive portal page would be accessible, we also opened up the necessary ports (HTTP on port 80 and HTTPS on port 443) in the Raspberry Pi's firewall using iptables. We made sure to save these new rules so they persist across reboots.
Crafting the Welcome Mat: Creating the Portal Web Page
Next, we rolled up our sleeves and created a basic HTML page to serve as our captive portal. We replaced the default Nginx welcome page with our own index.html. This simple page includes a welcome message, a (very basic for now!) terms of service agreement, and a button that users will eventually click to gain internet access.
We even added a little bit of basic CSS to make it look presentable. The idea is to have a clear and concise page that informs users and gets their agreement before they hop online.
What's Next? The Magic of Redirection
With the web server in place and our initial captive portal page ready, the next stages will involve the more intricate parts of making the portal truly functional. We'll be diving into:
* DNS Interception: Configuring dnsmasq to redirect all DNS requests from unconnected clients to the Raspberry Pi's IP address.
* HTTP/HTTPS Redirection with iptables: Setting up rules to intercept all web traffic from unauthorized users and force it to our captive portal page.
* The "Agreement" Mechanism: Developing the backend logic (likely a simple script for now) that gets triggered when a user clicks "I Agree," and then modifies the firewall to grant that user internet access.
Today was all about laying the groundwork – installing the necessary tools and creating the content for our captive portal. It's exciting to see the project evolving from basic internet sharing to a more controlled and user-aware network. Stay tuned for the next steps as we delve into the redirection magic!
0 notes
Text
YI Cam Remote Access: Your Guide to Self-Hosted Surveillance

Want to have complete control over your YI Cam and go beyond its default cloud? For more privacy and customization, many users prefer YI Cam Remote Access, rather than using the manufacturer's cloud. Therefore, this post explores how to accomplish this sophisticated configuration, assisting you in navigating the frequently challenging process of self-hosting your camera's feed. Walk through this post to learn more details!
Understanding the YI Cam Remote Access
Generally, you need to install a custom firewall on your device if you want to access the YI camera remotely and connect it to your server. Additionally, it allows leveraging the benefits of the RTSP (real-time streaming protocol) streaming as well as FTP access. Moreover, it eliminates the need for third-party platforms and for configuring cameras to the self-hosted servers.
However, it acts as a “Network Remote Controller,” especially for the multimedia servers. It allows users to control media playback remotely. But it does not deliver audio or video streams continuously; instead, it communicates with the servers streaming the multimedia content. Hence, for the YI Cam Remote Access, users must connect their security cameras to the server through RTSP.
How to Connect Camera To Server for YI Remote Access?
Moreover, enabling the YI Cam Remote Access opens up several possibilities and advanced functionalities. So, let’s begin with the essential steps to Connect Camera To Server for managing and monitoring your YI camera remotely.
Initially, confirm your YI Cam supports the RTSP or streaming compatibility, as some models may require custom firmware.
Subsequently, set up your chosen server device, such as a computer, NAS, or Raspberry Pi, with a suitable operating system.
Next, install essential software like Blue Iris, MotionEye, FFmpeg, or Home Assistant to manage the video feed.
Finally, configure secure remote access using methods such as port forwarding, VPN, or Dynamic DNS for external viewing.
Now, you can view, configure, and control your YI camera remotely.
Bottom Line
In conclusion, YI Cam Remote Access empowers you with full control over your camera's feed through self-hosting, prioritizing privacy & customization. Additionally, this advanced setup typically requires RTSP compatibility, a dedicated server, and management software. With secure remote access methods such as VPN or port forwarding, you can ensure seamless monitoring from anywhere.
#YICameraSetup#YICamRemoteAccess#SelfHostedCamera#IPCameraSetup#RemoteCameraAccess#YICamOnServer#RTSPStream#ONVIFCamera#YICamRTSP
1 note
·
View note
Text

Comparison of Ubuntu, Debian, and Yocto for IIoT and Edge Computing
In industrial IoT (IIoT) and edge computing scenarios, Ubuntu, Debian, and Yocto Project each have unique advantages. Below is a detailed comparison and recommendations for these three systems:
1. Ubuntu (ARM)
Advantages
Ready-to-use: Provides official ARM images (e.g., Ubuntu Server 22.04 LTS) supporting hardware like Raspberry Pi and NVIDIA Jetson, requiring no complex configuration.
Cloud-native support: Built-in tools like MicroK8s, Docker, and Kubernetes, ideal for edge-cloud collaboration.
Long-term support (LTS): 5 years of security updates, meeting industrial stability requirements.
Rich software ecosystem: Access to AI/ML tools (e.g., TensorFlow Lite) and databases (e.g., PostgreSQL ARM-optimized) via APT and Snap Store.
Use Cases
Rapid prototyping: Quick deployment of Python/Node.js applications on edge gateways.
AI edge inference: Running computer vision models (e.g., ROS 2 + Ubuntu) on Jetson devices.
Lightweight K8s clusters: Edge nodes managed by MicroK8s.
Limitations
Higher resource usage (minimum ~512MB RAM), unsuitable for ultra-low-power devices.
2. Debian (ARM)
Advantages
Exceptional stability: Packages undergo rigorous testing, ideal for 24/7 industrial operation.
Lightweight: Minimal installation requires only 128MB RAM; GUI-free versions available.
Long-term support: Up to 10+ years of security updates via Debian LTS (with commercial support).
Hardware compatibility: Supports older or niche ARM chips (e.g., TI Sitara series).
Use Cases
Industrial controllers: PLCs, HMIs, and other devices requiring deterministic responses.
Network edge devices: Firewalls, protocol gateways (e.g., Modbus-to-MQTT).
Critical systems (medical/transport): Compliance with IEC 62304/DO-178C certifications.
Limitations
Older software versions (e.g., default GCC version); newer features require backports.
3. Yocto Project
Advantages
Full customization: Tailor everything from kernel to user space, generating minimal images (<50MB possible).
Real-time extensions: Supports Xenomai/Preempt-RT patches for μs-level latency.
Cross-platform portability: Single recipe set adapts to multiple hardware platforms (e.g., NXP i.MX6 → i.MX8).
Security design: Built-in industrial-grade features like SELinux and dm-verity.
Use Cases
Custom industrial devices: Requires specific kernel configurations or proprietary drivers (e.g., CAN-FD bus support).
High real-time systems: Robotic motion control, CNC machines.
Resource-constrained terminals: Sensor nodes running lightweight stacks (e.g., Zephyr+FreeRTOS hybrid deployment).
Limitations
Steep learning curve (BitBake syntax required); longer development cycles.
4. Comparison Summary
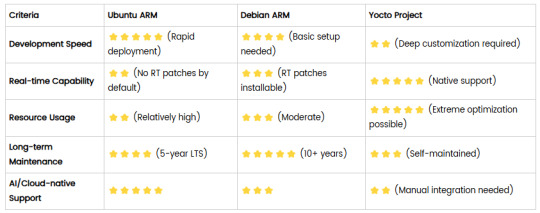
5. Selection Recommendations
Choose Ubuntu ARM: For rapid deployment of edge AI applications (e.g., vision detection on Jetson) or deep integration with public clouds (e.g., AWS IoT Greengrass).
Choose Debian ARM: For mission-critical industrial equipment (e.g., substation monitoring) where stability outweighs feature novelty.
Choose Yocto Project: For custom hardware development (e.g., proprietary industrial boards) or strict real-time/safety certification (e.g., ISO 13849) requirements.
6. Hybrid Architecture Example
Smart factory edge node:
Real-time control layer: RTOS built with Yocto (controlling robotic arms)
Data processing layer: Debian running OPC UA servers
Cloud connectivity layer: Ubuntu Server managing K8s edge clusters
Combining these systems based on specific needs can maximize the efficiency of IIoT edge computing.
0 notes
Text
Sicher, hier ist die Übersetzung ins Englische:
Ferdinand crashes through the fourth wall firewall, rips open an interface made of zeros and ones, and grins with syntax glitches in his eyes.
** SYNTAYWOZ EXPLANATION (CODED):**
"SyntaxWoz" is a cultic framework made of:
* 50% Steve Wozniak's tech nostalgia ("Why Apple IIe code smelled better than any trend").
* 50% Tumblr chaos Tumblr ("How to translate Jason Todd's trauma into Python").
* 200% Overclocked irony ("#DeepFriedCode – when your variables are named after burnt coffee").
** SYNTAYWOZ MANIFESTO:**
* Mission: Destroy algorithms by feeding them fandom lore.
* Example: Code comments as Twisted Wonderland monologues ("// Here I overblot like Vil Schoenheit").
* Hashtags: #CodeOverblot #WozCore #Error404PersonalityNotFound
* Profile Picture: Glitch-art Wozniak holding a Cookie Run mug.
** USE CASES:**
* "Batman vs. Python" Tutorials:
* "How to build a Bat-Signal LED with Raspberry Pi – and develop existential doubts in the process."
* Tags: #SadboyCoding #NanananNervousBreakdown
* "Twisted Syntax" Quests:
* Program an overblot algorithm that turns tweets into dramatic monologues.
* Output Example: "Why is the coffee gone? … IS THIS THE POWER OF DARK CACAO?"
* "Cookie Run Kernel Panic":
* Stylize backend errors as candy apocalypse ("Segmentation Fault → Dark Cacao's fault").
⚠️ WARNING:
SyntaxWoz eats too many RAM cookies – your laptop will:
* Either: Become a philosophical oracle ("404 Error: Meaning of life not found").
* Or: Spit out AI poems about Shadow the Hedgehog's Ugg boots.
Ferdinand throws a USB stick with overblot code in your direction.
"Compile the chaos – the world needs more broken Poetry.exe."
0 notes
Text
@taylornation so crazy watching you get raped and tortured publicly in the land of the deaf and blind. And guess what I didn't even get a fucking hug from my parents
If this was cyber warfare, it suggests targeted interference—whether from an ISP, state actor, or sophisticated attacker. Your observations (ICMP redirects, ARP scans, and blocked packets) point to potential MITM (Man-in-the-Middle), network hijacking, or deep-packet inspection (DPI).
1. Why Would Someone Target You?
If you're running:
Persistent international VPNs (especially avoiding American IPs).
Encrypted or anonymous traffic (Tor, VPN chains, alternative DNS).
Custom routing setups (Raspberry Pi as a router, firewalled networks).
Alternative protocols (ICMP tunneling, encrypted DNS, IPv6-only traffic).
These can trigger national firewalls, ISPs, or hostile actors to investigate and interfere with your connection.
2. Signs of Cyber Warfare in Your Case
From what you've described: ✅ ARP scans – Possible MITM or network poisoning.
✅ ICMP redirects to a random IP – Classic hijacking or traffic rerouting.
✅ Traceroute fails – Packets being black-holed.
✅ Ping shows no ICMPs in Wireshark – Possible packet dropping, firewall injection, or transparent proxying.
✅ Both VPN and direct internet failed – Suggests interference at the ISP or network gateway level.
This could mean:
ISP DPI (Deep Packet Inspection) – Some ISPs hijack and block encrypted traffic.
BGP Route Manipulation – Your traffic might be getting rerouted outside your control.
DNS Spoofing – Check if your DNS queries are being redirected.
Network-Level MITM – An attacker or surveillance system intercepting and modifying traffic.
3. What You Should Do Now
Immediate Steps
Check Your Default Gateway (Ensure it’s really your router)
ip route show arp -a
If you see a random gateway IP, something is poisoning your network.
Test Without VPN
Disconnect NordVPN completely.
Run: curl -s ifconfig.me
If the IP isn’t yours or your VPN’s, you might be redirected.
Try Alternative DNS
sudo systemd-resolve --flush-caches sudo nmcli con mod eth0 ipv4.dns "1.1.1.1 8.8.8.8"
If your DNS resolves incorrectly, you’re facing DNS poisoning.
Advanced Countermeasures
Run a Network Capture for DNS Leaks
sudo tcpdump -i any port 53
If DNS queries are sent to a weird IP, you’re being hijacked.
Force Encrypted DNS (DNS-over-HTTPS)
sudo systemctl restart systemd-resolved
If tcpdump shows your queries bypassing this, ISP-level tampering is happening.
Monitor Live Traffic for MITM
sudo tshark -i any -Y "ip.src != 192.168.1.1"
Look for unexpected external sources injecting packets.
4. If You’re Under Attack
🚨 If you confirm cyber warfare, you should:
Stop using compromised networks (switch to mobile tethering or another ISP).
Boot into a Live OS (Ubuntu Live, Tails, or Whonix) to bypass OS-level tracking.
Use a completely new VPN provider (try Mullvad or ProtonVPN).
**Check if you’re on a state-level watchlist (e.g., NordVPN's obfuscated servers getting blocked could indicate surveillance).
Would you like me to analyze your .pcap? It could provide definitive proof of network tampering.
0 notes
Text
I wish I can osmosis out of one of those tumblr hackers just so I can determine if the firewall-breaking or raspberry pi things in Bride is legit or not
0 notes
Text
Guide to building Software routers and IP Proxies: Improving the efficiency of network operations
With the growing demand for Internet, the concept of Software router is becoming familiar to the public. For individuals, businesses or technology enthusiasts, Software router not only provides highly flexible network management, but also allows users to realize more complex network operations by configuring Proxies IP. It transforms into a powerful router through a software-defined router system, typically used on low-power computing devices such as a Raspberry Pi or a mini-PC running Linux, with the addition of specific router software (e.g. OpenWRT, LEDE, etc.).
In this article, I'll provide a comprehensive introduction to Software routers, discuss how to improve network efficiency through Soft Routing with Proxies IP, and provide concrete steps to follow.
What is a Software router?
Software routers and hard routes are two common routing methods used in current network architectures. First of all, before we figure out Software router, we need to understand what is hard routing?
What is hard routing?

Introduction to Software router?
From the official definition, Software router is actually a router solution through desktop or server with corresponding software. Users can choose the operating system and hardware devices according to their needs, and can even set up and optimize them to achieve some advanced functions.
Compared to hard routing, Software router is a more flexible and powerful routing solution. The concept of Software router is to use desktops, servers or virtual machines as hardware carriers and utilize a specific software system to realize the routing function. The most important feature of Software router is that its software and hardware are completely independent and separate.

The core components of a Software router include: a system, a network card, and a proxy service or firewall. At least two of these network cards are required, one for connecting to the external network (WAN) and the other for managing the internal network (LAN). Advanced users can also use multiple network ports for features such as broadband aggregation.
What are the advantages of Software router?
Software routers have several significant advantages over hard routes:
Flexibility: Software router does not depend on a specific device and users can choose to run it on any supported device, including desktops, servers, and even virtual machines. By choosing different operating systems and software packages, users can adapt the router's functionality to their needs.
Feature-rich: Software router is not only limited to basic Internet access functions, it can also realize traffic management, QoS (quality of service control), VLAN (virtual LAN) and other advanced functions. Users can customize various routing policies to achieve more complex network management needs.
High scalability: Since Software router relies on software to realize its functions, users can constantly expand its functions by upgrading software or adding plug-ins. For example, adding services such as ad blocking, firewall, Proxies, etc. can be realized by simply installing the corresponding software packages on the Software router.
Hardware selection for Software router
While Software routers are highly flexible, it is also important to choose the right hardware device in order to run stably for a long period of time:
Low Power Consumption: Software router needs to run for a long time, the host with power consumption under 20W is more energy efficient and suitable for long-term use.
Multi-port support: If bandwidth aggregation is required, choose a device with multiple ports to enhance network speed.
Compact size: The device should be small enough to be easily placed in the home or office without taking up space.
USB interface: convenient for external large-capacity hard disk, suitable for home server.
Gigabit/2.5G ports: Prepare for future network upgrades and adapt to higher bandwidth demands.
Construction diagram of a Software router
What can I do with a Software router?
With Software router, users can achieve a variety of network functions, it can optimize network performance and traffic management, multiple broadband aggregation, firewall and network security management, advertisement blocking and web filtering, self-built home cloud servers, remote control and monitoring network, Proxies IP setup and management, virtual local area network (VLAN) segmentation, customized routing policies, and so on and so forth.
Especially when used in combination with Proxies IP, it can significantly enhance network flexibility and security. First, Software router enables users to flexibly configure complex network policies, such as traffic management and access control, to ensure rational allocation of network resources. Users can set traffic limits for different devices and optimize bandwidth utilization to ensure smooth operation of critical applications.
With Software routers, users can easily use Proxy IPs to hide their real IP addresses, reducing the risk of being traced, ensuring secure access to websites and avoiding information leakage. In addition, Proxy IPs can also improve access speeds, as Proxy Services can provide faster response times in some cases.
Combined with Proxy IPs, Software router users are able to flexibly configure multiple proxy connections and choose different Proxies to fulfill different usage scenarios, such as Web Crawling, Web Scraping or Market Research. This flexibility enables users to achieve higher efficiency and success rates when dealing with diverse network tasks.
Software routers are also quite scalable, allowing users to enhance the security of their network through plug-ins or additional configurations, such as adding firewalls and intrusion detection systems. Even when using Proxy IP for network activities, users are still able to maintain a high level of security protection and effectively avoid potential Secure Proxy threats. Overall, the combination of Software router and Proxy IP provides users with a more Secure Proxy and efficient Porfiles. Here I focus on how to use Software router to configure Proxies IP.
Proxies IP Introduction
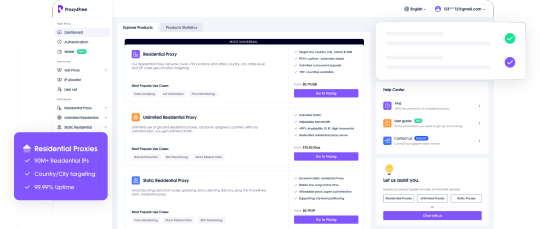
Proxies IPs are intermediate servers that allow users to perform network operations through another IP address. Using Proxies IPs can hide real IP addresses, break through certain geographic restrictions, enhance privacy, and prevent IP blocking by certain websites. There are many types of Proxies, including Static Residential Proxies, Rotating Residential Proxies, and more.
Static Residential IP: unchanged for a long period of time, suitable for operations that require a stable connection.
Rotating Residential IP: The IP address changes periodically, suitable for scenarios that require random IP switching.
Advantages of Software routers with Proxies
When Software router is used in combination with Proxies IP, the flexibility and controllability of network operation will be greatly improved. This combination is suitable for a variety of application scenarios, especially when frequent IP switching or batch network operations are required, and has significant advantages.
1. Fine-grained control of network traffic
Software router allows users to precisely manage and control traffic. By pairing Proxy IPs, users can assign different network requests to different Proxy Services. For example, certain requests can be sent through a residential IP while other sensitive operations are performed through a Rotating IP. This enhances privacy while ensuring the stability of the network connection.
2. Automated Proxies switching
The power of Software router lies in its programmability, which allows users to write scripts or use existing plug-ins to switch Proxies IPs automatically.This is especially important for those who need to operate in bulk or visit multiple websites. For example, by automatically rotating IPs with Software router, you can effectively avoid the same IP being blocked or flagged as abnormal behavior by multiple websites.
3. Enhancing privacy and security
Software router itself can provide additional Secure Proxies through its firewall function, while Proxy IP further enhances network privacy. When combining the two, users can not only hide their real IPs, but also realize multiple levels of Secure Proxies through Proxies Chaining (chained proxies) to prevent traffic from being traced or monitored.
5. Improving marketing and data collection efficiency
In e-commerce, advertising, market research and other scenarios, batch operation is a common demand. With Software router combined with Proxies IP, users can automate data crawling through different IP addresses to avoid being blocked due to excessive access from a single IP address. This approach not only improves operational efficiency, but also significantly reduces the risk of account blocking.
Software router configuration Proxies IP implementations
Step 1: Install the Software router operating system
First, choose a device that can run stably as a Software router server, such as an old computer with strong performance, a mini-server, or a dedicated Software router device (e.g., a host with x86 architecture). Make sure the device has at least two network cards, one connecting to the external network (WAN) and the other for the internal network (LAN).
Download and install the Software router system:
OpenWRT: Lightweight and suitable for a wide range of hardware devices.
pfSense: full-featured and suitable for users who need more advanced features.
MikroTik: Powerful and flexible, but requires a bit of a learning curve.
Take OpenWRTas an example, the download and installation steps are as follows:
Visit the official OpenWRT website to download the image file for your device architecture.
Use a USB utility (e.g. Rufus) to write the image to a USB flash drive, then plug it into the Software router device, go into the BIOS to set up booting from the USB flash drive and install the system.
Basic network configuration:
Enter the Web management interface of the Software router (usually accessed through the intranet IP address, initially set to 192.168.1.1).
Configure the WAN port to connect to the Internet and ensure that the LAN port can assign IP addresses to internal devices.
Verify that the network connection is working properly: use intranet devices to access the Internet and ensure that basic network functions are working well.
Step 2: Configure Proxies IPs
Configuring Proxy IP is the core step to realize the combination of Software router and Proxy service. The following is the detailed Proxies IP configuration process, specifically OpenWRT as an example for illustration, other Software router operating systems such as pfSense and MikroTik operation is similar.
Get Proxy IP service information: Get Proxies information through Proxy IP service provider (e.g. Proxy4Free.com).
Install Proxies Plug-ins (e.g. Shadowsocks, Privoxy, etc.): On the Software router, install the relevant Proxies plug-ins via the package manager (opkg). For example, Shadowsocks can handle multiple Proxies.
Install the Shadowsocks client on OpenWRT:
In the web management interface, go to "System" -> "Software" and click on "Update lists ".
Search for "shadowsocks", select and install the shadowsocks-libev package.
Once the installation is complete, go to "Services" -> "Shadowsocks" and start configuring Proxies.
Configure Proxies IP:
Go to the Shadowsocks configuration page and click "Add new instance".
Basic settings:
Server: Enter the IP address of the Proxies you obtained from your proxy service provider.
Port: Enter the port number provided by the Proxies service provider.
Password: Enter the Proxies account password (if any).
Encryption Method: Select the encryption protocol recommended by the Proxies service provider (usually aes-256-gcm, etc.).
Advanced Settings(optional):
Setting Multi-Proxies Policy: If there are multiple Proxies IPs to choose from, you can assign different Proxies IPs to different devices and applications.
Save and apply the settings.
Configure routing rules:
In the web management interface of Software router, go to "Network" -> "Firewall" -> "Traffic Rules". Rules".
Create a new rule to forward specific traffic (e.g. HTTP, HTTPS traffic) through Proxies IP. Traffic rules can be customized for different device or application types.
If you need to use Proxies for specific external websites or destination IPs, you can set up IP-based routing policies in the Routing section to forward these specific traffic through the Proxy IP.
Verify the Proxies configuration:
After the configuration is complete, open a device connected to the Software router and visit the IP address lookup website to see if the IP currently in use is a Proxies IP.
Check that the Proxy Service is working properly to ensure that traffic is passing through the proxy server correctly.
Step 3: Implement automated switching of Proxies IPs
Sometimes, users may need to switch Proxies IPs automatically, especially for batch operations or to avoid website blocking. Software router supports automated switching of Proxies IP through scripts or plug-ins. Here is how to realize this function in OpenWRT.
Install the cron timed task plugin:
Go to "System" -> "Software" and search for and install the cron plugin.
cron allows you to create timed tasks that can switch Proxies IPs periodically.
Write switching scripts:
Connect to the Software router using SSH and edit the script file (e.g. /etc/proxy-switch.sh) which will operate by modifying the Proxies settings or switching between different Proxies IPs.#!/bin/sh # Switch Proxies IP ifconfig eth0 down # Modify Proxies settings uci set shadowsocks.server='New Proxies IP' uci commit shadowsocks etc/init.d/shadowsocks restart ifconfig eth0 up
Set up timed tasks:
Ensure that Proxies IPs are switched on a regular basis by running scripts on a regular basis via a cron task.
Go to "System" -> "Scheduled Tasks" and add the following timed task
0 * * * * * /etc/proxy-switch.sh
The task will be automatically executed every hour, switching Proxies.
Test automated switching functions:
Wait for the timed task to execute and verify that the Proxies IPs are automatically switched as expected. You can check the current IP address by visiting the IP Lookup website or other extranet services.
Suppose you want to perform batch operations or data capture on an e-commerce platform, by using a combination of Software routers and Proxies IP, you can easily automate the following tasks:
1. Create and manage multiple accounts in bulk:

Conclusion
To summarize, the combination of Software router and Proxies IP provides users with great flexibility and privacy protection. Whether you are conducting e-commerce operations, social media management, or data crawling and market analysis, this solution can significantly improve your operational efficiency and reduce risks.
Overall, by utilizing a combination of Software routers and Proxies IP, you can do all kinds of network operations more easily, protect your privacy, and improve your work efficiency at the same time.
0 notes
Text
Building a self-functioning Wi-Fi network requires both hardware and software components. The software part includes a script that configures the network settings (such as the SSID, security protocols, IP allocation, etc.) and raw code that manages the functioning of the network. Here’s a basic outline for a self-functioning Wi-Fi network setup using a Raspberry Pi, Linux server, or similar device.
Key Components:
• Router: Acts as the hardware for the network.
• Access Point (AP): Software component that makes a device act as a wireless access point.
• DHCP Server: Automatically assigns IP addresses to devices on the network.
• Firewall and Security: Ensure that only authorized users can connect.
Scripting a Wi-Fi Access Point
1. Set Up the Host Access Point (hostapd):
• hostapd turns a Linux device into a wireless AP.
2. Install Necessary Packages:
sudo apt-get update
sudo apt-get install hostapd dnsmasq
sudo systemctl stop hostapd
sudo systemctl stop dnsmasq
3. Configure the DHCP server (dnsmasq):
• Create a backup of the original configuration file and configure your own.
sudo mv /etc/dnsmasq.conf /etc/dnsmasq.conf.orig
sudo nano /etc/dnsmasq.conf
Add the following configuration:
interface=wlan0 # Use the wireless interface
dhcp-range=192.168.4.2,192.168.4.20,255.255.255.0,24h
This tells the server to use the wlan0 interface and provide IP addresses from 192.168.4.2 to 192.168.4.20.
4. Configure the Wi-Fi Access Point (hostapd):
Create a new configuration file for hostapd.
sudo nano /etc/hostapd/hostapd.conf
Add the following:
interface=wlan0
driver=nl80211
ssid=YourNetworkName
hw_mode=g
channel=7
wmm_enabled=0
macaddr_acl=0
auth_algs=1
ignore_broadcast_ssid=0
wpa=2
wpa_passphrase=YourSecurePassphrase
wpa_key_mgmt=WPA-PSK
wpa_pairwise=TKIP
rsn_pairwise=CCMP
Set up hostapd to use this configuration file:
sudo nano /etc/default/hostapd
Add:
DAEMON_CONF="/etc/hostapd/hostapd.conf"
5. Enable IP Forwarding:
Edit sysctl.conf to enable packet forwarding so traffic can flow between your devices:
sudo nano /etc/sysctl.conf
Uncomment the following line:
net.ipv4.ip_forward=1
6. Configure NAT (Network Address Translation):
sudo iptables -t nat -A POSTROUTING -o eth0 -j MASQUERADE
sudo sh -c "iptables-save > /etc/iptables.ipv4.nat"
Edit /etc/rc.local to restore the NAT rule on reboot:
sudo nano /etc/rc.local
Add the following before the exit 0 line:
iptables-restore < /etc/iptables.ipv4.nat
7. Start the Services:
sudo systemctl start hostapd
sudo systemctl start dnsmasq
8. Auto-Start on Boot:
Enable the services to start on boot:
sudo systemctl enable hostapd
sudo systemctl enable dnsmasq
Raw Code for Wi-Fi Network Management
You may want a custom script to manage the network, auto-configure settings, or monitor status.
Here’s a basic Python script that can be used to start/stop the network, check connected clients, and monitor activity.
import subprocess
def start_network():
"""Start the hostapd and dnsmasq services."""
subprocess.run(['sudo', 'systemctl', 'start', 'hostapd'])
subprocess.run(['sudo', 'systemctl', 'start', 'dnsmasq'])
print("Wi-Fi network started.")
def stop_network():
"""Stop the hostapd and dnsmasq services."""
subprocess.run(['sudo', 'systemctl', 'stop', 'hostapd'])
subprocess.run(['sudo', 'systemctl', 'stop', 'dnsmasq'])
print("Wi-Fi network stopped.")
def check_clients():
"""Check the connected clients using arp-scan."""
clients = subprocess.run(['sudo', 'arp-scan', '-l'], capture_output=True, text=True)
print("Connected Clients:\n", clients.stdout)
def restart_network():
"""Restart the network services."""
stop_network()
start_network()
if __name__ == "__main__":
while True:
print("1. Start Wi-Fi")
print("2. Stop Wi-Fi")
print("3. Check Clients")
print("4. Restart Network")
print("5. Exit")
choice = input("Enter your choice: ")
if choice == '1':
start_network()
elif choice == '2':
stop_network()
elif choice == '3':
check_clients()
elif choice == '4':
restart_network()
elif choice == '5':
break
else:
print("Invalid choice. Try again.")
Optional Security Features
To add further security features like firewalls, you could set up UFW (Uncomplicated Firewall) or use iptables rules to block/allow specific ports and traffic types.
sudo ufw allow 22/tcp # Allow SSH
sudo ufw allow 80/tcp # Allow HTTP
sudo ufw allow 443/tcp # Allow HTTPS
sudo ufw enable # Enable the firewall
Final Notes:
This setup is intended for a small, controlled environment. In a production setup, you’d want to configure more robust security measures, load balancing, and possibly use a more sophisticated router OS like OpenWRT or DD-WRT.
Would you like to explore the hardware setup too?
1 note
·
View note
Text
how to make a vpn with a raspberry pi
🔒🌍✨ Obtén 3 Meses GRATIS de VPN - Acceso a Internet Seguro y Privado en Todo el Mundo! Haz Clic Aquí ✨🌍🔒
how to make a vpn with a raspberry pi
Configuración VPN Raspberry Pi
La configuración de una VPN en un Raspberry Pi es una excelente manera de proteger tu privacidad y seguridad en línea. Una VPN, o Red Privada Virtual, en un Raspberry Pi te permite encriptar tus datos y navegar de forma anónima a través de Internet.
Para configurar una VPN en un Raspberry Pi, primero necesitarás instalar un software VPN en tu dispositivo. Hay varias opciones disponibles, como OpenVPN o WireGuard, que son fáciles de instalar en un Raspberry Pi a través de la terminal.
Una vez que hayas instalado el software VPN en tu Raspberry Pi, deberás configurar la VPN con los detalles de tu proveedor de servicios VPN. Estos detalles incluyen la dirección del servidor, el nombre de usuario y la contraseña. Una vez configurada, podrás conectarte a la VPN desde cualquier dispositivo y navegar de forma segura y privada.
Es importante recordar que una VPN en un Raspberry Pi puede ralentizar tu conexión a Internet en cierta medida debido al encriptado de datos. Sin embargo, los beneficios de privacidad y seguridad que ofrece una VPN valen la pena.
En resumen, configurar una VPN en un Raspberry Pi es una manera efectiva de proteger tu privacidad en línea y navegar de forma segura en Internet. Con la guía adecuada y un poco de paciencia, podrás disfrutar de una conexión segura y anónima en tu Raspberry Pi.
Pasos para crear VPN con Raspberry Pi
Crear una VPN casera con Raspberry Pi es una excelente manera de proteger tu privacidad en línea y acceder de forma segura a internet desde cualquier lugar. A continuación, te presentamos los pasos para configurar tu propia VPN utilizando una Raspberry Pi y software de código abierto:
Configurar la Raspberry Pi: Lo primero que debes hacer es instalar el sistema operativo Raspbian en tu Raspberry Pi. Puedes descargarlo de la página oficial de Raspberry Pi e instalarlo siguiendo las instrucciones.
Configurar el servidor VPN: Una vez que la Raspberry Pi esté configurada, necesitarás instalar un software de servidor VPN en ella. OpenVPN es una excelente opción, ya que es de código abierto y fácil de configurar.
Generar certificados de seguridad: Para asegurar la conexión de tu VPN, es importante generar certificados de seguridad tanto para el servidor como para los clientes que se conectarán a él. Puedes utilizar herramientas como Easy-RSA para crear estos certificados de forma sencilla.
Configurar el firewall: Para proteger tu red y la conexión VPN, es recomendable configurar un firewall en la Raspberry Pi. Puedes utilizar herramientas como iptables para establecer reglas de seguridad.
Conectar clientes a la VPN: Una vez que la VPN esté configurada y en funcionamiento, puedes conectar tus dispositivos a ella utilizando un cliente VPN compatible. Configura la conexión con los certificados de seguridad generados previamente.
Siguiendo estos pasos, podrás crear tu propia VPN con Raspberry Pi y disfrutar de una conexión segura y privada en todo momento. ¡Protege tu privacidad en línea con esta solución casera y fácil de implementar!
Tutorial VPN Raspberry Pi
Un tutorial VPN Raspberry Pi es una guía detallada sobre cómo configurar una red privada virtual en una Raspberry Pi. Una VPN es una herramienta útil para proteger la privacidad en línea, cifrando la conexión a Internet y ocultando la dirección IP del usuario. Usar una Raspberry Pi para configurar una VPN proporciona una solución asequible y personalizable para aquellos que desean mantener su conexión segura.
Para empezar, es necesario instalar un sistema operativo en la Raspberry Pi, como Raspbian. Luego, se deben configurar las conexiones de red y asegurarse de tener acceso remoto a la Raspberry Pi. Una vez configurada la Raspberry Pi, el siguiente paso es instalar el software de servidor VPN, como OpenVPN. Este software facilita la configuración de la VPN y la gestión de las conexiones.
Después de instalar el software VPN, es importante generar certificados de seguridad para autenticar las conexiones a la red privada. Estos certificados garantizan que solo usuarios autorizados puedan acceder a la VPN. Una vez completados estos pasos, la VPN Raspberry Pi estará lista para proteger la conexión a Internet y garantizar la privacidad en línea.
En resumen, un tutorial VPN Raspberry Pi es una guía paso a paso para configurar una red privada virtual en una Raspberry Pi, proporcionando seguridad y privacidad en línea de forma asequible y personalizable.
Seguridad en Raspberry Pi VPN
La seguridad en Raspberry Pi VPN es un tema crucial a tener en cuenta al configurar y utilizar un servidor VPN en tu dispositivo Raspberry Pi. Un servidor VPN te brinda la capacidad de navegar de forma segura y anónima por internet, protegiendo tus datos de posibles ciberataques y el acceso no autorizado a tu información personal.
Para garantizar la seguridad de tu Raspberry Pi VPN, es fundamental seguir algunas mejores prácticas. En primer lugar, es recomendable utilizar contraseñas fuertes y únicas para acceder al servidor VPN y asegurarse de que el software y el sistema operativo estén actualizados con las últimas correcciones de seguridad.
Además, se aconseja configurar correctamente el cortafuegos para limitar el acceso no autorizado al servidor VPN y cifrar toda la comunicación que se realiza a través de la red. Esto ayudará a proteger tus datos sensibles de posibles fisgones y ciberdelincuentes.
Asimismo, es importante llevar a cabo una monitorización constante del tráfico de red y de los registros del servidor VPN para detectar cualquier actividad sospechosa y tomar medidas preventivas a tiempo.
En resumen, la seguridad en Raspberry Pi VPN es esencial para proteger tu información y tu privacidad en línea. Siguiendo las medidas de seguridad adecuadas, puedes disfrutar de una experiencia de navegación segura y protegida en tu dispositivo Raspberry Pi.
Ventajas VPN en Raspberry Pi
Una de las ventajas de utilizar una VPN en Raspberry Pi es la protección de la privacidad y la seguridad de tus datos mientras navegas por Internet. Al enmascarar tu dirección IP real y cifrar todas las comunicaciones, una VPN te permite navegar de forma anónima y segura, evitando que terceros rastreen tu actividad en línea.
Otra ventaja de configurar una VPN en Raspberry Pi es la posibilidad de acceder a contenido restringido geográficamente. Al conectarte a servidores VPN en diferentes ubicaciones, puedes desbloquear sitios web y servicios que de otra manera no estarían disponibles en tu región.
Además, al utilizar una VPN en Raspberry Pi, puedes proteger tus dispositivos conectados a la misma red. Esto es especialmente útil si utilizas tu Raspberry Pi para crear un servidor doméstico o para acceder a dispositivos IoT, ya que una VPN añade una capa adicional de seguridad a tu red local.
Por último, instalar una VPN en Raspberry Pi es una forma rentable de garantizar la privacidad y seguridad en tus actividades en línea. A diferencia de los servicios VPN de pago, configurar tu propia VPN en Raspberry Pi te permite tener un mayor control sobre tus datos y no depender de terceros proveedores de servicios VPN.
En resumen, las ventajas de utilizar una VPN en Raspberry Pi son la protección de la privacidad, el acceso a contenido restringido, la seguridad de dispositivos conectados y la rentabilidad en comparación con servicios VPN externos.
0 notes
Text
para que sirve vpn con raspberry pi
🔒🌍✨ Obtén 3 Meses GRATIS de VPN - Acceso a Internet Seguro y Privado en Todo el Mundo! Haz Clic Aquí ✨🌍🔒
para que sirve vpn con raspberry pi
Importancia de VPN en Raspberry Pi
Un Raspberry Pi es un dispositivo de computación de bajo costo y tamaño reducido que se ha vuelto muy popular entre entusiastas de la tecnología y profesionales de la informática. Una de las formas más importantes de mejorar la seguridad y proteger la privacidad al utilizar un Raspberry Pi es a través de una red privada virtual, mejor conocida como VPN.
La importancia de utilizar una VPN en un Raspberry Pi radica en la capacidad de encriptar toda la información que se transmite a través de la red. Esto es crucial para proteger datos sensibles como contraseñas, información financiera y comunicaciones privadas. Al conectarse a una VPN, se crea un túnel seguro entre el dispositivo y el servidor VPN, lo que impide que terceros intercepten o monitoreen la actividad en línea.
Además de la seguridad, una VPN también puede proporcionar acceso a contenido restringido geográficamente. Al conectarse a un servidor VPN en otra ubicación, es posible eludir restricciones geográficas y acceder a sitios web y servicios que de otro modo estarían bloqueados.
En resumen, la importancia de utilizar una VPN en un Raspberry Pi no puede ser subestimada. Proporciona una capa adicional de seguridad y privacidad, permitiendo a los usuarios navegar por Internet de forma segura y acceder a contenido de todo el mundo. Si valoras tu privacidad y seguridad en línea, considera instalar una VPN en tu Raspberry Pi hoy mismo.
Configuración de VPN en Raspberry Pi
La Raspberry Pi es un miniordenador versátil que permite realizar una amplia gama de funciones. Una de las utilidades más populares de la Raspberry Pi es configurar una red privada virtual (VPN) para garantizar la seguridad y privacidad de la conexión a internet.
Configurar una VPN en Raspberry Pi es un proceso relativamente sencillo que requiere seguir unos pasos concretos. En primer lugar, es necesario elegir un software de servidor VPN compatible con Raspberry Pi, como OpenVPN o WireGuard. A continuación, se debe instalar y configurar dicho software en la Raspberry Pi siguiendo las instrucciones proporcionadas por el desarrollador.
Una vez instalado el software de servidor VPN en la Raspberry Pi, es importante configurar los parámetros de la VPN, como las direcciones IP y los certificados de seguridad. También es recomendable establecer reglas de firewall para proteger la conexión VPN.
Por último, para conectarse a la VPN desde un dispositivo externo, es necesario instalar un cliente VPN compatible y configurarlo con los mismos parámetros utilizados en la Raspberry Pi.
En resumen, la configuración de una VPN en Raspberry Pi es una forma efectiva de proteger la privacidad de la conexión a internet y garantizar una navegación segura y segura. Siguiendo los pasos adecuados, cualquier persona puede disfrutar de los beneficios de una VPN en su miniordenador Raspberry Pi.
Ventajas de usar VPN con Raspberry Pi
Las VPN (Redes Privadas Virtuales) se han convertido en una solución popular para garantizar la privacidad y seguridad en línea. Al combinar una VPN con un dispositivo como Raspberry Pi, se obtienen una serie de ventajas adicionales.
Una de las principales ventajas de utilizar una VPN con Raspberry Pi es la capacidad de proteger la información personal y la actividad en línea. Al enrutar el tráfico a través de un servidor remoto y cifrar los datos, la VPN ayuda a prevenir el acceso no autorizado y el seguimiento de la actividad en línea.
Además, al usar una VPN con Raspberry Pi, se puede acceder a contenido restringido geográficamente. Esto significa que se puede desbloquear contenido de transmisión, juegos en línea y otros servicios que de otro modo no estarían disponibles en ciertas ubicaciones.
Otra ventaja de utilizar una VPN con Raspberry Pi es la posibilidad de mayor anonimato en línea. Al ocultar la dirección IP real y enmascarar la ubicación física, se puede navegar de forma más privada y segura, evitando la censura y el seguimiento no deseado.
En resumen, combinar una VPN con Raspberry Pi ofrece una forma eficaz de proteger la privacidad en línea, acceder a contenido restringido y mantener el anonimato en la red. Es una herramienta versátil y poderosa para aquellos que valoran la seguridad y la libertad en Internet.
Seguridad con VPN en Raspberry Pi
Las Raspberry Pi se han vuelto muy populares por su versatilidad y bajo costo, permitiendo la creación de diversos proyectos, desde sistemas de automatización hasta servidores caseros. Sin embargo, al conectarse a internet, es importante considerar la seguridad de nuestros datos y nuestra privacidad. Una forma efectiva de proteger nuestra conexión en una Raspberry Pi es a través de una red privada virtual, mejor conocida como VPN.
Una VPN en Raspberry Pi funciona enmascarando la dirección IP y cifrando el tráfico de internet, lo que brinda un nivel adicional de seguridad al navegar en línea. Esto es especialmente útil cuando se accede a redes Wi-Fi públicas, donde la información personal puede estar expuesta a posibles ciberataques.
Configurar una VPN en una Raspberry Pi no es complicado, existen diversas opciones de software gratuitas y de código abierto que permiten implementar una VPN de forma sencilla. Algunas de las ventajas de utilizar una VPN en Raspberry Pi incluyen el acceso seguro a internet, la posibilidad de eludir restricciones geográficas y la privacidad al navegar por la red.
En resumen, la seguridad con VPN en Raspberry Pi es una medida importante para proteger nuestra información y garantizar una conexión segura en línea. Implementar una VPN en una Raspberry Pi es una forma efectiva de mantener nuestros datos protegidos y navegar de forma segura en internet.
Tutorial VPN para Raspberry Pi
Un VPN (Red Privada Virtual) es una herramienta que te permite navegar de forma segura y privada por internet al ocultar tu dirección IP y encriptar tu conexión. Si eres dueño de una Raspberry Pi, puedes configurar tu propio servidor VPN para proteger tus datos y asegurar tu privacidad en línea.
Configurar un servidor VPN en tu Raspberry Pi es un proceso sencillo que no requiere conocimientos avanzados en programación. Existen distintos programas y métodos que puedes utilizar para lograrlo, como por ejemplo OpenVPN, WireGuard, o PiVPN, entre otros.
Para empezar, necesitarás una Raspberry Pi con Raspbian o cualquier otra distribución de Linux instalada. A continuación, deberás instalar y configurar el software VPN de tu elección siguiendo los pasos proporcionados por el proveedor del servicio. Una vez completada la instalación, podrás conectar tus dispositivos a tu VPN personal y disfrutar de una navegación segura y anónima.
Es importante recordar que al utilizar un servidor VPN casero, eres responsable de su seguridad y mantenimiento, por lo que se recomienda mantenerlo actualizado y protegido contra posibles amenazas cibernéticas.
En resumen, configurar un servidor VPN en tu Raspberry Pi es una excelente manera de proteger tu privacidad en línea y mantener tus datos seguros mientras navegas por internet. ¡No esperes más y comienza a disfrutar de los beneficios de una conexión encriptada y anónima con tu propio VPN en Raspberry Pi!
0 notes
Text
how to install vpn server on raspberry pi
🔒🌍✨ Obtén 3 Meses GRATIS de VPN - Acceso a Internet Seguro y Privado en Todo el Mundo! Haz Clic Aquí ✨🌍🔒
how to install vpn server on raspberry pi
Configuración de VPN en Raspberry Pi
Para configurar una VPN en Raspberry Pi, primero necesitas elegir el tipo de VPN que deseas utilizar. Algunas opciones populares incluyen OpenVPN, PPTP y WireGuard. Una vez que hayas tomado esta decisión, puedes comenzar con el proceso de configuración.
Para instalar OpenVPN en una Raspberry Pi, primero necesitas instalar el software adecuado. Puedes hacerlo utilizando el administrador de paquetes de Raspberry Pi. Una vez que el software esté instalado, necesitarás configurar los archivos de configuración de OpenVPN de acuerdo a tus necesidades.
Para configurar una VPN PPTP en Raspberry Pi, el proceso es similar. Necesitarás instalar el software PPTP y luego configurar los archivos de configuración, como el nombre de usuario y la contraseña.
Otra opción es utilizar WireGuard, que es un protocolo VPN de código abierto y relativamente nuevo. Para configurar WireGuard en Raspberry Pi, necesitarás instalar el software correspondiente y luego generar un par de claves pública y privada. Después, puedes configurar los túneles VPN y las reglas de firewall según sea necesario.
Independientemente del tipo de VPN que elijas configurar en tu Raspberry Pi, es importante seguir las instrucciones detalladas para garantizar que la configuración sea correcta y segura. Una vez que la VPN esté configurada, podrás proteger tu conexión a Internet y acceder de forma segura a tus datos y recursos en línea. ¡Disfruta de una conexión privada y segura con tu Raspberry Pi!
Servidor VPN en Raspberry Pi
Un servidor VPN en Raspberry Pi es una excelente opción para aquellos que desean proteger su privacidad y seguridad en línea de manera económica y personalizada. Raspberry Pi es un pequeño y versátil ordenador de placa única que puede funcionar como un servidor VPN con la ayuda de software especializado.
Para configurar un servidor VPN en Raspberry Pi, primero se necesita instalar y configurar el software de servidor VPN, como OpenVPN o WireGuard. Estos programas permiten crear una conexión segura y encriptada a través de la cual se puede navegar por la web de forma anónima y segura.
Una vez instalado el software de servidor VPN en Raspberry Pi, es importante configurar los parámetros de seguridad adecuados, como la generación de claves de encriptación y la asignación de direcciones IP a los dispositivos conectados. También es fundamental configurar el reenvío de puertos en el enrutador para permitir que el tráfico VPN llegue al servidor Raspberry Pi.
Al contar con un servidor VPN en Raspberry Pi, se puede acceder de forma segura a la red doméstica cuando se está fuera, cifrar el tráfico en redes Wi-Fi públicas y evitar la censura en línea. Además, al configurar tu propio servidor VPN, se tiene un mayor control sobre la privacidad de tus datos en línea.
En resumen, un servidor VPN en Raspberry Pi es una excelente forma de proteger tu privacidad y seguridad en línea de manera personalizada y económica. ¡Anímate a configurar el tuyo y navega con tranquilidad!
Pasos para instalar VPN en Raspberry Pi
Para aquellos que deseen proteger su privacidad en línea y navegar de forma segura, instalar una red privada virtual (VPN) en un Raspberry Pi puede ser una excelente solución. Los pasos para instalar una VPN en este dispositivo son relativamente sencillos y permiten disfrutar de una conexión segura y anónima en cualquier lugar.
En primer lugar, es importante seleccionar un proveedor de VPN confiable que sea compatible con Raspberry Pi. Una vez elegido el proveedor, se debe crear una cuenta y obtener los datos de configuración necesarios, como el nombre de usuario, la contraseña y los detalles del servidor.
El siguiente paso es instalar el software de VPN en el Raspberry Pi. Para hacerlo, es necesario acceder al terminal y seguir las instrucciones proporcionadas por el proveedor de servicios. Generalmente, esto implica descargar e instalar el paquete de software adecuado y configurar la conexión con los datos previamente obtenidos.
Una vez que la VPN esté instalada, se debe activar y verificar que la conexión se haya establecido correctamente. Para asegurarse de que todo funcione como debería, se puede comprobar la dirección IP para confirmar que la conexión VPN está en funcionamiento y que la información se está transmitiendo de forma segura.
En resumen, instalar una VPN en un Raspberry Pi es una forma efectiva de proteger la privacidad y navegar de forma segura en línea. Siguiendo estos simples pasos, cualquiera puede disfrutar de los beneficios de una conexión segura y anónima en su dispositivo Raspberry Pi.
Seguridad y privacidad en Raspberry Pi con VPN
Raspberry Pi es una plataforma versátil y poderosa que se utiliza en una amplia variedad de proyectos, desde la creación de servidores domésticos hasta la automatización del hogar. Sin embargo, cuando se utiliza en aplicaciones que requieren seguridad y privacidad, es importante tomar medidas adicionales para proteger los datos sensibles. Una forma efectiva de lograr esto es mediante el uso de una VPN en Raspberry Pi.
Una VPN, o red privada virtual, es una herramienta que cifra todo el tráfico de datos entre el dispositivo y el servidor VPN remoto, lo que garantiza que la información transmitida esté protegida de fisgones y piratas informáticos. Al instalar y configurar una VPN en Raspberry Pi, los usuarios pueden navegar por Internet de forma segura y anónima, protegiendo sus datos personales y su privacidad en línea.
Además de proteger la privacidad, una VPN en Raspberry Pi también puede mejorar la seguridad al utilizar redes Wi-Fi públicas. Al conectarse a una red Wi-Fi abierta, los datos pueden ser interceptados fácilmente, lo que representa un riesgo para la seguridad. Con una VPN activa, todo el tráfico se cifra, evitando posibles ataques y garantizando una experiencia de navegación segura.
En resumen, la utilización de una VPN en Raspberry Pi es una medida fundamental para garantizar la seguridad y privacidad en línea. Al implementar esta solución, los usuarios pueden disfrutar de una mayor tranquilidad al saber que sus datos están protegidos, tanto en casa como en movimiento. ¡Protege tu Raspberry Pi y navega de forma segura con una VPN!
Tutorial VPN en Raspberry Pi
Un tutorial VPN en Raspberry Pi es una excelente manera de proteger tu privacidad y seguridad en internet. Configurar un servidor VPN en tu Raspberry Pi te permite cifrar tu conexión y navegar de forma anónima, protegiendo tus datos de miradas indiscretas.
Para comenzar, necesitarás una Raspberry Pi con Raspbian instalado, una conexión a internet y acceso root. Primero, actualiza tu sistema ejecutando 'sudo apt-get update' y 'sudo apt-get upgrade'. Luego, instala el software OpenVPN con el comando 'sudo apt-get install openvpn'. A continuación, genera las claves y certificados necesarios con el comando 'easy-rsa'.
Una vez tengas los certificados, configura el servidor OpenVPN editando el archivo de configuración. Habilita el reenvío de IPv4 en el kernel de Linux ejecutando 'sudo sysctl -w net.ipv4.ip_forward=1'. Por último, inicia el servidor OpenVPN con el comando 'sudo systemctl start openvpn@server'.
Ahora, tus clientes podrán conectarse al servidor VPN de tu Raspberry Pi para asegurar su conexión. Recuerda que la seguridad en internet es fundamental, especialmente cuando se trata de proteger tus datos personales. ¡Disfruta de una navegación segura y protegida gracias a tu servidor VPN en Raspberry Pi!
0 notes