#git repo
Explore tagged Tumblr posts
Visit Tumblr Blog
Explore Tumblr blogs with no restrictions, modern design and the best experience.
Last Seen Tumblr Blogs


Fun Fact
Premium Tumblr themes are available from anywhere between $9 to $49.
Text
I need to, like, go to sea for a few weeks and hide from all communications of any sort. Want to reach me? Train a pigeon or learn semaphore or start rowing. I need extended nothingness thank you.
#text tag#yes I'm just grumpy that this fucking git repo takes fucking hours to do checks and refresh to live
4 notes
·
View notes
Text
Making some really bad --templates and --licenses to go in ~/.gem-release
#gem bootstrap worst_gem --template bad_helpers --license fuck_you --rspec#lmk if you would like to see these in a public git repo
6 notes
·
View notes
Text
the replies on this post are perfect
#its everyone from the screenshot#again and again#nerds never learn#some incel called me blind for calling git a repo lmao
9K notes
·
View notes
Text
oTL
#fucking kill me.#ok. group project with 3 other guys. awesome.#big compsci thingy we need to use github. were cool like that.\#dude no1. responsible for part1. DOESNT PUSH THE CODE. aka i had to upload what he had written#dude no2. DOESNT DO HIS PART. 'misread the deadline' WHATEBER. i look up and copy and i. make and push his code.#dude no3. (me) does my part. on time. and push it. only ~7 hours late bc my part takes 10 HOURS to run. fair.#dude no4. 'guys i fucked up the git repo idk what im doing someone fix please' OHOHOOHHOHOOHHOOHHOHOHO#what. are any of them. doing here. fucking genuinely.#hey at least the deadline got delayed :3 yay.#sillyposting#listen. i dont like boosting my own ego. BUT HOLY FUCK.#oh my fucking god.#oTL can i ever be saved.#btw :3 their code is all like 20 lines max and mine. again. is something that takes 10 HOURS to RUN. not even configured right.#whatberbe
0 notes
Text
RIP Cara.app
This is why you dont ship with Vercel if you don’t have reliable funding lmao
#$100k for 500k users sheeeesh#i get it. like. there’s definitely companies that can scale like that but#this is not that scenario#i remember theo.gg going through this too. I think he moved his assets to s git repo?#im assuming thats what zemotion will do#iunno what shes gonna do about funding tho#it wasnt smart of her to have the email for both the site’s ‘contact us’ message box#and Vercel’s notifications to be the same email#this definitely could have been avoided#but it is what it is#we’ll see what happens#they speak
1 note
·
View note
Text
I don't think people realize how absolutely wild Linux is.
Here we have an Operating system that now has 100 different varieties, all of them with their own little features and markets that are also so customizable that you can literally choose what desktop environment you want. Alongside that it is the OS of choice for Supercomputers, most Web servers, and even tiny little toy computers that hackers and gadget makers use. It is the Operating System running on most of the world's smartphones. That's right. Android is a version of Linux.
It can run on literally anything up to and including a potato, and as of now desktop Linux Distros like Ubuntu and Mint are so easily to use and user friendly that technological novices can use them. This Operating system has had App stores since the 90s.
Oh, and what's more, this operating system was fuckin' built by volunteers and users alongside businesses and universities because they needed an all purpose operating system so they built one themselves and released it for free. If you know how to, you can add to this.
Oh, and it's founder wasn't some corporate hotshot. It's an introverted Swedish-speaking Finn who, while he was a student, started making his own Operating system after playing around with someone else's OS. He was going to call it Freax but the guy he got server space from named the folder of his project "Linux" (Linus Unix) and the name stuck. He operates this project from his Home office which is painted in a colour used in asylums. Man's so fucking introverted he developed the world's biggest code repo, Git, so he didn't have to deal with drama and email.
Steam adopted it meaning a LOT of games now natively run in Linux and what cannot be run natively can be adapted to run. It's now the OS used on their consoles (Steam Deck) and to this, a lot of people have found games run better on Linux than on Windows. More computers run Steam on Linux than MacOS.
On top of that the Arctic World Archive (basically the Svalbard Seed bank, but for Data) have this OS saved in their databanks so if the world ends the survivors are going to be using it.
On top of this? It's Free! No "Freemium" bullshit, no "pay to unlock" shit, no licenses, no tracking or data harvesting. If you have an old laptop that still works and a 16GB USB drive, you can go get it and install it and have a functioning computer because it uses less fucking resources than Windows. Got a shit PC? Linux Mint XFCE or Xubuntu is lightweight af. This shit is stopping eWaste.
What's more, it doesn't even scrimp on style. KDE, XFCE, Gnome, Cinnamon, all look pretty and are functional and there's even a load of people who try make their installs look pretty AF as a hobby called "ricing" with a subreddit (/r/unixporn) dedicated to it.
Linux is fucking wild.
11K notes
·
View notes
Note
At least one of my friends is!
are you well known in your fandom?
#i keep my tumblr and my forum accounts VERY SEPARATE#here is for shame free shitposting not tied to any git repos nor trellos#xaser just was a good chunk of the team on Legacy of Rust tho ^u^
13K notes
·
View notes
Text
[PowerBi] Integración con AzureDevOps Git Repos
El lanzamiento de Power Bi Developer Mode durante el evento Microsoft Build está causando gran revuelo no solo por su posibilidad resguardar un proyecto de PowerBi sino también porque por primera vez tendríamos la posibilidad de que dos o más usuarios trabajen en un mismo proyecto. Esto no es trabajo concurrente instantáneo como Word Online sino más bien cada quien modificando los mismos archivos de un repositorio y logrando integrarlos al final del día.
La deuda de versionado y trabajo en equipo finalmente estaría cumplida. Según uno de los personajes más importantes del equipo, Rui Romano, aún hay mucho por hacer. Veamos que nos depara esta característica por el momento.
Vamos a iniciar asumiendo que el lector tiene un conocimiento básico de repositorios. Entienden que en un repositorio se almacenan versiones de archivos. Se pueden crear ramas/branches por persona que permita modificar archivos y luego se puedan integrar/merge para dejar una versión completa y definitiva.
Todo esto es posible gracias a la nueva característica de Power Bi Desktop que nos permite guardar como proyecto. Esto dividirá nuestro pbix en dos carpetas y un archivo:
Carpeta de <nombre del archivo>.Dataset: Una colección de archivos y carpetas que representan un conjunto de datos de Power BI. Contiene algunos de los archivos más importantes en los que es probable que trabajes, como model.bim.
Carpeta de <nombre del archivo>.Report: Una colección de archivos y carpetas que representan un informe de Power BI. El archivo más importante es "report.json", aunque durante la vista previa no se admiten modificaciones externas en este archivo.
Archivo <nombre del archivo>.pbip: El archivo PBIP contiene un enlace a una carpeta de informe. Al abrir un archivo PBIP, se abre el informe en Power Bi Desktop y el modelo correspondiente.
Entorno
Lo primero es configurar y determinar nuestro entorno para poder vincular las herramientas. Necesitamos una cuenta en Azure DevOps y un workspace con capacidad en Power Bi Service. Para que la integración sea permitida necesitamos asegurarnos que nuestra capacidad y la de la Organización de Azure DevOps estén en la misma región.
La región de una organización de Azure DevOps puede ser elegida al crearla, al igual que podemos elegir la región de una capacidad cuando creamos una premium, embedded o fabric.
En caso de utilizar capacidad PowerBi Premium Per User o Fabric Trial, no podríamos elegir la región. Sin embargo, podríamos revisar la región de nuestro PowerBi para elegir la misma en Azure DevOps
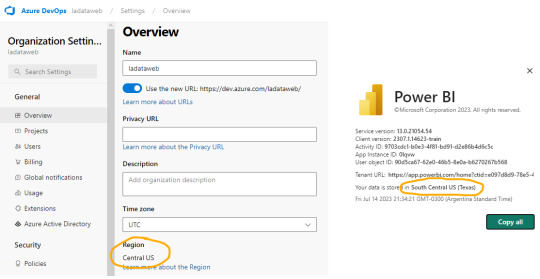
En ese caso creamos la organización de DevOps igual que nuestro PowerBi porque haremos el ejemplo con un workspace PPU.
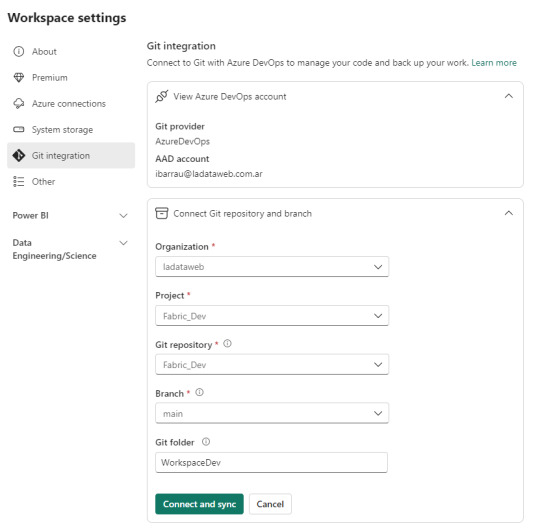
Seteo
Dentro de Power Bi Service y el Área de trabajo con capacidad que queremos versionar iremos a la configuración. Con la misma cuenta de ambos entornos completaremos los valores de organización, proyecto, repositorio, rama y carpeta (opcional).
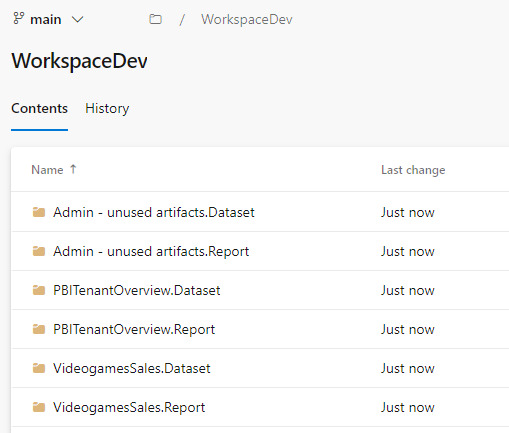
Como nuestro repositorio esta vacío, lo primero que sucederá cuando conectemos será una sincronización de todos los items del área de trabajo en el repositorio. Ahora bien, si teníamos reportes en el repositorio y en el area, tendremos un paso más para coordinar la operación deseada si pisar o integrar.
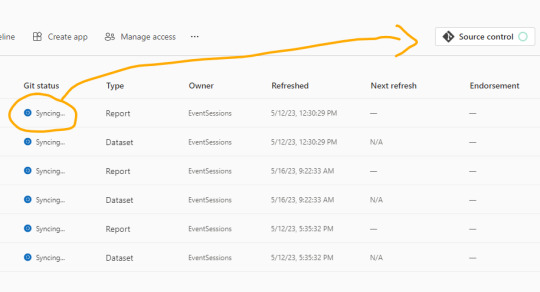
Una vez que todo tenga tilde verde y esté sincronizado, podremos ver como queda el repositorio.
En caso que ya tuvieramos informes cuando inicio el proceso, se crearán carpetas pero no el archivo .pbip que nos permitiría abrirlo con Power Bi Desktop.
Si crearamos el informe con Power Bi Desktop y eligieramos “Guardar como proyecto” si se crearía. Entonces podríamos hacer un commit al repositorio y automáticamente se publicaría en nuestra área de trabajo.
El archivo pbip es un archivo de texto. Podemos abrirlo con un bloc de notas para conocer como se constituye para generarlo en caso que necesitemos abrir con Desktop uno de los informes que sincronizamos antes. Ejemplo del archivo:
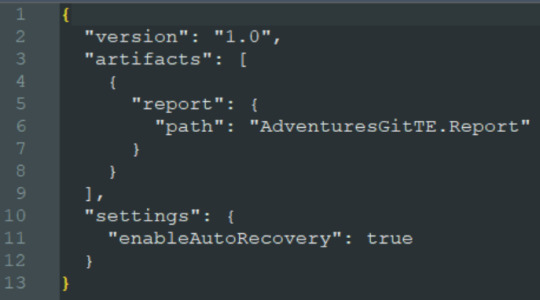
Al tener sincronizado el repositorio con el workspace podemos usar un entorno local. Si está en el repositorio en la rama principal, entonces estará publicado en el área de trabajo. Veamos como sería el proceso.

Esta sincronización también nos favorece en el proceso de Integración y Deploy continuo puesto que varios desarrolladores podrían tener una rama modificada y al integrarlo con la principal delimitada en el área de trabajo tendríamos automáticamente todo deployado.
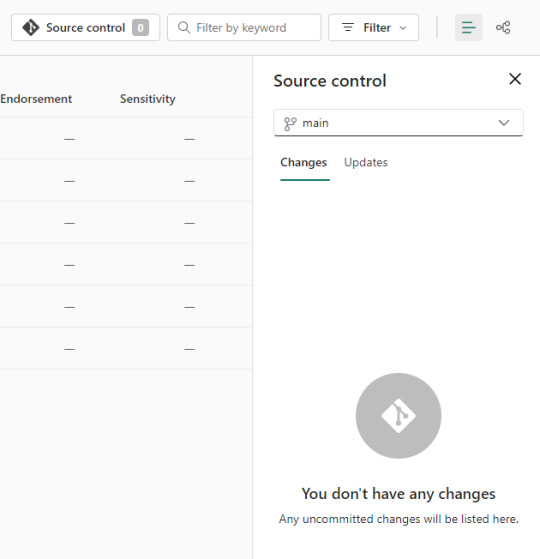
Si algo no se encuentra en su última versión o hacemos modificaciones en línea, podemos acceder al menú de source control que nos ayudaría a mantener ordenadas las versiones.
Alternativa Pro
Con las nuevas actualizaciones de Fabric en agosto 2023, podremos por primera vez, trabajar en equipo en PowerBi sin licencia por capacidad o premium. Guardar como proyecto es una característica de PowerBi Desktop. Por lo tanto, podemos usarla contra un repositorio Git en cualquier tecnología. Al termino del desarrollo, una persona encargada debería abrir el PBIP y publicarlo al área pertinente. Ahora podemos publicar desde Desktop los informes guardados como proyectos. Esto nos permite que los casos de puras licencias pro puedan aprovechar las características de histórico y control de versiones. Quedará pendiente la automatización para deploy e integración que aún no podría resolverse solo con PRO.
Conclusión
Esta nueva característica nos trae una práctica indispensable para el desarrollo. Algo que era necesario hace tiempo. Sería muy prudente usarlo aún en proyectos que no modifiquen un informe al mismo tiempo puesto que ganamos una gran capacidad en lo que refiere a control de versiones.
Si no tenemos capacidad dedicada, deberíamos trabajar como vimos en post anteriores sobre metodología de integración continua de repositorio https://blog.ladataweb.com.ar/post/717491367944781824/simplepbicd-auto-deploy-informes-de-powerbi
Esperemos que pronto tengamos una opción para importar por API estos proyectos al PowerBi Service para poder idear nuestros propios procesos sin usar las integraciones por defecto sino una personalizada a nuestro gusto.
#powerbi#power bi#power bi desktop#power bi git#azure devops#azure repos#power bi tutorial#power bi tips#power bi training#power bi argentina#power bi jujuy#power bi cordoba#ladataweb#power bi developer mode
0 notes
Text
Glitches at work
My laptop screen glitches. I freeze for a moment, but the screen returns to its normal glow. I go back to the creative project I'm doing. It is a web project for a non-profit. The person I am doing this for contacted me via email some wee...
The screen glitches again. What is this? It is getting annoying, and it momentarily throws me off. It is also too warm here, and I pull off my comfortable hoodie. It is a good thing the writing for this project is already done. From now on it is just the look and feel that needs finishing. The glitch made me dislike the greens on the page. Some pinks would look way nicer, softer on my eyes. I open the css and adjust the color of the ...
The screen glitches. It makes me feel dizzy. And it is hard to stay concentrated. I’m having this strange itch all over my skin. I rub along my arms, and it gives a slight relieve. But I’m looking back at the screen. I'm almost done, I can ignore this for a bit longer. There are just these final edits and those last pictures to upload and to do a final...
The screen glitches. I blink and pause. My T-shirt itches. My head feels heavy, like it is stuffed with cotton candy. I strip of my t-shirt, and the itching disappears. It takes some effort, but I sync the git repo. One final check and I’m ready to mail the owner who...
The screen glitches, and I stare mindlessly at the screen. Waiting on the mail with instructions. Not noticing the small green webcam light, that has been on the entire time.
432 notes
·
View notes
Text

Welcome back, coding enthusiasts! Today we'll talk about Git & Github , the must-know duo for any modern developer. Whether you're just starting out or need a refresher, this guide will walk you through everything from setup to intermediate-level use. Let’s jump in!
What is Git?
Git is a version control system. It helps you as a developer:
Track changes in your codebase, so if anything breaks, you can go back to a previous version. (Trust me, this happens more often than you’d think!)
Collaborate with others : whether you're working on a team project or contributing to an open-source repo, Git helps manage multiple versions of a project.
In short, Git allows you to work smarter, not harder. Developers who aren't familiar with the basics of Git? Let’s just say they’re missing a key tool in their toolkit.
What is Github ?
GitHub is a web-based platform that uses Git for version control and collaboration. It provides an interface to manage your repositories, track bugs, request new features, and much more. Think of it as a place where your Git repositories live, and where real teamwork happens. You can collaborate, share your code, and contribute to other projects, all while keeping everything well-organized.
Git & Github : not the same thing !
Git is the tool you use to create repositories and manage code on your local machine while GitHub is the platform where you host those repositories and collaborate with others. You can also host Git repositories on other platforms like GitLab and BitBucket, but GitHub is the most popular.
Installing Git (Windows, Linux, and macOS Users)
You can go ahead and download Git for your platform from (git-scm.com)
Using Git
You can use Git either through the command line (Terminal) or through a GUI. However, as a developer, it’s highly recommended to learn the terminal approach. Why? Because it’s more efficient, and understanding the commands will give you a better grasp of how Git works under the hood.
GitWorkflow
Git operates in several key areas:
Working directory (on your local machine)
Staging area (where changes are prepared to be committed)
Local repository (stored in the hidden .git directory in your project)
Remote repository (the version of the project stored on GitHub or other hosting platforms)
Let’s look at the basic commands that move code between these areas:
git init: Initializes a Git repository in your project directory, creating the .git folder.
git add: Adds your files to the staging area, where they’re prepared for committing.
git commit: Commits your staged files to your local repository.
git log: Shows the history of commits.
git push: Pushes your changes to the remote repository (like GitHub).
git pull: Pulls changes from the remote repository into your working directory.
git clone: Clones a remote repository to your local machine, maintaining the connection to the remote repo.
Branching and merging
When working in a team, it’s important to never mess up the main branch (often called master or main). This is the core of your project, and it's essential to keep it stable.
To do this, we branch out for new features or bug fixes. This way, you can make changes without affecting the main project until you’re ready to merge. Only merge your work back into the main branch once you're confident that it’s ready to go.
Getting Started: From Installation to Intermediate
Now, let’s go step-by-step through the process of using Git and GitHub from installation to pushing your first project.
Configuring Git
After installing Git, you’ll need to tell Git your name and email. This helps Git keep track of who made each change. To do this, run:

Master vs. Main Branch
By default, Git used to name the default branch master, but GitHub switched it to main for inclusivity reasons. To avoid confusion, check your default branch:

Pushing Changes to GitHub
Let’s go through an example of pushing your changes to GitHub.
First, initialize Git in your project directory:

Then to get the ‘untracked files’ , the files that we haven’t added yet to our staging area , we run the command

Now that you’ve guessed it we’re gonna run the git add command , you can add your files individually by running git add name or all at once like I did here

And finally it's time to commit our file to the local repository

Now, create a new repository on GitHub (it’s easy , just follow these instructions along with me)
Assuming you already created your github account you’ll go to this link and change username by your actual username : https://github.com/username?tab=repositories , then follow these instructions :


You can add a name and choose wether you repo can be public or private for now and forget about everything else for now.

Once your repository created on github , you’ll get this :

As you might’ve noticed, we’ve already run all these commands , all what’s left for us to do is to push our files from our local repository to our remote repository , so let’s go ahead and do that

And just like this we have successfully pushed our files to the remote repository
Here, you can see the default branch main, the total number of branches, your latest commit message along with how long ago it was made, and the number of commits you've made on that branch.

Now what is a Readme file ?
A README file is a markdown file where you can add any relevant information about your code or the specific functionality in a particular branch—since each branch can have its own README.
It also serves as a guide for anyone who clones your repository, showing them exactly how to use it.
You can add a README from this button:

Or, you can create it using a command and push it manually:

But for the sake of demonstrating how to pull content from a remote repository, we’re going with the first option:

Once that’s done, it gets added to the repository just like any other file—with a commit message and timestamp.
However, the README file isn’t on my local machine yet, so I’ll run the git pull command:

Now everything is up to date. And this is just the tiniest example of how you can pull content from your remote repository.
What is .gitignore file ?
Sometimes, you don’t want to push everything to GitHub—especially sensitive files like environment variables or API keys. These shouldn’t be shared publicly. In fact, GitHub might even send you a warning email if you do:

To avoid this, you should create a .gitignore file, like this:

Any file listed in .gitignore will not be pushed to GitHub. So you’re all set!
Cloning
When you want to copy a GitHub repository to your local machine (aka "clone" it), you have two main options:
Clone using HTTPS: This is the most straightforward method. You just copy the HTTPS link from GitHub and run:

It's simple, doesn’t require extra setup, and works well for most users. But each time you push or pull, GitHub may ask for your username and password (or personal access token if you've enabled 2FA).
But if you wanna clone using ssh , you’ll need to know a bit more about ssh keys , so let’s talk about that.
Clone using SSH (Secure Shell): This method uses SSH keys for authentication. Once set up, it’s more secure and doesn't prompt you for credentials every time. Here's how it works:
So what is an SSH key, actually?
Think of SSH keys as a digital handshake between your computer and GitHub.
Your computer generates a key pair:
A private key (stored safely on your machine)
A public key (shared with GitHub)
When you try to access GitHub via SSH, GitHub checks if the public key you've registered matches the private key on your machine.
If they match, you're in — no password prompts needed.
Steps to set up SSH with GitHub:
Generate your SSH key:

2. Start the SSH agent and add your key:

3. Copy your public key:

Then copy the output to your clipboard.
Add it to your GitHub account:
Go to GitHub → Settings → SSH and GPG keys
Click New SSH key
Paste your public key and save.
5. Now you'll be able to clone using SSH like this:

From now on, any interaction with GitHub over SSH will just work — no password typing, just smooth encrypted magic.
And there you have it ! Until next time — happy coding, and may your merges always be conflict-free! ✨👩💻👨💻
#code#codeblr#css#html#javascript#java development company#python#studyblr#progblr#programming#comp sci#web design#web developers#web development#website design#webdev#website#tech#html css#learn to code#github
93 notes
·
View notes
Text
and then: cd ~

Pulled a sneaky on my co-worker today :p
#so you don't take snapshots?#it would be a shame if someone were to cd ~/.config#← OH NO NOT THAT I WOULD DIE#i should back those up to a git repo or smth#save#programming
491 notes
·
View notes
Text

Little repo gang sketch for Hermit a Day May!
(I think that they should be called EGG GITS)
#etho#impulsesv#grian#gtwscar#gtws#tangotek#geminitay#skizzleman#hermitaday#hermitcraft#repo game#gigs phasmo
62 notes
·
View notes
Text
in the git hub, straight up 'forkin it', and by 'it', hahaa, lets jsut say,, my repo
117 notes
·
View notes
Text
Of course forking GitHub repositories is useful, but there are some repos I want to knife down, and some others I want to spoon. Is there any git hosting service that lets me do that?
75 notes
·
View notes
Text
Okay, I'll give it a shot; git is a program. You use it to make a git repository (which is in practice just a folder with some metadata).
The repository stores series of commits. Each commit stores a series of changes made since the previous one - files which have been added, files which have been removed, and changes which have been made to existing files.
(It stores them in branches, which have separate histories, but to begin with you'll just be dealing with one 'main' branch.)
You can then 'push' commits from this local repo to a remote repo, often on a service like GitHub, so the commit history can be shared between different devices, people, etc.
Doing any of this directly with git itself in the command line involves giving it a complicated series of commands in a specific order, often starting with the most complicated stuff before you can get to the simple stuff. In practice, you'll generally be using another program as a wrapper over git; which git client you use is mostly a matter of preference. On Windows good places to start could be the GitHub desktop client, which abstracts a lot of the more complicated bits away, or the default Git Gui which comes with Git for Windows, which maps more directly to whats happening on the command line (but with clearly laid out buttons instead of hard-to-memorise syntax). You shouldn't need to drop down to the command line until you're needing to do more complex stuff.
Start with the basics of getting something versioning, then you can work up into branches and all that if and when you need to. Each step is much easier once you've got a firm footing in the previous one.
Can someone explain to me in like five seconds how to use git, assuming that I know basic shit about coding/command line/whatever but don't know any of the specific terminology related to git. Like every tutorial online is at the same time both over my head and also vastly too basic. Just like. Tell me what it is.
Uh. First tell me its ontology. Is it a program, a standard, a language...? I know that it's for version control. Suppose I wanted to do version control at a piece of code. What do I do. What buttons do I press, on my computer? Tell me these things.
#git#does that work as an explanation? i've only been using this stuff for like a year idk if im at the point where i can properly re-explain it#also to clarify the difference between git and github:#git the program that represents the repos. it's like twenty years old and was originally made for tracking the development of linux#a git remote is just a git repo on a server somewhere#GitHub is a company that makes a business out of hosting servers with git repos on them. there are other ones too#(it's able to have git in its name since git comes from the linux world and so isn't under copyright in any form)#GitHub is the most popular one and is generally what you suggest to beginners since it lets you make both public and private repos for free#(you only have to pay when you need a private repo that multiple people can access)#(this business model is able to make sense because git repos take up a frankly ridiculously small amount of storage space)
476 notes
·
View notes
Text
That's it. I'm adding you to the git repo
77 notes
·
View notes