#gouache tutorial
Explore tagged Tumblr posts
Visit Tumblr Blog
Explore Tumblr blogs with no restrictions, modern design and the best experience.
Last Seen Tumblr Blogs


Fun Fact
Tumblr is available in 18 languages.
Text

practicing gouache on printer paper and it ended up being... dizzy??!!
#art#i dont actually know how to paint properly with gouache i was just winging it.#one day i should actually follow a tutorial#guilty gear
186 notes
·
View notes
Note
I really love the texture in your paintings!! I also use gouache but getting a nice texture with clean lines is something I've struggled with, do you have tips or specific techniques you use?
Thank you!!
Thank you so much!! I'd love to help - I'm self taught wrt painting so I have no idea if my approach will make sense to anyone else. I'll tell you what I do and why and you pick and choose whatever (if any) of my thoughts might be helpful ^^ I find that zooming in close on my subject makes textures much easier to capture, because more detail can be included without the picture looking noisy. It also saves me from having to make so many decisions (what to include, what to leave out, how to simplify and just suggest texture), but tackling every challenge at once is not a good way to learn anything. Maybe stick to close ups, or extreme close ups, to practice your textures, and then practice making judgement calls on what to include and what to leave out! Both parts are important, but they are somewhat separate concerns (IMO) I go over most areas of a painting many, many times. I build up many layers of paint, re-wet the area to blend them together, paint over it if I change my mind about something... Any "clean" line I make is often made up of 10+ strokes. I kind of creep up on detail, instead of trying to get it perfect once - I just find that the nature of the paints respond better to that. (And my hands often tremble, so that has to be accounted for) For example, the white highlights at the edges of these leaves I repainted I don't know how many times - I only made the decision to stop once I realized I was getting caught up in the joy of those movements of the wrist....

Because you can cover up areas well (at least if you cover with many layers), AND you can re-wet the paint to blend it or shape it differently, I find gouache very forgiving and I rarely start over a piece. A lot of times this messing around will bring up something fun I didn't expect, too! So I don't approach gouache like water colours, or expect a smooth surface on the paper, or paint in a style that requires anything to look good on the first stroke of the brush.
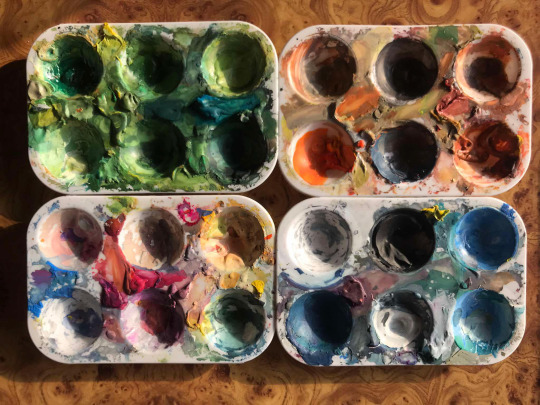
^^^ those are my palettes. I don't clean them... ever... I just wet my brush to loosen the pigment and add paint as I need it. I started working like this because I didn't feel I had the money to spend on paint, and then I built my techniques around that as I learned. So I rarely premix my paints, I usually pick whatever is closest and then mix colours on the paper. That means my focus isn't on getting the colour right, but on getting the values right. When gouache dries, it looks dull, so you have to over-shoot the mark wrt to values - make your darks darker and brights brighter. Go bold! I'll give some examples

^^^ with this painting, I think I succeeded wrt textures and values (and largely because of that, colours). I found this log in a big bush, so the light was very dappled under all those leaves. I added lots of small, very bright strokes on the bark where the sunlight landed the strongest, and kept most of the rest dark and flat-ish.
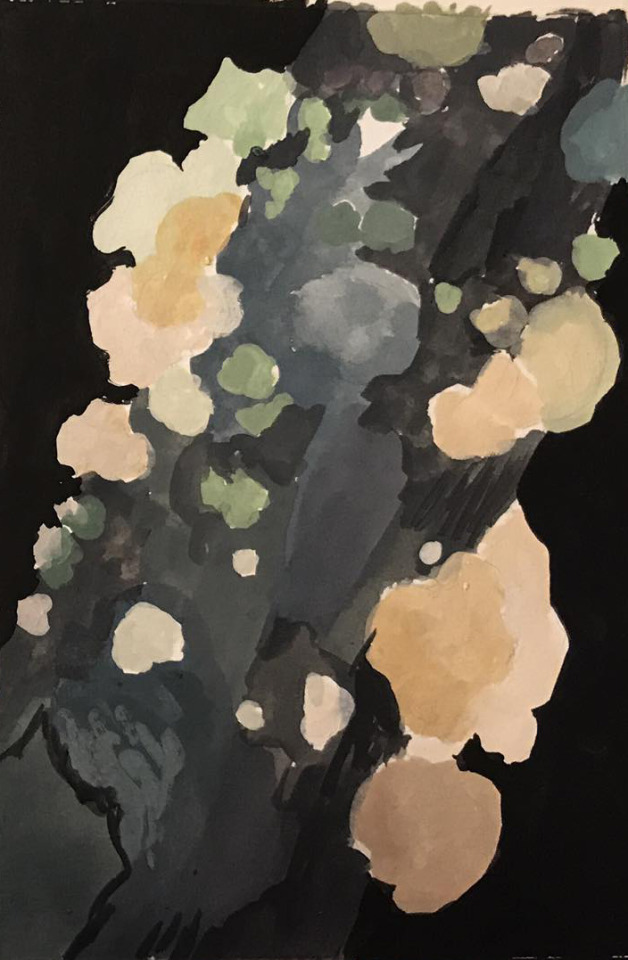
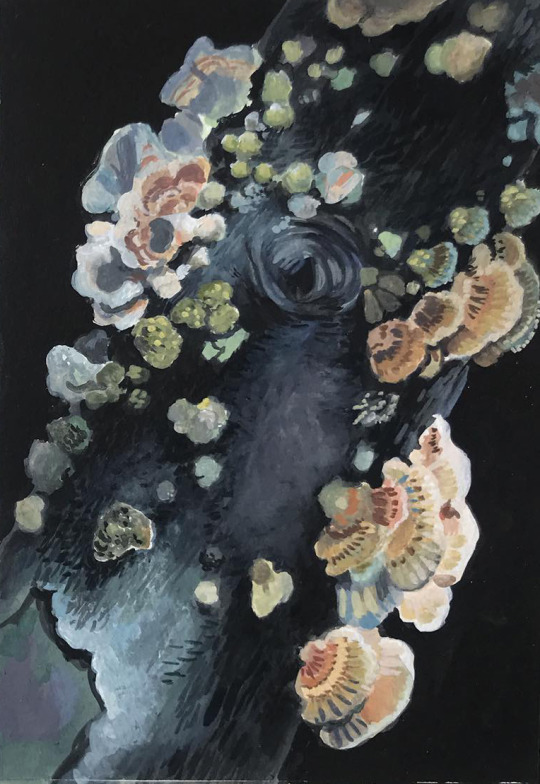
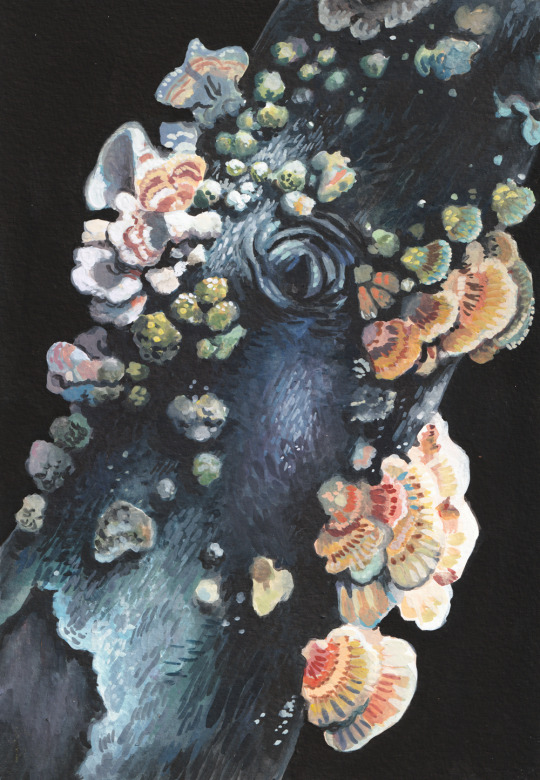
I initially added a lot of detail to the bark even in those dark areas, but then painted over them to lead the eye to the brighter areas. But since gouache doesn't give GREAT coverage, you can still see small brush strokes in there that add some texture. So it's rarely important to get things right on the first try! I think these ^^^ progress pictures do a pretty good job of showing how I tend to go back and forth on how much detail/contrast to add in any one area...

^^^ I'm not so satisfied with this painting in hindsight. My usual approach of mixing on my "canvas", lots of layering and trial and error looks muddy here and detracts from, rather than adds to, the result. The white flowers should be more uniform, bright and clean in colour, with shade added sparingly and with precision. The reds, oranges and yellows needed to be mixed fresh on a clean palette, because those were supposed to be the stars here and yellow is the most finicky colour, it can't take a beating like blue can... but I digress. The textures suffer for the same reason. Each individual flower has too much detail, too much texture, and they cancel each other out. My last piece of insight/advice is: approach textures like play. Like finding bunnies in clouds, textures suggest things, and that game of association or single-player-telephone is where you'll find YOUR approach to stylizing what you see, and how you'll share YOUR interpretation/imagination of the world with us.

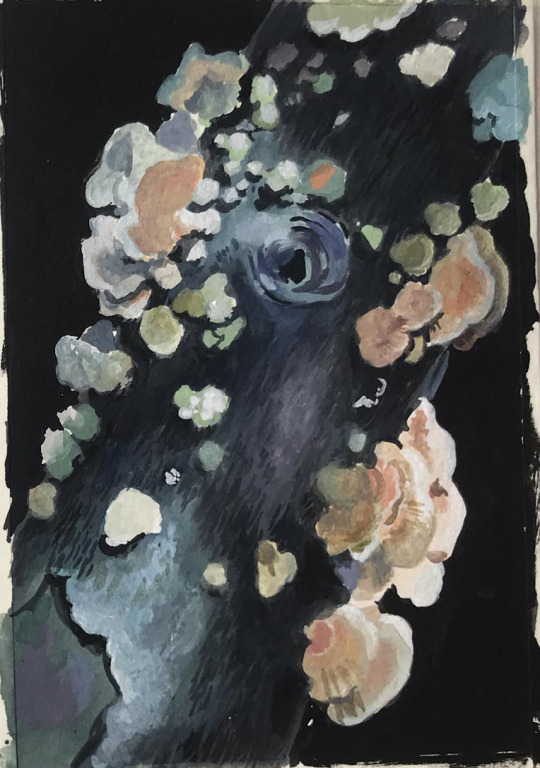
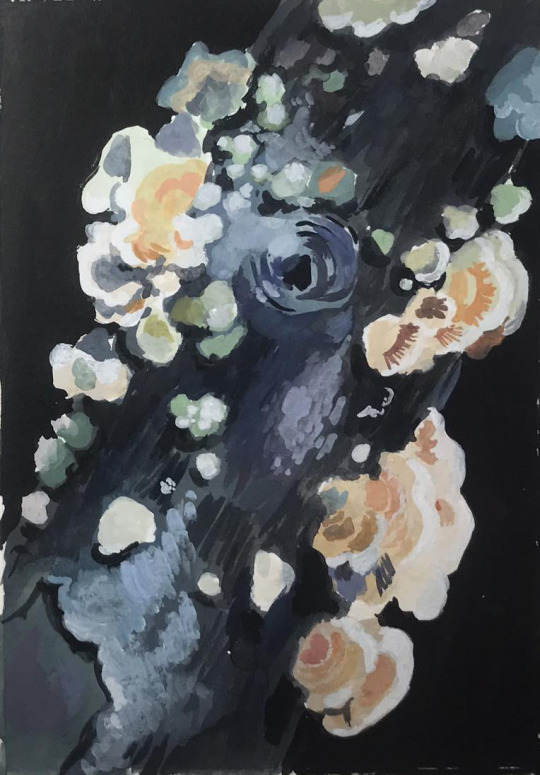
^^^ the original mushrooms didn't literally have those colours, or those swoops and dots... but I saw them there, and I brought them out and exaggerated them, because I used my brush to "play mushrooms". It wasn't exactly conscious decisions, either - I didn't decide to make this shape and not that shape, I didn't look at anyone else's style or mannerisms. If it's difficult to access that confidence to play on a subconscious level, make up some exercises to bring it out consciously. DON'T go looking at other people's choices and try to incorporate them into your own "style". "Style" is only interesting when it's an expression of someone's vision, and everyone has to explore their own vision. Inspiration from other artists is most useful when it reminds you of just how much is permitted, how far you can push the boat out. I think the same goes for learning techniques from other artists. My number one piece of advice for art generally is to divide your time into just learning (practicing techniques, following guides, making studies) and just making (sitting down to create and play, with or without a plan, entering flow as quickly as possible and shutting up your inner critic wrt execution). And that goes for the details, too - if you find someone who's art you like, who can explain how they work with textures in a step-by-step way (and I might make a guide like that, but that'll have to be another day ^^), by all means try out their methods. But when you're CREATING, try not to stop and think, try not to aspire, and try not to lean too hard on other people's methods. So! That was maybe not super straight-forward or strictly on topic, but it's the best advice I can give off the cuff! If there's interest, I'd be happy to sit down and analyze my own decision making when I paint and then I'll be better able to make a how-to guide of "first this, then that". But for now, I hope these thoughts are useful, and thanks for getting me thinking on such an interesting subject!!!
#dogboynecromancer#tutorial#tutorials#art tutorial#my painting#my art#gouache#gouache tutorial#well sort of...#questions#i realised half way into writing this that I have a migraine so idk if it's even coherent.#but if I let illness stop me i'd never say or do anything so...
57 notes
·
View notes
Text
Today's warm-up is a tutorial by Ruth Wilshaw for how to paint illuminated moss:

9 notes
·
View notes
Text
Gouache painting process back and forth
#illustration#sketchoftheday#traditionalart#gouache illustration#painting process#gouache tutorial#painting study
1 note
·
View note
Text


Small gouache paintings 🌻
#I'm trying to get used to gouache and small paintings are great practice. These are based on a lovely tutorial on youtube.#gouache#traditional art#gouache painting#gouache art#traditional painting#painting#drawing#flower art#flowers#artwork#illustration#art#artists on tumblr#small artist#art on tumblr#artist#traditional artist#gouache paints#original art#my art#original
117 notes
·
View notes
Text
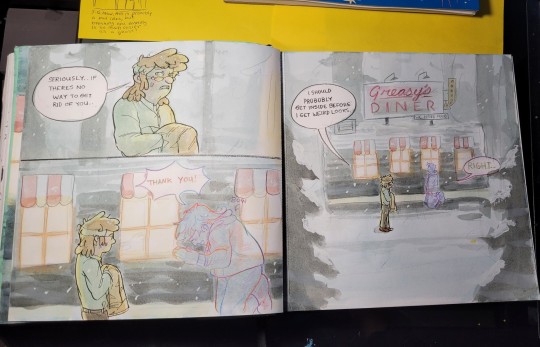
Quick tutorial for my traditional art :). (Specifically how I made the comic)
I can do a more in-depth process later, but I dont currently have the setup for recording a long-term video yet.
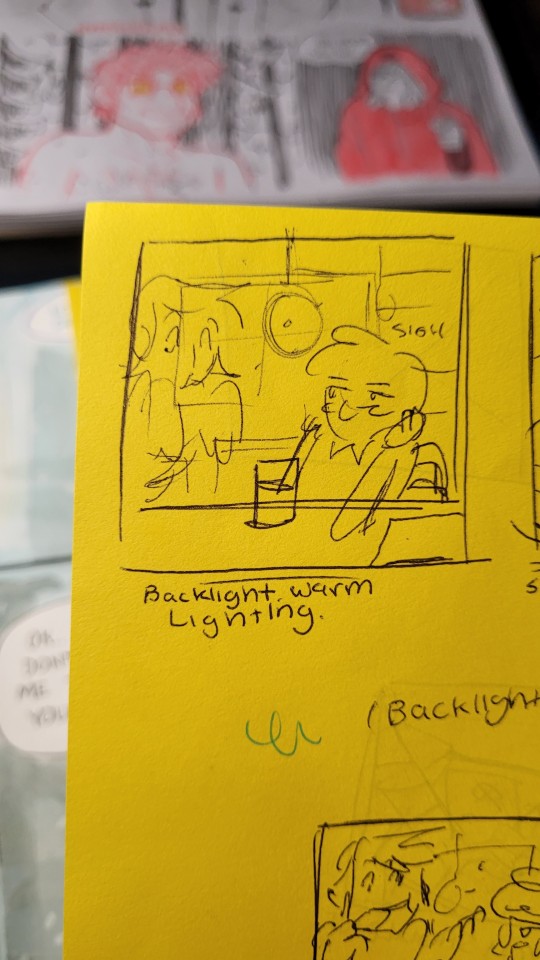
First, I sketch some really loose thumbnail/storyboards. This is where I decide how the scene will look, the lighting, and where it is coming from.

Next, I sketch everything out with a pencil (im using erasable pens in this case). Then, line the sketches with colored pencil or black ink.
I only do this for the comic because a lot of planning goes into it. Typically, I just do some figure drawing sketches to warm up, then jump into a sketch with a pen without doing a draft. (Drawing without a sketch beforehand is good practice and gets your brain to think about where your going to place things!)
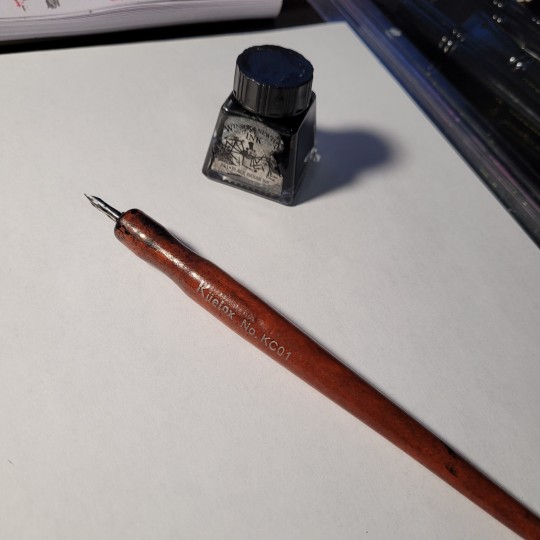
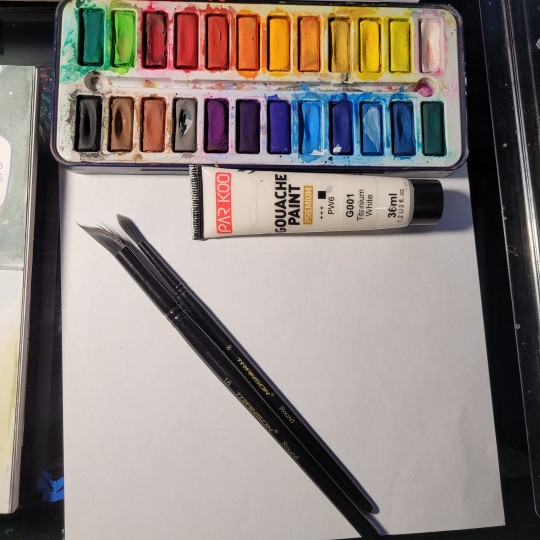
Dip pen and ink to line, watercolor, some white gouache, to color.
Painting/coloring is the last step I do and usually takes the longest.
After lining, I usually go back and make certain lines have more line-weight.
An example of lining with ink(without undersketch):🔽
For this one, I did the line-art with colored pencil (also without undersketch):🔽
After all the line-art is complete, I paint with watercolor, typically doing a wash with either a cool tone or warm tone for the underpainting (to set the mood/lighting) over the whole drawing and to make the colors more cohesive.
An example of this would be making the underpainting a cool tone for a snowy scene or making the underpainting a warm tone for a cozy or indoor scene.
(I dont have a video for an example of that because it's more of a long-term thing, and I dont have the setup for that)
Then, adding the flat colors, being mindful of where the light source and where it will shine on the person/scene, and where the shadows will be in contrast to that when shading next.
And Finaly adding the snowflakes overtop with Gouache.
(You can also do this whole process with other mediums, like marker, not just watercolor. Just find what works and looks good typically. it's not a strict process, I loved mixed media.)
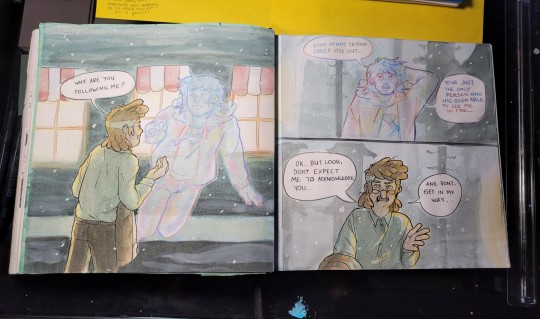
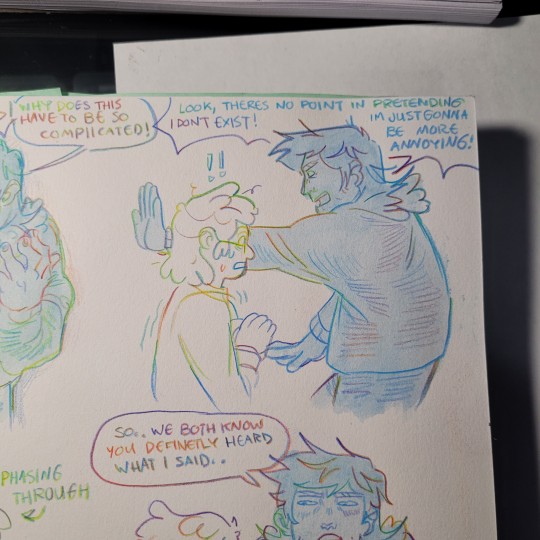
Closeup example of finished product!🔽
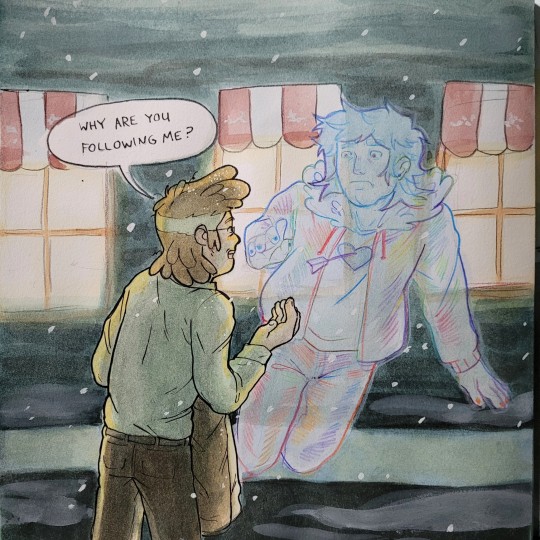
I enjoy doing traditional art because it is more of a sensory experience, and I LOVE that. I have dabbled in digital art, but I end up liking the traditional process more, and feel more connected to my art when I have a physical version of it. (not all digitaly stored on a computer).
With traditional art, there is more risk of accidentally screwing up an artwork you spent a long time on.. I kinda like that because it makes it more exciting, and working under pressure forces you to sharpen your skills and refine your process, making sure you dont make the same mistake twice.
Also, I really love digital art and look up to a lot of digital creators, I try to replicate the digital look when doing traditional art, it's really fun! :)
70 notes
·
View notes
Text

1/20
25 notes
·
View notes
Text

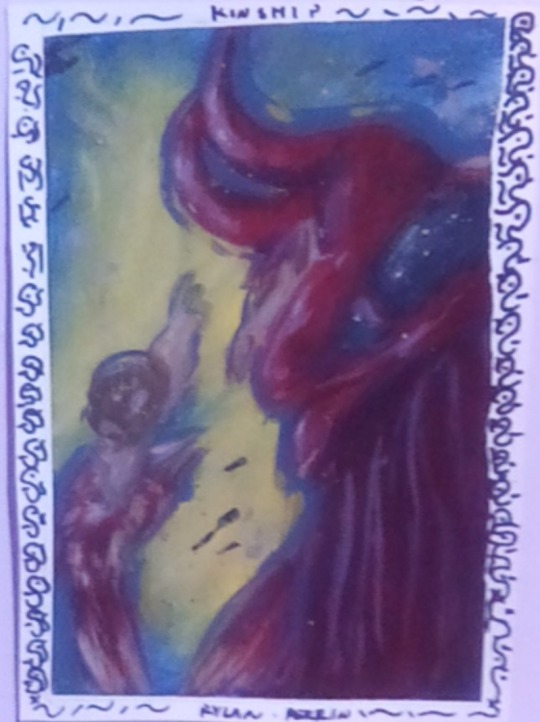
Later, Bruce finds him climbing the cave to join the bats.
#dick grayson#robin#alfred pennyworth#fanart#my art#traditional art#watercolor#colored pencils#I'm going to rant in 3... 2... 1...#omg I'm so pissed at how poorly this end up looking#I worked on this for so long and I all fucked it up because I couldn't paint the background well#I do not know how to use colors it's frustrating#I know color theory by heart like I have this shit memorizes#but I'm someone who needs examples to apply theory and all color theory stuff never goes into how to apply it to your art#outside the really contrasting illustrations#also all tutorials for illustration are for digital art and every watercolor tutorial is for landscape and I'm jrcbuyezrcufnqud#watercolor in illustration is not a new thing I came up with#anyway I used gouache to fade the background and it is still so bad#but I spent so much time on this I cannot just throw it away#the miniature I drew was so good and I made garbage why am i so bad at this??????#one day maybe I will draw it again better because I really like this idea
38 notes
·
View notes
Text

1. Paint the overall shape of the flower.

2. Paint the center shade(?) of the flower(??), paint the center petals over them(???)

3. ....success???!?
#original art#repost of sorts#gouache#gouache painting#gouache illustration#not a tutorial at all 🤪#more like an attempt to remember how exactly I painted this flower 🤪#mayhaps I should try painting another flower just so I could remember the exact steps 🥴🙃#camellia#flowers#plants#artists on tumblr#illustration#traditional art
10 notes
·
View notes
Text

thank GOD for step by step procreate tutorials bc if i had to learn to use the software thru 'tips and tricks' videos i was gonna kms
this one is from james julier and it was great, i haven't done digital art since college and i had no issue following along. very relaxing, bob ross type of way to learn a new medium
#next up the gouache set thats been sitting in my cabinet for *mumble* months#digital art#digital illustration#digital art tutorials#james julier
4 notes
·
View notes
Text

Lemon 🍋
Sticking a bit with the theme of food, here is a yellow lemon 🍋 😊
Trying out a few different YouTube tutorials I went back to Tatyworks and tried her gouache lemon tutorial. I wish she did more of them.
#procreate#thesathei’s art#procreate tutorial#tatyworks tutorial#Tatyworks brushes#artists on tumblr#digital art#food drawing#lemon#beginner artist#digital painting#gouache
12 notes
·
View notes
Text


Throwback to these plant illustrations I made back in 2021🌿 If you’re interested in learning how I painted these, I have a long video class breaking down my process up on Patreon! I’m looking forward to making more educational content in the future, I just love explaining things 🤓
48 notes
·
View notes
Text
If you're starting out in gouache and don't know what you're doing, here's my process, hopefully it helps!!!
I've been gouache painting for a year or two now, and it's my favorite medium. Here's a piece I did last night, and below the cut is a more detailed guide to my process for anyone hoping to improve their skills. In any other case you can also just enjoy the art lol

Step One, Thumbnails!
The first thing I try to nail out is a thumbnail. The first thumbnail I came up with for this was really nice and I liked it a lot, so I kept it, but i encourage messing around with different compositions and configurations! Once you find something you like, the next step is optional since you need acril-gouache to pull it off.
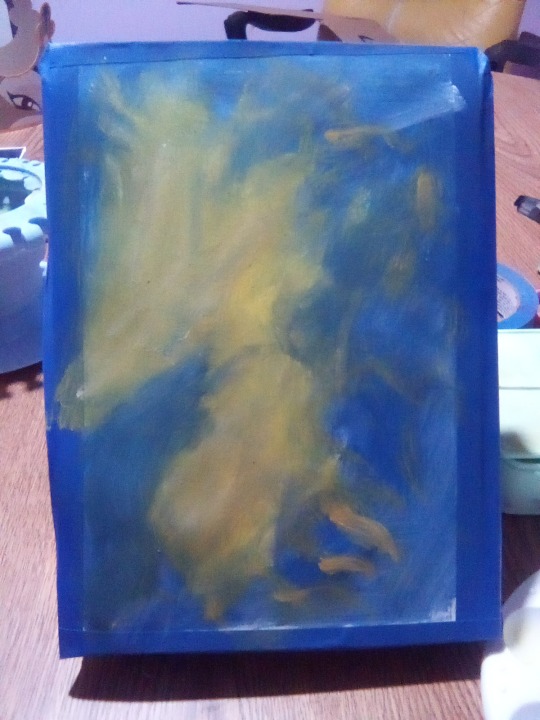
(Optional) Step Two, Underpainting!
This is moreso just a personal choice honestly, but I think doing an underpainting really helps with color coordination. Unfortunately, you need acrylics or acril-gouache to do underpainting, because regular gouache will pull back up once it's dry, where acril-gouache will not. I personally have a nice little 12 color set that I got from Michaels for like, 60-ish bucks. Definitely a bit expensive.
I usually try out a few different ideas and then use a sponge to lay them on the canvas.
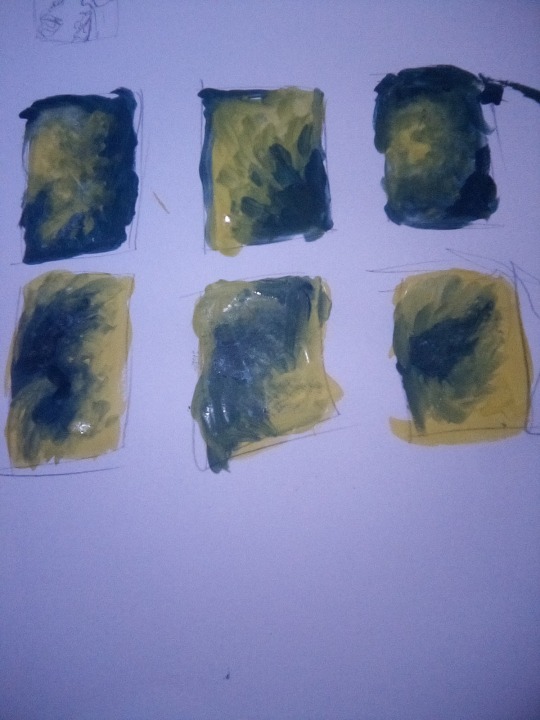
Step Three, Outlining!
Now, I use a very washed out and watered down version of my main colors (red and snail, in this case) to sort of mark out where I wasn't my subjects to be. You'll notice I did deviate from the thumbnail a little bit, which is absolutely fine. As long as it carries the same vibe, it generally isn't an issue.
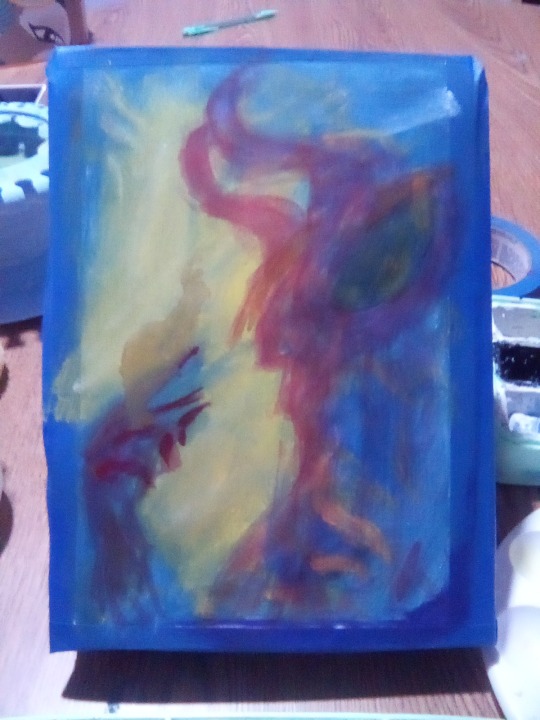
Step Four, the rest?? Idk what to call this part.
Using less and less water in my paint to make it thicker and thicker, I work forward until it looks how I want it to. If you look closely you can still see some spots where the underpainting comes through the paint. I usually work dark to light. Since I use paper for these, this step usually also involves making some sort of makeshift press to flatten the paper back out, since it warps and bends a lot during painting. I also like putting a border around the subjects and some paint colors the same color as the underpainting/background.
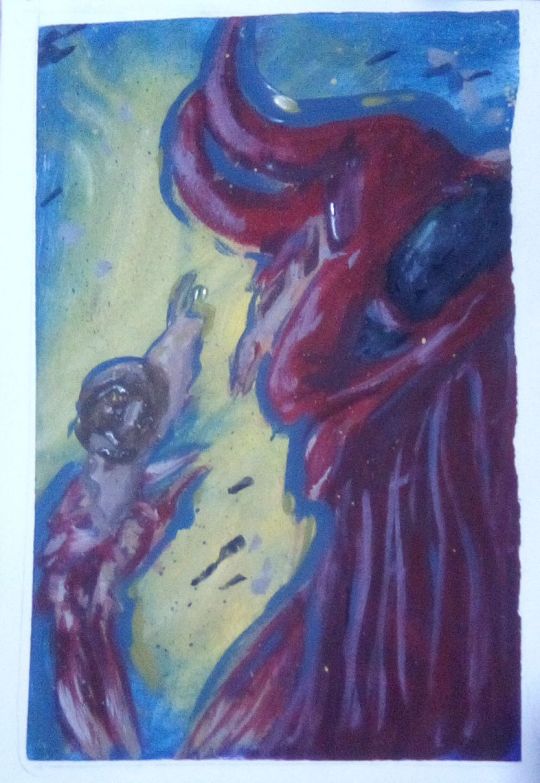
Last step, let's goo!!!
Now that the tape is off, I tend to sharpie in a neat little border with a work title at the top and my name at the bottom. I also go into a digital software to do some slight touchups, usually just color rebalancing to fix my terrible lighting in my room and making the borders a little neater.
#gouche#gouache#painting#tutorial#painting method#artwork#artists on tumblr#pathfinder#gouache painting#painting tips
6 notes
·
View notes
Text

Gouache Plants in Pots following a tutorial on Skillshare by Inga Yoon. First time playing around with these brushes and they are so much fun.
#art#procreate#digital art#digital illustration#flowers#plants#plant illustration#Skillshare#drawn from tutorial#Gouache procreate#digital gouache#learning to draw
2 notes
·
View notes
Text

Quick little gouache practice! 🌼💙🌼 tutorial by Journal Away on youtube
3 notes
·
View notes
Text

2/15
#my art#gouache#dude reflections are no joke. this one was rough#once again ty jess chung for your great gouache tutorials
11 notes
·
View notes