#how to clear cache on iphone apps
Explore tagged Tumblr posts
Visit Tumblr Blog
Explore Tumblr blogs with no restrictions, modern design and the best experience.
Last Seen Tumblr Blogs


Fun Fact
28.6 is the average number of monthly visits per US mobile user.
Text
youtube
Learn how to clear WhatsApp cache on iPhone with this full guide. Free up space and improve performance on your device with just a few simple steps!
#how to clear cache data in whatsapp on iphone#how to clear cache on iphone#how to clear app cache on iphone#how to clear iphone cache#clear app cache on iphone#how to clear cache on iphone apps#how to clear whatsapp cache android#how to clear whatsapp cache#how to clear browser cache on iphone#how to clear whatsapp cache on iphone#how to clear cache on iphone 10#clear cache whatsapp#clear cache#iphone cache#clear cache iphone#how to clear cache on iphone 11#Youtube
0 notes
Text
How to offload apps from iphone?
How to offload apps from iPhone? Ever felt your iPhone getting sluggish? Running out of space for those epic travel vlogs? Offloading apps can be a lifesaver! It frees up valuable storage without completely deleting the app itself. Here’s how to become an offloading pro on your iPhone: Understanding Offloading: Offloading removes the app itself from your phone, but keeps all its data…
#best way to optimize iPhone storage#clear iPhone cache#free up iPhone storage#how to clear app cache on iPhone#how to clear cache on iPhone#how to delete app cache on iPhone#how to free up iPhone storage#how to free up space on iPhone without deleting photos#how to manage iPhone storage#how to offload apps on iPhone#how to offload unused apps on iPhone#how to speed up iPhone#iPhone app storage#iphone performance#iPhone space#iPhone storage#iPhone storage management#iPhone tips and tricks#offload iPhone apps#optimize iPhone storage
0 notes
Text
How to Watch IPTV on Phone?

How to Watch IPTV on Phone: Full Step-by-Step Guide
In today’s fast-paced world, the ability to stream your favorite live TV channels, sports, and movies directly from your smartphone is more convenient than ever. Thanks to IPTV (Internet Protocol Television), you can now watch high-quality content on the go, right from your Android or iOS phone.
This complete guide will show you how to watch IPTV on your phone, step-by-step, with real examples from IPTV providers like StreamView IPTV and Digitalizard. Whether you use Android or iPhone, this tutorial will help you get started easily.
What is IPTV?
IPTV (Internet Protocol Television) delivers live TV channels and on-demand video content through internet connections, rather than traditional cable or satellite. With IPTV, all you need is:
A reliable IPTV subscription (e.g., Streamview IPTV or Digitalizard),
An IPTV player app,
A good internet connection.
Requirements to Watch IPTV on Your Phone
To watch IPTV on your smartphone, you need:
📶 Stable internet connection (minimum 10 Mbps recommended)
📲 A compatible IPTV app for Android or iOS
🔐 Your IPTV credentials (M3U playlist link or Xtream Codes)
🔄 An updated Android or iOS device
How to Watch IPTV on Android Phone? Step-by-Step Guide
Step 1: Get Your IPTV Subscription
Sign up with a reliable IPTV provider like:
🔹 Streamview IPTV – Offers M3U and Xtream Code login, with 24/7 channels and VOD content.
🔹 Digitalizard – Known for HD quality and global channels, compatible with many IPTV players.
Once registered, they’ll email you:
M3U Playlist URL
Or Xtream Codes (Username, Password, and Server URL)
Step 2: Download a Reliable IPTV Player App
Some of the best IPTV apps for Android:
IPTV Smarters Pro
TiviMate IPTV Player
XCIPTV Player
GSE Smart IPTV
Go to Google Play Store, search for one of these apps, and install it.
Step 3: Load IPTV Playlist
Open the IPTV app (e.g., IPTV Smarters Pro).
Choose how you want to login:
Load Your Playlist or File URL (M3U)
Login with Xtream Codes API
Enter the details you received from Streamview IPTV or Digitalizard.
Tap Add User and wait for the channels to load.
Start streaming your favorite live TV channels, sports, or movies.
How to Watch IPTV on iPhone (iOS)? Step-by-Step Guide
Step 1: Subscribe to IPTV Service
Choose from verified providers like:
Streamview IPTV – Offers multi-device support including iOS.
Digitalizard – Offers fast delivery of login details and mobile-compatible links.
Step 2: Download an IPTV Player App for iOS
Top IPTV apps for iPhone:
IPTV Smarters – Player
GSE Smart IPTV
iPlayTV
Smarters Player Lite
Go to the App Store, search for one of these apps, and install it.
Step 3: Configure the App
Open the IPTV app on your iPhone.
Select either Xtream Codes Login or M3U Playlist option.
Enter:
Server URL
Username
Password (provided by Streamview IPTV or Digitalizard)
Tap Login and wait for the channel list to load.
Enjoy streaming HD content directly on your iPhone.
Key Features You’ll Enjoy
When using services like Streamview IPTV or Digitalizard, here’s what you typically get:
✅ 10,000+ Live TV Channels
✅ Video On Demand (Movies, TV Shows)
✅ 24/7 Sports & PPV Channels
✅ EPG (Electronic Program Guide)
✅ Catch-up & Recording Options (depends on player)
✅ Anti-freeze Technology
Use a VPN for Secure Streaming
To protect your privacy and avoid ISP throttling, it’s recommended to use a VPN while streaming IPTV on your phone. Apps like NordVPN, ExpressVPN, or Surfshark work great with mobile devices.
Troubleshooting Tips
Buffering? Switch to a lower-quality stream or use a VPN.
Can’t login? Double-check M3U/Xtream details or contact support.
App not loading? Clear cache or reinstall the IPTV player.
Final Thoughts
Watching IPTV on your phone is one of the easiest ways to enjoy live TV, sports, movies, and shows wherever you go. Whether you're using Android or iPhone, all you need is a trusted IPTV provider like Streamview IPTV or Digitalizard, and a reliable IPTV player app.
With a simple setup and internet access, you’ll have 24/7 entertainment right in your pocket.
FAQs
Can I watch IPTV on multiple devices?
Yes, both Streamview IPTV and Digitalizard support multi-device use. Check your plan for simultaneous connections.
Is it legal to use IPTV on my phone?
Using licensed IPTV services is legal. Avoid using pirated or unverified sources.
Do I need a VPN for mobile IPTV?
A VPN is not mandatory but is highly recommended for security and privacy.
Can I record IPTV on my phone?
Some apps like XCIPTV support recording on Android. iOS options may be limited.
#blog#blog intro#ask blog#blogging#shifting blog#tech#iptv subscription#best iptv#iptv#iptv service#iptv usa#abonnement iptv#iptv firestick
3 notes
·
View notes
Note
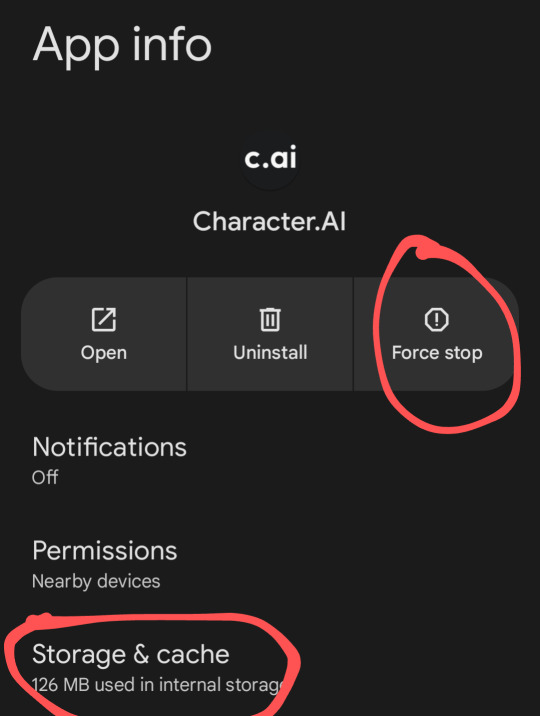
This is how it works for me (I'm on android so it might be diff if you're iPhone)
After closing the app, Hold down character AI app until you see app info pop up. Hit both these buttons, and the second one should say clear storage and clear cache (do NOT hit clear storage) just clear cache. You should be good to reopen now. Make sure it's closed, it won't work if you leave it up in the background
!!
2 notes
·
View notes
Video
youtube
How To Delete Your Browsing Data On The Chrome App Using An iPhone | iOS...
Want to clear your browsing history, cache, or cookies on Chrome for iOS? In this quick and easy tutorial, you'll learn how to delete your browsing data on the Google Chrome app using an iPhone. Whether you're freeing up space, improving privacy, or just starting fresh, this guide walks you through every step.
✅ Works on iPhone & iPad ✅ Clear history, cache, cookies, and more ✅ Manage privacy settings in seconds
Keep your data clean and your privacy protected!
If this video helped, give it a thumbs up and subscribe for more iOS how-tos and mobile tips!
Simple Steps 1. Open the Chrome app on your iOS device. 2. Tap on the "3 Dot Menu" in the lower right corner and then tap on "Settings". 3. Scroll down to "Privacy and Security" and tap on it. 4. Tap on "Delete Browsing Data". 5. Tap on "Time Range" to choose a time range for the data deletion. 6. Tap on "Browsing Data" to choose what kind of data you want deleted. 7. Tap on "Delete Data". 8. In the upper right corner, tap on "Done".
0 notes
Text
10 Methods Of Facebook Reels Download by Triveni World
10 Methods Of Facebook Reels Download by Triveni World
Facebook Reels Download are now a popular way of sharing short, funny videos to the world. Whether it is funny clips, tutorials, or motivational videos, you might want to Facebook Reels Download and watch or share offline. But Facebook does not provide a direct download. So, how do you Facebook Reels Download? Let us know!

Why Facebook Reels Download
Facebook Reels Download is useful to:
Offline Viewing: Watch your favorite Reels without the internet.
Content Generation: Leverage videos as a content bank and resource for future content.
Sharing: Share Reels effortlessly between apps.
Educational Uses: Bookmark useful tutorial videos for later use.
10 Ways to Facebook Reels Download
1. Facebook Reels Download online
There are certain third-party websites where you download Facebook Reels by simply copying the video's URL.
Steps:
Open Facebook and find the Reel you wish to download.
Press the three-dot menu (⋮) and press Copy Link.
Go to a web downloader like SaveFrom.net, SnapSave, or FBdown.net.
Paste the link you copied into the provided field.
Click on Download and choose the video quality.
This content is saved locally on your own device.
2. Using Screen Recording
Or if you prefer not to employ third-party programs, screen recording is an easy method to capture Reels.
Steps:
On Android:
Swipe down and select Screen Recorder from Quick Settings.
Play the Reel and capture.
Save the recorded video.
On iPhone:
Swipe down and select Screen Recording.
Open Facebook and view the Reel.
Complete the recording upon completion.

3. Via Browser Extensions
There are also Chrome and Firefox browser extensions through which you can download Facebook Reels.
Steps:
Download a Facebook video downloader addon (e.g., Video Downloader Plus).
Open Facebook and view the Reel.
The plugin will recognize the video and provide a download.
Click Download and download the video.
4. Downloading from Telegram Bots
There are some Telegram bots that offer Facebook Reels for download straight away.
Steps:
Get a Facebook video download bot on Telegram.
Paste the Reel link into the bot chat.
The bot will execute and give a download link.
Click here to download the video.
5. Use Facebook Reel-Specific Apps
It can also be downloaded with apps like FastSave, Facebook Video Downloader, or Snaptube.
Steps:
Install a popular app from the Play Store/App Store.
Copy and paste the Reel link into the app.
Click on Download to download the video.

6. Using the Facebook Lite App
A few users have also stated that Facebook Lite also temporarily caches video and it can be recovered.
Steps:
Open Facebook Lite and watch the Reel.
Clear your phone's temporary files folder.
Locate the cached video and save it to another folder.
7. Using Shortcuts on iPhone
iOS. Facebook Reels Download can be automated using the Shortcuts app.
Steps:
Download a Facebook Reel downloader shortcut.
Open the Reel and click on Share > Shortcuts.
Click on the shortcut to download and save the video.
8. File Manager Application Availability
Certain Android file managers are able to record cached video once played.
Steps:
Play the Reel while keeping the File Manager open.
Continue with cached videos.
Copy the file to a directory for ease.
9. Asking the Creator for the Reel
If you need the Reel for personal use, it would be best to contact the creator.
Steps:
Contact the Reel creator via DM or comments.
Request permission to download or acquire a copy.
If granted, download the file sent by the creator.
10. Desktop Video Download Software
Programs like 4K Video Downloader or JDownloader have sophisticated video download programs.
Steps:
Install a desktop video downloader.
Copy the Reel link and paste it into the software.
Select the resolution you want and save the file.
Is Facebook Reels Legal to Download?
It is okay to Facebook Reels Download for personal use but never for sharing or business purposes. Always get the consent of the creator before using their content.

Conclusion
With these 10 ways to Facebook Reels Download by Triveni World, you will never be late in downloading your favorite videos. Whether you are using online tools, apps, screen recording, or Telegram bots, choose the one most suitable to you. Want more tech tips? Stay tuned for more Triveni World tutorials!???? Need a tutorial on editing downloaded Reels????? Let me know!
0 notes
Text
Can someone please tell me how to get my home and settings button to reappear on this app?
I can’t even go to my own page without scrolling through my feed to find my profile pic on a comment thread.
The buttons suddenly disappeared today. I reinstalled the app and nearly lost access to my account. I couldn’t clear the cache because apple keeps saying it can’t find the cache.
It works in my iphone, but not my iPad.
The home, search, notification, and profile button is gone from the app on my iPad.
1 note
·
View note
Text
Clear Instagram Cache & Free Up Space – Easy Guide!
Is Instagram slowing down your phone? Learn how to clear the cache on iPhone and Android to free up storage and improve app speed. Follow our simple step-by-step guide to refresh your Instagram experience today! 🚀📱 #InstagramHacks #ClearCache #TechTips
clear cache on instagram
0 notes
Text
How to Clear Instagram Cache on iPhone?
How to Clear Instagram Cache on iPhone? #iphone #cache #instagram
Instagram is a popular social media platform that allows users to share photos and videos with their friends and followers. As you use Instagram, the app stores temporary files, known as cache, on your iPhone. These cache files can help Instagram load faster, but they can also take up space on your device. If you’re running out of storage space on your iPhone, or if you’re experiencing problems…
View On WordPress
#clear instagram cache and data iphone#clear instagram cache iphone#clear instagram cache to improve performance#clear instagram cache without deleting app#how to clear instagram cache iphone#how to free up space on iphone by clearing instagram cache#reset instagram settings by clearing cache#should i clear instagram cache regularly#what happens when you clear instagram cache iphone
0 notes
Text
How To Clear Cache in Messenger iPhone? – The Ultimate Guide

Does your Facebook Messenger feel sluggish? Is it taking up too much storage? The culprit could be cached files! Over time, Messenger stores temporary data that can slow down your app and device.
Why Should You Clear Cache in Messenger iPhone?
✅ Frees up storage space
✅ Improves app speed & performance
✅ Fixes minor glitches and slow loading
How to Clear Cache in Messenger iPhone?
Since iPhones don’t have a direct "Clear Cache" button, you can follow these steps:
1️⃣ Go to Settings > General > iPhone Storage 2️⃣ Scroll and tap Messenger 3️⃣ Select Offload App (this clears cache without deleting data) 4️⃣ Reinstall Messenger to refresh the app
💡 Pro Tip: Clearing your cache every few weeks keeps Messenger running smoothly! 🚀
Read the full guide here: Clear Cache in Messenger iPhone
#Messenger #ClearCache #iPhoneTips #TechHacks #FacebookMessenger
#iphonerepairservice#iphonerepairshop#iphonescreenrepair#iphonescreenreplacement#30minutesrepair#batteryreplacement#bayridgebrooklyn#androidrepair#blocknumber#brooklyn#clearcache#messenger#facebook#iphoneapps#macbook#apple#smartphone
0 notes
Text
Innovative Mobile App Development for Seamless User Experiences
In an increasingly mobile-first world, providing users with a seamless, intuitive, and engaging experience has become more important than ever. The key to standing out in a crowded marketplace lies not just in having a mobile app but in having an innovative, well-designed app that delivers superior user experiences (UX). As technology evolves and user expectations shift, the need for mobile app solutions that combine functionality, performance, and design has never been more critical. best mobile app development company plays a pivotal role in creating apps that meet these expectations and leave a lasting impression on users.

In this article, we’ll explore how innovative mobile app development can elevate your business, enhance user experience, and drive success by focusing on cutting-edge features, intuitive design, and seamless performance. By focusing on user-centric development and integrating the latest technologies, businesses can create apps that not only attract but also retain users, building long-term loyalty and trust.
1. Prioritizing User-Centered Design
At the heart of innovative mobile app development is user-centered design. The goal is to craft an app experience that meets the needs, preferences, and behaviors of users while providing a seamless and enjoyable interaction. User experience is one of the most important factors that determine the success of an app. An app that is difficult to navigate or has a confusing interface can result in high abandonment rates, which directly impacts business growth.
Read More: How to successfully outsource for your small business?
Innovative mobile app development focuses on understanding the users' pain points, preferences, and expectations from the outset. Developers and designers collaborate closely to create an app that is visually appealing, easy to navigate, and efficient. This includes optimizing the app layout, reducing clutter, and ensuring that key features are easy to access. Moreover, a clean, attractive design encourages users to engage more frequently, improving overall retention.
For instance, e-commerce apps can utilize clear categories, intuitive search features, and simple checkout processes to make shopping more enjoyable. Social media apps can ensure that notifications are timely, feeds are interactive, and user interactions are intuitive. The ultimate aim is to make the user’s journey as smooth and hassle-free as possible, ensuring they can accomplish their tasks with minimal friction.
2. Optimizing Performance and Speed
In today’s fast-paced world, users expect apps to load quickly, respond instantly, and provide smooth performance. A slow or buggy app not only frustrates users but also leads to high uninstall rates. Innovative app development ensures that performance is a priority from the early stages of development. By employing advanced technologies and optimizing the code, developers can create apps that run faster and more efficiently, even under heavy load.

Optimized mobile app performance involves fine-tuning every element, from the app’s backend infrastructure to its frontend interactions. Developers focus on reducing load times, minimizing resource consumption, and optimizing the app for different devices and operating systems. For example, through techniques like lazy loading, caching, and efficient data retrieval methods, apps can perform seamlessly, even in areas with limited internet connectivity.
Additionally, performance optimization includes ensuring that the app is stable across various devices, screen sizes, and operating systems. Whether your users are accessing the app on an Android smartphone, iPhone, or tablet, a well-optimized app guarantees a consistent and high-quality experience, regardless of the platform.
3. Integrating Cutting-Edge Technologies
Innovative mobile app development doesn’t just focus on functionality and design; it also involves leveraging the latest technologies to enhance the user experience. Technologies such as augmented reality (AR), machine learning (ML), artificial intelligence (AI), and blockchain are playing a transformative role in shaping the future of mobile apps. By integrating these technologies into the development process, businesses can create more interactive, personalized, and efficient user experiences.
For example, apps that use AR can offer users immersive experiences, such as visualizing products in real time. This is especially valuable in industries like furniture, fashion, or real estate, where customers want to see how a product fits into their environment before making a purchase. Similarly, machine learning can enable personalized content recommendations, predictive text, and even chatbot functionalities to make user interactions more intuitive and helpful.
AI can also be used to enhance user engagement by enabling smart features such as voice assistants or natural language processing (NLP), which allows users to interact with the app through voice commands. By integrating these advanced technologies, businesses can offer cutting-edge, interactive features that keep users engaged and create a strong competitive advantage.
4. Cross-Platform Compatibility
The world of mobile apps is fragmented with different operating systems (Android, iOS) and devices (smartphones, tablets, wearables). To ensure maximum reach and engagement, an app must work seamlessly across multiple platforms. Cross-platform mobile app development is a key component of creating a seamless user experience. With cross-platform tools like Flutter, React Native, and Xamarin, developers can write code once and deploy it across both iOS and Android App Development Company, saving time and resources while maintaining a consistent user experience.
Innovative mobile app development also focuses on optimizing the app for different device types. For example, apps that are optimized for tablets offer larger, more interactive interfaces, while apps for wearables like smartwatches need to be designed for quick interactions and minimalism. Regardless of the device, cross-platform compatibility ensures that users have a consistent, high-quality experience across the board, leading to greater satisfaction and engagement.
5. Personalization and User Engagement
Personalization is one of the most powerful ways to enhance user experience in mobile apps. Innovative development allows for deeper personalization, where the app can respond to individual preferences, behaviors, and needs. By collecting user data (with consent) and analyzing behavior patterns, mobile apps can offer tailored content, notifications, and recommendations that make the app more valuable to each user.
Read More: Top Custom Software Solutions For The Travel & Hospitality Industry
For example, a fitness app can recommend workout plans based on the user’s fitness level and goals, while a shopping app can provide personalized offers or show products the user is most likely to be interested in. Personalized push notifications can encourage users to return to the app, reminding them of updates, sales, or features they’ve shown interest in.
Engagement features like gamification—such as badges, rewards, and progress tracking—also play an important role in keeping users engaged. By integrating these personalized, interactive features, businesses can increase user retention and foster long-term loyalty.
6. Security and Data Privacy
As mobile apps collect more personal and sensitive data, security becomes a paramount concern. Innovative mobile app development ensures that the app is designed with security in mind from the very beginning. Encryption, secure payment gateways, multi-factor authentication, and data protection features help safeguard user information and ensure privacy compliance.
Security measures also build trust between businesses and their customers. When users feel confident that their data is safe, they are more likely to continue using the app and engage with the brand. This is particularly important in industries like finance, healthcare, and e-commerce, where user data must be handled with the highest level of care and compliance.
Conclusion
Innovative mobile app development is more than just a technical endeavor—it’s about creating experiences that delight users, drive engagement, and meet the unique needs of your business. By focusing on user-centered design, optimizing app performance, integrating cutting-edge technologies, ensuring cross-platform compatibility, offering personalized experiences, and prioritizing security, businesses can create mobile apps that provide seamless, efficient, ai development company.
In today’s competitive market, it’s not enough to just have a mobile app; you need an innovative app that stands out, engages users, and adapts to their needs. By investing in innovative mobile app development, businesses can create powerful solutions that not only meet but exceed user expectations, leading to higher retention, customer satisfaction, and long-term success.
#mobile app development company#web development#web developing company#services#crm software#mobile app development#mobile app
0 notes
Text
How to Diagnose Common Mobile Phone Problems: A Step-by-Step Guide
Mobile phones have become an integral part of our daily lives. They serve as communication tools, entertainment devices, work assistants, and much more. But like any other technology, they can face issues that disrupt their functionality. Knowing how to diagnose common mobile phone problems can save time, money, and stress. While some issues are easy to fix yourself, others might require professional repair services. In this step-by-step guide, we’ll walk you through how to diagnose and troubleshoot common mobile phone problems effectively.
1. Battery Drain Issues
One of the most common problems users face is rapid battery drain. If you notice that your phone's battery is draining quickly, it could be due to several factors.
Diagnosis Steps:
Check Battery Usage: Go to your phone's settings and check battery usage. Look for apps that are consuming more battery than usual.
Background Apps: Close unnecessary apps running in the background. Some apps keep running even when not in use, draining your battery.
Brightness and Power Settings: Lower your screen brightness or enable adaptive brightness. Also, consider turning off features like Bluetooth, Wi-Fi, or location services when not in use.
Battery Health: In iPhones, you can check battery health in the settings under "Battery Health" to see if the battery needs replacement. For Android, you may need a third-party app to monitor battery health.
If these steps don't help, it might be time to replace the battery.
2. Overheating Problems
Mobile phones tend to overheat due to prolonged use, running power-hungry apps, or environmental factors. Overheating can lead to performance throttling or damage to internal components.
Diagnosis Steps:
Remove the Case: Sometimes, the case traps heat, leading to overheating. Try removing the case and see if the phone cools down.
Close Power-Consuming Apps: Gaming, streaming, and using heavy apps can cause your phone to heat up. Close all apps and give your phone a break.
Update Software: Ensure your phone’s operating system is up to date. Sometimes, software bugs can cause excessive power consumption, leading to overheating.
Ambient Temperature: Avoid using your phone in hot environments or direct sunlight, as it can cause the device to overheat.
If your phone continues to overheat despite these steps, there could be a hardware issue with the battery or internal components, requiring professional assistance.
3. Slow Performance
A lagging or slow phone can be frustrating, especially when you need it the most. Several factors can contribute to slow performance, such as insufficient storage or outdated software.
Diagnosis Steps:
Clear Cache: Over time, cached data can slow down your phone. Go to settings and clear the cache data for individual apps or for the entire system.
Free Up Storage: Check the storage space on your phone. If it's almost full, delete or offload unnecessary files, apps, or photos to free up space.
Uninstall Unnecessary Apps: Unused apps consume resources and storage. Uninstall apps you no longer need.
Software Update: Ensure your phone is running the latest version of its operating system. Updates often include performance improvements and bug fixes.
If these tips don't resolve the issue, a hardware problem like a failing processor or insufficient RAM could be the culprit, and professional repair might be needed.
4. Screen Flickering or Touch Issues
A flickering screen or unresponsive touchscreen can be caused by software glitches, hardware malfunctions, or issues with the display itself.
Diagnosis Steps:
Restart Your Phone: A simple restart can often fix minor software glitches that cause screen flickering or touch issues.
Check for Software Updates: If there's a bug in the operating system causing the issue, updating the software could resolve it.
Inspect for Physical Damage: Check if the screen has any cracks or visible damage. If there is, the screen may need to be replaced.
Test the Touchscreen: You can test the touchscreen functionality by opening apps or using touch gestures. If the screen is unresponsive or erratic, it could indicate a hardware issue.
If the screen continues to flicker or the touch is unresponsive after troubleshooting, the screen or digitizer may need to be replaced.
5. Charging Problems
If your phone is not charging properly or takes too long to charge, it could be a result of software issues, charging port damage, or issues with the charger itself.
Diagnosis Steps:
Check the Charging Cable and Adapter: Ensure the charger and cable are not damaged. Try using a different charger and cable to see if that solves the problem.
Inspect the Charging Port: Dirt, dust, or lint in the charging port can prevent proper charging. Use a soft brush or compressed air to clean the port carefully.
Check for Software Issues: Sometimes, charging issues are related to software. Try restarting the phone to rule out any software glitches.
Battery Health: If the battery is old or damaged, it may no longer hold a charge properly. Check the battery health via your phone's settings or use a third-party app to assess the battery’s condition.
If none of these steps resolves the issue, it could indicate a problem with the charging port or battery, which may require professional repair.
Conclusion
Diagnosing common mobile phone problems can be easy if you follow a logical step-by-step process. From battery drainage to charging issues and sound problems, most of these issues can be fixed with a little effort. However, if you find that the problem persists or seems beyond your ability to solve, it's always a good idea to seek professional help.
At GoFix, we specialize in diagnosing and repairing mobile phones quickly and efficiently. Whether it's a screen replacement, battery replacement, or any other repair, our expert technicians are here to help. GoFix offers affordable repair services for all kinds of mobile phone issues, ensuring your device gets back to working like new. Visit us online or at our repair centers for all your mobile phone repair needs!
0 notes
Text
How to Handle Error Code 83 on DisneyPlus.com/Begin
Disney+ is a widely popular streaming platform offering an extensive library of movies, TV shows, and exclusive content. However, like any digital service, users sometimes encounter technical issues. One common problem faced by Disney+ subscribers is Error Code 83. This error can be frustrating, but understanding its causes and solutions can help you resolve it quickly.
In this guide, we’ll explore what Error Code 83 means, its potential causes, and how to troubleshoot the issue step-by-step to regain access to disneyplus.com/begin.
What Is Error Code 83 on Disney+?
Error Code 83 on Disney+ is a general device compatibility or network issue. When this error occurs, it prevents users from accessing Disney+ content, disrupting their streaming experience. The error message typically reads:
"Something went wrong. Please try again. If the problem persists, visit the Disney+ Help Center. Error Code 83."
Understanding the root cause of this issue is essential to determine the appropriate solution.
Common Causes of Error Code 83
1. Device Compatibility Issues
Not all devices are compatible with Disney+. Older operating systems or unsupported devices may trigger Error Code 83.
2. Network Connectivity Problems
A weak or unstable internet connection can prevent Disney+ from functioning properly. This may include Wi-Fi disruptions, router issues, or ISP throttling.
3. Account Authentication Errors
If Disney+ cannot verify your account credentials due to login issues or server errors, it might result in Error Code 83.
4. App or Browser Issues
Using an outdated version of the Disney+ app or an unsupported web browser can cause compatibility errors.
5. Digital Rights Management (DRM) Restrictions
Disney+ uses DRM to protect its content. If your device fails to meet DRM requirements, you may encounter Error Code 83.
Troubleshooting Steps for Error Code 83
Below are detailed steps to resolve Error Code 83. Follow these systematically to identify and fix the issue.
Step 1: Check Device Compatibility
Verify Device Requirements:
Ensure your device is compatible with Disney+. Refer to the Disney+ device compatibility list.
Update Operating System:
Check for updates on your device and install the latest operating system.
For example:
iOS/Android: Update to the latest version in your settings.
Windows/Mac: Update via system preferences or control panel.
Switch Devices:
If your current device remains unsupported, try accessing DisneyPlus.com/begin on another compatible device.
Step 2: Test Your Network Connection
Check Internet Speed:
Disney+ requires a minimum speed of 5 Mbps for HD streaming and 25 Mbps for 4K. Use an online speed test tool to verify your connection.
Restart Your Router:
Turn off your router, wait 30 seconds, and power it back on to reset your connection.
Switch Networks:
If possible, switch to a different Wi-Fi network or try a mobile hotspot to identify whether the issue is network-specific.
Disable VPN or Proxy:
Disney+ might block access if you’re using a VPN or proxy. Disable these services and try again.
Step 3: Update the Disney+ App
Check for Updates:
Open your app store and search for Disney+.
Install any available updates.
Reinstall the App:
Uninstall the Disney+ app and reinstall it to ensure you’re using the latest version.
Clear Cache and Data:
If reinstalling isn’t feasible, clear the app’s cache and data:
iOS: Go to Settings > General > iPhone Storage > Disney+ > Offload App.
Android: Go to Settings > Apps > Disney+ > Storage > Clear Cache.
Step 4: Use a Supported Browser
If you’re accessing DisneyPlus.com/begin via a web browser:
Update Your Browser:
Use the latest version of Chrome, Firefox, Safari, or Edge.
Enable DRM Settings:
Ensure your browser’s DRM settings are enabled. For example:
Chrome: Go to Settings > Privacy and Security > Site Settings > Additional Content Settings > Protected Content.
Clear Cookies and Cache:
Clear your browser’s cookies and cache to eliminate potential conflicts.
Disable Browser Extensions:
Temporarily disable ad blockers or other extensions that might interfere with Disney+.
Step 5: Resolve Account Authentication Issues
Re-login to Your Account:
Log out of DisneyPlus.com/begin and log back in to refresh your session.
Reset Your Password:
If login issues persist, reset your password through the Disney+ account management page.
Verify Your Subscription:
Ensure your Disney+ subscription is active. Check your billing details in your account settings.
Contact Disney+ Support:
If authentication problems persist, visit the Disney+ Help Center for assistance.
Step 6: Check Device DRM Support
Verify DRM Requirements:
Check if your device supports Widevine DRM or equivalent protocols.
Switch to a Certified Device:
If your current device lacks DRM support, use a certified device like a Smart TV, game console, or streaming device.
Additional Tips to Avoid Error Code 83
1. Maintain Up-to-Date Software
Regularly update your devices, apps, and browsers to prevent compatibility issues.
2. Optimize Internet Connection
Position your router for maximum signal strength and avoid network congestion during streaming.
3. Use Authorized Devices
Avoid jailbroken or rooted devices that might fail DRM checks.
4. Avoid Simultaneous Logins
Limit the number of simultaneous logins on your Disney+ account to prevent conflicts.
5. Enable Auto-Updates
Set your apps and system to auto-update to stay current with the latest Disney+ features and fixes.
When to Contact Disney+ Support
If you’ve tried all the steps above and still encounter Error Code 83, it’s time to reach out to Disney+ support:
Visit DisneyPlus.com/begin.
Navigate to the Help Center and select the appropriate troubleshooting category.
Use the live chat or email options to describe your issue.
Provide details such as:
Your device model and operating system.
Internet speed and connection type.
Steps you’ve already taken to resolve the issue.
Conclusion
Error Code 83 on Disney+ can stem from various issues, including device compatibility, network problems, or app glitches. By systematically following the troubleshooting steps outlined above, you’ll likely resolve the error and enjoy seamless streaming on disneyplus.com/begin. If the problem persists, don’t hesitate to contact Disney+ support for personalized assistance. With these solutions, you can minimize disruptions and make the most of your Disney+ subscription.
0 notes
Text
0 notes
Text
Can I Delete My Cash App Account and Make a New One?
Cash App has become one of the most popular mobile payment solutions, providing users with convenient peer-to-peer money transfer options and easy account management features. However, there may come a time when you want to delete your Cash App account, whether it’s for privacy reasons, switching to a new account, or resolving issues with the existing account. Here, we’ll guide you through the steps of deleting your Cash App account, creating a new one, and address key questions and considerations.
Can You Delete Your Cash App Account?
Yes, deleting your Cash App account is possible, but it’s a process that requires attention to detail. Cash App offers users an easy way to delete their accounts through the app, but there are a few necessary steps to ensure that everything is done properly, especially if you plan to create a new account afterward.
Reasons for Deleting a Cash App Account
There are various reasons why users may want to delete their Cash App accounts:
Privacy Concerns: Some users wish to delete their accounts to protect their personal data.
Account Issues: Certain issues, such as restrictions, disputes, or unauthorized transactions, can lead users to create a new account.
Financial Organization: Users may delete an account to start fresh for better financial organization.
How to Delete a Cash App Account in 2024
Deleting your Cash App account requires completing a few important steps. Before proceeding, make sure to handle any remaining balances or investments on your account to avoid losing money or having issues with incomplete transactions.
Step 1: Withdraw or Transfer Your Funds
Before deleting your Cash App account, make sure to withdraw or transfer any remaining funds. To do this:
Open the Cash App on your mobile device.
Tap the Balance tab on the home screen.
Choose to Cash Out and transfer the balance to your linked bank account.
Note: It may take a few business days for the funds to show up in your bank account, depending on the transfer method you choose.
Step 2: Clear Any Pending Deposits or Investments
If you have any pending deposits or investments, make sure to handle those before deleting the account. You can view and manage your deposits and investments from the main dashboard. Ensure that all financial activities are resolved before proceeding.
Step 3: Access Account Settings to Delete
Once you have cleared all funds and transactions, you can proceed to delete your account:
Open the Cash App on your mobile device.
Tap on your profile icon in the upper-right corner.
Navigate to Support and then select Something Else.
Choose Account Settings and select Close My Cash App Account.
After completing these steps, you’ll receive a confirmation email, verifying that your account has been deleted. Make sure to review the email to ensure all personal data has been removed from Cash App’s system.
How to Delete Cash App Account on iPhone
If you’re an iPhone user, the process for deleting your Cash App account remains the same. Follow the steps provided above, which apply regardless of the device you are using. Remember to confirm that the app has been fully deleted after you’ve closed the account, especially if you plan to create a new account on the same device.
How to Delete Cash App Account on Android
Android users can follow the same steps to delete Cash App account. Once the account has been deleted, it’s recommended to clear your app data and cache, or even uninstall the app entirely if you are not planning to create a new account. This will ensure that no residual information is left on your device.
Closing a Cash App Account with Money in It
Cash App requires that you have a zero balance before closing your account. If you attempt to close your account while it still holds funds, you’ll encounter an error message and won’t be able to proceed. Make sure to cash out the balance, as detailed in Step 1 above, before attempting to delete the account. This ensures you won’t lose any money during the deletion process.
Why Can’t I Delete My Cash App Account?
There may be several reasons why a Cash App account cannot be deleted:
Outstanding Balance: Your account must be cleared of all funds.
Pending Transactions: Any unresolved transactions, such as deposits or withdrawals, must be completed.
Unsettled Investments: Ensure that any Cash App Investing account linked to your main Cash App account has been closed or liquidated.
If you are still unable to delete cash app account after addressing these issues, contact Cash App’s customer support for further assistance.
How to Deactivate Cash App Account
For users who want to take a break without permanently deleting their account, Cash App does not currently offer a true “deactivation” feature. However, you can secure your account by logging out and deleting the app from your device. This will prevent unauthorized access until you decide to log in again.
Can I Make a New Cash App Account After Deleting My Old One?
Yes, you can create a new Cash App account after deleting your old one. However, it’s important to note the following:
Use a Different Email or Phone Number: Cash App requires unique identifiers, so you will need to use a different email address or phone number to register a new account.
Link a New Bank Account (Optional): While not necessary, linking a new bank account can help avoid issues if you plan to use Cash App’s financial features again.
To create a new account, simply download the Cash App, open it, and follow the registration prompts with your new email or phone number.
Cash App Account Settings: How to Manage Your Account
Cash App provides various settings that allow users to manage their accounts efficiently:
Profile Settings: Update your personal information, such as name, phone number, and email address.
Security Settings: Enable two-factor authentication, set up a PIN for transactions, and manage other security features.
Bank and Payment Settings: Link or unlink bank accounts, debit cards, and credit cards for easier money management.
Privacy Settings: Adjust visibility, such as who can view your activity or send you payments, to ensure a secure user experience.
Conclusion
Closing cash app account and starting a new one is a manageable process when you understand the steps involved. By ensuring all pending transactions are completed, transferring funds, and properly closing your account, you can safely delete your existing account. Creating a new Cash App account is also straightforward, as long as you use a different email or phone number for registration.
0 notes